tajima dg16 by pulse release notes - hsi.us€¦ · computer for tajima dg15 by pulse. increasing...
TRANSCRIPT
Tajima DG16 by Pulse
Release Notes

2
COPYRIGHT
© Copyright 2018 Pulse Microsystems Ltd. All rights reserved.
These Release Notes and the Tajima DG16 by Pulse software are copyrighted by the developer of the software, Pulse Microsystems Ltd. All rights reserved. US Patent Nos. 6 196 146; 6 216 618; 6 968 255. Other patents pend-ing.
Information in this document is subject to change without notice.
The software described in this document is furnished under a license agreement and/or nondisclosure agreement. The software may be used or copied only in accordance with the terms of those agreements. No part of this publi-cation and the software may be copied, photocopied, reproduced, translated, or reduced to any electronic medium or machine-readable form without the manufacturer’s written permission.
Commercial or industrial use of trademark and copyrighted works (For example, books, paintings, drawings, pho-tos, fanciful characters, and so forth) owned by other companies or persons, for creation of embroidery patterns
without permission is illegal and may result in either criminal or civil liability.
Microsoft and Windows® are registered trademarks of Microsoft Corporation. All other product names are copy-righted and registered trademarks or trademarks of their respective holders. All computer and software names identified by TM or tm are trademarks of their respective manufacturers.
Ver. 2018.3
3
Table of Contents Recommended Computer Specifications ................................................................. 4
1 User Interface Changes .................................................................................... 5
1.1 New Ribbon Interface ................................................................................................... 5 1.2 Toolbar Reorganization ................................................................................................. 6 1.3 User Settings ............................................................................................................... 6
1.3.1 Customize & Restore Recommended Settings ............................................................. 6 1.3.2 Highlight color overrides .......................................................................................... 6 1.3.3 New “Snap To” menu .............................................................................................. 7
1.4 New Thread Palette/Chart Manager Features ................................................................... 7 1.5 Sequence View—Select Same Color Tool ......................................................................... 7
2 Design Editing tools ......................................................................................... 8
2.1 Circular Copy Improvements ......................................................................................... 8 2.2 Advanced Duplicate Tool Features .................................................................................. 8 2.3 Random Repeats .......................................................................................................... 9 2.4 ColorIt Tool ............................................................................................................... 10 2.5 Import Emoji Tool ...................................................................................................... 10 2.6 Brush Tool................................................................................................................. 11
3 Design Settings .............................................................................................. 12
3.1 Design Start/End Configuration .................................................................................... 12 3.2 Design Start Position .................................................................................................. 12
4 Segment Settings ........................................................................................... 12
4.1 Programmed Fill Settings ............................................................................................ 12 4.1.1 Programmed Pattern Alignment ...............................................................................12 4.1.2 Flipped Programmed Patterns .................................................................................12 4.1.3 Mixed Programmed Patterns ...................................................................................13
4.2 Presets Revision ......................................................................................................... 13
5 Digitizing Tools .............................................................................................. 13
5.1 Complex Satin ........................................................................................................... 13 5.2 Create Boundary ........................................................................................................ 14
6 Text Tools & Settings ..................................................................................... 15
6.1 Rainbow Text............................................................................................................. 15 6.2 WordIt Tool ............................................................................................................... 16 6.3 Auto Kerning Wizard ................................................................................................... 16 6.4 Hide fonts ................................................................................................................. 18 6.5 New Fonts ................................................................................................................. 18
7 Artwork Tools ................................................................................................. 20
7.1 Shape Artwork keeps original colors ............................................................................. 20 7.2 Rounded Corner Tool .................................................................................................. 20 7.3 Drag Anchor Path ....................................................................................................... 21 7.4 Combine and Reflect ................................................................................................... 21
8 Tajima DG16 by Pulse Options ....................................................................... 22
8.1 Sequin Tool Enhancements .......................................................................................... 22 8.1.1 Sequin Lasso Tool ..................................................................................................22 8.1.2 Enhanced Edit Sequin tool ......................................................................................22 8.1.3 Sequin Fill Brush ...................................................................................................22
8.2 Arbitrary Block ........................................................................................................... 23 8.3 Bead Tool .................................................................................................................. 23
4
Introduction Thank you for purchasing Tajima DG16 by Pulse. This is the latest in embroidery creation
technology brought to you by Tajima and Pulse Microsystems.
This document outlines the major differences between DG16 and previous version. It is
intended to be used in combination with the program user’s guide or the online help. There
is an electronic copy of the user’s guide in PDF format on the installation CD. To access this
guide, click on the “View Documentation” button on the window that appears after you
insert the installation CD into your CD drive. You can also access documentation under the
Help menu or by pressing F1 key from within the program.
Tajima DG15 by Pulse has many new features; note that some features may only be
available in specific levels of the software.
Recommended Computer Specifications Below is a list of the recommended computer specifications if you plan to purchase a
computer for Tajima DG15 by Pulse. Increasing RAM memory and/or processor speed will
improve system performance.
Please contact your distributor for more information on system requirements.
• 64-bit 3.0 GHz Quad Core Genuine Intel Processor
• Microsoft Windows® 7 (64-bit), Windows® 8 (64-bit), Windows® 8.1 (64-bit) or
Windows® 10 (64-bit)
• Monitor with 1024x768 video resolution with 16-bit color display (or higher)
• CD-ROM drive
• 4 GB RAM
• Minimum 2 GB hard disk drive space available
• Mouse (three-button is preferred for digitizing)
• At least one Universal Serial Bus (USB) Port
• A LAN (Local Area Network) connection
• Additionally, an internet connection required for access to PulseCloud services
5
1 User Interface Changes
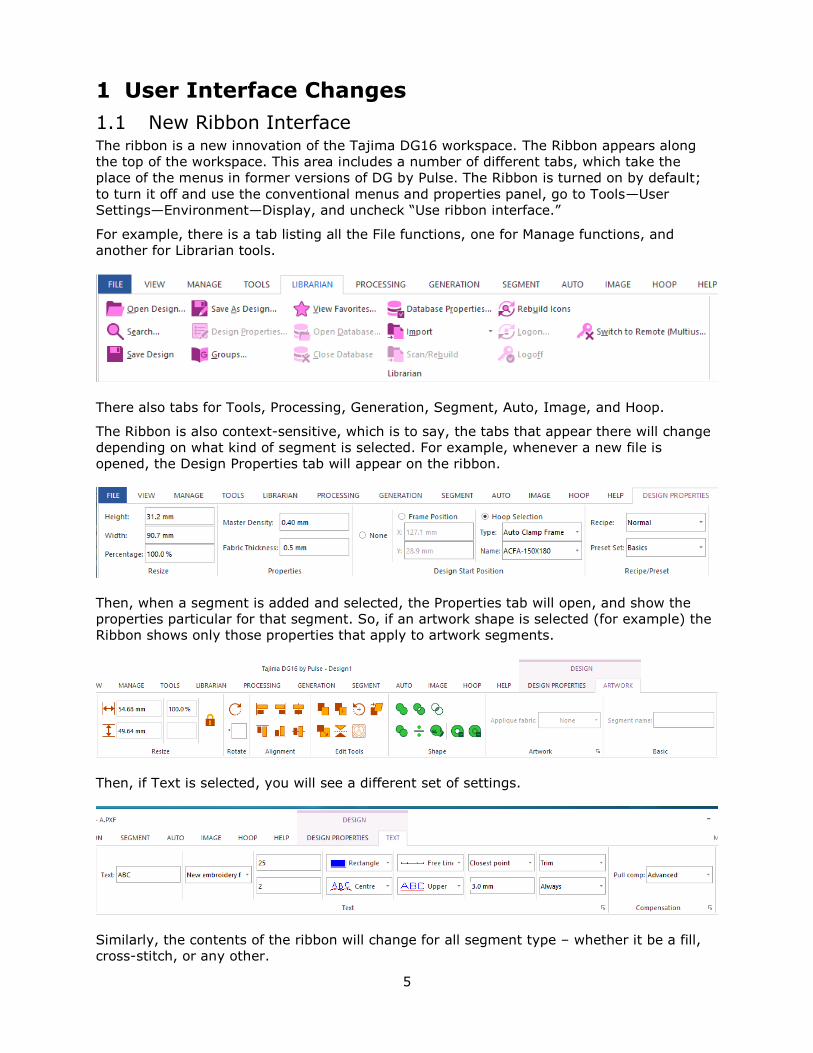
1.1 New Ribbon Interface The ribbon is a new innovation of the Tajima DG16 workspace. The Ribbon appears along
the top of the workspace. This area includes a number of different tabs, which take the
place of the menus in former versions of DG by Pulse. The Ribbon is turned on by default;
to turn it off and use the conventional menus and properties panel, go to Tools—User
Settings—Environment—Display, and uncheck “Use ribbon interface.”
For example, there is a tab listing all the File functions, one for Manage functions, and
another for Librarian tools.
There also tabs for Tools, Processing, Generation, Segment, Auto, Image, and Hoop.
The Ribbon is also context-sensitive, which is to say, the tabs that appear there will change
depending on what kind of segment is selected. For example, whenever a new file is
opened, the Design Properties tab will appear on the ribbon.
Then, when a segment is added and selected, the Properties tab will open, and show the
properties particular for that segment. So, if an artwork shape is selected (for example) the
Ribbon shows only those properties that apply to artwork segments.
Then, if Text is selected, you will see a different set of settings.
Similarly, the contents of the ribbon will change for all segment type – whether it be a fill,
cross-stitch, or any other.
6
Product level availability: All
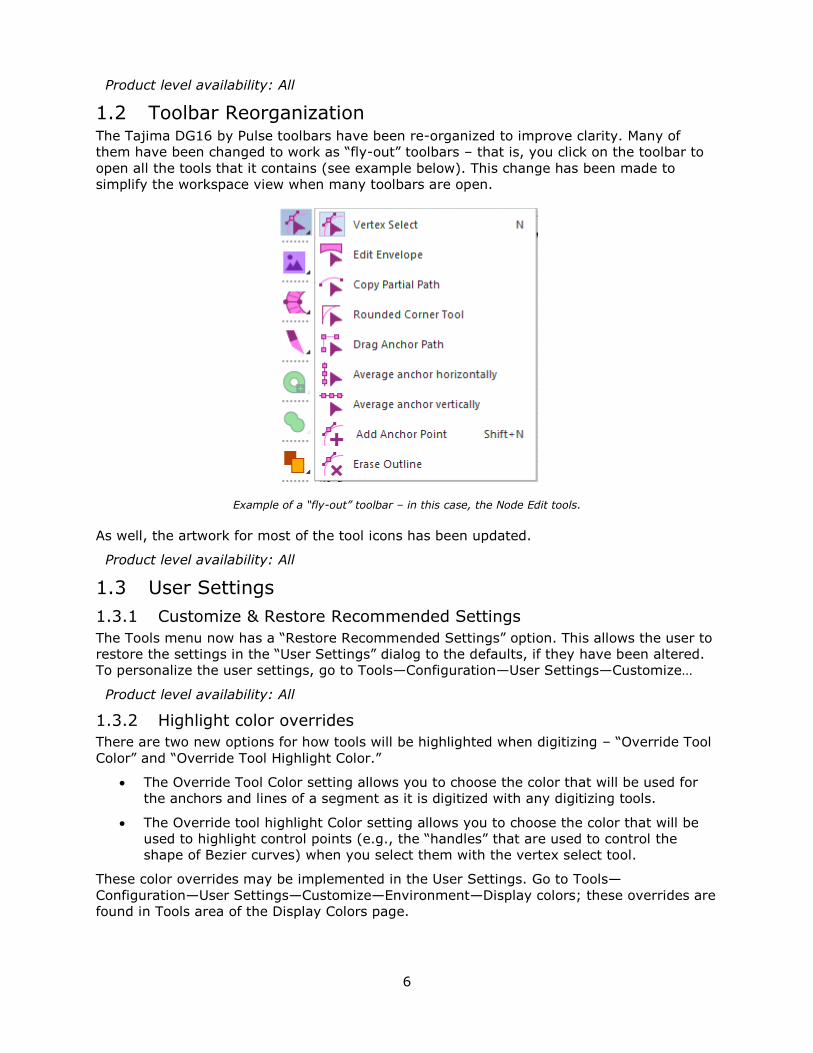
1.2 Toolbar Reorganization The Tajima DG16 by Pulse toolbars have been re-organized to improve clarity. Many of
them have been changed to work as “fly-out” toolbars – that is, you click on the toolbar to
open all the tools that it contains (see example below). This change has been made to
simplify the workspace view when many toolbars are open.
Example of a “fly-out” toolbar – in this case, the Node Edit tools.
As well, the artwork for most of the tool icons has been updated.
Product level availability: All
1.3 User Settings
1.3.1 Customize & Restore Recommended Settings
The Tools menu now has a “Restore Recommended Settings” option. This allows the user to
restore the settings in the “User Settings” dialog to the defaults, if they have been altered.
To personalize the user settings, go to Tools—Configuration—User Settings—Customize…
Product level availability: All
1.3.2 Highlight color overrides
There are two new options for how tools will be highlighted when digitizing – “Override Tool
Color” and “Override Tool Highlight Color.”
• The Override Tool Color setting allows you to choose the color that will be used for
the anchors and lines of a segment as it is digitized with any digitizing tools.
• The Override tool highlight Color setting allows you to choose the color that will be
used to highlight control points (e.g., the “handles” that are used to control the
shape of Bezier curves) when you select them with the vertex select tool.
These color overrides may be implemented in the User Settings. Go to Tools—
Configuration—User Settings—Customize—Environment—Display colors; these overrides are
found in Tools area of the Display Colors page.
7
1.3.3 New “Snap To” menu
A new toolbar icon has been created that give the user access to all the Snap to tools in
one menu. This tool is located on the Design toolbar (also known as the “Ribbon”), along
with the Show stitches, show outlines, show grid buttons.
Product level availability: Illustrator Extreme
1.4 New Thread Palette/Chart Manager Features A number of tools and new features have been added to the Thread Palette/Thread Chart
manager. These new features will make it quicker and easier to perform common editing
tasks on charts and palettes, such as inserting threads, deleting threads, changing thread
properties, and so on.
• The thread data in each column may now be sorted in ascending or descending
order. Click the column heading once for ascending order; click the column heading a
second time for descending order.
• An index column has been added to the thread data, so that the threads can be
sorted in chart order.
• Columns for thread thickness and thread type have been added to the data table.
• Multiple threads can selected simultaneously (using the Ctrl+click or Shift+click
shortcuts) and then edited.
In addition, buttons and shortcuts for the following common functions have been added to
the Thread Palette Manager:
• New Thread (Ctrl+N)
• Insert Thread (Ctrl+I)
• Delete Thread (Ctrl+D)
• Import Thread (Ctrl+R)
• Edit thread (Ctrl+E)
Product level availability: All
1.5 Sequence View—Select Same Color Tool To simultaneously select all segments of the same color, you can use the Select Same
Needle tool. This allows you to select all segments in the design having the same thread
color, provided they are all on the same needle.
To use this tool, open the sequenece view and select one segment of the color you want to
select all instances of. Then. click the Select Same Needle icon.
Product level availability: All
8
2 Design Editing tools
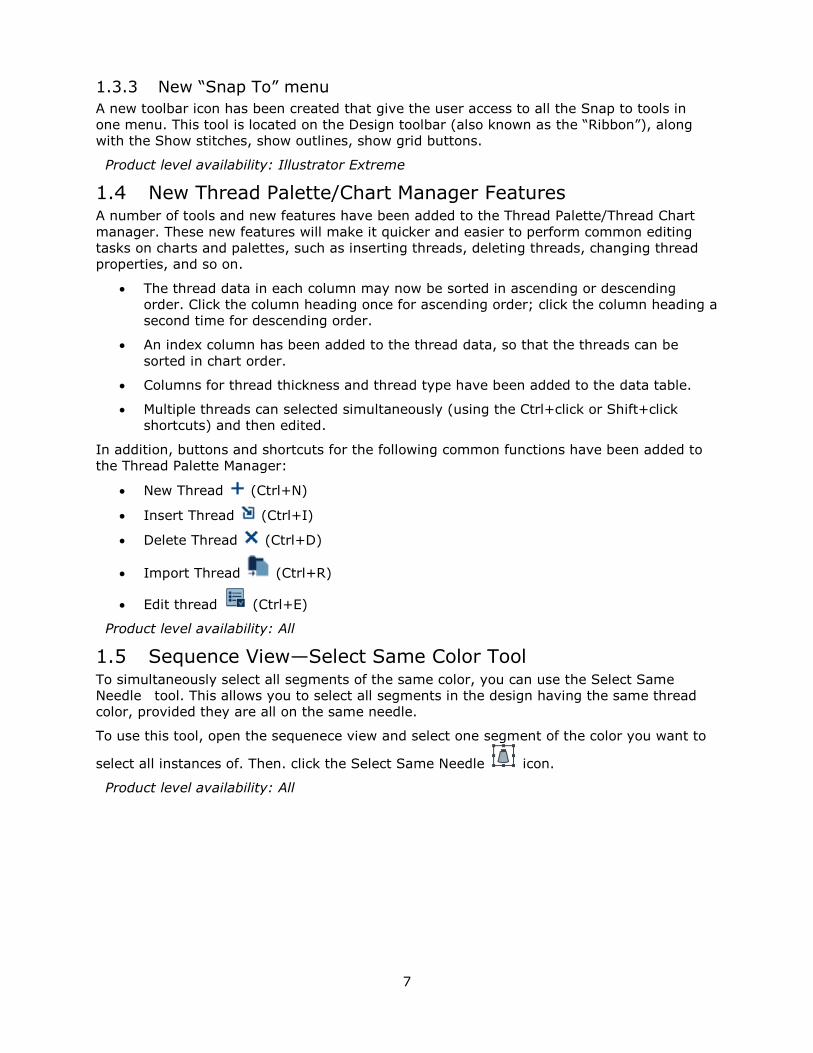
2.1 Circular Copy Improvements Extra functionality has been added to the Circular Copy tool.
In addition to the existing settings (the number of objects, the angle between objects, dis-
tance from center), Tajima DG16 by Pulse adds the following new settings:
• Offset angle: Offsets all copies of the selection by the angle that you input; positive
angles rotate the objects clockwise, negative angles rotate them counter-clockwise.
• Design Scale: Changes the size of the copies, as a percentage of the original seg-
ment.
• Design Angle: Use to pivot the copies around their centers (only applicable as long
as auto-rotate is not activated.)
• Auto Rotate: Rotates the copies so that each one is at the same angle, compared to
an imaginary line between the copy and the center of the circle.
• Reflect: Reflects each copy through 180º.
Product level availability: Illustrator Extreme
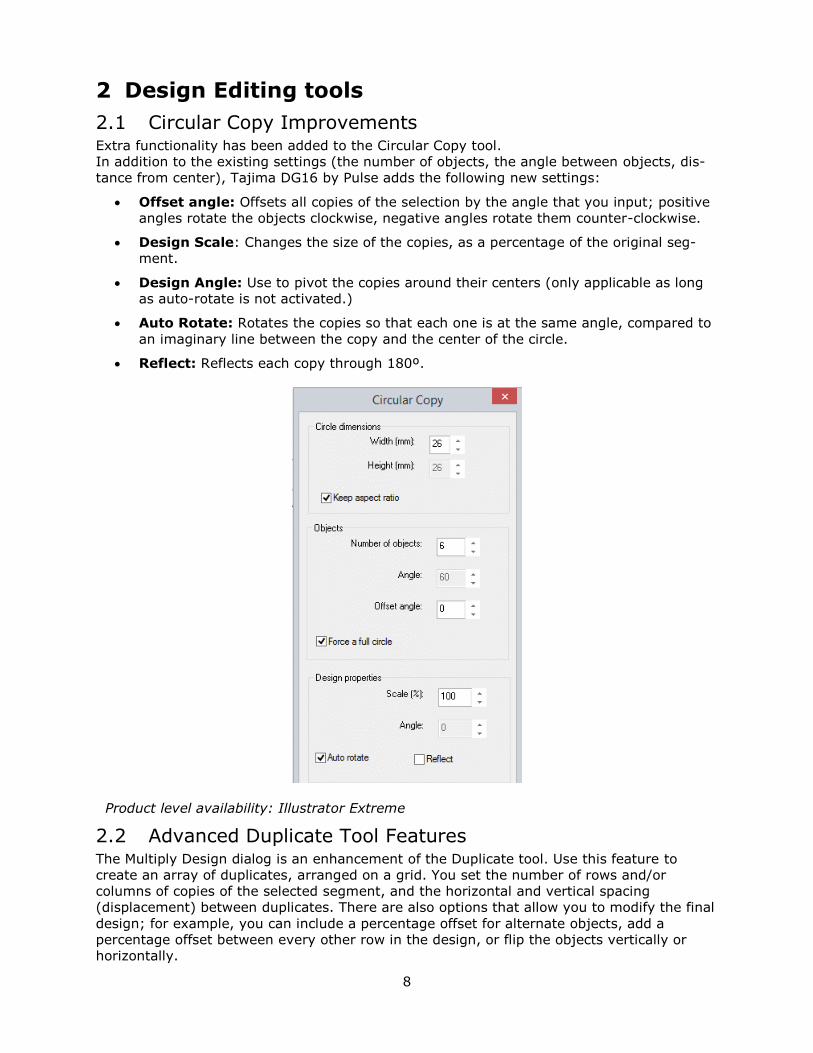
2.2 Advanced Duplicate Tool Features The Multiply Design dialog is an enhancement of the Duplicate tool. Use this feature to
create an array of duplicates, arranged on a grid. You set the number of rows and/or
columns of copies of the selected segment, and the horizontal and vertical spacing
(displacement) between duplicates. There are also options that allow you to modify the final
design; for example, you can include a percentage offset for alternate objects, add a
percentage offset between every other row in the design, or flip the objects vertically or
horizontally.
9
To use this feature, select a segment of any type and click the Duplicate tool on the
Transform toolbar (Ctrl + D). Then, press Ctrl and left-click to open the Multiply Design
dialog. Enter the parameters for how many rows and columns you want to include and
adjust other settings as required. Press OK to add the duplicates to the design.
Product level availability: Creator
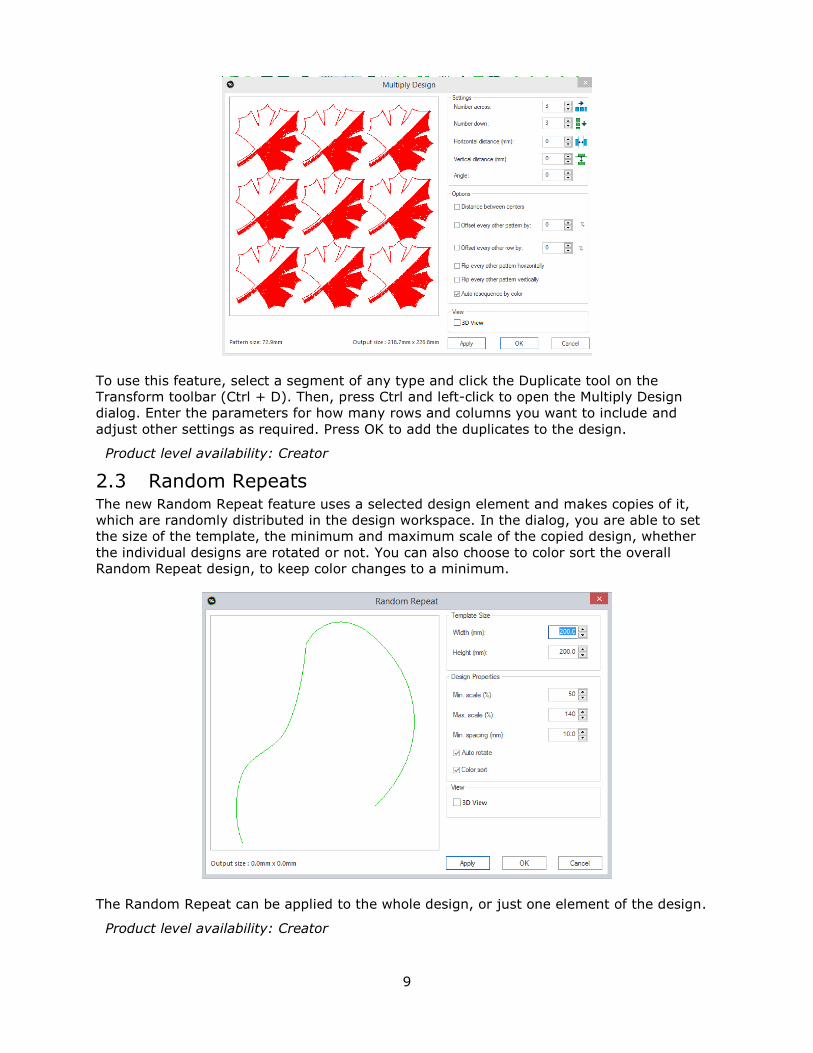
2.3 Random Repeats The new Random Repeat feature uses a selected design element and makes copies of it,
which are randomly distributed in the design workspace. In the dialog, you are able to set
the size of the template, the minimum and maximum scale of the copied design, whether
the individual designs are rotated or not. You can also choose to color sort the overall
Random Repeat design, to keep color changes to a minimum.
The Random Repeat can be applied to the whole design, or just one element of the design.
Product level availability: Creator
10
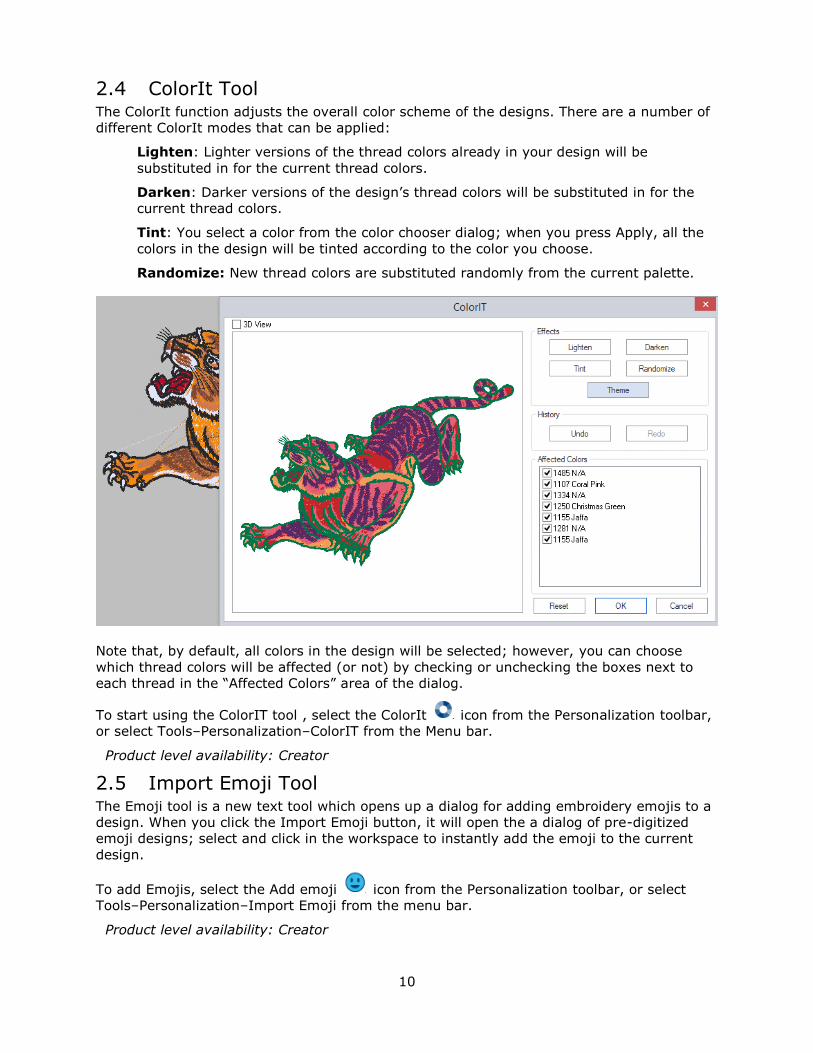
2.4 ColorIt Tool The ColorIt function adjusts the overall color scheme of the designs. There are a number of
different ColorIt modes that can be applied:
Lighten: Lighter versions of the thread colors already in your design will be
substituted in for the current thread colors.
Darken: Darker versions of the design’s thread colors will be substituted in for the
current thread colors.
Tint: You select a color from the color chooser dialog; when you press Apply, all the
colors in the design will be tinted according to the color you choose.
Randomize: New thread colors are substituted randomly from the current palette.
Note that, by default, all colors in the design will be selected; however, you can choose
which thread colors will be affected (or not) by checking or unchecking the boxes next to
each thread in the “Affected Colors” area of the dialog.
To start using the ColorIT tool , select the ColorIt icon from the Personalization toolbar,
or select Tools–Personalization–ColorIT from the Menu bar.
Product level availability: Creator
2.5 Import Emoji Tool The Emoji tool is a new text tool which opens up a dialog for adding embroidery emojis to a
design. When you click the Import Emoji button, it will open the a dialog of pre-digitized
emoji designs; select and click in the workspace to instantly add the emoji to the current
design.
To add Emojis, select the Add emoji icon from the Personalization toolbar, or select
Tools–Personalization–Import Emoji from the menu bar.
Product level availability: Creator
11
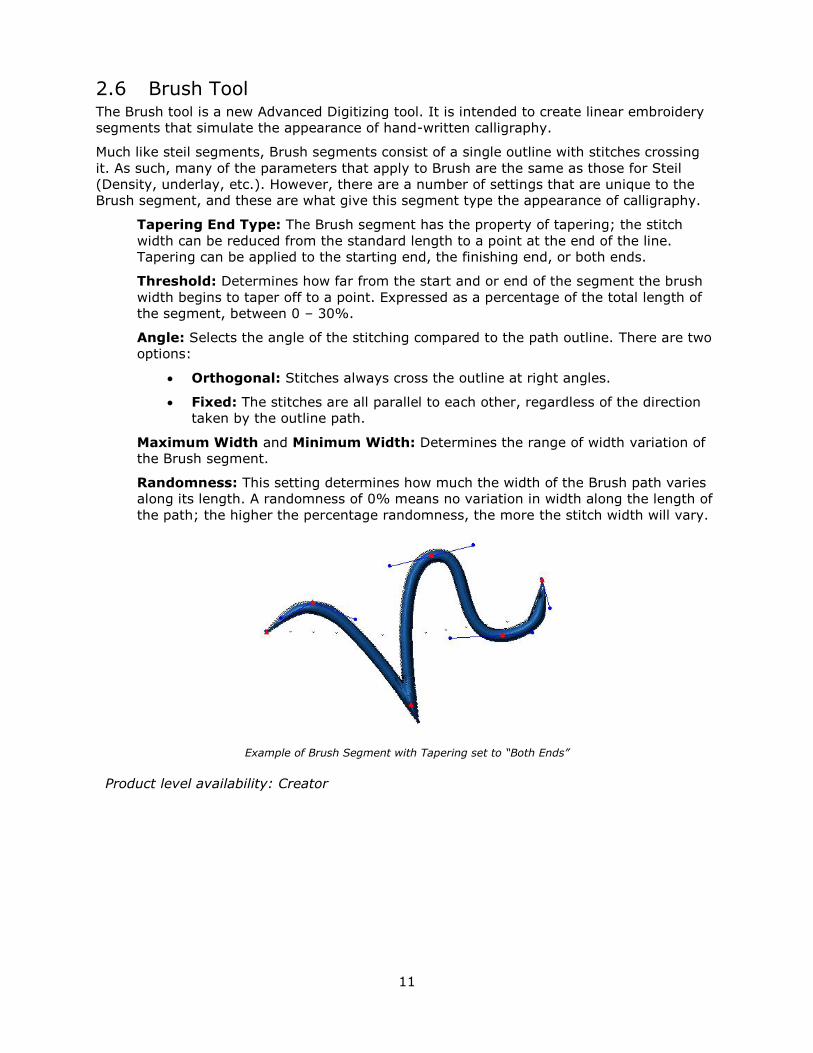
2.6 Brush Tool The Brush tool is a new Advanced Digitizing tool. It is intended to create linear embroidery
segments that simulate the appearance of hand-written calligraphy.
Much like steil segments, Brush segments consist of a single outline with stitches crossing
it. As such, many of the parameters that apply to Brush are the same as those for Steil
(Density, underlay, etc.). However, there are a number of settings that are unique to the
Brush segment, and these are what give this segment type the appearance of calligraphy.
Tapering End Type: The Brush segment has the property of tapering; the stitch
width can be reduced from the standard length to a point at the end of the line.
Tapering can be applied to the starting end, the finishing end, or both ends.
Threshold: Determines how far from the start and or end of the segment the brush
width begins to taper off to a point. Expressed as a percentage of the total length of
the segment, between 0 – 30%.
Angle: Selects the angle of the stitching compared to the path outline. There are two
options:
• Orthogonal: Stitches always cross the outline at right angles.
• Fixed: The stitches are all parallel to each other, regardless of the direction
taken by the outline path.
Maximum Width and Minimum Width: Determines the range of width variation of
the Brush segment.
Randomness: This setting determines how much the width of the Brush path varies
along its length. A randomness of 0% means no variation in width along the length of
the path; the higher the percentage randomness, the more the stitch width will vary.
Example of Brush Segment with Tapering set to “Both Ends”
Product level availability: Creator
12
3 Design Settings
3.1 Design Start/End Configuration On the design start/end dialog, there is now a setting that discounts the lock stitches when
calculating the start and end points of a design. This is to allow the designs to sew out on
machines that require the design to start with the first stitch of the first segment, and end
with the final stitch of the last segment.
3.2 Design Start Position The hoop information of a design (if a hoop has been specified) is now part of the properties
of the design. The properties include the type of hoop (e.g. round, square, cap, etc) and
also the hoop name (which includes the dimensions information.) To see the hoop infor-
mation for a given design, open the Design Properties dialog, and select the Production tab.
4 Segment Settings
4.1 Programmed Fill Settings
4.1.1 Programmed Pattern Alignment
There is a new pair of settings in the Programmed Pattern settings that control how a
programmed fill is aligned within the outline that it fills. There are both vertical (top, center,
bottom) and Horizontal (left, center, right) alignment options.
N.B. These settings work best for Programmed fills in which the direction line is perfectly
horizontal.
Product level availability: Creator
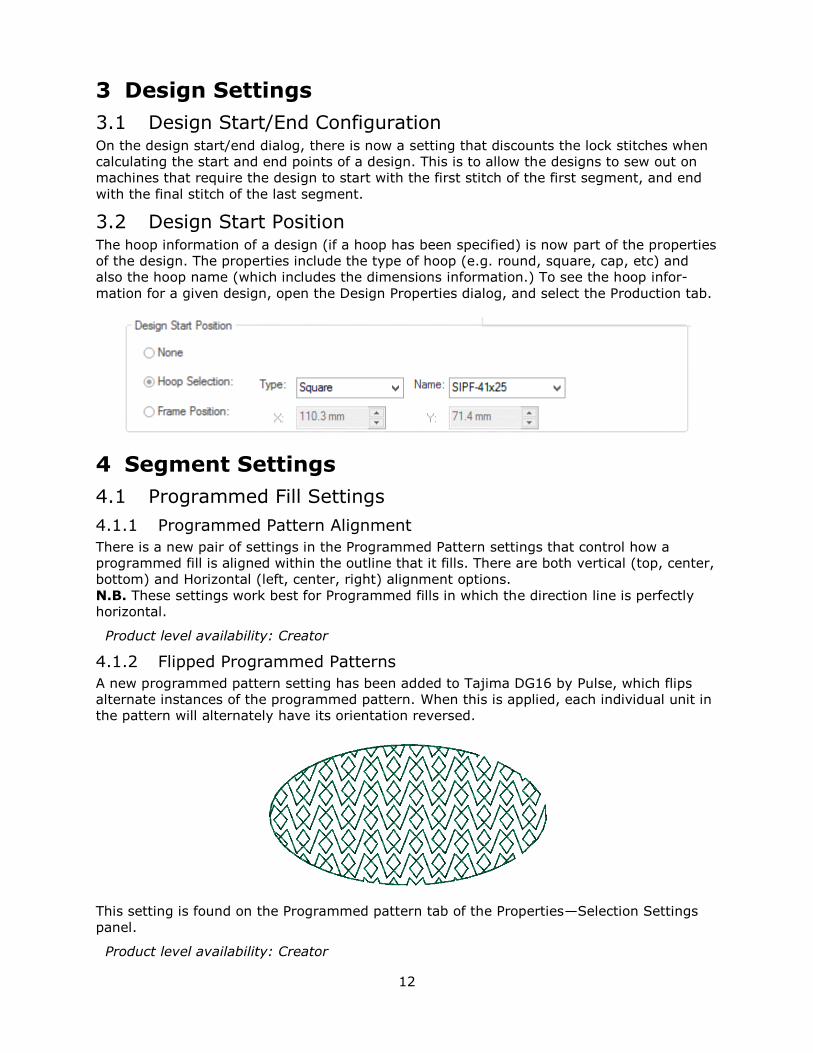
4.1.2 Flipped Programmed Patterns
A new programmed pattern setting has been added to Tajima DG16 by Pulse, which flips
alternate instances of the programmed pattern. When this is applied, each individual unit in
the pattern will alternately have its orientation reversed.
This setting is found on the Programmed pattern tab of the Properties—Selection Settings
panel.
Product level availability: Creator
13
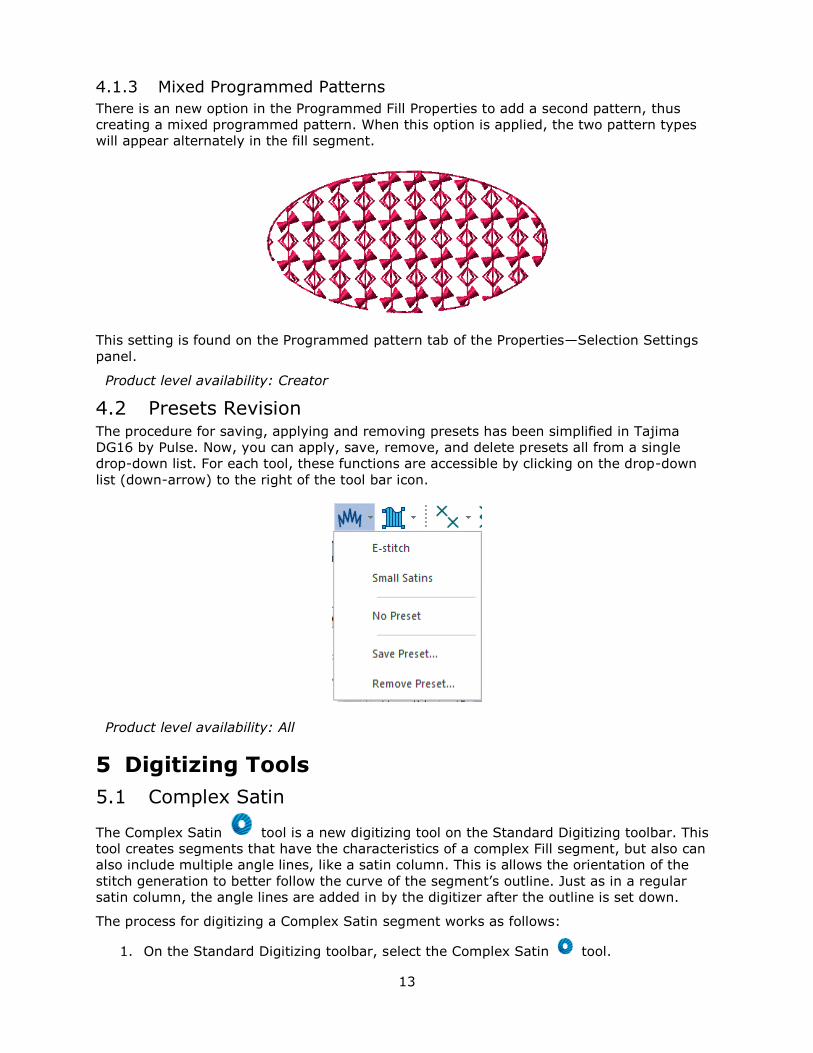
4.1.3 Mixed Programmed Patterns
There is an new option in the Programmed Fill Properties to add a second pattern, thus
creating a mixed programmed pattern. When this option is applied, the two pattern types
will appear alternately in the fill segment.
This setting is found on the Programmed pattern tab of the Properties—Selection Settings
panel.
Product level availability: Creator
4.2 Presets Revision The procedure for saving, applying and removing presets has been simplified in Tajima
DG16 by Pulse. Now, you can apply, save, remove, and delete presets all from a single
drop-down list. For each tool, these functions are accessible by clicking on the drop-down
list (down-arrow) to the right of the tool bar icon.
Product level availability: All
5 Digitizing Tools
5.1 Complex Satin
The Complex Satin tool is a new digitizing tool on the Standard Digitizing toolbar. This
tool creates segments that have the characteristics of a complex Fill segment, but also can
also include multiple angle lines, like a satin column. This is allows the orientation of the
stitch generation to better follow the curve of the segment’s outline. Just as in a regular
satin column, the angle lines are added in by the digitizer after the outline is set down.
The process for digitizing a Complex Satin segment works as follows:
1. On the Standard Digitizing toolbar, select the Complex Satin tool.

14
2. Click in the workspace to place points in the desired shape, just as you would for a
Complex fill path.
3. Right-click to complete the outline.
The cursor becomes a arrowhead with a black bead.
Click and drag from the from one side of the segment to the other to place the angle
lines. When all the angle lines are in place, right-click again.
The cursor changes to an arrowhead with a yellow bead.
4. Add any slice lines, if required.
5. Right-click again to complete the segment.
As with the other Tajima DG16 by Pulse segment types, you can convert other types
of segment to Complex Satin using the Convert tool.
Product level availability: Maestro
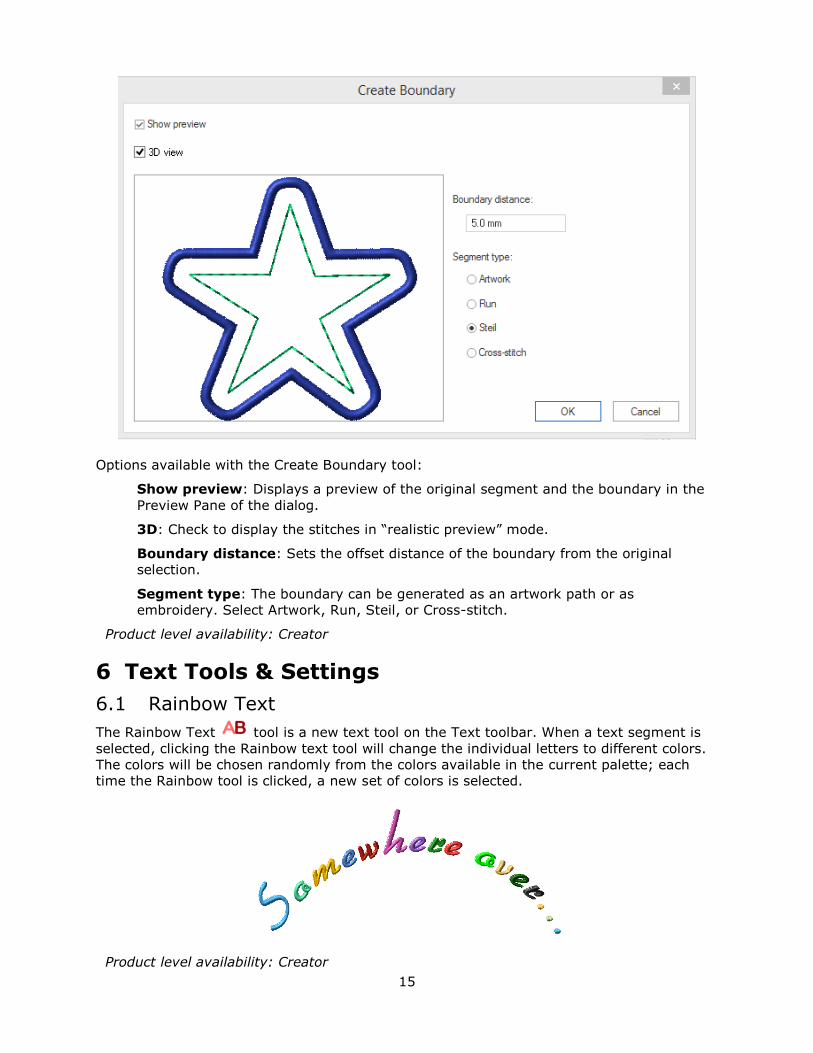
5.2 Create Boundary The Create Boundary dialog allows you to add a boundary around a selected artwork or
embroidery segment. The boundary that is created will exactly follow the outer outline of
the selection, but will be slightly displaced outwards.
To create a Boundary segment, select an outline segment and right-click on it. From the
context menu that appears, select Auto—Create Boundary.
15
Options available with the Create Boundary tool:
Show preview: Displays a preview of the original segment and the boundary in the
Preview Pane of the dialog.
3D: Check to display the stitches in “realistic preview” mode.
Boundary distance: Sets the offset distance of the boundary from the original
selection.
Segment type: The boundary can be generated as an artwork path or as
embroidery. Select Artwork, Run, Steil, or Cross-stitch.
Product level availability: Creator
6 Text Tools & Settings
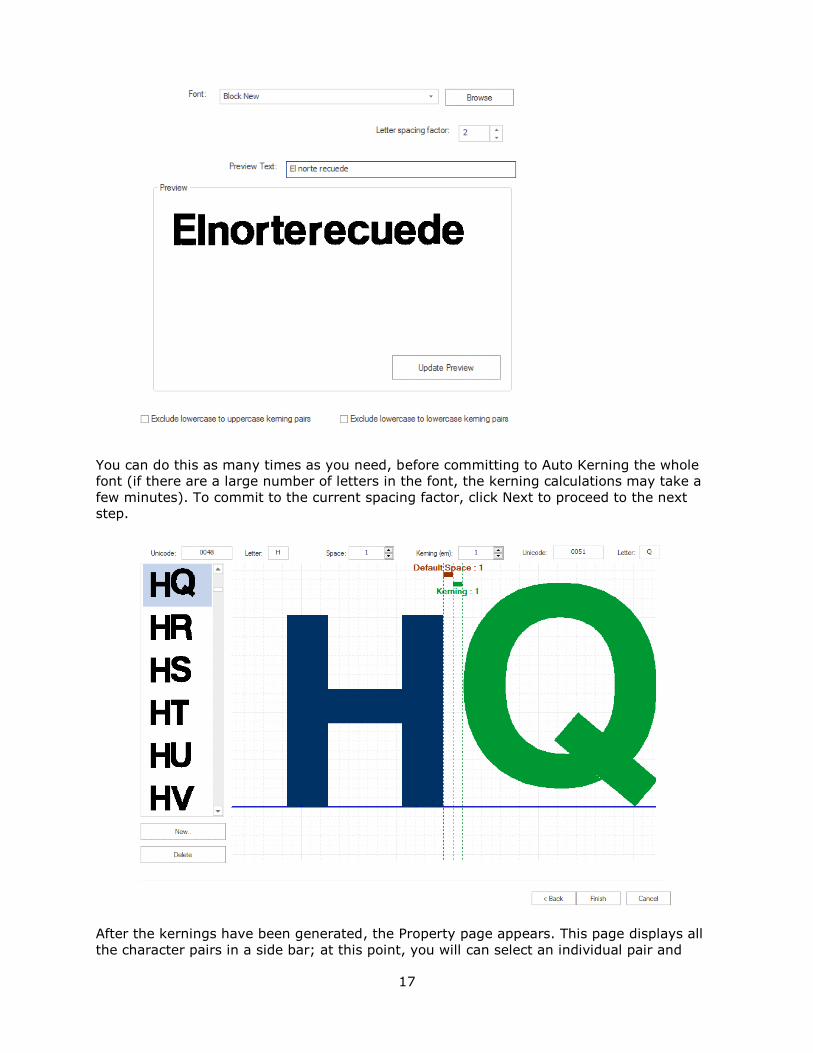
6.1 Rainbow Text
The Rainbow Text tool is a new text tool on the Text toolbar. When a text segment is
selected, clicking the Rainbow text tool will change the individual letters to different colors.
The colors will be chosen randomly from the colors available in the current palette; each
time the Rainbow tool is clicked, a new set of colors is selected.
Product level availability: Creator

16
6.2 WordIt Tool The WordIt tool is a special type of text tool that generates a number of text paths, and
puts them into the design. The text paths are scattered randomly around within the
boundaries of an envelope shape, which you select from the dialog.
In the WordIt dialog, you can set other parameters of the WordIt design, such as the
maximum number of text paths that will be included, the font used, the orientation of the
text, and the shape of the outline that will be generated to contain all the text segments.
The WordIt dialog includes a preview window which allows you to get a picture of how the
design will look before you actually place it in your design. This allows you to adjust
settings, and re-generate the WordIt design as often as required to get the right result.
The WordIt preview window
To open the WordIt dialog, select the WordIt icon on the Personalization toolbar, or
Tools—Personalization–WordIt in the menu bar.
Product level availability: Creator
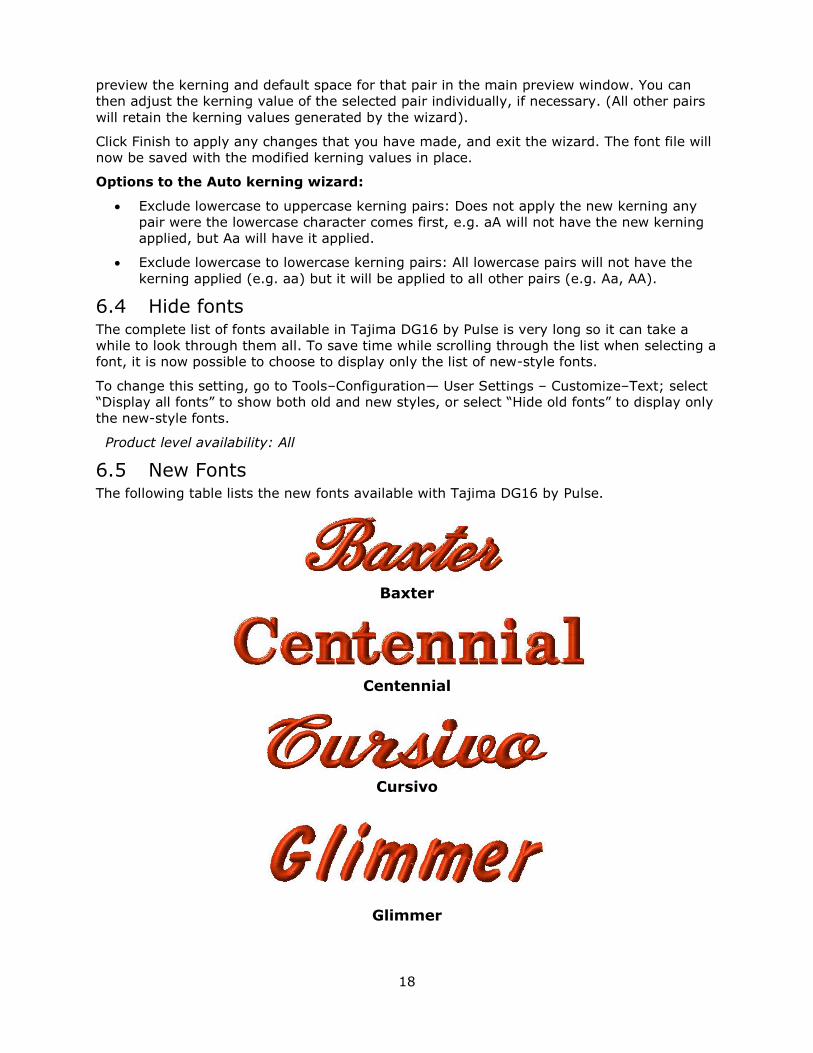
6.3 Auto Kerning Wizard The Auto Kerning Wizard is a quick and simple way to apply a new set of kernings to a font.
This wizard opens a dialog that allows you to set a “spacing factor” which sets the closest-
points distance between each pair of characters in the font. Taking the “spacing factor” that
you enter and the font’s default spacing (if any) into account, the wizard generates
individual kerning values for each combination of characters.
Note that only unsecured fonts (e.g. user-created fonts) can be Auto Kerned; the wizard cannot be ap-plied to regular DG16 system fonts.
There are two steps to using the Auto kerning wizard. In the first step, browse for the font
file you want to kern and then assign Letter spacing factor. At this stage, you can enter a
string of text and click the “Update Preview” button to check the spacing that will result
from a given Letter spacing factor.
17
You can do this as many times as you need, before committing to Auto Kerning the whole
font (if there are a large number of letters in the font, the kerning calculations may take a
few minutes). To commit to the current spacing factor, click Next to proceed to the next
step.
After the kernings have been generated, the Property page appears. This page displays all
the character pairs in a side bar; at this point, you will can select an individual pair and
18
preview the kerning and default space for that pair in the main preview window. You can
then adjust the kerning value of the selected pair individually, if necessary. (All other pairs
will retain the kerning values generated by the wizard).
Click Finish to apply any changes that you have made, and exit the wizard. The font file will
now be saved with the modified kerning values in place.
Options to the Auto kerning wizard:
• Exclude lowercase to uppercase kerning pairs: Does not apply the new kerning any
pair were the lowercase character comes first, e.g. aA will not have the new kerning
applied, but Aa will have it applied.
• Exclude lowercase to lowercase kerning pairs: All lowercase pairs will not have the
kerning applied (e.g. aa) but it will be applied to all other pairs (e.g. Aa, AA).
6.4 Hide fonts The complete list of fonts available in Tajima DG16 by Pulse is very long so it can take a
while to look through them all. To save time while scrolling through the list when selecting a
font, it is now possible to choose to display only the list of new-style fonts.
To change this setting, go to Tools–Configuration— User Settings – Customize–Text; select
“Display all fonts” to show both old and new styles, or select “Hide old fonts” to display only
the new-style fonts.
Product level availability: All
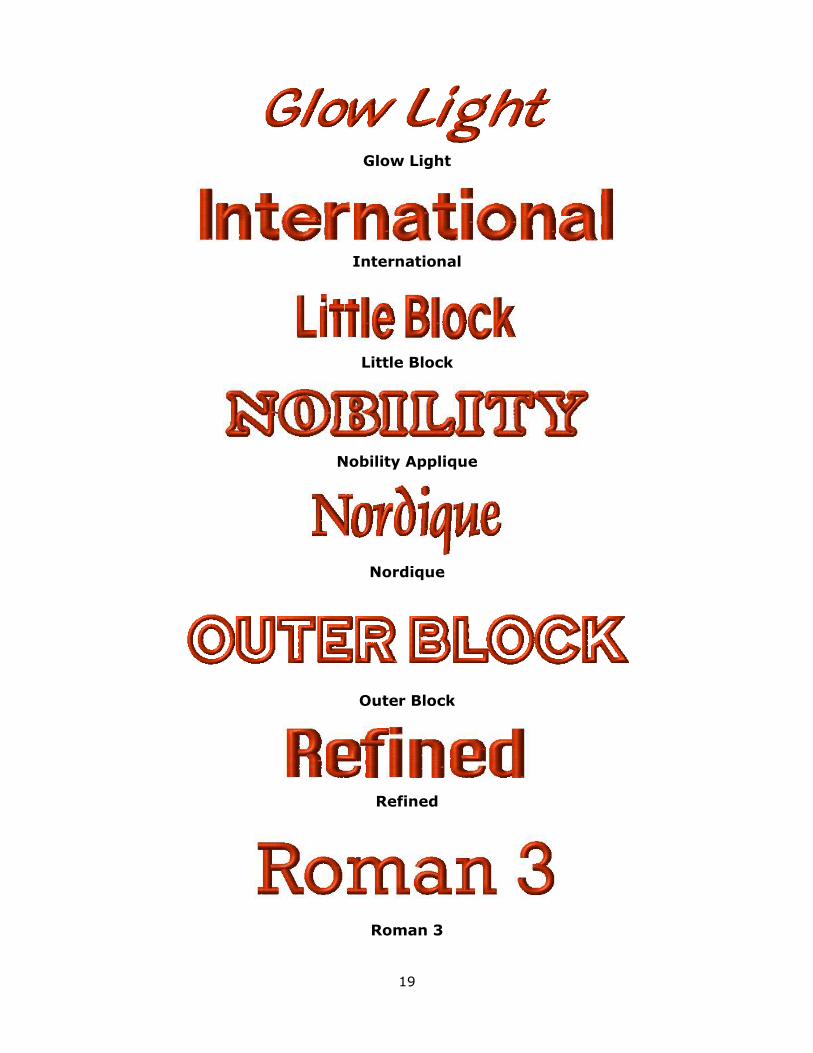
6.5 New Fonts The following table lists the new fonts available with Tajima DG16 by Pulse.
Baxter
Centennial
Cursivo
Glimmer
19
Glow Light
International
Little Block
Nobility Applique
Nordique
Outer Block
Refined
Roman 3
20
Suave
Swift
Washington
Product level availability: All
7 Artwork Tools
7.1 Shape Artwork keeps original colors The majority of the Shape Artwork tools (Clip, Exclude, Divide and Knock Out) have been
modified so that the resulting artwork will retain the thread colors of the original.
Three different artwork paths, after selecting all and applying the Clip tool.
The exceptions are the Unite and Intersect tools, which result in a single outline; in these
cases, the color of the artwork that was on top will be used.
Product level availability: Maestro
7.2 Rounded Corner Tool This tool allows the designer to quickly create a rounded corner from a right-angled corner.
Simply select the Rounded Corner tool (on the Path Edit toolbar), and then select an
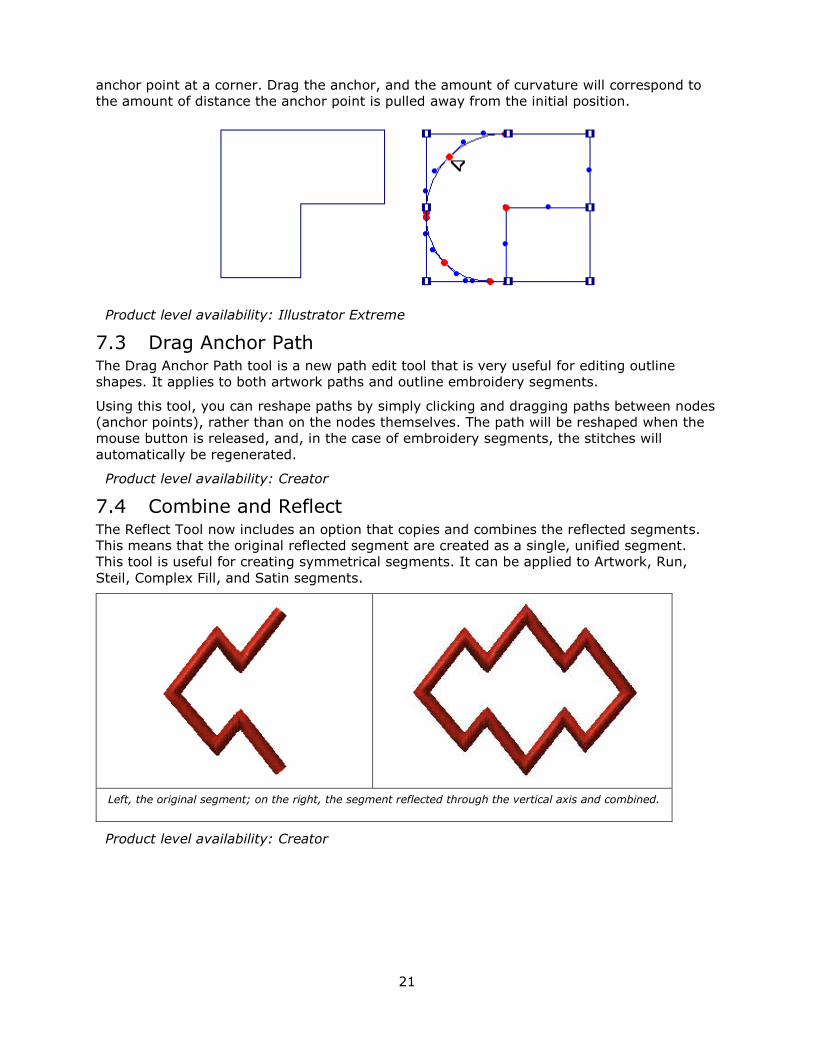
21
anchor point at a corner. Drag the anchor, and the amount of curvature will correspond to
the amount of distance the anchor point is pulled away from the initial position.
Product level availability: Illustrator Extreme
7.3 Drag Anchor Path The Drag Anchor Path tool is a new path edit tool that is very useful for editing outline
shapes. It applies to both artwork paths and outline embroidery segments.
Using this tool, you can reshape paths by simply clicking and dragging paths between nodes
(anchor points), rather than on the nodes themselves. The path will be reshaped when the
mouse button is released, and, in the case of embroidery segments, the stitches will
automatically be regenerated.
Product level availability: Creator
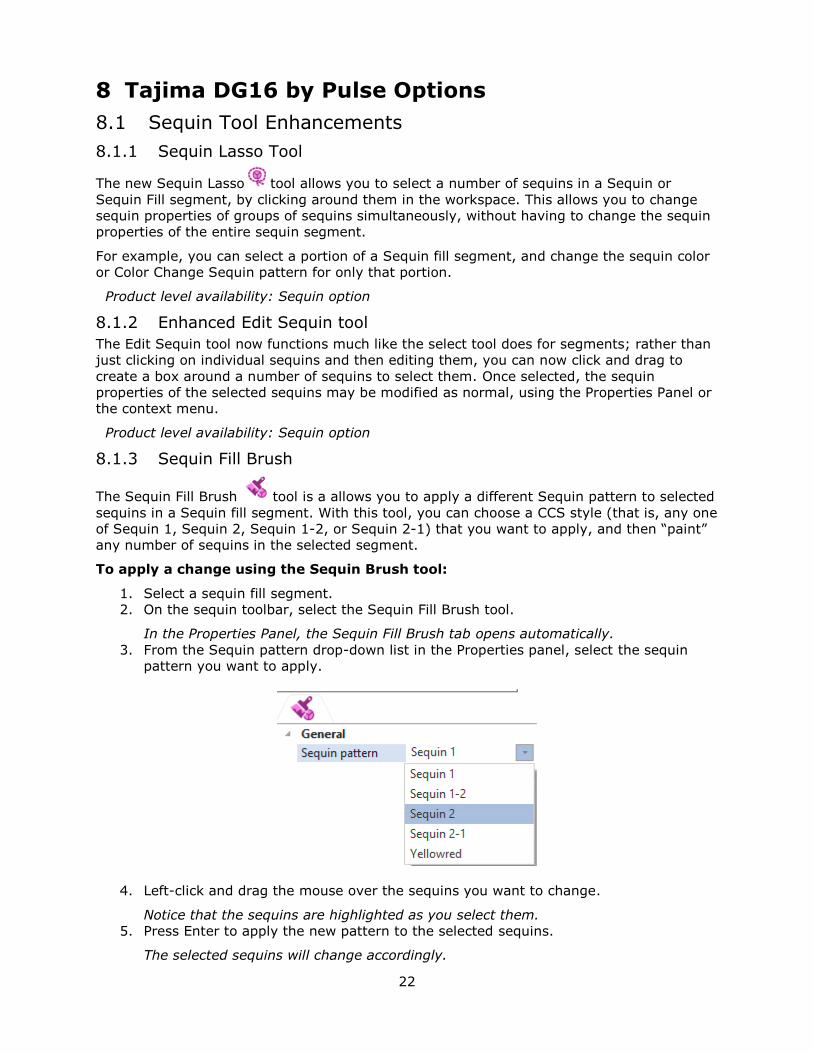
7.4 Combine and Reflect The Reflect Tool now includes an option that copies and combines the reflected segments.
This means that the original reflected segment are created as a single, unified segment.
This tool is useful for creating symmetrical segments. It can be applied to Artwork, Run,
Steil, Complex Fill, and Satin segments.
Left, the original segment; on the right, the segment reflected through the vertical axis and combined.
Product level availability: Creator
22
8 Tajima DG16 by Pulse Options
8.1 Sequin Tool Enhancements
8.1.1 Sequin Lasso Tool
The new Sequin Lasso tool allows you to select a number of sequins in a Sequin or
Sequin Fill segment, by clicking around them in the workspace. This allows you to change
sequin properties of groups of sequins simultaneously, without having to change the sequin
properties of the entire sequin segment.
For example, you can select a portion of a Sequin fill segment, and change the sequin color
or Color Change Sequin pattern for only that portion.
Product level availability: Sequin option
8.1.2 Enhanced Edit Sequin tool
The Edit Sequin tool now functions much like the select tool does for segments; rather than
just clicking on individual sequins and then editing them, you can now click and drag to
create a box around a number of sequins to select them. Once selected, the sequin
properties of the selected sequins may be modified as normal, using the Properties Panel or
the context menu.
Product level availability: Sequin option
8.1.3 Sequin Fill Brush
The Sequin Fill Brush tool is a allows you to apply a different Sequin pattern to selected
sequins in a Sequin fill segment. With this tool, you can choose a CCS style (that is, any one
of Sequin 1, Sequin 2, Sequin 1-2, or Sequin 2-1) that you want to apply, and then “paint”
any number of sequins in the selected segment.
To apply a change using the Sequin Brush tool:
1. Select a sequin fill segment.
2. On the sequin toolbar, select the Sequin Fill Brush tool.
In the Properties Panel, the Sequin Fill Brush tab opens automatically.
3. From the Sequin pattern drop-down list in the Properties panel, select the sequin
pattern you want to apply.
4. Left-click and drag the mouse over the sequins you want to change.
Notice that the sequins are highlighted as you select them.
5. Press Enter to apply the new pattern to the selected sequins.
The selected sequins will change accordingly.
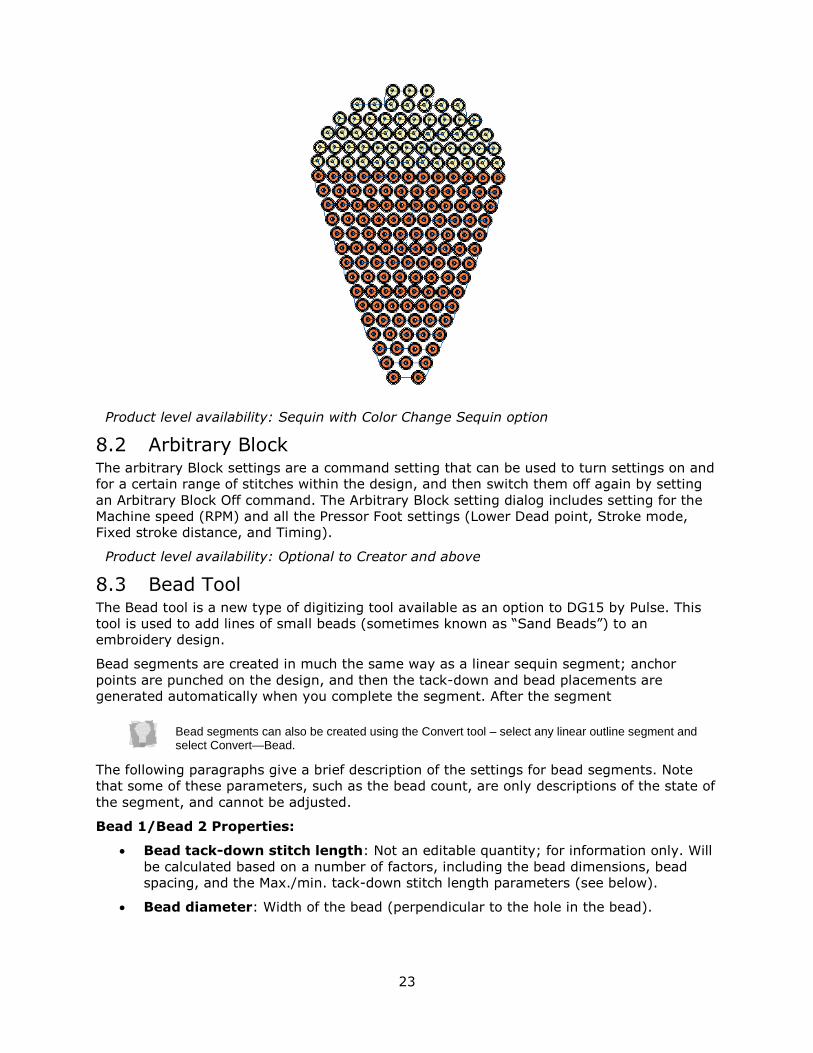
23
Product level availability: Sequin with Color Change Sequin option
8.2 Arbitrary Block The arbitrary Block settings are a command setting that can be used to turn settings on and
for a certain range of stitches within the design, and then switch them off again by setting
an Arbitrary Block Off command. The Arbitrary Block setting dialog includes setting for the
Machine speed (RPM) and all the Pressor Foot settings (Lower Dead point, Stroke mode,
Fixed stroke distance, and Timing).
Product level availability: Optional to Creator and above
8.3 Bead Tool The Bead tool is a new type of digitizing tool available as an option to DG15 by Pulse. This
tool is used to add lines of small beads (sometimes known as “Sand Beads”) to an
embroidery design.
Bead segments are created in much the same way as a linear sequin segment; anchor
points are punched on the design, and then the tack-down and bead placements are
generated automatically when you complete the segment. After the segment
Bead segments can also be created using the Convert tool – select any linear outline segment and select Convert—Bead.
The following paragraphs give a brief description of the settings for bead segments. Note
that some of these parameters, such as the bead count, are only descriptions of the state of
the segment, and cannot be adjusted.
Bead 1/Bead 2 Properties:
• Bead tack-down stitch length: Not an editable quantity; for information only. Will
be calculated based on a number of factors, including the bead dimensions, bead
spacing, and the Max./min. tack-down stitch length parameters (see below).
• Bead diameter: Width of the bead (perpendicular to the hole in the bead).
24
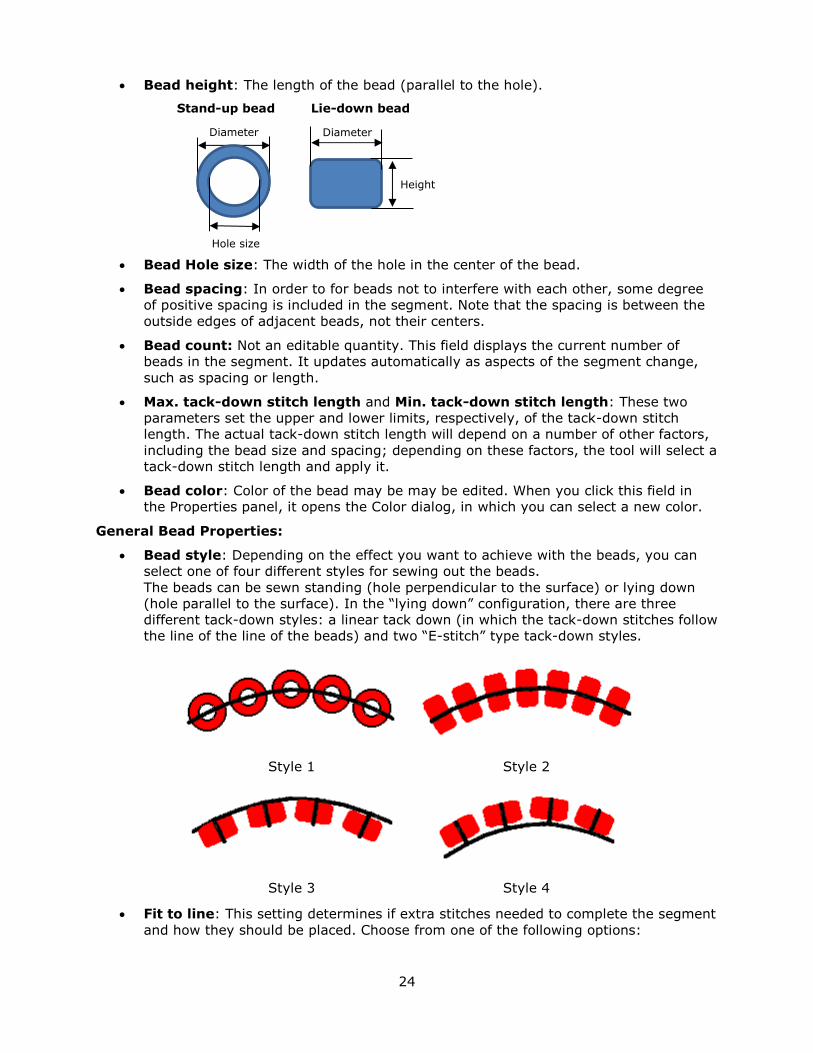
• Bead height: The length of the bead (parallel to the hole).
• Bead Hole size: The width of the hole in the center of the bead.
• Bead spacing: In order to for beads not to interfere with each other, some degree
of positive spacing is included in the segment. Note that the spacing is between the
outside edges of adjacent beads, not their centers.
• Bead count: Not an editable quantity. This field displays the current number of
beads in the segment. It updates automatically as aspects of the segment change,
such as spacing or length.
• Max. tack-down stitch length and Min. tack-down stitch length: These two
parameters set the upper and lower limits, respectively, of the tack-down stitch
length. The actual tack-down stitch length will depend on a number of other factors,
including the bead size and spacing; depending on these factors, the tool will select a
tack-down stitch length and apply it.
• Bead color: Color of the bead may be may be edited. When you click this field in
the Properties panel, it opens the Color dialog, in which you can select a new color.
General Bead Properties:
• Bead style: Depending on the effect you want to achieve with the beads, you can
select one of four different styles for sewing out the beads.
The beads can be sewn standing (hole perpendicular to the surface) or lying down
(hole parallel to the surface). In the “lying down” configuration, there are three
different tack-down styles: a linear tack down (in which the tack-down stitches follow
the line of the line of the beads) and two “E-stitch” type tack-down styles.
Style 1 Style 2
Style 3 Style 4
• Fit to line: This setting determines if extra stitches needed to complete the segment
and how they should be placed. Choose from one of the following options:
Hole size
Diameter Diameter
Height
Stand-up bead Lie-down bead
25
• Offset: The software adjusts the spacing between the beads, such that the
last bead is guaranteed to fit the end of the line.
• Bead: The software guarantees the spacing between the bead and ensures
the spacing will not change. An extra bead will be added to cover the end
point of the line.
• No Stitch: The software guarantees the spacing between the bead and
ensures the spacing will not change. The extra part of the line will be left
empty and the stitch will stop at the last bead.
• Bead drop run stitch: This setting determines where the bead run stitches will be
placed. Select one of the following options:
• At Anchor to place Run stitches penetrations at the anchor points.
• None to place Run stitches evenly along the segment.
• Chord Gap to place Run stitches to fit optimally along curves. If the “Chord
Gap” option is selected above, the following two settings become active.
• Max. bead chord gap distance. This sets the longest the acceptable gap for
the stitch at the peak of a curve.
• Min. bead stitch length. This sets the lower limit for how short the run
stitches will be made, so as to fit the peak of a curve.
• Bead Automatic Gap: Check this setting to create a gap in the beads in cases where
the Bead segment outline crosses over itself.
• Fit bead to box: Select to generate the beads such that they fill the given outline,
spread out as evenly as possible along it.
• Bead pattern: This parameter allows you to switch between “Bead1” and “Bead2” or
vice-versa, for the selected segment; this allows you to quickly change between
different colors, bead sizes, etc.
Product level availability: Optional to Creator and above