tbos field transmitter transmisor de campo tbos · unik field transmitter. this mode offers only...
TRANSCRIPT

Rain Bird CorporationContractor Division970 West Sierra Madre Avenue, Azusa, CA 91702Phone: (626) 963-9311 Fax: (626) 812-3411
Rain Bird CorporationCommercial Division 6991 East Southpoint Road, Tucson, AZ 85706Phone: (520) 741-6100 Fax: (520) 741-6522
Rain Bird International, Inc.145 North Grand Avenue, Glendora, CA 91741Phone: (626) 963-9311 Fax: (626) 963-4287
Rain Bird Technical Service(800) 247-3782 (U.S. only)
www.rainbird.com
TBOS is a trademark of Rain Bird Corporation.
P/N 635098
Rain Bird. Conserving More Than Water.
® Registered trademark of Rain Bird Corporation© 2004 Rain Bird Corporation 4/04
englishespañol
TBOS™ Field TransmitterTransmisor de Campo TBOS

english
1
TBOS™ Field Transmitter
Welcome to Rain BirdThe TBOS™ Field Transmitter, part of the TBOSirrigation system family, allows you to create,transmit and retrieve irrigation programminginformation when used with the TBOS orUNIK™ Control Module.
The Field Transmitter features include:
• One minute to 12 hour irrigation run times perstation in one minute increments
• Three independent programs: A, B, C
• Up to eight start times per program per day
• 365-day calendar (adjusts for leap year)
• Standard mode: 7-day (custom) cycle; any daycan be set ON or OFF as a watering day
• Turbo mode: includes 7-day (custom) cycle plusthe following cycles:
• Even day, odd day or odd-with-31st-of-the-month-off cycles (adjusts for leap year)
• 1 through 6 day cycles, water one of every one to six days
• Manual irrigation start or stop capacity
• Low battery icon indicates when a new battery isneeded in the TBOS Field Transmitter or TBOSControl Modules
• Ability to program an unlimited number of UNIKand TBOS Control Modules with one FieldTransmitter
• Automatic reset of current time and day whentransmitting a program to a Control Module
Operating principle
Above parameters are transmitted to the module.
The above parameters are received by the transmitter.
NOTE: The transmitter does not receive the currenttime from the module: there may be a difference in thecurrent time between the transmitter and the module.It is therefore advisable to retransmit the program tothe module to synchronize the current time in themodule with your transmitter.
english
Program transmission• Current time
and day• Water days/
program• Start times/
program• Run time/
station + programassignment
Program reception/display• Water days/
program• Start times/
program• Run time/
station + programassignment
• Irrigationmode ON or OFF
A
B
C
D
E
F
G
1
9
10
4 5 6 7 8
2
3
13 1112
Quick Programming Guide
A Quick Programming Guide label is providedwith the Field Transmitter. This label should beplaced on the inside of the Field Transmitter’sprotective cover.
Understanding the MenuDisplay, Icons and KeypadMenu system
The Field Transmitter has a cyclical menu sys-tem, which means that you move through theeight menu displays one display at a time bypressing B. All of the displays (except thestart-up display) have icons representing thefunction that you can program while in thatdisplay.
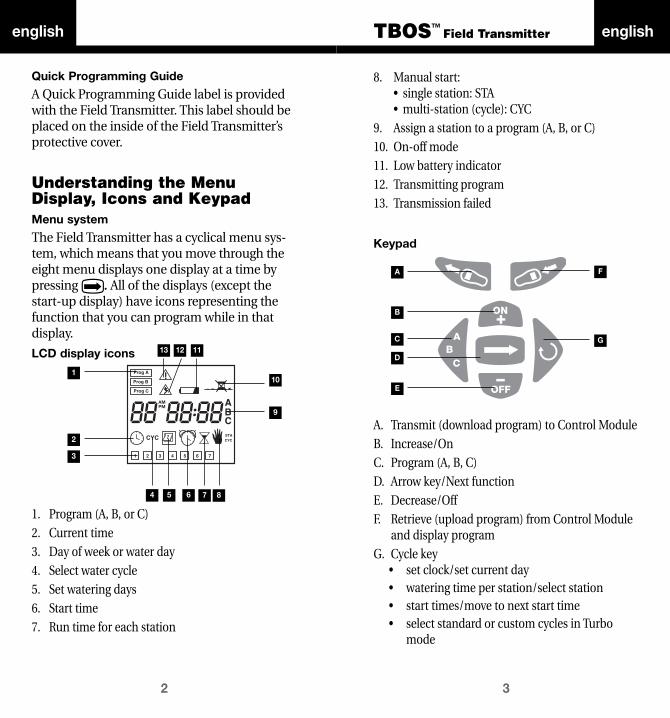
LCD display icons
1. Program (A, B, or C)2. Current time3. Day of week or water day4. Select water cycle5. Set watering days6. Start time7. Run time for each station
english
3
TBOS™ Field Transmitter
8. Manual start:• single station: STA• multi-station (cycle): CYC
9. Assign a station to a program (A, B, or C)10. On-off mode11. Low battery indicator12. Transmitting program13. Transmission failed
Keypad
A. Transmit (download program) to Control ModuleB. Increase/OnC. Program (A, B, C)D. Arrow key/Next functionE. Decrease/OffF. Retrieve (upload program) from Control Module
and display programG. Cycle key
• set clock/set current day• watering time per station/select station• start times/move to next start time• select standard or custom cycles in Turbo
mode
english
2

english
5
TBOS™ Field Transmitter
Setting the current date (year, month and day):
1. Press Oor P to set the current year.
2. Press B to move to setting the month and day.
3. If the time is displayed in the 24 hour format, thelast two digits will be blinking. If the time is dis-played in the 12 hour format, the first two digitswill be blinking. The blinking digits represent themonth. Set the month by pressing Oor P.Press B to move to the day. Set the day bypressing Oor P.
4. Press B to move to setting the time.
Changing the current date (year, month andday):
1. Turn on the Field Transmitter. If the FieldTransmitter is already on, press B to advanceto the startup display (the screen displaying thecurrent time and day of the week).
2. Press and hold B until the year is displayed onthe screen.
3. Follow the steps for setting the current date listedabove.
Setting the time
This screen shows the currenttime and current day (1 = Monday, 2 =Tuesday…7 = Sunday).
To set the time:
1. Press B until D appears in the display.
2. To switch between 12-hour and 24-hour display,press and hold down A for two seconds.
3. Press O to advance the clock or P to reversethe clock. Pressing and holding down either keywill make the numbers change more quickly.
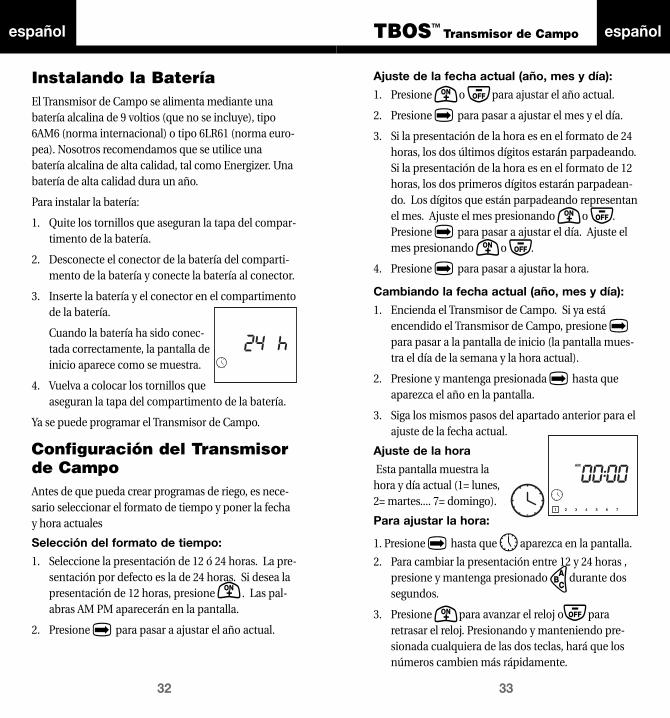
Installing the BatteryThe Field Transmitter is powered by a 9-voltalkaline battery (not included), type 6AM6(international standard) or type 6LR61(European standard). We recommend that youuse a high-quality alkaline battery, such asEnergizer. A high-quality battery will last oneyear.
To install the battery:
1. Remove the screws that secure the battery com-partment cover.
2. Remove the battery connector from the batterycompartment and attach the battery to the con-nector.
3. Insert the battery and connector into the batterycompartment.
When the battery is properlyconnected, the start-up displayappears as shown.
4. Reinstall the screws that securethe battery compartment cover.
The Field Transmitter can now be programmed.
Setting up the FieldTransmitterBefore you can create watering programs, youmust select the time format set the current dateand time
Selecting the time format:
1. Select either a 12-hour or a 24-hour display. Thedefault time display is 24 hour. If you would likea 12-hour display, press O. The words AM PMwill appear in the display.
2. Press B to move to setting the year.
english
4

english
7
TBOS™ Field Transmitter
Multiple stations and programs
If you want more than eight start times per day on asite equipped with only one valve, you can wire thevalve to several stations on a Two, Four, or Six StationControl Module and program multiple start timesfor each station.
For example, if you wire the same valve to both sta-tions on a Two Station Control Module, you canobtain up to 16 starts (2 x 8). If you connect the samevalve to three stations on a Four Station ControlModule, you can obtain up to 24 starts (3 x 8).Stations assigned to this valve, however, cannot beassigned to other valves. If you use this method,make sure that there is no program overlap. The pro-gram run time must be shorter than the time inter-val separating the two start times.
Note: A One Station Control Modulecan use only one program.
Now you can begin setting up your watering cycles.
Standard and Turbo modesThe TBOS Field Transmitter has two modes of opera-tion: Standard and Turbo.
The Standard mode of operation is identical to theUNIK Field Transmitter. This mode offers only the 7-day cycle and is useful when only 7-day (custom)cycles are needed or when using the TBOS FieldTransmitter to program UNIK Control Modules.
Note: Standard mode is the defaultmode of operation.
The Turbo mode offers even day, odd day and odd-31 (odd days with the 31st of the month) cycles and1 through 6 day cycles for use with TBOS ControlModules.
english
6
Note: If the display shows AM and thecurrent time is actually PM, advance orreverse the clock until the displayshows PM.
Important: When you change the bat-teries in the Field Transmitter, the timereverts back to the 24-hour display.
Programming the FieldTransmitterBefore you begin programming the Field Trans-mitter, please take some time to learn some of theprogramming and connection options you have withyour irrigation system.
Three independent programs
The Field Transmitter has three programs: A, B and C. This allows you to select a programaccording to plant type; for example, A for grasses, B for shrubs and C for trees. Stationsassigned to the same program operate sequentially.
For seven day cycles, these are independent pro-grams. You can consider each program as a separatecontroller with its own water days, start times andrun times.
For odd, even or 1 through 6 day cycles, all pro-grams use the same water days but start times andrun times may be programmed independently foreach program.
Note: A station may be assigned to onlyone program, either A, B or C.
Simultaneous watering start
If you assign a separate or different station to eachprogram with the same water days, start times andrun times, you will obtain an almost simultaneousstart of all three stations.
english
9
TBOS™ Field Transmitter
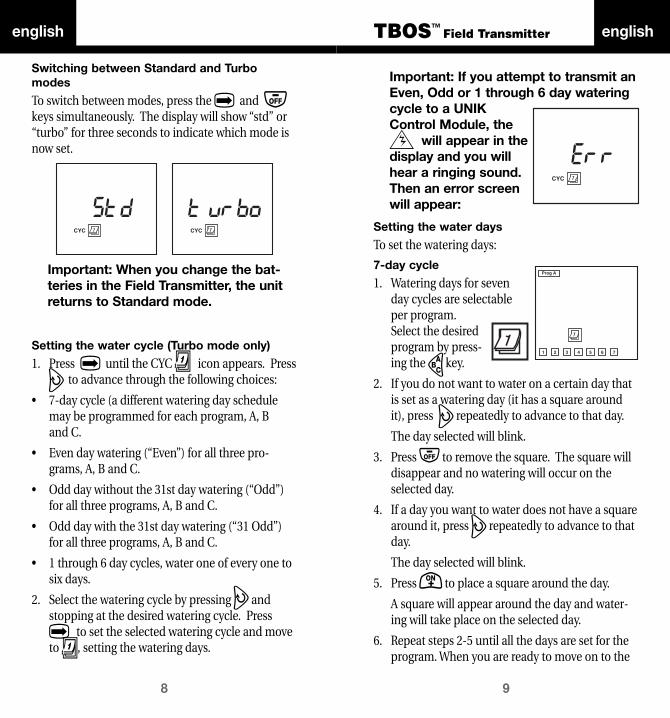
Important: If you attempt to transmit anEven, Odd or 1 through 6 day wateringcycle to a UNIKControl Module, the
W will appear in thedisplay and you willhear a ringing sound.Then an error screenwill appear:
Setting the water days
To set the watering days:
7-day cycle
1. Watering days for sevenday cycles are selectableper program.Select the desiredprogram by press-ing the A key.
2. If you do not want to water on a certain day thatis set as a watering day (it has a square aroundit), press C repeatedly to advance to that day.
The day selected will blink.
3. Press P to remove the square. The square willdisappear and no watering will occur on theselected day.
4. If a day you want to water does not have a squarearound it, press C repeatedly to advance to thatday.
The day selected will blink.
5. Press O to place a square around the day.
A square will appear around the day and water-ing will take place on the selected day.
6. Repeat steps 2-5 until all the days are set for theprogram. When you are ready to move on to the
english
8
Switching between Standard and Turbomodes
To switch between modes, press the B and Pkeys simultaneously. The display will show “std” or“turbo” for three seconds to indicate which mode isnow set.
Important: When you change the bat-teries in the Field Transmitter, the unitreturns to Standard mode.
Setting the water cycle (Turbo mode only)
1. Press B until the CYC F icon appears. Press
C to advance through the following choices:
• 7-day cycle (a different watering day schedulemay be programmed for each program, A, B and C.
• Even day watering (“Even”) for all three pro-grams, A, B and C.
• Odd day without the 31st day watering (“Odd”)for all three programs, A, B and C.
• Odd day with the 31st day watering (“31 Odd”)for all three programs, A, B and C.
• 1 through 6 day cycles, water one of every one tosix days.
2. Select the watering cycle by pressing C andstopping at the desired watering cycle. PressB to set the selected watering cycle and moveto F, setting the watering days.

english
11
TBOS™ Field Transmitter
3. Press B to move to setting “today” in thewatering cycle.
4. If you selected a 1 to 6 day watering cycle, therow of days in that cycle appears in the displaywith a box around day 1. The only watering dayin a 1 to 6 day cycle is day 1.
5. A number appears in the display, indicatingwhere “today” is in the watering cycle.
6. Press O or P to move today’s position inthe watering cycle.
7. For example, if you set “today” as day 2 in a 3-daycycle, the next watering day in the cycle will bethe day after tomorrow, since tomorrow wouldbe day 3, followed by day 1, the watering day.
8. Press B to move to G, setting the starttimes.
Setting the start times
You can set up to eight start times for each program,but it is not necessary for you to use all eight starttimes with each program. After you enter all the starttimes, the transmitter will automatically organizethe start times in chronological order, from 00:00 to23:59 or 12:00 AM to 11:59 PM.
To set the start time:
1. Make certain the G icon is visible on the dis-play. If it is not, press B repeatedly to cyclethrough the menu system and display the Gicon.
2. Press A repeatedly until the program you desire(A, B, or C) appears in the display.
3. Use O and P to set the first start time.
4. Press C to move to the next start time.
(continued)
english
10
next program, press A to change to anotherprogram.
7. When you have set the watering days for all ofyour programs, press B to move to the Gicon, Setting the Start Times display.
Even day cycle
1. The watering days are setfor even days.
2. Press B to move to
G, setting the start times.
Odd day cycle with 31stday off
1. The watering days are setfor odd days with the 31stday off.
2. Press B to move to G,setting the start times.
Odd day cycle with 31stday on
1. The watering days are setfor odd days with the 31stday on.
2. Press B to move to G,setting the start times.
1 through 6 day cycles
1. Watering days for 1 through 6 day cycles are thesame for all three programs.
2. Press C to select the daycycle from 1 to 6 days. Forexample, to select a 6-daycycle, press C until sixdays are displayed on thebottom of the screen.
english
13
TBOS™ Field Transmitter
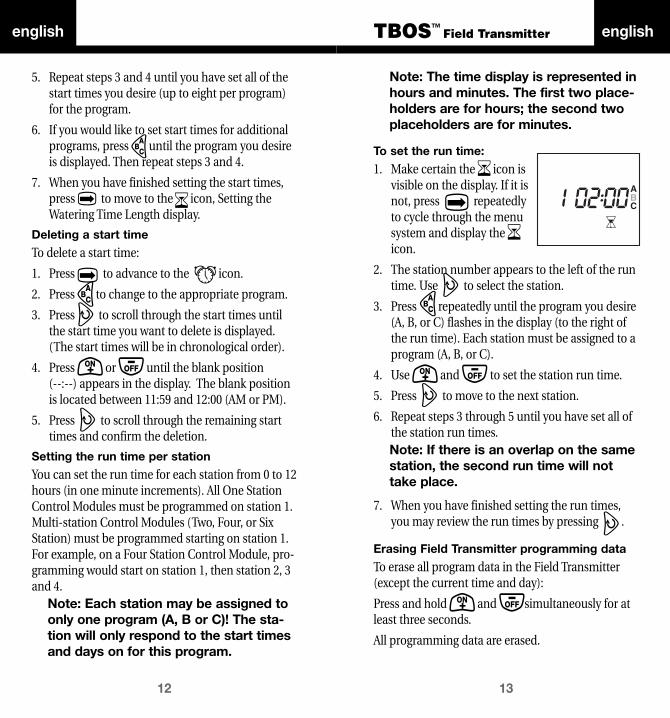
Note: The time display is represented inhours and minutes. The first two place-holders are for hours; the second twoplaceholders are for minutes.
To set the run time:
1. Make certain the H icon isvisible on the display. If it isnot, press B repeatedlyto cycle through the menusystem and display the Hicon.
2. The station number appears to the left of the runtime. Use C to select the station.
3. PressA repeatedly until the program you desire(A, B, or C) flashes in the display (to the right ofthe run time). Each station must be assigned to aprogram (A, B, or C).
4. Use O and P to set the station run time.
5. Press C to move to the next station.
6. Repeat steps 3 through 5 until you have set all ofthe station run times.Note: If there is an overlap on the samestation, the second run time will nottake place.
7. When you have finished setting the run times,you may review the run times by pressing C .
Erasing Field Transmitter programming data
To erase all program data in the Field Transmitter(except the current time and day):
Press and hold O and Psimultaneously for atleast three seconds.
All programming data are erased.
english
12
5. Repeat steps 3 and 4 until you have set all of thestart times you desire (up to eight per program)for the program.
6. If you would like to set start times for additionalprograms, press A until the program you desireis displayed. Then repeat steps 3 and 4.
7. When you have finished setting the start times,press B to move to theH icon, Setting theWatering Time Length display.
Deleting a start time
To delete a start time:
1. Press B to advance to the G icon.
2. Press A to change to the appropriate program.
3. Press C to scroll through the start times untilthe start time you want to delete is displayed.(The start times will be in chronological order).
4. Press O or P until the blank position (--:--) appears in the display. The blank positionis located between 11:59 and 12:00 (AM or PM).
5. Press C to scroll through the remaining starttimes and confirm the deletion.
Setting the run time per station
You can set the run time for each station from 0 to 12hours (in one minute increments). All One StationControl Modules must be programmed on station 1.Multi-station Control Modules (Two, Four, or SixStation) must be programmed starting on station 1.For example, on a Four Station Control Module, pro-gramming would start on station 1, then station 2, 3and 4.
Note: Each station may be assigned toonly one program (A, B or C)! The sta-tion will only respond to the start timesand days on for this program.

english
15
TBOS™Field Transmitter
5. Disconnect the Field Transmitter from theControl Module.
Reviewing Control Module programs
When you want to verify the program data of aControl Module:
1. Plug the Field Transmitter’s optical connectoronto the Control Module’s optical connector.
2. If the Field Transmitter’s display is blank, press B .
3. Press Ton the Field Transmitter to receive(upload) the program data stored in the ControlModule. You can now review all of the ControlModule program data except the current time ofday stored in the Control Module.Note: The Field Transmitter does notreceive the current time from theControl Module because there may bea difference in the current time betweenthe two devices. However, when youtransmit (download) a program to aControl Module, the Field Transmittersynchronizes the Control Module’s cur-rent time with the Field Transmitter’scurrent time.
Note: if a TBOS Field Transmitter set inStandard mode receives a Turbo modeprogram from a TBOS Control Module,the Field Transmitter will automaticallyswitch to Turbo mode and the displaywill show “turbo” for three seconds.
4. To modify the program data stored in the ControlModule, enter the desired modifications into theField Transmitter, then press R to transmit (download) the program to the Control Module.
english
14
Transmitting Programs to aControl ModuleWhen you want to transmit (download) programdata to a Control Module:
1. If the Field Transmitter’s display is blank, press B .
2. If you have not already done so, enter the pro-gram data into the Field Transmitter.
3. Plug the FieldTransmitter’s opticalconnector onto theControl Module’soptical connector.
4. PressR.
The W icon will appear on the screen for two sec-onds. When the icon disappears from the display, theprogram data has been successfully transmitted.
Important: If there is a transmissionproblem, the W icon will appear in thedisplay and you will hear three beeps.Then the E icon will appear.
Verify that the:
• Field Transmitter and the Control Module areconnected properly
• Field Transmitter’s and Control Module’s opticalconnectors are clean (wipe the connectors with adamp cloth)
• Field Transmitter and Control Module have afully charged 9-volt alkaline battery
• Press B and then transmit the programminginformation again.

english
17
TBOS™ Field Transmitter
2. If the icon is displayed, press P.
The Field Transmitter sends the irrigation OFFcommand to the Control Module. An X willappear on the sprinkler icon .
Deactivating a Control Module’s On-off Mode
To deactivate the On-off Mode (or turn the ControlModule’s default mode on):
1. Press B on the Field Transmitter repeatedlyuntil the icon is displayed.
• If the On-off Mode is deactivated, you will see theicon, indicating that the Control
Module will water according to current program-ming.
• If the On-off Mode is activated, you will see theicon, indicating that all Control
Module programs have been overridden and nowatering will take place.
2. If the icon is displayed, press O.
The Field Transmitter sends the irrigation ONcommand to the Control Module. The X on thesprinkler icon disappears .
Verifying the On-off Mode
To check the Control Module’s On-off status:
1. Plug the Field Transmitter’s optical connectorinto the Control Module’s optical connector.
2. If the Field Transmitter’s display is blank, press B .
3. Press Ton the Field Transmitter to receive(upload) the program data stored in the ControlModule.
4. Press B on the Field Transmitter repeatedlyuntil the icon is displayed.
(continued)
english
16
The W icon will appear on the screen for twoseconds. When the icon disappears from the dis-play, the program data has been successfullytransmitted.
Note: Press R even if you have notmade any changes to the programmingdata. This will synchronize the timebetween the two devices.
On-off Mode/System OverrideThe Field Transmitter’s On-off function allows you tocompletely suspend and override all currently setprogramming in the Control Module, withoutchanging or losing this programming for future use.The Control Module’s default mode is always ON,allowing programmed watering to take place. Youcan prevent watering, however, by activating the On-off Mode, thereby switching the Control Module’sdefault mode to OFF.
Activating a Control Module’s On-off Mode
To activate the On-off Mode (or turn the ControlModule’s default mode to OFF):
1. Press B on the Field Transmitter repeatedlyuntil the icon is displayed.
• If the On-off Mode is deactivated, you will see theicon, indicating that the Control
Module will water according to current program-ming.
• If the On-off Mode is activated, you will see theicon, indicating that all Control
Module programs have been overridden and nowatering will take place.

english
19
TBOS™Field Transmitter
Performing a manual single-station start
If you would like to manuallystart one station:
1. Press B until the Nicon is displayed.
The station num-ber will also bedisplayed.
2. Press P to stop any stations that may bewatering. If a station is in operation, a manualstart is impossible. A station may be in operationat the module level, but without any irrigation inthe field. This is what occurs when the Rain Shut-off Device prevents programmed irrigation.
3. Press C until the station you would like to startis displayed.
4. To start a station, press O. Irrigation will startwithin a few seconds.
5. If you wish to stop watering before the pro-grammed time is up, press P.
Performing a manual cycle start
The cycle consists of all of theprogrammed stations operat-ing in sequential order.
To manually per-form a cycle start:
1. Press B until the M icon is displayed.
Prog A, B or C also appears in the display.
2. Press P to stop any stations that may bewatering. If a station is in operation, a manualstart is impossible. A station may be in operationat the module level, but without any irrigation in
english
18
• If the On-off Mode is deactivated, you will see theicon, indicating that the Control
Module will water according to current program-ming.
• If the On-off Mode is activated, you will see theicon, indicating that all Control
Module programs have been overridden and nowatering will take place.
Performing Manual Starts and Stops
Important: Before you perform manualstarts and stops, you must verify theControl Module’s irrigation status. SeeVerifying the On-off Mode, above.
Note: The manual functions describedbelow override all other functions(except On-off); any program currentlyrunning will be suspended to permittheir use. Manual starts and stops onlyaffect an existing station run time orprogram.
Important: Manual operations will notwork if the On-off Mode is activated.
Starting a Control ModuleManuallyYou can perform either a single-station or a cycle(multi-station) manual start. Before carrying outeither type of manual start, make sure you have pro-grammed a run time of at least one minute per sta-tion and that the Control Module’s On-off Mode isnot activated.

english
21
TBOS™ Field Transmitter
Important: The Control Module low bat-tery indicator will function only withTBOS Control Modules, not with UNIKControl Modules.
Maintaining the TBOS FieldTransmitterTo keep your Field Transmitter in working order:
• Change the battery once a year. We recommendyou use a high-quality alkaline battery, such asEnergizer. When changing the Field Transmitterbattery, any stored programs will be lost. To avoidthis:
1. Press R to download the programs into aControl Module.
2. Change the battery.
3. Press T to upload the programs into theField Transmitter.
• Replace the Field Transmitter’s protective coverafter use.
• Secure the optical connector to the base of thecord after use.
• Do not expose the liquid crystal display (LCD) tosunlight for prolonged periods.
english
20
the field. This is what occurs when the Rain Shut-off Device prevents programmed irrigation.
3. Press A until the program cycle you would liketo start is displayed.
4. Press O to start the cycle.
Irrigation will start within a few seconds. Thestations assigned to the program will operate insequence until the last station has finishedwatering. Irrigation will then stop.
5. If you wish to stop watering before the manualcycle has completed, press P.
Low Battery IndicatorTBOS Field Transmitter
1. When the TBOS FieldTransmitter is turned on,the battery icon will blinkfor 30 seconds if the TBOSField Transmitter battery islow. The Field Transmitterwill then shut off automati-cally. You should replace the Field Transmitter’sbattery immediately.
TBOS Control Module
1. When data is uploaded(retrieved) from or down-loaded (sent) to the TBOSControl Module, the batteryicon will be displayed onthe Field Transmitter if theControl Module battery is low. The icon will dis-appear if B is pressed. You should replace theControl Module’s battery immediately.

english
23
TBOS™ Field Transmitter
TroubleshootingThe following list contains possible problems youmay encounter and some solutions.
Most of the problems involving the TBOS FieldTransmitter can be classified as transmission/ recep-tion malfunctions usually caused by a dead orimproperly connected battery. Other common caus-es of malfunction could be a dirty optical connectorand poor wire connections.
These problems are easy to fix. If you experiencetransmission/reception problems, try using aControl Module that operates properly to determineif it is the Field Transmitter or Control Module that isthe source of the problem.
Before calling Rain Bird, check this list. If you cannotsolve the problem yourself, call our Technical ServiceHotline at 1-800-247-3782 (U.S.) or 626-963-9311(outside the U.S.) and we will be glad to help you.
Problem: Weak LCD display/nodisplay/incomplete display
Possible cause: The battery is weak.Solution: Replace the battery.
Possible cause: The microprocessor has locked up.Solution: Remove the battery. Short the TBOS
Field Transmitter battery clip (notthe battery) contacts together with apaper clip or other piece of metalfor 30 seconds. Reinstall a fresh bat-tery.
Possible cause: The battery contact is faulty.Solution: Tighten the battery connectors to
ensure tight battery connection.
english
22
UNIK UNIK TBOS TBOSUNIK TBOS UNIK TBOS
✔
✔
✔ ✔
✔ ✔✔ ✔
✔ ✔
✔ ✔ ✔ ✔
✔ ✔ ✔ ✔
✔ ✔ ✔ ✔
✔ ✔ ✔ ✔
✔ ✔ ✔ ✔
✔ ✔ ✔ ✔
✔ ✔ ✔ ✔
✔ ✔ ✔ ✔
Field transmitter:Control Module
Turbo mode: 7-day (custom)cycle plus Even, Odd, Odd-31and 1 through 6 day cycles
Low battery icon indicateswhen a new battery is neededin the Control Module
Low battery icon indicateswhen a new battery is neededin the Field Transmitter
Simple deletion of start times
Replaceable Field Transmittercord
365-day calendar (adjusts forleap year)
One minute to 12 hour irriga-tion run times per station inone minute increments
Three independent programs:A, B, C
Up to eight start times perprogram per day
7-day (custom) cycle; any daycan be set ON or OFF as awatering day
Manual irrigation start or stopcapacity
Ability to program an unlimit-ed number of UNIK and TBOSControl Modules with oneField Transmitter
Automatic reset of currenttime and day when transmit-ting a program to a ControlModule
On-off mode (watering over-ride)
TBOS and UNIK™ Compatibility
english
25
TBOS™ Field Transmitter
If you are using 3M DBM wire con-nectors, make sure the wires havenot been stripped. Unlike other wireconnectors on the market, DBMsare designed to cut through theinsulation to make a water-resistantcoupling without removing theinsulation. Push the wires all theway into the wire connector. Be sureto crimp the black cap all the waydown (gel should ooze out of thetop) to ensure a water resistant con-nection. Gently pull on the wires tomake sure they are secure. If theinsulation has been stripped, re-cutthe wires and repeat the stepsabove.
Possible cause: The TBOS Rain Shut-off Device iswet.
Solution: Flip the TBOS Rain Shut-off Deviceswitch to off. If you have an old styleUNIK Control Module, cut the TBOSRain Shut-off Device wires. Connectthe black wires from the ControlModule to the black field wires.Carry out a manual stop and thenrepeat the manual start.
Possible cause: Watering has been suspended by asensor.
Solution: Short together the yellow wires fromthe sensor inputs of the ControlModule. This will bypass the sensor.
english
24
Problem: Locked display or keypadPossible cause: The microprocessor did not reset
properly.Solution: Remove the battery. Short the TBOS
Field Transmitter battery clip (notthe battery) contacts together with apaper clip or other piece of metalfor 30 seconds. Reinstall a fresh bat-tery.
Problem: Station does not startPossible cause: No run time has been programmed
for that station.Solution: Transmit a run time to the Control
Module.
Possible cause: The On-off Mode is activated (X onSprinkler icon ).
Solution: Permit irrigation by deactivating theOn-off Mode.
Possible cause: Another station is in operation.Solution: Use the manual station option to
turn off that station.
Possible cause: The battery is weak.Solution: Replace the battery.
Possible cause: A wire connection is faulty.Solution: If you are using King wire connec-
tors, gently pull on the wires tomake sure they are secure. If thewires are loose, cut the wires. Strip0.5 in. (1.25 cm.) of the insulationoff the wires. Twist the wires, thenpush the wires into a new King con-nector and twist the connectoraround the wires. Gently pull on thewires to make sure they are secure.
english
27
TBOS™ Field Transmitterenglish
26
Problem: Faulty transmissionPossible cause: The optical connector on the
Control Module and/or the FieldTransmitter is dirty.
Solution: Clean the connector(s).
Possible cause: The battery is weak.Solution: Replace the battery.
Possible cause: The microprocessor did not resetproperly.
Solution: Remove the battery. Short the TBOSField Transmitter battery clip (notthe battery) contacts together with apaper clip or other piece of metalfor 30 seconds. Reinstall a fresh bat-tery.
Problem: Even, Odd and 1 through 6 daycycles do not appear on the TBOSField Transmitter
Possible cause: The TBOS field transmitter is inStandard mode.
Solution: Switch to Turbo mode by pressingthe B and P keys simultaneous-ly.
Problem: The Control Module will notaccept Even, Odd or 1 through 6day cycles from the TBOS FieldTransmitter
Possible cause: The Control Module is not a TBOSControl Module. UNIK ControlModules will not accept these cycles
Solution: Replace the UNIK Control Modulewith a TBOS Control Module, orprogram a standard (seven day)cycle.
WARNING: This equipment has been testedand found to comply with the limits for aClass B digital device, pursuant to part 15 ofthe FCC Rules. These limits are designed toprovide reasonable protection against harm-ful interference in a residential installation.This equipment generates, uses and can radi-ate radio frequency energy and, if notinstalled and used in accordance with theinstructions, may cause interference to radiocommunications. However, there is no guar-antee that interference will not occur in a par-ticular installation.
If the equipment does cause harmful interfer-ence to radio or television reception, whichcan be determined by turning the equipmentoff and on, the user is encouraged to try tocorrect the interference by one of the follow-ing measures:
• Reorient or relocate the receiving antenna.• Increase the separation between the equip-
ment and receiver.• Connect the equipment into an outlet on a
circuit different from that to which thereceiver is connected.
• Consult the dealer or an experiencedradio/TV technician for help.
Changes or modifications not expresslyapproved by Rain Bird Sales, Inc. could voidthe user’s authority to operate the equipment.
This product was FCC certified under testconditions that included the use of shieldedI/O cables and connectors between systemcomponents. To be in compliance with FCCregulations, the user must use shielded cablesand connectors and install them properly.

español
29
TBOS™ Transmisor de Campo
Bienvenido a Rain BirdEl Transmisor de Campo TBOS™, parte de la familia desistemas de riego de TBOS, le permite crear, transmitir orecuperar información sobre los programas de riego,cuando se usa en conjunto con el Módulo de ControlTBOS o UNIK™.
Las características del Transmisor de Campo incluyen:
• Tiempo de riego desde un minuto a 12 horas porcada estación y con incrementos de un minuto
• Tres programas independientes: A, B, C
• Hasta ocho inicios por programa y por día
• Calendario de 365 días (ajustable para los añosbisiestos)
• Modo Estándar: ciclo de 7 días (personalizado),cualquier día, de riego, se puede añadir o anular
• Modo Turbo: incluye el ciclo de 7 días (personaliza-do), además de los siguientes ciclos:
• Ciclos de apagado para día par, día impar oimpar con el día 31 del mes (ajustable para los añosbisiestos)
• Ciclos de 1 hasta 6 días, regar uno de cada unode los seis días
• Capacidad de control manual de empezar o pararde regar
• El icono de batería baja indica cuando se necesitauna batería nueva en el Transmisor de CampoTBOS, o en los Módulos de Control TBOS
• Capacidad para programar un número ilimitado deMódulos de Control UNIK y TBOS con un soloTransmisor de Campo
• Puesta a cero automática del día y hora actual,cuando se transmite un programa a un Módulo deControl
español
28
Transmisión de un programa
• Hora y día encurso
• Días de riego encada programa
• Horas dearranque decada programa
• Tiempo de riegopor estación yestacionesasignadas acada programa
Recepción de un programa/visualización en pantalla
• Días de riego encada programa
• Horas dearranque decada programa
• Tiempo de riegopor estación yestacionesasignadas acada programa
• Riego encendidoo apagado

A
B
C
D
E
F
G
español
31
TBOS™ Transmisor de Campo
8. Arranque manual:
• estación única: STA
• múltiples estaciones (ciclo): CYC
9. Asignar una estación a un programa (A, B, o C)
10. Modo encendido - apagado
11. Indicador de batería baja
12. Programa en transmisión
13. Fallo en la transmisión
Teclas
A. Transmitir (descargar programa) al Módulo deControl
B. Aumentar/Encendido
C. Programa (A, B, C)
D. Tecla de flecha/Siguiente función
E. Disminuir/Apagado
F. Recuperar y presentar el programa (cargar progra-ma) desde el Módulo de Control
G. Tecla cíclica
• ajustar el reloj/ ajustar la fecha actual
• tiempo de riego por estación/seleccionar estación
• hora de inicio/pasar a la siguiente hora de inicio
• seleccionar ciclo estándar o ciclo personalizado, en modo Turbo
español
30
Guía rápida de programación
El Transmisor de Campo está provisto de una etiquetacon la Guía Rápida de Programación. Esta etiqueta sedebe colocar en la parte interior de la tapa de protec-ción del Transmisor de Campo.
Entendiendo la presentaciónde Menús, Iconos y TeclasSistema de Menús
El Transmisor de Campo tiene un sistema cíclico demenús, lo que significa que usted se mueve a través delos ocho menús de uno en uno, presionando la tecla
B . Todas las presentaciones (excepto la de inicio)tienen iconos que representan la función que se puedeprogramar mientras se permanezca en esa presentación.
Iconos de las presentaciones en la pantalla LCD
1. Programa (A, B, o C)
2. Hora actual
3. Día de la semana o día de riego
4. Seleccionar el ciclo de riego
5. Determinar los días de riego
6. Hora de comienzo
7. Tiempo de riego para cada estación
1
9
10
4 5 6 7 8
2
3
13 1112
español
33
TBOS™ Transmisor de Campo
Ajuste de la fecha actual (año, mes y día):
1. Presione Oo Ppara ajustar el año actual.
2. Presione B para pasar a ajustar el mes y el día.
3. Si la presentación de la hora es en el formato de 24horas, los dos últimos dígitos estarán parpadeando.Si la presentación de la hora es en el formato de 12horas, los dos primeros dígitos estarán parpadean-do. Los dígitos que están parpadeando representanel mes. Ajuste el mes presionando Oo P.Presione B para pasar a ajustar el día. Ajuste elmes presionando Oo P.
4. Presione B para pasar a ajustar la hora.
Cambiando la fecha actual (año, mes y día):
1. Encienda el Transmisor de Campo. Si ya estáencendido el Transmisor de Campo, presione Bpara pasar a la pantalla de inicio (la pantalla mues-tra el día de la semana y la hora actual).
2. Presione y mantenga presionada B hasta queaparezca el año en la pantalla.
3. Siga los mismos pasos del apartado anterior para elajuste de la fecha actual.
Ajuste de la hora
Esta pantalla muestra lahora y día actual (1= lunes,2= martes.... 7= domingo).
Para ajustar la hora:
1. Presione B hasta que D aparezca en la pantalla.
2. Para cambiar la presentación entre 12 y 24 horas ,presione y mantenga presionado A durante dossegundos.
3. Presione Opara avanzar el reloj oPpararetrasar el reloj. Presionando y manteniendo pre-sionada cualquiera de las dos teclas, hará que losnúmeros cambien más rápidamente.
español
32
Instalando la BateríaEl Transmisor de Campo se alimenta mediante unabatería alcalina de 9 voltios (que no se incluye), tipo6AM6 (norma internacional) o tipo 6LR61 (norma euro-pea). Nosotros recomendamos que se utilice unabatería alcalina de alta calidad, tal como Energizer. Unabatería de alta calidad dura un año.
Para instalar la batería:
1. Quite los tornillos que aseguran la tapa del compar-timento de la batería.
2. Desconecte el conector de la batería del comparti-mento de la batería y conecte la batería al conector.
3. Inserte la batería y el conector en el compartimentode la batería.
Cuando la batería ha sido conec-tada correctamente, la pantalla deinicio aparece como se muestra.
4. Vuelva a colocar los tornillos queaseguran la tapa del compartimento de la batería.
Ya se puede programar el Transmisor de Campo.
Configuración del Transmisorde CampoAntes de que pueda crear programas de riego, es nece-sario seleccionar el formato de tiempo y poner la fechay hora actuales
Selección del formato de tiempo:
1. Seleccione la presentación de 12 ó 24 horas. La pre-sentación por defecto es la de 24 horas. Si desea lapresentación de 12 horas, presione O . Las pal-abras AM PM aparecerán en la pantalla.
2. Presione B para pasar a ajustar el año actual.
español
35
TBOS™ Transmisor de Campo
Múltiples estaciones y programas
Si usted desea más de ocho inicios por día en un sitioequipado con sólo una válvula, usted puede cablear laválvula a varias estaciones, con un Modulo de Controlpara Dos, Cuatro, o Seis Estaciones, y programar múlti-ples inicios para cada estación.
Por ejemplo, si usted cablea la misma válvula a ambasestaciones de un Modulo de Control para DosEstaciones, podrá obtener hasta 16 inicios (2 x 8). Siusted conecta la misma válvula a tres estaciones de unModulo de Control para Cuatro Estaciones, podráobtener hasta 24 inicios (3 x 8). Sin embargo las esta-ciones asignadas a esa válvula, no se pueden asignar aninguna otra válvula. Si utiliza este método, asegúresede que los programas no se solapen. El tiempo de riegodel programa debe ser más corto que el intervalo detiempo que separa dos inicios de riego.
Nota: Un Módulo de Control Para UnaSola Estación, puede manejar sola-mente un programa.
Ahora puede comenzar a programar sus ciclos de riego.
Modos Estándar y TurboEl Transmisor de Campo TBOS tiene dos modos deoperación: Estándar y Turbo.
El modo Estándar de funcionamiento es idéntico que eldel Transmisor de Campo UNIK. Este modo solamenteofrece el ciclo de 7 días, y es adecuado cuando sola-mente se necesita el ciclo de 7 días (personalizado) ocuando se utiliza el Transmisor de Campo TBOS paraprogramar los Módulos de Control UNIK.
Nota: El modo Estándar es el modo deoperación predeterminado.
El modo Turbo ofrece ciclos de día par, día impar eimpar 31 (días impares con el día 31 del mes) y ciclos de
español
34
Nota: Si en la pantalla aparece AM y la horaactual es PM, avance o retroceda el reloj,hasta que en la pantalla aparezca PM.
Importante: Cuando cambie las baterías alTransmisor de Campo, la hora vuelve a lapresentación del formato de 24 horas.
Programando el Transmisor de CampoAntes de empezar a programar el Transmisor deCampo, por favor tómese algún tiempo para familiar-izarse con las opciones de programación y conexionesque usted tiene con su sistema de riego.
Tres programas independientes
El Transmisor de Campo tiene tres programas: A, B y C.Esto le permite seleccionar un programa de acuerdo altipo de plantas, por ejemplo A para hierba, B paraarbustos y C para árboles. Las estaciones asignadas almismo programa, funcionan de forma secuencial.
Para ciclos de siete días, estos son programas indepen-dientes. Usted puede considerar cada programa comoun controlador independiente, con sus propios días deriego, hora de inicio y tiempo de riego.
Para los ciclos impar, par o 1 hasta 6 días, todos los pro-gramas utilizan los mismos días de riego, pero la horade inicio y el tiempo de riego se pueden programar deforma independiente en cada programa. Para ciclos desiete días, estos son programas independientes.
Nota: Se puede asignar una estación aun solo programa, tanto A, B o C.
Comienzo simultáneo del riego
Si se asigna una estación diferente para cada programacon los mismos días de riego, hora de inicio y tiempo deriego, usted obtendrá un inicio casi simultáneo de lastres estaciones.

1 hasta 6 días para utilizar con los Módulos de ControlTBOS.
Cambiando entre los modos Estándar y Turbo
Para cambiar entre los modos, presione las teclas B y
Psimultáneamente. La pantalla mostrará “std”(estándar) o “turbo” durante tres segundos, para indicarque modo es el que está seleccionado ahora.
Importante: Cuando cambie lasbaterías en el Transmisor de Campo, launidad vuelve al modo Estándar.
Ajuste del ciclo de riego (solamente modoTurbo)
1. Presione la tecla B hasta que aparezca el iconoCYC F. Presione C Para avanzar a través de lassiguientes opciones:
• Ciclo de 7 días (Para cada programa A, B o C sepuede programar un horario diferente de riegodiario)
• Riego en días pares ( “even” ) para cada uno delos tres programas A, B o C.
• Riego en días impares sin riego el día 31 del mes( “Odd” ) para cada uno de los tres programas A,B o C.
• Riego en días impares con riego el día 31 delmes ( “31 Odd” ) para cada uno de los tres pro-gramas A, B o C.
• Ciclo de 1 hasta 6 días, regar uno de cada uno delos seis días.
español
37
TBOS™ Transmisor de Campo
2. Seleccione el ciclo de riego presionando C yparando en el ciclo de riego deseado. Presione
B para aceptar el ciclo de riego seleccionadoy muévase a F, para ajustar los días de riego.
Importante: Si ustedintenta transmitir unciclo de riego Par,Impar o de 1 hasta 6días a un Módulo deControl UNIK, el icono
W aparecerá en lapantalla y escuchará el sonido de untimbre. Entonces aparecerá una pan-talla de error:
Ajuste de los días de riego
Para ajustar los días de riego:
Ciclo de 7 días
1. Los días de riego para losciclos de siete díasson seleccionablespor programa.Seleccione el programa deseado presionando latecla A.
2. Si no desea regar un cierto día, que está selecciona-do como día de riego,( tiene un recuadro alrededorde él) presione la tecla C repetidamente paraavanzar hasta el día.
El día seleccionado parpadeará.
3. Presione P para eliminar el recuadrado. Elcuadrado desaparecerá, y el día seleccionado no seregará.
4. Si un día de los que quiere regar, no tiene unrecuadro alrededor de él, presione la tecla Crepetidamente para avanzar hasta el día.
El día seleccionado parpadeará. (continuación)
español
36
español
39
TBOS™ Transmisor de Campo
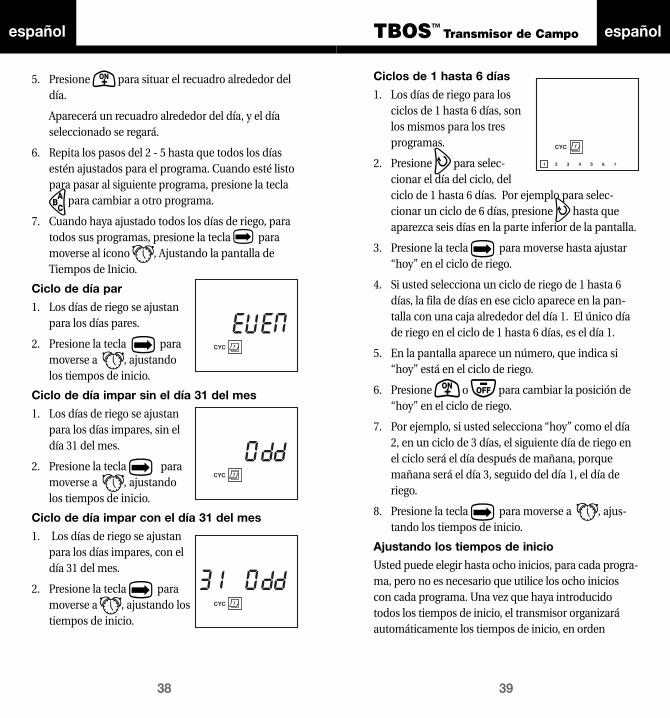
Ciclos de 1 hasta 6 días
1. Los días de riego para los ciclos de 1 hasta 6 días, sonlos mismos para los tres programas.
2. Presione C para selec-cionar el día del ciclo, delciclo de 1 hasta 6 días. Por ejemplo para selec-cionar un ciclo de 6 días, presione C hasta queaparezca seis días en la parte inferior de la pantalla.
3. Presione la tecla B para moverse hasta ajustar“hoy” en el ciclo de riego.
4. Si usted selecciona un ciclo de riego de 1 hasta 6días, la fila de días en ese ciclo aparece en la pan-talla con una caja alrededor del día 1. El único díade riego en el ciclo de 1 hasta 6 días, es el día 1.
5. En la pantalla aparece un número, que indica si“hoy” está en el ciclo de riego.
6. Presione O o P para cambiar la posición de“hoy” en el ciclo de riego.
7. Por ejemplo, si usted selecciona “hoy” como el día2, en un ciclo de 3 días, el siguiente día de riego enel ciclo será el día después de mañana, porquemañana será el día 3, seguido del día 1, el día deriego.
8. Presione la tecla B para moverse a G, ajus-tando los tiempos de inicio.
Ajustando los tiempos de inicio
Usted puede elegir hasta ocho inicios, para cada progra-ma, pero no es necesario que utilice los ocho inicioscon cada programa. Una vez que haya introducidotodos los tiempos de inicio, el transmisor organizaráautomáticamente los tiempos de inicio, en orden
español
38
5. Presione O para situar el recuadro alrededor deldía.
Aparecerá un recuadro alrededor del día, y el díaseleccionado se regará.
6. Repita los pasos del 2 - 5 hasta que todos los díasestén ajustados para el programa. Cuando esté listopara pasar al siguiente programa, presione la tecla
A para cambiar a otro programa.
7. Cuando haya ajustado todos los días de riego, paratodos sus programas, presione la tecla B paramoverse al icono G, Ajustando la pantalla deTiempos de Inicio.
Ciclo de día par
1. Los días de riego se ajustanpara los días pares.
2. Presione la tecla B paramoverse a G, ajustandolos tiempos de inicio.
Ciclo de día impar sin el día 31 del mes
1. Los días de riego se ajustanpara los días impares, sin eldía 31 del mes.
2. Presione la tecla B paramoverse a G, ajustandolos tiempos de inicio.
Ciclo de día impar con el día 31 del mes
1. Los días de riego se ajustanpara los días impares, con eldía 31 del mes.
2. Presione la tecla B paramoverse a G, ajustando lostiempos de inicio.

español
41
TBOS™ Transmisor de Campo
5. Presione C para pasar por los restantes inicios yconfirmar el borrado.
Ajustando el tiempo de riego para cadaestación
Usted puede ajustar el tiempo de riego, para cadaestación, de 0 hasta 12 horas (en incrementos de unminuto). El Módulo de Control para una única Estación,tiene que ser programado necesariamente en laestación 1. Los Módulos de Control para EstacionesMúltiples (de Dos, Cuatro, y Seis Estaciones) tienen queser programados necesariamente empezando por laestación 1. Por ejemplo, en un Módulo de Control deCuatro Estaciones, la programación comenzará en laestación 1 después la 2, 3 y 4.
Nota: Cada estación se puede asignarsolamente a un programa (A, B o C)! Laestación solo responderá a los inicios ydías de encendido de ese programa.
Nota: El tiempo presentado en pantalla,se representa en horas y minutos. Losdos primeros lugares son los de lashoras; los dos segundos lugares sonlos de los minutos.
Para ajustar el tiempo de riego:
1. Asegúrese que el icono Hestá visible en la pantalla.Si no es así, presione latecla B repetidamentepara ciclar a través del sis-tema de menús y presentarel icono H.
2. El número de la estación aparece a la izquierda deltiempo de riego. Utilice C para seleccionar laestación.
(continuación)
español
40
cronológico desde las 00:00 hasta las 23:59 o desde las12:00 AM hasta las 11:59 PM.
Para ajustar el tiempo de inicio:
1. Asegúrese de que el icono G sea visible en lapantalla. si no es así, presione la tecla B repeti-damente para ciclar por el sistema de menús hastaque aparezca el icono G.
2. Presione A repetidamente hasta que el programaque usted desea (A, B, o C) aparezca en la pantalla.
3. Use O y Ppara ajustar el primer inicio.
4. Presione C para moverse al siguiente inicio.
5. Repita los pasos 3 y 4 hasta que haya ajustado todoslos inicios que desee en el programa (hasta ochopor programa)
6. Si usted desea establecer inicios para programasadicionales, presione A hasta que aparezca el pro-grama que usted desea. Entonces repita los pasos 3y 4.
7. Cuando termine de establecer los inicios, presionela tecla B para moverse al icono H, que presentael Ajuste del Tiempo de Riego.
Borrando un inicio
Para borrar un inicio
1. Presione la tecla B para avanzar hasta el icono
G.
2. Presione A para cambiar al programa adecuado.
3. Presione C para pasar por los inicios, hasta que elinicio que se desea borrar aparece en la pantalla.(Los inicios estarán en orden cronológico).
4. Presione O o P hasta que aparezca la posi-ción en blanco (—:—) en la pantalla. La posiciónen blanco está situada entre las 11:59 y las 12:00(AM o PM).
español
43
TBOS™ Transmisor de Campo
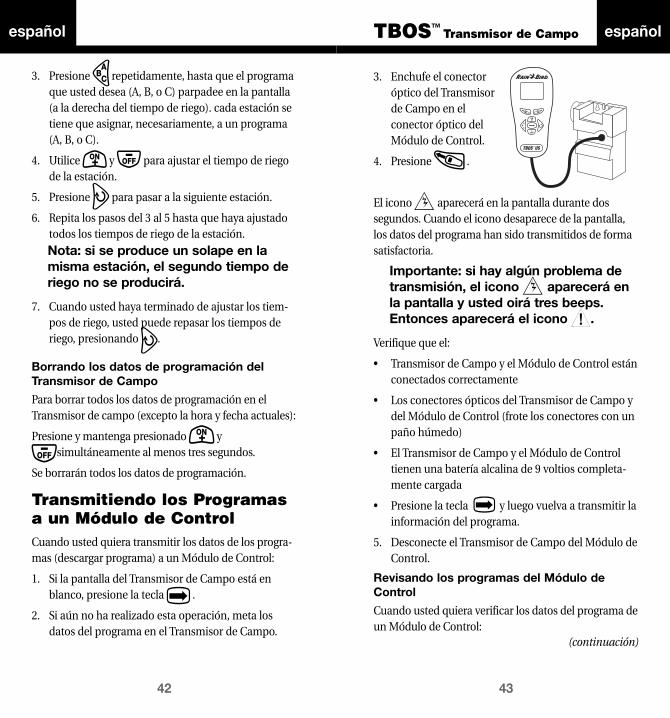
3. Enchufe el conectoróptico del Transmisorde Campo en elconector óptico delMódulo de Control.
4. Presione R .
El icono W aparecerá en la pantalla durante dossegundos. Cuando el icono desaparece de la pantalla,los datos del programa han sido transmitidos de formasatisfactoria.
Importante: si hay algún problema detransmisión, el icono W aparecerá enla pantalla y usted oirá tres beeps.Entonces aparecerá el icono E.
Verifique que el:
• Transmisor de Campo y el Módulo de Control estánconectados correctamente
• Los conectores ópticos del Transmisor de Campo ydel Módulo de Control (frote los conectores con unpaño húmedo)
• El Transmisor de Campo y el Módulo de Controltienen una batería alcalina de 9 voltios completa-mente cargada
• Presione la tecla B y luego vuelva a transmitir lainformación del programa.
5. Desconecte el Transmisor de Campo del Módulo deControl.
Revisando los programas del Módulo deControl
Cuando usted quiera verificar los datos del programa deun Módulo de Control:
(continuación)
español
42
3. Presione A repetidamente, hasta que el programaque usted desea (A, B, o C) parpadee en la pantalla(a la derecha del tiempo de riego). cada estación setiene que asignar, necesariamente, a un programa(A, B, o C).
4. Utilice O y P para ajustar el tiempo de riegode la estación.
5. Presione C para pasar a la siguiente estación.
6. Repita los pasos del 3 al 5 hasta que haya ajustadotodos los tiempos de riego de la estación.
Nota: si se produce un solape en lamisma estación, el segundo tiempo deriego no se producirá.
7. Cuando usted haya terminado de ajustar los tiem-pos de riego, usted puede repasar los tiempos deriego, presionando C.
Borrando los datos de programación delTransmisor de Campo
Para borrar todos los datos de programación en elTransmisor de campo (excepto la hora y fecha actuales):
Presione y mantenga presionado O y
Psimultáneamente al menos tres segundos.
Se borrarán todos los datos de programación.
Transmitiendo los Programasa un Módulo de ControlCuando usted quiera transmitir los datos de los progra-mas (descargar programa) a un Módulo de Control:
1. Si la pantalla del Transmisor de Campo está enblanco, presione la tecla B .
2. Si aún no ha realizado esta operación, meta losdatos del programa en el Transmisor de Campo.
español
45
TBOS™ Transmisor de Campo
El icono W aparecerá en la pantalla durante dossegundos. Cuando el icono desaparezca de la pan-talla, significará que los datos del programa se hantransmitido de forma correcta.
Nota: Presione R incluso aunqueusted no haya realizado ningún cambioen los datos del programa. Esto sin-cronizará la hora entre los dosaparatos.
Modo encendido - apagado/Anulación del SistemaLa función encendido - apagado del Transmisor deCampo le permite suspender y anular completamentetodos los programas actuales del Módulo de Control,sin cambios ni pérdida de esos programas, para usosfuturos. El modo por defecto del Módulo de Control essiempre Encendido, permitiendo así que se realicen losriegos programados. Sin embargo, usted puede impedirel riego activando el modo encendido - apagado, por lotanto cambiando el modo por defecto del Módulo deControl a Apagado.
Activando el Modo Encendido - Apagado deun Módulo de Control
Para activar el Modo encendido - apagado (o cambiar elmodo por defecto del Módulo de Control a Apagado):
1. Presione la tecla B en el Transmisor de Camporepetidamente, hasta que el iconoaparezca.
• Si el Modo encendido - apagado está desactivado,usted verá el icono indicando que elMódulo de Control regará de acuerdo a la progra-mación actual.
(continuación)
español
44
1. Enchufe el conector óptico del Transmisor deCampo en el conector óptico del Módulo deControl.
2. Si la pantalla del Transmisor de Campo está enblanco, presione la tecla B .
3. Presione T en el Transmisor de Campo pararecibir (cargar) los datos del programa almacena-dos en el Módulo de Control. Ahora ya puede revis-ar todos los datos del programa del Módulo deControl, excepto la hora actual del día almacenadaen el Módulo de Control.
Nota: El Transmisor de Campo norecibe la hora actual del Módulo deControl, porque puede haber diferen-cias en la hora actual de los dosaparatos. Sin embargo, cuando trans-mite un programa (descargar progra-ma) a un Módulo de Control, elTransmisor de Campo sincroniza lahora actual del Módulo de Control conla hora actual del Transmisor deCampo.
Nota: si un conjunto de Transmisor deCampo TBOS, en modo Estándar,recibe un programa en modo Turbo, elTransmisor de Campo automática-mente cambiará a modo Turbo, y en lapantalla aparecerá “turbo” durante tressegundos.
4. Para modificar los datos del programa almacenadosen el Módulo de Control, introduzca los cambiosdeseados en el Transmisor de Campo y luego pre-sione R para transmitir el programa (descargarprograma) al Módulo de Control.
español
47
TBOS™ Transmisor de Campo
2. Si la pantalla del Transmisor de Campo está enblanco, presione la tecla B .
3. Presione T en el Transmisor de Campo pararecibir (cargar) los datos del programa almacena-dos en el Módulo de Control.
4. Presione la tecla B en el Transmisor de Camporepetidamente, hasta que el iconoaparezca.
• Si el Modo encendido - apagado está desactivado,usted verá el icono indicando que elMódulo de Control regará de acuerdo a la progra-mación actual.
• Si el Modo encendido - apagado está activado,usted verá el icono indicando que losprogramas del Módulo de Control han sido cance-lados, y por tanto no se regará.
Realizando Arranques yParadas de forma Manual
Importante: Antes de realizar arranques yparadas de forma manual, usted debe veri-ficar el estado de riego del Módulo deControl. Vea Verificando el ModoEncendido - Apagado, más arriba.
Nota: Las funciones manuales, que sedescriben a continuación, anulan cualquierotra función (excepto la de Encendido -Apagado); cualquier programa activoactualmente, será suspendido para permitirsu uso. Los arranques y paradas manualessolamente afectan al tiempo de riego o alprograma de la estación actual.
Importante: La operación manual no fun-cionará si el Modo encendido - apagadoestá activado.
español
46
• Si el Modo encendido - apagado está activado,usted verá el icono indicando que losprogramas del Módulo de Control han sido cance-lados, y por tanto no se regará.
2. Si el icono aparece, presione P.
El Transmisor de Campo envía el comando NoRegar al Módulo de Control. Una X aparecerá sobreel icono del aspersor .
Desactivando el Modo encendido - apagadode un Módulo de Control
Para desactivar el Modo encendido - apagado (o cam-biar el modo por defecto del Módulo de Control aEncendido):
1. Presione la tecla B en el Transmisor de Camporepetidamente, hasta que el iconoaparezca.
• Si el Modo encendido - apagado está desactivado,usted verá el icono indicando que elMódulo de Control regará de acuerdo a la progra-mación actual.
• Si el Modo encendido - apagado está activado,usted verá el icono indicando que losprogramas del Módulo de Control han sido cance-lados, y por tanto no se regará.
2. Si el icono aparece, presione O.
El Transmisor de Campo envía el comando Regar alMódulo de Control. La X sobre el icono del aspersordesaparecerá .
Verificando el Modo encendido - apagado
Para comprobar el estado del modo encendido - apaga-do del módulo de Control:
1. Enchufe el conector óptico del Transmisor deCampo en el conector óptico del Módulo deControl.

español
49
TBOS™ Transmisor de Campo
1. Presione B hasta que elicono M aparezca.
También aparecerá en lapantalla el programaA, B o C.
2. Presione P paraparar cualquier estación que esté regando. Si unaestación está funcionando, no es posible realizar unarranque manual. Una estación puede estar en fun-cionamiento a nivel del módulo, pero sin que existaningún tipo de riego en el campo. Esto es lo quesucede cuando el Sistema de Corte por Lluvia impi-de el riego programado.
3. Presione A hasta que aparezca en pantalla laestación que usted desea encender.
4. Presione O para iniciar el ciclo.
El riego comenzará en unos segundos. Las esta-ciones asignadas al programa comenzarán a fun-cionar en orden secuencial, hasta que la últimaestación haya terminado de regar. Entonces sedetendrá el riego.
5. Si usted desea detener el riego antes de que se hayacompletado el ciclo manual, presione P.
Indicador de Batería BajaTransmisor de CampoTBOS1. Cuando se enciende el
Transmisor de Campo TBOS,el icono de la bateríaparpadeará durante 30segundos, si está baja labatería del Transmisor de Campo TBOS. ElTransmisor de Campo se apagará automática-mente. Usted debe sustituir la batería delTransmisor de Campo inmediatamente.
español
48
Arrancando un Módulo deControl de forma ManualUsted puede realizar un arranque manual tanto de unaestación única, como de un ciclo (estación múltiple).Antes de realizar cualquiera de los dos tipos dearranque manual, asegúrese de haber programado untiempo de riego de al menos un minuto de duraciónpara cada estación, y que el Modo encendido - apagadono está activado en el Módulo de Control.
Realizando unarranque manual deuna estación única Si usted desea realizar elarranque manual de una estación:
1. Presione la tecla B hasta que el icono Naparezca.
También aparecerá en la pantalla el número de laestación.
2. Presione P para parar cualquier estación queesté regando. Si una estación está funcionando, noes posible realizar un arranque manual. Unaestación puede estar en funcionamiento a nivel delmódulo, pero sin que exista ningún tipo de riego enel campo. Esto es lo que sucede cuando el Sistemade Corte por Lluvia impide el riego programado.
3. Presione C hasta que aparezca en pantalla laestación que usted desea encender.
4. Para encender una estación, presione O. El riegocomenzará en unos segundos.
5. Si desea interrumpir el riego antes de que transcur-ra el tiempo programado, presione P.
Realizando un arranque manual cíclicoEl ciclo consiste en que todas las estaciones progra-madas funcionen en orden secuencial.
Par realizar un arranque cíclico manualmente:

español
51
TBOS™ Transmisor de Campoespañol
50
Módulo de Control TBOS1. Cuando se cargan datos
(recogidos) desde o sedescargan (enviados) alMódulo de Control TBOS,aparecerá el icono de bateríaen el Transmisor de Campo sila batería del Módulo deControl estuviera baja. El icono desaparecerá si sepresiona la tecla B . Usted debe sustituir labatería del Módulo de Control inmediatamente.
Importante: El indicador de batería bajadel Módulo de Control, solamente fun-ciona con los Módulos de ControlTBOS pero no con los Módulos deControl UNIK.
Manteniendo el Transmisor deCampo TBOSPara mantener su Transmisor de Campo en buen estadode funcionamiento:
• Cambie la batería una vez al año. Nosotros recomen-damos el empleo de baterías alcalinas de alta cali-dad, tales como Energizer. Cuando se cambian lasbaterías del Transmisor de Campo, se pierdecualquier programa almacenado. Para evitar esto:
1. Presione R para descargar el programa a unMódulo de Control.
2. Cambie la batería.
3. Presione Tpara cargar el programa en elTransmisor de Campo.
• Vuelva a colocar la tapa protectora del Transmisorde Campo después de usarlo.
• Asegure el conector óptico a la base del cabledespués de usarlo.
• No exponga la pantalla de cristal líquido (LCD) a laluz del sol por periodos prolongados.
UNIK UNIK TBOS TBOSUNIK TBOS UNIK TBOS
✔
✔
✔ ✔
✔ ✔✔ ✔
✔ ✔
✔ ✔ ✔ ✔
✔ ✔ ✔ ✔
✔ ✔ ✔ ✔
✔ ✔ ✔ ✔
✔ ✔ ✔ ✔
✔ ✔ ✔ ✔
✔ ✔ ✔ ✔
✔ ✔ ✔ ✔
Transmisor de Campo: Módulo de Control
Modo Turbo: Ciclo de 7 días (per-sonalizado) más los ciclos Par,Impar, Impar - 31 y 1 hasta 6 días
El icono de batería baja indicacuando el Módulo de Controlnecesita una batería nueva
El icono de batería baja indicacuando el Transmisor de camponecesita una batería nueva
Borrado simple de los inicios
Cable reemplazable delTransmisor de Campo
Calendario de 365 días (ajustablepara los años bisiestos)
Tiempo de riego desde un minutohasta 12 horas por cada estación y con incrementos de un minuto
Tres programas independientes:A, B, C
Hasta ocho inicios por programa y por día
Ciclo de 7 días (personalizado),cualquier día, de riego, se puedeañadir o anular
Capacidad de control manual deempezar o parar de regar
Capacidad para programar unnúmero ilimitado de Módulos deControl UNIK y TBOS con un solo Transmisor de Campo
Puesta a cero automática del día y hora actual, cuando se transmite un programa a unMódulo de Control
Modo encendido - apagado (anulación del riego)
Compatibilidad del TBOS y UNIK™
español
53
TBOS™ Transmisor de Campo
Causa posible: El contacto de la batería está defec-tuoso.
Solución: Apriete los conectores de la batería,para asegurar una buena conexiónde la batería.
Problema: Pantalla o teclado bloqueadoCausa posible: El microprocesador no se reinicial-
izó correctamente.Solución: Quite la batería. Cortocircuite los
contactos del clip de la batería (nola batería) del Transmisor de CampoTBOS con un clip para papel u otrapieza de metal durante 30 segun-dos. Reinstale una batería nueva.
Problema: La estación no arrancaCausa posible: No se ha programado tiempo de
riego para esa estación.Solución: Transmita un tiempo de riego al
Módulo de Control.
Causa posible: Está activado el Modo encendido -apagado (aparece una X sobre elicono del aspersor) .
Solución: Permita el riego desactivando elModo encendido - apagado.
Causa posible: Hay otra estación en funcionamien-to.
Solución: Utilice la opción de apagado manu-al de la estación, para apagar laestación.
Causa posible: La batería está baja.Solución: Sustituya la batería.
español
52
Resolución de ProblemasLa siguiente lista contiene problemas que es posibleque usted se encuentre y algunas soluciones para losmismos.
La mayoría de los problemas que conciernen alTransmisor de Campo TBOS se pueden clasificar deanomalías en la transmisión/recepción, generalmentecausados por una batería “muerta” o incorrectamenteconectada. Otra fuente usual de anomalías pueden serun conector óptico sucio, o malas conexiones en loscables.
Esos problemas son fáciles de solucionar. Si ustedexperimenta problemas de transmisión/recepción,pruebe a utilizar un Módulo de Control que funcionecorrectamente, para determinar si la causa del proble-ma es el Transmisor de Campo o el Módulo de Control.
Antes de llamar a Rain Bird, compruebe esta lista. Siusted no puede resolver el problema por si mismo,llame a nuestra línea Permanente de Servicio Técnico al1-800-247-3782 (EE. UU.) o al 626-963-9311 (fuera deEE. UU.) y nosotros estaremos encantados de ayudarle.
Problema: Presentación pobre en la pan-talla LCD/no hay presentación/presentación incompleta
Causa posible: La batería está baja.Solución: Sustituya la batería.
Causa posible: El microprocesador se ha bloquea-do.
Solución: Quite la batería. Cortocircuite loscontactos del clip de la batería (nola batería) del Transmisor de CampoTBOS con un clip para papel u otrapieza de metal durante 30 segun-dos. Reinstale una batería nueva.
español
55
TBOS™ Transmisor de Campo
del Riego por Lluvia TBOS. Conectelos cables negros del Módulo deControl a los cables negros delcampo. Realice una parada manual,y luego repita el encendido manual.
Causa posible: El sensor ha suspendido el riego.Solución: Corto circuite los cables amarillos
de la entrada de sensor. Lo anteriorcancela la operación del sensor.
Problema: Transmisión defectuosaCausa posible: El conector óptico del Módulo de
Control y/o del Transmisor deCampo está sucio.
Solución: Limpie los conectores.
Causa posible: La batería está baja.Solución: Sustituya la batería.
Causa posible: El microprocesador no se reinicial-izó correctamente.
Solución: Quite la batería. Cortocircuite loscontactos del clip de la batería (nola batería) del Transmisor de CampoTBOS con un clip para papel u otrapieza de metal durante 30 segun-dos. Reinstale una batería nueva.
Problema: No aparecen en el Transmisorde Campo TBOS los ciclos Par,Impar y 1 hasta 6 días
Causa posible: El Transmisor de Campo TBOS estáen modo Estándar.
Solución: Cambie al modo Turbo presionandola tecla B y la tecla Psimultáneamente.
español
54
Causa posible: Falla la conexión de algún cable.Solución: Si está utilizando conectores King,
tire suavemente de los cables paraasegurarse de que están bien asegu-rados. si los cables están sueltos,corte los cables. Pele 0.5 in. (1.25cm.) del aislante de los cables.Trence los cables, después introduz-ca los cables en un conector Kingnuevo y retuerza el conector alrede-dor de los cables. Tire suavementede los cables para asegurarse de queestán bien asegurados. Si está utilizando conectores 3MDBM , asegúrese de que los cablesno se han pelado. Al contrario queen otros conectores del mercado,los DBM están diseñados para cor-tar a través del aislante, para haceruniones resistentes al agua sinnecesidad de quitar el aislante.Empuje los cables hasta el fondo delconector. Asegúrese de crimpar lacaperuza negra en toda su longitud(debe rezumar gel de la parte supe-rior) para asegurar una conexiónresistente al agua. Tire suavementede los cables para asegurarse de queestán bien asegurados. Si se ha pela-do el aislante, vuelva a cortar loscables y repita los pasos explicadosanteriormente.
Causa posible: El Sistema de Corte del Riego porLluvia TBOS está mojado.
Solución: Coloque en la posición de apagadoel Sistema de Corte del Riego porLluvia TBOS. Si usted posee unMódulo de Control UNIK antiguo,corte los cables del Sistema de Corte
español
57
TBOS™ Transmisor de Campoespañol
56
Problema: El Módulo de Control no aceptalos ciclos Par, Impar y 1 hasta 6días del Transmisor de CampoTBOS
Causa posible: El Módulo de Control no es unMódulo de Control TBOS. LosMódulos de Control UNIK no acep-tan esos ciclos
Solución: Sustituya el Módulo de ControlUNIK por un Módulo de ControlTBOS, o programe un ciclo estándar(de siete días).
AVISO: Este equipo ha sido probado y cumplelos límites para aparatos digitales de la clase B,cumple el apartado 15 de las Reglas FCC. Estoslímites se han diseñado para ofrecer una protec-ción razonable, contra radiaciones dañinas, enuna instalación residencial. Este equipo genera,utiliza y puede radiar ondas de energía deradiofrecuencia, y si no se instala y utiliza deacuerdo con las instrucciones, puede causarinterferencias a las comunicaciones vía radio.Sin embargo, no hay garantías de que no puedahaber interferencias en una instalación en par-ticular.
Si el equipo causa interferencias en la recepciónde la señal de radio o televisión, lo que se puededeterminar apagando y encendiendo el equipo,se anima al usuario a corregir la interferenciasiguiendo alguna de las siguientes medidas:
• Reoriente o recoloque la antena del receptor.
• Aumente la separación entre el equipo y elreceptor.
• Conecte el equipo a un enchufe de un circuitodiferente al que está conectado el receptor.
• Consulte al vendedor o pida ayuda a un técni-co experto en radio/TV.
Los cambios o modificaciones que no hayansido aprobadas expresamente por el departa-mento de Ventas de Rain Bird Inc, pueden anu-lar la autorización al usuario para operar elequipo.
Este producto ha sido certificado según FCC,bajo condiciones de ensayo que incluyen el usode cables de I/O y conectores apantallados entrelos componentes del sistema Para cumplir conlas regulaciones de la FCC, el usuario debe uti-lizar cables y conectores apantallados e instalar-los correctamente.