tc0226 volkswagen amarok 3 piece hard … amarok 3pc tc.pdf · tc0226 page 2 of 13 30/03/11...
TRANSCRIPT
TC0226
30/03/11 Page 1 of 13
TOOLS REQUIRED:● Fine Point Non Permanent Marker● Centre Punch● Drill● Ø3, Ø5, Ø6 & Ø7mm Drill Bits● Torque Wrench
● Rivet Gun● Scissors or Sharp Knife● Spanners● Socket Set
● Phillips Screwdriver (No 3)● Allen Key● Tape Measure● Masking Tape
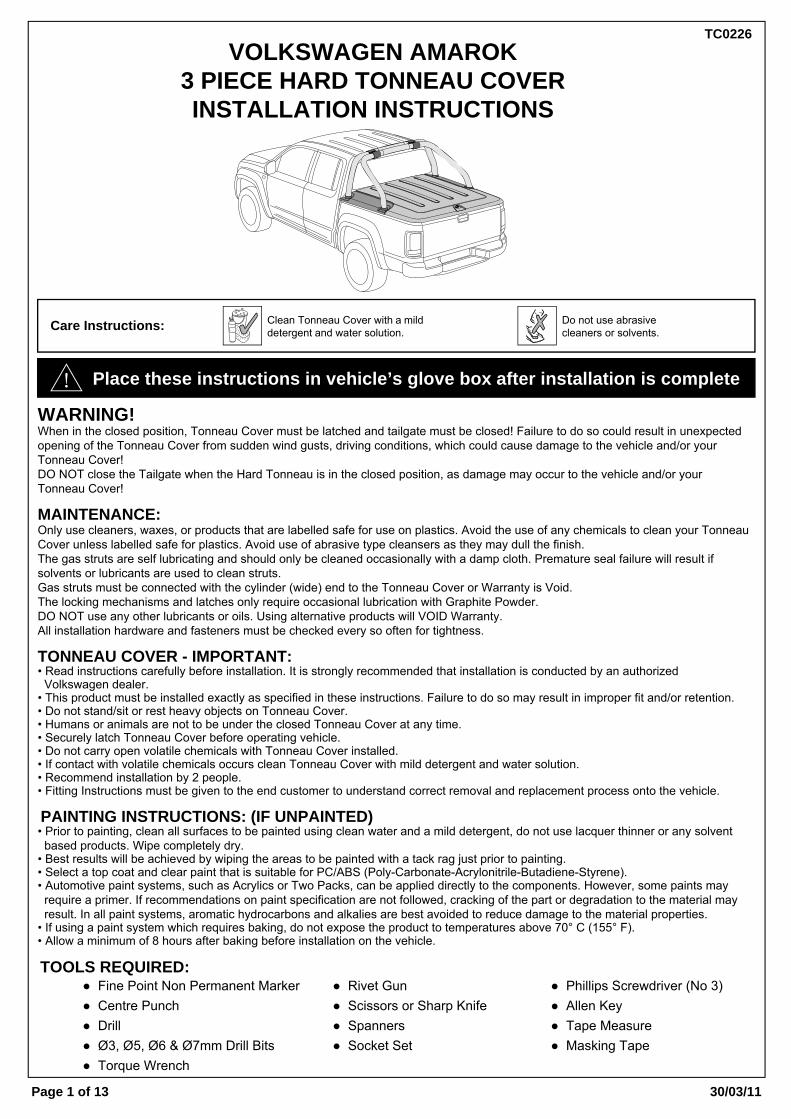
VOLKSWAGEN AMAROK3 PIECE HARD TONNEAU COVERINSTALLATION INSTRUCTIONS
Place these instructions in vehicle’s glove box after installation is complete
Clean Tonneau Cover with a milddetergent and water solution.
Do not use abrasivecleaners or solvents.Care Instructions:
WARNING!When in the closed position, Tonneau Cover must be latched and tailgate must be closed! Failure to do so could result in unexpectedopening of the Tonneau Cover from sudden wind gusts, driving conditions, which could cause damage to the vehicle and/or yourTonneau Cover!DO NOT close the Tailgate when the Hard Tonneau is in the closed position, as damage may occur to the vehicle and/or yourTonneau Cover!
MAINTENANCE:Only use cleaners, waxes, or products that are labelled safe for use on plastics. Avoid the use of any chemicals to clean your TonneauCover unless labelled safe for plastics. Avoid use of abrasive type cleansers as they may dull the finish.The gas struts are self lubricating and should only be cleaned occasionally with a damp cloth. Premature seal failure will result ifsolvents or lubricants are used to clean struts.Gas struts must be connected with the cylinder (wide) end to the Tonneau Cover or Warranty is Void. The locking mechanisms and latches only require occasional lubrication with Graphite Powder.DO NOT use any other lubricants or oils. Using alternative products will VOID Warranty.All installation hardware and fasteners must be checked every so often for tightness.
TONNEAU COVER - IMPORTANT:• Read instructions carefully before installation. It is strongly recommended that installation is conducted by an authorized Volkswagen dealer.• This product must be installed exactly as specified in these instructions. Failure to do so may result in improper fit and/or retention.• Do not stand/sit or rest heavy objects on Tonneau Cover.• Humans or animals are not to be under the closed Tonneau Cover at any time.• Securely latch Tonneau Cover before operating vehicle.• Do not carry open volatile chemicals with Tonneau Cover installed.• If contact with volatile chemicals occurs clean Tonneau Cover with mild detergent and water solution.• Recommend installation by 2 people.• Fitting Instructions must be given to the end customer to understand correct removal and replacement process onto the vehicle.
PAINTING INSTRUCTIONS: (IF UNPAINTED)• Prior to painting, clean all surfaces to be painted using clean water and a mild detergent, do not use lacquer thinner or any solvent based products. Wipe completely dry. • Best results will be achieved by wiping the areas to be painted with a tack rag just prior to painting.• Select a top coat and clear paint that is suitable for PC/ABS (Poly-Carbonate-Acrylonitrile-Butadiene-Styrene).• Automotive paint systems, such as Acrylics or Two Packs, can be applied directly to the components. However, some paints may require a primer. If recommendations on paint specification are not followed, cracking of the part or degradation to the material may result. In all paint systems, aromatic hydrocarbons and alkalies are best avoided to reduce damage to the material properties.• If using a paint system which requires baking, do not expose the product to temperatures above 70° C (155° F). • Allow a minimum of 8 hours after baking before installation on the vehicle.

TC0226
30/03/11Page 2 of 13
VOLKSWAGEN AMAROK 3 PIECE HARD TONNEAU COVER
5
Latch Striker(LOCK0023)Qty - 2
6
Hinge Lower(CLIP1987-1)Qty - 2
7
Hinge Pin(CLIP2032)Qty - 2
8
Hinge MountBracket(CLIP2582PC)Qty - 2
9
90x90 ClearTape(TAPE0392)Qty - 2
10
Ball StudScrew M6(SCRW0724)Qty - 2
11
Gas StrutStandard(STRT0005-2)Qty - 2
FittingInstructions
AUTOMOTIVESURFACE CLEANER
IMPREGNATED WITH 70% ISOPROPYL ALCOHOL
For use in cleaning painted metal,glass and other vehicle surfaces.For external use only.Dispose of properly after use.
RustInhibitor
12
JackingBracket(CLIP2646PC)Qty - 2
13
JackingBracket Truss(CLIP2804PC)Qty - 2
14
Rivet(FAST0505)Qty - 4
15
M5x16 HexHead Bolt(SCRW0450)Qty - 8
16
M5 FlatWasher(WASH0190)Qty - 16
17
M5 NylocNut(NUTS0171)Qty - 8
18
M6x16 HexHead Bolt(SCRW0633)Qty - 14
19
M6 FlatWasher Large(WASH0169)Qty - 22
20
M6 FlatWasher Small(WASH0153)Qty - 8
21
M6 NylocNut(NUTS0016)Qty - 14
22
M8x40 HexHead Bolt(SCRW0764)Qty - 2
23
M8 HexNut(NUTS0217)Qty - 2
26
AlcoholWipe(MISC0052)Qty - 4
27
RustInhibitor(MISC2776)Qty - 2
28
FittingInstruction(FIT-TC0222)Qty - 1
24
LH-Tub Sealing Block(TAPE0618-LH)Qty - 1
25
RH-TubSealing Block(TAPE0618-RH)Qty - 1
1
Tonneau CoverQty - 1
PARTS IN MAIN CARTON
PARTS IN FITTING KIT (KIT_____)
PARTS CHECK SHEET VW AMAROK - 3 Piece Hard Tonneau Cover
32
Sports Bar FootCup F-LHSQty - 1
37
Foot CupGasket F-LHSQty - 1
33
Sports Bar FootCup F-RHSQty - 1
38
Foot CupGasket F-RHSQty - 1
34
Sports Bar FootCup R-LHSQty - 1
39
Foot CupGasket R-LHSQty - 1
35
Sports Bar FootCup R-RHSQty - 1
40
Foot CupGasket R-RHSQty - 1
36
M6x40mm PhillipsHead ScrewQty - 4
41
M6 FlatWasherQty - 4
2
LHS CornerPieceQty - 1
3
LHS CornerPieceQty - 1
4
Lock KeysQty - 2
Fitting Kit(KIT_____)Qty - 1
Sports Bar Kit(INJM0010)Qty - 1
PARTS IN SPORTS BAR KIT (INJM0010)
29
HeaderRail Seal(MISC2229-2)Qty - 1
30
Front DrillTemplate(MISC3156)Qty - 1
31
Side DrillTemplate(MISC3321)Qty - 1
PARTS IN KIT (KIT032116)
VW 1
VW 2

TC0226
30/03/11Page 3 of 13
VOLKSWAGEN AMAROK 3 PIECE HARD TONNEAU COVER
Diagram #:11. NOTE: Two people are required to complete the installation.If a Sports Bar has been fitted to the vehicle, you will need to remove and retain the sports bar and all hardware.If a Sports Bar has not been fitted, you will need to go through the Sports Bar installation instructions to assemble theSports Bar but DO NOT drill any holes in the vehicle or fit the abrasive strips at this stage. Retain Sports Bar and all hardware.Thoroughly clean and dry the installations areas. See Dia #1.
Diagram #:2
1 REMOVE & RETAINSPORTS BAR (If Fitted)
2 ASSEMBLE & RETAINSPORTS BAR (If Not Fitted)
DO NOT DRILL ANYHOLES IN THE VEHICLE
CLEAN & DRYINSTALLATION AREAS
Diagram #:33. Measure and mark a centreline on the tub front panel. Align front drill template to marked centreline, ensuring arrows are facing upand top edge is level to top of front panel. Attach using masking tape. If a drill template is unavailable, measure and mark hole centresas dimensioned above. Centrepunch all hole positions and drill all eight (8) holes with Ø3 pilot drill and remove the drill template.Drill the eight (8) holes to Ø6mm as shown. Remove masking tape from the front rail. Remove all burrs, sharp edges and swarffrom vehicle. Apply rust inhibitor to all drilled holes. See Dia #3.
RHSLHS
Ø3mmALL HOLES
IMPORTANT!TOP EDGE LEVEL TO TOP
EDGE OF TUB USE ASTRAIGHT EDGE TO CHECK
SIDEPANEL
SIDEPANEL
FRONT PANEL
2
2 5
3 4
APPLY RUST INHIBITORTO ALL DRILLED HOLES
MEASUREMENTS ARE SYMMETRICALABOUT THE CENTRELINE
7
Ø6mm
6
1 1
IMPORTANT - BEFORE INSTALLING TONNEAU COVERIf a Sports Bar has been fitted to the vehicle, you will need to remove & retain the Sports Bar and all Hardware.
If a Sports Bar has not been fitted to the vehicle, you will need to go through the steps to assemble the Sports Bar,but DO NOT drill any holes in the vehicle or fit the abrasive strips at this stage. Retain Sports Bar & all Hardware.
3
Sports BarInstructions
40mm
24mm12mm
70mm 349mm
364mm
ENTIRE LENGTHENTIRE LENGTH
VIEWS LOOKING UP INTO LEFT HAND SIDE FRONT VEHICLE TUB CORNER
REMOVEADHESIVE LINER
2
1
3
FITTUB SEALING
BLOCK
POSITION SLITOVER SHEET METAL
4
PRESSTUB SEALING BLOCK AROUND TUB
SURFACES TO SEAL AND PREVENT WATER ENTRY
CROSS SECTION
SIDE PANELINNER
TOP OFFRONT
RAIL
TUBSEALINGBLOCK
SIDE PANELOUTER
5
2. Using alcohol wipe provided clean the front inside corners of the tub and wipe away residue with a dry clean cloth.Remove adhesive liner from the left hand tub sealing block. Feed tub sealing block through the opening allowing the split to sit overthe sheetmetal inner skin panel and firmly press into place as shown. Repeat process for the other side of the vehicle.MPORTANT: This step must be done properly to assist water sealing.Place masking tape in sections along the entire length of the front and side rails as shown. See Dia #2.

TC0226
30/03/11Page 4 of 13
VOLKSWAGEN AMAROK 3 PIECE HARD TONNEAU COVER
4. Position the side drill template flush to the front panel as shown, ensuring arrows are facing up and to the front of the vehicle, andtop edge is level with top of side rail. Attach using masking tape. If a drill template is unavailable, measure and mark hole centres asdimensioned above for both sides of the vehicle. Centrepunch all required hole positions.Drill all holes with Ø3 pilot drill and remove the drill template. Drill all holes Ø7 as shown.Repeat process by reversing the template to use on the other side of the vehicle. Remove all masking tape from the side rails.Remove all burrs, sharp edges and swarf from vehicle. Apply rust inhibitor to all drilled holes. See Dia #4.
Diagram #:4
Diagram #:5
5. Fit the M6 ball stud screw to the side rail and secure with two (2) M6 flat washers large and one (1) M6 nyloc nut as shown.Tighten to Torque 7Nm.Repeat process for the other side of the vehicle. See Dia #5.
Diagram #:6
6. Orient hinge mount bracket as shown and align the holes with the Ø6mm holes previously drilled in the front panel.Secure hinge mount bracket with four (4) M5x16 hex head bolts, eight (8) M5 flat washers and four (4) M5 nyloc nuts as shown.Tighten to Torque 5Nm.Repeat process for the other side of the vehicle. See Dia #6.
APPLY RUST INHIBITORTO ALL DRILLED HOLES
FRONTPANEL
SIDE PANEL (RHS)
Ø3mmALL HOLES
1 62 3
1 4
10mm
65mm20mm(3 PLACES)
26.5mm
659mm
1280mm
Ø7mm
5
920mm 18mm(2 PLACES)
SIDE VIEWTIGHTEN TO TORQUE 7Nm
TIGHTEN TO TORQUE 5Nm
10mm
7Nm
8mm8mm
5Nm
M6 NYLOCNUT
M6 FLATWASHERS
M6 NYLOCNUT
M5 NYLOCNUT (X4)
M5 FLATWASHER (X8)
M5x16 HEXHEAD BOLT (X4)
M6 BALL STUDSCREW
M6 BALLSTUD SCREW
M6 FLATWASHER LARGE

TC0226
30/03/11Page 5 of 13
VOLKSWAGEN AMAROK 3 PIECE HARD TONNEAU COVER
FRONTPANEL
1400mm
ALIGN TOFRONT FACE OF
THE FRONTPANEL
MEASURE & CUTHEADER RAIL SEAL
TO LENGTH - 1400mm FRONT OF VEHICLE
Diagram #:9
9. Pre-assemble M8x40 bolt and M8 nut into each jacking bracket as shown ensuring it is screwed all the way down at this pointas shown. Secure jacking bracket to the vehicle with two (2) M6x16 hex head bolts, four (4) M6 flat washers large and two (2) M6nyloc nuts as shown.Repeat process for the other side of the vehicle. Tighten to Torque 7Nm. See Dia #9.
M8x40BOLT
M8 NUT
Diagram #:7
7. Measure and cut header rail seal to a length of 1400mm.Locate the centre of the header rail seal and trial fit to the front panel, ensure seal is oriented correctly and centred to the tub.Remove approximately 50mm length from one end of liner as shown. Orient and align centre of seal with centre of front panel andrearward edge of seal with the front face of the front panel as shown. Starting from one end apply firm pressure and remove lineralong the length of the seal, ensuring seal runs parallel with the edge front panel. See Dia #7.
Diagram #:8
8. Orient the two (2) lower hinges as shown. NOTE: The the hinge mount bracket may have slots or holes.Align the holes in the hinge lower with the holes in the hinge mount brackets (if hinge mount bracket has holes), as shown, or alignthe holes in the hinge lower with the centre of the slots in the hinge mount brackets (if hinge mount bracket is slotted), as shown.Secure with two (2) M6x16 hex head bolts, four (4) M6 flat washers small and two (2) M6 nyloc nuts for each hinge as shown. Tighten to Torque 10Nm. See Dia #8.
RHSLHS
M6x16 HEX HEAD BOLT
M6 NYLOC NUT
M6 FLAT WASHER SMALL
M6 FLAT WASHER SMALL
HINGE LOWER
HINGE MOUNT BRACKET
ALIGN HOLE CENTRES(IF HINGE MOUNT BRACKET HAS HOLES)ALIGN HOLES TO CENTRE OF THE SLOTS(IF HINGE MOUNT BRACKET IS SLOTTED)
TOP VIEW OF HINGETIGHTEN TO TORQUE 10Nm
TIGHTEN TO TORQUE 7Nm
10mm10mm
10Nm
10mm10mm
7Nm
M6x16 HEXHEAD BOLT (x2)
M6 NYLOCNUT (2)M6 FLAT WASHER
LARGE (4)
SIDE VIEW
TC0226
30/03/11Page 6 of 13
VOLKSWAGEN AMAROK 3 PIECE HARD TONNEAU COVER
APPLY RUST INHIBITORTO ALL DRILLED HOLES
6
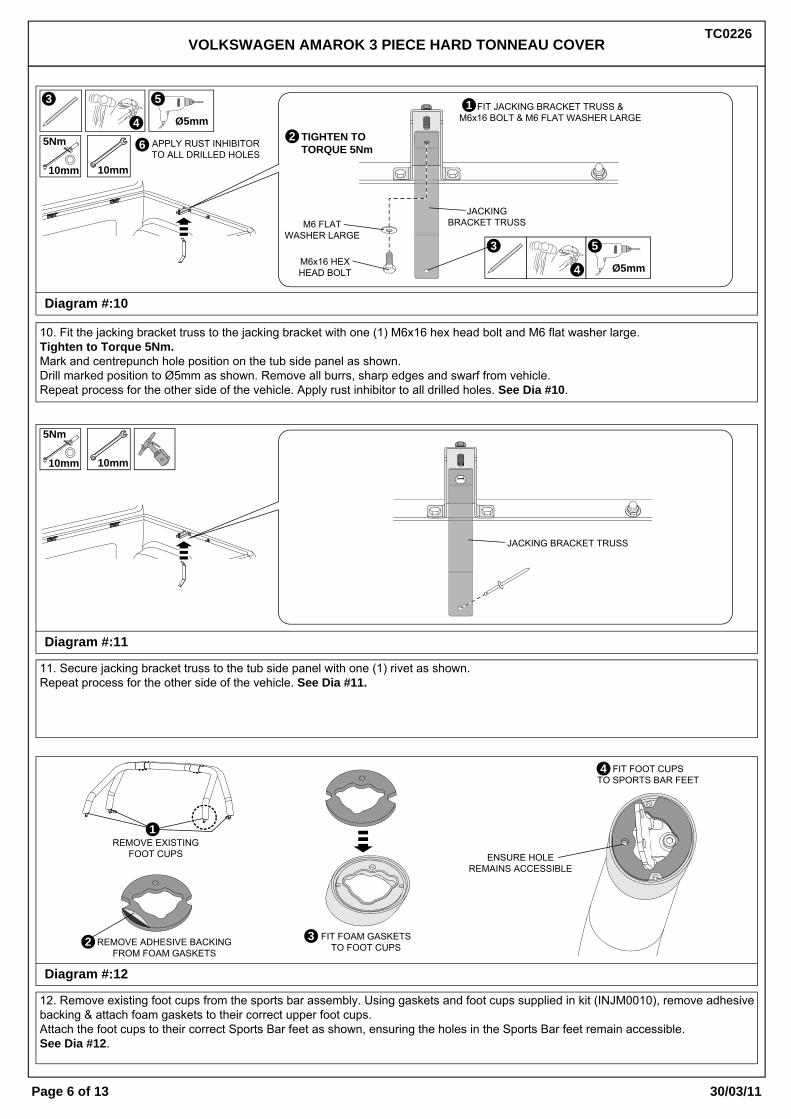
Diagram #:12
12. Remove existing foot cups from the sports bar assembly. Using gaskets and foot cups supplied in kit (INJM0010), remove adhesivebacking & attach foam gaskets to their correct upper foot cups.Attach the foot cups to their correct Sports Bar feet as shown, ensuring the holes in the Sports Bar feet remain accessible.See Dia #12.
Diagram #:10
10. Fit the jacking bracket truss to the jacking bracket with one (1) M6x16 hex head bolt and M6 flat washer large.Tighten to Torque 5Nm. Mark and centrepunch hole position on the tub side panel as shown.Drill marked position to Ø5mm as shown. Remove all burrs, sharp edges and swarf from vehicle.Repeat process for the other side of the vehicle. Apply rust inhibitor to all drilled holes. See Dia #10.
Diagram #:11
11. Secure jacking bracket truss to the tub side panel with one (1) rivet as shown.Repeat process for the other side of the vehicle. See Dia #11.
FIT JACKING BRACKET TRUSS &M6x16 BOLT & M6 FLAT WASHER LARGE
M6x16 HEXHEAD BOLT
REMOVE EXISTINGFOOT CUPS
M6 FLATWASHER LARGE
10mm10mm
5Nm
10mm10mm
5Nm
1
2Ø5mm
3
4
5
Ø5mm4
53
REMOVE ADHESIVE BACKINGFROM FOAM GASKETS
JACKING BRACKET TRUSS
JACKINGBRACKET TRUSS
TIGHTEN TOTORQUE 5Nm
2 FIT FOAM GASKETSTO FOOT CUPS
3
FIT FOOT CUPSTO SPORTS BAR FEET
ENSURE HOLEREMAINS ACCESSIBLE
4
1

TC0226
30/03/11Page 7 of 13
VOLKSWAGEN AMAROK 3 PIECE HARD TONNEAU COVER
Diagram #:13
13. Turn the Sports Bar upside down and place Sports Bar on a protective mat to avoid scratching.Fit corner pieces to sports bar as shown ensuring they are on the correct side.Loosely fit M6x40 phillips head screw and M6 flat washer in kit (INJM0010), to secure the corner pieces to the sports bar as shown.See Dia #13.
Diagram #:14
14. Carefully measure and mark a line along the side rail 790mm rearward of the front rail as shownRepeat process for the other side of the vehicleIf a sports bar was removed from the vehicle, this line should align to the centre of the existing hole for the sports bar foot.See Dia #14.
Diagram #:15
15. Carefully position the assembled sportsbar and corner pieces onto the tub, taking care not to scratch the vehicle.NOTE: Two people are required to lift into position. See Dia #15.
PROTECTIVE MAT
SP
OR
TS B
AR
CORNER PIECE OU
TSID
E S
CR
EW
INSIDEHOLE
M6x40 PHILLIPSHEAD SCREW
M6 FLATWASHER
LOOSELY FIT HARDWARE
FRONTPANEL
SIDE PANEL (RHS)
790mm

TC0226
30/03/11Page 8 of 13
VOLKSWAGEN AMAROK 3 PIECE HARD TONNEAU COVER
Diagram #:17
17. Drill the six (6) sports bar feet hole positions marked with a Ø5mm pilot drill, then re-drill to Ø10mm holes. Drill the rear cornerpiece hole to Ø5mm. Remove all burrs, sharp edges and swarf from vehicle. Apply rust inhibitor to all drilled holes.Remove marked line and place the 90x90 clear tape centrally over its position on the side rail as shown.Repeat process on the other side of the vehicle. See Dia #17.
Diagram #:18
18. Re-fit the sports bar and corner pieces to the vehicle. Secure the sports bar to the vehicle with hardware from the sports bar kitfor both sides as shown. Tighten all the inside screws to Torque 3Nm securing the sports bar to the corner pieces as shown.Tighten all the sports bar screws to Torque 18Nm as shown.Fit a rivet to secure the corner piece to the tub as shown. See Dia #18.
Diagram #:16
16. Two people are required for this step, one to apply firm pressure and the other to mark the positions. Apply pressure to push the corner piece and front sports bar feet firmly into the front corner of the tub and down onto the side rail.Centre-punch mark the front four (4) hole positions. Align the front slot on the rear sports bar feet with the line marked at 790mm(from previous step), and centre-punch mark the rear two (2) hole positions.Push the rear of the corner piece against the tub and mark the hole position. Centre-punch mark the rear corner piece hole position.Using a non permanent marker mark and note the rear edge of the corner piece on the side rail.Repeat process for the other side of the vehicle. Carefully remove sports bar and corner piece assembly. See Dia #16.
APPLY RUST INHIBITORTO ALL DRILLED HOLES
4
IMPORTANT - IF A SPORTS BAR WAS FITTED TO THE VEHICLE.YOU WILL NEED TO COMPLETE THIS STEP, & CHECK THE SPORTS BAR STILL LINES UP WITH THE EXISTING
HOLES IN THE TUB. IF NOT YOU WILL NEED TO RE-MARK THE HOLES AS DETAILED BELOW.
TIGHTEN SPORTS BAR SCREWS TO TORQUE 18Nm
18Nm
ALIGN SLOT WITH LINE PREVIOUSLYMARKED AT 790MM
REMOVE LINE ANDPLACE 90x90 CLEAR
TAPE CENTRALLY OVERITS POSITION
FIT RIVET
Ø10mm
2
Ø5mm
3
Ø5mmPILOT DRILL
1
5
TIGHTEN INSIDE SCREWSTO TORQUE 3Nm
SP
OR
TS B
AR
CORNER PIECE OU
TSID
E S
CR
EW
3Nm

TC0226
30/03/11Page 9 of 13
VOLKSWAGEN AMAROK 3 PIECE HARD TONNEAU COVER
13mm
Diagram #:19
19. Open vehicle’s tailgate and keep it open until locking mechanism has been adjusted correctly.Two people are required to carry out the fitment of the tonneau cover.Carefully fit tonneau cover to vehicle ensuring seal at the front of the tonneau cover sits correctly over the header rail seal as shown.Secure hinges with hinge pins as shown. See Dia #19.IMPORTANT: Ensure hinge pins clip into retaining leg on lower hinges. If misaligned, seal can be pushed forward from inside of the tub.
Diagram #:20
20. With tailgate open, Close and check Tonneau Cover is central to vehicle and the sides of Tonneau Cover do not contact the vehiclebedrail. Adjust position if necessary by loosening the top hinge screws for fore and aft adjustment and hinge mount screws for side toside adjustment to re-position Tonneau Cover to fit centrally on vehicle. Re-tighten hinges to Torque 5Nm. See Dia #20.
Diagram #:21
21. Adjust jacking bracket bolt until corner pieces are level with the main surface of the Tonneau Cover.Once in the correct position, lock into position against the bracket the pre-installed M8 nut using a 13mm spanner.Repeat process for the other side of the vehicle. See Dia #21.
IMPORTANT: Ensure vehicles’s tailgate is opened before installing Tonneau Cover, andremains open until lock striker is fitted and locking mechanism is adjusted correctly.
DO NOT close the Tailgate when the Hard Tonneau is in the closed position, as damagemay occur to the vehicle and/or your Tonneau Cover!
TONNEAU SEALFITMENT OVER
HEADER RAIL SEAL
NO POWER TOOLS
13mm
LOOSEN
TORQUE 5Nm

TC0226
30/03/11Page 10 of 13
VOLKSWAGEN AMAROK 3 PIECE HARD TONNEAU COVER
Diagram #:22
22. Attach gas struts by clipping into place as shown.Ensure the narrow end mounts to the vehicle and the wide end mounts to the tonneau cover. See Dia #22.!! Failure to do so Voids Warranty on gas struts!!
Diagram #:23
23. With the tailgate open, fit the latch striker, to the rear of the side rail and secure with two (2) M6x16 hex head screws, four (4)M6 flat washers large and two (2) M6 nyloc nuts as shown.Do not fully tighten at this stage. Repeat process for other side of the vehicle. See Dia #23.
NARROW END MOUNTS TO VEHICLE
WIDE END MOUNTS TO TONNEAU COVER
INSPECTION COVERPLASTIC RETAINER
CLIPSPULLRODS
REMOVE INSPECTIONCOVER
RELEASE PLASTICRETAINER CLIPS
UNCLIP PULLRODSFROM PLASTICRETAINER CLIPS
Diagram #:24
24. Open Tonneau Cover and remove inspection cover by removing scrivets and rotating cover anti-clockwise.Release plastic retainer clips and unclip pullrods as shown. See Dia #24.IMPORTANT: TAILGATE MUST BE OPEN TONNEAU COULD LOCK DURING ADJUSTMENT PROCESS.
IMPORTANT: Ensure vehicles’s tailgate is opened and remains open.Tonneau could lock during adjustment process.
10mm SIDE VIEW
M6x16 HEXHEAD BOLT
M6 NYLOCNUT
M6 FLAT WASHERLARGE
LATCH STRIKER
TC0226
30/03/11Page 11 of 13
VOLKSWAGEN AMAROK 3 PIECE HARD TONNEAU COVER
INCORRECT
INSPECT LATCHENGAGEMENT
CORRECT
SCREWS
SCREWS
TORQUE 10Nm TORQUE 4NmSTRIKERBRACKET
ADJUST STRIKER BRACKET ADJUST LATCHMECHANISM
1
Diagram #:25
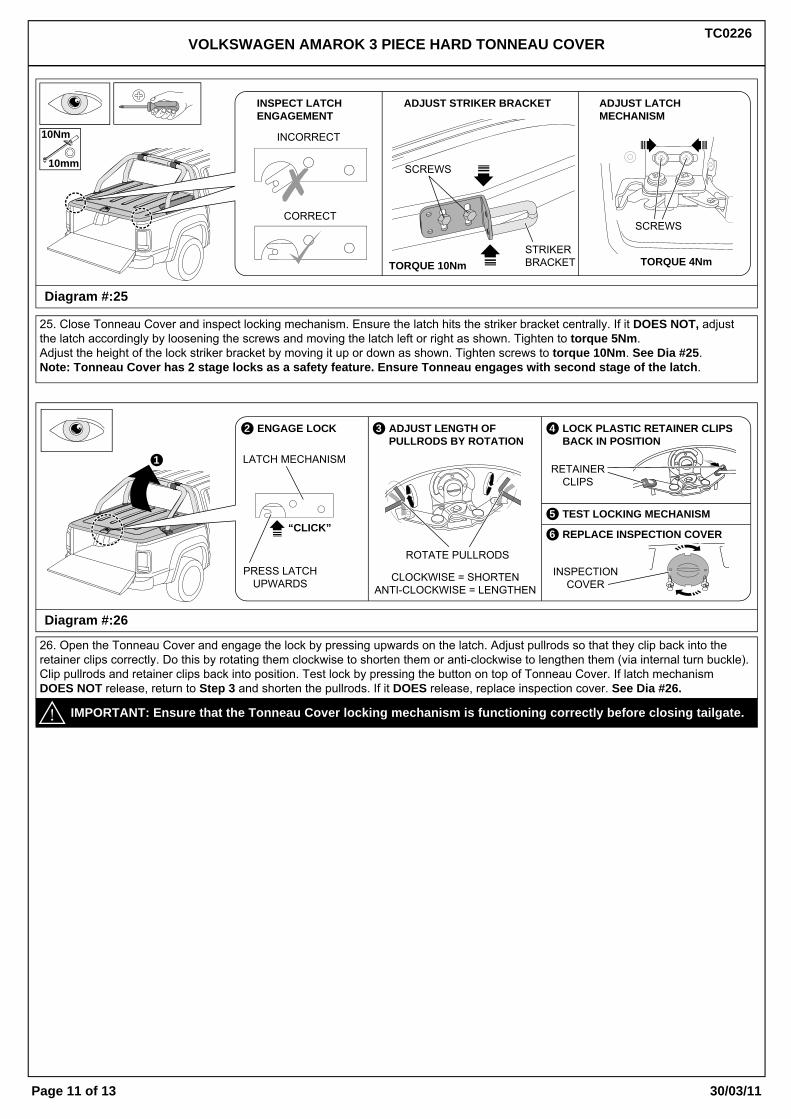
25. Close Tonneau Cover and inspect locking mechanism. Ensure the latch hits the striker bracket centrally. If it DOES NOT, adjustthe latch accordingly by loosening the screws and moving the latch left or right as shown. Tighten to torque 5Nm.Adjust the height of the lock striker bracket by moving it up or down as shown. Tighten screws to torque 10Nm. See Dia #25.Note: Tonneau Cover has 2 stage locks as a safety feature. Ensure Tonneau engages with second stage of the latch.
Diagram #:26
26. Open the Tonneau Cover and engage the lock by pressing upwards on the latch. Adjust pullrods so that they clip back into theretainer clips correctly. Do this by rotating them clockwise to shorten them or anti-clockwise to lengthen them (via internal turn buckle).Clip pullrods and retainer clips back into position. Test lock by pressing the button on top of Tonneau Cover. If latch mechanismDOES NOT release, return to Step 3 and shorten the pullrods. If it DOES release, replace inspection cover. See Dia #26.
ENGAGE LOCK
LATCH MECHANISM
PRESS LATCHUPWARDS
ROTATE PULLRODS
CLOCKWISE = SHORTENANTI-CLOCKWISE = LENGTHEN
“CLICK”
2 ADJUST LENGTH OFPULLRODS BY ROTATION
3 4
REPLACE INSPECTION COVER6
TEST LOCKING MECHANISM5
RETAINERCLIPS
INSPECTIONCOVER
LOCK PLASTIC RETAINER CLIPSBACK IN POSITION
IMPORTANT: Ensure that the Tonneau Cover locking mechanism is functioning correctly before closing tailgate.
10mm
10Nm
TC0226
30/03/11Page 12 of 13
VOLKSWAGEN AMAROK 3 PIECE HARD TONNEAU COVER
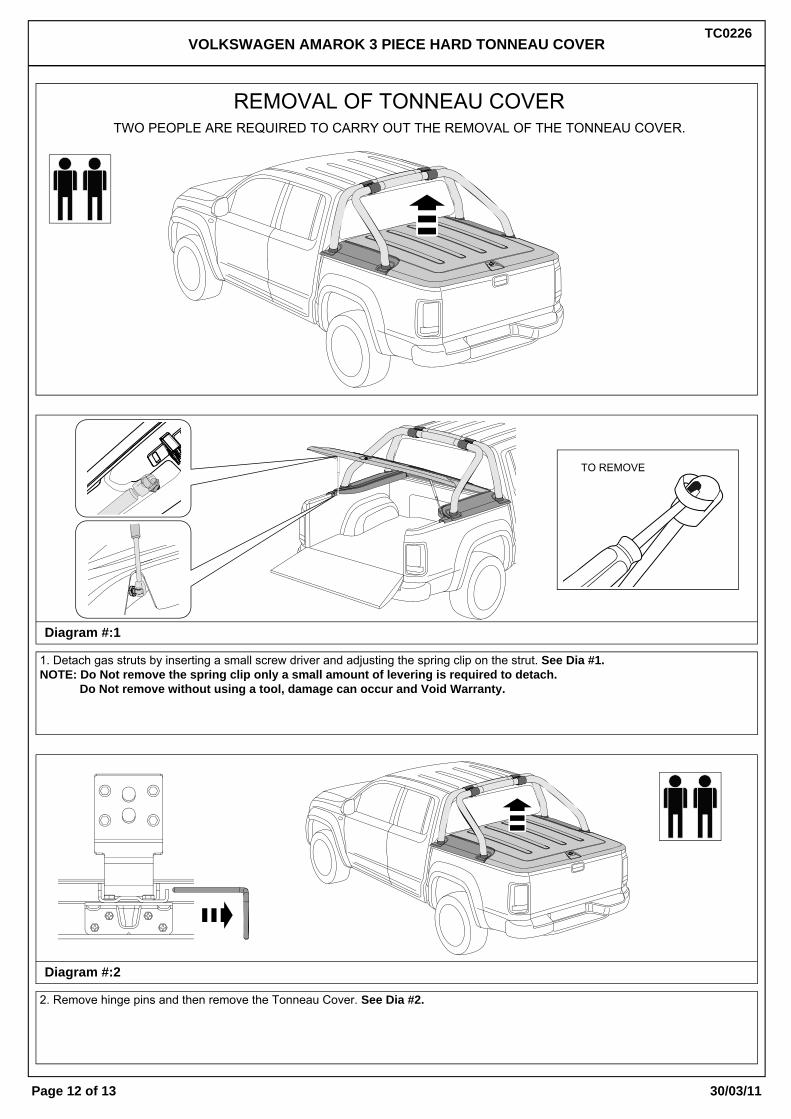
REMOVAL OF TONNEAU COVERTWO PEOPLE ARE REQUIRED TO CARRY OUT THE REMOVAL OF THE TONNEAU COVER.
Diagram #:1
1. Detach gas struts by inserting a small screw driver and adjusting the spring clip on the strut. See Dia #1.NOTE: Do Not remove the spring clip only a small amount of levering is required to detach. Do Not remove without using a tool, damage can occur and Void Warranty.
Diagram #:2
2. Remove hinge pins and then remove the Tonneau Cover. See Dia #2.
TO REMOVE

TC0226
30/03/11Page 13 of 13
VOLKSWAGEN AMAROK 3 PIECE HARD TONNEAU COVER
Diagram #:1
1. Open vehicle’s tailgate and fit tonneau cover to vehicle ensuring seal at the front of the tonneau cover sits correctly over the headerrail seal as shown. Secure hinges with hinge pins as shown. See Dia #1.IMPORTANT: Ensure hinge pins snap into retaining clip mounted to the lower hinges.
Diagram #:2
2. Attach gas struts by clipping into place as shown.Ensure the narrow end mounts to the vehicle and the wide end mounts to the tonneau cover. See Dia #2.!! Failure to do so Voids Warranty on gas struts!!
RE-INSTALLATION OF TONNEAU COVERTWO PEOPLE ARE REQUIRED TO CARRY OUT THE RE-INSTALLATION OF THE TONNEAU COVER.
TONNEAU SEALFITMENT OVER
HEADER RAIL SEAL
NARROW END MOUNTS TO VEHICLE
WIDE END MOUNTS TO TONNEAU COVER
