tcs comprehensive programming guide 2017
TRANSCRIPT

TCS Comprehensive Programming Guide 2017
(Revised 1/19/2018)
Decoder Configuration with CV 29 and CV 61 Page 2 BEMF Type and Keep-Alive™ Enabling using CV 182, RailCom Page 3 Decoder Addressing Page 4 Decoder Lock, Version Number, and Date Codes Page 5 Lighting Features and Programming Page 6
Random Flicker and Constant Dim Page 8 Ditch Lights Page 9 Mars, Gyra, and Rotary Beacon Adjustment Page 10 Strobes and Flashers Page 11 Rule 17 Dimming Page 12 Brake Lights, Consist and DC Lighting Control Page 13
Function Remapping Page 15 BEMF Page 16 Button Control of Motor and Dither Page 17 Button Control of Braking and Trolley Features Page 18 Motor Trim Page 19 Momentum (Acceleration and Deceleration) Page 20 Variable Momentum or 3-Point Momentum Page 21 3-Point Speed Curves Page 22 User Loadable Speed Tables Page 23 Quick Presets Page 24 CV’s Unique to WOWSound Decoders Page 25
Train Control Systems Phone: 215-453-9145
Email: [email protected] URL: www.tcsdcc.com

Page 2
CV 29 Configuration
Configuration CV’s 29 and 61
Decoder Configuration: CV 29
Value Features A 1 Reverse the direction the engine runs. B 2 Use 28/128 speed step mode. C 4 Enable analog (DC) operation. D 8 Enable RailCom E 16 Make the User Loadable Speed Tables active. F 32 Make the decoder address 128 or higher. (Four-Digit Addressing)
CV 29 Program the sum of the value(s) you choose into CV 29
CV 29 Configuration: CV 29 is the primary configuration CV in all DCC decoders and can be used to make basic
setting changes. To set-up CV 29 select the features from above that you want to use and tally up the corresponding values. For instance, if you would like to use 28/128 speed step mode, User Loadable Speed Tables, and Four Digit Addressing you would select the corresponding values of: 2, 16, and 32, and add them together. Take the sum: 2 + 16 + 32 = 50 and program that sum (50) into CV 29.
Decoder Configuration: CV 61
Value Features A (1) Enable BEMF* B 2 Enable Button Controlled BEMF* C 8 Button Control of Braking (Trolley) D 16 Headlights Dim When Stopped (Rule 17 enabled) E 32 Opposite Headlight Dim F 64 Manual Button Control of Motor G 68 Automatic Button Control of Motor H 128 Button Control of Brake Lights (Trolley
CV 61 Program the sum of the value(s) you choose in CV 61
*NOTE: BEMF is always active in WOWSound decoders. A & B have no effect in WOWSound Decoders
CV 61 Configuration:
CV 61 is used to configure a host of features including BEMF, Light Dimming and Button control of features. You will see references to CV 61 throughout this manual. Use the above table to assist in determining the value of CV 61 that gives you the features desired. Each of these features is better explained in the following chapters.

Page 3
BEMF Type and Keep-Alive™ Enabling: CV 182
CV 182 Configuration: CV 182 not only enable Keep-Alive™ with TCS decoders that are Keep-Alive™ ready, it also
determines the type of BEMF in your decoder. Use the table below to determine which setting is right for you. The DEFAULT value for CV 182 is 2 which enables Keep-Alive™ and uses the standard Automatic BEMF settings.
Note: When Keep-Alive™ is enabled using CV 182 the “Stop on DC” feature is disabled
to keep the loco from running away when the decoder sees the DC from the Keep-Alive™ on a bad piece of track.
Value CV 182 Features (BEMF and Keep-Alive™) A 0 Automatic BEMF - Stop on DC Enabled (No Keep-Alive™). B 1 Special BEMF setting for 3-Pole Motors C (2) Automatic BEMF - Stop on DC Disabled - Enable Keep-Alive™ with Keep-Alive™
ready decoders. (DEFAULT) D 4 Disable Safety Check, Requires the packet to be received 2x for Function
Presses. WOWSound decoders only
E 8 Motor Delay (about 2 seconds) in WOWSound Diesel decoders only
CV 182 Program the sum of the value(s) you choose into CV 182
RailCom RailCom is a bi-directional data communications technology found in The NMRA Recommended Practices RP 9.3.1 and 9.3.2. RailCom allows devices to read data transmitted by the decoder.
Most TCS decoders support RailCom.
NOTE: A value of 8 must be added to CV29 to Enable RailCom
CV28 – RailCom Configuration ‐ Default Value (0)
Value CV28 Features A 1 Enable Unsolicited Decoder Initiated Transmission B 2 Enable Initiated Broadcast Transmission using Asymmetrical DCC Signal C 4 Enable Initiated Broadcast Transmission using Signal Controlled Influence Signal
CV28 Program the sum of the value(s) you choose into CV28

Page 4
Decoder Addressing
2-Digit Address
2-Digit Address CV 1
2-Digit Addresses (any address between 1-127) are the base address for the decoder. All decoders ship from the factory with a base address of 3 which is programmed into CV 1. To modify this
address simply program CV 1 to a different value between 1-127. NOTE: CV 1 cannot be programmed in OPS mode (programming on the main line) and is the ONLY
CV which cannot be modified in OPS mode.
4-Digit Address
4-Digit Address (High Byte) CV 17 4-Digit Address (Low Byte) CV 18
Enable 4-Digit Address CV 29 4-Digit Addressing (addresses between 128-9999) are used frequently as they allow the user to address the decoder with the locomotive number. Calculating the values to put in CV 17 and CV 18 is a bit daunting for most users so TCS provides a 4-Digit Address calculator on it’s website under the DCC Tools section. This allows you to simply enter the address you wish to use and have the calculator return the corresponding CV 17 and 18 values. NOTE: Most DCC Systems today will make these calculations automatically when Programming the 4-Digit Address. Once the derived values have been programmed, enable the 4-Digit Address by adding a value of 32 to CV 29. CV 29 has a default value of 6, so to enable the 4-Digit Address just add a value of 32 and program the resulting value of 38 into CV 29
Consist Address
Consist Address CV 19
Consist Addressing is similar to 2-Digit Addressing in that it can accept values from 1-128. However, Consist Addressing differs in that it allows for a second address to be applied to a decoder
specifically for use when the locomotive is being operated in a Consist or “MU” train. The second differing feature of the Consist Address is that if you add a value of 128 to whatever address you
plan to use the locomotives forward and reverse will be swapped. This allows for consists that have locomotives running back to back.
For example, if you are setting up a 2 unit Consist with the address of 12 and an “A” unit travelling in the normal directions and a “B” unit running reversed you would program a value of 12 into CV
19 on the “A” unit and a value of 140 into CV 19 on the “B” unit.

Page 5
Decoder Lock, Version Number, and Date Codes Decoder Lock
Unlocked Decoder CV 15 Decoder Lock Number CV 16
CV 15 All Unlocked = 0 Decoder to unlock = 1 - 6 All locked = 7
CV 16 Mobile = 1 Sound = 2 Light Only = 3 User Defined = 4 User Defined = 5 User Defined = 6
Decoder Lock is used when a locomotive has 2 or more decoders in it. By default both decoders in the locomotive will be programmed together when placed on the programming track. This can
cause problems as you try to set up different features on each decoder. To compensate for that the NMRA has created the feature known as “Decoder Lock” which is implemented here.
CV 16 is used to store a key number. This number typically is: 1 for motor and light decoder, 2 for
sound decoders, and 3 for lighting only decoders. However, if you would like to have more than one decoder of the same type (motor and light, sound, or lighting only) the CV 16 value can be modified to a value between 1 and 6. NOTE: all modifications to CV 16 should be done before installing the
decoders to avoid rewriting CV 16 on all of the decoders.
With the CV 16 values defined you are ready to lock and unlock each decoder. To unlock a decoder simply put the locomotive on the programming track and program CV 15 to whatever value the decoder you want to program has in CV 16. For instance if you have a locomotive with a lighting only decoder (CV 16 = 3) and a motor decoder (CV 16 = 1) you would program a value of 1 into
CV 15 to lock the lighting only decoder and ready the motor decoder for programming. To switch to programming the lighting only decoder simply program a value of 3 into CV 15. Decoder Lock only effects programming, and so the values in CV 15 and 16 are not important for running your
locomotive. Values of 0 and 7 are reserved for: all unlocked ( 0 ) and all locked ( 7 ).
Version Number
Version Number CV 7
When major bug fixes or upgrades are done to the software in the decoder the version number is updated. For troubleshooting tech support representatives at TCS may ask for the version number
which can be read out of CV 7.
Date Code
Month Programmed CV 250 Day Programmed CV 251 Year Programmed CV 252
Each decoder that is programmed has the date it is programmed stored in CV’s 250, 251, and 252. If you contact TCS with a software related glitch or concern reading out the date code can help us
identify when your decoder was made and more succinctly diagnose the problem.

Page 6
Lighting Effects An overview of each
Constant Bright: Full bright lighting effect, common for headlights and reverse lights this feature produces a no-frills, on/off only light. Constant Dim: Much like the constant bright, the constant dim can be turned on/off but does not pulse, blink, flicker, or otherwise change brightness during operation. With one CV for adjusting, lights operated by the constant dim effect will remain at a brightness from completely to dim to full bright based on the setting used. Random Flicker (fire box): Accurately capturing the flicker of flames from a lit fire box or other burning light source, the random flicker effect creates a warm, organic flame pattern. Mars Light: Implemented as a signal-safety light the original “Mars Light” rotated the lighting module in a figure 8 pattern creating a distinctly recognizable pulsing pattern that alerted everyone to oncoming/outgoing locomotives. Due to the figure 8 pattern the resulting light would pulse in a: “dim-dim-bright” configuration which has been accurately replicated with this lighting feature. Flashing Light: This lighting feature simply turns on and off the light function for adjustable durations of time in a loop. Typically it is on for close to a half second, off for the same amount of time and right back to on again. Similar to the flashing “road-work” lights this lighting feature finds its way into many stationary applications. This is useful for the Crew Alert feature in the WOWDiesel Decoder. Single Pulse Strobe: A simple on/off strobing effect, the single pulse strobe spends 75%-80% of its light cycle off and only flashes at full brightness for the last portion of second in its light cycle. Perfect for a F.R.E.D. or any other simple strobe device where a regular, short blink is required. Double Pulse Strobe: The double pulse strobe takes the same basic on/off blink approach of the single pulse strobe, but adds a second bright flash to every cycle. The blink pattern appears as: “bright-bright-dim” where each “bright” is a separate flash of its own. Rotary Beacon: Use a safety-signal light the rotary beacon is typically on the top of a locomotive and is used to raise awareness in 360 degrees. By rotating in a full circle this light ramps from 50% brightness to full brightness and back again in a steady even pattern. Gyra Light: Similar to the rotary beacon the Gyra light also pulses back and forth from two points though with the Gyra it is typically from full bright to fully off. Gyra lights can still be found today on commuter trains typically right at the top of the front and rear. This lighting feature makes a perfect addition to a passenger train layout. Rule 17: While Rule 17 dimming is not one specific lighting feature, it is a series of train guidelines for handling lights in various operational states (stopped, moving forward, and moving reverse). These feature can be set to dim the light when the locomotive stops or to dim the opposing light when travelling down the rails. This means that if the train is heading forward the headlight will be on, and the reverse light will be dim (dim, not off). When the locomotive changes direction so to the reverse light will become bright and the forward light will go dim. Ditch Lights: Ditch lights project from the left and right side of a locomotive on the front end and are used both to provide light and to alert others to the presence of a train. During typical operation both the left and the right ditch light will be full bright when travelling down the rails and blink in an alternating, fading patter when passing over a road or other potentially occupied area. When utilized, this feature will allow your ditch lights to remain on at full brightness until a function button is pressed which begins the alternating pulse cycle. Auto-Mars Light: This lighting feature will remain at full brightness until the locomotive is decelerating below 36% speed at which point it will switch to the mars light pattern. When the locomotive accelerates over 36% speed it will again return to a full brightness light. Brake Lights: Operating much like the brake lights on cars, the brake light function is ideal for trolleys. With the brake light feature enabled whenever the locomotive is slowing, or the brake is applied the light function will illuminate.
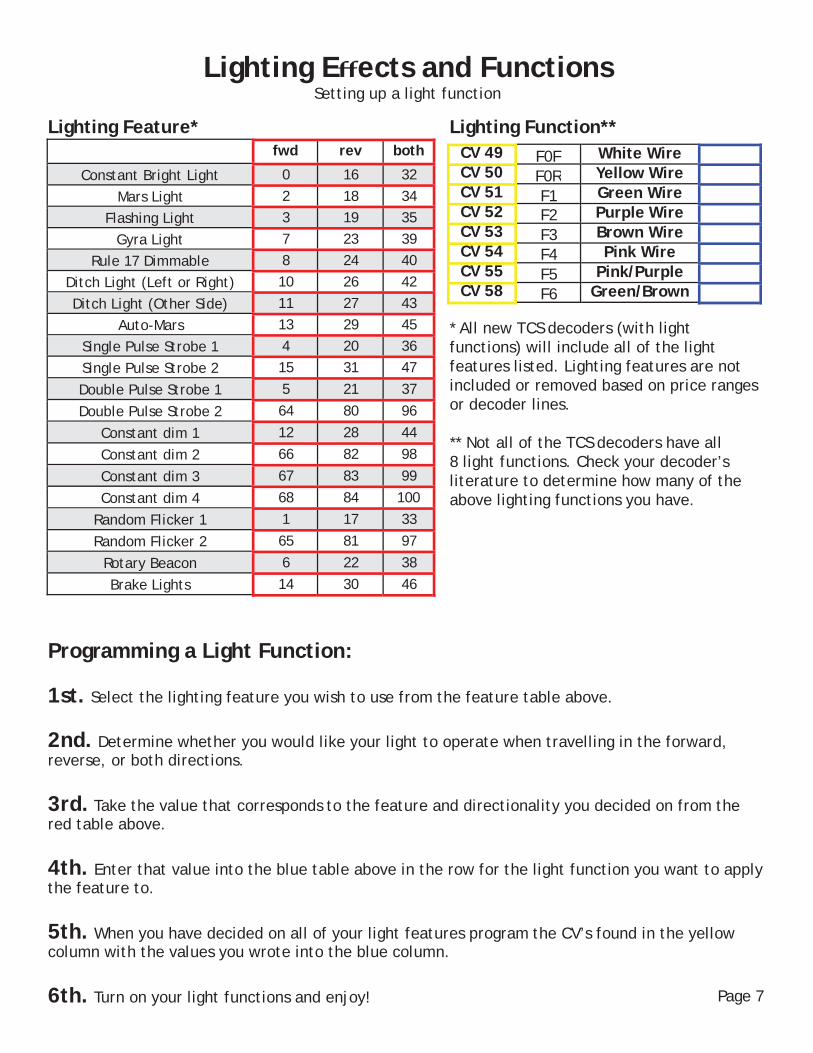
fwd rev both
Constant Bright Light 0 16 32
Mars Light 2 18 34
Flashing Light 3 19 35
Gyra Light 7 23 39
Rule 17 Dimmable 8 24 40
Ditch Light (Left or Right) 10 26 42
Ditch Light (Other Side) 11 27 43
Auto-Mars 13 29 45
Single Pulse Strobe 1 4 20 36
Single Pulse Strobe 2 15 31 47
Double Pulse Strobe 1 5 21 37
Double Pulse Strobe 2 64 80 96
Constant dim 1 12 28 44
Constant dim 2 66 82 98
Constant dim 3 67 83 99
Constant dim 4 68 84 100
Random Flicker 1 1 17 33
Random Flicker 2 65 81 97
Rotary Beacon 6 22 38
Brake Lights 14 30 46
Lighting Feature*
Lighting Effects and Functions Setting up a light function
Lighting Function**
CV 49 F0F White Wire CV 50 F0R Yellow Wire CV 51 F1 Green Wire CV 52 F2 Purple Wire CV 53 F3 Brown Wire CV 54 F4 Pink Wire CV 55 F5 Pink/Purple CV 58 F6 Green/Brown
* All new TCS decoders (with light functions) will include all of the light features listed. Lighting features are not included or removed based on price ranges or decoder lines.
** Not all of the TCS decoders have all 8 light functions. Check your decoder’s literature to determine how many of the above lighting functions you have.
Programming a Light Function:
1st. Select the lighting feature you wish to use from the feature table above.
2nd. Determine whether you would like your light to operate when travelling in the forward, reverse, or both directions.
3rd. Take the value that corresponds to the feature and directionality you decided on from the red table above.
4th. Enter that value into the blue table above in the row for the light function you want to apply the feature to.
5th. When you have decided on all of your light features program the CV’s found in the yellow column with the values you wrote into the blue column.
6th. Turn on your light functions and enjoy! Page 7

Page 8
Brightness Setting
Headlight Dim CV 156 (0)
Reverse Light Dim CV 157 (0)
Value of 30 = Max Bright
Value of 1 = Min. Bright Constant Dim 1 CV 64 (6)
Constant Dim 2 CV 153 (5)
Constant Dim 3 CV 154 (5)
Constant Dim 4 CV 155 (5)
Total Flicker
Modifying Lighting Effects Random Flicker
Random Flicker Modification:
Each TCS decoder includes two Random Flicker generators which allows for two different random flicker rates.
For each Random Flicker generator the overall speed of the flicker can be adjusted from 1-255 (1 being the fastest and 255 being the slowest).
Speed of Flicker
Random Flicker 1 CV 135 (16)
Random Flicker 2 CV 152 (16)
Constant Dim Constant Dim Modification: Each TCS decoder includes 6 Constant Dim generators which allows for 6 different Brightness settings. The first two work with the existing Headlight and Reverse light. Headlight and Reverse light must be set to the “Constant Bright Light” feature for this dim adjustment to work.
The other four are used as separate lighting features and can be assigned to any function output.
For each Constant Dim light the values can be adjusted between values of 1-30 (with 30 being full brightness and 1 being least bright). Typically values between 2-6 are best for LED’s and values between 12-18 are ideal for bulbs, but from light source to light source the results will vary and some degree of trial and error is required.

Ditch Lights:
Alternation Rate CV 117 (213)
Blink Holdover CV 63 (100)
Left Ditch Light
Right Ditch Light
Total Ditch Light Cycle
Ditch Lights
Ditch Light Modification:
Each TCS decoder includes a Left and Right Ditch Light which are controlled by a Single Ditch Light generator.
The overall speed at which the ditch lights alternate can be adjusted with CV 117 by entering values from 1-255. The lower the number slower the alternation, and the higher the number the faster they blink.
The Blink Holdover setting defines how long the lights will continue to alternate before returning to constant bright. Values of 1-255 can be used in CV 63 with lower values specifying a shorter holdover and high numbers causing a longer holdover.
See Quick Presets on page 24 for an easy way to setup Ditch Lights
*In the some locomotives the Ditch Lights do not cross fade. If your WOWSound decoder was purchased as an O.E.M.
installation in a locomotive that did not have prototypically cross fading ditch lights, the decoder’s ditch lights will not
cross fade.

Page 10
Mars/Gyra Light Adjustment
Max Brightness (CV 116)
Mid. Brightness (CV 115)
Min. Brightness (CV 112)
Max Bright Duration (CV 113)
Total Light Cycle Duration
(CV 114
Mars/Gyra Adjustment CV’s
Functionality CV Values Max Bright Duration CV 113 1-255 (9)
Total Light Cycle CV 114 1-3 (2) Max Brightness CV 116 1-25 (11) Mid. Brightness CV 115 1-25 (8) Min. Brightness CV 112 1-25 (7)
Max Brightness (CV 122)
Mid. Brightness (CV 121)
Max Bright Duration
(CV 119)
Rotary Beacon
Beacon Adjustment CV’s
Functionality CV Values Max Bright Duration CV 119 1-255 (5)
Total Light Cycle CV 120 1-3 (1) Max Brightness CV 122 1-25 (25) Mid. Brightness CV 121 1-25 (15) Min. Brightness CV 118 1-25 (1)
Min. Brightness
(CV 118)
Total Light Cycle Duration
(CV 120)
Mars Light, Gyra Light, and Rotary Beacon Modification: • Note: The Mars and Gyra light use the same light pattern generator which means they cannot be used
simultaneously. • All of the above lighting features allow for 3 points of brightness adjustment, as well as 2 timing related CV’s.
• The Total Light Cycle adjustment is a multiplier with increasing values (2 and 3) increasing the length of each light
cycle. • The Max Bright Duration dictates how long the lighting feature will remain at full brightness. The Total Life Cycle
value will act as a multiplier on the Max Bright Duration and increase the length of time at max bright. • When adjusting the brightness values keep these tips in mind:
-All values must be above 0. -All three values (Min., Mid., and Max) cannot be the same. -Min. brightness must always be lower than (or equal to) mid. brightness, and mid. brightness must be lower than (or equal to) the max brightness

Page 11
Single Pulse Strobe (SPS)
Light On Light Off
Single Pulse Strobe Modification: Each TCS decoder includes two Single Pulse Strobe generators which allows for two different pulse patterns. For each SPS generator the length of time the light function is on and the length of time it is off is adjustable with the CV’s identified on the left. Values between 0-255 are accepted (the larger the value, the
longer the light will remain in the specified state). Light On Duration Light Off Duration
SPS 1 CV 141 (5) CV 140 (140)
SPS 2 CV 143 (4) CV 142 (124)
Double Pulse Strobe (DPS)
Light On Light Off Light On Light Off
1st Light On Duration
“Short” Off Duration
2nd Light On Duration
“Long” Off Duration
DPS 1 CV 147 (5) CV 148 (16) CV 147 (5) CV 146 (112)
DPS 2 CV 150 (5) CV 151 (16) CV 150 (5) CV 149 (117)
Double Pulse Strobe Modification:
Each TCS decoder includes two Double Pulse Strobe generators which allows for two different pulse patterns.
For each DPS generator the length of time the light function is on, the length of time the light is off between pulses, and the length of time it is off before starting the pattern again is adjustable with the CV’s identified on the left. Values between 0-255 are accepted (the larger the value, the longer the light will remain in the specified
state).
Light On Light Off
Flashing Light (FL)
Flashing Light Modification:
Each TCS decoder includes one Flashing Light generator.
For the Flashing Light generator the length of time the light function is on and the length of time it is off is adjustable with the CV’s identified on the left. Values between 0-255 are accepted (the larger the value, the longer the light will remain in the specified state).
Light On Duration Light Off Duration
FL CV 145 (48) CV 144 (144)

Page 13
Rule 17 Explained: Rule 17 (or as it is known in modern train guidelines: Rule 5.9.1-5.9.4) specifies operational instances
where one or both lights should dim to avoid blinding workers or interfering with another trains operation. Some of the most common times this is used are: when a train is stopped at a station its lights should be dimmed, when a train stops on the mainline in an unsignaled region, and when passing a train on an adjacent track. To that end we have included several Rule 17 style lighting effects which can be used independently or collectively to achieve prototypical results.
Rule 17 Usage: Rule 17 Dimming implemented by TCS includes three different types of functionality: Opposite
Dim (when travelling forward the reverse light is on dimmed, and when travelling in reverse the forward light is on dimmed), Dim when stopped (when a locomotive comes to a complete stop the light(s) dim), and button controlled dimming.
By default button controlled dimming is in place any time a lighting function is assigned the Rule 17 lighting effect, however, Opposite Dim and Dim when Stopped must be enabled in CV 61 before they will effect the decoders operation. See the table on page 2 for more information on enabling these two effects.
Once you have selected the features you would like to use you must program the light func- tions which you wish to have Rule 17 active on with the Rule 17 Lighting Feature (See Lighting Features and Functions for more information). Please note that will Dim when Stopped will work on any function output Opposite Dim can only be used with the White or Yellow Wires (F0F, F0R).
As mentioned before, button controlled Rule 17 Dimming is always enabled so if you program a light function to the Rule 17 lighting feature and press the Rule 17 button (by default button 4) any light using the Rule 17 feature will dim. Please note that the dimming value is controlled by CV 64 which also effects the dimming of the Constant Dim 1 lighting feature. A Note regarding CV 61: CV 61 controls the use of BEMF as well as the Rule 17 lighting. Use the table on Page 2 to program CV61 properly. Select the features that you want then add up the corresponding values and program the result of that summation in CV 61. If you program an even number in CV 61 BEMF will be disabled which may significantly effect the slow speed performance of your locomotive. Please note that the dimming value is controlled by CV 64 for the dimming of the Front and Rear Headlight if the Rule 17 feature is selected.
Brake Lights, Consist Lighting, and Lights on DC
Brake Light Off Delay CV 138 (16) Acceptable values range from 0-255
Brake Lights Brake Lights:
The Brake Lights lighting feature operates much like the brake lights on a car. When the locomotive decelerates the brake
To adjust how long the brakes light remain on after applying the “brakes” change the value in CV 138. The higher the number the longer the lights will remain on (up to 13 seconds)
and the lower the number the less time they will remain active.
lights will remain on until the locomotive: levels out its speed, comes to a complete stop, or begins accelerating. Typically found on trolleys, this lighting feature can be adjusted for how long the brake lights will remain after the “brakes” are no longer being applied will the brake lights remain on. This can be adjusted from as much as 13 seconds to an instant off as outlined in the table to the left. Note: Button Control of Braking, and trolley braking features are covered in the motor control section of this manual.

Page 14
White & Yellow Wire (F0F and F0R) 1 Green Wire F(1) 2 Purple Wire F(2) 4 Brown Wire F(3) 8 Pink Wire F(4) 16 Pink/Purple Wire F(5) 32 Green/Brown Wire F(6) 64
Consist Lighting and Function Control
By default the decoder light functions will only respond to the base 2/4 Digit Address regardless of whether the locomotive is currently being controlled through the consist address. However, all of the lighting functions can be controlled by modifying CV’s 21 and 22.
CV 21 controls F(1) through F(8) and CV 22 controls F(0)F and F(0)R as well as F(9) through F(12).
Simply select the lighting features or Functions on the left that you would like to control while in a consist, add up the corresponding values from the right column and program the resulting value in the CV listed at the bottom of each table.
Current TCS Production
Decoders with Date Code of 02/24/15 or later Decoders with Date Code of 2/24/15 or later
Green – F1 1 White – F0F 1
Purple – F2 2 Yellow – F0R 2
Brown – F3 4 F9 4
Pink – F4 8 F10 8
Pink/Purple – F5 16 F11 16
Green/Brown – F6 32 F12 32
F7 64 Add Values for CV22
F8 128
Add Values for CV21
Older TCS Production
Decoders with Date Code Before 02/24/15 Decoders with Date Code Before 2/24/15
Green – F1 1 White – F0F 1
Purple – F2 2 Yellow – F0R 2
Brown – F3 4 Add Values for CV22
Pink – F4 16
Pink/Purple – F5 32
Add Values for CV21
DC Light Operation Enabling Lights on DC:
By default all of the light functions in TCS decoder will operate (with directional operation) on DC. This is accomplished by the default value of 255 in CV 13. To limit the functions that will operate in DC mode select the light functions from the table on the left , add the corresponding values for each function together, and program that value into CV 13.
Add the corresponding values from the right hand column of the table above and program that value into CV 13.

Page 15
Function Remapping
Button Fwd 0 Rev 1 2 3 4 5 6 7 8 9 10 11 12 Value 1 2 4 8 16 32 64 128 4 8 16 32 64 128
CV Default Value
Function (Button) Your Value
CV33 1 White Wire F(0)F
CV34 2 Yellow Wire F(0)R
CV35 4 Green Wire F(1) (7-12) CV 37
CV36 8 Purple Wire F(2) (7-12) CV 38
CV39 16 Brown Wire F(3) (7-12) CV 41
CV40 32 Pink Wire F(4) (7-12) CV 42
CV43 64 Pink/Purple Wire F(5) (7-12) CV 45
CV44 128 Green/Brown Wire F(6) (7-12) CV 46
CV123 32 On/Off for Rule 17 Dimming (0-6) (7-12) CV158* CV124 8 To Make the Ditch Lights Blink (0-6)
CV129 1 Brake Button (0–6)
CV134 2 Automatic Button Control of Motor Circuit (0-6)
CV136 2 Button Control of BEMF (0-6)
CV139 128 Brake Button
Note: a value of 0 removes any function from a Button *CV158 is only available in WOWElectric version 1+ decoders
Remapping Functions Remapping a Button Controlled Function
1st. Determine which wire or Function you would like to program, and select the CV specified above for that function. If you will be using buttons 7-12, select the CV listed in Function Group 2 which corresponds to the lighting function, otherwise (if the button is 0-6) select the CV in Function Group 1.
2nd. Find the function button you would like to use in the grey row from the table above.
3rd. Match the Row with the CV that controls the Function or Wire color you want with the Column with
the correct CV value.
Quick Reference Ditch Light Remapping
By default the green wire comes on with button one. To make the purple wire come on with button one as well enter the value 4 (the button one value) into CV 36 (the 0-6 CV from the Function Group 1 column for the purple wire).

Page 16
Back EMF (BEMF-Back Electro Motive Force) An overview of its purpose and how to implement it
BEMF Explained:
Friction, binds in the motor, out of round wheels, slop in the gears, poor gearing, and many more drive train variables prevent most decoders from creeping from a dead stop into ultra-slow speeds (1 tie per second). Typically to break through the friction and binding the motor most be given extra power which creates a lurching start where the loco- motive moves very quickly for a moment and then backs off its speed. However, this method of overshooting does not provide the slow (heavy) acceleration of a real locomotive.
Even those decoders with BEMF, Dither, Start Volts, and other methods for allowing a locomotive to creep along they all must be carefully adjusted and calibrated to reach peak performance. Once the low speed has been carefully perfect- ed though, many times the mid range and upper range of speed steps can be grossly inaccurate.
ALL THIS is where the TCS Auto-Adjusting BEMF comes into play. Built to intelligently and automatically adjust the motor RPM to create the most prototypical operation available. At slow speeds the TCS BEMF will adjust for friction and motor hiccups that cause stuttering operation and at high speeds it will allow for constant speeds regardless of grades on hills and heavy loads. This allows operators to use User Loadable Speed Tables, Speed Curves, Motor Trim, and Momentum to create the ideal speed range for a given locomotive and enjoy the accurate and even movement that replicates a full size locomotive.
BEMF Usage and Adjustment:
All TCS decoders ship with BEMF enabled though for some consists or for users who have standardized their locomotive speeds without BEMF disabling it all together may be preferred. However, the TCS BEMF allows for three different forms of disabling BEMF providing the most benefit with the least complexity. The three options for BEMF control are:
Programmed ON/OFF- Programmed On/Off simply refers to turning on or off BEMF by adjusting CV values. To disable BEMF simply set CV 61 to the next smallest even number. For instance, if CV 61 has a value of 17, programming a value of 16 will disable BEMF.
Button Control of BEMF- Turning on and off BEMF with a button is sometimes considered ideal when carrying heavy loads up a hill where BEMF would kick and keep the locomotive at pace in spite of the additional strain on the locomotive. Some users prefer to temporarily disable BEMF to accurately replicate the slowing of a locomotive when competing with situational challenges. To enable Button Control of BEMF a value of 2 should be added to the value in CV 61. Being that CV 61 has a default value of 1 adding a value of 2 and programming the resulting value of 3 into CV 61. By default after enabling button control of BEMF turning on and off function button 6 will turn on and off BEMF. To remap button control of BEMF select the function button from the table below and program the selected value into CV 136.
Function Button 5 6 7 8 9 10 11 12 Value 1 2 4 8 16 32 64 128
BEMF Cutout-* BEMF Cutout automatically disables BEMF once a user-defined speed is reached. This option is sometimes found beneficial when running locomotives in consist as (when improperly speed matched) the two locomotives may begin to fight each other at high speeds. Using ‘Cutout’ to disable BEMF after breaking through the especially sticky slow speeds allows the locomotive to perform prototypically at slow speeds and still respond well in a consist. To enable BEMF Cutout simply enter a value into CV 10 that is between 1 and 128. The value entered into CV 10 directly correlates to the speed step at which it will cut out. That is to say if you wish to disable BEMF at speed steps above speed step 50 enter a value of 50 into CV 10.

Page 16
*NOTE: “Programmed ON/OFF”, “Button Control of BEMF”, and “BEMF Cutout” are not available on the TCS WOWSound decoders. BEMF is critical for the correct operation of the sound features and cannot be turned off.
BEMF and 3-Pole Motors- Some locomotives come equipped with a less efficient 3-pole motor installed. Even with the TCS automatic BEMF some jerky operation will be unavoidable. To remedy this as much as possible TCS decoders have a 3-pole motor setting for the BEMF. When turned on, this has a very aggressive algorithm for the first 3 speed steps to get the 3-pole motor turning as smoothly as possible. This is turned on using CV 182.
Value CV 182 Features (BEMF and Keep-Alive™) A 0 Automatic BEMF - Stop on DC Enabled (No Keep-Alive™). B 1 Special BEMF setting for 3-Pole Motors C (2) Automatic BEMF - Stop on DC Disabled - Enable Keep-Alive™ with Keep-Alive™
ready decoders. (DEFAULT) D 4 Disable Safety Check, Requires the packet to be received 2x for Function
Presses. WOWSound
E 8 Motor Delay (about 2 seconds) in WOWSound Diesel decoders
CV 182 Program the sum of the values you choose into CV 182

Page 17
Button Control of Motor and Dither An overview of their purpose and how to implement them
Button Control of the Motor Explanation and Usage: For certain operations (controlling a smoke unit, turntable, drawbridges, etc.) one might want to use a TCS decoder and control said functionality with nothing more than a button press. For this type of operation included in every TCS motor decoder is a feature known as “Button Control of the Motor Circuit”. This allows the motor speed to be defined in a CV and then with a simple button press the motor circuit will be powered at the voltage defined by the user. Button Control of the Motor has two forms: Automatic (direction of motor spin determined by the direction command sent to the decoder) or Manual (direction of motor spin determined by which button is pressed). Automatic Button Control of Motor: To enable Automatic button control add a value of 68 to whatever value is found in CV 61. By default CV 61 has a value of 1 so simply program a value of 69 into CV 61. Now when button 0 is pressed the motor will run at full speed in the direction identified on the handheld. To remap the button used visit the Function Remapping section of this manual. Manual Button Control of Motor: To enable Manual button control add a value of 64 to whatever value is found in CV 61. Once this is completed the de- coder will spin it’s motor in the forward direction when button 2 is enabled and in reverse when button 3 is enabled.
(NOTE: Manual Button Control of Motor is hard coded and cannot be mapped to other buttons) In both cases to set the speed/voltage of the motor adjust the value of CV 133 (values ranging from 0-128 which cor- respond to the 128 speed steps). Dither Explanation and Usage: While most modelers will use BEMF to achieve slow speed starts and maintain even operation throughout the speed range some users still prefer to use the older Dither functionality to start their locomotive “creeping” at very low speeds. Dither works by adding micro pulses (when properly adjusted these pulses are invisible to the human eye) of a higher voltage to the motor to break through static friction and keep the motor from binding at very low speeds. To enable Dither one must only disable BEMF by programming an even number into CV 61. For instance if CV 61 has a value of 17 simply subtract a value of 1 and program the resulting value of 16 into CV 61. With BEMF disabled Dither automatically kicks in and can then be adjusted for optimal performance.
CV 56 (3) Dither Frequency (1 being the lowest frequency and 255 being the highest frequency). CV 57 (10) Dither Voltage (1 being the lowest and 255 being the top voltage).
To adjust Dither the values of CV’s 56 and 57 must be modified. CV 56 controls the frequency (the number of micro- pulses in a given period of time) and CV 57 controls the voltage (the power of each micro-pulse). To tune Dither begin by increasing the value of CV 57 by values of 5 until the locomotive in question is able to move at speed step 1. Next adjust the value of CV 56 by 1 value at a time until the locomotive is able to creep slowly and the operation still appears smooth and even.

Button Control of Braking and Trolley Features An overview of their purpose and how to implement them
Button Control of Braking
Button Control of Braking CV 61 (1) Button Control of Braking:
Acceptable values range from 0-255
Add a value of 8 to CV 61 to enable Button Control of Braking (defaults to function button 6, see the Function Remapping guide in this book for information on remapping the brake button). To enable braking tail lights add a value of 128 to the value found in CV 61.
Button Control of Braking is used most commonly with trolley cars where they are starting and stopping frequently. By pressing the button (default 6) to brake the locomotive the brake lights (if that effect is being used) will turn on, and the decoder will slow the locomotive to stopping at the rate defined below under Braking Deceleration.
See Quick Preset on page 24 for an easy way to setup Trolley Features
Braking Deceleration Rate CV 126 (0)
Acceptable values range from 0-255
Braking Deceleration
Braking Deceleration:
Braking deceleration defines the rate at which the decoder will slow Like standard momentum, the values range from 0 which will be a nearly instantaneous stop to 255 which will cause the locomotive to very gradually decelerate to a complete stop.
the locomotive to a complete stop during a braking cycle. When braking deceleration is active, and the brake button has been applied the base deceleration will not effect the actual deceleration and only the braking deceleration will be considered.
NOTE: This version of Button Controlled Braking and Brake Deceleration does not work on TCS WOWSound decoders. WOWSound decoders have their own version of 2 Button Controlled Braking, However the Brake Lights work correctly on a decoder using the 2 Button Brake.

Page 19
Motor Trim An overview of its purpose and how to implement it
CV 66 (128) Forward Motor Trim
CV 95 (128) Reverse Motor Trim
Faster Speed
Default Speed
0 128 CV Values
255
Motor Trim Explained:
Motor trim allows the entire speed range of a decoder to be shifted up (faster) or down (slower) using CV 66 and CV 95. This makes speed matching locomotives for consisting as well as adjusting for those notoriously fast and slow locomotives a breeze. If your locomotive performs slightly differently in forward than reverse you can adjust the trim in both directions independently to even out the speed curve regardless of direction. Motor trim can be used on top of User Loadable Speed tables and 3 point Speed Curves to adjust the entire range up or down. This way if you have the perfect speed curve but your locomotive is still slower or faster than you would like you can shift your custom curve up or down without adjusting each individual value.
Motor Trim Values:
As outlined in the diagram above, a value above 128 will increase the overall speed (the higher the number the faster the locomotive will go) and values below 128 will slow the locomotive (the lower the value the slower the locomotive will travel. The resolution (precision of the adjustment) of the values for motor trim is 4. This means that for every 4
you add or subtract from the trim value the speed will be adjusted by one degree of difference.
Motor Trim to Speed Match Locomotives: Adjusting the Motor Trim CV’s is a quick way to speed match dissimilar locomotives for Consisting especially on locomotives that have different speed characteristics when running in reverse. It is best to make your adjustments on the faster of the two locomotives since you can always slow it down, but not be able to speed it up enough to match the other locomotive.

Page 20
Momentum (Acceleration/Deceleration) An overview of its purpose and how to implement it
Momentum Explained: While most locomotives are accurately scaled down such that the details, sizing, color etc. etc. are accurate repre- sentations of the actual locomotive, but due to size and weight constraints most models have a far greater power-to- weight ratio than their life size counterparts. This means that they can accelerate at a rate that even the most powerful full size locomotives could not achieve. While for some slowly ramping the speed one speed step at a time provides smooth and slow enough acceleration (and deceleration) for those who want slower acceleration rates, or wish to set a speed and have their locomotive slowly ramp itself up to that speed Momentum allows the user to adjust how long it takes for the decoder to change speed. This creates the illusion of a heavy locomotive slowly accelerating to overcome it’s weight, or the slow deceleration of locomotive that has to slow the heavy load behind it.
CV 3 (0) The rate of Acceleration CV 4 (0) The rate of Deceleration CV 23 (0) Rate of Acceleration added to CV3 when in an Advanced Consist CV 24 (0) Rate of Deceleration added to CV4 when in an Advanced Consist
Momentum Usage: Momentum is controlled by adjusting the values of CV 3 and CV 4. Values between 1-255 are accepted and the larger the value used the longer it will take for the decoder to ramp up (Acceleration) or ramp down (deceleration) its speed from one speed step to the next. Typical values for both acceleration and deceleration fall between 5-50 and with minimal tweaking should allow the user to replicate nearly any size load on any train.
Optional Advanced Consist Momentum:
To simulate even heavier trains when using consisted locomotives, CV23 (Consist Acceleration) and CV24 (Consist
Deceleration) can increase the amount of momentum when using an Advanced Consist.
A value of between 1–255 in CV23 will be added to CV3 (acceleration) when a value other than 0 is in CV19
(Advanced Consist Address). A value of 0 (default) has no effect on acceleration.
A value of between 1–255 in CV24 will be added to CV4 (deceleration) when a value other than 0 is in CV19
(Advanced Consist Address). A value of 0 (default) has no effect on deceleration.

Page 21
Variable Momentum An overview of its purpose and how to implement it
Variable Momentum Explained:
For the most advanced users sometimes simple Acceleration and Deceleration controls (momentum) can’t quite produce the precisely prototypical operation they are looking for. In such cases variable momentum can be used to design precise and independently adjustable Acceleration and Deceleration (variable momentum). For most users this level of refined control will be far more precise than needed, but for modelers trying to squeeze every bit of real world detail into their trains we provide variable momentum.
Acceleration Deceleration CV 132 Acceleration Rate 3
CV 131 Rate 3 Starting Point
CV 130 Acceleration Rate 2
CV 129 Rate 2 Starting Point
CV 3 Acceleration Rate 1
Rate 3 Rate 2 Rate 1
ate 3 Rate 2 Rate 1
CV 128 Deceleration Rate 3
CV 127 Rate 3 Ending Point
CV 126 Deceleration Rate 2
CV 125 Rate 2 Ending Point
CV 4 Deceleration Rate 1
Variable Momentum Usage and Adjustment:
Variable uses five CV’s for Acceleration and five CV’s for deceleration (as pictured in the above diagram). Both Accel. and Decel. have three different rates of speed change as well as two points used to identify when to move from one rate to the next. As you can see above Acceleration and Deceleration have Rates 1, 2, and 3, and transition points be- tween 1 and 2, and 2 and 3.
Implementing Variable Momentum is as simple as programming values between 0-255 into all of the CV’s outlined above. To achieve the ideal curve a bit of trial and error and adjustment will be required. Typically the rate starting and ending points are values between 80-150 and the rate values tend to fall somewhere between 10-90 though again the range of values are much larger than that and will require a certain amount of tweaking.

Page 22
3 Point Speed Curves An overview of its purpose and how to implement it
3 Point Speed Curves Explained:
In most applications of acceleration and deceleration the rate at which a locomotive increases its speed forms a curve where the early speed steps do not increase the speed as rapidly as later speed steps. Whereas User Loadable Speed Tables have 28 individual speed steps to adjust and allows for speed plateaus, dips, and non-continuous speed curves, for most applications a simple Speed Curve will be more than adequate to create the prototypical movement of most locomotives.
To this end Speed Curves employes 3 CV’s, each defining the rate of speed of a given range of speed steps. Using the Start Volts, Mid Volts, and Top Volts the speed steps from 1-128 are divided into three equal sections. Adjusting the values in the corresponding CV’s shifts the standard speed curve up or down (within the specific range) thereby creat- ing an entirely new rate of speed from each speed step to the next.
CV 2 CV 6 CV 5
3 Point Speed Curves Usage and Adjustment:
To enable 3 Point Speed Curves simply program values into CV 2 (Start Volts), CV 6 (Mid Volts), and CV 5 (Top Volts).
The Speed Curve is defined in CV’s 2, 6 and 5 with each CV corresponding to approximately 1/3 of the speed range. Values may range from 1-255 and every value of 18 (approximately) added to one of the Speed Curve CV’s adds about 1 volt to the motor speed at the CV being adjusted.
NOTE: 3 Point Speed Curves do not allow for parabolic speed curves. That is to say each consecutive CV must have a value higher than, or equal to, the CV before it.

Page 23
User Loadable Speed Tables An overview of its purpose and how to implement it
User Loadable Speed Tables Explained:
For those looking for the ultimate of fine tuned speed adjustment User Loadable Speed Tables allows 28 speed steps to be individually defined. When running in 128 speed steps the gaps between the user defined speeds are averaged out and divided amongst the extra speed steps creating a smooth and even speed curve matching the points set by the user.
While for some this level of control and the time required to fine tune a unique speed table may be excessive for some users, others may find in this exactly the level of precise control needed to create a their ideal motor operation. If simple adjustment is all that is required, or speed matching two locomotives is the goal using Motor Trim and Speed Curves is typically a much easier and very effective option. User Loadable Speed Tables should be used only in those situations where ultra-fine control is needed and the other motor control options have been exhausted.
S P E E D
V A L U E
67 68 69 70 71 72 73 74 75 76 77
78 79 80 81 82 83 84 85 86 87 88 89 90 91 92 93 94
CV
User Loadable Speed Tables Usage and Adjustment: To enable User Loadable Speed Tables (ULST) add a value of 16 to whatever value you find in CV 29.
ULST values are defined in 28 CV’s from CV 67 to 94. Each CV defines 1/28th of the speed range (as shown in blue above) and the decoder uses each value as a point to generate the speed curve used by the locomotive (shown in red above). Every value of 9 (approximately) added to one of the ULST CV’s adds about 1 speed step (or approximately .5v) to the motor speed at the CV being adjusted.
If you are using 14 speed step mode only the CV’s highlighted in gray above will affect the speed curve of the locomo- tive. The remaining CV’s are only applicable in 28/128 speed step mode.
NOTE: ULST do not allow for parabolic speed curves. That is to say each consecutive CV must have a value higher than, or equal to, the CV before it.
CV 67 = 8 CV 74 = 64 CV 81 = 124 CV 88 = 194 CV 68 = 16 CV 75 = 72 CV 82 = 134 CV 89 = 204 CV 69 = 24 CV 76 = 80 CV 83 = 144 CV 90 = 214 CV 70 = 32 CV 77 = 88 CV 84 = 154 CV 91 = 224 CV 71 = 40 CV 78 = 96 CV 85 = 164 CV 92 = 234 CV 72 = 48 CV 79 = 104 CV 86 = 174 CV 93 = 244 CV 73 = 56 CV 80 = 114 CV 87 = 184 CV 94 = 255

Page 24
Quick Presets A quick way to set up certain features using CV 8
Ditch Light Preset:
CV 8 = 10 Program a value of 10 into CV 8 to make the Violet and Green wires into Ditch Lights. Button 1 will turn them on and Button 2 will make them alternate on and off for the holdover time period in CV 63.
Using this preset changes the following: CV 35 = 4 Green wire mapped to button 1. CV 36 = 4 Violet wire mapped to button 1. CV 51 = 42 Green wire set to Ditch Light Left in both forward and reverse. CV 52 = 43 Violet wire set to Ditch Light Right in both forward and reverse. CV 124 = 8 Maps Ditch Light Blink to button 2.
Standard Trolley Preset:
CV 8 = 11 Program a value of 11 into CV 8 to set up the standard Trolley Features. Button controlled Brake on Button 6 and working Brake Lights when Button 3 is on with Running Lights.
Using this preset changes the following: CV 61 = 9 Enables BEMF and Button Controlled Brake on Button 6 CV 3 = 5 Acceleration Setting CV 4 = 5 Deceleration Setting CV 34 = 16 Remaps yellow wire to button 3 (Turns on Brake light feature when Button 3 is on) CV 49 = 32 Makes Headlight Non-Directional CV 50 = 46 Makes the yellow wire into working Brake Lights CV 64 = 5 Dim value for running lights CV 126 = 5 Brake Deceleration Rate
IMPORTANT NOTE: For the running lights (tail lights) to be dim until the brake is applied you must program CV 61 to a value of 137 AFTER you have set CV 8 to 11.
Deluxe Trolley Preset:
CV 8 = 12 Program a value of 12 into CV 8 to set up the Deluxe Trolley Features. Button controlled Brake on Button 6 and working Brake Lights when Button 3 is on with Running Lights, On/off Function on Green wire with Button 1 and Violet wire with Button 4, and Rotary Beacon on brown wire with Button 5
Using this preset changes the following: CV 61 = 9 Enables Button Controlled Brake on Button 6 CV 3 = 5 Acceleration Setting CV 4 =5 Deceleration Setting CV 34 = 16 Remaps the yellow wire into working Brake Lights CV 49 = 32 Makes Headlight Non-Directional CV 50 = 46 Makes the yellow wire into working Brake Lights CV 64 = 5 Dim value for running lights CV 126 = 5 Brake Deceleration Rate CV 36 = 32 Maps Violet wire to button 4 On/Off CV 39 = 64 Maps Brown wire to button 5 CV 53 = 38 Makes Brown wire a Rotary Beacon
IMPORTANT NOTE: For the running lights (tail lights) to be dim until the brake is applied you must program CV 61 to a value of 137 AFTER you have set CV 8 to 12.
Page 25
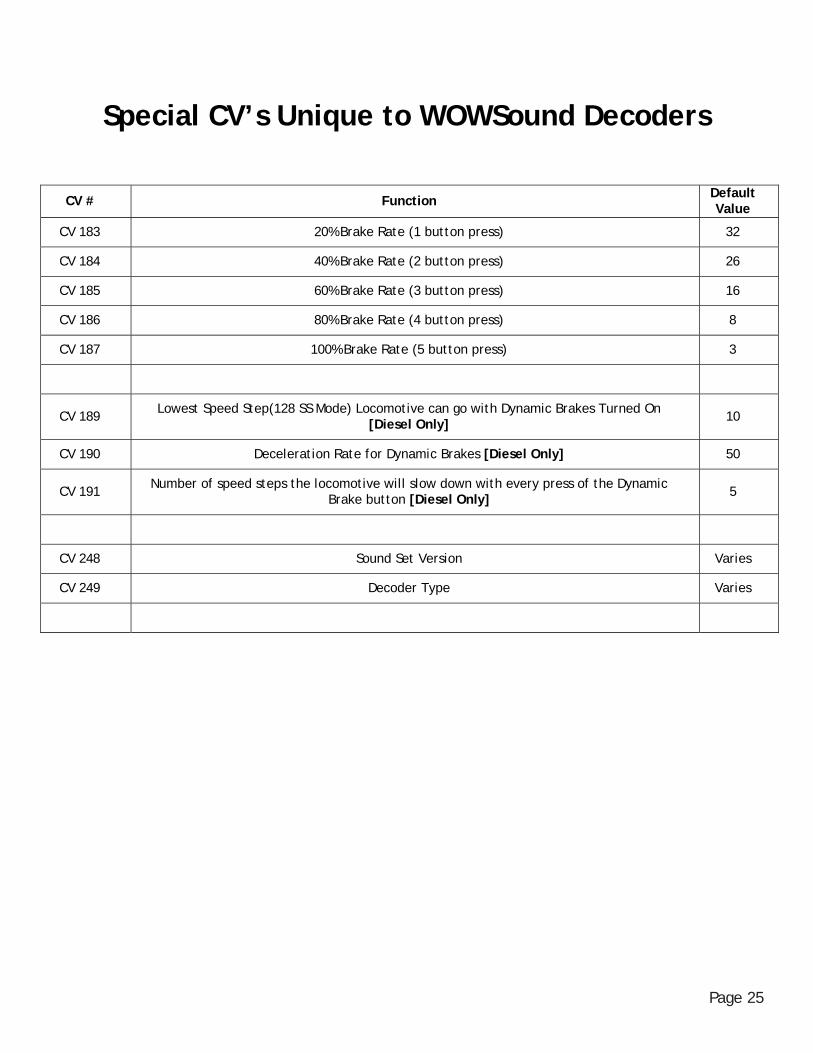
Special CV’s Unique to WOWSound Decoders
CV # Function Default Value
CV 183 20% Brake Rate (1 button press) 32
CV 184 40% Brake Rate (2 button press) 26
CV 185 60% Brake Rate (3 button press) 16
CV 186 80% Brake Rate (4 button press) 8
CV 187 100% Brake Rate (5 button press) 3
CV 189 Lowest Speed Step(128 SS Mode) Locomotive can go with Dynamic Brakes Turned On
[Diesel Only] 10
CV 190 Deceleration Rate for Dynamic Brakes [Diesel Only] 50
CV 191 Number of speed steps the locomotive will slow down with every press of the Dynamic
Brake button [Diesel Only] 5
CV 248 Sound Set Version Varies
CV 249 Decoder Type Varies

Page 26
WOWElectric ACS64 O.E.M. Addendum
Default CV value changes: CV Number Default Value Description
CV3 6 Acceleration
CV4 6 Deceleration
CV29 6 Configuration CV
CV35 16 Light output 1 mapped to F3
CV36 16 Light output 2 mapped to F3
CV39 16 Light output 3 mapped to F3
CV40 16 Light output 4 mapped to F3
CV49 8 Front headlight uses Rule 17
CV50 24 Rear headlight uses Rule 17
CV51 10 Light output 1 is a Ditch light
CV52 11 Light output 2 is a Ditch light
CV53 26 Light output 3 is a Ditch light
CV54 27 Light output 4 is a Ditch light
CV61 41 Configuration CV
CV63 10 Ditch light blink holdover time
CV117 221 Ditch light blink rate
CV123 0 So Rule 17 does not dim on F4
CV124 76 Ditch lights blink on buttons
1,2 and 5 CV158 4 Enables Rule17
dimming on F7