te-rtd12 user manual - motortronics manual.pdf · appendix c: rtd wiring diagram (2, 3 and 4 wire...
TRANSCRIPT


Motortronics
www.motortronics.com Page 1
Table of contents
1 About the Motortronics TE-RTD12 Relay Device .................................................................................. 2 1.1 General ............................................................................................................................................... 2 1.2 Dimensions and Mounting .................................................................................................................. 3 1.3 General Wiring Diagram ..................................................................................................................... 4
1.3.1 Wire Size and Tightning Torque ................................................................................................... 5 1.3.2 CT Connection: Core Balance Connection ................................................................................... 5 1.3.3 Ct Connection: Summing Method ................................................................................................. 6
1.4 Keypad ................................................................................................................................................ 7 1.4.1 Layout and Description ................................................................................................................. 7 1.4.2 Navigation ..................................................................................................................................... 8
1.5 Quick Start-Up .................................................................................................................................... 9
2 Parameters ............................................................................................................................................. 11 2.1 Parameters Overview .................................................................................................................. 11-17 2.2 Parameters Detailed Explanation ..................................................................................................... 18
2.2.1 RTD Settings.......................................................................................................................... 18-27 2.2.2 Digital Inputs ............................................................................................................................... 28 2.2.3 Analog Inputs .............................................................................................................................. 29 2.2.4 Analog Output ............................................................................................................................. 32 2.2.5 Device Setting ............................................................................................................................. 33 2.2.6 Differential CTs ........................................................................................................................... 33 2.2.7 Relay Settings ............................................................................................................................. 34 2.2.8 Communication ........................................................................................................................... 35 2.2.9 Real Time Clock.......................................................................................................................... 36 2.2.10 Display ................................................................................................................................... 37-38 2.2.11 Relay Configuration ............................................................................................................... 38-39 2.2.12 System Settings .......................................................................................................................... 39 2.2.13 Device Information ...................................................................................................................... 40
3 Fault History and Event Records ......................................................................................................... 41 3.1 Fault History ...................................................................................................................................... 41 3.2 Fault Code Table .............................................................................................................................. 42 3.3 Event Records .................................................................................................................................. 43
4 MODBUS RTU Communication ............................................................................................................ 44 4.1 Serial Connection / Wiring ................................................................................................................ 44 4.2 Serial Communication Settings ........................................................................................................ 45 4.3 MODBUS RTU Message Structure ............................................................................................. 45-48 4.4 Main Registers ............................................................................................................................. 49-53 4.5 Monitor Registers.............................................................................................................................. 54
APPENDIX A: TECHNICAL SPECIFICATIONS ........................................................................... 55
APPENDIX B: RTD TYPE TEMPERATURE VS RESISTANCE CHARTS .................................... 56
APPENDIX C: RTD WIRING DIAGRAM (2, 3 and 4 WIRE RTD) ................................................. 58
WARRANTY INFORMATION ....................................................................................................... 66
Motortronics
www.motortronics.com Page 2
1 About the Motortronics TE-RTD12 Relay Device
1.1 General The TE-RTD12 Relay device adds advanced RTD (Resistor Temperature Detector) and differential current monitoring capability to your new or existing motor system. The TE-RTD12 Relay device offers 12 built-in RTD inputs, 3 programmable output relays (5A), 2 isolated analog inputs (4-20mA), 1 isolated analog output (4-20mA), 3 isolated digital inputs and differential current feedback monitoring. Additionally, an RS485 (2 wire) communication port is available for use with a master device (PLC / SCADA / Operator Interface) for the purpose of programming and/or monitoring. Programmable relay outputs are provided that can be configured for a system function or for use as a global Alarm or Trip based on temperature readout, which can be entered in ºC or ºF.
A built-in event recorder stores fault history of past events with data points including Alarm / Trip Code, Current / Temperature value, Analog input value and Date / Time Stamp. The TE-RTD12 Relay device can be mounted on a back panel using the mounting bracket.
NOTES -

Motortronics
www.motortronics.com Page 3
1.2 Dimensions and Mounting Dimensions:
(133.3)
(77.7)
(212.9) (225.0)
(133.3)
(157.2)
(11.9)
(7.4)
(5.1)
8.86” x 6.19” x 3.06” (H x W x D)
225mm x 157.2mm x 77.7mm (H x W x D) (mm)
Mounting
Use the designated mounting holes to mount the TE-RTD12 in the designated area of your system.

Motortronics
www.motortronics.com Page 4
1.3 General Wiring Diagram The following figure shows the general wiring diagram for the TE-RTD12 Relay Device. The terminal blocks are removable (pluggable) for ease of wiring.
C N.O. N.C.
RELAY 1 RELAY 2 RELAY 3
CONTROL
POWER INPUT
110 - 240 Vac
1Ø 50 / 60 Hz
N LE
TB1
TB2
1 2 3 4 5 6 7 8 9 10 11 12 1 2 3 4 5 6 7 8 9
ISOLATED
DIGITAL
INPUTS
GND 1 2 3C N.O. N.C. C N.O. N.C.
ISOLATED
4 – 20 mA
INPUTS
IN1 COM IN2
ISOLATED
4 – 20 mA
OUTPUT
OUT OUT + - + -
1 2 3 4 5 6
A B C
DIFFERENTIAL
CT INPUTS
+ - + - + -
TB7
RS485
COM PORT
1 2 3 4 5 6 7 8
Connector RJ45 Pin Out
Pin Function
4 A+
5 A-
7 ISO +5V thru 560Ω Resistor
8 ISO Gnd
Note: Pin 7 and 8 can be used by the master device to
detect the presence of a connected unit.
RJ45
1 2 3 4 5 6 7 8 9 10 11 12 1 2 3 4 5 6 7 8 9 10 11 12
RTD 11 GND GND S
1 RET 1
RTD 2
2 GND GND S
2 RET 2
3 GND GND S
3 RET 3
RTD 3 RTD 4
4 GND GND S
4 RET 4
RTD 5
5 GND GND S
5 RET 5
6 GND GND S
6 RET 6
RTD 6
TB5 TB6
1 2 3 4 5 6 7 8 9 10 11 12
RTD 7
7 GND GND S
7 RET 7
RTD 8
8 GND GND S
8 RET 8
9 GND GND S
9 RET 9
RTD 9 RTD 10
10 GND GND S
10 RET 10
RTD 11
11 GND GND S
11 RET 11
12 GND GND S
12 RET 12
RTD 12
TB3 TB4
RTD Typical
Connections
1 2 3 4 5 6 7 8 9 10 11 12
Reset
Fn Enter
Relay 1 Relay 2 Relay 3
OK ALARM TRIP
TE-RTD12 Relay
Refer to table 1. for
recommended terminal
torque values.
Note:
· RS485 and Digital Inputs
have a common ground
· All 4-20mA I/O share a
common ground that is
isolated from the RS485
and Digital I/O ground.
Refer to section 4 for
detailed connections.
TE-RTD12 Relay Device General Wiring Diagram CAUTION: DO NOT CONNECT INPUT POWER TO TB2, TB3, TB4, TB5, TB6 or TB7 ONLY CONNECT INPUT POWER TO TB1 TERMINAL N AND L (110 - 240Vac)
Motortronics
www.motortronics.com Page 5
1.3.1 Wire Size and Tightening Torque
Connector Wire Size
AWG
Tightening Torque Recommended in-Lb
Tightening Torque
Maximum in-Lb
TB1, TB2, TB7 30 - 12 4.42 4.42
TB3, TB4 30 - 14 2.21 2.21
TB5, TB6 30 - 14 1.77 2.21
Table 1 1.3.2 CT Connection: Core Balance Connection
Motor
1 2 3 4 5 6
A B C
DIFFERENTIAL
CT INPUTS
+ - + - + -
TB7
A
B
C
A Phase
B Phase
C Phase

Motortronics
www.motortronics.com Page 6
1.3.3 CT Connection: Summing Method
1 2 3 4 5 6
A B C
DIFFERENTIAL
CT INPUTS
+ - + - + -
TB7
A
B
C
MotorA Phase
B Phase
C Phase
A Phase
B Phase
C Phase

Motortronics
www.motortronics.com Page 7
1.4 Keypad
1.4.1 Layout and Description
The Keypad for the TE-RDT12 Relay incorporates an 8 digit LED display, a membrane keypad for programming, data entry and data retrieval. There are also 6 LED status indicators.
Reset
Fn Enter
Relay 1 Relay 2 Relay 3
OK ALARM TRIP
TE-RTD12 Relay
TE- RTD12 Keypad
Keypad Description
Keys
Reset Resets the device after the conditions that cause an ALARM or TRIP have been cleared
Fn Enter program mode (view event log)
Up and Down Arrows Monitor Navigation / increase or decrease value
Right and Left Arrows
Each key press shifts the active (flashing) digit to the right or left by one position, allowing you to change higher values of functions without waiting to Auto-step through large numbers.
Enter Read and save parameter changes
Display 8888 8888 Two 4-digit 7-segment LED displays
LED
OK (Green) ON: Indicates that there are no Alarms or Trips. (Yellow and Red LED’s are OFF)
ALARM (Yellow) ON: An ALARM is active
TRIP (Red) ON: A TRIP has occurred
Relay 1 (Yellow)
ON: Relay is activated Relay 2 (Yellow)
Relay 3 (Yellow)
Table 2

Motortronics
www.motortronics.com Page 8
1.4.2 Navigation
Reset
Power Up
Main Monitor
#1 Hottest Stator RTD # (id)
#2 Hottest Stator RTD temperature
#3 Hottest Non-Stator RTD # (id)
#4 Hottest Non-Stator RTD temp.
#5 RTD #1 (default name: Stator #1)
#6 RTD #2 (default name: Stator #2)
…. See parameter F094
Fn
#15 #16
… See parameter F094
Program Mode
Event Log Mode
Blinking
Move
Cursor
Change
Value
Enter
Blinking
Accept / Switch
# and Value
Fault/Alarm
Auto-Scroll
Manual Select
Enter
Select
Select

Motortronics
www.motortronics.com Page 9
1.5 Quick Start-up
Follow these steps to setup your TE-RTD12 device.
Step 1: Connect Power Supply
With the power-supply turned OFF connect a single phase power supply 110 – 240 Vac Nominal to terminal TB1 (1 = Ground, 2 = N, 3 = L) to power the TE-RTD12. See wiring diagram for connections.
C N.O. N.C.
RELAY 1 RELAY 2 RELAY 3
CONTROL
POWER INPUT
110 to 240 Vac
1Ø 50 / 60 Hz
Earth GndN LE
TB1
C N.O. N.C. C N.O. N.C.
2 31
TB1
Important: Use fuse protection of 2A 240VAC 5kA RK5 or equivalent fuse for the input power supply.
CAUTION: DO NOT CONNECT INPUT POWER TO TB2, TB3, TB4, TB5, TB6 or TB7 ONLY CONNECT INPUT POWER TO TB1 TERMINAL N AND L (85 ~ 265Vac)
Step 2: Connect RTD Inputs (only if used)
- Turn power-supply OFF
- With the power-supply turned OFF connect the RTD inputs to terminal block TB3, TB4, TB5 and TB6 according to the wiring diagram.
1 2 3 4 5 6 7 8 9 10 11 12 1 2 3 4 5 6 7 8 9 10 11 12
RTD 11 GND GND S
1 RET 1
RTD 2
2 GND GND S
2 RET 2
3 GND GND S
3 RET 3
RTD 3 RTD 4
4 GND GND S
4 RET 4
RTD 5
5 GND GND S
5 RET 5
6 GND GND S
6 RET 6
RTD 6
TB5 TB6
1 2 3 4 5 6 7 8 9 10 11 12
RTD 7
7 GND GND S
7 RET 7
RTD 8
8 GND GND S
8 RET 8
9 GND GND S
9 RET 9
RTD 9 RTD 10
10 GND GND S
10 RET 10
RTD 11
11 GND GND S
11 RET 11
12 GND GND S
12 RET 12
RTD 12
TB3 TB4
RTD Typical
Connections
1 2 3 4 5 6 7 8 9 10 11 12
NOTE: The stator RTD’s have to connect consecutively from RTD #1 and up. The number of stator RTD’s has to be entered in parameter F049.
Motortronics
www.motortronics.com Page 10
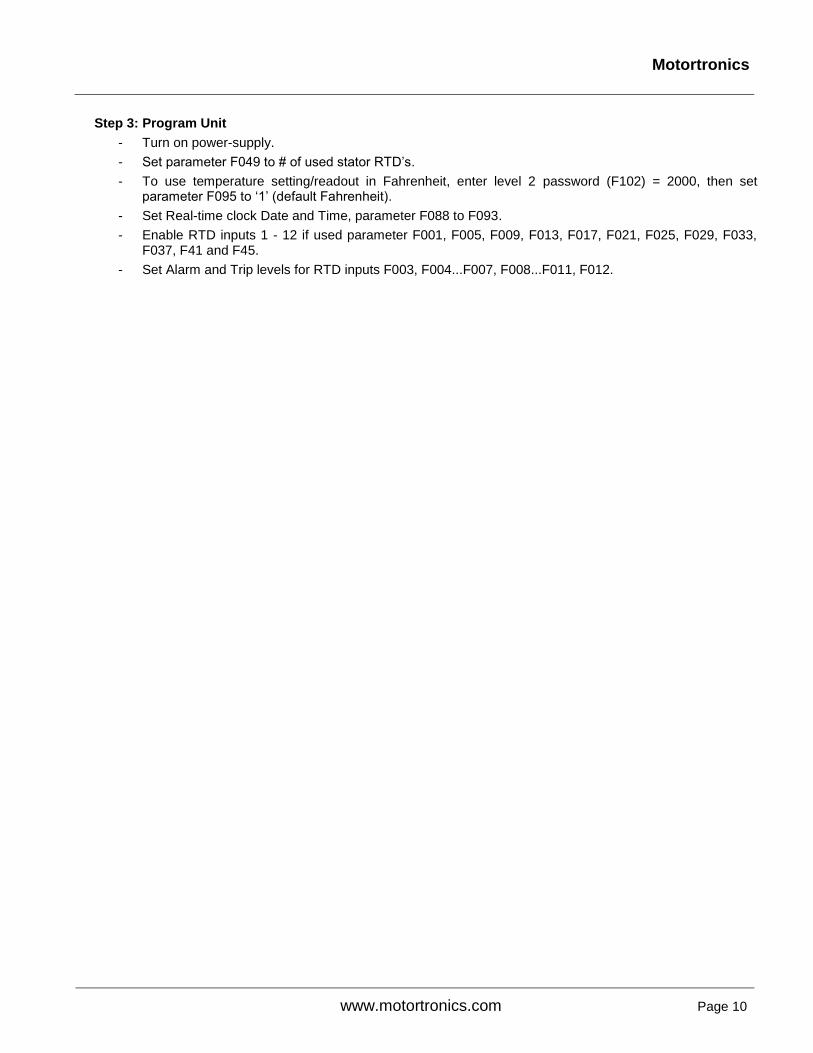
Step 3: Program Unit
- Turn on power-supply.
- Set parameter F049 to # of used stator RTD’s.
- To use temperature setting/readout in Fahrenheit, enter level 2 password (F102) = 2000, then set parameter F095 to ‘1’ (default Fahrenheit).
- Set Real-time clock Date and Time, parameter F088 to F093.
- Enable RTD inputs 1 - 12 if used parameter F001, F005, F009, F013, F017, F021, F025, F029, F033, F037, F41 and F45.
- Set Alarm and Trip levels for RTD inputs F003, F004...F007, F008...F011, F012.

Motortronics
www.motortronics.com Page 11
2.0 Parameters
2.1 Parameter Overview
Grp RTD# Fn# Function Adj. Range Incr. Default Setting
PSW
Level
1.
RT
D S
ett
ing
s.
RTD1
F001 STATOR PHASE A1 TYPE 0-4 [0: OFF; 1: 100 Ohm Pt; 2: 10 Ohm Cu; 3: 100 Ohm Ni; 4: 120 Ohm Ni.]
1 OFF 1
F002 RTD # 1 DESCRIPTION
0 –1
0: Stator #1 (StA1)
1: RTD #1 (rt 1)
1 0 1
F003
STATOR PHASE A1 ALARM
TEMPERATURE
0-464,[0-240 (C); 32-464 (F)], OFF 1 OFF 1
F004 STATOR PHASE A1 TRIP
TEMPERATURE 0-464,[0-240 (C); 32-464 (F)], OFF 1 OFF 1
RTD2
F005 STATOR PHASE A2 TYPE 0-4 [0: OFF; 1: 100 Ohm Pt; 2: 10 Ohm Cu; 3: 100 Ohm Ni; 4: 120 Ohm Ni.]
1 OFF 1
F006 RTD # 2 DESCRIPTION
0 –1
0: Stator #2 (StA2)
1: RTD #2 (rt 2)
1 0 1
F007
STATOR PHASE A2 ALARM
TEMPERATURE
0-464,[0-240 (C); 32-464 (F)], OFF 1 OFF 1
F008 STATOR PHASE A2 TRIP
TEMPERATURE 0-464,[0-240 (C); 32-464 (F)], OFF 1 OFF 1
RTD3
F009 STATOR PHASE A3 TYPE 0-4 [0: OFF; 1: 100 Ohm Pt; 2: 10 Ohm Cu; 3: 100 Ohm Ni; 4: 120 Ohm Ni.]
1 OFF 1
F010 RTD # 3 DESCRIPTION
0 –1
0: Stator #3 (StA3)
1: RTD #3 (rt 3)
1 0 1
F011
STATOR PHASE A3 ALARM
TEMPERATURE
0-464,[0-240 (C); 32-464 (F)], OFF 1 OFF 1
F012 STATOR PHASE A3 TRIP
TEMPERATURE 0-464,[0-240 (C); 32-464 (F)], OFF 1 OFF 1
RTD4
F013 STATOR PHASE A4 TYPE 0-4 [0: OFF; 1: 100 Ohm Pt; 2: 10 Ohm Cu; 3: 100 Ohm Ni; 4: 120 Ohm Ni.]
1 OFF 1
F014 RTD # 4 DESCRIPTION
0 –1
0: Stator #4 (StA4)
1: RTD #4 (rt 4)
1 0 1
F015
STATOR PHASE A4 ALARM
TEMPERATURE
0-464,[0-240 (C); 32-464 (F)], OFF 1 OFF 1
F016 STATOR PHASE A4 TRIP
TEMPERATURE 0-464,[0-240 (C); 32-464 (F)], OFF 1 OFF 1
Note: See parameter Fn95 first to change between ºC and ºF.

Motortronics
www.motortronics.com Page 12
Grp RTD# Fn# Function Adj. Range Incr. Default Setting
PSW
Level
1.
RT
D S
ett
ing
s.
RTD5
F017 STATOR PHASE A5 TYPE 0-4 [0: OFF; 1: 100 Ohm Pt; 2: 10 Ohm Cu; 3: 100 Ohm Ni; 4: 120 Ohm Ni.]
1 OFF 1
F018 RTD # 5 DESCRIPTION
0 –1
0: Stator #5 (StA5)
1: RTD #5 (rt 5)
1 0 1
F019
STATOR PHASE A5 ALARM
TEMPERATURE
0-464,[0-240 (C); 32-464 (F)], OFF 1 OFF 1
F020 STATOR PHASE A5 TRIP
TEMPERATURE 0-464,[0-240 (C); 32-464 (F)], OFF 1 OFF 1
RTD6
F021 STATOR PHASE A6 TYPE 0-4 [0: OFF; 1: 100 Ohm Pt; 2: 10 Ohm Cu; 3: 100 Ohm Ni; 4: 120 Ohm Ni.]
1 OFF 1
F022 RTD # 6 DESCRIPTION
0 –1
0: Stator #6 (StA6)
1: RTD #6 (rt 6)
1 0 1
F023
STATOR PHASE A6 ALARM
TEMPERATURE
0-464,[0-240 (C); 32-464 (F)], OFF 1 OFF 1
F024 STATOR PHASE A6 TRIP
TEMPERATURE 0-464,[0-240 (C); 32-464 (F)], OFF 1 OFF 1
RTD7
F025 FRONT BEARING TYPE 0-4 [0: OFF; 1: 100 Ohm Pt; 2: 10 Ohm Cu; 3: 100 Ohm Ni; 4: 120 Ohm Ni.]
1 OFF 1
F026 RTD # 7 DESCRIPTION
0 –1
0: Front Bearing (Fb)
1: RTD #7 (rt 7)
1 0 1
F027 FRONT BEARING ALARM
TEMPERATURE 0-464,[0-240 (C); 32-464 (F)], OFF 1 OFF 1
F028 FRONT BEARING TRIP
TEMPERATURE 0-464,[0-240 (C); 32-464 (F)], OFF 1 OFF 1
RTD8
F029 REAR BEARING TYPE 0-4 [0: OFF; 1: 100 Ohm Pt; 2: 10 Ohm Cu; 3: 100 Ohm Ni; 4: 120 Ohm Ni.]
1 OFF 1
F030 RTD # 8 DESCRIPTION
0 –1
0: Rear Bearing (rb)
1: RTD #8 (rt 8)
1 0 1
F031 REAR BEARING ALARM
TEMPERATURE 0-464,[0-240 (C); 32-464 (F)], OFF 1 OFF 1
F032 REAR BEARING TRIP
TEMPERATURE 0-464,[0-240 (C); 32-464 (F)], OFF 1 OFF 1
Note: See parameter Fn95 first to change between ºC and ºF.

Motortronics
www.motortronics.com Page 13
Grp RTD# Fn# Function Adj. Range Incr. Default Setting
PSW
Level
1.
RT
D S
ett
ing
s.
RTD9
F033 RTD #9 TYPE 0-4 [0: OFF; 1: 100 Ohm Pt; 2: 10 Ohm Cu; 3: 100 Ohm Ni; 4: 120 Ohm Ni.]
1 OFF 1
F034 RTD #9 DESCRIPTION
0 –1
0: Bearing Box (brbo)
1: RTD #9 (rt 9)
1 0 1
F035 RTD #9 ALARM
TEMPERATURE 0-464,[0-240 (C); 32-464 (F)], OFF 1 OFF 1
F036 RTD #9 TRIP
TEMPERATURE 0-464,[0-240 (C); 32-464 (F)], OFF 1 OFF 1
RTD10
F037 RTD #10 TYPE 0-4 [0: OFF; 1: 100 Ohm Pt; 2: 10 Ohm Cu; 3: 100 Ohm Ni; 4: 120 Ohm Ni.]
1 OFF 1
F038 RTD #10 DESCRIPTION
0 –1
0: Ambient (Abnt)
1: RTD #10 (rt10)
1 0 1
F039 RTD #10 ALARM
TEMPERATURE 0-464,[0-240 (C); 32-464 (F)], OFF 1 OFF 1
F040 RTD #10 TRIP
TEMPERATURE 0-464,[0-240 (C); 32-464 (F)], OFF 1 OFF 1
RTD11
F041 RTD #11 TYPE 0-4 [0: OFF; 1: 100 Ohm Pt; 2: 10 Ohm Cu; 3: 100 Ohm Ni; 4: 120 Ohm Ni.]
1 OFF 1
F042 RTD #11 DESCRIPTION
0 –1
0: User Defined #1 (USr1)
1: RTD #11 (rt11)
1 0 1
F043 RTD #11 ALARM
TEMPERATURE 0-464,[0-240 (C); 32-464 (F)], OFF 1 OFF 1
F044 RTD #11 TRIP
TEMPERATURE 0-464,[0-240 (C); 32-464 (F)], OFF 1 OFF 1
RTD12
F045 RTD #12 TYPE 0-4 [0: OFF; 1: 100 Ohm Pt; 2: 10 Ohm Cu; 3: 100 Ohm Ni; 4: 120 Ohm Ni.]
1 OFF 1
F046 RTD #12 DESCRIPTION
0 –1
0: User Defined #2 (USr2)
1: RTD #12 (rt12)
1 0 1
F047 RTD #12 ALARM
TEMPERATURE 0-464,[0-240 (C); 32-464 (F)], OFF 1 OFF 1
F048 RTD #12 TRIP
TEMPERATURE 0-464,[0-240 (C); 32-464 (F)], OFF 1 OFF 1
F049 # OF RTD’S USED FOR
STATOR 0-6 1 6
F050 RTD VOTING 0 – 1 [0=Disabled, 1= Enabled] 1 0 1
Note: See parameter Fn95 first to change between ºC and ºF.

Motortronics
www.motortronics.com Page 14
Grp RTD# Fn# Function Adj. Range Incr. Default Setting
PSW
Level
2.
Dig
ita
l In
pu
ts
F051 Input #1 (InP1) Select 0-2 [0: Disabled; 1: Normally Open; 2: Normally Closed]
1 0 1
F052 Time Delay 1-60 (Sec) 1 1 1
F053 Input #2 (InP2) Select
0-2 [0: Disabled; 1: Normally Open; 2: Normally Closed]
1 0 1
F054 Time Delay 1-60 (Sec) 1 1 1
F055 Input #3 (InP3) Select
0-2 [0: Disabled; 1: Normally Open; 2: Normally Closed]
1 0 1
F056 Time Delay 1-60 (Sec) 1 1 1
3.
An
alo
g I
np
uts
F057 Analog Input #1 Name
0-5
[0: OFF;
1: Analog Input #1 (AnA1);
2: Oscillation #1 (oSC1);
3: Air Flow #1 (AFL1);
4: Speed #1 (SPd1);
5: Pressure #1 (PrS1).]
1 OFF 1
F058 Analog Input #1 (AnA1) 4mA
0-9999 1 0 1
F059 Analog Input #1 (AnA1) 20mA
0-9999 1 9999 1
F060 Analog Input #1 Alarm Level
0,1-9999 [0: OFF; 1-9999 trip level] 1 OFF 1
F061 Analog Input #1 Alarm Time Delay
1-60 (Sec) 1 1 1
F062 Analog Input #1 Trip Level 0,1-9999 [0: OFF; 1-9999 trip level] 1 OFF 1
F063 Analog Input #1 Trip Time Delay
1-60 (Sec) 1 1 1
F064 Analog Input #2 Name
0-5
[0: OFF;
1: Analog Input #2 (AnA2);
2: Oscillation #2 (oSC2);
3: Air Flow #2 (AFL2);
4: Speed #2 (SPd2);
5: Pressure #2 (PrS2).]
1 OFF 1
F065 Analog Input #2 (AnA2) 4mA
0-9999 1 0 1
F066 Analog Input #2 (AnA2) 20mA
0-9999 1 9999 1
F067 Analog Input #2 Alarm Level
0,1-9999 [0: OFF; 1-9999 trip level] 1 OFF 1
F068 Analog Input #2 Alarm Time Delay
1-60 (Sec) 1 1 1
F069 Analog Input #2 Trip Level 0,1-9999 [0: OFF; 1-9999 trip level] 1 OFF 1
Note: See parameter Fn95 first to change between ºC and ºF.

Motortronics
www.motortronics.com Page 15
Grp RTD# Fn# Function Adj. Range Incr. Default Setting
PSW
Level
4.
An
alo
g O
utp
ut
F070 Analog Input #2 Trip Time Delay
1-60 (Sec) 1 1 1
F071 Analog Output
0-6
[0: OFF;
1: Hottest Stator RTD Temperature;
2. Hottest Non-Stator RTD Temperature;
3. Analog Input #1 (AnA1);
4: Analog Input #2 (AnA2);
5: Unit Internal Temperature;
6: Highest Differential Phase Current. ]
1 OFF 1
F072 Analog Output 4mA 0-9999 1 0 1
F073 Analog Output 20mA 0-9999 1 9999 1
5.
Dev
ice
Se
ttin
g
F074 Unit Internal Alarm Temperature
0 or 1=(85(C)[=185(F)]
[OFF, 85(C)=185(F)]
1 85C/
185F 1
F075 Reserved - - - -
6.
Dif
fere
nti
al
CT
s F076
Differential CT Alarm Level
OFF, 5-90 (% of CT Primary) 5 OFF 1
F077 Alarm Time Delay 1-60 (Sec) 1 1 1
F078 Differential CT Trip Level OFF, 5-90 (% of CT Primary) 5 OFF 1
F079 Trip Time Delay 1-60 (Sec) 1 1 1
F080 Differential CT Primary OFF, 5-2000 (A) 5 OFF 2
F081 Differential CT Secondary
1,5 (A) 4 5 2
7.
Rela
y S
ett
ing
s
F082 Relay 1 setting Operation # 19 only 1 19 (Any
Trip) 1
F083 Relay 2 setting Operation # 1 – 19 1 9 (Any Alarm)
1
F084 Relay 3 setting Operation # 1 – 19 1
13 (Digital Input #1
Trip)
1
8.
Co
mm
.
F085 Communications
0-2 [
0=OFF;
1=Enabled(11bit) communication only;
2=Enabled(10bit) comm. only;]
1 OFF 2
F086 Baud Rate 9.6, 19.2 and 38.4 - 9.6 2
F087 Modbus Address 1 - 247 1 1 2
9.
RT
C
F088 Year 2000 - 2047 1 Year - 1
F089 Month 1-12 1 Month - 1
F090 Day 1-31 1 Day - 1
F091 Hour 0 - 23 1 Hour - 1
F092 Minute 0 - 59 1 Min. - 1
F093 Seconds 0 - 59 1 Sec. - 1
Note: See parameter Fn95 first to change between ºC and ºF.

Motortronics
www.motortronics.com Page 16
Grp RTD# Fn# Function Adj. Range Incr. Default Setting
PSW
Level
10
. D
isp
lay
F094 Default Display 0-34 [0: Auto Scroll RTD Screens; 1-34: See Table of this Function]
1 1 2
F095 Unit of Temperature 0-1 [0: C_ Celsius; 1: F_ Fahrenheit.] 1 0 2
11
. R
ela
y c
on
fig
.
F096 Relay 1 Fail Safe 0-1 [0=Disabled; 1=Enabled.] 1 0 2
F097 Relay 2 Fail Safe 0-1 [0=Disabled; 1=Enabled.] 1 0 2
F098 Relay 3 Fail Safe 0-1 [0=Disabled; 1=Enabled.] 1 0 2
F099 Relay Test
0-3
[0=Disabled;
1=Energize Relay #1 for 5 seconds;
2=Energize Relay #2 for 5 seconds;
3=Energize Relay #3 for 5 seconds;]
1 0 2
12
. S
ys
tem
Se
ttin
gs
F100 Parameter Lock/ Level 1 Password
0, 001 – 999 [0= Disabled, Number=Password]
1 0(Show encrypted code)
1
F101 System Clear / Factory Reset
(TBD) (Reset
Factory Default Settings)
0, 1 – 4 [
0 = Disabled;
1=Clear Highest Temperature.
2= Reset Factory Default Settings in category of Level 1 Password. Level 1 Password required.
3 = Reset Factory Default Settings in categories of Level1 and Level 2 Password. Level 2 Password required.
4 = Reserved. ]
1 0 1
F102 Level 2 Password 2000 – 9999 1
2000 (Show
encrypted code)
2
F103 Reserved - - - -
13
. R
ev
.
F104 RTD12 Revision # - - -
F105 KP Revision # - - -
F106 RTD-INF Revision # - - -
Note: See parameter Fn95 first to change between ºC and ºF.

Motortronics
www.motortronics.com Page 17
Grp RTD# Fn# Function Adj. Range Incr. Default Setting
PSW
Level
14
. F
au
lt H
isto
ry
F107 Fault History #1, Latest Fault
0, 31 – 50 (Fault #: see Fault code list; 0: No fault history)
1 0
F108 Alarm / Trip Level (if available)
--- - -
F109 Time Stamp, Fault #1 EST 00.00-23.59 (hh.mm)
[hh = 00-23; mm = 00-59] 00.01 00.00
F110 Date Stamp, Fault #1 01.01 – 12.31 (MM.DD)
[MM = 01-12; DD = 01-31] 00.01 01.01
F111 Fault History #2, Previous Fault
0, 31 – 50 (Fault #: see Fault code list; 0: No fault history)
1 0
F112 Alarm / Trip Level (if available)
--- - -
F113 Time Stamp, Fault #2 EST 00.00-23.59 (hh.mm)
[hh = 00-23; mm = 00-59] 00.01 00.00
F114 Date Stamp, Fault #2 01.01 – 12.31 (MM.DD)
[MM = 01-12; DD = 01-31] 00.01 01.01
F115 Fault History #3, Oldest Fault
0, 31 – 50 (Fault #: see Fault code list; 0: No fault history)
1 0
F116 Alarm / Trip Level (if available)
--- - -
F117 Time Stamp, Fault #3 EST 00.00-23.59 (hh.mm)
[hh = 00-23; mm = 00-59] 00.01 00.00
F118 Date Stamp, Fault #3 01.01 – 12.31 (MM.DD)
[MM = 01-12; DD = 01-31] 00.01 01.01
15
. E
ve
nt
Reco
rd
F119 Present Event Record Number
0-447 [0: Null Rec; Others 1 – 447: Rec of Cycling Buffer. 4 parameters per Rec]
F120 Select Event Record Number [to navigate the record]
1-447 [Point to the Rec in Cycling Buffer. Total 447 Rec. 4 parameters per Rec]
2
F121 Fault Code 1
st parameter in Rec. (See Fault Code List for
fault code definitions.)
F122 Alarm / Trip Level (if available)
2nd
F123 Time Stamp of Selected Event Record
3rd
: 00.00-23.59 (hh.mm)
[hh = 00-23; mm = 00-59]
F124 Date Stamp of Selected Event Record
4th
(last): 01.01 – 12.31 (MM.DD)
[MM = 01-12; DD = 01-31]
Note: See parameter Fn95 first to change between ºC and ºF.
Table 3

Motortronics
www.motortronics.com Page 18
2.2 Parameter Detailed Explanation
2.2.1 RTD Settings
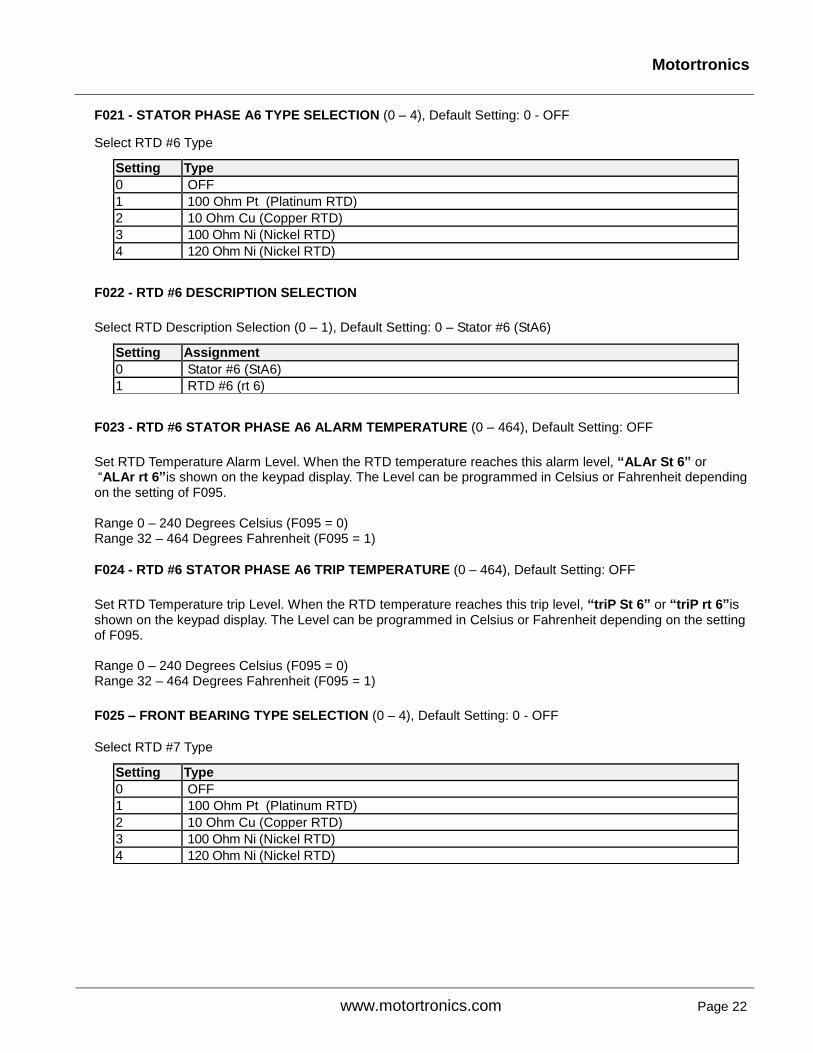
F001 - STATOR PHASE A1 TYPE SELECTION (0 – 4), Default Setting: 0 - OFF
Select RTD #1 Type
F002 - RTD #1 DESCRIPTION SELECTION
Select RTD Description Selection (0 – 1), Default Setting: 0 – Stator #1 (StA1)
F003 - RTD #1 STATOR PHASE A1 ALARM TEMPERATURE (0 – 464), Default Setting: OFF
Set RTD Temperature Alarm Level. When the RTD temperature reaches this alarm level, “ALAr St 1” or “ALAr rt 1” is shown on the keypad display. The Level can be programmed in Celsius or Fahrenheit depending on the setting of F095. Range 0 – 240 Degrees Celsius (F095 = 0) Range 32 – 464 Degrees Fahrenheit (F095 = 1)
F004 - RTD #1 STATOR PHASE A1 TRIP TEMPERATURE (0 – 464), Default Setting: OFF
Set RTD Temperature trip Level. When the RTD temperature reaches this trip level, “triP St 1” or “triP rt 1” is shown on the keypad display. The Level can be programmed in Celsius or Fahrenheit depending on the setting of F095. Range 0 – 240 Degrees Celsius (F095 = 0) Range 32 – 464 Degrees Fahrenheit (F095 = 1)
Setting Type
0 OFF
1 100 Ohm Pt (Platinum RTD)
2 10 Ohm Cu (Copper RTD)
3 100 Ohm Ni (Nickel RTD)
4 120 Ohm Ni (Nickel RTD)
Setting Assignment
0 Stator #1 (StA1)
1 RTD #1 (rt 1)

Motortronics
www.motortronics.com Page 19
F005 - STATOR PHASE A1 TYPE SELECTION (0 – 4), Default Setting: 0 - OFF
Select RTD #2 Type
F006 - RTD #2 DESCRIPTION SELECTION Select RTD Description Selection (0 – 1), Default Setting: 0 – Stator #2 (StA2)
F007 - RTD #2 STATOR PHASE A2 ALARM TEMPERATURE (0 – 464), Default Setting: OFF
Set RTD Temperature Alarm Level. When the RTD temperature reaches this alarm level, “ALAr St 2” or “ALAr rt 2” is shown on the keypad display. The Level can be programmed in Celsius or Fahrenheit depending on the setting of F095. Range 0 – 240 Degrees Celsius (F095 = 0) Range 32 – 464 Degrees Fahrenheit (F095 = 1)
F008 - RTD #2 STATOR PHASE A2 TRIP TEMPERATURE (0 – 464), Default Setting: OFF
Set RTD Temperature trip Level. When the RTD temperature reaches this trip level, “triP St 2” or “triP rt 2”is shown on the keypad display. The Level can be programmed in Celsius or Fahrenheit depending on the setting of F095. Range 0 – 240 Degrees Celsius (F095 = 0) Range 32 – 464 Degrees Fahrenheit (F095 = 1)
F009 - STATOR PHASE A3 TYPE SELECTION (0 – 4), Default Setting: 0 - OFF
Select RTD #3 Type
Setting Type
0 OFF
1 100 Ohm Pt (Platinum RTD)
2 10 Ohm Cu (Copper RTD)
3 100 Ohm Ni (Nickel RTD)
4 120 Ohm Ni (Nickel RTD)
Setting Assignment
0 Stator #2 (StA2)
1 RTD #2 (rt 2)
Setting Type
0 OFF
1 100 Ohm Pt (Platinum RTD)
2 10 Ohm Cu (Copper RTD)
3 100 Ohm Ni (Nickel RTD)
4 120 Ohm Ni (Nickel RTD)

Motortronics
www.motortronics.com Page 20
F010 - RTD #3 DESCRIPTION SELECTION Select RTD Description Selection (0 – 1), Default Setting: 0 – Stator #3 (StA3)
F011 - RTD #3 STATOR PHASE A3 ALARM TEMPERATURE (0 – 464), Default Setting: OFF Set RTD Temperature Alarm Level. When the RTD temperature reaches this alarm level, “ALAr St 3” or “ALAr rt 3”is shown on the keypad display. The Level can be programmed in Celsius or Fahrenheit depending on the setting of F095. Range 0 – 240 Degrees Celsius (F095 = 0) Range 32 – 464 Degrees Fahrenheit (F095 = 1)
F012 - RTD #3 STATOR PHASE A3 TRIP TEMPERATURE (0 – 464), Default Setting: OFF
Set RTD Temperature trip Level. When the RTD temperature reaches this trip level, “triP St 3” or “triP rt 3” is shown on the keypad display. The Level can be programmed in Celsius or Fahrenheit depending on the setting of F095. Range 0 – 240 Degrees Celsius (F095 = 0) Range 32 – 464 Degrees Fahrenheit (F095 = 1)
F013 - STATOR PHASE A4 TYPE SELECTION (0 – 4), Default Setting: 0 - OFF
Select RTD #4 Type
F014 - RTD #4 DESCRIPTION SELECTION
Select RTD Description Selection (0 – 1), Default Setting: 0 – Stator #4 (StA4)
F015 - RTD #4 STATOR PHASE A4 ALARM TEMPERATURE (0 – 464), Default Setting: OFF
Set RTD Temperature Alarm Level. When the RTD temperature reaches this alarm level, “ALAr St 4” or “ALAr rt 4”is shown on the keypad display. The Level can be programmed in Celsius or Fahrenheit depending on the setting of F095. Range 0 – 240 Degrees Celsius (F095 = 0) Range 32 – 464 Degrees Fahrenheit (F095 = 1)
Setting Assignment
0 Stator #3 (StA3)
1 RTD #3 (rt 3)
Setting Type
0 OFF
1 100 Ohm Pt (Platinum RTD)
2 10 Ohm Cu (Copper RTD)
3 100 Ohm Ni (Nickel RTD)
4 120 Ohm Ni (Nickel RTD)
Setting Assignment
0 Stator #4 (StA4)
1 RTD #4 (rt 4)
Motortronics
www.motortronics.com Page 21
F016 - RTD #4 STATOR PHASE A4 TRIP TEMPERATURE (0 – 464), Default Setting: OFF Set RTD Temperature trip Level. When the RTD temperature reaches this trip level, “triP St 4” or “triP rt 4”is shown on the keypad display. The Level can be programmed in Celsius or Fahrenheit depending on the setting of F095. Range 0 – 240 Degrees Celsius (F095 = 0) Range 32 – 464 Degrees Fahrenheit (F095 = 1)
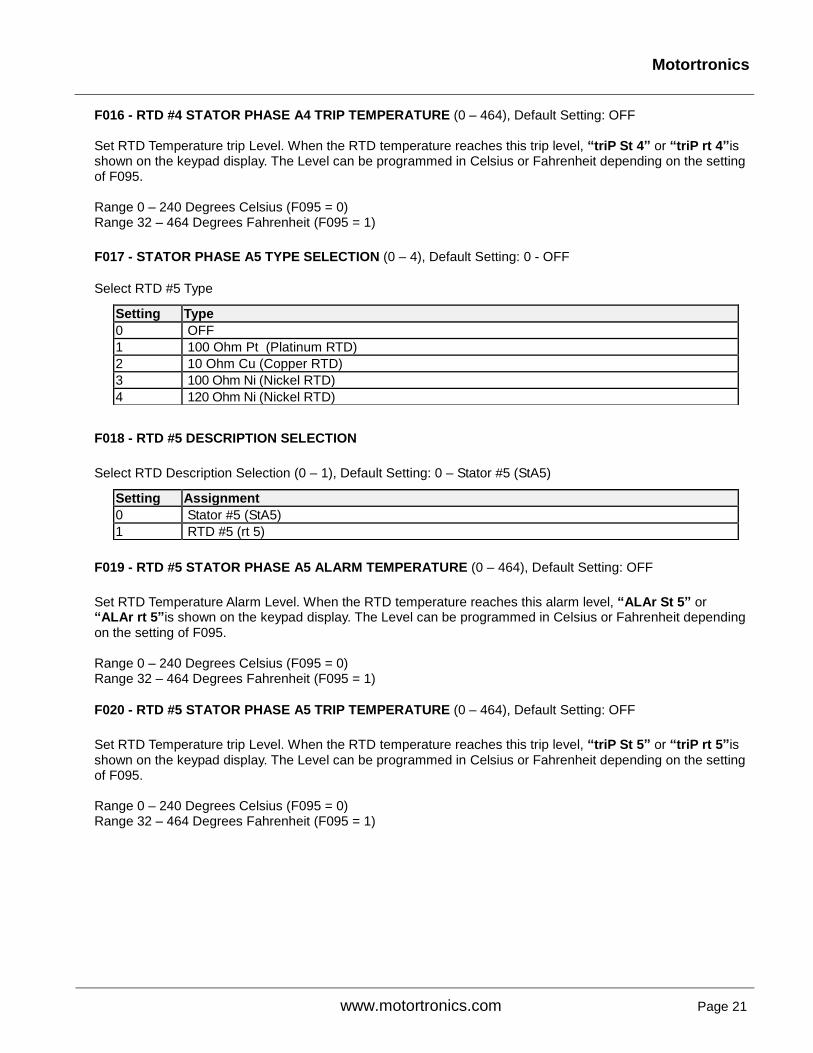
F017 - STATOR PHASE A5 TYPE SELECTION (0 – 4), Default Setting: 0 - OFF
Select RTD #5 Type
F018 - RTD #5 DESCRIPTION SELECTION
Select RTD Description Selection (0 – 1), Default Setting: 0 – Stator #5 (StA5)
F019 - RTD #5 STATOR PHASE A5 ALARM TEMPERATURE (0 – 464), Default Setting: OFF
Set RTD Temperature Alarm Level. When the RTD temperature reaches this alarm level, “ALAr St 5” or “ALAr rt 5”is shown on the keypad display. The Level can be programmed in Celsius or Fahrenheit depending on the setting of F095. Range 0 – 240 Degrees Celsius (F095 = 0) Range 32 – 464 Degrees Fahrenheit (F095 = 1)
F020 - RTD #5 STATOR PHASE A5 TRIP TEMPERATURE (0 – 464), Default Setting: OFF
Set RTD Temperature trip Level. When the RTD temperature reaches this trip level, “triP St 5” or “triP rt 5”is shown on the keypad display. The Level can be programmed in Celsius or Fahrenheit depending on the setting of F095. Range 0 – 240 Degrees Celsius (F095 = 0) Range 32 – 464 Degrees Fahrenheit (F095 = 1)
Setting Type
0 OFF
1 100 Ohm Pt (Platinum RTD)
2 10 Ohm Cu (Copper RTD)
3 100 Ohm Ni (Nickel RTD)
4 120 Ohm Ni (Nickel RTD)
Setting Assignment
0 Stator #5 (StA5)
1 RTD #5 (rt 5)
Motortronics
www.motortronics.com Page 22
F021 - STATOR PHASE A6 TYPE SELECTION (0 – 4), Default Setting: 0 - OFF
Select RTD #6 Type
F022 - RTD #6 DESCRIPTION SELECTION
Select RTD Description Selection (0 – 1), Default Setting: 0 – Stator #6 (StA6)
F023 - RTD #6 STATOR PHASE A6 ALARM TEMPERATURE (0 – 464), Default Setting: OFF
Set RTD Temperature Alarm Level. When the RTD temperature reaches this alarm level, “ALAr St 6” or “ALAr rt 6”is shown on the keypad display. The Level can be programmed in Celsius or Fahrenheit depending on the setting of F095. Range 0 – 240 Degrees Celsius (F095 = 0) Range 32 – 464 Degrees Fahrenheit (F095 = 1)
F024 - RTD #6 STATOR PHASE A6 TRIP TEMPERATURE (0 – 464), Default Setting: OFF
Set RTD Temperature trip Level. When the RTD temperature reaches this trip level, “triP St 6” or “triP rt 6”is shown on the keypad display. The Level can be programmed in Celsius or Fahrenheit depending on the setting of F095. Range 0 – 240 Degrees Celsius (F095 = 0) Range 32 – 464 Degrees Fahrenheit (F095 = 1)
F025 – FRONT BEARING TYPE SELECTION (0 – 4), Default Setting: 0 - OFF
Select RTD #7 Type
Setting Type
0 OFF
1 100 Ohm Pt (Platinum RTD)
2 10 Ohm Cu (Copper RTD)
3 100 Ohm Ni (Nickel RTD)
4 120 Ohm Ni (Nickel RTD)
Setting Assignment
0 Stator #6 (StA6)
1 RTD #6 (rt 6)
Setting Type
0 OFF
1 100 Ohm Pt (Platinum RTD)
2 10 Ohm Cu (Copper RTD)
3 100 Ohm Ni (Nickel RTD)
4 120 Ohm Ni (Nickel RTD)

Motortronics
www.motortronics.com Page 23
F026 - RTD #7 DESCRIPTION SELECTION Select RTD Description Selection (0 – 1), Default Setting: 0 – Front Bearing (Fb)
F027 - RTD #7 FRONT BEARING ALARM TEMPERATURE (0 – 464), Default Setting: OFF
Set RTD Temperature Alarm Level. When the RTD temperature reaches this alarm level, “ALAr Fb” or “ALAr rt 7” is shown on the keypad display. The Level can be programmed in Celsius or Fahrenheit depending on the setting of F095. Range 0 – 240 Degrees Celsius (F095 = 0) Range 32 – 464 Degrees Fahrenheit (F095 = 1)
F028 - RTD #7 FRONT BEARING TRIP TEMPERATURE (0 – 464), Default Setting: OFF
Set RTD Temperature trip Level. When the RTD temperature reaches this trip level, “triP Fb” or “triP rt 7” is shown on the keypad display. The Level can be programmed in Celsius or Fahrenheit depending on the setting of F095. Range 0 – 240 Degrees Celsius (F095 = 0) Range 32 – 464 Degrees Fahrenheit (F095 = 1)
F029 – REAR BEARING TYPE SELECTION (0 – 4), Default Setting: 0 - OFF
Select RTD #8 Type
F030 - RTD #8 DESCRIPTION SELECTION
Select RTD Description Selection (0 – 1), Default Setting: 0 – Rear Bearing (rb)
F031 - RTD #8 REAR BEARING ALARM TEMPERATURE (0 – 464), Default Setting: OFF
Set RTD Temperature Alarm Level. When the RTD temperature reaches this alarm level, “ALAr rb” or “ALAr rt 8”is shown on the keypad display. The Level can be programmed in Celsius or Fahrenheit depending on the setting of F095. Range 0 – 240 Degrees Celsius (F095 = 0) Range 32 – 464 Degrees Fahrenheit (F095 = 1)
Setting Assignment
0 Front Bearing (Fb)
1 RTD #7 (rt 7)
Setting Type
0 OFF
1 100 Ohm Pt (Platinum RTD)
2 10 Ohm Cu (Copper RTD)
3 100 Ohm Ni (Nickel RTD)
4 120 Ohm Ni (Nickel RTD)
Setting Assignment
0 Rear Bearing (rb)
1 RTD #8 (rt 8)
Motortronics
www.motortronics.com Page 24
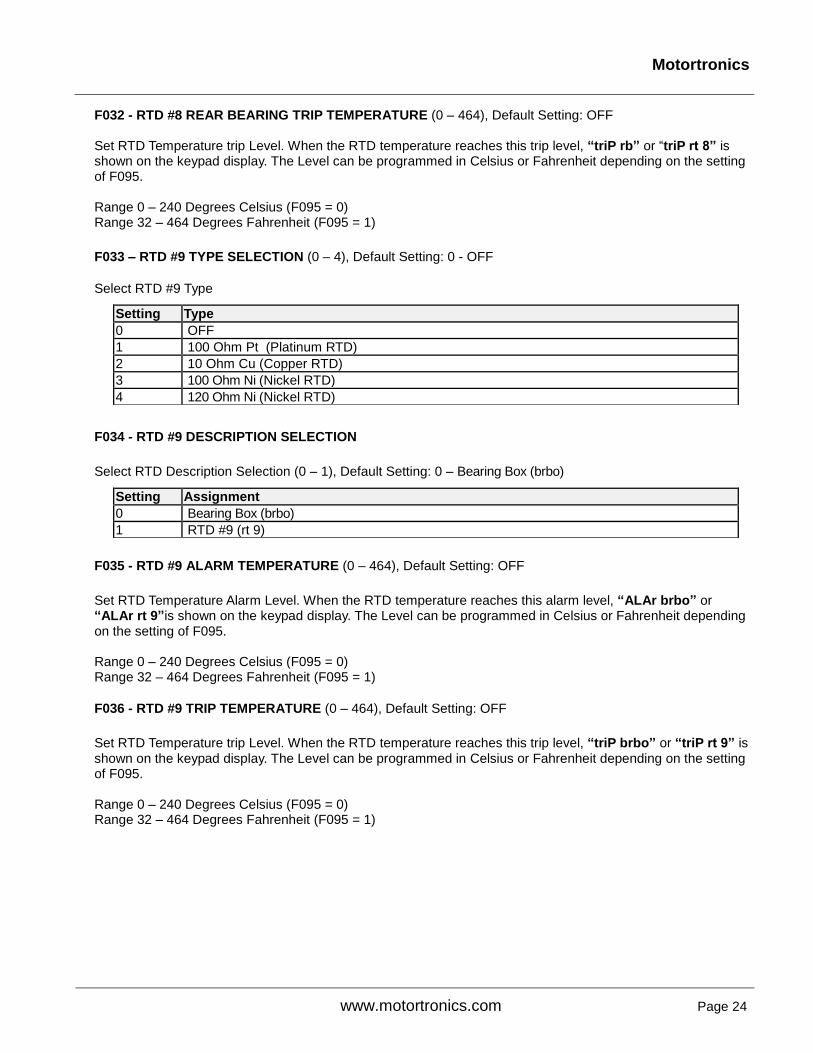
F032 - RTD #8 REAR BEARING TRIP TEMPERATURE (0 – 464), Default Setting: OFF Set RTD Temperature trip Level. When the RTD temperature reaches this trip level, “triP rb” or “triP rt 8” is shown on the keypad display. The Level can be programmed in Celsius or Fahrenheit depending on the setting of F095. Range 0 – 240 Degrees Celsius (F095 = 0) Range 32 – 464 Degrees Fahrenheit (F095 = 1)
F033 – RTD #9 TYPE SELECTION (0 – 4), Default Setting: 0 - OFF
Select RTD #9 Type
F034 - RTD #9 DESCRIPTION SELECTION
Select RTD Description Selection (0 – 1), Default Setting: 0 – Bearing Box (brbo)
F035 - RTD #9 ALARM TEMPERATURE (0 – 464), Default Setting: OFF
Set RTD Temperature Alarm Level. When the RTD temperature reaches this alarm level, “ALAr brbo” or “ALAr rt 9”is shown on the keypad display. The Level can be programmed in Celsius or Fahrenheit depending on the setting of F095. Range 0 – 240 Degrees Celsius (F095 = 0) Range 32 – 464 Degrees Fahrenheit (F095 = 1)
F036 - RTD #9 TRIP TEMPERATURE (0 – 464), Default Setting: OFF
Set RTD Temperature trip Level. When the RTD temperature reaches this trip level, “triP brbo” or “triP rt 9” is shown on the keypad display. The Level can be programmed in Celsius or Fahrenheit depending on the setting of F095. Range 0 – 240 Degrees Celsius (F095 = 0) Range 32 – 464 Degrees Fahrenheit (F095 = 1)
Setting Type
0 OFF
1 100 Ohm Pt (Platinum RTD)
2 10 Ohm Cu (Copper RTD)
3 100 Ohm Ni (Nickel RTD)
4 120 Ohm Ni (Nickel RTD)
Setting Assignment
0 Bearing Box (brbo)
1 RTD #9 (rt 9)

Motortronics
www.motortronics.com Page 25
F037 – RTD #10 TYPE SELECTION (0 – 4), Default Setting: 0 - OFF
Select RTD #10 Type
F038 - RTD #10 DESCRIPTION SELECTION Select RTD Description Selection (0 – 1), Default Setting: 0 – Ambient (Abnt)
F039 - RTD #10 ALARM TEMPERATURE (0 – 464), Default Setting: OFF
Set RTD Temperature Alarm Level. When the RTD temperature reaches this alarm level, “ALAr Abnt” or “ALAr rt10” is shown on the keypad display. The Level can be programmed in Celsius or Fahrenheit depending on the setting of F095. Range 0 – 240 Degrees Celsius (F095 = 0) Range 32 – 464 Degrees Fahrenheit (F095 = 1)
F040 - RTD #10 TRIP TEMPERATURE (0 – 464), Default Setting: OFF
Set RTD Temperature trip Level. When the RTD temperature reaches this trip level, “triP Abnt” or “triP rt10” is shown on the keypad display. The Level can be programmed in Celsius or Fahrenheit depending on the setting of F095. Range 0 – 240 Degrees Celsius (F095 = 0) Range 32 – 464 Degrees Fahrenheit (F095 = 1)
F041 – RTD #11 TYPE SELECTION (0 – 4), Default Setting: 0 - OFF
Select RTD #11 Type
F042 - RTD #11 DESCRIPTION SELECTION
Select RTD Description Selection (0 – 1), Default Setting: 0 – User Defined (USr1)
Setting Type
0 OFF
1 100 Ohm Pt (Platinum RTD)
2 10 Ohm Cu (Copper RTD)
3 100 Ohm Ni (Nickel RTD)
4 120 Ohm Ni (Nickel RTD)
Setting Assignment
0 Ambient (Abnt)
1 RTD #10 (rt 10)
Setting Type
0 OFF
1 100 Ohm Pt (Platinum RTD)
2 10 Ohm Cu (Copper RTD)
3 100 Ohm Ni (Nickel RTD)
4 120 Ohm Ni (Nickel RTD)
Setting Assignment
0 User Defined (USr1)
1 RTD #11 (rt 11)

Motortronics
www.motortronics.com Page 26
F043 - RTD #11 ALARM TEMPERATURE (0 – 464), Default Setting: OFF
Set RTD Temperature Alarm Level. When the RTD temperature reaches this alarm level, “ALAr USr1” or “ALAr rt11” is shown on the keypad display. The Level can be programmed in Celsius or Fahrenheit depending on the setting of F095. Range 0 – 240 Degrees Celsius (F095 = 0) Range 32 – 464 Degrees Fahrenheit (F095 = 1)
F044 - RTD #11 TRIP TEMPERATURE (0 – 464), Default Setting: OFF Set RTD Temperature trip Level. When the RTD temperature reaches this trip level, “triP USr1” or “triP rt11” is shown on the keypad display. The Level can be programmed in Celsius or Fahrenheit depending on the setting of F095. Range 0 – 240 Degrees Celsius (F095 = 0) Range 32 – 464 Degrees Fahrenheit (F095 = 1)
F045 – RTD #12 TYPE SELECTION (0 – 4), Default Setting: 0 - OFF
Select RTD #12 Type
F046 - RTD #12 DESCRIPTION SELECTION
Select RTD Description Selection (0 – 1), Default Setting: 0 – User Defined (USr2)
F047 - RTD #12 ALARM TEMPERATURE (0 – 464), Default Setting: OFF
Set RTD Temperature Alarm Level. When the RTD temperature reaches this alarm level, “ALAr USr2” or “ALAr rt12”is shown on the keypad display. The Level can be programmed in Celsius or Fahrenheit depending on the setting of F095. Range 0 – 240 Degrees Celsius (F095 = 0) Range 32 – 464 Degrees Fahrenheit (F095 = 1)
Setting Type
0 OFF
1 100 Ohm Pt (Platinum RTD)
2 10 Ohm Cu (Copper RTD)
3 100 Ohm Ni (Nickel RTD)
4 120 Ohm Ni (Nickel RTD)
Setting Assignment
0 User Defined (USr2)
1 RTD #12 (rt 12)
Motortronics
www.motortronics.com Page 27
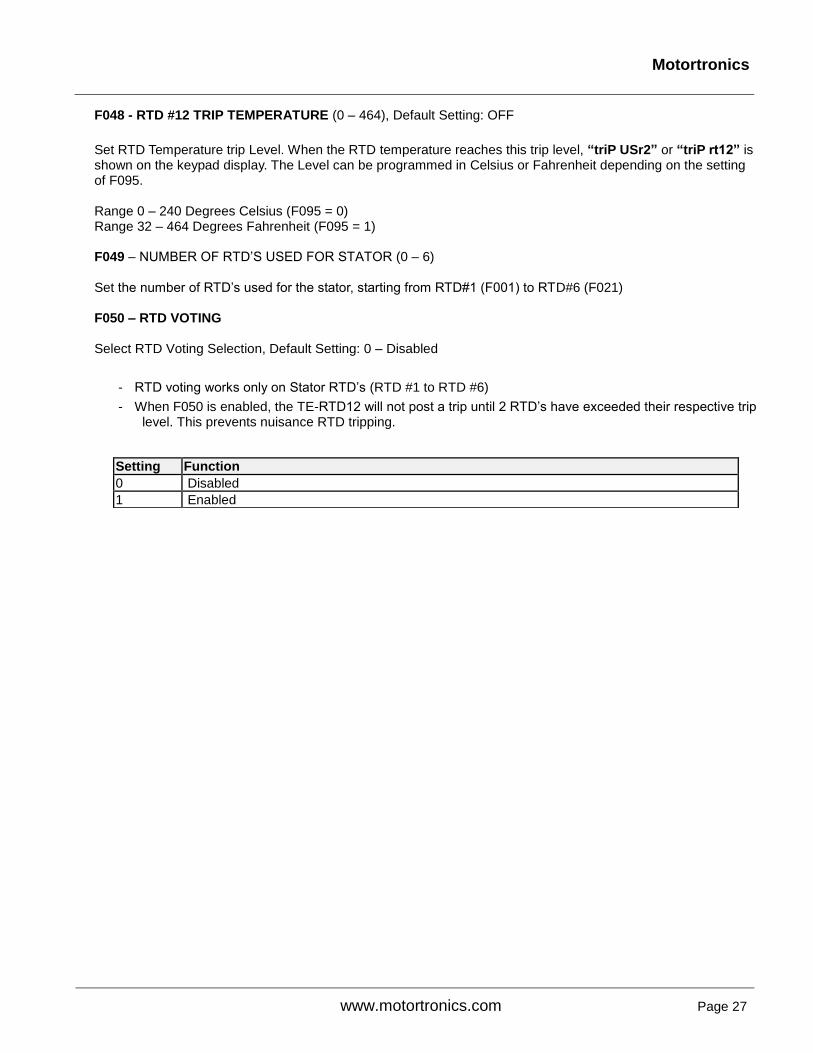
F048 - RTD #12 TRIP TEMPERATURE (0 – 464), Default Setting: OFF
Set RTD Temperature trip Level. When the RTD temperature reaches this trip level, “triP USr2” or “triP rt12” is shown on the keypad display. The Level can be programmed in Celsius or Fahrenheit depending on the setting of F095. Range 0 – 240 Degrees Celsius (F095 = 0) Range 32 – 464 Degrees Fahrenheit (F095 = 1) F049 – NUMBER OF RTD’S USED FOR STATOR (0 – 6) Set the number of RTD’s used for the stator, starting from RTD#1 (F001) to RTD#6 (F021) F050 – RTD VOTING Select RTD Voting Selection, Default Setting: 0 – Disabled
- RTD voting works only on Stator RTD’s (RTD #1 to RTD #6)
- When F050 is enabled, the TE-RTD12 will not post a trip until 2 RTD’s have exceeded their respective trip level. This prevents nuisance RTD tripping.
Setting Function
0 Disabled
1 Enabled

Motortronics
www.motortronics.com Page 28
2.2.2 Digital Inputs
The digital inputs are dry contact inputs. To activate a digital input connect a contact between GND and the desired digital input.
GND INP1 INP2 INP3
TB2
F051 – INPUT #1 (InP1) SELECTION (0 – 2), Default Setting: 0 - DISABLED
Select Input #1 Logic:
F052 – INPUT #1 TIME DELAY
Set digital input #1 turn-on delay time (1 – 60 sec), Default Setting: 1 sec.
F053 – INPUT #2 (InP2) SELECTION (0 – 2), Default Setting: 0 - DISABLED
Select Input #2 Logic:
F054 – INPUT #2 TIME DELAY
Set digital input #2 turn-on delay time (1 – 60 sec), Default Setting: 1 sec.
F055 – INPUT #3 (InP3) SELECTION (0 – 2), Default Setting: 0 - DISABLED
Select Input #3 Logic:
F056 – INPUT #3 TIME DELAY
Set input #3 turn-on delay time (1 – 60 sec), Default Setting: 1 sec.
Setting Function
0 Disabled
1 Normally Open
2 Normally Closed
Setting Function
0 Disabled
1 Normally Open
2 Normally Closed
Setting Function
0 Disabled
1 Normally Open
2 Normally Closed

Motortronics
www.motortronics.com Page 29
2.2.3 Analog Inputs
F057 – Analog Input #1 Name SELECTION (0 – 5), Default Setting: 0 - Off
Select assignment for analog input #1:
F058 – ANALOG INPUT #1 (Ana1) 4mA (0 – 9999), Default Setting: 0
Enter a value that the 4mA level will represent for the selected function; typically this value should be 0.
F059 – ANALOG INPUT #1 (Ana1) 20mA (0 – 9999), Default Setting: 9999
Enter a value that the 20mA level will represent for the selected function.
F060 – ANALOG INPUT #1 ALARM LEVEL (0 – 9999), Default Setting: OFF
Set Analog Input #1 Alarm Level. When the analog input scaled level rises above this level for the time delay programmed in F060 Alarm “ALAr AnA1” is shown on the keypad display.
F061 – ANALOG INPUT #1 ALARM TIME DELAY (1 – 60 sec), Default Setting: 1 sec.
Set Analog Input #1 Alarm time delay. When analog input #1 scaled level rises above the level set in F059 for the time delay programmed “ALAr AnA1” is shown on the keypad display
F062 – ANALOG INPUT #1 TRIP LEVEL (0 – 9999), Default Setting: OFF
Set Analog Input #1 Trip Level. When the analog input scaled level rises above this level for the time delay programmed in F062 Alarm “triP AnA1” is shown on the keypad display.
Setting Assignment
0 Off
1 Analog Input #1 (AnA1) (User Defined)
2 Oscillation #1 (oSC1) (Vibration)
3 Airflow (AFL1) (in cfm)
4 Speed #1 (SPd1) (in RPM)
5 Pressure #1 (PrS1)

Motortronics
www.motortronics.com Page 30
F063 – ANALOG INPUT #1 TRIP TIME DELAY (1 – 60 sec), Default Setting: 1 sec.
Set Analog Input #1 Trip time delay. When analog input #1 scaled level rises above the level set in F059 for the time delay programmed “triP AnA1” is shown on the keypad display
F061F058 F059
Alarm
Scaling
4mA
20mA
F058
F058
F062 Trip Level
F060 Alarm Level
F063
Trip Trip Active
Alarm Active
Alarm Time Delay
Trip Time Delay
Analog Input #1 Level Scaled Analog Input #1 Level
Example: Use Analog Input #1 to measure RPM of a motor with a maximum RPM of 3600.
- Set F057 to 4 (Speed) - Set F058 to 0 (4mA = 0 RPM) - Set F059 to 3600 (20mA = 3600 RPM) - If needed set F060 for desired Alarm level - If needed set F061 for desired Alarm delay time - If needed set F062 for desired Trip level - If needed set F063 for desired Trip delay time
F064 – Analog Input #2 Name SELECTION (0 – 5), Default Setting: 0 - Off Select assignment for analog input #2:
F065 – ANALOG INPUT #2 (Ana2) 4mA (0 – 9999), Default Setting: 0
Enter a value that the 4mA level will represent for the selected function; typically this value should be 0.
F066 – ANALOG INPUT #2 (Ana2) 20mA (0 – 9999), Default Setting: 9999
Enter a value that the 20mA level will represent for the selected function.
Setting Assignment
0 Off
1 Analog Input #2 (AnA2) (User Defined)
2 Oscillation #2 (oSC2) (Vibration)
3 Airflow (AFL2) (in cfm)
4 Speed #1 (SPd2) (in RPM)
5 Pressure #2 (PrS2)

Motortronics
www.motortronics.com Page 31
F067 – ANALOG INPUT #2 ALARM LEVEL (0 – 9999), Default Setting: OFF
Set Analog Input #2 Alarm Level. When the analog input scaled level rises above this level for the time delay programmed in F066 Alarm “ALAr AnA2” is shown on the keypad display.
F068 – ANALOG INPUT #2 ALARM TIME DELAY (1 – 60 sec), Default Setting: 1 sec.
Set Analog Input #2 Alarm time delay. When analog input #2 scaled level rises above the level set in F65 for the time delay programmed “ALAr AnA2” is shown on the keypad display
F069 – ANALOG INPUT #2 TRIP LEVEL (0 – 9999), Default Setting: OFF
Set Analog Input #2 Trip Level. When the analog input scaled level rises above this level for the time delay programmed in F068 Alarm “triP AnA2” is shown on the keypad display.
F070 – ANALOG INPUT #2 TRIP TIME DELAY (1 – 60 sec), Default Setting: 1 sec.
Set Analog Input #2 Trip time delay. When analog input #2 scaled level rises above the level set in F067 for the time delay programmed “triP AnA2” is shown on the keypad display
F068F065 F066
Analog Input #2 Level
Alarm
Scaling
4mA
20mA
Scaled Analog Input #2 Level
F065
F066
F069 Trip Level
F067 Alarm Level
F070
Trip Trip Active
Alarm Active
Alarm Time Delay
Trip Time Delay

Motortronics
www.motortronics.com Page 32
2.2.4 Analog Output
F071 – ANALOG OUTPUT SELECTION (0 – 6), Default Setting: 0 - OFF
Select Output #1 Assignment:
F072 – ANALOG OUTPUT 4mA (0 – 9999), Default Setting: 0
Enter a value that the 4mA level will represent for the selected function; typically this value should be 0.
F073 – ANALOG OUTPUT 20mA (0 – 9999), Default Setting: 9999
Enter a value that the 20mA level will represent for the selected function.
Example: Use Analog Output to measure Hottest Stator RTD temperature
- Set F071 to 1 (Hottest Stator RTD) - Set F072 to 32 (32deg F = 4mA) - Set F073 to 464 (464deg F = 20mA)
F070 F071
Scaling
4mA
20mA
Analog Output Level
Setting Assignment
0 OFF
1 Hottest Stator RTD Temperature
2 Hottest Non-Stator RTD Temperature
3 Analog Input #1 (AnA1)
4 Analog Input #2 (AnA2)
5 Unit Internal Temperature
6 Highest Differential Phase Current

Motortronics
www.motortronics.com Page 33
2.2.5 Device Setting
F074 – RTD UNIT INTERNAL ALARM TEMPERATURE LEVEL (0 – 85/185), Default Setting: 85°C /185°F
Set device temperature Alarm Level. When the device temperature reaches this alarm level, “ALAr Unit” is shown on the keypad display. The Level is automatically adjusted depending on the setting of F095.
F075 – RESERVED
2.2.6 Differential CTs
The differential CT feature in the TE-RTD12 is designed to measure the leakage current of the motor windings. Maintenance can closely monitor any increase in leakage current to determine when to overhaul the motor.
Important: The differential CT feature is NOT designed to act as a UL Ground Fault or Over Current protection.
F076 – DIFFERENTIAL CT ALARM LEVEL (5 – 90%), Default Setting: OFF
Set Differential CT Alarm Level. The TE-RTD12 measures the current difference between incoming and outgoing current of each motor winding, when this value rises above this level for the time delay programmed in F077 Alarm “ALAr diFX” is shown on the keypad display.
F077 DIFFERENTIAL CT ALARM TIME DELAY (1 – 60 sec), Default Setting: 1 sec.
Set Differential CT Alarm time delay value.
F078 – DIFFERENTIAL CT TRIP LEVEL (OFF, 5 – 90%), Default Setting: OFF
Set Differential CT Trip Level. The TE-RTD12 measures the current difference between incoming and outgoing current of each motor winding, when this value rises above this level for the time delay programmed in F079 Trip “triP diFX” is shown on the keypad display. F079 – DIFFERENTIAL CT TRIP TIME DELAY (1 – 60 sec), Default Setting: 1 sec.
Set Differential CT trip time delay value.
F080 – DIFFERENTIAL CT PRIMARY CURRENT VALUE (OFF, 5 – 2000A), Default Setting: 100A
Set CT primary value.
F081 – DIFFERENTIAL CT SECONDARY CURRENT VALUE (1, 5A), Default Setting: 5A
Set CT secondary value.
Setting Temperature
0 OFF (Display)
85/185 85°C /185°F (Display, temperature units and value depend on setting of F095)

Motortronics
www.motortronics.com Page 34
2.2.7 Relay Settings
C N.O. N.C.
RELAY 1 RELAY 2 RELAY 3
N LE
TB1
1 2 3 4 5 6 7 8 9 10 11 12
C N.O. N.C. C N.O. N.C.
F082 – RELAY 1 SETTING (19), Fixed Setting: 19 Relay 1 is set to ANY TRIP only.
F083 – RELAY 2 SETTING (1 – 19), Default Setting: 9 – Any Alarm
Select relay 2 function from table 4. F084 – RELAY 3 SETTING (1 – 19), Default Setting: 13 – Digital Input #1 Trip
Select relay 3 function from table 4.
Relay Functions
Table 4
Note: 1. Alarm relays are not latched. (Relay will revert back if alarm condition clears)
2. Trip relays are latched (Note: Required reset to clear the trip)
3. F082 is Option #19 only.
Setting Function Info
1 Stator RTD Alarm (ALAr StXX shown on display) Unlatched
2 Non-Stator RTD Alarm (ALAr nSXX) Unlatched
3 Any RTD Alarm (ALAr StXX) or (ALAr nSXX) Unlatched
4 RTD Failure Alarm (ALAr rtXX) Unlatched
5 Unit Over Temperature Alarm (ALAr Unit) Unlatched
6 Analog Input #1 Alarm (ALAr AnA1) Unlatched
7 Analog Input #2 Alarm (ALAr AnA2) Unlatched
8 Differential Current Alarm (ALAr diFX) Unlatched
9 Any Alarm (ALAr XXXX) Unlatched
10 Stator RTD Trip (triP StXX) Latched
11 Non-Stator RTD Trip (triP nStXX) Latched
12 Any RTD Trip (triP StXX) or (triP nSXX) Latched
13 Digital Input #1 Trip (triP InP1) Latched
14 Digital Input #2 Trip (triP InP2) Latched
15 Digital Input #3 Trip (triP InP3) Latched
16 Analog Input #1 Trip (triP AnA1) Latched
17 Analog Input #2 Trip (triP AnA2) Latched
18 Differential Current Trip (triP diFX) Latched
19 Any Trip (TriP XXXX) Latched
Motortronics
www.motortronics.com Page 35
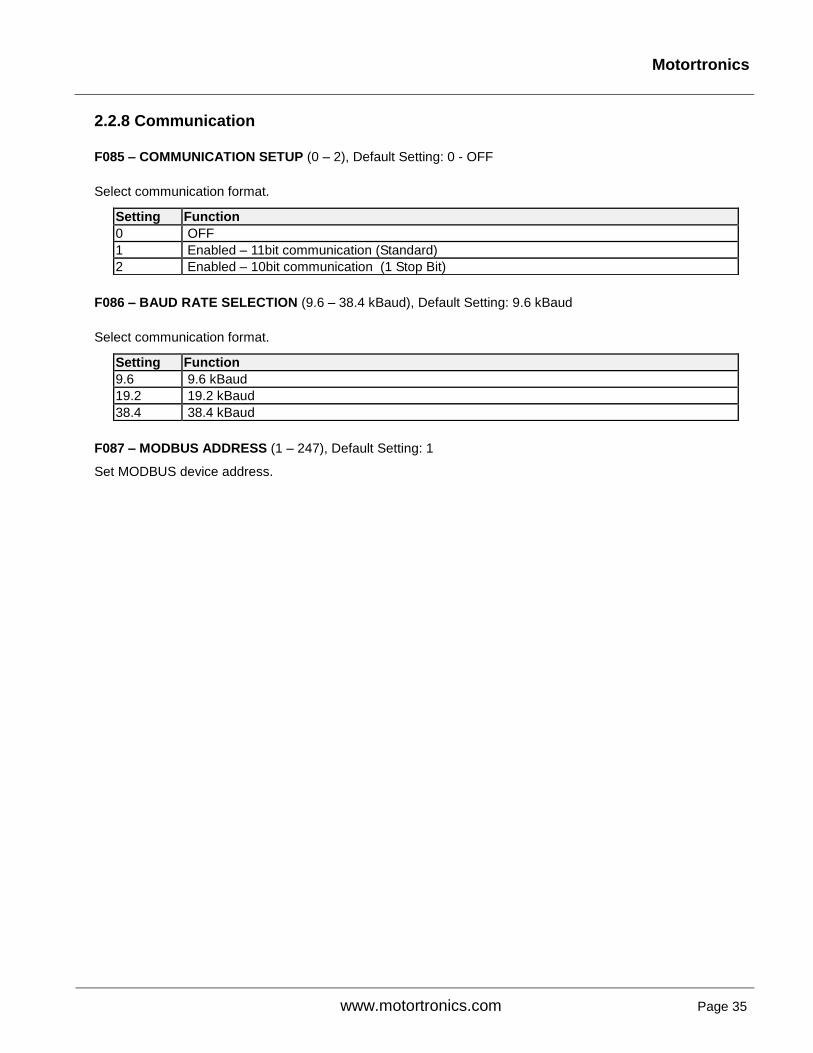
2.2.8 Communication
F085 – COMMUNICATION SETUP (0 – 2), Default Setting: 0 - OFF
Select communication format.
F086 – BAUD RATE SELECTION (9.6 – 38.4 kBaud), Default Setting: 9.6 kBaud
Select communication format.
F087 – MODBUS ADDRESS (1 – 247), Default Setting: 1
Set MODBUS device address.
Setting Function
0 OFF
1 Enabled – 11bit communication (Standard)
2 Enabled – 10bit communication (1 Stop Bit)
Setting Function
9.6 9.6 kBaud
19.2 19.2 kBaud
38.4 38.4 kBaud

Motortronics
www.motortronics.com Page 36
2.2.9 Real Time Clock
The built-in real time clock is used to record date and time for the event log.
F088 – YEAR (2000 – 2047)
Set real time clock year.
F089 – MONTH (1 – 12)
Set real time clock month of the current year.
F090 – DAY (1 – 31)
Set real time clock day of the current month.
F091 – HOUR (0 – 23)
Set real time clock hour of the current day.
F092 – MINUTE (0 – 59)
Set real time clock minute of the current hour.
F093 – SECONDS (0 – 59)
Set real time clock seconds of the current minute.
Important Note: Do not replace Real Time Clock internal battery, contact factory for support.

Motortronics
www.motortronics.com Page 37
2.2.10 Display
F094 – DEFAULT DISPLAY (0 - 34), Default Setting: 1–Hottest Stator RTD#(id)
Set the display information on power-up.
Note 1: While showing actual data on the display and no fault has occurred, pressing the left or right arrow buttons will alter scroll mode between manual and auto scroll mode. The actual data screens will only show the unit temperature and any of the active RTD values, active analog input values and active differential current values. If F094 is set to “0”, after startup the display will auto scroll from screen #5 thru #16, #29, #30 and #32 thru #34. (Except for the functions turned off in their respective parameter) At least 2 items have to be activated to enable auto scrolling. Screens #17 thru #28 (Highest Temperature Since Clear RTD #xx) are only shown in manual mode, not in auto mode.
Note 2: #29 (Ana1) Analog Input 1 display set by F057, #30 (Ana2) Analog Input 2 display set by F064
Screen No. Scroll Through Displays Display 1 Display 2 Remark Screen No.
#1 Hottest Stator RTD # (id) HSid 01to (F049) #1
#2 Hottest Stator RTD temperature HSt 0000-1000 #2
#3 Hottest Non-Stator RTD # (id) Hnid (F049)+1 to 12 #3
#4 Hottest Non-Stator RTD temperature HnSt 0000-1000 #4
#5 RTD #1 (default name: Stator #1) (default: StA1) [same as the above] [Note 1,2] #5
#6 RTD #2 (default name: Stator #2) (default: StA 2) [] [Note 1,2] #6
#7 RTD #3 (default name: Stator #3) (default: StA3) [] [Note 1,2] #7
#8 RTD #4 (default name: Stator #4) (default: StA4) [] [Note 1,2] #8
#9 RTD #5 (default name: Stator #5) (default: StA5) [] [Note 1,2] #9
#10 RTD #6 (default name: Stator #6) (default: StA6) [] [Note 1,2] #10
#11 RTD #7 (default name: Front Bearing ) (default: Fb) [] [Note 1,2] #11
#12 RTD #8 (default name: Rear Bearing ) (default: rb) [] [Note 1,2] #12
#13 RTD#9 (default name: Bearing Box ) (default: brbo) [] [Note 1,2] #13
#14 RTD #10 (default name: Ambient Temperature) (default: Abnt) [] [Note 1,2] #14
#15 RTD #11 (default name: User Defined #1) (default: USr1) [] [Note 1,2] #15
#16 RTD #12 (default name: User Defined #2) (default: USr2) [] [Note 1,2] #16
#17 Highest Temperature Since Clear RTD #1 Hi 1 [] [Note 1] #17
#18 Highest Temperature Since Clear RTD #2 Hi 2 [] [Note 1] #18
#19 Highest Temperature Since Clear RTD #3 Hi 3 [] [Note 1] #19
#20 Highest Temperature Since Clear RTD #4 Hi 4 [] [Note 1] #20
#21 Highest Temperature Since Clear RTD #5 Hi 5 [] [Note 1] #21
#22 Highest Temperature Since Clear RTD #6 Hi 6 [] [Note 1] #22
#23 Highest Temperature Since Clear RTD #7 Hi 7 [] [Note 1] #23
#24 Highest Temperature Since Clear RTD #8 Hi 8 [] [Note 1] #24
#25 Highest Temperature Since Clear RTD #9 Hi 9 [] [Note 1] #25
#26 Highest Temperature Since Clear RTD #10 Hi10 [] [Note 1] #26
#27 Highest Temperature Since Clear RTD #11 Hi11 [] [Note 1] #27
#28 Highest Temperature Since Clear RTD #12 Hi12 [] [Note 1] #28
#29 Analog Input #1 AnA1 0000-9999 [Note 2] #29
#30 Analog Input #2 AnA2 0000-9999 [Note 2] #30
#31 Unit Internal Temperature Unit [] #31
#32 Differential Current Phase A DiFA 0.000-9999 #32
#33 Differential Current Phase B DiFb 0.000-9999 #33
#34 Differential Current Phase C DiFC 0.000-9999 #34

Motortronics
www.motortronics.com Page 38
F095 – UNIT OF TEMPERATURE (0 – 1), Default Setting: 0 - Celsius Select temperature unit used for alarm levels, trip levels, event log and signal monitoring.
Note: It is important to select the temperature before programming any of the Alarm, Trip Levels and operating the device. Changing the temperature selection after programming requires trip and alarm settings to be reprogrammed to the correct temperature levels.
2.2.11 Relay Configuration
C N.O. N.C.
RELAY 1 RELAY 2 RELAY 3
N LE
TB1
1 2 3 4 5 6 7 8 9 10 11 12
C N.O. N.C. C N.O. N.C.
F096 – RELAY 1 FAIL SAFE (0 – 1), Default Setting: 0 - Disabled
Fail Safe Explanation: When a relay is configured as fail-safe and control power is applied to the RTD unit, the relay will energize and the relay contacts will change state. The relay will then de-energize when an event occurs or if the control power is removed from the RTD unit.
Select fail safe operation mode for Relay #1.
F097 – RELAY 2 FAIL SAFE (0 – 1), Default Setting: 0 - Disabled
Select fail safe operation mode for Relay #2.
F098 – RELAY 3 FAIL SAFE (0 – 1), Default Setting: 0 - Disabled
Select fail safe operation mode for Relay #3.
Setting Function
0 Celsius
1 Fahrenheit
Setting Function
0 Disabled
1 Enabled
Setting Function
0 Disabled
1 Enabled
Setting Function
0 Disabled
1 Enabled

Motortronics
www.motortronics.com Page 39
F099 – RELAY TEST (0 – 3), Default Setting: 0 - Disabled
Important: Before performing the relay test, make sure it is safe to operate the relays.
Performing this test may cause equipment to be energized!!
Each of the available relays can be tested by setting this parameter. When enabled the selected relay will be energized for 5 sec before de-energizing.
F100 – PARAMETER LOCK / LEVEL 1 PASSWORD (0 – 999), Default Setting: 0 - Disabled
Setting the level 1 password allows for locking the settings of Level 1 parameters. Please refer to the parameter table password level column of the parameter table for level of each parameter.
Note: When set, display of the value of F100 will show encrypted password value.
2.2.12 System Settings
F101 – SYSTEM CLEAR / FACTORY RESET (0 – 4), Default Setting: 0 - Disabled
Allows for clearing highest recorded temperature and resetting parameters to factory defaults.
F102 – LEVEL 2 PASSWORD (2000 – 9999), Default Setting: 2000
Setting the level 2 password allows for locking the settings of Level 2 parameters. Please refer to the parameter table password level column of the parameter table for level of each parameter.
Note: When set, display of the value of F102 will show encrypted password value.
F103 – RESERVED
Setting Function
0 Disabled
1 Energize Relay #1 one time for 5 seconds
2 Energize Relay #2 one time for 5 seconds
3 Energize Relay #3 one time for 5 seconds
Setting Function
0 Disabled
1 Clear Highest Temperature
2 Reset Factory Default Settings for Level 1, Note Requires Level 1 Password F100
3 Reset Factory Default Settings for Level 1 and 2, Note Requires Level 2 Password F102
Motortronics
www.motortronics.com Page 40
2.2.13 Device Information
F104 – TE-RTD12 REVISION #
Displays device firmware revision.
F105 – TE-RTD12 KEYPAD REVISION #
Displays device keypad firmware revision.
F106 – RTD-INF Revision #
Displays revision number of the interface board to interface the TE-RTD12 with the MVC CPU board. It emulates the old RTD board.
This only applies if the TE-RTD12 is interfaced with a MVC3 or MVC4 series of Medium Voltage Soft Starters, equipped with the RTD option board.
NOTES -

Motortronics
www.motortronics.com Page 41
3.0 Fault History and Event Records
3.1 Fault History (Read Only)
F107 – FAULT HISTORY #1, LATEST FAULT (0, 31 – 50) see Fault Code Table 5.
Default Setting: 0 – No Fault: Displays the last fault.
F108 – TRIP LEVEL Displays trip level of the last fault, if it is available.
F109 – TIME STAMP, FAULT #1 Displays the time fault #1 occurred.
F110 – DATE STAMP, FAULT #1 Displays the date fault #1 occurred.
F111 – FAULT HISTORY #2, PREVIOUS FAULT (0, 31 – 50) see Fault Code Table 5.
Default Setting: 0 – No Fault: Displays the previous fault.
F112 –TRIP LEVEL Displays trip level of the previous fault, if it is available.
F113 – TIME STAMP, FAULT #2 Displays the time fault #2 occurred.
F114 – DATE STAMP, FAULT #2 Displays the date fault #2 occurred.
F115 – FAULT HISTORY #3, OLDEST FAULT (0, 31 – 50) see Fault Code Table 5..
Default Setting: 0 – No Fault: Displays the oldest fault.
F116 –TRIP LEVEL Displays trip level of the oldest fault, if it is available.
F117 – TIME STAMP, FAULT #3 Displays the time fault #3 occurred.
F118 – DATE STAMP, FAULT #3 Displays the date fault #3 occurred.

Motortronics
www.motortronics.com Page 42
3.2 Fault Code Table 5 for Fault History F107, F111, F115, and Event Record F121:
Fault Code Description Fault #
ALAr St 1 or ALAr rt 1 Stator #1 or RTD #1 Alarm 1
ALAr St 2 or ALAr rt 2 Stator #2 or RTD #2 Alarm 2
ALAr St 3 or ALAr rt 3 Stator #3 or RTD #3 Alarm 3
ALAr St 4 or ALAr rt 4 Stator #4 or RTD #4 Alarm 4
ALAr St 5 or ALAr rt 5 Stator #5 or RTD #5 Alarm 5
ALAr St 6 or ALAr rt 6 Stator #6 or RTD #6 Alarm 6
ALAr Fb or ALAr rt 7 Front Bearing or RTD #7 Alarm 7
ALAr rb or ALAr rt 8 Rear Bearing or RTD #8 Alarm 8
ALAr brbo or ALAr rt 9 Bearing Box or RTD #9 Alarm 9
ALAr Abnt or ALAr rt10 Ambient or RTD #10 Alarm 10
ALAr USr1 or ALAr rt11 User Defined #1 or RTD #11 Alarm 11
ALAr USr2 or ALAr rt12 User Defined #2 or RTD #12 Alarm 12
FAiL St 1 or FAiL rt 1 Stator # or RTD #1 Failure Alarm 13
FAiL St 2 or FAiL rt 2 Stator # or RTD #2 Failure Alarm 14
FAiL St 3 or FAiL rt 3 Stator # or RTD #3 Failure Alarm 15
FAiL St 4 or FAiL rt 4 Stator # or RTD #4 Failure Alarm 16
FAiL St 5 or FAiL rt 5 Stator # or RTD #5 Failure Alarm 17
FAiL St 6 or FAiL rt 6 Stator # or RTD #6 Failure Alarm 18
FAiL Fb or FAiL rt 7 Front Bearing or RTD #7 Failure Alarm 19
FAiL rb or FAiL rt 8 Rear Bearing or RTD #8 Failure Alarm 20
FAiL brbo or FAiL rt 9 Bearing Box or RTD #9 Failure Alarm 21
FAiL Abnt or FAiL rt10 Ambient or RTD #10 Failure Alarm 22
FAiL USr1 or FAiL rt11 User Defined #1 or RTD #11 Failure Alarm 23
FAiL USr2 or FAiL rt12 User Defined #2 or RTD #12 Failure Alarm 24
ALAr Unit Unit Over Temperature Alarm 25
ALAr AnA1 Analog Input #1 Alarm 26
ALAr AnA2 Analog Input #2 Alarm 27
ALAr diFA Differential Chan A Alarm 28
ALAr diFb Differential Chan B Alarm 29
ALAr diFC Differential Chan C Alarm 30
triP St 1 or triP rt 1 Stator #1 or RTD #1 Trip 31
triP St 2 or triP rt 2 Stator #2 or RTD #2 Trip 32
triP St 3 or triP rt 3 Stator #3 or RTD #3 Trip 33
triP St 4 or triP rt 4 Stator #4 or RTD #4 Trip 34
triP St 5 or triP rt 5 Stator #5 or RTD #5 Trip 35
triP St 6 or triP rt 6 Stator #6 or RTD #6 Trip 36
triP Fb or triP rt 7 Front Bearing or RTD #7 Trip 37
triP rb or triP rt 8 Rear Bearing or RTD #8 Trip 38
triP brbo or triP rt 9 Bearing Box or RTD #9 Trip 39
triP Abnt or triP rt10 Ambient or RTD #10 Trip 40
triP USr1 or triP rt11 User Defined #1 or RTD #11 Trip 41
triP USr2 or triP rt12 User Defined #2 or RTD #12 Trip 42
triP inP1 Digital Input #1 Trip 43
triP inP2 Digital Input #2 Trip 44
triP inP3 Digital Input #3 Trip 45
triP AnA1 Analog Input #1 Trip 46
triP AnA2 Analog Input #2 Trip 47
triP diFA Differential Chan A Trip 48
triP diFb Differential Chan B Trip 49
triP diFC Differential Chan C Trip 50

Motortronics
www.motortronics.com Page 43
3.3 Event Record (Read Only)
The last 447 events / alarms and/or faults are stored in the device, each event can be accessed by the read only
parameters described below.
F119 – PRESENT EVENT RECORD POINTER (0 – 447)
Displays the latest event record. 0 = No Fault
F120 – SELECT EVENT RECORD (1 – 447)
Default Setting: 1 – Event Record 1 Selected
Set the active event record. Event data is displayed in read only parameters F121 – F124.
F121 – FAULT CODE (0, 1 - 50), see fault code table 5.
Default Setting: 0 – No Fault
Displays the fault code (see previous page) for the selected event record set by parameter F120.
F122 – ALARM / TRIP LEVEL
Displays alarm / trip level for the selected event record set by parameter F120, if the level is available.
F123 – TIME STAMP, SELECT EVENT RECORD
Displays the time stamp for the selected event record set by parameter F120.
F124 – DATE STAMP, SELECT EVENT RECORD
Displays the date stamp for the selected event record set by parameter F120.
The Event Recorder is accessible via the TE-RTD12 Mlink Software.
NOTES -

Motortronics
www.motortronics.com Page 44
4.0 Modbus RTU Communication
The TE-RTD12 can be programmed and monitored via a serial connection using the MODBUS RTU protocol. The TE-RTD12 features an RS485, optically isolated half-duplex communication port.
4.1 Serial Connection / Wiring
The physical connection for serial communication uses a RJ45 connector.
RJ45 Terminal Connection:
RS485 -
RS485 +
1 2 3 4 5 6 7 8
RJ45 Connector
TE-RTD12 RS485 Serial Communication Connections
orRS232 /
RS485-
+
Converter
RS232
X1
RS485
Terminating
Resistor
The TE-RTD12 has an RS485 termination
resistor that can be set to ON or OFF by slide
switch X1. The default position is ON.
To access the switch, the keypad must be
removed. The switch is located near the RJ45
connector on the circuit board.
Note:
Terminating resistors are placed at the extreme
ends of the cable.
All units in between these end units do NOT
need termination.

Motortronics
www.motortronics.com Page 45
4.2 Serial Communication Settings
Follow these steps to setup communication with the TE-RTD12:
Step 1: Enable communication
Set Parameter F085 – Communication to a value of ‘1’ or ‘2’
Setting 1: Enabled, 8-bit, No Parity, 2 Stop bits (Standard)
Setting 2: Enabled, 8-bit, No Parity, 1 Stop bit
Step 2: Communication Speed
Set communication baud rate with parameter F086 – default 9600 baud
Step 3: Modbus Address / Device Address
Set modus address with parameter F087 – default ‘1’
4.3 MODBUS RTU Message Structure
The TE-RTD12 supports the following MODBUS RTU functions.
Function Code TE-RTD12 Description Modbus Description
3 Read Multiple Registers Read Holding Registers
16 Write Multiple Registers Preset Multiple Registers
Message format: Query of Function 3 - Read Multiple Registers (Instance)
Field Name (byte) Decimal Hexadecimal
Device Address 1 01
Function 3 03
Starting Data Address High Byte Starting Data Address Low Byte
1001 03 E9
Number of Registers High Byte Number of Registers Low Byte
2 00 02
CRC Low Byte CRC High Byte
47893 15 BB
Motortronics
www.motortronics.com Page 46
Message Response of Function 3 - Read Multiple Registers (Instance)
Field Name (byte) Decimal Hexadecimal
Device Address 1 01
Function 3 03
Byte Count 4 04
Data High Byte of 1st Register from Starting Data Address
Data Low Byte of 1st Register from Starting Data Address
22 00 16
Data High Byte of 2nd
Register from Starting Data Address Data Low Byte of 2
nd Register from Starting Data Address
100 00 64
CRC Low Byte CRC High Byte
7194 1A 1C
Note: The sum of Data High Bytes and Data Low Bytes equal the Byte Count.
Message Query of Function 16 - Write Multiple Registers (Instance)
Field Name (byte) Decimal Hexadecimal
Device Address 1 01
Function 16 10
Starting Data Address High Byte Starting Data Address Low Byte
1001 03 E9
Number of Registers High Byte Number of Registers Low Byte
2 00 02
Byte Count 4 04
Data High Byte of 1st Register from Starting Data Address
Data Low Byte of 1st Register from Starting Data Address
23 00 17
Data High Byte of 2nd
Register from Starting Data Address Data Low Byte of 2
nd Register from Starting Data Address
105 00 69
CRC Low Byte CRC High Byte
22361 59 57
Note: The sum of Data High Bytes and Data Low Bytes equal the Byte Count (2 x Number of Registers).

Motortronics
www.motortronics.com Page 47
Message Response of Function 16 - Write Multiple Registers (Instance)
Field Name (byte) Decimal Hexadecimal
Device Address 1 01
Function 16 10
Starting Data Address High Byte Starting Data Address Low Byte
1001 03 E9
Number of Registers High Byte Number of Registers Low Byte
2 00 02
CRC Low Byte CRC High Byte
30864 90 78
Exception Response Frame
In normal response, the function field will always return the same code as Query sent. However, in an Exception response, the code in function field will be added 80(hex) to represent an Exception response. See Table 2-6: Wrong Query of Function 3 - Read Multiple Registers (Instance) and Table 2-7 Response of the Wrong Function 3 Query. Also see Table 2-8: Exception Codes
Invalid Query for Function 3 - Read Multiple Registers (Instance)
Field Name (byte) Decimal Hexadecimal
Device Address 1 01
Function 3 03
Starting Data Address High Byte Starting Data Address Low Byte
1000 03 E8
Number of Registers High Byte Number of Registers Low Byte
1 00 01
CRC Low Byte CRC High Byte
31236 04 7A
Response to an invalid Function 3 Query
Field Name (byte) Decimal Hexadecimal
Device Address 1 01
Function 131 83
Exception Code 2 02
CRC Low Byte CRC High Byte
61888 C0 F1

Motortronics
www.motortronics.com Page 48
Exception Codes
Exception Code Name Description
01 Illegal Function The Function field of the query does not fall into the range which the slave supports.
Function Codes 3 and 16 are supported.
02 Illegal Address The data address existed in the query is out of the supported range.
03 Illegal Data Value The data received from the host/master is invalid.
06 Busy The device is busy. The master should re-try sending the message again.
16 Illegal Data Length The field “Number of Registers” from the query is greater than the maximum allowed
value of 18 limited.

Motortronics
www.motortronics.com Page 49
4.4 Main Registers
Register Address
Register Name
Data Range
Data Incr.
Data Default
R/W
Remark Setpoint Inc.
Setpoint Default
1001 STATOR PHASE A1 TYPE 0-4 1 0 1 OFF
1002 RTD # 1 DESCRIPTION 0-1 1 0 1 1
1003 STATOR PHASE A1 ALARM
TEMPERATURE 0-464,465 1 465
Range varies
with unit setting
in F095. Same
for all RTDs
1 OFF
1004 STATOR PHASE A1 TRIP
TEMPERATURE 0-464,465 1 465
Range varies
with unit setting
in F095. Same
for all RTDs
1 OFF
1005 STATOR PHASE A2 TYPE 0-4 1 0 1 OFF
1006 RTD # 2 DESCRIPTION 0-1 1 0 1 2
1007 STATOR PHASE A2 ALARM
TEMPERATURE 0-464,465 1 465 1 OFF
1008 STATOR PHASE A2 TRIP
TEMPERATURE 0-464,465 1 465 1 OFF
1009 STATOR PHASE A3 TYPE 0-4 1 0 1 OFF
1010 RTD # 3 DESCRIPTION 0-1 1 0 1 3
1011 STATOR PHASE A3 ALARM
TEMPERATURE 0-464,465 1 465 1 OFF
1012 STATOR PHASE A3 TRIP
TEMPERATURE 0-464,465 1 465 1 OFF
1013 STATOR PHASE A4 TYPE 0-4 1 0 1 OFF
1014 RTD # 4 DESCRIPTION 0-1 1 0 1 0
1015 STATOR PHASE A4 ALARM
TEMPERATURE 0-464,465 1 465 1 OFF
1016 STATOR PHASE A4 TRIP
TEMPERATURE 0-464,465 1 465 1 OFF
1017 STATOR PHASE A5 TYPE 0-4 1 0 1 OFF
1018 RTD # 5 DESCRIPTION 1-22 1 0 1 0
1019 STATOR PHASE A5 ALARM
TEMPERATURE 0-464,465 1 465 1 OFF
1020 STATOR PHASE A5 TRIP
TEMPERATURE 0-464,465 1 465 1 OFF
1021 STATOR PHASE A6 TYPE 0-4 1 0 1 OFF
1022 RTD # 6 DESCRIPTION 0-1 1 0 1 0
1023 STATOR PHASE A6 ALARM
TEMPERATURE 0-464,465 1 465 1 OFF
1024 STATOR PHASE A6 TRIP
TEMPERATURE 0-464,465 1 465 1 OFF
1025 FRONT BEARING TYPE 0-4 1 0 1 OFF
1026 RTD # 7 DESCRIPTION 0-1 1 0 1 0
1027 FRONT BEARING ALARM 0-464,465 1 465 May swap with 1 OFF
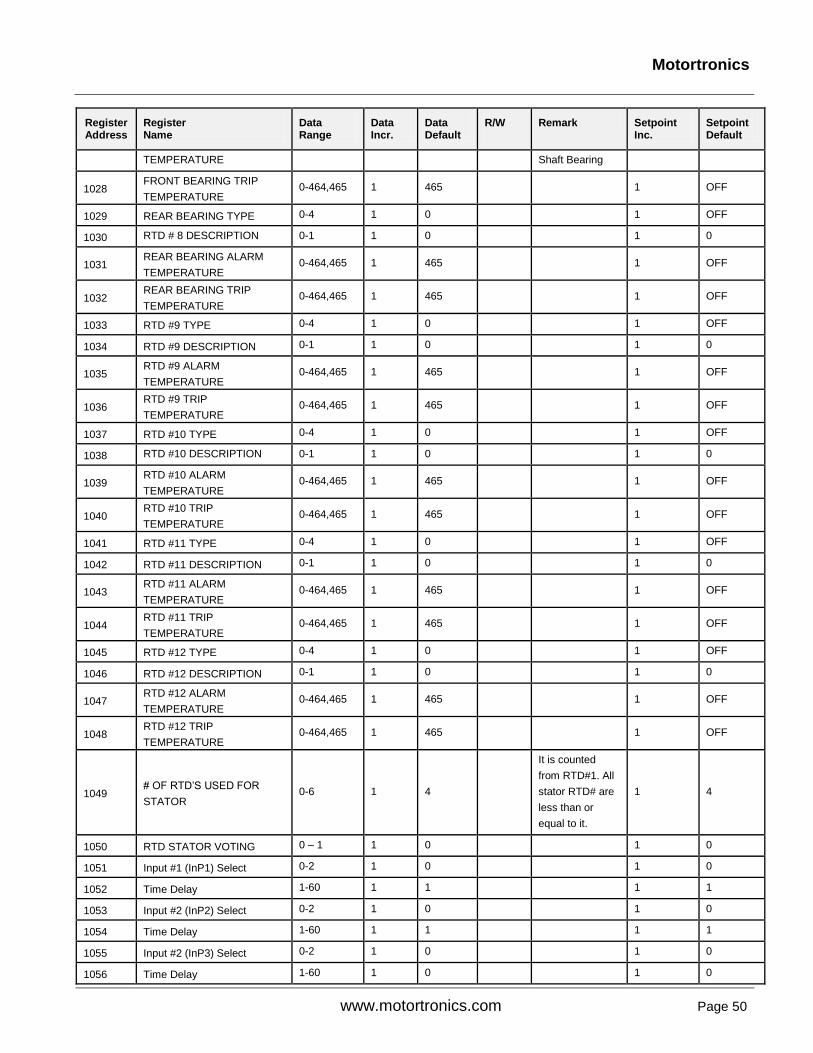
Motortronics
www.motortronics.com Page 50
Register Address
Register Name
Data Range
Data Incr.
Data Default
R/W
Remark Setpoint Inc.
Setpoint Default
TEMPERATURE Shaft Bearing
1028 FRONT BEARING TRIP
TEMPERATURE 0-464,465 1 465 1 OFF
1029 REAR BEARING TYPE 0-4 1 0 1 OFF
1030 RTD # 8 DESCRIPTION 0-1 1 0 1 0
1031 REAR BEARING ALARM
TEMPERATURE 0-464,465 1 465 1 OFF
1032 REAR BEARING TRIP
TEMPERATURE 0-464,465 1 465 1 OFF
1033 RTD #9 TYPE 0-4 1 0 1 OFF
1034 RTD #9 DESCRIPTION 0-1 1 0 1 0
1035 RTD #9 ALARM
TEMPERATURE 0-464,465 1 465 1 OFF
1036 RTD #9 TRIP
TEMPERATURE 0-464,465 1 465 1 OFF
1037 RTD #10 TYPE 0-4 1 0 1 OFF
1038 RTD #10 DESCRIPTION 0-1 1 0 1 0
1039 RTD #10 ALARM
TEMPERATURE 0-464,465 1 465 1 OFF
1040 RTD #10 TRIP
TEMPERATURE 0-464,465 1 465 1 OFF
1041 RTD #11 TYPE 0-4 1 0 1 OFF
1042 RTD #11 DESCRIPTION 0-1 1 0 1 0
1043 RTD #11 ALARM
TEMPERATURE 0-464,465 1 465 1 OFF
1044 RTD #11 TRIP
TEMPERATURE 0-464,465 1 465 1 OFF
1045 RTD #12 TYPE 0-4 1 0 1 OFF
1046 RTD #12 DESCRIPTION 0-1 1 0 1 0
1047 RTD #12 ALARM
TEMPERATURE 0-464,465 1 465 1 OFF
1048 RTD #12 TRIP
TEMPERATURE 0-464,465 1 465 1 OFF
1049 # OF RTD’S USED FOR
STATOR 0-6 1 4
It is counted
from RTD#1. All
stator RTD# are
less than or
equal to it.
1 4
1050 RTD STATOR VOTING 0 – 1 1 0 1 0
1051 Input #1 (InP1) Select 0-2 1 0 1 0
1052 Time Delay 1-60 1 1 1 1
1053 Input #2 (InP2) Select 0-2 1 0 1 0
1054 Time Delay 1-60 1 1 1 1
1055 Input #2 (InP3) Select 0-2 1 0 1 0
1056 Time Delay 1-60 1 0 1 0

Motortronics
www.motortronics.com Page 51
Register Address
Register Name
Data Range
Data Incr.
Data Default
R/W
Remark Setpoint Inc.
Setpoint Default
1057 Analog Input #1 Name 0-5 1 0 1 0
1059 Analog Input #1 (AnA1) 4mA 0-9999 1 0 1 0
1059 Analog Input #1 (AnA1)
20mA 0-9999 1 9999 1 9999
1060 Analog Input #1 Alarm Level 0,1-9999 1 0 1 0
1061 Analog Input #1 Alarm Time
Delay 1-60 1 1 1 1
1062 Analog Input #1 Trip Level 0,1-9999 1 0 1 0
1063 Analog Input #1 Trip Time
Delay 1-60 1 1 1 1
1064 Analog Input #2 Name 0-5 1 0 1 0
1065 Analog Input #2 (AnA2) 4mA 0-9999 1 0 1 0
1066 Analog Input #2 (AnA2)
20mA 0-9999 1 9999 1 9999
1067 Analog Input #2 Alarm Level 0,1-9999 1 0 1 0
1068 Analog Input #2 Alarm Time
Delay 1-60 1 1 1 1
1069 Analog Input #2 Trip Level 0,1-9999 1 0 1 0
1070 Analog Input #2 Trip Time
Delay 1-60 1 1 1 1
1071 Analog Output 0-6 1 0 1 0
1072 Analog Output 4mA 0-9999 1 0 1 0
1073 Analog Output 20mA 0-9999 1 9999 1 9999
1074 Unit Alarm Temperature 0-1 1 1 0=0FF
1=85°C/185°F 1 1
1075 Reserved
1076 Differential CT Alarm Level 0, 5-90 5 0 5 0
1077 Alarm Time Delay 1-60 1 1 1 1
1078 Differential CT Trip Level OFF, 5-90 5 0 5 OFF
1079 Trip Time Delay 1-60 1 1 1 1
1080 Differential CT Primary OFF, 5-
2000 5 0 5 OFF
1081 Differential CT Secondary 1,5 4 5 4 5
1082 Relay 1 setting 19 1 19 (Any
Trip) 1
9 (Any
Alarm)
1083 Relay 2 setting 1 – 19 1 9 (Any
Alarm) 1
19 (Any
Trip)
1084 Relay 3 setting 1 – 19 1
13
(Digital
Input #1
Trip)
1
13 (Digital
Input #1
Trip)
1085 Communications 0-2 1 0 1 0
1086 Baud Rate 0-3 1 1 Baud rate 9600

Motortronics
www.motortronics.com Page 52
Register Address
Register Name
Data Range
Data Incr.
Data Default
R/W
Remark Setpoint Inc.
Setpoint Default
1087 Modbus Address 1 - 247 1 1 1 1
1088 Year 2000 - 2047 1 year - 1 year -
1089 Month 1-12 1 Month - 1 Month -
1090 Day 1-31 1 Day - 1 Day -
1091 Hour 0 - 23 1 Hour - 1 Hour -
1092 Minute 0 - 59 1
Minute - 1 Minute -
1093 Seconds 0 - 59 1
Second - 1 Second -
1094 Default Display 0-34 1 1 1 1
1095 Unit of Temperature 0-1 1 0
Redo RTDs trip
and alarm
setting, if change
here.
1 0
1096 Relay 1 Fail Safe 0-1 1 0 1 0
1097 Relay 2 Fail Safe 0-1 1 0 1 0
1098 Relay 3 Fail Safe 0-1 1 0 1 0
1099 Relay Test 0-3
1 0 1 0
1100 Parameter Lock/ Level 1
Password
0, 001 –
999 1
0(Show
encrypte
d code)
1
0(Show
encrypted
code)
1101
System Clear / Factory Reset
(Reset Factory Default
Settings)
0, 1 – 4
1 0 1 0
1102 Level 2 Password 2000 –
9999 1 2000 1
2000
(Show
encrypted
code)
1103 Reserved
1104 RTD12 Revision # - - - Read Only - -
1105 KP Revision # - - - Read Only - -
1106 RTD-INF Revision# - - - Read Only - -
1107 Fault History #1, Latest Fault 0,31 – 50 1 0 Read Only 1 0
1108 Alarm / Trip Level (if
available) 0 - 9999 1 - Read Only - -
1109 Time Stamp, Fault #1 00.00-23.59
00.01 00.00 Read Only 00.01 00.00
1110 Date Stamp, Fault #1 01.01 –
12.31 00.01 01.01 Read Only 00.01 01.01
1111 Fault History #2, Previous
Fault 0, 31 – 50 1 0 Read Only 1 0
1112 Alarm / Trip Level (if
available) 0 - 9999 1 - Read Only - -

Motortronics
www.motortronics.com Page 53
Register Address
Register Name
Data Range
Data Incr.
Data Default
R/W
Remark Setpoint Inc.
Setpoint Default
1113 Time Stamp, Fault #2 EST 00.00-
23.59 00.01 00.00 Read Only 00.01 00.00
1114 Date Stamp, Fault #2 01.01 –
12.31 00.01 01.01 Read Only 00.01
01.01
1115 Fault History #3, Oldest Fault 0, 31 – 50 1 0 Read Only 1 0
1116 Alarm / Trip Level (if
available) 0 - 9999 1 - Read Only - -
1117 Time Stamp, Fault #3 EST 00.00-
23.59 00.01 00.00 Read Only 00.01 00.00
1118 Date Stamp, Fault #3 01.01 –
12.31 00.01 01.01 Read Only 00.01 01.01
1119 Present Event Record
Number
0-447
0: Null Rec;
Other: Rec.
Read Only 1 1
1120 Select Event Record Number
[to navigate the record] 1-447 - -
1121 Fault Code 0, 1 – 50 1 0 Read Only 1 0
1122 Alarm / Trip Level (if
available) 0 - 9999 1 Read Only - -
1123 Time Stamp of Selected
Event Record
00.00-23.59
(hh.mm)
[hh = 00-23;
mm = 00-
59]
Read Only
1124 Date Stamp of Selected
Event Record
01.01 –
12.31
(MM.DD)
[MM = 01-
12; DD =
01-31]
Read Only

Motortronics
www.motortronics.com Page 54
4.5 Monitor Registers
Register Address
Register Name
Data Type
R/W Actual Data Increment
2001 Hottest Stator ID INT16 - - R/O Sub-set of INT16 -
2002 Hottest Stator Temperature INT16 - - R/O -
2003 Hottest Non-Stator ID INT16 - - R/O -
2004 Hottest Non-Stator ID Temperature
INT16 - - R/O -
2005 Stator 1 Temperature INT16 - - R/O -
2006 Stator 2 Temperature INT16 - - R/O -
2007 Stator 3 Temperature INT16 - - R/O -
2008 Stator 4 Temperature INT16 - - R/O -
2009 Stator 5 Temperature INT16 - - R/O -
2010 Stator 6 Temperature INT16 - - R/O -
2011 Front Bearing Temperature INT16 - - R/O -
2012 Rear Bearing Temperature INT16 - - R/O -
2013 Bearing Box Temperature INT16 - - R/O -
2014 Ambient Temperature INT16 - - R/O -
2015 RTD11 Temperature INT16 - - R/O -
2016 RTD12 Temperature INT16 - - R/O -
2017 Highest Temperature of RTD 1 INT16 - - R/O -
2018 Highest Temperature of RTD 2 INT16 - - R/O -
2019 Highest Temperature of RTD 3 INT16 - - R/O -
2020 Highest Temperature of RTD 4 INT16 - - R/O -
2021 Highest Temperature of RTD 5 INT16 - - R/O -
2022 Highest Temperature of RTD 6 INT16 - - R/O -
2023 Highest Temperature of RTD 7 INT16 - - R/O -
2024 Highest Temperature of RTD 8 INT16 - - R/O -
2025 Highest Temperature of RTD 9 INT16 - - R/O -
2026 Highest Temperature of RTD 10 INT16 - - R/O -
2027 Highest Temperature of RTD 11 INT16 - - R/O -
2028 Highest Temperature of RTD 12 INT16 - - R/O -
2029 Analog Input 1 INT16 - - R/O -
2030 Analog Input 2 INT16 - - R/O -
2031 Unit Temperature INT16 - - R/O -
2032 Differential Current Phase A INT16 - - R/O -
2033 Differential Current Phase B INT16 - - R/O -
2034 Differential Current Phase C INT16 - - R/O -
2035 Fault Class # 0-50 - - R/O -
2036 Fault Code 0-50 - - R/O -
2037 Relay Status 0-7 - - R/O -

Motortronics
www.motortronics.com Page 55
APPENDIX A: Technical Specifications
Control Voltage: 110 - 240Vac Nominal 50/60Hz
Inputs: 12 RTD inputs (Pt100, Ni100, Ni120, Cu10) 3 CT inputs for differential CT’s
2 isolated 4-20mA inputs 3 isolated Digital Inputs*
Outputs: 3 programmable form C Relays with 5A contact rating pilot duty
One isolated 4-20mA output
Keypad: Two 4-digit displays, one for the RTD name (St1, St2, Fb, rb…) and one for the temperature. 1 green ‘OK’ LED, 1 yellow ‘ALARM’ LED, 1 red ‘TRIP’ LED and 3 Relay LED’s. 7 pushbuttons: 4 arrows, 1 ‘Function’, 1 ‘Enter’ and a ‘Reset’ button
Differential CT’s: Primary 5 - 2000A Secondary 1A or 5A Alarm and Trip Levels OFF, 5% to 90 % of CT value
Important: The differential CT feature is NOT designed to act as a UL Ground Fault or Over Current protection.
Resolution/Accuracy: Analog Inputs better than 1% Analog Outputs better than 0.5%
Communication Port: 2 Wire RS485* Protocol: MODBUS RTU I/O Terminals: Removable terminal blocks Operating Temperature: 32ºF – 122ºF / 0ºC to 50ºC Storage Temperature: -4ºF – 176ºF / -20ºC to 80ºC Humidity: 10% to 90% (non-condensing)
* RS485 and Digital Inputs share a common ground point
All analog I/O share a common ground point.

Motortronics
www.motortronics.com Page 56
APPENDIX B: RTD TYPE TEMPERATURE VS RESISTANCE CHARTS
10 Ω Copper RTD: 0.004 27 coefficient
100 Ω Nickel RTD: 0.00618 coefficient
°F 0 1 2 3 4 5 6 7 8 9
0 8.348 8.370 8.391 8.413 8.434 8.456 8.477 8.499 8.520 8.542
10 8.563 8.584 8.606 8.627 8.649 8.670 8.692 8.713 8.735 8.756
20 8.778 8.799 8.820 8.842 8.863 8.885 8.906 8.928 8.949 8.971
30 8.992 9.014 9.035 9.056 9.078 9.099 9.121 9.142 9.164 9.185
40 9.207 9.228 9.250 9.271 9.292 9.314 9.335 9.357 9.378 9.400
50 9.421 9.443 9.464 9.486 9.507 9.528 9.550 9.571 9.593 9.614
60 9.636 9.657 9.679 9.700 9.722 9.743 9.764 9.786 9.807 9.829
70 9.850 9.872 9.893 9.915 9.936 9.958 9.979 10.000 10.022 10.043
80 10.065 10.086 10.108 10.129 10.151 10.172 10.194 10.215 10.236 10.258
90 10.279 10.301 10.322 10.344 10.365 10.387 10.408 10.430 10.451 10.472
100 10.494 10.515 10.537 10.558 10.580 10.601 10.623 10.644 10.666 10.687
°F 0 1 2 3 4 5 6 7 8 9
0 90.459 90.751 91.043 91.336 91.629 91.922 92.216 92.510 92.805 93.100
10 93.396 93.691 93.988 94.284 94.582 94.879 95.177 95.475 95.774 96.073
20 96.373 96.673 96.973 97.274 97.575 97.877 98.179 98.482 98.784 99.088
30 99.391 99.696 100.000 100.305 100.610 100.916 101.222 101.529 101.836 102.143
40 102.451 102.759 103.068 103.377 103.686 103.996 104.306 104.617 104.928 105.240
50 105.552 105.864 106.177 106.490 106.803 107.117 107.432 107.746 108.062 108.377
60 108.693 109.010 109.327 109.644 109.962 110.280 110.598 110.917 111.236 111.556
70 111.876 112.197 112.518 112.839 113.161 113.483 113.806 114.129 114.453 114.777
80 115.101 115.426 115.751 116.076 116.402 116.729 117.056 117.383 117.711 118.039
90 118.367 118.696 119.026 119.355 119.686 120.016 120.347 120.679 121.011 121.343
100 121.676 122.009 122.343 122.677 123.011 123.346 123.681 124.017 124.353 124.690

Motortronics
www.motortronics.com Page 57
120 Ω Nickel RTD: 0.00672 coefficient
100 Ω Platinum RTD: 0.00385 coefficient
°F 0 1 2 3 4 5 6 7 8 9
0 107.66 108.04 108.42 108.80 109.18 109.56 109.94 110.32 110.70 111.09
10 111.47 111.85 112.23 112.62 113.00 113.39 113.77 114.16 114.54 114.93
20 115.32 115.71 116.09 116.48 116.87 117.26 117.65 118.04 118.43 118.82
30 119.21 119.61 120.00 120.39 120.79 121.18 121.58 121.97 122.37 122.77
40 123.16 123.56 123.96 124.36 124.76 125.16 125.56 125.96 126.36 126.76
50 127.17 127.57 127.98 128.38 128.79 129.19 129.60 130.00 130.41 130.82
60 131.23 131.64 132.05 132.46 132.87 133.28 133.69 134.11 134.52 134.93
70 135.35 135.76 136.18 136.59 137.01 137.43 137.85 138.26 138.68 139.10
80 139.52 139.95 140.37 140.79 141.21 141.64 142.06 142.48 142.91 143.34
90 143.76 144.19 144.62 145.05 145.48 145.90 146.34 146.77 147.20 147.63
100 148.06 148.50 148.93 149.37 149.80 150.24 150.67 151.11 151.55 151.99
°F 0 1 2 3 4 5 6 7 8 9
0 93.033 93.252 93.470 93.688 93.906 94.124 94.343 94.561 94.779 94.997
10 95.215 95.432 95.650 95.868 96.086 96.304 96.521 96.739 96.957 97.174
20 97.392 97.609 97.827 98.044 98.262 98.479 98.697 98.914 99.131 99.349
30 99.566 99.783 100.000 100.217 100.434 100.651 100.868 101.085 101.302 101.519
40 101.736 101.953 102.169 102.386 102.603 102.820 103.036 103.253 103.469 103.686
50 103.903 104.119 104.335 104.552 104.768 104.985 105.201 105.417 105.633 105.849
60 106.066 106.282 106.498 106.714 106.930 107.146 107.362 107.578 107.794 108.009
70 108.225 108.441 108.657 108.872 109.088 109.304 109.519 109.735 109.950 110.166
80 110.381 110.596 110.812 111.027 111.242 111.458 111.673 111.888 112.103 112.318
90 112.533 112.748 112.963 113.178 113.393 113.608 113.823 114.038 114.253 114.468
100 114.682 114.897 115.112 115.326 115.541 115.755 115.970 116.184 116.399 116.613

Motortronics
www.motortronics.com Page 58
APPENDIX 3: RTD WIRING DIAGRAM
2 Wire RTD
RTD X
X (Signal)
GND X
GND RET X
(Comp)
ShieldJumper at terminal
strip on TE-RTD12
3 Wire RTD
RTD X
GND X
Shield
X (Signal)
GND RET X
(Comp)
4 Wire RTD
RTD X
GND X
Shield
Leave one sensor
wire open
X (Signal)
GND RET X
(Comp)

Motortronics
www.motortronics.com Page 59
Warranty information
1 Year Warranty: Phasetronics Inc., dba Motortronics, (hereinafter “Company”) warrants the TE-RTD12 Series products to be free from defects in material and/or workmanship for a period of one (1) year from the date of sale, or a maximum of 18 months from the date of manufacture (if no sales records are available) as indicated by the unit’s date code. The Company reserves the right to repair or replace any malfunctioning units or sub- assemblies under warranty at the Company’ sole option. Warranty repairs may be performed at the Company’s facility, in the field by a factory-authorized technician, or by the customer only with prior approval and at the specific direction of the Company’s Technical Services personnel. During the 1 year period, malfunctions of the control boards will be dealt with by replacement of the Modular Control Assembly (MCA), which contains the User Interface Panel, Digital Control Unit, Bypass control (if any) and Communications Interface. The MCA is designed to be replaced quickly without the need for tools (plug-in), and as such will constitute the majority of warranty replacements. Warranty Service Procedure: In the event that warranty service becomes necessary, contact the distributor where the starter was purchased, or Motortronics Technical Services department directly at (727) 573-1819. Be prepared to provide the complete Model number, Serial Number, date and place of purchase. It is also helpful to know the date of initial commissioning. When Technical Services has determined the nature of the problem and that sending replacement parts or assemblies can repair it, they will require a purchase order for replacement parts and issue a Return Material Authorization (RMA) for the defective parts or assemblies. If any components or assemblies are received at the factory without the proper RMA documentation, the shipment(s) will be refused.
When the replacement parts are received and evaluated at the factory, any warranty determination will result in an offsetting credit being issued for the replacement parts already sent out. If the unit is not needed for immediate operation, an alternative is to have the Technical Services representative provide an RMA for the components, and they will be evaluated and repaired at the factory, and returned. In either circumstance, freight/shipping costs are the responsibility of the purchaser. Responsibility: Company is not responsible for the misuse or misapplication of its products, intentional or otherwise. Improper application, installation, failure to provide safety devices or protective measures, or operation above its ratings, and failure to properly maintain or service products are all beyond the control and responsibility of the Company. Under no circumstances shall the Company be liable for loss of profits, indirect, incidental, special, consequential or other similar damages arising out of the misuse, misapplication or failure to maintain the Company’s products.
