teacher guide - torch documents/teacher guide.pdf · u sera c t iv y: t hw lp oa u nf m gd’ . ......
TRANSCRIPT

Impero learning series
© 2012 Impero Solutions Ltd.www.imperosoftware.com
Teacher GuideEnglish
Impero installation guideTeacher Guide
Table of Contents
Part I The Basics 3
................................................................................................................................... 3Open Impero Console
................................................................................................................................... 4Screen Layout
................................................................................................................................... 4View Tabs ......................................................................................................................................................... 5Computer List ......................................................................................................................................................... 6Thumbnail ......................................................................................................................................................... 6Room Layout
................................................................................................................................... 7Selecting Computers ......................................................................................................................................................... 8Quick Select Toolbar ......................................................................................................................................................... 8Users vs Computers
Part II 10 Tips for Teachers 9
................................................................................................................................... 9How to Disable Internet ................................................................................................................................... 10Lock Screen, Keyboard & Mouse ................................................................................................................................... 12Run Website/Program on all PCs ................................................................................................................................... 13Only Allow Certain Websites ................................................................................................................................... 14Sending Homework to Students ................................................................................................................................... 15Collecting Homework from Students ................................................................................................................................... 16Let a Student Lead a Session ................................................................................................................................... 17Unlocking a Student's PC ................................................................................................................................... 18Take a Screenshot of the Entire Classroom ................................................................................................................................... 19How to Create a Quick Question
Teacher Guide
© 2012 Impero Solutions Ltd.© 2012 Impero Solutions Ltd. 3Page
1 The Basics
The Basics section provides information on the layout and identifies key areas within the Impero console.
1.1 Open Impero Console
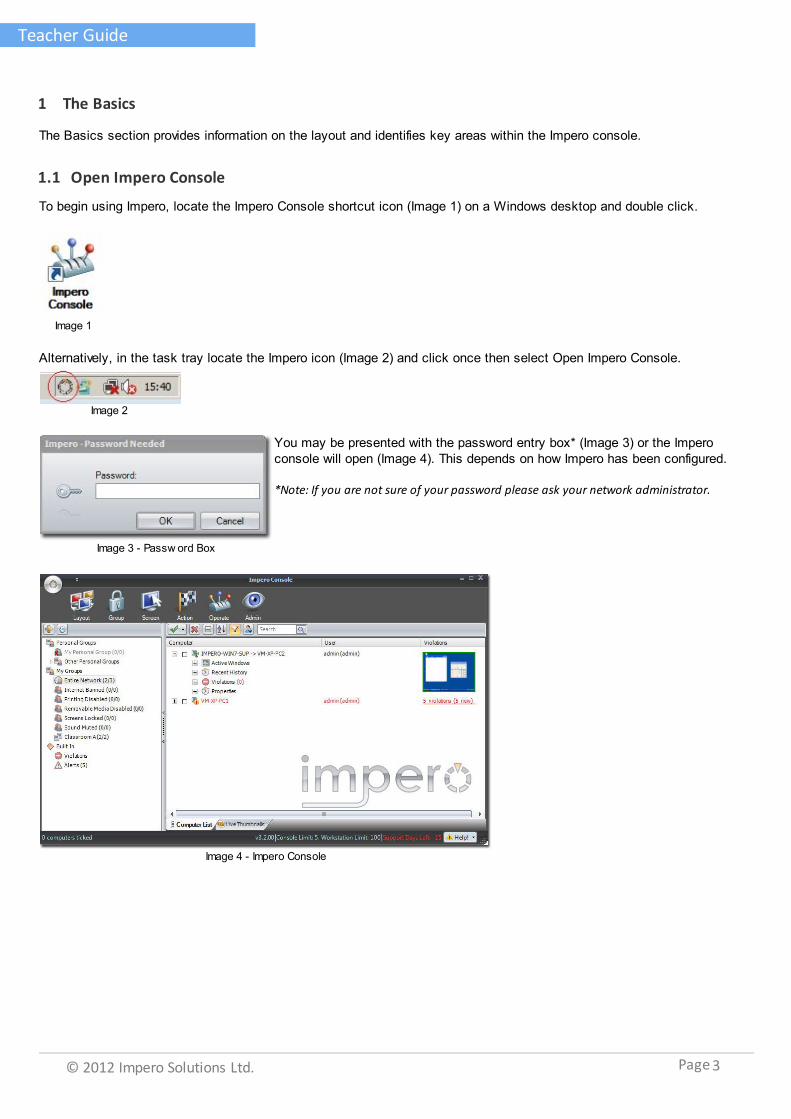
To begin using Impero, locate the Impero Console shortcut icon (Image 1) on a Windows desktop and double click.
Image 1
Alternatively, in the task tray locate the Impero icon (Image 2) and click once then select Open Impero Console.
Image 2
Image 3 - Passw ord Box
You may be presented with the password entry box* (Image 3) or the Imperoconsole will open (Image 4). This depends on how Impero has been configured.
*Note: If you are not sure of your password please ask your network administrator.
Image 4 - Impero Console

Teacher Guide
© 2012 Impero Solutions Ltd.© 2012 Impero Solutions Ltd. 4Page
1.2 Screen Layout
Image 5 - Impero Console
1. Toolbar: The toolbar area has been created by grouping similar features together to allow you to perform similar tasksfrom just one area.
2. My Groups: Allows you to switch between the classrooms that you have access to.
3. View Tabs: The tabs are located at the bottom of the Impero console and allow you to switch between views.
4. User Activity: This will report various information regarding the student’s activity during their lesson.
5. Violations: The student account turns red for quick identification of users who have gone off task.
1.3 View Tabs
The Impero console is able to display computers in your classroom in three different views (Image 6): Computer List, LiveThumbnails and Room Layout. Each of these tabs will help you perform different types of Impero tasks. You can quicklychange between these views by using the tabs located at the bottom of the console or by selecting Layout in the Toolbarand then clicking on the desired view.
Image 6 - Live Thumbnail Tabs

Teacher Guide
© 2012 Impero Solutions Ltd.© 2012 Impero Solutions Ltd. 5Page
1.3.1 Computer List
You will be presented with a list of computers/users for your classroom (Image 7). A sign in front of the computer nameindicates that a student is currently logged on to that computer. When you select the sign this will expand the studentaccount and provide further information about his/her activity during this session which includes; Active Windows, RecentHistory, Violations and Properties. If no user is currently logged on, the sign next to the computer name will not appearand the username column will appear blank. A computer/username displaying in gray indicates that the computer iscurrently powered-off, in Standby, hibernated or possibly the network cable is unplugged or wireless connection has beenlost.
1. Active Windows: Displays the programs that the student currently has open. You are able to select the active window and right click toeither close or block. Close shuts down the application and block builds a policy to stop the student from opening this inthe future.
Image 7.2 - Computer List
2. Recent History: Impero keeps a copy of all Windows, Websites, Applications, Printed Documents and Deleted files that have been usedduring this session (Image 7.1).
3. Violations: If the student has visited banned websites or applications then the username will turn red and display the number ofviolations that have occurred (Image 7.3).

Teacher Guide
© 2012 Impero Solutions Ltd.© 2012 Impero Solutions Ltd. 6Page
Image 7.3 - Computer List
4. Properties: Displays information about who is logged on and the name of the computer.
Note: Session activity is only available while the student is logged on. Once a student logs off, the quick view information is lost. Thelog viewer provides historic information about previous sessions and is also broken down by date and time.
1.3.2 Thumbnail
This view allows you to see your entire classroom in real-time (Image 8). You will be able to quickly identify if studentshave strayed from the task at hand. You are able to change the size of the live thumbnails by using the slider bar in themenu. For a better view you can double click any live thumbnail to view them in their own remote control window. Bydefault the remote control window is set to view only which will not disturb the student.
Image 8 - Live Thumbnails
1.3.3 Room Layout
This view gives you the ability to apply an image of your classroom so it is available to view in the background. Once youhave arranged the icons and selected save, it will then be available for future use to quickly identify by position instead of bycomputer/username (Image 9). This view is excellent for selecting students for exams, quick questions, collectinghomework and many more tasks.

Teacher Guide
© 2012 Impero Solutions Ltd.© 2012 Impero Solutions Ltd. 7Page
Image 9 - Room Layout
How to Set Background Image 1. Create a JPG, GIF or PNG image of your classroom2. From the Toolbar menu click on 'Room Image' then 'Set Background Picture' 3. Select the image of the room you have created in Step 1.4. Move the icons to desired position5. Click on 'Room Layout' and select 'Save Room Layout'
Note: Room layout view is only available to computer based groups.
1.4 Selecting Computers
You are able to perform any Impero function on one or more computers/users at the same time but first you must selectthem. Each computer has a small box next to it that you are able to put a tick in. The tick represents computers/usersthat are currently selected. You are able to select as many computers/users as you wish. For example: I have selectedthree computers/users in image 10.
Image 10 - Select Computers/Users

Teacher Guide
© 2012 Impero Solutions Ltd.© 2012 Impero Solutions Ltd. 8Page
1.4.1 Quick Select Toolbar
Quick Select Toolbar: clicking the down arrow gives you additional options (Image 12).
Image12 - Predefined Selection Groups
Tick All computers: This will tick all computers in this group.Tick Powered ON computers: This will only tick computers that are powered on.Tick Powered OFF computers: This will only tick computers that are powered off.Tick computers in use: This will only tick computers that have users logged on. Tick computers not in use: This will tick only computers that are running with nobody logged on.
This deselects all computers you have previously selected.
This collapses all the students you have expanded.
This will alphabetically sort the list below.
Removes the gray offline computers from view.
Displays the users alphabetically.
This will search for any part of a computer or username you type in.
Hint: You can always click on a column heading to sort ascending or descending alphabetically.
1.4.2 Users vs Computers
We first need to identify the differences between the user and computer groups.
User groups are represented by symbol and computer groups are represented by symbol. The main thing to keepin mind is that you can have different outcomes when applying blocks, locks or disabling items depending on the type ofgroup you select.
Applying blocks, locks or disabling items on a user group will affect the user no matter what computer they use. Inessence, the policy will follow the user around until you or someone else takes them out of that group. If you apply the
same blocks to a computer group then it will affect every user that accesses this group of computers; until it isremoved.
Examples:
Users: Disable InternetSelecting one or more computers and then drag and drop the users on top of the group 'Internet Banned' or right click andselect 'Add to Group', 'Internet Banned'. It will lock the internet for these user's no matter what computer they use.
To remove these user's from 'Internet Banned' group. Click on 'Internet Banned' group and select the user/s you wish toremove, then right mouse click on one of them and select 'Remove from Group'. Alternatively you could right click on'Internet Banned' group and select properties, then remove the desired users from the group by using the delete button tothe right of their username.

Teacher Guide
© 2012 Impero Solutions Ltd.© 2012 Impero Solutions Ltd. 9Page
Computers: Disable all Internet in the classroomIt does not matter if you have anyone selected or not because we are working with the 'Group' section of the toolbar. Todisable the internet for the entire classroom make sure you have the correct classroom highlighted and then click 'Group'from the toolbar, 'Lock Internet'. To remove the internet block click on 'Group' from the toolbar, 'Unlock Internet'.
2 10 Tips for Teachers
This section describes how to use the 10 most common tasks for teachers.
2.1 How to Disable Internet
You can disable the internet for the entire classroom or for individual users.
Image 48 - Group Toolbar
Entire classroom:Disabling the Internet for the entire classroom is very simple. Make sure you have selected the correct group/classroom,then you can see your users. Click on the 'Group' icon on your toolbar (Image 48) and select 'Lock Internet'. Rememberyou do not have to select any users as this locks all of the members in this group/classroom. It does not matter who usesthese computers as the internet has been disabled on the actual computers.
To return the internet back to normal click on the 'Group' from your toolbar and select 'Unlock Internet'.
Individual users:
Image 60 - Add to Group
By selecting different users you are able to disable their internet for a setamount of time. Since you are disabling the users internet it does not matterwhich computer they logon to, their internet will be disabled.
1. Select Computer List tab2. Select the users 3. Drag and drop one of the users on the group 'Internet Banned'.
Note: If you right mouse click on a user then click 'Add To Group' and select 'InternetBanned' then it will add these users until they are removed.
4. A dialog box appears (Image 60) asking for how long the internet should bebanned for.Until Removed: Forever For a limited time: Preset time intervalsUntil the following time: Displays a calendar to select the date and time.
5. Internet is banned until it is either manually removed or the time expires.
Note: When banning users internet it will be banned in every classroom.
Teacher Guide
© 2012 Impero Solutions Ltd.© 2012 Impero Solutions Ltd. 10Page
Return a users Internet back to normal
Option 1: Select the user(s) and then right mouse click on top of the selected user and select 'Remove from Group' andthen 'Internet banned'.
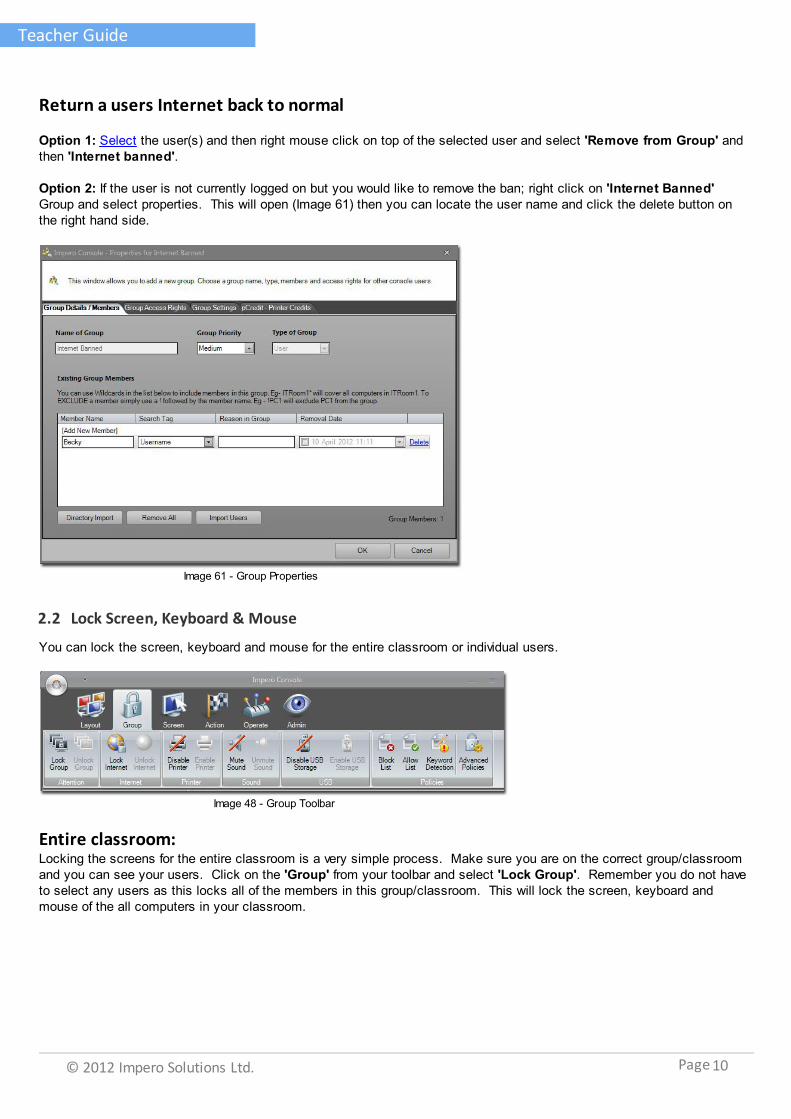
Option 2: If the user is not currently logged on but you would like to remove the ban; right click on 'Internet Banned'Group and select properties. This will open (Image 61) then you can locate the user name and click the delete button onthe right hand side.
Image 61 - Group Properties
2.2 Lock Screen, Keyboard & Mouse
You can lock the screen, keyboard and mouse for the entire classroom or individual users.
Image 48 - Group Toolbar
Entire classroom:Locking the screens for the entire classroom is a very simple process. Make sure you are on the correct group/classroomand you can see your users. Click on the 'Group' from your toolbar and select 'Lock Group'. Remember you do not haveto select any users as this locks all of the members in this group/classroom. This will lock the screen, keyboard andmouse of the all computers in your classroom.

Teacher Guide
© 2012 Impero Solutions Ltd.© 2012 Impero Solutions Ltd. 11Page
Image 41 - Locked Screen
To return the computer screens back to normal click on the 'Group' from your toolbar and select 'Unlock Group'.
Lock screen, keyboard and mouse for user(s)By selecting different users you are able to lock their screen, keyboard and mouse for a set amount of time. Since you arelocking the users, whichever computer they logon to will be locked.
1.
Image 60 - Add to Group
Select Computer List tab2. Select the users 3. Drag and drop one of the users on to the group 'Screens Locked'.
Note: If you right mouse click on a user then click 'Add To Group' andselect 'Screens Locked' then it will add these users until they are removed.
4. A dialog box appears (Image 60) asking for how long the screen, keyboardand mouse should be locked for.Until Removed: Forever For a limited time: Preset time intervalsUntil the following time: This provides a calendar to allow you to pick thedate and then you can adjust the time.
5. Screen, keyboard and mouse are locked until it is either manually removed orthe time expires.
Note: When locking a user screen, keyboard and mouse it will be locked in every classroom.
Return a users screen back to normalSelect the user(s) and right mouse click on top of their name and select 'Remove from Group' and then 'ScreensLocked'.
If the user is not currently logged on but you would like to remove the ban; then right click on 'Screens Locked' Group andselect properties. This will open (Image 63) then you can locate the user name and click the delete button on the righthand side.

Teacher Guide
© 2012 Impero Solutions Ltd.© 2012 Impero Solutions Ltd. 12Page
Image 63 - Properties of Screens Locked
2.3 Run Website/Program on all PCs
This allows you to quickly open a website or a program on one computer or the entire classroom at once. 1. Select the required students you wish to Run Website/File on.2. Open 'Action' toolbar and then click on 'Run Website/File' (Image 23).
Image 23 - Action Toolbar
3. Enter either a website address (Image 33) or a file (Image 34) to run.4. Once you click the Run button it will then display on all of the computers that you have selected.

Teacher Guide
© 2012 Impero Solutions Ltd.© 2012 Impero Solutions Ltd. 13Page
Image 33 - Run Website Address
Image 34 - Run File
2.4 Only Allow Certain Websites
1. click on the 'Groups' icon and then click on 'Allow Only' (Image 48)
Image 48 - Group Toolbar
Note: When the Allow Only List is empty it will allow all websites.
Teacher Guide
© 2012 Impero Solutions Ltd.© 2012 Impero Solutions Ltd. 14Page
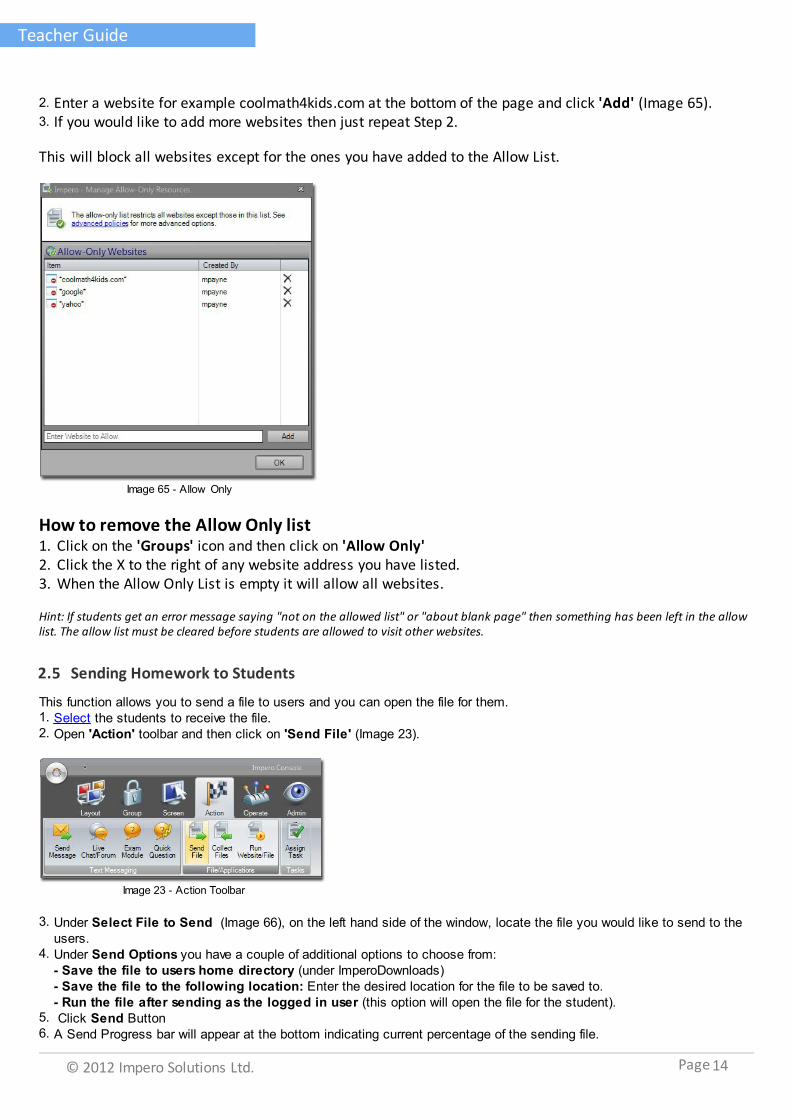
2. Enter a website for example coolmath4kids.com at the bottom of the page and click 'Add' (Image 65).3. If you would like to add more websites then just repeat Step 2.
This will block all websites except for the ones you have added to the Allow List.
Image 65 - Allow Only
How to remove the Allow Only list1. Click on the 'Groups' icon and then click on 'Allow Only' 2. Click the X to the right of any website address you have listed.3. When the Allow Only List is empty it will allow all websites.
Hint: If students get an error message saying "not on the allowed list" or "about blank page" then something has been left in the allowlist. The allow list must be cleared before students are allowed to visit other websites.
2.5 Sending Homework to Students
This function allows you to send a file to users and you can open the file for them.1. Select the students to receive the file.2. Open 'Action' toolbar and then click on 'Send File' (Image 23).
Image 23 - Action Toolbar
3. Under Select File to Send (Image 66), on the left hand side of the window, locate the file you would like to send to theusers.
4. Under Send Options you have a couple of additional options to choose from:- Save the file to users home directory (under ImperoDownloads)- Save the file to the following location: Enter the desired location for the file to be saved to.- Run the file after sending as the logged in user (this option will open the file for the student).
5. Click Send Button6. A Send Progress bar will appear at the bottom indicating current percentage of the sending file.

Teacher Guide
© 2012 Impero Solutions Ltd.© 2012 Impero Solutions Ltd. 15Page
Image 66 - Send File
2.6 Collecting Homework from Students
1. Select the required students you wish to collect files from.2. Open 'Action' toolbar and then click on 'Collect Files' (Image 23).
Image 23 - Action Toolbar
3. Impero will create a folder with today's date as the name and save the collected files from the student's to this location. 4. Click Ask For Files button (Image 31).
Image 31 - Receive File
5. On the students desktop My Documents area will appear (Image 32).

Teacher Guide
© 2012 Impero Solutions Ltd.© 2012 Impero Solutions Ltd. 16Page
Image 32 - My Documents
6. The student needs to select the file they wish to send to you.7. Impero will then take the students username and append it to the front of the file name for quick identification (Image
32.1).
Example:
Image 32.1 - Collected File
Before Collection: \\Student\My Documents\Science Report.doc Once Collected: \\Teachers\My Documents\today's date\David - Science report.doc (Image 32.1)
Note: You are only receiving a copy of the file as the student will still have the original.
8. To view the files you have collected click the 'View Files' button at the bottom of the dialog box (Image 31) or open MyDocuments and click on ImperoDownloads\today's date.
2.7 Let a Student Lead a Session
1. Select the desired users 2. Click on 'Broadcast Screen' from the 'Screen' Toolbar.
Image 40 - Screen Toolbar

Teacher Guide
© 2012 Impero Solutions Ltd.© 2012 Impero Solutions Ltd. 17Page
Image 43 - Broadcast Options
3. Then Impero - Broadcast Options dialog window opens (Image 43).4. Click on Select Broadcaster and change it from yourself to the student you wish tolead the lesson.5. Click 'Begin' to broadcast the screen in full or select 'Show broadcast inWindow' and select the desired size.6. Click on 'End Broadcast' from the 'Actions' toolbar to stop broadcasting (Image40).
Note: 'Show Broadcast in Window' allows users to switch between open windows usingAlt+Tab.
2.8 Unlocking a Student's PC
Scenario: a student was working on a computer in your classroom. They have now left the room and did not log off thecomputer. The computer can now only be unlocked by that student or a network administrator. With Impero you are ableto overcome this problem yourself by unlocking the computer or logging off the student immediately.
To unlock a users computer:
1. Select the desired users2. Click on the toolbar 'Operate' and then 'Unlock Station' or 'Log Off'
Image 21 - Operate Toolbar
Unlock Station: This gives you the ability to save any work they may have left open before logging them off.Log Off: This logs the student off immediately without saving any work.
3. Computer is ready for use.
Teacher Guide
© 2012 Impero Solutions Ltd.© 2012 Impero Solutions Ltd. 18Page
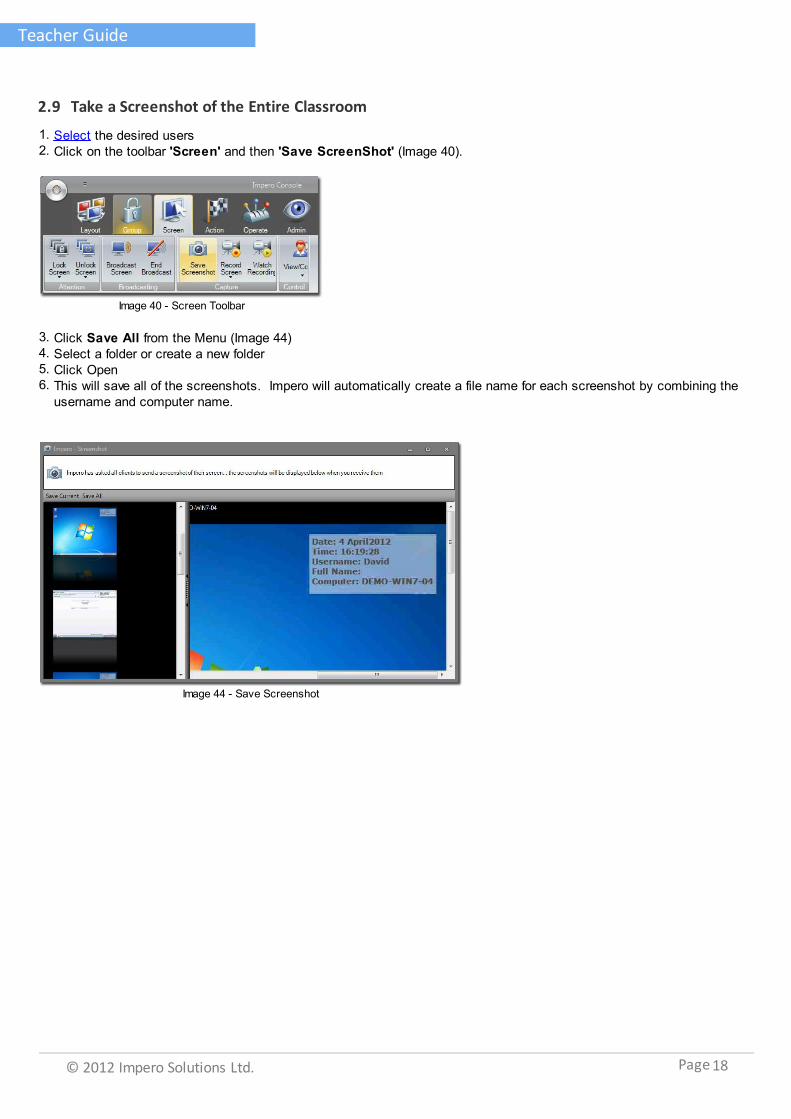
2.9 Take a Screenshot of the Entire Classroom
1. Select the desired users 2. Click on the toolbar 'Screen' and then 'Save ScreenShot' (Image 40).
Image 40 - Screen Toolbar
3. Click Save All from the Menu (Image 44)4. Select a folder or create a new folder5. Click Open6. This will save all of the screenshots. Impero will automatically create a file name for each screenshot by combining the
username and computer name.
Image 44 - Save Screenshot

Teacher Guide
© 2012 Impero Solutions Ltd.© 2012 Impero Solutions Ltd. 19Page
2.10How to Create a Quick Question
Quick Question
This function allows you to ascertain quickly if the students understood the lesson. By using the quick question feature ofImpero the student is not singled out if they answer incorrectly. This allows you to see who needs the lesson reviewing.
1. Select the required students you wish to receive the Quick Question.2. From the 'Action' toolbar select 'Quick Question' (Image 23).
Image 23 - Action Toolbar
3. Enter a question (Image 28)4. Pick the type of question you want;
- Yes/No: One answer- Written Answer: Maximum of 6 correct answers- Multiple Choice: Maximum of 6 keywords or phrases
5. Then type in the answers below unless it is the Yes/No question.6. Click 'Send Question' button7. The selected users will receive the question on their desktop.
Image 28 - Quick Question Image 29 - Quick Question Results
8. Once the user answers the question the window will close.9. On your desktop you will see a dialog box (Image 29); this will display the results in a bar chart along with each
username and the answers they gave.