teacher user guide - study...
TRANSCRIPT

Teacher User Guide

Page 2 of 57 Customer Support 11.08.2017 800.419.3191
Table of Contents
Study Island Help Center ...........................................3
Take a How To Tour ...............................................4
Contact Edmentum Customer Support ................4
Overview: Roles and Permissions ..............................5
Administrator ..........................................................5
District Administrator .............................................5
Teacher....................................................................5
Get Started .................................................................6
Sign into Your Account for the First Time ............6
Edit Your Personal Information .............................7
Teacher Resources .....................................................7
The Power User Program .......................................7
Teacher Toolkit .......................................................9
The Topic Tree ......................................................... 10
Locate Standards Details ..................................... 10
Understanding the Topic Tree ............................ 11
Set Up Classes .......................................................... 12
Create A Class ...................................................... 12
Create an Assignment .......................................... 13
Activate a Class ..................................................... 15
Navigate Your Class Page.................................... 16
Navigate Your Class Properties Page ................. 17
Message Center ....................................................... 18
Message Students ................................................ 18
Benchmarks .............................................................. 19
Adjust Benchmark Preferences ........................... 19
Administer a Benchmark Test .............................. 20
Help Students Navigate a Benchmark Test ........ 20
Adjust Student Difficulty .......................................... 21
Adjust Passing Goal ............................................. 21
Restrict Access to Other Grade Levels ............... 22
Reduce Answer Choices ...................................... 23
Enable Text-to-Speech ........................................ 23
Reset Student Start Date ..................................... 24
Create Custom Material .......................................... 25
Build a Test ............................................................... 27
Create a Built Test ................................................ 27
Navigate the Built Test Library ........................... 30
Assign a Built Test ................................................ 31
Grade a Constructed Response .......................... 32
Student View of Constructed Response Results 34
Built Test Report Time Stamp ............................. 35
Copy and Edit a Built Test ................................... 35
Share a Built Test .................................................. 36
Unshare a Test ...................................................... 37
Group Sessions ......................................................... 38
Create a Group Session ....................................... 38
Conduct a Group Session .................................... 41
Open A Previously Saved Group Session ........... 42
Set Up Parent Notifications ..................................... 42
Add Parent Contact Information ......................... 42
Create Parent Groups .......................................... 43
Send Parent Notifications .................................... 44
Track Student Progress ............................................ 45
Edmentum Sensei ................................................ 45
Navigate the Edmentum Sensei Page ................ 47
Live View ................................................................... 48
Access Reports ......................................................... 49
Create an Emailed Report Subscription ............. 50
Types of Reports ................................................... 51
Glossary ..................................................................... 52
Page 3 of 57 Customer Support 11.08.2017 800.419.3191 [email protected]
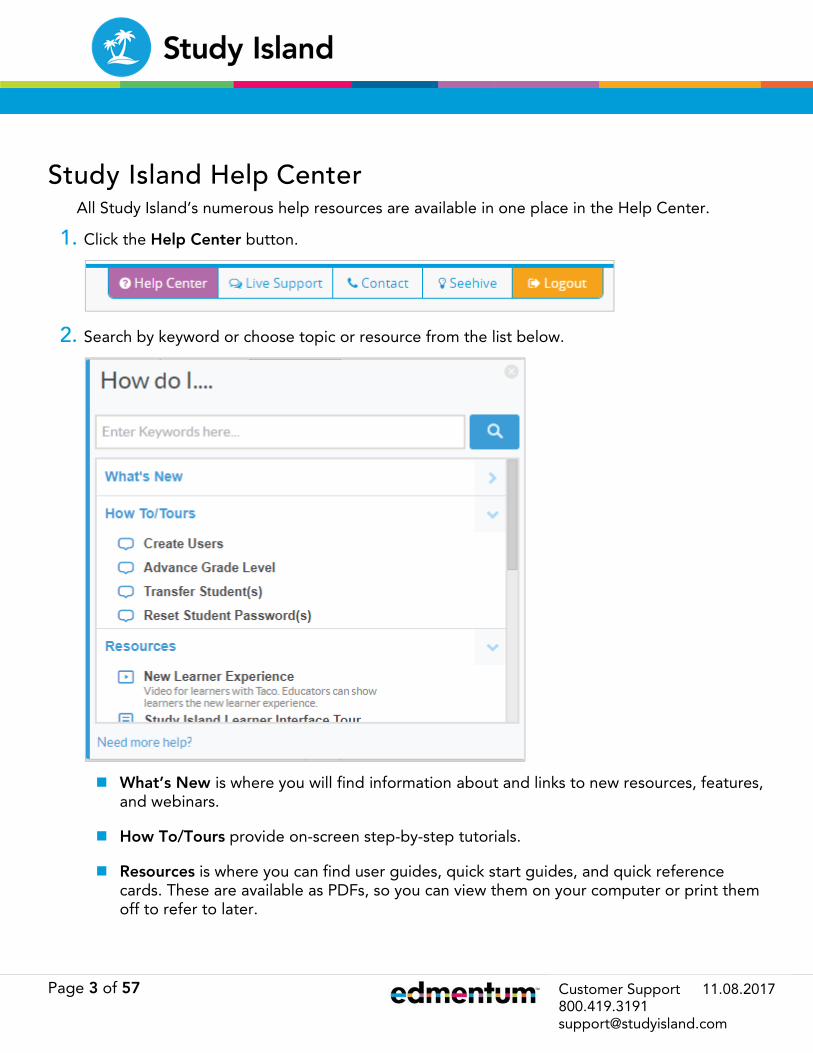
Study Island Help Center All Study Island’s numerous help resources are available in one place in the Help Center.
1. Click the Help Center button.
2. Search by keyword or choose topic or resource from the list below.
� What’s New is where you will find information about and links to new resources, features, and webinars.
� How To/Tours provide on-screen step-by-step tutorials.
� Resources is where you can find user guides, quick start guides, and quick reference cards. These are available as PDFs, so you can view them on your computer or print them off to refer to later.

Page 4 of 57 Customer Support 11.08.2017 800.419.3191 [email protected]
Take a How To Tour
How To Tours provide on-screen, step-by-step assistance.
3. Click Help Center and select a topic from the list or type in a keyword to find a topic.
4. Follow the instructions for each step. A new popup appears after you complete the previous step.
5. To close the How To/Tour windows without completing the task, click the X in the top right corner of the popup.
Contact Edmentum Customer Support
If you need additional assistance, our Customer Support staff is ready to help you! Contact Study Island Customer Support (800.447.5286 or [email protected]).
Follow the instructions below to use the Live Chat feature:
1. Click Live Support on the top menu bar. This opens a new window.
2. Click Chat Now. Your name and email will be automatically filled in according to the account you have logged into. A Customer Support Representative will contact you shortly.

Page 5 of 57 Customer Support 11.08.2017 800.419.3191 [email protected]
Overview: Roles and Permissions Administrator
The designated Study Island Account Administrator is responsible for creating users, both teachers and learners, scheduling benchmark tests, and overseeing the administrator actions within Study Island. Only the Account Administrator can add and delete users, schedule benchmarks tests, and set School Preferences for the Study Island account. If you are not sure who your Study Island Account Administrator is, please contact Customer Support.
District Administrator
The Study Island District Administrator can schedule district-wide benchmark assessments and access district-wide reports.
Teacher
Teachers are responsible for creating classes, enrolling students in those classes, and monitoring student progress. Study Island offers numerous teaching resources teachers can access to supplement lessons. Teachers can also create custom materials and build tests customized directly to their students and assign them to all students in their class, a group of students, or individual students.

Page 6 of 57 Customer Support 11.08.2017 800.419.3191 [email protected]
Get Started Sign into Your Account for the First Time
1. Go to https://app.studyisland.com/cfw/login/. Bookmark this page to easy access.
2. Type in your username and password.
3. Click Sign In.
The first time you sign in:
� Change your password for security purposes
� Select your default homepage: Edmentum Sensei or the Teacher Page
� Verify your personal information
� Add an email address for password retrieval
Note: Study Island will never make any of your information available to anyone. You are only allowed to change a limited amount of information. Study Island’s Privacy Policy
4. After reviewing the information on this page, click Update.
5. At any time while using Study Island, if you need to edit personal information, such as your password or email, or to change your Default Home Page, click your name in the top center of the screen, next to the Edmentum logo.

Page 7 of 57 Customer Support 11.08.2017 800.419.3191 [email protected]
Edit Your Personal Information
1. Click the Username button next to the Edmentum logo.
2. Edit your information, as needed.
Teachers can only edit their passwords, email, and default homepage.
3. Click Update.
Teacher Resources You have access to resources to learn how to use Study Island to the fullest and teacher resources to use in the classroom. Checkout the Power User Program to learn how to use Study Island. For classroom resources, go to the Teacher Toolkit.
Become a Study Island Expert: The Power User Program
The Power User Program is an excellent way to become a Study Island expert user. Watch the helpful tutorial videos, then practice what you’ve learned. For every topic you master, you’ll earn a Blue Ribbon, just like your students.
1. Click Power User Program on the Main Menu.
2. Click a topic.
3. Click Teacher Resources on the Topic Modal.

Page 8 of 57 Customer Support 11.08.2017 800.419.3191 [email protected]
4. Click the Videos tab to watch an informative video about specific features in Study Island. Close out of the dialog box when you’ve finished the video.
5. Click the topic again and choose Practice or Game Mode.
6. Answer the questions to test your knowledge of the topic.
7. If needed, click Save Session to return to your session another time.
8. When your session is complete, click End Session. Your results will be displayed on the next page.

Page 9 of 57 Customer Support 11.08.2017 800.419.3191 [email protected]
Teacher Toolkit
Study Island provides numerous teacher resources, including lesson plans, animations, Khan Academy videos, and virtual labs. Here’s how you can access them:
1. Go to Teacher Toolkit on the Main Menu.
2. Add a keyword to your search and/or select the Grade, Resource Type, Subject, and Category. Click the Search button.
3. To view a resource, click the title.
The Resource popup includes a description, links to videos, animations, additional information, and other resources.

Page 10 of 57 Customer Support 11.08.2017 800.419.3191 [email protected]
The Topic Tree Locate Standards Details
Study Island provides standards-aligned assessment practice. Follow these instructions to locate the Standards Details for a topic.
1. Go to the specific program you want to view and click to expand.
2. Choose a grade to view.
3. Choose a subject.
4. Click the Standards number on the right side of the screen. This will display the Standards Details:

Page 11 of 57 Customer Support 11.08.2017 800.419.3191 [email protected]
Understanding the Topic Tree
Lessons can be used to review a topic before practicing it.
Access teacher resources specific to this topic
Print worksheets of practice questions if students don’t
have internet/computer access
Launch topic as Group Session
Click the tabs to view other
subjects within the
Blue ribbons earned appear
here
This shows the number of
questions and
Click on the name of the topic to open the Practice Modal.
Click here to view the Standards Map for this subject.
Click here to see the Standards details.
Topics in progress are easy to see.

Page 12 of 57 Customer Support 11.08.2017 800.419.3191 [email protected]
Set Up Classes Classes allow you to organize your students into meaningful groups (such as grade or subject) that you can make assignments for and track student progress. Study Island does not require that you use Classes, but to use Edmentum Sensei and Group Sessions, you must have a class created. Classes also make it easier to run reports for groups of students.
Create A Class
You can create as many classes as you’d like. Follow these instructions to create a class:
1. Go to the Class Manager page.
2. Click Add New Class.
3. Name the class and choose a Class Owner from the drop-down menu. You can add up to three class co-owners.
Note: a co-owner has Class Management rights to add and edit Assignments but is restricted from editing Class Properties or deleting Assignments.
4. Toggle the Override School Preferences button if you wish to override the school preferences. You may not have this option if your Study Island Account Administrator has not given teachers the permissions to override School Preferences. Contact your Account Administrator for more information.
5. Select the students to enroll in the class and click Save.

Page 13 of 57 Customer Support 11.08.2017 800.419.3191 [email protected]
Create an Assignment
To activate a class and make it visible to your students, you must create an Assignment. Assignments can be assigned to a whole class, a group of students within a class, or individual students in the class. Use Assignments to supplement instruction, give students additional practice, or use as an intervention for a student who is struggling with a topic.
1. Go to the Class Manager page.
2. Click on the Class Title for the class you want to add the assignment to.
3. Click Add Assignment on the Class Assignments section.
4. Click the tab of the type of assignment you want to create.
5. Click Create Assignment.

Page 14 of 57 Customer Support 11.08.2017 800.419.3191 [email protected]
6. Complete the General Info & Preferences form.
a. Give your assignment a title.
b. Assign a due date. The Assigned Date defaults to the date you create the assignment.
c. Toggle the Activate Assignment Now? button to make the assignment available to your students immediately. Leave the button at No if you want to assign it later.
d. Add instructions for your students.
e. If desired, make changes to the Additional Preferences.
f. If desired, override the school preferences set by the Account Administrator by clicking the button next to Override School Preferences.
g. Click Next: Assignment Options
7. Choose from the Select a Program drop-down and then the Select a Subject drop-down.
8. Choose the topics from the Topic Tree to include in the assignment and click Next: Students.
9. Select the class to receive the assignment. Your class will automatically be selected but you can also add other students.
10. Click Save & Exit.
Note: You will be automatically returned to the Class Page & Properties. See the next section Activate a Class to make the assignment available to your students.

Page 15 of 57 Customer Support 11.08.2017 800.419.3191 [email protected]
Activate a Class
You need to have an assignment created to be able to activate a class. See Create A Class if you need to create an assignment. Once you create an assignment, you can activate the class on the Class Page & Properties page.
1. Go to Class Manager.
2. Click on the class name.
3. Click the Class Activated button to activate the class.
This activates the class so it will appear on each student’s My Classes page. Here is an example of what a student will see when a teacher

Page 16 of 57 Customer Support 11.08.2017 800.419.3191 [email protected]
Navigate Your Class Page
Each Class you create has its own Class Page & Assignments. From this page you can create assignments, launch Group Sessions, add Class Updates and News, and edit the Class Properties. This section provides a brief overview of navigating your Class Page.
1. Go to Class Manager.
2. Click the class name. The class’s Class Page & Assignments appears.
1. Class Page Activated: Select to activate a class; you must have an assignment created.
2. Block Other Material: Select this to limit what students can work on. Note: This will prevent students from working on other classes.
3. Class Page Header
4. Class Updates and News: Add updates and notes that appear on students’ class home pages.
5. Class Assignments: Add new assignments and view current and past assignments, including Group Sessions.
1
2
3
4
5
6

Page 17 of 57 Customer Support 11.08.2017 800.419.3191 [email protected]
6. Student Assignments: Create and view assignments for specific students or groups of students.
Navigate Your Class Properties Page
1. Go to Class Manager.
2. Click the class name. The class’s Class Page & Assignments appears.
3. Click the Class Properties tab.
1. Co-Owner(s): Select up to three Co-Owners for a class, such as another teacher or a school counselor.
2. Override School Preferences: If enabled by the Account Administrator, teachers can select to override and edit school preferences for their classes.
3. Select Students: find which students are enrolled in your class and remove or add students to your class.
3
2
1
Page 18 of 57 Customer Support 11.08.2017 800.419.3191 [email protected]
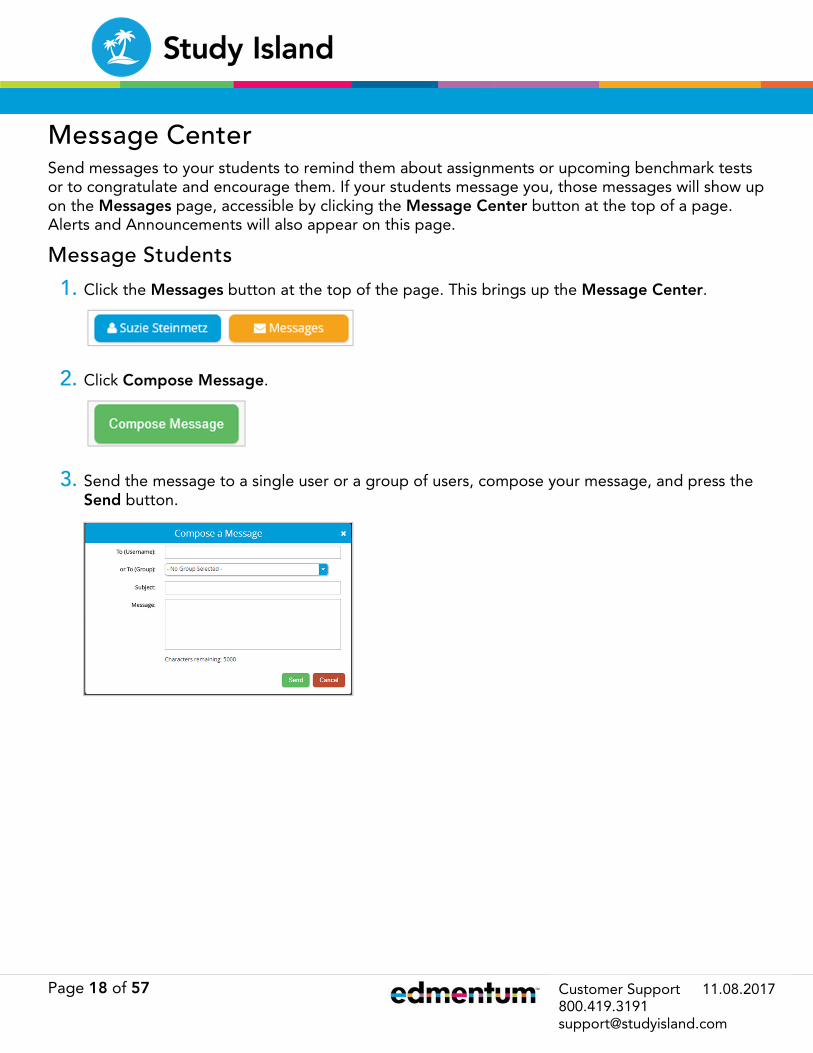
Message Center Send messages to your students to remind them about assignments or upcoming benchmark tests or to congratulate and encourage them. If your students message you, those messages will show up on the Messages page, accessible by clicking the Message Center button at the top of a page. Alerts and Announcements will also appear on this page.
Message Students
1. Click the Messages button at the top of the page. This brings up the Message Center.
2. Click Compose Message.
3. Send the message to a single user or a group of users, compose your message, and press the Send button.

Page 19 of 57 Customer Support 11.08.2017 800.419.3191 [email protected]
Benchmarks The purpose of Study Island Benchmarking is to get a snapshot of student proficiencies in relation to state standards and/or national standards. With four versions of each test, students can be assessed at multiple times during the year. These assessments will give teachers and administrators valuable diagnostic information that can be used to guide classroom instruction.
Each subject has four Benchmark test versions available.
Adjust Benchmark Preferences
1. Select to disable the Pretest and Post Tests so you can use Study Island’s benchmarking feature.
2. Select to allow students to practice topics during the Benchmark testing window before completing the Benchmark. Best Practice: do not select this preference to get a clear snapshot of where your students currently are in their learning paths.
3. Select to exclude Constructed Responses. Constructed Responses require written answers, which must be manually scored by teachers. If you want immediate scoring results from the Benchmark, be sure to select this option.
1
2
3

Page 20 of 57 Customer Support 11.08.2017 800.419.3191 [email protected]
Administer a Benchmark Test
At the scheduled time, the Benchmark test will be available to students when they log in to their Study Island accounts. During the Benchmark testing period, students will not have access to other topics until the Benchmark is complete, unless the administrator has allowed access though the Benchmark Preferences page.
Students do not have to complete the test in one sitting. They have the option to Save for Later; however, they must complete the test during the testing window.
For a Reading benchmark, teachers have the option of printing the reading selections for students. Follow these instructions for printing Reading Passages for a Reading Benchmark:
1. Go to the Benchmarking page.
2. Find the Reading Benchmark in the Benchmark Test Schedule list.
3. Click Print Reading Passages.
Help Your Students Navigate a Benchmark Test
1. Have students log into their Study Island accounts.
2. The Benchmark test will be available on each students’ Homepage in the Schedule Tests tile.
3. Students click the green Start button to begin the test.
4. Students have certain tools available to them by clicking the Tools tab on the blue menu bar, such as increasing font size, text-to-speech (if enabled), and a highlighter.
5. If needed, students can save the test for later.

Page 21 of 57 Customer Support 11.08.2017 800.419.3191 [email protected]
Adjust Student Difficulty Study Island allows you to make adjustments to student difficulty to accommodate students of all abilities. You can adjust the percentage it takes to earn Blue Ribbons, restrict student access to a certain grade level, enable or disable speech-to-text in practice sessions, and reduce answer choices in practice sessions.
Adjust Passing Goal
As the Account Administrator, you can adjust the percentage correct required to achieve a Blue Ribbon. This does not affect the difficulty of the material.
1. Go to the Teacher Page.
2. In the My Classes box, click the Adjust Student Difficulty button.
3. On the Adjust Passing Goal tab, select the program and class.
4. Select the student or students, the subject (or leave at All Subjects), and the Passing Level.
5. Click Submit and click Yes in the dialog box that appears.

Page 22 of 57 Customer Support 11.08.2017 800.419.3191 [email protected]
Restrict Access to Other Grade Levels
With this feature, you can prevent students from accessing other grade levels. Students will have access only to the grade level you select. This feature is helpful if you have a student who needs to work at a grade level below their actual grade. You can also select to hide the grade level from the student, if you do not want them to see that they are working below or above grade level.
1. Go to the Teacher Page.
2. In the My Classes box, click the Adjust Student Difficulty button.
3. On the Restrict Access tab, select the class and click Next.
4. Select a student from the list.
5. Select which class they will be restricted to from the drop-down and click Submit. If desired, select Hide Grade Level from User if you do not want the student to see the grade level.
6. Click OK to complete the task.

Page 23 of 57 Customer Support 11.08.2017 800.419.3191 [email protected]
Reduce Answer Choices
1. Go to the Teacher Page.
2. In the My Classes box, click the Adjust Student Difficulty button.
3. On the Modify Practice Session tab, select a class and click Next.
4. Next to each student’s name, toggle the button in the Reduce Answer Choices by 1 column to turn this function on or off.
Enable Text-to-Speech
1. Go to the Teacher Page.
2. In the My Classes box, click the Adjust Student Difficulty button.
3. On the Modify Practice Session tab, select a class and click Next.
4. Toggle the button in the Text-to-Speech column to turn Text-to-Speech on or off.

Page 24 of 57 Customer Support 11.08.2017 800.419.3191 [email protected]
Reset Student Start Date
Resetting a student’s start date hides a student’s stats without deleting and forces the student to start fresh in the program.
1. Go to the Teacher Page.
2. In the My Classes tile, click Reset Start Date.
3. Select a class from the drop-down menu and click Next.
4. Select the students whose start dates will be changed and change the start date as needed.
5. Click Set Start Date. You will receive a positive feedback statement at the top of the screen when the start date is successfully changed.
Page 25 of 57 Customer Support 11.08.2017 800.419.3191 [email protected]
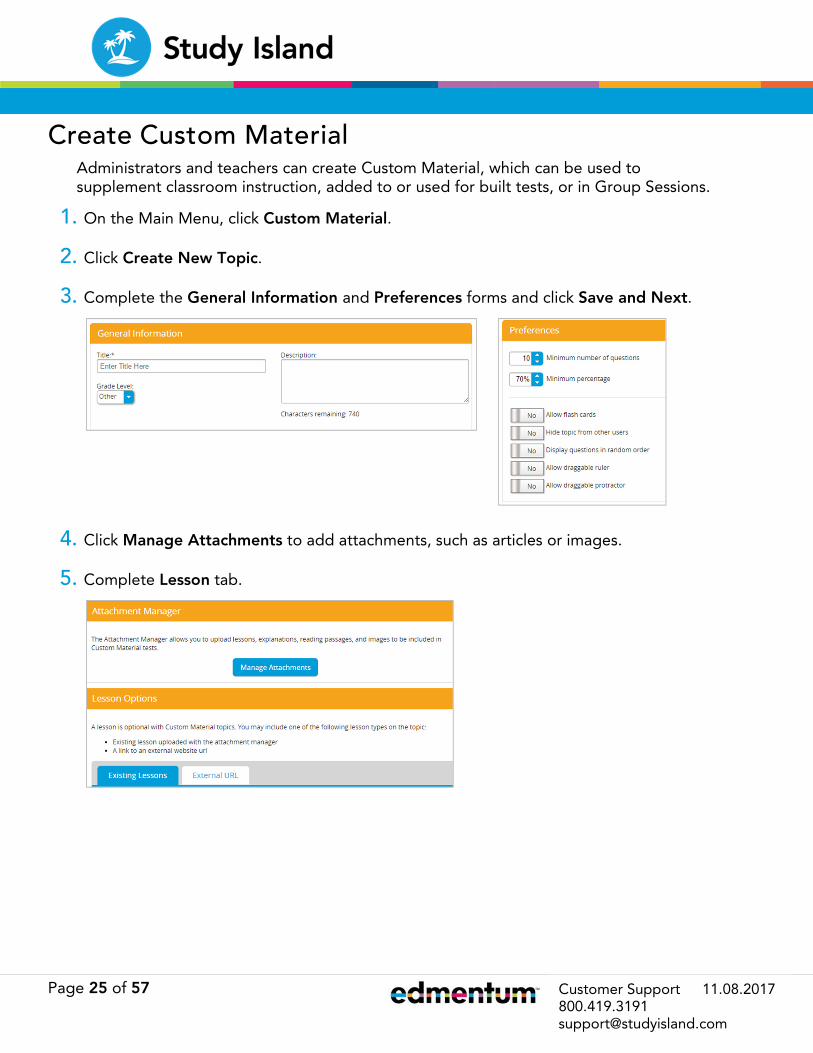
Create Custom Material Administrators and teachers can create Custom Material, which can be used to supplement classroom instruction, added to or used for built tests, or in Group Sessions.
1. On the Main Menu, click Custom Material.
2. Click Create New Topic.
3. Complete the General Information and Preferences forms and click Save and Next.
4. Click Manage Attachments to add attachments, such as articles or images.
5. Complete Lesson tab.

Page 26 of 57 Customer Support 11.08.2017 800.419.3191 [email protected]
6. Write your questions in the text box.
a. Add the question in the Adding a New Question form, choose the type of question (Multiple Choice, True/False, or Short Answer), add a Reading Passage and an Explanation, if desired.
7. Click Save.

Page 27 of 57 Customer Support 11.08.2017 800.419.3191 [email protected]
Build a Test With Study Island’s Test Builder, you can create personalized tests for your students. Use your customized tests to prepare students for upcoming exams or assessments or as an intervention for students who need additional practice on a specific topic. Launch a built test in a group session to provide your students with an interactive learning activity.
Create a Built Test
1. On the main menu, click Built Test Library.
2. Click Build a Test.
3. On the Test Information tab, name the test. In the Additional Information section, add instructions or other applicable information.
4. On the Questions tab, select the Program and Subject from the drop-down menus. This will bring up the topic tree for the specific subject you chose.

Page 28 of 57 Customer Support 11.08.2017 800.419.3191 [email protected]
5. Click a topic to view available questions.
6. Expand the list by clicking the + next to the type of questions you want to view.
Assessment Questions: questions not found in Study Island practice sessions.
Practice Questions: questions from Study Island practice sessions.
7. Add questions by clicking the green Add button. Remove a question you’ve added by click the red Remove button.
8. Once you are done adding questions, click Save Selections.

Page 29 of 57 Customer Support 11.08.2017 800.419.3191 [email protected]
9. If desired, add questions from other topics by selecting other topics from the topic tree.
10. When you are ready to create your built test, you have two options:
a. Click Save to Library & Exit to save the test for later use. When you select this choice, you will return to the Built Test homepage, and your test will be listed. See Assign a Built Test to assign the test to your students.
b. Click Create Assignment Now to use the test immediately. You will be taken to the Assignment Information tab. Proceed to Step 11.
11. Choose a date to assign the test and a due date.
12. Adjust Additional Preferences and School Preferences, if desired.
13. Click Next: Students.
14. Select the class or students you want to assign the test to and click Save & Exit.

Page 30 of 57 Customer Support 11.08.2017 800.419.3191 [email protected]
Navigate the Built Test Library
1. On the main menu, click Built Test Library.
2. Search by a specific Program and Subject, OR search All Programs and All Subjects.
3. Type a keyword into the search bar to narrow your search results.
4. View tests either created by your or by other teachers or account administrators in your school by clicking Created by Me or Created by Others.
5. View test details or access the Copy Test feature by clicking the green down arrow.
6. Preview a test by clicking the magnifying glass icon.
7. Assign a test by clicking the Assign Test icon.

Page 31 of 57 Customer Support 11.08.2017 800.419.3191 [email protected]
Assign a Built Test
1. On the main menu, click Built Test Library.
2. Search by a specific Program and Subject, or search All Programs and All Subjects.
3. Click the Assign button under Actions.
4. Select the assignment type to launch the built test as: Built Test (regular assignment) or Group Session.
For Built Test selection:
a. Click the Assignment Information tab.
b. Complete the General Information section and Preferences sections.
c. On the Students tab, select the class or students who will receive the assignment and click Save & Exit.
For Group Session selection:
a. Complete the General Information form and click Next: Assignment Options.
b. On the Assignment Options tab, review the selection and click Next: Classes.
c. Select the class or students to participate in the group session and click Save.
d. In the Ready to Start dialog box, click Start Session to start the session immediately or click Save & Exit to save the session for later.

Page 32 of 57 Customer Support 11.08.2017 800.419.3191 [email protected]
Grade a Constructed Response
Constructed response questions require students to write their own answer and need to be graded by the teacher. Follow these instructions to access student answers to constructed response questions and to grade them.
1. Go to the Class Manager.
2. Select a class from the list.
3. Scroll to the assignment section containing the constructed responses.
4. Click the Built Test Results icon. The Built Test Report opens in a new tab.

Page 33 of 57 Customer Support 11.08.2017 800.419.3191 [email protected]
5. Under the CR column of the report, click Grade. Constructed responses that are already graded will display a score in this column. You can click the score to view or edit the grade and your comments.
6. Add a score and a comment or explanation, as needed. Access the rubric by clicking View Rubric.
7. Click Save.

Page 34 of 57 Customer Support 11.08.2017 800.419.3191 [email protected]
Student View of Constructed Response Results
Use this information to help your students view the results from a constructed response from a test. This information is also available in the Study Island Student User Guide.
When a student completes a test with constructed responses, the test results page will provide the number of correct and incorrect responses for Study Island-graded questions. The status for the constructed responses appears below next to each question. In the example below, the student has completed the test and turned it in. It is not yet graded.
These instructions explain how students can view their results:
1. Sign into your account.
2. Click My Classes.
3. Click View Assignments for the class the test was for.
4. Click View on a completed test to open the results page.
You will find the status of your test (“graded” in this example), any comments from your teacher, and your score on this page.

Page 35 of 57 Customer Support 11.08.2017 800.419.3191 [email protected]
Built Test Report Time Stamp
Built test reports include a time stamp, giving you the date and time each student completed and turned in their test.
Copy and Edit a Built Test
To edit a built test that has already been published or assigned, you can use the Copy Test feature. You can also use this feature to edit a test created by another teacher.
1. Under the main menu, click Built Test Library.
2. Select the Program and Subject. If you want to view all built tests in the library, select All Programs and All Subjects and click Submit.
3. Expand the test you want to view by clicking the green down arrow.
4. Click Copy Test. The test builder opens. You can edit the test, share, and assign as any new built test you create.

Page 36 of 57 Customer Support 11.08.2017 800.419.3191 [email protected]
Share a Built Test
Follow these instructions to make a built test available to teachers in your school:
1. Under the main menu, click Built Test Library.
2. Select the Program and Subject. If you want to view all built tests in the library, select All Programs and All Subjects and click Submit.
3. Expand the test you want to view by clicking the green down arrow.
4. Click Share Test. The expanded view gives you detailed information about the test, such as program, subject, number of questions, and topics included. From this view, you can copy the test to edit it after it is assigned or delete it. See Copy and Edit a Built Test.
5. In the dialog box that appears, click OK. Your built test is now available to all other teachers in your school who have Study Island accounts.
6. If you wish to unshare a test, click the Unshare Test button.
Page 37 of 57 Customer Support 11.08.2017 800.419.3191 [email protected]
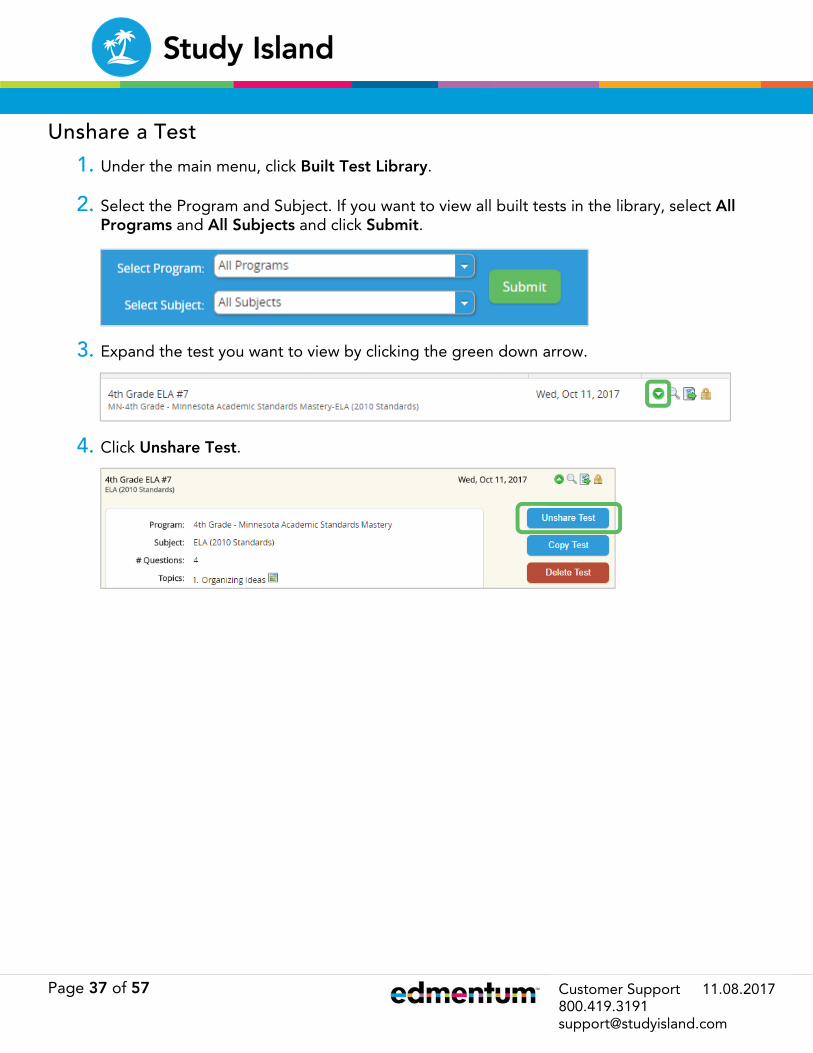
Unshare a Test
1. Under the main menu, click Built Test Library.
2. Select the Program and Subject. If you want to view all built tests in the library, select All Programs and All Subjects and click Submit.
3. Expand the test you want to view by clicking the green down arrow.
4. Click Unshare Test.

Page 38 of 57 Customer Support 11.08.2017 800.419.3191 [email protected]
Group Sessions Group Sessions is a powerful feature within Study Island that helps teachers gauge student understanding in real time, reinforces previously learned material, and allows teachers to take action immediately.
Create a Group Session
Follow these instructions to create a new Group Session. Once created, you can either save the Group Session for later or immediately launch the session. If you choose to save it for later, the Group Session will be available for seven days. After that, incomplete sessions will be removed, and completed assignments will be available in the reporting area.
You can also create a Group Session from the Topic Tree of a subject; however, you will still need to have a Class created to launch and save the Group Session under.
1. Under the Main Menu, click Class Manager.
2. Click the name of the class to open the class page. In this example, the class name is Mrs. Steinmetz 4th Grade Math:
3. Under the Class Page & Assignments tab, click Add Assignment.

Page 39 of 57 Customer Support 11.08.2017 800.419.3191 [email protected]
4. Click the Group Session tab.
a. Click Create Assignment.
5. Fill in the General Information page.
a. Add an assignment title.
b. Select Show Question or Hide Question.
c. Select where you want to choose content from: Practice Topics or Built Test Library.
d. Click Next: Assignment Options.

Page 40 of 57 Customer Support 11.08.2017 800.419.3191 [email protected]
6. Fill out the Assignment Options page.
a. Select Number of Questions.
b. Select a program to choose topics from.
c. Select a subject.
d. Select which topics you want to include.
e. Click Next: Classes.
7. Choose the class that will participate in the group session and click Save.
8. In the dialog box that appears, choose Start Session, Save & Exit, or Cancel.
a. To launch the group session immediately, choose Start Session.
b. Click Save for Later to save the group session and use at a later time.
Note: Group Sessions are only saved for seven days. After that, incomplete sessions will be removed, and completed assignments will be available in the reporting area.

Page 41 of 57 Customer Support 11.08.2017 800.419.3191 [email protected]
Conduct a Group Session
Project the Group Session window to discuss the question as a class or small group and have your students participate using their mobile devices, laptops, or desktops. Your students can access the Group Session by signing into their accounts, going to your class on their My Classes page, and clicking View Assignments. Then they join the Group Session by clicking the green arrow button.
Below is an example of a Group Session window. Click Save for Later at any time to save the Groups Session for seven days. Click End Session to save the results of the Group Session.
Click Start Polling to allow students to begin answering the current question
Automatically anonymously tallies how many students have answered and the number of correct/incorrect answers
Click here to view a different question
Click here to view a chart of each student’s answers
Collapse/expand student tab, which shows students signed in and if they answered

Page 42 of 57 Customer Support 11.08.2017 800.419.3191 [email protected]
Open A Previously Saved Group Session
Group Sessions can be created up to seven days in advance. They are saved to specific Classes and can be found on the Class Page & Assignments.
1. Navigate to the Class Page where the Group Session is located.
2. Click the green button under Actions to launch the saved Group Session.
Set Up Parent Notifications Keep parents informed and involved with their students’ progress in Study Island by creating automated Parents Notifications. Send individual updates, or remind groups of parents about an upcoming test.
Add Parent Contact Information
1. Go to the Class Manager.
2. Select a class.
3. Click the Parent Notifications tab.
4. Scroll down to the Parents section.
5. Click the pencil-shaped Edit Icon next to a student.
6. Add the parent information and click Save.

Page 43 of 57 Customer Support 11.08.2017 800.419.3191 [email protected]
Create Parent Groups
While Parent Groups are not required for sending notifications, Parent Groups are a helpful way to organize and simplify Parent Notifications.
1. Click Add Parent Group.
2. Complete the Create a Parent Group form by adding a Group Name and Description.
3. Click the Move All Parents to Group button or select a parent and press the arrow pointing to the group list.
4. Click Submit.
Page 44 of 57 Customer Support 11.08.2017 800.419.3191 [email protected]
Send Parent Notifications
Send a notification to the parents of a single student, parents of all your students, or to a Parent Group. Notifications can be one-time messages or automated messages sent on a chosen schedule.
1. Click Add Parent Notification.
2. Complete the Parent Notification Request form.
3. Click Preview Email. Close the window when done.
4. Click Submit. The notification is now listed in the Parent Notifications Schedule section. To edit, click the Edit Icon. To delete, click the red X.
Page 45 of 57 Customer Support 11.08.2017 800.419.3191 [email protected]
Track Student Progress Edmentum Sensei
Edmentum Sensei for Study Island is a unique data visualization tool that brings data-rich analytics to life using intuitive charts, graphs, and visual cues. You can see at a glance how your students are progressing, which students are mastering the material and which students may require intervention. It also helps you reward and encourage your students as they progress through Study Island.
The first time you log in you will need to set up Edmentum Sensei. You also have the option to make Sensei your home page, so you can see your students’ progress as soon as you log in to your Study Island account. To make Sensei your homepage, see Edit Your Profile.
1. Click on Sensei in the Main Menu.
2. Select a program from the drop-down menu and click Next.

Page 46 of 57 Customer Support 11.08.2017 800.419.3191 [email protected]
4. Select a class from the drop-down menu and click Next.
5. Click Continue.
Your Edmentum Sensei home page will appear.

Page 47 of 57 Customer Support 11.08.2017 800.419.3191 [email protected]
Navigate the Edmentum Sensei Page
View your school’s weekly time goal for Study Island usage
View a guide to Sensei and navigate to Study Island pages
Quickly identify mastered topics and areas that need additional support
View time-spent during the current week and the previous week
View this icon to see if students are logged in
View standards mastery by subject or view performance trends by subject

Page 48 of 57 Customer Support 11.08.2017 800.419.3191 [email protected]
Live View The Live View feature provides a real-time view of student progress as they work on topics and assignments in Study Island. Live View displays which students are logged in, the assignment students are working on, and the number of questions correct out of the number attempted. It also offers reporting options to track an individual student’s progress. Both Account Administrators and Teachers can access and use this feature.
Follow these instructions to access and use Live View.
1. Go to the Teacher Page.
2. Under My Classes, click Live View.
3. Select a class.
4. If needed, click the Refresh Now button to display the current information. Live View automatically refreshes every ten seconds.
5. To view an individual student’s reporting options:
a. Select a student.
b. Scroll to the bottom of the page and select a class to view that data.

Page 49 of 57 Customer Support 11.08.2017 800.419.3191 [email protected]
Access Reports Study Island offers several different kinds of reports, allowing you to quickly and easily see how your students are progressing and giving you the ability to quickly take action.
1. Click School Reports.
2. Hover over each report to read a brief explanation of the report.
3. Click on the report you want to generate.
4. Complete the form to select class, student, program, and subject. You can also filter by date, time, and day. Each form will vary depending on the report.
5. Click View Report. The report will open in a new tab. The example below is from the Individual Student Report. Note that for each session type, you can see the number of sessions a student has complete, the time spent on those sessions, the best score the student has achieved for the session type, total correct and the percentage, and finally, the grade achieved.

Page 50 of 57 Customer Support 11.08.2017 800.419.3191 [email protected]
Create an Emailed Report Subscription
You can keep track of your students’ progress with the Emailed Report Subscription feature. With this feature, you set up which reports you receive and when, and they are sent directly to your email account at the time you’ve chosen.
1. Generate a Report following the instructions in Access Reports.
2. Click the Emailed Report Subscription icon (the envelope with the clue arrow).
3. Complete the form, name the subscription and select the time period of the report and when it will be delivered to you.
4. Click Save.

Page 51 of 57 Customer Support 11.08.2017 800.419.3191 [email protected]
Types of Reports
Report Name Description
Class Gradebook View a list of students by their class and their Study Island statistics
Assignment Report View class results for assignments you have created
Time Spent Report Track student progress toward your school’s goal for time spent practicing
Weekly Report View overall weekly and yearly usage statistics for each program
Blue Ribbon Report View Blue Ribbons earned by class or grade level
RTI Report Track individual student response to intervention by topic
Weekly Campus Report View graphic representations of detailed educator and student usage on a school-wide basis
Individual Student Report Track individual student progress and Study Island usage
Built Test Report View student performance in each reporting category assessed
High Score Report Display student high score game ranking
Class Summary Report View a summary of class performance
Trend Report Display a trend graph for student usage and performance
Login Report View detailed individual student login information
Class Comparison Report Compare performance and Study Island usage among selected classes and/or grade levels
Suggested Topics Report View a list of topics that need improvement, sorted by priority
Statewide Comparison Report
View graphs comparing your school to state performance
Benchmarking Report Observe data for all students taking the benchmark test at your school
Group Sessions Report View detailed results of a completed group session
NWEATM MAP Link Report View results of a student’s Learning Path

Page 52 of 57 Customer Support 11.08.2017 800.419.3191 [email protected]
Glossary Account Administrator Designated individual from your school or district responsible for
importing and updating users, update the roster as needed, and setting preferences for the program
Assessment Questions Questions made only for Built Tests and inaccessible elsewhere
Assignment Topic(s) chosen by the teacher for the students to complete; created on the Class Manager Page and accessed through the Class Page
Attachments Pictures, articles, and links attached to Custom Material that serve as lessons, writing prompts, long questions, or question images
Attributes Individual data for each user, such as grade level, username, password, and demographics
Benchmark Test used to get a snapshot of student proficiencies in relation to state standards and national standards
Best Score Students will see the number of attempts and best score for each lesson they complete on the Topic Tree
Block Other Material Feature that allows Account Administrators and teachers to designate which material students have access; students will only be able to access Study Island topics assigned on the Class Page(s)
Blue Ribbon Reward students receive when they master a topic; students can view their earned Blue Ribbons on their Home pages
Building Block Remedial material automatically generated when a student does not meet mastery requirements; when a student scores too low on a topic, they are given a building block topic, which will be the same topic one grade level below the current topic
Built Test A customized test made from pre-built questions, allowing teachers to create their own topic tests;
Built Test Library Location of created Built Tests where teachers can preview, edit, share, assign, and delete their own Built Tests and search and use shared Built Tests
Class A grouping of students that simplifies assigning assignments and tracking student progress
Change School Feature allowing transfer of students or teachers to another school that uses Study Island; located in Admin Page under Manage Users
Class Assignments Assignments by teachers for all or a selection of students in their class to take

Page 53 of 57 Customer Support 11.08.2017 800.419.3191 [email protected]
Class Manager Study Island page where teachers can manage classes, and create/edit assignments and class pages
Class Page Header Title of the class that students will see on their My Classes page
Class Updates and News
Teachers can post updates and news that students will see on their My Classes page
Class Page & Assignments
Location of each created class’s information, properties, and assignments
Class Properties View and edit properties that apply to each class, including Class Title, Class Owners, School Preferences, and enrolled students
Clear Statistics Deletes all sessions and reporting information for a user; located in Admin Page under Manage Users
Clearing the Cache Study Island requires that users occasionally clear the cache of their internet browser
Constructed Responses Type of question in Benchmark tests that require a short answer or short essay answer; these questions are graded manually by teachers; see Benchmark
Custom Material Questions created wholly by teachers added into the Study Island program; allows teachers to create questions, answers, prompts, and add articles, pictures, and lessons
Database File School-generated file containing student information used to register users in Study Island
Deactivated User Users can be deactivated, which removes them from classes and reporting, without being deleted; go to manage users and select “Deactivated Users” to see all deactivated users
Default Password School-chosen password given to all users upon registration if unique password is not specified
Easy Login Feature giving K-1 students an easier login process, must be enabled by
Edmentum Sensei See Sensei
Emailed Report Manager
Feature allowing teachers and admins to schedule automatic report emails; located in School Reports and click Emailed Report Manager
Export Statistics Feature that allows an admin to export all statistics for any grade level(s); recommended that admins occasionally export statistics for record preservation
Flash Cards Feature available to students for many topics, Flash Cards operate similar to physical flash cards and help students learn a topic

Page 54 of 57 Customer Support 11.08.2017 800.419.3191 [email protected]
Game Mode Session type where students can play games based on their assignment performance; results are recorded for reporting and to earn Blue Ribbons as well as to get onto the high score table
Group Session An interactive session where a teacher leads students who, from their own smart phones or workstations, answer questions in real time; students do not earn Blue Ribbons from Group Sessions
Help Page Find user guides and quick reference cards on the Help page, accessible by clicking the Help tab on the top right menu bar or on the Admin Page under Tools
High Score Table Record of high game scores achieved in game mode
Highlighters Tools students can use during tests and assignments; teachers and admins can restrict the use of additional highlighters
Homeroom Optional field used during registration to automatically place students in a class Import - method of registering users by uploading a database file containing user information
How To/Tour A feature in Study Island that provides on-screen step-by-step assistance
Import File A Microsoft Excel spreadsheet used to put potentially massive amounts of information into Study Island; specifically used for importing users
Learning Path Prescribed set of assignments and topics by NWEATM MAP® Link; only available to customers who have purchased NWEATM MAP® Link
Lesson Session type that students can use to review a topic before doing a Practice Session
Live Support Study Island’s chat support feature, allows a user to chat with Customer Support
Login Cards Teachers and Account Administrators can print login cards for students, showing their username and password; go to the Teacher Page and click Password List
Live View A real-time monitoring system that allows teachers to monitor students’ progress in real time
Messages Students, teachers, and administrators can send in-system messages to each other; administrators can restrict user access to messaging
NWEATM MAP® Link Edmentum has partnered with NWEA MAP to allow the use of NWEA MAP Link imports, which created Learning Paths for students; only available to customers who have purchased NWEATM MAP® Link and requires schools to set SIS Primary Keys
Owner Teacher or Account Administrator in charge of a Class

Page 55 of 57 Customer Support 11.08.2017 800.419.3191 [email protected]
Parent Notification An automatic notification process designed to communicate student progress to parents via email; located in the Class Page under the Parent Notifications tab
Password List Roster of student usernames and passwords; accessible on the Teacher Page, click Password List
Plug-ins Study Island requires Adobe Flash®, Java, and MS Office compatible software
Pop-up Blockers Study Island requires that you disable pop-up blockers in your internet browser
Post Test Non-diagnostic assessment designed to determine subject mastery
Power User Program Feature designed to quickly get you up and running; includes brief video lessons and activities that walk Teachers and Account Administrators through specific Study Island features and functionality
Practice Session Session type where a student answers questions on a topic or topics; students earn Blue Ribbons for mastered topics
Practice Questions Standard questions used in Study Island in its assignments and topics; can be used when creating a Built Test
Pretest Non-diagnostic assessment designed to introduce users to the Study Island program
Printable Worksheets Type of session where a teacher prints worksheets for students to manually complete; these are manually graded by the teacher and do not help a student earn a Blue Ribbon
Question Panel Navigational tool accessible by students during tests and assignments, showing the current question, answered questions, and unanswered questions
Register To add users to the program manually or via a database file
Report Study Island statistical data organized in a viewable format; Study Island includes many reports that are exportable into Excel or PDF formats; provides actionable data to teachers and Account Administrators
Reporting Information Fields in Study Island used solely for reporting purposes, including gender, Title I, Special Ed, Ethnicity, Migratory Student, Gifted, Economically Disadvantaged, and LEP/ELL

Page 56 of 57 Customer Support 11.08.2017 800.419.3191 [email protected]
Reset Start Date Resetting a student’s start date resets their test results and reporting statistics, creating a blank slate starting on the new date; located in Teacher Page, click Reset Start Date or Admin Page under Manage Users
Restrict Access to Grade Level
Feature that limits a student’s available programs to a single grade; located in Admin Page under Manage Users, click Adjust Student Difficulty
Seehive An online feature where users can provide feedback and suggestions to Edmentum regarding Study Island
Scratchpad A tool students can use during assignments and tests to make notes; teachers and admins can restrict use of scratchpads
Sensei A feature in which data-rich analytics come to life via intuitive charts, graphs, and visual cues providing teachers with information in real-time; accessible under the Main Menu and can be made the home screen for teachers
Session Type Method in which students can work through Study Island topics; options include Practice Mode, Game Mode, Group Session, Classroom Response System and Printable Worksheet
SIS Primary Key Identification number that can be added when registering users to identify users in our system
SSID A student identification system ID number;
Start Date The date the user was created and/or the date from which stats are shown
Student Assignments Assignments assigned to an individual student or group of students
Teacher Toolkit Provides lesson plans, lesson resources, videos, and other resources for teachers
Text-to-Speech A feature reads text out loud to the student
Timer A timer records and presents the time students use for taking tests and assignments; teachers and admins can turn off the timer, however the time is still recorded for reporting purposes; assessments in Study Island are not time-limited
Topics Individual parts within a subject that align to a specific standard
Username suffix Suffix added to a username to prevent a high number of duplicates (e.g.: school name, initials, or mascot)
Username national database
Study Island has a nationwide database for usernames, requiring each school to take precautions to have unique usernames
White Ribbon Designation of Building Block mastery

Page 57 of 57 Customer Support 11.08.2017 800.419.3191 [email protected]
Writing Assignment A type of assignment which requires students to answer in essay or short essay form; writing assignments are manually graded by teachers
Writing Portfolio An option for students in the Main Menu where they can access their writing assignments