teacher's guide hemke
TRANSCRIPT

Teacher’s Guide
by Dr Frederick Hemke
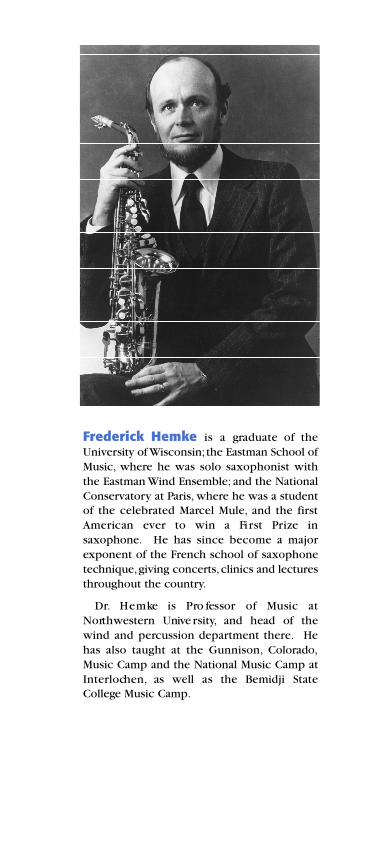
Frederick Hemke is a graduate of theUniversity of Wisconsin; the Eastman School ofMusic, where he was solo saxophonist withthe Eastman Wind Ensemble; and the NationalConservatory at Paris, where he was a studentof the celebrated Marcel Mule, and the firstA m e rican ever to win a Fi rst Prize insaxophone. He has since become a majorexponent of the French school of saxophonetechnique,giving concerts, clinics and lecturesthroughout the country.
D r. H e m ke is Pro fessor of Music atN o rt h we s t e rn Unive rs i t y, and head of thewind and percussion department there. Hehas also taught at the Gunnison, Colorado,Music Camp and the National Music Camp atI n t e r l o ch e n , as well as the Bemidji StateCollege Music Camp.
IntroductionIt is unnecessary to lament the plight of the saxophone andits gross misuse. It is necessary to recognize that theinstrument can be successfully taught with as high a degreeof seriousness as any other concert instrument. Moreover,it can be taught in relation to itself; that is, it need notdepend on any other instrument for pedagogical analogies.The saxophone is an instrument distinct in itself and mustbe taught as such.
While in the United States uncertainty has hampered theteaching of the saxophone, Europeans have long sincet u rned to Fra n c e ’s established school of saxophonetechnique, sound, and pedagogy. For this reason, the basicteaching premises in this pamphlet will be derived from theFrench School.
Whether a student’s inclinations are toward jazz orconcert music, certain fundamentals are prerequisite to hisplaying the instrument with dignity and musicianship. Thisis a guide to those fundamentals, and it can help yoursaxophone section to add a new sound and vital color toyour ensemble or prepare a promising saxophonist to gainthe most from his chosen instrument.
Basic to all wind instruments are certain acousticalcharacteristics linked to tone production, intonation,qualityof sound, range,and technique. Each instrument also has itsown acoustical peculiarities. In order to understand anyone instrument completely, the teacher must knowthoroughly both general principles and peculiarities. Onlya sketch of the acoustical nature of the saxophone can begiven here, and it can only serve as a preliminary guide tothe instrumental teacher.
The saxophone combines two acoustical features - asingle beating reed and a conical tube. These features werenot combined accidentally, but we re intended by theinventor,Antoine Sax. He thus produced an instrument thatresponded as an overblown open organ pipe, permittingthe production of the full complement of overtones in theharmonic series. Unlike the clarinet, which overblows atwelfth and is not capable of producing all the overtones,the saxophone overblows an octave. This accounts for itsrelatively simple system of fingering. It also accounts for thecharacteristic tone quality of the instrument.
Since it is not practical to produce all octaves simply byoverblowing their fundamentals, provision was made toassist mechanically the playing of the upper register. On astringed instrument stopping the string at its midpoint witha finger produces an octave. On the saxophone the sameprinciple holds, but it is a column of air which must be
1
divided. This is accomplished by placing a small hole in theside of the body to break the air column within. If low D tomiddle C sharp may be considered as basic fundamentals onwhich the notes above C sharp are produced, it will be seenthat at least 12 such holes would be necessary to raise thesefundamentals a perfect octave.
Yet the saxophone has but two octave keys,and any morethan this number would be mechanically impractical. Theresult is that while every possible means of compensationhas been incorporated, it is acoustically impossible toconstruct an instrument which is at once perfectly in tune,mechanically sound, and not a hindrance to the performer.In a superior instrument this problem is minimized, but itsimplications cannot be overlooked by the instrumentalteacher.
A few notes on the saxophone tend to be slightly sharpor flat within the instrument’s own scale. These can behumored to true intonation by minute adjustment of thee m b o u ch u re , assuming the player has acquired thenecessary sensitivity. The saxophone is constructed to tunebest at a specific pitch level, the same as other windinstruments. This is usually A-440 at 72 degrees F. If theinstrument is forced much above or below this pitch, it iscertain to become out of tune with itself, for changinglocation of the mouthpiece on the neck of the instrumentaffects some notes much more than others.
The uncommon flexibility of the saxophone’s pitchrequires the beginner to become extremely sensitive topitch discrimination, much as a young string player mustcultivate the same awareness. As the saxophonist matures,he will find that slight adjustment of the oral cavity,embouchure, breath or even alternate fingerings will haveto be utilized.
On the other hand, the simplicity of the instrument’sfingerings causes many young players to achieve technicalfacility only. This leaves intonation, tone quality andmusicianship to be attained late - or never. This is whyyoung saxophonists MUST LEARN TO PRACTICE SLOWLY.
2
In those situations where it is necessary to teach either aclass of saxophones or heterogeneous classes, the problemis aggravated, and in this respect, private lessons from aqualified teacher are a valuable supplement to regular classinstruction.
To get the best results from saxophones, treat them asprimary instruments capable of high musical achievements.Don’t try to build a fine saxophone section by startingyoungsters on clarinet or some other instrument and thenswitching them later. This old custom not only promotes animproper start on saxophone,but also prevents many of theproblems of the instrument from being explored. It alsoimplies that the saxophone is a secondary instrument,which it definitely is not.
Selecting Eqiupment
During the early part of the Twentieth Century when thesaxophone first became popular in the United States, almosteve ry household had a C melody or some sort ofsaxophone. During that time many fine instruments weremanufactured, but also many inferior ones. The beginnerwith an inferior instrument of this type is at a disadvantage.Although the student need not have an instrument identicalto that of a professional, it must have good intonation, bewell constructed and in good mechanical adjustment. Theprogress of a student can be seriously hindered by faulty orinferior equipment. Since few students or parents are ableto appraise an instrument, this responsibility usually falls onthe teacher, or on a reliable instrument dealer. Helping theparent and student to choose a proper instrument will notassure the student of success,but it will at least help him getoff to a good start.
The selection of a proper mouthpiece for the student islikewise important. Even an instrument of professionalquality can be difficult to play with an ill-suitedmouthpiece. Since a mouthpiece must be matched eitherto the instrument or the embouch u re , or both, Irecommend that the instrumental teacher have at hisdisposal a kit of mouthpieces with various facings. Theaverage student should select a mouthpiece with a mediumfacing. Avoid exaggerated tip openings and unconventionalbores. The exotic mouthpiece may have its place,but not inthe mouth of a beginning student. The material amouthpiece is made of plays only a small part in the tonalcolor produced. That is not to say that there is no differencein sound; the difference is discernible but usually notsignificant. Plastic, rod rubber or metal affect the durabilityand longevity of a mouthpiece far more than its sound. Ametal mouthpiece, for example, will naturally keep its lay
3
longer and will be free from cracking or breaking. Thechoice then is one of practicality as well as artistic results.
Whenever you select a mouthpiece for a student, be surethat the time of indoctrination is long enough. The studentshould use the mouthpiece conscientiously for a period ofmonths and not sw i t ch around from mouthpiece tomouthpiece.
Although the ligature also plays an important part insuccessful playing and teaching, it is seldom given a secondthought. Make sure that the ligature is malleable enough toconform to the shape of the mouthpiece. Avoid tighteningthe screws to the point that edges of the ligature gouge thereed. It is sometimes an advantage to place the screws onthe top of the mouthpiece so that the reed is held to themouthpiece firmly and with even pressure. Generally, thescrews should be just tight enough to hold the reed, thef ront screw being just tight enough to keep it fro mvibrating. Any excess tension will keep the reed fromvibrating fully.
The reed, that everlasting curse on instrumentalists, playsan extremely important part in the beginner’s early studies.A good instrument, good mouthpiece, good ligature, andbad reeds is a combination that has caused many a dropout.
It is nearly impossible to describe the perfect reed, andeven to suggest that there is such a thing may inspire alifelong (and futile) search. Still, a reed’s appearance revealsuseful clues to its quality. The best cane is usually deepyellow and without any tinge of green. The good reedshould have a straight grain running its entire length. Thereed should be evenly cut, so that holding it to the lightshows a dark “heart” in the middle, with one side neitherdarker nor lighter than the other. Rolling the reed from sideto side against the finger should indicate that the corners ofthe reed are equally springy. Finally, the two edges of a goodreed look identical. In short, the best reeds are bilaterallysymmetrical.
For the medium faced mouthpiece and the type ofembouchure that I will describe, a reed between 2 and 21/2 will work most successfully. Reeds should not becomestronger as the student progresses.
Advise the student to purchase several reeds at a time -even a box if possible. A reed which at first does notrespond should not be discarded, since it may performperfectly well later. Do not be satisfied with one good reed;search for three or four and then alternate them in dailypractice. With proper instruction and discipline, the seriousaverage student finds this not a chore,but a challenge. Earlyi n d o c t rination of this type provides the instru m e n t a l
4
teacher with teaching time that might otherwise have beenspent in cl e a ring out ambient ove rtones from theinstrument.
The Production of Tone
The embouchure here described is that of the FrenchSchool. I recommend it because of its successful results,butothers are also successful, and my description need not beused for anything more than a guide.
Cover the bottom teeth with the lower lip. Use no moreof the lip than necessary - certainly no more than the redpart. Since the lower lip acts as a cushion on which thereed rests and vibrates, it is not tightly drawn over the teeth.The top teeth rest on the mouthpiece. The pressure aroundthe mouthpiece is just sufficient to keep air from escapingat the corn e rs and keep the instrument in corre c tintonation. The concept is that of a rubber band with anequalized pressure around the entire mouthpiece.
The tongue will inevitably move a little during changes ofregister, but it should normally be kept flat on the bottomof the mouth. This is particularly important for good soundproduction in the lower range. In fact, all my pointsconcerned with tone production remain relatively constantthroughout the entire range of the instrument. No radicalchange is necessary for either the low register or the upperregister.
The position of the chin is natural, without pointing,tightening, or bunching. The jaw itself should tend to relax,with the mouthpiece being held firmly but not tightly in themouth. To introduce this concept to the beginner, have thestudent begin with an open mouth,with no lower lip drawnover the teeth. Have him put the mouthpiece about five-eighths of an inch into the mouth, rest the top teeth on themouthpiece, close the mouth, and only then roll the lowerlip over the bottom teeth just enough to cover them.During these first lessons a medium-face mouthpiece andsoft (No. 2) reed will help the student produce a soundwithout biting.
The next step is to blow and it is important that thestudent be allowed to project plenty of air into theinstrument. Do not hinder the student by forcing him top l ay softly ; this is the ve ry hardest task for anyinstrumentalist. A beginning saxophonist attempting toplay softly will only tighten up, and this is the antithesis ofwhat the French School wishes to accomplish. The tonemust be free and rich and must sound like a saxophone, nota clarinet or a bassoon.
5
The cheeks should not be drawn taut, but while notpuffed, they must give a large, open feeling within themouth. The throat remains open always. Rather than tryingto describe an open throat, take the student to the pianoand have him sing a scale in his range on an “AW” vowel.This feeling should be exactly the same when he plays theinstrument.
All these points concerned with tone production remainconstant throughout the entire range of the instrument. Nochange is necessary for either the low register or the upperregister. The common belief that the extreme registers ofthe saxophone are difficult to produce is unfounded. Aninstrument in good mechanical condition will respondeasily without embouchure or throat manipulations. Assuggested earlier, adjustments may be necessary to correctthe intonation of a particular instrument,but even these areslight. Remember that more air will be needed for both lowand high registers and allow the student to project plenty ofair through the instrument. Never tell a student that eitherregister is difficult to produce; this can only lead to anunjustified mental block.
The Teaching of Saxophone Vibrato
The sound that the mature student will produce must bea product of himself. The student should be guided byrecordings or concerts by prominent saxophonists andmust be continually encouraged to realize the inherentsound of the instrument. When you teach the student to bea sensitive musician as well as a saxophonist,his conceptionof the saxophone’s sound will help make the distinctivecolor of his section a greater asset to your ensemble.
Vibrato on the saxophone cannot be thought of as anembellishment superimposed on the tone. When vibrato isto be used, it must be considered inseparable from the totalsound. This is why problems of instruction go beyond thet e chnique of its production as an orn a m e n t a t i o n .Saxophone sound for the student should be a sound withvibrato.
If vibrato is a vital part not only of long tones, but ofmoving lines, then it must be controlled to the point whereit can be used as an inherent part of the sound, orcompletely eliminated to produce a “straight” tone.
The two common types of vibrato are the intensityvibrato and the frequency modulating vibrato. The one thatbest meets the requirements of the saxophonist is thefrequency modulating vibrato.
6
As its name makes clear, this vibrato affects pitch. Itcannot be stated absolutely, however, that it does not alsoaffect intensity. Experiments have shown that the low pointin the frequency undulation of vibrato is usually less intensethan the top. The effect is ev i d e n t ly produced bysimultaneous frequency and intensity changes.
If diagrammed, the saxophone frequency vibrato wouldtake the shape of a uniform undulation. This undulation willdip from the actual pitch by .05 - .15 of a semitone and thenreturn to the pitch. It is at the low point in the undulationthat the intensity change may be measured.
A prerequisite for the profitable study of vibrato is a wellestablished concept of saxophone sound. The time it takesto achieve this concept varies with the individual anddepends largely on the ideal set before him and his ownability and determination. It may be weeks or monthsbefore this is achieved. In any case it should be placedabove all technical achievements from the start. If it is,v i b rato may be taught at a re l a t i ve ly early level ofinstruction.
The experience of artistic vibrato is so subjective it isdifficult to explain how to teach it. However, there arereliable methods for teaching the first steps, with theexpectation or hope that later the student’s maturation willhelp.
Although the vibrato will ultimately be controlled by thelip, jaw movement is used also in the beginning to effect thepitch change. No more need be said about the intensitychange at this point, since this will evolve normally andneed not be taught. To begin, then, the student forms theproper embouchure and plays some easily produced tone,such as second line G. Then he allows his jaw to relaxalmost completely while the air supply remains constant.Since this is only a beginning technique, do not be alarmedat the degree of pitch ch a n ge . Its purpose rests indemonstrating to the student, in an exaggerated way, howthe vibrato is actually produced. As soon as the jaw isrelaxed, it is brought back to normal and the correct pitchis regained.
To stress the uniformity needed for vibrato, introduce ametronome and set up an absolute number of undulations.To begi n , set the metronome at MM 60 with twoundulations being given to each click. Play this exercise asfour beats to a measure, moving upward to the next note inthe scale after each four beats. The selection of a scale suchas G major, F major or C major will be helpful. When thestudent is proficient in ascending and descending the scalein this manner, have him practice three undulations to eachclick. Once the student has mastered this much, generally
7
in one lesson, urge him to practice vibrato with themetronome as part of his daily practice procedure. Do notattempt to teach the use of vibrato in solos or studies at thispoint.
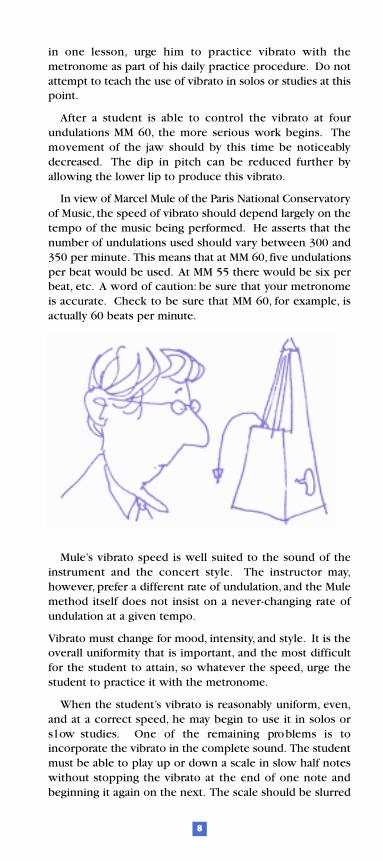
After a student is able to control the vibrato at fourundulations MM 60, the more serious work begins. Themovement of the jaw should by this time be noticeablydecreased. The dip in pitch can be reduced further byallowing the lower lip to produce this vibrato.
In view of Marcel Mule of the Paris National Conservatoryof Music, the speed of vibrato should depend largely on thetempo of the music being performed. He asserts that thenumber of undulations used should vary between 300 and350 per minute. This means that at MM 60, five undulationsper beat would be used. At MM 55 there would be six perbeat, etc. A word of caution: be sure that your metronomeis accurate. Check to be sure that MM 60, for example, isactually 60 beats per minute.
Mule’s vibrato speed is well suited to the sound of theinstrument and the concert style. The instructor may,however, prefer a different rate of undulation, and the Mulemethod itself does not insist on a never-changing rate ofundulation at a given tempo.
Vibrato must change for mood, intensity, and style. It is theoverall uniformity that is important, and the most difficultfor the student to attain, so whatever the speed, urge thestudent to practice it with the metronome.
When the student’s vibrato is reasonably uniform, even,and at a correct speed, he may begin to use it in solos ors l ow studies. One of the remaining pro blems is toincorporate the vibrato in the complete sound. The studentmust be able to play up or down a scale in slow half noteswithout stopping the vibrato at the end of one note andbeginning it again on the next. The scale should be slurred
8
and the vibrato continuous. When this is accomplished,repeat the study in quarter notes, then eighths, and finallysixteenth notes. At this last speed the vibrato will be all butunnoticeable, but will, if learned correctly, lend a distinctivetimbre to the sound. For obvious reasons an elementarystudent should not be expected to fulfill this final phase.
The true worth of vibrato study comes in the applicationof principle to practice. The artistic vibrato does not evolveovernight, but is part of the continuous maturation of theyoung musician, who slowly learns discretion in its use. Tobe sure, discretion cannot be taught with rules. Suffice it tosay that vibrato need not be used indiscriminately at alltimes. There is a time and place within every piece of musicwhere vibrato may be varied or stopped for effect. I won’tattempt to pinpoint this time and place.
In ensembles where many saxophones are used, a generalrule is to eliminate vibrato for the sake of group intonationor blend, except in solos or in passages chosen for effect.This is especially true at the grade and junior high schoollevel. In stage bands, where section work is so important,the entire section must learn to approximate the same kindof vibrato and to eliminate it for specific effects.
The instrumental teacher will be best qualified to judgeand determine when vibrato is desired in ensemble playing.On the other hand, the student should be encouraged,through guidance, to use his own discretion in the use ofv i b rato in solos or small ensembl e s . Te a ch him theprinciples and fundamentals so that he may know what,how, and why he is studying. Then he is in a position torespond intelligently and help himself to realizing goodmusicianship.
First Use of The Tongue
Among the various currently accepted tonguing methods,the most successful for the saxophone uses a part of thetongue away from the tip. The straight-on manner in whichthe saxophone mouthpiece enters the mouth accounts forthe success of this method. The tip is arched forward,touching either the underside of the bottom lip or thebottom teeth, depending on the length of the tongue.Although the tip need not be rigidly anchored, it must notbe allowed to find refuge under the reed (where it willassuredly produce a “slap tongue”). With the tip down andforward, only a portion away from the tip can then be usedto touch the reed. The motion of the tongue is one offlexing, with the tip used as a pivot. For the majority ofstudents, this method produces light, fast tonguing.
9
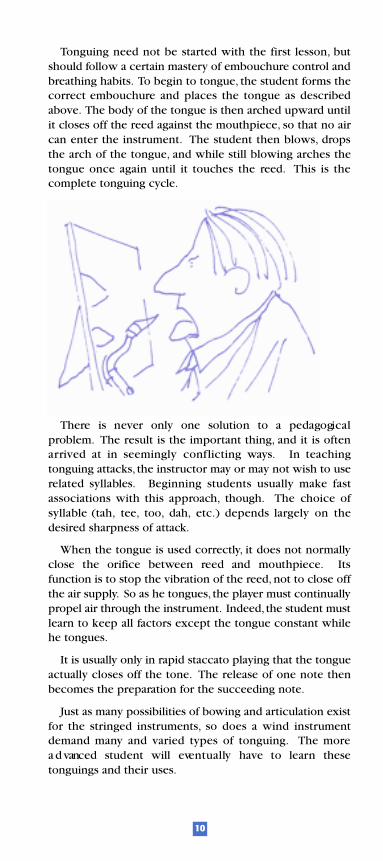
Tonguing need not be started with the first lesson, butshould follow a certain mastery of embouchure control andbreathing habits. To begin to tongue, the student forms thecorrect embouchure and places the tongue as describedabove. The body of the tongue is then arched upward untilit closes off the reed against the mouthpiece, so that no aircan enter the instrument. The student then blows, dropsthe arch of the tongue, and while still blowing arches thetongue once again until it touches the reed. This is thecomplete tonguing cycle.
T h e re is never only one solution to a pedago gi c a lproblem. The result is the important thing, and it is oftenarrived at in seemingly conflicting ways. In teachingtonguing attacks, the instructor may or may not wish to userelated syllables. Beginning students usually make fastassociations with this approach, though. The choice ofsyllable (tah, tee, too, dah, etc.) depends largely on thedesired sharpness of attack.
When the tongue is used correctly, it does not normallyclose the ori fice between reed and mouthpiece. I t sfunction is to stop the vibration of the reed, not to close offthe air supply. So as he tongues, the player must continuallypropel air through the instrument. Indeed, the student mustlearn to keep all factors except the tongue constant whilehe tongues.
It is usually only in rapid staccato playing that the tongueactually closes off the tone. The release of one note thenbecomes the preparation for the succeeding note.
Just as many possibilities of bowing and articulation existfor the stringed instruments, so does a wind instrumentdemand many and varied types of tonguing. The morea d vanced student will eve n t u a l ly have to learn thesetonguings and their uses.
10
Legato tonguing involves the same basic principles, withless pronounced attacks. Light attacks and a sustaineddoodoodoodoo articulation produce an agreeable legatotonguing effect.
Once the tonguing movement is successfully started, thequestion of stopping the sound remains. Generally this isdone by closing the aperture between mouthpiece and reedwith the tongue, by withdrawing the breath at the end of aphrase, or, at the end of a pianissimo phrase, allowing thebreath to die away. The stopping point is indicated by abreath mark, by a succeeding rest, or it may be left to theplayer’s musicianship.
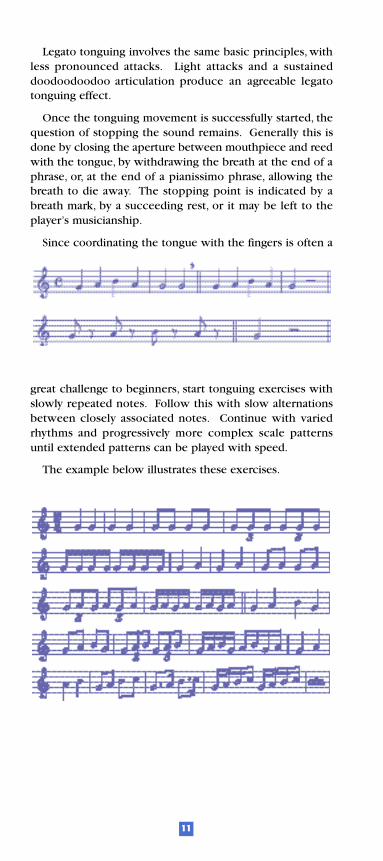
Since coordinating the tongue with the fingers is often a
great challenge to beginners, start tonguing exercises withslowly repeated notes. Follow this with slow alternationsbetween closely associated notes. Continue with variedrhythms and progressively more complex scale patternsuntil extended patterns can be played with speed.
The example below illustrates these exercises.
11
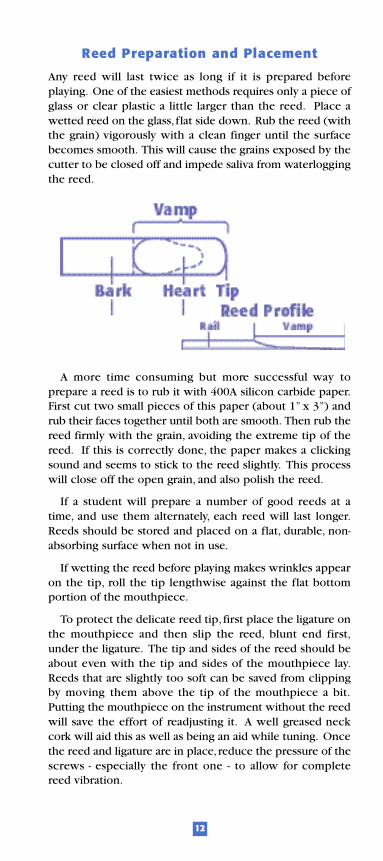
Reed Preparation and Placement
Any reed will last twice as long if it is prepared beforeplaying. One of the easiest methods requires only a piece ofglass or clear plastic a little larger than the reed. Place awetted reed on the glass, flat side down. Rub the reed (withthe grain) vigorously with a clean finger until the surfacebecomes smooth. This will cause the grains exposed by thecutter to be closed off and impede saliva from waterloggingthe reed.
A more time consuming but more successful way toprepare a reed is to rub it with 400A silicon carbide paper.First cut two small pieces of this paper (about 1” x 3”) andrub their faces together until both are smooth. Then rub thereed firmly with the grain, avoiding the extreme tip of thereed. If this is correctly done, the paper makes a clickingsound and seems to stick to the reed slightly. This processwill close off the open grain, and also polish the reed.
If a student will prepare a number of good reeds at atime, and use them alternately, each reed will last longer.Reeds should be stored and placed on a flat, durable, non-absorbing surface when not in use.
If wetting the reed before playing makes wrinkles appearon the tip, roll the tip lengthwise against the flat bottomportion of the mouthpiece.
To protect the delicate reed tip, first place the ligature onthe mouthpiece and then slip the reed, blunt end first,under the ligature. The tip and sides of the reed should beabout even with the tip and sides of the mouthpiece lay.Reeds that are slightly too soft can be saved from clippingby moving them above the tip of the mouthpiece a bit.Putting the mouthpiece on the instrument without the reedwill save the effort of readjusting it. A well greased neckcork will aid this as well as being an aid while tuning. Oncethe reed and ligature are in place, reduce the pressure of thescrews - especially the front one - to allow for completereed vibration.
12
The student should be taught how to adjust reeds whenhe becomes sensitive to his own sound and is studyingseriously. Because embouchures and mouthpieces do vary,reeds should be individually fitted. But, generally, only them o re serious students will have the time andpurposefulness to perfect the art of reed adjustment.
While mu ch of this adjustment must be learn e dempirically, a few major guides can be given.1. The marks of a promising reed were described earlier;
it is nearly impossible to adjust a reed that lacks these qualities in material and cut.
2. A good reed knife, light sandpaper and a rectangular piece of glass or plastic larger than the reed will be needed to begin.
3. When scraping, test the reed frequently on the mouthpiece to avoid taking off too much cane.
4. Avoid working on the center or heart of the reed.5. Avoid working at the extreme tip of the reed; work on
the small area directly behind the tip.6. Avoid clipping a reed unless it is extremely soft.7. If the reed is too bright or soft in all registers, move it a
bit above the tip of the mouthpiece.8. Unevenly cut reeds should be scraped on the thick
side.9. Reeds which respond well at forte but not well at
piano are too stiff at the tip. Work on the area immediately behind the tip.
10. If squeaks are present, one side of the reed is probablytoo heavy or too light.
11. If the reed is bright in the upper register and dark in the lower, scrape the sides near the back of the vamp.
12. If the reed is dark in the top register but bright in thelower, scrape at the edges about half way downits length.
13. If the reed is dark in all registers, scrape off a small amount behind the tip or at the middle and back ofthe vamp, where the bark ends.
14. Saliva entering the reed at the mouthpiece windowwill cause the grain to rise, and the reed will vibrate sluggishly. A reed that once worked well but is nowsluggish can be lightly sanded on the flat side.
15. Generally, scraping can be used to adjust trouble in anyregister of the saxophone. If the trouble is in the lowregister work on the back of the reed; if the trouble is higher, work towards the tip.
16. The balance of the reed is all important. The backsurface of the reed must always be flat and smooth.Be sure to scrape or lightly sand the underside of the reed to remove any swelling or unevenness.
13
Correct Breathing
To describe embouchure, equipment, throat and all otherfacets concerned with tone production is a waste unless thestudent has learned to breathe correctly.
The diaphragm is a three-part dome-shaped muscle justunder the lungs, or more precisely under the pleural cavity.By nature it assists us in our breathing. One can neither feelthe muscle nor directly and consciously control it. Thesaxophonist makes the best possible use of it by learning tocontrol it indirectly.
This means that students must be taught how to createthe largest possible inner chest cavity in which the lungsmay expand. To accomplish this, correct posture is aprimary consideration. The student should sit well forwardon the chair with his back away from the back of the chair.This will allow him to concentrate on expanding the ribcage to provide a large chest cavity. In inhalation, the highpart of the diaphragmatic muscle dome sinks downward,creating the vacuum that draws air into the lungs. Pushingthe abdominal muscles forward allows for still greaterexpansion. It can be seen that poor posture, or excessivelytight clothing or lack of concentration will impede theseobjectives.
In exhalation the procedure is reversed. The abdominalmu s cle and rib mu s cles are used to act on thediaphragmatic muscle and force the air out of the lungs atany given rate. This rate must be at all times uniform - adistinct “column of air.” While this is usually easy for thebeginner at forte, it becomes a problem at piano.
Forte or piano, the quality of the tone should remain thesame, but it often becomes pinched as it becomes soft. Thisis because the diaphragmatic mu s cle is contro l l e dindirectly, while the muscles of the larynx can be directlycontrolled. Hence in an effort to play softly, the student mayunconsciously close the larynx and sacrifice the quality ofsound.
To play softly successfully, pressure on the diaphragmmust combine with the correct opening of the larynx, acombination that is not learned overnight and one whichrequires an informed and understanding teacher.
The mechanics of breathing and sound production onthe saxophone must remain constant for all registers. Noris the range of the saxophone extensive enough to warrantdrastic embouchure or throat changes. Thus low B flat andhigh F are produced in basically the same way, with only anincrease in air to compensate for added resistance in theupper register and increased volume in the lower.
14

A high F should have the same sonority as a middle C or lowB flat. An efficient way for students to learn this is practiceof the extended scale:
The purpose of the extended scale is to utilize the entirei n s t rument for developing unifo rmity of sound, fi n ge rfacility in the extreme ranges, and familiarity with all keys.The scale is played diatonically from any given tone, such asC in the example, to the instrument’s highest note in thatkey or scale. The scale then descends to the instrument’slowest note in that scale and finishes on the starting note.
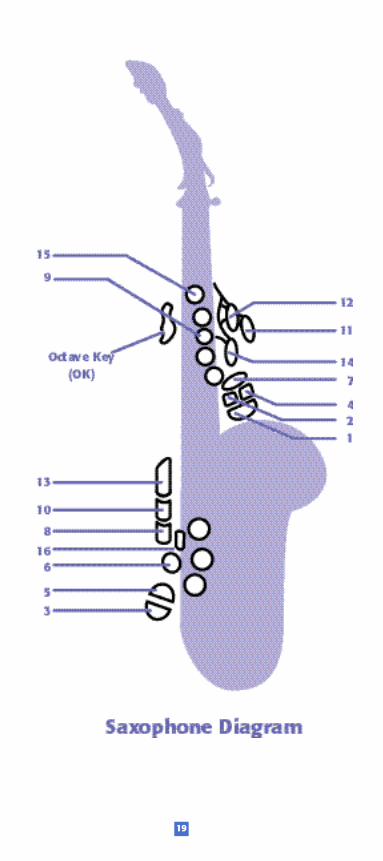
Hand Position, Finger Action andDevelopment of Technique
The young player must hold the instrument in a positionconducive to facility and accurate intonation. The seatedplayer can hold his saxophone directly in front, but it mustbe neither too close to his legs nor too close to his chair. Ifthe saxophone is too close to the legs the sound is stifledand the intonation of each note below low E hindered. Thesaxophone can also be held at the side if it is also farenough forward so that the player blows through themouthpiece and not against it. If the player is standing, theinstrument is best held in front and away from the body.
The hands are held in what is called a “streamlinedp o s i t i o n ” a p p ro a ching the instrument obl i q u e ly anda l l owing the fi n ge rs to move in a natural manner.Saxophone keys are designed for this position.
The left thumb is used as a pivot, rocking rather thanswitching from plateau to octave key. The right thumbhelps to support the instrument, but care must be taken tosee that the thumb is not too far under the support, as thiswill deter the action of the other fingers on that hand.
15
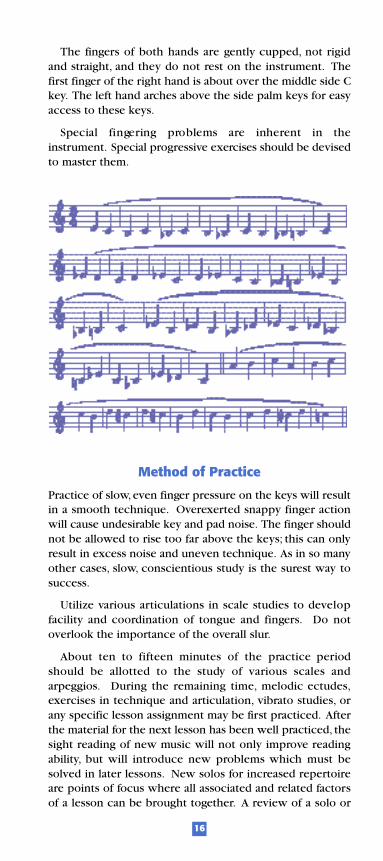
The fingers of both hands are gently cupped, not rigidand straight, and they do not rest on the instrument. Thefirst finger of the right hand is about over the middle side Ckey. The left hand arches above the side palm keys for easyaccess to these keys.
Special fi n ge ring pro blems are inherent in theinstrument. Special progressive exercises should be devisedto master them.
Method of Practice
Practice of slow, even finger pressure on the keys will resultin a smooth technique. Overexerted snappy finger actionwill cause undesirable key and pad noise. The finger shouldnot be allowed to rise too far above the keys; this can onlyresult in excess noise and uneven technique. As in so manyother cases, slow, conscientious study is the surest way tosuccess.
Utilize various articulations in scale studies to developfacility and coordination of tongue and fingers. Do notoverlook the importance of the overall slur.
About ten to fifteen minutes of the practice periodshould be allotted to the study of various scales andarpeggios. During the remaining time, melodic ectudes,exercises in technique and articulation, vibrato studies, orany specific lesson assignment may be first practiced. Afterthe material for the next lesson has been well practiced, thesight reading of new music will not only improve readingability, but will introduce new problems which must besolved in later lessons. New solos for increased repertoireare points of focus where all associated and related factorsof a lesson can be brought together. A review of a solo or
16
exercise learned for a previous lesson will help make thepractice time more meaningful.
Young players always attach a certain amount of prestigeto great speed. Their urge to speed can be disciplined bythe metronome, a considerable aid in the development ofuniform technique if used correctly.
The length of practice sessions while import a n t , i ssecondary to their regularity. Parents are obligated toprovide a time which is to be used daily for practicing.
Because the saxophone is capable of such wide variancein tonal color, the first major goal of the young saxophonistis a mature concept of sound quality. No student shouldever proceed from one note to the next until he and histeacher are sure that he first has the desired sound. Asidealistic as this may appear, it is neve rtheless a vitalnecessity for any student of any age who performs on thesaxophone. To this end must all practicing be geared, fromthe slowest, most lyrical etudes to the fastest technicalexercises. If a saxophonist does not bother about the soundof his instrument, he is likely to become little more than atechnician. He need not select an instrument with so rich asound quality potential.
Since almost all beginning and intermediate music, andmost advanced music as well, is based on scales, arpeggios,and various common intervals, is necessary for the studentto study these diligently, so that associations can be madebetween practice and performance. Major, minor andwhole-tone scales should be practiced in scalew i s eprogressions and intervallically in thirds, fourths, etc. Bothmajor and minor arpeggios likewise should be practiced.
Include the entire register of the instrument in thesestudies. Do not allow the student to become proficient inthe middle register of the instrument only. Explore both theupper and lower limits of the instrument as if they were themiddle register. Practice of extended scales, as alreadyexplained, will help to accomplish this.
17
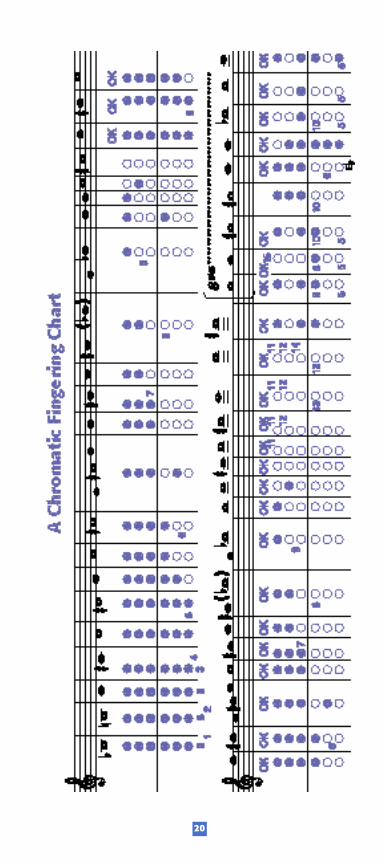
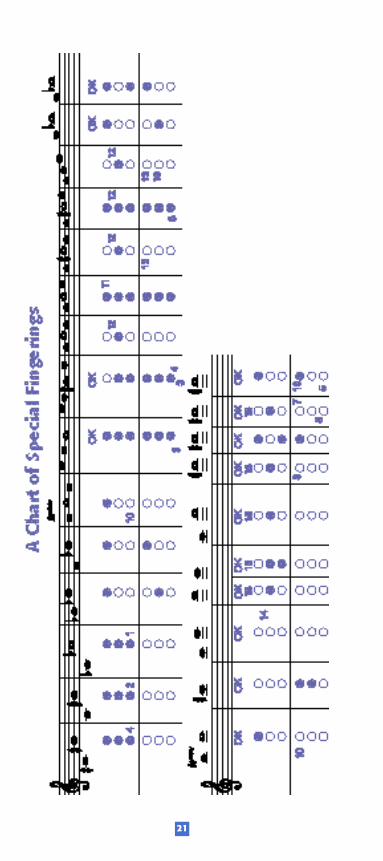
Fingering
The fingering of the saxophone is not complex. This is sowell known it has caused valuable alternate fingerings to beslighted. Choices of fingerings, for the sake of intonation orfacility, will have to be made as the student encounterspassages of increased complexity. For this reason thefollowing chart of regular and alternate fingerings should bem o re and more useful as the student pro gre s s e s .P re fe rences are indicated on the ch a rt by order ofpresentation. The first two B flats shown must be givenequal importance on the saxophone, however. The side Bflat and the Bis B flat are to be taught one with the other,since neither is sufficient to meet all fingering problems.The fingerings for notes above high F# are included onlybecause there is occasional reference to them in saxophonel i t e ra t u re . These fi n ge rings do not guarantee perfe c tintonation. Any of the fingerings above the normal registerwill demand ex p e ri m e n t a t i o n , some embouch u remanipulation and acute listening on the part of theperformer. Obviously, the beginner will not be concernedwith these notes and only the most advanced student needbe concerned, or even interested.
For other fi n ge ri n g s , students are encouraged toexperiment and to decide which are best suited to specificproblems in intonation, timbre, dynamics or technique.Those examples preceded or followed by blackened notesindicate the usual appro a ch or pro gression to thatparticular fingering.
18
19
20
21
Intonation Problems
The saxophone’s great variance in tone color and pitch hascaused many a band director to look with distaste on thesaxophone section. Some, unwilling to meet the challengeof section tuning, have eliminated the instrument from theband.
They might well have been discouraged by instrumentswith leaky pads, u n regulated key openings, fa u l t yalignment, etc. Such instruments will not be able to play intune.
Other mechanical details also influence tuning. The bore,throat, and facing of the mouthpiece must be suitable forthe instrument. The price of a mouthpiece often has littleto do with its suitability. A facing warped or distorted in anyway will impair both tone and pitch. Either too soft or toohard a reed will cause embouchure adjustments that lead tofaulty intonation in one or more parts of the instrument’srange. Reed manufacturers can grade their reeds onlyrelatively;2 1/2 reeds may be marked the same,but they willrespond differently. Students must be taught that theycannot simply buy one reed, wet it, and place it on themouthpiece and expect it to perform perfectly.
A “column of air” must always be flowing through theinstrument. To cut off this flow is to invite discrepancies inintonation. This may happen through what is called lack ofbreath support, tightening of the throat or tightening of theembouchure. Biting for the high register and relaxing forthe lower is common, unnecessary and detrimental toaccurate intonation.
Since there are usually many contributing difficulties, theproblem of intonation cannot be dealt with in isolation.E ve ry band director knows that inadequate pitch
22
perception cannot be cured with misunderstanding andimpatience.
It is necessary to work with deficient students in a specialway. Without such extra attention, no amount of sharpcriticism in a group rehearsal will be productive.
The ability to discriminate between good and badintonation can and must be taught. Students must be taughtto LISTEN. When tuning a section, avoid using only onenote to tune by. Make use of simple triads, easy scales andmelodic lines which may be approached in unison and insimple harmonization. Eventually tuning should be theresponsibility of the section itself, so that the membersdevelop pitch discrimination on their own.
Pa rticipation of young instrumentalists in smallensembles is highly recommended. Duet, trio, and quartetplaying helps to develop sensitivity to pitch and awarenessto the other parts in a composition.
Scoring
One of the greatest threats to the quality of a saxophonesection is the scoring for the instrument in band literature.The saxophone is no more than a buttress to the other bandinstruments, to judge by the various doublings that it isfo rced to make . O n ly in recent ye a rs have somecontemporary composers utilized the saxophone as anindependent color.
While doublings in arrangements can be and are oftennecessary and effective, there is no need to confine thesaxophone to this position permanently. If full scores areavailable, look for unnecessary or ineffective doubling andcorrect it by omitting the French horn sound occasionally,for example, and letting the saxophone color be heard.
Use the saxophones as a section whenever possible, byomitting those instruments which double the saxophone,by transposing and adding the voice which will allow thesaxophones to sound as a section, or by using thesaxophone section sound in place of an all brass or allclarinet sonority. Such changes are not irreverent to acomposer who probably has not heard any but the poordecadent sound of saxophonists at their worst.
Where a reed quality is desired, saxophones can easily beentrusted with the middle and lower sonorities often givento horns, baritones and basses. A doubling of saxophoneswith clarinets can give an excellent and rich sonority. Thealto saxophone doubles well with the flute. The tenorsaxophone coupled with the bassoon makes the low
23
double reed richer and more dexterous. Baritone and basssaxophones lend a rich sonority offered by no otherinstruments in the band. When they are not used as part ofthe saxophone section, they provide a secure bottom to thelow clarinets, bassoons, or low brasses.
Don’t avoid soprano saxophones. These instruments aretoday made well in tune. Not only are they a valuable assetto the modern saxophone quartet, but can be a mostva l u able addition to the band’s saxophone section.Directors who have performed works by Percy Graingerknow how effective this voice can be. A saxophone sectionwithout its upper voice is like a choir with only alto, tenorand baritone voices. Often the top voice of the saxophonesection is placed in the clarinet, flute or oboe parts. Thereis no set rule as to what part will contain the upper voicefor a complete saxophone section.
The saxophone has an almost infinite capacity fo rdynamic variation, so that the well-taught performer canplay either softly or loudly with a beautiful sonority. Untilband directors use their own imagination in respect tosaxophone voicing, composers will never know what canactually be accomplished with the instrument. It is hopedthat composers and arrangers alike will go beyond using thesaxophone as a solo virtuoso instrument and insist that italso become a vital new sound in the contempora ryensemble.
The claim that the literature for the saxophone is limitedis no longer justified. Below is a sampling of the wealth offine literature for the instrument, including works suitablefor beginning students and more advanced high schoolperformers. All are available in this country.
24
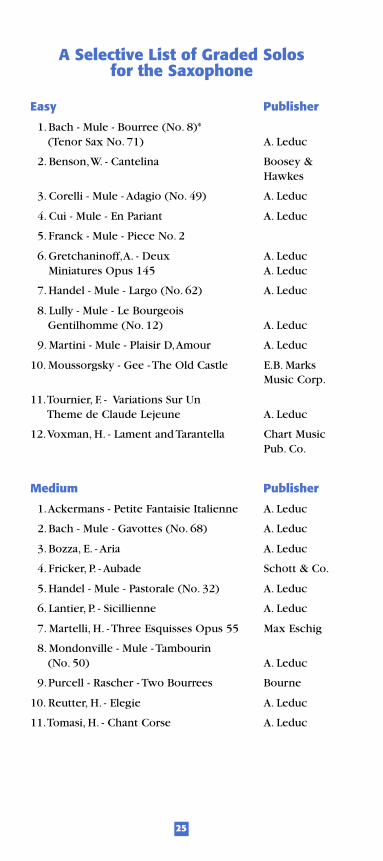
A Selective List of Graded Solosfor the Saxophone
Easy Publisher
1. Bach - Mule - Bourree (No. 8)*(Tenor Sax No. 71) A. Leduc
2. Benson,W. - Cantelina Boosey &Hawkes
3. Corelli - Mule - Adagio (No. 49) A. Leduc
4. Cui - Mule - En Pariant A. Leduc
5. Franck - Mule - Piece No. 2
6. Gretchaninoff,A. - Deux A. LeducMiniatures Opus 145 A. Leduc
7. Handel - Mule - Largo (No. 62) A. Leduc
8. Lully - Mule - Le BourgeoisGentilhomme (No. 12) A. Leduc
9. Martini - Mule - Plaisir D,Amour A. Leduc
10. Moussorgsky - Gee - The Old Castle E.B. Marks Music Corp.
11.Tournier, F. - Variations Sur Un Theme de Claude Lejeune A. Leduc
12.Voxman, H. - Lament and Tarantella Chart MusicPub. Co.
Medium Publisher
1.Ackermans - Petite Fantaisie Italienne A. Leduc
2. Bach - Mule - Gavottes (No. 68) A. Leduc
3. Bozza, E. - Aria A. Leduc
4. Fricker, P. - Aubade Schott & Co.
5. Handel - Mule - Pastorale (No. 32) A. Leduc
6. Lantier, P. - Sicillienne A. Leduc
7. Martelli, H. - Three Esquisses Opus 55 Max Eschig
8. Mondonville - Mule - Tambourin(No. 50) A. Leduc
9.Purcell - Rascher - Two Bourrees Bourne
10. Reutter, H. - Elegie A. Leduc
11.Tomasi, H. - Chant Corse A. Leduc
25
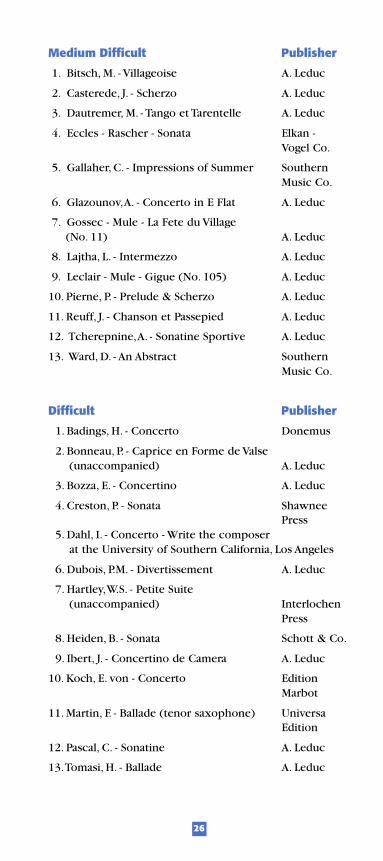
Medium Difficult Publisher
1. Bitsch, M. - Villageoise A. Leduc
2. Casterede, J. - Scherzo A. Leduc
3. Dautremer, M. - Tango et Tarentelle A. Leduc
4. Eccles - Rascher - Sonata Elkan -Vogel Co.
5. Gallaher, C. - Impressions of Summer SouthernMusic Co.
6. Glazounov,A. - Concerto in E Flat A. Leduc
7. Gossec - Mule - La Fete du Village(No. 11) A. Leduc
8. Lajtha, L. - Intermezzo A. Leduc
9. Leclair - Mule - Gigue (No. 105) A. Leduc
10. Pierne, P. - Prelude & Scherzo A. Leduc
11. Reuff, J. - Chanson et Passepied A. Leduc
12. Tcherepnine,A. - Sonatine Sportive A. Leduc
13. Ward, D. - An Abstract SouthernMusic Co.
Difficult Publisher
1. Badings, H. - Concerto Donemus
2. Bonneau, P. - Caprice en Forme de Valse(unaccompanied) A. Leduc
3. Bozza, E. - Concertino A. Leduc
4. Creston, P. - Sonata ShawneePress
5. Dahl, I. - Concerto - Write the composerat the University of Southern California, Los Angeles
6. Dubois, P.M. - Divertissement A. Leduc
7. Hartley,W.S. - Petite Suite(unaccompanied) Interlochen
Press
8. Heiden, B. - Sonata Schott & Co.
9. Ibert, J. - Concertino de Camera A. Leduc
10. Koch, E. von - Concerto EditionMarbot
11. Martin, F. - Ballade (tenor saxophone) UniversaEdition
12. Pascal, C. - Sonatine A. Leduc
13.Tomasi, H. - Ballade A. Leduc
26
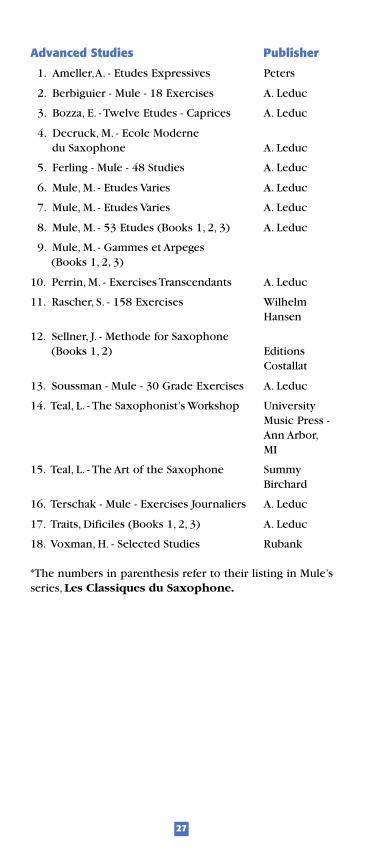
Advanced Studies Publisher
1. Ameller,A. - Etudes Expressives Peters
2. Berbiguier - Mule - 18 Exercises A. Leduc
3. Bozza, E. - Twelve Etudes - Caprices A. Leduc
4. Decruck, M. - Ecole Moderne du Saxophone A. Leduc
5. Ferling - Mule - 48 Studies A. Leduc
6. Mule, M. - Etudes Varies A. Leduc
7. Mule, M. - Etudes Varies A. Leduc
8. Mule, M. - 53 Etudes (Books 1, 2, 3) A. Leduc
9. Mule, M. - Gammes et Arpeges(Books 1, 2, 3)
10. Perrin, M. - Exercises Transcendants A. Leduc
11. Rascher, S. - 158 Exercises WilhelmHansen
12. Sellner, J. - Methode for Saxophone(Books 1, 2) Editions
Costallat
13. Soussman - Mule - 30 Grade Exercises A. Leduc
14. Teal, L. - The Saxophonist’s Workshop UniversityMusic Press -Ann Arbor,MI
15. Teal, L. - The Art of the Saxophone SummyBirchard
16. Terschak - Mule - Exercises Journaliers A. Leduc
17. Traits, Dificiles (Books 1, 2, 3) A. Leduc
18. Voxman, H. - Selected Studies Rubank
*The numbers in parenthesis refer to their listing in Mule’sseries, Les Classiques du Saxophone.
27
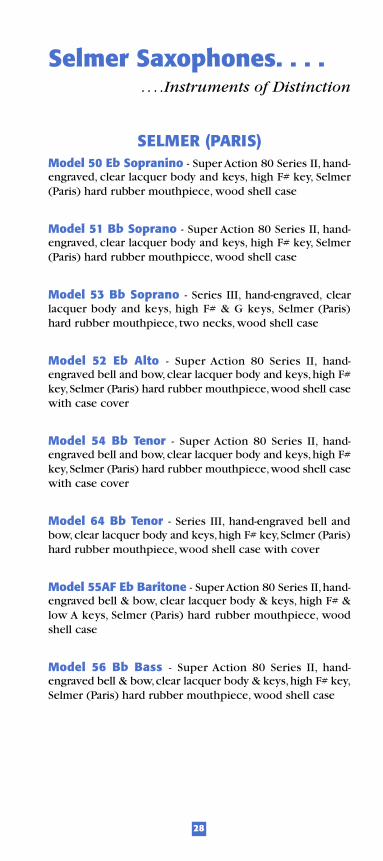
Selmer Saxophones. . . .. . . .Instruments of Distinction
SELMER (PARIS)Model 50 Eb Sopranino - Super Action 80 Series II, hand-engraved, clear lacquer body and keys, high F# key, Selmer(Paris) hard rubber mouthpiece, wood shell case
Model 51 Bb Soprano - Super Action 80 Series II, hand-engraved, clear lacquer body and keys, high F# key, Selmer(Paris) hard rubber mouthpiece, wood shell case
Model 53 Bb Soprano - Series III, hand-engraved, clearlacquer body and keys, high F# & G keys, Selmer (Paris)hard rubber mouthpiece, two necks, wood shell case
Model 52 Eb Alto - Super Action 80 Series II, hand-engraved bell and bow, clear lacquer body and keys,high F#key,Selmer (Paris) hard rubber mouthpiece,wood shell casewith case cover
Model 54 Bb Tenor - Super Action 80 Series II, hand-engraved bell and bow, clear lacquer body and keys,high F#key,Selmer (Paris) hard rubber mouthpiece,wood shell casewith case cover
Model 64 Bb Tenor - Series III, hand-engraved bell andbow, clear lacquer body and keys,high F# key,Selmer (Paris)hard rubber mouthpiece, wood shell case with cover
Model 55AF Eb Baritone - Super Action 80 Series II,hand-engraved bell & bow, clear lacquer body & keys, high F# &low A keys, Selmer (Paris) hard rubber mouthpiece, woodshell case
Model 56 Bb Bass - Super Action 80 Series II, hand-engraved bell & bow,clear lacquer body & keys,high F# key,Selmer (Paris) hard rubber mouthpiece, wood shell case
28
SELMER (USA)Model AS110 Eb Alto - Engraved bell, clear lacquer bodyand key s , high F# key, Selmer (Pa ris) hard ru bb e rmouthpiece, wood shell case
Model AS210 Eb Alto - Clear lacquer body and keys, highF# key, Selmer (Paris) hard rubber mouthpiece, wood shellcase
Model AS300 Eb Alto - Clear lacquer body, nickel-platedkeys, Selmer hard rubber mouthpiece, double - wall plasticcase
Model TS100 Bb Tenor - Hand-engraved bell,clear lacquerbody and keys, high F# key, Selmer (Paris) hard rubbermouthpiece, wood shell case
Model TS200 Bb Tenor - Clear lacquer body and keys,high F# key, Selmer (Paris) hard rubber mouthpiece, woodshell case
Model 1244 Bb Tenor - Clear lacquer body, nickel-platedkeys, Bundy plastic mouthpiece, vacuum - formed case
Model 156 Eb Baritone - Clear lacquer body, nickel-platedkeys, low A key, Selmer (Paris) hard rubber mouthpiece,wood shell case
Model 1256 Eb Baritone - Clear lacquer body, nickel-plated keys, G.M. Bundy hard rubber mouthpiece, woodshell case
29

Great Names in MusicSelmer (USA) • Selmer (Paris) • BachLudwig • Musser • Glaesel • Lewis
AV4107 (Rev 12/98) Printed in U.S.A.