teaching and learning geometry - homepage | … · what implications for teaching and learning...
TRANSCRIPT
331
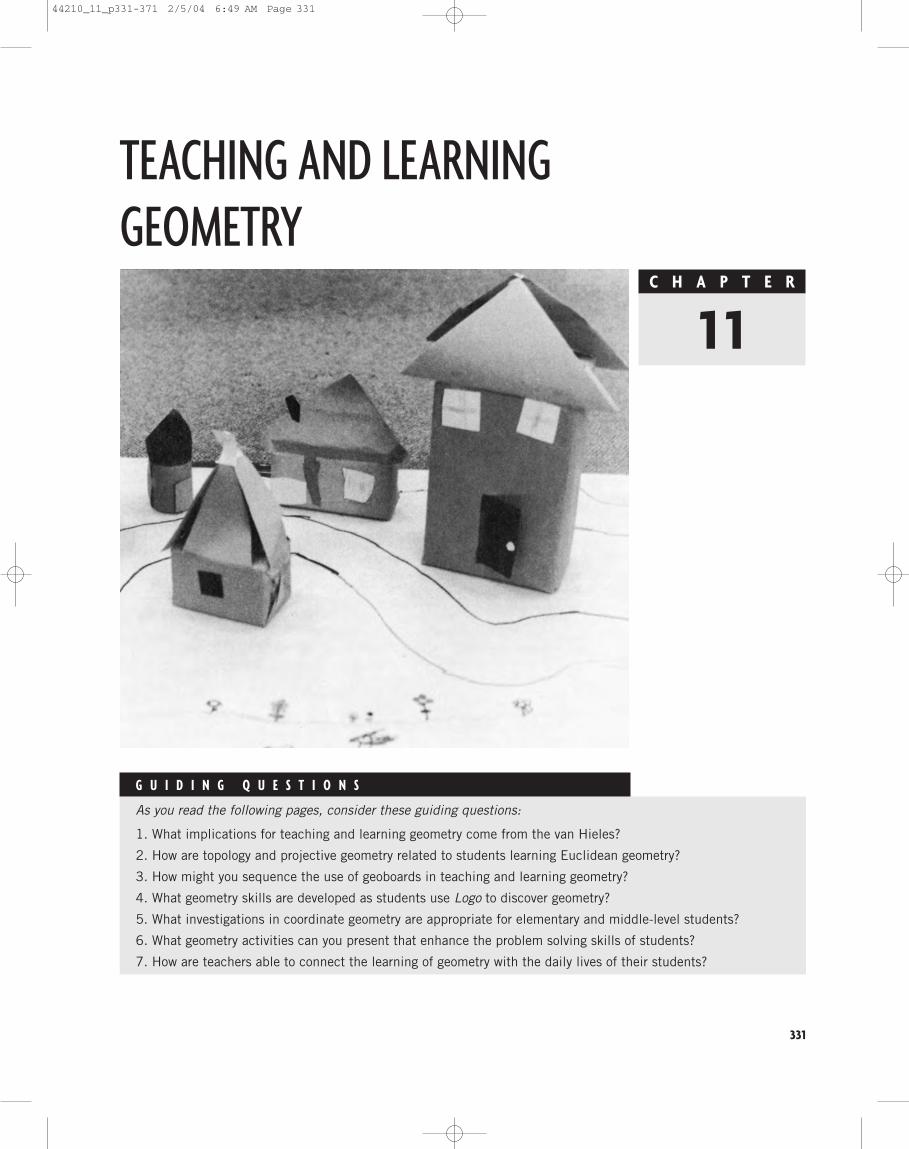
TEACHING AND LEARNING GEOMETRY
G U I D I N G Q U E S T I O N S
As you read the following pages, consider these guiding questions:
1. What implications for teaching and learning geometry come from the van Hieles?
2. How are topology and projective geometry related to students learning Euclidean geometry?
3. How might you sequence the use of geoboards in teaching and learning geometry?
4. What geometry skills are developed as students use Logo to discover geometry?
5. What investigations in coordinate geometry are appropriate for elementary and middle-level students?
6. What geometry activities can you present that enhance the problem solving skills of students?
7. How are teachers able to connect the learning of geometry with the daily lives of their students?
C H A P T E R
11
44210_11_p331-371 2/5/04 6:49 AM Page 331

NCTM Principles and Standards for School Mathematics
GeometryInstructional programs from prekindergarten through grade 12 should enable all students to:
Analyze characteristics and properties of two- andthree-dimensional geometric shapes and developmathematical arguments about geometric relationships
Pre-K to 2� recognize, name, build, draw, compare, and sort two-and three-dimensional shapes;� describe attributes and parts of two- and three-dimensional shapes;� investigate and predict the results of putting togetherand taking apart two- and three-dimensional shapes.
Grades 3–5� identify, compare, and analyze attributes of two- andthree-dimensional shapes and develop vocabulary todescribe the attributes;� classify two- and three-dimensional shapes accordingto their properties and develop definitions of classes ofshapes such as triangles and pyramids;� investigate, describe, and reason about the results ofsubdividing, combining, and transforming shapes;� explore congruence and similarity;� make and test conjectures about geometric propertiesand relationships and develop logical arguments to jus-tify conclusions.
Grades 6–8� precisely describe, classify, and understand relation-ships among types of two- and three-dimensionalobjects (e.g., angles, triangles, quadrilaterals, cylinders,cones) using their defining properties;� understand relationships among the angles, sidelengths, perimeters, areas, and volumes of similar objects;� create and critique inductive and deductive argumentsconcerning geometric ideas and relationships, such ascongruence, similarity, and the Pythagorean relationship.
Specify locations and describe spatial relationshipsusing coordinate geometry and other representationalsystems
Pre-K to 2� describe, name, and interpret relative positions inspace and apply ideas about relative position;� describe, name, and interpret direction and distancein navigating space and apply ideas about direction anddistance;� find and name locations with simple relationships suchas “near to” and in coordinate systems such as maps.
Grades 3–5� describe location and movement using common lan-guage and geometric vocabulary;� make and use coordinate systems to specify locationsand to describe paths;� find the distance between points along horizontal andvertical lines of a coordinate system.
Grades 6–8� use coordinate geometry to represent and examine theproperties of geometric shapes;� use coordinate geometry to examine special geometricshapes, such as regular polygons or those with pairs ofparallel or perpendicular sides.
Apply transformations and use symmetry to analyzemathematical situations
Pre-K to 2� recognize and apply slides, flips, and turns;� recognize and create shapes that have symmetry.
Grades 3–5� predict and describe the results of sliding, flipping,and turning two-dimpensional shapes;� describe a motion or a series of motions that willshow that two shapes are congruent;� identify and describe line and rotational symmetry intwo- and three-dimensional shapes and designs.
Grades 6–8� describe sizes, positions, and orientations of shapesunder informal transformations such as flips, turns,slides, and scaling;� examine the congruence, similarity, and line or rota-tional symmetry of objects using transformations.
Use visualization, spatial reasoning, and geometricmodeling to solve problems
Pre-K to 2� create mental images of geometric shapes using spa-tial memory and spatial visualization;� recognize and represent shapes from different per-spectives;� relate ideas in geometry to ideas in number and mea-surement;� recognize geometric shapes and structures in theenvironment and specify their location.
332
44210_11_p331-371 2/5/04 6:49 AM Page 332

Grades 3–5� build and draw geometric objects;� create and describe mental images of objects, pat-terns, and paths;� identify and build a three-dimensional object fromtwo-dimensional representations of that object;� identify and build a two-dimensional representationof a three-dimensional object;� use geometric models to solve problems in other areasof mathematics, such as number and measurement;� recognize geometric ideas and relationships and applythem to other disciplines and to problems that arise inthe classroom or in everyday life.
Grades 6–8� draw geometric objects with specified properties, suchas side lengths or angle measures;� use two-dimensional representations of three-dimensional objects to visualize and solve problemssuch as those involving surface area and volume;� use visual tools such as networks to represent andsolve problems;� use geometric models to represent and explainnumerical and algebraic relationships;� recognize and apply geometric ideas and relationshipsin areas outside the mathematics classroom, such asart, science, and everyday life.
333
NCTM (2000), pp. 96, 164, 232. Reprinted by permission.
44210_11_p331-371 2/5/04 6:49 AM Page 333
My Math Journal
A pentomino is made by connecting five squares of the same size so that each square
shares at least one complete side with another square. Copy two pages of the inch
graph paper from Appendix B, cut five squares apart, and try to find all of the possi-
ble pentominoes. If you find a shape that can be flipped or rotated to make another
shape, it is considered to be the same shape. As you find different shapes, outline
them on the graph paper. Work with others in your class to find all 12 pentominoes.
Color each of your 12 pentominoes a different color and cut them out. Try to put
all of your pentominoes together in one large rectangle. It is possible to make rectan-
gles that are 3 by 20, 4 by 15, 5 by 12, and 6 by 10. Sketch any of your successes. If
you cannot get the large rectangles, try using 6 of the pentominoes to get rectangles
that are 3 by 10 or 5 by 6.
As you discuss your work be sure to explain all of your thinking.
REFLECTIONS AND REFINEMENT: After you have completed this task,
compare your work with that of some of your classmates. How did your solution
differ from those of others? As you continue through this term, see if you can find
additional rectangles or other shapes to construct using the pentominoes. Write what
you have found here.
334
44210_11_p331-371 2/5/04 11:26 AM Page 334
MAKING SENSE OF GEOMETRIC CONCEPTS 335
Most of our buildings and decorations are based ongeometric forms. And, much of nature can be describedin geometric terms; this accounts, in part, for the originof geometry. The work of Babylonian astronomers andEgyptian surveyors laid the foundations for geometry.It is appropriate, then, to help children recognize thegeometry that surrounds them.
The environments most familiar to children arethose of the home, neighborhood, and school. By andlarge, the objects in these environments are the pro-ducts of human effort. The products of nature areevident, as well, and provide rich, intriguing objectsof study. Once children are made aware of variousshapes and geometric forms, they will find themeverywhere. The patterns and forms in nature may notbe as obvious but will capture children’s interests forlong periods of time. Peter Stevens noted in his bookPatterns in Nature that
[W]hen we see how the branching of trees resembles thebranching of arteries and the branching of rivers, howcrystal grains look like soap bubbles and the plates of a tor-toise’s shell, how the fiddleheads of ferns, stellar galaxies,and water emptying from the bathtub spiral in a similarmanner, then we cannot help but wonder why natureuses only a few kindred forms in so many different con-texts. Why do meandering snakes, meandering rivers, andloops of string adopt the same pattern, and why do cracksin mud and markings on a giraffe arrange themselves likefilms in a froth of bubbles? (1974, p. 3)
A children’s book that highlights patterns in natureis Echoes for the Eye: Poems to Celebrate Patterns in
Nature, (Esbensen, 1996), a collection of poems andillustrations of shapes in the natural world. Read thebook to students and discuss the images. Children’sawareness of geometry in the environment is height-ened considerably as teachers focus their attention onvarious applications of geometry. This awareness alsostrengthens students’ appreciation for and understandingof geometry and helps develop students’ spatial sense.
The foundations for learning geometry lie in infor-mal experiences from pre-kindergarten through middleschool. These experiences should be carefully plannedand structured to provide youngsters with a variety ofconcepts and skills. These concepts and skills serve asa basis for later, more formal work in geometry. That iswhy it is important to provide pre-extensive, systematicexposure to geometric ideas from pre-kindergartenthrough grade 8.
Infants explore space initially by thrashing about ina crib or playpen and crawling toward objects or opendoors. Children discover that some objects are close,while others are far. They discover that rooms haveboundaries, and that sometimes, if a door is left open,the boundaries can be crossed. They discover that certainitems belong inside boundaries—for example, father’s
nose belongs within the boundaries of his face, or thebathtub belongs within the confines of the bathroom.
Children also discover that events occur in a sequenceor an order. Early in their lives, they learned that theirown crying was often followed by the appearance ofa parent, who then attended to their needs. Later, chil-dren notice that a stacking toy is put together by puttingcertain parts in a particular order.
These examples illustrate children’s initial experiencesin space. They are far removed from school experienceswith geometric shapes but nonetheless help show howchildren discover spatial relationships. Children learnfirst about the common objects in their environments.Piaget and Inhelder (1967) found that young childrenview space from a topological perspective. For exam-ple, shapes are not seen as rigid; they may readilychange as they are moved about. Later, children useprojective viewpoints as they make the transition to aEuclidean point of view. Shadows provide an example ofprojective geometry. In projective geometry, distancesand dimensions are not conserved, but the relative posi-tions of parts of figures and the positions of figures rela-tive to one another are conserved. Employing projectiveviewpoints helps children, by ages five to seven, to beginto perceive space from a Euclidean point of view whenthey see shapes as rigid—the shapes do not change asthey are moved about.
There are many physical models available thatenhance the learning environment for geometry.Among those that we recommend are pattern blocks,geoblocks, geoboards, reflective tools, paper models,and Logo (the computer language of turtle graphics).These and other useful materials are described andillustrated as they are presented in this chapter.
Geometry also serves as an instructional medium inits own right. Geometric models are used to introduceand illustrate a variety of mathematical topics. Forexample, geometric models are used to illustrate algo-rithms in Chapters 6 and 7 and geometric models areused to illustrate the concept of fractions in Chapter 8.Visualizing mathematics through models is well estab-lished as a teaching method. Materials such as Mathand the Mind’s Eye (Bennett et al., 1987) and VisualMathematics (Bennett and Foreman, 1995, 1996) havebeen designed for use in grades 4–10 to help studentsdevelop their visual thinking. You are encouraged toexplore these and other materials that employ geome-try to model other mathematical topics.
MAKING SENSE OF GEOMETRIC CONCEPTS
The concepts upon which geometry is built begin withthe simplest figure, the point, and expand to lines,line segments, rays, curves, plane figures, and spacefigures. We briefly discuss each of these.
44210_11_p331-371 2/5/04 11:27 AM Page 335

336 CHAPTER 11. TEACHING AND LEARNING GEOMETRY
The point, like all geometric figures, is an abstractidea. A point has no dimensions. It may be thought ofas a location in space. For example, the tip of a pencil,the corner of a table, or a dot on a sheet of paper canrepresent a point.
A line is determined by two points and consistsof a set of points connecting the two points andcontinuing endlessly in both directions. Figure 11–1arepresents the line AB, defined by the points A and B.
Line segments and rays are subsets of a line. Likethe line, each is determined by two points. The linesegment, however, has two end points and the ray hasonly one end point. Line segment AB in Figure 11–1bis described by the two points A and B. Ray AB in Fig-ure 11–1c includes end point A and a set of pointscontinuing endlessly beyond point B. The arrowheadindicates the direction of a ray.
Lines, line segments, and rays have one dimension,length. When three or more points are not on the sameline, a different kind of geometric figure results. It is aplane figure, or a figure in two dimensions. Figuressuch as angles (the union of two rays) and triangles (theunion of three segments) are plane figures. We nowconsider curves and other plane figures.
A curve is a set of points that can be traced onpaper without lifting the pencil. Figure 11–1d showsa simple curve between points A and B. It is simplebecause it does not cross over itself as it is drawn. Thecurve in Figure 11–1e is not simple because it crossesover itself as it is drawn from point A to point B. Thesetwo curves are not closed because they both have end
points. When a curve has no end points, it is a closedcurve. Figure 11–1f illustrates a simple closed curve.
Plane figures that are simple closed curves formedby joining line segments are called polygons. A poly-gon is named by the number of segments joined tomake it. There are triangles (3 sides), quadrilaterals(4 sides), pentagons (5 sides), hexagons (6 sides),and so on. Figure 11–1g shows several polygons. Acommon simple closed curve not formed by joiningline segments is the circle.
The prefixes of the words that name the polygons—tri, quadri, penta, hexa, octa, and deca—are of Latinor Greek origin and tell the reader how many sides a fig-ure contains. Thus, tri means “three”; quadri, “four”;penta, “five”; hexa, “six”; octa, “eight”; and deca, “ten.”
A polygon may have certain properties that providea more specific description. For example, a regularfigure, such as a square or an equilateral triangle, hassides that are the same length and angles of the samemeasure. Having sides that are parallel and having rightangles are other descriptive characteristics of planefigures. A square is a quadrilateral with all sides thesame length and all angles the same size. A rectangle isa quadrilateral with opposite sides parallel and the samelength and all angles the same size. A parallelogram isa quadrilateral with opposite sides parallel and the samelength. A rhombus is a quadrilateral with oppositesides parallel and all sides the same length. A rhombusis sometimes called a diamond.
A space figure is one that does not lie wholly in aplane. A soup can represents one such figure, calleda cylinder, shown in Figure 11–1h. Other spacefigures include spheres, pyramids, prisms, and cones.The playground ball serves as a model of a sphere, theset of all points in space equidistant from a given point.A pyramid is a figure with a base the shape of a poly-gon and sloping triangular sides that meet at a commonvertex. A prism is a figure whose ends are congruentpolygons and parallel with each other, and whose sidesare parallelograms. A cone is a figure with a circularbase and a curved surface that tapers to a point.
Polyhedrons are space figures that have four ormore plane surfaces. Regular polyhedrons are thosein which each face is a regular polygon of the same sizeand shape and in which the same number of edges joinat each corner or vertex. There are only five regularpolyhedrons: the tetrahedron (4 faces), the cube (6faces), the octahedron (8 faces), the dodecahedron(12 faces), and the icosahedron (20 faces). These areshown in Figure 11–1i.
The geometric concepts described above form a majorpart of the elementary and middle school mathematicscurriculum. How these ideas are presented to children isimportant. Principles and Standards for School Mathematicssuggested:Figure 11 – 1 Common geometric figures and terms.
44210_11_p331-371 2/5/04 6:49 AM Page 336
MAKING SENSE OF GEOMETRIC CONCEPTS 337
Beginning in the early years of schooling, students shoulddevelop visualization skills through hands-on experienceswith a variety of geometric objects and through the use oftechnology that allows them to turn, shrink, and deformtwo- and three-dimensional objects. Later, they shouldbecome comfortable analyzing and drawing perspectiveviews, counting component parts, and describing attributesthat cannot be seen but can be inferred. Students need tolearn to physically and mentally change the position,orientation, and size of objects in systematic ways as theydevelop their understandings about congruence, similarity,and transformations. (NCTM, 2000, p. 43)
The following development of geometric conceptsexpands on the elementary or middle school textbookpresentation of recognition of shapes and definition ofterms. We begin with a description of the van Hielelevels of geometric thinking, followed by views youngchildren have of the world when they enter school,activities that introduce projective geometry, plane fig-ures and their properties, symmetry and transforma-tions, space figures and their properties, and fractalgeometry.
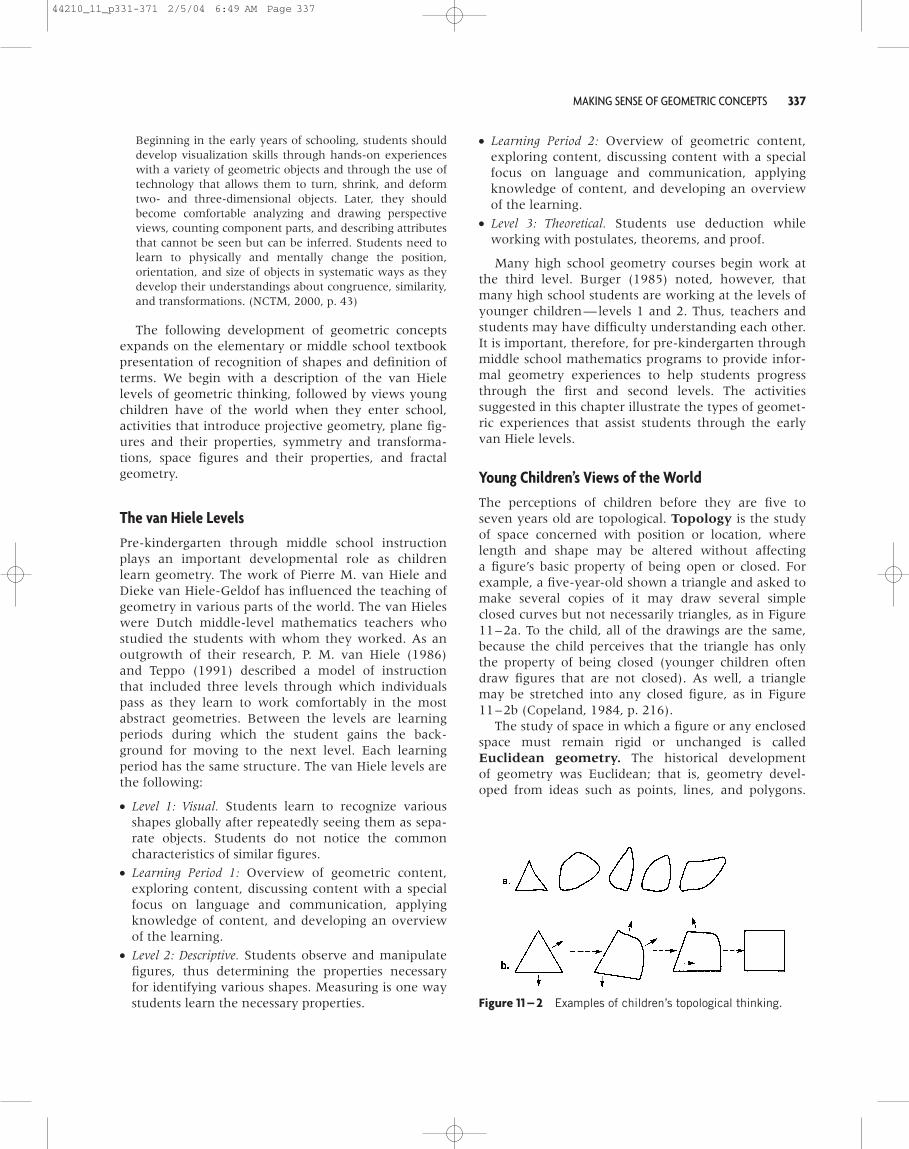
The van Hiele LevelsPre-kindergarten through middle school instructionplays an important developmental role as childrenlearn geometry. The work of Pierre M. van Hiele andDieke van Hiele-Geldof has influenced the teaching ofgeometry in various parts of the world. The van Hieleswere Dutch middle-level mathematics teachers whostudied the students with whom they worked. As anoutgrowth of their research, P. M. van Hiele (1986)and Teppo (1991) described a model of instructionthat included three levels through which individualspass as they learn to work comfortably in the mostabstract geometries. Between the levels are learningperiods during which the student gains the back-ground for moving to the next level. Each learningperiod has the same structure. The van Hiele levels arethe following:
� Level 1: Visual. Students learn to recognize variousshapes globally after repeatedly seeing them as sepa-rate objects. Students do not notice the commoncharacteristics of similar figures.
� Learning Period 1: Overview of geometric content,exploring content, discussing content with a specialfocus on language and communication, applyingknowledge of content, and developing an overviewof the learning.
� Level 2: Descriptive. Students observe and manipulatefigures, thus determining the properties necessaryfor identifying various shapes. Measuring is one waystudents learn the necessary properties.
� Learning Period 2: Overview of geometric content,exploring content, discussing content with a specialfocus on language and communication, applyingknowledge of content, and developing an overviewof the learning.
� Level 3: Theoretical. Students use deduction whileworking with postulates, theorems, and proof.
Many high school geometry courses begin work atthe third level. Burger (1985) noted, however, thatmany high school students are working at the levels ofyounger children—levels 1 and 2. Thus, teachers andstudents may have difficulty understanding each other.It is important, therefore, for pre-kindergarten throughmiddle school mathematics programs to provide infor-mal geometry experiences to help students progressthrough the first and second levels. The activitiessuggested in this chapter illustrate the types of geomet-ric experiences that assist students through the earlyvan Hiele levels.
Young Children’s Views of the WorldThe perceptions of children before they are five toseven years old are topological. Topology is the studyof space concerned with position or location, wherelength and shape may be altered without affectinga figure’s basic property of being open or closed. Forexample, a five-year-old shown a triangle and asked tomake several copies of it may draw several simpleclosed curves but not necessarily triangles, as in Figure11–2a. To the child, all of the drawings are the same,because the child perceives that the triangle has onlythe property of being closed (younger children oftendraw figures that are not closed). As well, a trianglemay be stretched into any closed figure, as in Figure11–2b (Copeland, 1984, p. 216).
The study of space in which a figure or any enclosedspace must remain rigid or unchanged is calledEuclidean geometry. The historical developmentof geometry was Euclidean; that is, geometry devel-oped from ideas such as points, lines, and polygons.
Figure 11 – 2 Examples of children’s topological thinking.
44210_11_p331-371 2/5/04 6:49 AM Page 337

338 CHAPTER 11. TEACHING AND LEARNING GEOMETRY
Some of Piaget’s research has implied that children donot develop geometric concepts in a Euclidean man-ner. Because of their topological perspectives, childrenneed active, exploratory time when they enter school(1953, p. 75).
In Chapter 5, relationships among objects and num-bers were discussed as the concept of number was devel-oped. Likewise, spatial relationships can be identifiedas the concepts associated with space are developed.Children who perceive the world from a topologicalpoint of view are developing an understanding of fourbasic relationships:
1. Is close to or is far from
2. Is a part of or is not a part of
3. Comes before or comes after
4. Is inside of, is outside of, or is on
During kindergarten and first grade, children developto the point where they can understand the meaning ofEuclidean space. That is, children develop their abilitiesto reproduce shapes without significantly altering thecharacteristics of those shapes. For example, in the ear-lier topological stage, children copy a figure but allowcorners to become round and distances to change. Atthe stage of Euclidean understanding, corners remaincorners and distances are unchanged—the figure isconsidered rigid.
The shift from topological to Euclidean thinking is notsudden. It may occur over a period of two years. Thus,usually between the ages of four and six, children canrecognize and name the more common figures: square,triangle, rectangle, circle. Other figures are neither iden-tified nor differentiated from these shapes. For example,the square and other rhombuses may be confused, asmay the rectangle and other parallelograms. Even moredifficult for children is copying various shapes fromblocks or drawings. Children may be able to accuratelyidentify shapes long before they are able to produce theirown examples.
During kindergarten and first grade, it is importantto continue activities that relate to topological space.The following are typical activities that extend topolog-ical ideas.
A C T I V I T I E S
Pre-Kindergarten – Grade 2OBJECTIVE: to develop and reinforce the concepts of near,far, on, in, under, over, inside, and outside.
1. Developing language in concert with activities isa natural part of teaching. Have children sit in smallgroups at tables on which numerous objects are placed.Give directions to various children. For example, “Julia,please put the red block as far away from the plastic cup
as you can,” or “David, please put the short pencil in thetin can.” Several children may participate simultaneously.Check the understanding of the language and the con-cept. Engage the children in discussion about the activity.
2. Draw three regions on the playground or on the floorof the multipurpose room. The regions represent a redbase, a green base, and a catchers’ region. Select twogroups of children: those who attempt to change from thered base to the green base when a signal is given andthose who begin at the catchers’ region. As the childrenare changing from the red to the green base, the catchersrun from their region and tag those who are changing.
The catchers may tag the changers as long as theyare outside of both the red and green bases. Once thechangers reach the green base, they try to return to the redbase. They continue running back and forth between basesas long as possible. Children who are tagged join thecatchers. The game is over whenever there are no morechildren to run between the red and green bases.
Children participating in this activity are concernedabout being inside or outside of the various regions.Occasionally during the activity, have the children“freeze.” Tell the children, “Raise your hand if you areinside the green region. Raise your hand if you are out-side the green region. Raise your hand if you are insidethe red region. Raise your hand if you are outside thered region. Raise your hand if you are outside both thered and green regions.”
3. Construct the following activity on the playgroundor on paper. Put large drawings such as those in Fig-ure 11–3 on the ground and invite the children to standinside and to see if they can get to the outside by walking.There is one rule: you cannot step over a boundary line.
Figure 11 – 3 Examples of boundary figures for inside andoutside activity.
44210_11_p331-371 2/5/04 6:49 AM Page 338
MAKING SENSE OF GEOMETRIC CONCEPTS 339
Students unable to get outside are inside a closedcurve. All other students are outside the closed curve orare standing on the curve itself, or the region is notclosed. Have the children experiment with several curvesuntil they can easily determine if they are inside or out-side a region, or if there is a closed region at all.
A simple curve like that in Figure 11–3a does notdivide the plane in which it is drawn. Thus, only oneregion exists, whereas in Figure 11–3b, two regionsexist because the simple closed curve separates theplane into two regions. In Figure 11–3c, there are fourregions and the curve itself. The region outside thefigure is counted. Figure 11–3d shows one region;Figure 11–3e shows three regions.
If these activities are performed on paper, the chil-dren may benefit from coloring each region a differentcolor. Devise variations of this sort of boundary exercise.Discuss the activity, encouraging the children to explainwhat happens in each case.
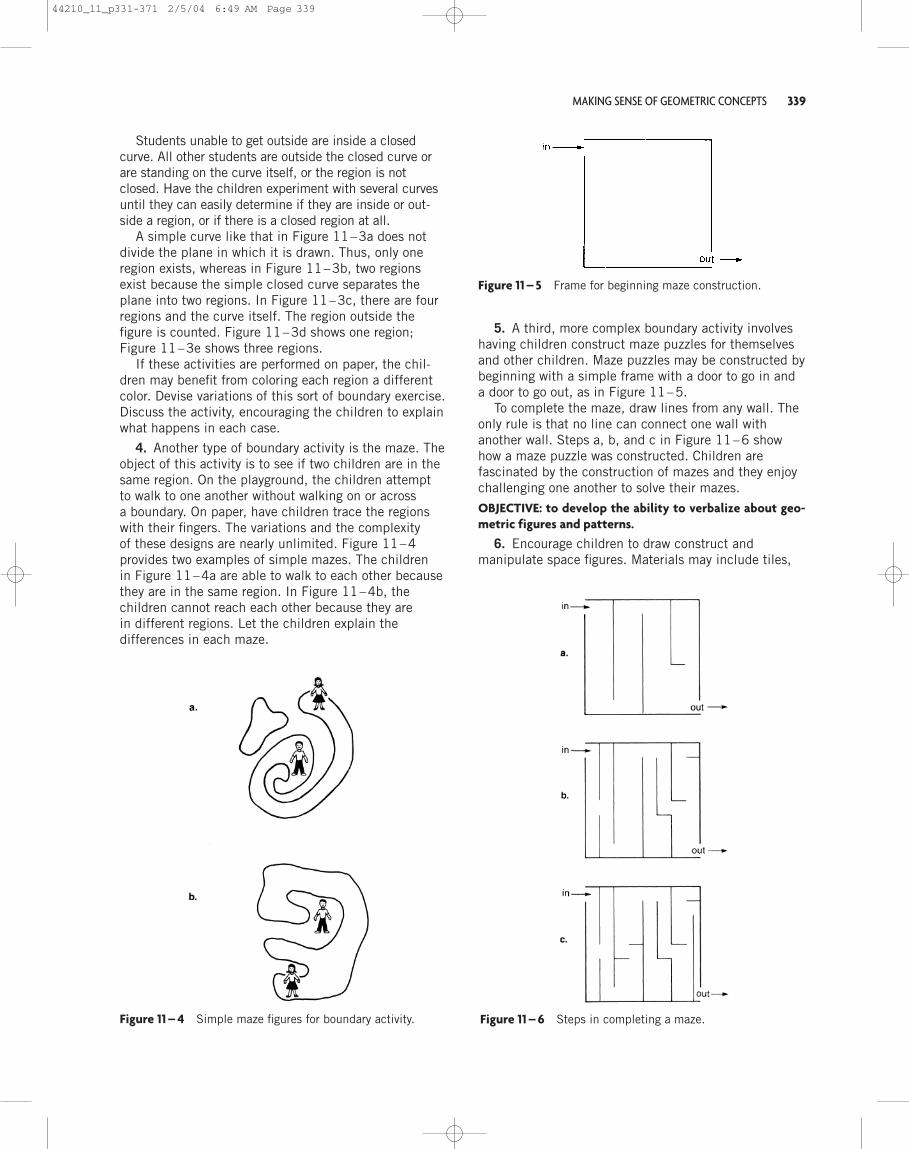
4. Another type of boundary activity is the maze. Theobject of this activity is to see if two children are in thesame region. On the playground, the children attemptto walk to one another without walking on or acrossa boundary. On paper, have children trace the regionswith their fingers. The variations and the complexityof these designs are nearly unlimited. Figure 11–4provides two examples of simple mazes. The childrenin Figure 11–4a are able to walk to each other becausethey are in the same region. In Figure 11–4b, thechildren cannot reach each other because they arein different regions. Let the children explain thedifferences in each maze.
5. A third, more complex boundary activity involveshaving children construct maze puzzles for themselvesand other children. Maze puzzles may be constructed bybeginning with a simple frame with a door to go in anda door to go out, as in Figure 11–5.
To complete the maze, draw lines from any wall. Theonly rule is that no line can connect one wall withanother wall. Steps a, b, and c in Figure 11–6 showhow a maze puzzle was constructed. Children arefascinated by the construction of mazes and they enjoychallenging one another to solve their mazes.
OBJECTIVE: to develop the ability to verbalize about geo-metric figures and patterns.
6. Encourage children to draw construct andmanipulate space figures. Materials may include tiles,
Figure 11 – 4 Simple maze figures for boundary activity.
Figure 11 – 5 Frame for beginning maze construction.
Figure 11 – 6 Steps in completing a maze.
44210_11_p331-371 2/5/04 6:49 AM Page 339

340 CHAPTER 11. TEACHING AND LEARNING GEOMETRY
Figure 11–7 Examining shadows of squares and other shapes.
The activities that follow are intended to providechildren with experience with projective geometry.
A C T I V I T I E S
Pre-Kindergarten – Grade 2OBJECTIVE: to produce and describe the shadows of squaresand other shapes, using the sun as a source of light.
1. Provide pairs of children with square regions suchas wooden or plastic geoboards or regions cut from rail-road board. Take the children to an area of the play-ground that has a flat, smooth surface such as blacktopor concrete. Have the children hold the square regions sothat shadows are cast on the ground, as in Figure 11–7.
Encourage the children to move the square regionsso that the shadow changes. Be sure both members ofa pair have a chance to experiment with shadow-making. After a few minutes, gather the childrenaround you and ask them to talk about the shadowsthey found as they moved their square regions. If itis difficult for a child to explain the shape of theshadow, have the child illustrate the shadow for theothers. Let the children discuss how they were ableto make the shapes larger and smaller. See what otherobservations they have made.
To make a permanent record of shapes, have onemember of each pair of children put a piece of paper onthe ground and let the shadow fall on the paper. Havethat child draw around the outline of the shadow on thesheet of paper. When each student has had a chance todraw a favorite shape, there will be a collection of inter-esting drawings that can serve as a source for discus-sion, sorting, and display.
2. Using the square regions from Activity 1, chal-lenge the children to make the shadow into a square.Ask the students what they had to do to produce asquare shadow. Give the children square regions that
attribute blocks, geoblocks, cubes, cans, empty milkcartons, Unifix cubes, Cuisenaire rods, pattern blocks,parquetry blocks, and clay. Geoblocks are pieces ofunfinished hardwood, cut into a wide variety of spacefigures. Have the children talk with one another as theywork. During that time, circulate and ask individuals,“Tell me what your picture shows. Can you find anothershape like this one? How would you describe this piece?How are the buildings the same?”
Children can learn to be analytical when questionsare carefully phrased. For example, “Can you makeanother house just like the one you have made there?I would like you to try.” At the same time, the questionscan serve to gather information for the teacher. Be sureto allow children to explain an answer.
OBJECTIVE: to use visual clues in matching shapes.
7. Encourage children to construct picture jigsaw puz-zles. Challenge the students with difficult puzzles, anddiscuss informally with individuals or small groups howthey have gone about putting the puzzle together. Itshould be evident that strategies are developed as puzzlesare completed. Edge pieces are generally put togetherfirst, followed by pieces that form distinct images or thosethat have easily matched colors. Pieces are added to thepuzzle when their shapes fit a region that has been sur-rounded by other pieces. Finally, all other pieces are putinto place by the process of elimination.
The preceding activities have been presented to helpreinforce the early geometry ideas of youngsters. Theyserve as preparation for the following activities, whichhelp introduce children to the Euclidean shapes.
Projective GeometryAs children investigate figures and their propertiesthrough shadow geometry, they are involved in thetransition from a topological perspective of their worldto a Euclidean perspective. Piaget and Inhelder (1967,p. 467) noted that “Projective concepts take account,not only of internal topological relationships, but alsoof the shapes of figures, their relative positions andapparent distances, though always in relation to a spe-cific point of view.” Children explore what happens toshapes held in front of a point source of light, such asa spotlight or a bright flashlight. They also explorewhat happens to shapes held in the sunlight when thesun’s rays are nearly parallel. They discover whichcharacteristics of the shapes are maintained undervarying conditions. Children need to make observa-tions, sketch the results of their work, and discuss theirobservations. As a result, children develop a viewpointthat is not part of a topological perspective.
44210_11_p331-371 2/5/04 6:49 AM Page 340

MAKING SENSE OF GEOMETRIC CONCEPTS 341
have been cut from paper to put on the ground. Havethe children use their square regions to make a shadowjust large enough to exactly cover the paper square onthe ground. Have them make a square smaller thanthe paper square, then one larger than the papersquare. Let the children discuss how they were ableto make their shadows different sizes.
Next, give pairs of children a paper diamond regionthat is not a square to put on the ground and ask them totry to make the same shape using the square region. Havethem exactly cover the diamond shape, then make dia-mond shapes smaller and larger than the paper diamond.
See if the children can make a triangle or a pentagonshadow using the square region. See if they can make arectangle or another parallelogram. It will be necessaryto provide paper shapes as models for the children touse. Be sure to have the children sketch their resultsand discuss their findings.
3. Introduce diamond, triangular, and hexagonalregions to see what kinds of shapes their shadows are.Can a diamond shadow be made with a diamond region?Can a square shadow be made? What other shadowshapes can be made? Can a triangular shadow bemade with a triangular region? Can square or diamondshadows be made?
Other shapes should be available with which the chil-dren can experiment. Again, outlining the shadows willproduce a permanent record of the shadow shapes.Expect the children to make discoveries that you had notthought of, and join in the excitement of such discoveries.
4. Using the outlines that the children drew of shad-ows cast by square regions, see if the children can findthings that are alike and things that are different in thedrawings. Encourage the students to count the numberof corners and the number of sides of each shadowshape and to compare those numbers. Write down theconclusions made based on these observations.
Pose problems such as: “Suppose we take one ofour shadow drawings and cut it out and glue it to apiece of railroad board cut exactly like the outline.Would it be possible to use that shape to make ashadow that would just match the square region thatwe started with? How do you think it could be done?Why do you believe that it can’t be done?” Let thechildren perform the experiment to see if they can dothis. Have them put their square regions on the groundand see if they can exactly cover the square regionwith a shadow from the outline region.
OBJECTIVE: to produce and describe the shadows ofsquares and other shapes, using a point source of light.
5. Set up a spotlight or use a flashlight so that thelight is projected onto a screen or wall. Let the childrenplay in the light by making shadows using their hands orby holding small objects. After this introductory activity,
provide the children with square regions and encouragethem to explore the different ways that shadows can beproduced. Tape paper to the wall and have the childrenoutline the shadows to provide a record of their work thatcan be displayed on a bulletin board and discussed.
As an extension, introduce other shapes such as tri-angular, rectangular, and hexagonal regions and let thestudents find out what their shadows look like. Let thechildren describe their shadow shapes and explain howvarious shadows were made.
6. Compare the outline drawings of the shadowsof the square regions made using the sun as a source oflight with those made using a point source of light. Abulletin board display can have the shadows sorted,with shadows made using the sun on one side and thosemade using the projector or flashlight on the other side.Can all of the same shadow shapes be made? Do theshapes look similar? For those shadows that are differ-ent, would it be possible to make that shape if we triedagain using the sun or a point source of light?
To extend this activity, cut out the outline of ashadow of a square region made with a point source oflight, glue it to a piece of railroad board cut to exactlythe same shape, and see if it is possible to make ashadow that matches the original square region. Are theresults of this activity the same as the results obtainedusing the sun as a source of light?
7. Take a square region and place it on a block or papercup so that the square region is supported parallel to thefloor as in Figure 11–8. Have the children hold a flash-light above the square region, moving it from side to side,and ask them to observe the shadow that is produced.
Figure 11 – 8 Setup for a shadow activity using a flashlight asa light source.
44210_11_p331-371 2/5/04 6:49 AM Page 341

Figure 11 – 9 Parquetry blocks and sample work card.
342 CHAPTER 11. TEACHING AND LEARNING GEOMETRY
What characteristics of the shadow shape are noted?If a sheet of paper is placed beneath the block, an out-line of the shadow shape can be drawn. Then directcomparisons can be made between the square regionand its shadow, such as comparing the sizes of the cor-ners and the lengths of the sides.
Is it possible to make diamonds or rectangles bymoving the light to various positions? As the flashlightis moved higher and lower how does the size of theshadow change? Next, use triangular and rectangularregions and explore their shadows.
The preceding activities in projective geometry havebeen presented to help children as they make the tran-sition from topological notions to Euclidean notions.You may also wish to examine the activities suggestedby Dienes and Golding (1967) and by Mansfield (1985)in the works listed in the references at the end of thechapter.
Plane Figures and Their Characteristics and PropertiesChildren’s abilities to learn the names and properties ofcommon plane figures, such as triangles, squares, rec-tangles, circles, parallelograms, rhombuses, hexagons,and so forth, vary considerably within any group ofchildren. Those who are able to observe a shape andthen easily find another like it or those who are able tolook at a figure and then draw it maintaining the char-acteristics essential to the figure are ready to proceedwith more systematic instruction on Euclidean shapes.
Piaget and Inhelder (1967, p. 43) indicated thatlearning shapes requires two coordinated actions. Thefirst is the physical handling of the shape, being able torun fingers along the boundaries of the shape. The sec-ond is the visual perception of the shape itself. It isinsufficient for children merely to see drawings orphotographs of the shapes. A variety of materials andactivities can help to present plane figures to children.Some of these materials and activities are presentedbelow.
A C T I V I T I E S
Pre-Kindergarten – Grade 2OBJECTIVE: to develop tactile understanding of commonplane figures.
1. Give children flat shapes to explore. The shapesmay be commercially produced, such as attribute blocks,or they may be teacher-constructed from colorful railroad
board. Allow the children time for free play with little orno teacher direction. Perhaps the children will constructhouses, people, cars, animals, patterns, or larger shapes.
After having plenty of free time with the shapes, thechildren will be ready for the teacher to ask a few ques-tions or to compliment them on their work. If someonehas constructed a truck, ask several children to con-struct others just like it. Challenge the children to makean object that is the same except upside down.
If a pattern is made, perhaps it can be extended.Encourage children and ask, “What shapes have youused to make your picture? What would happen if wechanged all of the triangles to squares? What wouldhappen if all the pieces were exchanged for largerpieces of the same shape? Let’s try it.”
2. Construct models of various shapes for the childrento handle. One way to construct a model is to bend heavywire in the shape of a triangle, square, rectangle, circle,parallelogram, rhombus, or hexagon. A touch of soldershould hold the ends together. Another way is to gluesmall doweling to a piece of railroad board. The childrencan then develop a tactile understanding of the shapes.
Once the children have handled the shapes, encour-age them to describe the shapes. Ask, “How many cor-ners does it have? How many sides does it have? Whatelse do you notice?” Ask them to draw a particularshape while looking at and feeling the model. Later, askthem to draw the shapes while only feeling or seeing themodels. Finally, ask the children to draw the shapeswithout either seeing or feeling the models.
OBJECTIVE: to make patterns using geometric shapes.
3. Parquetry blocks (Figure 11–9) are a uniquematerial to use to learn about plane figures. Parquetryblocks are geometric shapes of varying colors and sizes.The first attempt to use them should be in a free-playactivity. Then, there are several ways to use the blocksto present shapes.
• Copy activities include holding up one of theshapes and having children find another block ofthe same or a different shape. Next, put three orfour of the blocks together in a simple design andask the children to copy the design. It may be
44210_11_p331-371 2/5/04 6:49 AM Page 342
MAKING SENSE OF GEOMETRIC CONCEPTS 343
copied exactly or with a slight variation, such aswith different colors. Finally, put the blocks into asimple design but separate them from each other.Copying this design requires the children to visual-ize across the separations.
• Present outlines of parquetry blocks and ask thechildren to find a piece the same color, shape, andsize and place it on the outline. Later, have themmatch just shape and size. Present more compli-cated outlines, using designs of two or more blocks,after the children have worked with single blocks.
• Ask children to make their own outlines for others tofill in either by drawing around the various shapes orby putting all the shapes down and drawing aroundthe entire design. The latter variation produces achallenging puzzle for children to complete.
While our discussion has centered on the parquetryblocks, another learning aid, pattern blocks, worksequally well for the activities just mentioned.
OBJECTIVE: to construct common geometric figures.
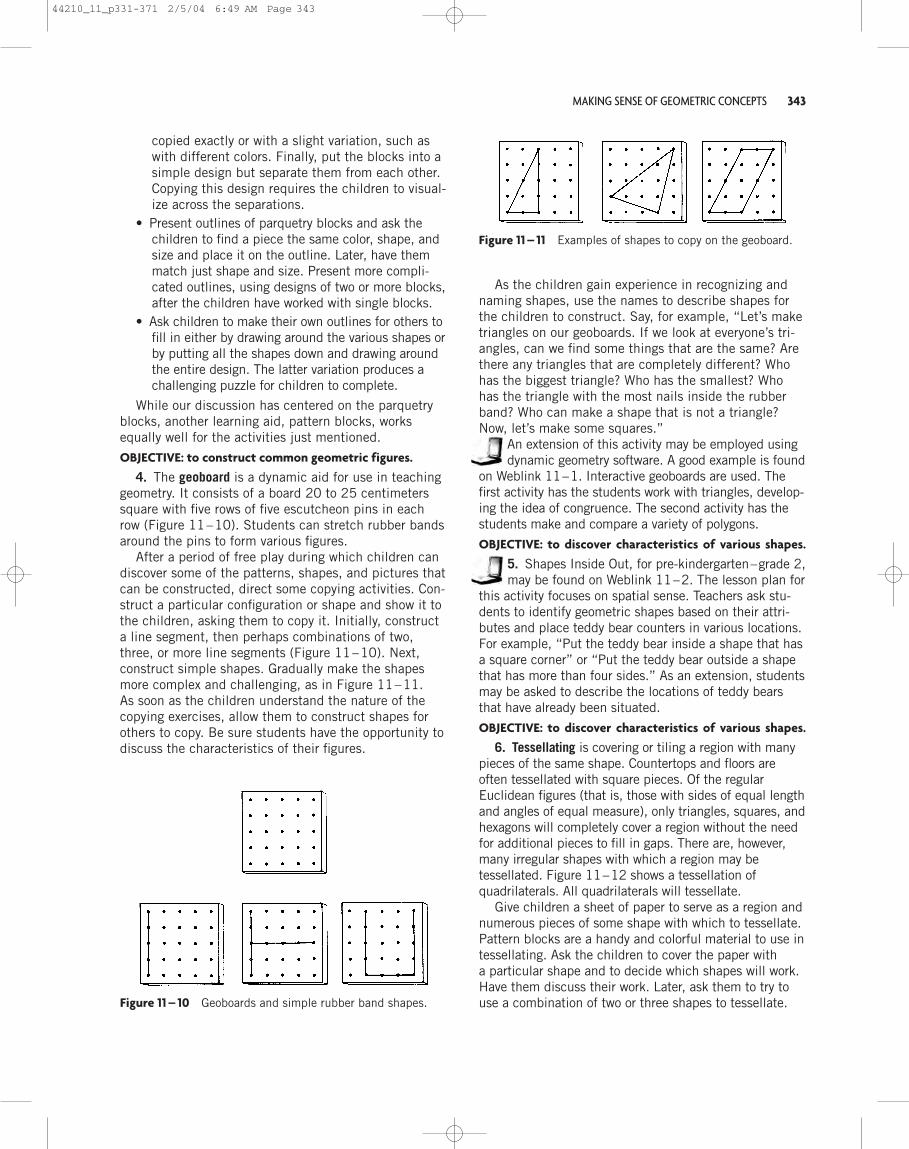
4. The geoboard is a dynamic aid for use in teachinggeometry. It consists of a board 20 to 25 centimeterssquare with five rows of five escutcheon pins in eachrow (Figure 11–10). Students can stretch rubber bandsaround the pins to form various figures.
After a period of free play during which children candiscover some of the patterns, shapes, and pictures thatcan be constructed, direct some copying activities. Con-struct a particular configuration or shape and show it tothe children, asking them to copy it. Initially, constructa line segment, then perhaps combinations of two,three, or more line segments (Figure 11–10). Next,construct simple shapes. Gradually make the shapesmore complex and challenging, as in Figure 11–11.As soon as the children understand the nature of thecopying exercises, allow them to construct shapes forothers to copy. Be sure students have the opportunity todiscuss the characteristics of their figures.
As the children gain experience in recognizing andnaming shapes, use the names to describe shapes forthe children to construct. Say, for example, “Let’s maketriangles on our geoboards. If we look at everyone’s tri-angles, can we find some things that are the same? Arethere any triangles that are completely different? Whohas the biggest triangle? Who has the smallest? Whohas the triangle with the most nails inside the rubberband? Who can make a shape that is not a triangle?Now, let’s make some squares.”
An extension of this activity may be employed usingdynamic geometry software. A good example is found
on Weblink 11–1. Interactive geoboards are used. Thefirst activity has the students work with triangles, develop-ing the idea of congruence. The second activity has thestudents make and compare a variety of polygons.
OBJECTIVE: to discover characteristics of various shapes.
5. Shapes Inside Out, for pre-kindergarten–grade 2,may be found on Weblink 11–2. The lesson plan for
this activity focuses on spatial sense. Teachers ask stu-dents to identify geometric shapes based on their attri-butes and place teddy bear counters in various locations.For example, “Put the teddy bear inside a shape that hasa square corner” or “Put the teddy bear outside a shapethat has more than four sides.” As an extension, studentsmay be asked to describe the locations of teddy bearsthat have already been situated.
OBJECTIVE: to discover characteristics of various shapes.
6. Tessellating is covering or tiling a region with manypieces of the same shape. Countertops and floors areoften tessellated with square pieces. Of the regularEuclidean figures (that is, those with sides of equal lengthand angles of equal measure), only triangles, squares, andhexagons will completely cover a region without the needfor additional pieces to fill in gaps. There are, however,many irregular shapes with which a region may betessellated. Figure 11–12 shows a tessellation ofquadrilaterals. All quadrilaterals will tessellate.
Give children a sheet of paper to serve as a region andnumerous pieces of some shape with which to tessellate.Pattern blocks are a handy and colorful material to use intessellating. Ask the children to cover the paper witha particular shape and to decide which shapes will work.Have them discuss their work. Later, ask them to try touse a combination of two or three shapes to tessellate.Figure 11 – 10 Geoboards and simple rubber band shapes.
Figure 11 – 11 Examples of shapes to copy on the geoboard.
44210_11_p331-371 2/5/04 6:49 AM Page 343

Figure 11 – 13 Developing the concept of an angle.
Figure 11 – 14 Students forming a quadrilateral with yarn.
344 CHAPTER 11. TEACHING AND LEARNING GEOMETRY
Before they begin, have the children estimate whetheror not they can use the shapes to tessellate.
7. Books that feature shapes can help childrenbecome aware of how commonplace geometry is in
our surroundings. In Shapes, Shapes, Shapes, Hoban(1986) invites children to identify a variety of shapesfrom photographs that they should recognize. The ButtonBox (Reid, 1990) displays a multitude of buttons thatillustrate shape and pattern and describes their uses.Bread in a variety of shapes is presented by Morris (1989)in Bread, Bread, Bread. This description of bread frommany cultures helps children identify many unusualshapes. Grifalconi (1986) tells a story of west Africa inwhich the shapes of houses are important. The Village ofRound and Square Houses is a beautifully written andillustrated book about a real place. After reading bookssuch as these to the students and discussing them, leavethe books out for the students to peruse on their own.
OBJECTIVE: to develop the concept of an angle.
8. An angle may be thought of as a change indirection along a line. On the floor or playground, havechildren walk along a line that at some point changesdirection, however slightly or sharply, as in Figure11–13a. Discuss with the children that the change indirection forms an angle.
Ask the children if they can think of a figure that hasan angle or corner. Children discussing the characteris-tics of a plane figure will mention the corners or bendsthat help give the figure its shape. The concept of anangle is being developed at an intuitive level.
Later, more formally define an angle as two rays shar-ing a common end point. Have children walk alongchalk or tape lines that form a zigzag path. By pointingone arm in the direction in which they have been walk-ing and the other arm in the direction of change, chil-dren can form the angle of change. Figure 11–13billustrates using the arms.
Then, have the children walk on large polygons. Thisactivity serves as an introduction to one aspect of thecomputer language Logo. Logo activities are presentedin a later section.
OBJECTIVE: to practice making polygons and discover nowtheir properties may change.
9. Provide the members of a learning group with a10-foot length of yarn that has been knotted at the endsto form a large loop. First, have two members of thegroup each hold it with both hands so that 4 vertices areformed, as in Figure 11–14. The other members of thegroup serve as observers and recorders. The holderspull the yarn taut, producing a quadrilateral, then theyexplore what happens to the shape as they change thesizes of the angles and the lengths of the sides of the fig-ure. An observer’s job is to describe what happens and arecorder’s job is to sketch the shape as it changes. Will itbe possible to produce a triangle? How about a penta-gon? What must be done to make a square, a rectangle,and a parallelogram? When the children have had achance to discuss their findings and to look at thesketches of the figures, ask them what they can concludeabout changing the angles, changing the lengths of thesides, and making other types of geometric figures.
Figure 11 – 12 A tessellation of quadrilaterals.
44210_11_p331-371 2/5/04 6:49 AM Page 344

MAKING SENSE OF GEOMETRIC CONCEPTS 345
To extend this activity, have a third student holdthe yarn so that there are 6 vertices. Now, what differ-ent shapes can they make and how does changingthe angles and the lengths of the sides affect theappearance of the figure? Does changing the lengthof the yarn affect the results of this activity? Again,discussion helps children share their observations andtheir sketches help to verify their conclusions.
The activities just presented are intended to give pri-mary children experiences with plane figures to com-plement work in the mathematics program. A numberof activities can be combined to develop a thematicunit about shapes. As a part of her work with kinder-garten children, student teacher Nicole Erwertdesigned a week of shape activities. On Monday, eachstudent constructed a shape book with four pages, fea-turing, in turn, triangles, circles, squares, and otherrectangles. Then the children looked through maga-zines for examples of the shapes to cut out and glue onthe appropriate page of their book. On Tuesday, thestudents took a shape walk in the school neighbor-hood, recognizing shapes on buildings, various struc-tures, and in nature. On Wednesday, the childrenconstructed a “town” by using common boxes ontowhich they had glued shapes that they had cut out. Allof the buildings were placed on a “street” drawn on alarge sheet of butcher paper. On Thursday, the stu-dents constructed geometric “people” by cutting outshapes and gluing them onto pieces of constructionpaper as in Figure 11–15. That afternoon a bulletinboard was arranged using the geometric people. OnFriday, a listening activity was introduced. Each stu-dent had a worksheet with several triangles, squares,circles, and other rectangles drawn on it. Instructionssuch as “color all of the triangles blue” were given.This quiet activity provided an opportunity for assess-ment of both shape recognition and listening ability.
Further, center activities were provided throughoutthe week. Students rotated from centers featuringgeoboards on which to construct shapes, buildingblocks, a game of shape Bingo, and shapes used tobuild patterns.
This was a successful week and raised the shapeawareness of the children. They talked about variousshapes each day.
Most of the following activities are intended tosupport children as they work in the first and secondof the van Hiele levels, visual and descriptive. Thismeans the students will continue to analyze theproperties of Euclidean figures and will begin tounderstand the characteristics of the figures in termsof definitions.
A C T I V I T I E S
Grades 3 – 5 and Grades 6 – 8OBJECTIVE: to discover important properties that define avariety of polygons.
1. Periodically designate a bulletin board as a shapeboard. Attach a label such as “quadrilaterals” and invitethe children to put as many different quadrilaterals asthey can on the board. Encourage a discussion about themeaning of quadrilateral. Let the students generate a listof characteristics of a quadrilateral. After two or threedays, have the children describe the ways in which theshapes are different. Thus, the children look at the defin-ing properties of quadrilaterals. Ask the children to clas-sify the quadrilaterals as squares, rhombuses, rectangles,parallelograms, and trapezoids. Which categories over-lap? How do the shapes relate? At other times, the boardtheme may be triangles, hexagons, or octagons.
2. Introduce students to dynamic geometry soft-ware by having them go to Weblink 11–3. Here,
students explore properties of rectangles and parallelo-grams by dragging corners and sides of the figures andchanging their shape and size. Students are encouragedto make conjectures about the properties and character-istics of the dynamic figures. The conjectures are then
Figure 11 – 15 A geometric person formed by gluing shapestogether.
44210_11_p331-371 2/5/04 6:49 AM Page 345

346
Figure 11 – 16 From Investigations in Number, Data and Space: Flips, Turns, and Area, byDouglas H. Clements, Susan Jo Russel, Cornelia Tierney, Michael T. Battista & Julie Sarama;Copyright © 1998. Reprinted by permission of Pearson Education, Inc.
44210_11_p331-371 2/5/04 6:49 AM Page 346

347
M A T H P R O G R A M
The family math page from the third-grade book shown in Figure 11–16 is designed to be
sent home at the beginning of this unit entitled Flips, Turns, and Area. This page is available
in several different languages so that teachers can communicate with parents for whom Eng-
lish is a second language. As you can see from this page, students in this section will be
designing tetrominoes and then studying transformations of these shapes as they look at area
and tessellation concepts. As part of this unit, students will use an included computer pro-
gram that is similar to the commercial game Tetris. In this game, however, students attempt
to completely cover rectangles with an area of 120 square units. In doing this, students
investigate all the factors of 120 and cut out rectangles to determine all the possible 120
square unit rectangles. They then work with paper tetrominoes to try to cover these rec-
tangles.
This Flips, Turns, and Area unit is one of 10 units in this third-grade program. It is part of
a series for kindergarten through fifth grade entitled Investigations in Number, Data and
Space. These units could be used as replacement units in conjunction with another program,
but they are designed to be a complete, self-contained program. Each unit has a teacher’s
book, and some contain software, but there are no student books. Students frequently use
black-line masters from the teacher’s book but are generally involved in active investigations
with objects and experiences from their environments. These activities include pair and
small-group work, individual tasks, and whole-class discussions. The unit also contains
10-minute math activities designed to be used outside of the regular math period to review
concepts that may have been taught at other times during the year. Homework is designed to
build on class investigations and is not given every day. Assessment includes Teacher Check-
points, which are checklists of concepts that teachers should look for as students work,
embedded assessment activities that may involve writing and reflections from the students or
brief interactions between students and the teacher, and ongoing assessment that includes
observations and portfolio or journal work.
This unit includes an investigation of motions with tetrominoes that is designed to last
approximately five hours and an investigation of area also designed to last approximately five
hours. Each of the sessions in these areas include suggestions for homework and extensions
that continue and expand upon the classwork.
44210_11_p331-371 2/5/04 6:49 AM Page 347

Figure 11 – 17 Triangles formed on a 2-by-5 arrangement ofnails on a geoboard.
348 CHAPTER 11. TEACHING AND LEARNING GEOMETRY
tested using the dynamic figures. Students should thendiscuss and raise questions with others about what theyhave discovered.
3. On the overhead projector or chalkboard, display aset of properties of a particular quadrilateral. Reveal theproperties one at a time until a student decides a suffi-cient number of properties have been displayed to iden-tify the shape. That student must then convince the restof the class that enough characteristics have been givento identify the figure. For example, the following listmay be presented.
• It is a closed figure with 4 straight sides.• It has 2 long sides and 2 short sides.• The 2 long sides are the same length.• The 2 short sides are the same length.• One of the angles is larger than one of the other
angles.• Two angles are the same size.• The other 2 angles are the same size.• The 2 long sides are parallel.• The 2 short sides are parallel.
Next, have the children develop lists, individuallyor in small groups, that can be used to challengethe others in the class. They may select particulartriangles, quadrilaterals other than the parallelogramdescribed above, or various other polygons. Invitediscussion of the lists; there should be manyquestions and observations.
OBJECTIVE: to discover the numerous configurations apolygon may have.
4. Challenge the children to find as many differenttriangles as possible on the geoboard. By different,we mean noncongruent, that is, not the same sizeand shape. Because of the variety of such figures, itis helpful to structure this activity using the problem-solving skill of simplifying the problem. For example,ask for as many different triangles as can be madeusing only two adjacent rows on the geoboard (we count14 such triangles). Before the children begin, havethem estimate how many triangles they can make.
You may wish to simplify the problem evenmore by asking the students to make triangles on a 2-by-2, 2-by-3, or 2-by-4 arrangement of nails. As the chil-dren find the triangles, have them sketch the triangleson a piece of dot paper (see Appendix B) and discusshow they went about finding them. Figure 11–17 showsa few of the possible triangles.
A little later, ask the children to make as many trianglesas possible on a 3-by-3 nail arrangement on the geoboard.Put a rubber band on the geoboard surrounding the 3-by-3area as a guide. Of course, you may use another arrange-ment as the basis for constructing triangles.
Discuss the types of triangles found. There willbe right triangles (one angle of 90 degrees), isoscelestriangles (a pair of congruent sides), acute triangles(all angles less than 90 degrees), obtuse triangles (oneangle more than 90 degrees), and scalene triangles (nosides of equal length).
Extend this activity by seeing how many quadrilater-als may be made on a certain part of the geoboard. Besure to have children estimate before they begin. Weknow that 16 noncongruent quadrilaterals can beformed on a 3-by-3 geoboard. How many squares orrectangles or hexagons may be constructed?
This series of activities for children in pre-kinder-garten through middle school plays an important rolein children’s geometric learning. They help defineplane figures and their properties in concrete andabstract terms. We now turn to transformations, sym-metry, and dynamic geometry.
Transformations, Symmetry, and Dynamic GeometryThe notions of transformations and symmetry areexemplified by patterns in nature and in the art
and architecture of human beings. Transformationsrefer to the movement of shapes by flipping them,rotating them, sliding them, or scaling them. Symme-try requires a line or lines about which a figure ordesign is balanced or a point about which a figure ordesign is rotated. There is something orderly and pleas-ant in balance, the characteristic of a figure thatsuggests an equality of parts. Children often generatesymmetrical designs with building materials. Manygeometric figures contain fine examples of symmetry,having, in some cases, several lines of symmetry.Dynamic geometry refers to an environment inwhich students may investigate geometric relationshipsusing conjecture and proof. Instruction may be aided
44210_11_p331-371 2/5/04 6:49 AM Page 348

MAKING SENSE OF GEOMETRIC CONCEPTS 349
using dynamic geometry software that allows studentsto explore and model the relationships by quickly pro-viding many example and, perhaps, a counterexample.The software helps students whose ability to prove anduse mathematical arguments has not been fully devel-oped. A good example of dynamic geometry software isThe Geometer’s Sketchpad. In this application, the user be-gins with a blank screen and a toolbar. A variety ofpowerful tools are available that allow the user to com-plete constructions, transformations, measurements,and graphing. Students are able to discover geometricrelationships by visualizing and reflecting and thenmake conjectures that can be tested. Weblink 11–4provides resources and examples from The Geometer’sSketchpad. The following activities combine transforma-tions, symmetry, and dynamic geometry.
A C T I V I T I E S
Pre-Kindergarten – Grade 2OBJECTIVE: to develop simple symmetrical patterns withobjects.
1. Provide the children with Cuisenaire rods, patternblocks, or parquetry blocks. Encourage them to makedesigns. Compliment the students on their efforts andpoint out the unique characteristics of the designs. Forexample, point out those made of materials of the samecolor, those using pieces of the same shape, and thosethat have line symmetry. Discuss with students what itmeans for a figure to have balance, using the children’sdesigns as examples. Have the children look around theroom, point to shapes that appear to be the same onboth sides, and explain the symmetry.
Ask the children to make a design with symmetry.You may structure this activity by designating whichpieces to use in making a design; for example, usingthe pattern blocks, have the children take two redpieces, four green pieces, and two orange pieces fortheir design. Ask the children to sketch the results orto glue colored paper cut into the shapes being used.Have the children share their designs with others.
2. Provide mirrors with which the children mayexplore and develop symmetrical patterns. (Inexpensivemirrors are available through school supply catalogs thatfeature learning aids.) Using Cuisenaire rods, patternblocks, or parquetry blocks and mirrors, have the chil-dren construct symmetrical designs and reaffirm theirsymmetry.
Ask the children to make a design using three or fourblocks or rods. Then have them place a mirror along oneedge of the design, note the reflection, and copy theimage in the reflection, placing the copy behind the mir-ror. Thus, the mirror is lying along the line of symmetry.
Then ask the children to remove the mirror and todiscuss their symmetrical designs. Say, for example,“What pattern do you see in your design? If your designwere a picture, what would it show? See if you can takethe reflected design away, mix up the pieces, and thenput the design back the way it was before. Where doyou think the line of symmetry is? Check it with the mir-ror. Can you make a new design and its reflection with-out using the mirror? Try it. Use your mirror to check tosee if your design has symmetry.”
Finally, have the children sketch and color the pat-tern and its mirror image on a sheet of squared paper.Figure 11–18 illustrates this process.
3. Stretch a rubber band across a geoboard fromedge to edge so there is ample space on each side of therubber band. In the simplest example, the rubber bandwould be stretched across the center of the geoboardeither horizontally or vertically. Construct a figure on oneside of the rubber band and challenge the children toconstruct the symmetrical image of the figure on theother side. In the beginning, have the children stand amirror on its edge along the symmetry line and make theimage while looking in the mirror. Figure 11–19 pro-vides examples of this activity.
Let the children make up figures and challenge therest of the class to construct the mirror image of the fig-ure on the geoboard across the line of symmetry, with orwithout a mirror. Provide dot paper on which the
Figure 11 – 18 A pattern and its mirror image sketched onsquared paper.
44210_11_p331-371 2/5/04 6:49 AM Page 349

350 CHAPTER 11. TEACHING AND LEARNING GEOMETRY
Figure 11 – 20 Rotations of an equilateral triangle.
students may copy their symmetrical geoboard designs.As the students develop proficiency in recreatingimages, use diagonal lines as lines of symmetry.
OBJECTIVE: to develop the ability to visualize symmet-rical patterns.
4. Ask the children to fold a sheet of paper in halfand to cut out some shape from the folded edge. Thenhave the children open the sheet and observe the sym-metrical figure. Provide an opportunity for the childrento share their designs.
Next, challenge the class to plan shapes to cut out offolded sheets and to guess what the results will looklike. The students may draw what they believe the fig-ures will look like when the paper is unfolded. Then letthem cut out the figures and check the results againsttheir estimates.
Another variation of this activity is to punch a holethrough the folded sheet with a paper punch. Have thechildren guess how many holes there will be, then openthe sheet to see. Try two holes, then three. Also, try foldingthe sheet of paper twice and then punching one or moreholes through the paper. Add a challenge to this activity byhaving children guess where the holes will be as well ashow many there will be. Display the children’s work.
OBJECTIVE: to identify symmetrical figures.
5. Have the children search through magazines forpictures that have symmetry. Have them cut out thosepictures. On a bulletin board, put up the heading“These Pictures Have Symmetry” and the heading“These Pictures Don’t Have Symmetry.” Have the chil-dren classify the pictures they have cut out and placeeach of them under the appropriate heading.
A variation of this activity is to go on a school orneighborhood walk to look for symmetry in the environ-ment. As examples are found, have two or three chil-dren sketch the examples on squared paper. When thewalk is over, have the students color the sketches andclassify them on the bulletin board.
Another variation of this activity is to provide eachchild with an object you have cut out from a magazineand then cut in half along its line of symmetry. For exam-ple, give children one side of a face, half of a flower ina pot, or half of an orange. Ask the children to paste thehalf-picture onto a piece of drawing paper and to drawthe other half of the object using crayons or markers.
Thus far, we have been using line symmetry. “Flip-ping,” or reflecting a shape across a line, produces linesymmetry when the shape and its image are viewed.Another type of transformation is produced by rota-tional, or point, symmetry. A figure has rotationalsymmetry if it can be rotated about a point in such away that the resulting figure coincides with the origi-nal figure. Thus, the equilateral triangle in Figure11–20 may be rotated clockwise about point. In thiscase, the triangle will coincide with the original trian-gle three times during one full turn. Each of thesepositions is shown in Figure 11–20. The first activitythat follows presents rotational symmetry.
A C T I V I T I E S
Grades 3 – 5OBJECTIVE: to introduce the concept of rotational sym-metry.
1. Construct a large equilateral triangular shape toserve as a model for rotational symmetry. On the floor,make a masking tape frame in which the triangle fits.
Figure 11 – 19 Symmetrical figures formed on the geoboard.
44210_11_p331-371 2/5/04 6:49 AM Page 350

MAKING SENSE OF GEOMETRIC CONCEPTS 351
Put a small hole through the model at its point of rota-tion and insert a pencil or a piece of doweling. Makesome sort of mark in one corner of the shape to serveas a reference point when the figure is rotated. Put theshape in its frame, and have the class record its posi-tion on their paper.
Invite students to carefully rotate the figure clockwiseuntil it again fits the frame. Have the class record thenew position.
Have the students rotate the figure again until itonce more fits the frame. Have the class record its newposition.
The next rotation will put the figure back in its start-ing position. Ask, “How many different positions arethere when we rotate an equilateral triangle?” There are3 positions. Continue, “We say this figure has rotationalsymmetry of order 3. What do you think will be theorder for the rotational symmetry of a rectangle, asquare, or a regular pentagon? Let’s try these figures.”
You will need to investigate a variety of plane figuresbefore the students will be entirely comfortable withrotational symmetry. As the students catch on, they willbe able to think about and draw figures with a specifiedorder of rotational symmetry.
OBJECTIVE: to introduce reflective tools for exploringtransformations and symmetry.
2. Activities involving reflective tools such as Miraand GeoReflector are particularly suited to a study ofsymmetry. Reflective tools are specially designed toolsmade of transparent plastic that are used in place ofa mirror for exploring line symmetry (see Figure11–21). Reflective tools are superior to mirrors inseveral ways. In the first place, you can see throughreflective tools, so images are easier to copy. Also,reflective tools stand by themselves and do not needto be held.
As with other new manipulative aids, the initialactivity with reflective tools should be a period of freeplay in which the students look for figures and pictures
to be checked for symmetry. Provide materials such aspattern blocks, tiles, Cuisenaire rods, and magazinepictures. Encourage students to draw patterns onsquared paper and to use the reflective tools toinvestigate the patterns. Interesting discoveries anddiscussions will result. Additional activities may befound in Giesecke (1996), Gillespie (1994), andWoodward and Woodward (1996).
3. Have students consider the letters of the alpha-bet as shown in Figure 11–22. Ask the students toidentify the letters that have at least one line ofsymmetry and those with more than one line ofsymmetry. Have the students visually estimate, thenhave them write down the letters they believe haveline symmetry.
Then, have the students use a mirror or a reflectivetool to check each letter for symmetry. It is appropriateat this time to see if the students are able to determineif any of the letters have rotational symmetry. That is,can the letter be rotated about a center point in such away that the letter appears as it normally does before ithas been rotated a full turn? For example, the letterIhasrotational symmetry of order 2.
An extension of this activity involves finding words thathave line or rotational symmetry. For example, both TOOTand CHOICE have line symmetry and NOON has rotationalsymmetry. Can you find another word that has both?
4. Let the students explore various materials such aspattern blocks using two mirrors or reflective tools. Sug-gest to the students that they tape the mirrors at rightangles and place blocks at the intersection. Increaseand decrease the angle of the mirrors to see whatimages result. Place the mirrors parallel to each otherand observe the image of blocks placed between them.
Try using three mirrors, one lying flat and two atright angles on top. Have the students sketch theimages they think will result. Examples of two mirrorconfigurations are shown in Figure 11–23.
Another application of line symmetry andthe images that result from using multiple
mirrors can be found in computer software. Forexample, various applications include word proces-sors, spreadsheets, draw programs, and paint pro-grams. The latter two programs can be used to drawfigures and then produce the mirror (flip) image orrotational image of the shape. Other dynamic geome-try programs such as The Geometer’s Sketchpad on acomputer or Cabri geometry on a computer or calcula-tor offer even more opportunities for explorations of
Figure 11 – 21 A reflective tool such as Mira or GeoReflector.
Figure 11 – 22 Letters of the alphabet used to find symmetry.
44210_11_p331-371 2/5/04 6:49 AM Page 351

352 CHAPTER 11. TEACHING AND LEARNING GEOMETRY
Figure 11 – 24 Selecting the triangle function on the TI-92calculator.
strategies to explore lines of symmetry. If you have notused the TI-92, try to find a teacher or student who hasexperience with the calculator, or use one of the booksfrom the reference list to help you get started.
Grades 6 – 8OBJECTIVE: to explore symmetry using dynamic geometrysoftware.
1. On a TI-92, choose F3 and select 3:Triangle(see Figure 11–24). Construct a small triangle on
the middle left side of the calculator screen (see Figure11–25). (This triangle will be reflected across theline of symmetry that you are going to construct next.)
Choose F2 and select 4:Line (see Figure 11–26).Construct a line near the center of your screen by point-ing to any point near the center and pushing ENTER.Then use the blue arrow key to move the line where youwant it. Push ENTER when the line is in a position thatyou like (see Figure 11–27). (This line will be used asa line of symmetry. A vertical line might be easiest forstudents to use, but a diagonal line will make theactivity more interesting and will lead to bettergeneralizations.)
Sketch the triangle and the line that are displayed onthe calculator screen. Sketch what you think the trianglewill look like when it is reflected across the line. Checkyour prediction with a mirror or other reflecting device.
Choose F5 and select 4:Reflection (see Figure11–28). Using the pointer and the blue arrow key,move the pointer to the triangle and choose “Reflectthis triangle” (ENTER). Then move the pointer to theline you just drew and choose “with respect to thisline” (ENTER) (see Figure 11–29). Check to see ifthe calculator screen looks like your drawing. (If theimage goes off the screen of the calculator, try usingthe grabbing hand to move the triangle or the lineuntil you can see both the line and the image onyour screen.)
rotations and symmetry. These exciting graphics fea-tures allow students to instantly see the results ofusing mirrors or rotations.
OBJECTIVE: to construct symmetrical figures.
5. Challenge the children by asking them to con-struct irregular figures on the geoboard. Provide a lineof symmetry; this could be a vertical, horizontal, ordiagonal line. Have the children construct the reflectionof the figure on the opposite side of the line of symme-try. Then, let the children check their efforts with reflec-tive tools or mirrors.
Let the students experiment with lines of symmetryother than those shown in Figure 11–19. See which,if any, other lines can be used to accurately constructreflected images.
If you have a dynamic geometry software available forcomputers or calculators, encourage the students toexplore concepts of geometry using that technology.For example, with the Cabri geometry capabilities ona TI-92 calculator, students might use the following
Figure 11 – 23 Using two mirrors to produce a reflectedimage.
44210_11_p331-371 2/5/04 6:49 AM Page 352

MAKING SENSE OF GEOMETRIC CONCEPTS 353
Observe the position of the reflected triangle. Howdoes the position of the reflected triangle relate to theposition of the original triangle in relation to the line?
Repeat this activity with other shapes and other linesof symmetry. Be sure to draw a sketch of your predictioneach time (see Figure 11–30).
Once you have mastered using a single line of sym-metry, try this activity with two or more lines of symme-try (see Figure 11–31).
Figure 11 – 25 Triangle constructed on the TI-92 calculator.
Figure 11 – 26 Selecting the line function on the TI-92calculator.
Figure 11 – 27 Drawing a diagonal line on the TI-92calculator.
OBJECTIVE: to investigate congruence, similarity, and sym-metry using dynamic geometry software.
2. Understanding congruence, similarity, and sym-metry can be facilitated by going to Weblink 11–5,
which has four activities. In the first, students choosetransformations and apply them to shapes and observethe resulting images. In the second, students try toidentify transformations that have already been appliedto shapes. In the third, students examine the results of
Figure 11 – 28 Selecting the reflection function on the TI-92calculator.
Figure 11 – 29 Triangle reflected across the line on the TI-92calculator.
Figure 11 – 30 Reflecting a pentagon on the TI-92 calculator.
44210_11_p331-371 2/5/04 6:49 AM Page 353
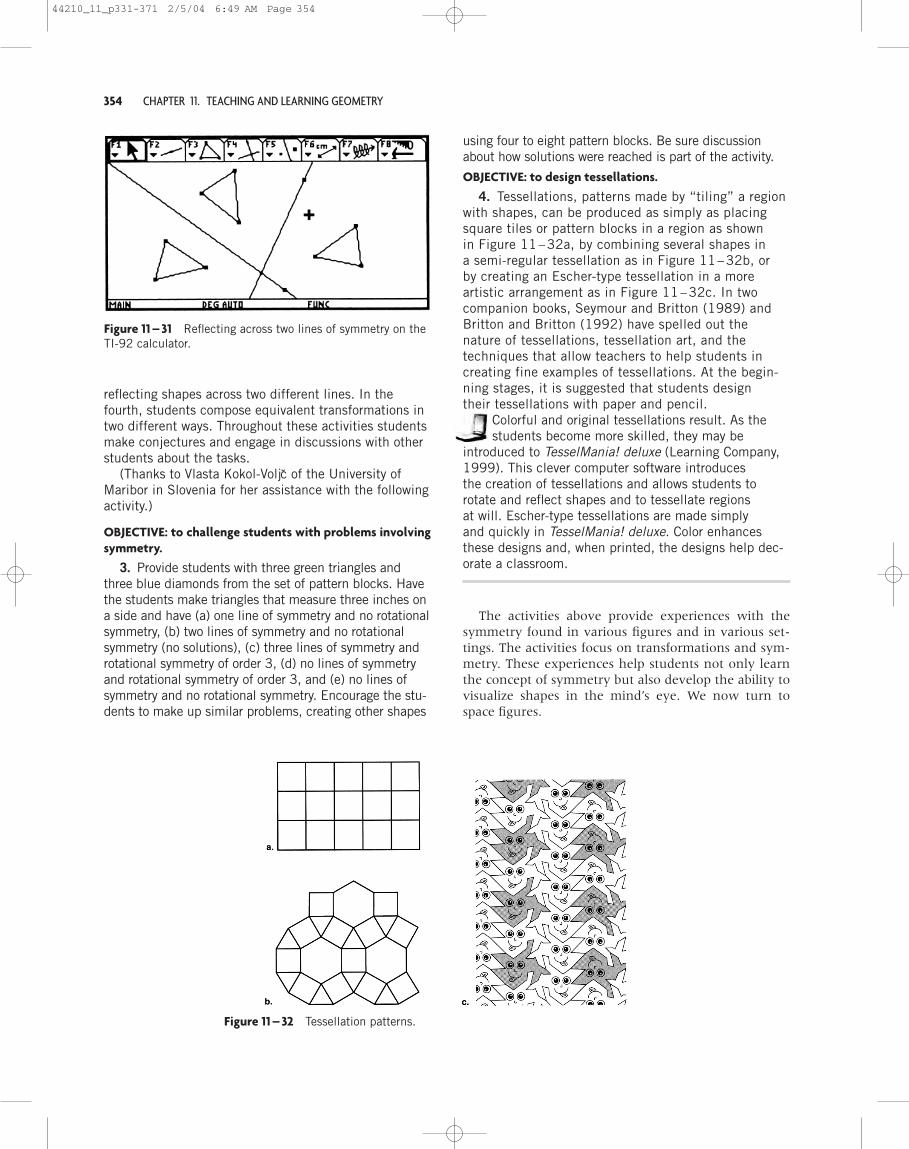
354 CHAPTER 11. TEACHING AND LEARNING GEOMETRY
Figure 11 – 32 Tessellation patterns.
using four to eight pattern blocks. Be sure discussionabout how solutions were reached is part of the activity.
OBJECTIVE: to design tessellations.
4. Tessellations, patterns made by “tiling” a regionwith shapes, can be produced as simply as placingsquare tiles or pattern blocks in a region as shownin Figure 11–32a, by combining several shapes ina semi-regular tessellation as in Figure 11–32b, orby creating an Escher-type tessellation in a moreartistic arrangement as in Figure 11–32c. In twocompanion books, Seymour and Britton (1989) andBritton and Britton (1992) have spelled out thenature of tessellations, tessellation art, and thetechniques that allow teachers to help students increating fine examples of tessellations. At the begin-ning stages, it is suggested that students designtheir tessellations with paper and pencil.
Colorful and original tessellations result. As thestudents become more skilled, they may be
introduced to TesselMania! deluxe (Learning Company,1999). This clever computer software introducesthe creation of tessellations and allows students torotate and reflect shapes and to tessellate regionsat will. Escher-type tessellations are made simplyand quickly in TesselMania! deluxe. Color enhancesthese designs and, when printed, the designs help dec-orate a classroom.
The activities above provide experiences with thesymmetry found in various figures and in various set-tings. The activities focus on transformations and sym-metry. These experiences help students not only learnthe concept of symmetry but also develop the ability tovisualize shapes in the mind’s eye. We now turn tospace figures.
Figure 11 – 31 Reflecting across two lines of symmetry on theTI-92 calculator.
reflecting shapes across two different lines. In thefourth, students compose equivalent transformations intwo different ways. Throughout these activities studentsmake conjectures and engage in discussions with otherstudents about the tasks.
(Thanks to Vlasta Kokol-Voljc of the University ofMaribor in Slovenia for her assistance with the followingactivity.)
OBJECTIVE: to challenge students with problems involvingsymmetry.
3. Provide students with three green triangles andthree blue diamonds from the set of pattern blocks. Havethe students make triangles that measure three inches ona side and have (a) one line of symmetry and no rotationalsymmetry, (b) two lines of symmetry and no rotationalsymmetry (no solutions), (c) three lines of symmetry androtational symmetry of order 3, (d) no lines of symmetryand rotational symmetry of order 3, and (e) no lines ofsymmetry and no rotational symmetry. Encourage the stu-dents to make up similar problems, creating other shapes
44210_11_p331-371 2/5/04 6:49 AM Page 354

MAKING SENSE OF GEOMETRIC CONCEPTS 355
Space Figures and Their Characteristics and PropertiesUp to this point, the activities have dealt principallywith plane figures—figures of two dimensions. All ofus, live in a three-dimensional world. All children’smovements, explorations, and constructions have beenin space. The exploration of space is the classic exam-ple of early mental growth.
As children continue their growth in geometry,activities with three-dimensional space figures are animportant part of this learning. Whenever possible, tapchildren’s environments—the classroom, home, andcommunity. The activities that follow are designed to aidin the development of spatial concepts. Again, activitiescannot by themselves teach. Augment them with read-ing, writing, discussion, examples, and thought.
A C T I V I T I E S
Pre-Kindergarten – Grade 2OBJECTIVE: to identify and draw two- and three-dimensional objects in the environment.
1. Extend the playground or neighborhood walk men-tioned earlier to include a search for three-dimensionalfigures. On a shape walk, ask students to sketch theshapes they observe. The shapes may be two or threedimensional. Students may draw the shapes of windows,doors, faces of bricks, or fences. Or they may draw theshapes of entire houses, individual bricks, garbage cans,or light posts. It is likely that you will need to discusshow to sketch three-dimensional figures. Have the chil-dren share with one another their own techniques.Descriptive stories by the class or individuals may helpto conclude an investigation of shapes in the community.
2. Ask the children to bring empty containers fromhome to serve as a collection of commonly found spacefigures. Expect containers such as cereal boxes, canswith the tops and bottoms removed, plastic soap contain-ers, and tubes from paper towels or toilet paper. Usethese materials as a bulletin board or table display. Havethe children classify the various figures, using their owncategories, by overall shape or the shapes of variousfaces. Cut the container so it lies flat and the studentscan examine the pattern of the space figure. In how manydifferent overall shapes are household items packaged?
OBJECTIVE: to copy and build space figures.
3. Encourage children to use a variety of materials tobuild space figures. Large blocks and cardboard build-ing bricks along with tiles, geoblocks, Unifix cubes,Cuisenaire rods, and pattern blocks are among thosecommonly found in primary classrooms. Make a con-struction and ask the children to copy it. Have childrenmake constructions for others to copy.
A challenging series of work cards accompanies theset of geoblocks. Develop other, similar cards for usewith the three-dimensional learning materials.
OBJECTIVE: to discover characteristics of polyhedrons.
4. Straws and pipe cleaners (or straws of two sizes)can be used to construct polyhedrons. Initially,produce two-dimensional figures. As space figures areinvestigated, it should become apparent that the facesof all polyhedrons are polygons. Thus, when a cube isconstructed, an investigation of its faces yieldssquares. If a tetrahedron is constructed, an investiga-tion of its faces yields triangles. Encourage childrento construct various polyhedrons. Several are shownin Figure 11–33.
Have the children compare the space figures, notingthe number and shapes of the faces, the number ofvertices, and interesting facts about their shapes. Havethe children record these findings on a chart and promi-nently display it.
5. Weblink 11–6 contains an activity entitled“Platonic Solids.” With this dynamic geometry
software, students interact with the Platonic solids (reg-ular polyhedrons). They are able to rotate the figures,color the faces of the figures, view “wire frame” versionsof the figures, and change the size of the figures. Thefaces, edges, and vertices can be counted.
Encourage the children to construct and manipulatespace figures. As they do so, they develop a sense ofhow figures fit in space. As children begin to analyzespace figures, they prepare the way for a more formalstudy of objects in space.
A C T I V I T I E S
Grades 3 – 5 and Grades 6 – 8OBJECTIVE: to explore the characteristics of the regularpolyhedrons.
1. Among the myriad space figures, there are onlyfive regular polyhedrons. A regular polyhedron is one inwhich all the faces are congruent, all the edges are thesame length, and all the angles are the same size. Theregular polyhedrons are the tetrahedron (4 faces),hexahedron or cube (6 faces), octahedron (8 faces),
Figure 11 – 33 Space figures built with straws and pipecleaners.
44210_11_p331-371 2/5/04 6:49 AM Page 355

356 CHAPTER 11. TEACHING AND LEARNING GEOMETRY
Figure 11 – 34 Wire figures for soap film shapes.
TABLE 11 – 1 Characteristics of Space Figures
Number of Tetrahedron Cube Octahedron Dodecahedron Icosahedron
vertices 4
edges 6
faces 4
dodecahedron (12 faces), and icosahedron (20 faces).They are illustrated in Figure 11–1i.
Students explore these shapes most effectively whenthey can hold them, turn them, and note their charac-teristics. Provide materials and patterns so the studentsmay construct their own set of regular polyhedrons. (SeeAppendix B for patterns for the five figures.) The pat-terns may be copied onto heavy paper or oaktag. Havethe students cut out the patterns, crease the fold lineswith a paper clip, make the folds, and glue the tabs.
One systematic investigation of the regular polyhedrais discovering the relationship between the number offaces, the number of edges, and the number of vertices.A table, such as the one shown in Table 11–1, can beused as an effective problem-solving tool to display theinformation gathered. The table provides a way to sys-tematically organize the information as it is collected.
Have the students handle the tetrahedron. Havethem count the number of vertices, or corners, of thetetrahedron. There are 4. Record that number in thetable. Next, count the number of faces (4) and recordthat information. Finally, count the number of edges (6)and record that information. Continue counting vertices,edges, and faces for the other figures.
Once the information has been recorded in thetable, challenge the students to look for a relationshipbetween the vertices, edges, and faces of a regular poly-hedron. Have them look at the numbers for each ofthe regular polyhedrons. Give the students time andsupport as they look for this relationship.
A formula named after the Swiss mathematician Leon-hard Euler describes the relationship between the faces,edges, and vertices of polyhedra. The formula states thatV � F � E � 2; that is, the number of vertices plus thenumber of faces minus the number of edges equals 2.Many students are capable of finding this relationship.
To extend this activity, see if the students can deter-mine if the relationship discovered for a regular polyhe-dron holds true for any pyramid or any prism.
OBJECTIVE: to explore space figures formed by soap filmon wire frames.
2. Provide the students with wire somewhat lighterthan coat hanger wire; it should be easy to bend and cutthe wire. The object is to construct shapes out of the wire
that can be used with soapy water to produce varioustwo- and three-dimensional figures. Figure 11–34 showsfour possible wire shapes. Encourage the students to cre-ate wire shapes with tightly secured corners.
Have the students dip the two-dimensional shapesin a mixture of liquid soap and water (half and half) andrecord what happens. Let them trade their wire shapesand experiment some more. Possible explorationsinclude blowing a bubble with a circular frame and thenblowing a bubble with a triangular frame. Have studentsmake conjectures about what they believe will happen.
See what happens when the three-dimensionalframes are dipped in soap and water. What happenswhen a diagonal is constructed inside a three-dimen-sional shape that is then dipped in soap and water?Construct shapes that are not polygons, then dip themand blow bubbles or just dip them.
OBJECTIVE: to combine imagination and knowledge ofspace figures to create a microworld.
3. Projects using space figures offer motivationfor creative learning experiences. One such project wasinitiated during an introductory class on space figures. Asthe children and the teacher looked at a set of geoblocks,one child noted that a particular piece looked like anEgyptian pyramid; another student thought that the wordprism sounded like prison. Soon a boy in the class men-tioned that it would be exciting to create a city full ofshapes. The geoworld project was begun. The geoworldwas built on a platform of triwall construction board thatmeasured 4 feet by 8 feet. The very first piece of archi-tecture that arose was tetrahedra terrace, a series of
44210_11_p331-371 2/5/04 6:49 AM Page 356

MAKING SENSE OF GEOMETRIC CONCEPTS 357
radius 10 inches, the T1 triangle has sides 6.2inches long, and the T2 triangle has one side 6.2inches long and two sides 5.5 inches long.
c. Make a pattern for each triangle. Figure 11–36shows one such set of triangles. Note that there is aflap on each side. The flap is used to attach the tri-angles.
d. Using the patterns, make 15 T1 triangles and 45T2 triangles. For a 10-inch radius dome, oaktag issuitable material; for a 40-inch radius dome,cardboard appliance cartons are best. It is neces-sary to lightly crease the fold lines on the flaps.
e. Begin construction. If you use oaktag, use whiteschool glue to attach the triangles. It will takethe cooperative effort of several students to putthe final pieces in place and hold them whilethey dry. If you use cardboard, you can use by-20 hexagonal machine nuts ( inches long) andbolts with washers to attach the pieces. Followthese four steps: (1) Make six pentagons and fivesemipentagons from T2 triangles (see Figure11–37a). (2) Add T1 triangles to the perimeter ofone pentagon (see Figure 11–37b). (3) Fill thegaps between triangles with other pentagons (seeFigure 11–37c. (4) Add T1 triangles between andbelow pentagons. Then, add semipentagons at thebottom (see Figure 11–37d).
As a final touch to the ball-shaped geodesic dome,fill the gaps around the base of the dome and attachthe bottom flaps together or to the floor to make thedome more rigid. It is helpful to cut windows anda door into geodesic domes large enough to enter.
During this project, students may wish to send awayfor a catalog from a company that prefabricates geo-desic dome houses or to search for magazine articlesabout such homes. Some students may investigatesome of Buckminster Fuller’s other inventions.
Fractal GeometryMuch of the natural world is difficult to describeusing common shapes such as triangles, squares, andrectangles. Apart from the human dimension, much
34
14-
connected tetrahedrons. Then came the cuban embassy,an idea sparked by surveying atlases for possibilities. Thecuban embassy was a large cube. It was surrounded byseveral cubans, who were represented by smaller cubeswith personal characteristics. Many other structures wereadded to geoworld; when the project had been com-pleted, every member of the class felt a deep sense ofpride in the creative work of their peers.
OBJECTIVE: to construct a geodesic dome.
4. Another project is the construction of a largespace figure. Thus, a cube that measures 1 or meterson a side may be built and used as a quiet place orreading corner. Zilliox and Lowrey (1997) describe theirwork with sixth graders who constructed a large rhombi-cosidodecahedron. The great effort and extreme pride inthe task illustrate the positive effects of such construc-tion projects. Among the more interesting of all suchfigures is the geodesic dome, originally conceived by thelate Buckminster Fuller. The following steps result ina rather spectacular geodesic dome, whether it has aradius of 10 or 40 inches.
a. Make the big decision. What size dome do you wantto build? Decide on the radius desired (half thewidth at the dome’s widest point). Figure 11–35illustrates what the finished dome will look like.
b. Construct the dome using two different sizes oftriangles. The size of each triangle is determinedby the size of dome desired. One of the triangles,T1, is equilateral, with each side 0.6180 timesthe length of the dome radius. The other triangle,T2, has one side equal to the length of a T1 sideand two shorter sides, each 0.5465 times thelength of the dome radius. Thus, for a dome of
112
Figure 11 – 35 Geodesic dome.
Figure 11 – 36 Patterns for T1 and T2 triangles for ageodesic dome.
44210_11_p331-371 2/5/04 6:49 AM Page 357
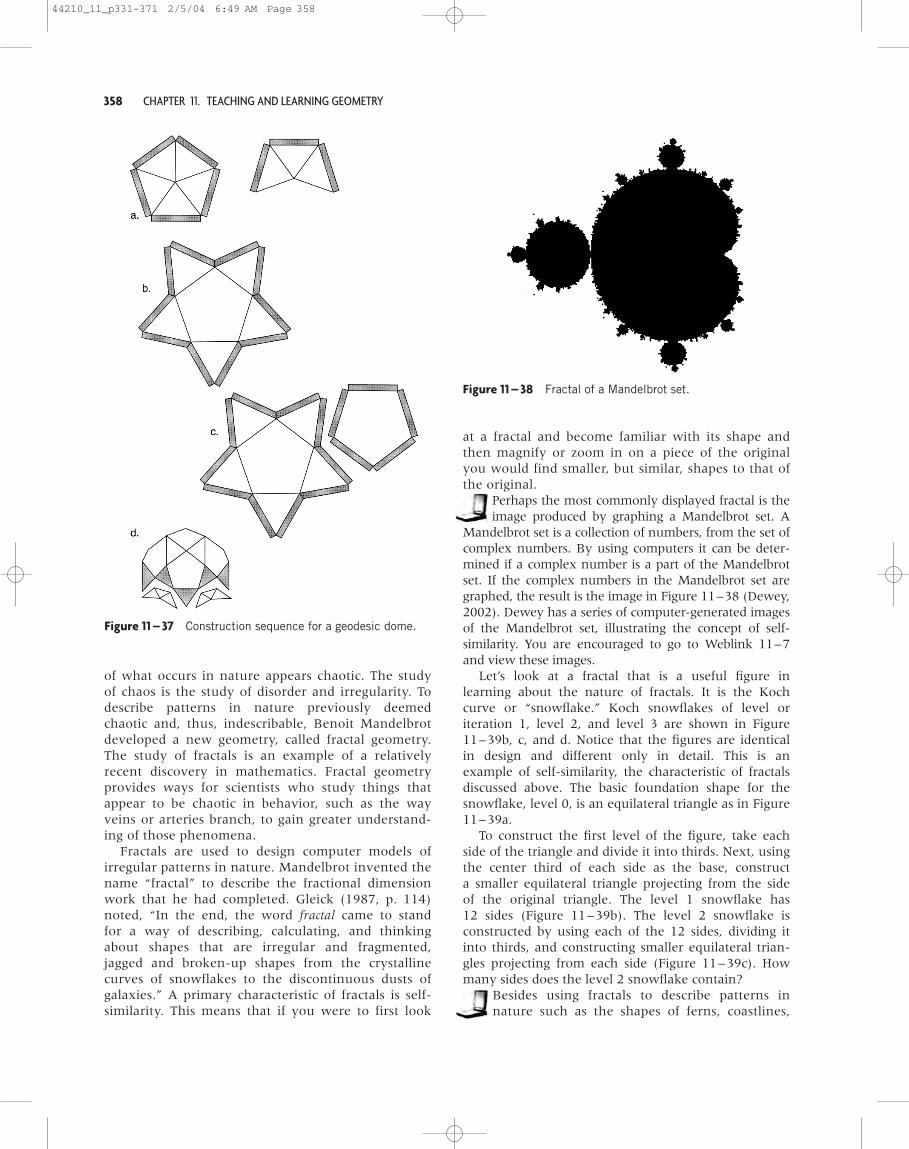
358 CHAPTER 11. TEACHING AND LEARNING GEOMETRY
Figure 11 – 38 Fractal of a Mandelbrot set.
of what occurs in nature appears chaotic. The studyof chaos is the study of disorder and irregularity. Todescribe patterns in nature previously deemedchaotic and, thus, indescribable, Benoit Mandelbrotdeveloped a new geometry, called fractal geometry.The study of fractals is an example of a relativelyrecent discovery in mathematics. Fractal geometryprovides ways for scientists who study things thatappear to be chaotic in behavior, such as the wayveins or arteries branch, to gain greater understand-ing of those phenomena.
Fractals are used to design computer models ofirregular patterns in nature. Mandelbrot invented thename “fractal” to describe the fractional dimensionwork that he had completed. Gleick (1987, p. 114)noted, “In the end, the word fractal came to standfor a way of describing, calculating, and thinkingabout shapes that are irregular and fragmented,jagged and broken-up shapes from the crystallinecurves of snowflakes to the discontinuous dusts ofgalaxies.” A primary characteristic of fractals is self-similarity. This means that if you were to first look
at a fractal and become familiar with its shape andthen magnify or zoom in on a piece of the originalyou would find smaller, but similar, shapes to that ofthe original.
Perhaps the most commonly displayed fractal is theimage produced by graphing a Mandelbrot set. A
Mandelbrot set is a collection of numbers, from the set ofcomplex numbers. By using computers it can be deter-mined if a complex number is a part of the Mandelbrotset. If the complex numbers in the Mandelbrot set aregraphed, the result is the image in Figure 11–38 (Dewey,2002). Dewey has a series of computer-generated imagesof the Mandelbrot set, illustrating the concept of self-similarity. You are encouraged to go to Weblink 11–7and view these images.
Let’s look at a fractal that is a useful figure inlearning about the nature of fractals. It is the Kochcurve or “snowflake.” Koch snowflakes of level oriteration 1, level 2, and level 3 are shown in Figure11–39b, c, and d. Notice that the figures are identicalin design and different only in detail. This is anexample of self-similarity, the characteristic of fractalsdiscussed above. The basic foundation shape for thesnowflake, level 0, is an equilateral triangle as in Figure11–39a.
To construct the first level of the figure, take eachside of the triangle and divide it into thirds. Next, usingthe center third of each side as the base, constructa smaller equilateral triangle projecting from the sideof the original triangle. The level 1 snowflake has12 sides (Figure 11–39b). The level 2 snowflake isconstructed by using each of the 12 sides, dividing itinto thirds, and constructing smaller equilateral trian-gles projecting from each side (Figure 11–39c). Howmany sides does the level 2 snowflake contain?
Besides using fractals to describe patterns innature such as the shapes of ferns, coastlines,
Figure 11 – 37 Construction sequence for a geodesic dome.
44210_11_p331-371 2/5/04 6:49 AM Page 358
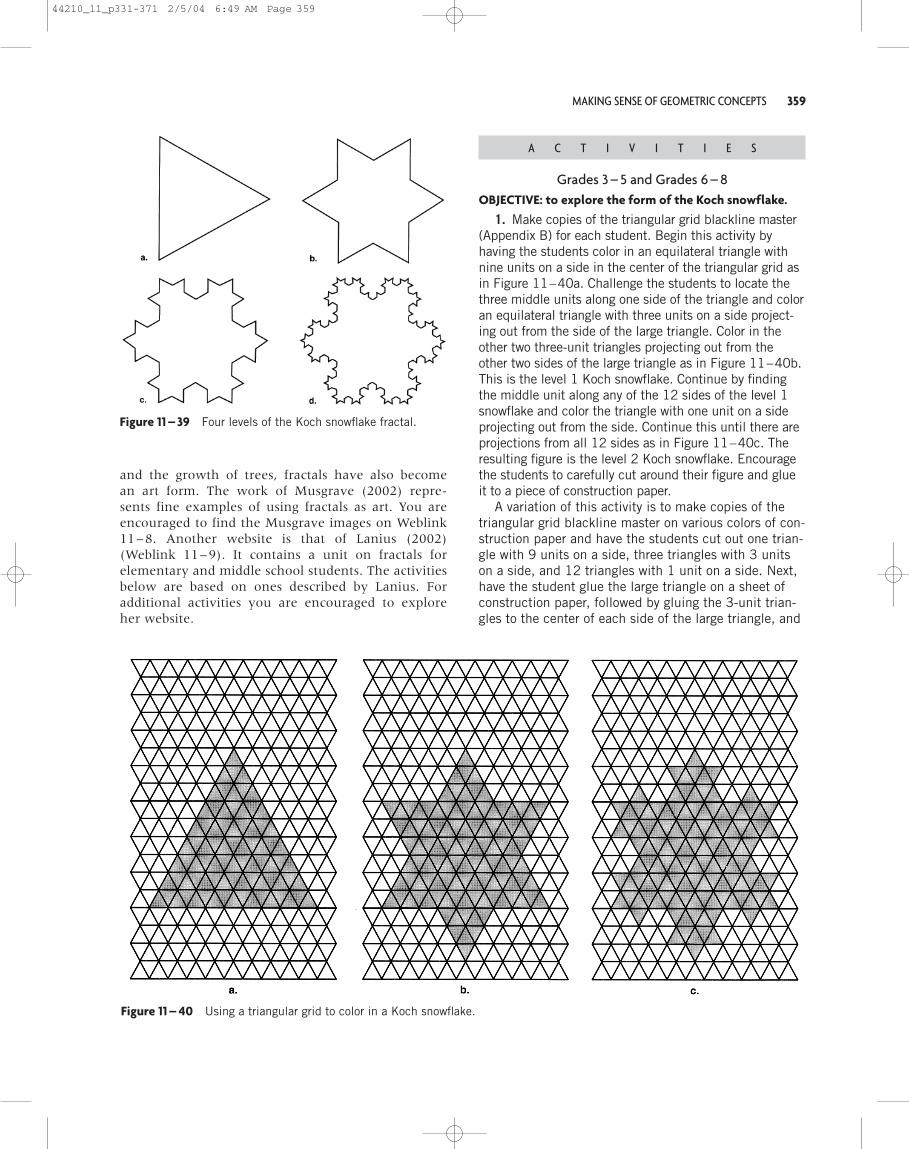
MAKING SENSE OF GEOMETRIC CONCEPTS 359
and the growth of trees, fractals have also becomean art form. The work of Musgrave (2002) repre-sents fine examples of using fractals as art. You areencouraged to find the Musgrave images on Weblink11–8. Another website is that of Lanius (2002)(Weblink 11–9). It contains a unit on fractals forelementary and middle school students. The activitiesbelow are based on ones described by Lanius. Foradditional activities you are encouraged to exploreher website.
A C T I V I T I E S
Grades 3 – 5 and Grades 6 – 8OBJECTIVE: to explore the form of the Koch snowflake.
1. Make copies of the triangular grid blackline master(Appendix B) for each student. Begin this activity byhaving the students color in an equilateral triangle withnine units on a side in the center of the triangular grid asin Figure 11–40a. Challenge the students to locate thethree middle units along one side of the triangle and coloran equilateral triangle with three units on a side project-ing out from the side of the large triangle. Color in theother two three-unit triangles projecting out from theother two sides of the large triangle as in Figure 11–40b.This is the level 1 Koch snowflake. Continue by findingthe middle unit along any of the 12 sides of the level 1snowflake and color the triangle with one unit on a sideprojecting out from the side. Continue this until there areprojections from all 12 sides as in Figure 11–40c. Theresulting figure is the level 2 Koch snowflake. Encouragethe students to carefully cut around their figure and glueit to a piece of construction paper.
A variation of this activity is to make copies of thetriangular grid blackline master on various colors of con-struction paper and have the students cut out one trian-gle with 9 units on a side, three triangles with 3 unitson a side, and 12 triangles with 1 unit on a side. Next,have the student glue the large triangle on a sheet ofconstruction paper, followed by gluing the 3-unit trian-gles to the center of each side of the large triangle, and
Figure 11 – 39 Four levels of the Koch snowflake fractal.
Figure 11 – 40 Using a triangular grid to color in a Koch snowflake.
44210_11_p331-371 2/5/04 6:49 AM Page 359

360 CHAPTER 11. TEACHING AND LEARNING GEOMETRY
TABLE 11 – 2 Perimeters of Koch Snowflakes
Level of Koch 0 1 2 3 4 5snowflake
Perimeter 27 36 ? ? ? ?
Figure 11 – 41 Using a ruler and compass to construct a Kochsnowflake.
completed by gluing the 1-unit triangles to the center ofeach side of the figure.
2. To extend the investigation of the Koch snowflake,suggest to the students that they see what they can dis-cover about the perimeters of the snowflakes as theymove from level to level. You may want to look ahead toChapter 12 for a discussion of measuring length,including perimeter. Use the snowflakes constructed inActivity 1 and determine the perimeters using the sideof the small triangle as the unit. A table like that shownin Table 11–2 might be a useful way to help organizethe information about perimeters.
How many levels would it take to have a perimeter ofat least 200 units? Make a conjecture and test the con-jecture. What do you notice about the size of the figureand its perimeter?
Next, consider the area of the Koch snowflake.You may want to look ahead to Chapter 12 for a discus-sion of measuring area. See what the students candiscover about the areas of the snowflakes as theymove from level to level. Use the snowflakes constructedin Activity 1 and determine the areas using the small tri-angle as the unit. A table like that shown in Table 11–3might help organize the information about areas.
How many levels would it take to have an area of atleast 150 triangular units? What do you notice aboutthe size of the figure and its area?
3. Another procedure for developing the Kochsnowflake is to use a combination of ruler and compass toconstruct the points of the snowflake (see the section onCopying and Constructing Shapes later in this chapter).Distribute to the students large sheets of paper on whichis found an equilateral triangle of sides 27 centimeterswith the middle third of each side missing as shown inFigure 11–41a. First, have the students construct twosides of an equilateral triangle projecting from the centerof each side of the large triangle as in Figure 11–41b.Then have them measure one third of each side of thenew figure and construct new triangles in the center of
each side, erasing the line in the center third of eachside. Continue this procedure for each side of the new fig-ure. The resulting figure is a level 3 Koch snowflake.
4. Students may explore the Koch snowflake using aLogo procedure. If you are unfamiliar with Logo, you
may wish to look ahead to the Logo section on Visualiza-tion, Spatial Reasoning, and Geometric Modeling later inthis chapter. Long and DeTemple (1996, pp. 1000–1001) provide procedures for drawing the snowflake:
TO FRACTAL :LEVEL :SIDEIF :LEVEL � 1[FD :SIDE STOP]FRACTAL :LEVEL–1 :SIDE/3LT 60FRACTAL :LEVEL–1 :SIDE/3RT 120FRACTAL :LEVEL–1 :SIDE/3LT 60FRACTAL :LEVEL–1 :SIDE/3END
TO FRAC :LEVEL :SIDEREPEAT 3 [FRACTAL :LEVEL :SIDE RT 120]END
Students are encouraged to discover the differentresults when the levels and the lengths of sides areentered as variables in running the procedure FRAC.Thus, how do FRAC 3 200 and FRAC 3 100 vary? Whatinteresting designs will result?
An alternative to constructing a Koch snowflakeusing Logo is using The Geometer’s Sketchpad. In
the Sketchpad environment, scripts are written to provideinstruction for The Geometer’s Sketchpad to performconstructions. Chanan, in The Geometer’s SketchpadLearning Guide (2000), provides a carefully writtendescription that helps the reader understand howthe Koch snowflake is constructed as well as a descriptionof how the script is developed. Students in grades 6–8could be challenged to use this application.
TABLE 11 – 3 Areas of Koch Snowflakes
Level of Koch 0 1 2 3 4 5snowflake
Area 81 108 ? ? ? ?
44210_11_p331-371 2/5/04 6:49 AM Page 360

DEVELOPING GEOMETRIC FLUENCY 361
This section has focused on how children learngeometric concepts and specific activities to reinforcethis learning. The process of learning is developmental;that is, children grow in their abilities to grasp geomet-ric concepts. Children should actively experience geom-etry. They should be guided in their explorations. Theyshould have time to investigate geometry and discusstheir discoveries. Above all, geometry should be anintegral part of the mathematics program. It should beextended far beyond the basal textbook and presentedthroughout the school year.
DEVELOPING GEOMETRIC FLUENCY
Geometric fluency refers to students’ abilities to explaingeometry concepts and to be able to extend those ideasas they develop skills related to geometry. It means thatgeometry makes sense to the student, that the studentcan analyze geometric problems and can make and testconjectures about aspects of geometry. The skills ofgeometry involve readily identifying and analyzingshapes and relationships, developing mathematical argu-ments about geometric relationships, copying and con-structing shapes, visualizing and spatial reasoning, andusing spatial relations and coordinate geometry. Teachthe skills in concert with teaching geometric concepts.Developing and practicing skills will, in most cases, fol-low conceptual development.
Identifying and Analyzing Shapes and RelationshipsThe collection of shapes easily identified by youngchildren varies with the experience and maturity ofthe children. The most productive activities for shapeidentification are those in which the child is activelymanipulating and discussing figures. A pre-kinder-gartner or first grader may call a triangle a rectanglebecause the names are similar. A second or thirdgrader who has used attribute blocks, pattern blocks,and geoboards and who has discussed the figures willseldom misname the triangle. A second or thirdgrader may, however, misname a rhombus or hexa-gon. Again, this difficulty can be alleviated throughcarefully designed experiences.
Primary students should be expected to developgeometric skills at a basic level. Thus, visual skillsshould include the ability to recognize different fig-ures from a physical model or a picture. Verbal skillsshould include the ability to associate a name witha given figure. Graphical skills should include theability to construct a given shape on a geoboardor to sketch the shape. Logical skills should include
the ability to recognize similarities and differ-ences among figures and to conserve the shape ofa figure in various positions. Applied skills shouldinclude the ability to identify geometric shapes inthe environment, in the classroom, and outside theclassroom.
At the primary level, children develop skills asa result of extending activities used to develop theconcepts. It is important that the teacher providetime, materials, and direction. Pay attention to devel-oping visual, verbal, graphical, logical, and appliedskills. Refer to the primary activities suggested earlierfor developing geometric concepts.
Throughout the study of geometry, students shouldbe encouraged to analyze and reflect on relationships.Using geometry effectively means that students canmake sense of what they are observing, touching, andconstructing. They can raise questions and can discusstheir observations with others. Thinking skills go handin hand with the physical skills of geometry.
Middle level students should be expected to developskills at a higher level. Thus, visual skills should includethe ability to recognize properties of figures, to identifya figure as a part of a larger figure, to recognize a two-dimensional pattern for a three-dimensional figure, torotate two- and three-dimensional figures, and to orientoneself relative to various figures. Verbal skills shouldinclude the ability to describe various properties of afigure. Graphical skills should include the ability to drawa figure from given information and to use given proper-ties of a figure to draw the figure. Logical skills shouldinclude the ability to classify figures into different typesand to use properties to distinguish figures. Applied skillsshould include the ability to recognize geometric proper-ties of physical objects and to draw or construct modelsrepresenting shapes in the environment. At this level,students should be able to make conjectures, deviseinformal ways to prove or disprove conjectures, anddiscuss their observations with other students.
Like children in the primary grades, students in theintermediate and middle grades should learn geometrythrough activities that use a variety of physical materi-als that may be complemented with dynamic geometrysoftware. Again, extending the activities intended forconceptual development will provide opportunities todevelop skills. As a teacher, you should facilitate activ-ities and discussion throughout the learning process.
Developing Mathematical Arguments aboutGeometric RelationshipsEarlier in this chapter we discussed how young childrendevelop geometric relationships and understandings. Asa result of their early experiences, coupled with their
44210_11_p331-371 2/5/04 11:28 AM Page 361
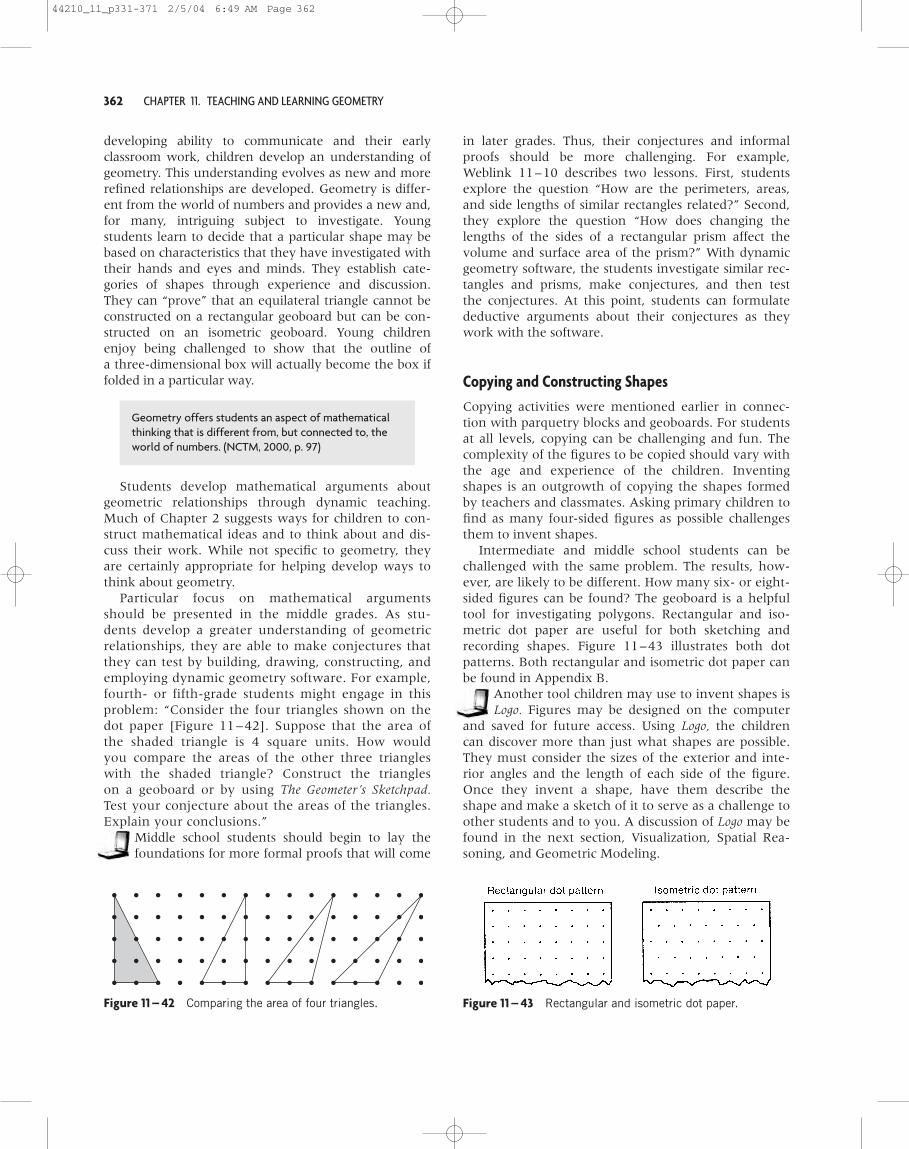
362 CHAPTER 11. TEACHING AND LEARNING GEOMETRY
Geometry offers students an aspect of mathematicalthinking that is different from, but connected to, theworld of numbers. (NCTM, 2000, p. 97)
Figure 11 – 42 Comparing the area of four triangles. Figure 11 – 43 Rectangular and isometric dot paper.
developing ability to communicate and their earlyclassroom work, children develop an understanding ofgeometry. This understanding evolves as new and morerefined relationships are developed. Geometry is differ-ent from the world of numbers and provides a new and,for many, intriguing subject to investigate. Youngstudents learn to decide that a particular shape may bebased on characteristics that they have investigated withtheir hands and eyes and minds. They establish cate-gories of shapes through experience and discussion.They can “prove” that an equilateral triangle cannot beconstructed on a rectangular geoboard but can be con-structed on an isometric geoboard. Young childrenenjoy being challenged to show that the outline ofa three-dimensional box will actually become the box iffolded in a particular way.
in later grades. Thus, their conjectures and informalproofs should be more challenging. For example,Weblink 11–10 describes two lessons. First, studentsexplore the question “How are the perimeters, areas,and side lengths of similar rectangles related?” Second,they explore the question “How does changing thelengths of the sides of a rectangular prism affect thevolume and surface area of the prism?” With dynamicgeometry software, the students investigate similar rec-tangles and prisms, make conjectures, and then testthe conjectures. At this point, students can formulatedeductive arguments about their conjectures as theywork with the software.
Copying and Constructing ShapesCopying activities were mentioned earlier in connec-tion with parquetry blocks and geoboards. For studentsat all levels, copying can be challenging and fun. Thecomplexity of the figures to be copied should vary withthe age and experience of the children. Inventingshapes is an outgrowth of copying the shapes formedby teachers and classmates. Asking primary children tofind as many four-sided figures as possible challengesthem to invent shapes.
Intermediate and middle school students can bechallenged with the same problem. The results, how-ever, are likely to be different. How many six- or eight-sided figures can be found? The geoboard is a helpfultool for investigating polygons. Rectangular and iso-metric dot paper are useful for both sketching andrecording shapes. Figure 11–43 illustrates both dotpatterns. Both rectangular and isometric dot paper canbe found in Appendix B.
Another tool children may use to invent shapes isLogo. Figures may be designed on the computer
and saved for future access. Using Logo, the childrencan discover more than just what shapes are possible.They must consider the sizes of the exterior and inte-rior angles and the length of each side of the figure.Once they invent a shape, have them describe theshape and make a sketch of it to serve as a challenge toother students and to you. A discussion of Logo may befound in the next section, Visualization, Spatial Rea-soning, and Geometric Modeling.
Students develop mathematical arguments aboutgeometric relationships through dynamic teaching.Much of Chapter 2 suggests ways for children to con-struct mathematical ideas and to think about and dis-cuss their work. While not specific to geometry, theyare certainly appropriate for helping develop ways tothink about geometry.
Particular focus on mathematical argumentsshould be presented in the middle grades. As stu-dents develop a greater understanding of geometricrelationships, they are able to make conjectures thatthey can test by building, drawing, constructing, andemploying dynamic geometry software. For example,fourth- or fifth-grade students might engage in thisproblem: “Consider the four triangles shown on thedot paper [Figure 11–42]. Suppose that the area ofthe shaded triangle is 4 square units. How wouldyou compare the areas of the other three triangleswith the shaded triangle? Construct the triangleson a geoboard or by using The Geometer’s Sketchpad.Test your conjecture about the areas of the triangles.Explain your conclusions.”
Middle school students should begin to lay thefoundations for more formal proofs that will come
44210_11_p331-371 2/5/04 6:49 AM Page 362

DEVELOPING GEOMETRIC FLUENCY 363
A skill appropriate at grade 3 through middleschool is that of constructing simple geometric shapesusing a compass and straightedge. At this level, thegoal is to introduce students to techniques of con-structing simple figures. The tools used in constructingfigures are inexpensive and readily available. A com-pass that we have found to be reliable and popularwith students is the Circle Master Compass, shown inFigure 11–44. Also pictured is a straightedge; a stan-dard school ruler works fine. It should be noted thatthe compass has a sharp point and care should betaken to assure the safety of students. There are othercompass designs such as a GeoTool or Triman compassthat avoid sharp points and should be considered ifthe situation warrants it.
The initial activities should involve copying a givenfigure. Thus, copying a line segment, an angle, and acircle with a given radius are appropriate. It is expectedthat the students will have been exposed to terms suchas line, line segment, point, angle, arc, ray, bisector, and per-pendicular. Most of these terms will appear in the mathbook, although words such as arc and bisector may needto be explained. An arc is any part of a circle. A bisec-tor is a line that divides an angle or line into two equalparts. Perpendicular means to be at a right anglewith a line.
A C T I V I T I E S
Grades 3 – 5 and Grades 6 – 8OBJECTIVE: to use a compass and straightedge to con-struct simple figures.
1. Copy a line segment, AB, onto a line, m (see Fig-ure 11–45a, b, and c).
a. Place the compass points on A and B.b. Mark the length of segment AB onto line m.c. Segment A�B� is the same length as segment AB.
2. Copy an angle, B, onto a given ray (see Figure11–46a, b, c, d, and e).
a. With B as the end point, make an arc crossing therays at points C and A.
b. Using the same radius and B� as the end point,make an arc crossing the given ray at point C�.
c. Make A�C� the same length as AC.d. Use the straightedge to draw ray B�A�.e. Angle A�B�C� is the same size as angle ABC.
3. Construct a circle with a given radius, r (see Fig-ure 11–47a, b, and c).
a. Spread the compass points to correspond to thelength of the radius, r.
b. Using the same radius, draw a circle.c. The completed circle has a radius equal to r.
Figure 11 – 44 Compass and ruler for geometricconstructions.
A′ B′
A B
m
m
a.
b.
c.
Figure 11 – 45 Copying a line segment.
44210_11_p331-371 2/5/04 6:49 AM Page 363

364 CHAPTER 11. TEACHING AND LEARNING GEOMETRY
a.
b.
c.
d.
e.
B C
A
B C
A
B′
A′
C′
B′ C′
B′
B′ C′
A′
C′
Figure 11 – 46 Copying an angle.
a.
c.
r
b.
Figure 11 – 47 Constructing a circle with a given radius.
The next three constructions require a somewhathigher level of skill. Instead of copying a given figure,they involve their own unique set of procedures. Thefirst involves constructing the perpendicular bisector ofa segment; the second, constructing a triangle fromthree given line segments; the third, constructing ahexagon inscribed in a circle.
A C T I V I T I E S
Grades 3 – 5 and Grades 6 – 8OBJECTIVE: to use a compass and straightedge to con-struct a perpendicular bisector and a triangle.
1. Construct the perpendicular bisector of a givenline segment, AB (see Figure 11–48a, b, c, andd).
a. Using point A as the center, draw an arc.b. Using the same radius and point B as the center,
draw another arc.c. Place the straightedge at the intersections of the
two arcs, points X and Y. Draw segment XY.d. Segment XY is perpendicular to segment AB and
bisects segment AB at point Z.
2. Construct a triangle with sides equal in length tothree given line segments, AB, BC, and CA (see Figure11–49a, b, c, d, and e).
a. Draw a line, m. On the line, copy segment AB.b. With point B as the center, draw an arc with a
radius the same length as segment BC.c. With point A as the center, draw an arc with a
radius the same length as segment CA.d. Use the straightedge to connect points A and B
with the intersection of the two arcs at C.e. Triangle ABC has sides equal in length to seg-
ments AB, BC, and CA.
44210_11_p331-371 2/5/04 6:49 AM Page 364

DEVELOPING GEOMETRIC FLUENCY 365
3. Construct a hexagon inscribed in a circle (see Fig-ure 11–50a, b, c, and d).
a. Construct a circle with a radius of your choice.b. Using the same radius, place the point of the
compass at any location on the circumference ofthe circle and draw another circle.
c. Place the point of the compass where the cir-cumference of the second circle intersects with
that of the original circle and draw a third circle.Continue around the circumference of the origi-nal circle using the points of intersection ascenters until a total of seven circles havebeen drawn.
d. Connect the points of the “star” to form a hexagoninscribed in the original circle. Note that theradius of the circle is also the length of each sideof the hexagon. Can you find a simpler way toconstruct the hexagon?
b.
c.
d.
a.
A B
A B
A B
X
X
X
Y
Z
Y
Y
A B
Figure 11 – 48 Constructing the perpendicular bisector of agiven segment.
b.
a.
c.
d.
e.
A B
C
A B
A B
B C
C A
m
C
C
A
A B
B
A B
Figure 11 – 49 Constructing a triangle with sides equal inlength to three given line segments.
44210_11_p331-371 2/5/04 6:49 AM Page 365
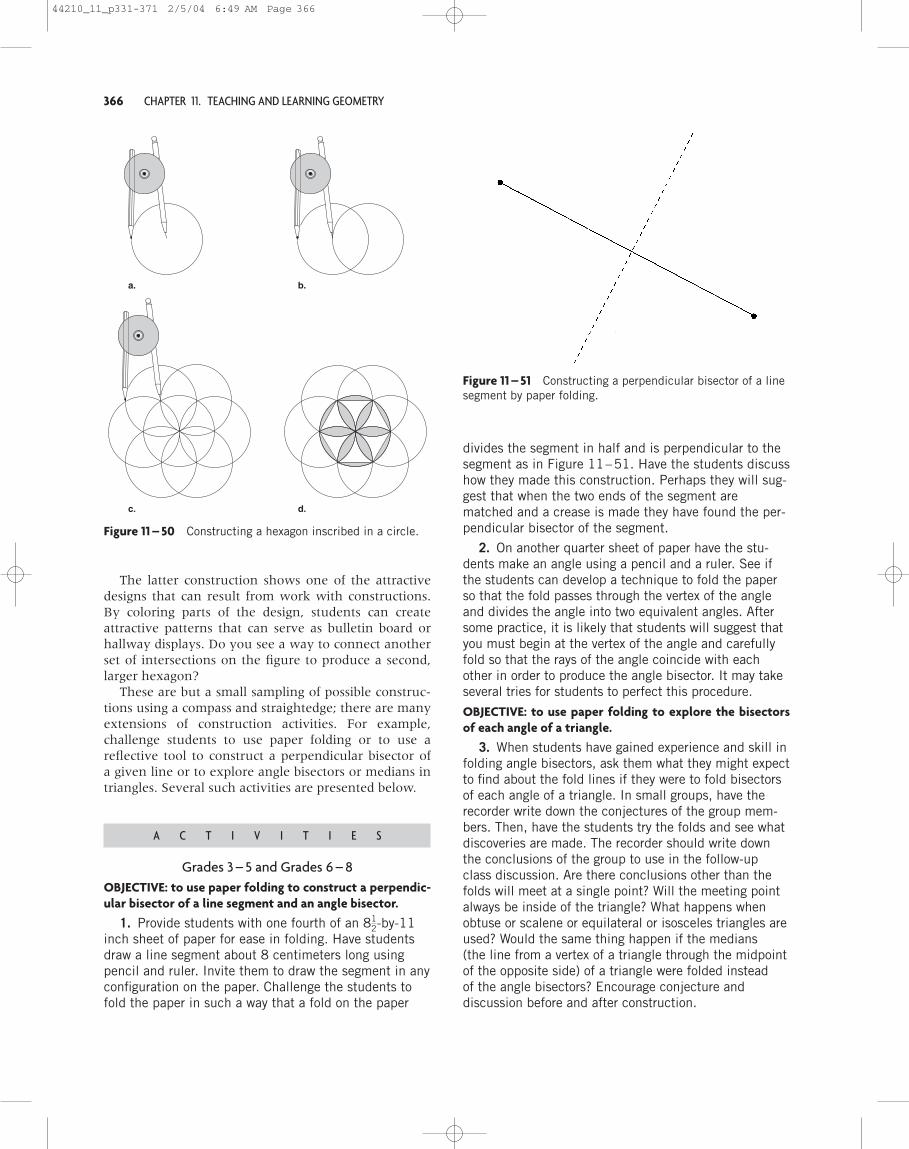
366 CHAPTER 11. TEACHING AND LEARNING GEOMETRY
b.a.
d.c.
Figure 11 – 50 Constructing a hexagon inscribed in a circle.
Figure 11 – 51 Constructing a perpendicular bisector of a linesegment by paper folding.
The latter construction shows one of the attractivedesigns that can result from work with constructions.By coloring parts of the design, students can createattractive patterns that can serve as bulletin board orhallway displays. Do you see a way to connect anotherset of intersections on the figure to produce a second,larger hexagon?
These are but a small sampling of possible construc-tions using a compass and straightedge; there are manyextensions of construction activities. For example,challenge students to use paper folding or to use areflective tool to construct a perpendicular bisector ofa given line or to explore angle bisectors or medians intriangles. Several such activities are presented below.
A C T I V I T I E S
Grades 3 – 5 and Grades 6 – 8OBJECTIVE: to use paper folding to construct a perpendic-ular bisector of a line segment and an angle bisector.
1. Provide students with one fourth of an by-11inch sheet of paper for ease in folding. Have studentsdraw a line segment about 8 centimeters long usingpencil and ruler. Invite them to draw the segment in anyconfiguration on the paper. Challenge the students tofold the paper in such a way that a fold on the paper
812-
divides the segment in half and is perpendicular to thesegment as in Figure 11–51. Have the students discusshow they made this construction. Perhaps they will sug-gest that when the two ends of the segment arematched and a crease is made they have found the per-pendicular bisector of the segment.
2. On another quarter sheet of paper have the stu-dents make an angle using a pencil and a ruler. See ifthe students can develop a technique to fold the paperso that the fold passes through the vertex of the angleand divides the angle into two equivalent angles. Aftersome practice, it is likely that students will suggest thatyou must begin at the vertex of the angle and carefullyfold so that the rays of the angle coincide with eachother in order to produce the angle bisector. It may takeseveral tries for students to perfect this procedure.
OBJECTIVE: to use paper folding to explore the bisectorsof each angle of a triangle.
3. When students have gained experience and skill infolding angle bisectors, ask them what they might expectto find about the fold lines if they were to fold bisectorsof each angle of a triangle. In small groups, have therecorder write down the conjectures of the group mem-bers. Then, have the students try the folds and see whatdiscoveries are made. The recorder should write downthe conclusions of the group to use in the follow-upclass discussion. Are there conclusions other than thefolds will meet at a single point? Will the meeting pointalways be inside of the triangle? What happens whenobtuse or scalene or equilateral or isosceles triangles areused? Would the same thing happen if the medians(the line from a vertex of a triangle through the midpointof the opposite side) of a triangle were folded insteadof the angle bisectors? Encourage conjecture anddiscussion before and after construction.
44210_11_p331-371 2/5/04 6:49 AM Page 366

DEVELOPING GEOMETRIC FLUENCY 367
OBJECTIVE: to use a reflective tool to construct a perpen-dicular bisector of a line segment and an angle bisector.
4. Have students draw a line segment about 10–12centimeters long in any configuration on a sheet ofpaper. Challenge the students to use the reflective tooland draw a line that divides the segment in half and isperpendicular to the segment. Have the students dis-cuss how they found where to draw their line. The stu-dents should soon discover that what they need to do isreflect the endpoints of the segment onto each otherand draw the line along the front edge of the reflectivetool. This is shown in Figure 11–52. Discuss whyreflecting the endpoints on one another in the reflectivetool will cause the segment to be bisected and producea perpendicular to the segment. Compare the process offolding the perpendicular bisector in Activity 1 in thissection with the procedure using the reflective tool.
5. On a sheet of paper have students make an angleusing a pencil and a ruler. See if the students candevelop a technique to draw a line through the vertex ofthe angle that divides the angle into two equivalentangles. Discuss the suggested techniques. After somepractice, it is likely that students will suggest that youmust align the front edge of the reflective tool on thevertex and then have one ray of the angle reflect uponthe other ray. At this time you can draw the line to pro-duce the angle bisector. Have students write instruc-tions for a student unfamiliar with reflective toolsdescribing how to use them to bisect an angle.
OBJECTIVE: to use a reflective tool to explore the bisec-tors of each angle of a triangle.
6. When students have gained experience andskill in using a reflective tool to construct angle
bisectors, ask them what they might expect to find aboutthe angle bisectors of each angle of a triangle. In smallgroups have the recorder write down the conjectures ofthe group members. Then, have the students constructthe bisectors and see what discoveries are made. Therecorder should write down the conclusions of the group
to use in the follow-up class discussion. Are there conclu-sions other than the angle bisectors will meet at a singlepoint? Will the meeting point always be inside of the tri-angle? What happens when obtuse or scalene or equilat-eral or isosceles triangles are used? Would the same thinghappen if the medians of a triangle were constructedinstead of the angle bisectors? Encourage conjecture anddiscussion before and after construction. How does thisactivity compare with Activity 3 in this section?
In this section several types of tools, particularly thecompass and straightedge, were used to explore geo-metric shapes through construction. The hands-onconstruction helps students extend their understand-ing of shapes and relationships among shapes. Manystudents excel using construction techniques and willcontinue to experiment with and invent a variety ofshapes and designs.
Visualization, Spatial Reasoning, and GeometricModelingSeveral of the activities that have been presented thusfar involve students manipulating objects and shapes(geometric modeling) and then conjecturing what theywill look like after some change has been made to them.For example, in the previous section we raised the ques-tion about what would happen to the angle bisectors ofan obtuse triangle. When conjectures are made, visualthinking takes place. The student is invited to use spatialvisualization and spatial reasoning, besides construction,to make sense of the problem. That is, the studentshould be using mental images along with drawings andmodels. A good example is presented in the Reasoning,Solving, and Posing Geometric Problems section later inthis chapter when students working with pentominoesare challenged to estimate which pentominoes can befolded into open-topped boxes before they actually foldthe shapes. Visualizing in the mind’s eye helps makethese conjectures.
Figure 11 – 52 Constructing a perpendicular bisector of a linesegment using a reflective tool.
Representing two- and three-dimensional shapes isan important part of visualization. Some of the repre-sentations are made with paper and pencil, some aremade using dynamic geometry software, and some aremade using software such as Logo. Students should be
Spatial visualization—building and manipulatingmental representations of two- and three-dimensionalobjects and perceiving an object from differentperspectives—is an important aspect of geometricthinking. (NCTM, 2000, PSSM, p. 41)
44210_11_p331-371 2/5/04 6:49 AM Page 367
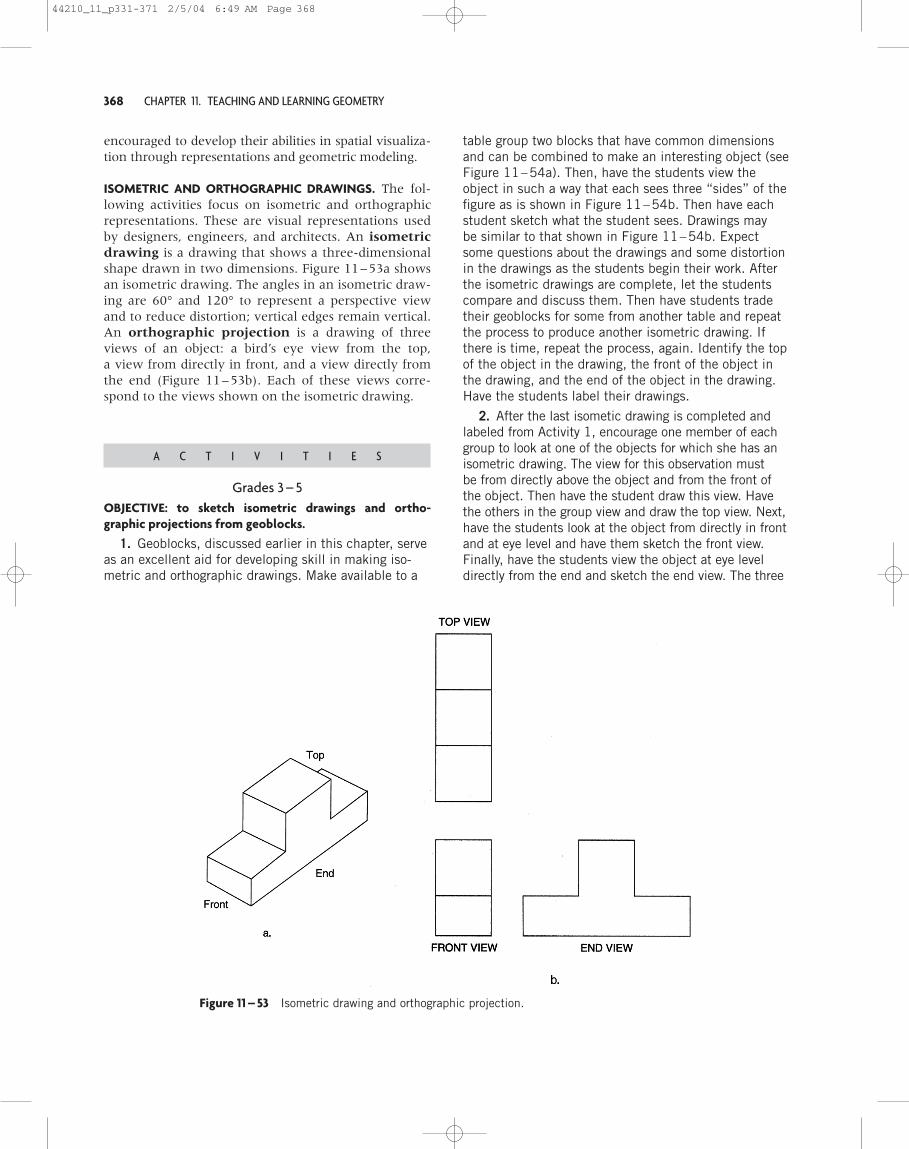
368 CHAPTER 11. TEACHING AND LEARNING GEOMETRY
Figure 11 – 53 Isometric drawing and orthographic projection.
encouraged to develop their abilities in spatial visualiza-tion through representations and geometric modeling.
ISOMETRIC AND ORTHOGRAPHIC DRAWINGS. The fol-lowing activities focus on isometric and orthographicrepresentations. These are visual representations usedby designers, engineers, and architects. An isometricdrawing is a drawing that shows a three-dimensionalshape drawn in two dimensions. Figure 11–53a showsan isometric drawing. The angles in an isometric draw-ing are 60° and 120° to represent a perspective viewand to reduce distortion; vertical edges remain vertical.An orthographic projection is a drawing of threeviews of an object: a bird’s eye view from the top,a view from directly in front, and a view directly fromthe end (Figure 11–53b). Each of these views corre-spond to the views shown on the isometric drawing.
A C T I V I T I E S
Grades 3 – 5OBJECTIVE: to sketch isometric drawings and ortho-graphic projections from geoblocks.
1. Geoblocks, discussed earlier in this chapter, serveas an excellent aid for developing skill in making iso-metric and orthographic drawings. Make available to a
table group two blocks that have common dimensionsand can be combined to make an interesting object (seeFigure 11–54a). Then, have the students view theobject in such a way that each sees three “sides” of thefigure as is shown in Figure 11–54b. Then have eachstudent sketch what the student sees. Drawings maybe similar to that shown in Figure 11–54b. Expectsome questions about the drawings and some distortionin the drawings as the students begin their work. Afterthe isometric drawings are complete, let the studentscompare and discuss them. Then have students tradetheir geoblocks for some from another table and repeatthe process to produce another isometric drawing. Ifthere is time, repeat the process, again. Identify the topof the object in the drawing, the front of the object inthe drawing, and the end of the object in the drawing.Have the students label their drawings.
2. After the last isometic drawing is completed andlabeled from Activity 1, encourage one member of eachgroup to look at one of the objects for which she has anisometric drawing. The view for this observation mustbe from directly above the object and from the front ofthe object. Then have the student draw this view. Havethe others in the group view and draw the top view. Next,have the students look at the object from directly in frontand at eye level and have them sketch the front view.Finally, have the students view the object at eye leveldirectly from the end and sketch the end view. The three
44210_11_p331-371 2/5/04 6:49 AM Page 368

DEVELOPING GEOMETRIC FLUENCY 369
views of the object represent the orthographic projection(Figure 11–54c). After students have had some experi-ence sketching isometric drawings and orthographic pro-jections, they will be able to identify figures drawn fromorthographic projections, will be able to sketch ortho-graphic projections from isometric drawings, and will beable to make accomplished isometric drawings.
Grades 6 – 8OBJECTIVE: to explore isometric drawings, orthographicprojections, and mat plans.
1. Weblink 11–11 engages students in a varietyof activities that focus on isometric drawings,
orthographic projections, and mat plans. A mat planconsists of the top views of a solid with the number ofcubes in each vertical column displayed on top of theappropriate column. This Illuminations lesson series isinteractive and challenging. Students may build shapes,color them, and rotate them. There are problems tosolve using spatial visualization and virtual manipula-tion of the cubes that form the drawings. There is aninteresting activity that investigates impossible figures,such as those by Escher.
LOGO. Logo, the computer language of turtle graph-ics, provides a rich environment for children to exploregeometric relationships. Children program a turtle tomove about the computer monitor. The environment isopen-ended, allowing children to discover and inventshapes, angles, complex curves, and the like. Logo is apowerful tool for enhancing geometry learning.
Following are a series of activities that begin bypreparing students to use Logo and continue by sug-gesting more challenging activities.
A C T I V I T I E S
Pre-Kindergarten – Grade 2OBJECTIVE: to explore geometric figures using Logoactivities.
1. The first Logo activities do not use the computer.They are intended to introduce students to sequentialorder of programming.
a. Find an activity that the children are familiar with.List the individual parts that make up the activity in aseries of steps. For example, to put the cat out, we might:
� Call the cat.� See if the cat comes.� If not, go find the cat.� When the cat comes, pick it up.� Carry the cat to the door.� Open the door.� Put the cat outside.� Shut the door.
Next, write each step on a separate card. Mix up thecards, and challenge the children to put them back inthe correct order. Once the children discover how to dothis activity, present a series of cards without first show-ing the appropriate sequence. Have the children orderthe steps of the procedure by figuring out the sequence.Procedures besides putting the cat out may includemaking a peanut butter sandwich, preparing for andtaking a bath, and getting ready for bed. Allow the chil-dren to make up sequences to challenge one another.
b. With masking tape or yarn, construct a large geo-metric figure on the floor. It may be a square, a triangle,or a rectangle, at first. Later, make a more complex fig-ure, such as those in Figure 11–55. Ask the children tobegin by going to any corner and facing an adjacent cor-ner. Have them describe what they are doing as theywalk around the boundary of the figure and end upwhere they started. Limit the descriptions to “step for-ward,” “step back,” “turn left,” and “turn right.” It maybe helpful to have direction cards that show what ismeant by the four commands. Figure 11–56 illustrateswhat such cards might look like. Later, have one child
Figure 11 – 54 Making an orthographic projection fromblocks.
Logo programming can help students construct elab-orate knowledge networks (rather than mechanicalchains of rules and terms) for geometric topics.(Clements and Battista, 2001, p. 143)
44210_11_p331-371 2/5/04 6:49 AM Page 369
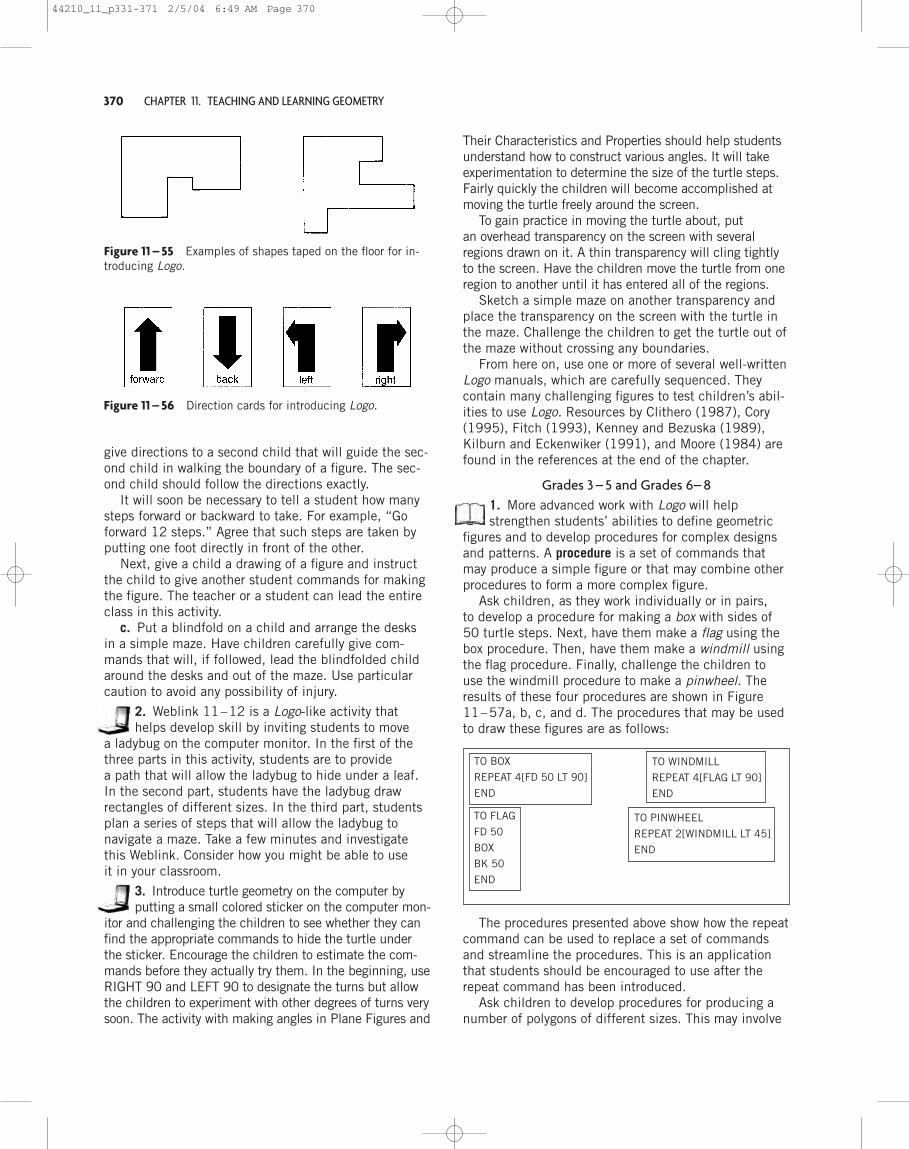
370 CHAPTER 11. TEACHING AND LEARNING GEOMETRY
Figure 11 – 55 Examples of shapes taped on the floor for in-troducing Logo.
Figure 11 – 56 Direction cards for introducing Logo.
TO BOX
REPEAT 4[FD 50 LT 90]
END
TO WINDMILL
REPEAT 4[FLAG LT 90]
END
TO FLAG
FD 50
BOX
BK 50
END
TO PINWHEEL
REPEAT 2[WINDMILL LT 45]
END
give directions to a second child that will guide the sec-ond child in walking the boundary of a figure. The sec-ond child should follow the directions exactly.
It will soon be necessary to tell a student how manysteps forward or backward to take. For example, “Goforward 12 steps.” Agree that such steps are taken byputting one foot directly in front of the other.
Next, give a child a drawing of a figure and instructthe child to give another student commands for makingthe figure. The teacher or a student can lead the entireclass in this activity.
c. Put a blindfold on a child and arrange the desksin a simple maze. Have children carefully give com-mands that will, if followed, lead the blindfolded childaround the desks and out of the maze. Use particularcaution to avoid any possibility of injury.
2. Weblink 11–12 is a Logo-like activity thathelps develop skill by inviting students to move
a ladybug on the computer monitor. In the first of thethree parts in this activity, students are to providea path that will allow the ladybug to hide under a leaf.In the second part, students have the ladybug drawrectangles of different sizes. In the third part, studentsplan a series of steps that will allow the ladybug tonavigate a maze. Take a few minutes and investigatethis Weblink. Consider how you might be able to useit in your classroom.
3. Introduce turtle geometry on the computer byputting a small colored sticker on the computer mon-
itor and challenging the children to see whether they canfind the appropriate commands to hide the turtle underthe sticker. Encourage the children to estimate the com-mands before they actually try them. In the beginning, useRIGHT 90 and LEFT 90 to designate the turns but allowthe children to experiment with other degrees of turns verysoon. The activity with making angles in Plane Figures and
Their Characteristics and Properties should help studentsunderstand how to construct various angles. It will takeexperimentation to determine the size of the turtle steps.Fairly quickly the children will become accomplished atmoving the turtle freely around the screen.
To gain practice in moving the turtle about, putan overhead transparency on the screen with severalregions drawn on it. A thin transparency will cling tightlyto the screen. Have the children move the turtle from oneregion to another until it has entered all of the regions.
Sketch a simple maze on another transparency andplace the transparency on the screen with the turtle inthe maze. Challenge the children to get the turtle out ofthe maze without crossing any boundaries.
From here on, use one or more of several well-writtenLogo manuals, which are carefully sequenced. Theycontain many challenging figures to test children’s abil-ities to use Logo. Resources by Clithero (1987), Cory(1995), Fitch (1993), Kenney and Bezuska (1989),Kilburn and Eckenwiker (1991), and Moore (1984) arefound in the references at the end of the chapter.
Grades 3 – 5 and Grades 6– 81. More advanced work with Logo will helpstrengthen students’ abilities to define geometric
figures and to develop procedures for complex designsand patterns. A procedure is a set of commands thatmay produce a simple figure or that may combine otherprocedures to form a more complex figure.
Ask children, as they work individually or in pairs,to develop a procedure for making a box with sides of50 turtle steps. Next, have them make a flag using thebox procedure. Then, have them make a windmill usingthe flag procedure. Finally, challenge the children touse the windmill procedure to make a pinwheel. Theresults of these four procedures are shown in Figure11–57a, b, c, and d. The procedures that may be usedto draw these figures are as follows:
The procedures presented above show how the repeatcommand can be used to replace a set of commandsand streamline the procedures. This is an applicationthat students should be encouraged to use after therepeat command has been introduced.
Ask children to develop procedures for producing anumber of polygons of different sizes. This may involve
44210_11_p331-371 2/5/04 6:49 AM Page 370

DEVELOPING GEOMETRIC FLUENCY 371
location relationships in their world. Some of thosementioned in Chapter 2 include over, under, above, andbelow. This is part of the process of learning about howto describe where an object can be found. As studentsmature, they become able to tell the direction, the dis-tance, and the position of an object in space. Teachersof young children should guide their students throughstories and discussions to describe locations of familiarobjects in their environment. For example, childrencan describe how to go from the library corner of theirclassroom to the dress-up corner. There are likely sev-eral ways to travel between the two locations. Oncechildren have described how far and in what directionto go, a simple model using geoblocks can be built or amap can be sketched on chart paper to act as a visualrepresentation of a preferred route.
Children in grades 3–5 can begin to navigate on asimple coordinate system in the form of a map. Usinga coordinate system such as that found on maps isa valuable application of geometry. The map can be animaginary neighborhood or the neighborhood surround-ing the school. One such map activity was presented inChapter 5 in the Solving and Posing Number Problemssection. Direction and distance are used to identify loca-tions and to describe routes on the map.
A C T I V I T I E S
Grades 3 – 5OBJECTIVE: to use a rectangular coordinate system.
The sample map shown in Figure 11–58 is the basisfor the following activities and questions. Copy it forindividual students. Five different yet related activitiesemploy the map. These are briefly described below.Expand each activity to match the needs and abilitiesof the students.
1. Where Is It? Have the students study the map andanswer the following questions:
• Laura’s Gas Station is at the corner of Second andWalnut. Where is Jack’s Market?
• Where is Fire House No. 46?• Where is Lincoln School? • Where is Center City Park? (Be careful!)
2. How Far Is It? Have the students use the mapto follow the instructions and answer the questionsbelow:
• From Tom’s Cafe to Fire House No. 32 is 5 blocksby the shortest route. See if you can draw theshortest route.
• How many different 5-block routes can you find?• How many blocks is the shortest route from Alice’s
Place to Lincoln School?
Figure 11 – 57 Steps in making a Logo pinwheel.
using variables within the procedures. Variables presentan added dimension to working with Logo. Challengethe students to use their skills to reproduce materialslike the pattern blocks, the attribute blocks, or a “pic-ture” drawn by students on squared paper. As studentsdevelop the ability to design figures, they learn valuableinformation about plane figures.
Besides using variables as they develop procedures,students will soon be able to use recursion, to employcoordinates to define locations, and to design complexfigures.
We believe that Logo provides valuable experiencesfor students that help develop thinking skills, thatstrengthen spatial visualization, that increase knowledgeof geometric relationships, and that motivate creativework.
Location, Coordinate Geometry, and SpatialRelationshipsCoordinate geometry provides a rich mechanism foridentifying locations and describing spatial relation-ships. Young children develop language that describes
44210_11_p331-371 2/5/04 6:49 AM Page 371

• Your bicycle had a flat tire on Sixth Street betweenOak and Peach Streets. Give the address of theclosest gas station.
• Suppose you are standing at Third and Walnut andsomeone from out of town asks how to get toJack’s Market. Tell them how to get there.
• You are a jogger and you want to jog around the out-side of Center City Park for 2.5 kilometers. Every 10blocks equals 1 kilometer. Tell where you begin andfinish your jog. Are there different ways to do this?
3. Location Codes. Have the students use the map toanswer the following questions:
• Suppose you are part of a group at Doug’s place.All of a sudden, one member of the group says, “Iknow a new way to tell where places are.” He goeson, “Laura’s Gas Station is (2,1),” and he writes itdown. “Sam’s Gas Station is (1,4).” Do you seethe code?
• Using the code, where is Jim’s house?• Using the code, where is the zoo entrance?• What is at (7,1)?• What is at (3,2)?
4. Following Directions. Have the students use themap to follow the directions below:
a. Place an A at the corner of Fifth and CherryStreets. The A will represent where you are.
b. Walk two blocks east, three blocks south, twoblocks west, and one block north. Place a B at thecorner where you have stopped.
c. Beginning at B, walk one block east, three blocksnorth, one block east, and place a C at the cornerwhere you have stopped.
d. Beginning at C, start out walking south and zigzagsouth and west, alternating one block at a timeand walking five blocks in all. Place a D at the cor-ner where you have stopped.
e. Beginning at D, walk three blocks west, threeblocks north, one block east, and place an Eat your final stopping point (Third and MapleStreets).
5. A Trip to the Zoo. Let students play the followinggame using the map: You and a friend decide to go tothe zoo. You both meet at Doug’s place and agree tomake the trip in an unusual way. You will need a pair of
372 CHAPTER 11. TEACHING AND LEARNING GEOMETRY
Figure 11 – 58 Map for introducing a rectangular coordinate system.
44210_11_p372-384 2/5/04 6:50 AM Page 372

dice to give directions. You may use dice like those inFigure 11–59 or regular dice.
The faces on the dice give you the directions east andnorth. East directs you to go one block east, and northdirects you to go one block north. (With regular dice,even numbers—2, 4, and 6—direct you to go east andodd numbers—1, 3, and 5—direct you to go north.)
You and your friend want to see who will get to thezoo first by rolling the dice and following the direc-tions. Begin now and see who arrives first at the zooentrance. If you go directly past City Hall, you get anextra throw.
OBJECTIVE: to reinforce the skill of plotting points on aCartesian coordinate graph.
6. After children have learned to use ordered pairs ofnumbers to locate points, they may practice by usingpoints to draw a picture. If you put a dot on each of thefollowing points on a Cartesian coordinate system andconnect the dots in order, you will make the pictureshown in Figure 11–60: (0,6), (3,4), (4,5), (5,4),(8,6), (7,1), (5,2), (4,1), (3,2), (1,1). Have the childrendraw their own pictures and then list the points for theother children to use.
Students in grades 4 and 5 who are familiar withnegative integers displayed on a number line will
be able to transfer that familiarity as they are introducedto the four quadrants of the Cartesian coordinate sys-tem. By the time they reach middle school, studentsshould be comfortable working with the coordinateplane. This will allow them to study variousrelationships, such as those associated with slope, trans-formations, and shapes. Their work in algebra willinvolve them in plotting graphs of equations on thecoordinate plane. By the time they begin high school,they should be proficient with the Cartesian coordinatesystem, able to use it solve problems and to supportmathematical arguments. A number of websites featuredynamic geometry software for the Cartesian coordinatesystem. One may be found at Weblink 11–13. At thisMaths Online site, the coordinate system applet allowsthe user to be able to mark points, draw lines, and readthe coordinates of the cursor position. The relationshipbetween geometry and algebra can be explored.
ESTIMATING AND MENTAL CALCULATING
Throughout the activities presented in this chapter, wehave suggested that you encourage children to esti-mate, asking, for example, “How many squares do youthink can be constructed on a geoboard? How manyturtle steps do you believe are necessary to hide theturtle under the shape? Which figures do you thinkhave line symmetry? Can you tessellate with a penta-gon?” All of these questions relate to estimating.
For those who actively pursue mathematical think-ing, estimating is a valuable skill. As related to geome-try, estimation involves the ability to reasonably guesshow many, to visualize how figures will look beforethey are constructed, and to estimate the sizes of one-,two-, and three-dimensional figures.
Constantly challenge children to take a momentand estimate before they complete a project, activity,or exercise. After a while, estimating becomes a partof geometric thinking. The entire mathematics cur-riculum, then, provides students with practice in esti-mating. Several activities that reinforce estimation andrelate to geometry follow.
A C T I V I T I E S
Pre-Kindergarten – Grade 2OBJECTIVE: to estimate the sizes and shapes of variousfigures.
1. On a sheet of paper, draw the outlines of five orsix triangles. Use actual cutouts of the shapes tomake the outlines. Then put the shapes on one tableor counter and the outlines on another. Ask one child
ESTIMATING AND MENTAL CALCULATING 373
Figure 11 – 59 Dice for A Trip to the Zoo activity.
Figure 11 – 60 Picture resulting from plotting points on aCartesian coordinate graph.
44210_11_p372-384 2/5/04 6:50 AM Page 373

to pick up one of the triangles and then move to theedge of the table containing the outlines. Ask anotherchild to look at the triangle being held by the firstchild and estimate which outline belongs to thatshape. Have the child holding the shape put the trian-gle in the outline to see if it fits. Then ask anotherchild to choose another of the triangular shapes. Con-tinue the activity until all of the shapes have been fit-ted to outlines. Discuss with the children how theychose a particular triangle.
Extend this activity by using different shapes. Usesquares, rectangles, hexagons, and irregular quadrilater-als. To make the estimating more challenging, use 12 or14 outlines and two or three different shapes at thesame time.
OBJECTIVE: to estimate and discover the number of non-congruent triangles that can be made on an isometricgeoboard.
2. Figure 11–61 shows an isometric geoboard. Beginby asking children to guess how many different trianglescan be made using the first two rows of this geoboard.We find that there are twelve different triangles. (Oneexample is shown on the geoboard in Figure 11–61.)Then have the students construct as many triangles asthey can.
Later, have the students guess how many different tri-angles can be made using three rows of the geoboard.See how many of those triangles the children can con-struct. It is helpful to provide isometric dot paper for thechildren to record their findings (see Appendix B). Theresults make a fine bulletin board display. This activitycan eventually be extended to incorporate the entiregeoboard.
OBJECTIVE: to imagine and describe various space figuresfrom their patterns.
3. Provide the children with patterns for variousspace figures. Include patterns for a cube, rectangularbox, cylinder, cone, and tetrahedron. Have thechildren describe the figure they believe will resultwhen the pattern is folded. Use dotted lines to indi-cate how the pattern will be folded. Encourage thechildren to sketch or find an example of the resultingspace figure. Then have some children cut out
and fold the figure. Compare the estimates with thefinal product.
A variation of this activity is to show the children sev-eral household containers such as a cereal box, a papertowel tube, and a cracker box. Have the children sketchthe pattern the container would make if it were cutapart and laid out flat. Cut the containers and comparethem with the sketches.
It is helpful for children to have the opportunity tomentally visualize shapes. This allows them to gainexperience in using the mind’s eye as an aid in work-ing with the visual aspects of geometry. We continuewith activities for older students.
A C T I V I T I E S
Grades 3 – 5 and Grades 6 – 8OBJECTIVE: to visualize and construct a figure of a givensize and shape.
1. Provide each student with one or more outlines offigures on oaktag or paper. These figures may be trian-gles, quadrilaterals, squares, rectangles, pentagons, orhexagons. Also provide construction paper.
Have each student observe the outline of a figure.Then, using the construction paper, cut out the shapethat will fill the outline. Encourage the students todevise ways to determine the appropriate size for thefigure they are cutting out. When the figures have beencut out, have the students place them in the outlinesand compare the results. Let the students thenexchange outlines and try again.
A variation of this activity is to put one outline onthe chalkboard and provide students with constructionpaper. Have all the students cut out the shape that fitsthe outline on the board. Again, let students see howwell their figures fit the outline.
OBJECTIVE: to determine the results of a set of Logocommands.
2. Make a list of several Logo commands that willproduce a geometric shape or design. Have the childrenread through the commands and attempt to draw whatthey believe the results will be. One set of design com-mands follows:
REPEAT 2 [FD 40 RT 90 FD 60 RT 90]BACK 60END
What do you think the results will be? (see Figure11–62). Have children act out the commands by walk-ing around the room or on the playground.
374 CHAPTER 11. TEACHING AND LEARNING GEOMETRY
Figure 11 – 61 Example of one triangle using the first tworows of an isometric geoboard.
44210_11_p372-384 2/5/04 6:50 AM Page 374

Invite individual children to suggest sets of commandsand let the other children guess what the results willbe. Try the commands on the computer. This particularactivity helps children visualize geometric figures bymentally or physically acting out a sequential procedure.
OBJECTIVE: to estimate and determine the number ofsquares that can be constructed on geoboards of varyingsizes.
3. Have the students estimate how many squaresthey will be able to construct on a 5 � 5 rectangulargeoboard without using any diagonal lines. After thestudents have guessed, encourage them to begin tosystematically estimate and determine how manysquares can be made on 2 � 2, 3 � 3, and 4 � 4rectangular geoboards without using diagonals. Thestudents should find one, five, and fourteen squares,respectively. See if they can use this information todiscover how many squares can be made on the 5 � 5geoboard.
There is a number pattern involving the squarenumbers (1, 4, 9, 16,. . .) that will show that thirtysquares can be made on the 5 � 5 geoboard withoutusing diagonals. How many squares would you expecton a 6 � 6 geoboard? How many on a 10 � 10geoboard?
Extend this activity by including squares that involvediagonals. Encourage the students to break the probleminto subproblems and then combine the results. Be sureto have the students estimate how many squares can beconstructed.
REASONING, SOLVING, AND POSING GEOMETRIC PROBLEMS
Just as estimating is an integral part of geometry, so issolving and creating problems. Once learned and prac-ticed, skills in problem solving continue to serve thelearner. Many of the activities discussed earlier were pre-sented in a problem format. Following are other usefulactivities that provide problem-solving experiences.
A C T I V I T I E S
Pre-Kindergarten-Grade 2 and Grades 3 – 5OBJECTIVE: to determine patterns for which clues havebeen given.
1. Make up pattern strips from railroad board, eachhaving approximately 10 squares, 10 by 10 centimetersin size. Place objects on four to six of the squares sothat a pattern is suggested. Ask the children to fill inor extend the pattern, depending on which squareshave been left blank. For example, in Figure 11–63athe pattern is trapezoid, triangle, triangle, trapezoid,and so on.
The pattern in Figure 11–63b is red triangle, redcircle, red square, red diamond, then blue triangle, bluecircle, and so on. In Figure 11–63c, the pattern is tworectangles in a horizontal position, two rectangles in avertical position, circle, two rectangles in a horizontalposition, and so on. Finally, let’s consider the patternin Figure 11–63d.
• Understanding the problem. What we need to doto solve this problem is to find shapes to put inthe empty regions that fit the pattern alreadystarted. The figures that we can see are triangleswith dots in them.
• Devising a plan. We will begin with the group ofthree triangles and look for likenesses and differ-ences. If we find what we think is a pattern, we
REASONING, SOLVING, AND POSING GEOMETRIC PROBLEMS 375
Figure 11 – 62 Result of a set of Logo commands.
Figure 11 – 63 Pattern strips.
44210_11_p372-384 2/5/04 11:29 AM Page 375

will move to the right along the row and see if thefigures fit the pattern we have in mind (look for apattern).
• Carrying out the plan. Because all of the triangleslook alike, we look closely at the dots in the trian-gles. The first triangle has a dot in the lower-rightcorner. In the next triangle, the dot is in the lower-left corner. In the next triangle, the dot is in thetop corner.
It seems as though the dot is moving from cor-ner to corner. If that is how the pattern works, thevery first square should have a triangle with a dotin the top corner. The next three empty squaresshould have triangles with dots in the lower-right,lower-left, and top corners. The last empty regionwill have a triangle with a dot in the lower-leftcorner.
We have found the pattern. It looks as if eitherthe dots are moving around to the right inside thetriangles or the triangles are rotating to the right.
• Looking back. When we put all of the triangles anddots in the empty regions, is the pattern of dotsthe same from the beginning to the end of therow? Yes, it is. The pattern must be correct.
There are many possibilities for patterns such asthese. Invite children to make patterns for their class-mates to complete. Children can be skillful problemposers.
OBJECTIVE: to develop spatial visualization using tangrampieces.
2. Tangram pieces were used in Chapter 9 inactivities related to fractions. Tangrams offer childrenthe chance to solve puzzles and to engage increative endeavors, as well. There are seven tan-gram pieces, as shown in Figure 11–64. All sevenmay be fitted together to make a square, as in Appen-dix B.
Initial activities should include providing frames inwhich the children fit two or more of the tangramshapes. For example, using an a piece and a d piece,make the shape shown in Figure 11–65a. The childrenshould be able to put the pieces together and achievesuccess. Later, use a greater number of pieces andmake the shapes more difficult to complete. Ask experi-enced children to make a shape using all but one epiece, as in Figure 11–65b.
Another enjoyable tangram activity is to constructpictures of animals, people, objects, and houses usingall or some of the tangram shapes. Children mayfill in frames, construct their own pictures, or developfigures for other children to complete. The wavingman in Figure 11–65c is an example of such acreation.
A variation of this activity can be found on Weblink11–14, where students can employ dynamic
geometry software to move tangram pieces into framesto make pictures and to make polygons.
376 CHAPTER 11. TEACHING AND LEARNING GEOMETRY
Figure 11–64 A set of Tangram pieces.
Figure 11 – 65 Tangram problems.
44210_11_p372-384 2/5/04 6:50 AM Page 376

OBJECTIVE: to use clues to solve mystery shape problemson the geoboard.
3. Provide the children with geoboards. Explain thatthey will be given clues to the mystery shapes. Theyshould find at least one shape that matches each set ofclues. Say, for example, “I am thinking of a shape thathas 4 nails on its boundary and 1 nail inside. Can youfind it?” Figure 11–66 shows three different shapesthat fit the clues; there are others. Once the childrenhave found one solution, encourage them to find others.
Here are additional clues that describe other shapes.“I am thinking of a shape that has. . .”
• 4 nails on its boundary and 0 nails inside• 5 nails on its boundary and 0 nails inside• 6 nails on its boundary and 0 nails inside• 10 nails on its boundary and 2 nails inside
Once children are able to find the mystery shapes,ask them to make up clues for shapes that other mem-bers of the class can find. Have them put the solutionson rectangular dot paper. Remind the children thatoften there is more than one shape that matches aset of clues.
Grades 3 – 5 and Grades 6 – 8OBJECTIVE: to create dodecagons of the same size using avariety of shapes.
1. Provide students with a set of pattern blocks andan example or two of dodecagons constructed using theblocks. Figure 11–67 shows two such figures. The chal-lenge is to see how many different dodecagons of thesame size students can make using the pattern blocks.
There are more than 60 different dodecagons of thesame size that can be constructed using the patternblocks.
Provide outlines of dodecagons on which thestudents can sketch the pattern blocks used. Letthe students color the sketches using the appropriatecolors. Then place the figures on a bulletin boardas a reference for others who are working on theproject.
OBJECTIVE: to develop visual perception.
2. Exploring pentominoes offers students the oppor-tunity to test their perceptual and creative abilitieswhile problem solving. A pentomino is a figure producedby combining five square shapes or cubes of the samesize. There is one rule: each square must share at leastone complete side with another square in the figure oreach cube must share a face with another cube in thefigure. Three of 12 possible pentominoes appear inFigure 11–68.
Pentominoes are two- or three-dimensional, and twopentominoes are considered the same if one is a flip ora rotation of the other. For instance, the pentominoes inFigure 11–69 are considered the same.
Initially, give students numerous square shapes toexplore. Squares of 3 centimeters on a side are ideal.
REASONING, SOLVING, AND POSING GEOMETRIC PROBLEMS 377
Figure 11 – 66 Three geoboard shapes from one set of clues.
Figure 11 – 67 Dodecagons constructed using pattern blocks.
Figure 11 – 68 Three of the twelve pentominoes.
Figure 11 – 69 Four examples of the same pentomino.
44210_11_p372-384 2/5/04 6:50 AM Page 377

Challenge students to find as many different pentomi-noes as they can. As they discover the figures, havethem shade or color the patterns on a sheet of squaredgraph paper.
Extend this activity by having students select thepentominoes that they believe can be folded to make abox with an open top. Allow time for students to cut outthe pentominoes and to attempt to fold them intoboxes. You may continue to extend work with pentomi-noes by presenting three-dimensional pentominoes withchallenging shapes to build. Discovery Toys (1993) hasdeveloped a three-dimensional pentomino puzzle set.
3. Another way to investigate pentominoes is to usethe small milk containers commonly found in schools.Cut off the top of each container so that the bottomand the four sides are same-sized squares. Then askthe students to see how many of the 12 pentominoesthey can make by cutting the cartons along the edgesand without cutting any one side completely off.Figure 11–70a shows an example in which a cut wasmade along each of the four vertical edges and thesides were folded down. Figure 11–70b shows a dif-ferent pentomino made by cutting along other edgesof the milk carton.
4. Once students are comfortable with pentominoes,have them tessellate with various pentominoes. Usingonly one of the pentomino shapes, is it possible to covera sheet of paper without leaving gaps? Figure 11–71illustrates the beginnings of two tessellations.
5. Use pentominoes to further explore symmetry.Have students try to place a mirror or a reflective tool onall or some of the pentominoes so that the reflection isthe same as the part of the figure behind the mirror. Inother words, do all pentominoes have line symmetry?Identify those that do and those that do not.
6. Have the students consider hexominoes, figuresconstructed using six square shapes. There are consid-erably more hexominoes than pentominoes. Each of thepreceding activities, except the one using the milk con-tainer, can easily be done with hexominoes.
OBJECTIVE: to analyze various cubes and determinecolor patterns.
7. Make available 27 small cubes with dimensionsof 2 or 3 centimeters. Have the students construct a large
2-by-2-by-2 cube using these smaller cubes (see Figure11–72a). Then have the students imagine that the largecube has been painted blue. Encourage the students tomake a table to record the number of faces of eachsmaller cube that are painted blue.
Then present the challenge. Have the students con-struct a large 3-by-3-by-3 cube using the smallercubes (see Figure 11–72b). Have them imagine thatthis cube is painted blue. Ask them to make a tableto record the number of smaller cubes with (a) nofaces painted blue, (b) exactly one face painted blue,(c) exactly two faces painted blue, and (d) exactlythree faces painted blue. Extend the problem by ask-ing the students to construct a 4-by-4-by-4 cube andanswer the same four questions regarding the facespainted blue. Here, the table will be especially useful.Then have the students try to construct a 5-by-5-by-5cube and answer the questions.
For a final, more difficult extension, see if anyonecan find the various numbers of blue faces on a 10-by-10-by-10 cube. This last problem may be a question ofthe week.
OBJECTIVE: to combine Logo procedures to generateother figures.
8. When students have had an opportunity to workwith Logo and can design certain simple shapes,
such as a square, a triangle, and a circle, encouragethem to solve problems using their skills. Have themconstruct a shape with each side a specified length ineach corner of the computer monitor. Have them makethe largest visible square or circle. Challenge the
378 CHAPTER 11. TEACHING AND LEARNING GEOMETRY
Figure 11 –70 Cutting a milk carton to make pentominoes.
Figure 11 –71 Tessellating with pentominoes.
b.
a.
Figure 11 –72 Examples of the painted cube problem.
44210_11_p372-384 2/5/04 6:50 AM Page 378

students to construct a large square with a circle insideit and a triangle inside the circle. See if they can con-struct three shapes side by side that just barely toucheach other.
Here is another opportunity for students to poseproblems to present to others in the class. When adesign or figure has been posed, ask the inventor tosketch the design on a piece of squared paper andpost it near the computer as a class challenge. Figure11–73 shows one such student-generated problem. Inaddition, Logo resources contain many problems forstudents.
Children’s awareness of geometry in the environmentis heightened considerably as you focus attention onvarious applications of geometry. This awareness alsostrengthens students’ appreciation for and understand-ing of geometry.
ORGANIZING FOR GEOMETRIC TLC
When students engage in learning geometry, a numberof teaching, learning, and curriculum decisions areappropriate. Geometry is a hands-on topic. Thus, a vari-ety of physical objects should be used during the instruc-tional time. Activity should be the basis for learninggeometry. The geometry curriculum lends itself well tobeing interspersed throughout the school year. It offersa change of pace in the mathematics program and is atopic of great interest to some students. How childrenare grouped for learning geometry should be considered.For example, when younger children are learning con-cepts such as near, far, on, in, and so on, you may wish tohave the children all together in a discussion corner or inanother area of the room. This allows several children toparticipate simultaneously, allows the students to carryon a discussion, and allows the teacher to observe thework of the children. Other examples of whole-classactivities include introductory work on the geoboard,introductory work with Logo, constructions of polyhedramodels, and projects such as building toothpick bridgesor a geodesic dome.
Cooperative learning groups are appropriate foractivities in which materials may be shared and forthose in which problems are presented. Examples oflearning group activities include geoboard problems,tessellations, pentominoes, mirror symmetry, soapfilms on wire frames, constructing shapes witha compass and straightedge, pattern block challenges,and projects. Roper (1989, 1990) has developedproblem-solving activities using Pattern Blocks thatare intended for use in cooperative learning groups.The focus is to construct shapes with the blocks usinginstructions that are provided for each member ofthe group.
Individual or pair learning may best take placewhen students are exploring the Logo environment ormaking line drawings or coloring patterns. Once chil-dren have learned how to make objects by paper fold-ing, folding is done individually.
By and large, the types of activities suggested in thischapter tend to be social activities; that is, they areeffectively accomplished when children are workingtogether and comparing and discussing their work.Even the skills of geometry are effectively learned aschildren work side by side informally.
COMMUNICATING LEARNING OF GEOMETRIC CONCEPTS
Description is an important part of communicating inlearning geometry. As children observe shapes, discovertheir properties, develop definitions involving essentialcharacteristics, and draw and construct shapes, theirability to communicate their thoughts is fundamental.For the students, part of the communication process isdrawing representations that illustrate their work. Writ-ten communication is used to describe their work andto put into words the shapes and forms with whichthey are working. Oral communication serves a similarpurpose. For example, “In your group today, you are todescribe the figure that has been provided. The reporterfor your group will present the description orally to therest of you and you will attempt to sketch the figurefrom the description. Tomorrow, we will do a similaractivity but your group’s recorder will write a descrip-tion that you will share with other groups to see if themembers of the other groups can sketch the figure thathas been described.”
Children enjoy writing and illustratingtheme books—for example, a book fea-
turing round objects with pictures and written descrip-tions of round things found at school and at home.Older students may keep journals of shapes withdescriptions of the shapes and where they are found.These journals can spark ideas for creative storiesabout various shapes. The shape descriptions in Norton
COMMUNICATING LEARNING OF GEOMETRIC CONCEPTS 379
Figure 11 –73 Student-posed Logo problem.
44210_11_p372-384 2/5/04 6:50 AM Page 379
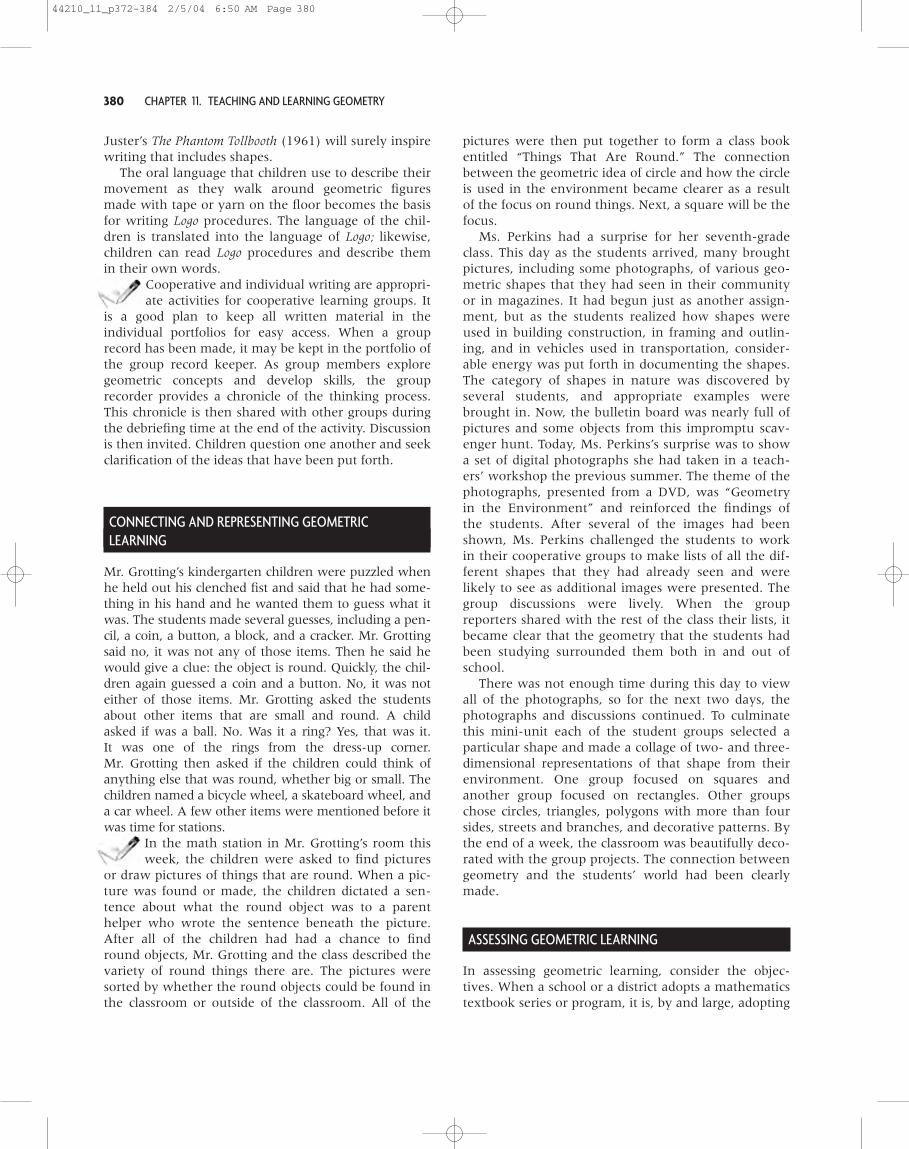
Juster’s The Phantom Tollbooth (1961) will surely inspirewriting that includes shapes.
The oral language that children use to describe theirmovement as they walk around geometric figuresmade with tape or yarn on the floor becomes the basisfor writing Logo procedures. The language of the chil-dren is translated into the language of Logo; likewise,children can read Logo procedures and describe themin their own words.
Cooperative and individual writing are appropri-ate activities for cooperative learning groups. It
is a good plan to keep all written material in theindividual portfolios for easy access. When a grouprecord has been made, it may be kept in the portfolio ofthe group record keeper. As group members exploregeometric concepts and develop skills, the grouprecorder provides a chronicle of the thinking process.This chronicle is then shared with other groups duringthe debriefing time at the end of the activity. Discussionis then invited. Children question one another and seekclarification of the ideas that have been put forth.
CONNECTING AND REPRESENTING GEOMETRIC LEARNING
Mr. Grotting’s kindergarten children were puzzled whenhe held out his clenched fist and said that he had some-thing in his hand and he wanted them to guess what itwas. The students made several guesses, including a pen-cil, a coin, a button, a block, and a cracker. Mr. Grottingsaid no, it was not any of those items. Then he said hewould give a clue: the object is round. Quickly, the chil-dren again guessed a coin and a button. No, it was noteither of those items. Mr. Grotting asked the studentsabout other items that are small and round. A childasked if was a ball. No. Was it a ring? Yes, that was it.It was one of the rings from the dress-up corner.Mr. Grotting then asked if the children could think ofanything else that was round, whether big or small. Thechildren named a bicycle wheel, a skateboard wheel, anda car wheel. A few other items were mentioned before itwas time for stations.
In the math station in Mr. Grotting’s room thisweek, the children were asked to find pictures
or draw pictures of things that are round. When a pic-ture was found or made, the children dictated a sen-tence about what the round object was to a parenthelper who wrote the sentence beneath the picture.After all of the children had had a chance to findround objects, Mr. Grotting and the class described thevariety of round things there are. The pictures weresorted by whether the round objects could be found inthe classroom or outside of the classroom. All of the
pictures were then put together to form a class bookentitled “Things That Are Round.” The connectionbetween the geometric idea of circle and how the circleis used in the environment became clearer as a resultof the focus on round things. Next, a square will be thefocus.
Ms. Perkins had a surprise for her seventh-gradeclass. This day as the students arrived, many broughtpictures, including some photographs, of various geo-metric shapes that they had seen in their communityor in magazines. It had begun just as another assign-ment, but as the students realized how shapes wereused in building construction, in framing and outlin-ing, and in vehicles used in transportation, consider-able energy was put forth in documenting the shapes.The category of shapes in nature was discovered byseveral students, and appropriate examples werebrought in. Now, the bulletin board was nearly full ofpictures and some objects from this impromptu scav-enger hunt. Today, Ms. Perkins’s surprise was to showa set of digital photographs she had taken in a teach-ers’ workshop the previous summer. The theme of thephotographs, presented from a DVD, was “Geometryin the Environment” and reinforced the findings ofthe students. After several of the images had beenshown, Ms. Perkins challenged the students to workin their cooperative groups to make lists of all the dif-ferent shapes that they had already seen and werelikely to see as additional images were presented. Thegroup discussions were lively. When the groupreporters shared with the rest of the class their lists, itbecame clear that the geometry that the students hadbeen studying surrounded them both in and out ofschool.
There was not enough time during this day to viewall of the photographs, so for the next two days, thephotographs and discussions continued. To culminatethis mini-unit each of the student groups selected aparticular shape and made a collage of two- and three-dimensional representations of that shape from theirenvironment. One group focused on squares andanother group focused on rectangles. Other groupschose circles, triangles, polygons with more than foursides, streets and branches, and decorative patterns. Bythe end of a week, the classroom was beautifully deco-rated with the group projects. The connection betweengeometry and the students’ world had been clearlymade.
ASSESSING GEOMETRIC LEARNING
In assessing geometric learning, consider the objec-tives. When a school or a district adopts a mathematicstextbook series or program, it is, by and large, adopting
380 CHAPTER 11. TEACHING AND LEARNING GEOMETRY
44210_11_p372-384 2/5/04 6:50 AM Page 380

a collection of objectives. The objectives are foundthroughout the teacher’s guides for each level in theseries. The geometry presented in a math program isreviewed and assessed at the end of a chapter or sec-tion. Chapter tests help in assessing geometric learningbut do not tell the whole story.
Activities provide opportunities for observing theactual performance of the children and making addi-tional assessment. Observations are most helpful whenteachers make anecdotal records at the time of orshortly after the observation. With the large number ofuseful geometry activities, there is ample opportunityfor teachers to observe and note children’s perfor-mance as the children actively engage in learninggeometry.
Further, we recommend that you expand on thematerial presented in the math textbook. Thus, stu-dents have a greater opportunity to advance from thefirst of the van Hiele levels (recognizing shapes) to thesecond level (establishing relationships between figuresand their properties).
Teacher-made assessments may provide some infor-mation regarding content not found in the math text-book. An assessment may require paper and pencil, orit may be a task requested by the teacher. Figure11–74 shows three sample paper-and-pencil testitems.
The same material can be assessed by asking stu-dents to construct a particular figure on theirgeoboards and then to hold the boards up for theteacher to see. Likewise, students can be given pen-tominoes and asked to use a mirror or a reflectivetool to find those figures with exactly one line ofsymmetry. Another task may be to produce a particu-lar design or figure on the computer using Logo. Atvarious times, work completed by the students shouldbe placed in the students’ portfolios to use for assess-ment purposes. Items that might not fit such as apolyhedron model or a geodesic dome could be pho-tographed and the photograph placed in the portfolioor in a computer file.
Problem-based assessment is initiated with a richlearning task. Students work through the problem andrecord their work. The written record is used for theassessment. Assessment is an ongoing task for theteacher. The more information you gather, the betterable you will be to fit instruction to the learning stylesof your students. Continually monitoring students asthey work is among the most important tasks of theteacher.
SOMETHING FOR EVERYONE
Many of the activities in Chapters 11 and 12 requirechildren to work in visual or in spatial learning modes.Of course, children use other learning modes as theylearn the concepts and skills of geometry and measure-ment. To avoid repetition, the discussion of the learn-ing modes associated with geometry and measurementis presented at the end of Chapter 12.
FOR YOU AS A TEACHER: IDEAS FOR DISCUSSION ANDYOUR PROFESSIONAL PORTFOLIO
This section is intended to provide you the opportunityto read, write, and reflect on key elements of thischapter. We list several discussion ideas. We hope thatone or more of these ideas will prove interesting toyou and that you will choose to investigate and writeabout the ideas. The results of your work should beconsidered as part of your professional portfolio. Youmight consider these two questions as guides for your
FOR YOU AS A TEACHER: IDEAS FOR DISCUSSION AND YOUR PROFESSIONAL PORTFOLIO 381
Figure 11 –74 Teacher-made assessment activities.
44210_11_p372-384 2/5/04 6:50 AM Page 381

writing: “What does the material in this chapter meanfor you as a teacher?” or “How can what you are read-ing be translated into a teaching practice for you as ateacher?”
D I S C U S S I O N I D E A S
1. Investigate the geometry of your environment.Select some shops, buildings, or a neighborhood andchronicle all the examples of shape that you can. Dis-cuss your findings and illustrate them with drawingsor photographs.
2. Explain how you might teach students who arevisually impaired about polygons and space figures.Design and construct several learning aids that wouldbe appropriate.
3. Use dynamic geometry software on either agraphing calculator or on a computer to practice trans-lation, reflection, and rotation transformations. Discussthe value of virtual transformations as part of thegeometry curriculum.
4. Construct a geodesic dome with a diameter of18 inches. Use tagboard for the triangles and whiteschool glue to attach the triangles to each other.Decorate the triangles either before or after you attachthem. Discuss the value of constructing a geodesicdome in your classroom.
5. Seek out a website on fractal geometry such asthat found at Weblink 11–9 and investigate the
site. From that site, link to other sites that feature frac-tal geometry. Explain to others what you were able todiscover from your investigation.
6. Using the discussion about and examples ofopen-ended problems presented in Chapter 4, designthree open-ended problems that focus on geometry,one each for pre-kindergarten–grade 2, grades 3–5,and grades 6–8.
A D D I T I O N A L R E S O U R C E S
REFERENCESArcidiacono, Michael J., David Fielker, and Eugene Maier,
Seeing Symmetry. Salem, OR: Math Learning Center, 1996.Bartels, Bobbye Hoffman, “Truss(t)ing Triangles,” Mathematics
Teaching in the Middle School, 3, no. 6 (March–April 1998),394–396.
Battista, M. T., and D. H. Clements, Exploring Solids and Boxes:3-D Geometry. Palo Alto, CA: Dale Seymour, 1995.
Beaumont, V., R. Curtis, and J. Smart, How to Teach Perimeter,Area, and Volume. Reston, VA: National Council of Teachersof Mathematics, 1986.
Bennett, Albert, and Linda Foreman, Visual MathematicsCourse Guide, Vol. I. Salem, OR: Math Learning Center,1995.
———,Visual Mathematics Course Guide, Vol. II. Salem, OR:Math Learning Center, 1996.
Bennett, Albert, Eugene Maier, and L. Ted Nelson, Math andthe Mind’s Eye: V. Looking at Geometry. Salem, OR: MathLearning Center, 1987.
Britton, Jill, and Walter Britton, Teaching Tessellating Art. PaloAlto, CA: Dale Seymour, 1992.
Browning, Christine A., and Dwayne E. Channel, Explo-rations: Graphing Calculator Activities for Enriching MiddleSchool Mathematics. Austin, TX: Texas Instruments, 1997.
Brummett, M. R., and L. H. Charles, Geoblocks Jobcards. Sun-nyvale, CA: Creative Publications, 1989.
Burger, William F., “Geometry,” Arithmetic Teacher, 32, no. 6(February 1985), 52–56.
Burger, William F., and J. Michael Shaughnessy, “Character-izing the van Hiele Levels of Development in Geometry,”Journal for Research in Mathematics Education, 17, no. 1(January 1986), 31–48.
Chanan, Steven, The Geometer’s Sketchpad Learning Guide.Emeryville: CA: Key Curriculum Press, 2000.
Clements, D. H., S. J. Russell, C. Tierney, M. T. Battista, andJ. S. Meredith, Flips, Turns, and Area: 2-D Geometry. PaloAlto, CA: Dale Seymour, 1995.
Clements, Douglas H., and Michael T. Battista, Logo andGeometry. Reston, VA: National Council of Teachers ofMathematics, 2001.
Clithero, Dale, “Learning with Logo ‘Instantly’,” ArithmeticTeacher, 34, no. 5 (January 1987), 12–15.
Copeland, Richard W., How Children Learn Mathematics. Engle-wood Cliffs, NJ: Merrill/Prentice Hall, 1984.
Cory, Sheila. LOGO Works: Lessons in LOGO. Portland, ME: Ter-rapin Software, Inc., 1995.
Cowan, Richard A., “Pentominoes for Fun Learning,” TheArithmetic Teacher, 24, no. 3 (March 1977), 188–190.
Cruikshank, Douglas E., and John McGovern, “MathProjects Build Skills,” Instructor, 87, no. 3 (October 1977),194–198.
Dienes, Z. P., and E. W Golding, Geometry through Transforma-tions: 1. Geometry of Distortion. New York: Herder & Herder,1967.
Discovery Toys, Pentominoes. Martinez, CA: Discovery Toys,Inc., 1993.
Findell, Marian Small, Mary Cavanagh, Linda Dacey, CaroleE. Greenes, and Linda Jensen Sheffield. Navigating throughGeometry in Prekindergarten–Grade 2. Reston, VA: NationalCouncil of Teachers of Mathematics, 2001.
Fitch, Dorothy M., 101 Ideas for Logo: 101 Projects for all Levelsof Logo Fun. Portland, ME: Terrapin Software, 1993.
Foreman, Linda, and Albert Bennett, Jr., Visual MathematicsCourse I. Salem, OR: Math Learning Center, 1995.
———, Visual Mathematics Course II. Salem, OR: Math Learn-ing Center, 1996.
Foster, T. E., Tangram Patterns. Sunnyvale, CA: Creative Publi-cations, Inc., 1977.
Fuys, David, “Van Hiele Levels of Thinking in Geometry,” Edu-cation and Urban Society, 17, no. 4 (August 1985), 447–462.
Fuys, David, Dorothy Geddes, and Rosamond Tischler, Thevan Hiele Model of Thinking in Geometry among Adolescents?
382 CHAPTER 11. TEACHING AND LEARNING GEOMETRY
44210_11_p372-384 2/5/04 6:50 AM Page 382

(Journal for Research in Mathematics Education, MonographNumber 3). Reston, VA: National Council of Teachers ofMathematics, 1988.
Gavin, M. Katherine, Louise P. Belkin, Ann Marie Spinelli,and Judy St. Marie, Navigating through Geometry in Grades3–5. Reston, VA: National Council of Teachers of Mathe-matics, 2001.
Giesecke, E. H., Reflective Geometry Activities with the GeoReflectorMirror: Grades 5–8. Vernon Hills, IL: Learning Resources,Inc., 1996.
Giganti, Paul, Jr., and Mary Jo Cittadino, “The Art of Tessel-lation,” Arithmetic Teacher, 37, no. 7 (March 1990), 6–16.
Gillespie, Norm, Gateway to Geometry: A School Program forTeachers Using the Mira. Oakville, Ontario: Mira Math Co.,Inc., 1994.
Gleick, James, Chaos: Making a New Science. New York: VikingPenguin, 1987.
Juraschek, William, “Getting in Touch with Shape,” Arith-metic Teacher, 37, no. 8 (April 1990), 14–16.
Kenney, Margaret J., and Stanley J. Bezuska, TessellationsUsing Logo. Palo Alto, CA: Dale Seymour, 1987.
Kilburn, Dan, and Mark Eckenwiker, Terrapin Logo for theMacintosh. Portland, ME: Terrapin Software, 1991.
Long, Calvin T., and Duane W. DeTemple, Mathematical Reason-ing for Elementary Teachers. Boston: Addison-Wesley, 1996.
Mandebrot, Benoit B., The Fractal Geometry of Nature. NewYork: Freeman, 1983.
Mansfield, Helen, “Projective Geometry in the ElementarySchool,” Arithmetic Teacher, 32, no. 7 (March 1985),15–19.
McKim, Robert H., Thinking Visually. Belmont, CA: LifetimeLearning Publications, 1980.
Moore, Margaret L., LOGO Discoveries. Palo Alto, CA: CreativePublications, 1984.
———, Geometry Problems for LOGO Discoveries. Worth, IL:Creative Publications, 1984.
Morris, Janet P., “Investigating Symmetry in the PrimaryGrades,” The Arithmetic Teacher, 24, no. 3 (March 1977),188–190.
National Council of Teachers of Mathematics, Principles andStandards for School Mathematics. Reston, VA: NCTM, 2000.
Onslow, Barry, “Pentominoes Revisited,” Arithmetic Teacher,37, no. 9 (May 1990), 5–9.
Piaget, Jean, “How Children Form Mathematical Concepts,”Scientific American, 189, no. 5 (November 1953), 74–78.
Piaget, Jean, and Barbel Inhelder, The Child’s Conception ofSpace. New York: Norton, 1967.
Pugalee, David K., Jeffrey Frykholm, Art Johnson, HannahSlovin, Carol Malloy, and Ron Preston, Navigating throughGeometry in Grades 6–8. Reston, VA: National Council ofTeachers of Mathematics, 2002.
Rectanus, C., Math by All Means: Geometry Grade 3. Sausalito,CA: Math Solutions Publications, 1994.
Roper, Ann, Cooperative Problem Solving with Pattern Blocks.Sunnyvale, CA: Creative Publications, 1989.
———, Cooperative Problem Solving with Pattern Blocks (Pri-mary). Sunnyvale, CA: Creative Publications, 1990.
Seymour, Dale, and Jill Britton, Introduction to Tessellations.Palo Alto, CA: Dale Seymour, 1989.
Stevens, Peter S., Patterns in Nature. Boston: Little, Brown,1974.
Suydam, Marilyn N., “Forming Geometric Concepts,” Arith-metic Teacher, 33, no. 2 (October 1985), 26.
Teppo, Anne, “van Hiele Levels of Geometric Thought Revis-ited,” Mathematics Teacher, 84, no. 3 (March 1991), 210–221.
van Hiele, Pierre M., Structure and Insight: A Theory of Mathe-matics Education. Orlando, FL: Academic Press, 1986.
Wenninger, Magnus J., Polyhedron Models for the Classroom.Reston, VA: National Council of Teachers of Mathematics,1975.
Wilgus, Wendy, and Lisa Pizzuto, Exploring the Basics of Geome-try with Cabri. Austin, TX: Texas Instruments, 1997.
Wirszup, Izaak, “Breakthrough in the Psychology of Learningand Teaching Geometry,” in Space and Geometry: Papersfrom a Research Workshop, ed. J. Larry Martin. Columbus,OH: ERIC Center for Science, Mathematics EnvironmentalEducation, 1976.
Woodward, Ernest, and Marilyn Woodward. Image ReflectorGeometry. White Plains, NY: Cuisenaire, 1996.
Zilliox, Joseph T., and Shannon G. Lowrey, “Many FacesHave I,” Mathematics Teaching in the Middle School, 3, no. 3(November–December 1997), 180–183.
CHILDREN’S LITERATUREEsbensen, Barbara Juster, Echoes for the Eye: Poems to Celebrate
Patterns in Nature. Illustrated by Helen K. Davie. Scranton,PA: HarperCollins, 1996.
Grifalconi, Ann, The Village of Round and Square Houses.Boston: Little, Brown, 1986.
Hoban, Tana, Shapes, Shapes, Shapes. New York: Greenwillow,1986.
Juster, Norton, The Phantom Tollbooth. New York: RandomHouse, 1961.
Morris, Ann, Bread, Bread, Bread. New York: Lothrop, Lee &Shepard Books, 1989.
Reid, Margarette S., The Button Box. New York: Dutton, 1990.
TECHNOLOGYBattista, Michael T., Shape Makers: Developing Geometric Reason-
ing with the Geometer’s Sketchpad. Triangle and QuadrilateralActivities for Grades 5–8. Berkeley, CA: Key CurriculumPress, 1998. (software and book)
Burns, Marilyn, Mathematics with Manipulatives: Geoboards.White Plains, NY: Cuisenaire Company of America, Inc.,1988. (video and guide)
Davidson, Kid Cad. Torrance, CA: Davidson, 1997. (software)Dewey, David. Home page. 4 Sept. 2002 �http://www.
olympus.net/personal/dewey/mandelbrot.html�Edmark, Mighty Math Calculating Crew. Novato, CA: Riverdeep
Interactive Learning, 1996. (software)———, Mighty Math Carnival Countdown. Novato, CA:
Riverdeep Interactive Learning, 1996. (software)———, Mighty Math Cosmic Geometry Grades 6–8. Novato, CA:
Riverdeep Interactive Learning, 1996. (software)———, Mighty Math Number Heroes. Novato, CA: Riverdeep
Interactive Learning, 1996. (software)———, Mighty Math Zoo Zillions. Novato, CA: Riverdeep
Interactive Learning, 1996. (software)Lanius, Cynthia. Home page. 2002 �http://math.rice.edu/
~ lanius/frac/index.html�
ADDITIONAL RESOURCES 383
44210_11_p372-384 2/5/04 6:50 AM Page 383

Learning Company. TesselMania! Deluxe. Cambridge, MA:Learning Co., 1999. (software)
Musgrave, Ken. Home page. 6 Dec. 2002 �http://www.ken-musgrave.com/�
Sunburst, Building Perspective Deluxe. Pleasantville, NY: Sun-burst Technology, 2000. (software)
———, The Factory Deluxe. Pleasantville, NY: Sunburst Tech-nology, 1998. (software)
WEBLINKSWeblink 11–1: NCTM Electronic Example: Investigating the
Concept of Triangle and Properties of Polygons.http://www.standards.nctm.org/document/eexamples/chap4/4.2/index.htm
Weblink 11–2: NCTM Illuminations activity: Shapes InsideOut. http://Illuminations.nctm.org/swr/review.asp?SWR �1808
Weblink 11–3: NCTM Electronic Example: Exploring Proper-ties of Rectangles and Parallelograms Using DynamicSoftware http://www.standards.nctm.org/document/eexamples/chap5/5.3/index.htm
Weblink 11–4: The Geometer’s Sketchpad classroomresources from The Math Forum. http://mathforum.org/sketchpad/sketchpad.html
Weblink 11–5: NCTM Electronic Example: UnderstandingCongruence, Similarity, and Symmetry Using Transforma-tions and Interactive Figures. http://www.standards.nctm.org/document/eexamples/chap6/6.4/index.htm
Weblink 11–6: Virtual manipulative site featuring Platonic sol-ids. http://matti.usu.edu/nlvm/nav/category_g_1_t_3.html
Weblink 11–7: An easy to understand introduction to theMandelbrot Set by David Dewey. http://www.olympus.net/personal/dewey/mandelbrot.html
Weblink 11–8: A fractal artist, Musgrave exhibits very impres-sive fractal landscapes. http://www.kenmusgrave.com
Weblink 11–9: Exceptional site for developing children’sunderstanding of fractals. http://math.rice.edu/~lanius/frac/index.html
Weblink 11–10: NCTM Electronic Example investigatingsimilar rectangles and prisms. http://www.standards.nctm.org/document/eexamples/chap6/6.3/index.htm
Weblink 11–11: NCTM Illuminations site: Spatial Reason-ing Using Cubes and Isometric Drawings. http://illuminations.nctm.org/imath/6-8/isometric/index.html
Weblink 11–12: NCTM Electronic Example: Exploring num-ber, measurement, and geometry in a Logo-like computerenvironment. http://www.standards.nctm.org/document/eexamples/chap4/4.3/index.htm
Weblink 11–13: Maths Online website: Drawing plane andcoordinate system. http://www.univie.ac.at/future.media/moe/galerie/zeich/zeich.html
Weblink 11–14: NCTM Electronic Example: DevelopingGeometry Understandings and Spatial Skills throughPuzzlelike Problems with Tangrams. http://www.standards.nctm.org/document/eexamples/chap4/4.4/index. htm
Additional Weblinks
Weblink 11–15: Collection of Illumination Web Resourcesfor Geometry for all grade bands. http://Illuminations.nctm.org/swr/list.asp?Ref=2&Std=2
Weblink 11–16: National Library of Virtual Manipulative forInteractive Mathematics. http://matti.usu.edu/nlvm/nav/vlibrary.html
384 CHAPTER 11. TEACHING AND LEARNING GEOMETRY
44210_11_p372-384 2/11/04 2:43 PM Page 384