teaching guide
DESCRIPTION
an approach to incorporating the built heritageTRANSCRIPT

A
guide to
teaching and
exploring the architectural heritage of your
locality...
Vernacular Architecture
Formal Buildings Fortified Architecture
Georgian Architecture
Religious Buildings

Senior Cycle
Construction Studies
A guide to teaching the built heritage in your locality
Noel Frawley
Completed as a Final Year Project
B.Tech (ED) in Materials & Architectural Technology

Exploring the built heritage of your locality Page 2
Table of Contents:
Section One - Guide Overview 4
1 Introduction 5
2 Aims 5
3 Structure of guide 6
4 Key Skills obtained 6
5 Unit 1 – Introductory lesson 6
6 Unit 2 – Class trip 7
7 Unit 3 – Recap lesson & Conservation 7
8 Unit 4 – Conservation of buildings &
Exam questions 8
9 Unit 5 – Individual research of a local heritage
building 8
10 Student workbook 8
11 Exemplar Guide 9
12 Website 9
Section 2 - Units of Study 10
Unit 1 Introductory lesson 11
Unit 2 Class trip 19
Unit 3 Recap lesson & Conservation 22
Unit 4 Conservation of buildings & Exam questions 36
Unit 5 Individual research of a local heritage building 42
Further Study 45
Exploring the built heritage of your locality Page 3
Section one – Guide Overview:

Exploring the built heritage of your locality Page 4
1 Introduction:
Recent Chief Examiners reports by the State Examinations Commission have outlined the
lack of attention our built heritage receives in Construction Studies. This has been indicated
by the low level of students undertaking a heritage based Leaving Cert project. However by
neglecting such a unique topic we are depriving students of the opportunity to experience the
efforts made by our previous generations.
This booklet aims to guide teachers through five prescribed units. In addition there is an
exemplar booklet to assist the teaching of the topic. This guide contains key questions at
various parts of lessons which should be asked in order to develop student’s appreciation of
the built heritage. Unit two is a class trip to a local heritage building. Subsequently the guide
will need adjustment to match the building under exploration. The overall structure and
content can be used no matter what type of building is under exploration. In particular the
aims and objectives of the lessons should be considered. There are PowerPoint presentations
attached with each unit, some of which have vacancies for the inclusion of the built heritage
from a locality.
In order to further assist teachers in covering the topic a website is part of this project. The
website aims to act as a further resource where teachers can promote students independent
learning. This could be used if the necessary content is not covered in class sufficiently.
2 Aim:
This ‘option taster’ aims to provide students with an insight into Ireland’s rich architectural
heritage with key emphasis being placed on their local heritage. The taster emphasizes
exploration for learning where students are expected to leave the classroom setting and report
their findings. On completion of this resource, there will be an increase in awareness of the
heritage topic, which in turn will affect the numbers considering a heritage related project.
3 Structure of Guide:
Unit 1 – Introductory lesson
Unit 2 – Class Trip
Unit 3 – Recap & conservation introduction
Unit 4 – Conservation of traditional stone walls
Exploring the built heritage of your locality Page 5
Unit 5 – Individual site visit
4 Key skills obtained:
Construction Studies requires a diverse range of skills for both the theory and practical
aspects of the subject. In this guide there is the potential to include many of these skills. By
promoting such skills at an early stage of 4th
year, the improvement will become apparent at
exam/project completion. The skills of the guide include:
Sketching – proportion, shading, rendering, correct use of colour
Concise notes and annotations
Photography
Building exploration
Data collection and analysis
Report writing
ICT – Microsoft word and/or PowerPoint
Creating a Blog
Along with the cognitive and psychomotor skills outlined, the guide also contributes greatly
to student’s affective domain:
Recognising the significance of their local built heritage
Working with others while exploring their built heritage
Communicating data to other groups and to the class
Gaining an appreciation of history and culture embedded in our historic structures.
5 Unit 1 – Introductory lesson:
The built heritage is primarily introduced to students at the beginning of 4th
year;
consequently students will have little knowledge of construction materials and processes.
Some students possibly have on-site experience as a result of a summer job or family
connections.
Students will have recognised ‘old buildings’ in their locality and will refer to these buildings
as structures with historical significance. The type of architectural heritage students will have
experienced depends on the locality of the school. For example Vernacular Architecture in

Exploring the built heritage of your locality Page 6
the west of Ireland differs in design to that in the east due to the prevalent winds that exist.
These differences will occur throughout the country. Therefore this lesson will depend
greatly on the locality of the school. For example if the class trip is based on Vernacular
Architecture teachers should incorporate an insight into another type of built heritage,
fortified buildings perhaps. As stated previously in the document Vernacular Architecture is
the most common category examined so ensure that category is completed.
6 Unit 2 – Class Trip :
This unit is arguably the most important aspect of the taster. By encouraging students to leave
the classroom setting and explore in order to learn at this stage, we are developing students
awareness of real life examples of the subject content. Construction Studies is fortunate to
have the ability to incorporate such examples into the lessons.
More importantly this trip will help to develop student's appreciation for historic buildings
which is one of the main aims of this guide. This guide promotes the use of group work
during the class trip. Groups will be given a specific task by which they can explore and bring
data back into the classroom.
7 Unit 3 – Recap & Conservation Introduction:
The recap lesson provides students with the opportunity to share their information with the
rest of the class. During the class trip different groups would have received different tasks in
order to provide focus. Now it is time to share the information. There are many different
ways in which the information can be shared from two minute group presentations to simply
photocopying data and distributing it. However it is encouraged that the following three
methods are considered and one selected:
Make a class blog where each group has access
Each group makes a poster & which is put up around the room
Create a class report on the building using Microsoft word/PowerPoint
This lesson also provides students with an insight into conservation principles and the
importance of the traditional sash window.

Exploring the built heritage of your locality Page 7
8 Unit 4 – Conservation of Traditional walls:
Conservation and maintenance of buildings is amongst the most popular areas of the heritage
sector today. The Heritage Council was set up in 1997 with a key aim to maintaining
Ireland’s heritage for future generations. The council provides grants as an initiative to
conserve such structures. A prime example is the Rural Environmental Protection Scheme
(REPS) grant set up in conjugation with the Department of Agriculture. The aim of the
scheme is to repair and conserve traditional farm buildings. This lesson further promotes
heritage conservation with the focus being on traditional stone walls.
While all this exploration for learning is very pleasing we must not lose sight of the Leaving
Certificate. The majority of students are completing the subject with a view to proceeding to
further education. Completing two exam questions based on the topic of built heritage will
not only act as a recap but will begin to get students focused on exam format and technique.
9 Unit 5 – Individual research of a heritage building:
Up to this point students have attained sufficient knowledge which allows them to
successfully explore a heritage building. It should be encouraged to instruct students to
research a building individually. A site visit is not absolutely necessary as there is a vast
amount of information available on line. However where possible a site visit and perhaps an
interview of the home owner should be encouraged. Students will complete this unit in their
own time – the deadline envisaged would be the first class post Halloween break. This will
allow students sufficient time and opportunity to ask the teacher questions relating to the
building or problems that occur. Each student should complete a report either neatly hand
written or typed on Microsoft word. It must be stressed that students are not expected to
allocated large amounts of time to this unit, simply enough to gain sufficient data. This unit
will solidify student’s value and interest in their local built heritage and further influence their
decision in taking option (iii) for the coursework.
10 Student workbook:
A student work book also exists with this guide. The workbook corresponds with the lessons
outlined. The workbook is in A5 format. Similar to the PowerPoint Presentation the
workbook also has vacancies for the incorporation of the student’s local built heritage.

Exploring the built heritage of your locality Page 8
11 Exemplar:
An exemplar guide is also part of this teaching package and it should help in providing
teachers and students with a further insight into the completion of the prescribed units.
12 Website:
In order to further assist teachers in covering the topic a website is part of this project. The
website aims to act as a further resource where teachers can promote students independent
learning. This could be used if the necessary content is not covered in class sufficiently. The
website contains an exemplar class trip which teacher can direct students towards for
guidance before/during/after respective units. Students have the potential to access this
website on their smart phone by using the QR code embedded in their workbook.
Exploring the built heritage of your locality Page 9
Section two – Units of Study:

Exploring the built heritage of your locality Page 10
Recognising a heritage building
The importance of the built heritage
Heritage council (in brief)
Local built heritage
Type of architecture different from that of the class trip
Hand out prior to class trip (varies according to building under exploration)
PowerPoint Presentation containing images of heritage buildings (including local
buildings)
Models of buildings is encouraged
Building(s) history from locality
Worksheet 1 & 2
Handout prior to class trip.
Subject matter
Lesson Resources:
Aim(s):
To introduce students to the topic of the Built Heritage
To develop students appreciation for the significance of the Built Heritage
in their locality
Objectives: Students will:
Compare & contrast different forms of architectural heritage highlighting
differences, advantages and disadvantages.
Complete worksheets 1 & 2 (which depend on the architecture discussed)
Recognise the significance of the Built heritage by establishing the
history associated with respective buildings in their locality
Length of
lesson:
Single class : 35 – 40 minutes approximately
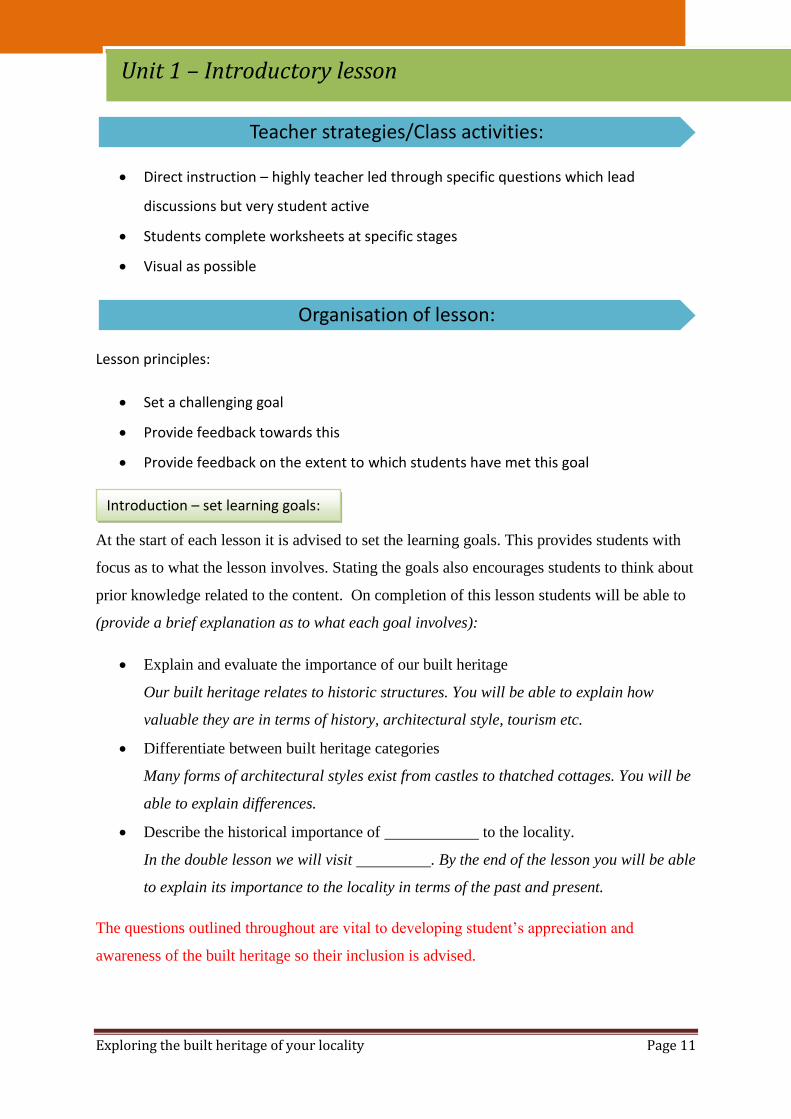
Unit 1 – Introductory lesson
Exploring the built heritage of your locality Page 11
Direct instruction – highly teacher led through specific questions which lead
discussions but very student active
Students complete worksheets at specific stages
Visual as possible
Lesson principles:
Set a challenging goal
Provide feedback towards this
Provide feedback on the extent to which students have met this goal
At the start of each lesson it is advised to set the learning goals. This provides students with
focus as to what the lesson involves. Stating the goals also encourages students to think about
prior knowledge related to the content. On completion of this lesson students will be able to
(provide a brief explanation as to what each goal involves):
Explain and evaluate the importance of our built heritage
Our built heritage relates to historic structures. You will be able to explain how
valuable they are in terms of history, architectural style, tourism etc.
Differentiate between built heritage categories
Many forms of architectural styles exist from castles to thatched cottages. You will be
able to explain differences.
Describe the historical importance of to the locality.
In the double lesson we will visit . By the end of the lesson you will be able
to explain its importance to the locality in terms of the past and present.
The questions outlined throughout are vital to developing student’s appreciation and
awareness of the built heritage so their inclusion is advised.
Teacher strategies/Class activities:
Organisation of lesson:
Unit 1 – Introductory lesson
Introduction – set learning goals:

Exploring the built heritage of your locality Page 12
Teacher instruction: Ask students for their interpretation of the word Heritage. Write
down responses on the board, PowerPoint or students copies. Develop a definition for
heritage with the students. Develop a personal value.
Key points of answer:
Our heritage is things/objects/belongings passed on by previous generations
These include houses, farms, sites, personal belongings and so on.
Our predecessors pass on such belongings as they trust us to care for and value
them.
It is very difficult to sell an inherited item as it is of personal value.
Teacher instruction: Ask students to write down their definition of the built heritage.
Circulate and provide feedback on answers. Provide definition of the built heritage
from sources such as the Heritage council. Students can correct their definition
accordingly.
Key points of definition:
‘By conserving our historic buildings we help to preserve them for future generations
to enjoy as part of their heritage, just as we do now’. (Heritage Council)
We have a duty of care to educate ourselves about these structures in order to
ensure they are correctly cared for
Our built heritage refers to the buildings and structures left to us by previous
generations. These structures include churches, castles, cottages and historical
monuments. In this unit we will be focusing on heritage buildings.
Key Question What does the word heritage mean?
Key Question Therefore what does Built Heritage mean?
Key Question What defines a heritage building?
Unit 1 – Introductory lesson continued...
Recognising a heritage building:
NOTE: A heritage building is not simply an old building!
Exploring the built heritage of your locality Page 13
Teacher instruction: Most students will respond to the above question by saying ‘an old
building’. This is not necessarily true as some old buildings could be a safety hazard or a
poor example. Investigate student’s experiences about protected buildings which must
be maintained. Perhaps a heritage building was the focal point associated with a recent
development. E.g. a heritage building might have obstructed the development of a new
building. Builders and investors wanted to demolish the heritage building but
organisations such as the heritage council and local residents objected.
Whilst discussing the factors with the class instruct students to identify possible heritage
buildings in the locality. Provide feedback when required.
The following factors should be considered when recognising a heritage building. (These
stages are provided on PowerPoint).
Often people perceive old buildings to be a significant part of our built heritage. However this
perception is incorrect as some old buildings have no history attached. In general there are
four factors which determine if a building is part of our built heritage:
1. History
2. Architecture
3. Integrity
4. Environment
1. History:
What people/group of people lived in the building and what was their occupation?
The more famous or well known the occupants of the building were, the more
potential the building has regarding historical stories or information. If a person was well
known within a local community, people will always have stories to tell. The likelihood is
that these famous people would have influenced the community by perhaps making
significant contributions either financially or otherwise.
What key historic events are linked with the building?
Famous historical buildings often gain their significance due to their association with
a particular event. A well known example is the General Post Office in Dublin as it had a
direct link with the 1916 Easter rising and it was from her the Proclamation of Independence
Unit 1 – Introductory lesson continued...
Exploring the built heritage of your locality Page 14
was read by Patrick Pearse. Other factors to be considered would be the residence of a key
personality or an iconic landmark of an area in years gone by.
Does the building link with the historical development in the community?
Often buildings illustrate a significant historical development such as local
agriculture, transportation or social factors.
2. Architecture:
When was the building constructed? What particular period?
The date at which the building was constructed is a huge factor in determining its
significance. It does not simply provide the age but gives an indication of the architectural
styles used. For example the medieval period (eleventh and twelfth century) is best illustrated
by the Romanesque style whereas buildings from the 17th
century are typically associated
with that of Vernacular architecture.
Did a famous designer have any influence on the building?
Different designers pose different architectural styles. They possess different
knowledge of building materials and construction processes. When a building was designed
by a trained architect it may be possible to analyse the style used. A building could be an
architectural style common to the community and its surroundings.
3. Integrity:
Has the building maintained its original state?
Historic buildings have been passed down through generations. It is fair to say that the
current generation may not appreciate the Architectural significance of these buildings as
much as previous generations. The fact that these buildings could have been sold and are
currently not in the family name is an issue. All over the country there are examples where
the character of the original structure was not maintained. Extensions have been built, paint
applied or original windows replaced. It is these adjustments that influence the building's
historical significance.
Unit 1 – Introductory lesson continued...
Exploring the built heritage of your locality Page 15
Has the building evolved in terms of function?
Over the years buildings evolve in order to meet functional requirements. In many
cases throughout the country the function has changed but the character of the building has
been maintained. However many buildings originality have been seriously affected by a
change in function.
4. Environment:
Often a building will be similar to other buildings in the community.
Teacher instruction: provide feedback which guides students to achieving the goal of
the task and further feedback on how they have/have not achieved the goal.
Aim to include two categories of Architectural heritage in the lesson. One of these will be the
building selected for the class trip. Remember vernacular architecture is a common heritage
exam question so do not leave that category out. Key categories include:
Vernacular Architecture
Fortified Architecture
Religious Buildings
Key point: If the locality of the school occupies a different form of architecture apply it to the
option taster. This is local heritage driven. Select one type from the list above for this section
of the lesson which will be followed by an introduction of the building being used for the
class trip. The section only lasts ten minutes so concise teaching points are necessary.
Studnet task Complete worksheet 1 (provided on PP)
Types of built heritage:
Unit 1 – Introductory lesson continued...

Exploring the built heritage of your locality Page 16
Exploring the heritage in your local community involves two key stages. Firstly it is
necessary to examine and investigate the building's history which should be followed by a
detailed exploration of the building itself. As a teacher it would be a good idea to examine
one or two buildings in your locality in terms of its history and background. This is the
information students should be provided with prior to the class trip. Often it is necessary to
make a trip to the library or local studies centre to obtain valuable information, records and
pictures. Interviewing people who had a connection with the building is also a valuable
means of gathering information and data. Prior to the class trip a brief handout for homework
would suffice to give a background on the building. The following key points should be
considered when making the handout:
General History and Background:
Who built it? – a collective effort by local people, trained builders, trained architects,
famous architects,
When was it built? – finding the age of the building allows us to distinguish the
architectural style. E.g. 17th
century onward included vernacular houses while
Georgian architecture dates from the 18th
century onward.
What was the purpose of the building? Has the function changed over the years?
What historic events are linked with the building? Did any famous people visit/use the
building? – linked with any particular periods of history, famine, world war etc.
Does the building link with the historic development of the area or the surrounding
areas? - transport links, social aspect, agriculture
Environment:
How does the building blend into its surroundings? – perhaps the building blends
seamlessly into the landscape such as rural thatched cottages, maybe the building
stands out as it is a formal estate.
Does the building link with other buildings in the locality? – townhouses often share
similar characteristics
What is the architectural style? – e.g. Vernacular, Georgian etc – the age, location and
features of the building will help determine this.
Hand out prior to class trip:
Unit 1 – Introductory lesson continued...
Exploring the built heritage of your locality Page 17
In order to increase the educational value of the class trip and provide structure, it would be
advisable to provide groups of students with specific tasks. This would insure all the key
information is obtained and can be shared in class. This approach also provides students with
a focus from the start of the trip as they arrive on site. Some key points to consider:
It could be worthwhile identifying student’s strengths prior to assigning groups with a
task. For example if a certain amount of students study art it would be worth
providing them a sketching task. Perhaps incorporate 1-2 students (depending on the
group size) who need to develop their sketching skills. This would help develop the
educational value of the trip.
Similarly students who study Design and Communication Graphics or who have
studied Technical Graphics could be given the task of sketching the orthographic
views of the building.
Other students might possess up-to-date technology such as an I-phone who
subsequently could be instructed to take pictures and videos out on site.
Typically a Construction Studies class will consist of 20-24 students so groups of 3
would be ideal.
Providing groups with a very manageable task with the view to completing it to a
high standard should be considered.
Teacher Instruction: Ask recap questions. Circulate the room aiming to engage as many
students as possible. Provide feedback on answers.
Define the term ‘Built Heritage’.
Based on the criteria outlined in the lesson identify a heritage building in the locality.
Why is this building deemed heritage? Evaluate its significance.
Studnet task Complete worksheet 2 (Based on types of
Architecture Covered )
Unit 1 – Continued...
Recap Questions:

Exploring the built heritage of your locality Page 18
Buildings historical significance to the cultural history of the community
Architectural style and features of the building
Construction details and materials of the building
Building and it’s immediate surroundings
Link between building and other structures in the locality
Subject matter
Aim(s):
To develop student's positive attitudes and appreciation towards their
architectural heritage in their local community.
To enable students to evaluate the significance, both past and present, of
the building to the local community
To further develop students knowledge of the construction
details/features of architectural heritage
Objectives: Students will:
Demonstrate exploration skills through sketching, photography, taking
notes and working in groups.
Work in groups to explore the history and significance of the building,
exploring beyond the physical structure through the use of imagination.
Recognise the importance of the built heritage to the cultural history of
their community
Evaluate the significance of the castle in terms of its past and present
influence on the local community.
Interview home owner/tour guide if possible
Length of
lesson:
Complete over a double lesson or two lessons.
Approx time -20 minutes travelling – 1 hour exploring building – 20
minutes return.
Unit 2 – Class trip:
Note: The following is a guide for the class trip. It is expected the outlined aims are considered, in
particular developing students appreciation towards our built heritage (affective domain). The
guide may need to be adjusted depending on the building under exploration. Some buildings may
have a deep history while others may have complex features such as columns and arches. Adjust
as you see fit.

Exploring the built heritage of your locality Page 19
Sketch pad
Phone capable of taking photos and videos with a sufficient amount of battery!
Sketching equipment (2B pencil, eraser, ruler)
Any other material which you deem appropriate for your assigned task (e.g voice
recorder if available for interviews)
Group work –groups of three/four are assigned a particular task
High level of discussion is encouraged amongst groups as they should compare and
contrast obtained date.
Teacher should circulate site and provide feedback to groups on sketches, photos and
videos. Explain how to improve certain areas for the next site visit.
Class discussion at the end of trip as recap.
Firstly provide class with an overall tour of the building evaluating the features,
history and aim to gain a sense of culture. This will be conducted by the tour
guide/homeowner/teacher.
Instruct students to assemble into groups and begin task
Circulate throughout and provide assistance if necessary
Provide feedback to groups throughout whilst assisting them in achieving their task.
Provide questions related to the assigned task asking different groups for information
obtained. Sample questions may include:
How does the building contribute to the culture of our community?
Lesson Resources:
Teacher strategies/Class activities:
Organisation of lesson:
Unit 2 – Continued...
Recap:

Exploring the built heritage of your locality Page 20
What key historic events/dates/people are associated with the building?
What are the main features of the building?
How has the building evolved in terms of function?
Homework: complete a 1 page word document/PowerPoint presentation of
your findings. If it has been decided to create a class blog to document the
data, instruct students to bring an electronic copy to class
Unit 2 – Continued...
Exploring the built heritage of your locality Page 21
Aim: Recap on class trip by creating a class blog using the
information gathered
Introduce students to the principles of conservation of heritage
buildings and apply them to conserving traditional windows
Objectives: Students will:
Demonstrate their ICT skills by contributing to the creation of a
class blog.
List and explain the importance of conservation principles and
the sequence of work.
Recognise the importance traditional sash windows have on the
integrity of our heritage buildings.
Length of
lesson:
Single lesson – 40 minutes
Assessment of
pupil learning:
Ask students questions throughout the lesson as they upload their
data to the blog. Each group will receive a separate page.
Ask students questions which assess the principles of
conservation. Correct worksheet throughout the lesson, providing
feedback regarding areas to develop.
Instruct students to compare and contrast modern and traditional
windows.
No. of pupils 21
analysing and selecting important data gathered during class trip
Uploading selected content to class blog
Key conservation principles
Traditional sash window – problems associated
Replacement windows.
Model of Heritage building demonstrating further heritage buildings in the locality
Subject matter
Lesson Resources:
Unit 3 –Recap & Conservation introduction
Exploring the built heritage of your locality Page 22
PowerPoint presentations
Completed worksheets
Conservation hand out
Direct Instruction – teacher lead but highly student active
Pair work
Visual learning
By the end of this lesson you will be able to (provide brief explanation using PowerPoint):
Explain how to set up a blog
A blog is a website onto which individuals/groups upload information. We will be
making a blog based on our class trip to
List and evaluate the importance of the main conservation principles.
In order to maintain heritage building they must be restored/conserved following
specific guidelines. Modern building methods will not suffice.
Recognise the importance of traditional sash windows to our built heritage
One key conservation principle is to ‘repair rather than replace’. We should be
repairing traditional windows instead of inserting new uPVC ones as much as
possible.
Teacher strategies/Class activities:
Organisation of lesson:
Unit 3 – Continued...
Introduction – set learning goals (5 minutes):

Exploring the built heritage of your locality Page 23
In order to share the information that each group obtained the following strategies could be
used:
Make a class blog where each group has a page to publish data
Each group makes a poster & presents findings to the class
Create a class report on the building using Microsoft word or a Power Point
Presentation.
Although the latter two suggestions appear to be the most practical, creating a class blog has
both educational and personal benefits. Firstly students are encouraged to use the internet
with purpose and it could be argued that by incorporating technology into topics such as the
built heritage, the experience will have more appeal to students. More and more teachers are
using strategies such as blogs in their teaching either to allow students access notes for
homework or as a means to contain individual lessons which require videos and animations.
The blog would be set up by the teacher and the content uploaded by each group. Each group
would have an individual page. With the correct structure in place the majority of the content
would be uploaded in a 40 minute lesson.
1. Create a Gmail account. The teacher could set up one Gmail account for the entire
class. On the Google home page select
G
m
a
i
l
.
How do I set up a class blog:
Unit 3 – Recap lesson.

Exploring the built heritage of your locality Page 24
2. Select ‘Create an Account’ on the top right
Fill in your relevant details and click ‘next step’. Now you have a Gmail account!
OR:
If you already have a Google account such as Gmail simply log in as normal.
Unit 3 – Continued...
Exploring the built heritage of your locality Page 25
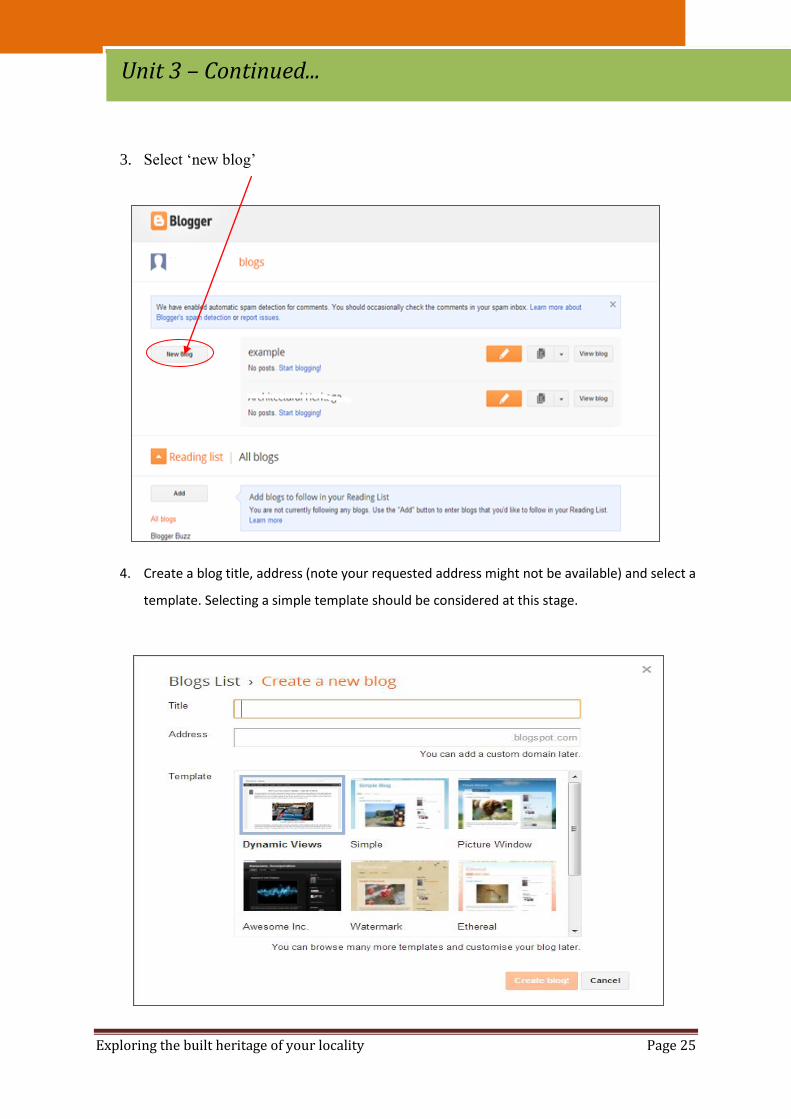
3. Select ‘new blog’
4. Create a blog title, address (note your requested address might not be available) and select a
template. Selecting a simple template should be considered at this stage.
Unit 3 – Continued...

Exploring the built heritage of your locality Page 26
5. Click ‘View Blog’ and the home page of the blog will appear.
On a new window your blog homepage will appear.
Blog Home page.
Unit 3 – Continued...
Exploring the built heritage of your locality Page 27
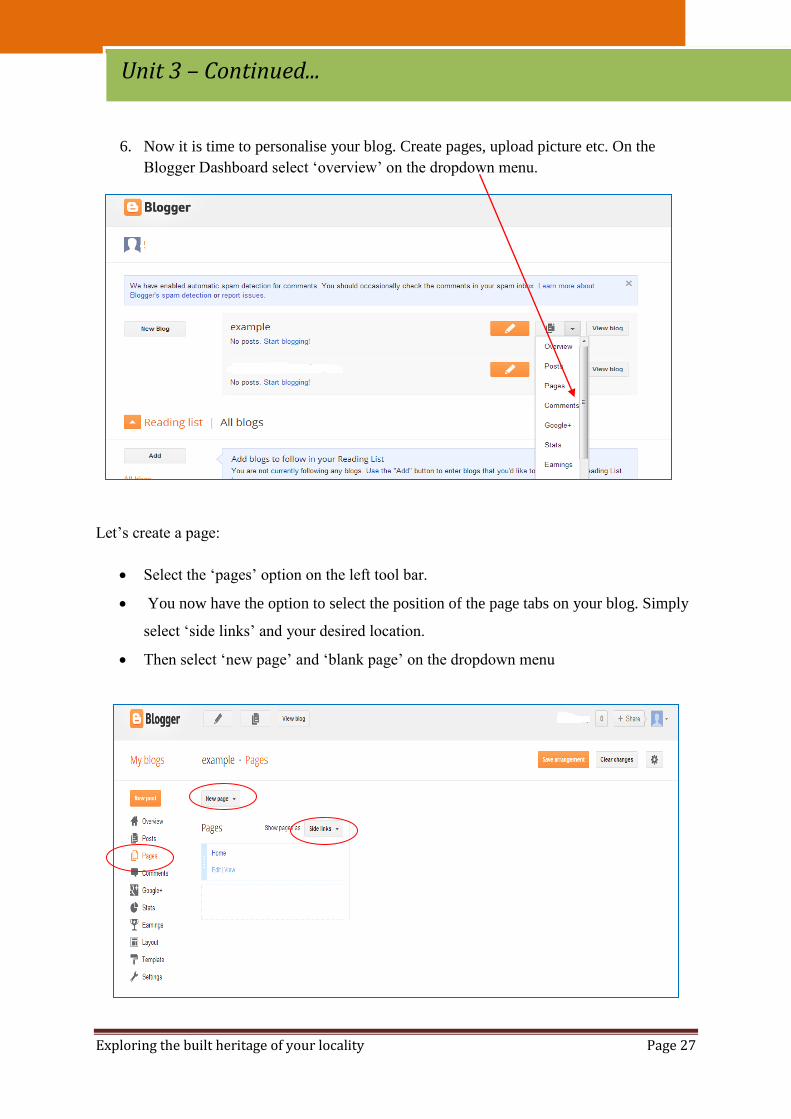
6. Now it is time to personalise your blog. Create pages, upload picture etc. On the
Blogger Dashboard select ‘overview’ on the dropdown menu.
Let’s create a page:
Select the ‘pages’ option on the left tool bar.
You now have the option to select the position of the page tabs on your blog. Simply
select ‘side links’ and your desired location.
Then select ‘new page’ and ‘blank page’ on the dropdown menu
Unit 3 – Continued...

Exploring the built heritage of your locality Page 28
Create a page title.
Type in any information you wish to have on this page.
Select save and publish
Click view blog and your
page will appear. Repeat for
additional pages. Each
group may have a page or
multiple pages depending
on the quantity of
information obtained. To
upload pictures, sketches or
videos simply select the
desired option when
creating the page.
First page complete.
Unit 3 – Continued...

Exploring the built heritage of your locality Page 29
Teacher Instruction: Instruct students to take notes on the stages involved. Print off and
present the ‘setting up a blog’ poster. This is in A2 format.
Steps involved:
1. Go to blogger homepage
2. On the ‘go to post’ tab select pages on the drop down menu
3. Select ‘new page’ tab and then blank page in the drop down menu
4. Title of page will be the group.
5. Main features required – text, inserting picture, inserting videos
6. When data is inserted click ‘save’ followed by ‘publish’
7. Select ‘view blog’ to view completed page
Note: After each page is set up stop and explain key points to class.
Each group will receive 5 minutes to set up their page provided with the assistance of the
teacher. The addition of a poster to guide the students though the stages is advised. While one
group is setting up blog page the remainder of the class will read the conservation handout
given, followed by the completion of an exam question.
Teacher instruction:
Each group will set up their page commencing with group one.
When students are not working on the blog complete hand out and exam
question in pairs.
Students will read hand out, read again taking notes. Then the teacher will go
through the handout asking the outlined key questions throughout as follows:
Conservation handout:
On completion of this hand out you will be able to:
Evaluate the importance of the key conservation principles
List and explain the sequence of conservation work
Setting up blog page:
Setting up blog pages or reading handout:
Unit 3 – Continued...
Exploring the built heritage of your locality Page 30
Recognise the importance traditional sash windows have on the integrity of our
heritage buildings.
Introduction:
In their conservation guidelines the Heritage Council have described the
conservation of buildings as a means to prolong the life of the building by preventing further
decay. Work is often carried out on a heritage building, but due to a lack of specialist
knowledge, great damage is caused to such structures. With this in mind the Heritage Council
have set up g
uidelines with the aim of promoting awareness about the conservation and restoration of
these buildings.
Main Conservation Principles as outlines by the Heritage council:
Retain and restore the historical significance of the building:
Aim should be to both protect and reveal as much of the historical significance of the
building as possible.
Complete adequate research prior to conservation work commencing:
Ensure the buildings history is known and documented prior to work. The history will
provide an indication of the materials associated with the building.
Minimum physical intervention as possible:
‘Repair rather than replace’ is the key rule of thumb associated with this principle.
By following this guideline the buildings character and history will be retained as
original material will be repaired and used.
Maintain visual setting:
In short this means maintain the overall surroundings of the building as much as
possible.
Question Why is specialist knowledge required when working
with heritage buildings?
Question What consquences might occur if no research is
carried out prior to work?
Unit 3 – Continued...

Exploring the built heritage of your locality Page 31
In their conservation guidelines the Heritage Council have outlined a detailed scheme which
should be followed in order to correctly undergo conservation work on a building. The main
points have been extracted and are outlined in the following table:
Stage: Description:
Research
Building
Establish the history of the building
Investigate old papers and documents
The fabric of the building will also provide key
information
Survey building Record existing building by making an overall survey
Complete plans and sectional views which provide
structural information
Identify original material and possessions and any items
which were added at a later date
Minimum
Intervention
Key conservation rule – ‘Repair rather than replace’
Any features that are missing should be reinstated by
trained professionals
Experienced
supervision
It is best practice to receive advice from a conservation
specialist at this stage to avoid costly damage.
Record work Complete a written and photographic document of the
work for future reference
Regular
maintenance
Ensure regular and recorded inspection to ensure the
building remains in good condition
Repair when required.
Conservation of traditional windows:
‘When the windows of the original design are removed or altered,
the buildings are deprived of their character, and the streetscape
suffers’ (Heritage Council)
Today replacement windows come in the form of uPVC and
aluminium which do not reflect the origin and character of the
house.
Unit 3 – Continued...

Exploring the built heritage of your locality Page 32
For example vernacular thatched cottages are known to have sliding sash windows
(right). Modern uPVC replacements with visually unpleasing glazing bars are
neglecting the integrity of vernacular design.
Teacher instruction: Show students the video of the sliding sash window working on
PowerPoint.
Common problems associated with windows to be addressed to students:
Timber Decay:
Traditional windows are made of superior timber which is justified by their longevity.
Some windows have lasted for over one hundred years and still survive.
If decay is found, always investigate the root of the problem. For example if a
window is leaking the leak must be dealt with appropriately.
Wet rot:
This is visible when the paint begins to ripple and timber goes soft. Over time the
wood will lose its strength.
Question What principles of vernacular architecure depend on
the restoration of the traditional sash windows.
Unit 3 – Continued...
Exploring the built heritage of your locality Page 33
Wet rot occurs mainly on Horizontal members as this is where water lodges and is
allowed to soak. The moisture might soak into the timber due to a lack of paint or
break in putty which keeps the glass in place.
Infected sections of the window should be repaired or replaced with exact replicas.
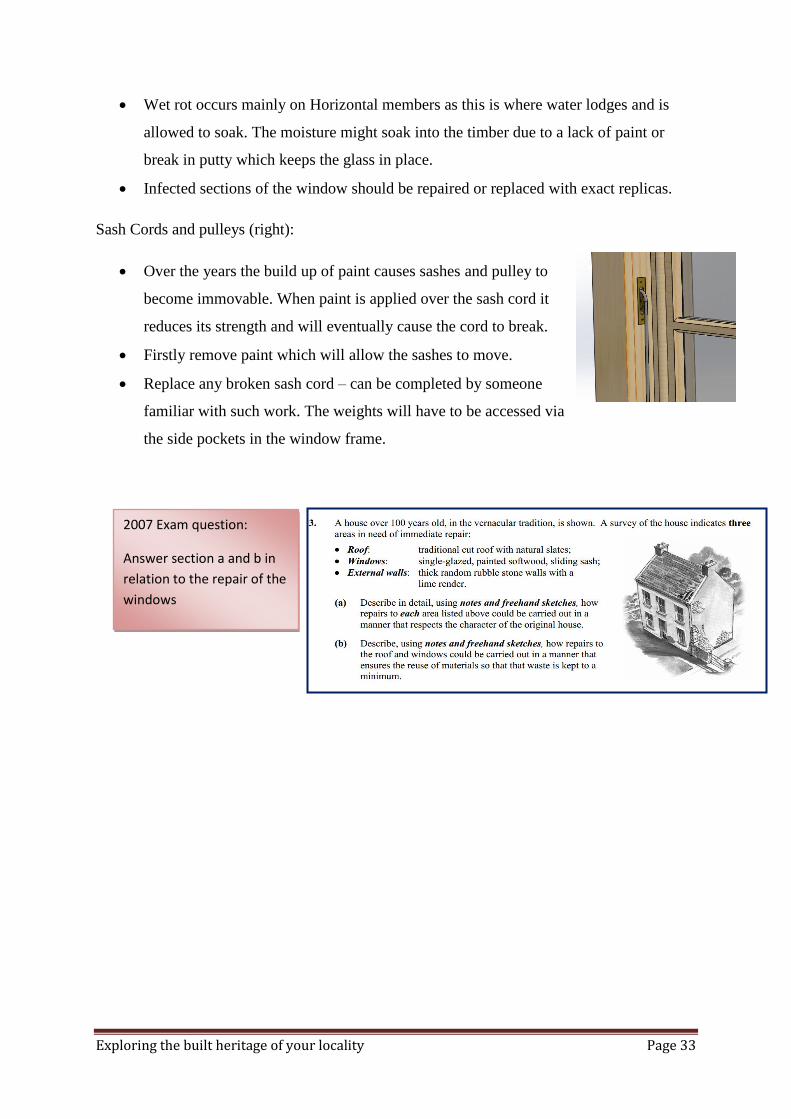
Sash Cords and pulleys (right):
Over the years the build up of paint causes sashes and pulley to
become immovable. When paint is applied over the sash cord it
reduces its strength and will eventually cause the cord to break.
Firstly remove paint which will allow the sashes to move.
Replace any broken sash cord – can be completed by someone
familiar with such work. The weights will have to be accessed via
the side pockets in the window frame.
2007 Exam question:
Answer section a and b in
relation to the repair of the
windows
Exploring the built heritage of your locality Page 34
Teacher instruction: instruct students to complete window sections of the question.
Provide feedback throughout on how to complete the question and further feedback on
the completed answer. A sample answer is provided below:
Part A:
Windows
Carefully inspect and repair existing windows as much as possible.
Check for any problems such as broken sash cords, putty breaks and repair accordingly.
Repair rather than replace’
If windows are beyond repair, replace with new sash windows identical to the original.
This can be achieved by asking the local joinery shops which specialise in the area.
Despite the perception that such windows are expensive to make they are in fact relatively
inexpensive. For the sake of retaining the historical significance of the building making
the exact replica is encouraged.
After the new window is installed prime, undercoat and gloss the window as the original
one was. This will help maintain the visual setting of the home.
Part B:
In order to encourage the reuse of materials the guide ‘repair rather than replace’
must be adopted.
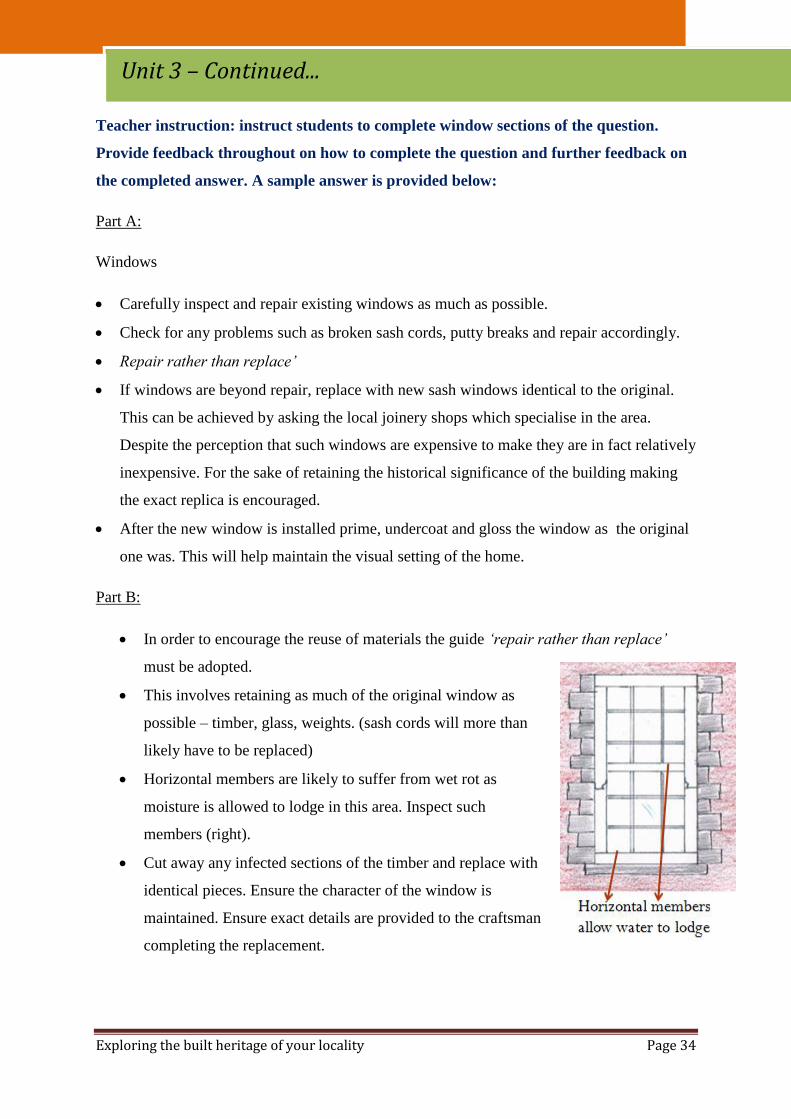
This involves retaining as much of the original window as
possible – timber, glass, weights. (sash cords will more than
likely have to be replaced)
Horizontal members are likely to suffer from wet rot as
moisture is allowed to lodge in this area. Inspect such
members (right).
Cut away any infected sections of the timber and replace with
identical pieces. Ensure the character of the window is
maintained. Ensure exact details are provided to the craftsman
completing the replacement.
Unit 3 – Continued... Unit 3 – Continued...
Exploring the built heritage of your locality Page 35
When removing infected sections care must be taken to avoid breaking the glass. This
will particularly apply when removing the original putty – original glass will be
reused.
Complete the repair of sashes and apply original glass. Apply putty around the glass
which acts as a sealant.
Allow 2-3 weeks for putty to dry before apply paint.
Prime, undercoat and paint new section as the original.
Install new sash cords. This will require accessing the weight through the side pockets
on the window frame.
Unit 3 – Continued...
Recap – correct exam question:
Exploring the built heritage of your locality Page 36
Traditional stone walls v concrete cavity construction
Principle of evaporation relating to traditional stone walls
The importance of lime
PowerPoint presentations
Completed worksheets
Conservation hand out
Exam question
Subject matter
Lesson Resources:
Aim(s):
To further develop student’s conservation awareness by focusing on
traditional walls.
Objectives: Students will:
Compare and contrast the walls of modern buildings with those of
traditional heritage structures to establish key principles.
List and explain the process of re-pointing and rendering traditional
stone walls.
Demonstrate their knowledge of lime rendering by through the
completion of an exam question.
Length of
lesson:
Single lesson 35-40 minutes approx.
Assessment
of pupil
learning
Ask students questions which assesses the principles associated with
walls e.g. evaluate how traditional stone walls functioned compared to
modern day construction
Circulate and correct student’s worksheets providing feedback on areas
which require improvement.
Correct an exam question which will show students knowledge of the
conservation of traditional walls
Unit 4 – Conservation of traditional walls...
Exploring the built heritage of your locality Page 37
Direct instruction
Class discussions
State learning goals – By the end of this lesson you will be able to:
Compare and contrast modern day walls with traditional stone/brick walls
Modern day construction differs greatly from traditional building. Thus materials
used today such as cement will not suffice when working with heritage buildings.
Explain how the principle of evaporation relates to traditional stone walls
When moisture soaks into an old stone wall it must be allowed to be released. This
happens through evaporation.
Explain the necessity of lime when working with traditional walls
Lime is a material which has the ability to absorb and release moisture.
Teacher instruction: provide pictures on PowerPoint and allow students time to analyse
the images. One possible response will relate to traditional walls being thicker than
modern walls. Instruct students to visualise a vertical section.
Key points:
Traditional walls are thicker than walls today
Traditional walls were constructed using random rubble stone as opposed to concrete
blocks
Teacher strategies/Class activities:
Organisation of lesson:
Key question What differences exist between modern walls and
old traditional walls?
Key question Why are traditional walls thicker than walls today?
Unit 4 – Continued...

Exploring the built heritage of your locality Page 38
Teacher instruction: show cross section of walls (both traditional and modern) on
PowerPoint and allow students time to develop an answer. Instruct students to take
notes throughout.
Key points:
Traditional walls are very wide, as this prevented moisture reaching the inner
surfaces.
Rain water would soak into the wall but would dry out before reaching the inner
surfaces.
This means that the materials used must allow for this moisture to leave the wall.
Modern cavity walls are designed with a cavity which prevents moisture reaching the
inner surfaces of the building. They also have DPC’s and expansion joints unlike
traditional structures. ‘Recognition of this is fundamental’ (Heritage Buildings) to the
well being of heritage buildings. See sections below:
Teacher instruction: Allow students time to take down key notes on PowerPoint.
Circulate and observe providing feedback on the quality of sketching. Criteria –
proportions, accuracy, correct use of colour.
Mortars, pointing and renders:
‘Traditional buildings require flexibility to allow for the in dependant movement of the
constituent parts, to cope with seasonal changes and to allow for any moisture entering the
walls to evaporate unimpeded’ (Heritage Council Conservation Guidelines)
Unit 4 – Continued...
Modern concrete cavity
walls have a cavity. Any
moisture which penetrates
the outer leaf falls down
the cavity thus not
reaching the inner surface.
Moisture which soaks into
a traditional stone wall
must be realised through
evaporation. The materials
used in the construction
must allow for this.
Exploring the built heritage of your locality Page 39
Mortars, plasters and renders must be pliable and porous. Pliable means flexible while porous
involves having minute holes which allows liquid or air to pass. The most important material
to achieve such characteristics is lime. Later in the year we will look at lime in detail but for
now it is vital we acknowledge its importance to the life of heritage buildings.
Repointing:
A common problem associated with traditional walls is decayed pointing. Decayed
and loose pointing allows water into the wall and lodge there. The procedure for
repairing this problem is illustrated in three basic steps:
The mortar joint should always be weaker than the stone/brick work to allow for the
release of moisture.
Rendering - is an external coat applied to the building to protect it from water/moisture
penetration
Most common render – Lime Based render applied to rubble walls.
Conservation Problems – Removal of this render & effects of
weathering
•Exposes Rubble Wall to rain (Water penetration)
•Uncovering unseen work, may be poor quality
•Material Mixtures (lime mortar & animal hair) not available
•Cannot be recovered, lack of respect for the craft
•Disrupts Aesthetics of building
Remove loose mortar
and cut back to a square
face
Air gaps occur due to
poor craftsmanship
Correct method- mortar
well pushed in
1
2 3
Unit 4 – Continued...
Exploring the built heritage of your locality Page 40
The original external plaster of an old house is to be removed to reveal solid stone walls
of random rubble construction as shown on the sketch. The
owner has the option of either leaving the external
stonework exposed or replastering the walls
Outline two reasons in favour of each option listed above.
If the house is to be replastered, a 1 lime: 3 sand mix is
recommended for the external render. Give two reasons why such a mix is
recommended for this house.
Teacher instruction: allow students time to complete the outlined exam question.
Provide feedback throughout on work. It must be noted that random rubble plastered
walls are not supposed to be exposed. They were not built with this in mind. Key points
to be included in answer:
In favour of exposing stone work:
Current render is cracked and is offering no protection to rain.
Crack render is reducing the aesthetics of the building. Exposing the stone work
would be more visually pleasing.
The original stone work will enhance the appearance of the house.
Exposing the stone show cases traditional skills which are now diminishing. These
old skills suit the age and characteristics of the house more.
In favour of replastering:
Most important – The random rubble wall was never intended to be seen. It could be
poor quality workmanship. More importantly the wall was built with the intention of
being plastered. Removing the plaster will result in the wall not being water and
weather resistant. Re-plastering the wall will protect it from water/moisture
penetration.
Simplicity is the key to the Vernacular design. These houses blend seamlessly into the
landscape. A common trait of vernacular house is the whitewashed plastered walls.
Unit 4 – Continued...
Exploring the built heritage of your locality Page 41
Replastering with a lime and sand mix:
Random rubble walls need to be able to breathe. They need to allow for the release of
the absorbed moisture. Lime has these characteristics which absorbs and releases
moisture. (porosity)
Traditional walls need to be flexible in order to expand and contract. Lime can
achieve this.
Lime renders can be easily moulded in order to follow contours of the wall.
Correct question at the end of class. This will act as the recap.
Unit 4 – Continued...
Exploring the built heritage of your locality Page 42
For the Construction Studies coursework option (iii) the actual building is the focus of
the project. It is the investigation and research which determines the standard of the project.
In order for students to gain further experience associated with these skills this unit should be
encouraged. Students will also have to complete a report on the building which is further
preparation for the coursework. Despite which option is chosen by the student a portfolio will
have to be completed. By encouraging the use of software such as Microsoft word and
PowerPoint at this stage of fourth year that standard of portfolios will be higher as Leaving
Certificate nears. Also by getting students to complete such tasks it will provide more
information and data for the class blog. The following worksheet could be used as a guide
when exploring the building. Photos, sketches, historical record/documents and interviews
should be used to support the report.
Aim(s):
To further develop students skills necessary to investigate and
explore a heritage building
To further encourage students to undertake a heritage related
project for the leaving certificate.
Objectives: Students will:
Demonstrate exploration skills by successfully completing a report of a
heritage building
Recognise the importance of the building to their locality
Recognise the cultural history of the building
Develop communication skills by interviewing home owner/local
people.
Assessment
of pupil
learning
Ask students questions at various stages throughput the term on order to
assess the development in their research.
Correct students work at various stages throughout the term and provide
feedback on areas which require improvement.
Collect and correct report when completed providing feedback where
required.
Unit 5 –Individual research of a local heritage building... Unit 5 –Individual research of a heritage building.

Exploring the built heritage of your locality Page 43
History of the building:
What people lived in the building?
What was their occupation?
Did famous people live in the building?
What contribution did such famous people make to the locality?
What key historic events are associated with the building?
How has the building linked with the historical development of the locality?
Architectural style:
When was the building constructed?
What particular period?
Who built it? A famous designer? Local untrained residents?
Integrity of the building:
Has the building maintained its original state? Seek old photos for evidence
How has the building evolved in terms of function?
Has the historical significance of the building been maintained?
Description of conservation/restoration works – have they complied with the
conservation principle as outlined by the Heritage council?
Environment:
How does the building relate to it surroundings?
Does it blend seamlessly into the landscape or stand out as a formal building?
Is there a link with the buildings and other buildings in the locality?
Construction details:
What construction processes were used in the construction process?
What materials were used?
How do the materials used reflect the economic/social statuses?
Complete sectional sketches/drawing. Seek original drawings if possible.
Unit 5 –Continued...
Exploring the built heritage of your locality Page 44
When should students complete this unit?
It would be advised to assign students this task directly after the completion of unit 4.
Typically this topic should be introduced at the start of 4th
year. By providing the task at this
stage and setting the deadline for the first lesson back after the Halloween midterm break
students will have sufficient time. It is not expected that students should spend large amounts
of time on this tasks as other aspects of the course will be the focal point. However by
completing this unit students are developing key skills necessary for this type of project in
their leaving certificate year.
Unit 5 –Continued...
Exploring the built heritage of your locality Page 45
Further Study:
On completion of the five units of study teachers are encouraged to further promote the built
heritage within the subject. On their class blogs links should be provided relating to heritage
projects. Students should be encouraged to refer to http://archheritage.blogspot.ie/ regularly in
order to check out updated links that the site contains.
More importantly teachers should encourage a number of students within a class group to
undertake a heritage based project for their Leaving Cert. It is class groups who do not
undertake a heritage project that are neglecting the educational value of the subject. By
simply encouraging a minority of the class to explore the built heritage students will learn
from each other.

Exploring the built heritage of your locality Page 46
Notes:

Exploring the built heritage of your locality Page 47
Notes:
