technical application note - oracle.com · port 1 (s1p1) interface into your inside (cucm...
TRANSCRIPT

Oracle Enterprise Session Border Controller and CUCM 10.5 with Bell Canada Enterprise SIP Trunk
Technical Application Note

Table of Contents
INTENDED AUDIENCE ................................................................................................................................................................. 4
DOCUMENT OVERVIEW .............................................................................................................................................................. 4
INTRODUCTION .......................................................................................................................................................................... 5
AUDIENCE .......................................................................................................................................................................................... 5
REQUIREMENTS ................................................................................................................................................................................... 5
ARCHITECTURE .................................................................................................................................................................................... 5
PHASE 1: CONFIGURING THE ORACLE ENTERPRISE SESSION BORDER CONTROLLER .................................................................... 6
IN SCOPE ............................................................................................................................................................................................ 6
OUT OF SCOPE .................................................................................................................................................................................... 6
WHAT WILL YOU NEED ........................................................................................................................................................................... 6
CONFIGURING THE E-SBC ...................................................................................................................................................................... 7
Establish the serial connection and logging in the SBC .............................................................................................................. 7
High Availability .......................................................................................................................................................................... 9
Bell Canada Trunk Authentication Handling ............................................................................................................................ 11
Header manipulation rules required for the Bell Canada Trunk .............................................................................................. 12
Webserver Configuration ......................................................................................................................................................... 20
PHASE 2 – CONFIGURING THE CISCO UNIFIED CALL MANAGER V10.5 ...................................................................................... 21
CREATING A SIP PROFILE IN CUCM ...................................................................................................................................................... 22
ADDING THE E-SBC AS A TRUNK IN CUCM ............................................................................................................................................ 23
CREATING A ROUTE PATTERN IN CUCM ................................................................................................................................................. 24
ADDING DHCP SERVER AND SUBNET IN CUCM....................................................................................................................................... 26
ADDING DEVICES/PHONES AND CONFIGURING DIRECTORY NUMBERS .......................................................................................................... 28
TEST PLAN ................................................................................................................................................................................ 29
TROUBLESHOOTING TOOLS ...................................................................................................................................................... 34
Wireshark ................................................................................................................................................................................. 34
On the Oracle E-SBC ................................................................................................................................................................... 34
APPENDIX A ............................................................................................................................................................................. 36
FULL E-SBC CONFIGURATION .............................................................................................................................................................. 36
APPENDIX B .............................................................................................................................................................................. 44
ACCESSING THE ACLI .......................................................................................................................................................................... 44
ACLI BASICS ..................................................................................................................................................................................... 44
CONFIGURATION ELEMENTS ................................................................................................................................................................. 48
CREATING AN ELEMENT ....................................................................................................................................................................... 48
EDITING AN ELEMENT .......................................................................................................................................................................... 48
DELETING AN ELEMENT ....................................................................................................................................................................... 49
CONFIGURATION VERSIONS .................................................................................................................................................................. 49

SAVING THE CONFIGURATION ............................................................................................................................................................... 50
ACTIVATING THE CONFIGURATION .......................................................................................................................................................... 51

Intended Audience
This document is intended for use by Oracle Systems Engineers, third party Systems Integrators, and end users of the Oracle Enterprise Session Border Controller (E-SBC). It assumes that the reader is familiar with basic operations of the Oracle Enterprise Session Border Controller.
Document Overview
Cisco Call Manager offers the ability to connect to Internet telephony service providers (ITSP) using an IP-based SIP trunk. This reduces the cost and complexity of extending an enterprise’s telephony system outside its network borders. Oracle Enterprise Session Border Controllers (E-SBCs) play an important role in SIP trunking as they are used by many ITSPs and some enterprises as part of their SIP trunking infrastructure.
This application note has been prepared as a means of ensuring that SIP trunking between Cisco Call Manager, Oracle E-SBCs and Bell Canada IP Trunking services are configured in the optimal manner.

Introduction
Audience This is a technical document intended for telecommunications engineers with the purpose of configuring the
Oracle Enterprise Session Border Controller and CUCM. There will be steps that require navigating the
Command Line Interface (ACLI). Understanding the basic concepts of TCP/UDP, IP/Routing, SIP/RTP, TLS and
SRTP are also necessary to complete the configuration and for troubleshooting, if necessary.
Requirements
Fully installed and configured Cisco Call Manager 10.5
Oracle Enterprise Session Border Controller is running ECZ7.3.0 Patch 2 (Build 75) o Note: the configuration running on the E-SBC is backward/forward compatible with any release
in the 7.3.0 stream.
Bell Canada trunk based customers with dedicated data connectivity to Bell Canada.
Architecture The following reference architecture shows a logical view of the connectivity between CM and the E-SBC.
Enterprise Network Bell Canada Carrier Network
Bell Canada MPLS Network
SP Trunk Infrastructure
PSTN

Phase 1: Configuring the Oracle Enterprise Session Border Controller In this section we describe the steps for configuring an Oracle Enterprise Session Border Controller, formally known as an Acme Packet Net-Net Enterprise Session Director, for use with CUCM Server in a SIP trunking scenario.
In Scope The following guide configuring the Oracle E-SBC assumes that this is a newly deployed device dedicated to a single customer. If a service provider currently has the E-SBC deployed then please see the ACLI Configuration Guide on http://docs.oracle.com/cd/E56581_01/index.htm for a better understanding of the Command Line Interface (CLI). Note that Oracle offers several models of E-SBC. This document covers the setup for the E-SBC platform running ECZ7.3.0 or later. If instructions are needed for other Oracle E-SBC models, please contact your Oracle representative.
Out of Scope
Configuration of Network management including SNMP and RADIUS
What will you need
Hypervisor with console connectivity through the hypervisor
Terminal emulation application such as PuTTY or HyperTerm
Passwords for the User and Super user modes on the Oracle E-SBC
IP address to be assigned to management interface (Wancom0) of the E-SBC - the Wancom0 management interface must be connected and configured to a management network separate from the service interfaces. Otherwise the E-SBC is subject to ARP overlap issues, loss of system access when the network is down, and compromising DDoS protection. Oracle does not support E-SBC configurations with management and media/service interfaces on the same subnet.
IP address of CUCM external facing NIC
IP addresses to be used for the E-SBC internal and external facing ports (Service Interfaces)
IP address of the next hop gateway in the service provider network

Configuring the E-SBC
Once the Oracle SBC is racked and the power cable connected, you are ready to set up physical network connectivity.
Plug the slot 0 port 0 (s0p0) interface into your outside (Bell Canada next-hop facing) network and the slot 1 port 1 (s1p1) interface into your inside (CUCM server-facing) network. Once connected, you are ready to power on and perform the following steps.
All commands are in bold, such as configure terminal; parameters in bold red such as SBC1 are parameters which are specific to an individual deployment. Note: The ACLI is case sensitive.
Establish the serial connection and logging in the SBC
Confirm the SBC is powered off and connect one end of a straight-through Ethernet cable to the front console port (which is active by default) on the SBC and the other end to console adapter that ships with the SBC, connect the console adapter (a DB-9 adapter) to the DB-9 port on a workstation, running a terminal emulator application such as PuTTY. Start the terminal emulation application using the following settings:
Baud Rate=115200
Data Bits=8
Parity=None
Stop Bits=1
Flow Control=None
Power on the SBC and confirm that you see the following output from the bootup sequence.

Enter the following commands to login to the E-SBC and move to the configuration mode. Note that the default E-SBC password is “acme” and the default super user password is “packet”.
Password: acme
SBC1> enable
Password: packet
SBC1# configure terminal SBC1 (configure)# You are now in the global configuration mode. Initial Configuration – Assigning the management Interface an IP address To assign an IP address, one has to configure the bootparams on the E-SBC by going to SBC1#configure terminal --- >bootparams Once you type “bootparam” you have to use “carriage return” key to navigate down A reboot is required if changes are made to the existing bootparams SBC1#(configure)bootparam
'.' = clear field; '-' = go to previous field; q = quit boot
device : eth0 processor number : 0
host name : acmesystem
file name : /boot/nnECZ730m1p1.32.bz --- >location where the
software is loaded on the SBC
inet on ethernet (e) : 192.168.1.22:ffffff80 --- > This is the ip address of the
management interface of the SBC, type the IP address and
mask in hex
inet on backplane (b) :
host inet (h) :
gateway inet (g) : 192.168.1.1 -> gateway address here
user (u) : vxftp
ftp password (pw) (blank = use rsh) : vxftp flags (f) :
target name (tn) : SBC1 -> ACLI prompt name & HA peer name
startup script (s) : other (o) :
Configuring the E-SBC The following section walks you through configuring the Oracle E-SBC. It is outside the scope of this document
to include all of the configuration elements as it will differ in every deployment.

High Availability
For additional information on High Availability please see the enterprise SBC documentation for more
information (http://www.oracle.com/technetwork/indexes/documentation/oracle-comms-acme-packet-
2046907.html). Interfaces wancom1 and 2 need to be added to facilitate HA communication between the two
HA pairs.
phy-interface
name wancom1
operation-type Control
port 1
slot 0
virtual-mac
admin-state enabled
auto-negotiation enabled
duplex-mode FULL
speed 100
wancom-health-score 8
overload-protection disabled
mac-filtering disabled
last-modified-by [email protected]
last-modified-date 2016-07-21 18:12:08
phy-interface
name wancom2
operation-type Control
port 2
slot 0
virtual-mac
admin-state enabled
auto-negotiation enabled
duplex-mode FULL
speed 100
wancom-health-score 9
overload-protection disabled
mac-filtering disabled
last-modified-by [email protected]
last-modified-date 2016-07-21 18:12:15
network-interface
name wancom1
sub-port-id 0
description HA_HEARTBEAT1

hostname
ip-address
pri-utility-addr 169.254.1.1
sec-utility-addr 169.254.1.2
netmask 255.255.255.252
gateway
sec-gateway
gw-heartbeat
state disabled
heartbeat 0
retry-count 0
retry-timeout 1
health-score 0
dns-ip-primary
dns-ip-backup1
dns-ip-backup2
dns-domain
dns-timeout 11
hip-ip-list
ftp-address
icmp-address
snmp-address
telnet-address
ssh-address
network-interface
name wancom2
sub-port-id 0
description HA_HEARTBEAT2
hostname
ip-address
pri-utility-addr 169.254.2.1
sec-utility-addr 169.254.2.2
netmask 255.255.255.252
gateway
sec-gateway
gw-heartbeat
state disabled
heartbeat 0
retry-count 0
retry-timeout 1
health-score 0
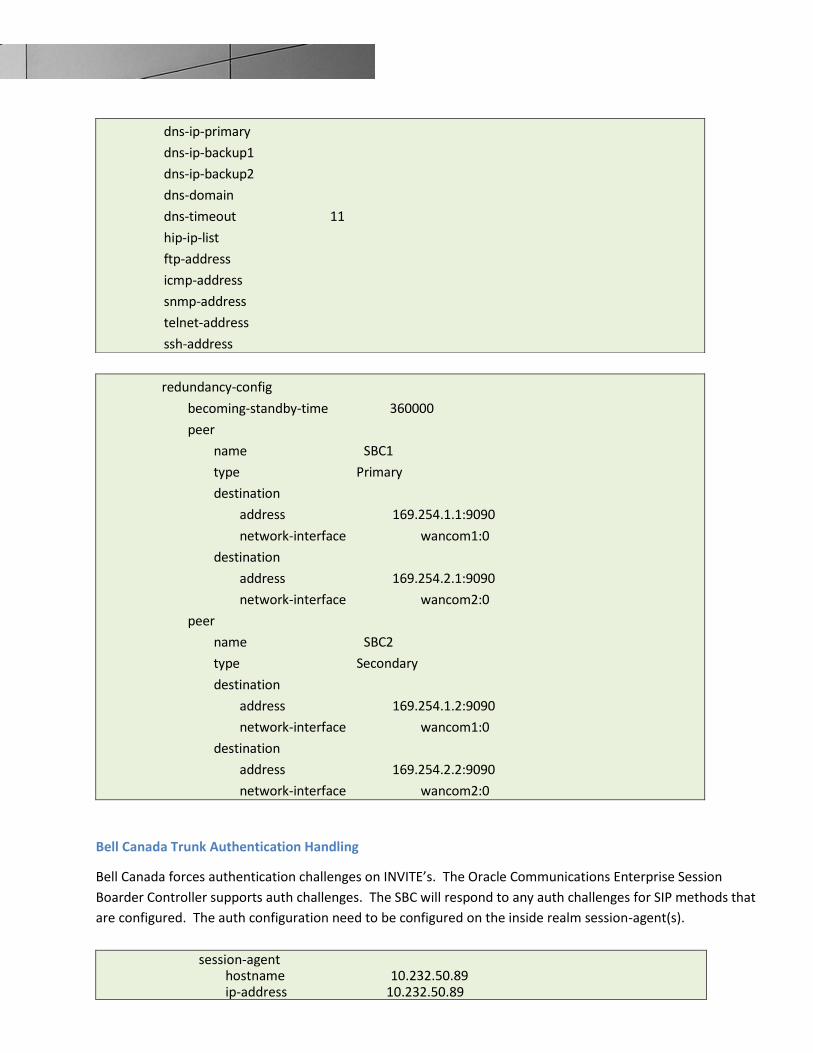
redundancy-config
becoming-standby-time 360000
peer
name SBC1
type Primary
destination
address 169.254.1.1:9090
network-interface wancom1:0
destination
address 169.254.2.1:9090
network-interface wancom2:0
peer
name SBC2
type Secondary
destination
address 169.254.1.2:9090
network-interface wancom1:0
destination
address 169.254.2.2:9090
network-interface wancom2:0
Bell Canada Trunk Authentication Handling Bell Canada forces authentication challenges on INVITE’s. The Oracle Communications Enterprise Session
Boarder Controller supports auth challenges. The SBC will respond to any auth challenges for SIP methods that
are configured. The auth configuration need to be configured on the inside realm session-agent(s).
session-agent hostname 10.232.50.89 ip-address 10.232.50.89
dns-ip-primary
dns-ip-backup1
dns-ip-backup2
dns-domain
dns-timeout 11
hip-ip-list
ftp-address
icmp-address
snmp-address
telnet-address
ssh-address

port 5060 state enabled app-protocol SIP app-type transport-method StaticTCP realm-id cisco-inside … monitoring-filters auth-attributes auth-realm lab.ca username abc_123456_ca password ******** in-dialog-methods INVITE session-recording-server session-recording-required disabled
Header manipulation rules required for the Bell Canada Trunk The header rules Update_Request, Update_To, Update_From and Update_Contact update the host portion of
the URI to the fqdn for Request-URI, To, From and Contact headers according to the Bell Canada Spec. Some
other parameters like otg,user=phone and tgrp are also added to the URI portion of the To and From headers
according to the Bell Canada trunk specification.
sip-manipulation
name To_Bell
description
split-headers
join-headers
header-rule
name Update_Request
header-name request-uri
action manipulate
comparison-type case-sensitive
msg-type any
methods
match-value
new-value
element-rule
name Update_URI_Host
parameter-name
type uri-host
action replace
match-val-type any
comparison-type case-sensitive
match-value

new-value lab.ca
element-rule
name Rmv_User
parameter-name user
type uri-param
action delete-element
match-val-type any
comparison-type case-sensitive
match-value
new-value
element-rule
name Rmv_Port
parameter-name
type uri-port
action delete-element
match-val-type any
comparison-type case-sensitive
match-value
new-value
header-rule
name Update_To
header-name To
action manipulate
comparison-type case-sensitive
msg-type any
methods
match-value
new-value
element-rule
name Update_URI_Host
parameter-name
type uri-host
action replace
match-val-type any
comparison-type case-sensitive
match-value
new-value lab.ca
element-rule
name Rmv_User
parameter-name user
type uri-param

action delete-element
match-val-type any
comparison-type case-sensitive
match-value
new-value
header-rule
name Update_From
header-name from
action manipulate
comparison-type case-sensitive
msg-type any
methods
match-value
new-value
element-rule
name Update_URI_Host
parameter-name
type uri-host
action replace
match-val-type any
comparison-type case-sensitive
match-value
new-value lab.ca
element-rule
name Add_OTG_URI_Param
parameter-name otg
type uri-param
action add
match-val-type any
comparison-type case-sensitive
match-value
new-value abc_ca
element-rule
name Rmv_UriParam_User
parameter-name user
type uri-param
action add
match-val-type any
comparison-type case-sensitive
match-value
new-value phone

header-rule
name Update_Contact
header-name Contact
action manipulate
comparison-type case-sensitive
msg-type any
methods INVITE
match-value
new-value
element-rule
name Add_tgrp
parameter-name tgrp
type uri-user-param
action add
match-val-type any
comparison-type case-sensitive
match-value
new-value abc_ca
element-rule
name Add_trunk_context
parameter-name trunk-context
type uri-user-param
action add
match-val-type any
comparison-type case-sensitive
match-value
new-value lab.ca
The header rule Max-Forwards_0 changes the Max-forwards header in the OPTIONS message to 0, and the
header-rule
name Max_Forward_0
header-name Max-Forwards
action manipulate
comparison-type pattern-rule
msg-type request
methods OPTIONS
match-value
new-value 0
header-rule
name Rmv_UserAgent_Hdr
header-name user-agent

action delete
comparison-type case-sensitive
msg-type any
methods
match-value
new-value
The below set of header rules store the Diversion header in case it is present, if not then a new one is added. This Diversion header contains the BTN/Pilot number and is the responsibility of the administrator to configure. The Update_Diversion header rule adds the uri-params otg and user to the Diversion header according to the Bell spec.
header-rule
name save_Diversion
header-name Diversion
action store
comparison-type case-sensitive
msg-type any
methods
match-value
new-value
header-rule
name Chk_Add_Diversion
header-name Diversion
action manipulate
comparison-type boolean
msg-type any
methods INVITE
match-value !$save_Diversion
new-value <sip:<613xxxxxxx>@domain-name;user=phone>
header-rule
name Update_Diversion
header-name Diversion
action manipulate
comparison-type case-sensitive
msg-type any
methods
match-value !$save_Diversion
new-value
element-rule
name Update_URI_Host

parameter-name
type uri-host
action replace
match-val-type any
comparison-type case-sensitive
match-value
new-value lab.ca
element-rule
name Add_OTG_URI_Param
parameter-name otg
type uri-param
action add
match-val-type any
comparison-type case-sensitive
match-value
new-value abc_ca
element-rule
name Del_User_Param
parameter-name user
type uri-param
action add
match-val-type any
comparison-type case-sensitive
match-value
new-value
The below set of header rules update the host portion of the PAI header to a FQDN specified by Bell, also adding
the uri-param otg and user=phone.
header-rule
name Update_PAI
header-name P-Asserted-Identity
action manipulate
comparison-type case-sensitive
msg-type any
methods
match-value
new-value
element-rule
name Update_URI_Host

parameter-name
type uri-host
action replace
match-val-type any
comparison-type case-sensitive
match-value
new-value lab.ca
element-rule
name Add_User_UriParam
parameter-name user
type uri-param
action add
match-val-type any
comparison-type case-sensitive
match-value
new-value phone
element-rule
name Add_OTG_URI_Param
parameter-name otg
type uri-param
action add
match-val-type any
comparison-type case-sensitive
match-value
new-value abc_ca
The below set of header-rules store the Referred-By header in case of call transfers using the REFER method. The Referred-By header is stored and then added back as the Diversion header on the INVITE sent out to the trunk, and then deleted so that it’s not passed on to the trunk.
header-rule
name save_Referred_By
header-name Referred-by
action store
comparison-type case-sensitive
msg-type request
methods INVITE
match-value
new-value
element-rule

name Fix_URI_Host
parameter-name
type uri-host
action replace
match-val-type any
comparison-type case-sensitive
match-value
new-value lab.ca
header-rule
name Referred_By_2_Div
header-name Diversion
action add
comparison-type boolean
msg-type any
methods INVITE
match-value $save_Referred_By
new-value $save_Referred_By.$0
element-rule
name Update_URI_Host
parameter-name
type uri-host
action replace
match-val-type any
comparison-type case-sensitive
match-value
new-value lab.ca
header-rule
name RmvReferredBy
header-name Referred-by
action delete
comparison-type case-sensitive
msg-type any
methods
match-value
new-value
The below two header rules delete the Call-Info and Cisco-GUID headers sent by CUCM which are not required
on the trunk side.
header-rule
name Rmv_CallInfo

header-name Call-Info
action delete
comparison-type case-sensitive
msg-type any
methods
match-value
new-value
header-rule
name Rmv_CiscoGUID
header-name Cisco-Guid
action delete
comparison-type case-sensitive
msg-type any
methods
match-value
new-value
Webserver Configuration
A webserver is available on all Enterprise versions of Oracle E-SBCs. The Webserver can be used to provide tracing,
configuration and dashboard info. For tracing info, 2 parts must be configured.
The webserver must be enabled.
Tracing filters must be applied.
web-server-config
state enabled
inactivity-timeout 5
http-state enabled
http-port 80
https-state disabled
https-port 443
tls-profile
sip-monitoring
match-any-filter disabled
state enabled
short-session-duration 0
monitoring-filters *
trigger-window 30

Phase 2 – Configuring the Cisco Unified Call Manager v10.5
The enterprise will have a fully functioning CUCM v10.5 installed and deployed for this certification.
There are a few parts for configuring CUCM v10.5 to be configured and connected to operate with the Oracle E-SBC:
Creating a SIP profile in CUCM and enabling OPTIONS ping to pro-actively monitor the SIP connectivity with the SBC
Adding the SBC as a trunk to the CUCM infrastructure
Creating a route pattern in the CUCM configuration to utilize the configured SBC trunk and route calls from CUCM to the SBC
Additional configuration to add Directory Numbers, Phones to register to the CUCM and enabling a DHCP server for assigning IP addresses to Cisco phones

Creating a SIP Profile in CUCM
To add a new SIP Profile in CUCM, login into the CUCM console, use the Device --- > Device settings --- > SIP Profile menu path in CUCM. Click on Add new and following are the settings, rest can be default:

Adding the E-SBC as a trunk in CUCM
The following process details the steps to add the SBC as a trunk in CUCM Web UI
1. On the CUCM administration console (UI), maneuver to Device --- > Trunk. Click on New
2. Select SIP Trunk from the Trunk Type drop down menu and protocol will also be SIP
3. Let default of none be selected on the Trunk service type
4. Following 2 screenshots are the other settings to be configured on the Trunk, all other parameters set to default

Creating a route Pattern in CUCM
Route pattern in CUCM take the form of regular expressions to define specific routes and give flexibility in network design for dialing outbound calls from CUCM users to the PSTN via the E-SBC. A route pattern comprises a string of digits (an address) and a set of associated digit manipulations that route calls to a route list or a gateway/trunk. In CUCM administration console, use the Call Routing --- >Route/Hunt --- >Route Pattern menu path to configure route patterns. Follow the fields I the screenshots below:


Adding DHCP server and subnet in CUCM
In CUCM administration console, use the System --- >DHCP --- >DHCP Server menu path to define/add a new DHCP server. Use the IP address of the CUCM as the DHCP server/primary/secondary TFTP server address for the phones. Phones will use DHCP option 150 to discover the address of CUCM and request an IP address. Below is the screenshot for the same:
1. The Topology Builder window will now be displayed. Click on Action and select Download Topology.

Add a DHCP subnet from the same menu path: System --- >DHCP --- > DHCP subnet

Adding Devices/Phones and configuring Directory numbers
Cisco phones need to be added in CUCM by way of their MAC address and assigned to a specific user and then when powered on, they obtain an IP address in the CUCM topology with the subnet defined in CUCM administration console. Use the Device --- > Phone menu path to add new devices. One will need to define the template based on the device being configured, for example Cisco 9971 phone template as in the screenshots below. Also, some highlights of the configuration to add a user and configure a directory number (DN) to it in CUCM are shown below:
The CUCM is now ready to send/receive calls and establish SIP connectivity with the Oracle E-SBC.

Test Plan Caveats and out of scope items: Fax was not tested because the Lab CM did not have an analog card to test these capability there for Fax is considered out of scope for this testing. Following is the test plan executed against this setup and results have been documented below.
ID Test Case Title Status
1000 Section 1
1100 SIP Connectivity
1101 Validate syntax of OPTIONS messages sent to service provider p
1102 Validate syntax of OPTIONS messages sent from service provider
p
1103 Validate in service reponse codes to OPTIONS messages from provider
p
1104 Validate in service reponse codes to OPTIONS messages to provider
p
1105 Validate OPTIONS messages are not sent more than once every 10 seconds to provider
p
2000 Section 2
2100 Initial Calls To/From External Phones
2101
Inbound call from an external phone to an enterprise extension. Hang-up at called party (enterprise extension). Wait for calling party to disconnect. Validate proper SIP header syntax, ringback tone, two-way audio and proper call clearance
p
2102
Inbound call from an external phone to an enterprise extension. Hang-up at calling party (PSTN phone). Wait for called party to disconnect. Validate proper SIP header syntax, ringback tone, two-way audio and proper call clearance
p
2103
Outbound call from an enterprise extension to an external phone. Hang-up at called party (PSTN phone). Wait for calling party to disconnect. Make sure originating party is properly identified (Diversion/History-Info, PAI or From- in that order), using exactly 10 digits for the user part and the domain matching this TN's "PBX" (to which its TG is assigned). Also validate "tgrp/trunk-context" in Contact, if doing explicit TG selection (usually for Toll-bypass). Validate ringback tone, two-way audio and proper call clearance
p
2104
Outbound call from an enterprise extension to an external phone. Hang-up at calling party (enterprise extension). Wait for called party to disconnect. Make sure originating party is properly identified (Diversion/History-Info, PAI or From- in that order), using exactly 10 digits for the user part and the domain matching this TN's "PBX" (to which its TG is assigned). Also validate "tgrp/trunk-context" in Contact, if doing explicit TG selection (usually for Toll-bypass).
p

Validate ringback tone, two-way audio and proper call clearance
2105 Trunk Group Selection: test absense of explicit trunk group selection
p
2106 Trunk Group Selection: testtrunk group selection with tgrp tag p
2107 Trunk Group Selection: testtrunk group selection with otg tag p
3000 Section 3
3100 Incomplete Call Attempts
3101 Inbound call from an external phone to an enterprise extension. Hang-up before far-end answers.
p
3102 Outbound call from an enterprise extension to an external phone. Hang-up before far-end answers.
p
3103 No Answer of inbound call from an external phone to an enterprise extension. (No explicit rules on CPE. Let extension ring.)
p
3104 No Answer of outbound call from an enterprise extension to an external phone.
p
3105 Inbound call from an external phone to an enterprise extension that is “Busy”.
p
3107 Inbound call from an external phone to an unassigned enterprise extension.
p
3108 Outbound call from an enterprise extension to an invalid external number (Note that this also happens to test CPE support for early media)
p
3109 Validation of explicit treatments/terminating responses to basic conditions (busy, no circuit avail, bldn etc)
p
4000 Section 4
4100 Codec Support and Negotiation with Hard Phones
4101 Whenever the CPE sends out SDP, the Content-Type must be "application/sdp"
p
4102 Validate inbound G.729 calls p
4103 Validate outbound G.729 calls (annexb=no is required) p
5000 Section 5
5100 Voicemail and DTMF Tone Support
5101 Inbound call from an external phone to an enterprise extension, transfer to voicemail. Leave a message.
p
5102 Inbound call from an external phone to an enterprise extension, let ring for close to 2 minutes, then transfer to voicemail. Leave a message.
p
5103 Login to enterprise voicemail and retrieve message from 5102. p
5104 Outbound call to an external number, transfer to voicemail. (Ex. Call office or cell phone with voicemail). Leave a message.
p
5105 Login to external voicemail and retrieve message from 5104. p
5108 RFC2833 DTMF sent from the CPE outbound to an external device are recognised by the recieving equipment
p

5109 RFC2833 DTMF sent from an external device inbound to the CPE are recognised by the recieving equipment
p
5111 Inband (Q.24) DTMF sent from an external device inbound to the CPE are recognised by the recieving equipment
p
6000 Section 6
6100 PSTN Numbering Plans
6101 Inbound Call p
6102 Outbound Toll-Free Call p
6103 Outbound Local Call p
6104 Outbound International Calls (011)961-865-0650
p
6105 Operator call (0) p
6106 Operator Assisted Calls (e.g. 0+10 digits in US)
6107 Validation of e.164 handling on DID p
6108 Validation number plan format is correct across all headers according to interop spec
p
6109 Operator Assisted International Call (e.g. 0+1 8 to 35 digits) p
6110 Casual Dial: 101+xxxx+NDC call (from 13 to 40 digits) p
6111 n11 call (e.g. 211) p
6112 911 call
p
6113 1-xxx-555-1212 call p
6114 310-xxxx call p
6115 1-700-xxx-xxxx call p
6118 Operator-assisted long-distance call (00) p
7000 Section 7 - Calling Name and Number Presentation
7100 Static ONND
7101 Outbound call with Static ONND - using only the From header and a pre-provisioned number (with user=phone)
p
7102 Outbound call with Static ONND - using the P-Asserted-Identify header and a pre-provisioned number (with user=phone)
p
7103 Outbound call with Static ONND - using explicit trunk group selection (with user=phone)
p
7104 Outbound call with Static ONND - using the Diversion header without PAI (with user=phone)
p
7105 Outbound call with Static ONND - using the Diversion header (valid Bell number) with PAI (with user=phone)
p
7106 Outbound call with Static ONND - using the Diversion header (external number) with PAI (with user=phone and implicit trunk group selection)
p
7107 Outbound call with Static ONND - using the Diversion header (external number) with PAI (with user=phone and explicit trunk group selection)
p
7108 Validate proper syntax used in PAI, PPI, From and Diversion for CNAM/CLID display on outbound calls
p
7200 Dynamic ONND

7201 Outbound call with Dynamic ONND - using the From header (without user=phone)
p
7202 Outbound call with Dynamic ONND - using the P-Asserted-Identify header (without user=phone)
p
7203 Outbound call with Dynamic ONND - using the Diversion header (with user=phone ) without PAI and using a valid Bell SIP Trunking number in both the Diversion and From
p
7204 Outbound call with Dynamic ONND - using the Diversion header (with user=phone ) without PAI and using an external number in either the Diversion or From
p
7205 Outbound call with Dynamic ONND - using the Diversion header (with user=phone) with PAI and using a valid Bell SIP Trunking number in both the Diversion and PAI
p
7206 Outbound call with Dynamic ONND - using the Diversion header (with user=phone) with PAI and using an external number in the Diversion
p
7207 Outbound call with Dynamic ONND to party A, transfer via tromboning to party B
p
7209 Validate proper syntax used in PAI, PPI, From and Diversion for CNAM/CLID display on outbound calls
p
7300 Private and Unknown Calls
7301 Place an outbound private call. Validate privacy header syntax and interworking on outbound private call against Bell spec and document differences.
p
7302 Place an inbound private call. Validate privacy header syntax and interworking on inbound private call against Bell spec and document differences. CPE must respect the privacy header.
p
7303 Validate handling of incoming unknown calls p
7304 Validate handling of incoming calls when not subscribed to Calling Line ID Delivery
p
8000 Section 8
8100 Supplementary Features – Call Hold
8101 Inbound Call – PBX Hold and Resume (No music) – Short Hold Duration
p
8102 Inbound Call – PBX Hold and Resume (With music) – Short Hold Duration
p
8103 Outbound Call – PBX Hold and Resume No music) – Short Hold Duration
p
8104 Outbound Call – PBX Hold and Resume (With music) – Short Hold Duration
p
8105 Inbound Call – PSTN Hold and Resume (No music) – Short Hold Duration
p
8106 Inbound Call – PSTN Hold and Resume (With music) – Short Hold Duration
p
8107 Outbound Call – PSTN Hold and Resume (No music) – Short Hold Duration
p
8108 Outbound Call – PSTN Hold and Resume (With music) – Short Hold Duration
p

8109 Inbound Call - PBX Hold and Resume (No music) – Long Hold Duration that exceeds the SIP session timers (~10 min)
p
8110 Inbound Call - PBX Hold and Resume (With music) – Long Hold Duration that exceeds the SIP session timers (~10 min)
p
8111 Outbound Call - PBX Hold and Resume (No music) – Long Hold Duration that exceeds the SIP session timers (~10 min)
p
8112 Outbound Call - PBX Hold and Resume (With music) – Long Hold Duration that exceeds the SIP session timers (~10 min)
p
8113 Inbound Call - PSTN Hold and Resume (No music) – Long Hold Duration that exceeds the SIP session timers (~10 min)
p
8114 Inbound Call - PSTN Hold and Resume (With music) – Long Hold Duration that exceeds the SIP session timers (~10 min)
p
8115 Outbound Call - PSTN Hold and Resume (No music) – Long Hold Duration that exceeds the SIP session timers (~10 min)
p
8116 Outbound Call - PSTN Hold and Resume (With music) – Long Hold Duration that exceeds the SIP session timers (~10 min)
p
8200 Supplementary Features – Call Forward
8203 Call Forwarding (All) to External Number (Off-net) - Tromboning
p
8206 Call Forwarding (No Answer) to External Number (Off-net) – Tromboning
p
8209 Call Forwarding (Busy) to External Number (Off-net) – Tromboning
p
8300 Supplementary Features – Call Transfer, Conference
8302 Blind Call Transfer of inbound call: Transfer to External Number (Tromboning)
p
8304 Blind Call Transfer of inbound call: Transfer to Internal Number (Tromboning)
p
8306 Blind Call Transfer of outbound call: Transfer to External Number (Tromboning)
p
8308 Blind Call Transfer of outbound call: Transfer to Internal Number (Tromboning)
p
8309 Attended Transfer of inbound call: Transfer to External Number (Tromboning)
p
8310 Attended Transfer of inbound call: Transfer to Internal Number (Tromboning)
p
8311 Attended Transfer of outbound call: Transfer to External Number (Tromboning)
p
8312 Attended Transfer of outbound call: Transfer to Internal Number (Tromboning)
p
8313 Validate call park and unpark p
9000 Section 9
9100 Failover
9101 Validate handling of ICMP unreachable messages on a new call, by pointing CPE primary IP to unreachable IP
p
9102 Validate handling of bell SBC silently discarding packets on a new call, by pointing to 207.236.202.114:50505
p

9103 Validate handling of SIP 503 responses on a new call, by pointing to 207.236.202.114:50503
p
9104 Validate Handling of out service response codes to OPTIONS pings, out of service codes are anything other then 200 and 483 by pointing to 207.236.202.114:50504
p
9105 Validate traffic to CPE from multiple Bell IPs in order to simulate SBC failover. Requires Bell participation.
p
11000 Section 11
11100 Miscellaneous
11101 Validate handling of multiple concurrent calls for the same number
p
11102 Long Duration Calls - Inbound
p
11103 Long Duration Calls - Outbound
p
11104 Outgoing call with wrong DID number or wrong PBX domain. p
11105 (Optional) Validate handling of outbound call to full TG (403 Forbidden)
p
11106 Validate handling of session audits every 5 or 10 min (UPDATE or re-INVITE)
p
11107 Validate handling of CPE-initiated session audits p
Caveats: For call transfers, the INVITE sent from the CUCM to the transferred phone does not have the transferee phone number in the SIP messaging, hence the CLID on the call transfer target shows as the transferor and not the transferee.
Troubleshooting Tools
Wireshark Wireshark is also a network protocol analyzer which is freely downloadable from www.wireshark.org.
On the Oracle E-SBC The Oracle E-SBC provides a rich set of statistical counters available from the ACLI, as well as log file output
with configurable detail. The follow sections detail enabling, adjusting and accessing those interfaces.
Resetting the statistical counters, enabling logging and restarting the log files. At the E-SBC Console:
SBC1# reset sipd
SBC1# notify sipd debug
SBC1#
enabled SIP Debugging SBC1# notify all rotate-logs

Examining the log files Note: You will FTP to the management interface of the E-SBC with the username user and user mode password (the default is
“acme”
C:\Documents and Settings\user>ftp 192.168.1.22
Connected to 192.168.85.55.
220 SBC1 server (VxWorks 6.4) ready. User (192.168.1.22:(none)): user
331 Password required for user. Password: acme
230 User user logged in.
ftp> cd /opt/logs
250 CWD command successful. ftp> get sipmsg.log
200 PORT command successful.
150 Opening ASCII mode data connection for '/opt/logs/sipmsg.log' (3353 bytes).
226 Transfer complete.
ftp: 3447 bytes received in 0.00Seconds 3447000.00Kbytes/sec. ftp> get log.sipd
200 PORT command successful.
150 Opening ASCII mode data connection for '/opt/logs/log.sipd' (204681 bytes).
226 Transfer complete.
ftp: 206823 bytes received in 0.11Seconds 1897.46Kbytes/sec
You may now examine the log files with the text editor of your choice. Through the Web GUI You can also check the display results of filtered SIP session data from the Oracle Enterprise Session Border Controller, and
provides traces in a common log format for local viewing or for exporting to your PC. Please check the “Monitor and Trace” se ction (page 145) of the Web GUI User Guide available at http://docs.oracle.com/cd/E56581_01/index.htm

Appendix A
Full E-SBC Configuration
codec-policy name prefer_729 allow-codecs telephone-event G729 PCMU order-codecs G729 PCMU telephone-event local-policy from-address * to-address * source-realm cisco-inside policy-attribute next-hop SAG:BellSIPTrunkGRP1 realm outside action replace-uri local-policy from-address * to-address * source-realm outside policy-attribute next-hop 10.232.50.89 action replace-uri media-manager initial-guard-timer 86400 subsq-guard-timer 86400 media-profile name G729 payload-type 18 parameters annexb=no media-profile name PCMA payload-type 8 media-profile name PCMU payload-type 0 network-interface name s0p0 description outside ip-address 150.200.200.160 netmask 255.255.255.0 gateway 150.200.200.1 hip-ip-list 150.200.200.160 icmp-address 150.200.200.160 ssh-address 150.200.200.160 network-interface name s1p1 ip-address 10.232.50.20 netmask 255.255.255.0 hip-ip-list 10.232.50.20

ftp-address 10.232.50.20 icmp-address 10.232.50.20 ssh-address 10.232.50.20 network-interface name wancom1 description HA_HEARTBEAT1 pri-utility-addr 169.254.1.1 sec-utility-addr 169.254.1.2 netmask 255.255.255.252 network-interface name wancom2 description HA_HEARTBEAT2 pri-utility-addr 169.254.2.1 sec-utility-addr 169.254.2.2 netmask 255.255.255.252 phy-interface name s0p0 operation-type Media phy-interface name s1p1 operation-type Media port 1 slot 1 phy-interface name wancom1 port 1 wancom-health-score 8 phy-interface name wancom2 port 2 wancom-health-score 9 realm-config identifier cisco-inside network-interfaces s1p1:0 realm-config identifier outside network-interfaces s0p0:0 codec-policy prefer_729 redundancy-config becoming-standby-time 360000 peer name SBC1 type Primary destination address 169.254.1.1:9090 network-interface wancom1:0 destination address 169.254.2.1:9090 network-interface wancom2:0

peer name SBC2 type Secondary destination address 169.254.1.2:9090 network-interface wancom1:0 destination address 169.254.2.2:9090 network-interface wancom2:0 session-agent hostname 10.232.50.89 ip-address 10.232.50.89 transport-method StaticTCP realm-id cisco-inside ping-method OPTIONS ping-interval 90 auth-attributes auth-realm lab.ca username abc_123456_ca password ******** in-dialog-methods INVITE auth-attributes auth-realm test session-agent hostname 207.236.202.114 ip-address 207.236.202.114 port 50504 realm-id outside ping-interval 30 out-service-response-codes 503 session-agent hostname 200.236.200.170 ip-address 200.236.200.170 ping-method OPTIONS ping-interval 90 out-manipulationid To_Bell session-agent hostname 60.150.190.70 ip-address 60.150.190.70 realm-id outside ping-interval 90 ping-in-service-response-codes 200,483 out-manipulationid To_Bell session-group group-name BellSIPTrunkGRP1 dest 60.150.190.70 200.236.200.170 sag-recursion enabled session-timer-profile

name test session-expires 400 force-reinvite enabled session-translation id addplus1 rules-called addplus1 sip-config options max-udp-length=0 session-timer-support sip-interface realm-id cisco-inside sip-port address 10.232.50.20 transport-protocol TCP allow-anonymous agents-only session-timer-profile test sip-interface realm-id outside sip-port address 150.200.200.160 allow-anonymous agents-only initial-inv-trans-expire 6 add-sdp-invite invite add-sdp-profiles PCMU PCMA G729 session-timer-profile test sip-manipulation name To_Bell header-rule name Update_Request header-name request-uri action manipulate element-rule name Update_URI_Host type uri-host action replace new-value lab.ca element-rule name Rmv_User parameter-name user type uri-param action delete-element element-rule name Rmv_Port type uri-port action delete-element element-rule name Update_URI_User

type uri-user comparison-type pattern-rule match-value \+?(\d+) new-value \++$1 header-rule name Update_To header-name To action manipulate element-rule name Update_URI_Host type uri-host action replace new-value lab.ca element-rule name Rmv_User parameter-name user type uri-param action delete-element element-rule name Update_URI_User type uri-user comparison-type pattern-rule match-value \+?(\d+) new-value \++$1 header-rule name Update_From header-name from action manipulate element-rule name Update_URI_Host type uri-host action replace new-value lab.voice.ca element-rule name Add_OTG_URI_Param parameter-name otg type uri-param new-value abc_123456_ca element-rule name Rmv_UriParam_User parameter-name user type uri-param action add new-value phone header-rule name Update_Contact header-name Contact action manipulate methods INVITE

element-rule name Add_User type uri-user new-value 613xxxxxxx element-rule name Add_tgrp parameter-name tgrp type uri-user-param new-value abc_123456_ca element-rule name Add_trunk_context parameter-name trunk-context type uri-user-param new-value lab.ca header-rule name Max_Forward_0 header-name Max-Forwards action manipulate comparison-type pattern-rule msg-type request methods OPTIONS new-value 0 header-rule name Rmv_UserAgent_Hdr header-name user-agent action delete header-rule name save_Diversion header-name Diversion action store header-rule name Chk_Add_Diversion header-name Diversion action manipulate comparison-type boolean methods INVITE match-value $save_Diversion new-value <sip:[email protected];user=phone> header-rule name Update_Diversion header-name Diversion match-value !$save_Diversion element-rule name Update_URI_Host type uri-host action replace new-value lab.voice.ca element-rule name Add_OTG_URI_Param

parameter-name otg type uri-param new-value abc_123456_ca element-rule name Chg_Tmp_UriUser type uri-user action replace new-value 7207759641 element-rule name Del_User_Param parameter-name user type uri-param header-rule name Rmv_Priv_Hdr header-name Privacy header-rule name Update_PAI header-name P-Asserted-Identity action manipulate element-rule name Update_URI_Host type uri-host action replace new-value lab.voice.ca element-rule name Add_User_UriParam parameter-name user type uri-param action add new-value phone element-rule name Add_OTG_URI_Param parameter-name otg type uri-param new-value abc_123456_ca element-rule name Add_User type uri-user new-value 7207759641 header-rule name save_Referred_By header-name Referred-by action store msg-type request methods INVITE element-rule name Fix_URI_Host type uri-host action replace

new-value lab.voice.ca header-rule name Referred_By_2_Div header-name Diversion action add comparison-type boolean methods INVITE match-value $save_Referred_By new-value $save_Referred_By.$0 element-rule name Update_URI_Host type uri-host action replace new-value lab.voice.ca header-rule name RmvReferredBy header-name Referred-by action delete header-rule name Rmv_CallInfo header-name Call-Info action delete header-rule2 name Rmv_CiscoGUID header-name Cisco-Guid action delete sip-monitoring monitoring-filters * steering-pool ip-address 10.232.50.20 start-port 40000 end-port 60000 realm-id cisco-inside steering-pool ip-address 150.200.200.160 start-port 49152 end-port 49200 realm-id outside system-config process-log-level DEBUG default-gateway 172.18.0.1 translation-rules id addplus1 type add add-string 01 delete-string +1 web-server-config

Appendix B
Accessing the ACLI Access to the ACLI is provided by:
o The serial console connection;
o TELNET, which is enabled by default but may be disabled; and
o SSH, this must be explicitly configured.
Initial connectivity will be through the serial console port. At a minimum, this is how to configure the
management (eth0) i nterface on the E-SBC.
ACLI Basics There are two password protected modes of operation within the ACLI, User mode and Superuser mode.
When you establish a connection to the E-SBC, the prompt for the User mode password appears. The
default password is acme. User mode consists of a restricted set of basic monitoring commands and is
identified by the greater than sign (>) in the system
prompt after the target name. You cannot perform configuration and maintenance from this mode.

The Superuser mode allows for access to all system commands for operation, maintenance, and
administration. This mode is identified by the pound sign (#) in the prompt after the target name. To enter
the Superuser mode, issue the enable command i n the User mode.
From the Superuser mode, you can perform monitoring and administrative tasks; however you cannot
configure any elements. To return to User mode, issue the exit command.
You must enter the Configuration mode to configure elements. For example, you can access the configurati on
branches and configuration elements for signaling and media configurations. To enter the Configuration
mode, issue the configure terminal command in the Superuser mode. Configuration mode is identified by the word configure in parenthesis followed by the pound sign (#) in the
prompt after the target name, for example, SBC1 (configure)#. To return to the Superuser mode, issue the
exit command.

In the configuration mode, there are six configuration branches:
bootparam;
ntp-sync;
media-manager;
session-router;
system; and
security. The ntp-sync and bootparams branches are flat branches (i.e., they do not have elements inside the
branches). The rest of the branches have several elements under each of the branches.
The bootparam branch provides access to E-SBC boot parameters. Key boot parameters include: boot device – The global management port, usually eth0
file name – The boot path and the image file.
inet on ethernet – The IP address and subnet mask (in hex) of the management port of the SD.
host inet –The IP address of external server where image file resides.
user and ftp password – Used to boot from the external FTP server.
gateway inet – The gateway IP address for reaching the external server, if the server is located in a different network.

The ntp-sync branch provides access to ntp server configuration commands for synchronizing the
E-SBC time and date. The security branch provides access to security configuration.
The system branch provides access to basic configuration elements as
system-config, snmp-community, redundancy, physical interfaces,
network interfaces, etc.
The session-router branch provides access to signaling and routing related elements, including
H323-config, sip-config, iwf-config, local-policy, sip-manipulation, session-agent, etc. The media-manager branch provides access to media-related elements, including realms, steering pools,
dns-config, media- manager, and so forth.
You will use media-manager, session-router, and system branches for most of your working configuration.

Configuration Elements The configuration branches contain the configuration elements. Each configurable object is referred to
as an element. Each element consists of a number of configurable parameters.
Some elements are single-instance elements, meaning that there is only one of that type of the element -
for example, the global system configuration and redundancy configuration.
Some elements are multiple-instance elements. There may be one or more of the elements of any given
type. For example, physical and network interfaces.
Some elements (both single and multiple instance) have sub-elements. For example: SIP-ports - are children of the sip-interface element
peers – are children of the redundancy element
destinations – are children of the peer element
Creating an Element o To create a single-instance element, you go to the appropriate level in the ACLI path and enter its
parameters. There is no need to specify a unique identifier property because a single-instance element
is a global element and there is only one instance of this element.
o When creating a multiple-instance element, you must specify a unique identifier for each instance of
the element.
o It is important to check the parameters of the element you are configuring before committing the
changes. You do this by issuing the show command before issuing the done command. The parameters
that you did not configure are filled with either default values or left empty.
o On completion, you must issue the done command. The done command causes the configuration to
be echoed to the screen and commits the changes to the volatile memory. It is a good idea to review
this output to ensure that your configurations are correct.
o Issue the exit command to exit the selected element.
o Note that the configurations at this point are not permanently saved yet. If the E-SBC reboots, your
configurations will be lost.
Editing an Element The procedure of editing an element is similar to creating an element, except that you must select the
element that you will edit before editing it.
Enter the element that you will edit at the correct level of the ACLI path.

Select the element that you will edit, and view it before editing it. The select command loads the element to the volatile memory for editing. The show command allows
you to view the element to ensure that it is the right one that you want to edit.
Once you are sure that the element you selected is the right one for editing, edit the parameter
one by one. The new value you provide will overwrite the old value.
It is important to check the properties of the element you are configuring before committing it to the
volatile memory. You do this by issuing the show command before issuing the done command.
On completion, you must issue the done command.
Issue the exit command to exit the selected element. Note that the configurations at this point are not permanently saved yet. If the E-SBC reboots, your configurations will be lost.
Deleting an Element The no command deletes an element from the configuration in editing. To delete a single-instance element,
Enter the no command from within the path for that specific element
Issue the exit command. To delete a multiple instance element,
Enter the no command from within the path for that particular element.
The key field prompt, such as <name>:<sub-port-id>, appears. Use the <Enter> key to display a list of the existing configured elements. Enter the number corresponding to the element you wish to delete. Issue the select command to view the list of elements to confirm that the element was removed. Note that the configuration changes at this point are not permanently saved yet. If the E-SBC reboots, your configurations will be lost.
Configuration Versions At any time, three versions of the configuration can exist on the E-SBC: the edited configuration, the saved
configuration, and the running configuration.
The edited configuration – this is the version that you are making changes to. This version of the
configuration is stored in the E-SBC’s volatile memory and will be lost on a reboot.
To view the editing configuration, issue the show configuration command

The saved configuration – on issuing the save-config command, the edited configuration is copied into
the non- volatile memory on the E-SBC and becomes the saved configuration. Because the saved
configuration has not been activated yet, the changes in the configuration will not take effect. On
reboot, the last activated configuration (i.e., the last running configuration) will be loaded, not the
saved configuration.
The running configuration is the saved then activated configuration. On issuing the activate-config
command, the saved configuration is copied from the non-volatile memory to the volatile memory.
The saved configuration is activated and becomes the running configuration. Although most of the
configurations can take effect once being activated without reboot, some configurations require a
reboot for the changes to take effect.
To view the running configuration, issue command show running-config.
Saving the Configuration The save-config command stores the edited configuration persistently. Because the saved configuration has not been activated yet, changes in configuration will not take effect. On
reboot, the las t activated configuration (i.e., the last running configuration) will be loaded. At this stage, the
saved configuration is different from the running configuration.
Because the saved configuration is stored in non-volatile memory, it can be accessed and activated at later time. Upon issuing the save-config command, the E-SBC displays a reminder on screen stating that you must use the activate- config command if you want the configurations to be updated.
SBC1 # save-config
Save-Config received, processing. waiting 1200 for
request to finish Request to 'SAVE-CONFIG' has
Finished, Save complete
Currently active and saved configurations do not match!
To sync & activate, run 'activate-config' or 'reboot activate'.
SBC1
Activating the Configuration On issuing the activate-config command, the saved configuration is copied from the non-volatile memory
to the volatile memory. The saved configuration is activated and becomes the running configuration. Some configuration changes are service affecting when activated. For these configurations, the E-SBC warns
that the change could have an impact on service with the configuration elements that will potentially be
service affecting. You may decide whether or not
to continue with applying these changes immediately or to apply them at a later time.
SBC1# activate-config Activate-Config received,
processing. waiting 120000 for request to finish Request
to 'ACTIVATE-CONFIG' has Finished, Activate Complete SBC1#
Oracle Corporation
World Headquarters
500 Oracle Parkway
Redwood Shores, CA 94065
U.S.A.
Worldwide Inquiries:
Phone: +1.650.506.7000
Fax: +1.650.506.7200
racle.com
Copyright © 2013, Oracle and/or its affiliates. All rights reserved. This document is provided for information purposes only, and the contents hereof are
subject to change without notice. This document is not warranted to be error-free, nor subject to any other warranties or conditions, whether expressed
orally or implied in law, including implied warranties and conditions of merchantability or fitness for a particular purpose. We specifically disclaim any
liability with respect to this document, and no contractual obligations are formed either directly or indirectly by this docu ment. This document may not be
reproduced or transmitted in any form or by any means, electronic or mechanical, for any purpose, without our prior written permission.
Oracle and Java are registered trademarks of Oracle and/or its affiliates. Other names may be trademarks of their respective owners.
Intel and Intel Xeon are trademarks or registered trademarks of Intel Corporation. All SPARC trademarks are used under license and are trademarks or
registered trademarks of SPARC International, Inc. AMD, Opteron, the AMD logo, and the AMD Opteron logo are trademarks or reg istered trademarks
of Advanced Micro Devices. UNIX is a registered trademark of The Open Group. 0716