technical white paper imaging the hp z240 workstationh20195. · 3 technical white paper imaging the...
TRANSCRIPT

Technical white paper
Imaging the HP Z240 Workstationwith Windows 10 Pro (64-bit) and Microsoft Deployment Toolkit (MDT) 2013 v1.2

2
Technical white paper | Imaging the HP Z240 Workstation
A system image enables you to automate the deployment of computers in your organization. This document provides step-by-step guidance on how to image HP Z240 Workstations with Windows 10 Pro using the Microsoft Deployment Toolkit (MDT). It includes a list of items to consider before you start, instructions on how to set up the deployment share, deployment options, and resources for additional information.
Before you begin
Licensing, URLs, consulting, and other OSs• Be aware of Windows OS licensing requirements. Contact your Microsoft licensing
representative for more information.
• The URLs in this document are reference only and are subject to change without notice.
• By providing this document, HP is not liable for providing any additional consulting services. Contact your HP Sales Representative or Channel Partner to arrange HP Consulting Services.
• This document does not cover all possible configurations of the HP Z240 Workstation.
• These instructions are for Windows 10 Pro, but can also be used to deploy Windows 7 64-bit on an HP Z240 Workstation.
CAUTION: Imaging the HP Z240 will erase the hard drive. If the hard drive contains data that needs to be retained, create a backup of your hard drive in a separate location before proceeding with the installation.
Prerequisites• MDT 2013
• Windows Assessment and Deployment Kit (ADK) for Windows 10
• Working knowledge of MDT
• A management computer running Windows 10
• An MDT deployment share, created on the management computer
Required downloads• HP Z240 Workstation Windows 10 x64 Driver Pack SP71640
• Windows 10 Pro 64-bit install media
• To build a driver pack using HP Softpaq Download Manager; follow the instructions in the white paper, HP Driver Packs
Optional downloads• HP Performance Advisor
• HP Remote Graphics Software (RGS)
Table of contents
2 Before you begin
2 Licensing, URLs, consulting, and other OSs
2 Prerequisites
2 Required downloads
2 Optional downloads
3 MDT 2013 deployment share setup
3 Import the HP Z240 Workstation driver pack
5 Import applications for HP Z240 Workstation deployment (optional)
7 Create the HP Z240 Workstation-specific selection driver profile
8 Import Windows 10 64-bit media
9 Create an HP Z240 Workstation specific task
16 Deployment Options
16 Deploy via MDT standalone USB media
17 Update the Deployment Share
22 Format and make a USB flash drive bootable
23 Deploy via USB Discovery Media
24 Appendix: Additional HP support URLs

3
Technical white paper | Imaging the HP Z240 Workstation
MDT 2013 deployment share setup
Import the HP Z240 Workstation driver pack• Open a command window in the folder where SP71640 resides, and enter the command: SP71640.exe /e
• At the MDT 2013 Deployment Workbench Console, expand the Out-of-Box Drivers section
• Right-click Out-of-Box Drivers, and select New Folder
• Create a folder: Z240 Windows10 64-bit Drivers; right-click this new folder, and select Import Drivers

4
Technical white paper | Imaging the HP Z240 Workstation
• Browse to the folder where you extracted Windows 10: SP71640 (likely in c:\swsetup\SP71640), and click OK
• Select the checkbox Import drivers even if they are duplicates of an existing driver and click Browse

5
Technical white paper | Imaging the HP Z240 Workstation
• You should see a list of drivers
NOTE: To deploy to different system models or use multiple versions of an OS, each driver pack must have its own Out-of-Box Driver folder in MDT; this reduces the risk of driver issues occurring in subsequent OS deployments.
Import applications for HP Z240 Workstation deployment (optional)• Download the HP Performance Advisor installer
NOTE: Follow these steps to deploy applications and drivers.
• Right-click the Applications folder in the MDT 2013 Deployment Share, and select New Folder

6
Technical white paper | Imaging the HP Z240 Workstation
• Create a folder: Workstation Applications; right-click the new folder, and select New Application
• Select the radio button, Application with source files
• Enter the details for the application, and click Next
7
Technical white paper | Imaging the HP Z240 Workstation
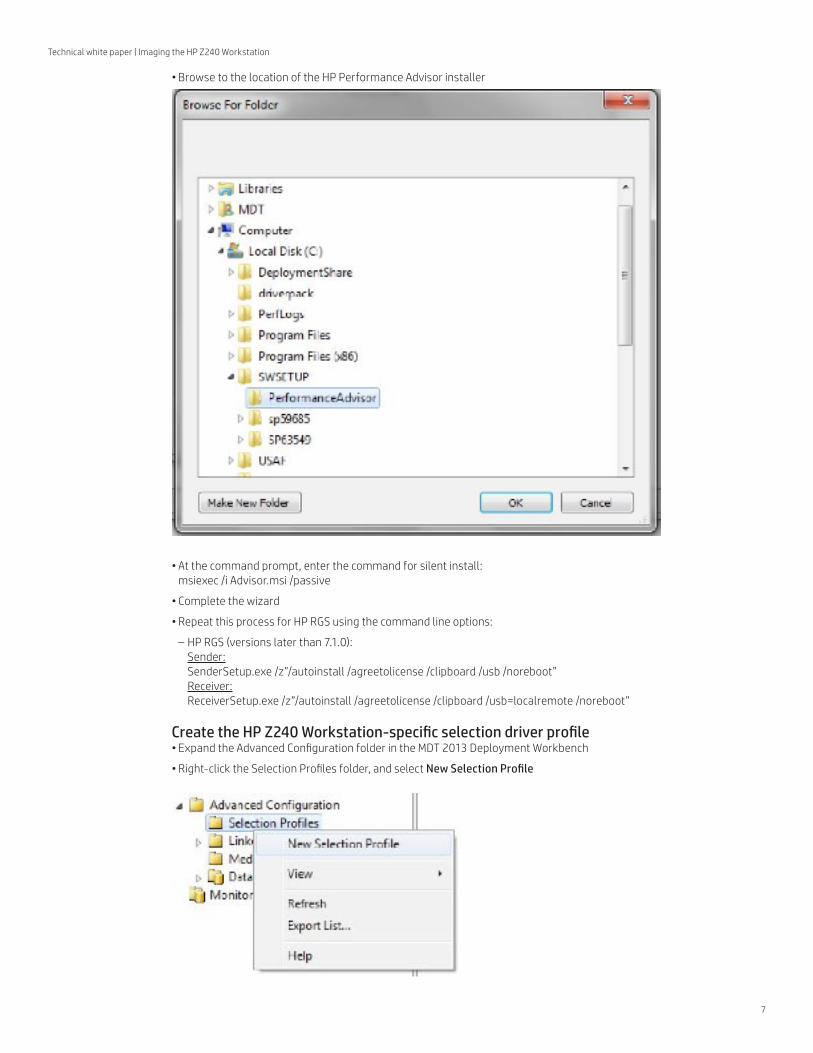
• Browse to the location of the HP Performance Advisor installer
• At the command prompt, enter the command for silent install: msiexec /i Advisor.msi /passive
• Complete the wizard
• Repeat this process for HP RGS using the command line options:
– HP RGS (versions later than 7.1.0): Sender: SenderSetup.exe /z”/autoinstall /agreetolicense /clipboard /usb /noreboot” Receiver: ReceiverSetup.exe /z”/autoinstall /agreetolicense /clipboard /usb=localremote /noreboot”
Create the HP Z240 Workstation-specific selection driver profile• Expand the Advanced Configuration folder in the MDT 2013 Deployment Workbench
• Right-click the Selection Profiles folder, and select New Selection Profile

8
Technical white paper | Imaging the HP Z240 Workstation
• Name the selection profile: Z240 Windows10 64-bit Drivers
• Select Z240 Windows 10 64-bit Drivers from the Out-of-Box Drivers section
• Complete the wizard
Import Windows 10 64-bit mediaNOTE: Skip this step if you already imported the media.
• Right-click the Operating Systems folder in the MDT 2013 Deployment Share, and select New Folder
• Name the folder something easily identifiable (in this example, Windows 10 64-bit), and click Next
• Insert the Windows 10 64-bit install media or mount the ISO file
• Right-click the Windows 10 64-bit folder, and select Import Operating System

9
Technical white paper | Imaging the HP Z240 Workstation
• Select Full set of source files
• Browse to either the mounted ISO file or the media that contains the Windows 10 64-bit install
• Complete the wizard
Create an HP Z240 Workstation specific task• Right-click the Task Sequences folder, and select New Folder
• Name the folder: Z240 Windows 10 64-bit; right-click this new folder, and select New Task Sequence
• Assign a Task Sequence ID, Name (in this case, Z240 Windows 10 64-Bit), and any important task sequence comments, then click Next
• Select Standard Client Task Sequence, and click Next
• Select the Windows 10 64-bit Install media imported earlier
• Complete the rest of the wizard
• Double-click the new task you created

10
Technical white paper | Imaging the HP Z240 Workstation
• Select the Task Sequence tab
• Expand the Preinstall folder, and select the Inject Drivers portion of the task
• Choose the Z240 Windows 10 64-bit selection profile from the dropdown
• Click the radio button Install only matching drivers from the selection profile
• Select the Options tab
• Click Add and select If statement
11
Technical white paper | Imaging the HP Z240 Workstation
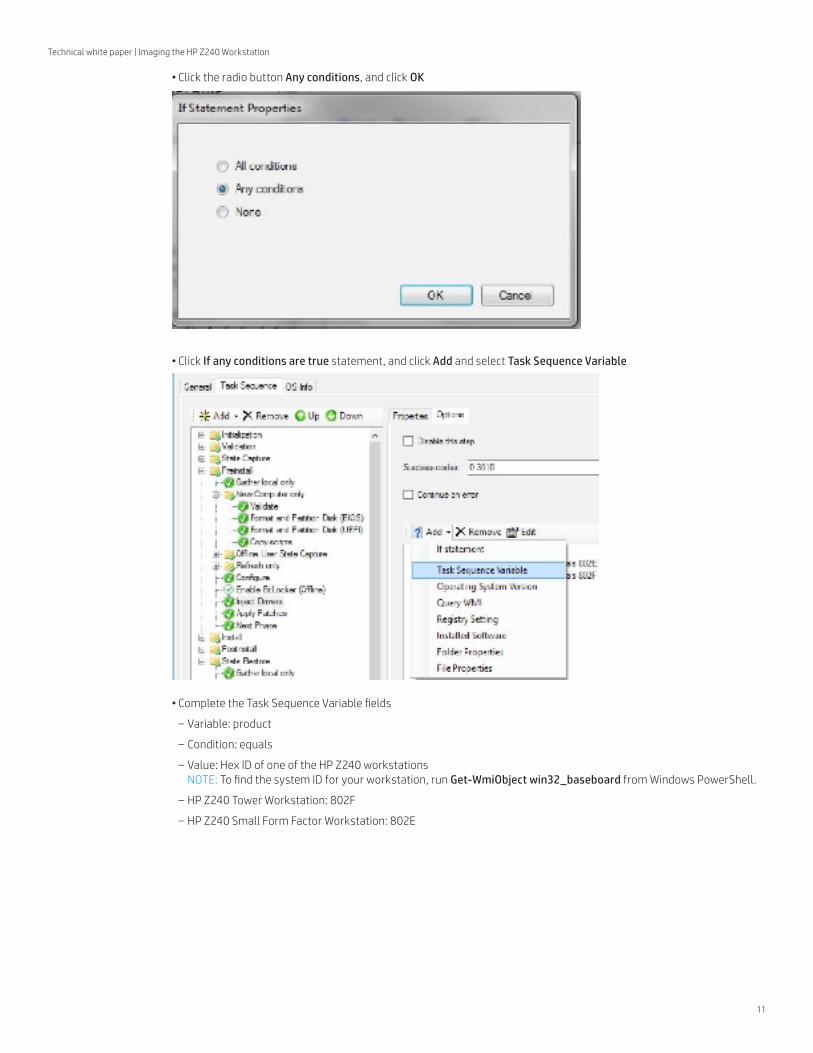
• Click the radio button Any conditions, and click OK
• Click If any conditions are true statement, and click Add and select Task Sequence Variable
• Complete the Task Sequence Variable fields
– Variable: product
– Condition: equals
– Value: Hex ID of one of the HP Z240 workstations NOTE: To find the system ID for your workstation, run Get-WmiObject win32_baseboard from Windows PowerShell.
– HP Z240 Tower Workstation: 802F
– HP Z240 Small Form Factor Workstation: 802E

12
Technical white paper | Imaging the HP Z240 Workstation
• When finished, your options tab should appear as:
• Click Apply
• Expand the state restore section of the task
• Select the Custom Tasks folder
• Click Add, select Roles, select Install Roles and Features

13
Technical white paper | Imaging the HP Z240 Workstation
• Select the Install Roles and Features task, and select Windows 10 from the dropdown menu
• Click the checkbox .NET Framework 3.5
• Click Apply
• Click Add, select General, select Install Application

14
Technical white paper | Imaging the HP Z240 Workstation
• Click the radio button Install a single application
• Browse and select HP Performance Advisor
• Repeat this process for the HP RGS (NOTE: you must reboot the system before using HP RGS for your task)
– Click Add, select General, and Restart computer to add a reboot to the task
• Add any additional applications your task requires
• Click OK to close the task sequence
NOTE: For a system with a native primary NVMe drive and at least one additional SATA drive, you must follow these additional steps. Use the chart below to determine the desired drive number.
Hard drive number MDT disk value
SATA 0 0
SATA 1 1
SATA 2 2
SATA 3 3
NVMe 0 +1
Example: For a system with a single SATA hard drive and a native NVMe, the desired drive number is 1. A single NVMe drive with no SATA drives is drive 0.

15
Technical white paper | Imaging the HP Z240 Workstation
NOTE: For complex drive configurations where the system has a combination of SATA, native NVMe, and PCIe NVMe (such as HP Z Turbo Drive), test your deployment to guarantee that Windows installs on the desired drive, or remove all data drives.
• Expand the Install folder
• Select Install Operating System
• Complete the Operating system to install
• Select Specific Disk and partition from the location dropdown menu
• Select Disk X (calculated above) and Partition 2
• Click Apply

16
Technical white paper | Imaging the HP Z240 Workstation
Deployment Options
Deploy via MDT standalone USB media(NOTE: To deploy using LiteTouch installation, skip to page 23.)
• Right-click the Selection Profiles folder in the Advanced Configuration section of the deployment workbench, and select New Selection Profile
• Name the selection profile: Z240 Windows 10 64-bit Media
• Select the Workstations Application folder
• Select the Windows 10 64-Bit operating system folder
• Select the Z240_Windows 10 64-Bit drivers folder
• Select the Z240_Windows 10 64-Bit Task Sequences folder
• Click Next and finish the wizard

17
Technical white paper | Imaging the HP Z240 Workstation
Update the Deployment Share• Right-click the main deployment share folder, and select Update Deployment Share
• Use the wizard to generate the boot images
• Right-click the Media folder in the Advanced Configuration section of the MDT 2013 Deployment Workbench, and select New Media
• Create a new folder to store the Z240 Windows 10 64-bit Media

18
Technical white paper | Imaging the HP Z240 Workstation
• In the Selection profile dropdown menu select Z240 Windows10 64-Bit
• Click Next and finish the wizard
• Right-click the media item you created, and select Properties (NOTE: If this was the first media created in MDT, it is MEDIA001)
19
Technical white paper | Imaging the HP Z240 Workstation
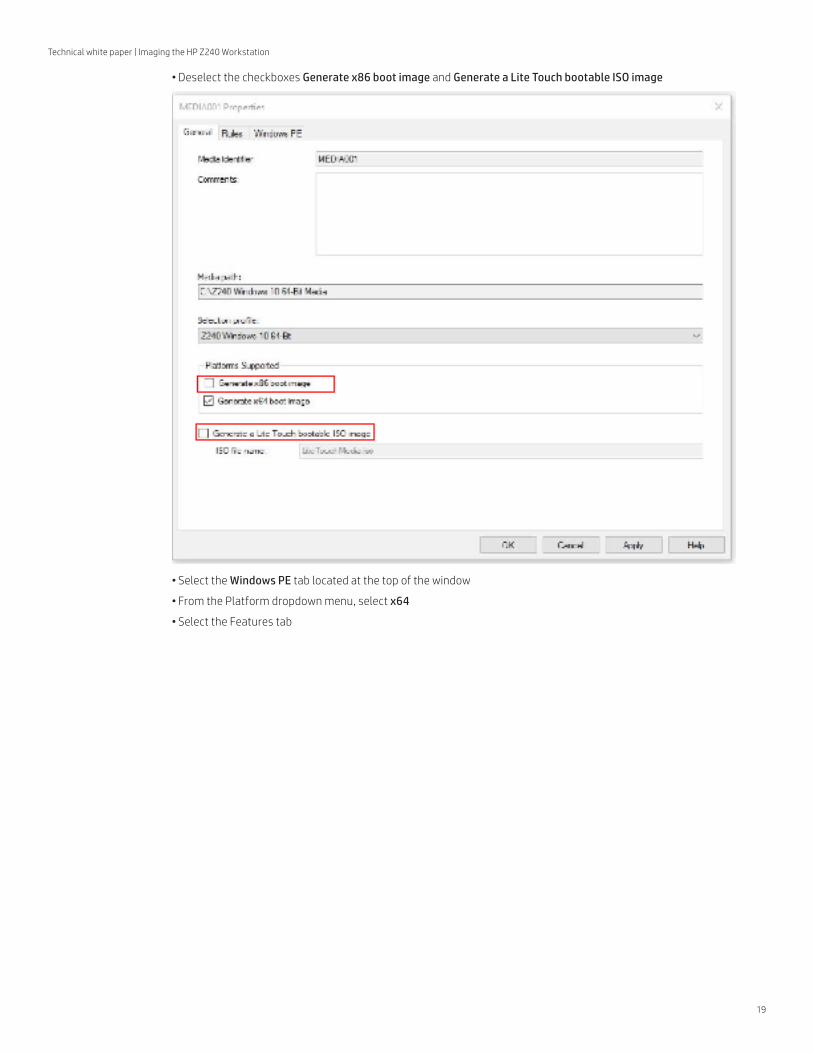
• Deselect the checkboxes Generate x86 boot image and Generate a Lite Touch bootable ISO image
• Select the Windows PE tab located at the top of the window
• From the Platform dropdown menu, select x64
• Select the Features tab

20
Technical white paper | Imaging the HP Z240 Workstation
• Select the checkboxes for .NET framework, Windows PowerShell, and Secure Boot Cmdlets
(NOTE: Microsoft Data Access Components (MDAC/ADO) support is selected by default, and should remain selected.)
• Click Apply
• Select the Drivers and Patches tab
• From the Selection profile dropdown menu, select Z240 Windows 10 64-Bit

21
Technical white paper | Imaging the HP Z240 Workstation
• Select the radio button Include all drivers from the selection profile
• Click Apply
• Click OK
• Right-click the main Deployment Share folder, and select Update deployment share
• Right-click the Media item and select Update Media Content
22
Technical white paper | Imaging the HP Z240 Workstation
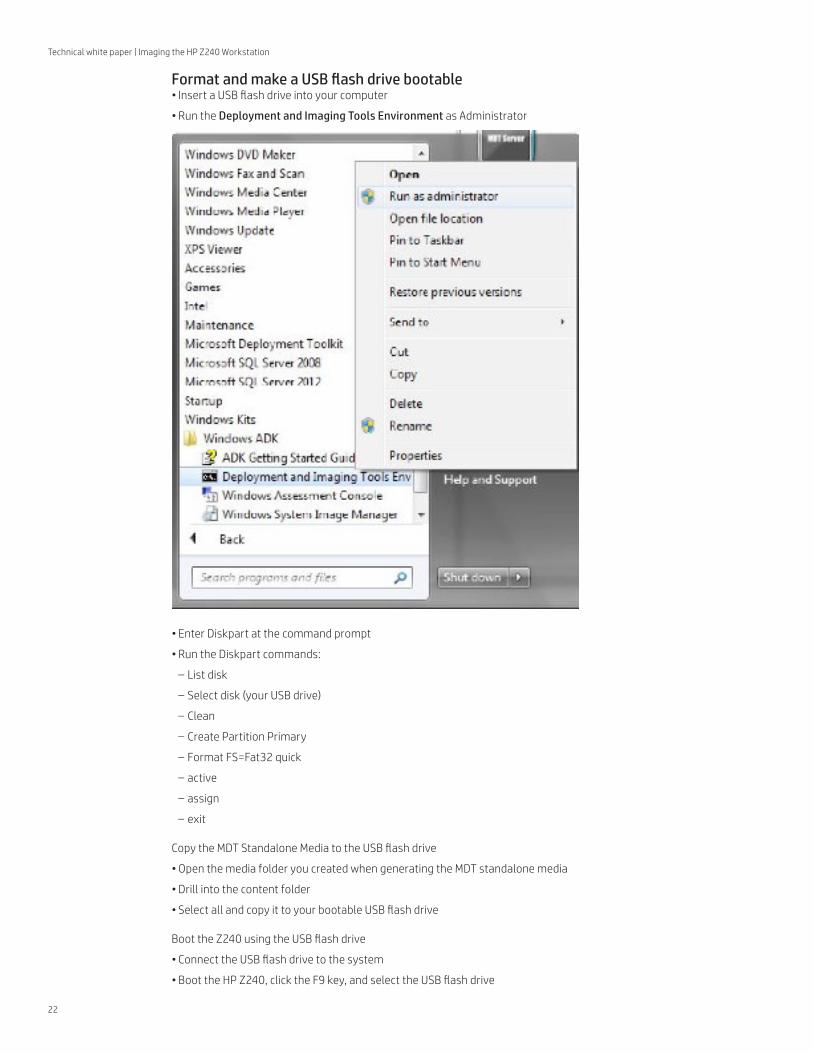
Format and make a USB flash drive bootable• Insert a USB flash drive into your computer
• Run the Deployment and Imaging Tools Environment as Administrator
• Enter Diskpart at the command prompt
• Run the Diskpart commands:
– List disk
– Select disk (your USB drive)
– Clean
– Create Partition Primary
– Format FS=Fat32 quick
– active
– assign
– exit
Copy the MDT Standalone Media to the USB flash drive
• Open the media folder you created when generating the MDT standalone media
• Drill into the content folder
• Select all and copy it to your bootable USB flash drive
Boot the Z240 using the USB flash drive
• Connect the USB flash drive to the system
• Boot the HP Z240, click the F9 key, and select the USB flash drive

23
Technical white paper | Imaging the HP Z240 Workstation
– To install using UEFI (Unified Extensible Firmware Interface), click the F9 key during BIOS POST, and select UEFI Boot Sources -> the USB drive containing the OS media. UEFI requires a new partitioning method referred to as GPT. (View the Windows and GPT FAQ for more details.)
– To install using MBR (Master Boot Record), click the F9 key during BIOS POST, and select Legacy Boot Sources -> the USB drive containing the OS media.
Deploy via USB Discovery MediaTo deploy via a network connection, create USB boot media that will load from the network deployment share.
Format and make a USB disk bootable
• Insert a USB flash drive
• Run the Deployment and Imaging Tools Environment as Administrator
• Enter Diskpart at the command prompt
• Run the Diskpart commands:
– List Disk
– Select disk (indicate your USB disk here)
– Clean (select your USB drive)
– Create Partition Primary
– Format FS=Fat32 quick
– active
– assign
– exit
Mount the LiteTouchPE_x64.iso file
• Browse to the Boot folder in the root of your deployment share
• Right-click the LiteTouchPE_x64.iso file, and select mount (if not using Windows Server 2012, locate a utility to mount this file--try Microsoft Virtual CDROM Control Panel)
Copy the contents of the ISO to the USB flash drive
• Copy the contents of the mounted ISO to the previously formatted USB flash drive
• Eject the USB flash drive

Boot the HP Z240 to the standalone USB Media
• Connect the USB flash drive to the system
• Boot the HP Z240, click the F9 key, and select the USB flash drive To install using UEFI, click the F9 key during BIOS POST, and select UEFI Boot Sources -> the USB drive containing the OS media. UEFI requires a new partitioning method referred to as GPT. (See Windows and GPT FAQ for more details.) Make sure to change the Format and Partition Disk section of editing the task sequence above.
– Install using MBR (Master Boot Record) To install using an MBR partition, click the F9 key during BIOS POST, and select Legacy Boot Sources -> The USB drive contains the OS media.
Appendix: Additional HP support URLs
• HP Z Workstations
• HP Customer Support
• HP Driver Packs
• HP driver subscriptions, alerts, and notifications
• Download SoftPaqs
© Copyright 2017 HP Development Company, L.P. The information contained herein is subject to change without notice. The only warranties for HP products and services are set forth in the express warranty statements accompanying such products and services. Nothing herein should be construed as constituting an additional warranty. HP shall not be liable for technical or editorial errors or omissions contained herein.
Microsoft and Windows are U.S. registered trademarks of the Microsoft group of companies. All other trademarks are the property of their respective owners.
4AA7-0407ENW, Created June 2017
Get connectedhp.com/go/getconnected