techoalien git
TRANSCRIPT

Presented by Aditya Tiwari
VERSION CONTROL SYSTEM USING GIT
TechoAlienwww.techoalien.com

Learning Version Control•Version Control (aka Revision Control aka Source Control) lets you track your files over time.

Why do you care?
You’ve probably cooked up your own•AdityaResumeOct2013.doc•AdityaResumeMar2014.doc•instacalc-logo3.png•instacalc-logo4.png•logo-old.png

It’s why we use “Save As”.
You want the new file without obliterating the old one. It’s a common problem, and solutions are usually like this:
•Make a single backup copy (Document.old.txt).
•If we’re clever, we add a version number or date: Document_V1.txt, DocumentMarch2007.txt
•We may even use a shared folder so other people can see and edit files without sending them over email. Hopefully they re-label the file after they save it.

So Why Do We Need A Version Control System (CS)?
•Our shared folder/naming system is fine for class projects or one-time papers. But software projects? Not a chance.
•Do you think the Windows source code sits in a shared folder like “Windows2007-Latest-UPDATED!!”, for anyone to edit? That every programmer just works in a different subfolder? No way.

•Large, fast-changing projects with many authors need a Version Control System (geekspeak for “file database”) to track changes and avoid general chaos.

Attributes of Good VCS
•Backup and Restore•Synchronization•Short-term undo•Long-term undo•Track Changes•Track Ownership•Sandboxing or Insurance against yourself
•Branching and merging

Basic Setup
•Repository (repo)•Server•Client•Working Set/Working Copy•Trunk/Main

Why Git ?1.Easy to learn 2.Git is fast3.Distributed4.Data Assurance 5.Staging Area6.Free & open Source (cont….)

1.Easy to learn

2.Git is Fast

3.Distributed
GIT supports different types of workflows
•Subversion-Style Workflow•Integration Manager Workflow•Dictator and Lieutenants Workflow
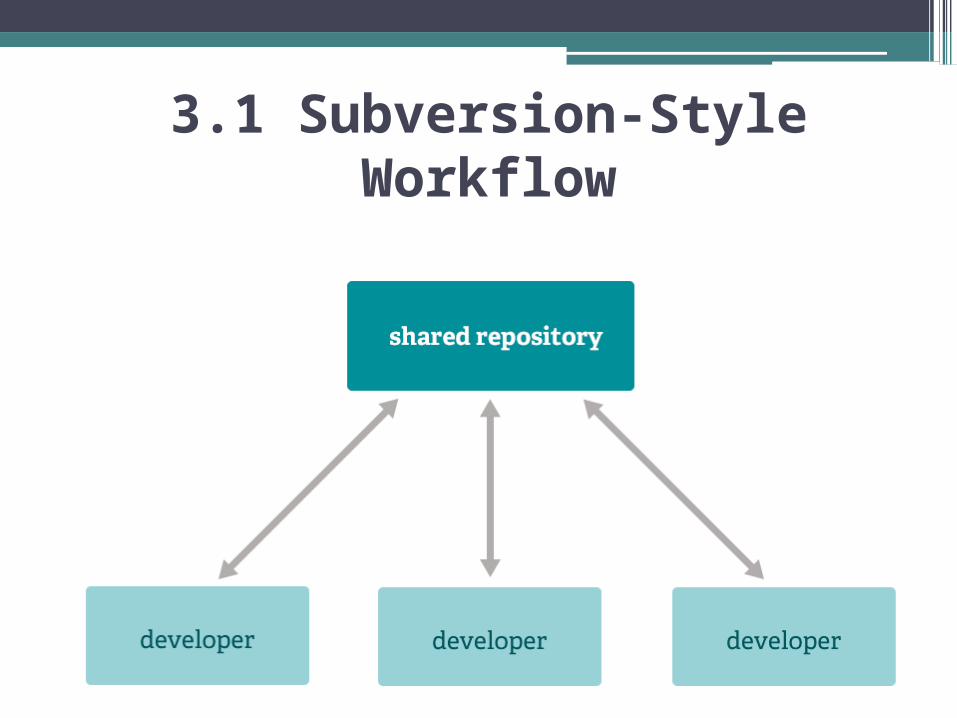
3.1 Subversion-Style Workflow

3.2 Integration Manager Workflow

3.3 Dictator and Lieutenants Workflow

4. Data Assurance

5.Staging Area*

6. Free and Open Source

Hand on Git

Step 1: Create a folder “Octocat”

Step 2: git init
•Initiate git repository
•The repository is a hidden directory where Git operates.

Step 3: git status
•The git status command to see what the current state of our project is

Step 4:
Add a file called food.txt add Milk in it

Step 5:Again git status• staged: Files are ready to be committed.
• unstaged: Files with changes that have not been prepared to be committed
• untracked: Files aren't tracked by Git yet. This usually indicates a newly created file.
• (Difference- Unstaged files are like files that has a node in git, which have changed but not added for commit. untracked are those files which doesn't have a node in git.)
• deleted: File has been deleted and is waiting to be removed from Git.

Step 6 :git add list.txt
•Add all : You can also type git add -A . where the dot stands for the current directory, so everything in and beneath it is added. The-A ensures even file deletions are included.
git reset: You can use git reset <filename> to remove a file or files from the staging area.•

Step: 7 git status
•Files are now in staged portion

Step 8: git commit -m “Octocat likes milk"•Finally committed !!

Step 9: Some exercise

Step 10: Now add files furniture.txt and books.txt

Step 11: git log
•git log --summary to see more information for each commit. You can see where new files were added for the first time or where files were deleted. It's a good overview of what's going on in the project.

Step 12: Create repository on GitHub •Go to github.com

Step 13: git remote add origin <url>•git remote: Git doesn't care what you name your remotes, but it's typical to name your main one origin.
•We are declaring our GitHub repo as origin

Step 14. git push -u origin masterSo let's push our local changes to our origin repo (on GitHub).The name of our remote is origin and the default local branch name is master.
The -u tells Git to remember the parameters, so that next time we can simply run git push and Git will know what to do. Go ahead and push it!

Step 15: password caching
•If you prefer working with the command line, you can also install a native Git shell, such as msysgit. With msysgit, running the following in the command line will store your credentials
•git config --global credential.helper wincred

Step 16: git pull origin master
•Let's pretend some time has passed. We've invited other people to our github project who have pulled your changes, made their own commits, and pushed them.
•We can check for changes on our GitHub repository and pull down any new changes

Step 17: git diff HEAD
•The HEAD is a pointer that holds your position within all your different commits. By default HEAD points to your most recent commit, so it can be used as a quick way to reference that commit

Step 18: Staged Differences
•Another great use for diff is looking at changes within files that have already been staged. Remember, staged files are files we have told git that are ready to be committed.
•Add home/furniture.txt
•Run - git diff –staged•Run- git add home/furniture.txt

Step 19: git reset home/furnitures
•You can unstage files by using the git reset command. Go ahead and remove home/furnitures

Step 20. Undo
•git reset did a great job of unstaging furnitures.txt, but you'll notice that he's still there. He's just not staged anymore.
•git checkout --list.txt

Step 21 : Branching OutBefore branching out create version r7

Step 22 Create new branch Clean_up•git branch clean_up

Step 23:Switching Branchesgit branch To see all branches •git checkout clean_upOr
•git checkout -b new_branchFor creating and checking simultaneously

Step 24 : Removing All The Things •git rm '*.txt‘
•for all folder remove git rm –r <foldername>

Step 25: Committing Branch Changes•git commit -m "Remove all the items“
*IMP The '-a' option•If you happen to delete a file without using'git rm' you'll find that you still have to'git rm' the deleted files from the working tree. You can save this step by using the '-a' option on 'git commit', which auto removes deleted files with the commit.
•git commit -am "Delete stuff“

To Do
Git add .Git commit –m “r5”

Step 26 : Switching Back to master•git checkout master
•*IMP Pull RequestsIf you're hosting your repo on GitHub, you can do something called a pull request.A pull request allows the boss of the project to look through your changes and make comments before deciding to merge in the change. It's a really great feature that is used all the time for remote workers and open-source projects.

Step 27 :Preparing to Merge
Run: git merge clean_up

Step 28 : (IMP) Merge Conflicts•Merge Conflicts can occur when changes are made to a file at the same time. A lot of people get really scared when a conflict happens, but fear not! They aren't that scary, you just need to decide which code to keep.
••<<<<<<< HEAD• XYZ your code•=======• ABC also your code •>>>>>>> master•

How to remove merge conflict

Step 29 :delete branch
•git branch -d clean_up
•This will not work for unmerged branch so use
git branch -d -f clean_up or git branch -D clean_up

Step 30 : At Last !!
•git push

Advance Git

1. Undoing changes
1.git checkout <commit>
2.git reset <commit>
3.git revert <commit>

Difference

Git Checkout
•git checkout hotfix•Internally, all the above command does is move HEAD to a different branch and update the working directory to match. Since this has the potential to overwrite local changes, Git forces you to commit or stash any changes in the working directory that will be lost during the checkout operation. Unlike git reset, git checkout doesn’t move any branches around.
•

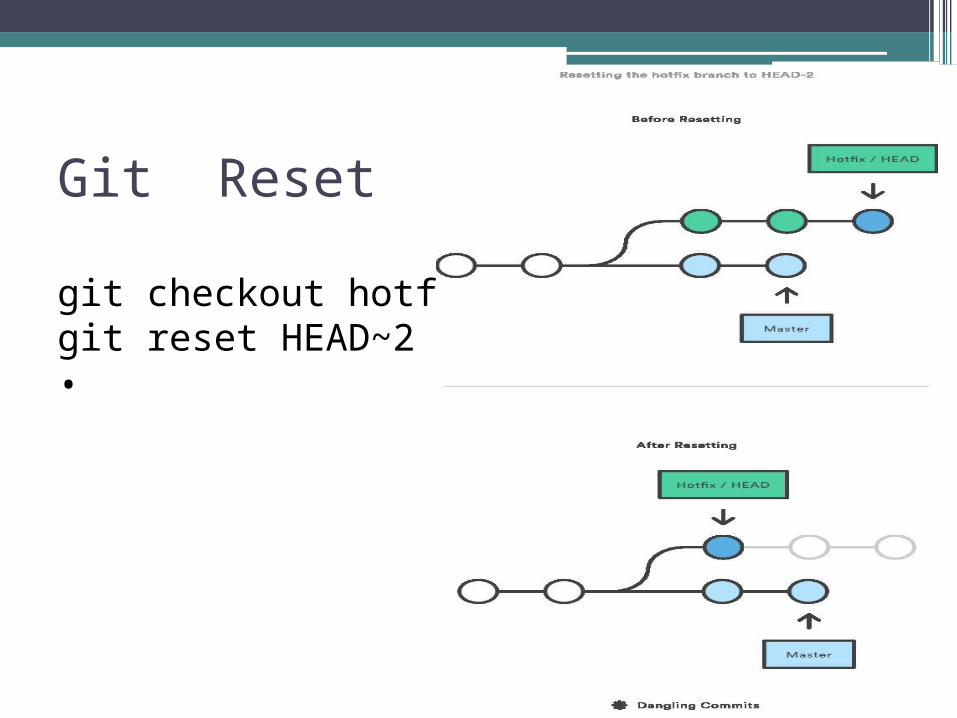
Git Reset
git checkout hotfixgit reset HEAD~2•

Git Reset (Cont..)
•--soft – The staged snapshot and working directory are not altered in any way.
•--mixed – The staged snapshot is updated to match the specified commit, but the working directory is not affected. This is the default option.
•--hard – The staged snapshot and the working directory are both updated to match the specified commit.

Git Revert
•Reverting undoes a commit by creating a new commit. This is a safe way to undo changes, as it has no chance of re-writing the commit history. For example, the following command will figure out the changes contained in the 2nd to last commit, create a new commit undoing those changes, and tack the new commit onto the existing project.
•git checkout hotfix•git revert HEAD~2

This can be visualized as the following:

Using these commands
•If a commit has been made somewhere in the project's history, and you later decide that the commit is wrong and should not have been done, then git revert is the tool for the job. It will undo the changes introduced by the bad commit, recording the "undo" in the history.
•If you have modified a file in your working tree, but haven't committed the change, then you can use git checkout to checkout a fresh-from-repository copy of the file.
•If you have made a commit, but haven't shared it with anyone else and you decide you don't want it, then you can use git reset to rewrite the history so that it looks as though you never made that commit.

More…
•git commit --amend•git rebase•git reflog•*git fetchThe git fetch command imports commits from a remote repository into your local repo. The resulting commits are stored as remote branches instead of the normal local branches that we’ve been working with. This gives you a chance to review changes before integrating them into your copy of the project.•git clean

Thank youFb.com/
aditya019333