tennis practice plan.pdf
DESCRIPTION
bnvnm jkbjk jkbbjkbjb jnjjkbbjkb jhhhhhhhhhhhhhhhhhhhhhhhhhhhhh jjjjjjjjjjjjjjjjn jjjjjjjjjjjjjjjjjjjjjlTRANSCRIPT

White Plains, NY Flushing, NY Boca Raton, FL
QUICKSTART TENNISA Guide for Parents andRecreational Coaches

Written by: Kirk Anderson and Anne Davis with Sharon Cleland and Jason Jamison. Chapter 3 andGary’s Tips by Gary Avischious; Chapter 9 by Marikate Murren.
Edited by: E.J. Crawford
Illustrated by: Roberto Sabas
70 West Red Oak LaneWhite Plains, NY 10604www.usta.com
© 2009 by the United States Tennis Association Inc. All rights reserved. No part of this bookmay be reproduced in any form without the written permission of the publisher.
Printed in the United States of America.
Published for the USTA byH. . ZIMMAN, Inc.

iii
Contents
Preface ..............................................................................................................v
Chapter 1: QuickStart Tennis: An Introduction ......................................1
Chapter 2: Equipment and Rules for the Developing Player ...............7
Chapter 3: Keys to Coaching Young Players .........................................11
Chapter 4: Driveway, Playground and Wall Tennis..............................21
Chapter 5: Practice Sessions (Ages 5-6) .................................................25
Practice Session 1 Controlling the Ball and Racquet...................................27
Practice Session 2 Sending and Receiving .................................................29
Practice Session 3 Sending and Receiving with Direction ............................31
Practice Session 4 Sending and Receiving with the Racquet .......................34
Practice Session 5 Sending and Receiving with Racquet on the Backhand ..37
Practice Session 6 Rally Skills ..................................................................40
Practice Session 7 Rally Skills with a Partner............................................42
Practice Session 8 Play Day—Tennis Olympics...........................................44
Chapter 6: Practice Sessions (Ages 7-8) .................................................45
Practice Session 1 Racquet Control............................................................47
Practice Session 2 Instant Rally Progression—Forehand ............................50
Practice Session 3 Instant Rally Progression—Backhand ...........................54
Practice Session 4 Forehand and Backhand Rallying .................................57
Practice Session 5 Serve and Return..........................................................61
Practice Session 6 Rally Skills ..................................................................63
Practice Session 7 Volley...........................................................................65
Practice Session 8 Play Day ......................................................................68

iv
Chapter 7: Practice Sessions (Ages 9-10) ...............................................69
Practice Session 1 Instant Rally ................................................................72
Practice Session 2 Rally Skills ..................................................................75
Practice Session 3 Serve and Return..........................................................79
Practice Session 4 The Volley ....................................................................83
Practice Session 5 Approaching the Net ....................................................86
Practice Session 6 Singles.........................................................................89
Practice Session 7 Doubles ........................................................................93
Practice Session 8 Play Day ......................................................................95
Chapter 8: Introducing Your Kids to Tennis the QuickStart Way:After-School Programs and Camps ......................................97
Chapter 9: USTA Jr. Team Tennis and Its Benefits ............................105
APPENDIX ...................................................................................................111
vQUICKSTART TENNIS : A GUIDE FOR PARENTS AND RECREATIONAL COACHES
PrefaceWhat makes tennis fun is being able to rally a ball back and forth over a net with a
partner. The sooner youngsters can rally, the sooner they can actually play the gameand participate on a team. This book is designed to give coaches and parents who workwith youngsters at the beginning stages of development the necessary tools to getchildren playing the game during their first practice—tools such as simple lead-upactivities and ways to modify the court, net, racquets and balls.
This first edition of QuickStart Tennis: A Guide for Parents and RecreationalCoaches includes practice plans that are age specific for children 5-6, 7-8 and 9-10.Each series of practice plans is designed appropriately for the physical, mental andsocial skills for that age group. As a coach, you can refer specifically to the series ofpractice plans written for the age group you are coaching.
The primary goal of this edition is to introduce children to the game through theinnovative QuickStart Tennis format. QuickStart Tennis includes six specifications,including age, court size, racquet length, ball weight and speed, net height andscoring format. This enables youngsters to practice and play real tennis to scale andallows them to play and learn at the same time—as opposed to the traditional model oflearning the skills before playing the game. Since rallying and playing is much morefun than standing in line, children will want to continue to learn the game and developthe skills necessary to play with their friends on a team.
In addition to introducing the skills needed by children to play the game success-fully, this edition has instruction for the coach to make practice sessions safe and funfor young players. Just as the instruction for kids is age specific, the section and tipsfor adults is specific to youth coaches and provides examples on how to be fair, keeppractices fun, put competition in a child’s perspective, and even performance and skilldevelopment. This information for youth tennis coaches is new and vitally importantas more children are beginning tennis at younger ages and more adults are coachingyoung players and teams.
Each practice session is designed as a team practice that will prepare players forcompetition and match play, including USTA Jr. Team Tennis. Coaches can use the firstfew practices as preseason sessions and continue through the series as the team tennisseason continues, so the child has an opportunity to practice in a group and play teammatches.
Enjoy this series of practice plans, and have fun getting kids playing this greatgame of tennis!
Kirk Anderson, Director, Recreational Coaches and Programs, USTA
Gary Avischious, President, The Coaching Minute
Sharon Cleland, Tennis Director, Midland Community Tennis Center, Midland, Mich.
Anne Davis, National Manager, QuickStart Tennis, USTA
Jason Jamison, National Manager, School Tennis, USTA
Marikate Murren, National Manager, Jr. Team Tennis, USTA


Chapter 1: QuickStart Tennis:An Introduction
IntroductionMany sports have recognized the importance of giving children the opportunity
to learn and play. For young people to be attracted to and succeed in a sport, theequipment, playing area and competitive structures need to be appropriate.
In the pages that follow, we will provide tools in the form of resources, instruc-tion and opportunities that you as coaches and parents need to get our youngstersonto the tennis court and rallying and playing as quickly as possible.
An important component of this is the practice session plans (available inChapters 4-7). These plans are written for coaches who are teaching children whoare either new to the game of tennis or at the early stages of development. The activ-ities are specific to the ages listed in each chapter. Each chapter and each age groupis written in a progressive order so coaches can build a foundation and follow theprogression as skills are developed.
For any coach, it is not uncommon to get a variety of ages in a beginning class oron a beginning team. You can use this book to find activities that will challenge andallow kids to succeed by moving forward or even back among the age group sessions.
This book contains a large number of activities. The key is to change the activi-ties frequently, but don’t hesitate to use activities or games the children enjoy fromone practice to another. Just as young children enjoy the same story or movie, theylike the familiarity of their favorite games.
The Needs, Abilities and Characteristics of Young PlayersChildren are not adults. They will eventually become adults, but only after a
lengthy developmental process. That development takes place throughout childhoodand adolescence. Children, especially those pre-puberty, have specific physical,mental and emotional needs and abilities that differ greatly from those of an adult.
These specific needs and abilities are highly related to the progress a child canmake in any sport because sport requires technical and tactical competence. Theability to perform a technical skill is highly dependent on physical development.Competitive competence depends on tactical knowledge, which relies on a certainlevel of mental and emotional skill. Children also learn in different ways from adults,so teaching approaches must fit a child’s needs.
1CHAPTER 1: QUICKSTART TENNIS : AN INTRODUCTION
QuickStart Tennis

2 QUICKSTART TENNIS : A GUIDE FOR PARENTS AND RECREATIONAL COACHES
Moreover, there are differences in the rate of growth and development amongchildren of the same age and between boys and girls. Chronological age can be verydifferent from developmental age, and two children of the same age can be up tothree years apart in developmental terms.
Youth tennis coaches need to recognize the differences between children andadults as well as among children themselves. Such recognition means adapting tothe way in which children learn to play, and requires an understanding of what isbest for them to enjoy the experience and make progress. In addition, sport has aresponsibility to consider the development of the child as a whole person and not justas an athlete.
The following section describes the needs and abilities of each age group andthen describes the equipment, scoring and competition, and teaching needed for eachage group to have fun, progress and succeed.
Ages 5 to 6
Characteristics of the Age Group
Children in this age group are small in stature and lack strength. They arehighly active. They are learning how to move and have great difficulty with “fine”motor skills. Partly because they are young but also because they lack experience,their reactions and anticipation skills are very low.
Some children of this age have not yet attended school and are only beginningthe process of learning to read, write and count. They tend to be self-centered. Theylack a sense of time and are impatient, become easily bored and have a very shortattention span. They get tired quickly. They imitate and copy. Listening to andfollowing instructions is very difficult for them. Concepts such as scoring andwinning and losing are not understood yet.
Children of this age can run, jump and land, crawl, twist, hit and kick. They aredeveloping agility, coordination and balance. They throw with limited rotation andcatch with both hands. They are learning to handle equipment and have slowreactions and poor tracking skills.
They develop confidence through fun and success, and they are very creative.They enjoy exploring and copying. They are learning to share, to be part of a groupand think about other people.
EquipmentThese children should use 17- to 21-inch racquets, foam balls/Koosh balls/balloons
and small playing areas such as a single service court. (Equipment is coveredfurther in Chapter 2, on the QuickStart Tennis format.)
Practice SessionsChildren need to be taught in small groups of no more than one teacher/helper to
four students (1:4). A ratio of 1:1 or 1:2, using parents or a sibling for addedoversight, is ideal. Sessions should be fun, active and interesting. Coaches andhelpers must be actively involved.

3CHAPTER 1: QUICKSTART TENNIS : AN INTRODUCTION
Many different activities should be covered in the same session, perhaps in acircuit of four or five different stations. Don’t hesitate to repeat activities from onesession to another. Children like to repeat activities they enjoy.
Teaching should be in very short time spans and highly visual with almost no—orvery brief—explanation. The children learn by copying what they see, meaning thatdemonstration is more important than explanation. Children of this age group enjoyteaching aids and love to explore and to play with various colors and shapes.
Activities such as grips, swing action and rallying over a net can be too advancedfor most children in this age group. The focus should be on a wide variety of skillssuch as balance, movement, agility, coordination, throwing, catching and hittingbecause this is the crucial age for the child to learn them.
Ask parents to help with “homework tasks” or “take-home activities” that continuethe activities/lessons covered in the practice sessions. Parents then develop a betterunderstanding of what their children are capable of doing and what they need todevelop.
Length of PracticeA 30-minute time period is optimal for children of this age.
Ages 7 to 8
Characteristics of the Age GroupFun continues to be of paramount importance for 7- to 8-year-olds. As children
mature physically, neural pathways are becoming established and many gross motorskills are being developed; for example, throwing has more body turn and weighttransfer. Children of this age group are likely to participate in many activities. Thisis important because skills can be transferred between different sports and activities.Reaction speed is improving but many children find tracking and making contactwith a ball quite difficult.
Concentration and focus are improving, but copying is still the best way for themto learn, so demonstration is still the key. They seek adult approval frequently andare learning the concept of winning and losing.
Children of this age group are beginning to cooperate and share with others.They prefer to be with their own gender and show responsibility through simpletasks and requests.
EquipmentChildren should use 19- to 23-inch racquets, foam or oversized low compression
balls, a net height of 2-foot-9 and a court size of 36 feet in length and 18 feet in width.
Scoring and CompetitionThis age group should play two-out-of-three games, with each game being the
first player to win seven points. (These matches should last approximately 20minutes.) Multiple matches in round robin formats works best. Children of this agelike being on and playing as a team.

4 QUICKSTART TENNIS : A GUIDE FOR PARENTS AND RECREATIONAL COACHES
Practice SessionsCoaching children with a ratio of one coach/helper to four children (1:4) is ideal.
Parents and siblings can show the children what to do and how to do it. Keepingchildren with their friends is important. Children 7-8 do best in a very active, funand positive environment.
This is the time to introduce children to simple guidelines such as scoring andcalling lines so they begin the process of learning the basic rules of tennis.
Length of PracticeThe optimal length for each session is 45 minutes with a short break after 20
minutes.
Ages 9 to 10
Characteristics of the Age GroupThis age group is becoming better able to concentrate and focus for longer
periods of time. However, they need to be interested and inspired by enthusiastic andenergetic coaches who are positive and encouraging.
Physically, they have more refined motor skills and, with practice, show fluentand well-developed skills. The children of this age group are becoming moreindependent and are able to understand concepts of winning and losing, even if theyneed help in knowing how to cope with them. They are able to share and enjoy beingon teams. Some may be early maturers, especially girls. Players can be taught skillsand positioning at this age and can be taught doubles positioning and tactics.
Players ages 9-10 have improved reaction and anticipation skills and morerotation while serving and when hitting ground strokes. Their decision-makingskills are developing along with their independence and confidence. They need to berewarded for effort and not just ability. They play well with others and prefer to bewith their own gender. They seek and accept adult opinions. They are able toverbalize their thoughts and feelings.
EquipmentThis age group should use 23- to 25-inch racquets, low compressions balls and a
court that is 60 feet long and 21 feet wide (27 feet wide for doubles). The net shouldbe 3 feet at the center and 3-foot-6 at the net posts.
Scoring and Competition
For match play, scoring is two-out-of-three, four-game sets with the final setdetermined by the first player or team to score seven points. Doubles play should beencouraged.
Practice SessionsHave team practices in fun and positive environments, and reward effort and
good attitude. Develop skills, good court positioning and shot selection. Keeppractices active and simple.

5CHAPTER 1: QUICKSTART TENNIS : AN INTRODUCTION
Length of PracticeThe recommended time for each practice is one hour, or 90 minutes for practice
and a match.
In the case that you follow a practice with a match, divide the session so that nomore than 45 minutes is devoted to practice. Take a short break and finish withmatch play for approximately 45 minutes.
Teaching Tools and Equipment for Instructing the Developing PlayerEach practice plan has a list of the equipment recommended for that session.
Using the appropriate equipment allows young players to rally and play more effec-tively, especially as the ability to rally and play relates to the weight, length, speedand size of the equipment used.
It is highly recommended that all children have their own racquet, not only forthe practice sessions but also for the take-home activities. These racquets should bethe appropriate length based on the size of the player. The best way to measure forracquet length is to have a child stand up straight with his or her arms at their sides.(See page 9 for an illustration.) The distance from the tip of their fingers to theground is the length the racquet should be.
Foam balls and oversized felt-covered balls are used on a 36-foot court. (Courtdimensions are explained further in Chapter 2.) Foam balls are light, safe and bouncewell. They are ideal for indoor use, especially if courts are set up on smooth surfaces.They are also recommended for safety reasons if there are lots of kids in a small space.Oversized low compression felt-covered balls may be more appropriate for outdoor use,especially in windy conditions. Many of these balls are approved by the InternationalTennis Federation (ITF) and fall under the Stage 3 or “Red” classification.
A low compression ball is used on a 60-foot court. This ball is a standard size felt-covered ball, but is softer, lighter and moves slower through the air than the tradi-tional tennis ball approved for a full-sized court. The ITF approves these lowcompression balls as Stage 2 or “Orange” balls.
Other equipment listed makes learning easier and fun for kids and offers varietyto the practice sessions. This equipment is available from all major tennis manufac-turers and much of it can be obtained from sporting goods, department and toystores. Many times a substitute can be created from items found around the house.
Below is a list of equipment with a description and some possible substitutes:
Cones: These are colorful plastic pylons used as obstacles or targets. Substitutewith shoe boxes, tennis ball cans or pyramids created by tennis balls.
Koosh balls: A ball made up of colorful rubber strings bound together to form aball, available at most toy stores. Substitute with beanbags or sock balls.
Playground balls: 10- to 12-inch textured inflated rubber balls. Substitute withbeach balls, volleyballs, soccer balls or basketballs.
Poly spots and donuts: Colorful flat rubber, non-slip spots and circles for on-court marking. Substitute with carpet squares or sidewalk chalk.

6 QUICKSTART TENNIS : A GUIDE FOR PARENTS AND RECREATIONAL COACHES
Portable nets: Several portable net systems are available and come either inindividual pieces that need to be joined to construct a frame for a net, or with allpieces attached by an elastic cable so they easily fit together and pop up so the netcan be attached to the frame. A simple substitute would be to use caution tape orsurveyor tape tied to the net, fence or chair.
Throw-down lines: Flat non-slip rubber strips approximately 2 inches by 24inches that can be used as temporary lines for courts. Substitute with sidewalkchalk, a chalk snap line, masking tape or painter’s tape. (Use a tape that will not pullup the court surface or leave a residue on the court.)

7CHAPTER 2: EQUIPMENT AND RULES FOR THE DEVELOPING PLAYER
Chapter 2: Equipment and Rules for theDeveloping Player
The easier it is for kids to play tennis, the greater the chance that they’ll stickwith the game over the long haul. And the chances of retaining them are higher ifthey achieve early success and have fun playing.
That is the basis behind QuickStart Tennis. In an effort to engage children at thebeginner level, other sports bring their games down to scale, from a smallerdiamond for Little League baseball to a shorter goal and smaller ball for basketball.
For tennis, the answer is the same. In QuickStart Tennis, children will play oncourts that are either 36 or 60 feet long, depending on their age and development,and with racquets that are shorter than the standard 27 inches for adults. Also,children will start by using a foam ball or an oversized low compression felt ball thatbounces lower and moves through the air slower than the traditional felt ball.
Overall, there are six specifications to QuickStart Tennis—court size, age ofplayer, type of ball, racquet length, net height and scoring—that allow children tolearn and play tennis to scale. It is critical that all six specifications be used at thesame time for the complete development of the child as a tennis player, and to createconsistency for competitive play throughout the United States.
Age Court Size Racquet Ball Net Height Scoring
8 and 36’ x 18’ Up to 23” Foam and 2’9” Best of 3 gamesunder oversized low – first to 7
compression points(Red Ball)
9-10 60’ x 21’ singles Up to 25” Low 3’ Best of 3 sets –60’ x 27’ doubles compression first to 4 games
(Orange Ball) with third setfirst to 7 points
Court SizeThirty-six feet is the width of a regulation court, including the doubles alleys.
On a 36-foot court, the doubles sidelines are the baselines and the singles sidelinesare the service lines. A center service line should be marked between the two regula-tion sidelines. The width of the court is 18 feet and the regulation service line andbaseline are used as sidelines.
QuickStart Tennis

8 QUICKSTART TENNIS : A GUIDE FOR PARENTS AND RECREATIONAL COACHES
The 60-foot court is a three-quarters-sized court using the existing regulationnet, while the baseline is moved 9 feet inside the existing, regulation baseline. Thesidelines are moved in 3 feet on each side for singles, and the existing singlessidelines are used for doubles. The regulation service court is used as the servicecourt for 60-foot tennis.
The narrower sidelines on the 60-foot court develop youngsters’ abilities to moveforward and close out points at the net. Young players also find it easier to anticipatea ball moving to the side of them, and the 60-foot court encourages them to learnhow to “read” the height and depth of the incoming ball. If the court width was theregulation 27 feet, children would have to cover a distance almost the equivalent toan adult playing singles on a doubles court, and side-to-side ground strokes wouldbecome the most dominant shots.
AgeChildren ages 8 and under play on the 36-foot court and use the specifications
recommended for a court measured from doubles sideline to doubles sideline. Theywill enjoy tennis on a court where they can rally, recover and play points when theball stays in play for several hits.
Children ages 10 and under play on the 60-foot court and use all of the specifica-tions recommended for this court, which is three-quarters the size of a standardcourt. These children are mature enough to play a complete game on a three-quarter-sized court, and they will develop technique, shot selection, rallying skills and theability to hit and recover on a 60-foot court. By reducing the size of the court to 60feet, children 10 and under will be able to compete in both individual and teamtennis events on a platform that fits their size and suits their abilities.
36-foot Court 60-foot Court

9
BallFoam and oversized felt-covered balls perform better based on court size,
racquet length and the height of the child. Using the correct ball and racquet iscritical so children can hit with full strokes and strong grips.
For the 36-foot court, foam balls are lightweight, move more slowly through theair and have a lower bounce. They can be easily hit and controlled with shorter andlighter racquets. An alternative to the foam ball is an oversized felt-covered ball,which is especially useful outdoors. It is helpful in that the ball—which movesslower and bounces lower—can be hit at the right height and the right speed inrelation to the child. Otherwise, extreme grips become the norm as children adjust toconsistently hitting balls above their heads. The International Tennis Federation(ITF) has official specifications for this ball that classify it as a Stage 3 or “Red” ball.
For the 60-foot court, a low compression, lightweight, felt-covered ball is ideal. Itmoves slower through the air and the bounce height is lower. The ITF has officialspecifications for this ball that classify it as a Stage 2 or “Orange” ball.
Racquet LengthChildren will play much better if they use a racquet that is the appropriate
length. A child using a racquet of the correct length will be able to control the swingpattern and angle of the racquet face. Ultimately, with the right racquet, he or shewill be able to control direction, height, distance, spin and power.
Children on the 36-foot court will generally use racquets up to 23 inches inlength. On the 60-foot court, racquet length should not exceed 25 inches. Theseracquets are readily available, are to scale based on the height of the child and allowthe child to develop racquet skills so they can hit with various speeds and spins. (Thesejunior racquets have weight and grip sizes proportionate to the racquet length.)
Racquets that are too long are difficult for a young-ster to control. These longer racquets also have morepower, and thus children cannot hit with full strokes.
To measure for the correct length, have the childrenstand straight with arms at their sides. The racquetshould be no longer than the distance from the finger-tips to the ground.
These short racquets, varying in length from 17 to23 inches, are usually made of aluminum; they arelightweight and have small grips.
As children grow taller and stronger, so should theracquet be longer and stronger. Children on a 60-footcourt using low compression balls can begin withaluminum racquets but also have the option of usingstronger and more powerful graphite compositeracquets that are 23 and 25 inches in length. (Astandard racquet is 27 inches.)
CHAPTER 2: EQUIPMENT AND RULES FOR THE DEVELOPING PLAYER
Racquet Length

10
Net HeightThe 36-foot court uses a net height of 2 feet, 9 inches; this is more appropriate to
the height of a child 5 to 8 years old and is the height of many temporary nets. Noadjustments need to be made when using the 60-foot court and the regulation netthat is 3 feet high at the center strap (and 3-foot-6 at the net posts).
ScoringYoung children need shorter matches based on their age, energy level and atten-
tion span. Children 8 and under play the best-of-three, first-to-seven point games.The server gets two serves and each player serves two points before changingservers.
The 60-foot match for 9- and 10-year-old children consists of two-out-of-three,four-game sets with the final set determined by one first-to-seven point game. Theserve rules are the same as regulation tennis.
Optimally, children should play in small teams, where the result of their matchcounts as a point for the team. Any singles tournament should be round robin,compass draw or a similar format that enables as many players as possible to play asmany matches as possible. (See the appendix for more on compass draws.)
Note: QuickStart Tennis is designed for players 10 and under. However, teachingtechniques incorporating foam balls, low compression balls, shorter racquets andsmaller courts can be applied to beginners at any age level. Also, the 60-foot court isvery effective for senior players to play singles or doubles.
QUICKSTART TENNIS : A GUIDE FOR PARENTS AND RECREATIONAL COACHES

11CHAPTER 3: KEYS TO COACHING YOUNG PLAYERS
Chapter 3: Keys to Coaching YoungPlayers
Coaching 101In this book, we will spend much time focusing on how to rally a tennis ball and
consequently play tennis, but it is important at the outset to look at what it means toplay. Not just play tennis, but play itself. We’ll explore what it means to play and tohave fun and what makes things fun for a child. Without this understanding andframework, we could produce mechanically sound tennis players yet not givechildren the tools they really need to continue in tennis or other sports—or to besuccessful in life.
Buttoning Your ShirtHave you ever buttoned your shirt wrong? Maybe you were in the dark, or you
were in a hurry or you hadn’t had your morning coffee. Somehow you ended upwith one more button than you had a hole for. What happened? At which button didyou do wrong? Was it the last one where you discovered your error? No, it was thefirst one. And then you just continued along, doing what you normally do. It seemedto make sense. It felt right. It’s what everyone else does. It’s how you always do it. Itis how it’s done. But if you start out wrong, you’re going to end wrong.
Youth sports are like buttoning your shirt. If you start out wrong, you’re goingto end wrong. You may miss teaching something really important in the beginningstages, and as you go along, one button after the next, you get to the end andwonder what happened.
• “This is what the other coaches are doing.”• “It’s how you’ve always done it.”• “This is what parents expect.”• “If we’re going to win, this is what we’ve got to do.”• “This is the way my college or high school coach treated me.”• “I’m just teaching a bunch of kids; how hard can it be?”
It’s not hard. You just have to pay attention—and be intentional—in the earlystages. You have to start out right to get the results you and the kids want. What dokids want? Why do they start tennis and why do they quit? It’s important to under-stand these questions—and answers—before you even think about picking up atennis racquet.
QuickStart Tennis

12 QUICKSTART TENNIS : A GUIDE FOR PARENTS AND RECREATIONAL COACHES
Child Sports Statistics to KnowThere are three statistics that make up the 70/80/90 rule of teaching kids. The
first alarming statistic is that 70 percent of kids drop out of youth sports by the ageof 13! Seventy percent! And tennis is no different. You can have tons of kids in yourjunior program, but if you keep doing what you’ve always been doing (buttoningyour shirt without paying attention to how you start), 70 percent will be gone by age13. Why? Adults! We’re it! The top three reasons kids drop out of sports are becauseof us—coaches and parents. Despite our best intentions, we are the reason that kidsquit.
Top Three Reasons Kids Drop Out of Youth Sports:
1. It’s not fun anymore2. Parental pressure to perform3. Unmet coaching expectations
You can take those reasons and boil them down to two primary components:pressure and performance. This is the sad state of youth sports in America, andtennis is no different. If we don’t change what we do, what we’ve always done, andhow we do it, we’re going to keep getting the same results, with 70 percent of kidschecking out.
The 80 percent statistic is that kids (yes, even a 6-year-old) can remember with 80percent accuracy what was said to them by a coach. Coaches, on the other hand, canonly remember with 20 percent accuracy what they have said to children. Thesummary of the study on why kids drop out of youth sports, by University ofWashington Ph.D. researchers Frank Smoll and Ronald Smith, is that “coaches areblissfully unaware of what they say to children and the impact it has on kids.”
• “I didn’t say that.”• “I wouldn’t have said that.”• “Who are you going to believe: me, or a kid?”• “They’re just making that up.”
Really? Statistics show they’re not. Children are four times more likely to have anaccurate recollection of what we said than what we “know” we said. That’s scary! Wehave the best intentions. We want to do and say the right things. But sometimes inthe heat of the battle or the afternoon sun, with a dozen or so little kids runningaround, when they just aren’t cooperating, again, we say something trying torestore order. It may not be abusive, but it may not be the thing our kids need tostay active and involved in tennis, or even sports in general.
The 90 percent stat is that 90 percent of kids would rather play on a losing teamthan sit on the bench of a winning team. Kids want to play; they want to be involved.They don’t want to sit around or wait in line for their turn. They want to be activelyinvolved and engaged. Too often it’s an adult model of scheduling, performance andcompetition that is imposed on kids and that influences how they experience youthsports.

13CHAPTER 3: KEYS TO COACHING YOUNG PLAYERS
Opportunities to RespondThe more opportunities you provide children to play, the better they will become
at their chosen sport. The more they stand in line, waiting, watching and listeningrather than moving, running and doing, the fewer opportunities they have torespond and learn. Sure, there will be times when you are instructing while they arewatching and listening, but those times must be kept in balance and out-weighed bytons of time for them to play tennis. Experience is the best teacher. Let them experi-ence every aspect of tennis. Create environments where children have as manyopportunities to respond as possible.
Teach Kids to ThinkAs you will learn later in this book, tennis is an open skills sport in which there
are no set plays. There are a multitude of decisions to be made, fluidly and in a splitsecond. It’s a lot like driving a car. There is some skill involved in making the car goleft and right, but the critical element is in the decisions that go along with that.When to slow down or speed up, when to pull out or when to wait, and beingprepared for what the other driver might do are all examples of the importance oflearning to think that come with driving a car. But these decisions are independentof the skill and the actual mechanics of making the car go.
You can have players with great shots but poor shot selection. They can be veryfast but always too close to the ball. They can be good volleyers but approach the netat the wrong time. It is important that we teach kids to think at all ages and stagesof development. Too often as adults, coaches and parents, we order kids around thecourt, telling them what, when and how to do something. In the process, theybecome too reliant on a coach or parent to be able to handle situations on their own.For the kids who we do teach how to think, they become the smart players—thosewho “just know” where to be on the court and what shot to hit. Generally, they arein the right place at the right time. We often label these types of players as gifted,but most often they have been taught to think and react on their own at an earlyage. Give the kids you coach space to learn and space to make mistakes.
Making MistakesMistakes are part of learning. They are to be expected. From children to pros,
everyone makes mistakes. Even you make mistakes. When was the last time youtripped or bit your tongue? These are basic life functions, yet we sometimes makemistakes even in the simplest of tasks. Tennis is no different. You will sometimesmake mistakes on the simplest of shots. The key is to determine when mistakes arejust mistakes, and when they are a sign that something else is going on.
When children keep making the same mistakes, it is generally a sign that theyhave not learned the desired skill or strategy properly. Taking that a step further,they generally have not learned it because we have not taught it effectively. They arenot trying to annoy you, ignore your instruction or think they are smarter thanyou. They are kids. Often we adults do not provide age-appropriate instruction oractivities. One of the biggest mistakes that adults make in teaching children isfailing to understand the difference between showing them a skill and actuallyteaching them. The more we just “show and tell,” the less learning takes place andthe more reliant they become on our instruction.
So if the ultimate goal in the performance spectrum is not to make any mistakes,how do you get there? The key is understanding that the opposite of makingmistakes is not perfection. If you focus on NOT making mistakes, you will createfear, as well as a protective, cautious player. When children—or adults for that

14 QUICKSTART TENNIS : A GUIDE FOR PARENTS AND RECREATIONAL COACHES
matter—focus on not making mistakes, they are more likely to make them. Embracemistakes. Allow them. Encourage them. Understand your part in the children’smistakes and adjust your instruction. And after you have done everything you can,expect that they will make some more.
FunWhat makes things fun? Why do you do what you do? Why do kids do what they
do? Is there a difference between what is fun for you and fun for them? Certainly.Fun, or play, is different for everyone. The best definition of “play” is somethingdone for the enjoyment of the doer. That’s it. It’s that simple. Two people might beskiers: One likes to jump off cornices into deep powder bowls, while the other likessafe, groomed runs. Who’s having more fun? The person jumping off cornices maybe hoopin’ and hollerin’ as he/she jumps, but the other person loves being outside inthe winter, the crisp mountain air followed by a warm hot chocolate at the end of theday. They are both having fun doing what they love to do.
Tennis is no different. Who has more fun playing tennis: a 3.0 player or a 4.5player? They both can have fun. Because we are in the business of helping people getbetter, we can too easily move toward saying the 4.5 player. However, it is incorrectto think that skill proficiency equates to more fun. The same is true in coachingchildren. Girls—and boys—“just wanna have fun.” Coaching beginning tennis meanshelping kids have fun and it happens to be on a tennis court. There is a paradox ofplay that says the more you make it about skill acquisition and performance, the lessfun it will be and the more likely kids are to drop out. The more fun you make it—without focusing on performance—the more children like it and the better they willperform.
Video Games & Skate ParksSeveral years ago if you were to ask kids, “If you weren’t playing tennis, what
would you be doing,” they would have said playing. Now they say playing videogames. Therefore, our beginning-level teaching experience with kids is of the utmostimportance. It is this first encounter with tennis that can set the stage for kidsbecoming— and staying—athletic and moving. While we would love for them tocontinue in tennis, our first priority is to create an environment that is fun andfilled with movement. The more you equate fun with doing and movement, the morelikely a child will be to stick with tennis and, ultimately, perform better.
Have you been to a skate park lately? They’re packed. Why? Why are skate parksso crowded and, for the most part, baseball and soccer fields are empty, except fororganized activities? The difference is adults. There aren’t too many adults hangingout at skate parks, while they line the sidelines of other venues for games andpractices. The United States Olympic Committee Athlete Development Departmentbelieves the best athletes in the country are at skate parks. Why? There are nocoaches. Skate parks are filled with self-motivated athletes. There is no one tellingthe kids how to do certain tricks. Just kids teaching kids. They will work onsomething for hours, or even days. They’ll figure it out by trial and error. And thenthey’ll get it. They flip the board over once in the air. They will celebrate theirachievement briefly, and then some other kid will show them how to flip it twice.Then they’ll work on that. All without an adult guiding them, telling them what todo, showing them how they are doing it wrong, or getting in their face about nottrying hard enough. The kids will even say its fun. It’s fun because they arelearning at their own pace, moving, risking, hanging out with friends, challengingone another, laughing and, at the deepest level, playing.

15CHAPTER 3: KEYS TO COACHING YOUNG PLAYERS
If you run a tennis program, your competition is not another tennis program. It’sthe local skate park. It is the truest example of kids playing athletically acrossAmerica. The pick-up games of baseball and basketball have largely been replaced byskate parks. The last sentence from the previous paragraph described why you didwhat you did as a youngster and describes what still make things fun for children.
Kid MagnetKids naturally gravitate to whatever is fun. Is your tennis program fun from a
kid’s perspective? Or has an adult model of performance and skill acquisition takenover? Using the following list of characteristics of play, how does your programrate?
Learning at their own pace Performance expectations
Full of movement Standing in line, waiting
Promote risk taking & experimentation Don’t swing so hard; just get it in…
Being with friends Separating kids so they get more done
Kids teaching kids Adults-only models
Laughing Stop goofing around; we’ve got a lot to do
Play Structured environment
If you are like most of us, we can all use a little help making our programs alittle more kid friendly. That’s OK. All of us have been kids at one time, but it mayhave been a while. And what we used to do—mostly by accident—when we were kidsturns out to be much healthier than what we are experiencing today. There are moreoptions for kids today, which is great. But 70 percent of them are choosing not toparticipate in sports by the age of 13. What can we do to change that number? Whatcan you do to change that number for the kids in your program?
Program HealthHow healthy is your program? How do you judge that? By the trophies in the
hall case? By the sheer numbers in each age bracket? By the smiles on the kids’faces? How skilled are your coaches? Are they skilled at working with children? Arethey good tennis players but lack the skills and patience to work with kids? If yourprogram is like most, your youngest coaches work with the kids’ program. That is aU.S. model of coaching. The European model of coaching is to have the best coaches,the ones with the most experience, work with the youngest players. That couldaccount for the number of great athletes that come from small countries, where theyhave fewer athletes and yet can compete on the world’s stage.
Changing the FormulaLet’s say you have a coach who is in charge of an age group that wins 85 percent
of its matches, yet only 50 percent of the kids come back the following year. Youhave another coach who wins only 45 percent of his matches, but almost all of hiskids continue with tennis the following year. Who is the better coach? Do you valueperformance or participation? Can you value both? Sure. But you can’t value perfor-mance and expect participation to increase. (That’s what we’ve been doing, and itdoesn’t work.) The more you value participation, the more performance comes. Butit’s so hard not to force it, to get in our adult model of scheduling, organization,competition, performance and winning.

16 QUICKSTART TENNIS : A GUIDE FOR PARENTS AND RECREATIONAL COACHES
There is a simple formula for working with children:
• The more they enjoy it, the more they will do it.
• The more they do it, the more they learn.
• The more they learn, the better they will perform.
Simply put, the more they enjoy it, the better they will perform. We typicallystart with the outcome and work our way backward, creating performancemilestones to gauge our progress to make sure we are on target. We become sofocused on the outcome and milestones that we fail to hold a child’s heart and atten-tion. We may have better players at age 10 than we ever had before, but still 70percent of them are going to be gone in just three more years.
We need to get serious about play and about having fun playing tennis.
Invent and PretendKids love to invent and pretend. It comes naturally for them and is a huge
component of play. The more your practice activities incorporate the ability of a childto invent and pretend, the more fun it will be. To you it may appear more chaotic,but a skilled coach of children will know how to harness what is happening.
Do you know the football term “audible”? It’s when the quarterback goes up toreceive the ball snap and, in making a last-second read of what the defense is goingto be doing, changes the play. To the outsider, it looks like a mad scramble. But tothe experienced quarterback, it’s a planned change. Working with young children ismuch the same. To the outsider, it looks pretty crazy. But if you are well preparedand can make adjustments on the fly based on what the kids are doing, you willcreate an environment where children will have fun and flourish. If your lesson planis sequentially choreographed, you will become frustrated and your kids will bebored. A good rule of thumb is to have 12 things planned and hope to do eight. Givethe kids a chance to choose what they want to do. Find out what game they like bestin the first few practices and save that for last in subsequent practices.
There will be a great desire on your part to make the lesson be about tennis andacquiring skills. Kids don’t play to acquire skills; they play because its fun. If theyare acquiring skills at a high rate and aren’t having fun, they are good candidatesto join the 70 percent who drop out. There is a foundation of needs that mustCONTINUALLY be met in order to keep kids playing tennis.
Tennis
Sports
Movement
Fun / Enjoyment
Too often as coaches and parents we go straight for the top and make all that weare doing with kids be about tennis. The more we continue to build the base, not justin the first age level or two, but continually, the more we create a foundation wherea child can build the appropriate aptitude and training to become an athlete AND atennis player.

17CHAPTER 3: KEYS TO COACHING YOUNG PLAYERS
The ZoneAt the end of every lesson with kids, we often look at what was accomplished. Did
they get it? How proficient are they at the skill that was taught? Who needs morework on what? What’s next on the lesson plan? While that thinking is good,organized and normal, it focuses only on the top tier. Basically, it’s an adult model ofsport. It is primarily concerned with performance.
At the end of EVERY lesson, ask yourself—or better yet, ask the kids—did theyhave fun today? Did you hear laughter? Were they smiling? Would they want toinvite their friends to join in?
The highest level of performance is called “the zone.” That same state of being, ofawareness, of performance, actually, in children, is called a state of play. Grand Slamchampions have it AND children in your classes can have it—when they are sofocused on “the now” that they lose track of time and space. Just like when you wereoutside playing as a child and your parents would call you to come in “in fiveminutes.” And after 20 minutes had passed, you and your brothers and sisters wererounded up and headed home complaining, “It’s not fair! It hasn’t even been fiveminutes yet. Can’t we stay out longer?” That is a state of play. It is focused attentionand performance.
As coaches, we can create an environment where children can experience “thezone”—when they are focused on “the now,” the activity, the joy they are experi-encing. They aren’t aware of how hot it is, who is watching or the match that willtake place next. They are immersed in now. So an important question is this: Areyour kids glad your lesson is over? Are you struggling to fill the time slot? Or arethey, and you, wondering where an hour went? Do you have to kick them off thecourt because they just want to stay and play? Were you so immersed as well that youcan’t believe the time is over? That is the ultimate lesson, regardless of the skills thatwere taught. It invites participation. It captures the spirit of a child. They want tocome back. They want to keep playing. And the more they do, the better they will be.
The Most Important Thing to Give KidsOf all the things you can give kids, what’s the most important? A winning
attitude? Great forehands and backhands? Amazing tactics? A killer server? A killerinstinct? Or would it be compassion and/or understanding?
According to research by Benjamin Bloom, author of Developing Talent in YoungPeople, the most important thing is a love of the game. More than 20 years ago,Bloom did an in-depth study of young, talented people across different genres,including music, art, drama, science, math and sports. He looked for correlationsbetween the diverse group of high-performing teenagers, similar to what StephenCovey would do in his best-selling book, The Seven Habits of Highly Effective People.Bloom found that it wasn’t discipline, specializing at a young age, being part of agreat program, having enough money to make kids’ dreams come true or beingnaturally talented that made the biggest difference. All the high-performing kidsBloom studied had, at an early age, a parent, teacher or coach who gave them a lovefor the game or a love for learning. The best student is a self-motivated one, the onewho asks, “Why?” One who seeks out knowledge on his own. One who loveslearning. One who reads voraciously. One who practices and then practices somemore. The true gift of those labeled as gifted is not their talent, but their love forwhatever it is they do.

18 QUICKSTART TENNIS : A GUIDE FOR PARENTS AND RECREATIONAL COACHES
But, How?It’s simple. You just “give” them a love for the game and your children will
become champions. As Happy Gilmore says about golf, “Golf would be so mucheasier if you just hit a hole-in-one every time. You wouldn’t have to learn how toputt.” So how do you give children a love for the game? How do you give themsomething so powerful, yet so simple? The best way to give children a love for thegame is to model it. You can’t scream, yell, demean, scold, intimidate, or use fear orpublic humiliation with children and expect them to love it. You need to take to heartALL the things we have said thus far AND simply just love playing tennis yourself.Go out there and have fun! Laugh and play! If it’s not fun for you, how would youever expect children to have fun? Remember, what’s the No. 1 reason kids drop outof youth sports? It’s not fun anymore.
“I try to make it fun, but the kids just don’t respond.” Have you ever felt thatway? Like you’re doing your best and it’s just not clicking. You just went to a clinicand saw a high school coach do a great drill. But it isn’t working with your kids. It’snot any skill or drill that captures a child’s heart; it’s YOU! It’s your attitude. It’syour passion for life, sport and tennis that brings them back.
Can You Be a Dork?One of the best ways to capture a child’s heart is to not be afraid to be viewed as
dorky. The best school teachers, year after year, are those who are not afraid to goout on a limb and be a little—or a lot—dorky. It’s scary. You make yourself veryvulnerable. Especially in front of a bunch of kids who could laugh at you. Still, thosewho aren’t afraid to show a passion for life—and tennis—are able to inspire kids andcreate an environment where they will flourish.
Watch the movie Patch Adams for inspiration. A clown suit. Funny glasses. Crazyhats. Music on the court. Talking in rhymes. Backward Day. 1970s Day. Using asuperball. Playing with two balls. Making noises. Making up games. Letting the kidsmake up games. There will be times when it won’t look or sound like tennis. Butyour programs will be fun. Your programs will be full (because they are fun). Kidswill stay around longer. And they will perform better because they are there andself-motivated.
DisciplineOn the other end of the “fun spectrum” is the typical usage of the word “disci-
pline.” Typically we think of discipline as getting someone to do something theydon’t want to do. But the root word of discipline is “disciple,” which means a joyfulfollower. Do you demand discipline or do you earn it? Are you trying to get kids todo something they don’t want to do? Don’t focus on what it is, but look at why theydon’t want to do it. The more you create a love of the game for your young players,the fewer discipline problems you will have.
Tennis enjoyed an explosion in participation when tennis whites were no longerrequired. More people became involved when the sport was more acceptable and thedefinition of proper attire was changed. Tennis may see its next explosion atyounger ages when PROPER includes what is proper behavior for children. Whenyour tennis lessons look less like school and work, and more like what KIDS wouldbe doing naturally, your programs will grow in size.

19CHAPTER 3: KEYS TO COACHING YOUNG PLAYERS
The Most Important Thing to Teach KidsIf a love of the game is the most important thing you can GIVE the children you
coach, the most important thing you can TEACH the children you coach is effort.The one quality that makes the biggest difference at the professional level is thething you need to teach your kids at the youngest age. TEACH them that effortmakes a difference! Don’t just tell them after they’ve lost; teach them by the way youconduct yourself. Show them what maximum effort looks like! How can you expectthem to dig deeper and give more effort when they don’t feel like they have anythingleft if you don’t model that, too? Imagine, you’ve already been on the court for sixhours in a row, in the hot sun, and now you’ve got third graders. Do you have whatit takes to dig deeper? Do you model effort?
Teaching EffortThe psychology of effort, and that of low effort, is a very interesting topic and
could be a whole book in itself. In fact, there is such a book, and it’s called Mindset,by psychologist Carol Dweck, Ph.D. She has done more than 30 years of research onsuccess, failure and effort. Reading her book will change the way you coach andparent. She chronicles numerous personalities, including John McEnroe, andexamines their mindsets in how they approached difficulties. Dweck says the bestway to inspire success is to praise/reward effort, not performance. This is as truewith elite athletes as it is with young children.
Praise effort! Don’t praise the victory; praise the hard work in practice thatmakes the victory possible. Don’t praise the number of forced errors; praise the effortit took to make the change. Don’t praise the shot selection; praise how well they havebeen paying attention in practice. Don’t placate a player in a loss; let him know thereis more to learn and that continuing to work at it will make a difference.
None of us who has ever enjoyed some level of success would say that it cameeasily. Especially if you wanted to sustain it. Success comes to those who try. Tothose who persevere. To those who continue to work, or even struggle, through diffi-cult times, dry spells or injuries. To those who are OK with making mistakes. Thosewho are successful have risen above all odds because they have discovered that isworth it to try again.
Careful What You SayYou can have the best strokes. You can move around the court with the greatest
of ease. You can have a rocket first serve. You can even be masterful at communi-cating all of this to children. You are fit and all of the muscles in your body are fine-tuned for creating tennis excellence—except one. And this one muscle can be themost damaging to your young athletes. The muscle many of us need to workovertime to keep in check is our tongue. Remember the statistic that made up the 80percent part of the 70/80/90 rule of teaching kids? Kids can remember with 80percent accuracy what was said to them by a coach, and coaches can remember withonly 20 percent accuracy what they say to kids. It is crucial that you take a seriouslook at everything you say to children.
The most damaging, and often overlooked, type of communication we use withothers—and specifically children—is sarcasm. You can have all your other ducks in arow regarding teaching and instructing, but if this one is out of line, you are out ofline. Using sarcasm may be OK for you. Your friends use it. They use it with you.It’s not that big a deal. But a child may perceive it very differently, and what maynot be a big thing for you can be very damaging to the child.

20 QUICKSTART TENNIS : A GUIDE FOR PARENTS AND RECREATIONAL COACHES
A young child who encounters sarcasm for the first time has a mental process togo through that is unfamiliar to them. An instructor may “jokingly” say, “Yourgrandmother is faster than you are.” The naïve child begins thinking, The coachdoesn’t know my grandmother. I am faster than she is. I really am. At least Ithought I was. Is the coach lying to me or is he/she telling me the truth? Childrenprocess your sarcastic comment by wondering and then begin the process ofdeciphering whether you are lying to them. It’s the same thing you do when youencounter sarcasm as an adult from your friends, your spouse or your kids. Asadults, we are faster at processing it and have more communication skills to judgethe sincerity of the comment. Or at least we think so. Isn’t that where sarcasm bites,when you feel there is some thread of truth encoded in the message?
Controlling your tongue and eliminating sarcasm when teaching children willgreatly improve your communication and effectiveness with them. Wouldn’t it begreat if they knew that everything you ever told them was true? There would be noneed for them to process your communication by running it through thesarcasm/lying filter. They would inherently know that you were speaking the truthto them and that they could trust you immediately. They would know that you areon their side and have their best interest in mind. Again, you might not think it’s abig deal, but it is to children. Take the high road and be the best YOU can be!
Teach and InspireWhen you break down all the things we do on a tennis court with children, it
comes down to two things: to teach and to inspire. That’s it. That’s the heart of agreat tennis instructor. Your kids will not have success without both components.You may have taught them well, but if they don’t play inspired or aren’t inspired togive maximum effort, they will fall short. If you just inspire them without teachingthem the skills they need to build upon, they again will fall short.
You have an incredible opportunity to make a difference in the life of child! Asthe Benjamin Bloom book, Developing Talent in Young People, points out, you areone of the greatest sources of influence in the life a child. It’s not just about tennis,or forehands and backhands. It’s about making a difference that can last a lifetime!It’s about having them fall in love with movement, sports and tennis. If tennis is fun,they’ll keep playing. If they keep playing, they’re going to learn something alongthe way. And the more they learn, the better they will perform.
Have fun!
Laugh, giggle and be dorky!
You’ll feel like a kid again.
You’ll fall in love with tennis all over again!
You’ll play better than you ever have before.
And your playing at tennis will draw in more kids!

CHAPTER 4: DRIVEWAY, PLAYGROUND AND WALL TENNIS 21
Chapter 4: Driveway, Playground andWall Tennis
Children often get their first exposure to sport through a parent or familymember. As in other sports, this probably means going into the backyard with mom,dad or an older brother and playing catch, kicking a ball between the rose bush andthe hedge, or shooting a lightweight basketball into a 4-foot basket. The list goes on,depending on the sport.
The common characteristic is that the equipment is smaller, lighter and theintent is to learn a very simple task: throwing, catching, kicking, dribbling orshooting. The instructions, if any, are generally brief and simple with the emphasison activity. The duration is short because any activity is interesting for a brief periodof time and could be interrupted by a passing butterfly or the discovery of a colorfulflower in bloom.
Driveway/Playground TennisBy that same token, tennis can be a driveway or a playground activity. The goal
of playing catch is to learn to enjoy throwing and catching, not playing baseball.The goal of driveway and playground tennis is to rally with a family member. This ispossible when everything is scaled down to the size of the child.
The EquipmentAs discussed in Chapters 1 and 2, the most important variables are the ball,
racquet and length of the court. It is a good thing that the driveway orplayground space not be anywhere near the size of a regulation tennis court(which is 78 feet long by 27 feet wide). Even a space of 10 feet in length will work,provided that the racquets are short and the ball is light and slow. The “net” couldbe as simple as a line on the driveway/playground, rope or caution tape tied to atree and chair across the driveway. A pop-up portable net is also an option. Linescan be drawn by using sidewalk chalk, or you can use the existing seams in thedriveway or playground for the lines of the court.
Children under 5 years old should be using very short and lightweight tennisracquets in the 19- to 21-inch range. The ball should be a lightweight foam ballthat rebounds well off the driveway/playground surface. Large foam balls with adiameter of around 4 inches are very forgiving if the surface is somewhat irreg-ular. These lightweight balls will not travel very far or fast, and contact does notneed to be made in the center of the racquet to make the ball go forward. The foamball is easy on the arm and will not cause the racquet to twist in the hand of achild if hit off center.
QuickStart Tennis

QUICKSTART TENNIS : A GUIDE FOR PARENTS AND RECREATIONAL COACHES22
Getting Started
The starting point forchildren is hitting the ball upin the air, letting it bounce onthe ground and trying to hit itup again. This is a self rally,and children should attempt tohit the ball up as high as theirhead before the ball bounces sothey can hit it again. Thisheight is important because itgives kids an idea of how hardthey must hit the ball to get ithead high and allows them timeto get in position to play theball again after the bounce.
To develop better control andto create a challenge, a circle ofabout 2 feet in diameter could be drawn on the pavement as a target. This gives theyoungsters something to aim for as they tap the ball up and try to land it on thetarget.
The next step is to do the same activity with the parent, but this time alternatehits. This is actually a mini rally since the ball is being alternately struck by thechild and the parent. Once some level of success is attained, the next stage is tocreate two target areas a few feet apart. These targets should be on either side of aline, and the rally will go back and forth between the two targets placed three orfour feet apart on the court.
So far, this is simple and the instruction has been visual as in “see if you can hitthe ball up like mommy.” Once you get to the stage of rallying the ball back andforth over a line to two targets, you are ready to put up the makeshift net using arope or caution tape. You have now created a small tennis court and are ready torally the same lightweight foam ball back and forth the over the net. The distance isshort, the ball is very light and slow moving, and the racquet is short, so hittingballs with everything to scale will be a joy and countless hours can be spent hittingballs back and forth on the driveway or playground.
As the child becomes taller and stronger, boundary lines can be placed fartheraway from the net because the child will hit with more power. This gives the child anopportunity to rally by hitting balls after they bounce (ground strokes), and if he orshe is closer to the net, out of the air (volleys). Eventually, children will learn tobegin a rally and even play points with an overhand serve. They will also make uptheir own scoring and play different games.
Even older children can have an enjoyable driveway/playground experience in alimited space if the ball remains slow and light and the racquets remain short. Foamballs and 23- or 25-inch racquets over a net height of 30 inches will create enjoyableplaying opportunities for children and adults alike on the driveway without aregulation-size tennis court.
Tap Up

CHAPTER 4: DRIVEWAY, PLAYGROUND AND WALL TENNIS 23
Wall TennisHitting balls off a wall or garage door has been a starting point and a method of
practice for a number of champion players in the past. Many players have spenthours hitting balls off a wall and imagining themselves playing matches and matchpoints against the champions of the day in the final of the US Open.
The EquipmentWhen using a regular hard ball, hitting against a garage or wall is possible
only after developing some playing skills. The regular hard tennis ball reboundsoff the wall quickly and gives little time to move to, prepare for and return the ballto the wall. The harder ball is simply not appropriate if the wall or garage door isirregular and certainly not an option if there are any glass windows anywherenear the wall or door.
With lightweight foam balls, hitting against the garage door can be much moreaccessible and enjoyable, even for younger children. Hours can be spent rallyingoff the wall without the need of a partner or any type of court set-up.
Getting StartedChildren should begin with the progression described above for driveway or
playground tennis: Begin with a self rally, hitting the ball head-level high. Oncechildren can accomplish this, they should tap the ball to the wall instead of to atarget 3-4 feet away. The ball should be hit up to a target about head high andreturned to the wall after the bounce.
As the child becomes more accomplished, he or she can gradually move backand increase the length of his or her strokes. Contests can be created by drawing aline on the pavement farther away from the wall so the child can hit every ballfrom behind the line and develop full-length ground strokes. Rallies can eventuallybe started by using an overhand serve.
As children become older, stronger and more proficient, they can graduate to alonger racquet. If they continue to use the soft, slow foam ball, they will be able togenerate power and racquet head speed to hit the ball and still have time torecover, prepare and return the next shot.

24 QUICKSTART TENNIS : A GUIDE FOR PARENTS AND RECREATIONAL COACHES

25CHAPTER 5: PRACTICE SESSIONS (AGES 5-6)
Chapter 5: Practice Sessions (Ages 5-6)This chapter contains eight progressive practice sessions for children ages 5-6
playing on a 36-foot or smaller court and with 17- to 21-inch racquets and foam oroversized low compression balls. (By progressive, we don’t mean that these lessons areahead of their time; it means that each practice session sets the stage for the next.)
The goal of these practices is to help children learn how to use their racquets andjudge the flight and path of the ball using fun activities. The ultimate goal is to havethese children enjoy the experience of hitting balls back and forth.
Initially, with the 5- to 6-year-old age group, this will begin with floor tennis,leading to passing and throwing tennis. These activities will develop a child’s ability tosend and receive a ball before being able to rally a ball over a net or low barrier.
Also included in each practice is a list of equipment that is used for that session.Practices for this age group should last no longer than 45 minutes.
The practice session for 5- to 6-year-olds will contain the following:
1. Theme of the day2. Movement Activities3. Skill development4. A take-home tennis activity
Note: Each practice session contains a tip for coaches written by Gary Avischious,an expert on coaching youth sports. Gary has done extensive study on how to makepractices fun and how to motivate kids, as well as developing creativity in yourpractices and even what to say and what not to say to young players. If yourpractices are fun and challenging, your kids will want to come back to practices, andthey will get better if they continue to come to your practices.
QuickStart Tennis
25

2626 QUICKSTART TENNIS : A GUIDE FOR PARENTS AND RECREATIONAL COACHES
Practices at a Glance: Ages 5-6This one-page guide outlines the eight practice sessions that follow. It serves as a
handy reference for what is covered in more detail during each practice
Practice 1 Controlling the Ball and RacquetMovement Activities Flamingo, The Bird, Frog Hops, Racquet QuicknessSkills Roll with Hands, Koosh Ball Pass, Tunnel Ball, Rolly Polly,
Alligator RiverTake Home Tennis Koosh Ball Pass
Practice 2 Sending and ReceivingMovement Activities Simon Sez, Red Light-Green Light, Team Tag, Cannon BallSkills Catch Me if You Can, Underhand Throw and Catch, One
Bounce-Two Bounce, Tennis HockeyTake Home Tennis One Bounce-Two Bounce
Practice 3 Sending and Receiving with DirectionMovement Activities Funny Bones, Ball Drop, Sharks in a Tank, Dodge BallSkills Lollipops, Throw Ball, Dirty HarryTake Home Tennis Throw Ball
Practice 4 Sending and Receiving with the RacquetMovement Activities Lobster Trap, Team Lily Pad, Through the Tunnel,
Crash Test, Side ShowSkills Tennis Shoot Out, Home BaseTake Home Tennis Lobster Trap
Practice 5 Sending and Receiving with Racquet on the BackhandMovement Activities Train Crash, Applause, Racquet Splat, Bungee Jump, Clear
the CourtSkills Tennis Hockey, Alligator RiverTake Home Tennis Applause
Practice 6 Rally SkillsMovement Activities Statues, Call My Name, Slamma JammaSkills Jacks, Partner Jacks, Rally Me, SurvivorTake Home Tennis Rally: Player and Adult
Practice 7 Rally Skills with a PartnerMovement Activities Follow the Leader, Partner Toss and Catch, Inch WormSkills Partner Rally Jacks, Splat, Mini Rally, Tag Team SinglesTake Home Tennis Mini Rally
Practice 8 Play DayTake Home Tennis Mini Rally

2727CHAPTER 5: PRACTICE SESSIONS (AGES 5-6)
Practice 1
Theme: Controlling the ball and racquet
Equipment: 17- to 21-inch racquets, foam or oversized low compression balls, Kooshballs or beanbags, large balls such as playground balls or beach balls
Note: For more information on equipment—including a definition of terms andpossible substitutes—see Chapter 1.
Gary’s Youth Coaching Tip
Kids don’t care how much you know until they know how much you care.
Movement Activities
Flamingo. Have the children move around the court like an animal the coachchooses. When the coach shouts out “Flamingo,” the players stop the animal imita-tion and balance on one foot with their arms out and eyes looking straight ahead.Repeat several times, choosing a different animal to imitate. You can even let thechildren make the animal noise.
The Bird. Have the children move around the court with the coach, but this timeimitating one of three different types of birds that the coach will call out—either ahummingbird with arms moving short and quick, a robin with medium length andmedium speed arm movements, or an eagle with long and slow arm movements.
Frog Hops. Jump from a crouching position along the ground, landing quietlyon the balls of the feet and with both feet together.
Racquet Quickness. Two players (or player and coach) stand facing one another,each standing a racquet on the tip of the frame with the handle pointing up. At thecount of three, the players will switch places and catch the other player’s racquetwithout letting it drop. After several successful trials, move the children back a half-step at a time and see how far they can go without letting the racquets drop.
Skills
Roll with Hands. Using a playground ball or beach ball, have the children stand4 to 5 feet apart and have them roll the ball back and forth to their partner or coach.Have them catch the rolling ball with two hands directly in front of their body.
Koosh Ball Pass. Use one Koosh ball or beanbag for each pair. Have the playersbegin by standing close together with their racquets, passing the Koosh ball backand forth from one racquet to the other. After several successful trials, have themmove back so they have to use a gentle toss to get the Koosh ball from one racquet tothe other. Add a challenge by tossing the Koosh ball low, high and even adding acreative catch, such as standing on one leg, between the legs, just above the ground,on one knee, etc. Let the kids be creative with their catch.
Tunnel Ball. Two players stand across from each other about 4 or 5 feet apartwith one foam ball per pair. One player rolls the ball to her partner, who moves sothe ball will roll through her legs without touching her feet. Every time the playersare successful, they score a point.

28 QUICKSTART TENNIS : A GUIDE FOR PARENTS AND RECREATIONAL COACHES
Rolly Polly. The players stand across from eachother on either side of the doubles alley. Players have aracquet and should position themselves sideways to theball as they might be positioned for a forehand (seeillustration)—with the edge of the racquet on theground behind the ball and the strings touching theball. Using the racquet, the player with the ball rolls itto his partner, who stops the ball with his foot and rollsit back. After five successful attempts, the two playersroll the ball—and stop it—with the racquet beforerolling the ball back.
Alligator River. The players line up across fromeach other on either side of the doubles alley, with theirracquets and one ball for each pair. The coach or one ofthe players is the “alligator” and is going to walk downthe “river” (i.e., the alley). As the coach walks down thealley, the players roll the ball to their partner, trying tohit the alligator.
Take Home Tennis
Koosh Ball Pass. Have parents, older siblings, friends, relatives, etc., pass aKoosh ball back and forth with the player. As the player gains success, have hermove back and toss the Koosh ball and catch it on the strings. See if the player canmove back two or three steps. Have her toss the ball low and high, and be creative inhow the ball is caught on the strings.
The Forehand

29CHAPTER 5: PRACTICE SESSIONS (AGES 5-6)
Practice 2
Theme: Sending and receiving
Equipment: 17- to 21-inch racquets, foam or oversized low compression balls, largeballs such as playground balls or beach balls, cones, poly spots or donuts
Gary’s Youth Coaching Tip
Don’t show kids “the right way” so they can be as good as you. Allow them todiscover and experiment so they can be better than you!
Movement Activities
Simon Sez – Lines of the Court. Use this activity to learn the areas and lines ofthe court. The coach calls out a line or area of the court and a movement. Forexample: “Hop on one foot, skip, tip-toe, little mouse steps, monster steps, etc.” Afterall players have gone to their line or part of the court, the coach goes to the correctarea so everyone learns the correct line or area.
Red Light – Green Light. Players line up side by side, facing the coach who is adistance away. Players have a racquet with a ball, beanbag or Koosh ball balanced onthe strings. The coach calls out either “green light” or “red light.” On green light,the players can move toward the coach. When red light is called, they must stop. Ifthe players are caught moving when red light is called, if the ball falls off theracquet or if they touch the ball, they must go back to the starting line. The firstplayer to reach the coach wins.
Team Tag. Divide players into two groups. Use the area between the baseline andthe service line. Call the name of one player who will attempt to tag as many playersas he can in 30 seconds. If a player moves out of the defined playing area or if theyget tagged, they are out. After 30 seconds, all players are back in and the coach callsout a new name.
Cannon Ball. The coach uses a large ball, either a playground ball or a beach ball,and tosses it high in the air and calls out a player’s name. The player attempts tocatch the ball after it bounces, counting how many times it bounces before it iscaught. This continues until all the players have been called. This can also be donewith partners, with one player tossing the ball up and the other partner catching it.
Skills
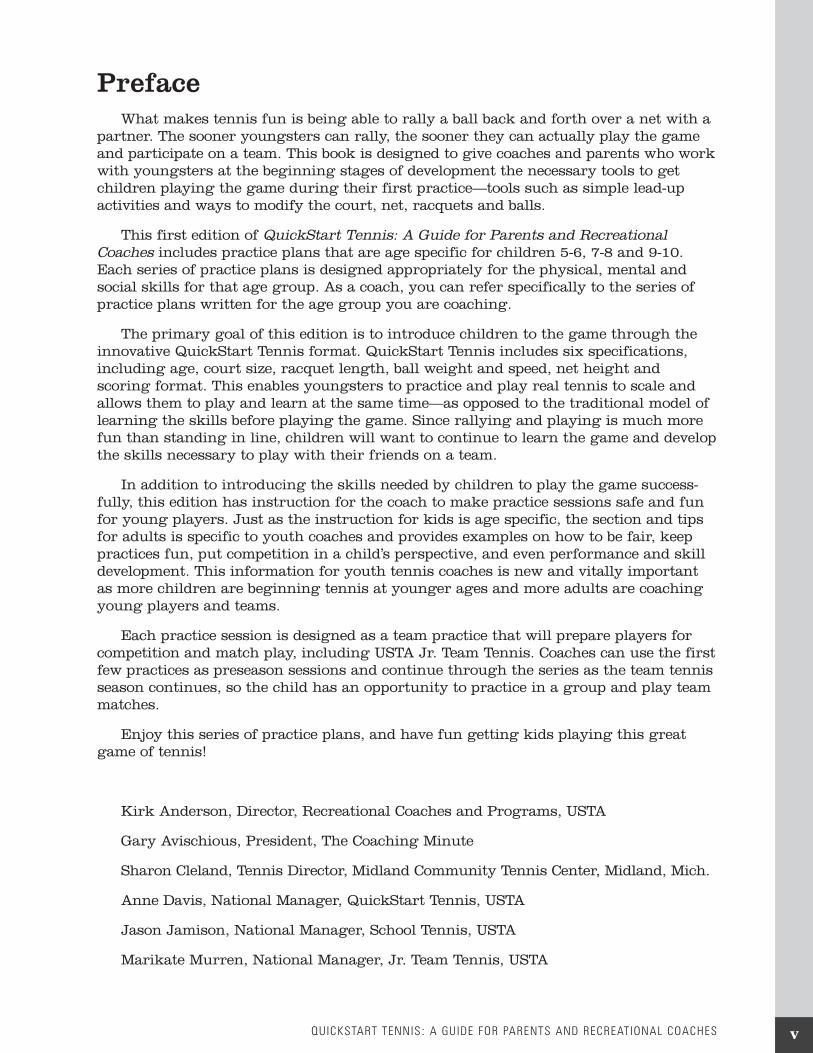
Catch Me If You Can (self toss and catch). Each player has a ball and tosses it inthe air at least head high, lets it bounce on the court and catches it.
Underhand Throw and Catch (add clapping). Show children how to toss the ballunderhand, standing with both feet facing the target and stepping forward with theopposite foot (left foot if they are right-handed) and swinging their arm at their side.Place a target for the ball about two-thirds of the distance to the partner so theplayer has an aiming point. Have the catcher clap when the ball bounces beforecatching. You can have them add multiple claps if they elect to catch the ball aftertwo or three bounces.

30 QUICKSTART TENNIS : A GUIDE FOR PARENTS AND RECREATIONAL COACHES
One Bounce – Two Bounce. Oneplayer tosses the ball underhand over thenet and calls out “One” or “Two.” Theother player must allow the ball tobounce that number of times beforecatching it and tossing it back, alsocalling out a number. Start withplayground balls and progress to oneplayer trapping the ball with the racquet,and then eventually hitting the ball oneither one or two bounces.
Tennis Hockey. Players form twoteams and stand across from each otheron the doubles sidelines and place twocones as goals about 3 feet beyond theend of the line. Keeping the ball close totheir racquets, the children tap the ballalong the line (have them name the line)trying to keep the ball on the line. Whenthey get to the end, they must try toscore a goal for their team by hitting theball between the two cones.
Take Home Tennis
One Bounce – Two Bounce. The adult or older partner tosses a playground ballup in the air and calls out “One,” “Two,” “Three” or even “Zero.” The player mustallow the ball to bounce that number of times before catching it and tossing it backto the adult. Begin with a playground ball and progress to a foam ball with the childtrapping the ball on the strings of his racquet.
Team2
XX
Team1
XX
X
X
X
Conesas goal
X
X
X
Conesas goal
Tennis Hockey

31CHAPTER 5: PRACTICE SESSIONS (AGES 5-6)
Practice 3
Theme: Sending and receiving with direction
Equipment: 17- to 21-inch racquets, foam and oversized low compression balls, polyspots/donuts, playground balls
Gary’s Youth Coaching Tip
It is not well executed forehands and backhands that get a child hooked on tennis.It is movement, fun and play that captures a child’s heart—and it happens to occuron a tennis court.
Movement Activities
Funny Bones. To get kids moving, balancing and learning the lines of the court,have them move to the lines called out by the coach and balance on the line with theinstructed number of body parts. The coach will give two commands: One will be forthe line, and the second will be for the number of body parts to put on the line. Forexample, the coach could say “Skip to the baseline and balance on three body parts”(as in two feet and one hand), or “March to the center service line and balance on twobody parts, but you can only use one foot.”
Ball Drop. In pairs or with a coach, one player has a ball in both hands with armsextended at shoulder height. The player drops one ball and the partner runs and catchesthe ball after one bounce. Move slightly back after each successful drop and catch.
Sharks in a Tank. Define the play area, such as the entire backcourt (between theservice line and the baseline) or one service court, depending on the size of thegroup. The coach calls out the name of the child and that child becomes the “shark”and attempts to tag as many players as possible. When a player is tagged, he stepsout of the boundaries, does two jumping jacks and then rejoins the game. It is a goodidea to control the movement—calling out “fast walk,” “skip” or “march”—to preventanyone from getting hurt while running. The coach changes the identity of theshark frequently.
Ball Drop

QUICKSTART TENNIS : A GUIDE FOR PARENTS AND RECREATIONAL COACHES
Dodge Ball. Players with racquets form a circle. One player is selected to be inthe middle of the circle without her racquet. Players attempt to roll a foam ballacross the circle and tap the player in the middle with the ball, who is dodging therolling ball. Make this game move even quicker by using two or even three balls.
Skills
Lollipops – Roll or Toss to a Color. Two players, each with a racquet, stand 5 to 6feet from each other with two spots of different colors in front of them. One of theplayers calls out a color of one of the spots and rolls the ball to that spot. The partnermoves to stop and pick up the ball, calls out a color and rolls the ball back to thatspot. Start this game with a rolling ball, progress to a tossed ball and finally incorpo-rate rolling the ball with a racquet.
Throw Ball. Using a playground ball and a 36-foot court, children play tennis bythrowing the ball over the net with two hands and catching it on the opposite side.You can permit multiple bounces but all other rules of tennis apply. By using twohands you can encourage rotation and getting sideways. Players learn to see emptyspaces and can play over a net with relatively little skill while learning to move theopponent and learning the tactic of hitting to the open court.
Dirty Harry. Each player has apartner. One player is positioned off toone side of the court (tosser) while theother player (catcher) is starting on her“home base.” Home base is just insidethe singles side line of the 36-foot court.The tosser makes an underhand tossdiagonally to a large target area(working on crosscourt). The “catcher”has to move out to catch the ball. Allowplayers three bounces, then twobounces, then one bounce beforecatching the ball. The “catcher” thendoes an underhand toss back to thetosser before returning to “home base.”Address side shuffle on the recovery.The tosser can only toss the next ballonce the catcher has returned to homebase.
Each time the catcher successfullycatches the ball and the tosser tossesthe ball in the target area, they get onepoint. Use either scoring flip cards orcones to keep track of the score. Thecoach announces the number of pointsthe players need to achieve. Players whoare struggling may be challenged toscore fewer points than more skilled
TOSSER
CATCHERHOMEBASE
Dirty Harry
32

CHAPTER 5: PRACTICE SESSIONS (AGES 5-6)
players. As they progress, the team can be challenged to get seven points. Staywithin the seven-point goal, as this will help them learn the match play scoringsystem for QuickStart Tennis. When a team reaches their designated points, they yell“Dirty Harry” and they are the winners. All players rotate roles after a team has a“Dirty Harry.”
Note: A large target area is essential to ensure success by all.
Variation: The tosser tosses the ball underhand to a large target area straight ahead(working down the line).
Variation 2: The tosser tosses from the other side of the court.
Take Home Tennis
Throw Ball. Have the child and an adult rally with a playground ball bythrowing and catching over a line/net in the driveway or any other flat surface. Youcan allow multiple bounces and let the child move closer to the line/net for bettersuccess.
33

34 QUICKSTART TENNIS : A GUIDE FOR PARENTS AND RECREATIONAL COACHES
Practice 4
Theme: Sending and receiving with the racquet
Equipment: 17- to 21-inch racquets, foam and oversized low compression balls, polyspots/donuts, playground balls, cones
Gary’s Youth Coaching Tip
Who are you becoming because of tennis? It’s not your win/loss record that isimportant. In the game of life, the bigger picture is more important than the details.
Movement Activities
Lobster Trap. This activity is done in pairs. The players stand 8 to 10 feet apart,with one player holding two racquets, one in each hand, and the partner with oneball. The player with the ball (the tosser) makes an easy underhand toss and theplayer with the racquets (the lobster) catches the ball after the bounce by trappingthe ball between both racquets. After trapping the ball, the player drops the ball fromthe racquets and hits the ball back to the tosser. Encourage the “lobster” to trap theball at the side of his body so it is easy to make the drop and hit from a sidewaysposition. Change tossers and “lobsters” after five tosses.
Lobster Trap

35CHAPTER 5: PRACTICE SESSIONS (AGES 5-6)
Team Lily Pad. Players work as a team to get from one side of the court to theother (the swamp). To cross the swamp, one player must step only on the “lily pads”(poly spots or donuts). Each team has two poly spots and one player places one “lilypad” in front, where the other player can hop to or step on. The partner picks up thevacated “lily pad” and moves it in front so the partner can move forward by steppingor hopping to the next “lily pad.” This continues until one team makes it across theswamp. At this point, the players change roles and one person moves the lily padswhile the other steps or hops to the open lily pad in front until she makes it backacross the swamp.
Through the Tunnel. Players line up right behind each other, with their legswider than shoulder width apart. The last player in line, or the coach, rolls the ballbetween the legs of the other payers. After the player rolls the ball, she runs to thefront of the line and tries to stop the ball before it passes her. Continue this formatuntil the team reaches a designated area, such as one of the lines of the court.
Crash Test. This activity uses fourplayers, each with a racquet and onefoam ball per pair. Partners stand diago-nally opposite each other with one ball,and the other pair is also diagonallyopposite with one ball. When the coachcalls out, “Go,” the players roll the ballwith their racquets to their partneropposite them, so two balls are going atthe same time. If the two balls collide inthe middle, the players yell out, “Crash.”
Side Show. Players are in pairs,throwing a playground ball with bothhands across their body to a partner onthe other side of the net. The throwshould resemble that action of theforehand and backhand (see illustration) ground stroke.
A1
A2
B1
B2
Crash Test
One-Handed Backhand, Two-Handed Backhand

36 QUICKSTART TENNIS : A GUIDE FOR PARENTS AND RECREATIONAL COACHES
Skills
Tennis Shoot Out. Players are dividedinto two teams. Spots are spread out alongeach singles sideline of the 78-foot court, andtwo cones forming a goal are placed behindthe baseline. Make sure the goals are largeenough to ensure success. Players from eachteam stand on a spot so they form a linealong the singles sideline.
The ball starts with the player at the net,who rolls the ball with his racquet to the nextplayer, who stops it and rolls the ball to thenext player until it gets to the last player,who shoots the ball between the cones withher racquet. The first team to get the desig-nated number of balls between the cones winsthe game.
Home Base. Players are hitting or tossinga ball to each other over the net. A spot isplaced in the center of the baseline as the“recovery spot.” Every time a ball is tossed orhit, the player goes for the ball, traps it onhis strings and hits or throws the ball to theother side of the net and recovers to his spot.The players are working cooperatively to scorefive points—a successful hit or toss, the trap,return and recovery.
Take Home Tennis
Lobster Trap. The adult has one foam ball and the child has two racquets, one ineach hand. The adult makes an easy underhand toss to the child, who traps the ballbetween both racquets after the bounce. After the trap, the child turns to the side,drops the ball from the racquets and hits a forehand to the adult. See page 34 forillustration.
A1
A2
A3
B1
B2
B3
Tennis Shoot Out

37CHAPTER 5: PRACTICE SESSIONS (AGES 5-6)
Practice 5
Theme: Sending and receiving with racquet on the backhand
Equipment: 17- to 21-inch racquets, foam balls, oversized low compression balls,cones
Gary’s Youth Coaching Tip
You can’t scream, yell, demean or humiliate a child into loving tennis. Whatare you going to do TODAY to help them fall in love with it?
Movement Activities
Train Crash (use backhand side of racquet). Two players stand on either side ofthe doubles alley, each with a ball. Players roll the balls back and forth with theirracquet, using the backhand side without the two balls hitting. As they get moresuccessful they can move back a step.
Applause. All players have a ball in their own space. Each will toss the ball up,clap and catch after the bounce. To increase the difficulty, have them clap twicebefore catching, then three times, then as many times as they can before the ballbounces twice.
Racquet Splat. Two players with one ball are facing each other. Place a racquetbetween the two players who are standing 8 to 10 feet apart. Each player will makean underhand toss attempting to hit the racquet face. Each time the ball hits the faceof the racquet, the team scores one point. Make this a cooperative game so each teamis trying to score as many points as possible in the allotted time. Keep the time frameshort, such as 30 seconds, and switch partners frequently.
Applause

Bungee Jump. Each player has a ball that is balanced on the strings. Theplayers move around the court balancing the ball. When the coach calls out,“Bungee Jump,” the players let the ball drop off the racquet, let it bounce and thencatch the ball back on the racquet. They may have to use their hands to trap theball on the strings, but with practice they can just use the racquet face. Once theball is on the strings, the player continues to move until the coach calls, “BungeeJump,” again.
Clear the Court. Divide players into two teams and put them on either side of thenet. Dump out as many foam balls as you have on both sides of the court. When thecoach calls out, “Clear the Court,” players pick up balls and throw them over the netto the other side of the court. Let them continue to catch or pick up balls and throwthem over to the other side for a minute to see what side of the court has the fewestballs.
38 QUICKSTART TENNIS : A GUIDE FOR PARENTS AND RECREATIONAL COACHES
Bungee Jump

39CHAPTER 5: PRACTICE SESSIONS (AGES 5-6)
Skills
Tennis Hockey – Use Backhand Sideof the Racquet. Place children in groupsalong a line starting by the net. Place twocones as a goal about 4 feet beyond thebaseline. Keeping the ball close to theracquet on the backhand side, the childrentap the ball along the line while trying tokeep the ball on the line. When they get tothe baseline, they try to score a goal byhitting the ball between the two cones.
Alligator River – Use Backhand Sideof the Racquet. The players line up oneither side of the doubles alley, each with aracquet and with one ball for each pair.The coach or one of the players is the“alligator” and is going to walk down the“river” – the alley. As the coach walksdown the alley, the players roll the ball totheir partner trying to hit the alligator’sfeet.
Take Home Tennis
Applause. Use a foam or playgroundball. The adult tosses the ball up and thechild claps and catches the ball after thebounce. Do the same with two claps andthree claps before the catch. See if the coachand player can clap between the toss andcatch without a bounce. Can you do twoclaps before the bounce? Three claps?
Team2
XX
Team1
XX
X
X
X
Conesas goal
X
X
X
Conesas goal
Tennis Hockey — Backhand

40 QUICKSTART TENNIS : A GUIDE FOR PARENTS AND RECREATIONAL COACHES
Practice 6
Theme: Rally Skills
Equipment: 17- to 21-inch racquets, foam and oversized low compression balls,throw down lines, poly spots or donuts
Gary’s Youth Coaching Tip
“I don’t get excited about talent. I get excited about unconditional effort and I’mlooking for it every time I’m with you.” —Dr. Jim Loehr
Movement Activities
Statues. Children jog around the court until the coach calls out, “Freeze.”Children have to stop very quickly and hold their balance.
Call My Name. Children are in pairs, one partner with a ball and the other withher back to her partner. The partner with the ball tosses it up and calls out thepartner’s name. The partner has to turn around and catch the ball after one bounce.
Slamma Jamma. Place throw down lines orpoly spots/donuts every 5-6 feet inside thedoubles alley. Players stand on either side of thedoubles alley facing each other. Players sideshuffle up and down the court tossing a ballunderhand to a partner. The ball must bouncebetween the players before the partner can catchit. The goal is to move from the net to thebaseline without dropping the catch. Every timea player drops the ball, the team quickly goesback to the nearest throw down line or spotbefore continuing on. A2
A1
A1
A2A1 A2
B1
B1 B2
B2
B1 B2
Slamma Jamma
41CHAPTER 5: PRACTICE SESSIONS (AGES 5-6)
Skills
Jacks. The player tosses the ball up and lets it bounce, bumps it up with theracquet one time and catches it—“onesies.” The player then attempts to tap it uptwice—“twosies”—and so on until they reach “fivesies”—or five in a row.
Partner Jacks. Same as above except the ball is caught by a partner on each tap-up.
Rally Me. Within the service box, the player tosses the ball, lets it bounce off thecourt and bumps it up with the racquet, lets it bounce and taps it up again. This canbe done while moving around the service box.
Survivor. Players line up on one side of the net (the island), and drop and hit aball over the net—or, if need be, hit from a toss made by the coach. If the ball goesover the net, the player stays on the island and goes to the end of the line.
If the player misses, he is off the island and goes across the net, where he will tryto catch a ball. If he catches the ball in the air, everyone on that side (the off-the-island side) gets to return to the island. If the ball is caught after one or two bounces,only that player goes back to the island. The last player left who successfully hits theball over the net, into the court and that is not caught is the survivor.
Take Home Tennis
Rally: Player and Adult. Player rallies with an adult on any flat surface with afoam or oversized low compression ball. Alternate hitting up after one bounce andtrying to keep the ball from going outside a defined area, such as an area in thedriveway, sidewalk or playground.
Jacks

42 QUICKSTART TENNIS : A GUIDE FOR PARENTS AND RECREATIONAL COACHES
Practice 7
Theme: Rally Skills with a partner
Equipment: 17- to 21-inch racquets, foam or oversized low compression balls,beanbags or Koosh balls
Gary’s Youth Coaching Tip
Effort trumps everything, including talent.
Movement Activities
Follow the Leader. Have children follow the coach around the court and imitatethe movement of the leader, such as run, hop, swinging arms, monster walk, march,shuffle sideways, skip, etc. The coach can substitute a player to serve as the leader.
Partner Toss and Catch. Place two players in a service court with one ball. Theplayer with the ball will toss it up at least head-level height so it lands anywhere inthe service box. The other player must move and catch it after one or two bounces,then toss it so the first player must run and catch it. See how many successful tossand catches each team can make. Change partners frequently.
Inch Worm. Players line up shoulder to shoulder in a straight line, with theirracquets held out in front with the strings facing up. The last player in the line has abeanbag or Koosh ball. That player passes it from his racquet to the next player inline and then runs behind the line of players to the front of the line. As each playerpasses and moves to the front of the line, the line will move forward to the oppositeend of the court.

43CHAPTER 5: PRACTICE SESSIONS (AGES 5-6)
Skills
Partner Rally Jacks. Partners alternatehits going from one hit each, “onesies,” up tofive hits each, “fivesies.”
Splat. Two players each with a racquet anda ball pyramid made of four balls (three for thebase and one on top). One player drops and tapsthe ball up at about head-level height, trying tohit the ball pyramid to make it “splat.” When theballs are hit, the player scores a point.
Mini Rally. Partners work together andrally over a line or low obstacle that serves asthe net. They stand close to the obstacle andgently rally balls over the line or obstacleusing the forehand. To start the rally, haveplayers start close and sideways to eachother, match up racquet faces and take twosteps back.
Tag Team Singles. There are a few varia-tions to this cooperative game where playersin two lines on opposite sides of the net hitand move to the end of the line while keepingthe ball in play. The rally begins with thefirst hit being a drop hit by the first player inline or by an underhand toss from the coach.This game is perfect for coaches and helpersto play as part of the team. They should getin line and participate just like the kids,hopefully adding consistent and accurate hitswhen they play.
Take Home Tennis
Mini Rally. Player mini rallies with an adult over a line or low obstacle such as aracquet bag or any low barrier made by items from the house or garage. Use a foamor oversized low compression ball.
B1B2 B3 B4
A1
A2A3A4
Tag Team Singles

44 QUICKSTART TENNIS : A GUIDE FOR PARENTS AND RECREATIONAL COACHES
Practice 8
Theme: Play Day – Tennis Olympics
Equipment: 17- to 21-inch racquets; selected from practices above
Gary’s Youth Coaching Tip
Praise effort, not ability and performance. Don’t praise the first-serve percentage;praise the work it took to get that.
Movement Activities
This is a fun day and the activities can be just for fun or competitive, especially ifthe kids are placed on teams. Stations are set up around the court and players startat an assigned station and perform the activity. When the time is up, they move tothe next station. All of the activities have been done somewhere in the first sevenpractice sessions.
Here are some samples of simple activities for the stations around the court:
• Self rally
• Rally with a partner
• Splat
• Inch Worm
• Throw ball
• Tag Team Singles
• Any other activity that the players enjoy
Take Home Tennis
Mini Rally Over a Line. Player mini rallies with an adult over a line or lowobstacle such as a racquet bag or any low barrier made by items from the house orgarage. Use a foam or oversized low compression ball.

45CHAPTER 6: PRACTICE SESSIONS (AGES 7-8)
Chapter 6: Practice Sessions (Ages 7-8)This chapter contains eight progressive practice sessions for children ages 7-8
playing on a 36-foot court, and with 21- to 23-inch racquets and foam or oversizedlow compression balls. The goal of these practices is to help children learn the basicsof a rally by being able to hit a ball back and forth over the net with a partner.
This chapter will build on and reinforce children learning to use their racquetsand judging the flight and direction of the ball by using fun activities and games.While the emphasis will be on rally skills using both forehand and backhand groundstrokes, other skills needed to play a complete game of tennis are introduced,including the serve and return, along with the volley.
The goal is to move a young player along from a simple rally to actual game playon a 36-foot court. Points will begin with a serve and players will learn simple tactics,recovery after the hit and shot selection. The rules of tennis also are introduced, andyoung players will learn to keep and announce score and to call their own lines.
Each session for this age group will include an opportunity for kids to rally andplay. The chapter will begin with roll ball, where kids roll balls back and forth usingthe 36-foot court, followed by throw ball, where they throw and catch one ball over anet into the 36-foot court. This will lead into rally and play opportunities. Don’t beconcerned if kids struggle some keeping the ball in play. As a coach, you need to getthem moving, tracking and hitting. The kids might not be very successful initially,but they will probably think this is the most fun, and they will get better in everypractice.
Included in each practice session is a list of equipment that is used for thatsession, as well as a coaching tip from youth coaching expert Gary Avischious.Practices for this age group should be no longer than 60 minutes.
The practice sessions for 7- to 8-year-olds will contain the following:
1. Theme of the day2. Movement activities3. Skill development4. Game5. A take-home tennis activity
QuickStart Tennis

Practices at a Glance: Ages 7-8This one-page guide outlines the eight practice sessions that follow. It serves as ahandy reference for what is covered in more detail during each practice.
Practice 1 Racquet ControlMovement Activities Different Moves, Ball ChaseSkills Kirk-O-Rama, Lobster Trap, Half-Pound Lobster TrapGame Roll Ball TennisTake Home Tennis Roll Ball Tennis
Practice 2 Instant Rally Progression – ForehandMovement Activities Dynamic Warm-up, Ball DropSkill Instant Rally Progression—ForehandGame Splat, Throw Ball TennisTake Home Tennis Driveway/Playground Forehand Tennis or
Forehand Wall Tennis
Practice 3 Instant Rally Progression – BackhandMovement Activities Two Ball Roll, Two Ball Toss, Jog BallSkill Instant Rally Progression—BackhandGame Lobster RallyTake Home Tennis Driveway/Playground Backhand Tennis or
Backhand Wall Tennis
Practice 4 Forehand and Backhand RallyingMovement Activities Partner Ball Tossing and Catching, Call My Name,
Rally Me, JacksSkills Reinforce Forehands and BackhandsGame Four Square, Tag Team SinglesTake Home Tennis Driveway/Playground Continuous Rally or Wall Tennis
Practice 5 Serve and ReturnMovement Activities High Fiver, MirrorSkill Introduction to Underhand ServeGame ChampionsTake Home Tennis Driveway/Playground or Wall Tennis
Practice 6 Rally SkillsMovement Activities Slamma JammaSkills 3-2-1 Juggle Rally, Continuous RallyGame Tag Team Singles, Up and Down the RiverTake Home Tennis Driveway/Playground or Wall Tennis
Practice 7 VolleyMovement Activities Jog Ball, Koosh Ball Step-BackSkill Volley IntroductionGame Champion of the Court, Star CatcherTake Home Tennis Driveway/Playground or Wall Tennis
Practice 8 Play DayGame Star TeamTake Home Tennis Driveway/Playground or Wall Tennis
QUICKSTART TENNIS : A GUIDE FOR PARENTS AND RECREATIONAL COACHES46

CHAPTER 6: PRACTICE SESSIONS (AGES 7-8) 47
Practice 1
Theme: Racquet Control
Equipment: 21- to 23-inch racquets, foam or oversized low compression balls
Gary’s Youth Coaching Tip
Seventy percent of kids drop out of youth sports by the age of 13. What areyou going to do today to make sure the kids in your program are not part ofthe 70 percent?
Movement Activities
Different Moves. Players are in pairs with one person designated as the leader.The leader will do a movement activity on the court, such as jogging, hopping,skipping, jumping, etc., and moving in different directions—forward, backward,sideways. The partner has to copy the movement and follow the leader as closely aspossible. Players should take turns as the leader.
Ball Chase. Both players stand beside each other, one with the ball, and the otherplayer with his back to his partner. The player with the ball rolls it away from thepartner and calls out, “Go.” The other player turns around, chases after the ball andstops it before it finishes rolling. A variation is to face forward and have the backplayer roll the ball between the legs of the player in front, who runs after the balland stops it before it stops rolling.
Skills
Kirk-O-Rama. To liven up simple racquet-handling activities like bouncing ballsup and down, add some music and change activities every 20 to 30 seconds. Use avariety of activities and have players change every time they hear a whistle. Withracquets, have players try any or all of these activities for variety in your practices:
1. Bounce ball down2. Bounce ball up, letting it bounce on the court after each hit3. Bounce ball down on the edge of the racquet4. Bounce ball up, keeping the ball in the air5. Bounce ball up, alternating sides of the racquet6. Bounce ball up, alternating sides but add a hit up on the edge between hitting onboth sides
7. Bounce ball high8. Bounce ball low9. Bounce ball while on one knee10. Bounce ball while sitting on the court11. Bounce ball while lying on the court12. Bounce ball in a circle around the body13. Bounce ball in a Figure 8 around the legs14. Bounce ball down while hopping on one foot15. Bounce ball up while hopping on the other foot16. Bounce ball up, with the racquet between the legs17. Bounce ball up, with the racquet around the back

48 QUICKSTART TENNIS : A GUIDE FOR PARENTS AND RECREATIONAL COACHES
18. Toss the ball up and catch it on the racquet without it bouncing on the strings19. Balance the ball on the strings and turn the racquet 180 degrees without the ball
falling off the strings20. Spin quickly in a circle while balancing the ball on the strings
Lobster Trap. Players work with a partner, one player holding two racquets andone player with a foam ball. The feeder (player with the ball) makes an underhandtoss and bounces the ball to the other player, who traps the ball between two racquets(lobster claws). The player then turns sideways, drops the ball from the racquets andgently hits the ball back to the feeder, who catches it after one bounce.
Increase the challenge by having both players with two racquets and have both dothe sequence: turn sideways, drop, hit, bounce and trap. Include a large target areaso players have a visual of where to aim their drop-hit or underhand toss.
Half-Pound Lobster Trap. One player has a racquet and the other player has a
Lobster Trap

49CHAPTER 6: PRACTICE SESSIONS (AGES 7-8)
ball. The player with the ball will underhand toss to the player with the racquet. Theplayer with the racquet holds the racquet with the butt cap against the belt buckle inline with the contact point and the ball should be caught (trapped) against thestrings with the hand after one bounce.
Game
Roll Ball Tennis. With two players on either side of the 36-foot court, each playerwill roll the ball under the caution tape (no net is used for this game). The otherplayer moves into position, where she stops the rolling ball with her racquet and rollsit back. See how many rolls and stops the players can get in a row. As a variation,have the players stop the ball with their feet before rolling it back.
Take Home Tennis
Roll Ball Tennis. Players will find a flat area such as a driveway, playground oreven hallway and play roll ball tennis, rolling and stopping a ball back and forth witha partner. See how many consecutive rolls and stops the player and partner can get.
Half-Pound Lobster Trap

Practice 2
Theme: Instant Rally Progression – Forehand
Equipment: 21- to 23-inch racquets, foam balls, oversized low compression balls,poly spots or donuts, playground balls
Gary’s Youth Coaching Tip
Fill in the blanks.
What does your tennis program have in common with smiling, joy and laughter?
Hopefully you need more space!
Movement Activities
Dynamic Warm-up. The following activities are a perfect way to warm up andalso give players an opportunity to toss, catch and learn about the flight of the ball.Use some or all of these with the coach leading the activities:
1. Jog in place while juggling ball from right hand to left hand and back2. Slow jog and fast juggle3. Fast feet and slow juggle4. Regular jog and regular juggle5. Skip and regular juggle6. High knees and regular juggle7. Heel kicks and regular juggle8. Pass ball around left leg three times9. Pass ball around right leg three times10. Pass ball around waist three times, stop and reverse direction11. Pass ball around knees three times, stop and reverse direction12. Pass ball around neck three times, stop and reverse direction13. Toss ball straight into air with a leap and catch14. Dribble ball from right hand to left hand15. Dribble ball through the group16. Toss one ball with a partner while shuffling through the group17. Bounce pass one ball with partner while shuffling through group
QUICKSTART TENNIS : A GUIDE FOR PARENTS AND RECREATIONAL COACHES50

CHAPTER 6: PRACTICE SESSIONS (AGES 7-8)
Ball Drop. Players are in pairs facing each other. One player has one ball in eachhand and his arms extended at shoulder level. The player drops one ball and theother player has to run and catch the dropped ball after one bounce. Switch partnersafter three drops. To increase the difficulty, have players move one step farther awayafter every successful drop, bounce and catch.
Skill
Instant Rally Progression – Forehand. Each child will have a racquet and ball.Follow this sequence in order and young players will develop rally skills in just afew minutes. To keep kids engaged, move through these activities quickly. Forexample, the coach might say, “Let’s see how many you can do in 30 seconds.”
1. Tap up, bounce and catch. Players will tap the ball up about head-level height,let the ball bounce and catch it.
2. Self rally. This time, rather than catching the ball after the first bounce,continue to tap the ball up after one bounce to about head-level height.
Ball Drop
Tap Up
51

3. Rally with a partner to a target. Find a partner and alternate tapping the ballup to about head level. After the bounce, the partner taps up and lets the ballbounce. See how many consecutive tap ups each pair can get in a row. To helpthem focus on hitting up rather than out, place a poly spot, donut or draw achalk circle as a target between the two players. Players should try to hit everyball up to head level.
4. Rally over line with partner. Draw a line or find a line and place each player oneither side. Have them match up racquet faces forehand to forehand and moveback two to three steps. Have them rally so the ball bounces over the line. Theball should be hit about head high. See how many they can get in a row, hittingall balls on the forehand side.
5. Rally over a net. This is similar to the above, but the players will rally over a netor barrier. Start at the net and have players match up racquet faces forehand toforehand and move 3-4 feet away from the net and play all shots on the forehandside. To assist them with control and direction, add a target about three feet fromthe net (poly spot, donut or chalk circle).
6. Game—Step-back forehands. Players are on either side of the net and match upracquet faces forehand to forehand, then take two steps back. The player with theball drops and hits it to the partner, and they rally for two shots on the forehandside. After two successful consecutive hits, both players take one step back andtry again for another two-ball rally. After each successful two-ball rally, theymove back. If they miss, they must both move forward one step. Try this againwith a three-ball rally before the players can step back and eventually get to afour-ball rally.
Games
Splat. To add some excitement to the instant rally progression, go back toActivity No. 3—Rally with Partner to a Target—but this time the target is made up offour tennis balls constructed in a pyramid. (This is done by placing three balls on theground in a triangle, with one ball on top.) All balls must be hit up to head level, andthe team scores a point every time they hit a shot that knocks the pyramid down.
The Forehand
QUICKSTART TENNIS : A GUIDE FOR PARENTS AND RECREATIONAL COACHES52

CHAPTER 6: PRACTICE SESSIONS (AGES 7-8) 53
Throw Ball Tennis. Players are on either side of the net on a 36-foot court.Players throw a foam ball underhanded over the net. The opposite player must catchit and throw it back after the ball bounces one time on the court. To make this gameeasier, players can use a larger ball (such as a playground ball) and they are allowedmultiple bounces before catching. Also, they can move closer to the net, marked by apoly spot or donut, before throwing the ball back over the net.
Play can be a continuous rally, or let the players play points to see if they cantoss the ball in the court and away from the opponent. (This simulates real matchconditions and strategy.)
Take Home Tennis
Driveway/Playground Forehand Tennis or Forehand Wall Tennis. Player hitsforehand rallies with a partner in the driveway or playground over a line/net, or hitsagainst a wall using a foam ball.

Practice 3
Theme: Instant Rally Progression – Backhand
Equipment: 21- to 23-inch racquets, foam and oversized low compression balls,poly spots or donuts, chalk
Gary’s Youth Coaching Tip
Teach your players to think. The more you voice-activate them in practice, the morereliant they become on you—and the less they learn and the less they perform.
Movement Activities
Two Ball Roll. Players line up facing a partner on either side of the doubles alley. Allplayers have a ball that they roll at the same time to one another so each player catchesthe opposing rolling ball. They continue to roll and catch at the same time. Create somemovement by letting the players roll the ball a step or two away from their partner.
Two Ball Toss. This is an extension of Two Ball Roll described above, but thistime, rather than rolling, the players will make an underhand toss and they willcatch the balls after one bounce.
Jog Ball. While players are jogging in a large circle, they toss the ball up andcatch it after the bounce with two hands, then with the right hand, then the lefthand. Keep players moving and have them change direction when the coach calls outto change directions.
Skill
Instant Rally Progression – Backhand. This is the exact same progression as theInstant Rally Progression on the forehand side, but players are using only thebackhand side of the racquet. Players can use two hands on the backhand side, orsome might elect to use only one hand. Have them follow this sequence:
1. Tap up on the backhand side of the racquet, bounce and catch. Players will tapthe ball up to about head-level height, let the ball bounce and then catch it.
2. Self rally. This time, rather than catching the ball after the first bounce, continueto tap the ball up on the backhand side of theracquet after one bounce to about head level.
3. Rally with a partner to a target. Find a partner andalternate tapping up to about head level on thebackhand side of the racquet. After the bounce, thepartner taps the ball up and lets it bounce. See howmany consecutive tap ups each pair can get in arow. To help them focus on hitting up rather thanout, place a poly spot, donut or draw a chalk circleas a target between the two players. Players shouldtry to hit every ball head level high.
Tap Up
QUICKSTART TENNIS : A GUIDE FOR PARENTS AND RECREATIONAL COACHES54

CHAPTER 6: PRACTICE SESSIONS (AGES 7-8) 55
4. Rally over a line with a partner. Draw a line or find a line on the court and placeeach player on either side. Have them match up racquets on the backhand sideand move back two or three steps. Have them rally so the ball bounces over theline. The ball should be hit about head high. See how many they can get in a rowhitting all balls on the backhand side.
5. Rally over a net. This is similar to above but the players will rally over a net orbarrier. Have them match up racquet faces backhand to backhand and move 3-4feet away from the net and play all shots on the backhand side. To assist themwith control and direction, add a target about 3 feet from the net (poly spot,donut or chalk circle).
6. Game—Step-back backhands. Players are on either side of the net and match upracquets backhand to backhand and take two steps back. The player with the balldrops and hits it to the partner and they rally for two shots on the backhand side.After two successful consecutive hits, both players take one step back and try againfor another two-ball rally. After each successful two-ball rally, they move one stepback. If they miss, they both must move forward one step.
Note: Players hitting two-handed backhands might have trouble dropping andhitting on the backhand side. You can allow them to put the first shot in play with aforehand, and the return would be the first backhand shot on their way to fourconsecutive hits.
Two-Handed Backhand
One-Handed Backhand
Game
Lobster Rally. Players are on both sides of the net with two racquets each andone ball. The first person drops the ball and hits it over the net. The second playermoves and traps the ball between his racquets, turns sideways to the net, drops theball and hits it over with the back racquet. Play can go for a continuous rally or theplayers can try to hit to the court on either side of the partner on the opposite side ofthe net. (See Practice 1 for illustration of Lobster Trap.)
Take Home Tennis
Driveway/Playground Backhand Tennis or Backhand Wall Tennis. Playerrallies with backhand ground strokes in the driveway or on the playground with apartner. One player can rally against a wall with a foam ball.
QUICKSTART TENNIS : A GUIDE FOR PARENTS AND RECREATIONAL COACHES56

CHAPTER 6: PRACTICE SESSIONS (AGES 7-8) 57
Practice 4
Theme: Forehand and Backhand Rallying
Equipment: 21- to 23-inch racquets, foam or oversized low compression balls,throw down or chalk lines
Gary’s Youth Coaching Tip
Mistakes are part of learning. They tell you what you need to spend more timeteaching. And after you invest time and energy in skillfully teaching, children willstill make mistakes.
Movement Activities
Partner Ball Tossing and Catching:
• Roll the ball to a partner standing 6-8 feet away. Start with one ball and then dotwo balls at the same time.
• One player underhand tosses; one player catches the ball after one bounce.• One player with two balls in her hand tosses two balls positioned side by side(horizontal position). Her partner catches balls on one bounce or two bounces.
• One player with two balls in her hand tosses two balls stacked on top of eachother (vertical position). Her partner catches the balls after one or two bounces.
Vertical Position
Horizontal Position

Call My Name. Children are in pairs, one with a ball and the other with his backto the partner. The player with the ball tosses it up and calls out the partner’s name.The partner has to turn around and catch the ball after one bounce.
Rally Me. All players begin in one of the service courts. Each has a ball andracquet. They toss the ball up, let it bounce off the court and bump it up with theirracquet. They continue to bump the ball up after it hits the court (self rally). Thiscan be done while moving around the service court.
Jacks. The player tosses the ball up and lets it bounce and bumps it up with theracquet and catches it and announces, “onesies.” The player then attempts to tap itup twice, “twosies” and so on until they reach “fivesies.”
Skills
There are no new skills introduced in Practice 4. Review the forehand andbackhand and play the following games to reinforce forehand and backhand rallyskills.
Jacks
QUICKSTART TENNIS : A GUIDE FOR PARENTS AND RECREATIONAL COACHES58

CHAPTER 6: PRACTICE SESSIONS (AGES 7-8) 59
Game
Four Square. This popularplayground game can be adapted fortennis. It can be played over the netusing the four service courts of the 36-foot court. Each service court isnumbered one through four, andplayers enter the court in Square 1.
All points begin in the Ace Square(Square 4). The player in Square 4starts the ball with a drop-hit into anyof the other three squares. The playerin the receiving square must hit theball before it bounces twice. If theplayer hits it out of any of the squares,or if it bounces twice before she hits it,that player is out, the remainingplayers move up to the next vacantsquare and a new player enters onSquare 1. (For example, if the player inSquare 3 misses, the player in Square 2moves up to Square 3 and the player inSquare 1 moves up to Square 2.)
The game can be played withoutracquets by tossing and catching alarger ball.
4
1
XXXX
3
2
AceSquare
Four Square

Tag Team Singles. A minimum offour players are needed for this game.Divide players into two groups, witheach group forming a line behind themiddle of each baseline. One player isup on each side (A1 and B1). The firstplayer from side A (A1) drop-hits theball over the net and moves to the backof her line. The first player on B (B1)returns the ball and goes to the back ofthe line on his side. From there, eachsubsequent player hits one ball andmoves to the back of the line, keepingthe point going until one side misses.This can be a cooperative game and theteam (players in both lines are on thesame team) attempts to get 10 consecu-tive rallies. For safety, make sure youuse a waiting spot for those playersnot hitting.
Take Home Tennis
Driveway/Playground ContinuousRally or Wall Tennis. Player works ona continuous rally either over the netwith a partneror off the wall individually with afoam ball.
B1B2 B3 B4
A1
A2A3A4
Tag Team Singles
QUICKSTART TENNIS : A GUIDE FOR PARENTS AND RECREATIONAL COACHES60
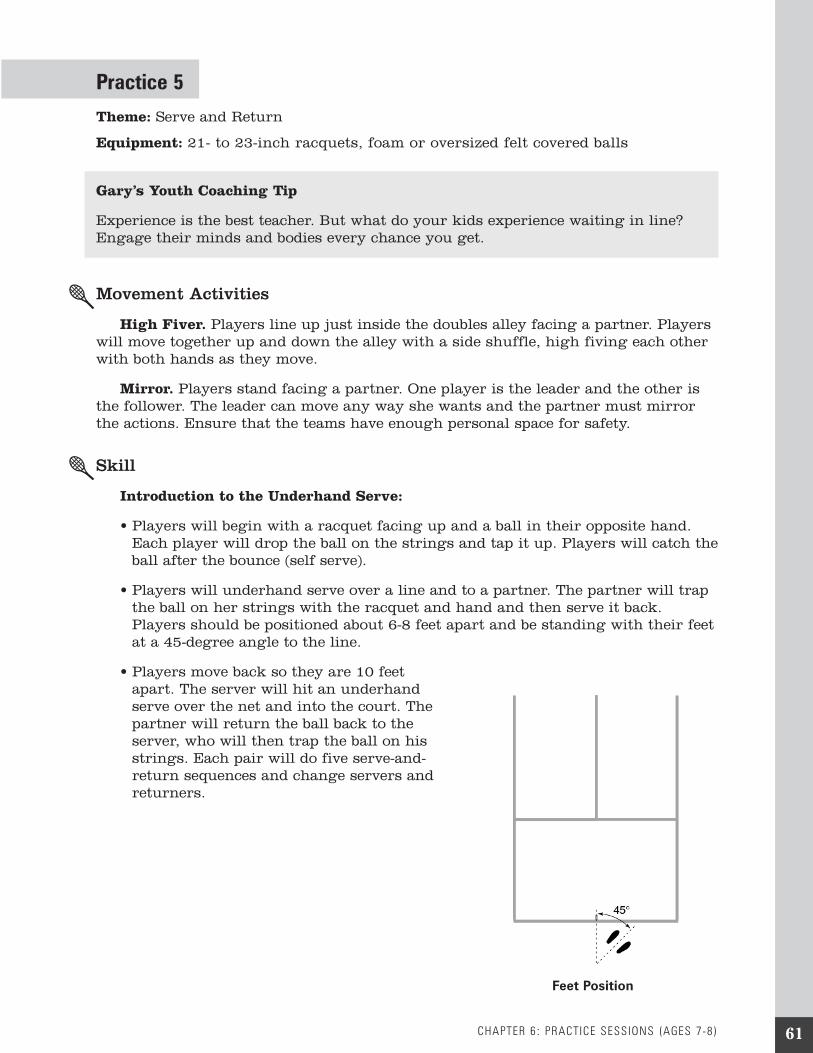
CHAPTER 6: PRACTICE SESSIONS (AGES 7-8) 61
Practice 5
Theme: Serve and Return
Equipment: 21- to 23-inch racquets, foam or oversized felt covered balls
Gary’s Youth Coaching Tip
Experience is the best teacher. But what do your kids experience waiting in line?Engage their minds and bodies every chance you get.
Movement Activities
High Fiver. Players line up just inside the doubles alley facing a partner. Playerswill move together up and down the alley with a side shuffle, high fiving each otherwith both hands as they move.
Mirror. Players stand facing a partner. One player is the leader and the other isthe follower. The leader can move any way she wants and the partner must mirrorthe actions. Ensure that the teams have enough personal space for safety.
Skill
Introduction to the Underhand Serve:
• Players will begin with a racquet facing up and a ball in their opposite hand.Each player will drop the ball on the strings and tap it up. Players will catch theball after the bounce (self serve).
• Players will underhand serve over a line and to a partner. The partner will trapthe ball on her strings with the racquet and hand and then serve it back.Players should be positioned about 6-8 feet apart and be standing with their feetat a 45-degree angle to the line.
• Players move back so they are 10 feetapart. The server will hit an underhandserve over the net and into the court. Thepartner will return the ball back to theserver, who will then trap the ball on hisstrings. Each pair will do five serve-and-return sequences and change servers andreturners.
Feet Position

62 QUICKSTART TENNIS : A GUIDE FOR PARENTS AND RECREATIONAL COACHES
• Step-back serves. This activity starts with the previous formation and distanceaway from the net. Every time the server hits the serve into the court, thepartner returns the ball and the server traps the ball on her racquet, the teamcan move back one step each. If they miss, they must move forward one step.Change servers after every five serves. You can elect to have the players let theball bounce three times before the trap, then progress to two and, finally, onebounce before the trap.
• Serve, return and trap. Both players will be 10-12 feet away from the net. Thefirst player begins with an underhand serve. The second player returns the ballback to the server and the server traps the ball with her hand and racquet. Dothis sequence, but have targets for the server and the returner so they canconcentrate on an aiming point for each shot.
Game
Champions. Partners stand on opposite sidesof the net. One player is the server and the otheris the catcher. The server (A1) starts with anunderhand serve, attempting to serve into thediagonal service box. The catcher (B1) is trying tocatch the ball after one bounce. After catching theball, the catcher tosses it back to the server. Theserver and catcher score a point for a successfuldiagonal serve and catch, trying to reach thenumber set by the coach. Stay within the seven-point goal to help the kids learn the match playscoring system for QuickStart Tennis. Use eitherscoring flip cards, cones, throw down lines orclothespins to mark the score. When the playersreach the set number of points, they yell,“Champions,” and are declared the winners.Rotate roles and repeat.
Take Home Tennis
Driveway/Playground or Wall Tennis. Playerbegins every rally in the driveway or playgroundwith a serve. On the wall, begin with a serve and rallyuntil you miss, then begin again with the serve.
Underhand Serve Sequence
A1
B1
Champions

63CHAPTER 6: PRACTICE SESSIONS (AGES 7-8)
Practice 6
Theme: Rally Skills
Equipment: 21- to 23-inch racquets, foam or oversized low compression balls,throw down lines or spots, beach balls
Gary’s Youth Coaching Tip
We are hardwired to play.Nothing excites the brain like play.Play is the wellspring of creativity and imagination.Where does standing in line fit into your program?
Movement Activities
Slamma Jamma. The coach placesspots or throw down lines every 5-6feet inside the doubles alley. Playersstand on either side of the alley facingeach other. Players side shuffle fromthe net to the baseline tossing under-hand to a partner with a foam ball orbeach ball. The ball must bouncebetween the players before the partnercan catch it. The goal is to move fromthe net to the baseline withoutdropping the catch. Every time aplayer drops the ball, he quickly goesback to the nearest spot or throw downline before continuing on.
To increase the difficulty, have theplayers catch the ball in the air. If youhave large numbers, use the width ofthe court (doubles sideline to doublessideline) and place spots or throw downlines every 5-6 feet.
Skills
No new skills are introduced in Practice 6. Use the following activities and gamesto reinforce the rally skills that were previously introduced and prepare yourplayers for match play.
3-2-1 Juggle Rally. Players are paired up with one player on either side of thenet. One player self-rallies (tap up and bounce) the ball three times and hits it over toher partner. The partner does the same three-ball self-rally and hits the ball backover to his partner. The next time the players self-rally twice, and finally once, beforehitting it over the net. Do this on both the forehand and backhand sides.
A2
A1
A1
A2A1 A2
B1
B1 B2
B2
B1 B2
Slamma Jamma
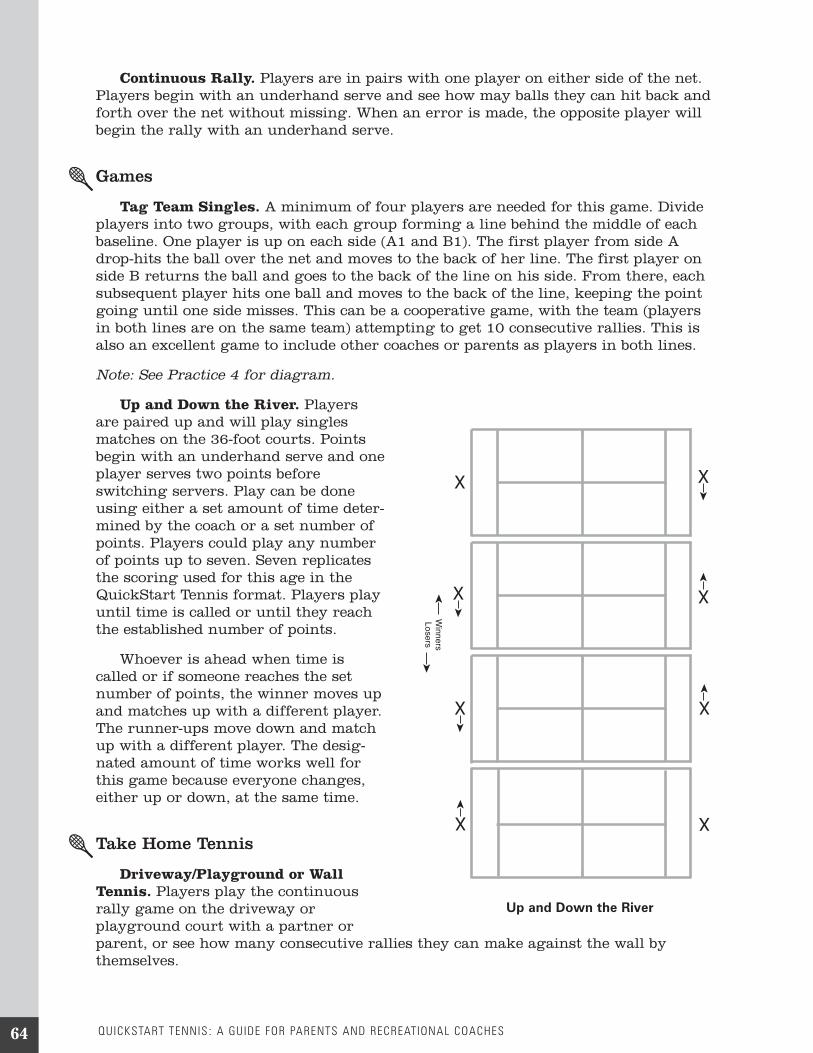
64 QUICKSTART TENNIS : A GUIDE FOR PARENTS AND RECREATIONAL COACHES
Continuous Rally. Players are in pairs with one player on either side of the net.Players begin with an underhand serve and see how may balls they can hit back andforth over the net without missing. When an error is made, the opposite player willbegin the rally with an underhand serve.
Games
Tag Team Singles. A minimum of four players are needed for this game. Divideplayers into two groups, with each group forming a line behind the middle of eachbaseline. One player is up on each side (A1 and B1). The first player from side Adrop-hits the ball over the net and moves to the back of her line. The first player onside B returns the ball and goes to the back of the line on his side. From there, eachsubsequent player hits one ball and moves to the back of the line, keeping the pointgoing until one side misses. This can be a cooperative game, with the team (playersin both lines are on the same team) attempting to get 10 consecutive rallies. This isalso an excellent game to include other coaches or parents as players in both lines.
Note: See Practice 4 for diagram.
Up and Down the River. Playersare paired up and will play singlesmatches on the 36-foot courts. Pointsbegin with an underhand serve and oneplayer serves two points beforeswitching servers. Play can be doneusing either a set amount of time deter-mined by the coach or a set number ofpoints. Players could play any numberof points up to seven. Seven replicatesthe scoring used for this age in theQuickStart Tennis format. Players playuntil time is called or until they reachthe established number of points.
Whoever is ahead when time iscalled or if someone reaches the setnumber of points, the winner moves upand matches up with a different player.The runner-ups move down and matchup with a different player. The desig-nated amount of time works well forthis game because everyone changes,either up or down, at the same time.
Take Home Tennis
Driveway/Playground or WallTennis. Players play the continuousrally game on the driveway orplayground court with a partner orparent, or see how many consecutive rallies they can make against the wall bythemselves.
XX
X
XX
X
X
X
WinnersLosers
Up and Down the River

65CHAPTER 6: PRACTICE SESSIONS (AGES 7-8)
Practice 7
Theme: Volley
Equipment: 21- to 23-inch racquets, foam or oversized low compression balls,Koosh balls or bean bags, hoops or ropes for circles
Gary’s Youth Coaching Tip
“Smart players” have learned where and when to be there, with the appropriate shotselection. Teach this. Teach your players to think and don’t just voice-activate themaround the court.
Movement Activities
Jog Ball. While players are jogging in a large circle, they toss the ball up andcatch it after the bounce with two hands, then with the right hand, then with the lefthand. Keep players moving and have them change directions when the coach callsout to change directions.
Koosh Ball Step-Back. Players are in pairs, each with a racquet with the stringsup, facing each other with one Koosh ball (or bean bag) on the strings of one player’sracquet. They begin by turning the racquet so the Koosh ball drops onto thepartner’s racquet. After the successful exchange, they both move back one step andpass the Koosh ball from one racquet to the other. As they step back, they will haveto toss the Koosh ball from one racquet to the other. See which pair can get the mostdistance between partners and still toss and catch the Koosh ball without it fallingoff the strings.
Skill
The Volley. Begin with two players positioned on either side of the net about 2-3feet apart. One player has a ball and the other player has his racquet up so thestrings are facing the tosser (like holding a stop sign). The tosser will make fiveunderhand tosses and the partner will volley the ball back so the tosser can catch theball in the air. Do five volleys each on the forehand side.
Step 2 is to move farther apart. The one player will underhand toss the ball to herpartner, who will volley it back so it bounces on the court and the tosser will trap theball with his hand against the racquet face. Do five toss, volley and traps beforeswitching roles on the forehand side.
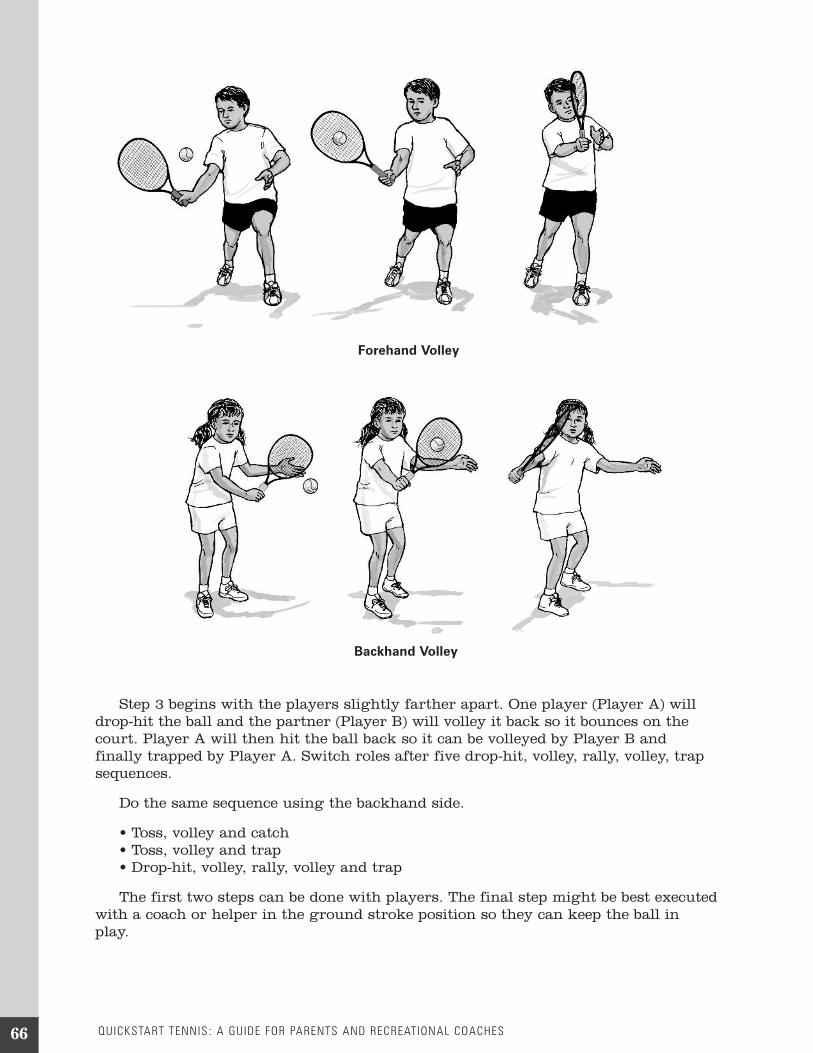
66 QUICKSTART TENNIS : A GUIDE FOR PARENTS AND RECREATIONAL COACHES
Step 3 begins with the players slightly farther apart. One player (Player A) willdrop-hit the ball and the partner (Player B) will volley it back so it bounces on thecourt. Player A will then hit the ball back so it can be volleyed by Player B andfinally trapped by Player A. Switch roles after five drop-hit, volley, rally, volley, trapsequences.
Do the same sequence using the backhand side.
• Toss, volley and catch• Toss, volley and trap• Drop-hit, volley, rally, volley and trap
The first two steps can be done with players. The final step might be best executedwith a coach or helper in the ground stroke position so they can keep the ball inplay.
Forehand Volley
Backhand Volley

67CHAPTER 6: PRACTICE SESSIONS (AGES 7-8)
Volley Game—Basketball. Make targets by using circles or hoops on the court.Give a point value for every target, with the closest targets worth less than a targetfarther away. The players attempt to volley a ball that is fed with an underhand tossby a partner to a target so they score points. Go for one minute (one quarter), totalthe score and switch roles. Play for four minutes (four quarters) and total the scoresfor all four quarters.
Games
Champion of the Court. A desig-nated “champion” competes against aline of at least three players, with thechampion assuming a baselineposition on one side of the court (A1)and the other players (i.e., thechallengers) waiting at the back of theopposite side of the court.
The first challenger (B1) assumes aposition at the baseline and under-hand serves the ball to the champion(A1). A point is then played using the36-foot court boundaries. If B1 wins,he is the new champion and runs tothe other side of the court (thechampion’s side). If A1 wins, she staysand plays a point against B2.
Star Catcher. Use a series of 36-foot courts to play this game. Playersplay singles games to a designatednumber of points, such as first to fiveor seven. At the conclusion of thegame, both players exit the court andreturn to the coach. The winner gets asticker or star on their hand orracquet. Players in a line by the coach fill inas courts become available.
Points begin with an underhand serve and each player will serve two pointsbefore switching servers. Make sure that players go back out on the court against adifferent partner.
Take Home Tennis
Driveway/Playground or Wall Tennis. Players play tennis with a foam ball on adriveway or playground with a partner, or play wall tennis if a partner is notavailable.
A1
WI
N
B1 B2 B3 B4LO S E
Champion of the Court

QUICKSTART TENNIS : A GUIDE FOR PARENTS AND RECREATIONAL COACHES
Practice 8
Theme: Play Day
Equipment: As needed
Gary’s Youth Coaching Tip
The #1 reason kids drop out of youth sports is because it’s not fun anymore.“Are you saying I need to make tennis fun for a bunch of whiny 8-year-olds?” Yes,we are! Capture their hearts and imagination for movement, sport and tennis bymaking it fun.
Game
This is a fun day and the activities can be the favorite activities from this series ofpractices. Individual activities can be set up in stations around the court. Teams canbe created and games can be played in a team format.
Star Team is a variation of Star Catcher and is a fun team game. Divide the groupinto two teams and each team will always play from one side of the court. It is playedjust like Star Catcher, but when the players return to the coach, rather than get astar, they move one cone from a stack of cones to their side of the court. Playcontinues until all the cones are gone. Count up the number of cones for each teamto determine the winning team.
Take Home Tennis
Driveway/Playground or Wall Tennis. Players play driveway or playgroundtennis with a partner or wall tennis individually using a foam ball.
68

CHAPTER 7: PRACTICE SESSIONS (AGES 9-10) 69
Chapter 7: Practice Sessions (Ages 9-10)This chapter contains eight progressive practice sessions for children ages 9-10
playing on a 60-foot court with 23- to 25-inch racquets and low compression balls.The goal of these practices is to help children learn the basics of a rally by usingforehand and backhand ground strokes so players can hit balls back and forth overthe net with a partner after the first session.
From that point, an array of skills will be introduced so these players can playand begin to have an understanding of singles and doubles play. The overhand serveis introduced and the return of serve is emphasized more with this age group. Also,volley and overhead skills are introduced, and players will learn to move from thebackcourt to the net by hitting an approach shot.
Each practice will develop the technical skills that will enable players to developthe tactics for different playing situations associated with the game of tennis. Shotselection and court positioning are important to introduce to this age group so theseplayers can have fun learning and competing. Many of the games and activities usedby the kids ages 11-17 on a 78-foot (full-size) court are applicable for this age group,when kids are playing on a 60-foot court with low compression balls and 23- to 25-inch racquets.
The practice sessions are categorized by the following playing situations andskills are introduced in the context of the situation:
• Playing Situation 1: Both players in the backcourt. The skills needed for thissituation are rallying skills, or more specifically, forehand and backhand groundstrokes. Once children can rally, games and contests can be used to get them onthe court and playing tennis.
• Playing Situation 2: Serving and returning. The skills needed are serves andreturns.
• Playing Situation 3: One player at the net and one player at the baseline.The skills for the net player include the volley and the overhead, while theplayer at the baseline will hit ground strokes and lobs.
• Playing Situation 4: Transitioning from the baseline to the net. This is aresult of moving forward from the baseline to return a short ball and thencontinuing to the net. The skill necessary is the approach shot.
QuickStart Tennis

Also included in each practice session is a list of equipment that should be usedfor that session, as well as a coaching tip from youth coaching expert GaryAvischious. Each practice session for this age group lasts 60 minutes.
The practice sessions for the 9- to 10-year-olds will contain the following:
1. Theme of the day2. Movement activities3. Skill development4. Game5. A take-home tennis activity
QUICKSTART TENNIS : A GUIDE FOR PARENTS AND RECREATIONAL COACHES70

CHAPTER 7: PRACTICE SESSIONS (AGES 9-10) 71
Practices at a Glance: Ages 9-10This one-page guide outlines the eight practice sessions that follow. It serves as a
handy reference for what is covered in more detail during each practice.
Practice 1 Instant RallyMovement Activities Kirk-O-RamaSkill Instant Rally Progression – ForehandGame Tag Team SinglesTake Home Tennis Driveway/Playground or Wall Tennis
Practice 2 Rally SkillsMovement Activities Roll and Catch; Toss and Catch; Toss and Trap;
Toss, Turn and TrapSkill Instant Rally Progression – BackhandGame Champion of the Court SinglesTake Home Tennis Driveway/Playground or Wall Tennis
Practice 3 Serve and ReturnMovement Activities Two Ball Toss, Jog Ball, Two-Hand Ball Passes,
Overhead ThrowSkills Overhand Serve Progression, Serve ReturnGame Champs and Chumps with ServeTake Home Tennis Driveway/Playground or Wall Tennis
Practice 4 VolleyMovement Activities 3-2-1 Juggle Rally, Circle VolleysSkill Volley Progression with a PartnerGame One Ball LiveTake Home Tennis Driveway/Playground or Wall Tennis
Practice 5 Approaching the NetMovement Activities Dynamic Warm-up, Ball DropSkills Approach Shots, Approach Shot and VolleyGame Champions of the Court DoublesTake Home Tennis Driveway / Wall Tennis
Practice 6 SinglesMovement Activities Partner Ball Tossing and Catching, Catch It!Skill Singles TacticsGame Champion of the Court SinglesTake Home Tennis Driveway/Playground or Wall Tennis
Practice 7 DoublesMovement Activities Ball Drop, Jog Ball, Circle VolleysSkill All Position DoublesGame Team DoublesTake Home Tennis Driveway/Playground or Wall Tennis
Practice 8 Play DayActivities Team GamesGames Deep Desperation, Wipe OutTake Home Tennis Jr. Team Tennis

Practice 1
Theme: Instant Rally
Equipment: 23- to 25-inch racquets, low compression balls, poly spots, donuts orchalk for targets
Gary’s Youth Coaching Tip
When was the last time you had more fun coaching tennis than your kids did inclass? The more you model fun, the more your kids will catch it.
Movement Activities
Kirk-O-Rama. To liven up simple racquet handling activities, such as bouncingballs up and down, add some music and change activities every 20 to 30 seconds. Usea variety of activities and have players change every time they hear a whistle. Useany or all of these activities to add variety to your practices:
1. Bounce ball down2. Bounce ball up, letting it bounce on the court after each hit3. Bounce ball down on the edge of the racquet4. Bounce ball up, keeping the ball in the air5. Bounce ball up, alternating sides of the racquet6. Bounce ball up, alternating sides but add a hit up on the edge between hitting onboth sides
7. Bounce ball high8. Bounce ball low9. Bounce ball while on one knee10. Bounce ball while sitting on the court11. Bounce ball while lying on the court12. Bounce ball in a circle around the body13. Bounce ball in a Figure 8 around the legs14. Bounce ball down while hopping on one foot15. Bounce ball up while hopping on the other foot16. Bounce ball up, with the racquet between the legs17. Bounce ball up, with the racquet around the back18. Toss the ball up and catch it on the racquet without it bouncing on the strings19. Balance the ball on the strings and turn the racquet 180 degrees without the ball
falling off the strings20. Spin quickly in a circle while balancing the ball on the strings
Skill
Instant Rally Progression – Forehand. Each player will have a racquet and alow compression ball. Follow this sequence and young players will develop rallyskills in just a few minutes. To keep kids engaged, move through these activitiesquickly. For example, the coach might say, “Let’s see how many you can do in 30seconds.”
QUICKSTART TENNIS : A GUIDE FOR PARENTS AND RECREATIONAL COACHES72

CHAPTER 7: PRACTICE SESSIONS (AGES 9-10) 73
1. Tap up, bounce and catch with the non-racquet hand. Players will tap the ballup about head-level high, let the ball bounce and catch it after one bounce withtheir non-dominant hand (that is, the opposite hand they use to grip theracquet for their forehand).
2. Self rally. This time, rather than catching after the first bounce, continue totap the ball up after each bounce to about head-level height.
3. Rally with a partner to a target. Find a partner and alternate tapping upabout head level. After the bounce, the partner taps the ball up and lets itbounce. See how many consecutive tap-ups each pair can get in a row. To helpthem focus on hitting up rather than hitting forward, place a poly spot, donutor draw a circle with chalk as a target between the two players. Players shouldtry to hit every ball up to head level and have it land in the circle.
4. Rally over a line with a partner. Draw a line or find a line on the court andplace each player on either side. Have them match up their racquet facesforehand to forehand and move back two to three steps. Have them rally so theball bounces over the line. The ball should be hit to head-level height. See howmany they can get in a row hitting all balls on the forehand side.
The Forehand

5. Rally with partner over a net. This is similar to “rally over a line with apartner,” but this time the players will rally over a net or barrier. Start at thenet and have players match up racquet faces forehand to forehand and move 3-4 feet away from the net and play all shots on the forehand side. To assist themwith control and direction, add a target about 3 feet from the net (e.g., a polyspot, donut or chalk circle).
6. Step-back forehands. Both players are on either side of the net and match upracquet faces forehand to forehand, then take two steps back. The player withthe ball drops and hits it to the partner, and they rally for four shots in a rowon the forehand side. After four consecutive hits, stop the ball and both playerstake one step back, then they try again for another four-ball rally. After eachsuccessful four-ball rally, they move a step back. If they miss, they must bothmove forward one step.
Games
Tag Team Singles. A minimum of fourplayers are needed for this game. Divideplayers into two groups with each groupforming a line behind the middle of eachbaseline. One player is up on each side (A1and B1). The first player from side A (A1)drop-hits the ball over the net and movesto the back of her line. The first player onB (B1) returns the ball and goes to theback of the line on his side. From there,each subsequent player hits one ball andmoves to the back of the line, keeping thepoint going until one side misses.
This can also be a cooperative game,with the team (players in both lines are onthe same team) attempting to get 10consecutive rallies.
Take Home Tennis
Driveway/Playground or Wall Tennis.Play a continuous rally game on thedriveway or playground court or see howmany consecutive rallies you can makeagainst the wall.
B1B2 B3 B4
A1
A2A3A4
Tag Team Singles
QUICKSTART TENNIS : A GUIDE FOR PARENTS AND RECREATIONAL COACHES74

CHAPTER 7: PRACTICE SESSIONS (AGES 9-10) 75
Practice 2
Theme: Rally Skills
Equipment: 23- to 25-inch racquets, low compression balls, poly spots, donuts orchalk for targets
Gary’s Youth Coaching Tip
We ask kids to give 110 percent effort in a match. How do they know whatthat looks and feels like if we don’t model it to them?
Movement Activities
Roll and Catch. Players should stand 10 feet apart, with one ball for each pair.The player with the ball (Player A) rolls the ball to either side of the partner (Player B),and Player B moves so she can catch the ball directly between her feet. Player Bshould shuffle into position and squat down, keeping her back straight to catch theball. Player B then rolls the ball back to either side of player A, who also catches theball and rolls it back. Add some variation by having players use two balls and havethem both roll and catch at the same time.
Toss and Catch. This activityis similar to “Roll and Catch,”but this time Player A tosses theball underhand so it bounces onthe court, and Player B catchesthe ball with one hand with thefingers pointing up. This willforce each player to movequickly side to side and to getbelow the ball so the fingers areup, similar to the position of thehand when executing a volley.Player B then tosses the ballunderhand to Player A, who hasto try to catch the ball in thesame manner as mentionedearlier. For a greater challenge,have both players toss and catchtwo balls at the same time.
Toss and Catch

Toss and Trap. Thisactivity is similar to “Tossand Catch,” but this timethe player will have aracquet. The racquet isheld at its throat with thedominant hand, and thebutt of the racquet is heldagainst the stomach at the“belt buckle” position.Player A tosses the balland Player B traps the ballon the strings with thenon-dominant hand in aperfect contact position.Player B tosses it back to Player A, who moves and traps the ball against the stringswith his racquet butt against the stomach and the dominant hand at the racquetthroat. This is an excellent warm-up activity to train players to move into the perfectspot for the ideal contact for a ground stroke. All players will have to move quicklyto trap all balls on the forehand side of the racquet while facing sideways whenmaking the trap.
Toss, Turn and Trap. This time, Player A uses a higher underhand toss to Player B,who is holding her racquet and with her back to the feeder (Player A). The tossercalls out the partner’s name and the partner (Player B) turns 180 degrees, locates theball and moves to trap the ball against her strings. Have each pair do this five times,then change tosser and trapper.
Skill
Instant Rally Progression – Backhand. This is the exact same progression as theInstant Rally Progression on the forehand side, but players are using only thebackhand side of the racquet. Players can use two hands on the backhand side, orsome might elect to use only one hand. Have them follow this sequence. To keep kidsengaged, move through these activities quickly. For example, the coach might say,“Let’s see how many you can do in 30 seconds.”
1. Tap up on the backhand side of the racquet, bounce and catch. Players willtap the ball up about head-level high using the backhand side of the racquet, letthe ball bounce and catch it after one bounce with their non-dominant hand(that is, the hand not gripping the racquet on the forehand).
2. Self rally. This time, rather than catching after the first bounce, continue totap the ball up after each bounce to about head-level height.
3. Rally with a partner to a target. Find a partner and alternate tapping upabout head level on the backhand side of the racquet. After the bounce, thepartner taps the ball up and lets it bounce. See how many consecutive tap-upseach pair can get in a row. To help them focus on hitting up rather thanhitting forward, place a poly spot, donut or draw a circle with chalk as a targetbetween the two players. Players should try to hit every ball up to head leveland have it land in the circle.
Toss and Trap
QUICKSTART TENNIS : A GUIDE FOR PARENTS AND RECREATIONAL COACHES76

CHAPTER 7: PRACTICE SESSIONS (AGES 9-10) 77
4. Rally over a line with a partner. Draw a line or find a line on the court andplace each player on either side. Have them match up their racquet facesbackhand to backhand and move back two to three steps. Have them rally sothe ball bounces over the line. The ball should be hit to head-level height. Seehow many they can get in a row hitting all balls on the backhand side.
5. Rally with partner over a net. This is similar to “rally over a line with apartner,” but this time the players will rally over a net or barrier. Start at thenet and have players match up racquet faces backhand to backhand and move3-4 feet away from the net and play all shots on the backhand side. To assistthem with control and direction, add a target about three feet from the net(e.g., a poly spot, donut or chalk circle).
6. Step-back backhands. Both players are on either side of the net and match upracquet faces backhand to backhand, then take two steps back. The player withthe ball drops and hits it to the partner, and they rally for four shots in a rowon the backhand side. After four consecutive hits, stop the ball and bothplayers take one step back, then they try again for another four-ball rally. Aftereach successful four-ball rally, they move a step back. If they miss, they mustboth move forward one step.
Note: Players hitting two-handed backhands might have difficulty dropping andhitting on the backhand side. You can allow them to put the first shot in playwith a forehand and the return would be the first backhand shot on their way tofour consecutive hits.
Two-Handed Backhand
One-Handed Backhand

Game
Champion of the Court Singles.A designated “champion” competesagainst a line of at least three and nomore than six players, with thechampion assuming a baselineposition on one side of the court (A1)and the other players (i.e., thechallengers) waiting at the back onthe opposite side of the court.
The first challenger (B1) assumesa position at the baseline and drop-hits the ball to the champion (A1). Apoint is then played using thesingles boundaries on the 60-footcourt. If B1 wins, he is the newchampion and runs to the other sideof the court (the champion’s side). IfA1 wins, she stays and plays a pointagainst B2.
Note: This game can be varied bymaking the challengers have to wintwo or three points against thechampion before they can assume thechampion’s position.
Take Home Tennis
Driveway/Playground or WallTennis. Play a continuous rallygame on the backhand side on adriveway or playground court, oragainst the wall with a foam ball.
A1
B1 B2 B3 B4LOSE
WI
N
Champion of the Court Singles
QUICKSTART TENNIS : A GUIDE FOR PARENTS AND RECREATIONAL COACHES78

CHAPTER 7: PRACTICE SESSIONS (AGES 9-10) 79
Practice 3
Theme: Serve and Return
Equipment: 23- to 25-inch racquets, low compression balls, playground balls andNerf footballs
Gary’s Youth Coaching Tip
Are you winning the game? Are you winning the battle against your kidscontinuing to move and love tennis compared to becoming sedentary and playingvideo games? If not, why not?
Movement Activities
Two Ball Toss. Players line up facing a partner about 7-8 feet away. Both playershave a ball that they underhand toss at the same time to each other and each playercatches the ball after one bounce. Create some movement by letting the players tossthe ball a step or two away from their partner.
Jog Ball. While players are jogging in a large circle, they toss the ball up andcatch it after the bounce with two hands, then with the right hand, then with the lefthand. Keep players moving and have them change direction when the coach calls outto change directions.
Two-Handed Ball Passes. With partners 10 feet apart, players pass a large ball,such as a beach ball, volleyball or playground ball, back and forth in the air. Do two-handed chest passes, an overhead pass forward and an overhead pass backward tothe partner. Have players face their partners directly and have them use their legs todrive up and fully extend their arms on all tosses.
Overhand Throw. Have players use an overhand throwing motion to throw a ballback and forth to a partner who is 15 to 20 feet away. Have players begin sidewaysand rotate so they are facing their partners as the ball is released. (This simulatesthe overhand service motion.) Tip: Use NERF footballs to develop a good overhandthrowing motion and release.
Skills
Overhand Serve Progression. Demonstrate an overhand serve in slow motionfrom the baseline into the service court on the 60-foot court. Explain that servesmust be hit from behind the baseline into the opposite service court. Each gamebegins with a serve in the deuce court, and the server plays the next serve into the adcourt, alternating sides for every serve until the game is complete. The server getstwo serves to get the ball in the correct service court.
The following activities demonstrate a Serve-and-Return Progression and aredone with a partner on the other side of the net:
• Throw over the net to a partner. Since the serve is like an overhand throwingmotion (see Overhand Throw to ensure players are throwing the ball correctly),have players throw a ball over the net to their partners, who catch it after onebounce and throw the ball back. Both players should start at the service line andmove back to the baseline after a series of successful throws and catches.

• Toss, touch and freeze. Positionplayers two steps away from the net.Have them stand at a 45-degree angleto the net with their racquets back andtheir arms bent at the elbow like aquarterback preparing to throw. Haveplayers toss the ball up with the non-dominant hand, reach up to full exten-sion and freeze at the contact point. Theracquet face should be directed at theservice court. Several players can bepositioned along the net with theirpartners on the opposite side. Thepartners will trap the ball, move twosteps from the net and serve it backover the net.
Note: Make sure that players freeze at thepoint of contact so they can see the contactpoint and make any necessary correctionsto the toss. To prevent them from over-swinging, see if they can make the ballbounce four times before it goes over theservice line.
• Toss, touch, follow through and trap. Position players four steps away fromthe net. Instead of freezing at the contact point, have players toss, hit and followthrough across their bodies. As the players reach up with their racquets, theheel of the back foot lifts off the ground so the body can rotate forward towardthe net. Players should work on an accurate toss, consistent contact point andgood balance throughout the swing. The partner moves and traps the ball on theracquet with his hand and then serves the ball back.
The Serve
Feet Position
QUICKSTART TENNIS : A GUIDE FOR PARENTS AND RECREATIONAL COACHES80

CHAPTER 7: PRACTICE SESSIONS (AGES 9-10) 81
• Add a step, serve and trap. Begin allplayers four steps from the net. Haveplayers toss, hit and follow through sothe ball goes to the partner in theservice court. After one bounce thepartner traps the ball on the racquetface with his hand and serves it back tohis partner. After each time thepartners serve and trap, both playersmove back a step and repeat the activity.Players should be sideways whentrapping the ball.
• Driveway/Playground or Wall Tennis.Players start in the same position as theabove. The server will serve, followed bya return by the partner, followed by arally from the server and finally a trapby the returner. The returner nowbecomes the server and she starts thesequence of serve, return, rally andtrap. Players should be sideways whentrapping the ball.
S = Server R = Receiver
S
Second Bounce
First Bounce
R
Return of Serve
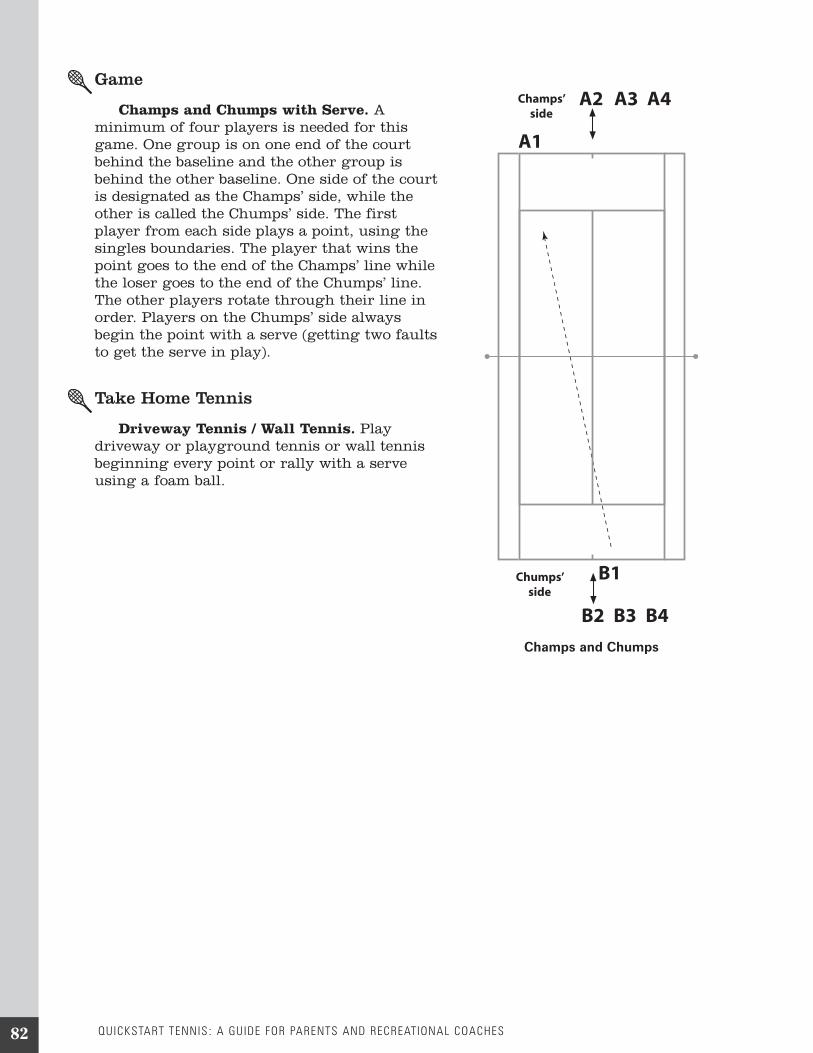
QUICKSTART TENNIS : A GUIDE FOR PARENTS AND RECREATIONAL COACHES
Game
Champs and Chumps with Serve. Aminimum of four players is needed for thisgame. One group is on one end of the courtbehind the baseline and the other group isbehind the other baseline. One side of the courtis designated as the Champs’ side, while theother is called the Chumps’ side. The firstplayer from each side plays a point, using thesingles boundaries. The player that wins thepoint goes to the end of the Champs’ line whilethe loser goes to the end of the Chumps’ line.The other players rotate through their line inorder. Players on the Chumps’ side alwaysbegin the point with a serve (getting two faultsto get the serve in play).
Take Home Tennis
Driveway Tennis / Wall Tennis. Playdriveway or playground tennis or wall tennisbeginning every point or rally with a serveusing a foam ball.
B2 B3 B4
Chumps’side
B1
A2 A3 A4Champs’side
A1
Champs and Chumps
82

CHAPTER 7: PRACTICE SESSIONS (AGES 9-10) 83
Practice 4
Theme: The Volley
Equipment: 23- to 25-inch racquets, low compression balls, foam or oversized lowcompression balls
Gary’s Youth Coaching Tip
Kids will naturally gravitate to whatever is fun. Is your program fun, or is itbecoming programmed?
Movement Activities
3-2-1 Juggle Rally. A player stands with her racquet at one service line and self-rallies (tap up and bounce) the ball three times and then hits it to a partner on theother side of the net at the other service line using either a foam or oversized lowcompression ball. The partner then self rallies three times before returning the ballback over the net. Do three juggle rallies for a minute, then two juggle rallies for aminute followed by one juggle rally for a minute.
Circle Volleys. Players form a circle and bump a foam ball to each other atrandom after one bounce. After two minutes, move in a step and keep the foam ballin the air while it goes randomly from player to player around the circle.
Skill
Describe and demonstrate the forehand and backhand volley, emphasizing thatthe ball is hit before it touches the ground and that there is no backswing.
Volley Progression with a Partner. Position players 4 feet apart in pairs oneither side of the net. Players take turns tossing underhand and hitting a forehandvolley through the following sequence:
• The player should hold the racquet at its throat and bump the ball back to thetosser. Move the hand and racquet together so the stroke is not “wristy.” Thehitters hold the racquet as if they were signaling “Stop” and gently volley theball back to the tossers. Switch tossers and hitters after five trials.
• The volleyer should move his hand halfway down the handle and volley the ballback to the feeder so the tosser catches the ball in the air. Switch after fivevolleys.
• Have the volleyer hold the racquet at the handle and gently volley the ball backto the tosser. Switch after five hits.
• Have volleyers turn so they are facing in the opposite direction and repeat thesequence with a backhand volley. Change tossers and hitters after five volleys.

Ground Stroke - Volley Combination. Position one player at the net and thepartner at the opposite service line:
1. From the service line, one player drop-hits a forehand ground stroke to a partnerat the net.
2. The player at the net volleys the ball back to the partner at the service line.
3. The “feeder” traps the ball on the strings with her hand and repeats the groundstroke – volley – trap sequence.
Change positions after five hits each. This activity is much easier if you startwith foam balls and move to low compression balls as the players master these skills.Players should be sideways when trapping the ball.
QUICKSTART TENNIS : A GUIDE FOR PARENTS AND RECREATIONAL COACHES84
The Volley

CHAPTER 7: PRACTICE SESSIONS (AGES 9-10) 85
Game
One Ball Live. A minimum of six playersis needed for this game. Two pairs of playersrally with one another in a “split-court” setup in which the court is halved vertically.Two balls are put in play with a drop-hitstraight ahead for two simultaneous rallies.Once an error is made, the person calls out“one ball live!” and the remaining ball isplayed out among the four players. Thewinning team scores a point and stays toplay against two new players.
Take Home Tennis
Driveway/Playground or Wall Tennis.Have players play driveway or playgroundtennis or wall tennis, emphasizing andpracticing the volley when possible using afoam ball.
B1 B2
A2A1
C1C2
One Ball Live

QUICKSTART TENNIS : A GUIDE FOR PARENTS AND RECREATIONAL COACHES86
Practice 5
Theme: Approaching the Net
Equipment: 23- to 25-inch racquets, low compression balls, poly spots or a throwdown lines
Gary’s Youth Coaching Tip
The more kids enjoy it, the more they will do it.The more they do it, the more they will learn.The more they learn, the better they will perform.
Movement Activities
Dynamic Warm-up.
• Jog in place while juggling ball from right hand to left hand
• Slow jog and fast juggle
• Fast feet and slow juggle
• Regular jog and regular juggle
• Skip and regular juggle
• High knees and regular juggle
• Heel kicks and regular juggle
• Pass ball around left leg three times
• Pass ball around right leg three times
• Pass ball around waist three times; reverse direction
• Pass ball around knees three times; reverse direction
• Pass ball around neck three times; reverse direction
• Toss ball straight into the air with a leap and catch
• Dribble ball from right hand to left hand
• Dribble ball through the group
• Toss one ball with a partner while shuffling through the group
• Change partners and continue with tossing and catching, but now using twoballs at the same time
Ball Drop. In pairs facing each other, one player has her arms extended atshoulder height and a ball in each hand. This player drops one ball at random andthe other player has to catch the ball after one bounce. After each successful dropand catch, move apart one step. Change catchers and droppers after five trials.
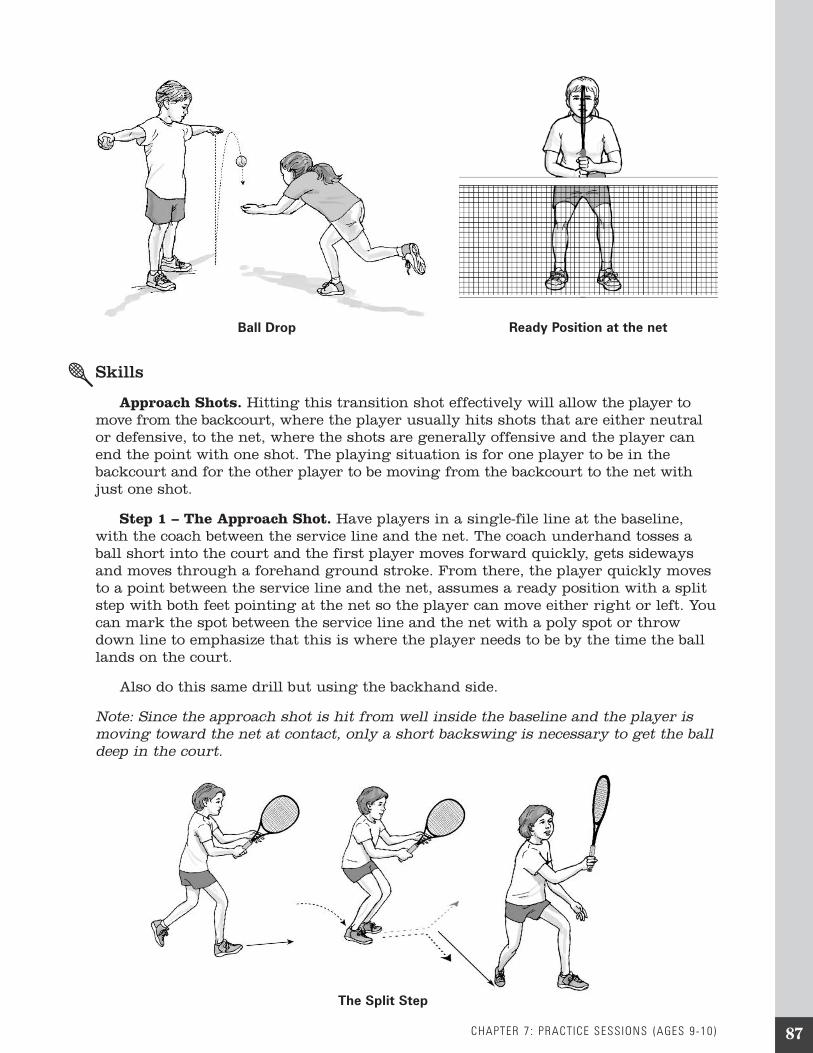
CHAPTER 7: PRACTICE SESSIONS (AGES 9-10) 87
Skills
Approach Shots. Hitting this transition shot effectively will allow the player tomove from the backcourt, where the player usually hits shots that are either neutralor defensive, to the net, where the shots are generally offensive and the player canend the point with one shot. The playing situation is for one player to be in thebackcourt and for the other player to be moving from the backcourt to the net withjust one shot.
Step 1 – The Approach Shot. Have players in a single-file line at the baseline,with the coach between the service line and the net. The coach underhand tosses aball short into the court and the first player moves forward quickly, gets sidewaysand moves through a forehand ground stroke. From there, the player quickly movesto a point between the service line and the net, assumes a ready position with a splitstep with both feet pointing at the net so the player can move either right or left. Youcan mark the spot between the service line and the net with a poly spot or throwdown line to emphasize that this is where the player needs to be by the time the balllands on the court.
Also do this same drill but using the backhand side.
Note: Since the approach shot is hit from well inside the baseline and the player ismoving toward the net at contact, only a short backswing is necessary to get the balldeep in the court.
The Split Step
Ready Position at the netBall Drop
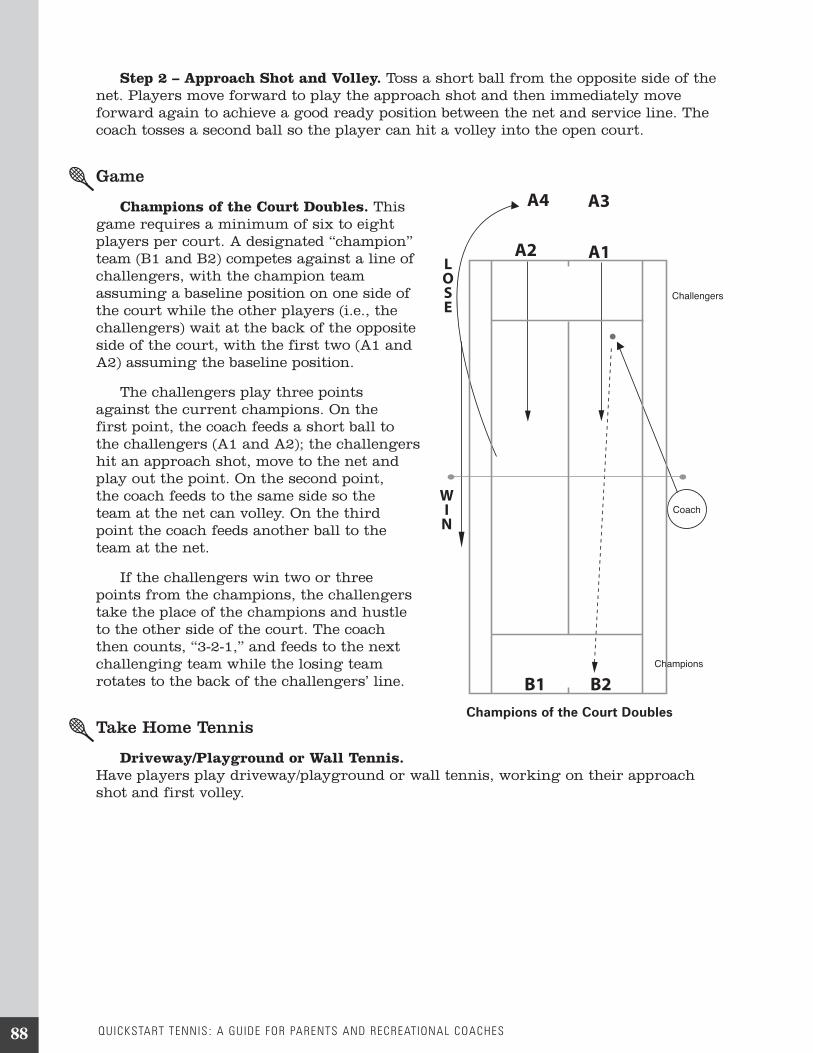
Step 2 – Approach Shot and Volley. Toss a short ball from the opposite side of thenet. Players move forward to play the approach shot and then immediately moveforward again to achieve a good ready position between the net and service line. Thecoach tosses a second ball so the player can hit a volley into the open court.
Game
Champions of the Court Doubles. Thisgame requires a minimum of six to eightplayers per court. A designated “champion”team (B1 and B2) competes against a line ofchallengers, with the champion teamassuming a baseline position on one side ofthe court while the other players (i.e., thechallengers) wait at the back of the oppositeside of the court, with the first two (A1 andA2) assuming the baseline position.
The challengers play three pointsagainst the current champions. On thefirst point, the coach feeds a short ball tothe challengers (A1 and A2); the challengershit an approach shot, move to the net andplay out the point. On the second point,the coach feeds to the same side so theteam at the net can volley. On the thirdpoint the coach feeds another ball to theteam at the net.
If the challengers win two or threepoints from the champions, the challengerstake the place of the champions and hustleto the other side of the court. The coachthen counts, “3-2-1,” and feeds to the nextchallenging team while the losing teamrotates to the back of the challengers’ line.
Take Home Tennis
Driveway/Playground or Wall Tennis.Have players play driveway/playground or wall tennis, working on their approachshot and first volley.
Challengers
A1
B1 B2
LOSE
WI
N
A2
A3A4
Champions
Coach
Champions of the Court Doubles
QUICKSTART TENNIS : A GUIDE FOR PARENTS AND RECREATIONAL COACHES88

CHAPTER 7: PRACTICE SESSIONS (AGES 9-10) 89
Practice 6
Theme: Singles
Equipment: 23- to 25-inch racquets, low compression balls, foam or oversized lowcompression balls, different colored poly spots, donuts or chalk
Gary’s Youth Coaching Tip
There will be a great desire on your part to make your lessons about tennis andacquiring skills, but kids PLAY tennis because it’s fun. If it’s fun, the tennis andskills will come. If it’s not fun, it won’t matter how skilled you are at teaching skills.
Movement Activities
Partner Ball Tossing and Catching. All of these activities are done with apartner and the two players should be positioned 8-10 feet apart:
• A player rolls one ball to either side of his partner. The partner moves so she isdirectly in front of the ball and catches it directly between her feet. Add asecond ball so there are two balls going at the same time.
• Players still moving their partners side to side, one player rolls and the otherplayer underhand tosses. Reverse roles.
• One player underhand tosses back to her partner in the air and the other playerbounce passes. Reverse roles.
• One player tosses two balls stacked side by side (horizontal) to partner. Changeafter five tosses.
— Partner catches both balls at the same time after one bounce.— Partner catches both balls at the same time after two bounces.— Partner catches both balls at the same time with arms crossed.
Horizontal Position

• One player tosses two balls stacked on top of each other (vertical) to partner.Change after five tosses.
— Partner catches both balls at the same time after one bounce.— Partner catches both balls at the same time after two bounces.
• Turn and catch. Both players are facing the same direction. The front playerhas a racquet and is in the ready position. The back player tosses a ball up andcalls out the name of his partner. The partner turns, reacts to the ball and trapsthe ball on the strings with her hand in the ideal contact point. Change tossersand trappers after five tosses.
Catch It! Players are in pairs facing each other about 4-5 feet apart. Playersposition themselves at the net. Both players have balls and underhand toss balls backand forth at the same time. Players will side shuffle from the net to the baseline andback tossing and catching without letting the ball drop.
Skill
Singles Tactics. Now that players have learned to hit ground strokes, volleys,serves and returns, it is time to add some simple singles tactics to their game. Theeasiest singles tactic is to keep the ball in play. This means that the players willalways attempt to hit one more ball back than their opponent. This tactic is based onconsistency and patience.
• Continuous rally – keep the ball in play. Players are on either side of the net,rallying balls back and forth to see what team can get the greatest number ofrallies in a row. You can start your players with foam balls or oversized lowcompression balls and have them rally from service line to service line beforemoving back to go baseline-to-baseline on the 60-foot court using low compres-sion balls.
QUICKSTART TENNIS : A GUIDE FOR PARENTS AND RECREATIONAL COACHES
Vertical Position
90

CHAPTER 7: PRACTICE SESSIONS (AGES 9-10) 91
• Move your opponent side to side. Beginningservice line-to-service line, position differentcolor targets (poly spots, donuts or chalkcircles) on the court about6 feet apart on either side of the players.Players rally back and forth using foam ballsor oversized low compression balls and have tocall out the color of the target before hittingthe ball. Players can use both forehand andbackhand ground strokes (first do this drillwith all forehands, then with all backhands)and must recover to the center after each shot.Players can move back to the full 60-foot courtand use low compression balls. Move targets 8to 10 feet apart.
• Move your opponent up and back. Positiondifferent color targets about 6 feet apart—oneinside the service line and one behind theservice line. Players using foam balls oroversized low compression balls call out thecolor of the target before hitting each short ordeep ball. Players must recover to behind thedeep target after every shot. Move targets backand use the 60-foot court with low compressionballs. Players will recover to behind the baselineafter each shot. Place short target in back ofthe service line for this activity.
B1
A1
RedSpot
BlueSpot
Move Your Opponent Side to Side
B1
A1
RedSpot
BlueSpot
Move Your Opponent Up and Back

Game
Champion of the Court – Singles. Adesignated champion competes against aline of at least three challengers. Thechampion (A1) assumes a baselineposition on one side of the court. Otherplayers (i.e. the challengers, diagrammedas B1-B4) wait at the back of the oppositeside of the court. The first challenger, B1,assumes the opposite baseline positionand drop-hits or serves (two serves to getone ball in the service court) the ball toA1 and a point is played using the singlesboundaries. The court size should be 60-feet long and 21-feet wide. If B1 wins, sheis the new champion and runs to theother side of the court (Champion’s side).If A1 wins, he stays and plays a pointstarted by B2. For a variation, have thechallengers win two or three points beforebecoming the Champion.
Take Home Tennis
Driveway/Playground or Wall Tennis.Have players play driveway orplayground tennis with a partner/parent,or play wall tennis with a foam ball.
QUICKSTART TENNIS : A GUIDE FOR PARENTS AND RECREATIONAL COACHES
A1
B1 B2 B3 B4LOSE
WI
N
Champion of the Court Singles
92

CHAPTER 7: PRACTICE SESSIONS (AGES 9-10) 93
Practice 7
Theme: Doubles
Equipment: 23- to 25-inch racquets, low compression balls, foam balls
Gary’s Youth Coaching Tip
Ultimate performance occurs in “the zone.” The combination of thought, feelingand action. Where THEY can “just do it.” Create the fertile soil in which a playercan grow into that kind of performance.
Movement Activities
Ball Drop. In pairs facing each other, one player has her arms extended atshoulder height and a ball in each hand. This player drops one ball at random andthe other player has to catch the ball after one bounce. After each successful dropand catch, move players apart one step. Change catchers and droppers after fivetrials. (See Practice 5 for illustration.)
Jog Ball. While players are jogging in a large circle, they toss the ball up andcatch it after the bounce with two hands, then with the right hand and then with theleft hand. Keep players moving and have them change direction when the coach callsout to change directions.
Circle Volleys. Players form a circle andbump a foam ball to each other at random afterone bounce. After two minutes, move in a stepand keep the foam ball in the air while it goesrandomly from player to player around thecircle.
Skill
All Position Doubles. This activity is agreat way to teach players the positions andresponsibilities for doubles. Position fourplayers in the proper doubles positions—theserver (A1), the partner of the server (A2), theserve returner/receiver (B1) and the partner ofthe returner (B2). A point is played startingwith a serve or a drop-hit. Once two or threepoints are played, each player rotates to thenext doubles position. After the rotation, morepoints are played with the players in their newdoubles positions.
B1
A2
A1
B2
Receiver
Server’spartner
Receiver’spartner
Server
Court Positions

The coach can work on the positions of these players as they play a large numberof doubles points. They also can focus on the shot selection. This is a good time toget players thinking about hitting deep to deep (players at the baseline should behitting back to the opposite baseline player) or close to close (players at the netshould think about hitting to the side of the opposite volley position).
The coach also can take one of the doubles positions and she will stay at thatposition while everyone else rotates. For example, the coach might be in the servicereturn position and have three balls. The coach hits the return from the server and apoint is played. When the point ends, the coach can put another ball in play and asecond point is played. Continue until the coach plays all three balls, making surethat every player hits a shot or two from his respective doubles position. This coachformation with multiple balls before rotating ensures more hitting before moving tothe next position.
Game
Team Doubles. This game requires aminimum of four players but can easilyaccommodate eight players. Four playersassume the typical doubles positions oneach side of the court. One side is theserving side and the other side is thereturning side.
Points can begin with a drop-hit or aserve. After a point is played, playersrotate one spot on their side of the net. Forexample, player A1 would move to theback of the “A” line, player A2 would moveto the net and A3 would be on thebaseline. Games can be played to 7 or 11points with teams switching ends of thecourt after each game. One side serves theentire game. All serves are from the deucecourt.
Take Home Tennis
Driveway/Playground or Wall Tennis.Have players play driveway or playgroundtennis with a partner/parent, or play walltennis with a foam ball.
QUICKSTART TENNIS : A GUIDE FOR PARENTS AND RECREATIONAL COACHES
A1
A3A4
A2
B3 B4
B2
B1
Team Doubles
94

CHAPTER 7: PRACTICE SESSIONS (AGES 9-10) 95
Practice 8
Theme: Play Day
Equipment: As needed
Gary’s Youth Coaching Tip
The most important thing you can give your kids is a love of tennis. That willcarry them through difficult times, injuries, bad calls, bad coaches and toughcompetition. Their love for the game will take them further than any other thingyou could teach them.
Games
This is a fun day and the activities can be the favorite activities from this series ofpractices. Teams can be created and games can be played in a team format.
There are some large group gamesthat are ideal if you have enough players:
Deep Desperation. A doubles“champion” team (A1 and A2) ispositioned on the baseline. The otherplayers line up with a partner at the netpost. The first team at the net post takespositions at the net. The coach beginseach point with a lob over the heads of theteam at the net. Begin with an easy lobthat the players can move back andreturn after one bounce. This ball willmost likely land in the service court tostart. The players at the net must chasedown the lob and play out the pointagainst the champion team. If thechallenging team wins, they run over toreplace the champions.
A new ball is fed as soon as the newchallengers are in the volley position. Ifthe challenging team loses, they quicklygo to the end of the line at the net postand the next team of challengers comes into play out the next point started by a lobfrom the coach.
Whoever is left in the championposition after a designated time winsthe game.
A1 A2
C1
B2B1
LOSE
COACH
WI
N
C2D1 D2E1 E2
Deep Desperation

96 QUICKSTART TENNIS : A GUIDE FOR PARENTS AND RECREATIONAL COACHES
Wipe Out. Divide the group into two teams (A and B) of at least four players each.Each team stands in a line along the back fence on opposite ends of the court. Tobegin, one person from each team plays a singles point beginning with a drop-hit.After the point, the winner (A1) stays on the court and adds a second person (A2) toher side of the court. The player who loses the point (B1) goes to the end of her line(side B) and the next player (B2) begins the point with a drop-hit to the two people onthe opposite side.
The team that wins the point keeps adding an additional player until all playersare on the court and that team wins the point. When multiple players are playingagainst one player, the lone player can use the doubles boundaries, and the multipleplayers must use the singles court. The game ends when one side has all its playerson the court and wins the point.
Take Home Tennis
Jr. Team Tennis. Continue to play on a driveway/playground tennis court oragainst a wall, and sign up for the next session of USTA Jr. Team Tennis.

CHAPTER 8: INTRODUCING YOUR KIDS TO TENNIS THE QUICKSTART WAY: AFTER-SCHOOL PROGRAMS AND CAMPS 9797
Chapter 8: Introducing Your Kids to Tennisthe QuickStart Way: After-SchoolPrograms and Camps
How to Start an After-School ProgramThe previous practice sessions are an excellent way to introduce your kids to
tennis and teach them the basics of the game. For those 10 and under, the next stepis to get them involved in playing tennis on teams, which allows them to enjoy thesport in a fun atmosphere and to play with their friends—all of which increases theirlikelihood of sticking with tennis for life.
Once kids have been introduced to tennis, QuickStart Tennis is the ideal nextstep—and schools and after-school programs are a natural place to start. By utilizingsmaller courts and modified equipment, schools can serve as the ideal location tohelp students take their love of the game to the next level. Kids will gain confidenceby seeing their own immediate progress, making them more enthusiastic aboutcontinuing to play and improve.
Your RoleAnyone can help to bring the QuickStart Tennis format to their school or
community: Physical Education teachers, administrators, faculty, volunteers and/orafter-school providers.
Ideally, the program will have support from the following:
• A QuickStart Tennis Coordinator
• Teachers, parents and volunteers to serve as organizers and program leaders
Getting StartedTo get your after-school program off the ground, you will need:
• An indoor or outdoor play area
– If you do not have access to tennis courts, the QuickStart Tennis formatcan be played on blacktops, cement multi-purpose courts or gymnasiumfloors. Courts also can be set up on packed dirt or even on grass.
– Existing markings on floors (badminton and volleyball lines) can beutilized. Flat rubber lines, chalk or tape can be used for playing surfacesthat are not marked.
QuickStart Tennis

QUICKSTART TENNIS : A GUIDE FOR PARENTS AND RECREATIONAL COACHES98
– A regulation tennis court can be turned into four 36-foot by 18-footQuickStart Tennis format courts by hanging a net or rope with streamersthrough its center lengthwise from fence to fence. (See Chapter 2 for theconfiguration of the 36-foot and 60-foot QuickStart Tennis courts.)
• Junior tennis racquets (21 to 23 inches for 36-foot courts, and 23 to 25 inchesfor 60-foot courts)
• Lightweight nets and portable standards; or makeshift nets or barriers
– A lowered badminton or volleyball net can be used
– You can also improvise by using plastic barrier tape, yellow caution tapeor rope with streamers
• Foam and/or low compression tennis balls
Organizing PlayThere are many successful models for organizing play. These range from
organized team play to drop-in formats and round-robin tournaments. We recom-mend play formats that emphasize participation.
• Organized Team Play formats are a perfect bridge toward team programs atthe middle school and high school levels.
– Concept: To provide structured team matches with students remaining onthe same team for an entire season.
– How to: Students are divided into teams representing their class, theirgrade or their school. Team size should reflect the facilities, with the goalof creating matches where every player can remain active. The schedule ofmatches should allow each team to play each other at least once duringthe season.
• Flexible Team Competition
– Concept: To allow for team competition in a situation where the studentpopulation changes from day to day.
– How to: Divide students into teams and play a series of short scoringmatches (e.g., 11-point games or 21-point games) or for a designated time(10-minute matches). Each team may have, for instance, four doublessquads. At the end of the period, points can be totaled to determine theday’s winner.
• Round-Robin Tournament
– Concept: Provide students with equal opportunity for singles or doublesplay in a non-elimination format.
– How to: Players are divided into four to five small groups of four to fivestudents. Students will play all other students within that group. Thisusually results in records that have a distribution such as: 3-0, 1-2 and0-3. For the second half of the intramural program, students are once againdivided into groups (or flights) based upon their record.

CHAPTER 8: INTRODUCING YOUR KIDS TO TENNIS THE QUICKSTART WAY: AFTER-SCHOOL PROGRAMS AND CAMPS 99
Grow Your Program• Get to know other Physical Education teachers, parents and personnel of theschool(s) and distribute information
• Offer to assist with P.E. classes (demonstrate the QuickStart Tennis format)
– Kids are introduced to tennis in the P.E. classes, which transition into thelocal USTA Jr. Team Tennis League, NJTL or other after-school programs
• Recruit your local high school players to help teach younger kids
• Include everyone and keep it fun!
School Tennis ResourcesIt is recommended that each school involved in hosting QuickStart Tennis after
school also offer tennis during the school day through the physical educationclasses. The USTA can assist schools with teacher training, user-friendly lessonplans, equipment assistance and staff support for implementing tennis into thephysical education curriculum.
For more information and to access the new Physical Educators Guide forTeaching Tennis in Schools, log onto www.usta.com/schooltennis.
How to Organize Your QuickStart Tennis Camp (Ages 5-13 years old)After-school programs are only one way to get your kids playing tennis.
Another popular option is QuickStart Tennis camps. These are designed both tointroduce kids to the game and to provide a building block for those who havepicked up tennis in the schools and want to take it further.
Setting up a Park and Recreation Camp or a Summer Camp, while immenselyrewarding, does have its challenges. And it helps to have a head start. Below arethe necessary steps and some helpful hints so you can launch—and run—asuccessful QuickStart Tennis camp.
Group FormatsIt is important to know the number of junior players you have in each age
group. This can be determined through registration. Thus, the registration formmust include “Age of Player.” Another pivotal component is determining how manyvolunteers are available to help (see finding volunteer/parent assistance).
Format A. Group players into age groups that follow the practice plans of thebook. Place the following age groups together: 5- to 6-year-olds, 7- to 8-year-olds, 9-to 10-year-olds and 11-and-up. In order to accomplish this grouping format, thereshould be enough players and a sufficient number of volunteers to assist in eachgroup.

QUICKSTART TENNIS : A GUIDE FOR PARENTS AND RECREATIONAL COACHES100
Format B. If the number of volunteers and the number of junior players do notallow you to implement “Format A,” it is important that you utilize your volunteerseffectively and strategically.
If you have too many junior players and not enough volunteers, place yourlimited volunteers in the following age groups first: 5- to 6-year-olds and 7- to 8-year-olds.These age groups require extra attention because of their limited physical abilitiesand mental capacity. Ages 9 through 13 require less one-on-one attention becausetheir physical abilities and mental capacity are more developed, thus less volunteerhelp is needed. (If possible, have the 9- to 10-year-olds play on a 60-foot court and the11- to 13-year-olds play on a full-size, 78-foot court.)
If you do not have enough juniors per group, players need to join another agegroup. (A small group is defined as four players or fewer, and small groups canchallenge the coach/volunteer to keep the players engaged and the group energized.)If a player lacks the physical ability, place this player in the age group below (i.e.,place a lower-skilled 7-year-old in the 5- to 6-year-old age group). If a player hasgreat physical ability, place him or her in the next age group up. If the 5- to 6-year-old age groups need to be combined with the 7- to 8-year old age group, imple-ment the 5- to 6-year-old practice plan to ensure success for all.
Coaching Tip
Players may need to start out on a court size smaller than is suggested for theirage group. Coaches may want to do this if they do not know the skill level of theirgroup and if they have players whose skill levels do not allow them to be successfulon the suggested court size for their age. Once the players and/or group aresuccessful, they move to the court size recommended for their age group.
Success: Be Prepared!• Registration of all players should occur before the start date. This will assist thecoach in determining how many players they have in each age group, thenumber of parents/volunteers needed and the overall organization of the on-court program.
• The lead coach of the program is going to have to put in some extra work.Volunteers/parents need to be trained in the practice plans they will becoaching. Remember, if your volunteers/parents are trained, they will help youprovide a quality program, which in turn will create a positive tennis experiencefor the junior players.
• Recommendations for on-court trainings: 5- to 6-year-old practice plans followthose prescribed in this book, 7- to 8-year-old practice plans follow thoseprescribed in this book, 9- to 13-year-old practice plan trainings are a combinationof Chapters 6 and 7.
• Have all the practice plans ready to hand out to your volunteers/parents on thefirst day of the training. This will give them the opportunity to review thematerial before each day of the program.

CHAPTER 8: INTRODUCING YOUR KIDS TO TENNIS THE QUICKSTART WAY: AFTER-SCHOOL PROGRAMS AND CAMPS 101
• In addition, when volunteers/parents come out each day to assist, ensurethat you hand out the practice plan they are responsible for so they canrefer to it on court if needed.
• Designate responsibilities. Do this ahead of time. At your on-court training,provide a handout that outlines their responsibilities as a volunteer/parent(see volunteer/parent responsibilities).
• Before the start date, ensure that you have all the players grouped by age.This way, when the players come out for practice, you are organized andready to communicate to them which court they need to go to. Once on thecourt, if you see that a player’s ability is too high, move him or her up tothe next age group.
Volunteer/Parent Responsibilities• Arrive 30 minutes early to set up your court, receive your practice planhandout for that day and ask any questions you may have.
• Ensure that players have an appropriate-sized racquet. Make sure you haveextra racquets if needed.
• Volunteers/parents take their respective age groups to their courts and runthrough the practice plan for that day.
• Ensure safety for all players.
Finding Volunteer/Parent Assistance• On the registration form, include an area for parents to acknowledge if theycan assist in the program or not.
• Go to your nearest clubs or tennis facilities and find out if they have anyhigh school players who would be interested in volunteering their time toassist you.
• Go to your local high school to find out which clubs/organizations requiretheir participants to volunteer.
PlayIt is important that players are rallying as soon as possible. At the end of
each practice, designate a certain time to rally or implement a mini team tennismatch. At the end of the summer camp session, have the last day be a teamtennis match—because kids love to play and keep score! Go to the USTA Jr. TeamTennis chapter (Chapter 10) to read more.
Challenging PlayersThose players who keep returning to your program pose a challenge. How do
we keep them interested and challenged? First, determine if their ability allowsyou to move them up to the next age group. If you cannot move them up to thenext age group, challenge them within the group and match them to the othertop players in the group if their ability allows. For example, players have tocatch the ball off one bounce, but the returnee has to catch it out of the air.
Go to the back of the book or our website—www.partners.quickstarttennis.com—to get new games and rally activities.

QUICKSTART TENNIS : A GUIDE FOR PARENTS AND RECREATIONAL COACHES102
How to Organize a TournamentOrganized play is an important part of QuickStart Tennis. If organized appropri-
ately, the children are learning to play and compete in a way that is fun for them.Competition using the QuickStart Tennis format should emphasize children playingmultiple opponents in a non-elimination format. Doing this can help learning becomemore meaningful, give players a sense of achievement and also can aid in the socialdevelopment of children. The QuickStart Tennis format is a perfect way for childrento first experience, in a positive manner, competition on a scaled-down court that isappropriate for their size, strength and ability.
It is very important that every effort is made to get it right for children in orderfor them to develop a love and understanding of the game. Essentially what thatmeans is the competition length, scoring and format needs to be appropriate for theage of the child. These events are best held locally, with maximized play opportunities,and in a fun environment with the emphasis on participation instead of winning.
Children under the age of 10 generally prefer team competition, although childrenunder the age of 7 are just learning what it means to work together as a member of ateam. By age 8, children have a better understanding of working together and arebeginning to understand the rules of play. As children get older and have achieved abetter understanding of rules, they will learn about winning and losing.
Team competition for kids can be a great way to start children playing because itcan potentially keep all kids playing. It should be structured to recognize individualperformance and team results.
The chart opposite gives an idea of what is appropriate for each age group:

CHAPTER 8: INTRODUCING YOUR KIDS TO TENNIS THE QUICKSTART WAY: AFTER-SCHOOL PROGRAMS AND CAMPS 103
5- to 6-YEAR OLDS 7- to 8-YEAR OLDS 9- to 10-YEAR OLDS
Equipment 36-foot courts, foamballs or oversized lowcompression balls,17- to 21-inch racquets
36-foot courts, foamballs or oversized lowcompression balls,19- to 23-inch racquets
60-foot courts, lowcompression balls,23- or 25-inch racquets
Goals for theevent
• Learn simple gameswhere points arescored
• Cooperative activities• Learn basic rules, helpothers, pick upequipment
• Being with friends• Local community-based events
• Make decisions andkeep score
• Learn to play usingthe basic rules of thegame
• Many playingopportunities in ashort period of time
• Play with friends inmixed teams and areable to play againstteams
• Learn the basic tenetsof sportsmanship
• Learn the basics ofdoubles
• Learn to play as anindividual
• Many playingopportunities in shortperiod of time
• Lean to play doubles• Learn to apply therules of doubles andsingles
• Learn to practice• Developsportsmanship
• Understand that sporthas winners andlosers
Format • Activity day withstations thatemphasize skillsneeded to play on36-foot court;emphasis on skillsand coordination
• Team-based events• Round robins• Non-eliminationevents
• Jr. Team Tennisleague play
• Round robin, compassdraws*
• Non-eliminationtournaments
• Jr. Team Tennisleague play
Length of event
Length ofmatches /scoring
1 hour
Short activity stationslasting no more than10 minutes
1-1/2 to 2 hours
• 10- to 15-minute timedmatches
• Matches consisting ofbest 2-out-of-3, 7-pointgames
• One 7-point game andthen switch partners
2 to 3 hours
• Timed matches• 2 out of 3 short set,first to 4 games,7-point game is usedin lieu of a third set
• One set to 4 gamesand then switchpartners
Volunteer needs • Ratio of 1 adult to 4children
• Parents, volunteers,high school students
• 1 volunteer per courtto help with scoringand teaching the rules
• Parents, volunteers,high school students
• 1 volunteer per courtto help with scoringand the rules
• Parents, volunteers,high school students
Awards Snacks, prizes for allattending
Small participationitems for everyone,snacks
Small participationitems for everyone;awards for goodsportsmanship, besteffort, shot of the day
*A compass draw is a format that gives players an opportunity to play a number of matches (similar to a doubleelimination tournament). It works best for eight- or 16-player draws where there are no byes. At the end of each round,the winners continue in their tournament in the same direction, while the losers move to other points on the compass toform a new satellite tournament. Go to the appendix for more on compass draws.
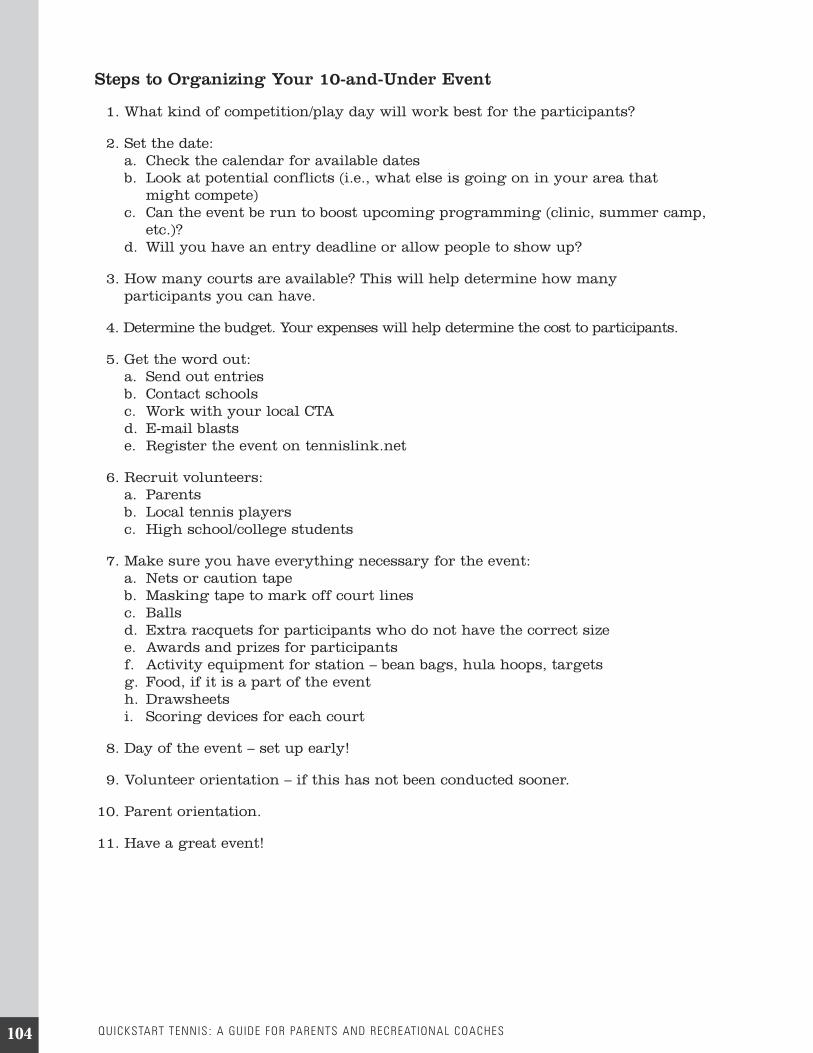
QUICKSTART TENNIS : A GUIDE FOR PARENTS AND RECREATIONAL COACHES104
Steps to Organizing Your 10-and-Under Event
1. What kind of competition/play day will work best for the participants?
2. Set the date:a. Check the calendar for available datesb. Look at potential conflicts (i.e., what else is going on in your area that
might compete)c. Can the event be run to boost upcoming programming (clinic, summer camp,
etc.)?d. Will you have an entry deadline or allow people to show up?
3. How many courts are available? This will help determine how manyparticipants you can have.
4. Determine the budget. Your expenses will help determine the cost to participants.
5. Get the word out:a. Send out entriesb. Contact schoolsc. Work with your local CTAd. E-mail blastse. Register the event on tennislink.net
6. Recruit volunteers:a. Parentsb. Local tennis playersc. High school/college students
7. Make sure you have everything necessary for the event:a. Nets or caution tapeb. Masking tape to mark off court linesc. Ballsd. Extra racquets for participants who do not have the correct sizee. Awards and prizes for participantsf. Activity equipment for station – bean bags, hula hoops, targetsg. Food, if it is a part of the eventh. Drawsheetsi. Scoring devices for each court
8. Day of the event – set up early!
9. Volunteer orientation – if this has not been conducted sooner.
10. Parent orientation.
11. Have a great event!
CHAPTER 9: USTA JR . TEAM TENNIS AND ITS BENEFITS 105
Chapter 9: USTA Jr. Team Tennis andIts Benefits
Children love team games, and more importantly, they love to be with theirfriends. As opposed to individual sports, team sports emphasize cooperation,teamwork, camaraderie and friendship—valuable skills at all stages of growth anddevelopment.
Playing on a team makes tennis more fun for kids. It allows them to practicetogether and travel to matches together, fostering team spirit and, along with it, alove of tennis. Players who play on teams generally enjoy tennis more, which meansthey are more apt to stick with tennis into middle school, high school and beyond.
Teams are also a great motivation for kids, who will want to become better so theycan do well for their team. USTA Jr. Team Tennis also provides the social interactionoften missing in singles tournaments—including youth team sports staples such asuniforms and pizza parties.
USTA Jr. Team Tennis is all about turning an individual sport into a team sport.Not only is it fun and social, it’s also practical. Team practices ensure that kidscontinue to develop their skills, and team matches give them a place to apply thelessons they’ve learned—so that while they’re learning, they’re also having a greattime with friends.
What Is USTA Jr. Team Tennis?Designed for 5- to 18-year-olds, USTA Jr. Team Tennis gets kids playing right
away on teams. It’s easy to organize. Only two teams are needed to start a league andleagues can be played at local parks, schools or clubs. Teams are composed of playersof similar ages so everyone gets to play with their friends and make new friends,too.
USTA Jr. Team Tennis offers five divisions of play: 8-and-under, 10-and-under, 12-and-under, 14-and-under, and 18-and-under. The 8- and 10-and-under divisions utilizethe QuickStart Tennis format described in Chapter 2 and apply the new skills taughtin Chapters 5 and 6. This format features age-appropriate equipment, smaller courtsizes and modified scoring.
The other three divisions (12-, 14- and 18-and-under) play on full-size courts anduse standard equipment and various play formats. In addition, for the 14- and 18-and-under divisions, teams have the option of playing locally only or competing inthe National Championships. (The required play format for the NationalChampionships is later in this chapter.)
QuickStart Tennis

QUICKSTART TENNIS : A GUIDE FOR PARENTS AND RECREATIONAL COACHES106
Start a Team
There are many USTA Jr. Team Tennis programs across the country, and youhave the option of joining an existing league in your community or starting yourown. Either way, it’s easy and rewarding. If you are interested in joining an existingteam, visit our website at jrteamtennis.usta.com to find a program in your area. Ifyou are looking to start a league, follow these four simple steps to start playing.
1. Evaluate Your Community
Court Availability. Based on the time of the year and the day of the week,court availability will vary. We recommend selecting times that giveparents an opportunity to participate and help coach a team.
Season. We recommend playing your team tennis season in thespring/summer or fall months.
Age Divisions. It is important to determine what age groups you aretargeting. Fair and competitive team play is easily achieved by using thefollowing age divisions:
• 8 and under• 10 and under• 12 and under• 14 and under• 18 and under
2. Establish Rules and Play Format
Rules. Beyond the basic rules of tennis, local leagues can establish theirown league regulations. It is best to keep regulations to a minimum, whilemaking certain that any ground rules are necessary and clearly spelled out.
Recommended Format. By playing USTA Jr. Team Tennis using theQuickStart Tennis format for players 10 and under, kids will progresswith their friends from smaller, age-appropriate-size courts and equip-ment to the full-size courts and equipment. As kids improve throughcompetition, they may explore additional play opportunities (for playersages 12-18).
3. Organize Your Local League
All tennis leagues require some type of organizational structure tomanage or administer their operation. This can be accomplished by oneperson or by a group of participants.
To run an effective league, you need to address the following areas:Administration (covers everything from court selection to setting theschedule), Budgets & Finance, League Fee Structure, Sponsorships andLiability.
The USTA provides powerful online tools to help you manage your league.By logging on to the TennisLink System athttp://tennislink.usta.com/teamtennis/main/homepage.aspx, you not onlyregister your league but also reduce paperwork while saving time.

CHAPTER 9: USTA JR . TEAM TENNIS AND ITS BENEFITS 107
4. Local Promotion
There are many ways to reach kids in your community, and all haveproven successful. Here are just a few options to explore:
Local Schools. Ask the principal and Parent-Teacher Association (PTA)leaders to disseminate information to kids.
Youth Service Organizations. Partner with the local boys and girls clubor other youth service organizations in your community.
Current Tennis Players. Many of your current players may have kids inyour target audience.
Advertising. Newspaper ads, postcards and online promotions all can beeffective tools in the recruiting process.
Do it with the Support of the USTAThe USTA wants to make it as easy as possible to get children involved in tennis.
To do so, we can provide access to the following resources to make it simple tobecome a USTA Jr. Team Tennis organizer (to access these resources, go tojrteamtennis.usta.com):
• Marketing materials for Jr. Team Tennis promotion
• TennisLink registration for league organization
• Established play formats and practice plans for all age groups
• Recreational coach workshops
• Scholarships and grants to help launch your program
• Official Jr. Team Tennis uniforms for each team
• Dedicated staff on a national, section and district level
National ChampionshipsUSTA Jr. Team Tennis offers youths in the 14- and 18-and-under age divisions the
opportunity to advance to a national championship at both the advanced and interme-diate levels. Each USTA section advances one team for each event (14-and-underIntermediate and Advanced, 18-and-under Intermediate and Advanced) for a total offour teams per section.
The National Championships introduce young players to competition in a way thatminimizes competitive stress and maximizes learning opportunities. The fun aspect oftennis and team spirit is always emphasized, and the goal of the competition is tobuild a strong foundation for both athletic success and personal achievement.
The championships also are designed to:
• Provide a competitive opportunity for maximizing each player’s physical andemotional development.

QUICKSTART TENNIS : A GUIDE FOR PARENTS AND RECREATIONAL COACHES108
• Promote the spirit of competition and camaraderie in such a way that the self-esteem of each player is enhanced and strengthened.
• Provide a national competitive climate that focuses more on personal develop-ment and less on competitive outcomes.
Teams are coed and made up of at least six players—three boys and three girls—based on similar ages and skills. Each team must meet all eligibility requirements.For complete rules, please see the USTA Jr. Team Tennis Regulations atjrteamtennis.usta.com or consult your USTA Section Coordinator.
Placement by Age and Skill LevelWithin USTA Jr. Team Tennis for the 12-, 14- and 18-and-under age divisions,
players are further divided into three play levels—Beginner (NTRP 2.0 and below),Intermediate (NTRP 3.0 and below) and Advanced (NTRP 3.5 and above).
Parents and coaches are asked to place players in the appropriate level of playusing NTRP levels. Players can always choose to move up to a higher age or skilllevel should they need the challenge.
The National Tennis Rating ProgramPlayers are placed on USTA Jr. Team Tennis teams based on their age and skill
level as determined by the National Tennis Rating Program (NTRP). The coach, teammanager and/or parent place players on teams, from the 12-and-under division onup. Use the following NTRP chart to help place your players (additional notes perlevel are added to aid you in placing players).
General Characteristics of Various NTRP Playing Levels
1.0 Player is just starting to play tennis and is learning the basic skills ofserving, forehands, backhands and volleys.
1.5 Player has limited experience and is working primarily on getting the ballin play.Note to team manager: Player needs to coordinate moving when hitting theball. In fact, player is still concentrating on getting the ball over the netfrom a stationary position. Player is learning to serve and keep score.
2.0 Player lacks court experience and strokes need developing. Player isfamiliar with the basic positions for singles and doubles play.Note to team manager: Player is now beginning to coordinate footwork butis not consistent in hitting the ball over the net. Player can serve to somedegree, understands scoring as well as correct positions for serving andreceiving, and has limited success with volleys.
2.5 Player is learning to judge where the ball is going, although court coverageis limited. Player can sustain a short rally of slow pace with other playersof the same ability.Note to team manager: Player can keep score unassisted, can call own lines,can serve overhand from the baseline and has an understanding of the basicrules.

CHAPTER 9: USTA JR . TEAM TENNIS AND ITS BENEFITS 109
3.0 Player is fairly consistent when hitting medium-paced shorts but is notcomfortable with all strokes and lacks execution when trying for directionalcontrol, depth or power. The most common doubles formation is one-up,one-back.Note to team manager: Player is improving court coverage and can sustaina rally and serve with consistency. On ground strokes, player needs toimprove control of height, depth, direction and speed.
3.5 Player has achieved improved stroke dependability with directional controlon moderate shots but needs to develop depth and variety. Player exhibitsmore aggressive net play, has improved court coverage and is developingteamwork in doubles.Note to team manager: Player is starting to recognize opportunities toattack short balls by coming to net. Player is developing more spin andpower on the serve and seldom double faults.
4.0 Player has dependable strokes, including directional control and depth onboth forehand and backhand sides on moderate-paced shots, and occasion-ally forces errors when serving. Rallies may be lost due to impatience.Teamwork in doubles is evident.Note to team manager: Player has added variety in shot selection by usinglobs, overheads, volleys and approach shots with some success. Player candevelop a game plan.
4.5 Player has developed use of power and spin and can handle pace. Player hassound footwork, can control depth of shots and attempts to vary game planaccording to his/her opponents. Player can hit first serves with power andaccuracy and place the second serve. Player tends to over-hit on difficultshots. Aggressive net play is common in doubles.Note to team manager: Player is developing an offensive weapon.
5.0 Player has good shot anticipation and frequently has an outstanding shotor attribute around which a game may be structured. Player can regularlyhit winners or force errors off short balls and can put away volleys. Playercan successfully execute lobs, drop shots, half volleys and overheadsmashes, and has good depth and spin on most second servesNote to team manager: Player is match-wise and uses shots that have ahigh percentage of success in both singles and doubles

QUICKSTART TENNIS : A GUIDE FOR PARENTS AND RECREATIONAL COACHES110
Players in WheelchairsPlayers in wheelchairs are encouraged to participate in USTA Jr. Team Tennis.
Integration—wheelchair players participating with able-bodied players—is the mainobjective. This practice is accepted and based on player ability. Players should usethese same general characteristics to determine their NTRP skill level. The onlydifferences are as follows:
• Mobility: While players in wheelchairs may have skills that would normallyprovide them a certain rating, the mobility factor suggests that when competingagainst able-bodied players, they should participate at an NTRP skill level thatprovides for competitive rather than compatible play.
• Serving ability: Due to the nature of the player’s injury or disability, a powerfulserve may not be possible. In this case, it may be more realistic to self-rate below3.5, as serve strength becomes key beyond this level.
• Two-Bounce Rule: The wheelchair tennis player is allowed two bounces of theball. The player must return the ball before it hits the ground a third time. Thesecond bounce can be either in or out of the court boundaries.

111APPENDIX
APPENDIX
Dynamic and Static StretchingIt is important to prepare your body before you play tennis and to treat it kindly
after you play. You can easily do this by following a simple warm-up exercise, pre-play stretching, warm-down exercise and post-play stretching routine. If you do this,you will have fewer injuries, feel better and recover sooner to play again the same orthe next day. As people age, this routine becomes even more important. It is alsoimportant for serious younger players who spend many hours on the tennis court.
Recent research has demonstrated that dynamic stretching (i.e., stretching withmovement) is best done before play, while static stretching (i.e., stretching withoutmovement) is best done after play. Static stretching done before play, which has beenrecommended in the past, may actually adversely affect the ability of the muscles toperform in an optimal way.
When exercising or stretching, it is important to avoid sudden, jerky movements.Finally, if you feel pain, stop doing the exercise or stretch and, if necessary, seekmedical attention. As with any exercise program, it is recommended that you consultyour physician before beginning.
In summary, the recommended exercise/stretch routine for tennis players is asfollows:
Before You Play Tennis• Warm-up Exercises• Dynamic Stretching
After You Play Tennis• Warm-down Exercises• Static Stretching
Before You Play TennisWarm-up Exercise
Begin with five minutes of warm-up activities such as walking, light jogging,jumping jacks or side shuffling. Mix the activities for variety. These activities shouldraise your body temperature, ready your heart and lungs for strenuous play andimprove overall muscle function. The goal should be to reach the point of beginningto perspire.
Dynamic StretchingA dozen dynamic stretches are described on the following pages. Optimally, you
should do all the stretches before you begin to play tennis. These dynamic stretchescombine stretching with movement. The illustrations provided will help you to do thestretches correctly.

112 QUICKSTART TENNIS : A GUIDE FOR PARENTS AND RECREATIONAL COACHES
Flexibility ExercisesDynamic Stretching
Straight-Leg March
Straight-Leg MarchTarget muscles: Hamstring (back of thigh) and hip muscles
Put your arms straight out in front of you at shoulder height.With your knees straight, lift one leg up toward your hands ashigh as you can without discomfort or until you feel a stretchin the back of the leg. March from singles sideline to singlessideline and back again, while maintaining good balance.
A
Toe and Heel Walks
Toe and Heel WalksTarget muscles: Calf and lower leg muscles
Walk on your toes from singles sideline to singles sideline.Repeat the same sequence walking on your heels.
S
Forward and Backward Hurdle
Forward and Backward HurdleTarget muscles: Inner and outer thigh
Move your right leg backward, up, and around to the front asif you were stepping over a hurdle that is approximately waisthigh. While alternating legs, walk from singles sideline tosingles sideline. Reverse the motion, so you are walkingbackward to the starting point.
Walking Side Hip StretchTarget muscles: Outer thigh
Facing the net, cross your right leg over the left leg and pushthe left hip out until you feel a light stretch in the outside ofyour hip. Stand up straight and step to the left with your leftfoot. Continue to “walk” sideways by repeating the stepsdescribed above. When you reach the singles sideline,reverse the movement and perform the exercise to the right.
F
Alternate Toe Touch
Alternate Toe TouchTarget muscles: Hamstring (back of thigh) and hip muscles
Stand with the left leg forward, while keeping the kneesstraight, but not locked. With your right hand, reach downtoward the left foot as far as is comfortable (if possible, to thefoot), to the point of feeling a light stretch in the back of yourleg. Then stand up all the way, step forward with the right legand reach for the right foot with the left hand. Walk fromsingles sideline to singles sideline and back again, alternatingreaching for the left foot with the right hand and reaching forthe right foot with the left hand. Be sure to stand up all theway between each step.
1
Long WalksTarget muscles: Hip flexors (front of hip) and quadriceps (front of thigh)
Long walking is walking with extra long steps. Whilewalking, keep your back leg nearly straight and move thehips forward to the point where you feel a light stretch atthe front of the hip on the same side as your back leg.Stretch both right and left hip flexors and quadriceps bywalking from singles sideline to singles sideline and backagain.
Long Walks

113APPENDIX
Wrist Circles
Wrist CirclesTarget muscles: Wrist flexors and extensors in the forearm
With both arms held out in front of your body at shoulderheight and with the palms facing down rotate your wrists inclockwise circles. Use the full range of motion in the wristswhen performing the circles so that you feel a slight stretch inthe forearm muscles. Perform 10 clockwise circle repetitions.Then reverse and rotate your wrists in counterclockwise circles.Do 10 repetitions.
Wrist Flexion and ExtensionTarget muscles: Wrist flexors and extensors in the forearm
Standing with both arms in front of your body at shoulderheight and with the palms facing the sky, alternate flexing andextending the wrists in a controlled manner. When flexing, bendthe hands toward the body and when extending, extend themaway from the body. Use the complete range of motion in thewrist so that you feel a stretch in the forearm muscles as youperform the exercise. The stretch should be felt in the backof the forearm as you flex the wrist and in the front of theforearm as you extend the wrist. Do 10 repetitions alternatingone flexion and one extension.
S
Wrist Flexion and Extension
(flexion) (extension)
Standing Trunk RotationsTarget muscles: Abdominal and lower back muscles
Stand with your feet shoulder width apart and your hands onyour hips. Then rotate your torso by leaning forward from thewaist, then moving to the left, to the back, and to the right.Do 10 repetitions at a speed and range of motion that iscomfortable for you. Then reverse the direction by moving firstto the front, then to the right, to the back, and to the left for10 repetitions.
Diagonal ChopsTarget muscles: Abdominal and lower back muscles
Stand up straight with your feet shoulder width apart andhold your arms together in front of you at shoulder height.Link your hands together and make a chopping movement(as if you are swinging an axe) as you rotate your body tothe left and bring your hands down to the left of your legs.Stand up straight and repeat the exercise on the right sideof the body. Perform 10 repetitions of one chop to the leftand one to the right.
Diagonal ChopsStanding Trunk Rotation
Forward and Backward Arm CirclesTarget muscles: Deltoid muscles and rotatorcuff of the shoulder
Hold your arms out to your sides at shoulder height withpalms down and rotate them in small forward circles about6 inches in diameter. Perform 10 forward circles and 10backward circles. Then do 10 forward and 10 backwardlarge arm circles, using the shoulders’ full range of motion—you should feel a slight stretch in the shoulders as youperform the exercise.
90–90 Internal/External RotationTarget muscles: Rotator cuff of the shoulder
With your arms held out to your sides at shoulder height,bend the elbow 90 degrees so your fingers point uptoward the sky. Using the shoulders’ full range of motion,rotate your shoulders forward once and then backwardonce in a controlled manner. Do 10 repetitions.
U
Forward and Backward Arm Circles

114 QUICKSTART TENNIS : A GUIDE FOR PARENTS AND RECREATIONAL COACHES
Static Stretching
Knee-Chest Flex
In a standing position, bend one leg and grasp itwith both hands clasped just below the knee.Slowly pull the knee to your chest. Hold thisposition (and all the positions in the followingexercises) for 15 to 30 seconds.
Hamstring Stretch
In a lying position on your back, bend both knees.Straighten one leg and raise it toward the trunk. Useyour hands to gently increase the stretch. Point yourtoes toward the face to stretch the calf.
Spinal Twist
Figure 4 Hamstring Stretch
In a sitting position, place the foot of the right leg against theinside of the knee of the left leg. Try to bring the chest to thethigh by bending forward from the hips. Keep the backstraight. Pull your toes back to point toward your face.
Spinal Twist
In a sitting position, place the right foot on the outside of theleft knee. Bring the left arm around the right knee, resting theelbow above the outside of the right knee. Slowly turn thehead and upper body to the right. You’ll wind up lookingover your right shoulder.
Q
Figure 4 Hamstring Stretch
Groin Stretch
Quadriceps Stork Stretch
If necessary for support, place one hand on a wall to theside of you. Stand on one leg. Bend the opposite knee whilegrasping the ankle. Keeping the back straight and thebuttocks tucked under, bring your knee down as far as youcan, trying to point it straight down to the floor. Do not turnthe knee out or twist it.
Groin Stretch
Stand with legs greater than shoulder width apart. Placeone hand above the knee, the other hand on the oppositehip. With toes pointed forward, slowly bend the knee yourhand is on until you feel a stretch in the groin area. Rollyour weight onto the inside of your foot.

115APPENDIX
Hip Stretch
Stand with your right hand on a wall, your weight on yourright leg, and your left leg crossed in front of it. Gentlypush the right hip toward the wall. Increase the stretchby standing farther from the wall.
S
Calf Stretch
Place both hands on a wall in front of you. Extend one legbehind you, while keeping the other forward. Keep the kneeof the back leg straight, the heel on the floor, and the footpointing forward. Bend the knee of the forward leg and leanyour trunk forward. Do not arch the lower back. Then slightlybend the back leg, raise the heel 2 inches off the floor, andlean into the wall. This time, feel the stretch near the heel.
FShoulder Stretch
With your left hand, hold a racquet behind your back by thethroat or the handle with the head of the racquet pointingdown. With your right hand, slowly pull the racquet headdown, bringing your left elbow to your ear and pointing it tothe ceiling. Then slowly pull up with the left arm, pointing thelower elbow to the floor.
Shoulder Stretch
Forearm Stretch
Extend one arm straight in front of you with the palm up.Use the opposite hand to gently stretch the wrist back(extension). Turn the palm down and gently stretch thewrist downward (flexion).
Forearm Stretch
(flexion)
(extension)

QUICKSTART TENNIS : A GUIDE FOR PARENTS AND RECREATIONAL COACHES116
Compass DrawThis is a wonderful format to give players an opportunity to play lots of matches.
It also can accommodate different ability levels in one draw. It works best for eight,16, 32 or 64 players so that there are no byes are in the draw.
At the end of each round, the winners continue in their tournament in the samedirection, while the losers move to other points on the compass to form a new satel-lite tournament.
At the end of round 1:• The winners go east• The losers go west
At the end of round 2:• The east losers go north• The west losers go south
At the end of round 3:• The east losers go northeast• The north losers go northwest• The west losers go southwest• The south losers go southeast
At the end of round 4:• The losers are out of the tournament (unless it is announced in writing beforethe start of the first match of the tournament that there will be semifinal play-offs);
• The winners play the finals on each draw sheet.
For a draw of 16 use only the top half of the draw at each compass point. Followthe same procedure as in a draw of 32 except that round 4 is the finals instead of thesemifinals.
For a draw of 64 use two 32 draw sheets. Round 4 becomes the quarterfinals ofeach tournament instead of the semifinals. At the end of Round 4, all losers are outof the tournament. The draw sheet tournaments continue with their own semifinalmatches until there is an eventual winner for each (The losers of the semifinals areout of the tournament).
On the following pages are examples of a 32-, a 16- and an eight-player compassdraw.

APPENDIX 117
8 Player Compass Draw Sheet

QUICKSTART TENNIS : A GUIDE FOR PARENTS AND RECREATIONAL COACHES118
16 Player Compass Draw Sheet
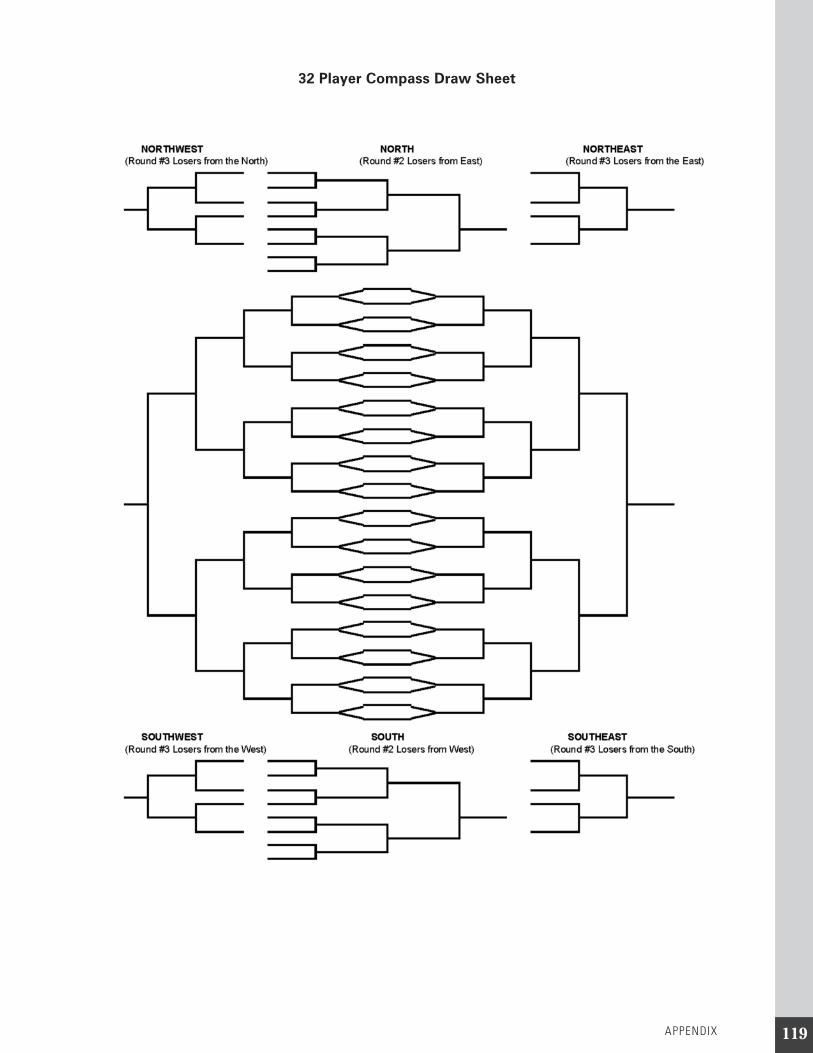
APPENDIX 119
32 Player Compass Draw Sheet

120 QUICKSTART TENNIS : A GUIDE FOR PARENTS AND RECREATIONAL COACHES
ResourcesSuppliers of Tennis Equipment
The following companies and vendors are suppliers of junior racquets, shortcourts, teaching aids, transition balls and entry-level tennis kits.
Dunlop Sports Group America116 South Pleasantburg DriveGreenville, SC 29607888-215-1530864-552-4000864-552-4032 (fax)Email: [email protected]
Gamma Sports200 Waterfront DrivePittsburgh, PA 15222800-333-0337412-323-0335800-274-0317 (fax)[email protected]
Gopher Sport220 24th Avenue NWP.O. Box 998Owatonna, MN 55060-0998800-533-0446800-451-4855 (fax)www.gophersport.com
Head/Penn Racquet Sports306 S. 45th AvenuePhoenix, AZ 85043800-289-1497602-269-1492602-484-0533 (fax)[email protected]
Prince Sports, Inc.1 Advantage CourtBordentown, NJ 08505800-2-TENNIS609-291-5800609-291-5902 (fax)www.princetennis.com

121APPENDIX
Oncourt Offcourt6301 Gaston Avenue, Suite 650Dallas, TX 7521488-TENNIS-11214-823-3078214-823-3082 (fax)[email protected]/
Rocky Mountain Sports (Tretorn)650 South Taylor AvenueLouisville, CO 80027800-525-2852303-444-5340303-444-7526 (fax)[email protected]
Wilson Racquet Sports8700 West Bryn Mawr Avenue, 10th FloorChicago, IL 60631800-333-8326773-714-6400800-272-6062 (fax)[email protected]
BooksAmerican Sport Education Program, Coaching Youth Tennis, 3rd edition.
Champaign, IL, Human Kinetics, 2002.
United States Professional Tennis Association, The Complete Guide-USPTALittle Tennis. USPTA, Houston,1998.
United States Tennis Association, Friend at Court: The USTA Handbook ofTennis Rules and Regulations, 2007 edition. USTA, White Plains, NY, 2007.
United States Tennis Association, Illustrated Introduction to the Rules ofTennis, 2nd edition. USTA, White Plains, NY, 2006.
VideotapesBackboard Tennis, United States Tennis Association, White Plains, NY, 1998.
Games Approach to Coaching Tennis, United States Tennis Association, WhitePlains, NY, 2002.
Teaching Group Tennis, United States Tennis Association, White Plains, NY, 1998.

122122 QUICKSTART TENNIS : A GUIDE FOR PARENTS AND RECREATIONAL COACHES
OrganizationsProfessional Tennis RegistryP.O. Box 4739Hilton Head Island, SC 29938800-421-6289
United States Professional Tennis Association3535 Briarpark DriveHouston, TX 77042800-877-8248
United States Tennis Association70 West Red Oak LaneWhite Plains, NY 10604914-696-7000
For more information on the different programs found in this book—includingQuickStart Tennis, Jr. Team Tennis and more—go to USTA.com or call the USTANational Office at 914-696-7000.