terabee lora level monitorin g xl integration with th e
TRANSCRIPT
Terabee LoRa Level Monitoring XL
Integration with The Things
Network (TTN) server
v1.0
Technical support: [email protected] and commercial support: [email protected]
Table of contentsIntroduction 3
Symbols explanation 3
Device integration with The Things Network 4The Things Network (TTN) account 4Creating a New Application 5Creating a New Device 6OTAA vs ABP as activation methods 11Testing network connection 11Receiving data from Terabee device to TTN server 12Decoding uplink payload 14
Appendix A 16General uplink payload structure 16
Error codes (byte 5) bit structure 16Uplink payload decoding function 16
Copyright © Terabee 2021Terabee, 90 Rue Henri Fabre01630, St Genis-Pouilly, France (next to CERN)
2/17
IntroductionThe purpose of this document is to give guidelines for Terabee LoRa Level Monitoring XLdevice (further in text referred as Terabee device) integration with the The Things Network(TTN) server. This includes instructions on device registration and setup, receiving uplinkframes as well as decoding the payload.
Symbols explanation
The following symbols are used within the document:
This symbol indicates important messages or specific recommendations in orderto operate the product in the intended manner
Copyright © Terabee 2021Terabee, 90 Rue Henri Fabre01630, St Genis-Pouilly, France (next to CERN)
3/17
Device integration with The Things Network
The Things Network (TTN) account
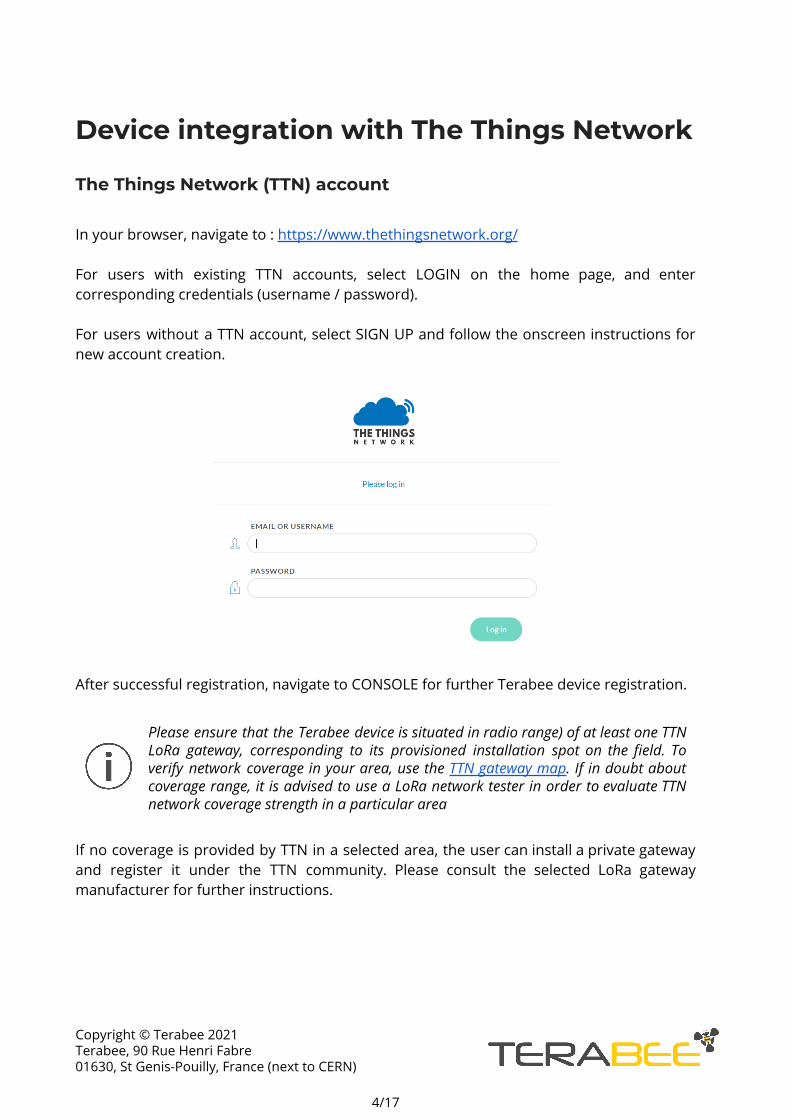
In your browser, navigate to : https://www.thethingsnetwork.org/
For users with existing TTN accounts, select LOGIN on the home page, and entercorresponding credentials (username / password).
For users without a TTN account, select SIGN UP and follow the onscreen instructions fornew account creation.
After successful registration, navigate to CONSOLE for further Terabee device registration.
Please ensure that the Terabee device is situated in radio range) of at least one TTNLoRa gateway, corresponding to its provisioned installation spot on the field. Toverify network coverage in your area, use the TTN gateway map. If in doubt aboutcoverage range, it is advised to use a LoRa network tester in order to evaluate TTNnetwork coverage strength in a particular area
If no coverage is provided by TTN in a selected area, the user can install a private gatewayand register it under the TTN community. Please consult the selected LoRa gatewaymanufacturer for further instructions.
Copyright © Terabee 2021Terabee, 90 Rue Henri Fabre01630, St Genis-Pouilly, France (next to CERN)
4/17
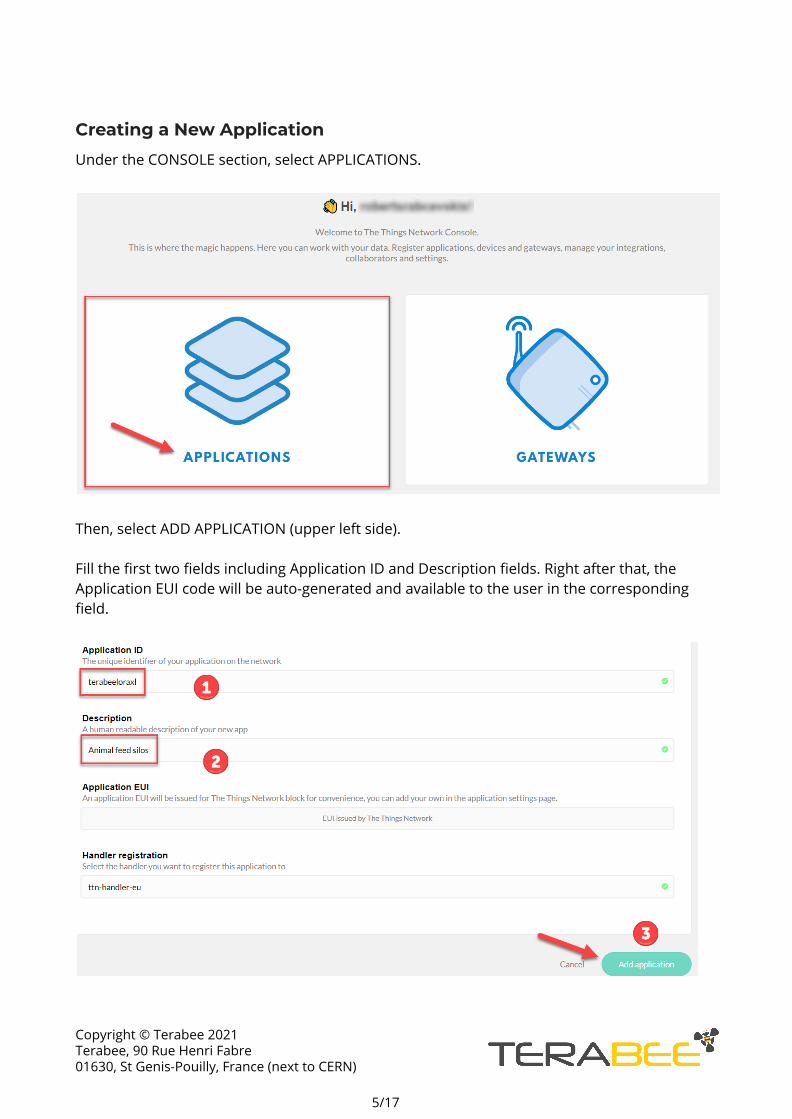
Creating a New Application
Under the CONSOLE section, select APPLICATIONS.
Then, select ADD APPLICATION (upper left side).
Fill the first two fields including Application ID and Description fields. Right after that, theApplication EUI code will be auto-generated and available to the user in the correspondingfield.
Copyright © Terabee 2021Terabee, 90 Rue Henri Fabre01630, St Genis-Pouilly, France (next to CERN)
5/17
For the handler registration field, it is advised to select the geographically closest TTNserver in the region. For Europe, this is ttn-handler-eu (default).
Once all fields are filled, click on ADD APPLICATION at the bottom right part of the page.
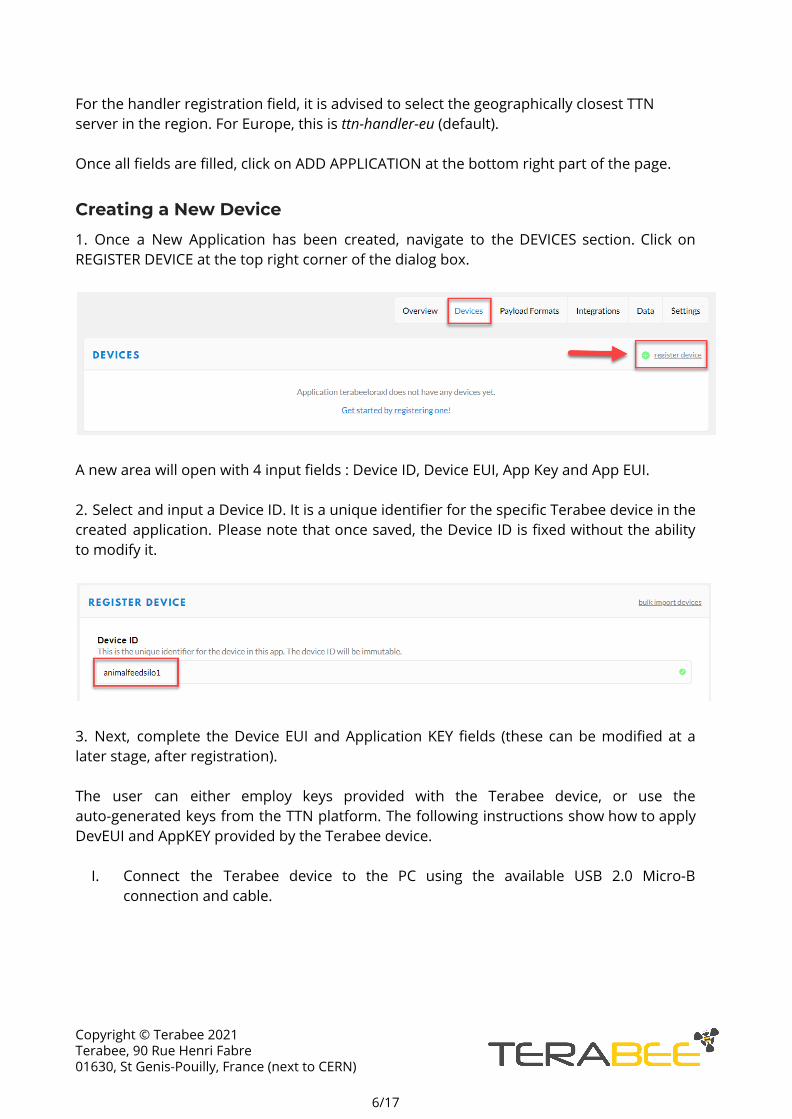
Creating a New Device
1. Once a New Application has been created, navigate to the DEVICES section. Click onREGISTER DEVICE at the top right corner of the dialog box.
A new area will open with 4 input fields : Device ID, Device EUI, App Key and App EUI.
2. Select and input a Device ID. It is a unique identifier for the specific Terabee device in thecreated application. Please note that once saved, the Device ID is fixed without the abilityto modify it.
3. Next, complete the Device EUI and Application KEY fields (these can be modified at alater stage, after registration).
The user can either employ keys provided with the Terabee device, or use theauto-generated keys from the TTN platform. The following instructions show how to applyDevEUI and AppKEY provided by the Terabee device.
I. Connect the Terabee device to the PC using the available USB 2.0 Micro-Bconnection and cable.
Copyright © Terabee 2021Terabee, 90 Rue Henri Fabre01630, St Genis-Pouilly, France (next to CERN)
6/17
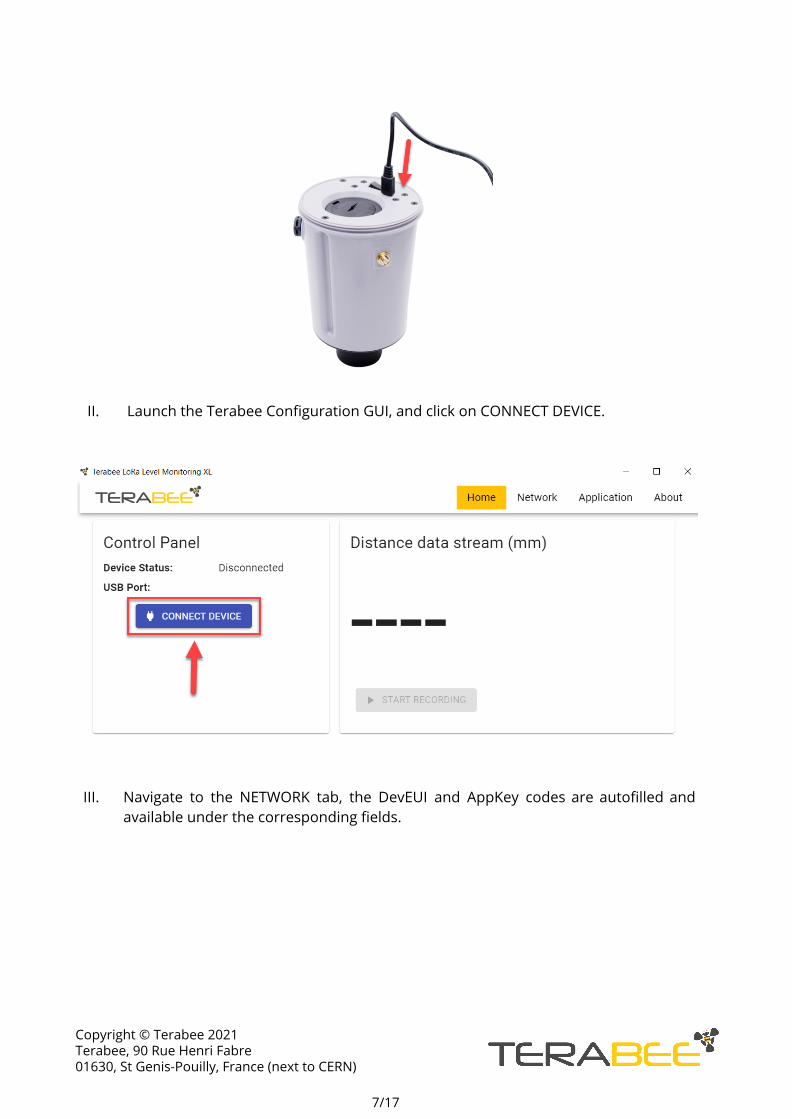
II. Launch the Terabee Configuration GUI, and click on CONNECT DEVICE.
III. Navigate to the NETWORK tab, the DevEUI and AppKey codes are autofilled andavailable under the corresponding fields.
Copyright © Terabee 2021Terabee, 90 Rue Henri Fabre01630, St Genis-Pouilly, France (next to CERN)
7/17
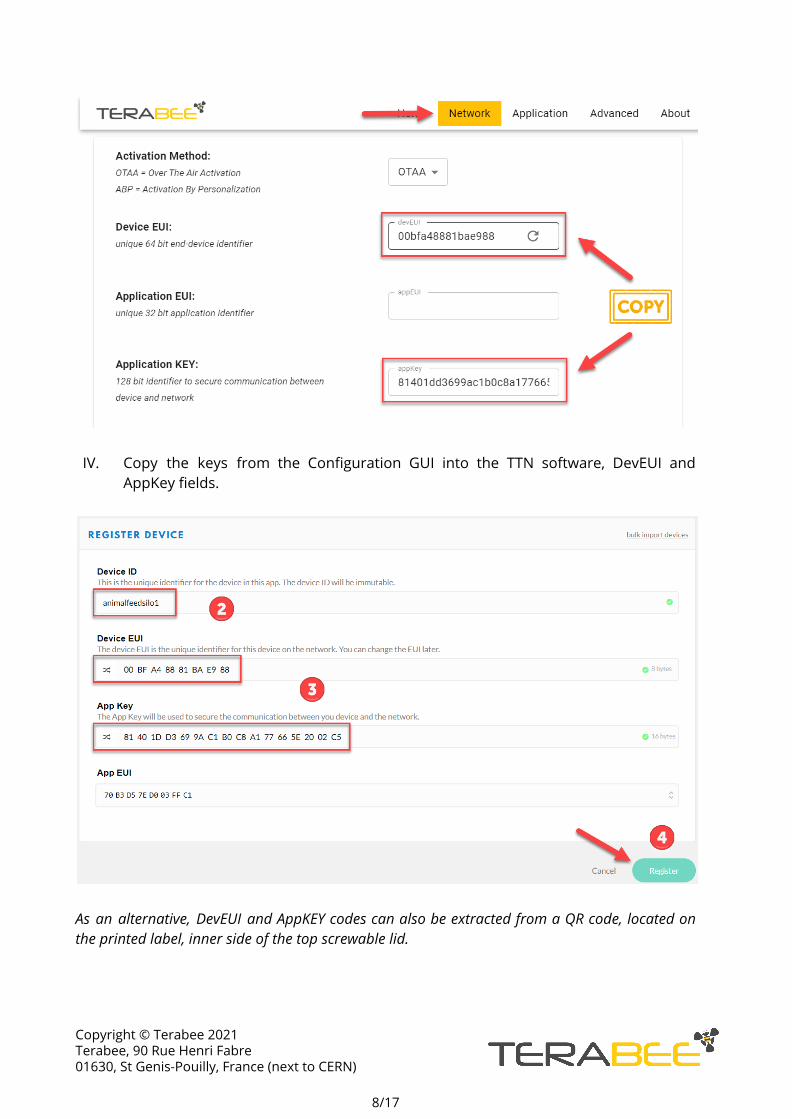
IV. Copy the keys from the Configuration GUI into the TTN software, DevEUI andAppKey fields.
As an alternative, DevEUI and AppKEY codes can also be extracted from a QR code, located onthe printed label, inner side of the top screwable lid.
Copyright © Terabee 2021Terabee, 90 Rue Henri Fabre01630, St Genis-Pouilly, France (next to CERN)
8/17
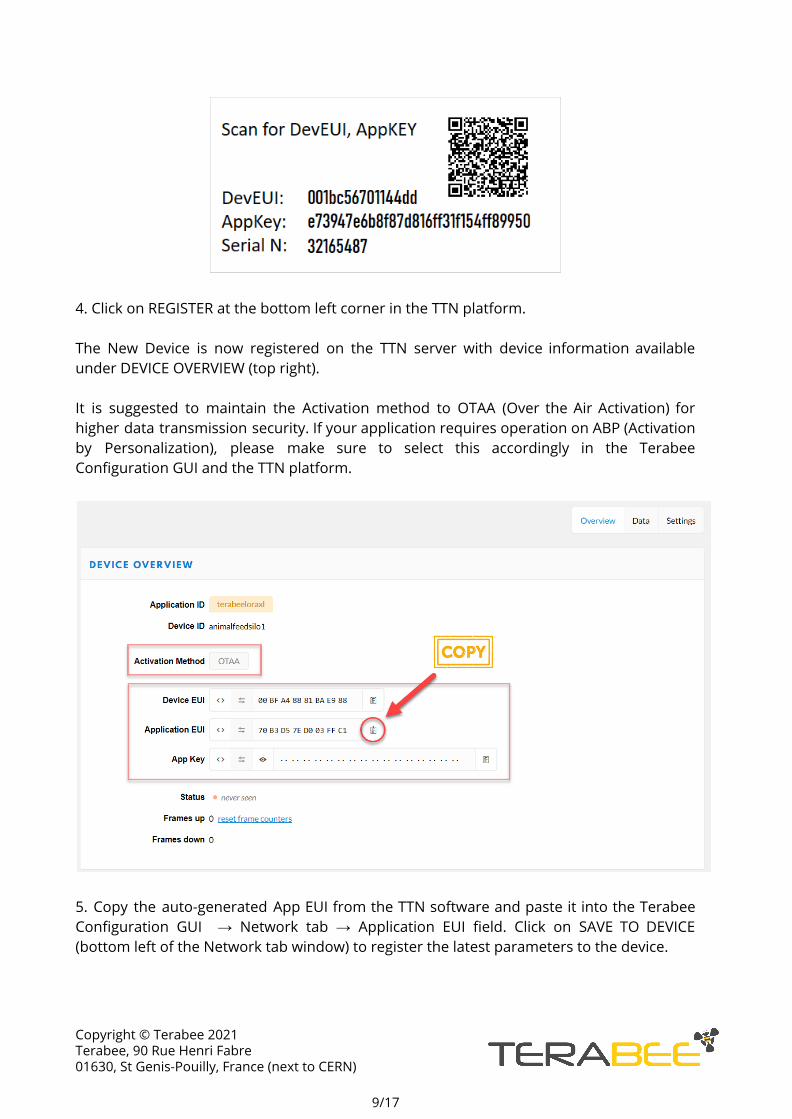
4. Click on REGISTER at the bottom left corner in the TTN platform.
The New Device is now registered on the TTN server with device information availableunder DEVICE OVERVIEW (top right).
It is suggested to maintain the Activation method to OTAA (Over the Air Activation) forhigher data transmission security. If your application requires operation on ABP (Activationby Personalization), please make sure to select this accordingly in the TerabeeConfiguration GUI and the TTN platform.
5. Copy the auto-generated App EUI from the TTN software and paste it into the TerabeeConfiguration GUI → Network tab → Application EUI field. Click on SAVE TO DEVICE(bottom left of the Network tab window) to register the latest parameters to the device.
Copyright © Terabee 2021Terabee, 90 Rue Henri Fabre01630, St Genis-Pouilly, France (next to CERN)
9/17
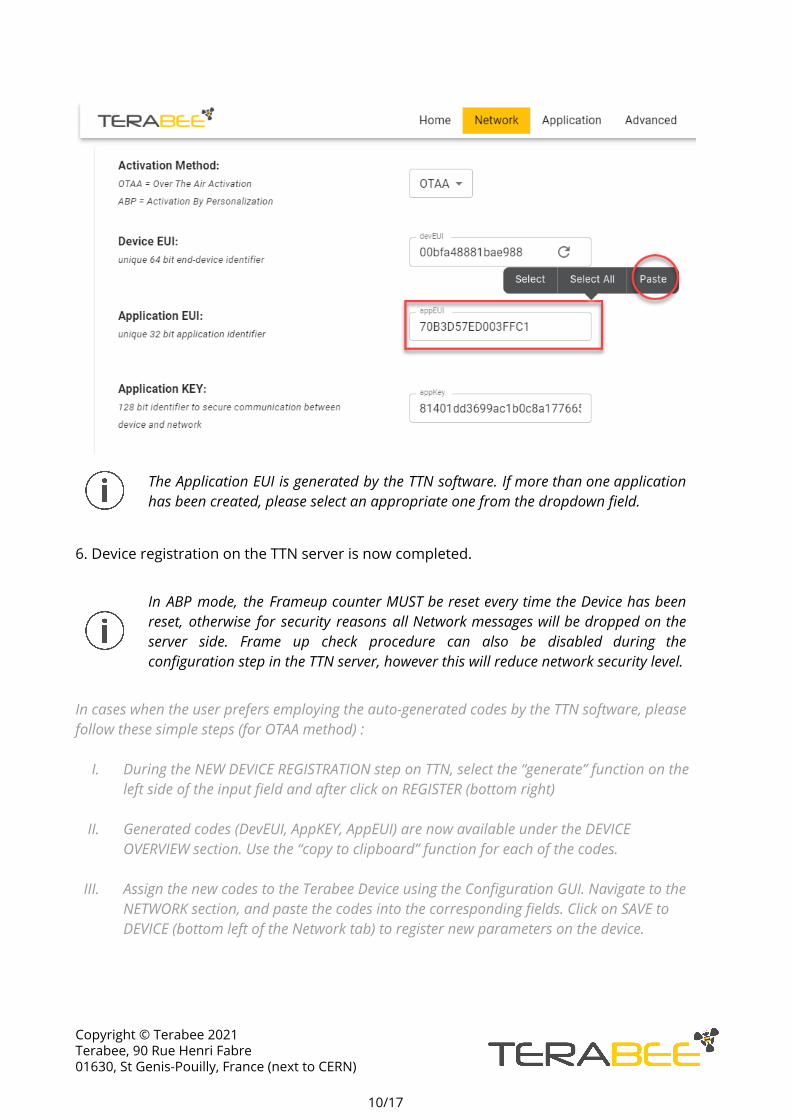
The Application EUI is generated by the TTN software. If more than one applicationhas been created, please select an appropriate one from the dropdown field.
6. Device registration on the TTN server is now completed.
In ABP mode, the Frameup counter MUST be reset every time the Device has beenreset, otherwise for security reasons all Network messages will be dropped on theserver side. Frame up check procedure can also be disabled during theconfiguration step in the TTN server, however this will reduce network security level.
In cases when the user prefers employing the auto-generated codes by the TTN software, pleasefollow these simple steps (for OTAA method) :
I. During the NEW DEVICE REGISTRATION step on TTN, select the “generate” function on theleft side of the input field and after click on REGISTER (bottom right)
II. Generated codes (DevEUI, AppKEY, AppEUI) are now available under the DEVICEOVERVIEW section. Use the “copy to clipboard” function for each of the codes.
III. Assign the new codes to the Terabee Device using the Configuration GUI. Navigate to theNETWORK section, and paste the codes into the corresponding fields. Click on SAVE toDEVICE (bottom left of the Network tab) to register new parameters on the device.
Copyright © Terabee 2021Terabee, 90 Rue Henri Fabre01630, St Genis-Pouilly, France (next to CERN)
10/17

OTAA vs ABP as activation methods
Over-the-Air Activation (OTAA) is the preferred and most secure way to connect with TheThings Network. Devices perform a join-procedure with the network, during which adynamic DevAddr is assigned and security keys are negotiated with the device.
In some cases you might need to hardcode the DevAddr as well as the security keys in thedevice. This means Activating a device by Personalization (ABP). This strategy mightseem simpler, because you skip the join procedure, but it has some downsides related tosecurity.
Source : TheThingsNetwork, Addressing & Activation
Testing network connection
The Terabee Configuration GUI provides users with the possibility to test connectionbetween the Terabee device and surrounding gateway/s.
1. In the GUI, under the Network tab, click on TEST NETWORK (bottom right).
The Terabee device will initiate a join request procedure, exchanging unique identifierswith the network server. After a successful connection, an uplink message will be sent fromthe device with a test payload info “BBBB”. The device will then wait for anacknowledgement via downlink from the server.
The whole network test step can be monitored on the TTN platform, under the DATA fieldof the Device. An example of network join request & uplink frame is provided below.
Copyright © Terabee 2021Terabee, 90 Rue Henri Fabre01630, St Genis-Pouilly, France (next to CERN)
11/17
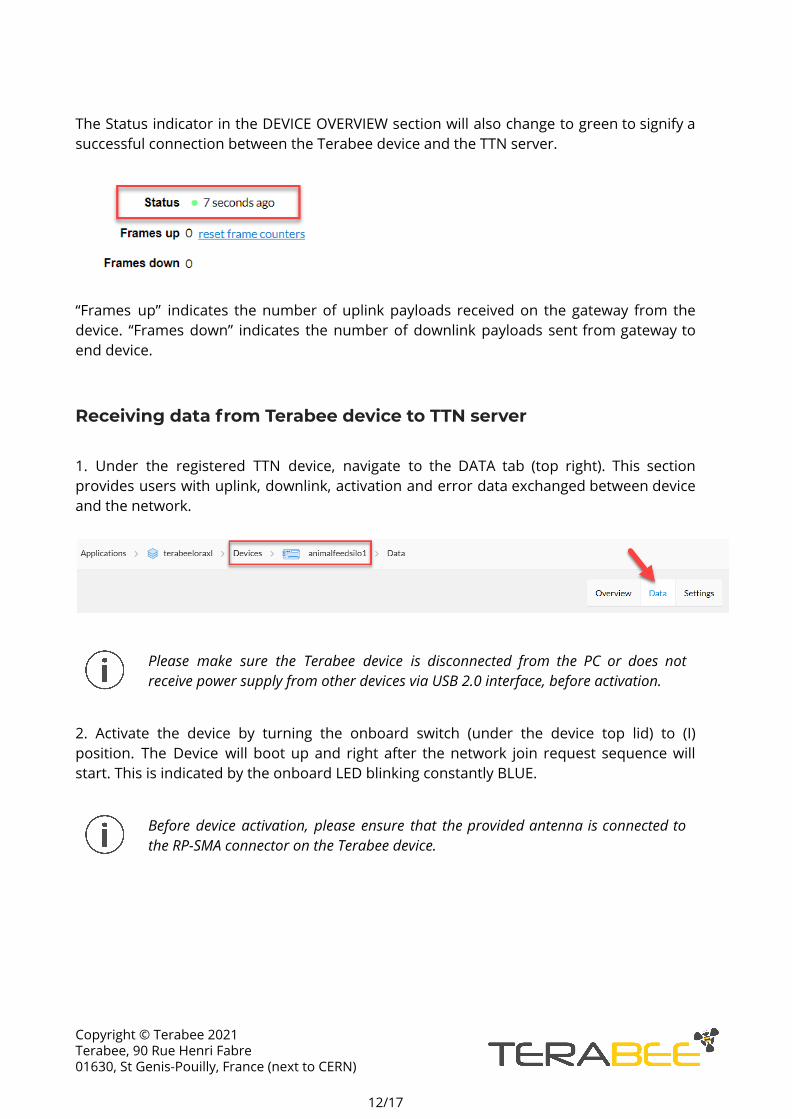
The Status indicator in the DEVICE OVERVIEW section will also change to green to signify asuccessful connection between the Terabee device and the TTN server.
“Frames up” indicates the number of uplink payloads received on the gateway from thedevice. “Frames down” indicates the number of downlink payloads sent from gateway toend device.
Receiving data from Terabee device to TTN server
1. Under the registered TTN device, navigate to the DATA tab (top right). This sectionprovides users with uplink, downlink, activation and error data exchanged between deviceand the network.
Please make sure the Terabee device is disconnected from the PC or does notreceive power supply from other devices via USB 2.0 interface, before activation.
2. Activate the device by turning the onboard switch (under the device top lid) to (I)position. The Device will boot up and right after the network join request sequence willstart. This is indicated by the onboard LED blinking constantly BLUE.
Before device activation, please ensure that the provided antenna is connected tothe RP-SMA connector on the Terabee device.
Copyright © Terabee 2021Terabee, 90 Rue Henri Fabre01630, St Genis-Pouilly, France (next to CERN)
12/17
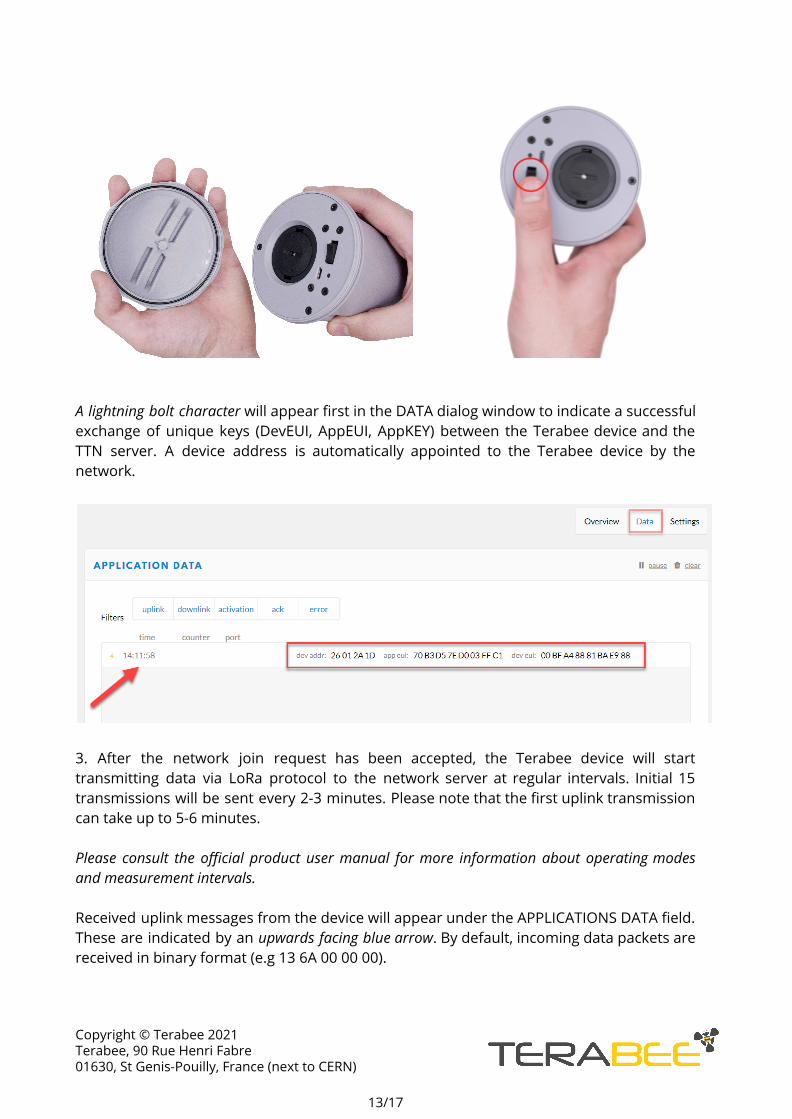
A lightning bolt character will appear first in the DATA dialog window to indicate a successfulexchange of unique keys (DevEUI, AppEUI, AppKEY) between the Terabee device and theTTN server. A device address is automatically appointed to the Terabee device by thenetwork.
3. After the network join request has been accepted, the Terabee device will starttransmitting data via LoRa protocol to the network server at regular intervals. Initial 15transmissions will be sent every 2-3 minutes. Please note that the first uplink transmissioncan take up to 5-6 minutes.
Please consult the official product user manual for more information about operating modesand measurement intervals.
Received uplink messages from the device will appear under the APPLICATIONS DATA field.These are indicated by an upwards facing blue arrow. By default, incoming data packets arereceived in binary format (e.g 13 6A 00 00 00).
Copyright © Terabee 2021Terabee, 90 Rue Henri Fabre01630, St Genis-Pouilly, France (next to CERN)
13/17
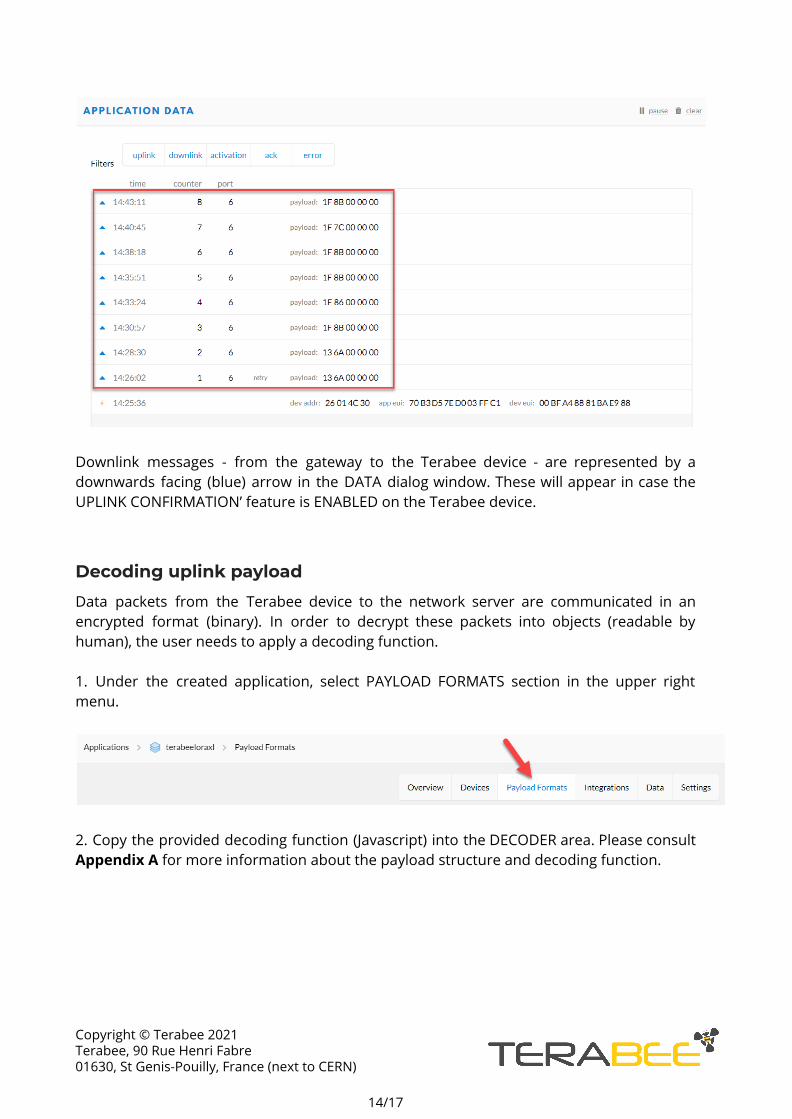
Downlink messages - from the gateway to the Terabee device - are represented by adownwards facing (blue) arrow in the DATA dialog window. These will appear in case theUPLINK CONFIRMATION’ feature is ENABLED on the Terabee device.
Decoding uplink payload
Data packets from the Terabee device to the network server are communicated in anencrypted format (binary). In order to decrypt these packets into objects (readable byhuman), the user needs to apply a decoding function.
1. Under the created application, select PAYLOAD FORMATS section in the upper rightmenu.
2. Copy the provided decoding function (Javascript) into the DECODER area. Please consultAppendix A for more information about the payload structure and decoding function.
Copyright © Terabee 2021Terabee, 90 Rue Henri Fabre01630, St Genis-Pouilly, France (next to CERN)
14/17

3. Before saving the decoding function, the user has the possibility to test it. To do so, copyone of the uplink data payloads previously received from the DATA field and paste it intothe PAYLOAD TEST field.
Click on TEST. An example of decoded payload - received from the Terabee device - shouldnow be available in the payload dialog window.
4. Click on SAVE PAYLOAD FUNCTIONS (bottom left side of the window) to apply andregister the newly added decoding function.
For every new uplink message received, the DATA dialog box will now also display thedecoded information (objects) in addition to the binary payload.
Copyright © Terabee 2021Terabee, 90 Rue Henri Fabre01630, St Genis-Pouilly, France (next to CERN)
15/17
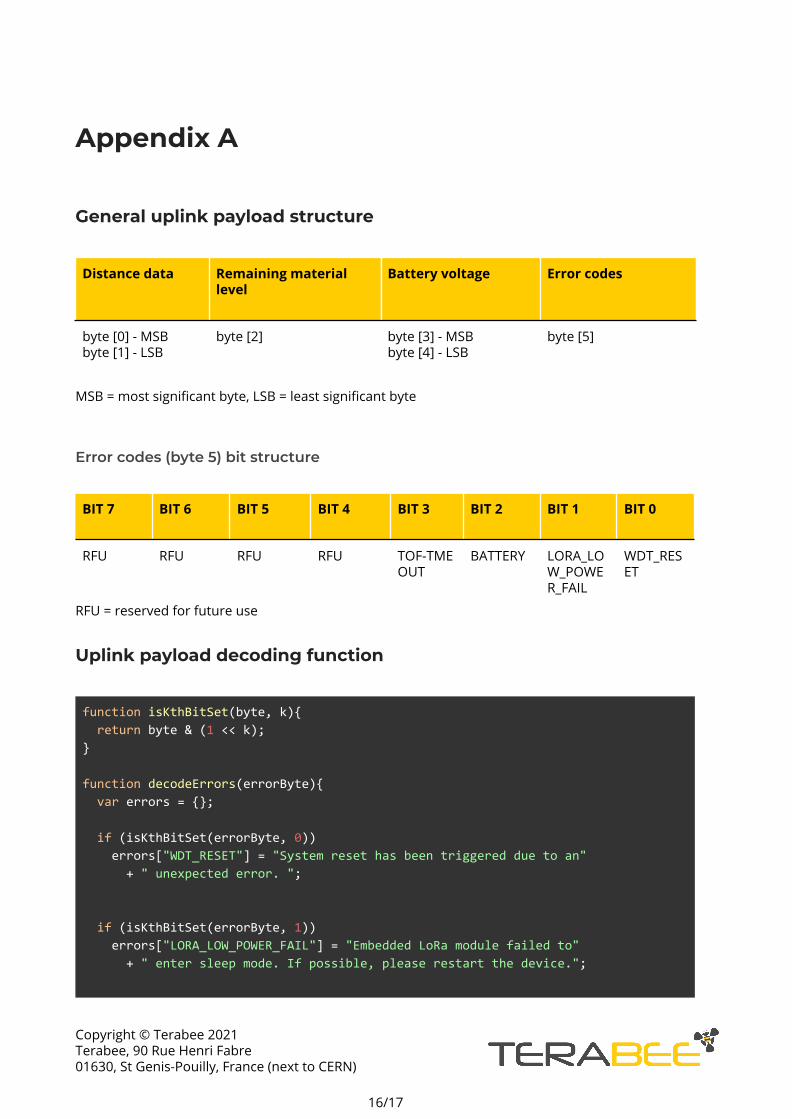
Appendix A
General uplink payload structure
Distance data Remaining materiallevel
Battery voltage Error codes
byte [0] - MSBbyte [1] - LSB
byte [2] byte [3] - MSBbyte [4] - LSB
byte [5]
MSB = most significant byte, LSB = least significant byte
Error codes (byte 5) bit structure
BIT 7 BIT 6 BIT 5 BIT 4 BIT 3 BIT 2 BIT 1 BIT 0
RFU RFU RFU RFU TOF-TMEOUT
BATTERY LORA_LOW_POWER_FAIL
WDT_RESET
RFU = reserved for future use
Uplink payload decoding function
function isKthBitSet(byte, k){
return byte & (1 << k);
}
function decodeErrors(errorByte){
var errors = {};
if (isKthBitSet(errorByte, 0))
errors["WDT_RESET"] = "System reset has been triggered due to an"
+ " unexpected error. ";
if (isKthBitSet(errorByte, 1))
errors["LORA_LOW_POWER_FAIL"] = "Embedded LoRa module failed to"
+ " enter sleep mode. If possible, please restart the device.";
Copyright © Terabee 2021Terabee, 90 Rue Henri Fabre01630, St Genis-Pouilly, France (next to CERN)
16/17
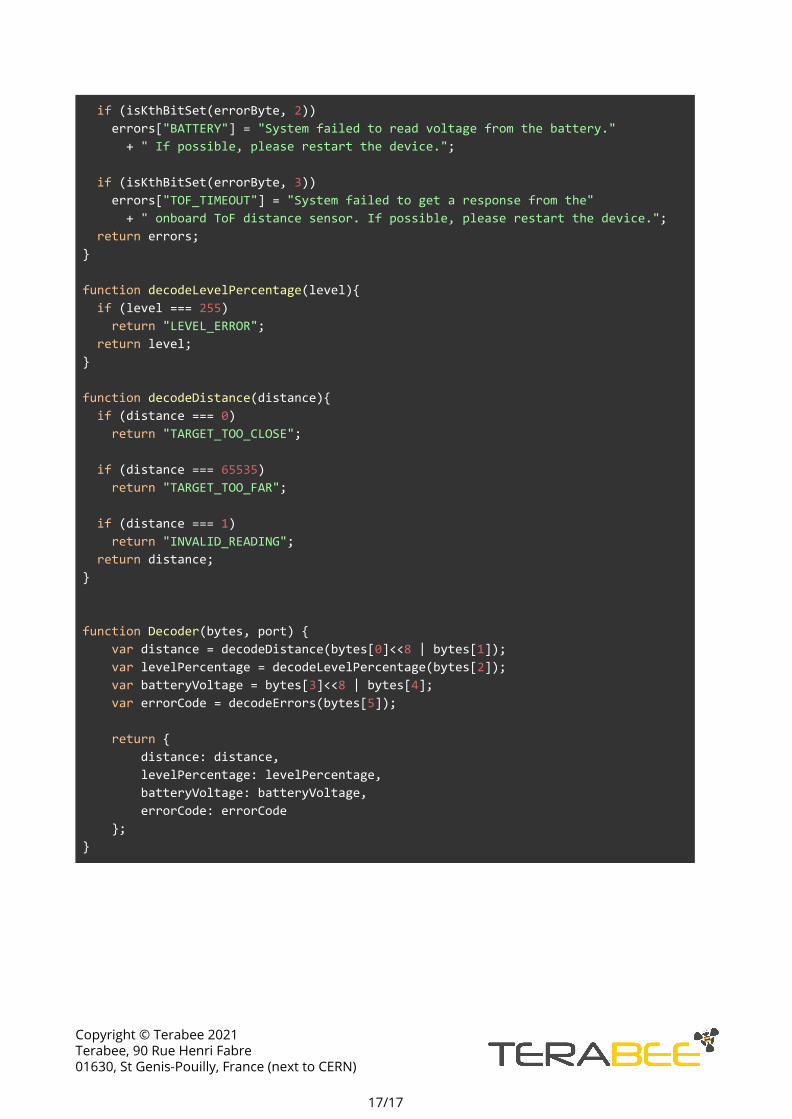
if (isKthBitSet(errorByte, 2))
errors["BATTERY"] = "System failed to read voltage from the battery."
+ " If possible, please restart the device.";
if (isKthBitSet(errorByte, 3))
errors["TOF_TIMEOUT"] = "System failed to get a response from the"
+ " onboard ToF distance sensor. If possible, please restart the device.";
return errors;
}
function decodeLevelPercentage(level){
if (level === 255)
return "LEVEL_ERROR";
return level;
}
function decodeDistance(distance){
if (distance === 0)
return "TARGET_TOO_CLOSE";
if (distance === 65535)
return "TARGET_TOO_FAR";
if (distance === 1)
return "INVALID_READING";
return distance;
}
function Decoder(bytes, port) {
var distance = decodeDistance(bytes[0]<<8 | bytes[1]);
var levelPercentage = decodeLevelPercentage(bytes[2]);
var batteryVoltage = bytes[3]<<8 | bytes[4];
var errorCode = decodeErrors(bytes[5]);
return {
distance: distance,
levelPercentage: levelPercentage,
batteryVoltage: batteryVoltage,
errorCode: errorCode
};
}
Copyright © Terabee 2021Terabee, 90 Rue Henri Fabre01630, St Genis-Pouilly, France (next to CERN)
17/17