tetris inspired modular lamp
DESCRIPTION
tetris inspired modular lampTRANSCRIPT
http://www.instructables.com/id/Tetris-Inspired-Modular-Lamp/
technology workshop craft home food play outside costumes
Tetris-Inspired Modular Lampby watchmeflyy on March 26, 2016
Table of Contents
Tetris-Inspired Modular Lamp . . . . . . . . . . . . . . . . . . . . . . . . . . . . . . . . . . . . . . . . . . . . . . . . . . . . . . . . . . . . . . . . . . . . . . . . . . . . . . . . . . . . . . . . . . . . . . . . . . . . 1
Intro: Tetris-Inspired Modular Lamp . . . . . . . . . . . . . . . . . . . . . . . . . . . . . . . . . . . . . . . . . . . . . . . . . . . . . . . . . . . . . . . . . . . . . . . . . . . . . . . . . . . . . . . . . . . . . 2
Step 1: Materials . . . . . . . . . . . . . . . . . . . . . . . . . . . . . . . . . . . . . . . . . . . . . . . . . . . . . . . . . . . . . . . . . . . . . . . . . . . . . . . . . . . . . . . . . . . . . . . . . . . . . . . . . . . 4
Step 2: Cutting clear polyester and paper . . . . . . . . . . . . . . . . . . . . . . . . . . . . . . . . . . . . . . . . . . . . . . . . . . . . . . . . . . . . . . . . . . . . . . . . . . . . . . . . . . . . . . . . 5
Step 3: Connecting faces . . . . . . . . . . . . . . . . . . . . . . . . . . . . . . . . . . . . . . . . . . . . . . . . . . . . . . . . . . . . . . . . . . . . . . . . . . . . . . . . . . . . . . . . . . . . . . . . . . . . 7
Step 4: Electronics . . . . . . . . . . . . . . . . . . . . . . . . . . . . . . . . . . . . . . . . . . . . . . . . . . . . . . . . . . . . . . . . . . . . . . . . . . . . . . . . . . . . . . . . . . . . . . . . . . . . . . . . . 9
Step 5: Copper foil tape . . . . . . . . . . . . . . . . . . . . . . . . . . . . . . . . . . . . . . . . . . . . . . . . . . . . . . . . . . . . . . . . . . . . . . . . . . . . . . . . . . . . . . . . . . . . . . . . . . . . . . 12
Step 6: Magnets . . . . . . . . . . . . . . . . . . . . . . . . . . . . . . . . . . . . . . . . . . . . . . . . . . . . . . . . . . . . . . . . . . . . . . . . . . . . . . . . . . . . . . . . . . . . . . . . . . . . . . . . . . . 14
Step 7: Battery housing: part 1 . . . . . . . . . . . . . . . . . . . . . . . . . . . . . . . . . . . . . . . . . . . . . . . . . . . . . . . . . . . . . . . . . . . . . . . . . . . . . . . . . . . . . . . . . . . . . . . . 15
Step 8: Battery housing: part 2 . . . . . . . . . . . . . . . . . . . . . . . . . . . . . . . . . . . . . . . . . . . . . . . . . . . . . . . . . . . . . . . . . . . . . . . . . . . . . . . . . . . . . . . . . . . . . . . . 19
Step 9: Finished, plus alternative suggestions . . . . . . . . . . . . . . . . . . . . . . . . . . . . . . . . . . . . . . . . . . . . . . . . . . . . . . . . . . . . . . . . . . . . . . . . . . . . . . . . . . . . . 22
Related Instructables . . . . . . . . . . . . . . . . . . . . . . . . . . . . . . . . . . . . . . . . . . . . . . . . . . . . . . . . . . . . . . . . . . . . . . . . . . . . . . . . . . . . . . . . . . . . . . . . . . . . . . . . 24
Advertisements . . . . . . . . . . . . . . . . . . . . . . . . . . . . . . . . . . . . . . . . . . . . . . . . . . . . . . . . . . . . . . . . . . . . . . . . . . . . . . . . . . . . . . . . . . . . . . . . . . . . . . . . . . . . . . . 25
Comments . . . . . . . . . . . . . . . . . . . . . . . . . . . . . . . . . . . . . . . . . . . . . . . . . . . . . . . . . . . . . . . . . . . . . . . . . . . . . . . . . . . . . . . . . . . . . . . . . . . . . . . . . . . . . . . . 25
http://www.instructables.com/id/Tetris-Inspired-Modular-Lamp/
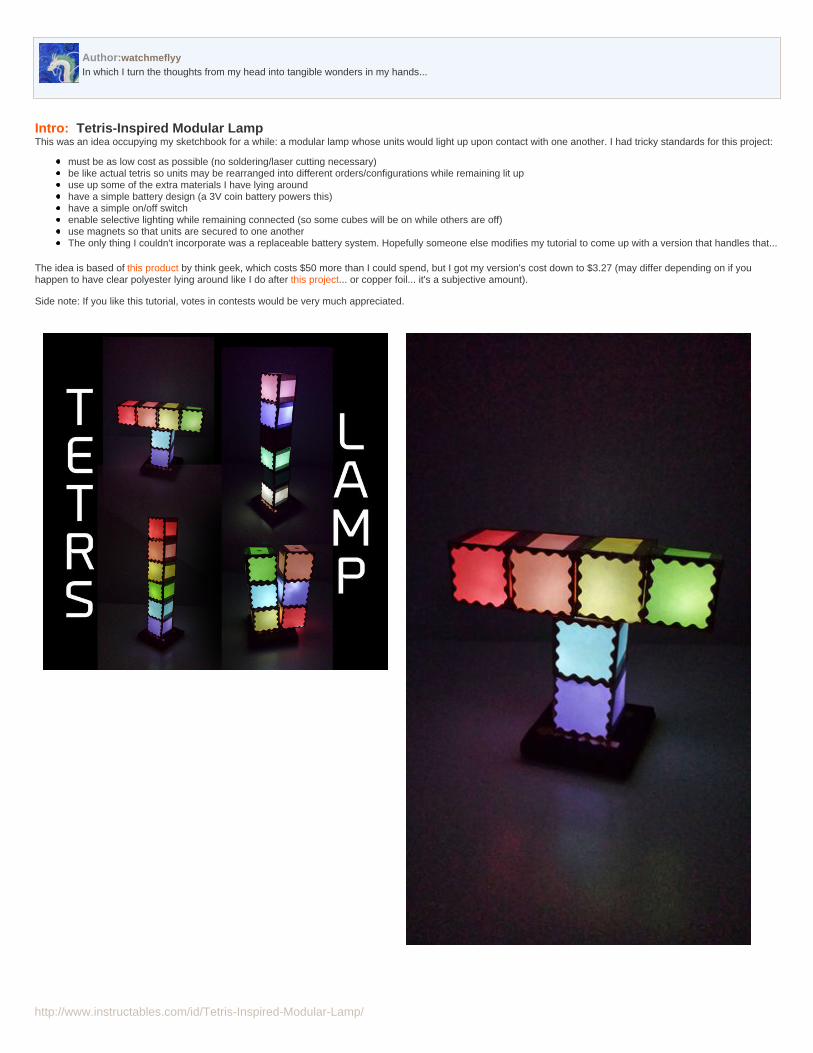
Author:watchmeflyyIn which I turn the thoughts from my head into tangible wonders in my hands...
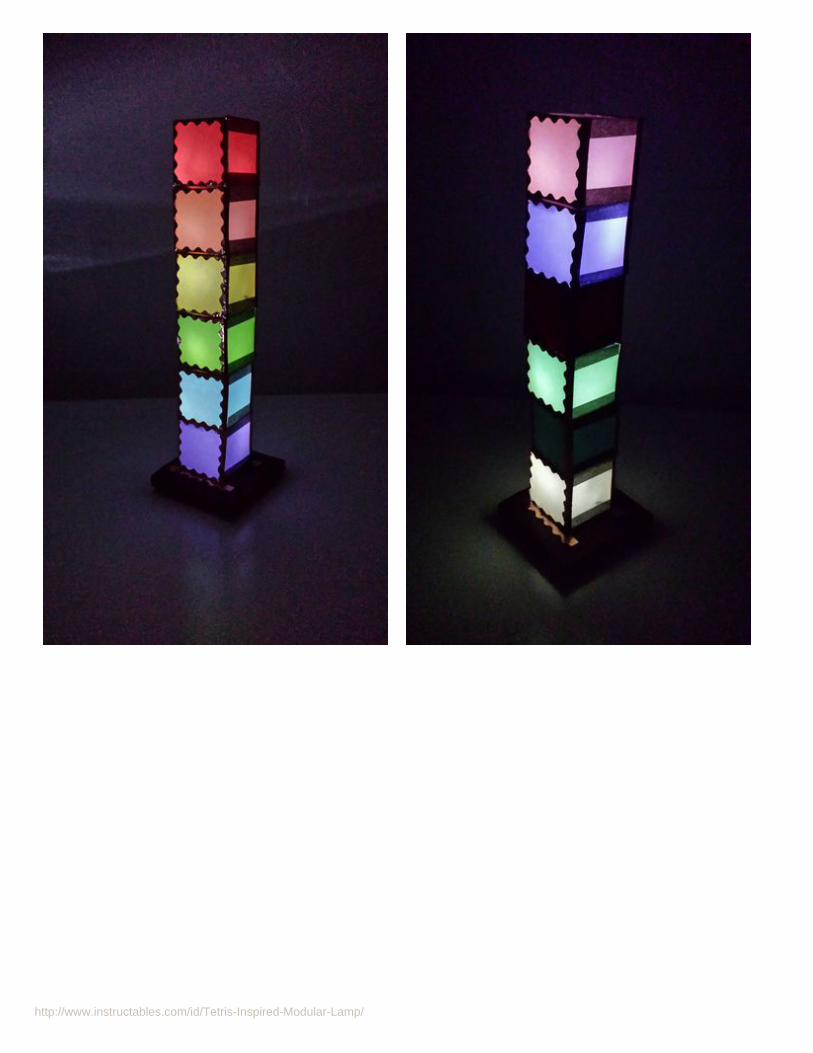
Intro: Tetris-Inspired Modular LampThis was an idea occupying my sketchbook for a while: a modular lamp whose units would light up upon contact with one another. I had tricky standards for this project:
must be as low cost as possible (no soldering/laser cutting necessary)be like actual tetris so units may be rearranged into different orders/configurations while remaining lit upuse up some of the extra materials I have lying aroundhave a simple battery design (a 3V coin battery powers this)have a simple on/off switchenable selective lighting while remaining connected (so some cubes will be on while others are off)use magnets so that units are secured to one anotherThe only thing I couldn't incorporate was a replaceable battery system. Hopefully someone else modifies my tutorial to come up with a version that handles that...
The idea is based of this product by think geek, which costs $50 more than I could spend, but I got my version's cost down to $3.27 (may differ depending on if youhappen to have clear polyester lying around like I do after this project... or copper foil... it's a subjective amount).
Side note: If you like this tutorial, votes in contests would be very much appreciated.
http://www.instructables.com/id/Tetris-Inspired-Modular-Lamp/

http://www.instructables.com/id/Tetris-Inspired-Modular-Lamp/
Step 1: MaterialsI originally had plans on using a laser cutter to make more precise cuts with thicker material, but spring break came around and I didn't have access to the school designfacilities. Thus, I cut clear polyester by hand and hid the imperfections as much as possible, but laser cutters with acrylic would definitely be a sturdier/cleaner alternative.
clear polyester (I had some leftover from a project; bought at a local art shop called Blick's Art. Make sure the protective film is as clean as possible!)scissors (should be very sharp to make things easier on your hands...)tape (both clear and patterned)copper foil tape (I happened to pick up ~9 feet for $2.50 a while ago when a jewelry shop had a sale, but you can get this from electronics or jewelry shops (mostlysold in bulk though, so 36 yards from what I've seen...). Jewelers use this for soldering frames, and yes it conducts the same as copper tape in paper electronics.)glue stickwire (plastic coated better but not necessary)magnets -- 2 per unit plus 1 for battery base (I had a few small neodymium magnets lying around because in this case the smaller the better. I don't suggest theones I linked to since they're super expensive, but that's the ideal sizing. You can use regular big magnets too, but the smaller ones snap together more nicely. Ionly had 6 so I had to buy 7 more magnets -- not neodymium but decent enough -- hence my $3.27 cost of the project.)LEDs (just normal, ~1.5V ones, any color you want but I just used white for all)needles/pointy objects to make holestissue paper (or tissues, napkins -- just to diffuse the LEDs)cardboard + paper for your power supply3V coin battery
Quick rundown of how this works: Each unit has copper tape around two square rims, each side separately connected to the LED's positive or negative terminal. Thepower supply is the black base at the bottom, which houses a coin battery, and the two strips of copper tape on the base are connected to the battery's positive andnegative terminals. When the copper rims of the cubes are correctly aligned with copper strips attached to the positive and negative battery terminals, the cube will lightup. Simply rotate to align/misalign the copper tape to make a cube go on/off. Magnets attached at the top and bottom of each cube, in addition to at the bottom base, helpeverything remain connected.
http://www.instructables.com/id/Tetris-Inspired-Modular-Lamp/
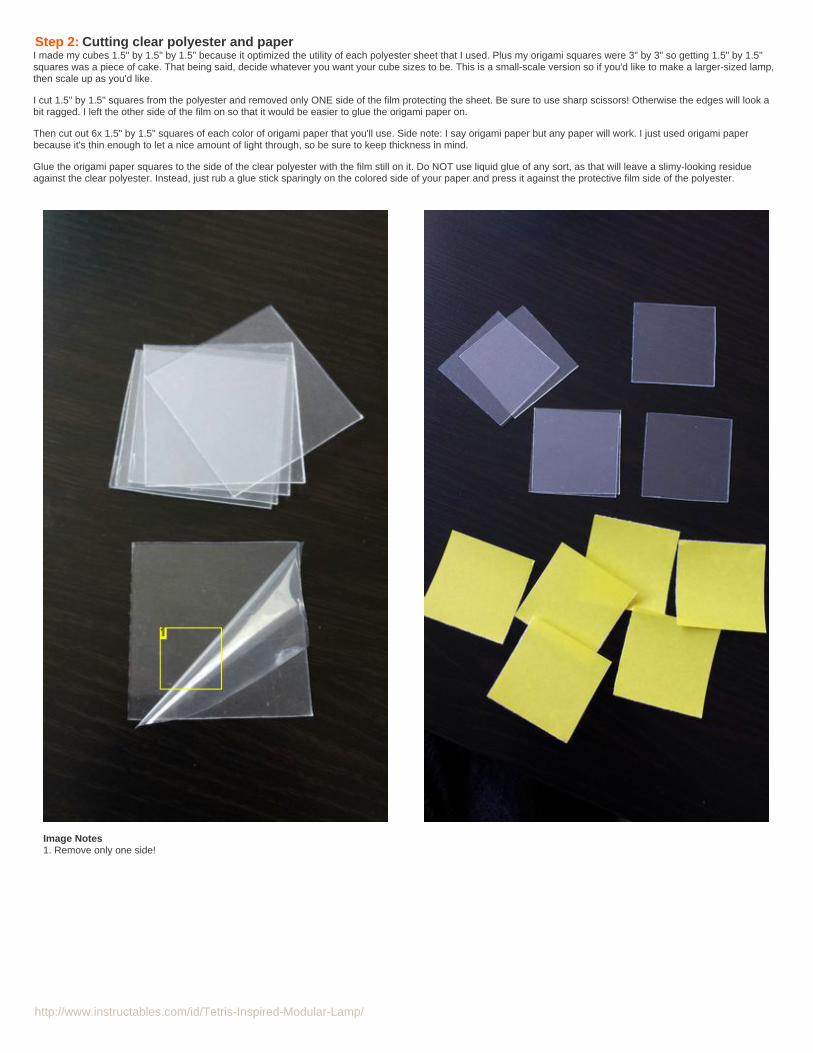
Step 2: Cutting clear polyester and paperI made my cubes 1.5" by 1.5" by 1.5" because it optimized the utility of each polyester sheet that I used. Plus my origami squares were 3" by 3" so getting 1.5" by 1.5"squares was a piece of cake. That being said, decide whatever you want your cube sizes to be. This is a small-scale version so if you'd like to make a larger-sized lamp,then scale up as you'd like.
I cut 1.5" by 1.5" squares from the polyester and removed only ONE side of the film protecting the sheet. Be sure to use sharp scissors! Otherwise the edges will look abit ragged. I left the other side of the film on so that it would be easier to glue the origami paper on.
Then cut out 6x 1.5" by 1.5" squares of each color of origami paper that you'll use. Side note: I say origami paper but any paper will work. I just used origami paperbecause it's thin enough to let a nice amount of light through, so be sure to keep thickness in mind.
Glue the origami paper squares to the side of the clear polyester with the film still on it. Do NOT use liquid glue of any sort, as that will leave a slimy-looking residueagainst the clear polyester. Instead, just rub a glue stick sparingly on the colored side of your paper and press it against the protective film side of the polyester.
Image Notes1. Remove only one side!

http://www.instructables.com/id/Tetris-Inspired-Modular-Lamp/
Image Notes1. Use your glue stick to attach your paper to the film side of the polyester squarebefore flipping it over like so and using a finger to press bubbles out between thepaper and polyester.
Image Notes1. You might see little marks like this, but it's fine/inevitable. Only noticeableup close so eh.

http://www.instructables.com/id/Tetris-Inspired-Modular-Lamp/
Step 3: Connecting facesGrab 4x squares of the same color and connect them at 90 degree angles to each other using the clear or patterned tape (see pictures above on clear illustration of whatI mean). I used both clear and patterned tape for extra protection, since patterned tape is typically less strong. Also, be sure that your tape goes almost all the way alongthe edge rather than being very short (see 4th picture above); you'll want the copper tape to hide your edges later.
Image Notes1. Arrange at 90 degrees before adding tape along the edge.

http://www.instructables.com/id/Tetris-Inspired-Modular-Lamp/
Image Notes1. Tape should almost reach the edges.

http://www.instructables.com/id/Tetris-Inspired-Modular-Lamp/
Step 4: ElectronicsThe electronics are quite simple for this, no fancy micro-controllers, resistors, etc. necessary. You'll just need LEDs and wire. The wire doesn't even needs to be plasticcoated, and soldering isn't required; though honestly, if you're looking for a more polished final lamp, I highly suggest soldering and plastic coated wire. I don't have asoldering iron so no luck for me, but use solder if you have access!
Attach wire to the two terminals of the LED (simply bend, or solder if possible) so that they are long enough to reach the edges of the cube. Then position them as in the5th picture above and bend the wire around the edge as shown in the 6th picture. Make sure you keep track of which side is attached to your LED's positive/negativeterminals!

http://www.instructables.com/id/Tetris-Inspired-Modular-Lamp/
Image Notes1. Cut some wire like so for attaching to the LED.
Image Notes1. Bend together for attachment (soldering is better!)

http://www.instructables.com/id/Tetris-Inspired-Modular-Lamp/
Image Notes1. Keep track of which is your positive or negative terminal!

http://www.instructables.com/id/Tetris-Inspired-Modular-Lamp/
Image Notes1. Make sure wire pokes out like this!
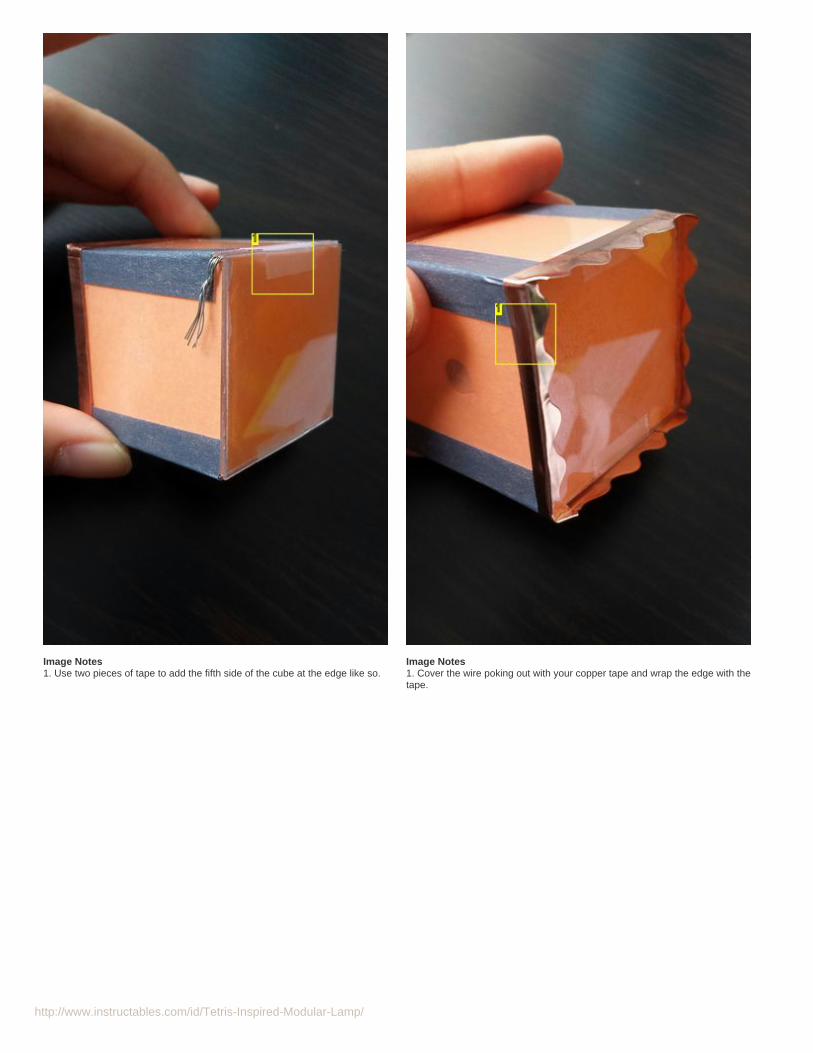
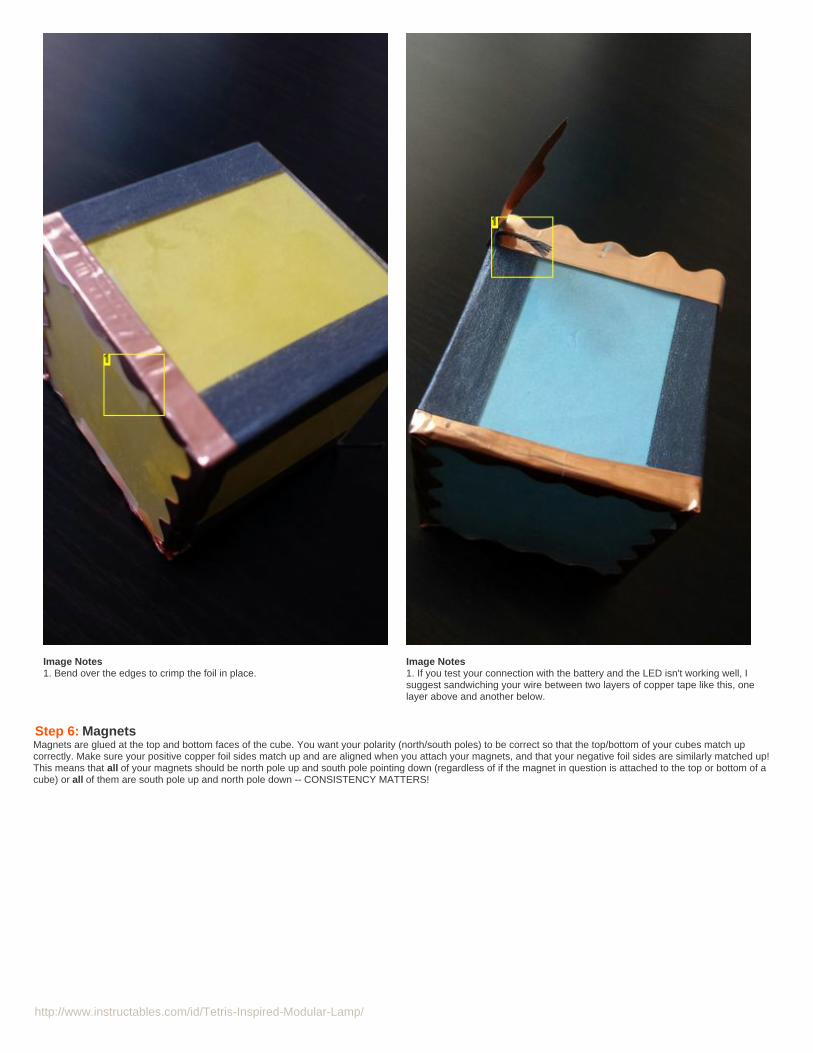
Step 5: Copper foil tapeCopper tape is conductive, so this will allow the LED terminals to be conductive wherever the copper tape is. With the wire attached to your LEDs bent around the edge ofthe clear polyester (1st picture), tape over the end with the copper tape as shown in the 2nd picture. Crimp the tape down over the edges of the cube. If you test yourconnection with the battery and the LED isn't working well, I suggest sandwiching your wire between two layers of copper tape like in the 4th picture, one layer of copperabove and another below.
Be sure to constantly test your circuit connection! Connect the positive side of the foil to the positive side of a 3V battery, and the other side to the negative side of thebattery using extra wire (this is why it's important to keep track of which copper foil side relates to the positive/negative terminals of your LED). If your light isn't working,try flipping your battery (terminal might be wrong). If that doesn't work, disassembly and reassemble, carefully making sure that all your wire is in contact with the coppertape properly, etc.
NOTE: Getting the electronics to work was far more difficult/challenging than I thought. I would have lights work when I tested them with a battery + wire, but then after Iadded copper tape the LED would go off. Just be patient, remember to keep your terminals straight, solder everything well if you have solder (will really make your lightwork better, I can't emphasize this enough..), and continually test your LEDs.
http://www.instructables.com/id/Tetris-Inspired-Modular-Lamp/
Image Notes1. Use two pieces of tape to add the fifth side of the cube at the edge like so.
Image Notes1. Cover the wire poking out with your copper tape and wrap the edge with thetape.
http://www.instructables.com/id/Tetris-Inspired-Modular-Lamp/
Image Notes1. Bend over the edges to crimp the foil in place.
Image Notes1. If you test your connection with the battery and the LED isn't working well, Isuggest sandwiching your wire between two layers of copper tape like this, onelayer above and another below.
Step 6: MagnetsMagnets are glued at the top and bottom faces of the cube. You want your polarity (north/south poles) to be correct so that the top/bottom of your cubes match upcorrectly. Make sure your positive copper foil sides match up and are aligned when you attach your magnets, and that your negative foil sides are similarly matched up!This means that all of your magnets should be north pole up and south pole pointing down (regardless of if the magnet in question is attached to the top or bottom of acube) or all of them are south pole up and north pole down -- CONSISTENCY MATTERS!

http://www.instructables.com/id/Tetris-Inspired-Modular-Lamp/
Image Notes1. Magnets at the top and bottom of the cubes. Be sure that they are correct in terms of polarity (North vs South poles of the magnet) so that they can beinterchangeable. Just test out the magnets before gluing in place.
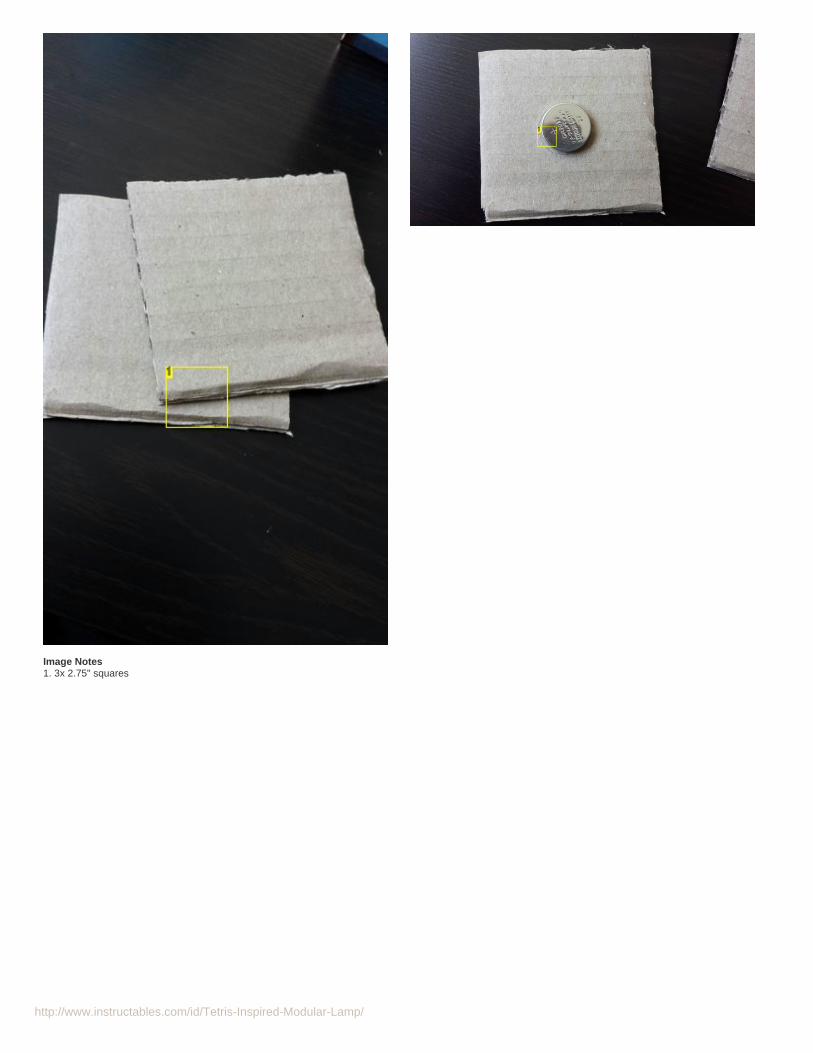
Step 7: Battery housing: part 1Essentially, I sandwiched the 3V battery in layers of 2.75" cardboard squares and connected parallel strips of copper tape to the positive and negative sides. See thenotes in the above pictures for how that happens..
Image Notes1. Cut out a coin battery shaped hole in the middle of one square.
http://www.instructables.com/id/Tetris-Inspired-Modular-Lamp/
Image Notes1. 3x 2.75" squares

http://www.instructables.com/id/Tetris-Inspired-Modular-Lamp/
Image Notes1. Cut out a 3" piece of wire and strip the ends. Then use tape to tape it to oneside of the battery.

http://www.instructables.com/id/Tetris-Inspired-Modular-Lamp/
Image Notes1. On the other face of the battery, attach another stripped wire.2. Poke two holes through the second cardboard square so the wires can pokeup like so.
Image Notes1. Make sure your holes' distance is the same as the cube length! (so 1.5" for me)2. These two pencil marks are from tracing the copper foil edges of a cube.3. This center hole marks where the magnet will go later. Make a hole here foryour magnet! I didn't, unfortunately for me, so don't make that mistake.
http://www.instructables.com/id/Tetris-Inspired-Modular-Lamp/
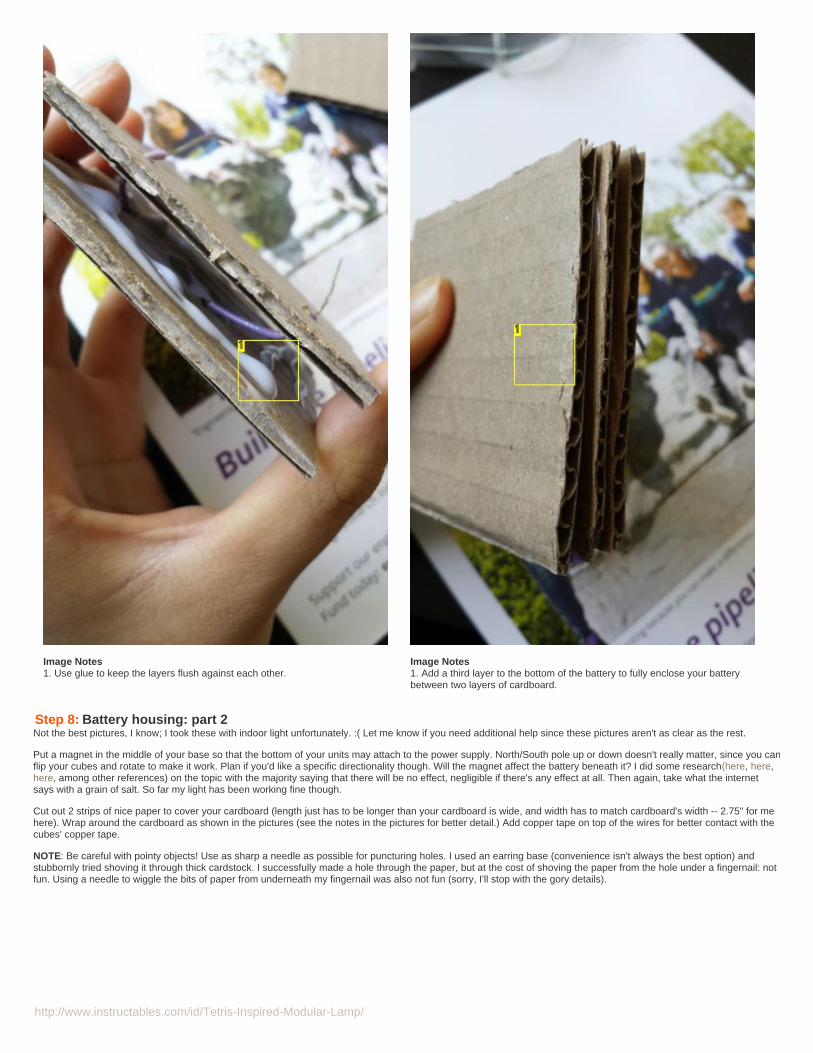
Image Notes1. Use glue to keep the layers flush against each other.
Image Notes1. Add a third layer to the bottom of the battery to fully enclose your batterybetween two layers of cardboard.
Step 8: Battery housing: part 2Not the best pictures, I know; I took these with indoor light unfortunately. :( Let me know if you need additional help since these pictures aren't as clear as the rest.
Put a magnet in the middle of your base so that the bottom of your units may attach to the power supply. North/South pole up or down doesn't really matter, since you canflip your cubes and rotate to make it work. Plan if you'd like a specific directionality though. Will the magnet affect the battery beneath it? I did some research(here, here,here, among other references) on the topic with the majority saying that there will be no effect, negligible if there's any effect at all. Then again, take what the internetsays with a grain of salt. So far my light has been working fine though.
Cut out 2 strips of nice paper to cover your cardboard (length just has to be longer than your cardboard is wide, and width has to match cardboard's width -- 2.75" for mehere). Wrap around the cardboard as shown in the pictures (see the notes in the pictures for better detail.) Add copper tape on top of the wires for better contact with thecubes' copper tape.
NOTE: Be careful with pointy objects! Use as sharp a needle as possible for puncturing holes. I used an earring base (convenience isn't always the best option) andstubbornly tried shoving it through thick cardstock. I successfully made a hole through the paper, but at the cost of shoving the paper from the hole under a fingernail: notfun. Using a needle to wiggle the bits of paper from underneath my fingernail was also not fun (sorry, I'll stop with the gory details).

http://www.instructables.com/id/Tetris-Inspired-Modular-Lamp/
Image Notes1. Put a magnet in the middle of your base so that the bottom of your units mayattach to the power supply. North/South pole up or down doesn't really matter,since you can flip your cubes and rotate to make it work. Plan if you'd like aspecific directionality though.
Image Notes1. Use one strip of nice paper to cover your cardboard like this (length just hasto be longer than your cardboard is wide, and width has to match cardboard'swidth -- 2.75" for me here).

http://www.instructables.com/id/Tetris-Inspired-Modular-Lamp/
Image Notes1. Poke holes to let your wire go through on top of the paper.
Image Notes1. Grab another strip of the paper (same dimensions) and wrap it the other way(rotated perpendicular to the previous strip). Remember to poke holes for thewire!
http://www.instructables.com/id/Tetris-Inspired-Modular-Lamp/
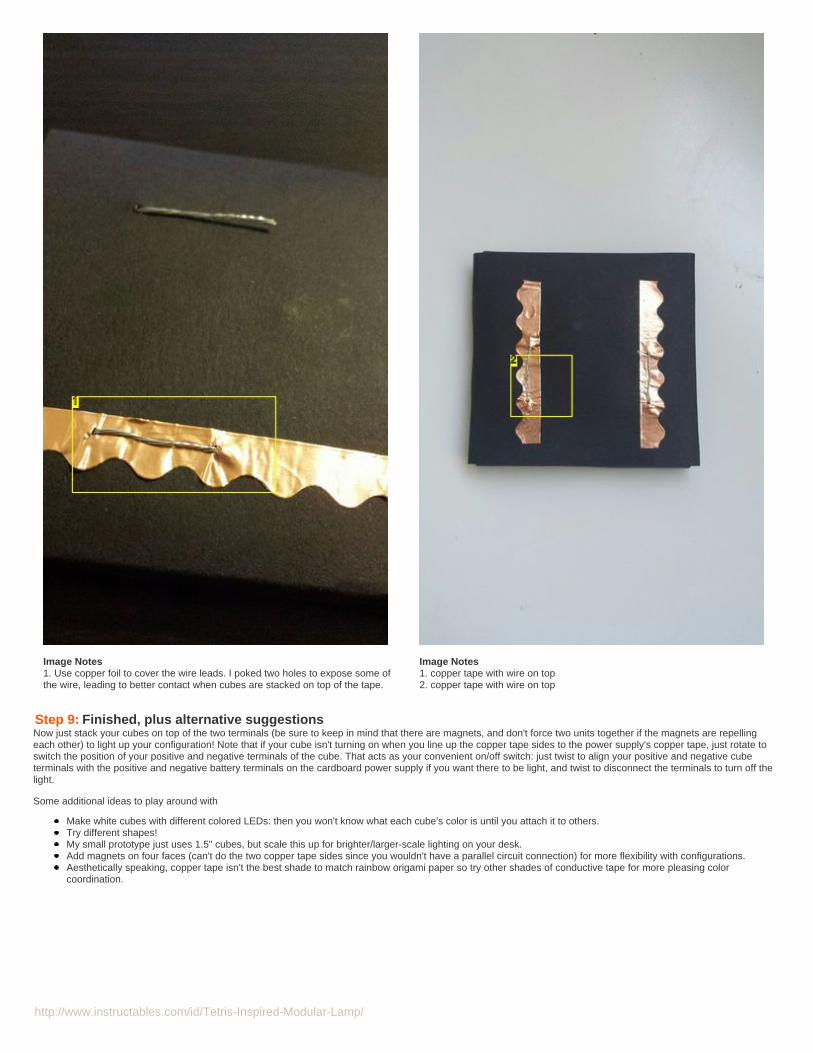
Image Notes1. Use copper foil to cover the wire leads. I poked two holes to expose some ofthe wire, leading to better contact when cubes are stacked on top of the tape.
Image Notes1. copper tape with wire on top2. copper tape with wire on top
Step 9: Finished, plus alternative suggestionsNow just stack your cubes on top of the two terminals (be sure to keep in mind that there are magnets, and don't force two units together if the magnets are repellingeach other) to light up your configuration! Note that if your cube isn't turning on when you line up the copper tape sides to the power supply's copper tape, just rotate toswitch the position of your positive and negative terminals of the cube. That acts as your convenient on/off switch: just twist to align your positive and negative cubeterminals with the positive and negative battery terminals on the cardboard power supply if you want there to be light, and twist to disconnect the terminals to turn off thelight.
Some additional ideas to play around with
Make white cubes with different colored LEDs: then you won't know what each cube's color is until you attach it to others.Try different shapes!My small prototype just uses 1.5" cubes, but scale this up for brighter/larger-scale lighting on your desk.Add magnets on four faces (can't do the two copper tape sides since you wouldn't have a parallel circuit connection) for more flexibility with configurations.Aesthetically speaking, copper tape isn't the best shade to match rainbow origami paper so try other shades of conductive tape for more pleasing colorcoordination.

http://www.instructables.com/id/Tetris-Inspired-Modular-Lamp/
Image Notes1. The copper tape doesn't look so great with the color scheme...

http://www.instructables.com/id/Tetris-Inspired-Modular-Lamp/
Related Instructables
Simple LEDMeditationLamp by binney
City lights bymade_by_kyle
MinecraftGlowstoneCube Lamp byFabricateIO
Tetris Lamp bylindarose92
Multi DirectionMagnetic SignLamp bygracegotlost
Cute MagneticOwl Lamp byFuzzy-Wobble

http://www.instructables.com/id/Tetris-Inspired-Modular-Lamp/
Advertisements
Comments
3 comments Add Comment
ProfGenki says: Mar 29, 2016. 12:25 PM REPLYAmazing project!
emilyvanleemput says: Mar 29, 2016. 11:26 AM REPLYBeautiful!
momoluv says: Mar 29, 2016. 10:34 AM REPLYThis is really cool! I'm voting for you :-)