tfs 4.1 advanced guide - amazon s3
TRANSCRIPT

2011
HANCOM, INC.
Cloud Solution Team
[TFS 4.1 ADVANCED GUIDE] To administrator for installation/upgrade/management

1
Copyright 2010 (c) Hancom INC. All rights reserved.
Contents Section Subject page
Installation Server hardware specification and server topology
How to install TFS on Linux without GUI(X-window)
How to install TFS as a service on Windows 32/64bit
64bit Debian/Ubuntu issue
Tomcat basic configuration
MySQL basic configuration
How to change service port number
3
4
5
8
9
10
12
Advanced
Installation
Load Balancer
Check SSL Handshake Failure
How to solve established connection release issue
14
17
19
Management How to change HTTPS certificate
Code signing certificate
Change storage tag name
How to backup
How to print out the adapter log
21
23
24
25
26
Customization &
Troubleshooting
How to solve JRE installation issues
Launcher
Rebranding
28
30
33

2
Copyright 2010 (c) Hancom INC. All rights reserved.
INSTALLATION

3
Copyright 2010 (c) Hancom INC. All rights reserved.
Server hardware specification and server topology
The recommend server hardware specification is shown in the table below.
Application
server hardware
CPU x86 architecture 1 Quad-core, 2Ghz or
Higher
RAM 4 GB or higher
OS Linux or Windows 2003 server or later
Hard disk 40 GB or higher
Network Bandwidth LAN : 768kbps or higher
WAN : 1.5Mbps or higher
The following table shows the general recommended server topology for various workloads.
Note that the measurement was conducted on normal office usage after the initial applet
download (around 15MB). The results will vary according to the specific customer system
environment.
Number of daily visitors Concurrent users Server count
5000 200 1 EA
12000 500 2 EA and Load-balancer, DBMS
25000 1000 3 EA and Load-balancer, DBMS

4
Copyright 2010 (c) Hancom INC. All rights reserved.
How to install TFS on Linux without GUI(X-window)
TFS supports command line installation because X-window is often not running on Linux systems
due to high resource requirements.
# ./[TFS-linux-installer] –q –dir [target directory name]
After executing the above command, the port number is assigned to 80 and TFSI will be installed
to the designated target directory automatically.
Note that since the listening port is below 1024, you must have root permission. After the
successful execution, you may continue the installation using the web browser configuration
wizard.
Finally, a more detailed description is available in the silent mode installation section of the admin
guide.

5
Copyright 2010 (c) Hancom INC. All rights reserved.
How to install TFS as a service on Windows 32/64bit
TFS installer builds a package for 32 bit machines by default. Some additional work is needed to
install TFS as a service on the Windows server platform.
1. Download apache-tomcat-6.0.32-windows-x86 from http://tomcat.apache.org
2. Decompress downloaded file and copy service.bat, tomcat6.exe to {TFS_HOME}/bin directory.
3. Edit service.bat file if you want to change the displayed SERVICE_NAME.
set SERVICE_NAME=TFSI4
set PR_DISPLAYNAME=TFSI4
4. Go to {TFS_HOME}/bin using the console and type “Service install”.
.
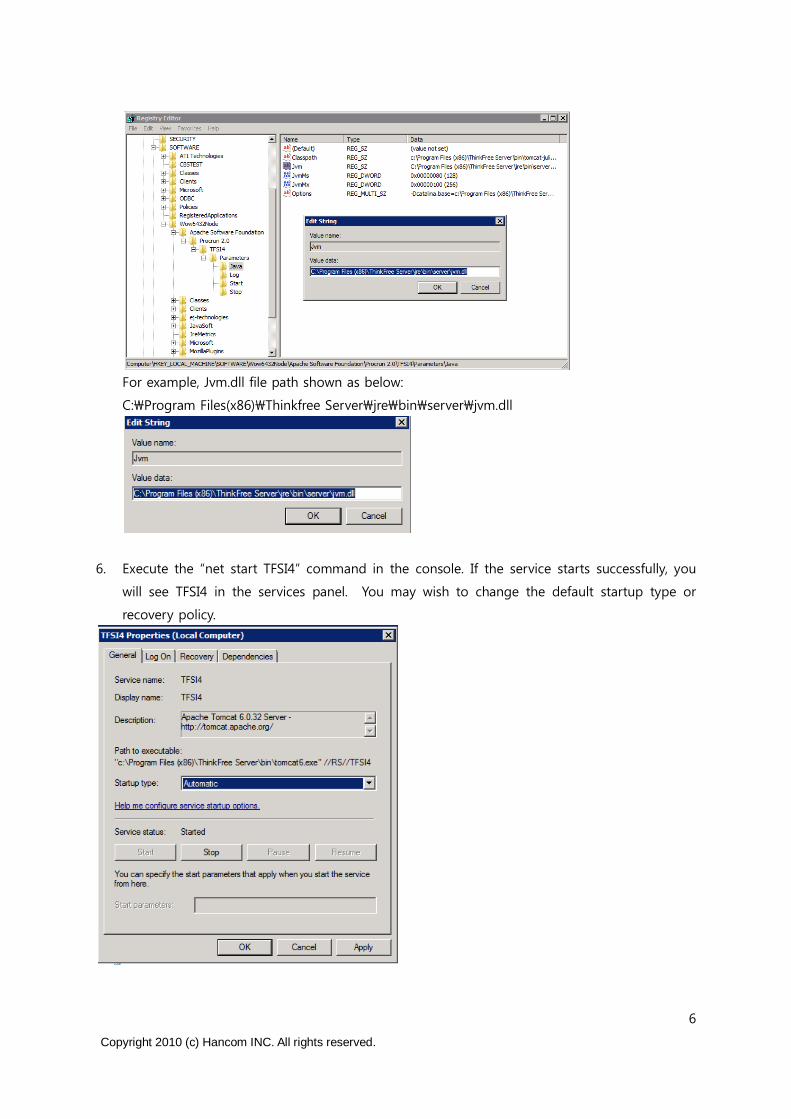
5. Check the registry value using the “regedit” command. In particular, you should make sure
that the Jvm parameter is showing the proper location of the Jvm.dll file.
6
Copyright 2010 (c) Hancom INC. All rights reserved.
For example, Jvm.dll file path shown as below:
C:\Program Files(x86)\Thinkfree Server\jre\bin\server\jvm.dll
6. Execute the “net start TFSI4” command in the console. If the service starts successfully, you
will see TFSI4 in the services panel. You may wish to change the default startup type or
recovery policy.

7
Copyright 2010 (c) Hancom INC. All rights reserved.
7. If you want to remove the TFS service later, use the command “Service remove TFSI4”.
Troubleshooting
If “NET HELPMSG 4373” or similar error message appears when you execute the “net start TFSI4”
command then you need to check the following:
1. 64bit/32bit tomcat6.exe: There are two tomcat.exe (64bit and 32bit), make sure you are using
the appropriate exe for your OS.
2. TFS installation finished and works well: Check that TFS runs well after installation before
attempting to run TFS as a service.
3. Service.bat and tomcat6.exe: Ensure that both files are in the correct location.
4. Service registration: Check that the service registered properly.
5. Jvm.dll path: Check to make sure the Jvm.dll is in the searchable path.
6. Duplicate service: Make sure there are no duplicate services.

8
Copyright 2010 (c) Hancom INC. All rights reserved.
64bit Debian/Ubuntu issue
Unlike Fedora / RHEL, the 64bit Debian/Ubuntu OS installer does not include 32bit packages by
default. Since TFS installation requires the 32bit packages, an error message as shown below will
appear:
thinkfree:~# ./TFS-Standard-4.0.0130-release.sh -q –dir /usr/local/tfs
Unpacking JRE ...
Starting Installer ...
./TFS-Standard-4.0.0130-release.sh: line 393:
/root/TFS-Standard-4.0.0130-release.sh.19921.dir/jre/bin/java: No such file or directory
We suggest the following workaround:
1. Install TFS on 32bit Ubuntu/Debian OS.
2. Copy the TFS directory on 32bit system and its contents to the 64bit Debian/Ubuntu OS.
3. Next, remove the 32bit {TFS_HOME}/jre directory and then replace with the 64bit jre directory
contents.
4. You can use the startup.sh/shutdown.sh to start and stop the TFS as usual.

9
Copyright 2010 (c) Hancom INC. All rights reserved.
Tomcat basic configuration
TFS uses tomcat as the default web server. The table below shows some common configuration
parameters:
Item Description File Path
OS: linux Increase Open files limit * hard nproc 16384 * soft nofile 2048 * hard nofile 65536
/etc/security/limits.conf
Tomcat:maxthread Increase maxThreads limit An appropriate setting is 800 when using 4GB physical RAM <Connector server="ThinkFree Server" ….maxThreads="800"….
{TFS_HOME}/conf/server.xml
Tomcat:JAVA_OPT Increase Vm size according to the physical RAM size. A typical setting of 2 GB is
appropriate for 4GB of physical RAM. It’s also
possible to add a GC option here. JAVA_OPTS=-Xmx2048m
{TFS_HOME}/bin/catalina.sh
Please refer to the following URL for more details.
http://tomcat.apache.org/tomcat-6.0-doc/index.html

10
Copyright 2010 (c) Hancom INC. All rights reserved.
MySQL basic configuration
TFS supports both Derby(http://db.apache.org/derby/) and MySQL(http://www.mysql.com/) DBMS
by default. Derby can be installed easily in embedded mode. However, if you decide to install
MySQL, you will need to perform some additional administrative tasks.
For example, if you have a system environment like below:
TFS server IP address : 172.30.0.18
Mysql Server IP address : 172.30.0.15
Database name : newmysqldb
Account : test1
Password : testpwd
mysql> CREATE DATABASE newmysqldb;
mysql> GRANT ALL PRIVILEGES ON newmysqldb.* TO "test1"@"172.30.0.18" IDENTIFIED BY
"testpwd";
mysql> GRANT ALL ON newmysqldb.* TO test1@'172.30.0.18' IDENTIFIED BY 'testpwd';
mysql> FLUSH PRIVILEGES;
mysql> EXIT
Select MySQL when you set up TFS during the web browser setup wizard.
The setup wizard requires you to fill out the database parameters next.

11
Copyright 2010 (c) Hancom INC. All rights reserved.
If you want to change the IP address, please refer to command below. You can also change to an
IP address range if you use the „%‟ instead of a specific IP address.
mysql> update db set Host='10.10.10.1" where Db='newmysqldb';
mysql> update user set Host='10.10.10.1' where user='test1';
Please refer to the following URL for more details on this matter.
http://www.mysql.com/

12
Copyright 2010 (c) Hancom INC. All rights reserved.
How to change service port number
You can change service port number on the GUI mode using the initial setup wizard. After that,
if you want to change the service port number, you may edit the tomcat configuration file.
Open {TFSI_HOME}/conf/server.xml and revise below lines:
※Note: Before making any changes, you should back server.xml file up to another directory.
Otherwise, any entry errors may cause TFS to fail to run.
For example, if you want to change HTTP port number from 80 to 8080 and HTTPS port number
from 443 to 9443, edit port numbers as shown below in red.
<Connector server="ThinkFree Server" port="8080" protocol="HTTP/1.1"
connectionTimeout="10000" maxSpareThreads="75" maxThreads="512"
minSpareThreads="25" enableLookups="false"
redirectPort="9443" URIEncoding="UTF-8"/>
<Connector server="ThinkFree Server" acceptCount="100"
clientAuth="false" disableUploadTimeout="true" enableLookups="true"
maxHttpHeaderSize="8192" maxSpareThreads="75"
maxThreads="800" minSpareThreads="25" port="9443"
scheme="https" secure="true" sslProtocol="TLS"

13
Copyright 2010 (c) Hancom INC. All rights reserved.
ADVANCED INSTALLATION

14
Copyright 2010 (c) Hancom INC. All rights reserved.
Load Balancer
Load balancing system is usually used in order to minimize response time and avoid excessive
server load. When building a TFSI web cluster using a load balancer, it is important to maintain
session persistence to avoid unmatched sessions. The main problem originates from the session
handling method and can be solved by using a session persistence parameter.
[Multiple Server Installation for TFSI]
1. Commercial application switch
Commercial application switch will distribute workload from client request to multi node using hash
metric
For example, if there are 2 servers and a virtual IP address assigned to a load balancer. Here is the
configuration for example environment.
/c/slb/real 1
ena
rip 10.10.10.1
/c/slb/real 2
ena
rip 10.10.10.2
/c/slb/group 1
metric hash
health http
add 1
add 2
/c/slb/virt 1
15
Copyright 2010 (c) Hancom INC. All rights reserved.
ena
ipver v4
vip 10.10.10.10
/c/slb/virt 1/service http
group 1
/c/slb/virt 1/service https
group 1
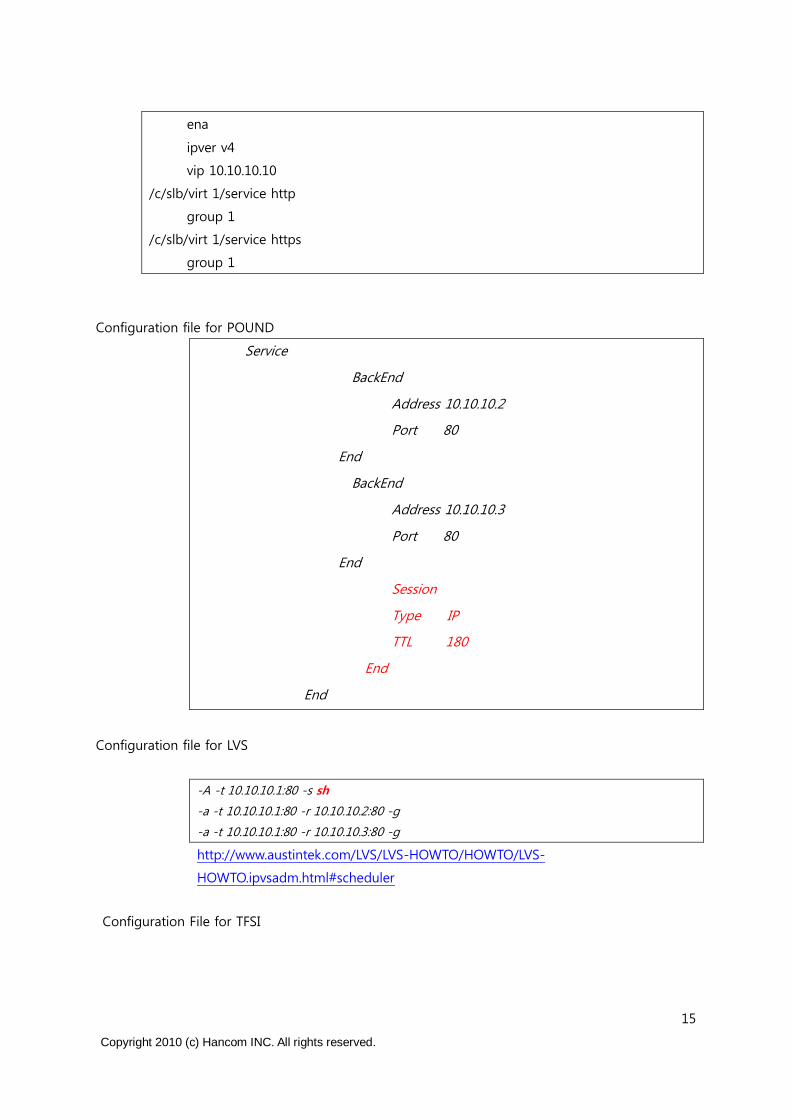
Configuration file for POUND
Service
BackEnd
Address 10.10.10.2
Port 80
End
BackEnd
Address 10.10.10.3
Port 80
End
Session
Type IP
TTL 180
End
End
Configuration file for LVS
-A -t 10.10.10.1:80 -s sh
-a -t 10.10.10.1:80 -r 10.10.10.2:80 -g
-a -t 10.10.10.1:80 -r 10.10.10.3:80 -g
http://www.austintek.com/LVS/LVS-HOWTO/HOWTO/LVS-
HOWTO.ipvsadm.html#scheduler
Configuration File for TFSI
16
Copyright 2010 (c) Hancom INC. All rights reserved.
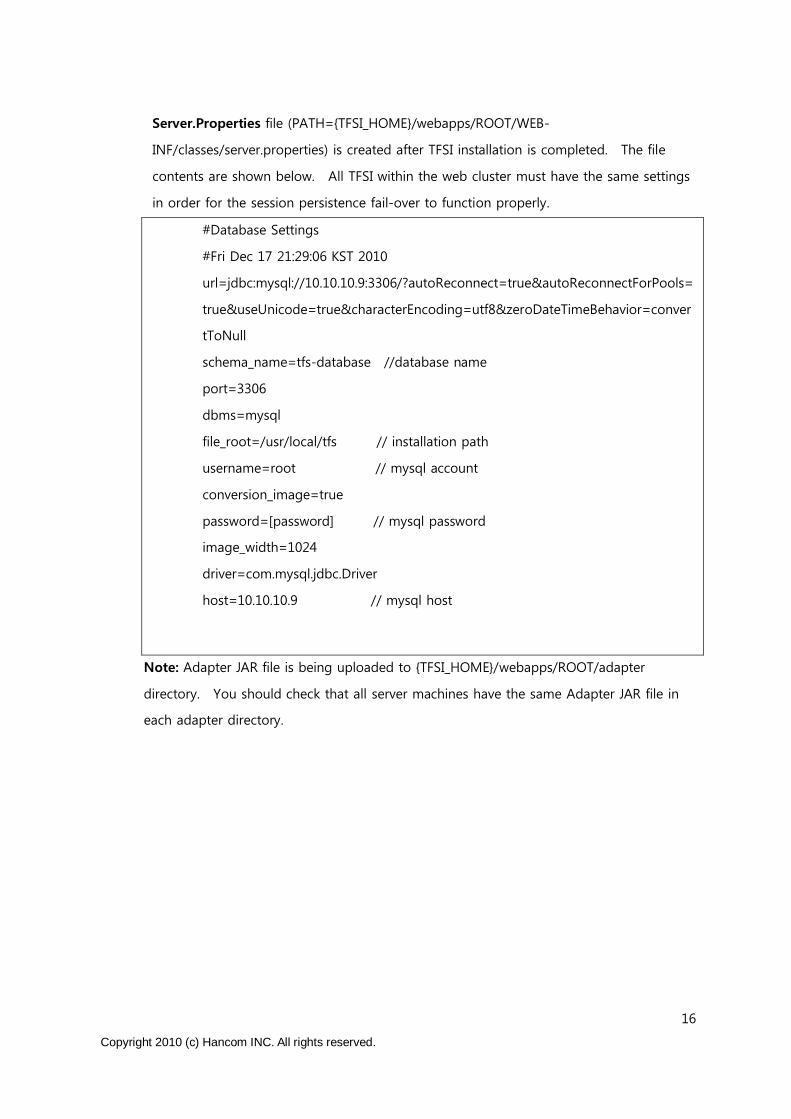
Server.Properties file (PATH={TFSI_HOME}/webapps/ROOT/WEB-
INF/classes/server.properties) is created after TFSI installation is completed. The file
contents are shown below. All TFSI within the web cluster must have the same settings
in order for the session persistence fail-over to function properly.
#Database Settings
#Fri Dec 17 21:29:06 KST 2010
url=jdbc:mysql://10.10.10.9:3306/?autoReconnect=true&autoReconnectForPools=
true&useUnicode=true&characterEncoding=utf8&zeroDateTimeBehavior=conver
tToNull
schema_name=tfs-database //database name
port=3306
dbms=mysql
file_root=/usr/local/tfs // installation path
username=root // mysql account
conversion_image=true
password=[password] // mysql password
image_width=1024
driver=com.mysql.jdbc.Driver
host=10.10.10.9 // mysql host
Note: Adapter JAR file is being uploaded to {TFSI_HOME}/webapps/ROOT/adapter
directory. You should check that all server machines have the same Adapter JAR file in
each adapter directory.

17
Copyright 2010 (c) Hancom INC. All rights reserved.
Check SSL handshake failure
If you can see the message below, then the certificate doesn‟t match between the integrated target
system and TFSI.
Caused by: javax.naming.CommunicationException: simple bind failed: [TFSI SERVER] [Root
exception is javax.net.ssl.SSLHandshakeException: sun.security.validator.ValidatorException: PKIX
path building failed
You can check generated log from the java console in debug mode.
1. Please open the Control Panel -> Java settings panel as shown below:
2. Please set the Java console setting in the Advanced tab to "Show console":

18
Copyright 2010 (c) Hancom INC. All rights reserved.
3. Under Java tab, Java Runtime Environment Settings, input the runtime parameter "-
Dtfo.debug=true" and press OK.
4. Try to open the file in the web office applet. Copy and paste the log contents from the
console and send the contents to technical support.
19
Copyright 2010 (c) Hancom INC. All rights reserved.
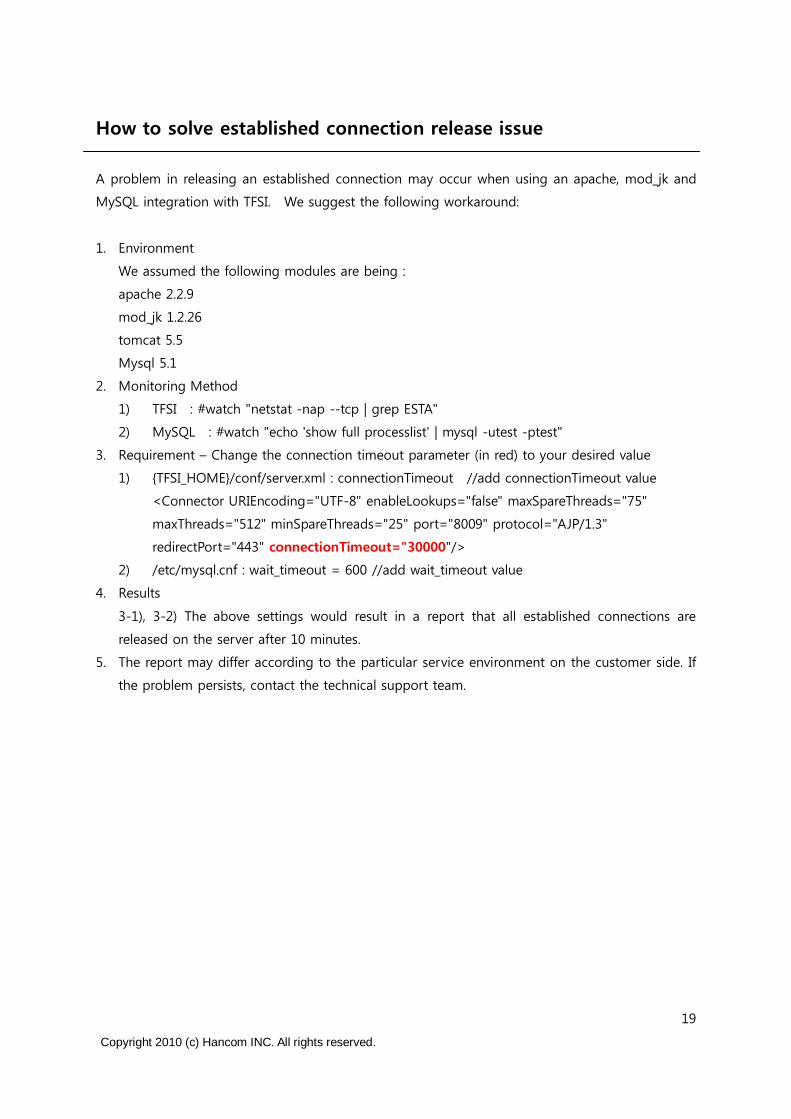
How to solve established connection release issue
A problem in releasing an established connection may occur when using an apache, mod_jk and
MySQL integration with TFSI. We suggest the following workaround:
1. Environment
We assumed the following modules are being :
apache 2.2.9
mod_jk 1.2.26
tomcat 5.5
Mysql 5.1
2. Monitoring Method
1) TFSI : #watch "netstat -nap --tcp | grep ESTA"
2) MySQL : #watch "echo 'show full processlist' | mysql -utest -ptest"
3. Requirement – Change the connection timeout parameter (in red) to your desired value
1) {TFSI_HOME}/conf/server.xml : connectionTimeout //add connectionTimeout value
<Connector URIEncoding="UTF-8" enableLookups="false" maxSpareThreads="75"
maxThreads="512" minSpareThreads="25" port="8009" protocol="AJP/1.3"
redirectPort="443" connectionTimeout="30000"/>
2) /etc/mysql.cnf : wait_timeout = 600 //add wait_timeout value
4. Results
3-1), 3-2) The above settings would result in a report that all established connections are
released on the server after 10 minutes.
5. The report may differ according to the particular service environment on the customer side. If
the problem persists, contact the technical support team.

20
Copyright 2010 (c) Hancom INC. All rights reserved.
MANAGEMENT

21
Copyright 2010 (c) Hancom INC. All rights reserved.
How to change HTTPS certificate
Starting from the TFS 4.1 release, the administrator can change the HTTPS certificate on the
admin page.
* If you want to change the HTTPS certificate for prior TFS versions, please contact technical
support.
1. The HTTPS certificate needs to support the HTTPS connection protocol for enhanced security.
2. TFS can support SUN java keystore Type (JKS) only. Please refer to below URL if you want
more information on the JKS type of HTTPS certificate.
https://knowledge.verisign.com/support/ssl-certificates-
support/index?page=content&id=AR278&actp=search&viewlocale=en_US&searchid=13107087
74044
http://www.crosscert.com/service_global/pages/sslinfo.htm
3. A HTTPS certificate signed by authentification service company like Verisign can be applied
to TFS. You must enter a keystore file, password and alias name on the server page.
4. Afterwards, you need to check “SSL enable” on the admin page. Note that ThinkFree Server
Enterprise version is designed to support both HTTP and HTTPS protocol automatically when
adding a new HTTPS certificate.

22
Copyright 2010 (c) Hancom INC. All rights reserved.
[check SSL enable]
You are able to see the HTTPS connection on the web browser after the configuration is finished.

23
Copyright 2010 (c) Hancom INC. All rights reserved.
Code signing certificate
A code signing certificate ensures that the code has not been altered or corrupted since it was
signed by a certificate authority such as VeriSign and GoDaddy.
“HANCOM.INC.” will appear as the publisher name in the code signing certificate when the applet
runs on the web browser.

24
Copyright 2010 (c) Hancom INC. All rights reserved.
Change storage tag name
After installing ThinkFree Server Integrator, and applying the adapter, a storage tag name shown
in the file dialog below will be shown. You may change the default storage tag name using the
following steps.
1. Edit {TFSI_HOME}/webapps/ROOT/WEB-INF/classes/server.properties on the server.
2. You can change the storage tag by adding a parameter (see red text).
#Database Settings
……
driver=com.mysql.jdbc.Driver
host=10.10.10.1
storage_tag =changeit
3. After saving the changes, restart the server.

25
Copyright 2010 (c) Hancom INC. All rights reserved.
How to backup
You should backup the entire {TFSI_HOME} directory and its subdirectories. If you use MySQL as
a DBMS, please refer to following the URL:
http://dev.mysql.com/doc/refman/5.1/en/backup-and-recovery.html
Note that TFSE (ThinkFree Server for Enterprise) contains additional subdirectories that are
described below:
1. DB: contains derby data file.
2. files: origin of document storage
3. converted: storage for HTML conversion results for documents
4. Indexes: storage for internal search indexing file
26
Copyright 2010 (c) Hancom INC. All rights reserved.
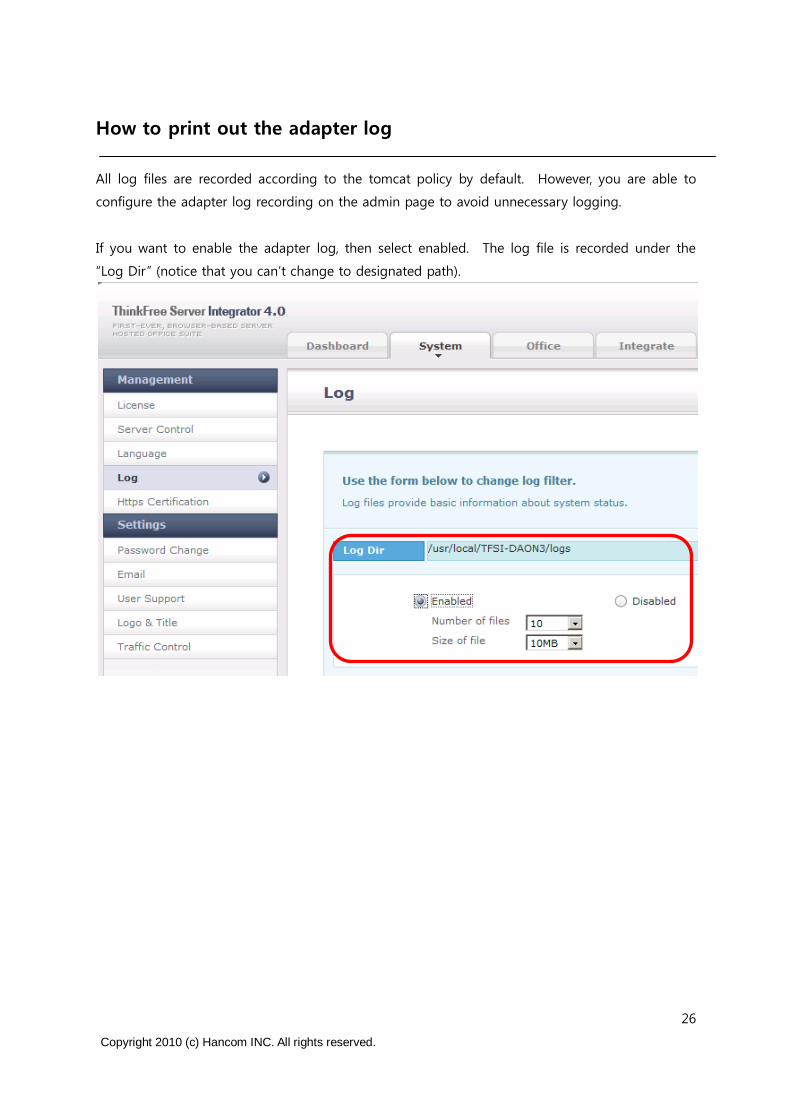
How to print out the adapter log
All log files are recorded according to the tomcat policy by default. However, you are able to
configure the adapter log recording on the admin page to avoid unnecessary logging.
If you want to enable the adapter log, then select enabled. The log file is recorded under the
“Log Dir” (notice that you can‟t change to designated path).

27
Copyright 2010 (c) Hancom INC. All rights reserved.
Customizing & Troubleshooting

28
Copyright 2010 (c) Hancom INC. All rights reserved.
How to solve JRE installation issues
ThinkFree Office uses SUN JAVA technology thus you need to install the JRE (Java Runtime
Environment). TFS sets up the JRE automatically however some client PC experience problems
related to running JAVA and may display a blank web browser window as shown below.
It occurred when without JRE installation or some file corrupted regardless OS type. In the Linux, it might be occurred due to browser plug-in not installed.
1. First of all, go to http://www.java.com/en/download/testjava.jsp and check if the applet runs correctly. If you see a screen similar below, then no JRE is installed or an older version is in use.
Also it is possible that a 32bit JRE is installed on the 64bit OS. Therefore you need to check following list to ensure the JRE is installed and configured properly.
1. Enable Java through your Web browser

29
Copyright 2010 (c) Hancom INC. All rights reserved.
2. Enable Java through the "Java Plug-in Control Panel"
3. Clearing your Web Browser Cache
4. Firefox 3.6 and above requires Java 6 Update 10 or above
5. Java and Google Chrome Browser
6. Supported System Configurations
7. Check if another JDK such as Open JDK is installed. ThinkFree Office applet requires SUN
JDK to run properly.
2. For example, install SUN JDK on the Ubuntu 10.10 :
root@ubuntu10:~#add-apt-repository ppa:sun-java-community-team/sun-java6
root@ubuntu10:~#apt-get update
root@ubuntu10:~#apt-get install sun-java6-jdk
root@ubuntu10:~#update-java-alternatives -s java-6-sun
3. For example, install SUN JDK on the Ubuntu 10.4 :
root@ubuntu10:~#add-apt-repository "deb http://archive.canonical.com/ lucid partner"
root@ubuntu10:~#aptitude update
root@ubuntu10:~#aptitude install sun-java6-jdk
root@ubuntu10:~#update-java-alternatives -s java-6-sun
※ Refer to http://christiansons.net/mike/blog/2010/07/sun-java-6-on-ubuntu-10-04-10-10-
and-later/ .
If you still encounter JRE installation problems, please refer to the official JAVA forum or technical
resources.
http://forums.oracle.com/forums/category.jspa?categoryID=285
30
Copyright 2010 (c) Hancom INC. All rights reserved.
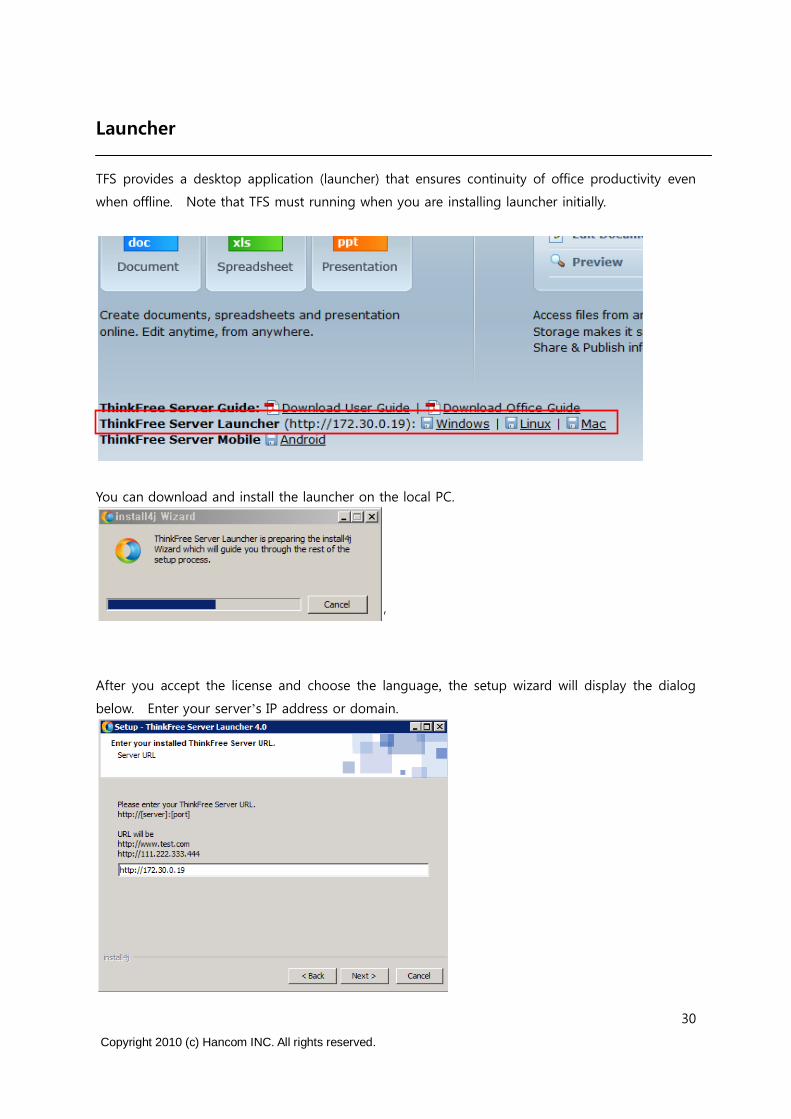
Launcher
TFS provides a desktop application (launcher) that ensures continuity of office productivity even
when offline. Note that TFS must running when you are installing launcher initially.
You can download and install the launcher on the local PC.
‟
After you accept the license and choose the language, the setup wizard will display the dialog
below. Enter your server’s IP address or domain.

31
Copyright 2010 (c) Hancom INC. All rights reserved.
The current install will now proceed.
If you keep the default setting, shortcuts will be created on the Desktop.
After setup wizard is finished, the launcher will check for available updates. Click yes.

32
Copyright 2010 (c) Hancom INC. All rights reserved.
After checking for updates, you may see the below screen.
If the launcher is not the latest version, the latest version will be downloaded.
When update finishes, you will be able to run launcher on the local PC.

33
Copyright 2010 (c) Hancom INC. All rights reserved.
Rebranding
You may replace some TFS images and logo in the red areas shown below. If you need to
perform further customizations, please contact technical support.