tg020 tough gun robotic air-cooled gun 500 amp€¦ · manufacturing operations ... materials and...
TRANSCRIPT

TECHNICAL GUIDE
For TOUGH GUN™
G1 Series Robotic
Air-Cooled MIG Guns
500 amp
SAFETY & WARRANTY INFORMATION
INSTALLATION
MAINTENANCE GUIDE
TECHNICAL DATA
OPTIONS
EXPLODED VIEW & PARTS LIST
TROUBLESHOOTING
ORDERING INFORMATION
Certified ISO 9001:2008 Please read instructions prior to use. Save this manual for future reference.
2
TABLE OF CONTENTS
THANK YOU… .....................................................................................................................................2
WARRANTY .........................................................................................................................................3
GENERAL SAFETY ..............................................................................................................................3
1.0 – INSTALLATION ...........................................................................................................................4 1.1 INSTALLING QUICK CONNECT BLOCK TO Feeder .............................................................................. 4 1.2 INSTALLING GUN TO QUICK CONNECT BLOCK .................................................................................. 4 1.3 INSTALLING GUN TO GUN MOUNT ARM.............................................................................................. 5 1.4 INSTALLING CLUTCH CABLE TO GUN ................................................................................................. 5 1.5 INSTALLING INTERFACE CABLE .......................................................................................................... 6 1.6 INSTALLING GUNS EQUIPPED WITH “DIRECT POWER PINS” ........................................................... 6
2.0 – MAINTENANCE ...........................................................................................................................7 2.1 NOZZLE AND CONTACT TIP SYSTEMS ................................................................................................ 7 2.2 NECK REPLACEMENT ........................................................................................................................... 7 2.2.2 TOUGH GUN I.C.E.™ INSTALLATION AND NECK REPLACEMENT .................................................. 8 2.3 CONVENTIONAL LINER REPLACEMENT .............................................................................................. 9 2.3.2 QUICK LOAD™ LINER INSTALLATION AND REPLACEMENT ......................................................... 10 2.4 POWER PIN REPLACEMENT ............................................................................................................... 11 2.5 UNICABLE ASSEMBLY REPLACEMENT ............................................................................................. 12
3.0 – TECHNICAL DATA .................................................................................................................... 13 3.1 NECK DIMENSIONS ............................................................................................................................. 13 3.2 GUN AMPERAGE RATINGS ................................................................................................................. 13
4.0 – COMPLETE ASSEMBLY OPTIONS ......................................................................................... 14
5.0 – NECK INSPECTION SPECIFICATIONS ................................................................................... 15
6.0 – EXPLODED VIEW AND PARTS LIST ....................................................................................... 16
7.0 – WIRING DIAGRAMS ................................................................................................................. 18 7.1 TORCHES MADE IN 2013 AND AFTER ................................................................................................ 18 7.1.1 CLUTCH WIRING DIAGRAM.............................................................................................................. 18 7.1.2 CLUTCH WITH JOG BUTTON WIRING DIAGRAM ............................................................................ 19 7.2 TORCHES MADE IN 2012 AND PRIOR ................................................................................................ 20 7.2.1 ROBOTIC TORCH WITH INSIDE CLUTCH WIRING DIAGRAM ........................................................ 20
8.0 – TROUBLESHOOTING ............................................................................................................... 21
9.0 – ORDERING INFORMATION ...................................................................................................... 22 9.1 REPLACEMENT PARTS ....................................................................................................................... 22 9.2 GUN STANDARDS CHART ................................................................................................................... 22
THANK YOU…
For selecting a Tregaskiss TOUGH GUN™ Robotic MIG gun. Manufacturing operations demand extremely dependable robotic equipment. With this in mind, the TOUGH GUN MIG Gun was designed and engineered to be a reliable tool to support high production within a robotic cell. As the name implies, the TOUGH GUN MIG Gun is made from durable materials and components engineered to perform in a rugged welding environment. Your TOUGH GUN MIG Gun is completely assembled and ready to weld, and has undergone numerous quality checks to ensure high performance. The instructions and illustrations in this technical guide make it easy for you to maintain your TOUGH GUN MIG Gun. Please read, understand, and follow all safety procedures. Keep this Technical Guide booklet as a handy reference when ordering complete guns, parts and special options. For technical support and special applications, please call the Tregaskiss Technical Service Department at 1-855-MIGWELD (644-9353) within Canada and the U.S.A. or fax 1-877-737-2111. International customers can reach the same Technical Service Department at +1-519-737-3030 or by faxing +1-519-737-1530. Our trained technicians are available between 8:00 a.m. and 5:00 p.m. EST, and will answer your application or repair questions.

3
Tregaskiss employees build TOUGH GUN MIG Guns for the world’s welding professionals. We are always striving to improve our products and services, and would appreciate receiving your suggestions or comments. Please contact us immediately if you experience any safety or operating problems.
WARRANTY
Product is warranted to be free from defects in material and workmanship for the period specified below after the sale by an authorized Buyer. Should there be a defect please refer to our Return Merchandise Policy.
PRODUCT WARRANTY PERIOD
TOUGH GUN™ Robotic MIG Guns and Components 180 days
TOUGH GUN Reamer 1 year
TOUGH GARD™ Spatter Cleaner 1 year
TOUGH GUN Robotic Peripherals (Clutch, Sprayer, Wire Cutter, Mounting Arms)
1 year
Low-Stress Robotic Unicables (LSR Unicables) 2 years
Tregaskiss reserves the right to repair, replace or refund the purchase price of non-conforming product. Product found not defective will be returned to the Buyer after notification by Customer Service. Tregaskiss makes no other warranty of any kind, expressed or implied, including, but not limited to the warranties of merchantability or fitness for any purpose. Tregaskiss shall not be liable under any circumstances to Buyer, or to any person who shall purchase from Buyer, for damages of any kind including, but not limited to any, direct, indirect incidental or consequential damages or loss of production or loss of profits resulting from any cause whatsoever, including, but not limited to, any delay, act, error or omission of Tregaskiss. Genuine Tregaskiss™ parts must be used for safety and performance reasons or the warranty becomes invalid. Warranty shall not apply if accident, abuse, or misuse damages a product, or if a product is modified in any way except by authorized Tregaskiss personnel.
GENERAL SAFETY
Before installation or operation of TOUGH GUN™ Robotic MIG Guns, please read the safety precautions listed below:
1. Do not touch live electrical parts. The following should be checked to prevent electrical shock. a. Faulty or damaged equipment is repaired or replaced. b. Equipment is off when not in use.
2. Ensure that all safety devices, guards, shields or barriers are properly in place and connected correctly before allowing operation of the equipment.
3. CSA Standard W117.2 CODE FOR SAFETY IN WELDING AND CUTTING obtainable from the Canadian Standards Association, Standards Sales, 178 Rexdale Boulevard, Rexdale, Ontario, Canada M9W 1R3.
4. ANSI Standard Z49.1 CODE FOR SAFETY IN WELDING AND CUTTING obtainable from the American National Standards Institute, 1430 Broadway, New York, NY 10018.
CALIFORNIA PROPOSITION 65 WARNING This product, when used for welding or cutting, produces fumes or gases which contain chemicals known to the State of California to cause birth defects and, in some cases, cancer. This product contains chemicals, including lead, known to the State of California to cause cancer, and birth defects or other reproductive harm. Wash hands after use.
(California Health & Safety Code Section 25249.5 at seq.)

4
POWER PIN
WELDING WIRE
THUMB SCREW
SET SCREW
FEEDER ADAPTOR
QUICK CONNECT BLOCK
FEEDER ADAPTOR LINER
1.0 – INSTALLATION
1.1 INSTALLING QUICK CONNECT BLOCK TO Feeder
STEP #1
Insert the correct feeder adaptor liner for desired wire diameter (2 provided) flush with the threaded end of the feeder adaptor.
Tighten setscrew.
Thread feeder adaptor into Quick Connect block and tighten.
STEP #2
Position assembly into feeder adaptor and trim liner within 1/16” (1.6 mm) of the drive rolls and remove burrs if necessary.
Secure assembly into feeder.
Thread gas hose nipple into feeder gas fitting.
Connect power cable to 1/2” (13 mm) power bolt with appropriate lug.
Tighten all connections.
Feed welding wire through assembly by hand and tighten drive rolls.
1.2 INSTALLING GUN TO QUICK CONNECT BLOCK
NOTE: Ensure correct liner and contact tip are utilized. Examine and replace power pin o-rings if necessary.
STEP #1
Guide welding wire into power pin.
Insert power pin to shoulder.
Tighten thumbscrew securely.
STEP #2
With gun mounted on robot (see below "Installing Gun to Gun Mount Arm"), feed wire through gun. It may be necessary to remove contact tip when feeding small wire sizes.
Recheck the following: proper gas flow, drive roll pressure, voltage and wire feed speed
DRIVE ROLLS

5
1.3 INSTALLING GUN TO GUN MOUNT ARM
With arm mounted to robot, loosen the two screws on the gun mount arm with a 5 mm Allen wrench.
STEP #2
Insert gun, nozzle first, into opening of gun mount arm. Ensure that key on gun housing is lined up with and fully inserted into keyway in gun mount arm.
Tighten two screws on gun mount arm with a 5 mm Allen wrench.
IMPORTANT: It is necessary that the gun
be fully seated in the gun mount arm. If it is not, and gun is removed or replaced, TCP may be affected.
1.4 INSTALLING CLUTCH CABLE TO GUN
Install orange jumper cable (12" / 0.3 m) supplied with the robotic safety clutch to the switch connection at the clutch.
Install the other end of the jumper cable to the connector on the gun housing.
STEP #1
SAFETY CLUTCH
GUN MOUNT ARM
ROBOT
M6 SHCS (5 mm ALLEN WRENCH)
SAFETY CLUTCH
ROBOT
GUN MOUNT ARM
M6 SHCS 5 mm ALLEN WRENCH
GUN KEY
KEY WAY
FLUSH WITH ARM
6
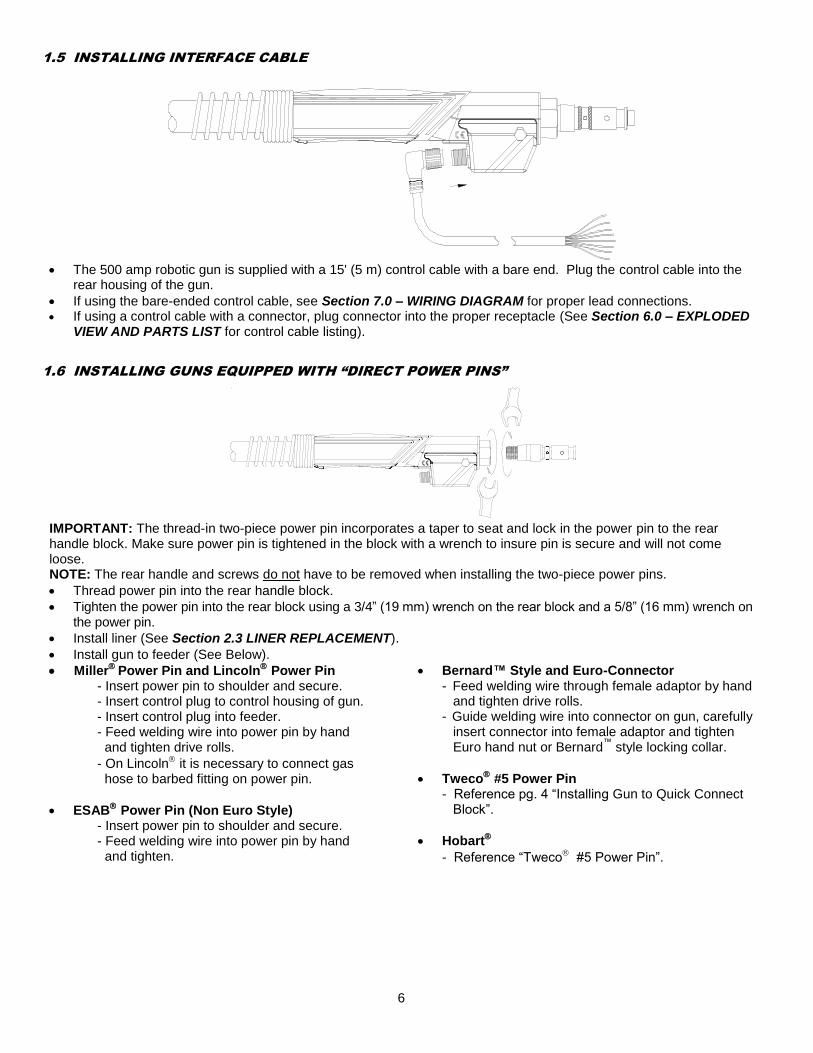
1.5 INSTALLING INTERFACE CABLE
The 500 amp robotic gun is supplied with a 15' (5 m) control cable with a bare end. Plug the control cable into the
rear housing of the gun.
If using the bare-ended control cable, see Section 7.0 – WIRING DIAGRAM for proper lead connections. If using a control cable with a connector, plug connector into the proper receptacle (See Section 6.0 – EXPLODED
VIEW AND PARTS LIST for control cable listing).
1.6 INSTALLING GUNS EQUIPPED WITH “DIRECT POWER PINS”
IMPORTANT: The thread-in two-piece power pin incorporates a taper to seat and lock in the power pin to the rear handle block. Make sure power pin is tightened in the block with a wrench to insure pin is secure and will not come loose. NOTE: The rear handle and screws do not have to be removed when installing the two-piece power pins.
Thread power pin into the rear handle block.
Tighten the power pin into the rear block using a 3/4” (19 mm) wrench on the rear block and a 5/8” (16 mm) wrench on the power pin.
Install liner (See Section 2.3 LINER REPLACEMENT).
Install gun to feeder (See Below).
Miller Power Pin and Lincoln Power Pin
- Insert power pin to shoulder and secure. - Insert control plug to control housing of gun. - Insert control plug into feeder. - Feed welding wire into power pin by hand and tighten drive rolls.
- On Lincoln it is necessary to connect gas hose to barbed fitting on power pin.
ESAB Power Pin (Non Euro Style) - Insert power pin to shoulder and secure. - Feed welding wire into power pin by hand and tighten.
Bernard™ Style and Euro-Connector - Feed welding wire through female adaptor by hand and tighten drive rolls. - Guide welding wire into connector on gun, carefully insert connector into female adaptor and tighten Euro hand nut or Bernard
™ style locking collar.
Tweco #5 Power Pin - Reference pg. 4 “Installing Gun to Quick Connect Block”.
Hobart
- Reference “Tweco #5 Power Pin”.

7
2.0 – MAINTENANCE
2.1 NOZZLE AND CONTACT TIP SYSTEMS
IMPORTANT:
Neck insulator MUST be in place before welding to properly insulate neck armor.
Check all parts to ensure that connections are tight before welding.
The retaining head MUST be tightened with a 5/8” (16 mm) wrench to prevent the contact tip from overheating.
DO NOT use pliers to remove or tighten the retaining head or scoring may result.
Removal and Replacement
Nozzle
Pull slip-on nozzles off with a twisting motion.
When installing the nozzle, ensure that it is fully seated.
Contact Tip
Thread the contact tip into the retaining head.
Torque to 30 in.-lbs. (3.5 Nm).
The Tregaskiss Tip Tool (Part # 450-18 – for heavy-duty tips) or a pair of weld pliers are the optimal tools for contact tip installation.
Retaining Head
Thread retaining head onto Neck with a 5/8” (16 mm) wrench.
Torque to 80 in.-lbs. (9 Nm).
DO NOT use pliers to remove or tighten the heavy duty retaining head or scoring may result.
Neck Insulator
The Neck insulator is pressed onto the Neck by hand with the aluminum side towards the Neck and the black insulation towards the nozzle.
2.2 NECK REPLACEMENT
STEP #1
There is a protective ring that must be rotated to expose the Neck set screw.
Using a 5 mm Allen wrench, loosen screw 1/4 turn to remove neck.
Pull Neck directly out of connector cone assembly.
SAFETY CLUTCH
GUN MOUNT ARM
ROBOT ARM
NECK
5 mm ALLEN WRENCH
HEAVY DUTY NOZZLE VARIOUS SIZES AVAILABLE
NECK INSULATOR
HEAVY DUTY TOUGH LOCK CONTACT TIP
HEAVY DUTY TOUGH LOCK RETAINING HEAD
8
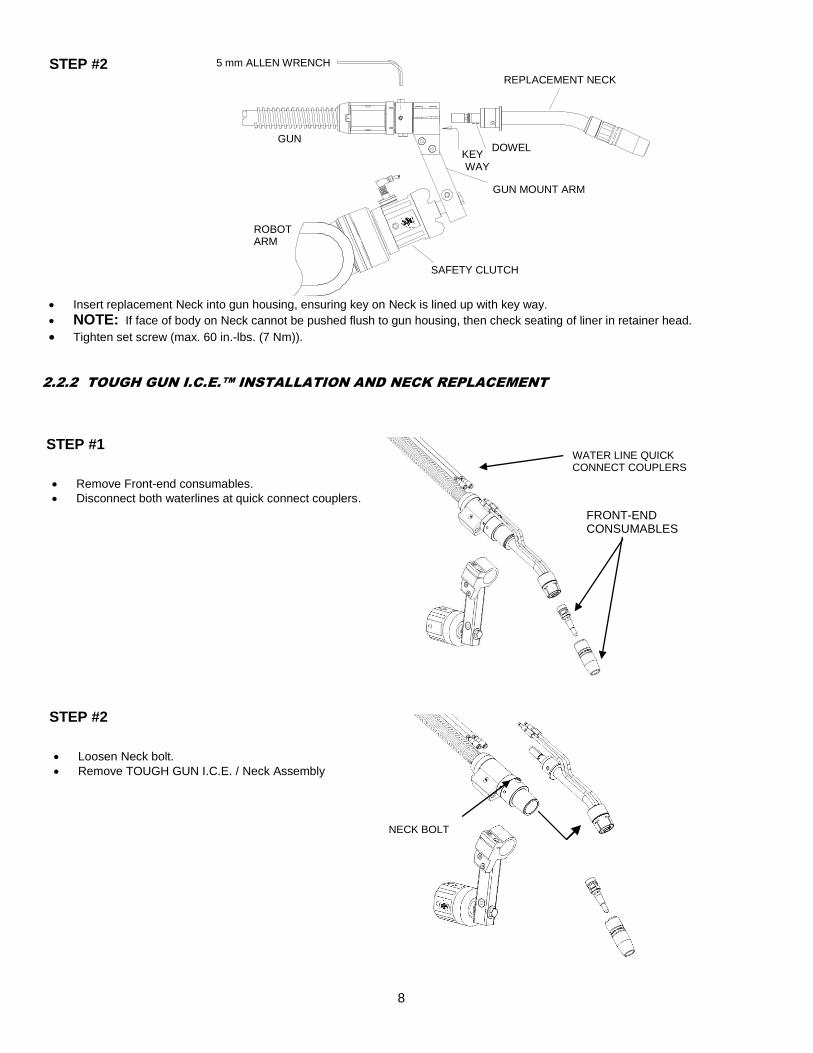
STEP #2
Insert replacement Neck into gun housing, ensuring key on Neck is lined up with key way.
NOTE: If face of body on Neck cannot be pushed flush to gun housing, then check seating of liner in retainer head.
Tighten set screw (max. 60 in.-lbs. (7 Nm)).
2.2.2 TOUGH GUN I.C.E.™ INSTALLATION AND NECK REPLACEMENT
STEP #2
Loosen Neck bolt.
Remove TOUGH GUN I.C.E. / Neck Assembly
STEP #1
Remove Front-end consumables.
Disconnect both waterlines at quick connect couplers.
SAFETY CLUTCH
ROBOT ARM
GUN
GUN MOUNT ARM
5 mm ALLEN WRENCH
KEY WAY
DOWEL
REPLACEMENT NECK
NECK BOLT
WATER LINE QUICK CONNECT COUPLERS
FRONT-END CONSUMABLES

9
STEP #3
Insert the connector housing of new torch into the
mounting arm.
NOTE: If existing clamping device on arm has 2 bolts, remove only the front bolt and snug the rear bolt.
Reinstall TOUGH GUN I.C.E./ Neck Assembly
Tighten Neck bolt to torque specification (60 in.-lbs. or 7 Nm).
STEP #4
Reinstall front end consumables.
Connect waterlines with quick connect couplers.
Fasten waterline bracket with bolt (bracket and bolt included with TOUGH GUN I.C.E. assembly.
NOTE: Ensure both bolts are tightened on the
mounting arm clamp.
Place leather wrap around unicable and water lines
2.3 LINER REPLACEMENT
2.3.1 CONVENTIONAL LINER REPLACEMENT
STEP #1
NOTE: Ensure power supply is off and gun is removed from feeder before proceeding.
Remove nozzle, tip and gas diffuser.
If power pin uses a liner set screw, loosen the setscrew using a 5/64” Allen wrench.
If power pin is thread-in liner type, using a 10 mm wrench, turn thread-in liner collet counterclockwise until liner is free from the power pin.
With gun straightened, grip conduit liner with pliers and remove.
CONNECTOR HOUSING
MOUNTING ARM
WATERLINE BRACKET
10
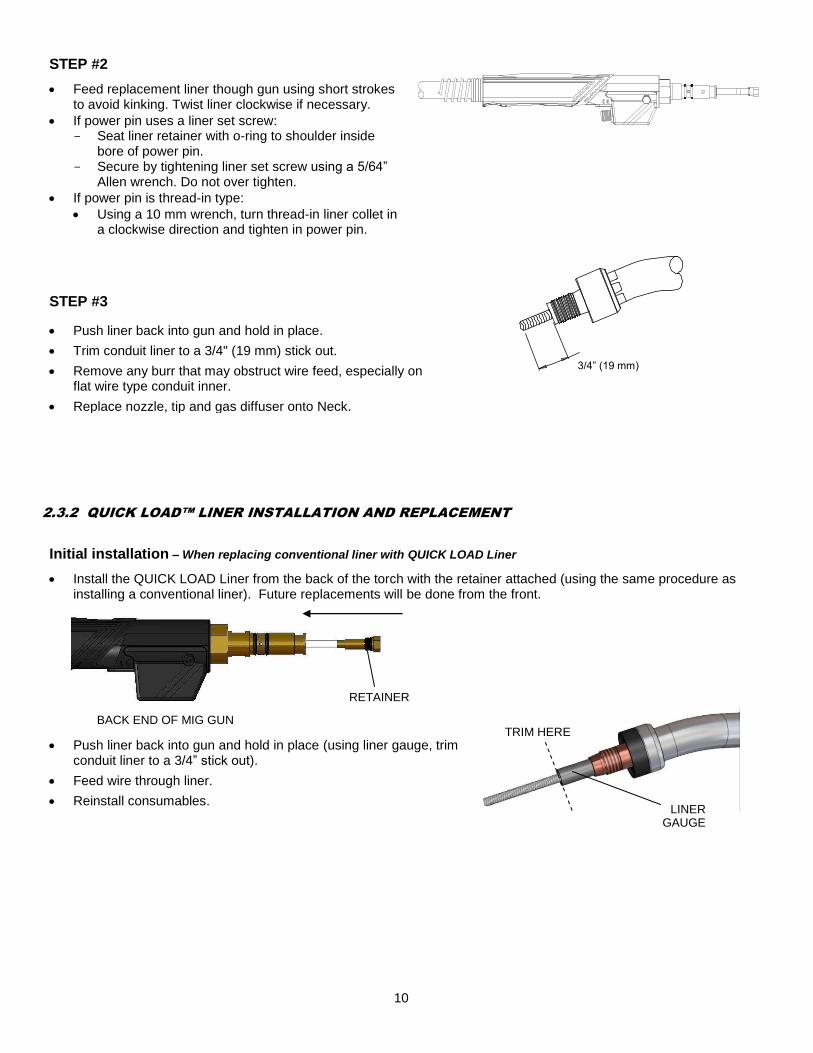
STEP #2
Feed replacement liner though gun using short strokes to avoid kinking. Twist liner clockwise if necessary.
If power pin uses a liner set screw: - Seat liner retainer with o-ring to shoulder inside
bore of power pin. - Secure by tightening liner set screw using a 5/64”
Allen wrench. Do not over tighten.
If power pin is thread-in type:
Using a 10 mm wrench, turn thread-in liner collet in a clockwise direction and tighten in power pin.
STEP #3
Push liner back into gun and hold in place.
Trim conduit liner to a 3/4" (19 mm) stick out.
Remove any burr that may obstruct wire feed, especially on flat wire type conduit inner.
Replace nozzle, tip and gas diffuser onto Neck.
2.3.2 QUICK LOAD™ LINER INSTALLATION AND REPLACEMENT
Initial installation – When replacing conventional liner with QUICK LOAD Liner
Install the QUICK LOAD Liner from the back of the torch with the retainer attached (using the same procedure as installing a conventional liner). Future replacements will be done from the front.
Push liner back into gun and hold in place (using liner gauge, trim conduit liner to a 3/4” stick out).
Feed wire through liner.
Reinstall consumables.
3/4” (19 mm)
BACK END OF MIG GUN
RETAINER
LINER GAUGE
TRIM HERE

11
Replacement of QUICK LOAD Liner
Remove consumables (nozzle, contact tip and retaining head).
Remove existing QUICK LOAD Liner.
Insert the new QUICK LOAD Liner through the Neck using the welding wire as a guide (short strokes will prevent from kinking).
Once liner stops feeding, give it an extra push to ensure it is inserted completely.
Push liner back into gun and hold in place. Using liner gauge, trim
conduit liner to a 3/4” stick out. HELPFUL HINT: Before cutting
liner make a mark and pull it back out past the end of the welding wire and then cut it and push the liner back into place securely. This will help with feeding the wire threw the contact tip afterwards.
Reinstall consumables.
2.4 POWER PIN REPLACEMENT
STEP #1
Remove liner from gun (See Section 2.3 LINER REPLACEMENT).
Unthread power pin and remove using 1" wrench on the power pin block and a 5/8 or 3/4" wrench on power pin.
Repeat procedure in reverse order to install replacement power pin.
POWER PIN
LINER
NECK
LINER GAUGE
TRIM HERE
12
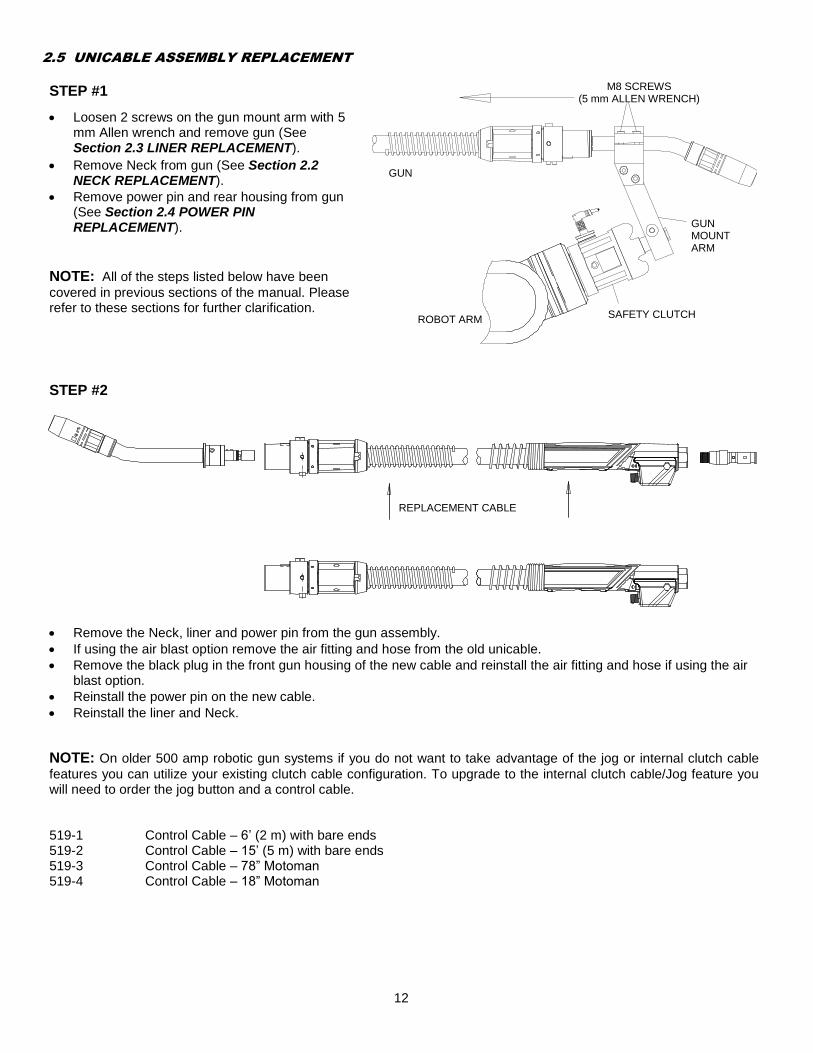
2.5 UNICABLE ASSEMBLY REPLACEMENT
STEP #1
Loosen 2 screws on the gun mount arm with 5 mm Allen wrench and remove gun (See Section 2.3 LINER REPLACEMENT).
Remove Neck from gun (See Section 2.2 NECK REPLACEMENT).
Remove power pin and rear housing from gun (See Section 2.4 POWER PIN REPLACEMENT).
NOTE: All of the steps listed below have been
covered in previous sections of the manual. Please refer to these sections for further clarification.
STEP #2
Remove the Neck, liner and power pin from the gun assembly.
If using the air blast option remove the air fitting and hose from the old unicable.
Remove the black plug in the front gun housing of the new cable and reinstall the air fitting and hose if using the air blast option.
Reinstall the power pin on the new cable.
Reinstall the liner and Neck.
NOTE: On older 500 amp robotic gun systems if you do not want to take advantage of the jog or internal clutch cable
features you can utilize your existing clutch cable configuration. To upgrade to the internal clutch cable/Jog feature you will need to order the jog button and a control cable. 519-1 Control Cable – 6’ (2 m) with bare ends 519-2 Control Cable – 15’ (5 m) with bare ends 519-3 Control Cable – 78” Motoman 519-4 Control Cable – 18” Motoman
REPLACEMENT CABLE
SAFETY CLUTCH ROBOT ARM
GUN MOUNT ARM
GUN
M8 SCREWS (5 mm ALLEN WRENCH)
13
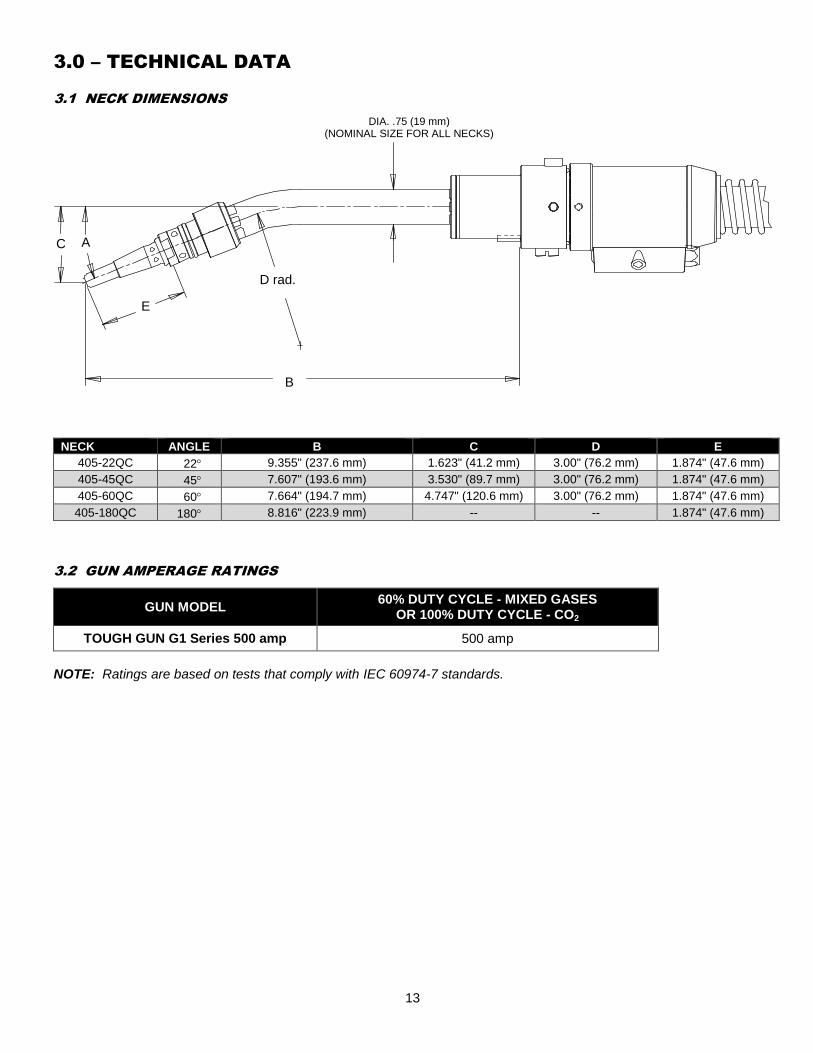
3.0 – TECHNICAL DATA
3.1 NECK DIMENSIONS
NECK ANGLE B C D E
405-22QC 022 9.355" (237.6 mm) 1.623" (41.2 mm) 3.00" (76.2 mm) 1.874" (47.6 mm)
405-45QC 045 7.607" (193.6 mm) 3.530" (89.7 mm) 3.00" (76.2 mm) 1.874" (47.6 mm)
405-60QC 060 7.664" (194.7 mm) 4.747" (120.6 mm) 3.00" (76.2 mm) 1.874" (47.6 mm)
405-180QC 180 8.816" (223.9 mm) -- -- 1.874" (47.6 mm)
3.2 GUN AMPERAGE RATINGS
GUN MODEL 60% DUTY CYCLE - MIXED GASES
OR 100% DUTY CYCLE - CO2
TOUGH GUN G1 Series 500 amp 500 amp
NOTE: Ratings are based on tests that comply with IEC 60974-7 standards.
DIA. .75 (19 mm) (NOMINAL SIZE FOR ALL NECKS)
C A
E
D rad.
B

14
4.0 – COMPLETE ASSEMBLY OPTIONS
ITEM PART
NUMBER DESCRIPTION
CLUTCH AS-708 Safety Clutch
ARMS AS-306-1 For 180 Neck
AS-306-2 For 22 Neck
AS-306-3 For 45 Neck
NECKS 405-22QC 22° Neck
405-45QC 45° Neck
405-60QC 60° Neck
405-180QC 180° Neck
INSULATING DISCS AS-101-01 Blank
AS-101-2
ABB® IRB-1400, IRB-1500, IRB-2000, IRB6, Miller® MRV-2, MRV-10, FANUC®, ArcMate 100, 120, 100i, 120i, Motoman® SK6, OTC® MRV-6, DR-4400
AS-101-4 ABB IRB-2400
AS-101-5 OTC DR200
AS-101-12 Panasonic® W0500, ABB MAC500
AS-102-5 KUKA®
AS-102-6 HITACHI® PW-10
ITEM PART
NUMBER DESCRIPTION
INSULATING DISCS cont’d AS-102-7 Milacron® T3-776
AS-102-8 COMAU® SMART-3S
AS-102-10 Motoman K6, K10, Hitachi® M6060
AS-102-11 Hitachi M5030, M6030
AS-102-12 Panasonic AW - 500
AS-103-3 FANUC ArcMate JR, SR
AS-103-4 KUKA®
AS-104-3 Milacron
AS-105-1 Miller MRK-5
AS-105-2 Miller MRH-2, MR-1000
AS-106-1 Motoman L10W, L106, Panasonic AW7000
AS-106-3 Mitsubishi® MZ10
AS-106-5 Samsung® FARA AM1
AS-106-6
Panasonic AW-005A, AW-010A NACHI® 7603
AS-107-1 NACHI VORG-35
AS-107-2 NACHI SC15
AS-107-3 NACHI SC 35-01
AS-107-4 NACHI 8633
AS-107-9 Puma® ALL
AS-110-1 Kawasaki® ALL
DISC
CLUTCH
NECK .
MOUNTING ARM

15
5.0 – NECK INSPECTION SPECIFICATIONS
Remove consumables from Neck (nozzle, retaining head, shock washer etc.).
Insert Neck into fixture turn Neck completely clockwise against shoulder (if using a new air cooled robotic neck with flat and 2 locator pins, lightly tighten set screw on neck flat).
Push check pin towards neck and see if point lines up with small hole in end of gauging point.
If neck is not aligned, slip point and bend until alignment is correct.
Remove gauging point and Neck in reverse order as described above.
Store parts for your fixture in the locations provided to prevent misplacing them.
G-495-6 BENDING HANDLE
G-405-3 CHECKING PIN BLOCK ASSY’
(INCLUDES G495-3)
PLACEHOLDER FOR G-495-8 TOUGH GUN I.C.E. GAUGE POINTER
G-405-4 DATUM BLOCK FOR AIR-COOLED & TOUGH GUN I.C.E.
G-405-7 GAUGE POINTER
G-495-3 GAUGE CHECKING PIN

16
6.0 – EXPLODED VIEW AND PARTS LIST
ITEM PART # DESCRIPTION
1 STANDARD NOZZLES (SELF INSULATED)
401-4-62 5/8" (16 mm) Bore - 1/8" (3 mm) Tip Recess 401-4-75 3/4" (19 mm) Bore - 1/8" (3 mm) Tip Recess SHORT ARC NOZZLE
401-8-62 1/8" (3 mm) Tip Stick-Out 401-81-62 1/8" (3 mm) Tip Stick-Out HEAVY DUTY NOZZLES (SELF INSULATED)
401-6-62 5/8" (16 mm) Bore - 1/8" (3 mm) Tip Recess 401-7-62 5/8" (16 mm) Bore - 1/4" (6 mm) Tip Recess (Brass) 401-7-87 7/8" (22 mm) Bore - 1/4" (6 mm) Tip Recess (Brass) 401-42-50 1/2" Bore - 1/8" Tip Recess - Bottleneck* 401-48-50 1/2" Bore - 1/8" Tip Stick-Out - Bottleneck* 401-48-62 5/8" Bore - Flush Tip - Bottleneck* 401-71-62 5/8" - 1/8" Tip Recess (Brass)* 401-81-62 5/8" Bore - 1/8" Tip Stick-Out 401-87-62 5/8" Bore - 1/8" Tip Stick-Out (Brass) *NOTE: Straight Inside Bore Nozzles
2 402-11 NECK INSULATOR
3 404-32 Retaining Head - TOUGH LOCK™
4 454-1-2 Retaining Ring Only 5 402-16 O-Ring Only
6 TOUGH LOCK™ CONTACT TIPS
403-20-30 For 0.030” (0.8 mm) Wire 403-20-35 For 0.035” (0.9 mm) Wire 403-20-1.0 For 1.0 mm Wire 403-20-45 For .045” (1.2 mm) Wire 403-20-52 For .052” (1.3 mm) Wire 403-20-116 For 1/16" (1.6 mm) Wire 403-20-564 For 5/64" (2.0 mm) Wire 403-20-332 For 3/32" (2.4 mm) Wire 403-20-364 For 3/64" Aluminum (1.2 mm) 403-20-1.4 For 1.4 mm Wire TOUGH LOCK TAPERED CONTACT TIPS 403-21-30 For 0.030” (0.8 mm) Wire 403-21-35 For 0.035” (0.9 mm) Wire 403-21-1.0 For 1.0 mm Wire 403-21-45 For 0.045” (1.2 mm) Wire 403-21-116 For 1/16” (1.6 mm) Wire
ITEM PART # DESCRIPTION
7 NECKS 405-22QC 22 Degree 405-45QC 45 Degree 405-60QC 60 Degree 405-180QC Straight
8 405-1QC O-Ring (10)
9 UNICABLE ASSEMBLY (COMPLETE WITH REAR HANDLE) 513-204 4' (1.2 m) Service - 500 amp 513-204.5 4.5' (1.4 m) Service - 500 amp 513-205 5' (1.5 m) Service - 500 amp 513-206 6' (1.8 m) Service - 500 amp 513-208 8' (2.4 m) Service - 500 amp 513-210 10' (3.05M) Service - 500 amp UNICABLE ASSEMBLY - WIRE BRAKE 513-404 4’ (1.2 m) Service - 500 amp 513-404.5 4.5’ (1.4 m) Service - 500 amp 513-4XX XX = Length - 500 amp
10 414 Quick Connect Power Pin (Tweco® #4) 414-11-116 Miller® Power Pin - For 0.035" - 1/16" Wire 414-11-332 Miller 3/32 414-12 Tweco #5 414-16 Lincoln® 414-32 Panasonic® 414-33 Lincoln (Short)
10A 414-400 Power Pin Block 10B 214 Tweco
214-2 Lincoln 214-4 L-Tec MT Series 214-6-116 Miller 1/16 214-6-332 Miller 3/32 214-7 Lincoln (Short) 214-12 Tweco 214-13 Panasonic 414-1 O-Ring - Tweco 414-11-2 O-Ring for Miller Power Pin
11 Wire Connectors (Included with 510-200-3 Terminal Housing)
12 510-200-3 Terminal Housing

17
ITEM PART # DESCRIPTION
13 510-200-2 Housing - Less Jog Button
14 417 Quick Connect Block Assembly (Tweco® #4)
417-50 Quick Connect Block Assembly (Euro)
417-60 Quick Connect Block Assembly (Tweco #5)
15 Feeder Adaptor
(To be used with 417 (Tweco #4, 417-50 (Euro) & 417-60 (Tweco #5) Quick Connect Block)
418-3 ESAB (Non-Euro Style) & Hobart® (BetaMIG)
418-4 Hobart 27
418-5 Lincoln (LN-4, LN-5) & (SWM-31)
418-6 Lincoln (LN-7, LN-8, LN-9,LN-22, LN-24 SUITCASE)
418-7 Linde (SWM-14)
418-8 Linde (ALL MODELS EXCEPT SWM-14, 31, 32, L-TECH 35)
418-9 Miller (10A, 30A) (MillerMATIC 35S Feeder)
418-10 Miller (52E, 54E, 521, 522 SERIES & MillerMATIC 200,250,& 60)
418-14 OTC
418-21 Gilliland
418-26 Lincoln Adaptor (NA2)
418-27 Panasonic
418-35 Kobelco®
16 CONTROL CABLES
519-1 Control Cable- 6' (2 m)
519-2 Control Cable - 15' (5 m)
519-3 Control Cable - 78" Motoman
519-4 Control Cable - 18" Motoman
17 CONDUIT LINERS
415-26 Liner Retainer for QUICK LOAD™ Liner (QLL)
415-35-6Q QLL for 0.035” (0.9 mm) & .045 (1.2 m) Wire - 6' (1.8 m)
415-116-6Q QLL for 0.035” (0.9 mm) & .045 (1.2 m) Wire - 6' (1.8 m)
415-35-6 For 0.035” (0.9 mm) & .045” (1.2 m Wire - 6' (1.8 m)
415-35-10 For 0.035” (0.9 mm) & .045” (1.2 m) Wire - 10' (3.05 m)
415-35-2 For 0.035” (0.9 mm) & .045” (1.2 m) Aluminum Wire - 5' (1.5 m)
415-116-10 For 0.052” (1.3 mm) - 1/16” (1.6 mm) Wire -10' (3.05 m)
415-332-6 For 0.078” (1.9 mm) - 3/32” Wire - 6' (1.8 m) - Flat Wound
415-332-15 For 0.078” (1.9 mm) - 3/32” Wire - 15' (5 m) - Flat Wound
415-332-153 For 0.078” (1.9 mm) - 3/32” Wire - 15' (5 m) - Round Wound
ITEM PART # DESCRIPTION
A. AIR-BLAST KIT OPTION – PART# 508-A (INCLUDES ALL ITEMS BELOW)
1 Insert
2 Fitting
3 Air Line
4 Fitting
B. Wire BRAKE OPTION (ONLY IF GUN WAS ORIGINALLY ORDERED WITH Wire BRAKE)
1 450-17 Holder Tool
2 495-18-35 Jump Liner for 0.045” Wire (or Smaller)
495-18-116 Jump Liner for 0.052-1/16”
3 Pushing Unit (Included in WB-045 and WB-116 Kits)
4 499-9-15 Air Line 15’
5 498 Holder for 0.045” Wire (or Smaller)
498-116 Holder for 0.052” TO 1/16” Wire
WB-045 Wire Brake Kit for 0.045” Wire (Includes Items 1-5 Above)
WB-116 Wire Brake Kit for 1/16” Wire (Includes Items 1-5 Above)
C. EURO CONNECTOR KIT OPTION – PART# 677E (INC. ALL ITEMS BELOW)
1 425-11 Hand Nut
2 425-20E Euro Connector Body
3 677H Handle Assembly
A
B
C
18
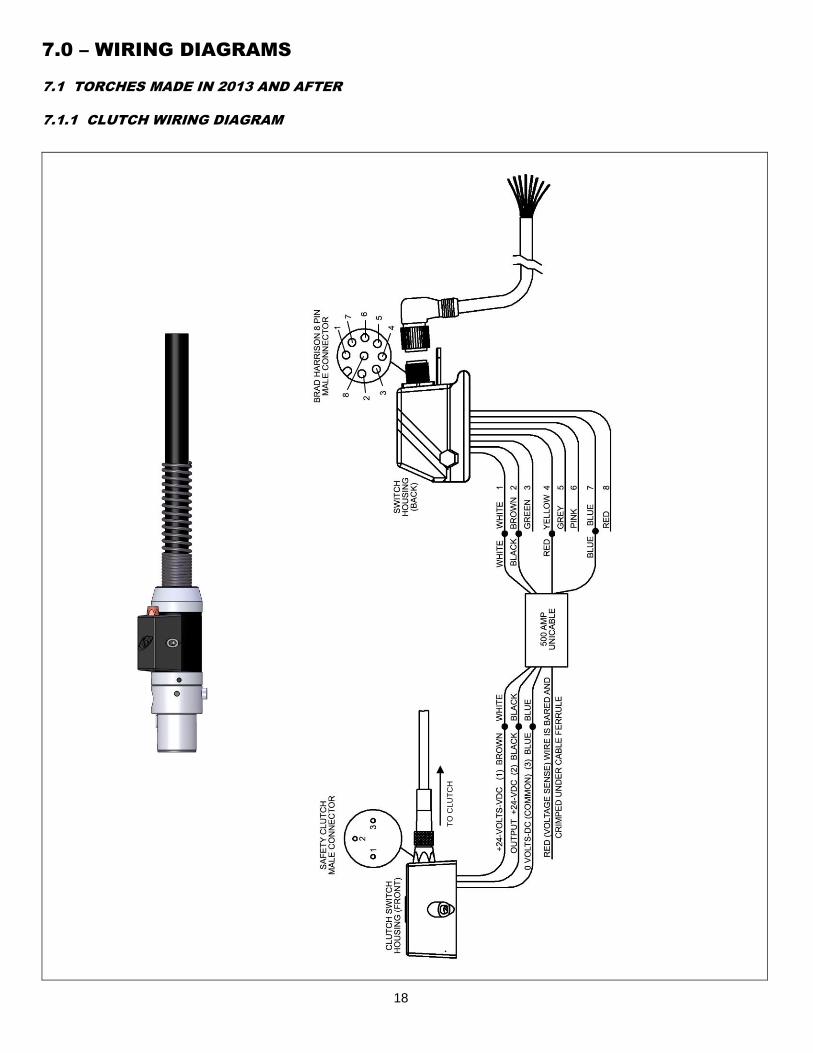
7.0 – WIRING DIAGRAMS
7.1 TORCHES MADE IN 2013 AND AFTER
7.1.1 CLUTCH WIRING DIAGRAM
TO
CLU
TC
H

19
7.1.2 CLUTCH WITH JOG BUTTON WIRING DIAGRAM
20
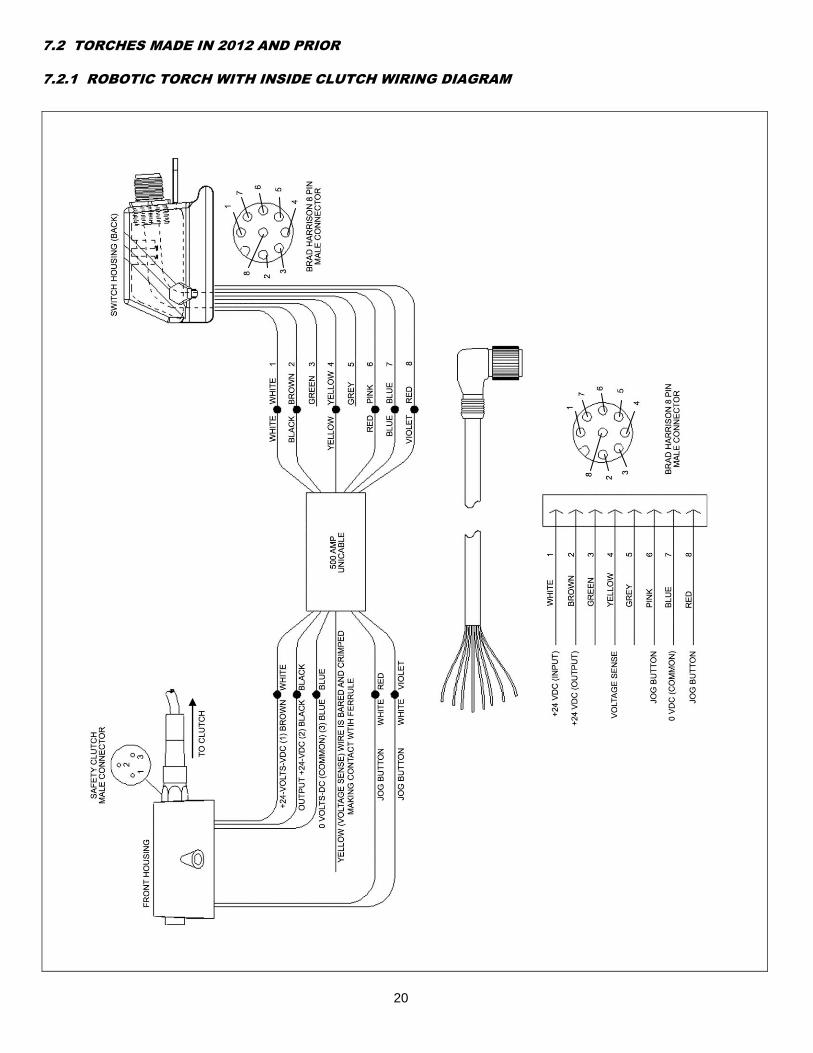
7.2 TORCHES MADE IN 2012 AND PRIOR
7.2.1 ROBOTIC TORCH WITH INSIDE CLUTCH WIRING DIAGRAM
21
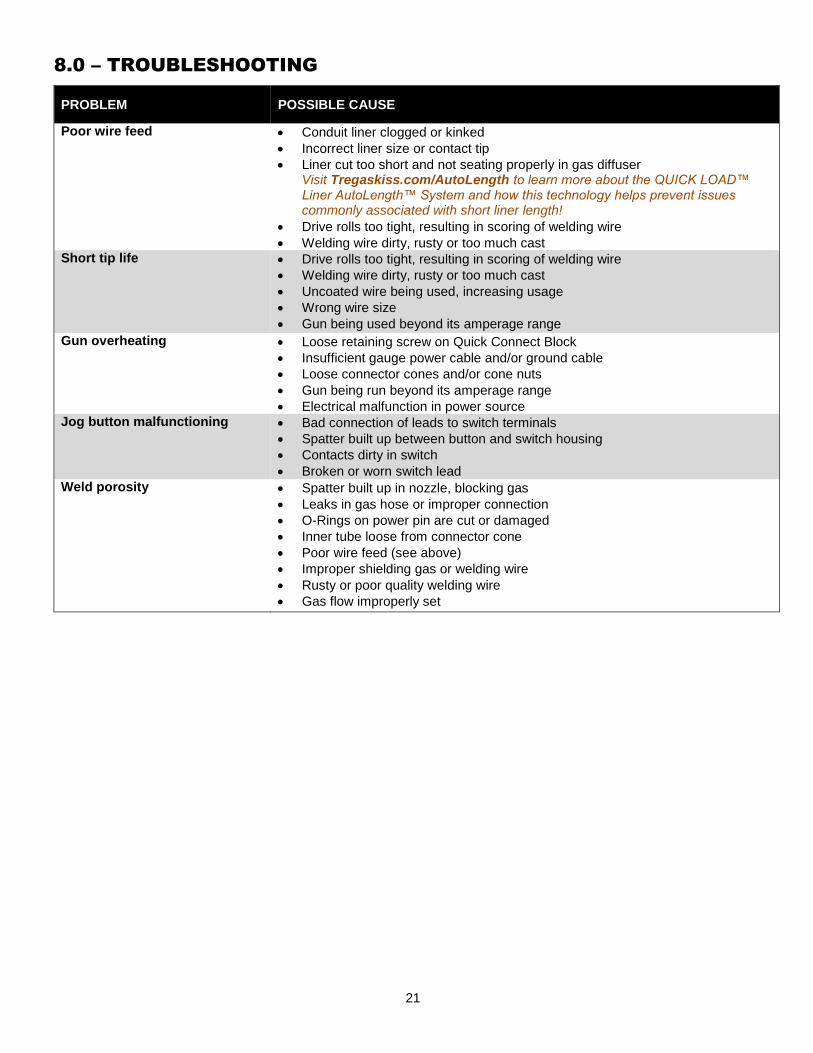
8.0 – TROUBLESHOOTING
PROBLEM POSSIBLE CAUSE
Poor wire feed Conduit liner clogged or kinked
Incorrect liner size or contact tip
Liner cut too short and not seating properly in gas diffuser Visit Tregaskiss.com/AutoLength to learn more about the QUICK LOAD™ Liner AutoLength™ System and how this technology helps prevent issues commonly associated with short liner length!
Drive rolls too tight, resulting in scoring of welding wire
Welding wire dirty, rusty or too much cast Short tip life Drive rolls too tight, resulting in scoring of welding wire
Welding wire dirty, rusty or too much cast
Uncoated wire being used, increasing usage
Wrong wire size
Gun being used beyond its amperage range
Gun overheating Loose retaining screw on Quick Connect Block
Insufficient gauge power cable and/or ground cable
Loose connector cones and/or cone nuts
Gun being run beyond its amperage range
Electrical malfunction in power source Jog button malfunctioning Bad connection of leads to switch terminals
Spatter built up between button and switch housing
Contacts dirty in switch
Broken or worn switch lead
Weld porosity Spatter built up in nozzle, blocking gas
Leaks in gas hose or improper connection
O-Rings on power pin are cut or damaged
Inner tube loose from connector cone
Poor wire feed (see above)
Improper shielding gas or welding wire
Rusty or poor quality welding wire
Gas flow improperly set

22
9.0 – ORDERING INFORMATION
9.1 REPLACEMENT PARTS
To order replacement parts for your TOUGH GUN G1 Series Robotic MIG Gun, please contact Tregaskiss Customer Service by phone at 1-855-644-9353 (Canada and US) or +1-519-737-3030 (international). For help with configuring a part number for a new TOUGH GUN G1 Series Robotic MIG Gun, please visit Tregaskiss.com/ConfigureMyGun. Tregaskiss Customer Service can also assist you by phone at 1-855-MIGWELD (644-9353) from within Canada and the USA. International customers can reach the same Tregaskiss Customer Service team by calling +1-519-737-3030.
9.2 GUN STANDARDS CHART
Standard models are shipped with the following components:
GUN MODEL NECK NOZZLE RETAINING
HEAD DIFFUSER NECK INSULATOR CONTACT TIPS
500 amp 405-180QC 401-6-62 404-32 --- 402-11 403-20-xx
Distributed by:
10/13 REV E TG020