the art of woodsball collection - wordpress.com the first opportunity, he is willing to let the...
TRANSCRIPT

The Art of Woodsball Collection
David “Soulspitter” Roberts
Team L337 KREW, Guthrie OK
Book of the Paintball Sniper
“There Is Such a Thing as a Paintball Sniper”
A short memoir by Nashorn
For some reason, Soulspitter’s warnings didn’t register in my head as I was barking out orders atop the fort tower and I took a nice one to the head. There was no mask (or hair for that matter) protecting that
part of my nub and it hurt like hell. As I was making my way back to the kill box, I saw my “killer” sitting in the bushes. I felt like giving him a nasty stare or something, but I had been warned at least
twice by that “passing bush” of my pending doom. I just told myself mentally Suck it up, Nash. I should’ve listened better and got my head down. Oh well. As I was approaching the opposing player
dressed in a dark navy Coast Guard work uniform, I heard the faint but distinct report of an Ion firing-once. The fact that it was only one shot grabbed my attention. As sudden as the sound occurred, there
was a very perceptible split second of dead silence. Then came a thundering
THWACK!
It was the undeniable sound of a head shot. The paintball on plastic impact was so loud, for a moment, I thought it had cracked the player’s mask. As the enemy player realized he was out, he called out, “good hit.” It was the finest kill I had ever seen. It was so clean, so…absolute. It was then that I recalled the
sniper creed: “One Shot. One kill”. Soulspitter then appeared from the bushes to confirm his kill. He had a mask on and a ghillie suit, but one only had to look in those eyes to know there was a $hit-eatin’ grin
blazing underneath. I believe there was a certain pep in his step as he trotted by and a slight victory jump followed by a thumbs up as he passed by. To this day I’m not sure why I thanked him for avenging my “death” in my mind rather than words. I took a couple of seconds to make sure the now “dead” guy was removing himself from play. I then looked back in the direction that Soulspitter was headin’ to, but he had already become one with the forest again. I thought to myself, “Poor bastards. Dave’s on a roll.”
Foreword
Choosing the role of sniper in paintball is not something usually
thought of as favorable. Many paintball players believe that it’s simply
not possible to play a sniper role in paintball due to the inherent
inaccuracy of paintball technology. Other players have grown accustom to
the kids who buy bagged ghillies from their local high volume sporting
goods store and abuse their use by playing on after a bounce. Playing
this role requires an undistracted dedication to the class and a strict
code of honor during game play. I tell you now and hear me well, the role
of a paintball sniper is one that can be mastered, and once mastered
becomes one of the most rewarding experiences in all of paintball. The
sniper role greatly enhances the power of squad tactics and special
mission viability. It, in my opinion, is also one of the most lethal
playing styles of woodsball.
Class Types and Abilities to Master
The Common Sniper
Specializes in the covert kill rather than heated battle of an
assault class.
The Ambush Camper
Specializes in the ambush kill - Defensive role - Takes stationary
positions of concealment along likely travel conduits and
objectives to kill his enemy from a position of concealment.
The Ghost Flanker
Specializes in the group assist kill - Assist role - Stealth flanks
off of an assaulting body to kill his enemy from a position of
stealthy assault.
The Stalker
Specializes in the solo kill, offensive role, stalks his prey and
takes him out from a position of stealth.

Type: Common Sniper
- Specializes in the covert kill rather than heated battle of an
assault class.
1 Shadows - The sniper has uses the power of shadow, striving to maintain
a position free of direct sunlight at all times.
2 Accuracy - The sniper has uses the power of accuracy, constructing a
weapon of consistent velocity & accurate barrel system.
2.1 Paint to bore matching – The sniper must have a barrel system
capable of matching paint to bore size for any given paint size.
2.2 Consistent Velocity – The sniper must utilize technological
improvements in regulator technology, preserving the performance of
the regulator with cleanliness and lubrication. +- 5fps is ideal.
Velocity will never be consistent if the paint to bore has not been
properly matched, or if using poor quality paint.
2.3 Stability – The third requirement for accuracy mandates the use
of a properly mounted non-magnifying scope and butt stock. The
scope should be mounted angling inward toward the sniper’s body. If
right handed the scope should be on the left of the gun. The scope
should also be recessed back toward the sniper. The scope should
come to within half an inch of the sniper’s visor at the firing
position. The butt stock should never be directly behind the
barrel. It should be about 10 inches below the barrel. This can be
accomplished by purchasing the correct type of stock system to
provide elevation to the gun when held at the shoulder. The sniper
should never have to tilt his head to see his scope.
3 Silence - The sniper uses the power of silence, ensuring the low sound
profile of both himself and his weapon.
4 Concealment - The sniper has uses the power of concealment,
constructing a ghillie suit effective for his environment.
5 Evasion - The sniper has uses the power of evasion, mastering the art
of the L-drop and last stand.
5.1 L-drop – When the sniper’s location has been compromised he may
evade his enemy by executing an L-drop. Upon taking fire the sniper
runs away from the enemy for 10 sprinted steps, hooks a 90 degree
turn and continues to sprint until he passes an obstruction,
immediately dropping to one knee and freezing. The enemy will
continue looking for you in the direction of your previous
movement.
5.2 Last Stand - When the sniper’s location has been compromised he
may choose to “all in” rather than evade his pursuers. If an L-drop
has failed you and death is inevitable, sprint away from your enemy
with no more than 5 steps, jump into the air while turning your
body to face the enemy, tilting your body parallel to the ground,
and using the toes of your boot to break your fall into a prone

position. Firing should commence before you hit the ground and
continue until you or your enemy has perished.
6 Six - The sniper has learned the power of six, always aware of what is
behind him. Look behind you constantly, listen behind you constantly.
7 Cover – The sniper has learned the power of cover, keeping a mental fix
on the most useful cover within his immediate vicinity as he stalks. The
experienced sniper will never, ever be in a position of taking fire while
having to look for cover as he will already know exactly where to go upon
receiving it.

Archetype: Ambush Camper
- Specializes in the ambush kill - Defensive role - Takes stationary
positions of concealment along likely travel conduits and
objectives to kill his enemy from a position of concealment.
1 Patience - The ambush camper knows the value of patience. Never firing
at the first opportunity, he is willing to let the enemy get very close
before annihilating a squad of enemy units.
1.1 Eye on the Prize – The ambush camper centers his reticle right
smack dab in the middle of the approaching enemy’s point man’s
face. If at any time the point man of the enemy squad shows signs
of spotting you, blow his head off.
2 The Hide - The ambush camper knows the value of a hide, able to
identify and quickly prepare positions of concealed cover from his
surroundings.
2.1 Nest – The ambush camper has learned how to properly make an
ambush nest. Using live tree branches, the ambush camper snaps a
limb near the thickest part of the torn off branch to form a fork
and uses the fork to hang the branch from a long stick placed
between two trees. Much like hanging clothes on a hangar rack, the
ambush camper prepares a hide in this fashion with 1, 2 or 3 sides
to the hide. Additional hanging of live vegetation around the hide
further decreases it’s visibility by introducing different depths
of field to the camouflage.
2.2 Depression – The ambush camper takes note of depressions and
slopes in his environment. These can be readily used as sniper
hides without the need to prepare hung foliage. Higher ground does
have the advantage in a firefight, so once you’ve used your hide to
make a kill do not proceed to attempt to defend it; relocate ASAP.
3 Escape - The ambush camper has learned the art of escape, able to
quickly abandon a blown hide and execute a baited ambush immediately
afterward. High rate of success of the L-drop tactic is a requirement.
3.1 Transitional Escape - An experienced ambush camper has created
multiple hides along a predetermined retreat route. Upon taking
fire the ambush camper retreats to the next hide for an additional
ambush. Take care however to ensure that the successive hides are
not visible to the previous. Enemy line of sight must be broken
during hide transitions.
3.1.1 Round Robin Escape – A highly effective transitional
escape is one that forms a half circle allowing the ambush
camper to come round upon his defensive objective from a
completely different angle. This usually requires three or
more successive hides.

Archetype: Ghost Flanker 1
- Specializes in the group assist kill - Assist role - Stealth flanks
off of an assaulting body to kill his enemy from a position of
stealthy assault.
1 Opportunity - The Ghost Flanker has learned the value of opportunity,
performing flanking maneuvers from an assault squad he encounters without
their knowing.
2 Crybaby - The Ghost Flanker has learned the art of the crybaby, able to
consistently shoot his opponents in the back of the head with a single
shot. This often results in weaker enemies dropping to the ground in a
fetal position.
3 Strategist - The Ghost Flanker has learned the tactics of crack the
whip and horse shoe, able to quickly execute the movements of role.
3.1 Crack the Whip – Support: “the handle” – a solid fast shooting
suppression gunner with lots of ammo, taking point & hunkering down
upon enemy contact. Assault: “the whip” – a fast running assault
gunner who immediately begins a medium range flanking maneuver
against the enemy forcing them into the start of a curved retreat.
Ghost Flank: “the tip” – a very fast, very stealthy tip of the whip
executes the real flank on the same side as the assault, just out
of visual range of the combat coming full circle around the enemy.
3.2 Horse Shoe – In a squad of at least 5, crack the whip is
available to be executed on both sides of an opposing force. This
is executed exactly like crack the whip, but with the support
gunner covering the assault movements while dual ghost flankers
close in on both sides of the enemy. This tactic is extremely
effective in paintball.
1

Archetype: Stalker
- Specializes in the solo kill, offensive role, stalks his prey and
takes him out from a position of stealth.
1 Thrill of The Hunt - The stalker has learned the value of an adrenal
rush, able to recognize the onset of a rush of adrenaline and mentally
fuel it to increase its potency.
1.1 The voluntary release of adrenalin is not something developed over
night. It requires an absolute dedication of one’s soul to the art
of his craft and usually years of practice. The sniper must get
good enough to where he becomes accustom to prevailing over his
enemies with such ease that the rush he gets in the field during
the “thrill of the hunt” moment becomes so familiar that he can
replicate it by merely thinking about it. While this may not count
as directly controlling the release of adrenalin, it is in effect
the same. Without something truly motivational as a source of
concentration, the effect is lost. It takes practice; try it calmly
sitting in a chair with your eyes closed. Once this ability becomes
consistent the sniper can use the familiarity of the induced
adrenal rush to greatly amplify the effect of the real thing in the
field. As soon as you sense that adrenal release begin focusing on
what you do to produce it while in non-combat. Go back to your
practice. The result is a catastrophic boost of reflexes, speed and
endurance, very useful. This technique has one downside – once it
wears off your legs will be very shaky so be ready for it. From my
own experience expect about 5 years of practicing it before it
becomes a dependable tool. Use this technique immediately before
making a kill at the end of a stalk, especially against multiple
simultaneous targets.
2 Profile - The stalker has learned the value of his profile, always
ensuring that he approaches an enemy in a straight line with gun centered
and head down so that at a glance he appears motionless.
3 Wildlife - The stalker has learned the value of wildlife, always taking
note when a he comes upon a bird. An animal in an area almost always
guarantees that the sniper will not encounter an enemy in that direction.
4 Statue – The stalker has learned the value of being motionless.
Oftentimes a ghillie stalker will be approaching his prey only to have
his prey suddenly turn to scan his sector. Fight the instinct to drop to
the ground or hide behind something. Instead, simply freeze in whatever
position you are in and stare him down. There is a very high chance that
enemy eyes will pass right over you.
5 Creep – The stalker has mastered the art of the ghillie creep,
comfortably walking through the battlefield unnoticed.
5.1 Lightfoot – The stalker takes great care to place his footing
on soundless ground. Where leaves are unavoidable the stalker rolls

his steps slowly to prolong and stagger the report of identifiable
footsteps.
5.2 Sloth – The stalker takes great care not to make any sudden
movements, or any movements of average human speed that would be
detectable at a distance. The stalker maintains a slow pace,
working his way into killing range, ready to freeze at any moment.

Appendix A: Ghillie Construction
When attaching netting to a paintball mask use 2 part epoxy. It takes a
while, and you don’t need very much. Only glue around the edges of the
netting, or in spots along the edge.
Building The Superior Quality Ghillie Suit
To build a
durable ghillie
you must use
durable
materials.
Pictured here is
palm tree raffia
from Madagascar
purchased from
Hobby Lobby as
“Madagascar
Grass.” Each
hanging color
you see here
comes in a bag
for $5. The dye
packs are $2 each
and can dye
about 5 times the
amount shown
here. The salt
cans (2) cost
about $3 each.
Be sure to hose
down the raffia
right after
hanging it up
before it dries

out.
After allowing
the raffia to
completely dry
using a pair of
shears the grass
is easily cut
into manageable
piles for later
use. I wrap the
piles individually
with a couple
rubber bands
when not in use.
The BDU of
choice is a high
quality multicam
with a velcro
neck collar. The
collar greatly
helps with
holding down the
camo mask,
shown later. The
pants/jacket
shown here were
purchased at an
army surplus
store for about
Click to enlarge

$60 each.
Many websites
sell ghillie
netting and
ghillie kits with
cheap netting
prone to fray and
rot. You can
easily spot the
garbage from the
good stuff – the
garbage looks
like plain nylon
twine tied
together to form
a net. It is soft
and flimsy when
handled.
The good stuff is
UV, abrasion &
rot resistant
interwoven
nylon. Its strong,
and has a life
span longer than
the BDU’s you
sew it to. It is
stiff and not
flimsy when

handled.
A lot of people
suggest using
dental floss to
sew with, but in
my experience it
is a poor choice.
Unwaxed dental
floss is very
prone to abrasion
and fray. It
doesn’t last very
long even when
glued. Waxed
floss doesn’t
absorb the glue
and ends up with
very
poor adhesion.
Don’t even think
about heavy
fishing line.
Having tried
various things
nothing stands up
to the test of time
and abuse like
heavyweight
nylon upholstery
thread. It
is abrasion, UV,
mildew &
moisture

resistant. It also
adheres to glue
like a champ.
I’ve tried several
different types of
glues, shoe glue,
Goop, rubber
cement, and
various fabric
glues. A product
called Liquid
Stitch is by far
the reining
champ. It can be
used indoors,
doesn’t give off
any nasty fumes
and
adheres fantastica
lly to threads and
fabrics. It’s also
very flexible
when it dries and
can be used to
“rubberize”
portions of a
ghillie that need
extra durability
(thumb loops, tie
straps). Cost $6
per tube, usually
requiring 4-5

tubes per suit.
I use about 90%
palm raffia and
about 10% burlap
strips. Walmart,
Academy &
pretty much any
sporting goods
store sells pre-
dyed camo
burlap hunting
blinds. Simply
unfold it a bit and
cut long strips
out 5 at a time to
mass produce
strips. Cost $15.

Start the building
process by laying
your netting
down on the floor
stretched semi-
tight and
anchored down
with
some dumbbells
or something
heavy. Lay out
your pants and
jacket & safety
pin them in
place. Cut out the
netting to form fit
your suit as you
see fit; full body
for the traditional
‘walking bush’,
rear only for the
traditional crawl
suit, or, like this
build, an archery
specific cutout.
Once the netting
patterns are
completely cut
out, fold the
netting over the
pants and jacket
& safety pin
them in place. It
will take a long

time to sew all
the netting in
place and the
pins will keep the
netting aligned
while you sew.
Start by sewing
the perimeter or
the netting to the
BDU fabric. Put
stitches into
every single inch
of that
netting perimeter
anchor it down
good. Once you
have that done
sew across large
open areas of the
netting and make
several spot
stitches within
the smaller areas.
The idea is to
keep the netting
secure but
not too tied
down to the
fabric. You need
to leave room to
tie on the ghillie
material. Apply a
good amount of
Liquid Stitch to

all visible thread.

In the picture I
have attached tie
down strands and
rubberized them
with Liquid
Stitch, as
mentioned above.
Note the stitching
on the shoulder
leaves a little
extra netting in
the pleat gaps as
well as runs
along the strong
seams of the
jacket.

Stitch your
thumb loops to
the sleeves and
apply a thick
coating of Liquid
Stitch to both the
stitching and the
loops themselves.
You’ll need to
get your fingers
dirty to really rub
in the glue but
it’ll pay off. The
loops will gain
tremendous
durability by the
“rubberization”
process. Word of
advice – don’t
get any glue on
the hairs of your
arms or legs..
Trying to remove
it results in lots
of pain.
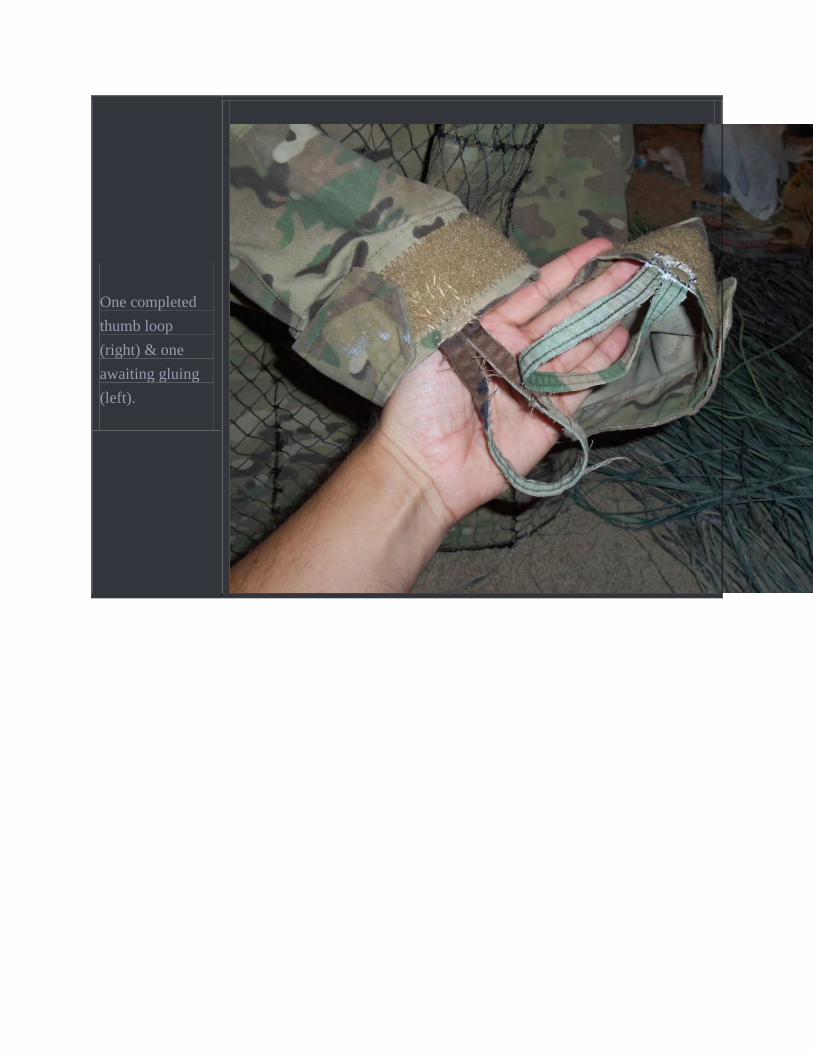
One completed
thumb loop
(right) & one
awaiting gluing
(left).

Starting from the
bottom of the
jacket, begin
attaching the
dyed raffia. I
have found that
an index finger
knuckle to
fingernail is
about the perfect
length for
spacing. You can
mix up the
pattern any way
you wish, but my
personal
preference is to
go with a perfect
balanced mix
using a color
rotation as I
attach the raffia.
After each cluster
of strands is tied
I bend them
down into a V so
that they overlap
with
their neighbor str
ands.

The vertical
spacing depends
on how long your
strands are. The
need to be far
enough away that
they don’t bunch
up, but close
enough to
overlap with the
previous layer.
Note –
“Madagascar
Grass” as Hobby
Lobby calls it is
very tough stuff.
It looks like a
cactus at first but
after a about a
weeks worth of
trampling
through the
woods it will be
properly
conditioned &
quite a bit
more frayed than
you see in these
pictures. The
ends of the raffia
split and tear
forming a much
greater camoufla

ge texture.
Properly tied
down ghillie
leaves very little
of
the original jacke
t fabric still
visible. Not
pictured here is
the burlap, added
later in random
places about 10
inches apart; it
really gives the
suit a perfecting
look. By
attaching the
ghillie in
intentionally
spaced
overlapping rows
you leave room
to lift up a
section & tie in
additional
material as you
see fit – burlap
strips, un-dyed
raffia for the
dead of winter,
etc.

Continue up the
jacket until you
reach the neck &
begin on the arms
& front.

Once all the
raffia is on tie on
a few strips of
burlap here &
there. Don’t
worry about pre-
fraying it, it’ll
break up REAL
fast when you
start moving
around in the
trees. In this
picture the ghillie
around the neck
has not been
trimmed yet.
Depending on
your choice of
head covering
you may want to
leave or trim
around the neck
line. For this
ghillie I chose to
make a ball
cap cover out of
a fully clothed
(no mesh) camo
lighted bill ball
cap, shown later.

For the pants,
build just like
you did the
jacket. For this
suit (archery
build) I would
likely be
spending a lot of
time crouched on
my knees.
The knee
pads shown here
are not stitched
on, simply apply
a large amount of
Liquid Stitch to
the pants, slap on
your foam
padding, apply
some more glue
& then the fabric
covering. As a
bit of artistic
boredom I glued
on some raffia
bits to the front
of them to see
how it’d look. I
expected it to be
gone within the
first days use
but surprisingly
most of it has
held up after four
outings.No
matter what
design you go
with on the pants
make sure you

Now make your
head cover.
There are many
ways – boonie
hat, mesh, netting
alone, hoodie,
etc. My personal
preference by
FAR is the plain
jane ball cap. I
love having a bill
to move the
ghillie away from
my eyes and to
provide side
curtains for my
face. Unless I’m
looking right at
you my face is
mostly obscured
the entire time.
It’s very easy to
cut the netting for
ball caps. Simply
cut out 6 good
sized pizza slices
and sew them to
the hat. Glue it
up good & you’re
set.

This hat happens
to be one of those
hats that have the
dual LED lights
on the front,
added bonus for
those times when
you need a light
quick.

Tie on your
strands, trim
around the face
& eyes as
needed, toss on a
little burlap &
you’re good.
When you put on
your cover run
your hands along
the inside of the
hanging ghillie
and flare it out so
that it rests
slightly on your
shoulders. This
keeps it from
from your neck
line.

Once in the field
the gaps in the
netting allow for
live vegetation to
be inserted. A
face mask
completes the
camo covering
for the head.

Trimmed
neckline for the
hat. Getting
poked in the ears
and the back of
the head
constantly is very
annoying.

Archer Specific
ghillie
layout: Leave
the bow arm bare
on the inside as
well as the
portion of the
chest that the
string would be
in conflict with.
Even the smallest
strand of raffia or
burlap is enough
to throw your
shot a mile off as
well as endanger
yourself and your
equipment. A
simple strand of
raffia or burlap
left untrimmed in
the wrong place
could throw your
string off your
cams & ruin a
really good day.
Additionally, I
leave a small
elastic archers
brace attached to
my left sleeve to
keep the jacket
fabric out of the
way at all times.
(not pictured
here) Once the
brace is in place
netting &
additional ghillie

Brand new
untrimmed &
unconditioned
archers guillie,
pardon the messy
room we’re still
unpacking
believe it or not.

Conditioned
front.

Conditioned left.

Conditioned
back.

Conditioned
right.
Conditioning is
very important
for a suit made of
raffia. The suit is
ready for use, but
not completely
broken in. Right
now the only part
of my suit that is
conditioned to
my complete
satisfaction is the
ankle portion. I’ll
post another
series of shots in
a few months of
the suits’
conditioning
progress.

This picture
shows the
effectiveness of
the suit
WITHOUT
live vegetation ti
ed in. With
live vegetation ta
ken from the
plants pictured
here it the
effectiveness
would be ten
fold. Note the use
of shadow
placement. Even
without
live vegetation in
the tie downs the
texturing of the
raffia gives the
suit a very
planty-like
appearance. In
this picture I am
in my one knee
down one knee
up shooting
position with
head tucked
down.

Same as the
previous picture,
but zoomed in a
bit so you can see
me looking at the
cameraman. I can
see completely
through with
both eyes in that
small space in the
head area.

One of the suits I
use for paintball,
this one is winter
only using the
same material as
the archery suit.

Another well-
conditioned light
ghillie. The raffia
on this suit is 3-9
years old and has
seen very heavy
use.
Share this: