the bowflex xceed plus home gym assembly manual
TRANSCRIPT

The Bowflex Xceed™ Plus Home Gym
Assembly Manual
P/N 001-6907 Rev. D (06/12/2007)

Table of Contents
Specifications / Approvals . . . . . . . . . . . . . . . . . . . . . . 1Important Safety Precautions. . . . . . . . . . . . . . . . . . . . 2Before You Begin.. . . . . . . . . . . . . . . . . . . . . . . . . . . . . 3Parts Reference Guide. . . . . . . . . . . . . . . . . . . . . . . . . . 4Hardware Guide. . . . . . . . . . . . . . . . . . . . . . . . . . . . . . 6Assembly Guide . . . . . . . . . . . . . . . . . . . . . . . . . . . . . . . 7Contact Information. . . . . . . . . . . . . . . . . . . . . . . . . . . 17
Congratulations.on.your.commitment.to.fitness.and.your.purchase.of.the.Bowflex.Xceed™.Plus.home.gym ..Before.assembling.your.Bowflex.Xceed™.Plus.home.gym.please.read.the.Assembly.Manual.and.follow.the.Important.Safety.Precautions ..For.information.on.how.to.use.your.Bowflex.Xceed™.Plus.home.gym.refer.to.the.Bowflex.Xceed™.Plus.Owner’s.Manual ...
Nautilus,.Inc .16400.S .E ..Nautilus.DriveVancouver,.Washington,.USA.98683
1-800-NAUTILUS.(1-800-628-8458)Fax.(800).898-9410Nautilus .com.Bowflex .com

Bowflex.Xceed™.Plus.Assembly.Manual �
Specifications / Approvals
Regulatory Approvals:
Product Weight 157.lbs ...(71.kg)
Product Dimensions 53".(135.cm).long.x.49".(124.cm).wide.x.82".(208.cm).high
Workout Area 96".(244.cm).long.x.78".(198.cm).wide
Number of Exercises Over.60
Power Rod® Resistance 310.lbs ...(141.kg)
Power Rod® Upgradability 410.lbs ...(186.kg .)
User Weight Limit 300.lbs ...(136.kg)
Meets:. EN957-1..Class.H. EN957-2..Class.H
Meets:. ASTM.F2276-05. ASTM.F2216-05
US
US
Product Specifications:

� Bowflex.Xceed™.Plus.Assembly.Manual
Important Safety Precautions
Used to call attention to POTENTIAL hazards that could result in personal injury or loss of life.
READ ALL INStRUCtIoNS BEfoRE ASSEmBLING tHE mACHINE.
ImPoRtANt SAfEtY INStRUCtIoNSThe.following.definition.applies.to.the.word.“Warning”.found.throughout.this.manual:
For your safety, perform all assembly steps in the sequence given. Improper assembly can lead to injury.
Some components can be heavy or awkward to handle. Get help if necessary.

Bowflex.Xceed™.Plus.Assembly.Manual �
Before You Begin
Before You Assemble
Please take the time to read all assembly instructions before attempting to assemble your Bowflex Xceed™ Plus home gym..Select.where.you.are.going.to.locate.your.machine.carefully ..The.best.place.for.your.Bowflex.Xceed™.Plus.home.gym.is.on.a.hard,.level.surface ..
Select.a.workout.area.that.provides.a.minimum.clearance.behind.the.rod.box.of.0 .5.ft.(15.cm).and.a.total.width.of.6 .5.ft.(2 .0.m) ...Allow.a.minimum.of..3 .0.ft.(0 .9.m).free.space.in.front.of.the.machine .
Basic Assembly Principles
Here.are.a.few.basic.tips.that.will.make.your.assembly.of.the.Bowflex.Xceed™.Plus.home.gym.quick.and.easy ..By.using.these.principles,.you.can.simplify.each.process.and.save.yourself.extra.time.and.effort .
1 .... To.make.the.assembly.process.go.faster,.gather.the.pieces.you.need.for.each.step.and.thoroughly.read.the.assembly.instructions.for.that.step.prior.to.starting.assembly.for.the.step .
2 .... When.tightening.a.locknut.on.a.bolt,.use.a.combination.wrench.to.grip.the.locknut.and.ensure.that.it.is.fastened.securely .
3 .... When.attaching.two.pieces,.gently.lift.and.look.through.the.bolt.holes.to.help.guide.the.bolt.through.the.holes .
4 .... As.a.general.rule,.and.for.all.bolts.and.nuts.on.your.Bowflex.Xceed™.Plus.home.gym,.turn.bolts.or.nuts.toward.the.right.to.tighten.and.left.to.loosen ..Or.you.can.remember.the.mnemonic:.“Righty.tighty,.lefty.loosey .”
Important: Leave aLL CabLeS CoILed and wrapped untIL your
bowFLex xCeed™ pLuS Home Gym IS FuLLy aSSembLed.

� Bowflex.Xceed™.Plus.Assembly.Manual
Leg Extension Attachment.
Parts Reference Guide

Bowflex.Xceed™.Plus.Assembly.Manual �
Lock.Knob .Leg.Extension.Backbone
2.Chrome.Tubes.(3/4")
4..Foam.Rollers 4..End.Caps.(3/4") 2.Snap.Hooks..&.2.Cables
50".Bent.Lat.Bar Squat.Bar 2..Squat.Straps 8..Snap.Hooks ..... . . . ...tools Included:
.Seat.Backbone Seat.Back
SeatBottom
.Upper.Lat.Tower Lat.Cross.Bar.with.Pulleys.
2..Hand.Grips
Lower.Lat.Tower.Frame.
Rod.Box.w/.Rods Seat..Support..Rail
Squat.Pulley.Frame Left.Pulley.Arm Right.Pulley.Arm
Base.Frame .Left.Frame.Rail . Right.Frame.Rail Rear.Cross..Member.
NOTE:.Specifications.Subject.to.Change.Without.Notice
Leg Extension Parts
NOTE:.Specifications.Subject.to.Change.Without.Notice
Cable Pulley Slider and Cable are included with pulley.
7/32”
3/16”
Parts Reference Guide
2.Hex.Wrenches
� Bowflex.Xceed™.Plus.Assembly.Manual
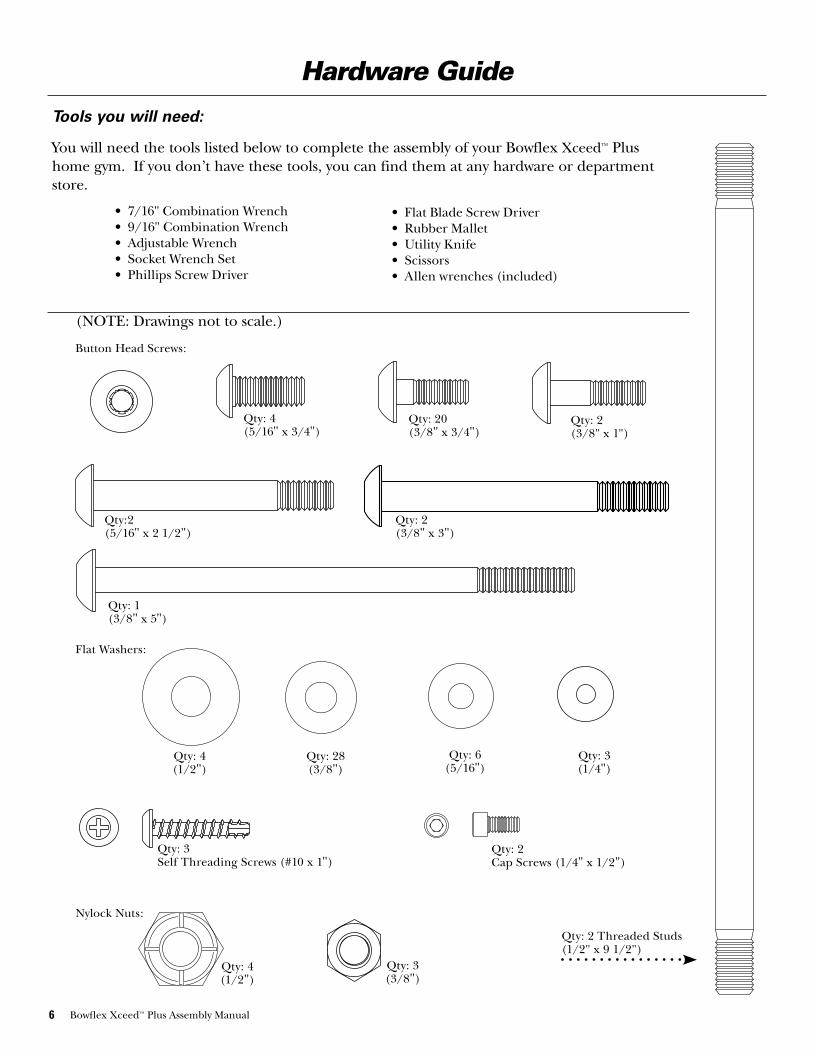
Qty:2.(5/16".x.2.1/2")
Qty:.2.(3/8".x.3")
Qty:.2..(3/8".x.1")
Qty:.4.(5/16".x.3/4")
Qty:.20.(3/8".x.3/4")
Qty:.2.Threaded.Studs.(1/2".x.9.1/2")
Qty:.1.(3/8".x.5")
Qty:.4.(1/2")
Qty:.3.(3/8")
Qty:.2.Cap.Screws.(1/4".x.1/2")
Qty:.3.Self.Threading.Screws.(#10.x.1")
Hardware Guide
Button.Head.Screws:.
Flat.Washers:
Qty:.28.(3/8")
Qty:.6.(5/16")
Qty:.3.(1/4")
Qty:.4.(1/2")
Nylock.Nuts:
Tools you will need:
You.will.need.the.tools.listed.below.to.complete.the.assembly.of.your.Bowflex.Xceed™.Plus.home.gym ...If.you.don’t.have.these.tools,.you.can.find.them.at.any.hardware.or.department.store .
(NOTE:.Drawings.not.to.scale .)
•...Flat.Blade.Screw.Driver•...Rubber.Mallet•...Utility.Knife•...Scissors•...Allen.wrenches.(included)
•...7/16".Combination.Wrench•...9/16".Combination.Wrench•...Adjustable.Wrench•...Socket.Wrench.Set.•...Phillips.Screw.Driver

Bowflex.Xceed™.Plus.Assembly.Manual �
Assembly Guide
Step 1 Base.Frame.Assembly
parts:. •...Base.Frame. •...Right.Frame.Rail. •...Left.Frame.Rail. •...Rear.Cross.Member
Hardware: ... •...6.Button.Head.Screws.(.3/8".X.3/4").. •....6.Flat.Washers.(3/8")
tool: ...7/32".Allen.Wrench..(or.Hex.Wrench)
1-1 ...Lay.all.parts.on.floor.as.shown .
1-2 ...Insert.Frame.Rail..connectors.into.the..Base.Frame.and..Rear.Cross.Member ...Secure.with.screws..and.washers.as.shown .
Finger tighten screws at this time.
Step 2 ..Lower.Lat.Tower.Assembly
parts:.. •...Lower.Lat.Tower.Frame. •...Rod.Box.with.Power.Rod®.Pack
Hardware: .. •...3.Self.Threading.Screws.(#10.X.1").. •...3.Flat.Washers.(1/4")
tool: phillips Screw driver
2-1 ...Lay.parts.on.floor.as.shown ..Firmly.slide.Rod.Box.into.Lower.Lat.Tower.Frame .
2-2 ...Fasten.the.Rod.Box.to.the..Lower.Lat.Tower.Frame.with..screws.and.washers.as.shown ...Tighten.screws.until.snug .
Self.Threading.Screws
Flat.Washers
Rod.Box.w/.Rods
Lower.Lat.Tower.Frame
Rear.Cross.Member
Right.Frame.Rail
Button.Head.Screws
Flat.Washers
Flat.Washers
Base frame
Button.Head.Screws
Left.Frame.Rail
Button.Head.Screws
Flat.Washers

� Bowflex.Xceed™.Plus.Assembly.Manual
Assembly Guide
Step 3 ...Install.Lower.Lat.Tower.Assembly
parts:. •...Lower.Lat.Tower.Assembly.. •...Base.Frame.Assembly.
Hardware: •..2.Button.Head.Screws.(3/8".X.3/4")•..2.Flat.Washers.(3/8")
tool: 7/32”.Hex.Wrench
3-1 ...Align.the.Lower.Lat.Tower.Assembly.over..the.Base.Frame ..Push.the.bottom.of.the.Lower.Lat.Tower.onto.the.connector.of.the.Rear.Cross.Member.as.shown .
3-2 ....Secure.Lower.Lat.Tower.Assembly..using.screws.and.washers.as.shown ..
Finger tighten screws at this time.
Step 4 Install..Seat.Support.Rail
parts:. •...Seat.Support.Rail. •...Base.Frame.Assembly
Hardware:.•...2.Button.Head.Screws.(3/8".X.3/4")•...2.Flat.Washers.(3/8")
tool: 7/32".Hex.Wrench
4-1 ...Slide.the.bottom.of.the.Seat.Support.Rail.onto.the.Base.Frame.connector.as.shown .
4-2 .....Slide.the.top.of.the.Seat.Support.Rail.onto.the.Lower.Lat.Tower.Assembly.connector.as.shown ..Secure.using.screws.and.washers..as.shown ..
Finger tighten screws at this time.
Base.Frame.Assembly
Button.Head.Screw
Flat.Washer
Button.Head.Screw
Flat.Washer
Base.Frame/..Lower.Lat.Tower
Assembly
Seat.Support.Rail
Flat.Washer
Button.Head.Screw
Button.Head.Screw
Flat.Washer
Lower.Lat.TowerAssembly

Bowflex.Xceed™.Plus.Assembly.Manual �
Step 6 ..Install.Pulley..Arms
parts:.. •...Right.Pulley.Arm. •...Left.Pulley.Arm
•...Main.Assembly
Hardware: •...4.Washers.(3/8")•...4.Button.Head.Screws..
(3/8".X.3/4")
tools: 7/32".Hex.Wrench
6-1...Slide.Left.and.Right.Pulley.Arms.onto.the.connectors.on.the.base.frame.as.shown .
6-2 .....Secure.Pulley.Arms.to.Base.Frame.using.screws.and.washers.as.shown ..
Finger tighten screws at this time.
Step 5 Install..Squat.Pulley.Frame
parts:.•...Squat.Pulley.Frame.Assembly •...Main.Assembly
Hardware: .•...1.Button.Head.Screw.(3/8"..X.5").•...1.Nylock.Nut.(3/8").•...2.Button.Head.Screws.(3/8".X.1").•...4.Washers.(3/8")
tools: 7/32".Hex.Wrench.&.Adjustable..or.Socket.Wrench.
5-1 ....Place.the.Squat.Pulley.Frame.behind.the.Seat.Support.Rail.and.align.the.top.screw.holes ..Secure.using.a.3/8".X.5".screw,.washer.and.nut.in.the.top.hole.as.shown .
5-2 ....Install.screws.and.washers.into.the.bottom.holes.of.the.Squat.Pulley.Frame.as.shown ..
Button.Head.Screw
Flat.Washers
Nylock.Nut
Squat.Pulley.Frame
Flat.Washers
Button.Head.Screws
Base.Frame.&.Lower.Lat.Tower.
Assembly
Flat.Washers
Button.Head.Screw
Button.Head.Screw
Right.Pulley.Arm
Left.Pulley.Arm
Button.Head.Screws
Washers
Assembly Guide

�0 Bowflex.Xceed™.Plus.Assembly.Manual
Step 8�...Install.Slider.Pulleys
parts:.. •...2.Slider.Pulleys.with.Cable.Assembly
•...Main.Assembly
Hardware: •...2.Cap.Screws.(1/4".X.1/2")
tools: 3/16.Hex.Wrench
8�-1 ...Unwrap.the.Slider.Pulley.and.uncoil.the.cable ..
8�-2 .Install.a.Slider.Pulley.onto.each.Pulley.Arm.as.shown ..Choose.any.of.the.four.holes.to.secure .
8�-3 ....Install.a.cap.screw.into.the.underside..of.each.Pulley.Arm,.as.shown .
Cap.Screw
Slider.Pulley.w/.Cable.Assembly
Cap.Screw
Slider.Pulley.w/.Cable.Assembly
Step 7�...Secure.Pulley.Arms
Hardware: .•...2.Threaded.Studs.(1/2".X.9.1/2")•...4.Nylock.Nuts.(1/2")•...4.Washers.(1/2")
tool: Rubber.Mallet
7�-1...Align.the.two.holes.in.the.Pulley.Arms.with.those.in.the.Lower.Lat.Tower.Assembly.and.secure.using.threaded.studs,.washers.and.nuts.as.shown .
Flat.Washers
Threaded.Studs
Nylock.Nuts
Nylock.Nuts
Flat.Washers
Assembly Guide

Bowflex.Xceed™.Plus.Assembly.Manual ��
Step 10 ..Leg.Extension.Assembly
parts:. •...Leg.Extension.Backbone. •...2.Chrome.Tubes. •...4.Foam.Rollers. •...4.End.Caps
tool:..Rubber.Mallet
10-1 ...Insert.Chrome.Tubes.through.the.upper.hole.and.one.of.the.lower.holes.in.the.Leg.Extension ..(Select.hole.for.your.comfort.level .)
10-2 ...Slide.Foam.Rollers.onto.the.Chrome.Tubes.and.secure.with.end.caps ..A.rubber.mallet.may.be.needed.to.secure.the.end.caps .
note: ...The.Leg.Extension.may.be.adjusted..during.workout.to.best.suit.your.height..and.personal.preferences .
Step 9 ..Seat.Assembly
parts:.. •...Seat.Backbone. •...Seat.Bottom
Hardware: .•...4.Button.Head.Screws.(5/16".X.3/4")•...4.Washers.(5/16")
tool: 3/16".Hex.Wrench
9-1 ...Install.the.Seat.Backbone.to.the..underside.of.the.Seat.Pad.using.screws.and.washers.as.shown .
Button.Head.Screws
Flat.Washers
Seat.BackboneSeat.Bottom
Assembly Guide
Leg.Extension.Backbone
End.Caps
Foam.Rollers
Chrome.Tubes
Lock.Pin

�� Bowflex.Xceed™.Plus.Assembly.Manual
Step 11...Install.Optional..Leg.Extension.Assembly
parts:.. •...Leg.Extension.Assembly. •...Lock.Knob
11-1...Insert.Leg.Extension.Backbone.into.open.end.of.Seat.Backbone.as.shown .
11-2...Align.one.hole.of.the.Leg.Extension.with.the.hole.in.the.Seat.Backbone.to.fit.your.height.and.secure.with.the.Lock.Knob.as.shown .
Lock.Knob
Step 12.....Install.Seat.Assembly
parts:.. •...Seat.Assembly. •...Main.Assembly
12-1...Align.the.top.two.hooks.on.the.Seat.Backbone.with.one.of.the.lower.pairs.of.pins.on.the.Seat.Support.Rail .
12-2...Tip.seat.front.up.and.slide..hooks.onto.pins ..Rotate.seat.down.and.back.to.use .
note:...Use.lower.pins.until.the.seat.back.is.installed ..Reverse.procedure.to.remove.seat .
SeatBackboneLeg.
Extension.Backbone
SeatBackbone
Seat.Support.Rail
Assembly Guide

Bowflex.Xceed™.Plus.Assembly.Manual ��
Step 14 ..Upper.Lat.Tower.Assembly
parts:.•...Upper.Lat.Tower•...Lat.Cross.Bar
Hardware:•...2.Button.Head.Screws.(3/8".X.3").•...2.Washers.(3/8")•...2.Nylock.Nuts.(3/8”)
tool: 7/32".Hex.Wrench.and.Adjustable.Wrench
14-1 ...Align.the.two.holes.on.the.Lat.Cross.Bar.with.those.on.the.Upper.Lat.Tower.as.shown ..
14-2 ...Secure.using.washers.and.screws.as.shown ..
Step 13 ..Install.Seat.Back.Pad
note: The.back.of.the.Seat.Back.Pad.has.two.pairs.of.holes ..Select.the.appropriate..set.based.on.your.height .
parts:. •...Seat.Back.Pad.. •...Main.Assembly
Hardware:•...2.Button.Head.Screws.(5/16".X.2.1/2")•...2.Washers.(5/16")
tool: 3/16".Hex.Wrench
13-1 ...Position.Seat.Back.Pad.against.the..Seat.Support.Rail.and.align.the..screw.holes.for.your.height.with..those.on.the.Seat.Support.Rail .
13-2 ...Secure.Seat.Back.Pad.to.the.Seat.Support.Rail.using.screws.and..washers.as.shown .
Button.Head.Screws
Flat.Washers
Lat.Cross.Bar
Upper.Lat.Tower
Seat.Back.Pad
Flat.Washers
Button.Head.
Screws
Assembly Guide

�� Bowflex.Xceed™.Plus.Assembly.Manual
Step 15...Install.Upper.Lat.Tower.Assemblyparts:
.•...Upper.Lat.Tower.Assembly
.•...Main.Assembly
Hardware (1:1):
.•...6.Button.Head.Screws.(3/8".X.3/4")•...6.Washers.(3/8")
tool: 7/32".Hex.Wrench
15-1...Position.the.Upper.Lat.Tower.Assembly..over.the.Lower.Lat.Tower.Assembly .
15-2...Slide.the.Upper.Lat.Tower.onto.the..Lower.Lat.Tower.and.secure.with.screws..and.washers.as.shown .
Upper.Lat.Tower
Button.Head.Screws
Flat.Washers
Flat.Washers
Button.Head.Screws
Lower.Lat.Tower
Step 16 ...Tighten.Hardware
16-1 Carefully.go.over.the.entire.Bowflex.Xceed™.Plus.home.gym.and.tighten.all.hardware.before.proceeding.to.the.next.step ..Pay.close.attention.to.the.hardware.installed.in.Steps.1,.3,.4,.and.6 ..
Assembly Guide

Bowflex.Xceed™.Plus.Assembly.Manual ��
Assembly Guide
Step 17� ..Connect.Cables.
parts:.Completed.Bowflex.Xceed™.Plus.home.gym
tool: Scissors.or.other.cutting.tool
17�-1..Remove.the.wrapping.from.around.the.coiled.cable.and.pulley.attached.to.the.Right.and.Left.Frame.Rails ..
17�-2 Remove.the.wrapping.from.around.the.coiled.cable.and.pulley.attached.to.the.left.and.right.side.of.the.lat.tower .
17�-3..Attach.the.cable.to.the.home.gym.following.the.routing.for.the.various.exercise.positions ..
note:..As.you.use.your.home.gym,.you.will.connect.the.cables.and.pulleys.in.a.variety.of.ways.to.perform.the.exercises ...Refer.to.the.Owner’s.Manual.for.information.on.using.the.Bowflex.Xceed™.Plus.home.gym . .
Chest Exercises
Leg and Squat Exercises
Lat Pulldown Exercises

�� Bowflex.Xceed™.Plus.Assembly.Manual
Failure to visually check and test assembly before use can cause damage to the bowflex xceed™ plus home gym and serious injury to users and bystanders and can also compromise the effectiveness of your exercise program.
Assembly Guide
Step 18� Final..Inspection
Please.inspect.your.machine.to.ensure.that.all.fasteners.are.tight.and.components.are.properly.assembled ..Review.all.warnings.affixed.to.machine .
Congratulations!..You.have.successfully.completed.assembly.of.your.Bowflex.Xceed™.Plus.home.gym!.

Important Contact Numbers
OFFICES IN THE UNITED STATES:
•.TECHNICAL/CUSTOMER.SERVICENautilus,.Inc .World.Headquarters16400.SE.Nautilus.DriveVancouver,.Washington,.USA..98683Phone:..800-NAUTILUS.(800-628-8458)Email:.customerservice@nautilus .comFax:..877-686-6466
•..CORPORATE.HEADQUARTERSNautilus,.Inc .World.Headquarters16400.SE.Nautilus.DriveVancouver,.Washington,.USA.98683Phone:..800-NAUTILUS.(800-628-8458)
If.you.need.assistance,.please.have.both.the.serial.number.of.your.machine.and.the.date.of.purchase.available.when.you.contact.the.appropriate.Nautilus.office.listed.below .
INTERNATIONAL OFFICES:
For.technical.assistance.and.a.list.of.distributors.in.your.area,.please.call.or.fax.one.of.the.following.numbers .
•..INTERNATIONAL.CUSTOMER.SERVICENautilus.International.S .A .Rue.Jean.Prouvé.61762.Givisiez./.SwitzerlandTel:...+.41-26-460-77-77Fax:..+.41-26-460-77-70.Email:.technics@nautilus .com
INTERNATIONAL OFFICES:
•..SWITzERLAND.OFFICENautilus.Switzerland.S .A .Tel:...+.41-26-460-77-66Fax:..+.41-26-460-77-60.
•.GERMANY.and.AUSTRIA.OFFICE.Nautilus.GmbH.Tel:..+49-2204-610-27Fax:.+49-2204-628-90. .
•.ITALY.OFFICE.Nautilus.Italy.s .r .l .Tel:...+39-051-664-6201Fax:..+39-051-664-7461.
•.UNITED.KINGDOM.OFFICENautilus.UK.Ltd .Tel:..+44-1908-267-345Fax:.+44-1908-267-346
•.CHINA.OFFICENautilus.Representative.OfficeTel:..+86-21-523-707-00Fax:.+86-21-523-707-09
Bowflex.Xceed™.Plus.Assembly.Manual ��
Serial Number
Date of Purchase
Please record the following information for future reference.
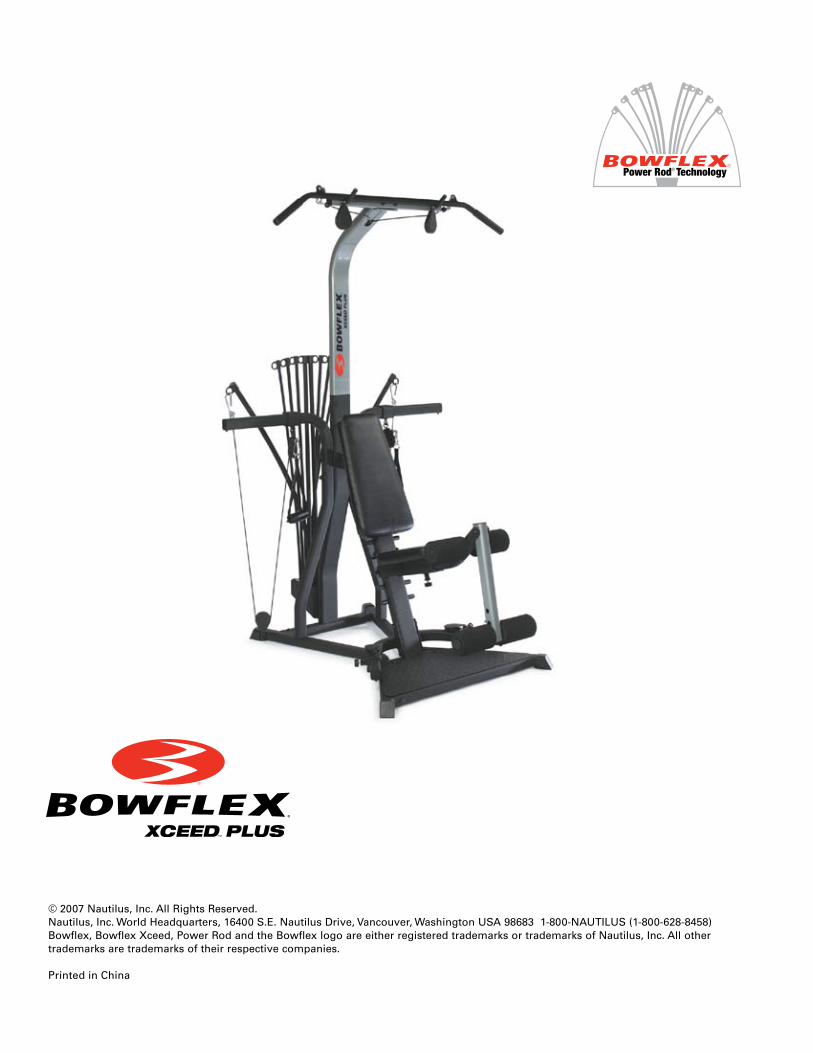
© 2007 Nautilus, Inc. All Rights Reserved. Nautilus, Inc. World Headquarters, 16400 S.E. Nautilus Drive, Vancouver, Washington USA 98683 1-800-NAUTILUS (1-800-628-8458)Bowflex, Bowflex Xceed, Power Rod and the Bowflex logo are either registered trademarks or trademarks of Nautilus, Inc. All other trademarks are trademarks of their respective companies.
Printed in China