the castle house assembly instructions by laser … house assembly... · the castle house assembly...
TRANSCRIPT
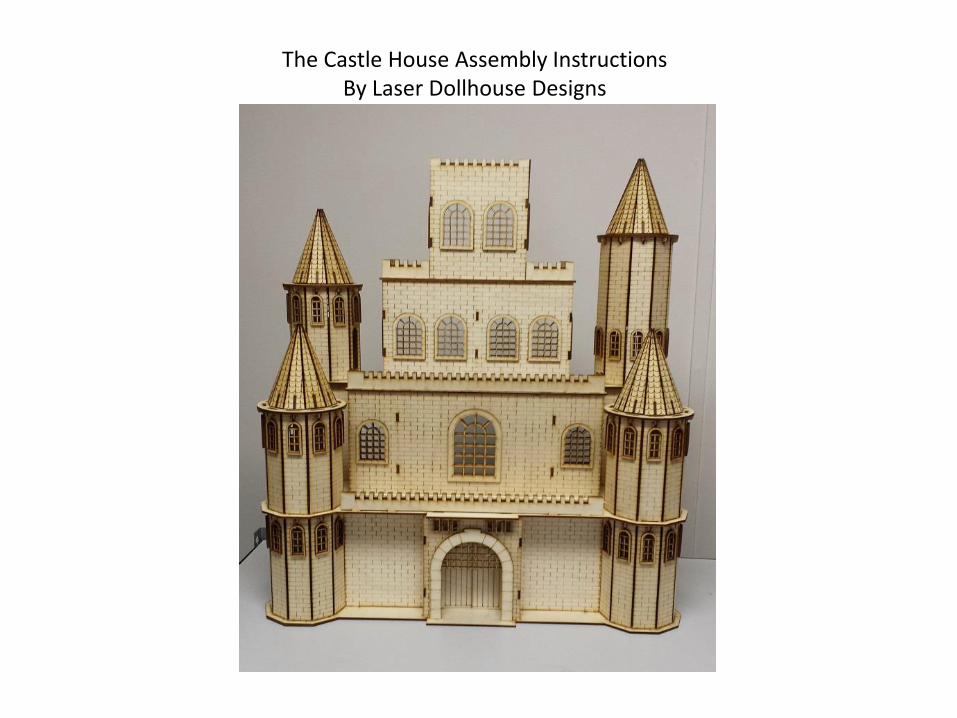
The Castle House Assembly Instructions By Laser Dollhouse Designs
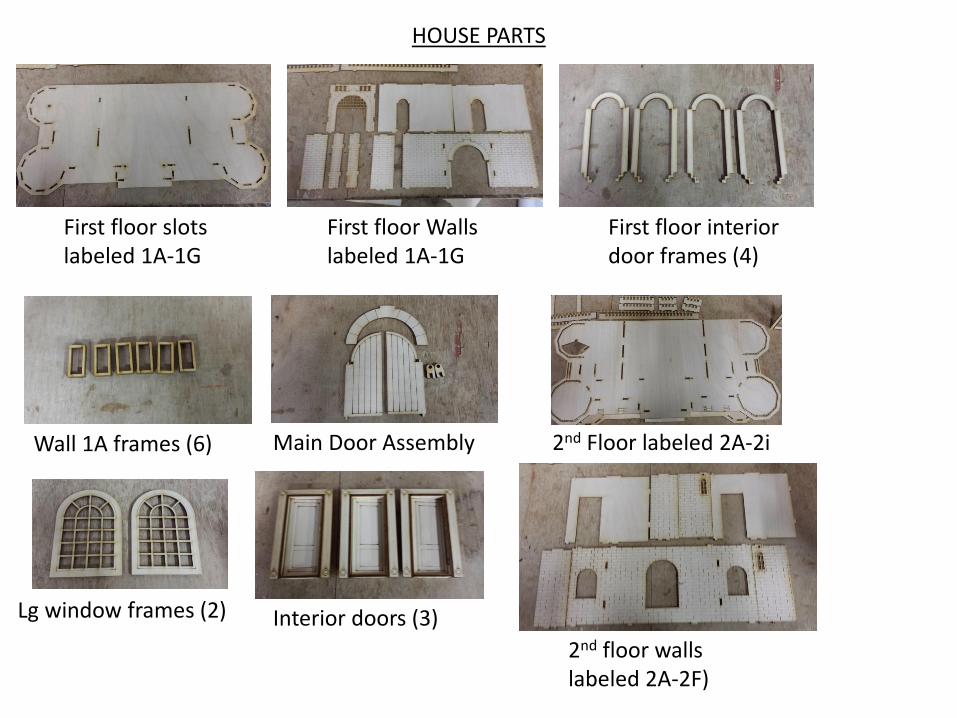
HOUSE PARTS
First floor slots labeled 1A-1G
First floor Walls labeled 1A-1G
First floor interior door frames (4)
Wall 1A frames (6) Main Door Assembly 2nd Floor labeled 2A-2i
Lg window frames (2) Interior doors (3)
2nd floor walls labeled 2A-2F)

Tower walls 5.5” ceiling height (10) with two tab feet and (28) single tab feet.
Plexiglass window inserts (16) small and (1) large.
Interior door frames (3)
3rd Floor base 3rd Floor walls 3A-3D
HOUSE PARTS

4th floor base 4th floor walls 4G-4i
4th floor ceiling Wall assemblies 2nd & 3rd Floor tower walls
5” ceiling height (27)
2nd & 3rd Floor walls 5” height ceiling with opening (3)
Tower roof cap base (4)
HOUSE PARTS

Tower cap roof assembly (40) Tower cobles (80)
Extended Tower walls (10)
Main Entry frame (1) Tower window frames (80)
HOUSE PARTS

Parts for spiral stairs assembly
18 Handrails 18 Treads
17 Risers double notch 1 lower Risers (larger of two) 1 Upper Riser (Smaller of two)
1 landing
1 assembly support/ cutout guide
1 center support rail

Step 1. Take the assembly support/ cutout guide and lay on a flat surface. Next insert the dowel into the center hole. DO NOT GLUE THESE TOGETHER!!! see in figure 6 This will help keep the stairs level during assembly. Once assembly is done the assembly support/ cutout guide will be removed.
Figure 1
SPIRAL STAIRS ASSEMBLY

ASSEMBLY
Step 2. Using the lower riser (the bottom part and larger of the two) Figure 2, and a tread Figure 3, glue to the left side as seen in figure 4. Make sure the tread circle angle is to the left when the round hole is facing up. See note below.
Figure 2
Figure 3 Figure 4
Note: Tread facing up and notch to the left, riser glued to the bottom left side.

ASSEMBLY
Step 3. Using the remaining risers with two tabs (figure 5) and remaining treads glue them together with the risers on the bottom left side. Figure 6 You should have when done 17 assemblies with risers having a bottom tab and one without a tab along with the upper final riser and final landing. Figure 7
Figure 5
Figure 6
Figure 7
ASSEMBLY
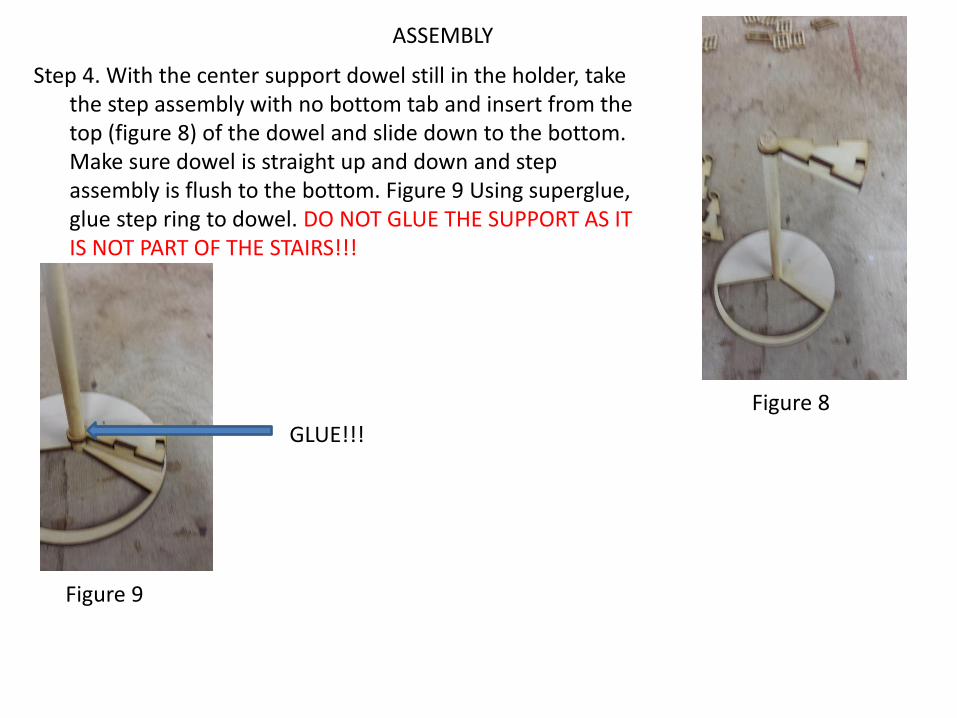
Step 4. With the center support dowel still in the holder, take the step assembly with no bottom tab and insert from the top (figure 8) of the dowel and slide down to the bottom. Make sure dowel is straight up and down and step assembly is flush to the bottom. Figure 9 Using superglue, glue step ring to dowel. DO NOT GLUE THE SUPPORT AS IT IS NOT PART OF THE STAIRS!!!
Figure 8
Figure 9
GLUE!!!

ASSEMBLY
Step 5. Run superglue along the edge where handrail will be placed (figure 10) and install handrail. Figure 11
Figure 11
Figure 10
GLUE!!!

ASSEMBLY
Step 6. Run superglue along the right edge of your first assembled step, Figure 12. Next take one of the 17 assembled steps with a tab (figure 13) and insert on dowel and slide down and join to the lower step. Figure 14. Make sure that the front riser meets up with the lower steps handrail. You may have a small gap in the cutout middle of the step. This is fine as it is more important that the riser and rail align in order to meet the next step assembly.
Figure 13
Figure 12
GLUE!!!
Figure 14
Should meet up together!!!

ASSEMBLY
Step 7. Repeat steps 11 and 12 until you reach the top and have approx. a quarter inch of space left. Figure 15. Using the remaining parts insert final riser with no upper tab and final tread landing with no holes, Figure 16. Assembly complete. Leave in safe area to dry on base plate, once ready to position in house remove lower plate and insert to house floor.
Figure 15
Figure 16

Assembly : (Note; recommend doing a dry assembly prior to gluing. This way you are familiar with the way parts go together. Follow Instructions but use tape to hold parts walls and floors together. Pass up installing windows, doors and stairs.)
Step 2. Locate walls 1E (2) and install interior door frames (4). Refer to figure 2. If doing dry assembly skip this step.
Step 1. Install to front wall 1A the 6 small frames if doing dry assembly skip this step. Refer to figure 1.
Figure 1
Figure 2
HOUSE ASSEMBLY

Step 3. Front door assembly, install wall 1B. Refer to figure 3.
Figure 3
Figure 4
Step 4. Install door hinges . Refer to figure 4.
Figure 5
Step 5. Install door to wall 1B. (DO NOT GLUE LOWER DOOR TO THE FLOOR OR WALL TO HINGE) glue hinge square notch to wall only. Refer to figure 5.
Step 6. Install upper frame above door, if dry assembly skip this step. Refer to figure 6.
Figure 6

Step 7. Install remaining walls, refer to figure 7.
Figure 3
Figure 7
Step 8. Install second floor on wall 1A-1G Refer to figure 8.
Figure 8

Step 9. Install stairs by inserting the upper part first thru the second floor cutout by front rail to cutout and align to first floor, insert the dowel into the holes. Refer to figure 9 & 10.
Figure 9
Figure 10
Step 10. Locate 28 walls for the first floor they have center tabs on the top and bottom, the walls with two bottom tabs are for the second floor. Refer to figure 11
Figure 11

Figure 12
Step 11. Insert the 28 wall by inserting one end into a floor slot and gently raise second floor and insert other side. Apply weight with free hand on installed walls to help keep them in place as you go around. Start from the inside and work outward. Refer to figure 12. Once a corner is complete run masking tap from bottom of first floor to second floor to hold corner in place. Refer to figure 13.
Figure 13
Step 12. Complete all four corners as seen in figure 14.
Figure 14

Step 13. Locate window frames and install windows by aligning them by looking from the inside with window on opposite side of wall. Make sure you see even amount of window frame in opening for all sides. See figure 15.
Figure 15
Figure 16
Figure 17
Step 14. Place plexiglas into wall cutout. See figure 16.
Step 15. Place window frame to hold plexiglas by aligning to frame opposite side of wall. See figure 17.
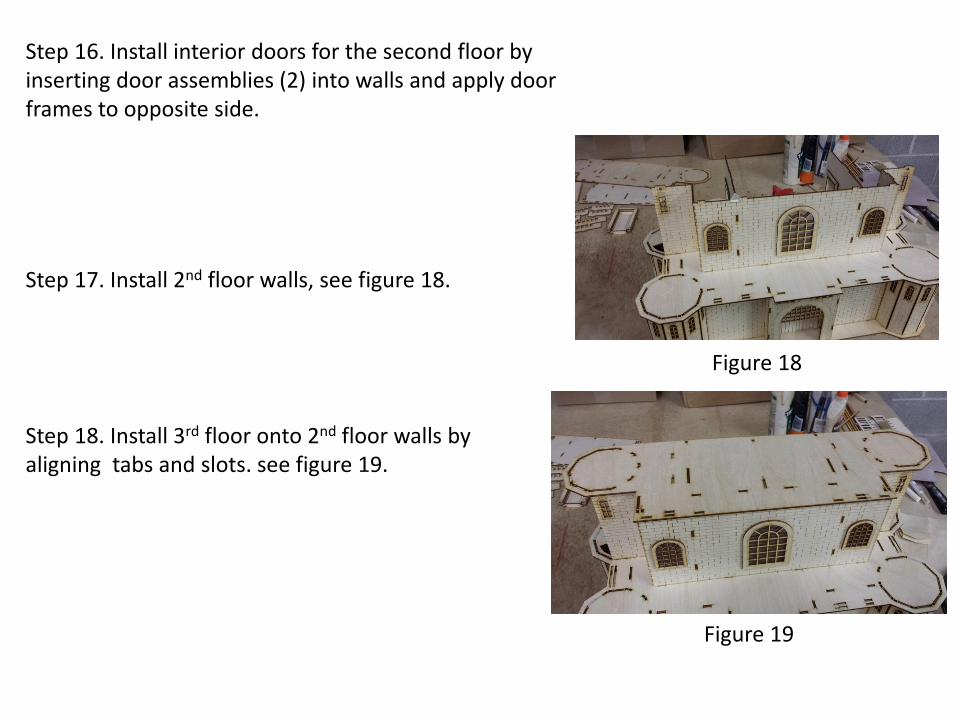
Step 16. Install interior doors for the second floor by inserting door assemblies (2) into walls and apply door frames to opposite side.
Figure 18
Step 17. Install 2nd floor walls, see figure 18.
Figure 19
Step 18. Install 3rd floor onto 2nd floor walls by aligning tabs and slots. see figure 19.

Step 19. Install 5.5” ceiling height walls (10) as you did for the first floor to the two rear sides of the house and hold in place with masking tape. See figure 20.
Figure 20
Step 20. Install 3rd floor walls 3A-3D after installing windows and interior door as discussed earlier. See figure 21.
Figure 21
Figure 22
Step 21. Install 3rd floor roof . See figure 22.

Step 22. Install 4th floor walls 4G-4i. See figure 23.
Figure 23
Step 23. Install 4th ceiling. See figure 24.
Figure 24
Figure 25
Step 24. Install wall assemblies by matching the walls to the labeled marked locations for each floor, insert the center spacers between each set of walls. See figure 25.

Step 25. house should look as it does in figure 26.
Figure 26
Figure 27
Step 26. Install open tower walls with openings to the inside of the right and left side front as well as left rear. See figure 27.

Step 27. Add remaining (27) 5” walls and tower roof circles as seen in figure 28. This will complete three towers minus roofs.
Figure 28
Figure 29
Step 28. Assemble tower roof supports to roofs as seen in figure 29. You will have 40 assemblies when completed.

Step 29. Install large rear right tower with remaining 10 extended walls and roof base circle.
Figure 30
Step 30. Install tower roof assemblies to each tower circle base. Once all are in place align and glue. If dry fitting do not glue. See figure 30.
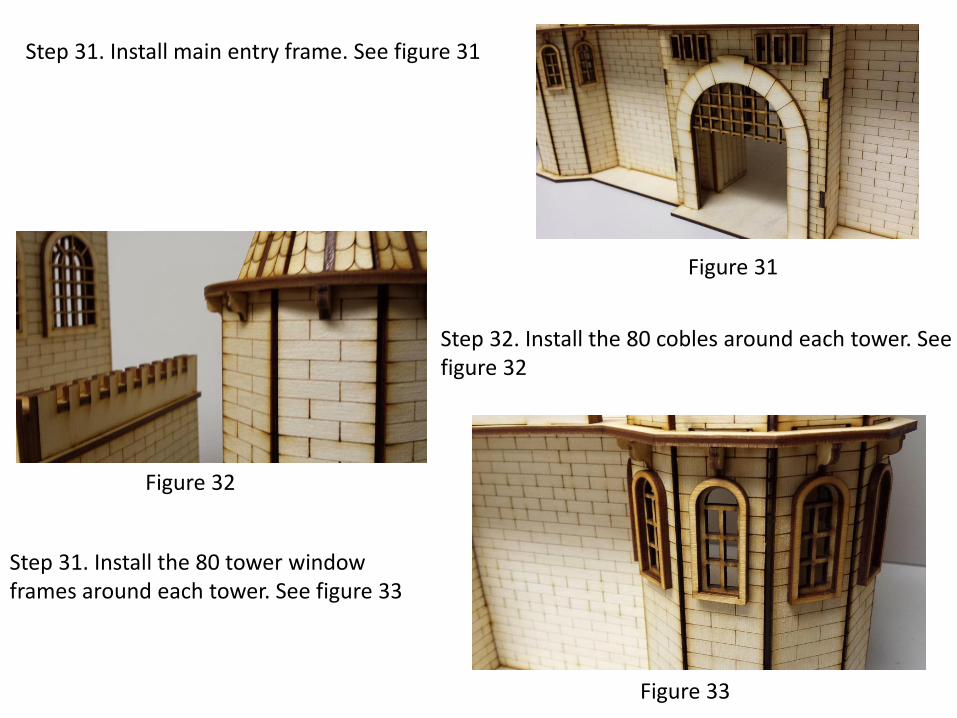
Step 31. Install main entry frame. See figure 31
Figure 31
Step 32. Install the 80 cobles around each tower. See figure 32
Figure 32
Step 31. Install the 80 tower window frames around each tower. See figure 33
Figure 33
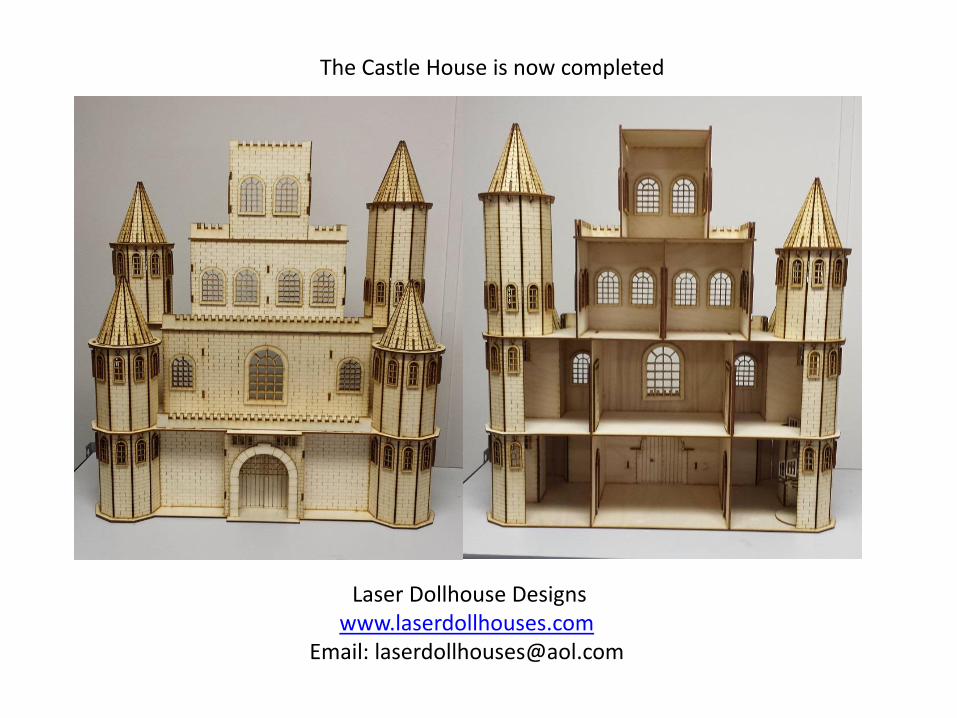
The Castle House is now completed
Laser Dollhouse Designs www.laserdollhouses.com
Email: [email protected]