the eclipse 4.1 application platform an introduction to e4 · the eclipse 4.1 application platform...
TRANSCRIPT

The Eclipse 4.1 Application Platform
An Introduction to e4
How to write an RCP-Application with e4
Tom Schindl <[email protected]>
The Eclipse 4.1 Application Platform Page 1 of 60Copyright Tom Schindl<[email protected]>/http://www.bestsolution.at Creative Commons Attribution-NonCommercial-ShareAlike 3.0

The Eclipse 4.1 Application Platform
Table of contentsAbstract................................................................................................ 3Setup the IDE........................................................................................ 3
Download & Install Eclipse 4.0 SDK........................................................3Install Eclipse 4.0 (Model)Tooling...........................................................4
Setup project......................................................................................... 5Create an OSGi-Project........................................................................ 5Add a product definition....................................................................... 6Add a minimal Eclipse 4.0-ApplicationModel............................................7Create a MailDemo-4.0.product............................................................. 9
Create the MailServices......................................................................... 10Create the UI....................................................................................... 12
Implement the AccountView UI............................................................13Create a TestProject...........................................................................14Create the FolderView UI.................................................................... 15Create the Mail UI.............................................................................17
Assemble an Eclipse 4.0-Application........................................................20DI and the POJO Application Programming Model...................................20Wiring the POJOs into the Application Model..........................................23
Improve the Application L&F...................................................................27Extended Annotations...........................................................................30
@Preference..................................................................................... 30@Focus............................................................................................ 32Menus and @Execute......................................................................... 32
The Event System.................................................................................36Advanced Eclipse 4.0 - Contributing Fragments.........................................38
Contributing a Command-Element.......................................................40Contributing a Handler....................................................................... 41Contributing a HandledMenuItem.........................................................43Contributing a ToolItem...................................................................... 44Dynamic UI creation.......................................................................... 46Improve Usability with Keybindings...................................................... 53
Get the source..................................................................................... 57Using git-repository at github.com.......................................................57Download zip-Files.............................................................................57
Closing words.......................................................................................57
The Eclipse 4.1 Application Platform Page 2 of 60Copyright Tom Schindl<[email protected]>/http://www.bestsolution.at Creative Commons Attribution-NonCommercial-ShareAlike 3.0

The Eclipse 4.1 Application Platform
AbstractOne of the most used RCP-Applications to teach people the concept of the 3.x platform is the mail demo generated by the PDE Wizard. In this tutorial we are going to create a similar application using the Eclipse 4.1 Application Platform.
This document will not delve into the details about about the internals of the Application Platform but will instead focus on showing how one can use it to create an application.
We hope to deliver an in depth book talking about the internals and more advanced information in the 4.1 timeframe.
Setup the IDEProbably the most natural way to develop an Eclipse 4.1 application is to download the Eclipse 4.1 SDK which uses the Eclipse 4.1 Application Platform to provide you a Java and OSGi-Tooling-IDE.
We should mention at this point that you are NOT forced to use the Eclipse 4.1 SDK to write Eclipse 4.1 applications and all the introduced tooling is available to you as well in the Helios Release through the e4 Update-Site of the Eclipse-IDE.
Though we appreciate if you use Eclipse 4.1 SDK as your IDE we'd like to mention that it is not targeted yet for daily work but marked as an “Early Adopter Release” giving plugin developers the possibility to test if their 3.x bundles run in a 4.1 environment.
Download & Install Eclipse 4.1 SDKYou should be able to download Eclipse 4.1 SDK from http://eclipse.org/eclipse4/ . Featurewise what you get with this download is comparable to Eclipse Classic 3.7 that includes JDT, PDE, CVS, ... .
After having downloaded the Eclipse version for your platform you'll have to unzip it and launch the platform executeable and you should see an 4.1 SDK similar to this one:
The Eclipse 4.1 Application Platform Page 3 of 60Copyright Tom Schindl<[email protected]>/http://www.bestsolution.at Creative Commons Attribution-NonCommercial-ShareAlike 3.0

The Eclipse 4.1 Application Platform
Install Eclipse 4.1 (Model)ToolingThe Eclipse 4.1 tooling provides a specialized editor designed with the Eclipse 4.1 application model in mind and simplifies working with it.
If you don't want to use the tooling you can also use standard EMF-Tools to work with the application model but most people will probably prefer the specialized editor we are using through out this tutorial.
Because the Eclipse 4.1 Tooling has not yet graduated into the 4.1 SDK you need to install it using Help > Install New Software … .
The Eclipse 4.1 Application Platform Page 4 of 60Copyright Tom Schindl<[email protected]>/http://www.bestsolution.at Creative Commons Attribution-NonCommercial-ShareAlike 3.0
Figure 1: 4.1 SDK

The Eclipse 4.1 Application Platform
Warning:Do not install the XWT-Tooling (most important not the one for the Visual Workbench Designer) because it might make opening .e4xmi-Files fail on certain platforms (e.g. OS-X).
Troubleshooting:In case the installation fails because p2 is unable to resolve e.g. the EMF dependencies check that your Eclipse 4.1 comes with the helios-update-site preconfigured. If because of whatever reason your installation does not come with indigo-update-sites configured add the following ones:
• http://download.eclipse.org/releases/indigo
• http://download.eclipse.org/e4/updates/0.11
Setup projectThere is a wizard for creating a complete Eclipse 4.1 Application project but we will not be using that wizard. Instead, we will setup the project by hand so that we understand exactly what is going on in the back.
Create an OSGi-ProjectWe are using File > New > Project … and select Plug-in Development > Plug-in Project and enter the following data into the wizard pages:
The Eclipse 4.1 Application Platform Page 5 of 60Copyright Tom Schindl<[email protected]>/http://www.bestsolution.at Creative Commons Attribution-NonCommercial-ShareAlike 3.0
Figure 2: Install Eclipse 4.1 Tooling

The Eclipse 4.1 Application Platform
Add a product definitionIn order to create something we can launch and export we are creating an Equinox application and product definition by using the extension points provided by “org.eclipse.equinox.app”.
To write an Eclipse 4.1 Application, we don't have to define our own application but reuse an application already defined by the Eclipse 4.1 Application Platform named ”org.eclipse.e4.ui.workbench.swt.E4Application”.
Let's do things step by step:
a) Open the MANIFEST.MF
Add a dependency on “org.eclipse.equinox.app“
b) Create a plugin.xml
Add a product definition like this<?xml version="1.0" encoding="UTF-8"?><?eclipse version="3.4"?><plugin> <extension
id="product"point="org.eclipse.core.runtime.products">
<productapplication="org.eclipse.e4.ui.workbench.swt.E4Application"name="Mail App">
The Eclipse 4.1 Application Platform Page 6 of 60Copyright Tom Schindl<[email protected]>/http://www.bestsolution.at Creative Commons Attribution-NonCommercial-ShareAlike 3.0
Figure 3: New OSGi-Project 1 Figure 4: New OSGi-Project 2

The Eclipse 4.1 Application Platform
</product> </extension></plugin>
As an alternative you can use the “Extension”-Tab in the MANIFEST.MF-Editor – in case it is not shown select the Extension-Link on the “Overview”-tab.
We are still missing two things before we can launch our application:
• An Eclipse 4.1 Application which uses the predefined E4Application has to have a minimal workbench model (we'll learn about this in the upcoming sections)
• A .product to define a launchable and exportable application.
Add a minimal Eclipse 4.1-ApplicationModelIn contrast to 3.x applications where you used a mixture of Java and Extension Points to setup up an application the Eclipse 4.1 Application Platform follows another route. The complete application is defined and made up from one single model.
You'll learn in later sections of the tutorial how this application model can be made up dynamically but for getting something up and running we'll create a minimal application model using “File > New > Other” and select “e4 > Model > New Application Model”.
Fill in the following information:
The Eclipse 4.1 Application Platform Page 7 of 60Copyright Tom Schindl<[email protected]>/http://www.bestsolution.at Creative Commons Attribution-NonCommercial-ShareAlike 3.0
Figure 5: Extension

The Eclipse 4.1 Application Platform
Technically this would be enough to launch an application, but a UI-Application without at least one window is quite senseless.
After having created the Application.e4xmi, the “e4 Workbench Model”-Editor should have opened itself automatically.
Select the “Windows” entry on the left, select “TrimmedWindow” on the right and press the button next to the drop down. The result should be an editor looking like this:
The Eclipse 4.1 Application Platform Page 8 of 60Copyright Tom Schindl<[email protected]>/http://www.bestsolution.at Creative Commons Attribution-NonCommercial-ShareAlike 3.0
Figure 6: New Application Model

The Eclipse 4.1 Application Platform
Afterwards select the “Trimmed Window” entry in the tree and set the height and width values to 640 and 480 and the Label-Property to “MailDemo 4.0”.
Let's take a look at what is written to Application.e4xmi:<?xml version="1.0" encoding="ASCII"?><application:Application xmi:version="2.0" xmlns:xmi="http://www.omg.org/XMI" xmlns:xsi="http://www.w3.org/2001/XMLSchema-instance" xmlns:application="http://www.eclipse.org/ui/2010/UIModel/application" xmlns:basic="http://www.eclipse.org/ui/2010/UIModel/application/ui/basic" xmi:id="_-K-zoJS1Ed-3RJVy9OYaEA" elementId="org.eclipse.e4.demo.mailapp.application"> <children xsi:type="basic:TrimmedWindow" xmi:id="_mWWEUJS2Ed-3RJVy9OYaEA" label="MailDemo 4.0" width="640" height="480"/></application:Application>
You normally don't have to edit this file by hand because Eclipse 4.1 provides tooling and I'd also like to point out that XMI is only one possible serialization format of the EMF Model we just created – yes you've just created your first instance of an EMF Model.
The default system expects to have a model loaded from such an XMI-File but the framework allows you to replace this by your own model
The Eclipse 4.1 Application Platform Page 9 of 60Copyright Tom Schindl<[email protected]>/http://www.bestsolution.at Creative Commons Attribution-NonCommercial-ShareAlike 3.0
Figure 7: Add window to model

The Eclipse 4.1 Application Platform
loading/construction strategy if you are not comfortable with the default – all the framework cares about internally is to get an in memory EMF Model of the application whether loaded from XMI, constructed on the fly, loaded over the wire, … is something totally up to you.
One of the important things you notice in the file are the xmi:id attributes who have a very cryptic value that is needed by the default implementation used to restore the application state when started.
Create a MailDemo-4.0.productA product file allows us to define a product we'll export later on to provision on our clients' desktops. You should familiarize yourself with the process of creating such a “.product” but here's a step by step instruction because we need to add some extra stuff PDE is not able resolve on its own.
1. New > File > Other …
2. Plug-in Development > Product Configuration
3. In dialog enter:
◦ Filename: MailDemo-4.0
◦ Use an existing product: org.eclipse.e4.demo.mailapp.product
4. Add the following additional bundles
◦ org.eclipse.equinox.ds: This adds declarative OSGi services who use the extender pattern and so none of the framework has a dependency on it
◦ org.eclipse.equinox.event: This provides e4 the event system it uses internally for communication and can be used by you as well
◦ org.eclipse.e4.ui.workbench.renderers.swt: e4 comes with a very flexible rendering system which allows people to completely replace the rendering. We are using the default one provided by e4 team.
5. Press „Add Required Plug-ins“
Before we can launch, we need to add some more information to our product-extension point to make it look like this:<?xml version="1.0" encoding="UTF-8"?><?eclipse version="3.4"?><plugin> <extension id="product" point="org.eclipse.core.runtime.products"> <product application="org.eclipse.e4.ui.workbench.swt.E4Application" name="Mail App"> <property
The Eclipse 4.1 Application Platform Page 10 of 60Copyright Tom Schindl<[email protected]>/http://www.bestsolution.at Creative Commons Attribution-NonCommercial-ShareAlike 3.0

The Eclipse 4.1 Application Platform
name="appName" value="Mail App"> </property> <property name="applicationXMI" value="org.eclipse.e4.demo.mailapp/Application.e4xmi"> </property> </product> </extension>
</plugin>
The important information we need to provide to the E4Application is, what initial model it should use to make up the application.
Now we are ready to launch our minimal Eclipse 4.1 application the first time and it will show us something like this:
Want the source code? Look at “Source Zip for Chapter 2” on page 59.
Create the MailServicesTo let our application really do meaningful stuff and present you all the cool new features the Eclipse 4.1 Application Platform provides you when writing OSGi based UI applications, we are going to add some OSGi service stuff.
The Eclipse 4.1 Application Platform itself is designed from day one with OSGi in mind and so in order to follow good OSGi practives we create 2 new OSGi-projects:
• org.eclipse.e4.demo.mailapp.mailservice
• org.eclipse.e4.demo.mailapp.mailservice.mock
We are not going into details here how this is implemented but you should
The Eclipse 4.1 Application Platform Page 11 of 60Copyright Tom Schindl<[email protected]>/http://www.bestsolution.at Creative Commons Attribution-NonCommercial-ShareAlike 3.0
Figure 8: First Application

The Eclipse 4.1 Application Platform
simply download the premade bundles and import them in your workspace.
The premade bundles are available from “Premade Service-Bundle” on page 59.
The important APIs for now are:
• IMailSessionFactory#openSession(): Allows you to open a mail session
• IMailSession#getAccounts(): used to retrieve mail accounts
• IMailSession#getMails(): used to fetch mails from a folder
If you are not familiar with Declarative OSGi Services, there's a vast number of tutorials and books describing them in great detail.
After having imported the bundles your workspace should look like this:
The Eclipse 4.1 Application Platform Page 12 of 60Copyright Tom Schindl<[email protected]>/http://www.bestsolution.at Creative Commons Attribution-NonCommercial-ShareAlike 3.0
Figure 9: Workspace after ServiceBundles import

The Eclipse 4.1 Application Platform
To finish this task we need to add the 2 new bundles to our “.product” file and recreate our launch configuration so that those new bundles are picked up.
Create the UINext thing we need to do is to write our UI-Code. In 3.x we would have derived our UI-Parts from ViewPart or EditorPart but this is not needed anymore when using the Eclipse 4.1 Application Platform where everything is a POJO.
Before we can start writing our UI code, we need to add the following dependencies to our MANIFEST.MF in ”org.eclipse.e4.demo.mailapp”:
• org.eclipse.swt
• org.eclipse.jface
• org.eclipse.jface.databinding
• org.eclipse.core.databinding
• org.eclipse.core.databinding.observable
• org.eclipse.core.databinding.property
• org.eclipse.core.databinding.beans (this one you also has to added to “.product” file – don't forget to update your launch-config!)
• org.eclipse.e4.demo.mailapp.mailservice
Implement the AccountView UINext we create a new Java-Class named org.eclipse.e4.demo.mailapp.AccountView and add the following lines of Java-Code into it.public class AccountView { private IMailSessionFactory mailSessionFactory; private IMailSession mailSession; private TreeViewer viewer; private String username = "john"; private String password = "doe"; private String host = "tomsondev.bestsolution.com";
public AccountView(Composite parent, IMailSessionFactory mailSessionFactory) { this.mailSessionFactory = mailSessionFactory; viewer = new TreeViewer(parent,SWT.FULL_SELECTION); viewer.setLabelProvider(new ColumnLabelProvider() { @Override public String getText(Object element) { if( element instanceof IAccount ) { return ((IAccount) element).getName(); } else if( element instanceof IFolder ) { return ((IFolder)element).getName(); } return super.getText(element);
The Eclipse 4.1 Application Platform Page 13 of 60Copyright Tom Schindl<[email protected]>/http://www.bestsolution.at Creative Commons Attribution-NonCommercial-ShareAlike 3.0

The Eclipse 4.1 Application Platform
} });
IObservableFactory factory = new IObservableFactory() { private IListProperty prop = BeanProperties.list("folders");
public IObservable createObservable(Object target) { if( target instanceof IObservableList ) { return (IObservable) target; } else if( target instanceof IFolderContainer ) { return prop.observe(target); } return null; } };
TreeStructureAdvisor advisor = new TreeStructureAdvisor() {};
viewer.setContentProvider(new ObservableListTreeContentProvider(factory, advisor)); }
public void setUsername(String username) { this.username = username; }
public void setPassword(String password) { this.password = password; }
public void setHost(String host) { this.host = host; }
public void init() { if( username != null && password != null && host != null ) { mailSession = mailSessionFactory.openSession(host, username, password); viewer.setInput(mailSession.getAccounts()); } }}
How can we test this UI? We could add it directly to our Eclipse 4.1 application but when looking closer, we see that there's no need to bring up the complete framework to see what our fragment is doing.
There's not even a dependency on an OSGi environment so the class above should be runnable as a standard Java-Application.
Create a TestProjectWe create a Test project we can use to launch our UI codeparts who have now no real dependency on the Application-Framework nor OSGi itself.
Although we are writing a standard Java application let's create a PDE-enabled project named “org.eclipse.e4.demo.mailapp.test” so that we don't have to manage the classpath ourselves.
The Eclipse 4.1 Application Platform Page 14 of 60Copyright Tom Schindl<[email protected]>/http://www.bestsolution.at Creative Commons Attribution-NonCommercial-ShareAlike 3.0

The Eclipse 4.1 Application Platform
Add the following dependencies to the MANIFEST.MF:
• org.eclipse.swt
• org.eclipse.jface.databinding
• org.eclipse.core.databinding
• org.eclipse.e4.demo.mailapp
• org.eclipse.e4.demo.mailapp.mailservice
• org.eclipse.e4.demo.mailapp.mailservice.mock
• org.eclipse.core.runtime
Open the MANIFEST.MF in “org.eclipse.e4.demo.mailapp” and export the “org.eclipse.e4.demo.mailapp”-package so that it is visible in our test-bundle.
Add a TestAccountView-Class:public class TestAccountView { public static void main(String[] args) { final Display d = new Display(); Realm.runWithDefault(SWTObservables.getRealm(d), new Runnable() {
public void run() { Shell shell = new Shell(d); shell.setLayout(new FillLayout()); AccountView view = new AccountView(shell, new MailSessionFactoryImpl()); view.setUsername("john"); view.setPassword("doe"); view.setHost("tomsondev.bestsolution.at"); view.init();
shell.open();
while( !shell.isDisposed() ) { if( ! d.readAndDispatch() ) { d.sleep(); } } } });
d.dispose(); }}
Now launch it as a standard Java-Application and you should see something like this:
The Eclipse 4.1 Application Platform Page 15 of 60Copyright Tom Schindl<[email protected]>/http://www.bestsolution.at Creative Commons Attribution-NonCommercial-ShareAlike 3.0

The Eclipse 4.1 Application Platform
Create the FolderView UIThis view displays all mails of a folder in a SWT table. Here's the code and the class to test it.public class FolderView { private TableViewer viewer;
public FolderView(Composite parent) { this.viewer = new TableViewer(parent); this.viewer.setContentProvider(new ArrayContentProvider()); this.viewer.getTable().setHeaderVisible(true); this.viewer.getTable().setLinesVisible(true);
TableViewerColumn column = new TableViewerColumn(viewer, SWT.NONE); column.getColumn().setText("Subject"); column.getColumn().setWidth(250); column.setLabelProvider(new ColumnLabelProvider() { @Override public String getText(Object element) { return ((IMail)element).getSubject(); } });
column = new TableViewerColumn(viewer, SWT.NONE); column.getColumn().setText("From"); column.getColumn().setWidth(200); column.setLabelProvider(new ColumnLabelProvider() { @Override public String getText(Object element) { return ((IMail)element).getFrom(); } });
column = new TableViewerColumn(viewer, SWT.NONE); column.getColumn().setText("Date"); column.getColumn().setWidth(150); column.setLabelProvider(new ColumnLabelProvider() { private DateFormat format = SimpleDateFormat.getDateTimeInstance();
@Override public String getText(Object element) {
The Eclipse 4.1 Application Platform Page 16 of 60Copyright Tom Schindl<[email protected]>/http://www.bestsolution.at Creative Commons Attribution-NonCommercial-ShareAlike 3.0
Figure 10: Test Account UI

The Eclipse 4.1 Application Platform
Date date = ((IMail)element).getDate(); if( date != null ) { return format.format(date); } return "-"; } }); }
public void setFolder(IFolder folder) { viewer.setInput(folder.getSession().getMails(folder, 0, folder.getMailCount())); }}
And the class to test it:public class TestFolderView { public static void main(String[] args) { final Display d = new Display(); Realm.runWithDefault(SWTObservables.getRealm(d), new Runnable() {
public void run() { Shell shell = new Shell(d); shell.setLayout(new FillLayout()); FolderView view = new FolderView(shell); view.setFolder(((IAccount)new MailSessionFactoryImpl().openSession( "", "john", "doe").getAccounts().get(0)).getFolders().get(0) );
shell.open(); while( !shell.isDisposed() ) { if( ! d.readAndDispatch() ) { d.sleep(); } } } });
d.dispose(); }}
The UI you should see when running the Java Application looks like this:
The Eclipse 4.1 Application Platform Page 17 of 60Copyright Tom Schindl<[email protected]>/http://www.bestsolution.at Creative Commons Attribution-NonCommercial-ShareAlike 3.0
Figure 11: Test FolderView

The Eclipse 4.1 Application Platform
Create the Mail UIThis UI displays a mail to the user. The Java code for the View looks like this:public class MailView { private DataBindingContext dbc; private WritableValue mail = new WritableValue(); private ObservablesManager manager;
public MailView(final Composite composite) { dbc = new DataBindingContext(); manager = new ObservablesManager(); manager.runAndCollect(new Runnable() { public void run() { initUI(composite); } }); }
public void setMail(IMail mail) { if( mail != null ) { this.mail.setValue(mail); } }
private void initUI(Composite composite) { Composite parent = new Composite(composite, SWT.NONE); GridLayout gd = new GridLayout(); gd.horizontalSpacing=0; gd.verticalSpacing=0; parent.setLayout(gd);
Composite header = new Composite(parent,SWT.NONE); header.setLayout(new GridLayout(2,false)); header.setLayoutData(new GridData(GridData.FILL_HORIZONTAL));
Label l = new Label(header, SWT.NONE); l.setText("From");
l = new Label(header, SWT.NONE); l.setLayoutData(new GridData(GridData.FILL_HORIZONTAL)); dbc.bindValue(WidgetProperties.text().observe(l), BeanProperties.value("from").observeDetail(mail));
l = new Label(header,SWT.NONE); l.setText("Subject");
l = new Label(header, SWT.NONE); l.setLayoutData(new GridData(GridData.FILL_HORIZONTAL)); dbc.bindValue(WidgetProperties.text().observe(l), BeanProperties.value("subject").observeDetail(mail));
l = new Label(header,SWT.NONE); l.setText("To");
l = new Label(header, SWT.NONE); l.setLayoutData(new GridData(GridData.FILL_HORIZONTAL)); dbc.bindValue(WidgetProperties.text().observe(l), BeanProperties.value("to").observeDetail(mail));
l = new Label(parent, SWT.SEPARATOR|SWT.HORIZONTAL); l.setLayoutData(new GridData(GridData.FILL_HORIZONTAL));
The Eclipse 4.1 Application Platform Page 18 of 60Copyright Tom Schindl<[email protected]>/http://www.bestsolution.at Creative Commons Attribution-NonCommercial-ShareAlike 3.0

The Eclipse 4.1 Application Platform
Text t = new Text(parent, SWT.BORDER|SWT.V_SCROLL|SWT.H_SCROLL|SWT.WRAP); t.setLayoutData(new GridData(GridData.FILL_BOTH)); t.setEditable(false); dbc.bindValue(WidgetProperties.text().observe(t), BeanProperties.value("body").observeDetail(mail)); }
public void dipose() { manager.dispose(); }}
And the class to test it:public class TestMailView { public static void main(String[] args) { final Display d = new Display(); Realm.runWithDefault(SWTObservables.getRealm(d), new Runnable() {
public void run() { Shell shell = new Shell(d); shell.setLayout(new FillLayout()); MailView view = new MailView(shell); IFolder folder = ((IAccount)new MailSessionFactoryImpl().openSession( "", "john", "doe").getAccounts().get(0)).getFolders().get(0);
view.setMail(folder.getSession().getMails(folder, 0, 1).get(0)); shell.open();
while( !shell.isDisposed() ) { if( ! d.readAndDispatch() ) { d.sleep(); } } } });
d.dispose(); }}
Running the test-Program should create a UI like this:
The Eclipse 4.1 Application Platform Page 19 of 60Copyright Tom Schindl<[email protected]>/http://www.bestsolution.at Creative Commons Attribution-NonCommercial-ShareAlike 3.0

The Eclipse 4.1 Application Platform
We new have created all the UI parts of our application without the need to have any knowledge about the Eclipse 4.1 Application Platform. All we had to know was SWT/JFace and how to program in Java.
Want the source code? Look at “Source Zip for Chapter 4” on page 59.
Assemble an Eclipse 4.1-Application
DI and the POJO Application Programming ModelWe now have 3 UI classes that on their own don't make much sense but together they are able to build a complete MailReader application.
Before we start with the process of integrating our POJOs in the application model I think it makes sense to explain what we are going to do in the next few sections of this tutorial.
I assume most of you have already heard at least once about Dependency Injection (DI). Those of you who have ever worked with Spring or Guice are familiar with the concepts. For others who never have - don't be afraid, it's not really not rocket science.
Let's take a look at a typical 3.x sample code, dealing with the change of the current selection in the workbench.public class View extends ViewPart {
public void createPartControl(Composite parent) {
getSite().getSelectionProvider().addSelectionChangedListener(new ISelectionChangedListener() { public void selectionChanged(SelectionChangedEvent event) { if( event.getSelection() instanceof IStructuredSelection) {
The Eclipse 4.1 Application Platform Page 20 of 60Copyright Tom Schindl<[email protected]>/http://www.bestsolution.at Creative Commons Attribution-NonCommercial-ShareAlike 3.0
Figure 12: Test MailView

The Eclipse 4.1 Application Platform
Object o = ((IstructuredSelection)event.getSelection()).getFirstElement();
if( o instanceof IFolder ) { updateFolder((IFolder) o);
}
}
}
});
}
void updateFolder(IFolder folder) { // Do something when selection changes }}
And here's what you write when using the Eclipse 4.1 Application Platform:public class View { @Inject void updateFolder(@Named(IServiceConstants.ACTIVE_SELECTION) IFolder folder) { // Do something when selection changes }}
The first thing you notice is that the code is much more concise and you don't have to write tons of glue code but what is more interesting is that you are flipping sides.
Instead of being the active part, you play the inactive one who gets informed automatically if something changes you are interested in.
This makes your code much more reuseable because you are not depending on external stuff like the ISelectionService being available.
I'm not going into great detail here now because DI is a very wide area. The imporant thing for us is that we'll have to add annotations like @Inject at various places in our code (constructors, fields, methods) to get information we need to make up the UI.
There's no other way to get access to information because the Eclipse 4.1 Application Platform doesn't provide statics or singletons like the 3.x platform did!
Before we start adding the annotations to our code we have to add some more bundles to our MANIFEST.MF:
• javax.inject
• javax.annotation
• org.eclipse.e4.core.di
• org.eclipse.e4.ui.services
The Eclipse 4.1 Application Platform Page 21 of 60Copyright Tom Schindl<[email protected]>/http://www.bestsolution.at Creative Commons Attribution-NonCommercial-ShareAlike 3.0

The Eclipse 4.1 Application Platform
Those provide the annotations we are going to add to our code and some constants.
Modify the AccountView like this:
public class AccountView { @Inject public AccountView(Composite parent, IMailSessionFactory mailSessionFactory) { // Unmodified }
@PostConstruct public void init() { // Unmodified }}
Modify the FolderView like this:
public class FolderView { @Inject public FolderView(Composite parent) { // Unmodified }
@Inject public void setFolder(@Named(IServiceConstants.ACTIVE_SELECTION) @Optional IFolder folder) { // Unmodified }}
and the MailView like this:
public class MailView {
@Inject public MailView(final Composite composite) { // Unmodified }
@Inject public void setMail(@Named(IServiceConstants.ACTIVE_SELECTION) @Optional IMail mail) { // Unmodified }
@PreDestroy public void dipose() { // Unmodified } }
Let's try to understand the code parts above a bit better. The first thing you need to know is that the instance creation and destruction is handled by the Eclipse-4.1 DI-container.
When some code requests an instance of e.g. AccountView the DI-Framework searches through constructors annotated with @Inject and tries to satisfy the arguments of the constructor. The informations required to call the constructor
The Eclipse 4.1 Application Platform Page 22 of 60Copyright Tom Schindl<[email protected]>/http://www.bestsolution.at Creative Commons Attribution-NonCommercial-ShareAlike 3.0

The Eclipse 4.1 Application Platform
are looked up in the so called IEclipseContext that you can think of as a Map of type Map<String,Object>.
For the AccountView-constructor from above it searches for 2 keys:
• org.eclipse.swt.widget.Composite
• org.eclipse.e4.demo.mailapp.mailservice.IMailSessionFactory
and passes the value found to the constructor.
After having created an instance of the class it searches for fields and methods annotated with @Inject and looks up their value.
In contrast to ordinary constructor injection, it remembers the injected keys and whenever the value connected to the kay changes it reinjects the changed value.
A special thing in this context is the usage of @Named that allows one to define the key to used when looking up the value (by default the fully qualified class name is used).
The @Optional annotation means that if no value is found or the value stored under the key can not be converted to the required type, the system should pass in null instead.
The other 2 annotations you see are controlling the life cycle of an object. Methods annotated with @PostConstruct are called after the object is created and all injections are done (field and method).
The @PreDestroy is the opposite. It is called before the object is destroyed by the DI-container and provides the possibility to clean up resources allocated by the POJO.
Wiring the POJOs into the Application ModelAs noted above the Eclipse 4.1 Application Platform at its heart is a DI-container that controls the entire application and connects bits and pieces to make up a complete application from those small POJOs.
To connect all this information, it uses the application model we've already used to define the initial layout of our application. Our POJOs from above are now going to get part of the application model and because of the DI-annotations we added, the application framework knows how to create instances whenever it needs one.
a) Open the Application.e4xmi and create a structure like this:
The Eclipse 4.1 Application Platform Page 23 of 60Copyright Tom Schindl<[email protected]>/http://www.bestsolution.at Creative Commons Attribution-NonCommercial-ShareAlike 3.0

The Eclipse 4.1 Application Platform
b) Select the 1st Part in the tree and press the “Find...“-button on the Class URI attribute and search for our AccountView-POJO.
c) Select the 2nd Part in the tree, press the “Find...“-button and select the “FolderView“
d) Select the 3rd in the tree, press the „Find...“-button and select the “MailView“
The Eclipse 4.1 Application Platform Page 24 of 60Copyright Tom Schindl<[email protected]>/http://www.bestsolution.at Creative Commons Attribution-NonCommercial-ShareAlike 3.0
Figure 13: UI Model for Mail 4.1
Abbildung 14: Connect POJO with UI

The Eclipse 4.1 Application Platform
What we've done in steps b) to d) is to wire our UI model with our POJOs and now at the moment the application has to render a part which is connected to such a POJO it creates an instance through the DI-Container and hands over control for this area to the POJO.
When launching our application we should see something like this:
But there's still one thing missing. When selecting an entry in the account area the list of mails is not updated. The problem you are seeing here is that the AccountView has to inform others about the changed selection.
This information can be passed around by a special service named ESelectionService. To get access to this service, you need to add “org.eclipse.e4.ui.workbench“ to your MANIFEST.MF and modify the UI code like this:
AccountView:
public class AccountView { @Inject @Optional private ESelectionService selectionService;
@Inject public AccountView(Composite parent, IMailSessionFactory mailSessionFactory) { // Unmodified viewer.addSelectionChangedListener(new ISelectionChangedListener() { public void selectionChanged(SelectionChangedEvent event) { if( selectionService != null ) { selectionService.setSelection( ((IStructuredSelection)event.getSelection()).getFirstElement()
The Eclipse 4.1 Application Platform Page 25 of 60Copyright Tom Schindl<[email protected]>/http://www.bestsolution.at Creative Commons Attribution-NonCommercial-ShareAlike 3.0
Figure 15: Running MailDemo Application

The Eclipse 4.1 Application Platform
); } } }); }
@PostConstruct public void init() { // Unmodified }}
FolderView:
public class FolderView {
@Inject @Optional private ESelectionService selectionService;
@Inject public FolderView(Composite parent) { // Unmodified viewer.addSelectionChangedListener(new ISelectionChangedListener() { public void selectionChanged(SelectionChangedEvent event) { if( selectionService != null ) { selectionService.setSelection( ((IStructuredSelection)event.getSelection()).getFirstElement() ); } } }); }
@Inject public void setFolder(@Named(IServiceConstants.ACTIVE_SELECTION) @Optional IFolder folder) { // Unmodified }}
The application should now behave as expected and look like this.
The Eclipse 4.1 Application Platform Page 26 of 60Copyright Tom Schindl<[email protected]>/http://www.bestsolution.at Creative Commons Attribution-NonCommercial-ShareAlike 3.0

The Eclipse 4.1 Application Platform
Want the source code? Look at “Source Zip for Chapter 5” on page 59.
Improve the Application L&FNow that we have a running application, we can work on a more modern look and feel.
To customize the L&F of applications, the Eclipse 4.1 Application Platform provides us with a CSS-like declarative syntax.
In order to tell the framework what CSS stylesheet it has to apply to the application we need to:
a) Create a directory called “css”
b) Add a file called “default.css”
c) Modify the plugin.xml like this<?xml version="1.0" encoding="UTF-8"?><?eclipse version="3.4"?><plugin> <extension id="product" point="org.eclipse.core.runtime.products"> <product application="org.eclipse.e4.ui.workbench.swt.E4Application" name="Mail App"> <property name="appName"
The Eclipse 4.1 Application Platform Page 27 of 60Copyright Tom Schindl<[email protected]>/http://www.bestsolution.at Creative Commons Attribution-NonCommercial-ShareAlike 3.0
Figure 16: Running MailDemo Application after chapter 5

The Eclipse 4.1 Application Platform
value="Mail App"> </property> <property name="applicationXMI" value="org.eclipse.e4.demo.mailapp/Application.e4xmi"> </property> <property name="applicationCSS" value="platform:/plugin/org.eclipse.e4.demo.mailapp/css/default.css"> </property> </product> </extension>
</plugin>
The applicationCSS-property informs the system about the fact that there's a CSS stylesheet which has to be applied to the whole RCP application.
Defining the above property is all you need to do to tell your application to consume a CSS stylesheet.
Here's the initial CSS information we are adding:.MTrimmedWindow.topLevel { margin-top: 5px; margin-bottom: 2px; margin-left: 2px; margin-right: 2px;}
.MPartStack { tab-renderer: url('platform:/plugin/org.eclipse.e4.ui.workbench.renderers.swt/org.eclipse.e4.ui.workbench.renderers.swt.CTabRendering'); unselected-tabs-color: #FFFFFF #FFFFFF #FFFFFF 100% 100%; outer-keyline-color: #DDDDDD; inner-keyline-color: #FFFFFF; padding: 0px 9px 10px; tab-outline: #DDDDDD; shadow-visible: true;}
.MPartStack.active { unselected-tabs-color: #F6F6F6 #D3D3D3 #D1D1D1 #D1D1D1 #D6D6D6 #D6D6D6 #FFFFFF 20% 45% 60% 70% 100% 100%; outer-keyline-color: #C4C5C1; tab-outline: #C4C5C1;}
.MTrimBar { background-color: #CFCFCF #A8A8A8 100%;}
What you see above is the definition of 2 CSS classes MTrimmedWindow and MPartStack. The name of those classes are the ones of the Application-Model elements we used prefixed with an “M”.
I think I don't have to explain in great detail the attributes defined in
The Eclipse 4.1 Application Platform Page 28 of 60Copyright Tom Schindl<[email protected]>/http://www.bestsolution.at Creative Commons Attribution-NonCommercial-ShareAlike 3.0

The Eclipse 4.1 Application Platform
MTrimmedWindow. Maybe the only remarkable thing is that the margin information is not interpreted by the SWT-Widget but needs programmatic intervention by the programmer updating the layout.
The information on MPartStack is more interesting because they differ from what we know from the Web.
The most interesting one is the tab-renderer attribute which is pointing to a Java class one can set since 3.6 on a CTabFolder to influence how it is drawn. To find out what the others are doing I'd suggest you play around to see what their effect is.
The first set of style information have been applied to widget owned by the Eclipse 4.1 Application Platform but we'd also like to apply css information on the widgets created by the Part-POJOs.
The Eclipse 4.1 Application Platform Page 29 of 60Copyright Tom Schindl<[email protected]>/http://www.bestsolution.at Creative Commons Attribution-NonCommercial-ShareAlike 3.0
Figure 17: MailDemo with CSS

The Eclipse 4.1 Application Platform
The CSS information added to the file are:.mailList {
background-color: #FFF #EEE 100%;}
.mailHeader {background-color: #FFF #DDD 100%
}
But to take effect in our application we need to modify our UI-Code to mark the widget with the CSS-Classnames.public class FolderView { @Inject public FolderView(Composite parent, @Optional IStylingEngine styleEngine) { //Unmodified if( styleEngine != null ) { styleEngine.setClassname(this.viewer.getControl(), "mailList"); } }}
public class MailView { @Inject public MailView(final Composite composite, @Optional final IStylingEngine styleingEngine) { //Unmodified manager.runAndCollect(new Runnable() {
The Eclipse 4.1 Application Platform Page 30 of 60Copyright Tom Schindl<[email protected]>/http://www.bestsolution.at Creative Commons Attribution-NonCommercial-ShareAlike 3.0
Figure 18: CSS in custom area

The Eclipse 4.1 Application Platform
public void run() { initUI(composite, styleingEngine); } }); }
private void initUI(Composite composite, IStylingEngine styleingEngine) { //Unmodified if( styleingEngine != null ) { styleingEngine.setClassname(header, "mailHeader"); } }}
There's not much magic, we simply inform the DI-container that we need another service (IStylingEngine) we can use to set a CSS class on the widget.
Want the source code? Look at “Source Zip for Chapter 6” on page 59.
Extended AnnotationsTo get access to the extended annotations you'll have to add another dependency in your MANIFEST.MF. The name of the dependency is “org.eclipse.e4.core.di.extensions”.
@Preference
The next area we are going to take a look at is how to best deal with preferences. A perfect example for preferences are the username, password and host information used to create a MailSession in AccountView.public class AccountView { // ... private String username = "john"; private String password = "doe"; private String host = "tomsondev.bestsolution.com";
// ...
public void setUsername(String username) { this.username = username; }
public void setPassword(String password) { this.password = password; }
public void setHost(String host) { this.host = host; }}
To get access to values stored in the preferences, the 4.1 Platform provides a special annotation you can use in conjunction with @Inject named @Preference that can take 2 parameters:
The Eclipse 4.1 Application Platform Page 31 of 60Copyright Tom Schindl<[email protected]>/http://www.bestsolution.at Creative Commons Attribution-NonCommercial-ShareAlike 3.0

The Eclipse 4.1 Application Platform
• nodepath (optional): the path to the preference node, by default the bundle name is used
• value: the value key
public class AccountView {
// ...
private boolean modified = false;
// ...
@Inject public void setUsername(@Preference("username") String username) { this.username = username; this.modified = true; }
@Inject public void setPassword(@Preference("password") String password) { this.password = password; this.modified = true; }
@Inject public void setHost(@Preference("host") String host) { this.host = host; this.modified = true; }
@PostConstruct public void init() { if( username != null && password != null && host != null ) { mailSession = mailSessionFactory.openSession(host, username, password); if( mailSession != null ) { viewer.setInput(mailSession.getAccounts()); } else { viewer.setInput(new WritableList()); } } modified = false; }}
After having added this code, the preferences get automagically injected into our view, but we still need to react on the changes and inform the user that he probably wants to recreate the mail session.
A simple solution for now is to remember that values have been modified and the next time the AccountView receives the focus ask the user whether he'd like to reconnect.
@Focus
To inform the framework what method to invoke when the view receives focus, all we need to do is to annotate a method in our code using the @Focus which
The Eclipse 4.1 Application Platform Page 32 of 60Copyright Tom Schindl<[email protected]>/http://www.bestsolution.at Creative Commons Attribution-NonCommercial-ShareAlike 3.0

The Eclipse 4.1 Application Platform
is coming from “org.eclipse.e4.ui.di” which you should add to your MANIFEST.MF and then add a method like this:
@Focusvoid onFocus(@Named(IServiceConstants.ACTIVE_SHELL) Shell shell) { if( modified ) { if( MessageDialog.openQuestion(shell, "AccountInfos Modified", "The account informations have been modified would you like to reconnect with them?") ) { init(); if( mailSession == null ) { MessageDialog.openWarning(shell, "Connection failed", "Opening a connecting to the mail server failed."); } } }}
Want the source code? Look at “Source Zip for Chapter 7” on page 59.
Menus and @Execute
In the previous chapter we added preferences support to our AccountView. Now we'll now add a dialog we use to edit those preferences:
a) Open the Application.e4xmi
b) Select the “Trimmed Window” in the Tree and select the “Main Menu” checkbox:
c) Create a structure like this
The Eclipse 4.1 Application Platform Page 33 of 60Copyright Tom Schindl<[email protected]>/http://www.bestsolution.at Creative Commons Attribution-NonCommercial-ShareAlike 3.0
Figure 19: Add main menu

The Eclipse 4.1 Application Platform
d) Click on the Class URI and enter the following information
This will generate a class like this:public class PreferenceHandler {
The Eclipse 4.1 Application Platform Page 34 of 60Copyright Tom Schindl<[email protected]>/http://www.bestsolution.at Creative Commons Attribution-NonCommercial-ShareAlike 3.0
Figure 20: Create the menu structure
Figure 21: Create handler class

The Eclipse 4.1 Application Platform
@Execute public void execute() { }}
In the above steps we've connected the MenuItem directly to a Java-Class. Now at the moment the user selects the MenuItem, the framework calls the method annotated with @Execute.
Before going on to implement the Dialog and the Handler you need to add the following bundles to your MANIFEST.MF:
• org.eclipse.e4.core.contexts
• org.eclipse.equinox.preferences
• org.eclipse.equinox.common
The implementation of the dialog looks like this:public class PreferenceDialog extends TitleAreaDialog {
@Inject @Preference("username") private String username;
@Inject @Preference("password") private String password;
@Inject @Preference("host") private String host;
private Text usernameField; private Text passwordField; private Text hostField;
@Inject public PreferenceDialog(@Named(IServiceConstants.ACTIVE_SHELL) Shell parentShell) { super(parentShell); }
@Override protected Control createDialogArea(Composite parent) { Composite area = (Composite) super.createDialogArea(parent);
getShell().setText("Connection informations"); setTitle("Connection informations"); setMessage("Configure the connection informations");
Composite container = new Composite(area, SWT.NONE); container.setLayoutData(new GridData(GridData.FILL_BOTH)); container.setLayout(new GridLayout(2, false));
Label l = new Label(container, SWT.NONE); l.setText("Username");
usernameField = new Text(container, SWT.BORDER); usernameField.setText(username == null ? "" : username);
The Eclipse 4.1 Application Platform Page 35 of 60Copyright Tom Schindl<[email protected]>/http://www.bestsolution.at Creative Commons Attribution-NonCommercial-ShareAlike 3.0

The Eclipse 4.1 Application Platform
usernameField.setLayoutData(new GridData(GridData.FILL_HORIZONTAL));
l = new Label(container, SWT.NONE); l.setText("Password");
passwordField = new Text(container, SWT.BORDER); passwordField.setText(password == null ? "" : password); passwordField.setLayoutData(new GridData(GridData.FILL_HORIZONTAL));
l = new Label(container, SWT.NONE); l.setText("Host");
hostField = new Text(container, SWT.BORDER); hostField.setText(host == null ? "" : host); hostField.setLayoutData(new GridData(GridData.FILL_HORIZONTAL));
return area; }
@Override protected void okPressed() { IEclipsePreferences prefs = new InstanceScope().getNode("org.eclipse.e4.demo.mailapp"); prefs.put("username", usernameField.getText()); prefs.put("password", passwordField.getText()); prefs.put("host", hostField.getText());
try { prefs.flush(); super.okPressed(); } catch (BackingStoreException e) { ErrorDialog.openError(getShell(), "Error", "Error while storing preferences", new Status(IStatus.ERROR, "org.eclipse.e4.demo.mailapp", e.getMessage(),e) ); } }}
You will notice that we are using DI here as well in order to get the current preference's value. The useage of DI is not restricted to the framework, instead you can use it in your own code as well to create instances.
The implementation of the PreferenceHandler shows how one uses the DI framework in custom code to create an instance of a class.@Executepublic void execute(IEclipseContext context) { PreferenceDialog dialog = ContextInjectionFactory.make(PreferenceDialog.class, context); dialog.open();}
The Eclipse 4.1 Application Platform Page 36 of 60Copyright Tom Schindl<[email protected]>/http://www.bestsolution.at Creative Commons Attribution-NonCommercial-ShareAlike 3.0

The Eclipse 4.1 Application Platform
Want the source code? Look at “Source Zip for Chapter 8” on page 59.
The Event SystemAnother major change coming with the Eclipse 4.1 Application Platform is the event system provided. The 4.1 Application Platform does not invent its own but uses the EventAdmin-Bus provided by OSGi instead (you are free to substitute through your own implementation just in case you are not happy with the default one!).
The first thing we do is to register ourselves as a listener to the MailSession and post an event into the system. Before writing the code you'll have to add some more bundles:
• org.eclipse.e4.core.services
• org.eclipse.osgi.services
public class AccountView {
//Unmodified
private ISessionListener listener;
@Inject @Optional private IEventBroker eventBroker;
The Eclipse 4.1 Application Platform Page 37 of 60Copyright Tom Schindl<[email protected]>/http://www.bestsolution.at Creative Commons Attribution-NonCommercial-ShareAlike 3.0
Figure 22: Connection Configuration

The Eclipse 4.1 Application Platform
@Inject public AccountView(Composite parent, IMailSessionFactory mailSessionFactory) {
//Unmodified listener = new ISessionListener() { public void mailAdded(IFolder folder, IMail mail) { if( eventBroker != null ) { Map<String,Object> map = new HashMap<String, Object>(); map.put(EventConstants.NEW_MAIL_TAG_FOLDER, folder); map.put(EventConstants.NEW_MAIL_TAG_MAIL, mail); eventBroker.post(EventConstants.NEW_MAIL, map); } } }; }
//Unmodified
@PostConstruct public void init() { if( username != null && password != null && host != null ) { if( mailSession != null ) { mailSession.removeListener(listener); }
mailSession = mailSessionFactory.openSession(host, username, password); if( mailSession != null ) { viewer.setInput(mailSession.getAccounts()); mailSession.addListener(listener); } else { viewer.setInput(new WritableList()); } } modified = false; }
@PreDestroy void cleanUp() { if( mailSession != null && listener != null ) { mailSession.removeListener(listener); } }}
The code is quite straightforward, the only interesting thing is that we are using ”post” - meaning that we are not blocking untall receivers processed the event. If we want the event to be deliver in a synchronous fashion we would have used ”send”.
Code parts that want to get informed about those events are subscribing them to the EventBroker like this:
public class FolderView {
//Unmodified
@Inject @Optional private IEventBroker eventBroker; private EventHandler eventHandler;
The Eclipse 4.1 Application Platform Page 38 of 60Copyright Tom Schindl<[email protected]>/http://www.bestsolution.at Creative Commons Attribution-NonCommercial-ShareAlike 3.0

The Eclipse 4.1 Application Platform
private IFolder folder;
//Unmodified
@PostConstruct void hookEvents() { if( eventBroker != null ) { eventBroker.subscribe(EventConstants.NEW_MAIL, new EventHandler() {
public void handleEvent(final Event event) { if( event.getProperty(EventConstants.NEW_MAIL_TAG_FOLDER) == folder ) { viewer.getControl().getDisplay().asyncExec(new Runnable() { public void run() { viewer.add(event.getProperty(EventConstants.NEW_MAIL_TAG_MAIL)); } }); } } }); } }
@PreDestroy void unhookEvents() { if( eventBroker != null && eventHandler != null ) { eventBroker.unsubscribe(eventHandler); }
}
@Inject public void setFolder(@Named(IServiceConstants.ACTIVE_SELECTION) @Optional IFolder folder) { if( folder != null ) { this.folder = folder; viewer.setInput(folder.getSession().getMails(folder, 0, folder.getMailCount())); } }}
It is important to note that this is the ONLY event system available and all notifications are passed through this system (e.g. creation of widgets like the shells for workbench windows, ...).
Want the source code? Look at “Source Zip for EventSystem” on page 59.
Advanced Eclipse 4.1 - Contributing FragmentsUntil now our application is created out of one single “monolithic” bundle and application model definition, but that is not how a typical Eclipse-RCP-Application is made up. One of the strengths of Eclipse 3.x has been that an application could be made up from different bundles who contributed pieces to make up a complete application.
e4 is no different in this aspect but contributing to the model is done a bit differently. What you do is to contribute small fragments to a base application model and then the Eclipse 4.0 Application Platform merges those fragments
The Eclipse 4.1 Application Platform Page 39 of 60Copyright Tom Schindl<[email protected]>/http://www.bestsolution.at Creative Commons Attribution-NonCommercial-ShareAlike 3.0

The Eclipse 4.1 Application Platform
into the final model used to create the application.
A first and very important thing when contributing is that the elements in the base model we want to contribute to have to, have an elementId (in the editor shown as “Id”).
You should open our Application.e4xmi and check:
• the Application-Element has the Id: org.eclipse.e4.demo.mailapp.application
• the File-Menu-Element has the Id: org.eclipse.e4.demo.mailapp.filemenu
The next thing we do is to create new OSGi-bundle named “org.eclipse.e4.demo.mailapp.newmail” and add the following dependencies:
• org.eclipse.e4.core.di
• javax.inject
• org.eclipse.e4.ui.services
• org.eclipse.swt
• org.eclipse.e4.demo.mailapp.mailservice
• org.eclipse.e4.ui.model.workbench
• org.eclipse.e4.ui.workbench
• org.eclipse.e4.core.contexts
• javax.annotation
• org.eclipse.jface
• org.eclipse.jface.databinding
• org.eclipse.core.databinding
• org.eclipse.core.databinding.observable
• org.eclipse.core.databinding.property
• org.eclipse.core.databinding.beans
Now we create a Model-Fragment using “File > New > Other ...” and “e4 > Model > New Model Fragment”.
We are going to contribute the following things to the base model:
• A Command to the Application-element
• A Handler to the Application-element
• A HandledMenuItem to the File-Menu-element
The Eclipse 4.1 Application Platform Page 40 of 60Copyright Tom Schindl<[email protected]>/http://www.bestsolution.at Creative Commons Attribution-NonCommercial-ShareAlike 3.0

The Eclipse 4.1 Application Platform
Contributing a Command-ElementBefore we start adding commands and other stuff we need to add some extra stuff to our application model which teaches the Eclipse Application Platform how to deal with commands, handlers and stuff like this.
Open your Application.e4xmi and add the following Addon-Elements:
<?xml version="1.0" encoding="UTF-8"?><application:Application xmi:version="2.0" xmlns:xmi="http://www.omg.org/XMI" xmlns:xsi="http://www.w3.org/2001/XMLSchema-instance" xmlns:advanced="http://www.eclipse.org/ui/2010/UIModel/application/ui/advanced" xmlns:application="http://www.eclipse.org/ui/2010/UIModel/application" xmlns:basic="http://www.eclipse.org/ui/2010/UIModel/application/ui/basic" xmlns:menu="http://www.eclipse.org/ui/2010/UIModel/application/ui/menu" xmi:id="_JoCdII0JEeCR2c-wvIZHbw" elementId="org.eclipse.e4.ide.application" bindingContexts="_JoDEMI0JEeCR2c-wvIZHbw">
<!-- ALL OTHER CONTENT -->
<addons xmi:id="_JoDEM40JEeCR2c-wvIZHbw" elementId="org.eclipse.e4.core.commands.service" contributionURI="platform:/plugin/org.eclipse.e4.core.commands/org.eclipse.e4.core.commands.CommandServiceAddon"/>
<addons xmi:id="_JoDENI0JEeCR2c-wvIZHbw" elementId="org.eclipse.e4.ui.contexts.service" contributionURI="platform:/plugin/org.eclipse.e4.ui.services/org.eclipse.e4.ui.services.ContextServiceAddon"/>
<addons xmi:id="_JoDENY0JEeCR2c-wvIZHbw" elementId="org.eclipse.e4.ui.bindings.service" contributionURI="platform:/plugin/org.eclipse.e4.ui.bindings/org.eclipse.e4.ui.bindings.BindingServiceAddon"/>
<addons xmi:id="_JoDENo0JEeCR2c-wvIZHbw" elementId="org.eclipse.e4.ui.workbench.commands.model" contributionURI="platform:/plugin/org.eclipse.e4.ui.workbench/org.eclipse.e4.ui.internal.workbench.addons.CommandProcessingAddon"/>
<addons xmi:id="_JoDEN40JEeCR2c-wvIZHbw" elementId="org.eclipse.e4.ui.workbench.contexts.model" contributionURI="platform:/plugin/org.eclipse.e4.ui.workbench/org.eclipse.e4.ui.internal.workbench.addons.ContextProcessingAddon"/>
<addons xmi:id="_JoDEOI0JEeCR2c-wvIZHbw" elementId="org.eclipse.e4.ui.workbench.bindings.model" contributionURI="platform:/plugin/org.eclipse.e4.ui.workbench.swt/org.eclipse.e4.ui.workbench.swt.util.BindingProcessingAddon"/>
</application:Application>
We are not going into detail on addons here the only thing you need to know about them is that you can enhance the Eclipse 4.1 Application Platform adding such Addons. Other things contributed through the Addons System are e.g. Part-Drag and Drop, Min/Max of Stacks, … . Let's proceed now with the addition of commands and handlers.
The first element we contribute is a Command-Element that is contributed to the Application-Element of our base model.
a) In the Fragment-Editor we select the ModelFragments entry and press the
The Eclipse 4.1 Application Platform Page 41 of 60Copyright Tom Schindl<[email protected]>/http://www.bestsolution.at Creative Commons Attribution-NonCommercial-ShareAlike 3.0

The Eclipse 4.1 Application Platform
“Add ...”-button
b) We press the “Find ...”-button next to the “Element Id”-TextField that helps us to find the correct element id of the application-element
c) We press the “Find ...”-button next to the “Featurename”-TextField that helps us to find the feature-name (=attribute-name) the contributed Command should be stored in.
The Eclipse 4.1 Application Platform Page 42 of 60Copyright Tom Schindl<[email protected]>/http://www.bestsolution.at Creative Commons Attribution-NonCommercial-ShareAlike 3.0
Figure 23: Select Application-Element Id
The Eclipse 4.1 Application Platform
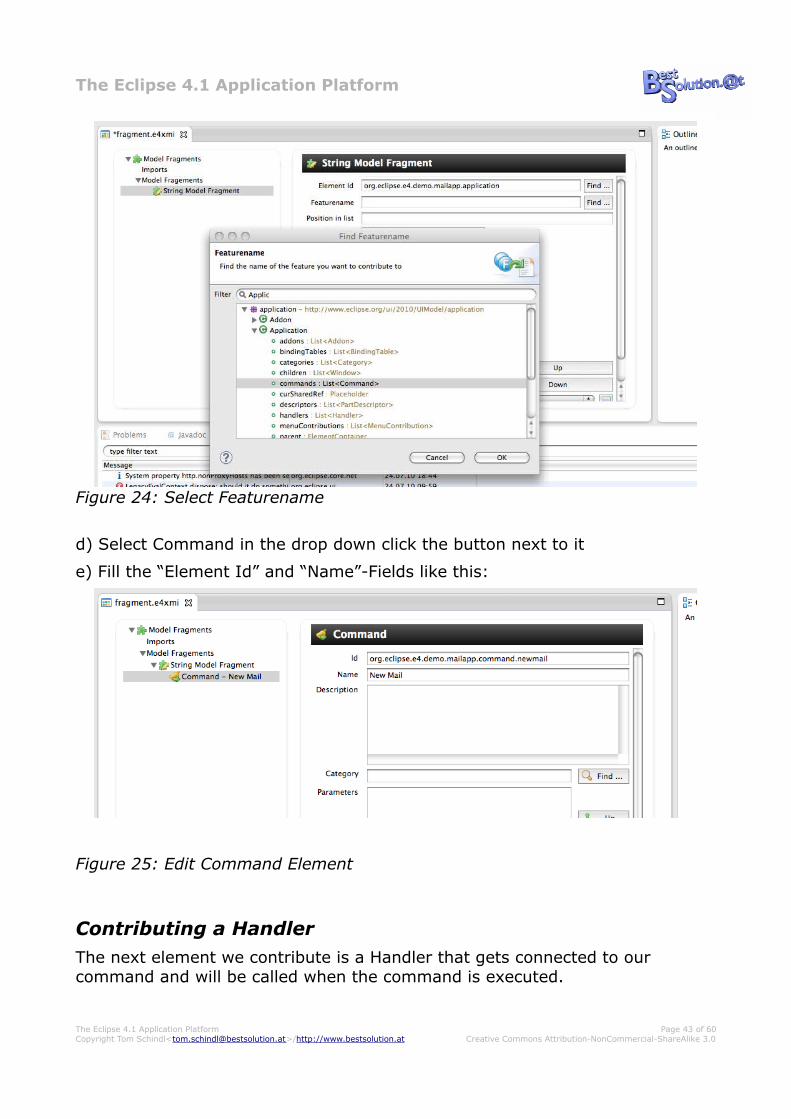
d) Select Command in the drop down click the button next to it
e) Fill the “Element Id” and “Name”-Fields like this:
Contributing a HandlerThe next element we contribute is a Handler that gets connected to our command and will be called when the command is executed.
The Eclipse 4.1 Application Platform Page 43 of 60Copyright Tom Schindl<[email protected]>/http://www.bestsolution.at Creative Commons Attribution-NonCommercial-ShareAlike 3.0
Figure 24: Select Featurename
Figure 25: Edit Command Element

The Eclipse 4.1 Application Platform
a) Add another “String Model Fragment”
b) Set “Element Id” to “org.eclipse.e4.demo.mailapp.application” and “Featurename” to “handlers”
c) Add a Handler-Element
d) Press the “Find...”-button next to the Command text field
e) Press the “Class URI”-Link and enter the following information
The Eclipse 4.1 Application Platform Page 44 of 60Copyright Tom Schindl<[email protected]>/http://www.bestsolution.at Creative Commons Attribution-NonCommercial-ShareAlike 3.0
Figure 26: Connect to command

The Eclipse 4.1 Application Platform
Contributing a HandledMenuItemThe next thing we contribute is MenuItem to the File-Menu that is connected to our command.
a) Add another “String Model Fragment”
b) Set “Element Id” to “org.eclipse.e4.demo.mailapp.filemenu”, “Featurename” to “children” and “Position in list” to “first”
c) Add an HandledMenuItem-Element
d) Set the “Label”-Attribute to “New Mail”
e) Press the “Find ...”-button next to the “Command”-TextField
The Eclipse 4.1 Application Platform Page 45 of 60Copyright Tom Schindl<[email protected]>/http://www.bestsolution.at Creative Commons Attribution-NonCommercial-ShareAlike 3.0
Figure 27: Set a handler class

The Eclipse 4.1 Application Platform
Contributing a ToolItemOpen the Application.e4xmi and add
• a TrimBar with side-value set to Top
• a ToolBar with Id set to “org.eclipse.e4.demo.mailapp.maintoolbar”
The model should now look like this:
The Eclipse 4.1 Application Platform Page 46 of 60Copyright Tom Schindl<[email protected]>/http://www.bestsolution.at Creative Commons Attribution-NonCommercial-ShareAlike 3.0
Figure 28: Connect MenuItem to Command

The Eclipse 4.1 Application Platform
Open the default.css-File and add the following entry:.MTrimBar { background-color: #CFCFCF #A8A8A8 100%;}
Back in our fragment.e4xmi, execute the following steps:
a) Add another “String Model Fragment”
b) Set “Element Id” to “org.eclipse.e4.demo.mailapp.maintoolbar” and “Featurename” to “children”
c) Add a HandledToolItem, set its label to “New Mail” and connect it also to the “org.eclipse.e4.demo.mailapp.command.newmail”-command
We have to add 2 more elements:
• Command-Element and the following properties:
◦ Id: org.eclipse.e4.demo.mailapp.command.sendmail
◦ Name: “Send Mail”
• Handler:
◦ connected to org.eclipse.e4.demo.mailapp.command.sendmail-command
The Eclipse 4.1 Application Platform Page 47 of 60Copyright Tom Schindl<[email protected]>/http://www.bestsolution.at Creative Commons Attribution-NonCommercial-ShareAlike 3.0
Figure 29: Toolbar Addition

The Eclipse 4.1 Application Platform
◦ Class-URI: pointing to a class named SendMail
Dynamic UI creationThat's it for the model. Let's now work on the Java code of the handler.public class NewMailHandler {
@Execute public void execute(final MApplication application, IMailSession mailSession) { // Create the window final MTrimmedWindow window = MBasicFactory.INSTANCE.createTrimmedWindow(); window.getTags().add("temporaryObject"); window.setHeight(500); window.setWidth(600);
// Create the toolbar MTrimBar topTrim = MBasicFactory.INSTANCE.createTrimBar(); topTrim.setSide(SideValue.TOP); window.getTrimBars().add(topTrim);
MToolBar toolbar = MMenuFactory.INSTANCE.createToolBar(); topTrim.getChildren().add(toolbar);
MHandledToolItem sendItem = MMenuFactory.INSTANCE.createHandledToolItem(); sendItem.setLabel("Send"); sendItem.setIconURI("platform:/plugin/org.eclipse.e4.demo.mailapp.newmail/images/email_go.png");
for( MCommand cmd : application.getCommands() ) { if( "org.eclipse.e4.demo.mailapp.command.sendmail".equals(cmd.getElementId()) ) { sendItem.setCommand(cmd); } }
toolbar.getChildren().add(sendItem);
// Create the mail editor
The Eclipse 4.1 Application Platform Page 48 of 60Copyright Tom Schindl<[email protected]>/http://www.bestsolution.at Creative Commons Attribution-NonCommercial-ShareAlike 3.0
Figure 30: Final Fragment

The Eclipse 4.1 Application Platform
MPart part = MBasicFactory.INSTANCE.createPart(); part.setContributionURI( "platform:/plugin/org.eclipse.e4.demo.mailapp.newmail/org.eclipse.e4.demo.mailapp.newmail.EditMailView"); window.getChildren().add(part); application.getChildren().add(window); window.getContext().set(IMail.class, mailSession.createMail()); }
@CanExecute public boolean canExecute(@Optional IMailSession mailSession) { return mailSession != null; }}
What we are doing here is to interface with the application model to add a new window that has a toolbar at the top and a part to edit a mail that will take up the rest of the window's area.
I think what you see above is one of the coolest things in the Eclipse 4.1 Application Platform. You have access to the application model and are allowed to modify it at runtime, adding, removing, moving things around.
We also introduced a new @CanExecute-annotation that can be used on Command-Handlers to compute the enabled state. The framework calls this method whenever the values defined in the parameters of the method change, in our case the new command is only enabled if there's a IMailSession available.
Before we can run the application we need to make some changes to our existing code:public class AccountView { // Unmodified code
@Inject @Optional private MApplication application;
@Inject public AccountView(Composite parent, IMailSessionFactory mailSessionFactory) { // Unmodified code
// Work around for 4.0 Bug of not cleaning up on Window-close viewer.getControl().addDisposeListener(new DisposeListener() { public void widgetDisposed(DisposeEvent e) { cleanUp(); } }); }
// Unmodified code
@PostConstruct public void init() { // Unmodified code
if( application != null ) { application.getContext().set(IMailSession.class, mailSession);
The Eclipse 4.1 Application Platform Page 49 of 60Copyright Tom Schindl<[email protected]>/http://www.bestsolution.at Creative Commons Attribution-NonCommercial-ShareAlike 3.0

The Eclipse 4.1 Application Platform
} }
// Unmodified code
@Focus void onFocus(@Named(IServiceConstants.ACTIVE_SHELL) Shell shell) { // Unmodified code
if( application != null ) { application.getContext().set(IMailSession.class, mailSession); } }}
So here we access to the MApplication-Element to get easy access to the context attached to it and store the current mail-session there.
You may notice tjat I also introduced a work-around for a bug in the 4.1-code base that deals with @PreDestroy when a window is closed. This bug hasn't been a problem so far for our tutorial, because we only had a single window but as of now is going to affect us.
We also have to fix the problem in the FolderView:
public class FolderView { // Unmodified code
@Inject public FolderView(Composite parent, @Optional IStylingEngine styleEngine) { // Unmodified code
// Work around for 4.0 Bug of not cleaning up on Window-close viewer.getControl().addDisposeListener(new DisposeListener() { public void widgetDisposed(DisposeEvent e) { unhookEvents(); } }); }}
The last 2 things missing are now:
a) The implementation of our EditMailView:
public class EditMailView { @Inject private MTrimmedWindow window;
private ComboViewer viewer;
private IObservableValue master = new WritableValue();
private ObservablesManager manager = new ObservablesManager();
@Inject public EditMailView(final Composite container) { manager.runAndCollect(new Runnable() { public void run() { createUI(container); }
The Eclipse 4.1 Application Platform Page 50 of 60Copyright Tom Schindl<[email protected]>/http://www.bestsolution.at Creative Commons Attribution-NonCommercial-ShareAlike 3.0

The Eclipse 4.1 Application Platform
}); }
private void createUI(Composite container) { Composite parent = new Composite(container,SWT.NONE); parent.setLayout(new GridLayout(2, false));
Label l = new Label(parent, SWT.NONE); l.setText("Account");
viewer = new ComboViewer(parent); viewer.getControl().setLayoutData(new GridData(GridData.FILL_HORIZONTAL)); viewer.setLabelProvider(new LabelProvider() { @Override public String getText(Object element) { return ((IAccount)element).getName(); } }); viewer.addSelectionChangedListener(new ISelectionChangedListener() { public void selectionChanged(SelectionChangedEvent event) { window.getContext().set(IAccount.class, (IAccount)((IStructuredSelection)event.getSelection()).getFirstElement()); } }); viewer.setContentProvider(new ObservableListContentProvider());
DataBindingContext dbc = new DataBindingContext(); IWidgetValueProperty prop = WidgetProperties.text(SWT.Modify);
l = new Label(parent, SWT.NONE); l.setText("To");
Text t = new Text(parent, SWT.BORDER); t.setLayoutData(new GridData(GridData.FILL_HORIZONTAL)); dbc.bindValue(prop.observe(t), BeanProperties.value("to").observeDetail(master));
l = new Label(parent, SWT.NONE); l.setText("Subject");
t = new Text(parent, SWT.BORDER); t.setLayoutData(new GridData(GridData.FILL_HORIZONTAL)); dbc.bindValue(prop.observe(t), BeanProperties.value("subject").observeDetail(master));
BeanProperties.value("subject").observeDetail(master).addValueChangeListener( new IValueChangeListener() { public void handleValueChange(ValueChangeEvent event) { String value = (String) event.diff.getNewValue(); value = value == null ? "" : value;
if( window != null ) { window.setLabel("New Mail: " + value); } } });
t = new Text(parent, SWT.BORDER|SWT.MULTI|SWT.WRAP); GridData gd = new GridData(GridData.FILL_BOTH); gd.horizontalSpan = 2; t.setLayoutData(gd); dbc.bindValue(prop.observe(t), BeanProperties.value("body").observeDetail(master)); }
The Eclipse 4.1 Application Platform Page 51 of 60Copyright Tom Schindl<[email protected]>/http://www.bestsolution.at Creative Commons Attribution-NonCommercial-ShareAlike 3.0

The Eclipse 4.1 Application Platform
@PreDestroy void cleanUp() { manager.dispose(); }
@Inject void setMailSession(IMailSession session) { if( session != null ) { viewer.setInput(session.getAccounts()); } else { if( ! viewer.getControl().isDisposed() ) { viewer.setInput(new WritableList()); } } }
@Inject @Optional void setMail(IMail mail) { master.setValue(mail); }}
Not really a lot of magic besides that we are here pushing the ComboViewers-Account selection into the TrimmedWindow's context.
When we introduced DI, I said you can think of the IEclipseContext used for injection as a Map of type Map<String,Object> but the IEclipseContext is not a flat but an hierarchical structure. There is an application-context (attached to the Application-Element), a window-context (attached to a Window-Element), a Part-Context attached to a Part, … .
b) The implementation of the SendMail handler:
public class SendMail { @Execute public void sendMail(@Named(IServiceConstants.ACTIVE_SHELL) Shell shell, MTrimmedWindow window, IMail mail, IAccount account, IPresentationEngine engine) {
if( mail.getTo() == null || mail.getTo().trim().length() == 0 || mail.getTo().indexOf('@') == -1 ) {
MessageDialog.openError(shell, "No Recipient", "Your mail has no recipient."); return; }
if( mail.getSubject() == null || mail.getSubject().trim().length() == 0 ) { if( ! MessageDialog.openQuestion(shell, "No subject", "You have not set a subject would you like to proceed?") ) { return; } }
account.getSession().sendMail(account, mail);
// Bug in 4.0 we need to tear down through the presentation-engine engine.removeGui(window); window.getParent().getChildren().remove(window);
The Eclipse 4.1 Application Platform Page 52 of 60Copyright Tom Schindl<[email protected]>/http://www.bestsolution.at Creative Commons Attribution-NonCommercial-ShareAlike 3.0

The Eclipse 4.1 Application Platform
}
@CanExecute public boolean canExecute(@Optional IAccount account, @Optional IMail mail) { return account != null && mail != null; }}
The only interesting thing is the use of the IPresentationEngine that we need to use because of another problem with removing already existing workbench-windows from the application in the 4.1 codebase.
Because we have to use the IPresentationEngine, we should briefly explain what it is and what it does. The IPresentationEngine is the one who translates the Application-Model into an UI and reflects all modifications you make on the model (like the one we made in NewMailHandler) in the UI - ranging from easy ones like updating the label to such complex ones like adding new windows, moving views and much more.
We can now run our application which looks like this:
You'll immediately notice a problem after having started and stopped the application once. The new mail windows we created are restored on restart so we need to take care on shutdown to remove them before the workbench state is persisted.
The Eclipse 4.1 Application Platform Page 53 of 60Copyright Tom Schindl<[email protected]>/http://www.bestsolution.at Creative Commons Attribution-NonCommercial-ShareAlike 3.0
Figure 31: Final Application

The Eclipse 4.1 Application Platform
The only available solution in 4.1 is to install a lifecycle-handler in the product definition in “org.eclipse.e4.demo.mailapp”.
Create a class named LifecycleHandler which looks like this:
public class LifecycleHandler { @PreSave void cleanupModel(MApplication application, EModelService modelService) { List<Object> list = modelService.findElements(application, null, null, Collections.singletonList("temporaryObject"));
for (Object o : list) { EcoreUtil.delete((EObject) o, true); } }}
There are 4 annotations available to plug into the lifecycle:
• @PostContextCreate: Called after the application context is created
• @ProcessAdditions: Called before the model is passed to the renderer
• @ProcessRemovals: Called before the model is passed to the renderer
• @PreSave: Called before the model is persisted
The other nice thing is that the Eclipse 4.0 Application Platform provides us a services to interface with the application model and we are using it here to remove objects tagged with “temporaryObject”, yet still we need some EMF help to clean the elements (note this is the first and only time in this tutorial that you see that the application model is defined using EMF)
Finally we need to register the lifecycle handler in our product definition that now looks like this:<?xml version="1.0" encoding="UTF-8"?><?eclipse version="3.4"?><plugin> <extension id="product" point="org.eclipse.core.runtime.products"> <product application="org.eclipse.e4.ui.workbench.swt.E4Application" name="Mail App"> <property name="appName" value="Mail App"> </property> <property name="applicationXMI" value="org.eclipse.e4.demo.mailapp/Application.e4xmi"> </property> <property name="applicationCSS" value="platform:/plugin/org.eclipse.e4.demo.mailapp/css/default.css"> </property> <property
The Eclipse 4.1 Application Platform Page 54 of 60Copyright Tom Schindl<[email protected]>/http://www.bestsolution.at Creative Commons Attribution-NonCommercial-ShareAlike 3.0

The Eclipse 4.1 Application Platform
name="lifeCycleURI" value="platform:/plugin/org.eclipse.e4.demo.mailapp/org.eclipse.e4.demo.mailapp.LifecycleHandler"> </property> </product> </extension>
</plugin>
Improve Usability with KeybindingsA professional application allows the user to use the application using the keyboard as well and so, we add as a “final polish” keybindings.
We can only define keybindings for actions triggered through commands (so we can't add one for our Connection Configuration dialog which is launched using a DirectMenuItem).
The first thing we need to create are binding contexts that define under which circumstance a keybinding is active.
a) Open the Application.e4xmi and check the “Root Context” checkbox
b) We set the “Id” to “org.eclipse.e4.demo.mailapp.app.context” and the Name “In the Application”
c) Create a child context with “Id” set to “org.eclipse.e4.demo.mailapp.mainwindow.context” and the Name to “In Main Window”.
d) Bug workaround: There's a small bug in the Binding-Implementation which yields an exception if no “org.eclipse.ui.contexts.dialog” is available. So we add a dummy context with this id.
Now we have to define two BindingTables that we connect to the contexts defined before.
The Eclipse 4.1 Application Platform Page 55 of 60Copyright Tom Schindl<[email protected]>/http://www.bestsolution.at Creative Commons Attribution-NonCommercial-ShareAlike 3.0

The Eclipse 4.1 Application Platform
• BindingTable 1:
◦ Id: org.eclipse.e4.demo.mailapp.app.keybindings
◦ Context Id: org.eclipse.e4.demo.mailapp.app.context
• BindingTable 2:
◦ Id: org.eclipse.e4.demo.mailapp.mainwindow.keybindings
◦ Context Id: org.eclipse.e4.demo.mailapp.mainwindow.context
Now we are ready to create keybindings. The first one we create is a special one to shutdown the application (CTRL+Q/CMD+Q).
You should create the following Model-Elements:
• A Command:
◦ Id: org.eclipse.e4.demo.mailapp.command.exit
◦ Name: Exit Application
• A Handler:
◦ Command: org.eclipse.e4.demo.mailapp.command.exit
◦ Class URI pointing to: org.eclipse.e4.demo.mailapp.ExitHandler
• A Separator to the File-Menu
• A HandledMenuItem to the File-Menu with
◦ Id: org.eclipse.ui.file.exit (this is important for OS-X users because using this id ensures that the menu entry is moved to the
The Eclipse 4.1 Application Platform Page 56 of 60Copyright Tom Schindl<[email protected]>/http://www.bestsolution.at Creative Commons Attribution-NonCommercial-ShareAlike 3.0
Figure 32: Connect BindingTable to Contexts

The Eclipse 4.1 Application Platform
Application-Menu)
◦ Label: Exit
◦ Command: org.eclipse.e4.demo.mailapp.command.exit
The application model looks like this after you have executed the actions above:
The next model change is to add the KeyBinding to the “org.eclipse.e4.demo.mailapp.app.keybindings”-BindingTable. You'll have to set the following values on the element:
• Sequence: M1+Q
• Command: org.eclipse.e4.demo.mailapp.command.exit
Last step in our model is to
• associate our Application-Element with the “org.eclipse.e4.demo.mailapp.app.context”-Context.
• associate our TrimmedWindow with the “org.eclipse.e4.demo.mailapp.mainwindow.context”-Context
Open the elements and enter the above ids into the “Binding Context”-Field and press “Add”.
Finally we implement the ExitHandler class:public class ExitHandler { @Execute public void execute(@Named(IServiceConstants.ACTIVE_SHELL) Shell shell, IPresentationEngine engine) {
if( MessageDialog.openQuestion(shell, "Exit Application?",
The Eclipse 4.1 Application Platform Page 57 of 60Copyright Tom Schindl<[email protected]>/http://www.bestsolution.at Creative Commons Attribution-NonCommercial-ShareAlike 3.0
Figure 33: Model Structure

The Eclipse 4.1 Application Platform
"Do you really want to exit the application?") ) {
engine.stop();
} }}
You can now launch your application and hit CTRL/CMD+Q and should be prompted with dialog like this:
Last step in the binding story is to contribute a Keybinding for the “New Mail”-Command.
Open the fragement.e4xmi and add a new “String Model Fragment” with the following attributes:
• Element Id: org.eclipse.e4.demo.mailapp.mainwindow.keybindings
• Featurename: bindings
Add a KeyBinding-Element to the elements list and set the following values:
• Sequence: M1+N
• Command: org.eclipse.e4.demo.mailapp.command.newmail
Want the source code? Look at “Source Zip for Contribution” on page
The Eclipse 4.1 Application Platform Page 58 of 60Copyright Tom Schindl<[email protected]>/http://www.bestsolution.at Creative Commons Attribution-NonCommercial-ShareAlike 3.0
Figure 34: Exit Application Dialog

The Eclipse 4.1 Application Platform
59.
Get the source
Using git-repository at github.comThe sources used in this document are all available from git repository hosted at http://github.com/tomsontom/e4demo/ .
You'll can install EGit-Plug-in into your Eclipse 4.1 SDK to clone the respository to your local workspace and import the sources.
Download zip-Files• Premade Service-Bundle: http://tomsondev.com/e4rcp/services-
bundle.zip
• Source Zip for Chapter 2: http://tomsondev.com/e4rcp/chapter2.zip
• Source Zip for Chapter 4: http://tomsondev.com/e4rcp/chapter4.zip
• Source Zip for Chapter 5: http://tomsondev.com/e4rcp/chapter5.zip
• Source Zip for Chapter 6: http://tomsondev.com/e4rcp/chapter6.zip
• Source Zip for Chapter 7: http://tomsondev.com/e4rcp/chapter7.zip
• Source Zip for Chapter 8: http://tomsondev.com/e4rcp/chapter8.zip
• Source Zip for EventSystem: http://tomsondev.com/e4rcp/eventsystem.zip
• Source Zip for Contribution: http://tomsondev.com/e4rcp/contribution.zip
Closing wordsI hope this RCP-Application tutorial has helped introduce you to the most important concepts behind the new Eclipse 4.1 Application Platform and provide you a jump start on writing applications using the Eclipse 4.1 Application Platform.
There is more of course, as we have actually only scratched the surface of this new platform. Here are some topics we haven't yet looked into:
• Customization of the Workbench-Rendering by writing our own Renderers
• Writing our own IPresentationEngine to e.g. use a different Widget-Toolkit like Swing to render the Workbench-UI
• Extending the Workbench Model to introduce your own concepts
The Eclipse 4.1 Application Platform Page 59 of 60Copyright Tom Schindl<[email protected]>/http://www.bestsolution.at Creative Commons Attribution-NonCommercial-ShareAlike 3.0

The Eclipse 4.1 Application Platform
• CSS-Themes
• Advanced model contribution using Java-Code
Most API provided currently by the Eclipse 4.1 Application Platform is provisional and can change in the 4.2 timeframe, so if you decide to use the Eclipse 4.1 Application Platform as your application framework, you should subscribe to the e4-dev-mailing list.
The provisional state of the API should not solely regarded as a disadvantage as you have the opportunity to influence its direction as an early adopter.
We need your constructive feedback to make the Eclipse 4.1 Application Platform the most powerful UI-Application-
Framework
All Java-code provided in this document is released under EPL and you are free to use it under the terms of this license.
The tutorials textual content and screenshots are released under Creative Commons Attribution-NonCommercial-ShareAlike 3.0.
Finally there are some people who helped me with this document
• Angelo Zerr: provided feedback on the initial document
• Lars Vogel: provided feedback and the tip to use git for the different code lines
• Remy Suen: for correcting many of my grammar and spelling errors
• Udo Rader: for correcting many of my grammar and spelling errors
Changelog• July 2010 – First Version for Eclipse 4.0
• August 2010 – Changes based on User Feedback
• June 2011 – Updated to Eclipse 4.1
The Eclipse 4.1 Application Platform Page 60 of 60Copyright Tom Schindl<[email protected]>/http://www.bestsolution.at Creative Commons Attribution-NonCommercial-ShareAlike 3.0