the great battles of history series – volume v samurai · 10.2 samurai ... the great battles of...
TRANSCRIPT
R U L E B O O K1 Introduction ........................................................ 22 Components and Terms ...................................... 2 2.1 The Maps ................................................... 2 2.2 The Playing Pieces .................................... 2 2.3 Charts, Tables, and Die ............................. 3 2.4 Terminology .............................................. 3 2.5 Game Scale................................................ 4 2.6 Game Length ............................................. 4 2.7 Use of Japanese ......................................... 5 2.8 Questions ................................................... 53 Sequence of Play ................................................ 54 Busho ................................................................. 5 4.1 Busho Counters ......................................... 5 4.2 Clans and Contingents............................... 6 4.3 Busho Capabilities .................................... 6 4.4 Taisho and So-Taisho ................................ 6 4.5 Honjin (HQs) ............................................. 7 4.6 Busho Movement ...................................... 7 4.7 Busho and Enemy Units ............................ 75 Clan Activation and Orders ................................ 7 5.1 Initiative and Continuity ........................... 7 5.2 How to Activate Clans .............................. 8 5.3 Giving Orders ............................................ 85.4 Momentum ......................................................... 9 5.5 The Trump Option ..................................... 9 5.6 Out-of-Command Units ............................ 10 5.7 Coordination .............................................. 106 Movement .......................................................... 11 6.1 Movement Allowances .............................. 11 6.2 Movement and Terrain .............................. 11
6.3 Movement Restrictions ............................. 11 6.4 Withdrawal ................................................ 11 6.5 Stacking ..................................................... 127 Facing and ZOCs ............................................... 12 7.1 Facing ........................................................ 12 7.2 Zones of Control (ZOCs) .......................... 138 Fire Combat ....................................................... 13 8.1 Fire-Capable Units .................................... 13 8.2 Basic Fire Procedure ................................. 14 8.3 Reaction Fire ............................................. 159 Shock Combat .................................................... 15 9.1 Shock Requirements.................................. 15 9.2 Shock Procedure........................................ 15 9.3 Norikuzushi (Cavalry Charges) ................. 17 9.4 Advance After Combat .............................. 17 9.5 Babo-saku (Anti-Cavalry Palisades) ......... 1710 Individual Combat ............................................. 18 10.1 Combat Between Busho ............................ 18 10.2 Samurai ..................................................... 18 10.3 Bundori: Severed Heads ............................ 19 10.4 Hara-Kiri ................................................... 19 10.5 Replacing Killed Bushos ........................... 2011 Effects of Combat .............................................. 20 11.1 Combat Tables ........................................... 20 11.2 Cohesion .................................................... 20 11.3 Disruption .................................................. 20 11.4 Unit Rout ................................................... 21 11.5 Recovery, Rally, Removal ......................... 21 11.6 Clan Flight ................................................. 2212 Victory ................................................................ 23
Table of Contents
The Great Battles of History Series – Volume V
SAMURAISAMURAI WARFARE IN THE SENGOKU JIDAI
16th Century JapanOKEHAZAMA (1560) • KAWANAKAJIMA (1561) • ANEGAWA (1570)
MIKATA-GA-HARA (1572) • NAGASHINO (1575) • SEKIGAHARA (1600)
Version 2a RICHARD BERG/ MARK HERMAN game
2 Samurai Rules of Play
© 2007 GMT Games, LLC
1.0 INTRODUCTION SAMURAI is the fifth volume in the Great Battles of History Se-ries. It covers the major, important battles of the Sengoku Jidai, the Age of Warring States, in which powerful daimyo (Japanese feudal lords) strove to maintain and extend their power bases while seeking to attain the office of shogun, the power behind the throne of the Emperor. It features three of the greatest fighting daimyos in Japanese history: Oda Nobunaga, Takeda Shingen, and Tokugawa Ieyasu (the fourth great figure of the era, Toyatomi Hideoshi, although present in the game, was more a political influence than anything else). Tokugawa emerged victorious, and his family-run shogunate closed off Japan to the outside world and ruled her, in fanatically rigid isolation, for 250 years.
Samurai simulates the highly personal form of warfare devel-oped by the Japanese samu-rai, wherein formal battles played out almost as backdrops to individual feats of courage, bravery, and devotion—much of it outstanding, some of it rather foolhardy, all of it very Homeric. Although political and tactical victory was the bottom line, collecting the severed heads of enemy samurai ranked a very close second in importance. In terms of tactics, this was, as in Europe, the Dawn of Modern Warfare, with the introduction of guns (arquebuses) by the Portuguese. Even with the revelatory effect of musketry, Japanese battles were still pretty much a swirl-ing, non-linear affair between ashigaru (infantry with spears and lances) and kibamusha (cavalry with spears and lances). The teppo (arquebusiers) eventually replaced the yumi (archers).
A Few Introductory Notes for Players:For Those Who Have Never Played a Historical Simulation Before: Your main problem will be that wargaming has its own language. That language is the main barrier to enjoyment. Above all, this is supposed to be fun, so sort of flip through the rules to see what those mysterious words mean, especially as we’re using a fair dollop of Japanese (the section on Terminology is most helpful in this case). We then suggest you set up one of the battles, turn to the Rules Section called Sequence of Play [3.0], and start doing what that sequence tells you to do, referring to the rules when you don’t understand what to do next.
For Those Who Have Not Played the System Before: Even if you are quite familiar with simulation gaming, we suggest that you set up a battle and push the counters around for a turn or two before actually starting a game. This will reveal the basic tactical strategies available, how the different types of weapon systems may best be used, and how best to (try to) protect against them. The one thing to remember is that the more you know about your units and how they act/interact, the better Busho (general) you will be.
For Those Who Have Played the GBoH System: SAMURAI is rather less complex than its ancestors, but it does contain a large number of new rules. Although the biggest changes are to the command system, because of the unusual nature of Sengoku-era combat, many of the systems are quite different from their GBoH brethren.
2nd Edition Notes: For the 2nd edition, we did a fair amount of “dusting and cleaning” of the rules incorporating all known errata and revising certain sections for better clarity. There have been no significant rule changes from the 1st Edition.
2.0 COMPONENTS AND TERMS Each game of SAMURAI contains the following: • Two 22 x 33 maps, back-printed • Five Sheets of 9/16” counters (1,140 counters)• One Rules Book • One Scenario Book • 3 Charts & Tables Cards• 2 Samurai Record Cards• 1 ten sided die
2.1 THE MAPS Each battle has its own map(s). • Sekigahara and Okehazama have their own, full maps • Anegawa and Kawanakajima each use the same game-map,
printed on the back of the Sekigahara map • Nagashino and Mikata-ga-hara use half-maps, each printed on
the reverse of the Okehazama map
A hex grid covers each map to regulate movement and combat, and the effects of each of the different kinds of terrain are covered in the rules and charts.
2.2 THE PLAYING PIECES There are four types of playing pieces, or counters: • Combat units, representing the various types of fighting
troops;• Busho (including So-taisho and Taisho), the generals who com-
mand the troops; • Samurai, individuals used in Individual Combat; and • Information Markers used to note certain types of information
necessary for play.
2.21 Combat units come in six Types:
• Ashigaru, or Infantry [AS] • Kibamusha, or cavalry [KB]; the personal guard of the So-taisho,
the hatamoto, is identified in the rules as KBH. • Honjin, the field camp HQs, complete with bodyguard, of the
So-taisho, or commander-in-chief. Each honjin contains the mon (emblem) of the commanding clan.
• Teppo, Musket-armed foot soldiers [TP]• Yumi, or Archers [YU] • Ozutsu, or cannon [OZ]
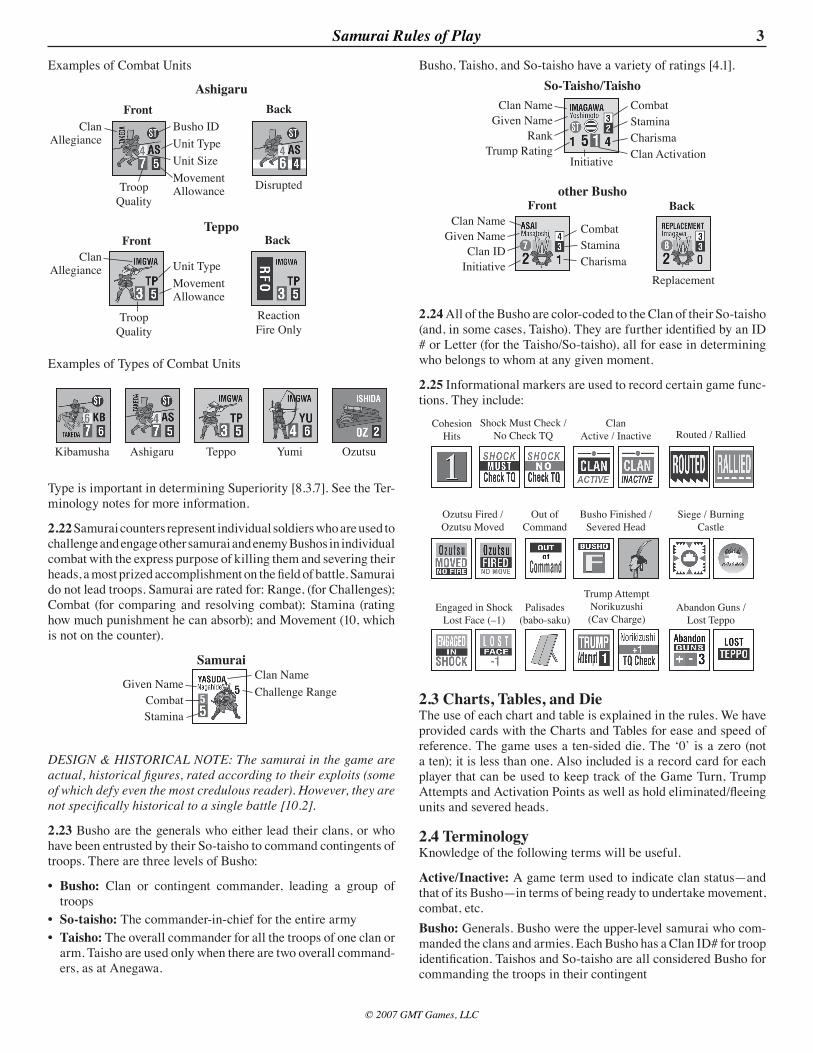
The Type is used to determine certain combat results and effective-ness in relation to other types. Each combat unit is rated numerically for Size (the number of men in that unit), Troop Quality (TQ), and Movement capability. Also important is a unit’s Clan of Allegiance and Busho ID#, which delineate which Busho may command that unit. Teppo and Yumi do not have Busho ID#s. When an Ashigaru or Kibamusha unit is flipped to its reverse side, that side indicates it has been Disrupted. The reverse of a Teppo and Yumi units indicate that the unit has performed Ordered Fire.
�
© 2007 GMT Games, LLC
Samurai Rules of Play
Busho, Taisho, and So-taisho have a variety of ratings [4.1].
2.24 All of the Busho are color-coded to the Clan of their So-taisho (and, in some cases, Taisho). They are further identified by an ID # or Letter (for the Taisho/So-taisho), all for ease in determining who belongs to whom at any given moment.
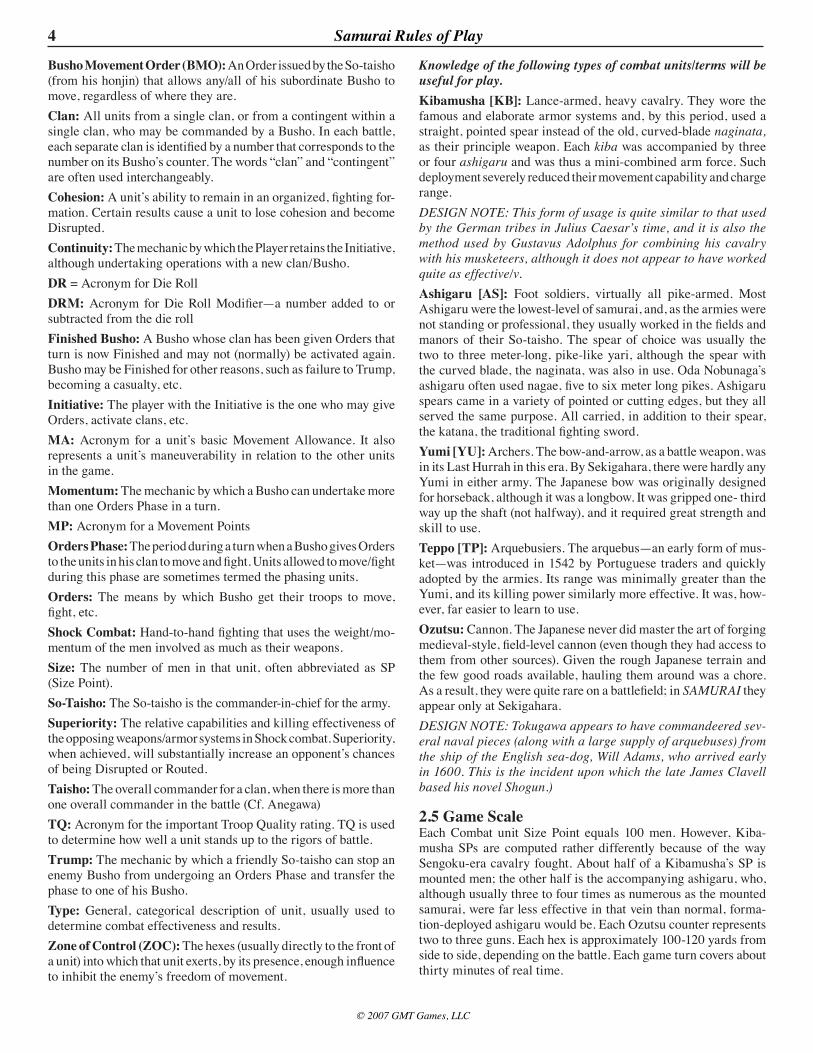
2.25 Informational markers are used to record certain game func-tions. They include:
2.� Charts, Tables, and Die The use of each chart and table is explained in the rules. We have provided cards with the Charts and Tables for ease and speed of reference. The game uses a ten-sided die. The ‘0’ is a zero (not a ten); it is less than one. Also included is a record card for each player that can be used to keep track of the Game Turn, Trump Attempts and Activation Points as well as hold eliminated/fleeing units and severed heads.
2.4 Terminology Knowledge of the following terms will be useful.
Active/Inactive: A game term used to indicate clan status—and that of its Busho—in terms of being ready to undertake movement, combat, etc. Busho: Generals. Busho were the upper-level samurai who com-manded the clans and armies. Each Busho has a Clan ID# for troop identification. Taishos and So-taisho are all considered Busho for commanding the troops in their contingent
Examples of Combat Units
Examples of Types of Combat Units
Type is important in determining Superiority [8.3.7]. See the Ter-minology notes for more information.
2.22 Samurai counters represent individual soldiers who are used to challenge and engage other samurai and enemy Bushos in individual combat with the express purpose of killing them and severing their heads, a most prized accomplishment on the field of battle. Samurai do not lead troops. Samurai are rated for: Range, (for Challenges); Combat (for comparing and resolving combat); Stamina (rating how much punishment he can absorb); and Movement (10, which is not on the counter).
DESIGN & HISTORICAL NOTE: The samurai in the game are actual, historical figures, rated according to their exploits (some of which defy even the most credulous reader). However, they are not specifically historical to a single battle [10.2].
2.2� Busho are the generals who either lead their clans, or who have been entrusted by their So-taisho to command contingents of troops. There are three levels of Busho:
• Busho: Clan or contingent commander, leading a group of troops
• So-taisho: The commander-in-chief for the entire army• Taisho: The overall commander for all the troops of one clan or
arm. Taisho are used only when there are two overall command-ers, as at Anegawa.
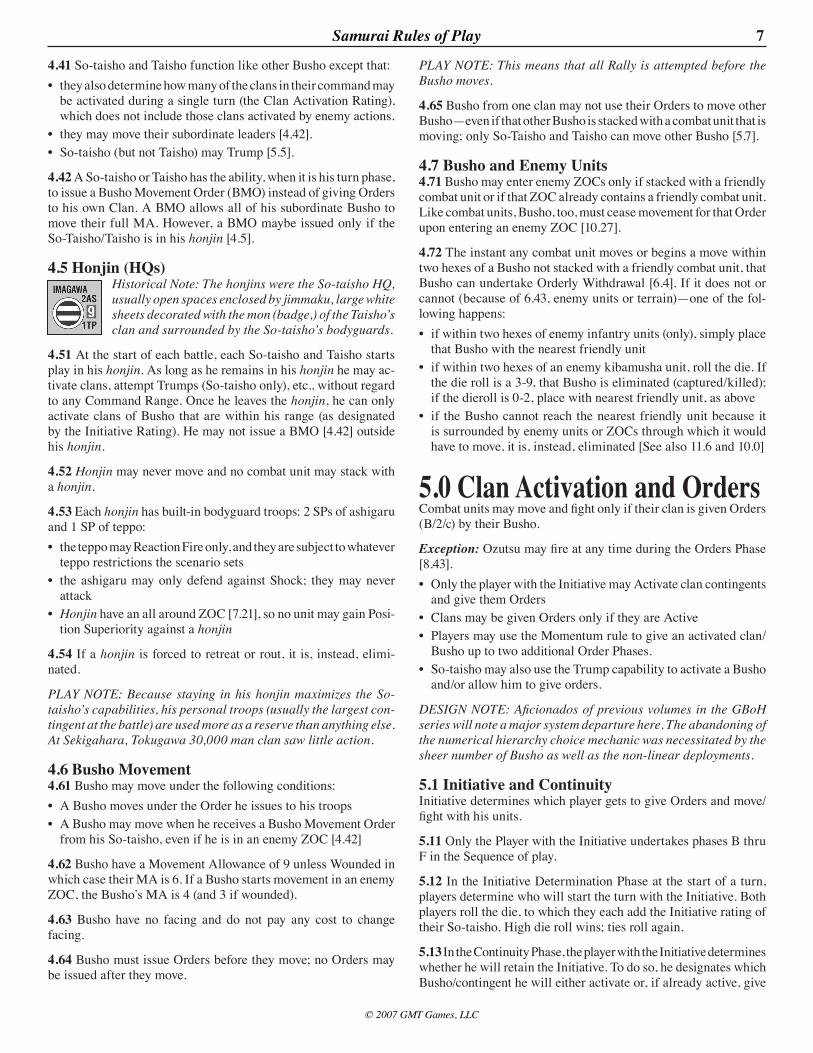
AshigaruFront Back
Busho IDUnit TypeUnit SizeMovement AllowanceTroop
Quality
Clan Allegiance
Disrupted
TeppoFront Back
Unit TypeMovement Allowance
TroopQuality
Clan Allegiance
ReactionFire Only
Kibamusha Ashigaru Teppo Yumi Ozutsu
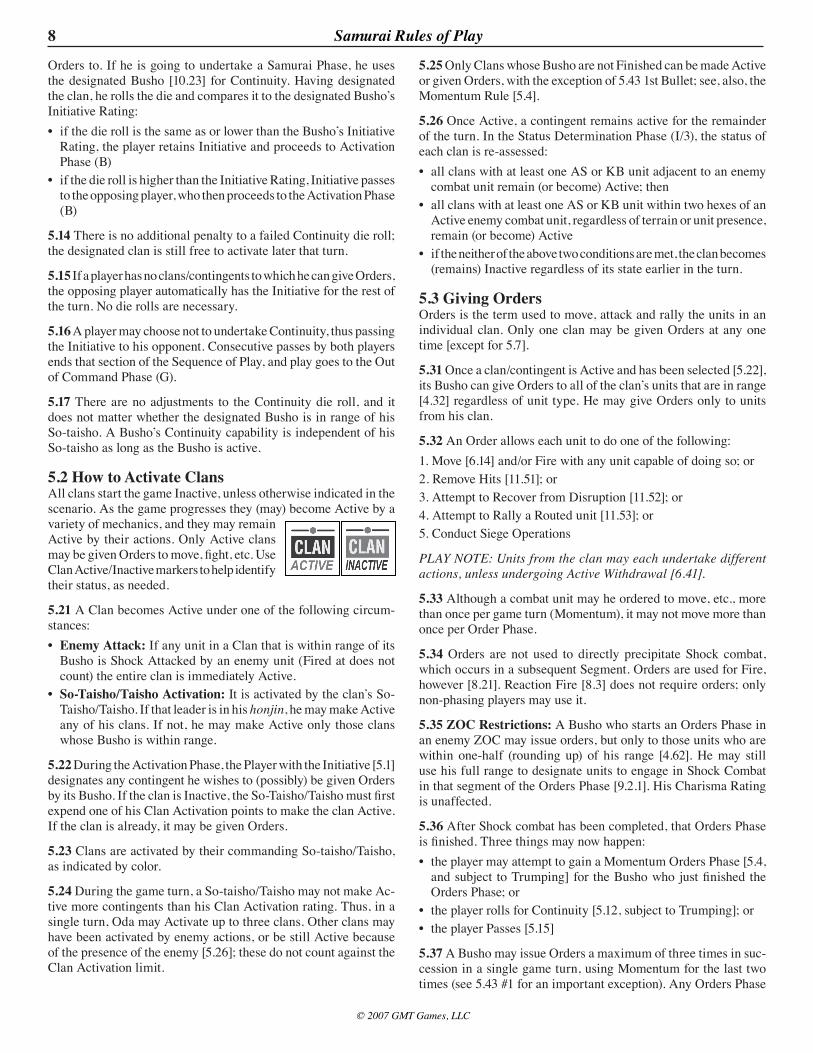
SamuraiClan NameChallenge RangeGiven Name
CombatStamina
So-Taisho/Taisho
other BushoFront Back
CombatStaminaCharismaClan ActivationInitiative
Clan NameGiven Name
RankTrump Rating
Clan NameGiven Name
Clan IDInitiative
CombatStaminaCharisma
Replacement
CohesionHits Routed / Rallied
Clan Active / Inactive
Shock Must Check / No Check TQ
Out ofCommand
Siege / Burning Castle
Busho Finished /Severed Head
Ozutsu Fired /Ozutsu Moved
Palisades(babo-saku)
Engaged in ShockLost Face (–1)
Abandon Guns /Lost Teppo
Trump AttemptNorikuzushi (Cav Charge)
4 Samurai Rules of Play
© 2007 GMT Games, LLC
Busho Movement Order (BMO): An Order issued by the So-taisho (from his honjin) that allows any/all of his subordinate Busho to move, regardless of where they are. Clan: All units from a single clan, or from a contingent within a single clan, who may be commanded by a Busho. In each battle, each separate clan is identified by a number that corresponds to the number on its Busho’s counter. The words “clan” and “contingent” are often used interchangeably. Cohesion: A unit’s ability to remain in an organized, fighting for-mation. Certain results cause a unit to lose cohesion and become Disrupted. Continuity: The mechanic by which the Player retains the Initiative, although undertaking operations with a new clan/Busho. DR = Acronym for Die RollDRM: Acronym for Die Roll Modifier—a number added to or subtracted from the die rollFinished Busho: A Busho whose clan has been given Orders that turn is now Finished and may not (normally) be activated again. Busho may be Finished for other reasons, such as failure to Trump, becoming a casualty, etc. Initiative: The player with the Initiative is the one who may give Orders, activate clans, etc. MA: Acronym for a unit’s basic Movement Allowance. It also represents a unit’s maneuverability in relation to the other units in the game. Momentum: The mechanic by which a Busho can undertake more than one Orders Phase in a turn.MP: Acronym for a Movement PointsOrders Phase: The period during a turn when a Busho gives Orders to the units in his clan to move and fight. Units allowed to move/fight during this phase are sometimes termed the phasing units. Orders: The means by which Busho get their troops to move, fight, etc.Shock Combat: Hand-to-hand fighting that uses the weight/mo-mentum of the men involved as much as their weapons. Size: The number of men in that unit, often abbreviated as SP (Size Point).So-Taisho: The So-taisho is the commander-in-chief for the army.Superiority: The relative capabilities and killing effectiveness of the opposing weapons/armor systems in Shock combat. Superiority, when achieved, will substantially increase an opponent’s chances of being Disrupted or Routed.Taisho: The overall commander for a clan, when there is more than one overall commander in the battle (Cf. Anegawa) TQ: Acronym for the important Troop Quality rating. TQ is used to determine how well a unit stands up to the rigors of battle. Trump: The mechanic by which a friendly So-taisho can stop an enemy Busho from undergoing an Orders Phase and transfer the phase to one of his Busho. Type: General, categorical description of unit, usually used to determine combat effectiveness and results. Zone of Control (ZOC): The hexes (usually directly to the front of a unit) into which that unit exerts, by its presence, enough influence to inhibit the enemy’s freedom of movement.
Knowledge of the following types of combat units/terms will be useful for play. Kibamusha [KB]: Lance-armed, heavy cavalry. They wore the famous and elaborate armor systems and, by this period, used a straight, pointed spear instead of the old, curved-blade naginata, as their principle weapon. Each kiba was accompanied by three or four ashigaru and was thus a mini-combined arm force. Such deployment severely reduced their movement capability and charge range. DESIGN NOTE: This form of usage is quite similar to that used by the German tribes in Julius Caesar’s time, and it is also the method used by Gustavus Adolphus for combining his cavalry with his musketeers, although it does not appear to have worked quite as effective/v.Ashigaru [AS]: Foot soldiers, virtually all pike-armed. Most Ashigaru were the lowest-level of samurai, and, as the armies were not standing or professional, they usually worked in the fields and manors of their So-taisho. The spear of choice was usually the two to three meter-long, pike-like yari, although the spear with the curved blade, the naginata, was also in use. Oda Nobunaga’s ashigaru often used nagae, five to six meter long pikes. Ashigaru spears came in a variety of pointed or cutting edges, but they all served the same purpose. All carried, in addition to their spear, the katana, the traditional fighting sword. Yumi [YU]: Archers. The bow-and-arrow, as a battle weapon, was in its Last Hurrah in this era. By Sekigahara, there were hardly any Yumi in either army. The Japanese bow was originally designed for horseback, although it was a longbow. It was gripped one- third way up the shaft (not halfway), and it required great strength and skill to use. Teppo [TP]: Arquebusiers. The arquebus—an early form of mus-ket—was introduced in 1542 by Portuguese traders and quickly adopted by the armies. Its range was minimally greater than the Yumi, and its killing power similarly more effective. It was, how-ever, far easier to learn to use. Ozutsu: Cannon. The Japanese never did master the art of forging medieval-style, field-level cannon (even though they had access to them from other sources). Given the rough Japanese terrain and the few good roads available, hauling them around was a chore. As a result, they were quite rare on a battlefield; in SAMURAI they appear only at Sekigahara. DESIGN NOTE: Tokugawa appears to have commandeered sev-eral naval pieces (along with a large supply of arquebuses) from the ship of the English sea-dog, Will Adams, who arrived early in 1600. This is the incident upon which the late James Clavell based his novel Shogun.)
2.5 Game Scale Each Combat unit Size Point equals 100 men. However, Kiba-musha SPs are computed rather differently because of the way Sengoku-era cavalry fought. About half of a Kibamusha’s SP is mounted men; the other half is the accompanying ashigaru, who, although usually three to four times as numerous as the mounted samurai, were far less effective in that vein than normal, forma-tion-deployed ashigaru would be. Each Ozutsu counter represents two to three guns. Each hex is approximately 100-120 yards from side to side, depending on the battle. Each game turn covers about thirty minutes of real time.

5
© 2007 GMT Games, LLC
Samurai Rules of Play
2.6 Game Length A battle is fought until one side Routs—anywhere from two hours of real time to about half a day. In playing terms, a full-blown game turn, complete with lots of activation decisions, movement, and combat resolution, will take about one hour.
2.7 Use of Japanese For most military units and general terms we will use the angli-cized form of the Japanese word, most of which are listed in the terminology section. Consider it as a mood enhancer.
A word on Japanese names: Most sources place the family clan name first, followed by the given name. Thus, for Oda Nobunaga: the So-taisho’s clan is Oda, his given name, Nobunaga. It would be as if the designers of the game were called Herman Mark and Berg Richard.
2.8 Questions?Send a self addressed stamped envelope to:GMT GamesATTN: Samurai Q’sPO Box 1308Hanford CA 93232
You can also reach us at www.Consimworld.com in the various gaming sections.
�.0 Sequence of Play Generally, the player with the Initiative either designates an already active clan (or activates one) and then has its Busho give Orders, which allow that clan’s units that are within his Command Range to move and conduct combat. After all clans/Bushos eligible to give Orders and undertake actions are Finished, out of command units are moved. After which, the players move Routed units, replace leaders, resolve various statuses including Clan Flight. Finally, each player checks to see if his Army Routs, after which the game turn is concluded.
The Sequence of Play A. Initiative Determination Phase: The players each roll one die to determine who starts the turn with the Initiative [5.2]
B. Activation Phase: [Do 1, then 2 or 3]1. Possible Reinforcements: If applicable, check the scenario to
see whether reinforcements are available2. Clan Segment: The player with Initiative a. Designates any already Active clan for Orders, or b. Activates an Inactive clan for Orders c. Proceed to Phase C 3. Samurai Activation: The Player may choose, instead, to activate
a samurai [Go to Phase D and see 10.2]
C. Orders Phase1. Movement/Fire Segment: If the Player has chosen to Activate
a Clan—or continue its Activation—the units in that Clan may undertake any action listed in 5.32. Opposing units capable of Reaction Fire [8.34] may do so throughout this segment.
2. Shock Combat Segment: After units of a clan have finished moving and/or firing, eligible units [9.2] engage in Shock combat, using the following sequence:
a. Shock Designation; determine which units must Shock, which may, and which have to undergo Pre-Shock TQ checks
b. Pre-Shock TQ Check, as required c. Determine Position Superiority and Shock column d. Resolve the Shock
D. Samurai Challenge Phase 1. Samurai Movement, including Samurai Charge2. Eligible samurai may issue Challenges3. Resolution of Individual Combat, or4. Hara-kiriPhases C and D are mutually exclusive. You may do one or the other.
E. Momentum Phase or Proceed to F. The player for the Busho who was activated in the immediately preceding Orders Phase may attempt a Momentum die roll to give that Busho another Orders Phase (C) or Samurai Phase (D). If not, go to F.
F. Continuity Phase: The player checks to see whether he retains Initiative [5.1]• If he does, he goes back to B/2 • If he does not, Initiative passes to his opponent, who goes back
to B/1 or B/2 (whichever applies)
G. Out of Command Phase: Out of Command units may move, as per 5.63.
H. The Three Rs Phase1. Remove Rallied, Busho Finished, and Out of Command mark-
ers2. Rout Movement—Routed units must undergo Rout Movement 3. Replace killed leaders
I. Status Determination Phase1. Check for Hits in burning fortifications (Okehazama only)2. Check for Clan Flight [11.62]3. Determine which clans are Active and which are Inactive
J. Victory Determination Phase: Each Player totals his Rout Points [12.0] to see whether his arm has left the field—and the other player has won.
At the conclusion of the Victory Determination Phase, that game turn is concluded and another game turn begins.
4.0 Busho (Leaders) Combat units may not move or fire without receiving an Order from a Busho (see 5.6 and 8.3 for two excep-tions). Those combat units that had received an Order during a Phase, or that are within range of that same Busho, may affect Shock
Combat. When a Busho has concluded giving Orders, place a Finished marker on his counter. Taisho and So-taisho, although having other, overall command duties, are still treated as Busho for their specific contingents.
4.1 Busho Counters All leaders are Busho; some Busho are Taisho or So-taisho, as described below.
6 Samurai Rules of Play
© 2007 GMT Games, LLC
Each Busho possesses several ratings:
Initiative: Denotes his overall ability to control forces and make rapid decisions. Initiative is used to determine:• the hex range within which units of his Clan must be to receive
Orders. Thus a Busho with an Initiative of ‘4’ has a Command range of four hexes [4.32]
• the chances of that Busho being able to use Momentum [5.4]• the chances of that Busho being used to Continue [5.12] that
player’s Initiative
Charisma: Denotes his ability to spur his troops on to greater ef-forts. The rating adjusts the die roll on the Shock Combat Results Table (and for Pre-Shock TQ checks) in his favor for combat units with which he is stacked. It is also used by Busho in Recovery [11.52] attempts, Rally [11.53] attempts and to determine whether his Clan is in Flight [11.62].
Individual Combat [IC] Ratings: Busho (and samurai) have two IC Ratings: Combat and Stamina. These determine success in individual combat [10.1].
Movement Allowance: The number of Movement Points a Busho may expend in an Orders Phase. The MA, which is 9 for all Busho, is not printed on the counter [see, though, 4.6].
Clan Identification: The clan of that Busho’s So-taisho, and an identifying number that delineates which troops are his.
So-taisho/Taisho also possess the following ratings:
Clan Activation: The number to the right of the Initiative on the So-taisho/Taisho’s counter that delineates the number of inactive Clans he may Activate in a turn.
Trump: The number of Trump attempts [5.5] a So-taisho may make during a turn.
4.2 Clans and Contingents Japanese armies of the Sengoku era were usually led by the daimyo of a powerful clan, often in combination with an allied daimyo/clan. These armies were not homogenous groups, but rather conglom-erations of various contingents and clans commanded by trusted samurai. Thus, organization was less by weapon system (as in the West) than by allegiance.
In game terms, what this means is that each player has an army led by a So-taisho, such as Oda Nobunaga or Tokugawa Ieyasu, composed of different contingents usually from the same Clan. Command is often complicated by the fact that some armies are conglomerations of two powerful Taisho. Thus, at Anegawa (see the battle information in the Scenario book), we actually have four, separate armies:• Oda’s army consists of his troops and those of the Tokugawa.
Oda’s command (clan) contains seven different contingents (not including the reinforcements), and Tokugawa has four contingents from his clan. Oda is the So-taisho for the entire army; Tokugawa is the Taisho for the Tokugawa contingents, subordinate only to Oda.
• On the opposing side are the Asai contingents (five) and the Asakura contingents (three). Asai Nagamasa is So-taisho for this army.
For most rules we use the terms “clan” and “contingent” interchange-ably, except in 5.7 and where otherwise specifically noted.
4.� Busho CapabilitiesWhen his clan is activated (or already active), a Busho may issue Orders to its units; his ability to gain Momentum [5.4] or to affect Continuity [5.12] is entirely dependent on his Initiative Rating.
4.�1 A Busho may issue Orders to the units of an Active clan when the player with the Initiative states that that clan will be undergoing an Orders Phase [5.2]. The ability to issue Orders is not contingent on the Busho being within Command Range of his So-taisho—as long as the So-taisho remains in his honjin. If the So-taisho is not in his honjin, the Busho must be within the So-taisho’s range to issue Orders. That range is traced from the So-Taisho to the Busho, into/through any hex which the So-Taisho can enter. Count the Busho’s hex, but not the So-Taisho’s. The path may not be traced through enemy occupied hexes, or hexes in an enemy ZOC, unless the latter are occupied by friendly units.
4.�2 Orders may be given to any/all units in that Busho’s clan, regard-less of unit type. However, to receive an Order, a unit must be:
• within Command Range of its Busho [4.1]. That range is traced from the Busho to the combat unit, into/through any hex that a Busho may enter. Count the unit’s hex, but not the Busho’s. It may not be traced through enemy occupied hexes, or hexes in an enemy ZOC—unless the latter are occupied by friendly units: or
• adjacent to a combat unit from that clan that is within range
Command Ranges are calculated at the instant the Order is to given.
PLAY NOTE: The adjacency rule allows a Busho to extend his range, effectively, by one hex. Busho of the few really large clans (e. g. the Kobayakawa at Sekigahara) will need this rule to keep their units in command.
4.�� A Busho may move when he has issued Orders to his clan’s units. He may move as far as he wishes, within his MA of nine per Orders Phase, or he may not move at all [see 4.6 for Busho move-ment rules, and 4.42.].
4.�4 A Busho who starts the Orders Phase in an enemy Zone of Control has his command range halved (round up) [5.35]. If his clan is Active [5.32], units that are already Engaged with an enemy unit must either continue Shock or Withdraw, whether the unit is within the Busho’s range or not.
4.�5 A Busho who is Finished [5.22] may not issue Orders. However, he may move, but only when so ordered by his So-taisho [4.42].
4.�.6 A Busho may command only those combat units from his So-taisho’s clan, and with the same Clan ID#.
EXAMPLE: At Nagashino, Baba Nobufusa may command only those Takeda clan troops with the Clan ID#
4.4 Taisho and So-Taisho The So-taisho is the leader that commands the entire army (e. g. Takeda Katsuyori at Nagashino). Taishos are those superior leaders that command one of an army’s two major corps (e. g. Tokugawa at Anegawa).
7
© 2007 GMT Games, LLC
Samurai Rules of Play
4.41 So-taisho and Taisho function like other Busho except that: • they also determine how many of the clans in their command may
be activated during a single turn (the Clan Activation Rating), which does not include those clans activated by enemy actions.
• they may move their subordinate leaders [4.42]. • So-taisho (but not Taisho) may Trump [5.5].
4.42 A So-taisho or Taisho has the ability, when it is his turn phase, to issue a Busho Movement Order (BMO) instead of giving Orders to his own Clan. A BMO allows all of his subordinate Busho to move their full MA. However, a BMO maybe issued only if the So-Taisho/Taisho is in his honjin [4.5].
4.5 Honjin (HQs) Historical Note: The honjins were the So-taisho HQ, usually open spaces enclosed by jimmaku, large white sheets decorated with the mon (badge,) of the Taisho’s clan and surrounded by the So-taisho’s bodyguards.
4.51 At the start of each battle, each So-taisho and Taisho starts play in his honjin. As long as he remains in his honjin he may ac-tivate clans, attempt Trumps (So-taisho only), etc., without regard to any Command Range. Once he leaves the honjin, he can only activate clans of Busho that are within his range (as designated by the Initiative Rating). He may not issue a BMO [4.42] outside his honjin.
4.52 Honjin may never move and no combat unit may stack with a honjin.
4.5� Each honjin has built-in bodyguard troops: 2 SPs of ashigaru and 1 SP of teppo: • the teppo may Reaction Fire only, and they are subject to whatever
teppo restrictions the scenario sets • the ashigaru may only defend against Shock; they may never
attack• Honjin have an all around ZOC [7.21], so no unit may gain Posi-
tion Superiority against a honjin
4.54 If a honjin is forced to retreat or rout, it is, instead, elimi-nated.
PLAY NOTE: Because staying in his honjin maximizes the So-taisho’s capabilities, his personal troops (usually the largest con-tingent at the battle) are used more as a reserve than anything else. At Sekigahara, Tokugawa 30,000 man clan saw little action.
4.6 Busho Movement 4.61 Busho may move under the following conditions:• A Busho moves under the Order he issues to his troops • A Busho may move when he receives a Busho Movement Order
from his So-taisho, even if he is in an enemy ZOC [4.42]
4.62 Busho have a Movement Allowance of 9 unless Wounded in which case their MA is 6. If a Busho starts movement in an enemy ZOC, the Busho’s MA is 4 (and 3 if wounded).
4.6� Busho have no facing and do not pay any cost to change facing.
4.64 Busho must issue Orders before they move; no Orders may be issued after they move.
PLAY NOTE: This means that all Rally is attempted before the Busho moves.
4.65 Busho from one clan may not use their Orders to move other Busho—even if that other Busho is stacked with a combat unit that is moving; only So-Taisho and Taisho can move other Busho [5.7].
4.7 Busho and Enemy Units 4.71 Busho may enter enemy ZOCs only if stacked with a friendly combat unit or if that ZOC already contains a friendly combat unit. Like combat units, Busho, too, must cease movement for that Order upon entering an enemy ZOC [10.27].
4.72 The instant any combat unit moves or begins a move within two hexes of a Busho not stacked with a friendly combat unit, that Busho can undertake Orderly Withdrawal [6.4]. If it does not or cannot (because of 6.43, enemy units or terrain)—one of the fol-lowing happens: • if within two hexes of enemy infantry units (only), simply place
that Busho with the nearest friendly unit• if within two hexes of an enemy kibamusha unit, roll the die. If
the die roll is a 3-9, that Busho is eliminated (captured/killed); if the dieroll is 0-2, place with nearest friendly unit, as above
• if the Busho cannot reach the nearest friendly unit because it is surrounded by enemy units or ZOCs through which it would have to move, it is, instead, eliminated [See also 11.6 and 10.0]
5.0 Clan Activation and Orders Combat units may move and fight only if their clan is given Orders (B/2/c) by their Busho.
Exception: Ozutsu may fire at any time during the Orders Phase [8.43].• Only the player with the Initiative may Activate clan contingents
and give them Orders• Clans may be given Orders only if they are Active • Players may use the Momentum rule to give an activated clan/
Busho up to two additional Order Phases. • So-taisho may also use the Trump capability to activate a Busho
and/or allow him to give orders.
DESIGN NOTE: Aficionados of previous volumes in the GBoH series will note a major system departure here. The abandoning of the numerical hierarchy choice mechanic was necessitated by the sheer number of Busho as well as the non-linear deployments.
5.1 Initiative and Continuity Initiative determines which player gets to give Orders and move/fight with his units.
5.11 Only the Player with the Initiative undertakes phases B thru F in the Sequence of play.
5.12 In the Initiative Determination Phase at the start of a turn, players determine who will start the turn with the Initiative. Both players roll the die, to which they each add the Initiative rating of their So-taisho. High die roll wins; ties roll again.
5.1� In the Continuity Phase, the player with the Initiative determines whether he will retain the Initiative. To do so, he designates which Busho/contingent he will either activate or, if already active, give
8 Samurai Rules of Play
© 2007 GMT Games, LLC
Orders to. If he is going to undertake a Samurai Phase, he uses the designated Busho [10.23] for Continuity. Having designated the clan, he rolls the die and compares it to the designated Busho’s Initiative Rating:• if the die roll is the same as or lower than the Busho’s Initiative
Rating, the player retains Initiative and proceeds to Activation Phase (B)
• if the die roll is higher than the Initiative Rating, Initiative passes to the opposing player, who then proceeds to the Activation Phase (B)
5.14 There is no additional penalty to a failed Continuity die roll; the designated clan is still free to activate later that turn.
5.15 If a player has no clans/contingents to which he can give Orders, the opposing player automatically has the Initiative for the rest of the turn. No die rolls are necessary.
5.16 A player may choose not to undertake Continuity, thus passing the Initiative to his opponent. Consecutive passes by both players ends that section of the Sequence of Play, and play goes to the Out of Command Phase (G).
5.17 There are no adjustments to the Continuity die roll, and it does not matter whether the designated Busho is in range of his So-taisho. A Busho’s Continuity capability is independent of his So-taisho as long as the Busho is active.
5.2 How to Activate Clans All clans start the game Inactive, unless otherwise indicated in the scenario. As the game progresses they (may) become Active by a variety of mechanics, and they may remain Active by their actions. Only Active clans may be given Orders to move, fight, etc. Use Clan Active/Inactive markers to help identify their status, as needed.
5.21 A Clan becomes Active under one of the following circum-stances: • Enemy Attack: If any unit in a Clan that is within range of its
Busho is Shock Attacked by an enemy unit (Fired at does not count) the entire clan is immediately Active.
• So-Taisho/Taisho Activation: It is activated by the clan’s So-Taisho/Taisho. If that leader is in his honjin, he may make Active any of his clans. If not, he may make Active only those clans whose Busho is within range.
5.22 During the Activation Phase, the Player with the Initiative [5.1] designates any contingent he wishes to (possibly) be given Orders by its Busho. If the clan is Inactive, the So-Taisho/Taisho must first expend one of his Clan Activation points to make the clan Active. If the clan is already, it may be given Orders.
5.2� Clans are activated by their commanding So-taisho/Taisho, as indicated by color.
5.24 During the game turn, a So-taisho/Taisho may not make Ac-tive more contingents than his Clan Activation rating. Thus, in a single turn, Oda may Activate up to three clans. Other clans may have been activated by enemy actions, or be still Active because of the presence of the enemy [5.26]; these do not count against the Clan Activation limit.
5.25 Only Clans whose Busho are not Finished can be made Active or given Orders, with the exception of 5.43 1st Bullet; see, also, the Momentum Rule [5.4].
5.26 Once Active, a contingent remains active for the remainder of the turn. In the Status Determination Phase (I/3), the status of each clan is re-assessed: • all clans with at least one AS or KB unit adjacent to an enemy
combat unit remain (or become) Active; then• all clans with at least one AS or KB unit within two hexes of an
Active enemy combat unit, regardless of terrain or unit presence, remain (or become) Active
• if the neither of the above two conditions are met, the clan becomes (remains) Inactive regardless of its state earlier in the turn.
5.� Giving Orders Orders is the term used to move, attack and rally the units in an individual clan. Only one clan may be given Orders at any one time [except for 5.7].
5.�1 Once a clan/contingent is Active and has been selected [5.22], its Busho can give Orders to all of the clan’s units that are in range [4.32] regardless of unit type. He may give Orders only to units from his clan.
5.�2 An Order allows each unit to do one of the following:1. Move [6.14] and/or Fire with any unit capable of doing so; or2. Remove Hits [11.51]; or 3. Attempt to Recover from Disruption [11.52]; or 4. Attempt to Rally a Routed unit [11.53]; or 5. Conduct Siege Operations
PLAY NOTE: Units from the clan may each undertake different actions, unless undergoing Active Withdrawal [6.41].
5.�� Although a combat unit may he ordered to move, etc., more than once per game turn (Momentum), it may not move more than once per Order Phase.
5.�4 Orders are not used to directly precipitate Shock combat, which occurs in a subsequent Segment. Orders are used for Fire, however [8.21]. Reaction Fire [8.3] does not require orders; only non-phasing players may use it.
5.�5 ZOC Restrictions: A Busho who starts an Orders Phase in an enemy ZOC may issue orders, but only to those units who are within one-half (rounding up) of his range [4.62]. He may still use his full range to designate units to engage in Shock Combat in that segment of the Orders Phase [9.2.1]. His Charisma Rating is unaffected.
5.�6 After Shock combat has been completed, that Orders Phase is finished. Three things may now happen: • the player may attempt to gain a Momentum Orders Phase [5.4,
and subject to Trumping] for the Busho who just finished the Orders Phase; or
• the player rolls for Continuity [5.12, subject to Trumping]; or • the player Passes [5.15]
5.�7 A Busho may issue Orders a maximum of three times in suc-cession in a single game turn, using Momentum for the last two times (see 5.43 #1 for an important exception). Any Orders Phase
�
© 2007 GMT Games, LLC
Samurai Rules of Play
that is generated by a Momentum dieroll is called a “Momentum-generated Orders Phase”; all others, including a phase resulting directly from a Trump, is an Initial Orders Phase. Momentum Phases do not need Continuity.
5.�8 A Busho is Finished when one of the following occurs: • the Busho has completed an Orders Phase and does not (or can-
not) make a Momentum attempt; or • the Busho has been Trumped; or • the Busho fails a Momentum attempt; or • the Busho’s clan has Withdrawn and/or becomes Inactive
When a Busho is Finished, place a Finished marker on his counter to so indicate. A Finished Busho cannot undertake any further Orders Phases that turn (Excep-tion: [5.43[1]]).
5.�� When all Busho are Finished or when there are no Active clans remaining and the So-taisho/Taisho has used all his Clan Activation points, the players proceed to the Out of Command Phase (G).
5.4 Momentum PLAYER’S NOTE: Momentum (and Trumping, below,) are highly useful and powerful game-oriented gambits, especially for the Player with superior leadership. Only a player with Initiative can attempt Momentum.
5.41 At the conclusion of an Orders Phase, if the Busho who had issued Orders for that Phase is not Finished [5.38], and was not previously Trumped [5.54], the player may attempt to undertake an additional Orders Phase with that same Busho. To do so, that Busho must pass a Momentum die roll.
5.42 To gain Momentum, the Initiative player rolls the die and compares the result to the Busho’s Initiative Rating:• if the die roll is the same or less than the rating, that Busho starts
another Orders Phase; • if higher than the rating, that Busho is Finished for the turn.
Proceed to Continuity Phase (F).
EXAMPLE: At Mikata-ga-hara, Honda Tadakatsu would need a dieroll of 0-5 to gain Momentum; a 6-9 would Finish him.
5.4� The Dieroll of Doom: If the Momentum die roll is a 9, the die is immediately rolled again. • if the second die roll is a 0 or 1, the Initiative immediately
transfers to the opposing player, who may use any Busho of an Active clan, regardless of whether or not they are Finished. A Busho who was previously Finished may not use Momentum, but a Busho who is not Finished and is activated by this rule may use Momentum.
• if the second die roll is 2-8, the Busho attempting Momentum is Finished. Proceed to the Continuity Phase (F).
• if the second die roll is a 9, the Busho has suffered a Crisis of Faith in his allegiance and he issues an automatic Active Withdrawal Order [6.41]
5.44 Momentum die rolls apply only to the Busho who has just finished an Orders Phase. You may not apply Momentum to a Busho who Finished several phases ago or who was Finished and then activated by 5.43 #1.
5.45 A Busho is allowed only two Momentum-generated Orders Phases per game turn. A Busho who manages to undertake three Orders Phases in succession (one Initial and two Momentum-gener-ated) is automatically Finished.
PLAY NOTE: It is important to differentiate between Continuity and Momentum. Momentum applies to getting the same Busho to activate again. Continuity allows another leader to activate.
5.5 The Trump Option Trumping is an out-of-turn attempt to grab the Initiative. It is a play mechanic available only to the So-taisho of the army.
DESIGN NOTE #1: Trumping portrays the effect of superiority in the area of Overall Command.
DESIGN NOTE #2: Players familiar with the GBoH system games will please note that this rule—a staple of all previous games— has changed somewhat.
5.51 The Basic Trumping Procedure: Before look-ing at what Trumping is and how it affects play, here is how you go about doing it.
1. Designate the Busho/clan who will he the beneficiary of the Trump. This Busho must have an Initiative Rating the same as our higher than the Busho being Trumped. You cannot designate an Inactive clan if the So-taisho has no remaining Clan Activation points.
2. The player attempting the Trump rolls the die and compares it to the Initiative Rating of his army’s So-taisho.
3. If the die roll is higher than the rating, the Trump attempt fails. There is no penalty to the rolling So-taisho. He has simply wasted one of his Trump attempts. The original Busho proceeds with his Orders Phase.
4. If the die roll is the same as or lower than the So-taisho’s Initia-tive Rating, the Trump attempt is successful, and Initiative passes to the Trumping player. The trumped Busho is Finished.
5. If the designated clan is Inactive, the Busho’s So-taisho (or Taisho) must expend one of his Clan Activation points to make that clan Active.
PLAY NOTE: GBoH veterans will see the big change immediately: all Trumping resides with the So-taisho, and he is not penalized if he fails. However, each So-taisho has a maximum number of Trump attempts he may make per turn. Also, note that while the So-taisho is doing the Trumping, if the clan is Inactive and there is a Taisho in addition to the So-taisho, the Activation (and expenditure of the Clan Activation point) is undertaken by the Taisho for that clan.
5.52 The opposing player has two Trump options, each usable under different circumstances.
1. Trumping Continuity: If—and only if— the Initiative player is successful with his Continuity attempt [5.12], the opposing player has the option of attempting to trump that Continuity using one of his own Busho—if that Busho is eligible, and his clan is Active or can be made Active. See 5.51 for the procedure.
EXAMPLE: Anegawa: Asai has just undertaken an Orders Phase with Atsuji Sadahide. He wants to continue his turn, this time designating Isono Kazumasa (Initiative rating of 5) for Continuity.

10 Samurai Rules of Play
© 2007 GMT Games, LLC
suffers an automatic Disruption at the conclusion of Withdrawal.
5.65 When determining what to do with Out-of-Command units, the lowest-rated TQ units go first. In case of ties, roll a die to see who goes first and then alternate.
5.7 Coordination Coordination between troops from different clans/contingents was an iffy proposition in this era, even when those troops were from the same clan but under different Busho. The competitive personalities of the highly individualistic samurai Busho often got in the way of cogent action. For this rule it is important to distinguish between a Clan (all combat units with the same name) and the Contingent (units with different Contingent numbers from the same clan). Only one attempt at Coordination is allowed per Orders Phase.
5.71 A player may attempt to activate two (never more) Contin-gents (or, at Sekigahara, two Clans) at the same time. To do so, the player announces a Clan Coordination attempt when it is his turn [5.24], and then he designates which two contingents will attempt coordination. The So-taisho or Taisho [5.72] may expend Clan Activation Points [5.21].
5.72 To effect the Coordination, the player rolls the die and compares it to the Initiative rating of both selected Busho: • If the die roll is the same as or lower than both Busho’s Initiative,
Coordination is successful • If the die roll is higher than either Busho’s Initiative, Coordination
is unsuccessful. There is no penalty to either clan, but the player must now use Continuation if he wishes to do anything else.
5.7� Clans/contingents that are successful in Coordinating now undertake the Orders Phase using all normal rules, except for Shock. When units from different contingents or clans are involved in the same Shock Segment—not just the same attack, the same Segment—the attacking player must roll a die to see whether the attacks for that segment can take place as planned. The possible results of that adjusted die roll are as follows, and they apply to all the attacks in the segment as a whole;
CLAN COORDINATION SHOCK TABLE Dieroll Result 0-3 attack takes place as planned 4-5 only those units from the contingent/clan with the
higher-rated Busho attack. If tied, player’s choice 6 only those units from the contingent/clan with the
lower-rated Busho attack. If tied, player’s choice 7 the player chooses which clan/contingent’s units will
attack. Only one clan or contingent may be chosen 8-9 the Busho are so busy arguing about who should attack
that no shock attack takes place. Ignore Must Shock requirements
5.74 Coordinated clans may roll for Momentum, using the Initiative Rating of the lower-rated Busho and adding one (+1) to the die roll. If Momentum is achieved, go back to 5.73.
The Asai Player rolls a 4, so he has achieved Continuity. However, Oda attempts to Trump, designating Shibata Katsuie. He rolls for Trumping, getting a 3, which is lower than Oda Initiative rating. Therefore, the Trump attempt is successful, Initiative passes to Oda, and Shibata’s clan (which was Active,) may be given Orders.
2. Momentum Trump: If the Initiative player is successful at-tempting a Momentum dieroll [5.4], the non-Initiative player may attempt to trump in the same fashion as 5.52 above.
EXAMPLE: Following the previous example, Shibata (Initiative of 5), after undertaking his initial Orders Phase, goes for Momentum. The Oda player rolls a 3, so Shibata has achieved Momentum. However, the Asai player announces a Trump attempt with Maeba Shinpichirou. He rolls a 7, the Trump fails (because it is higher than Asai’s Initiative), Maeba is Finished, and Shibata activates.
>>5.5� There are two further restrictions to Trump ability: • A So-taisho may attempt to Trump only as many times per game
turn as his Trump Rating • Each So-taisho is allowed only one Trump attempt per Orders
Phase• A So-Taisho may Trump outside his honjin, however, halve (round
down) his Initiative Rating when determining the outcome (5.51 #2-4).
5.54 A Busho who has been trumped is Finished. There is no ad-ditional effect on him or on any other leader.
PLAY NOTE: GBoH aficionados will note that the Trumped/No Momentum rule is not used in this game.
5.55 A Busho that successfully Trumps cannot do nothing. He must issue an order to at least one unit to move, fight, rally, etc., or he must use his range to have units Shock attack.
PLAY NOTE: No, you cannot move your units one hex back and then one hex forward (sort of jogging in place). You must either fire, attack, or move at least one unit so that it ends in a different hex.
5.6 Out-of-Command Units 5.61 When an Active clan is given Orders, it is pos-sible that one/some of the units in that clan may not be within the Busho’s range. Such units are Out of Command; place an Out of Command marker on that
unit to so indicate. Routed units are not automatically treated as Out of Command units simply because they are routed.
5.62 Out of Command units may not be given Orders. They may Reaction Fire, and they do Withdraw when eligible [6.41]. They may not use Rally or Recovery.
5.6� Out of Command units may move, without Orders, in the Out of Command Phase (G). Kibamusha may use a maximum of 2 MP; all other units may use a maximum of 1 MP. Units mov-ing in this phase must end their movement closer to, or the same distance away from, their Busho. They may not enter enemy ZOCs (6.33 applies).
5.64 Out of Command units may not Shock attack unless they are Engaged [9.12]. They may use Active Withdrawal—even without an Order, but only if they are Engaged—and, in doing so, the unit
11
© 2007 GMT Games, LLC
Samurai Rules of Play
6.0 Movement 6.1 Movement Allowances DESIGN NOTE: Movement Allowances simulate not only the time it takes a unit to move from point to point, but also its maneuver-ability relative to other, different-type units.
6.11 A combat unit’s printed Movement Allowance (MA) is the basic allowance for a single Order. A combat unit receiving an Order may move up to its printed MA, unless it is Out of Command (see 5.63 for the maximum allowances). Units may always move less than the printed MA. Disrupted units have lower MAs.
6.12 There is no limit to the number of times a combat unit may move in a single turn. However, it may move only once per Orders Phase. Thus, a Kibamusha ordered by a Busho to move in that Busho’s initial Orders phase may move again; but, to do so, it must wait for that Busho’s Order given in a subsequent, Momentum Phase.
6.1� See 4.6 for Busho movement.
6.14 The act of Firing [8.2] costs phasing units Movement Points. It costs: • Teppo (and Ashigaru at Sekigahara), 2 Movement Points, and • Yumi, 1 Movement Point to Fire.
Those units must have the MPs to expend, and they may still only fire once per Orders Phase.
6.15 Out of Command Teppo/Yumi may not fire in a friendly Or-ders Phase. They may always use Reaction Fire, when applicable, regardless of command situation.
6.2 Movement and Terrain DESIGN NOTE: One of the major areas of difference between Japan and the West—especially in terms of combat in this era—is the terrain. Japan is a relatively hilly, even mountainous, county in which most of the mountains were covered with heavy woods. Few are the flat, featureless plains so sought after by western generals. As a result, formations were not as dense as in the West, giving the Japanese ashigaru a bit more flexibility. Still, commanders did prefer the flat ground, as can be seen from the battle maps.
6.21 A unit expends Movement Points for each hex it enters. MP costs do not depend on unit type; all units pay the same MP cost. Units also pay movement point costs (and possible cohesion penal-ties) to change facing [7.1] (and remember 6.14).
6.22 Units pay costs to move into a higher elevation. However, they only pay the cost of moving into the second, additional such change, not the first.
EXAMPLE: A unit on the Nagashino map in hex 2015 would expend only 1 MP to move into 1914 but 2 MPs to move from 1914 to 1913, one for the clear hex and one more for the higher elevation change, because it is the second elevation change it entered that turn.
6.2� Certain units (determined by Type; see 6.2.5 incur a Cohesion penalty (Hit) whenever they enter or change facing in a village and/or change elevation [6.22]. The Hit cost to enter or cross dif-ferent types of terrain depends on the unit moving. Thus, although it will cost Ashigaru 1 Hit to change an additional elevation level, it will cost Yumi none. All Cohesion penalties for movement (in-cluding all advances after combat) and facing changes are applied
the instant they occur. However, a Disrupted unit may not enter a hex whose Cohesion penalty would cause it to Rout. Busho never suffer Cohesion penalties.
DESIGN NOTE: Cohesion penalties for movement have to do with the disruption of a unit’s formation. Japanese units were rather more amorphous than their European counterparts, and formation was far less important to them, which is why Movement Cohesion penalties are rare in this game.
6.24 Certain hexsides are impassable to certain units: no unit may enter/cross such a hex(side). The Terrain Chart delineates these restrictions.
6.25 The Movement Costs Chart gives the Movement and Cohesion penalty costs for each type of unit moving (or changing facing in) into/across a specific type of terrain.
6.� Movement Restrictions 6.�1 As a unit moves it traces a path of contiguous hexes through the hex grid, paying the cost of each hex entered. One unit’s move-ment must be completed before another can begin.
6.�2 A unit may be moved in any direction or combination of direc-tions, provided that the hex it enters is located to its front [7.11]. For a unit to change direction it must first change facing [7.13].
6.�.� A moving unit must have enough MPs to pay the terrain cost of entering a hex; if it doesn’t, it may not enter that hex.
6.�4 Important: A unit may not use its last, remaining MP to move adjacent to an enemy unit. Exception: Kibamusha using Norikuzushi [9.34].
6.4 Withdrawal Withdrawal is a voluntary retreat. There are two types of With-drawal: Active Withdrawal and Reactive Withdrawal. Their use and application depends on whether it is that player’s Phase. Routed units and Ozutsu are not eligible to Withdraw—either AW or RW—regardless of their situation.
6.41 Active Withdrawal is an Order given to all units in a clan by the Busho in his Orders Phase. They may not do anything else. A Busho: • may order Active Withdrawal at any time during his Phase • must order Active Withdrawal if there are units in his Clan that
are Engaged [9.12] and he does not wish to Shock Attack with those units
• must order Active Withdrawal if he rolls a 9 after the Dieroll of Doom [5.43]
6.42 When given an AW Order, all units so ordered must try to move so that they are not within two hexes of any Active enemy unit. Units so moving do not pay costs for Changing Facing either before the start such movement or when they finish AW; they do pay face-changing costs while moving. Moreover, units may not:• exceed their Movement Allowance• withdraw into an enemy ZOC or into any hex (or across a hexside)
into across which movement would be prohibited • fire during either kind of Withdrawal
If a unit is not capable of so Withdrawing it must remain in place. After Withdrawing, the Busho is Finished.
12 Samurai Rules of Play
© 2007 GMT Games, LLC
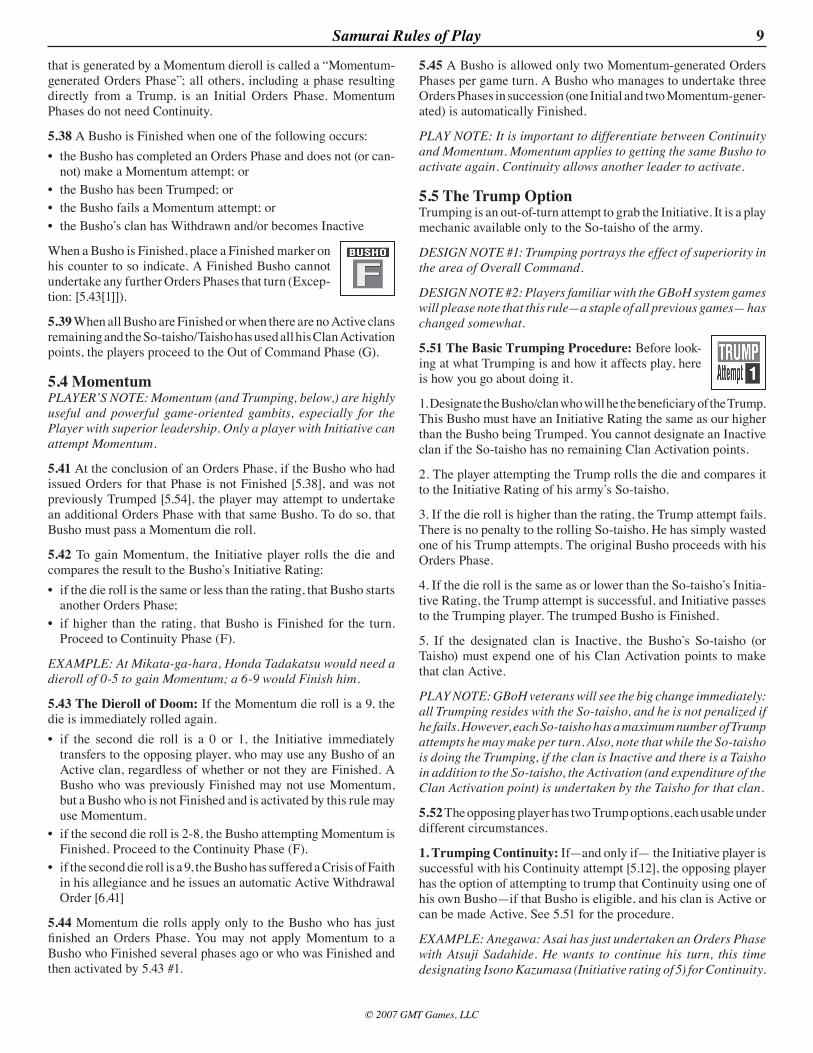
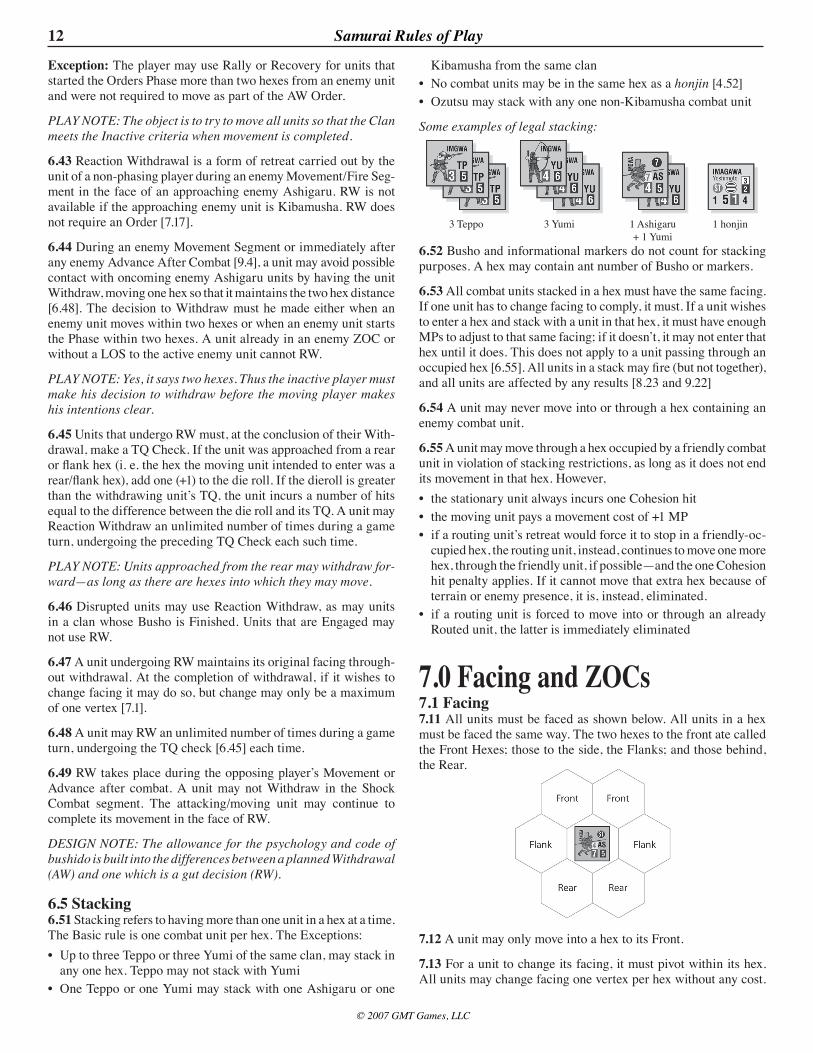
Kibamusha from the same clan • No combat units may be in the same hex as a honjin [4.52]• Ozutsu may stack with any one non-Kibamusha combat unit
Some examples of legal stacking:
6.52 Busho and informational markers do not count for stacking purposes. A hex may contain ant number of Busho or markers.
6.5� All combat units stacked in a hex must have the same facing. If one unit has to change facing to comply, it must. If a unit wishes to enter a hex and stack with a unit in that hex, it must have enough MPs to adjust to that same facing; if it doesn’t, it may not enter that hex until it does. This does not apply to a unit passing through an occupied hex [6.55]. All units in a stack may fire (but not together), and all units are affected by any results [8.23 and 9.22]
6.54 A unit may never move into or through a hex containing an enemy combat unit.
6.55 A unit may move through a hex occupied by a friendly combat unit in violation of stacking restrictions, as long as it does not end its movement in that hex. However, • the stationary unit always incurs one Cohesion hit• the moving unit pays a movement cost of +1 MP • if a routing unit’s retreat would force it to stop in a friendly-oc-
cupied hex, the routing unit, instead, continues to move one more hex, through the friendly unit, if possible—and the one Cohesion hit penalty applies. If it cannot move that extra hex because of terrain or enemy presence, it is, instead, eliminated.
• if a routing unit is forced to move into or through an already Routed unit, the latter is immediately eliminated
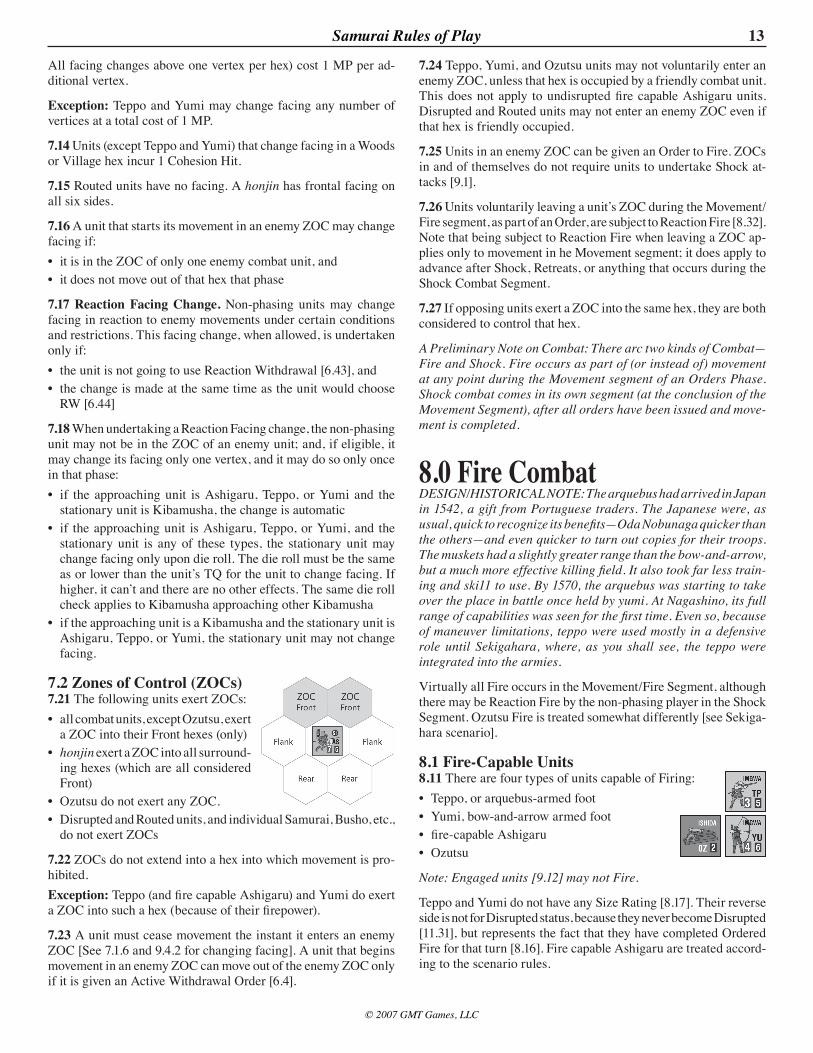
7.0 Facing and ZOCs 7.1 Facing 7.11 All units must be faced as shown below. All units in a hex must be faced the same way. The two hexes to the front ate called the Front Hexes; those to the side, the Flanks; and those behind, the Rear.
7.12 A unit may only move into a hex to its Front.
7.1� For a unit to change its facing, it must pivot within its hex. All units may change facing one vertex per hex without any cost.
Exception: The player may use Rally or Recovery for units that started the Orders Phase more than two hexes from an enemy unit and were not required to move as part of the AW Order.
PLAY NOTE: The object is to try to move all units so that the Clan meets the Inactive criteria when movement is completed.
6.4� Reaction Withdrawal is a form of retreat carried out by the unit of a non-phasing player during an enemy Movement/Fire Seg-ment in the face of an approaching enemy Ashigaru. RW is not available if the approaching enemy unit is Kibamusha. RW does not require an Order [7.17].
6.44 During an enemy Movement Segment or immediately after any enemy Advance After Combat [9.4], a unit may avoid possible contact with oncoming enemy Ashigaru units by having the unit Withdraw, moving one hex so that it maintains the two hex distance [6.48]. The decision to Withdraw must he made either when an enemy unit moves within two hexes or when an enemy unit starts the Phase within two hexes. A unit already in an enemy ZOC or without a LOS to the active enemy unit cannot RW.
PLAY NOTE: Yes, it says two hexes. Thus the inactive player must make his decision to withdraw before the moving player makes his intentions clear.
6.45 Units that undergo RW must, at the conclusion of their With-drawal, make a TQ Check. If the unit was approached from a rear or flank hex (i. e. the hex the moving unit intended to enter was a rear/flank hex), add one (+1) to the die roll. If the dieroll is greater than the withdrawing unit’s TQ, the unit incurs a number of hits equal to the difference between the die roll and its TQ. A unit may Reaction Withdraw an unlimited number of times during a game turn, undergoing the preceding TQ Check each such time.
PLAY NOTE: Units approached from the rear may withdraw for-ward—as long as there are hexes into which they may move.
6.46 Disrupted units may use Reaction Withdraw, as may units in a clan whose Busho is Finished. Units that are Engaged may not use RW.
6.47 A unit undergoing RW maintains its original facing through-out withdrawal. At the completion of withdrawal, if it wishes to change facing it may do so, but change may only be a maximum of one vertex [7.1].
6.48 A unit may RW an unlimited number of times during a game turn, undergoing the TQ check [6.45] each time.
6.4� RW takes place during the opposing player’s Movement or Advance after combat. A unit may not Withdraw in the Shock Combat segment. The attacking/moving unit may continue to complete its movement in the face of RW.
DESIGN NOTE: The allowance for the psychology and code of bushido is built into the differences between a planned Withdrawal (AW) and one which is a gut decision (RW).
6.5 Stacking 6.51 Stacking refers to having more than one unit in a hex at a time. The Basic rule is one combat unit per hex. The Exceptions: • Up to three Teppo or three Yumi of the same clan, may stack in
any one hex. Teppo may not stack with Yumi• One Teppo or one Yumi may stack with one Ashigaru or one
3 Teppo 3 Yumi 1 Ashigaru+ 1 Yumi
1 honjin
1�
© 2007 GMT Games, LLC
Samurai Rules of Play
All facing changes above one vertex per hex) cost 1 MP per ad-ditional vertex.
Exception: Teppo and Yumi may change facing any number of vertices at a total cost of 1 MP.
7.14 Units (except Teppo and Yumi) that change facing in a Woods or Village hex incur 1 Cohesion Hit.
7.15 Routed units have no facing. A honjin has frontal facing on all six sides.
7.16 A unit that starts its movement in an enemy ZOC may change facing if:• it is in the ZOC of only one enemy combat unit, and • it does not move out of that hex that phase
7.17 Reaction Facing Change. Non-phasing units may change facing in reaction to enemy movements under certain conditions and restrictions. This facing change, when allowed, is undertaken only if: • the unit is not going to use Reaction Withdrawal [6.43], and • the change is made at the same time as the unit would choose
RW [6.44]
7.18 When undertaking a Reaction Facing change, the non-phasing unit may not be in the ZOC of an enemy unit; and, if eligible, it may change its facing only one vertex, and it may do so only once in that phase: • if the approaching unit is Ashigaru, Teppo, or Yumi and the
stationary unit is Kibamusha, the change is automatic• if the approaching unit is Ashigaru, Teppo, or Yumi, and the
stationary unit is any of these types, the stationary unit may change facing only upon die roll. The die roll must be the same as or lower than the unit’s TQ for the unit to change facing. If higher, it can’t and there are no other effects. The same die roll check applies to Kibamusha approaching other Kibamusha
• if the approaching unit is a Kibamusha and the stationary unit is Ashigaru, Teppo, or Yumi, the stationary unit may not change facing.
7.2 Zones of Control (ZOCs) 7.21 The following units exert ZOCs: • all combat units, except Ozutsu, exert
a ZOC into their Front hexes (only) • honjin exert a ZOC into all surround-
ing hexes (which are all considered Front)
• Ozutsu do not exert any ZOC. • Disrupted and Routed units, and individual Samurai, Busho, etc.,
do not exert ZOCs
7.22 ZOCs do not extend into a hex into which movement is pro-hibited. Exception: Teppo (and fire capable Ashigaru) and Yumi do exert a ZOC into such a hex (because of their firepower).
7.2� A unit must cease movement the instant it enters an enemy ZOC [See 7.1.6 and 9.4.2 for changing facing]. A unit that begins movement in an enemy ZOC can move out of the enemy ZOC only if it is given an Active Withdrawal Order [6.4].
7.24 Teppo, Yumi, and Ozutsu units may not voluntarily enter an enemy ZOC, unless that hex is occupied by a friendly combat unit. This does not apply to undisrupted fire capable Ashigaru units. Disrupted and Routed units may not enter an enemy ZOC even if that hex is friendly occupied.
7.25 Units in an enemy ZOC can be given an Order to Fire. ZOCs in and of themselves do not require units to undertake Shock at-tacks [9.1].
7.26 Units voluntarily leaving a unit’s ZOC during the Movement/Fire segment, as part of an Order, are subject to Reaction Fire [8.32]. Note that being subject to Reaction Fire when leaving a ZOC ap-plies only to movement in he Movement segment; it does apply to advance after Shock, Retreats, or anything that occurs during the Shock Combat Segment.
7.27 If opposing units exert a ZOC into the same hex, they are both considered to control that hex.
A Preliminary Note on Combat: There arc two kinds of Combat— Fire and Shock. Fire occurs as part of (or instead of) movement at any point during the Movement segment of an Orders Phase. Shock combat comes in its own segment (at the conclusion of the Movement Segment), after all orders have been issued and move-ment is completed.
8.0 Fire Combat DESIGN/HISTORICAL NOTE: The arquebus had arrived in Japan in 1542, a gift from Portuguese traders. The Japanese were, as usual, quick to recognize its benefits—Oda Nobunaga quicker than the others—and even quicker to turn out copies for their troops. The muskets had a slightly greater range than the bow-and-arrow, but a much more effective killing field. It also took far less train-ing and ski11 to use. By 1570, the arquebus was starting to take over the place in battle once held by yumi. At Nagashino, its full range of capabilities was seen for the first time. Even so, because of maneuver limitations, teppo were used mostly in a defensive role until Sekigahara, where, as you shall see, the teppo were integrated into the armies.
Virtually all Fire occurs in the Movement/Fire Segment, although there may be Reaction Fire by the non-phasing player in the Shock Segment. Ozutsu Fire is treated somewhat differently [see Sekiga-hara scenario].
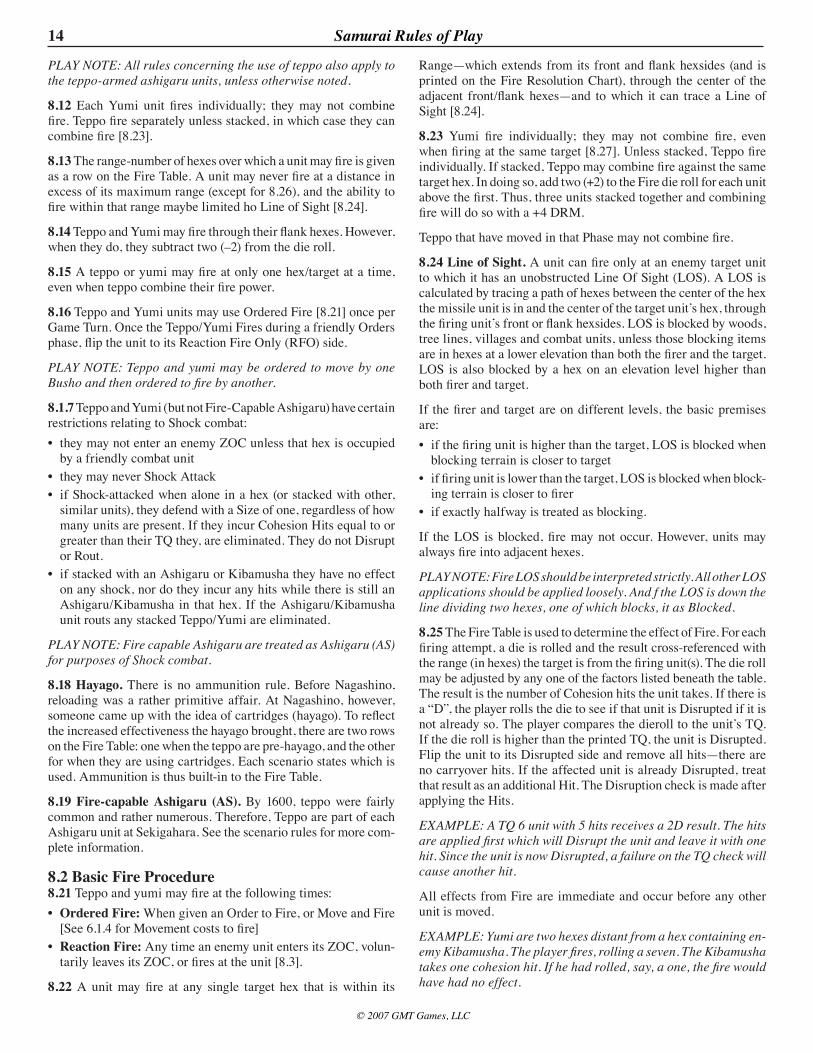
8.1 Fire-Capable Units 8.11 There are four types of units capable of Firing: • Teppo, or arquebus-armed foot• Yumi, bow-and-arrow armed foot• fire-capable Ashigaru • Ozutsu
Note: Engaged units [9.12] may not Fire.
Teppo and Yumi do not have any Size Rating [8.17]. Their reverse side is not for Disrupted status, because they never become Disrupted [11.31], but represents the fact that they have completed Ordered Fire for that turn [8.16]. Fire capable Ashigaru are treated accord-ing to the scenario rules.
14 Samurai Rules of Play
© 2007 GMT Games, LLC
PLAY NOTE: All rules concerning the use of teppo also apply to the teppo-armed ashigaru units, unless otherwise noted.
8.12 Each Yumi unit fires individually; they may not combine fire. Teppo fire separately unless stacked, in which case they can combine fire [8.23].
8.1� The range-number of hexes over which a unit may fire is given as a row on the Fire Table. A unit may never fire at a distance in excess of its maximum range (except for 8.26), and the ability to fire within that range maybe limited ho Line of Sight [8.24].
8.14 Teppo and Yumi may fire through their flank hexes. However, when they do, they subtract two (–2) from the die roll.
8.15 A teppo or yumi may fire at only one hex/target at a time, even when teppo combine their fire power.
8.16 Teppo and Yumi units may use Ordered Fire [8.21] once per Game Turn. Once the Teppo/Yumi Fires during a friendly Orders phase, flip the unit to its Reaction Fire Only (RFO) side.
PLAY NOTE: Teppo and yumi may be ordered to move by one Busho and then ordered to fire by another.
8.1.7 Teppo and Yumi (but not Fire-Capable Ashigaru) have certain restrictions relating to Shock combat: • they may not enter an enemy ZOC unless that hex is occupied
by a friendly combat unit• they may never Shock Attack • if Shock-attacked when alone in a hex (or stacked with other,
similar units), they defend with a Size of one, regardless of how many units are present. If they incur Cohesion Hits equal to or greater than their TQ they, are eliminated. They do not Disrupt or Rout.
• if stacked with an Ashigaru or Kibamusha they have no effect on any shock, nor do they incur any hits while there is still an Ashigaru/Kibamusha in that hex. If the Ashigaru/Kibamusha unit routs any stacked Teppo/Yumi are eliminated.
PLAY NOTE: Fire capable Ashigaru are treated as Ashigaru (AS) for purposes of Shock combat.
8.18 Hayago. There is no ammunition rule. Before Nagashino, reloading was a rather primitive affair. At Nagashino, however, someone came up with the idea of cartridges (hayago). To reflect the increased effectiveness the hayago brought, there are two rows on the Fire Table: one when the teppo are pre-hayago, and the other for when they are using cartridges. Each scenario states which is used. Ammunition is thus built-in to the Fire Table.
8.1� Fire-capable Ashigaru (AS). By 1600, teppo were fairly common and rather numerous. Therefore, Teppo are part of each Ashigaru unit at Sekigahara. See the scenario rules for more com-plete information.
8.2 Basic Fire Procedure 8.21 Teppo and yumi may fire at the following times: • Ordered Fire: When given an Order to Fire, or Move and Fire
[See 6.1.4 for Movement costs to fire] • Reaction Fire: Any time an enemy unit enters its ZOC, volun-
tarily leaves its ZOC, or fires at the unit [8.3].
8.22 A unit may fire at any single target hex that is within its
Range—which extends from its front and flank hexsides (and is printed on the Fire Resolution Chart), through the center of the adjacent front/flank hexes—and to which it can trace a Line of Sight [8.24].
8.2� Yumi fire individually; they may not combine fire, even when firing at the same target [8.27]. Unless stacked, Teppo fire individually. If stacked, Teppo may combine fire against the same target hex. In doing so, add two (+2) to the Fire die roll for each unit above the first. Thus, three units stacked together and combining fire will do so with a +4 DRM.
Teppo that have moved in that Phase may not combine fire.
8.24 Line of Sight. A unit can fire only at an enemy target unit to which it has an unobstructed Line Of Sight (LOS). A LOS is calculated by tracing a path of hexes between the center of the hex the missile unit is in and the center of the target unit’s hex, through the firing unit’s front or flank hexsides. LOS is blocked by woods, tree lines, villages and combat units, unless those blocking items are in hexes at a lower elevation than both the firer and the target. LOS is also blocked by a hex on an elevation level higher than both firer and target.
If the firer and target are on different levels, the basic premises are: • if the firing unit is higher than the target, LOS is blocked when
blocking terrain is closer to target• if firing unit is lower than the target, LOS is blocked when block-
ing terrain is closer to firer • if exactly halfway is treated as blocking.
If the LOS is blocked, fire may not occur. However, units may always fire into adjacent hexes.
PLAY NOTE: Fire LOS should be interpreted strictly. All other LOS applications should be applied loosely. And f the LOS is down the line dividing two hexes, one of which blocks, it as Blocked.
8.25 The Fire Table is used to determine the effect of Fire. For each firing attempt, a die is rolled and the result cross-referenced with the range (in hexes) the target is from the firing unit(s). The die roll may be adjusted by any one of the factors listed beneath the table. The result is the number of Cohesion hits the unit takes. If there is a “D”, the player rolls the die to see if that unit is Disrupted if it is not already so. The player compares the dieroll to the unit’s TQ. If the die roll is higher than the printed TQ, the unit is Disrupted. Flip the unit to its Disrupted side and remove all hits—there are no carryover hits. If the affected unit is already Disrupted, treat that result as an additional Hit. The Disruption check is made after applying the Hits.
EXAMPLE: A TQ 6 unit with 5 hits receives a 2D result. The hits are applied first which will Disrupt the unit and leave it with one hit. Since the unit is now Disrupted, a failure on the TQ check will cause another hit.
All effects from Fire are immediate and occur before any other unit is moved.
EXAMPLE: Yumi are two hexes distant from a hex containing en-emy Kibamusha. The player fires, rolling a seven. The Kibamusha takes one cohesion hit. If he had rolled, say, a one, the fire would have had no effect.
15
© 2007 GMT Games, LLC
Samurai Rules of Play
8.26 Extended Yumi Fire. When a yumi fires at a target unit on a lower elevation, it may fire at a range of four hexes.
8.27 Volley Fire. Teppo units stacked together, as well as Teppo in adjacent hexes, may use Volley Fire, if the scenario rules allow. In Volley Fire, each unit fires separately at the same target. However, the second firing unit adds one (+1) to the die roll, the third adds two (+2), and so on. The maximum number of units that may use Volley fire is four. Units that have moved in that Phase may not use Volley Fire.
PLAY NOTE: Volley fire is the best way to use teppo to inflict damage. However, it cannot be used in most scenarios, as it first appeared at Nagashino.
8.28 Busho Casualty: If there is a Busho in a hex fired at, and the adjusted Fire die roll was a nine, there is a possibility that the Busho has been hit. See 9.25 for Casualty resolution.
8.� Reaction Fire Units may fire in reaction to certain enemy movements into (Entry Reaction) and out of (Retire Reaction) their ZOCs, and whenever they are fired at.
8.�1 Entry Reaction: When a friendly unit enters the ZOC of an enemy fire-capable unit, including Advance after Combat, that enemy unit may fire at the entering unit (range is one hex) before further movement occurs. All effects from this fire apply immediately.
8.�2 Retire Reaction: When an un-routed unit voluntarily leaves the ZOC of an enemy fire capable unit, the latter may fire at the moving unit before it leaves the ZOC. Any results are applied before the unit moves. Retire Reaction fire is always at a range of two.
8.�� Return Fire: A fire capable unit may Reaction Fire against a unit that is not in its ZOC if that unit Fires at it.
8.�4 Reaction Fire does not require an order.
�.0 Shock Combat�.1 Shock Requirements The requirement that a unit must attack an enemy unit usually depends both on unit Type and on whether it moved, Shock being a question of inertia more than weaponry.
�.11 Must Shock. In the Shock Combat segment, all combat units that moved during the current Orders Phase—including changing facing [7.16]—must undertake a Shock attack against all enemy units in their ZOC, unless those units are being Shock attacked by other friendly unit in the current Shock combat segment. Teppo and yumi unit may never Shock attack, but do defend.
EXAMPLE: If two friendly units moved into the ZOC of a single enemy unit, only one of the moving units would be required to attack.
�.12 Engaged Units. Non-Disrupted Engaged units in clans of the Busho conducting the Orders Phase, must Shock attack. This applies whether the Engaged unit is In or Out of Command. Non-Disrupted Engaged units do not make a Pre-Shock TQ check. Engaged Disrupted units may choose to Shock (see 9.13).
�.1� May Choose to Shock. Any non-Disrupted unit within the active Busho’s command range may choose to attack all enemy combat units in their (friendly) ZOCs. This only applies to units that are not required to Shock per 9.11 and 9.12. Engaged Disrupted units may Shock attack, but must make a Pre-Shock TQ check. Disrupted units that are not Engaged cannot Shock attack.
�.14 The moving player places a Shock- Must Check TQ marker on top of each unit that must Shock attack in the ensuing Shock segment and on any Engaged Disrupted unit that has chosen to attack. Shock-Must Check TQ markers, placed the instant the moving unit moves adjacent, designate which units will have to undergo a Pre-Shock TQ check [9.23].
�.15 Non-Disrupted Engaged units [9.12] and non-moving units [9.13] do not make a Pre-Shock TQ Check.
�.2 Shock Procedure General Principles: After the completion of the Movement/Fire Segment of an Orders Phase, Shock combat occurs. Shock is part of a Busho’s Orders Phase, and all Shock engendered by that Busho is resolved before the next Busho/clan may be activated (or momentum attempted). Important: Each Shock combat is conducted as a series of steps performed in sequence for all units participating in Shock combat. Thus, step 9.23 is completed, followed by Step 9.24, etc. for all involved units. We suggest undertaking each step from left to right, across the map. Players may use any system they wish to note what has happened up and down the lines of attack. DESIGN NOTE: It would he easier to resolve each separate com-bat as one piece. However, to do so creates a blitzkrieg effect, in which the attacker gets to choose which attacks he wants to do first so that he can achieve breakthroughs. Despite its simplicity, this would he so far from reality as to render the system—and the game—inaccurate. However, isolated shocks can certainly he resolved as apiece, if doing so would not affect other attacks. The method you choose should keep this intent in mind.
�.21 Shock Designation Segment. The attacker determines which of his units are going to Shock attack and which of them (and/or their targets) must make Pre-Shock TQ die rolls. The following units undergo a Pre-Shock TQ die roll:• units with a Must Shock/Check TQ marker on top of them, unless
excepted as below• Disrupted units, even if they fall under one of the No-Check
Necessary categories below
The following units do not need a Pre-Shock TQ dieroll: • units attacking Routed units • units Shock attacking Teppo, Yumi, or Ozutsu alone in a hex • Engaged units. However, if a new attacker joins that combat,
both that new attacker and the otherwise Engaged defender must check
• units behind babo-saku [9.5] • units attacking under the Aggression rule [9.46] • Kibamusha using Norikuzushi [9.3]
Use a Shock/No Check marker for those units that will Shock but are not required to a make a Pre-Shock TQ check.
16 Samurai Rules of Play
© 2007 GMT Games, LLC
�.24 Non-Samurai Individual Combat. If there are Bushos from both sides involved in the same Shock Resolution, Individual Combat [10.1] takes place before proceeding with Shock Resolution.
�.25 Busho Casualties. Busho casualties may occur when only one player has a Busho and thus there is no Individual Combat. Roll a die. If the die roll is a “0” to “8”, nothing has happened. If the die roll is a “9” a casualty has occurred, that Busho may not use his Charisma rating as a die roll modifier that combat, and the player rolls again to see what the casualty is:
BUSHO CASUALTY TABLE
0-6 Busho is Finished
7 Busho is Wounded. He is Finished and subtract one (–1) from all ratings except for Contingent Activation. A Busho who is wounded a second time or whose hits from IC exceed his reduced Stamina Rating is killed.
8 Busho is Wounded. He is Finished and subtract two (–2) from all ratings except for Contingent Activation. A Busho who is wounded a second time or whose hits from IC exceed his reduced Stamina Rating is killed.
9 The Busho is Killed. Time to visit the ancestors (see 10.5)
�.26 The Clash of Arms. The Clash of Arms Chart is now con-sulted to determine under which Shock CRT column the combat will occur (before any adjustments). If there is more than one type of defending unit, the defender chooses which type will be used for determination. However, if the attacker is attacking with more than one unit, and the attack is coming from more than one direction, the attacker chooses the direction of attack most advantageous to him. If there is more than one attacking unit, the attacker determines the Type he will use (but see 9.27 #1). If a unit is being attacked through the vertex between different facings, that defender gets the benefit of the most advantageous facing.
�.27 The Melee. Players determine the effect of any advantages either side has and resolve the Shock combat:
1. Determine Position Superiority: If a friendly unit is attack-ing an enemy through its Flank or Rear (or all defending enemy units are Routed) it is considered Position Superior to the defender. However, whichever unit the attacker uses to determine Position Superiority must also be used to determine Shock Column on the Clash of Arms Chart. Exception: Regardless of angle of attack, no unit may gain Position Superiority if its Flank or Rear is in the ZOC of another enemy unit that is not being Shock-Attacked in that same phase. GBoH Aficionados: No Weapons System Superiority. Too few systems—and not much difference between them—allowed us to simplify this process.
2. Determine Size Ratio: Compare the total Size of the attacking unit(s) to those of the defender(s). For each level of Size Ratio greater than 1:1, a unit gets a Shock Results Table Column Adjustment of one in its favor. The attacker adjusts to the right, the defender to the left. Reduce all size ratios to a x:1 or 1:x, rounding off as follows: • if any attacker moved to effect the shock, and the defender is
not receiving any terrain or babo-saku [9.5] benefit, round up in favor of the attacker. Thus a five Size unit attacking a two Size unit is 3:1; a 4:5 is 1:1; and a 2:5 is a 1:2
�.22 Who Can Attack Whom. Units that attack by Shock must attack all units in their ZOCs, unless that defending unit is being attacked by another, friendly unit in that Shock segment. The at-tacker determines which units will be involved in each combat, within the restrictions that follow. • a friendly unit may attack more than one unit, a long as the
targeted defenders are all in the attacking unit’s ZOC • an attacking unit may not split its attack capabilities, although
two (or more) units may combine to attack one defender • if more than one unit is defending and/or attacking, total the
Sizes• each unit may attack only once per Shock Combat segment • a defending unit maybe shock-attacked only once per Shock
Combat segment• Teppo and yumi may not attack [8.17]
Other than these restrictions, the attacking player may divide his attacks amongst his units as he sees fit.
Overview of Combat Resolution Sections 9.2.3 through 9.2.7 describe the sequence and procedure used to resolve Shock Combat. Although extensive in narrative terms, players will soon realize that these steps are: 1. Pre-Shock TQ Check: Units with Must Check TQ markers see
whether troops will attack/stand [9.23] 2. Undertake any non-samurai Individual Combat [9.24] 3. Check for Shock-induced Busho Casualties [9.25] 4. Use Clash of Arms Chart to determine which column on the
Shock CRT will be used [9.26] 5. Determine whether terrain, Bushos, Position Superiority, and/or
comparative Sizes will have any effect 6. Determine results using the Shock Results Table [9.27]
�.2� Pre-Shock TQ Check. This section applies only to units that must undergo Pre-Shock TQ Checks [9.21]. All units with a Must Shock/Check TQ marker (and their intended targets) undergo a TQ check by rolling one die for each unit, all such checks being simultaneous. In all Norikuzushi (charges by Kibamusha [9.3]), defending foot units (only) add one (+ 1) to that TQ check die roll. If stacked with a Busho, subtract his Charisma from the dieroll. If the unit is anything other than a charging [9.3] kibamusha unit, and the die roll is higher than a unit’s TQ, it takes a number of Cohesion hits equal to the difference between the die roll result and its TQ.
• if the unit has taken sufficient Cohesion hits to be equal to or greater than its TQ Rating, it is immediately Disrupted [11.24]
• if a Disrupted unit has taken sufficient Cohesion Hits to be equal to or greater than its TQ Rating, it is immediately Routed and an attacking unit advances into the vacated hex (where it may change its facing one vertex, if desired), if it has no other enemy units in its ZOC and if it can physically do so [see 9.4 for rules on Advancing]
• if the attacker has Routed from its TQ check, Defender stays put (if routed see 11.47)
• if both units would Rout from their TQ checks, see 11.47
After the TQ check, if the attacker and the defender did not rout, go to the next step.
17
© 2007 GMT Games, LLC
Samurai Rules of Play
• if no attacker moved, or if the defender is receiving a Terrain or babo-saku benefit, round down in favor of the defender Thus a five Size unit attacking a four Size would be 1:1; but 4:5 is 1:2
�. Adjust Columns and Resolve: To resolve shock, the Attacker consults the Shock Table, determines the base column, and adjusts that column for any Size Ratio, Disruption [11.32], and/or Terrain effects [Terrain Chart]. He then rolls the die, modifying the die roll by the Charisma Rating of any Busho stacked with the units of either side. For example, if Nobunaga Oda were leading (stacked with) the attackers, the die roll adjustment would be +5. 4. Apply Results: Results on the Shock CRT are Cohesion hits for both attacker and defender—the number in parentheses is for the defender. If the attacker was Position Superior, then double the defender’s result. If more than one unit (of the same side) was involved in that combat, hits are distributed according to 11.22.
5. Determine Results of Shock: All units that have Cohesion Hits equal to or greater than their TQ are immediately Disrupted. Flip the unit to it Disrupted side [11.32]. However, if the Disruption resulted from Position Superiority, the unit is Routed instead. All Disrupted units that have Cohesion Hits equal to or greater than their TQ automatically Rout. See 11.0. for descriptions of combat results. Ashigaru (AS vs. AS only) and Kibamusha (KB/H vs. KB/H only) units that were involved in Shock Combat, are still adja-cent, and did not Advance after Combat or Rout, are considered Engaged. Place an Engaged marker on the affected units.
�.� Norikuzushi (Cavalry Charges) Cavalry charges (as we know them in the West) were somewhat different in Sengoku Japan. Each kibamusha was accompanied by three or four ashigaru acting like a screen, which severely restricted mobility and made
anything except a close-range charge impossible. However, such charges did occur.
�.�1 Before designating the target in the Shock Segment, the at-tacking player must decide whether his Kibamusha are going to use Norikuzushi or not. Kibamusha that started the Orders phase adjacent to a target unit may not use Norikuzushi. In either situa-tion, the Kibamusha Must Shock under most circumstances. No die roll is involved; simply a decision. Kibamusha using Norikuzushi, however, do not make a Pre-Shock TQ check.
�.�2 Norikuzushi Kibamusha use the appropriate column on the Clash of Arms Chart. However, the Size of such a unit is halved, rounding down (the Ashigaru aren’t taking part in the shock). PLAY NOTE: The benefit is that the player gets to use a better column on the Shock RT and a +1 DRM for his enemy Pre-Shock TQ cheek.
�.�� Norikuzushi does not apply to defending Kibamusha. There is no counter-charge.
�.�4 Kibamusha using Norikuzushi may ignore the No Last MP restriction in 6.34.
�.4 Advance After Combat �.41 Attacking units that are not Disrupted must advance into any hex vacated by enemy units as a result of Shock (there is, normally,
no advance after Fire. See, however, 9.46.). This advance does not require an Order, but the advancing unit incurs all terrain-induced Hits engendered by such a move. See 6.48 for continuing movement in the face of enemy Reaction Withdrawal. Victorious defenders, and Disrupted Attackers, may not advance.
�.42 Advancing units may change their facing one vertex upon finishing the advance, even if in an enemy ZOC.
�.4� If there was more than one attacking unit, the unit that had Position Superiority (if any) must advance. If no such unit, the one with the highest TQ must advance. In case of ties, the advancing player chooses.
�.44 Units advancing after Shock are subject to Entry Reaction Fire from enemy units—other than the one that just vacated the hex—if the advancing units enter the latter’s ZOC and the non-phasing enemy is not in the ZOC of a unit other than the advancing one. Advancing units are not subject to Retire Reaction Fire [8.34].
�.45 Advancing units that reach or exceed their TQ because of ter-rain-induced hits are Disrupted after completing the Advance.
�.46 Teppo-induced Aggression: When a Teppo unit stacked with an undisrupted Ashigaru or Kibamusha unit, or an Ashigaru with fire capability, inflicts a Disruption result by Fire on an adjacent enemy unit, the stacked Ashigaru/Kibamusha or fire capable Ashi-garu unit must attempt to Shock attack the (enemy) Disrupted unit. This requirement applies whether the Fire was during an Orders Phase or was Reaction Fire. Roll the die: • if the die roll is higher than the AS units TQ rating, nothing
happens• if the die roll is the same as or lower than the AS units
TQ rating, the unit is designated for Shock. However, the attacking unit does not undergo a Pre-Shock TQ check. Use a Shock No Check marker as a reminder. The Shock is resolved in the Shock Segment, even if it is the other player’s Phase. If so, it is resolved first.
Kibamusha automatically Shock using Norikuzushi, no die roll is needed.This rule does not apply to Yumi fire. For units behind babo-saku [9.5], Shock is voluntary (although if the unit wishes to Shock, it still rolls). DESIGN NOTE: This rule covers a tactic that developed when the Japanese saw how effective arquebuses could be. It will have its greatest effect in Reaction Fire, allowing the non-phasing unit to actually shock attack out of turn. It is not used in battles before Nagashino, as noted in those scenarios.
�.5 Babo-saku (Anti-Cavalry Palisades) Because of their usually exposed position on the battle-field, teppo had to be protected. In the west, they made them part of the huge infantry formations. In Japan, they put them behind babo-saku, stockade—like fences that
didn’t so much protect the teppo as provide the oncoming enemy troops with enough of a hindrance so that the arquebusiers didn’t simply get trampled, while providing the necessary time for them to cut and run. Unfortunately, it took a bit of time to construct the babo-saku, and the So-taisho had to have a pretty good idea where an attack would come from. Their most famous appearance was at Nagashino. They were not used at Kawanakajima, Okehazama,
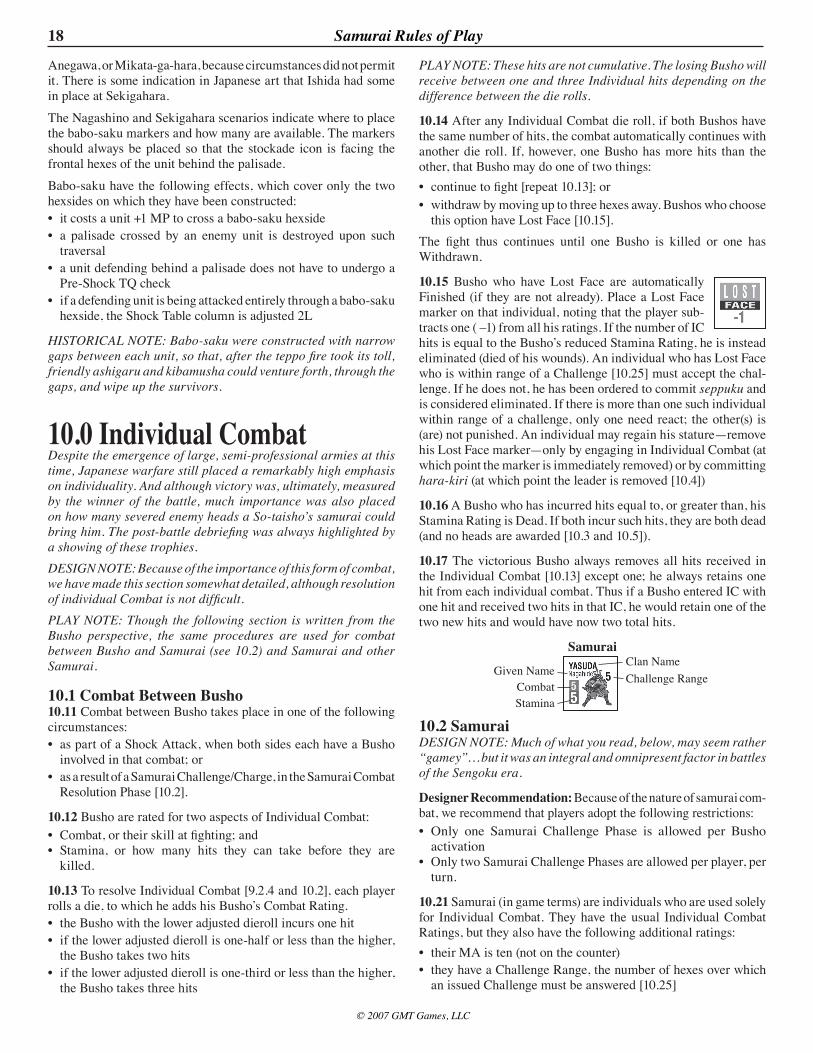
18 Samurai Rules of Play
© 2007 GMT Games, LLC
Anegawa, or Mikata-ga-hara, because circumstances did not permit it. There is some indication in Japanese art that Ishida had some in place at Sekigahara. The Nagashino and Sekigahara scenarios indicate where to place the babo-saku markers and how many are available. The markers should always be placed so that the stockade icon is facing the frontal hexes of the unit behind the palisade.Babo-saku have the following effects, which cover only the two hexsides on which they have been constructed: • it costs a unit +1 MP to cross a babo-saku hexside• a palisade crossed by an enemy unit is destroyed upon such
traversal• a unit defending behind a palisade does not have to undergo a
Pre-Shock TQ check• if a defending unit is being attacked entirely through a babo-saku
hexside, the Shock Table column is adjusted 2L
HISTORICAL NOTE: Babo-saku were constructed with narrow gaps between each unit, so that, after the teppo fire took its toll, friendly ashigaru and kibamusha could venture forth, through the gaps, and wipe up the survivors.
10.0 Individual Combat Despite the emergence of large, semi-professional armies at this time, Japanese warfare still placed a remarkably high emphasis on individuality. And although victory was, ultimately, measured by the winner of the battle, much importance was also placed on how many severed enemy heads a So-taisho’s samurai could bring him. The post-battle debriefing was always highlighted by a showing of these trophies. DESIGN NOTE: Because of the importance of this form of combat, we have made this section somewhat detailed, although resolution of individual Combat is not difficult. PLAY NOTE: Though the following section is written from the Busho perspective, the same procedures are used for combat between Busho and Samurai (see 10.2) and Samurai and other Samurai.
10.1 Combat Between Busho 10.11 Combat between Busho takes place in one of the following circumstances: • as part of a Shock Attack, when both sides each have a Busho
involved in that combat; or • as a result of a Samurai Challenge/Charge, in the Samurai Combat
Resolution Phase [10.2].
10.12 Busho are rated for two aspects of Individual Combat: • Combat, or their skill at fighting; and • Stamina, or how many hits they can take before they are
killed.
10.1� To resolve Individual Combat [9.2.4 and 10.2], each player rolls a die, to which he adds his Busho’s Combat Rating. • the Busho with the lower adjusted dieroll incurs one hit • if the lower adjusted dieroll is one-half or less than the higher,
the Busho takes two hits• if the lower adjusted dieroll is one-third or less than the higher,
the Busho takes three hits
PLAY NOTE: These hits are not cumulative. The losing Busho will receive between one and three Individual hits depending on the difference between the die rolls.
10.14 After any Individual Combat die roll, if both Bushos have the same number of hits, the combat automatically continues with another die roll. If, however, one Busho has more hits than the other, that Busho may do one of two things: • continue to fight [repeat 10.13]; or • withdraw by moving up to three hexes away. Bushos who choose
this option have Lost Face [10.15]. The fight thus continues until one Busho is killed or one has Withdrawn.
10.15 Busho who have Lost Face are automatically Finished (if they are not already). Place a Lost Face marker on that individual, noting that the player sub-tracts one ( –1) from all his ratings. If the number of IC hits is equal to the Busho’s reduced Stamina Rating, he is instead eliminated (died of his wounds). An individual who has Lost Face who is within range of a Challenge [10.25] must accept the chal-lenge. If he does not, he has been ordered to commit seppuku and is considered eliminated. If there is more than one such individual within range of a challenge, only one need react; the other(s) is (are) not punished. An individual may regain his stature—remove his Lost Face marker—only by engaging in Individual Combat (at which point the marker is immediately removed) or by committing hara-kiri (at which point the leader is removed [10.4])
10.16 A Busho who has incurred hits equal to, or greater than, his Stamina Rating is Dead. If both incur such hits, they are both dead (and no heads are awarded [10.3 and 10.5]).
10.17 The victorious Busho always removes all hits received in the Individual Combat [10.13] except one; he always retains one hit from each individual combat. Thus if a Busho entered IC with one hit and received two hits in that IC, he would retain one of the two new hits and would have now two total hits.
10.2 Samurai DESIGN NOTE: Much of what you read, below, may seem rather “gamey”… but it was an integral and omnipresent factor in battles of the Sengoku era.
Designer Recommendation: Because of the nature of samurai com-bat, we recommend that players adopt the following restrictions:• Only one Samurai Challenge Phase is allowed per Busho
activation• Only two Samurai Challenge Phases are allowed per player, per
turn.
10.21 Samurai (in game terms) are individuals who are used solely for Individual Combat. They have the usual Individual Combat Ratings, but they also have the following additional ratings: • their MA is ten (not on the counter)• they have a Challenge Range, the number of hexes over which
an issued Challenge must be answered [10.25]
SamuraiClan NameChallenge RangeGiven Name
CombatStamina
1�
© 2007 GMT Games, LLC
Samurai Rules of Play
10.22 Neither side has any specifically assigned samurai. All Samu-rai counters are placed in an opaque cup at the start of the battle. When a player desires to use a samurai he pulls one randomly from the cup. This samurai remains his for the remainder of the battle. If he is killed he is placed aside.
DESIGN NOTE: Yes, this is rather generic. However, although specific samurai names—and abilities—were available for some of the battles, they were totally missing from others. In addition, pre-knowledge of who, and how good, their samurai were led players to some very strange gaming during playtesting. The Pool was the method we alighted upon to level the samurai playing field. You’ll hope you pull out the legendary Magara Naotaka Jorazaemon, a giant of a man with a giant sword, or perhaps, the great (and historical,) samurai figure of Japanese literature, Miyamoto Musashi. True, he flowered after Sekigahara, but we simply couldn’t leave him out.
10.2� To put a Samurai into play, a Busho must use his ability to issue Orders. Instead of ordering his troops to move, etc., he selects a Samurai from the Pool and places that Samurai in the same hex as the Busho and declares a Samurai Challenge Phase, which takes the place of the usual Orders Phase. A Samurai Challenge Phase maybe initiated either in a Busho’s Initial Orders Phase or in a Momentum-generated Phase. Remember, though, that that Samurai is a retainer of the Clan Busho and is considered one of his troops; he may not be used by any other Busho, including the So-taisho.
10.24 In a Samurai Challenge Phase, the individual Samurai may do the following, in order: 1. move [4.3], including a Samurai Charge [10.27] 2. issue a Challenge [10.25] 3. resolve the Individual Combat brought about by the Challenge
[10.13] 4. instead of 1-3, commit hara-kiri [10.4]
10.25 When a Samurai issues a Challenge, it affects any/all enemy Busho and Samurai within that Samurai’s Challenge Range and Line of Sight (LOS). So-Taishos/Taishos in a honjin are not affected by a Challenge and do not have to respond.
The opposing player must do one of the following: • accept the Challenge with any one of his Busho or Samurai that
is within the Challenge range. The Busho does not have to be active (he can even be Finished) to accept the Challenge; or
• if the Busho is from an Active Clan and is not Finished, he may, instead of going himself, select a new Samurai (from the Pool) and send him off to accept the Challenge. If the Busho does this, he is now Finished. A Finished Busho may select a Samurai to defend, but to do so the player rolls a die. If the die roll, is the same or lower than the Busho’s Initiative rating, he succeeds in doing so. If greater, he fails and has Lost Face.
• ignore the Challenge. In this case, all challenged Busho and Samurai within range of the challenging Samurai have now Lost Face [10.15].
10.26 The Busho/Samurai who accepts the challenge is moved to the same hex as the challenging Samurai; just pick him up and place him in the challenger’s hex. After that, the Individual Combat is resolved [10.13].
10.27 Samurai Charge: Alternately, a Samurai may charge an
enemy Busho. If he reaches the hex and enters it, Individual Combat takes place. A Samurai Charge:• ignores enemy ZOC for movement purposes, but • incurs all normal Reaction Fire • may not enter enemy occupied hexes; however • if the target hex contains any Samurai, the owning player may
have a Samurai fight instead of the target Busho, and• may enter the target hex even if it is occupied by enemy combat
units—and this includes honjin—but such an occupied hex costs +2 MPs to so enter. In addition, to see whether he reaches the enemy leader in an occupied hex, roll a die. If the die roll is the same as or lower than the Samurai’s Stamina Rating, he reaches the enemy leader (and begins IC). If not, he is killed in the at-tempt.
10.28 At the conclusion of the Individual Combat, all samurai remaining are returned to the same hex as their Clan Busho, and the Samurai Challenge Phase is over.
10.2� The maximum number of samurai that may be used by one player in a given battle is six. In addition, no individual Busho may have more than two samurai in play at any one time.
HISTORICAL NOTE: For those interested in knowing—insofar as we know—who appeared where, and for whom:
• Akashi: At Sekigahara, with the Ukita (Akashi was a Chris-tian)
• Aoki: At Anegawa, with the Tokugawa. (He killed Magara Nao-taka Jorazaemon there)
• Ban: At Sekigahara with the Katoh (and probably drunk) • Endoh: At Anegawa, with the Asai • Gotoh: At Sekigahara, with the Kuroda • Hajikano: At Kawanakajima, with the Takeda • Kani: At Sekigahara, with the Fukushima. (Kani got 17 (or 20)
heads at Sekigahara, top scorer for the East) • Magara: At Anegawa, with the Asakura • Matsuno: At Sekigahara, with the Kobayakawa • Musashi: At Sekigahara (age 16), with the Ukita • Ohhasi: At Sekigahara, with the Ishida • Sakisaka: At Anegawa, with the Tokugawa • Watanabe: At Sekigahara, with the Tokugawa • Yamamoto: At Kawanakajima, with the Takeda • Yasuda: At Kawanakajima, with the Uesugi
10.� Bundori: Severed Heads The survivor of an Individual Combat is awarded a bundori marker, representing the severed head he has won as a trophy. Place the marker in the honjin of that Samurai/Busho’s So-taisho (or in the box on the player’s
record card). If there is no honjin in play (as in Kawanakajima, for the Uesugi), place the marker with the So-taisho of that army. Bundori are awarded only for Individual Combat. Death by any other means does not earn Bundori.
Bundori are used to decrease the number of rout points an army has accumulated [12.0].
If the honjin is eliminated, the captured bundori are returned to their owner (and removed from the game).
DESIGN NOTE: The number of bundori that will accumulate is
20 Samurai Rules of Play
© 2007 GMT Games, LLC
far less than one would see in a normal battle.
10.4 Hara-Kiri The samurai way of life is interwoven with death; and, for the samurai, self-inflicted death was often used as a statement, as a recognition of fealty, or as a way of maintaining honor and dignity in the face of adverse conditions.
In this rule we concern ourselves not with the highly ritualistic sep-puku [for which see 10.15], but with the rather amazing instances of self-inflicted death committed on the spot, in the midst of battle. Perhaps the most famous of these concerns one Miura Yoshimoto who, during a siege in 1516, is said to have cut off his own head!
A samurai or Busho may, during a Samurai Challenge Phase, choose to commit suicide (hara-kiri) on the field in the hopes of inspiring his fellow men. The player simply announces the act of hara-kiri and removes the Samurai or Busho from the game. As a result of which: • the player may remove one Hit [11.51] from all friendly com-
bat units—regardless of their status or position in an enemy ZOC—within the Samurai’s Challenge, or Busho’s Command Range; or
• may automatically recover [11.52] any two Disrupted units that are within that Samurai’s Challenge, or Busho’s Command Range; and
• for TQ checks for any units from clans whose Busho were within that Samurai’s Challenge range, subtract one (–1) for the remainder of that turn.
However, that Player may not draw any new Samurai for the re-mainder of that turn. Eliminated Busho are replaced [10.5].
10.5 Replacing Killed Bushos 10.51 Dead Busho maybe replaced, but only in the 3Rs Phase of the Game Turn.
10.52 The reverse side of each Busho is his replacement. In the 3Rs Phase, the player flips the removed Busho to his replacement side and places him with any counter from that clan. If a replacement is killed, simply return the replacement.
10.5� So-taisho and taisho also have replacements (although, in reality, the loss of the So-taisho would be devastating to his army). Replacing So-taisho/taisho works like replacing Busho.
11.0 Effects of Combat Units suffer cohesion hits from combat and, sometimes, from movement. Cohesion hits the same as or greater than a unit’s TQ cause Disruption, and Disrupted units that incur hits equal or ex-ceed their TQ Rout. Routing units run away towards the Retreat Edge of the map.
11.1 Combat Tables The way in which these tables and charts are used is discussed above. The effect of the actual combat results, and how they are applied, is discussed below.
Fire Table: This table is used to determine the results, usually in Cohesion hits, of a unit firing at a given range.
Clash of Arms Chart: This chart is used to determine which column will be used on the Shock Table (subject to adjustments).
Shock Table: This Table is used to resolve shock combat in terms of Cohesion hits to both attacker and defender.
11.2 Cohesion Cohesion is a measure of how long a combat unit can remain ef-fective.
11.21 Each time a unit suffers a Cohesion hit, place a Cohesion # Marker—representing the total number of hits taken—on or under the unit.
11.22 If there are multiple units involved in a single combat resolu-tion, hits must be divided as equally as possible among these units, with any extra hits being given to the unit that (in priority):1. determined Position Superiority 2. determined the Shock CRT column 3. owning player’s choice
11.2� When an individual unit has absorbed Cohesion hits equal to, or more than, its TQ Rating, it becomes Disrupted. Flip the unit over to its Disrupted side. A Disrupted unit that incurs hits equal to or more than its (Disrupted) TQ Rating automatically Routs [11.3]. Place a Routed marker on top of the unit.
Exception: As noted in 9.2.7, if a unit incurs enough hits to cause it to be Disrupted, but these hits were the result of the enemy’s Position Superiority, the unit is Routed instead.
11.24 Excess hits are carried over to the Disrupted state.
EXAMPLE: A six TQ unit with five hits, receives three more hits. It is now Disrupted, with two hits [However, see 11.3.1, Excep-tion #1]
11.25 Cohesion hits do not affect a unit’s combat strength or ca-pabilities in anyway, other than to show how close it is to falling apart. Thus, a unit with a TQ of six and four hits has the same combat capabilities as one with no hits.
11.� Disruption 11.�1 A unit becomes Disrupted when it is on its full-strength side and it incurs TQ hits equal to or greater than its TQ Rating (or as are result of Fire combat).
Exception #1: When a unit receives hits that equal or exceed its TQ while defending against a Shock attack where the enemy had Posi-tion Superiority, it Routs. In this case, 11.24 does not apply, because Routed units never retain hits. However, if a Disruption results from a Pre-Shock TQ check, treat it normally (including 11.24).
Exception #2: Ozutsu, teppo, and yumi never become Disrupted; they are eliminated instead.
11.�2 A Disrupted unit is flipped to its Disrupted side. The TQ and MA of a Disrupted unit are (usually) lower than its normal status. If a Disrupted unit is again Disrupted [11.31], it is Routed [11.4].
11.�� A Disrupted unit: • may not Enter an enemy ZOC (it may leave if already in one.) • may Shock Attack only if it must. This will usually happen
21
© 2007 GMT Games, LLC
Samurai Rules of Play
when an attacking unit is Disrupted immediately before Shock by enemy fire [See, however, 9.13]
• may not Advance after Shock
In addition: • if a Disrupted unit Shock Attacks, there is a 2L adjustment to
the Shock Table Column. There is no adjustment for defending Disrupted units.
• Disrupted units have no ZOC
11.�4 Disrupted units may use Active and Reactive Withdrawal [6.4].
11.�5 Units that become Disrupted during Movement continue to move, applying MPs used to their (now lower) Disrupted Movement Allowance. Disrupted units may not enter a hex whose Hit penalty would cause them to Rout.
11.4 Unit Rout 11.41 Combat units Rout under the following circumstances: • Disrupted ashigaru and kibamusha Rout when they incur hits
equal to or greater than their Disrupted TQ • Undisrupted ashigaru and kibamusha Rout when they incur hits
equal to or greater than their TQ as a result of a Position Supe-riority Shock Attack by the enemy [11.31]
• Ozutsu, teppo, and yumi never rout: they are simply elimi-nated
11.42 A unit that has routed is immediately moved a number of hexes equal to one-half its Disrupted Movement Allowance (rounded up) toward its Retreat Edge (as defined in scenario rules, but usually the one behind his original deployment). No MPs are expended, but the unit must take the most direct path towards its Retreat Edge, even if this means moving into and/or through friendly units. However, when given a choice, it will take the path of least resistance (see below). The unit’s facing is changed (at no cost) so that it faces the direction it is going to go at the instant of Rout. Place a Routed marker on that unit when it finishes its retreat [11.45].
The Path of Least Resistance is, generally, and in the order of preference, as follows: 1. a vacant hex not in enemy ZOC (even if terrain is difficult);
then 2. a friendly occupied hex not in an enemy ZOC; then 3. a friendly occupied hex in an enemy ZOC
PLAY & DESIGN NOTE: Routing units have one thought in mind: getting out of the area as quickly as possible. Although routing units usually move directly towards the rear of their lines, instances will occur where that is not feasible or even possible. In such instances, common sense and the knowledge that these units are trying to get away from the enemy should guide your movements.
11.4� In the Rout Movement Phase all routed units are moved their full Disrupted movement allowance in the same direction and manner as in 11.42—even if they moved previously during the turn. Routed units use normal movement rules, except that they may not enter enemy ZOCs unoccupied by friendly units. They do not suffer Cohesion hits from Rout movement.
11.44 A unit that either moves off the map for whatever reason or cannot complete its Rout movement because of the presence of impassable terrain or enemy unit presence is eliminated and removed from play.
11.45 Routing units may move through friendly units, but they may not end Rout Movement stacked with friendly units—even if stacking were normally allowed. A unit that has had a Routed unit pass through suffers an immediate one Cohesion Hit.
11.46 Restrictions on Routed Units • Routed units retain their Size and Disrupted Movement Allow-
ance• Rout-moving units do not incur movement/terrain Cohesion
Hits• Routed units may not receive or use Orders, other than to Rally;
nor may they reaction fire • if a Routed unit is attacked (fire or Shock) and suffers any ad-
ditional Cohesion hits, the unit is immediately eliminated and removed from play
• Units shock-attacking Routed units do not undergo a Pre-Shock TQ check.
11.47 If, as a result of Cohesion hits from Shock, all attacking and defending units would rout, the following occurs: 1. Attacker adds to his total hits the number of Hits (if any) that he would incur were he to advance after combat. 2. The side that has the unit with the greatest discrepancy between hits and TQ rating Routs. The opponent is not Routed; if it was the attacker he advances (if eligible); otherwise he stays in place. He now has Cohesion hits equal to its TQ minus one. 3. If the difference between the hits and TQ is the same for both sides, the defender routs and the attacker advances after combat (if allowed) and has Cohesion hits equal to its TQ minus one. 4. If one (or both) sides have more than one unit involved and at least one unit did not reach or exceed its TQ then all units that did so Rout.
EXAMPLE #1: A kibamusha (TQ 7, five Cohesion hits) attacks an ashigaru unit (TQ 6, four Cohesion hits). The Shock result is 3(2), so both units have equaled or exceeded their EQ. The KB has eight hits, or one over its TQ; and the AS has six hits, the came as its TQ. Therefore, the KB routs, and the AS stays in place—it was not the attacker and could not advance—with five cohesion hits.
EXAMPLE #2: Same attack as above, but the result is 2(2). In that case, because both units equal their TQ in cohesion hits, the defending AS routs, and the KB advances after combat (with six Cohesion hits).
EXAMPLE #3: Same as #1, but, in addition to the KB, there is an attacking AS (TQ 5) with three cohesion hits. Regardless of how the hits are applied to the attacker [11.42], one would reach its TQ and one would not. Therefore, both the defender and the one attacker that reached its TQ Rout; the other, un-routed attacker may advance, if possible.
11.48 If a Busho is stacked with a routing unit that Busho may Rout move along with that unit, if he so wishes. He is otherwise unaffected by the rout.
22 Samurai Rules of Play
© 2007 GMT Games, LLC
11.5 Recovery, Rally, Removal Players may Rally routed units, attempt to get units to Recover from Disruption, and Remove hits from those units that have incurred them.
11.51 Hit Removal: During an Orders Phase, any active, un-routed unit with cohesion hits that is not in an enemy ZOC, nor adjacent to an enemy unit, nor within range of any enemy missile unit (which has a LOS) and is in clear terrain may remove two cohesion hits by being given an Order to do so. A unit may not remove more than two cohesion hits per Order Phase. A unit that has had Hits removed may not do anything else that Phase, and vice versa [See, also, 10.4].
11.52 Recovery: Getting units to Recover from their Disrupted status requires that the unit be given an Order from its Busho. The Disrupted unit must be within the Busho’s range and may not be in an enemy ZOC, nor within range of any enemy missile unit (which has a LOS). The range may not be traced through impassable ter-rain or enemy occupied or controlled hexes. • if the Busho is stacked with or adjacent to that unit, simply flip
it to its normal status side and give it two TQ Hits (in addition to any other hits it may have).
• if the Busho is two or more hexes away (but within range), the player rolls the die. He adds to the die roll the distance in hexes between the Busho and the Disrupted unit and subtracts his Charisma Rating. If the adjusted dieroll is the same as or lower than the unit’s Disrupted TQ, it recovers (and give it two TQ hits). Otherwise, no effect if it fails [See 11.55 for attempt limitations.]
• Hara-Kiri, see 10.4. • Disrupted units with Hits equal to one less than their Disrupted
TQ may not Recover.
Only one Recovery attempt can be made per unit per Orders Phase.
PLAY NOTE: Thus, once a unit has become Disrupted, when it returns to its original, untarnished state, it will always have at least two hits.
11.5� Rally: During an Orders Phase a player may attempt to Rally any routed unit which is within its Busho’s range, not an enemy ZOC, and not within range of any enemy missile unit (which has a LOS). The range may not be traced through impassable terrain or enemy occupied or controlled hexes. If the Busho is stacked with or adjacent to that unit, it is automatically Rallied (see 11.54). If the Busho is two or more hexes away (but within range), the player rolls the die. He adds to the die roll the distance in hexes between the Busho and the Routed unit and subtracts his Charisma Rat-ing. If the adjusted die roll is the same as or lower than the unit’s Routed TQ of 1, the unit is Rallied. Otherwise, no effect if it fails (see 11.55).
11.54 A successful Rally (die roll or automatic) removes the Routed marker and returns the unit to its Disrupted status with two hits. It may be refaced at no cost. However, the player may not attempt Recovery [11.52] for that unit until the next Game Turn. It is free, however, to move, etc., in a subsequent Orders Phase.
11.55 If a Rally attempt fails, the unit remains Routed, but it does not move. No further attempt may be made that Phase. Additional
attempts to Rally may occur in a later Phase, as long as there is only one attempt per Phase. The same applies to Recovery.
11.6 Clan Flight 11.61 In the Clan Flight Segment of the Status Determination Phase, each player checks to see whether any of his individual clans have Fled.
11.62 To determine Clan Flight, the player compares the number of AS and KB units (only) in that clan that are Disrupted (D), Routed (R), and Eliminated (E) to the total number of AS+KB units in that clan and consults the Clan Flight Determination Table. He then rolls the die, adding to that die roll one-half of the Clan’s Busho’s Charisma, rounding down. If the die roll is the same as or lower than the number cross-referenced, that Clan has Fled. If it is higher, nothing has happened.
EXAMPLE: Ii Naornasa’s clan at Sekigahara (Eastern Army’) has five AS and KB an its. One of those units is Disrupted, one is in Rout, and a third has been Eliminated. Cross-referencing the total units (five,) with the D/R/E units (three) the Clan Flight table shows a five. The player rolls a five, but Ii’s Charisma of three allows him to add one to that DR, keeping what’s left of his clan in the game.
PLAY NOTE: Obviously, a clan whose units have all been elimi-nated does not have to check for Flight.
11.6� When a clan flees, all of its units—including Busho and retainer samurai—are immediately and permanently removed from the game.
12.0 Victory Victory is determined by which player’s army Routs first.
A player’s Army Routs when it accumulates Rout Points equal to or greater than the Rout Point Level it is given in each scenario. Rout Points are determined and totaled in the Victory Determina-tion Phase.
Rout Points are determined as follows: • Ashigaru and Kibamusha: unit’s TQ• Teppo and Yumi: 2 RP• Ozutsu, Honjin, Bushos, and Samurai: 0 RP
If a Clan has Fled, double the RP value for each Ashigaru and Kibamusha unit. Teppo/Yumi are not doubled.
Subtract from an army’s total five RP for each Severed Head it has in the So-taisho’s honjin [10.3]. If the Severed Head is that of a So-taisho or Taisho, it is worth twenty-five RP.
If both armies reach/exceed Rout Level at the same time, the army with the larger number of Severed Heads accumulated wins.
PLAY NOTE: The method of determining Rout Point Levels takes into account Clan Flight, so it is important to inflict that level of punishment on the other player. Loss of Bushos and samurai is reflected in the subtraction of Severed Heads, so losing too many heads will enable an otherwise beat-up enemy army to stay on the field.

2�
© 2007 GMT Games, LLC
Samurai Rules of Play
Activation ..................................... 5.2Advance after combat .................. 9.4Ashigaru ....................................... 2.4Babo-saku .................................... 9.5Bundori ........................................ 10.3Busho.............................4, 2.24, 2.2.3 capabilities ............................... 4.3 casualties .................................. 9.25 command range ........................ 4.31 counters .................................... 4.1Finished ........................................ 17 fire combat ............................... 8.28 momentum limits ..................... 5.45 movement ................................. 4.6 orderly withdrawal ................... 4.72 orders limit ............................... 5.37 ratings ....................................... 4.1 replacement .............................. 10.5 stacking .................................... 6.52Busho movement order ................ 4.42Cavalry Charges ........................... 9.3Charisma ...................................... 4.1Clan .............................................. 2.4 activation .................................. 5 coordination ............................. 5.7 how to activate ......................... 5.2 orders ........................................ 5Clan fight ...................................... 11.6Clans and contingents .................. 4.2Cohesion ...................................... 11.2, 2.4Combat effects ....................................... 11 individual ................................. 10 tables ........................................ 11.1Combat units ................................ 2.21Command range ........................... 4.31 effects of ZOC .......................... 4.3.4 in honjin ................................... 4.51Components and terms ................. 2Continuity .................................... 5.1Coordination ................................ 5.7Die rolls ........................................ 2.3Dieroll of doom ............................ 5.43Disruption .................................... 11.23Extended Yumi Fire ..................... 8.26Facing ........................................... 7.1 change of .................................. 7.13 effect on movement .................. 7.12 reaction ..................................... 7.17 routed units ............................... 7.15ZOC effects .................................. 7.16Finished ........................................ 5.38, 2.4Fire capable units ......................... 8.1Fire combat .................................. 8
Busho ........................................... 8.28 range ......................................... 8.13Fire procedure .............................. 8.2Fire Table ..................................... 8.25Game length ................................. 2.6Game scale ................................... 2.5Giving orders ............................... 5.3Hara-Kiri ...................................... 10.4Hayago ......................................... 8.18Head (severed) ............................. See BundoriHit removal .................................. 11.51Honjin (HQs) ............................... 4.5 stacking effects ......................... 6.51Individual Combat ....................... 10 busho ........................................ 10.1 samurai ..................................... 10.2Informational markers .................. 2.25Initiative ....................................... 5.1, 4.1, 2.4Kibamusha ................................... 2.4Line of sight ................................. 28Losing Face .................................. 10.14Maps ............................................. 2.1Momentum ................................... 5.4Momentum generated orders phase..5.37Movement .................................... 6 adjacent to enemy .................... 6.34Busho ........................................... 4.6 effects of over-stacking during 6.55 elevation change ....................... 6.22 restrictions ................................ 6.3Movement allowance ................... 6.1 effect of firing........................... 6.14 out-of-command effects ........... 5.63Movement and terrain .................. 6.2Norikuzushi (Cavalry Charges) ... 9.3Orders ........................................... 5.3, 5, 4.3Orders, requirements to receive ... 4.32Out-of-command fire restrictions ......................... 6.15Out-of-command units ................. 20Ozutsu .......................................... 2.4 stacking .................................... 6.51Playing pieces .............................. 2.2Rally ............................................. 11.53Reaction facing change ................ 7.17Reaction Facing change ............... 7.17Reaction Fire ................................ 8.3Recovery ...................................... 11.52Rout .............................................. 11.4Samurai ........................................ 10.2, 2.22 challenge phase ........................ 10.23 charge ....................................... 10.27 maximum number .................... 10.29Sequence of play .......................... 3
Shock requirements ...................... 9.1Shock Combat .............................. 9 compulsory attacks ................... 9.46, 9.12 optional attacks ........................ 9.13 pre-shock .................................. 9.21 procedure .................................. 9.2So-taisho ...................................... 2.23 replacement .............................. 10.53So-Taisho ..................................... 4.41Stacking ........................................ 6.5 and facing ................................. 6.53Taisho ........................................... 4.4, 2.23 replacement .............................. 10.53Teppo ............................................ 2.4 fire combat ............................... 8.12 stacking .................................... 6.51ZOC.............................................. 7.23Terminology ................................. 2.4Terrain cohesion penalties .................... 6.23 effects on movement ................ 6.2Trumping ...................................... 5.5 initiative requirement ............... 5.51 procedure .................................. 5.51 restrictions ................................ 5.53Victory determination .................. 12Volley fire ..................................... 8.27Withdrawal ................................... 6.4 active ........................................ 6.41Reaction ....................................... 6.43Yumi ............................................. 8.26, 2.4 fire combat ............................... 8.12 stacking .................................... 6.51ZOC.............................................. 7.23Zone of control effects ................. 4.71, 4.34Zones-of-control .......................... 7.2 effects on movement ................ 7.23
Index

24 Samurai Rules of Play
© 2007 GMT Games, LLC
A. Initiative Determination PhaseThe players each roll one die to determine who starts the turn with the Initiative [5.2]
B. Activation Phase [Do 1, then 2 or �]1. Possible Reinforcements: If applicable, check the
scenario to see whether reinforcements are available2. Clan Segment: The player with Initiative a. Designates any already Active clan for Orders, or b. Activates an Inactive clan for Orders c. Proceed to Phase C �. Samurai Activation: The Player may choose, instead, to activate a samurai [Go to Phase D and see 10.2]
C. Orders Phase1. Movement/Fire Segment: If the Player has chosen
to Activate a Clan-or continue its Activation-the units in that Clan may undertake any action listed in 5.32. Opposing units capable of Reaction Fire [8.34] may do so throughout this segment.
2. Shock Combat Segment: After units of a clan have finished moving and/or firing, eligible units [9.2] engage in Shock combat, using the following sequence:
a. Shock Designation; determine which units must Shock, which may, and which have to undergo Pre-Shock TQ checks
b. Pre-Shock TQ Check, as required c. Determine Position Superiority and Shock column d. Resolve the Shock
D. Samurai Challenge Phase 1. Samurai Movement, including Samurai Charge2. Eligible samurai may issue Challenges3. Resolution of Individual Combat, or4. Hara-kiri
Phases C and D are mutually exclusive. You may do one or the other.
E. Momentum Phase or Proceed to FThe player for the Busho who was activated in the imme-diately preceding Orders Phase may attempt a Momentum die roll to give that Busho another Orders Phase (C) or Samurai Phase (D). If not, go to F.
F. Continuity PhaseThe player checks to see whether he retains Initiative [5.1]
• If he does, he goes back to B/2 • If he does not, Initiative passes to his opponent, who
goes back to B/1 or B/2 (whichever applies)
G. Out of Command PhaseOut of Command units may move, as per 5.63.
H. The Three Rs Phase1. Remove Rallied, Busho Finished, and Out of Command
markers2. Rout Movement—Routed units must undergo Rout
Movement 3. Replace killed leaders
I. Status Determination Phase1. Check for Hits in burning fortifications (Okehazama
only)2. Check for Clan Flight [11.62]3. Determine which clans are Active and which are
Inactive
J. Victory Determination PhaseEach Player totals his Rout Points [12.0] to see whether his arm has left the field-and the other player has won.
Sequence of Play
© 2007 GMT Games, LLCP.O. Box 1308, Hanford, CA 93232-1308
www.GMTGames.com