the greenland paddle - the woodshop - home page · part of the beauty of the greenland paddle for...
TRANSCRIPT
THE GREENLAND PADDLE
ITS CONSTRUCTION AND USEby Gerry David
About two and half years ago I met Tom Lucas on one of Al's Hudson River trips out of Cold Spring. He was using aGreenland paddle, and it just looked right--especially after I blew a bunch of rolls with my Werner paddle, including theall-time mud roll in which I left the paddle stuck in the mud, after nearly impaling myself on it. I came out of the boat and gotto shore, and Tom caught a glimpse of the four inches of the paddle sticking above the surface from where I planted it in themud at Peekskill and, making like Arthur pulling Excalliber from the rock, managed to retrieve it. On the train back to ColdSpring, I tried to pick Tom's brain for everything he knew about Greenland paddles, because about that time he had writtenan article on Greenland paddling for The Drift and obviously knew his subject. In the article he alleged that one couldbe made from a two by four.
That week I hied myself to The Home Depot and bought a couple of stud-grade spruce 2x4's, and made my first Greenlandpaddle following the rules of thumb in Tom's article (length-- anywhere between your wrist and finger tips with arm extendedover your head). I inlaid some mahogany tips to keep the wood from splitting, mopped on a couple of coats of high gloss sparvarnish, and the next time I met Tom, about four weeks later, on a Connecticut River trip, he expressed amazement that Iactually did it.
"But you said in your article that a two-by-four would work," I said."Yeah, but I didn't know it could actually be done!" he remarked.
There may be a moral in all of that somewhere. I'm not exactly sure what it is--something about thosewho tell don't know and those who know aren't telling, perhaps. In any case, gentle reader, you havebeen warned.
That first paddle was seven feet long, a little too narrow for the Sea Lion I was paddling at the time, so I made another oneabout seven-feet two or three inches long, and gave away the first one, which has done its new owner yeoman service lo thesepast two or more years.
Eager to propel my kayak faster and more efficiently, I omitted an important step in making that second paddle. I failed to usea good piece of wood. Too lazy to make another trip to the Home Depot, or too cheap to shell out the $1.99 they wanted forthose eight-foot lengths of stud-grade spruce, I made use of a couple of bad pieces of wood I had purchased on my first trip.Using what I thought was the best stuff out of a bad batch, I laminated the blank for the paddle from the straightest andsoundest bits and pieces I could scrounge. Once again, I inlaid mahogany tips and slathered on a couple of coats of varnish.Looked right spiffy, it did. But the piece I used for the shaft was spalted, and although it had a nice figure in it, on a trip inThe Thousand Islands it cracked across the grain. Now, it didn't crack all the way through, mind you--just enough to make ita little flexible. I should have thrown it away right then, but being either lazy or cheap (maybe both?), I pried the crack openand flooded that baby with epoxy, poured it right in there and watched the excess ooze out. I made another paddle and keptnumber two for a spare. It got a free ride down the Saguenay Fjord on the back of my boat, and I was fortunate enough neverto have to use it. Don Gorski was not so fortunate, however.
Greatly aided by the use of the Greenland paddles, I developed some proficiency inbracing and rolling, and on a trip out of Barn Island with Jane Ahlquist, the big Gexpressed an interest in the paddles I was using. I demonstrated my skills and generouslyoffered him my spare so he could give it a shot. . . . I helped him back into his boat whileJane picked up the pieces of the paddle, floating in the tranquil waters of Fischer'sSound. It snapped on his second effort. Hardly an endorsement for Greenland paddles ortheir maker. Use good wood.
Greenland paddles are almost always made unfeathered, but paddle number three began to warp until it looked like anairplane propeller. A high school baton twirler could have moved the kayak like an airboat just by spinning that paddlewithout dipping it in the water at all. Yet the twist never seemed to affect its efficiency for either paddling or rolling.
Part of the beauty of the Greenland paddle for rolling is that it virtually orients itself on the surface. When you push up to thelight, as Derrick Hutchinson puts it, if you let go of the Greenland paddle, it will float flat on the surface in the correctorientation for planing. All you have to do is grab it with your wrists cocked before you start your sweep. Being symmetricalabout all three axes, it has very little tendency to dive. It's also very easy to control when sculling, which involves slicing eithera horizontal or vertical figure-eight through the water. Euro-style paddles with their feathered, asymmetrical spoon blades

have a mind of their own and struggle against you to exert it by fluttering and diving. But twisted as it was, paddle numberthree still behaved itself, and I would probably have kept on using it, if I hadn't tried Erika's paddle.
Up to this point, my paddles were more or less based on the design used by Cricket and Betsie Bay and looked something likethe paddle in Figure 1-a. The blades were about 3 1/2 inches wide at the tip (the full width of the 2 x4) and maintained thatwidth up to about ten inches from the throat where they tapered into the loom. The looms were as round in cross section as Icould get them. In fact, I prided myself on the round shafts, which I made using a set of antique rounding planes. I felt thatpeople who made paddles with squarish looms lacked the skill to make them round. Regarding the blades, my object had beento get as much area as possible to maximize the bite on the water--in other words to deviate as little as possible from the idea ofthe conventional paddle. Erika's paddle, made by Mark Rodgers, had a squarish shaft and narrower blades, which formed astraight taper from the tip to the loom like the paddle in Figure 1-b.
Such blades have considerably less area and less bite on the water than my parallel-bladed ones, but when I tried Erika'spaddle in the Greenland style boat I had just bought, I seemed to move faster. Erika explained that the rectangular-sectionedshaft fitted the grip between thumb and forefinger and held the blade at the correct angle--the "dig" angle as Andy Steevercalls it in his book Oars and Oar Making. I had become aware of the importance of this dig angle because I noticed that Ifrequently splashed my way along with a very audible "plop," as did other Greenland paddlers. I also noticed I was pulling asizeable whirlpool behind the blade, which is inefficient. I had tried several techniques to eliminate it, including kind of pokingthe blade into the water with a stabbing motion, somewhat as if I were harpooning an imaginary whale swimming alongsidemy boat. But because of its squarish loom, Erika's paddle entered the water more quietly and didn't pull a whirlpool. I didn'thave to harpoon an imaginary Moby Dick. Figure 2 illustrates the "dig angle."
The narrower blades--they were 3 1/4" wide at the tips( still wide for an Eskimo paddle, Erika said)-- required a fastercadence, but with a limited amount of power it is always easier to take many smaller bites than fewer larger ones, and theolder I get, the more limited my power. The smaller blades make it easier to maintain an efficient cadence against wind orcurrent, much like riding a bicycle in a lower gear while going up hill. As kayakers, we are basically one-speed bikes, and it isbetter to keep that gear ratio on the low side. Vellodrome racers use one unbelievably high gear, and flatwater racers use apaddle with lots of area, but they are conditioned athletes competing under specialized conditions, and we are cruisers (at leastI am) who must deal with a variety of conditions, and the lower ratio is for me. Moreover, the narrower blades with theirconstant taper, make it easier to grab them anywhere along their length for the extended paddle strokes, which are anessential part of the Greenland repertoire.
Some Greenland blades have a "shoulder " where they meet the loom as in Figure 1-c. I have heard two plausible reasonsfor it.
First, it allows for more blade area by carrying the width up the blade instead of makingthe tip wider, thereby still allowing one to grip the blade anywhere for extended strokes.
Second, the shoulder encourages water to drip off the blade, an important considerationfor paddling in cold water if you don't want to soak your sealskin gloves.
However, because the shoulder inhibits the use of the slide stroke, a valuable Greenland technique, I believe it is adisadvantage. Surely, the shoulder is unnecessary for helping to orient your hands on the paddle. Because you grip theshort-loomed paddle at the throat (where the blade meets the loom), you can always judge its position quickly by feel. Back toErika's paddle.
Besides the narrower blades, rectangular-sectioned loom, and straight taper from the tip to the throat, there were two morefeatures about it that I liked.
It had much thinner edges than I had been accustomed to putting on my paddles.
It was unvarnished. It had an oil finish of some sort, but it was not smooth and shiny likethe paddles I had been making.
And my paddles, smooth and shiny as they were, were not as smooth and shiny as some of the commercially availableGreenlanders. More than once that smooth and shiny paddle had slipped out of my increasingly arthritic hands--once during aroll right smack under the middle of the George Washington Bridge. Smooth and shiny is not good.
So I took some measurements from Erika's paddle (and some from Captain Al's, for his was similar, only bigger), and cameup with a design I believe suited me. Referring to Tom Lucas's article for the proportions,

I made the paddle seven-feet three inches long with a seventeen and a half inch loom(which was too short as I discovered more than one year later) and a width of 3 1/4" atthe tips. I gave the loom a husky cross section of 1 5/8" by 1 5/16".
Twelve years or so ago I had purchased a twelve-foot western red cedar 4 x4, which had been aging in my cellar rafters eversince. I forget why I bought it, but it was a beautiful piece of wood--clear, straight, and fine-grained. I resawed itperpendicular to the annual rings, in effect coming up with two quarter-sawn 2"x4"s. I fashioned the paddle in the mannerindicated below and dipped it in the water for the first time on October 22, 1994 on Barnegat Bay, and used it as my numberone paddle for over a year--something over 400 hours. It has no finish, and although it has weathered to a beautiful gray, it issmooth enough to slide effectively for the slide stroke but has never slipped out of my hands. Although western red cedar issofter than spruce and not as strong, it is lighter and strong enough. I dispensed with the cross-grain inlaid tips but believesome precaution should be taken to prevent the tips from splitting, although the paddle is probably in greater danger from acar door than it is from a rock. I have made a few repairs, but nothing major--glued down a minor split and worked out somedings and nicks in the edges. All-in-all it has been a satisfactory paddle.
Nevertheless, the good can always be made better--can't it? I made a paddle for a friendand made the blades much thinner than those on mine. Her paddle was extraordinarilylight--less than twenty-four ounces. The thinner blades might be more efficient.
I read an article in Anorak that our current obsession with short paddles--in the seven-foot range--was erroneous. Longerpaddles have greater tip speed, so they ought to drive the boat faster, right? So I made an eight-foot paddle with thin blades.Wrong. The paddle would have had greater tip-speed if I had the strength to move the tips through the water fast enough. ButI was on the wrong end of the lever. The resistance of the water was multiplied through the greater length.
Stick with the proportions in Tom Lucas's article. Steve Burkhardt, who is six-foot sevenuses a paddle about seven-foot two.
There is a neat Eskimo paddle in the American Museum of Natural History with bone tips and edges--h'mm. Bone is hard tocome by. How about plastic tips and edges to protect cedar from the ice? So I found a great retail outlet for plastic and madeone by mortising the plastic to the cedar. I doubt whether epoxy (or any glue) would be good for this job. Were I to makeanother edged paddle, I would mortise the tips, but use bronze ring nails to hold on the plastic edges. The bronze nailsproperly placed would also inhibit splitting. In fact, on my recent paddles, I have driven brass pins across the grain at the tipsfor that purpose.
My current number-one paddle is seven-feet five inches long--the absolute longest I can make using the Inuit rules of thumb. Itweighs about 1 1/2 pounds. It has thin blades and a longer loom than my first cedar paddle--19 1/2" compared to 17 1/2"--thedistance from the little finger of the right hand to the little finger of the left when my elbows are bent as if I were going to do apullup. I had wrongly determined that distance on the earlier paddle, perhaps measuring the distance between my thumbs.Those two and a half inches make a world of difference. With the earlier paddle, because the loom is too short, in order toincrease the leverage, I frequently grip the paddle below the throat on the flat of the blades. This throws off the dig angle,which spoils the efficiency considerably. On my next paddle, I may increase that distance another inch. One writerrecommends making the loom the same width as the boat in front of the cockpit. Pay attention to the length of the loom!
Undoubtedly, the Greenland paddle is a less hydrodynamically efficient propulsive device than the modern Euro-style paddle,whose wide spoon-shaped blades bite with less slippage. Unfortunately, I am not as biologically efficient as I should be toderive optimum benefit from the more efficient paddle. I am slipping, and a slipping paddle suits me fine. On the positive side,the Greenland paddle is a more generalized and less specialized tool than the Euro-style paddle. Its unspecialized symmetrysuits it for sculling, bracing and rolling. Its center of effort is much closer to the paddler than that of a comparable Euro-stylepaddle: 18 1/2" inches on my current number one paddle, vs. 21 1/4" inches on my Werner paddle, which permits a fastercadence. However, the slide stroke allows me to increase the lever arm dramatically from 39" to 66 1/4" inches (vs. 50" on theWerner, unextended, because it is rarely used in the extended position)--thus allowing strong sweep strokes for turning. Theblades on my paddle (made of one piece of Western Red Cedar) are as thin as I dared to make them. The paddle flexes witheach stroke, and when I did some rolls, a kayaker who observed me was amazed at how much the paddle flexed. (They musthave been pretty poor rolls because the legs, not the paddle, should be applying the force.)
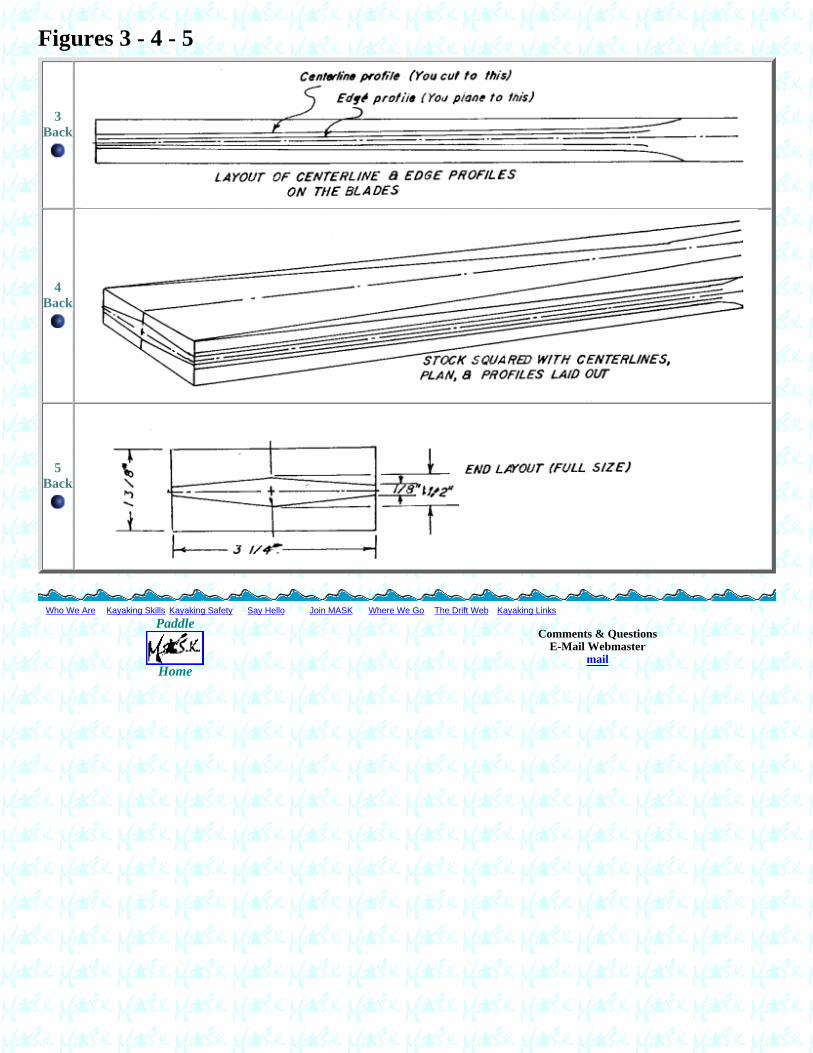
There are many ways to make a Greenland paddle. But they fall into two basic methods: laminate it or carve it from one piece.The laminated types allow different widths and thicknesses to be glued up into a blank thereby eliminating a lot of roughshaping by removing wood. It is also possible to use different types of wood in the lamination and to orient the grain in orderto control flexibility. My experience to date, however, shows that one-piece paddles are more flexible, which I like. I also thinkthat if you have the right tools, a one-piece paddle is faster to make because you don't have to do a lot of clamping up andwaiting for the glue to cure, etc. Carving a Greenland paddle from one piece is not difficult, but there are a couple of things tokeep in mind. First, lay out your paddle carefully on an accurately squared piece of wood. Second (and this applies tolaminated paddles as well), work from center lines drawn on all six sides. Figures 3 and 4. The easiest way to do the rough
shaping is with a bandsaw, but other tools will work--a Sawzall or a heavy-duty saber saw. The classic way to rough out theblank is with a drawknife or a crooked knife. (It takes only a little longer than with a bandsaw.) Careful work with an axwould suffice. The best tools for the final shaping are a couple of planes, a spokeshave, and perhaps a rasp or a Sureform tool.
Drawings illustrate the key steps:
First, determine the size and shape of your paddle, and lay it out clearly on a
SQUARED piece of stock. I have included typical dimensions and cross sections in Figure 6, but you should
make your paddle to suit yourself. Figure 5 shows the layout of the end. The annual rings should be vertical, asthis makes for a stiffer and stronger blade than flat-sawn lumber with its horizontally oriented rings. The spruce Ihave worked with has a tendency to warp, but the stud-grade 2x4's I have used are inexpensive, so you could buy abunch and let them sit for a couple of weeks and choose the straightest ones. Avoid stock from the very center ofthe tree containing the pith, as this will have the most tendency to warp. Good quality fir or pine would do verywell. I like western red cedar because it is light, and good quality stock is readily available. Straight and cleareight-foot cedar 4x4's currently cost me about $24.00, and I can resaw one into two 2x4's with the grain runningthe right way. If you do not work with squared stock, you are making things difficult. Manuals on handtoolwoodworking explain how to square a board.
Next, lay out the paddle accurately, both plan and profile. As Figures3 and 4 show, there are a bunch of lines in the profile view. To simplify things, you could omit the edge profile inyour initial layout and draw it in after you have shaped the blank to the center line profile and before you beginbeveling from the centerlines to the edges. Work the paddle uniformly--keep the ends balanced as you go along. InFigure 7 the beveling is complete, and the redrawn edge profile has been worked off. Notice how in order to saveweight the profile of the blade sweeps down from the loom in a curve before it straightens out about ten inchesaway from the shoulder. But the important thing is to WORK FROM THE CENTER LINES.
Finally, after you have achieved a precise but very angular paddle with sharp edges and a well-defined
center ridge, drill for the brass pins, and do the final shaping and rounding as shown in Figure 8. A 2-in. pindriven in from each edge should suffice. There is no need to drive them exactly opposite each other. I use a varietyof planes and spokeshaves for shaping. Using the longest plane possible in a given situation, a jackplane, helpskeep things square. But a 6-inch block plane is very useful as well. A straight-bladed spokeshave with a curvedstock is very useful in shaping the narrow part of the blade where it sweeps in a curve up to the loom. Totransform the loom from a rectangular cross section to a squarish oval, I still use a some antique rounding planes,but they are not necessary. After I have it shaped as accurately and smoothly as I can with cutting tools, I sand it. Iuse a palm sander where possible on the blades and sand the loom by hand. I start with 60 grit paper and proceedthrough 100 and 150 grit. After I have it smooth, I paint it with water to raise the grain, and sand it again with 150grit and finish off with 220. Cedar requires no finish, but if you insist upon some sort of protective coating, I wouldstay away from anything that produces a smooth, shiny, and slippery surface.
I have mentioned some things about using a Greenland paddle. The technique differs really very little from that used with aEuro-style paddle. The cadence is faster because the blades are narrower, and because the center of effort is closer to thepaddler, the paddle can be carried lower permitting the strokes to be more sweeping than with the Euro-style paddle, wherethe strokes tend to be more vertical. Carrying the paddle lower results in less fatigue and keeps the blades more out of thewind, which diminishes the closer one gets to the surface of the water. What Derrick Hutchinson says in Sea Kayaking 4thedition comparing the basic touring stroke to the racing stroke is an accurate description of the basic Greenland stroke. Hiswhole description is worth reading, even for experienced paddlers, but I cite only a part of it here:
. . . It is important, therefore, that the paddle blade is placed well forwards. It is thenpropelled backwards with a vigorous pulling movement involving the shoulder and thehip muscles--indeed the whole of the upper torso. This is also referred to as "upper-bodyrotation." The pulling action ends when the lower hand is level with the hips. The speedwith which this pulling blade is lifted from the water is governed by the rotation of yourbody.

The paddle is placed further out from the side of the hull than it is during the racingstroke, giving the stroke a slight sweep rather than a downward plunge. The upper bladepresents a more acute and therefore more favorable angle to any beam wind with hardlyany likelihood of the paddle being snatched or twisted from the upper hand by the wind.Moreover, because the paddle action is lower, it is less tiring on the arms and shoulders.
(Derek C. Hutchinson, The Complete Book of Sea Kayaking, Fourth Edition, The GlobePequot Press, Old Saybrook, Connecticut, pp. 46-47. Reprinted by permission.)
Remember the appropriate dig angle Figure 2 illustrates the "dig angle." --a paddle that enters too perpendicularly willplop and draw air behind it. Strive for a stroke with no splash and no whirlpool being pulled by the tip of the blade. Ifrequently follow the tip of the paddle with my eyes to check on its efficiency. A smooth and efficient forward stroke is assatisfying as a well-performed roll.
Because of its short loom which blends smoothly into the blades, the Greenland paddle is well suited for extended strokes,which are used most commonly for sweeps, sculls, and rolls. In the extended position, the Greenland paddle, with its shorterlever arm, actually exceeds the lever arm of the Euro-style paddle considerably, so turns, braces, and rolls can be very easilyaccomplished. However, there is another stroke associated with the Greenland paddle, the slide stroke, a stroke often ignoredby converts to the Greenland paddle.
In his article Tom Lucas quotes John Heath's description of the slide stroke from Sea Kayaker, which I will notrepeat. However, I have experimented considerably with the stroke, and have discovered some things about it Iwould like to pass along.
Basically, the stroke consists of a series of extended paddle strokes on alternate sides.
The stroke requires the paddler to make these alternating extended strokes as rapidly and as smoothly as possible. Perhapsbest done with a storm paddle, a Greenland paddle with normal blades and a loom about afoot or more shorter than astandard paddle, it is effective with a standard paddle as well.
To do the stroke,
starting on the left side, rotate your torso to the right and reach as far forward as youcan and quickly slide your forward (left) hand backward to the center of the loom andyour right (rear) hand backward along the blade as far as you can. With my currentseven foot-five-inch paddle, I manage to get about ten or twelve inches from the end ofthe blade. You are now in the position illustrated in Figure 9-a.
Keeping your forward (left) arm straight or slightly flexed, rotate your upper body to theleft until just before the paddle is perpendicular to the side of the boat. Continuing torotate your body, allow the left elbow to flex as it lifts the blade from the water and, stillgripping the center of the loom, allow the paddle to slide through your right hand untilthe two hands bump. You are now in the position illustrated in Figure 9-b.
When the hands bump, the right grips the loom, and the left relaxes as the right armextends, pulling the paddle through the left hand to the position shown in Figure 9-c,which is the end of the complete cycle.
Although it looks as if the blade hand slides forward to meet the loom hand, the reverse is true. The blade hand remainsbasically still, allowing the paddle to slide through it until the loom hand bumps it, and then the blade hand grips the loom,becoming the loom hand; the loom hand relaxes, becoming the blade hand, and all the while the torso continues to rotate.
Some comments on performing the stroke:Although the loom hand pulls the blade through the water, the stroke's power derives from the thrust on thepaddle exerted by the blade hand, similar to a canoist exerting thrust on the grip of his paddle with his upperhand; but although the positions are similar, do not extend the blade arm like a canoist punching the gripforward. Instead, keep the blade hand close to your chest and allow it merely to transmit the thrust generated byyour rotating torso. As the whitewater boys say, "Paddle in the box." At least Sean says it. Only in this case,
because one arm is extended, the box is really a trapezoid.
Because one important purpose of the stroke is to minimize wind action on the paddle, the closer to the end of theblade you can get your blade hand the better. If you grip the paddle loosely enough, you may be able to allow it toslide considerably beyond the center of the loom, thereby increasing the lever length still further and keeping theupper blade out of the wind. Notice that while the loom hand moves maybe half the distance of the loom--perhapsten inches--the lever arm is really from the center of effort to the blade hand--a considerable lengthening.
Keep the paddle low, stab it into the wind, rotate with vigor, and get as much of your legs and back into the strokeas possible. By leaning as far forward on the deck as you can at the start of the stroke, you can closely imitate theaction of a rower pulling on an oar, and this action, combined with the sweep generated by your rotating torso,makes for a very powerful stroke.
The cadence of this stroke is somewhat slower than that of the basic Greenland stroke, mainly because the tip ofthe paddle has further to go. It requires more effort than the standard stroke because the water has that longerlever with which to resist your efforts, but practice the stroke until you can get it going pretty fast.
It is a good stroke to bring other muscles into play. I like to sprint with it and get my back into it simply because inleaning forward over the deck, I stretch my lumbar muscles and whatever else is down there.
Some boats seem to respond to it more dramatically than others. My Recluse doesn't seem to pick up speeddramatically with the stroke, perhaps because it is such an easily driven boat that I can get it to hull speed prettyeasily with the standard stroke. On the other hand, my Prijon Oddysea double, which I frequently paddle solowhile pushing my dog around in the forward cockpit, seems to go remarkably faster with this stroke. I think it'sbecause I can't get it up to hull speed with the standard stroke.
It is also a very wet stroke. If your spray skirt has holes in it or is not otherwise very water resistant, be preparedfor a lot of water in the boat. And that is what I know about Greenland paddles and technique.
P.S. Since this was written, I have modified my ideas somewhat. Steve Winning, who has built several kayaks and a lot ofpaddles, keeps the blades on his paddles quite thick in cross section--"egg shaped," he says. they seem to be very efficient andpull less air than the more flat-bladed paddles. My next paddle will have thicker blades. Lately, I have been doing a lot ofpaddling with a 5' 4" storm paddle, which moves the boat very well. it also makes the slide stroke imperative. There is nofaster way to learn the slikde stroke than with a short paddle. Greenland paddles are inexpensive and failry easy to make. Halfthe fun of this Greenland paddling business is trying out new ideas.
Who knows, maybe you'll be the one to rediscover the ledgendary ten-knot paddle.
Who We Are Kayaking Skills Kayaking Safety Say Hello Join MASK Where We Go The Drift Web Kayaking LinksPaddle
Home
Comments & QuestionsE-Mail Webmaster

GREENLAND PADDLING
Notes From A Novice:by Tom Lucas
I first became intrigued with Greenland paddling technique for purely aesthetic reasons. On a weekend trip to the ChesapeakeBay last spring I observed several paddlers, all recent converts to Greenland-style equipment, using these short skinny stickswith remarkable skill. The easy grace with which they handled their boats, upright, upside down and in between waswonderful to watch. One of the things that always appealed to me about kayaks was their elegance and kayaks never appearedquite so elegant as when they were being propelled with Greenland paddles.
I bought my own Greenland paddle in July of 1992, a "Greenlander" from Betsie Bay Kayak and all aspirations tograce and elegance quickly dissipated. My forward stroke splashed and clunked and got me nowhere. My sweeps failed to turnthe boat and my roll, hard earned over the winter in weekly pool sessions simply vanished. I was very discouraged, but notdefeated. I read whatever I could. I laid down my conventional paddle and used the Greenlander exclusively, beginning in asmall pond (on windless days no less!) and graduating from there.
This is what I've learned so far.
Greenlanders used various anthropomorphic measurements to size their paddles. Most are between 7 and 7.5 feet in length.The loom or shaft of the paddle is usually about 18 to 22 inches long, although it may be longer. The paddle blades grow wideras they extend outward from the loom to a maximum of S. 5 to 4 inches. It is important that the paddler's hands fitcomfortably and securely around the blade even at its widest point. The paddles are always made of wood and the bladesalways unfeathered.
The forward stroke comes in two basic varieties: the traditional and the slide. John Heath, a Greenland aficionado andprobably the best writer on the subject, provides the most succinct description of the traditional forward stroke:
"In executing this stroke, the paddle is gripped with the thumb and forefinger aroundthe loom and the remaining fingers around the inboard end of the blade. Forwardmovement is achieved by twisting the torso, not by pulling or pushing on the paddle. Inthe beginning it is helpful to exaggerate this movement while locking the elbows in place.On the day after paddling if anything hurts besides your abdominal obliques, youprobably were doing the stroke incorrectly."
I'm convinced that Greenland paddles, like baseball bats have a "sweet spot". When a pitched ball is struck with the sweetpart of the bat, an economical swing; smooth, compact and quick, will drive, the ball an extraordinary distance.
The ball is said to "fly off the bat", like an animate object with a power all its own. On the best days when you find the sweetspot of the Greenland paddle (and you don't always find it), something similar takes place. The traditional strokes seemseffortless and the kayak glides not through the water but over it. It is truly a cause for joy.
A special case modification of the traditional stroke is worth noting here. Sometimes it is necessary to accelerate the kayakrapidly, e.g. when punching through surf or catching a ride on a following wave. To do this with a Greenland paddle, thehands are spread a little further apart and the paddle is held nearly vertical. The stroke is hard and as close to the gunwale aspossible. The acceleration achieved in this manner belies the narrowness of the blade; it is surprisingly effective.
The slide stroke is a little more difficult to describe as well as perform. Once again, JohnHeath:
The "smooth, continuous movement" is the tough part. When I use this stroke, I findthat my hands rarely come together at the middle of the loom. Rather, the upper handsstops about 6 to 8 inches shy of the lower- a kind of "half slide" that facilitates thelinking of strokes. As in the traditional stroke, the hands are kept low and rotation of thetorso provides the primary thrust. In addition, the upper blade is pushed forward anddown throughout the stroke for added power. This is similar to the forward stroke with aconventional paddle.
The cadence for the traditional stroke is roughly 60 repetitions per minute, or better, for the half-slide about 40-50 per minute.Both strokes result in comparable cruising speeds. I find that I switch frequently between the two, sometimes just to vary

rhythm and break the monotony, sometimes in response to wind and sea.
The slide stroke is particularly useful because it can be modulated almost endlessly to accommodate the conditionsimmediately at hand. For example, in a steep quartering sea it might be appropriate to execute an extreme slide on one side ofthe kayak and a minimal slide on the other in order to keep one course. A short time later it might be appropriate to tonedown the difference between the strokes and a short time after that to reverse the difference. This ability to vary your responsequickly to changing conditions is a great advantage in rough seas. And far from being a nuisance, it's actually enjoyable. It'salso less taxing over the course of a long day on the water.
The slide stroke is the bridge to the extended-paddle position and the extended position is the only effective way I know to turna kayak with a Greenland paddle. A sweep stroke with both hands on the loom is futile. In the extended-paddle position theupper hand grips the non-working blade at or near the end, while the lower hand grasps the loom just below the inboard endof the same blade. The sweep itself is performed exactly as with a conventional paddle but now there is a full 4.5 -5 ft. ofpaddle on the sweep side. This provides both a powerful lever for turning the boat and a stable platform for supporting anaggressive lean throughout the sweep. This combination is extremely effective. I have never been able to turn my boat as wellwith a conventional paddle as I can with my Greenlander.
The extended-paddle position is also the bridge to Greenland style braces, rolls and sculls. But that is another story bestreserved for another day. For now I only hope that I have aroused your curiosity regarding Greenland technique and given'you some helpful information to get started. There are some relatively inexpensive traditional paddles on the market or betteryet, you can make one from a standard 2 x 4. Remember though, you probably won't like it at first and a few brief attempts isnot really a fair test. I suggest you strap the paddle to the deck of your kayak and use it a little each time you go paddling. Ifyou still don't like it, just leave it on your deck; it makes a great spare. It's readily accessible and since it requires no assembly,it is easy to put to use in a real emergency.
There has been some controversy recently regarding the advantage of the conventional vs. the Greenland paddle (ANorAkJune/July, 1992 and August/September, 1992). When couched as an all-or-nothing proposition, this is a red herring issue. Justas there is no one perfect boat for all people and all conditions, there is no one perfect paddle. There are pluses and minuses toboth styles. For me the pluses fall heavily in favor of the Greenland paddle. For you the answer might be different. The bestway to make that determination is to take paddle in hand and use it. Perhaps you might find that you like what you discoveror that you can adapt some of what you learn to your own paddling style. Perhaps not.
I leave you with a quote from a man who surely never paddled a lick in his life but whose words are nonetheless right on themoney:
"Different stokes for different folks. "
Sly and the Family Stone, 1969
Who We Are Kayaking Skills Kayaking Safety Say Hello Join MASK Where We Go The Drift Web Kayaking LinksPaddle
Home
Comments & QuestionsE-Mail Webmaster

Kayaking SkillsArticle Web
PostingHand Rolling by Gerry David April 1997
The Greenland Paddle by Gerry David April 1997
Greenland Paddling by Tom Lucas April 1997
Building the Outer Island by Jay Babina Nov 1997
The Tuilik - Then and Now by Tom Carroll Nov 1997
Who We Are Kayaking Skills Kayaking Safety Say Hello Join MASK Where We Go The Drift Web Kayaking LinksPaddle
Home
Comments & QuestionsE-Mail Webmaster

Kayaking SafetyArticle Web
PostingIn The Fog by Captain Denis J. Blaise April 1997
Deceptive But 'Orrible Off-shore Winds by Paul Caffyn April 1997
Planning For A Strait Crosing by Paul Caffyn April 1997
Who We Are Kayaking Skills Kayaking Safety Say Hello Join MASK Where We Go The Drift Web Kayaking LinksPaddle
Home
Comments & QuestionsE-Mail Webmaster

Kayaking LinksThe Links listed here we believe have material that is of interest and value to all kayakers. MASKhowever, does not endorse any commercial aspects of these links. If you find a broken link please let me know and Iwill repair it [email protected]
Publications
Atlantic Coastal KayakerCovering the Coast from Canada to the Caribbean
Paddler MagazinePreview, review and commentary on Paddler's newsstand magazine
Seakayaker Magazine Premier sea kayaking publication -- covering the world of sea kayaking
Organizations
American Canoe AssociationFun and information for all types of paddlers
British Canoe Union - HeadquartersThe governing body for the Sport and Recreation of canoeing in the United Kingdom
The US Coast Guard -- Office of Boating SafetyThis Office's aim is to improve boating safety
Equipment
By The Sea By The Sea is a huge site with links to sites for boat builders, building supplies, plans, safety, instruction, classified ads.
Guillemot KayaksSea kayak design company - Guillemot Kayaks
The Kayak Centre Located in Wickford RI - They have a good selection of boats and accessories
Clubs
Coastal Kayaking AssociationThe Coastal Kayaking Association is a non dues paying paddling club for experienced paddlers in S.E. Georgia
CONNYAKConnecticut Sea Kayakers
FSKAFlorida Sea Kayaking Association a State wide club with chapters all over Florida
GASPfor Sea Kayakers Interested in Paddling the Gulf of Mexico and Caribbean areas
Maatsuyker Canoe Club Tasmania. I recommend you look at this one. A big site with lots of links
Rhode Island Canoe/Kayak AssociationFlatwater - Whitewater - Seakayaking - Racing

Paddling
GORP Paddling PageA Showcase for all types of paddling
Northeast Paddler's Message BoardCommunicate information of interest to all paddlers
Preston's Kayak PageA potpourri of paddling related information
Wave~Length Paddling NetworkComing to you from Gabriola Island, British Columbia
Rescue
SARBCSearch and Rescue Society of British Columbia
International Paddling Links
CRCA Canadian Recreational Canoeing Association
NSWSKC - New South Wales Sea Kayak Club, Inc.Established by a group of enthusiastic paddlers to further the sport of Sea Kayaking.
Sea Paddler Magazine -UKThis publication is no longer around but most of the content can be viewed at the Jersy Canoe Club site. This is a clublocated in the Channel Islands
Who We Are Kayaking Skills Kayaking Safety Say Hello Join MASK Where We Go The Drift Web Kayaking LinksPaddle
Home
Comments & QuestionsE-Mail Webmaster

Figure 1
aBack
bBack
cBack
Who We Are Kayaking Skills Kayaking Safety Say Hello Join MASK Where We Go The Drift Web Kayaking LinksPaddle
Home
Comments & QuestionsE-Mail Webmaster

Figure 2Fig 2Back
Who We Are Kayaking Skills Kayaking Safety Say Hello Join MASK Where We Go The Drift Web Kayaking LinksPaddle
Home
Comments & QuestionsE-Mail Webmaster

Figures 3 - 4 - 5
3Back
4Back
5Back
Who We Are Kayaking Skills Kayaking Safety Say Hello Join MASK Where We Go The Drift Web Kayaking LinksPaddle
Home
Comments & QuestionsE-Mail Webmaster

Figures 66
Back
Who We Are Kayaking Skills Kayaking Safety Say Hello Join MASK Where We Go The Drift Web Kayaking LinksPaddle
Home
Comments & QuestionsE-Mail Webmaster
Figures 3 - 4 - 5
3Back
4Back
5Back
Who We Are Kayaking Skills Kayaking Safety Say Hello Join MASK Where We Go The Drift Web Kayaking LinksPaddle
Home
Comments & QuestionsE-Mail Webmaster

Figures 77
Back
Who We Are Kayaking Skills Kayaking Safety Say Hello Join MASK Where We Go The Drift Web Kayaking LinksPaddle
Home
Comments & QuestionsE-Mail Webmaster

Figures 88
Back
Who We Are Kayaking Skills Kayaking Safety Say Hello Join MASK Where We Go The Drift Web Kayaking LinksPaddle
Home
Comments & QuestionsE-Mail Webmaster

Figure 2Fig 2Back
Who We Are Kayaking Skills Kayaking Safety Say Hello Join MASK Where We Go The Drift Web Kayaking LinksPaddle
Home
Comments & QuestionsE-Mail Webmaster

Figure 9
aBack
bBack
cBack
Who We Are Kayaking Skills Kayaking Safety Say Hello Join MASK Where We Go The Drift Web Kayaking LinksPaddle
Home
Comments & QuestionsE-Mail Webmaster

Hand Rollingby Gerry David
I have reached that point in my Eskimo-rolling ability where I ambecoming a menace to myself and others. Having learned to roll on both sides and nothaving come out of the boat in six months (except that time when the spray skirt popped as I attempted aone-armed roll and that time with the dog deck strapped to the rear hatch—but they don’t count do they?), nothaving come out of the boat in six months, I say: my confidence is overwhelming. I feel that as long as I have apaddle in my hand, I’m coming up. What was that my mother used to say about pride going before a fall?
Whatever: I have shifted my attention to the hand roll because I’d like to be able to come up whether ornot I have a paddle in my hand. And that’s where I’m becoming a menace to others. As a result of some recentsuccess with a hand roll I developed on my own, some people actually believe I know what I’m doing and haveencouraged me to share my knowledge (ignorance?). This hand roll is very forgiving and requires no athleticability. I have performed it successfully in varying conditions—once in three to five-foot seas with fifteen-knotwinds and two other times in fifteen to twenty-knot winds with two to three-foot chop. So it is not just a swimmingpool trick. But it is important to be able to do it on both sides so the wind can assist you. Sounds good? Read on, butbe warned that the guru who now addresses you speaks at this writing with about four months experience with thehand roll. You may want to reach for the salt shaker.
First, the hand roll is misnamed:
It should be called the leg roll, because, as in any well-executed roll, it is the legs thataccomplish most of the work. In most hand rolls, the upper body, including the hand or hands, substitutes for thepaddle, the bow of somebody else’s boat, the side of a swimming pool—anything that serves as a support for thetorso on or near the surface of the water—while the roller presses the thigh of his lower leg upward against thethigh brace and pushes with his upper foot on the foot peg, an action which twists the boat virtually upright. Thisleg pressure is generally termed the "hip-snap," another misnomer, in my opinion, because it does not need to beapplied quickly all at once, although it may be. The final part of the roll, which Paul Dutky in his excellent book,The Bombproof Roll and Beyond, terms the "recovery," consists in getting one’s torso into or onto theboat without upsetting it again.
On the basis of when the leg pressure is applied, Dutky distinguishes three basic types ofrolls:
Brace - Advanced Brace - Sweep
In the brace rolls, the hip-snap is timed to coincide with the downward vertical pull of thepaddle, once it has become perpendicular to the boat at amidships, whereas in the sweeproll, the hip-snap coincides with the sweep of the paddle in the water throughout the roll.
The hand roll I am talking about is fundamentally a sweep roll and uses CONTINUOUS PRESSURE ONTHE THIGH BRACE AND FOOT PEG from beginning to end. This is exactly the same kind oftorquing action that keeps the boat upright and away from the paddler when performing the balance brace.Indeed, this hand roll can be thought of as sculling up by hand into the balance brace and sitting upright fromthere.

Second, the balance brace.Although most paddlers regard it as an esoteric trick with no practical application, in my opinion it is afundamental maneuver. Usually done with a paddle for support, it can be readily (well, pretty readily) donewithout a paddle. To repeat: it is the torquing movement of the thighs and feet against the braces and pegs thatholds the boat upright. John Heath writes in Sea Kayaker of Spring 1992: "By flexing the lower, orimmersed side knee toward the face and twisting the pelvis in the opposite direction, thekayak can be tilted away from the kayaker, but the hip-snap that is used in rolling is onlyto get into position. From then on the pressure against the kayak is "frozen" ormaintained to hold the position . . . ." The reason people are unsuccessful at it, I believe, is that theirattention is misdirected to the paddle, which either through its buoyancy or planing action can assist in achievingthe position. But it is the leg pressure that is most important. Drive your lower (immersed) knee against the thighbrace and toward your chest while getting over on your side with a sculling brace and stop sculling. You shouldstay afloat on your side.
Now, if you can get into the balance brace without a paddle, you are two-thirds of the way through this hand roll.All you have to do is learn to get upright, which is certainly more difficult without the paddle than getting into thebrace without it in the first place.
To get into the balance brace without a paddle, lie back on the rear deck and kind of shlep the boat over onto itsside and allow yourself to slide off into the water. Remember the leg pressure; drive your lower knee toward yourchest. Once you are in the water, you can revolve your torso away from the rear deck and float out at virtual rightangles to the boat. To sit up, go back the way you came; that is, revolve to the rear deck in a flat arc parallel to thewater.
Do not attempt to sit upright by hoisting yourself up in a vertical arc. (See fig. 1)
Throwing what Dutky terms your "assist hand" over the high side will help right you. Your "support hand" isthe last one to leave the water. Your assist hand is the other one.
Figure 1. Do not attempt to sit upright by hoisting yourself up in a vertical arc.

Finally, to do this hand roll, proceed as follows:
Lean slightly forward and capsize, say to your left, keeping as nearthe center-line of the boat as possible. Still leaning slightly forward underwater, shift tothe right and float up as high as you can on your right side, twisting around on to your back. Apply leg pressure(your face may come out of water at this point), and sweep your body back in an arc toward the rear deck whilemaintaining constant leg pressure and sculling in a shallow figure eight with your support hand. When you reachthe rear deck, proceed as in sitting up from a balance brace.
A note on wind and waves.
Headwinds or tailwinds have less effect on the roll than beam orquartering winds. In the former, it is probably best to roll on your stronger side, but in a beam orquartering wind the trick is to come up with your deck into the wind, so the wind blows the boat upright. Beforeyou go over, the wind should be blowing from the direction of your support hand. Capsize away from the wind. In a360-degree roll this means that you come up with the wind blowing on your deck, which helps greatly to right theboat. (See fig. 2)
Figure 2. View from the stern (Kayaker's support hand is the right)
Sitting upright -- wind coming fromthe right
Tucking forward and capsizingaway from the wind.
Reaching up and applyingpressure with the right kneeagainst the thigh brace.
Beginning the scull and sweep whilemaintaining knee pressure
Leaning back -- wind is nowhelping to blow the boat upright.Assist hand is being thrown over.Support hand is still in the watersculling.
Upright and leaning back on therear deck.

Plansinclude
installationof VCP
and FlushWood
Hatches...both100%watertight.
Building the Outer Island by JayBabina
I’m now addicted to building a wood boat each winter. It gives me something to look forward to during the shorter and less
desirable evenings. Woodworking was always a hobby of mine, and I learned a lot of skills building acoustic guitars. Thenatural transition of building and kayaking came together.
I named my design after the last island of the thimbles in Branford where I’m always playing. Having built twokayaks previously, I designed the Outer Island because the type of kayak I wanted to build was not available inplans. The kayak is not a computer designed vessel. I use the computer to help in my drafting chores, but there’sno magic button to loft and fair out a kayak. I relied a lot on my paddling experience and artistic taste.
I basically lofted forms based on what I saw in other boats and tried to incorporate all the traits that were favorable to me. It
took about 6 months of cutting, correcting and swearing. Every time I corrected one form, it seemed that two forms each waynow had to be changed. When I finally completed the boat, I dragged it out of the basement, laid it on the lawn and wasdisapointed. It was a little too beefy looking. My heart sank and I lived in denial for about two days. Then the saw came out. Ichopped the entire boat in two and lowered it. I also chopped some sections off the sides and re-constructed the entire thing.
People who saw it were already asking about plans. And if they rolled it, they wanted it! It’s now two generationsold and I’m building another right now. I’m always tweaking the forms a bit ... like a 16th off here etc. 8 yearsfrom now I’ll probably be paddling around on a board. This is an expensive hobby. There are 8 being built, andI’m about $1500. in the red ..mostly because of advertising costs. I’m having a great time with it and meeting thenicest people from all over the world and that’s worth every nickel.
21" X 17'10"
The Outer Island is a low volume kayak following the West Greenland lines. The kayak is designed forintermediate and advanced paddlers with it’s 21 inch beam ...yet its quite stable ...comparable to many boats in theintermediate level. (tippy doesn’t mean better) It’s quite fast with a stronger tracking characteristic yet plentymaneuverable for sea touring, playing in waves and winding along rocky shores. It rolls easily and will lay on it’sside with very little sculling effort. Paddlers who know the technique can easily balance brace it! Thesecharacteristics were well thought out in advance and incorporated in to the hull shape ...a major criteria of mine.Paddlers who like to play in their boats will fully appreciate it’s forgiving traits. Don’t be misled. There’s no idealkayak and all boat designs are a series of trade-offs. The boat you’re most comfortable in is the one for you. I’mbeing as honest as possible with my enthusiasm. Paddlers who have tried this kayak share my feelings.
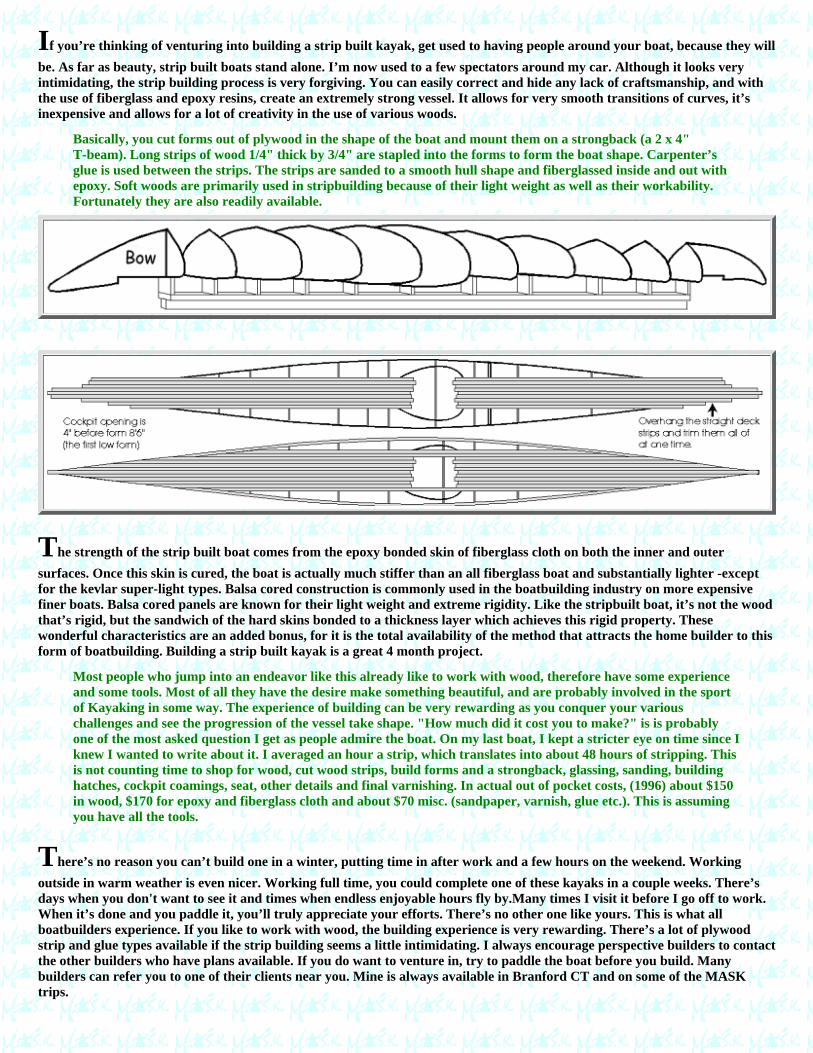
If you’re thinking of venturing into building a strip built kayak, get used to having people around your boat, because they will
be. As far as beauty, strip built boats stand alone. I’m now used to a few spectators around my car. Although it looks veryintimidating, the strip building process is very forgiving. You can easily correct and hide any lack of craftsmanship, and withthe use of fiberglass and epoxy resins, create an extremely strong vessel. It allows for very smooth transitions of curves, it’sinexpensive and allows for a lot of creativity in the use of various woods.
Basically, you cut forms out of plywood in the shape of the boat and mount them on a strongback (a 2 x 4"T-beam). Long strips of wood 1/4" thick by 3/4" are stapled into the forms to form the boat shape. Carpenter’sglue is used between the strips. The strips are sanded to a smooth hull shape and fiberglassed inside and out withepoxy. Soft woods are primarily used in stripbuilding because of their light weight as well as their workability.Fortunately they are also readily available.
The strength of the strip built boat comes from the epoxy bonded skin of fiberglass cloth on both the inner and outer
surfaces. Once this skin is cured, the boat is actually much stiffer than an all fiberglass boat and substantially lighter -exceptfor the kevlar super-light types. Balsa cored construction is commonly used in the boatbuilding industry on more expensivefiner boats. Balsa cored panels are known for their light weight and extreme rigidity. Like the stripbuilt boat, it’s not the woodthat’s rigid, but the sandwich of the hard skins bonded to a thickness layer which achieves this rigid property. Thesewonderful characteristics are an added bonus, for it is the total availability of the method that attracts the home builder to thisform of boatbuilding. Building a strip built kayak is a great 4 month project.
Most people who jump into an endeavor like this already like to work with wood, therefore have some experienceand some tools. Most of all they have the desire make something beautiful, and are probably involved in the sportof Kayaking in some way. The experience of building can be very rewarding as you conquer your variouschallenges and see the progression of the vessel take shape. "How much did it cost you to make?" is is probablyone of the most asked question I get as people admire the boat. On my last boat, I kept a stricter eye on time since Iknew I wanted to write about it. I averaged an hour a strip, which translates into about 48 hours of stripping. Thisis not counting time to shop for wood, cut wood strips, build forms and a strongback, glassing, sanding, buildinghatches, cockpit coamings, seat, other details and final varnishing. In actual out of pocket costs, (1996) about $150in wood, $170 for epoxy and fiberglass cloth and about $70 misc. (sandpaper, varnish, glue etc.). This is assumingyou have all the tools.
There’s no reason you can’t build one in a winter, putting time in after work and a few hours on the weekend. Working
outside in warm weather is even nicer. Working full time, you could complete one of these kayaks in a couple weeks. There’sdays when you don't want to see it and times when endless enjoyable hours fly by.Many times I visit it before I go off to work.When it’s done and you paddle it, you’ll truly appreciate your efforts. There’s no other one like yours. This is what allboatbuilders experience. If you like to work with wood, the building experience is very rewarding. There’s a lot of plywoodstrip and glue types available if the strip building seems a little intimidating. I always encourage perspective builders to contactthe other builders who have plans available. If you do want to venture in, try to paddle the boat before you build. Manybuilders can refer you to one of their clients near you. Mine is always available in Branford CT and on some of the MASKtrips.

There are paddlers out there who might desire an even lower volume boat. It’s very easy to cut halfinch or more through the center of each station plan and tape it back together. You leave below thewater line alone and reduce the volume from the center to the deck. I’ve done this and it works out
fine. I weigh 180 lbs.
The last thing I wanted to do was use the MASK newsletter for advertising. I present this material for yourreading enjoyment. If anyone is interested in further information about plans or a video, I can be contacted at: JayBabina 7 Jeffrey Lane N. Branford, CT 06471 (203) 481-3221 Best wishes, hope to see you on the water.-JayBabina
Who We Are Kayaking Skills Kayaking Safety Say Hello Join MASK Where We Go The Drift Web Kayaking LinksPaddle
Home
Comments & QuestionsE-Mail Webmaster
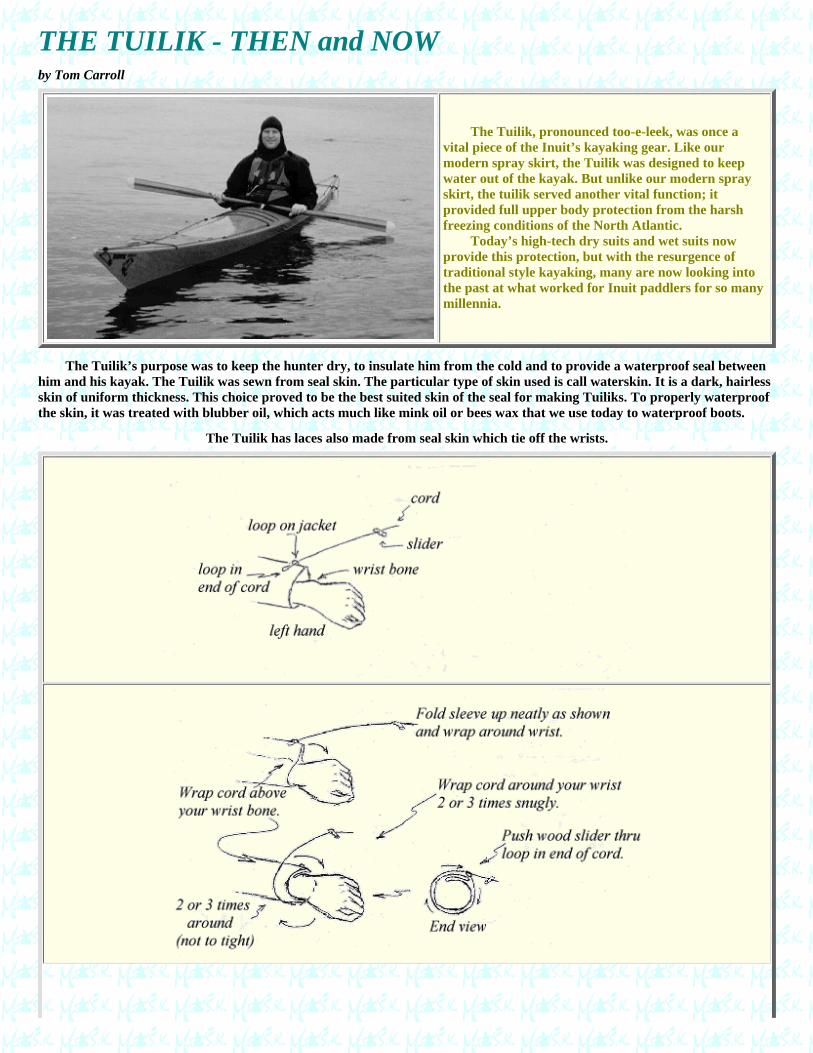
THE TUILIK - THEN and NOWby Tom Carroll
The Tuilik, pronounced too-e-leek, was once avital piece of the Inuit’s kayaking gear. Like ourmodern spray skirt, the Tuilik was designed to keepwater out of the kayak. But unlike our modern sprayskirt, the tuilik served another vital function; itprovided full upper body protection from the harshfreezing conditions of the North Atlantic. Today’s high-tech dry suits and wet suits nowprovide this protection, but with the resurgence oftraditional style kayaking, many are now looking intothe past at what worked for Inuit paddlers for so manymillennia.
The Tuilik’s purpose was to keep the hunter dry, to insulate him from the cold and to provide a waterproof seal betweenhim and his kayak. The Tuilik was sewn from seal skin. The particular type of skin used is call waterskin. It is a dark, hairlessskin of uniform thickness. This choice proved to be the best suited skin of the seal for making Tuiliks. To properly waterproofthe skin, it was treated with blubber oil, which acts much like mink oil or bees wax that we use today to waterproof boots.
The Tuilik has laces also made from seal skin which tie off the wrists.

The hood was designed so a snug fit around the face may be achieved by tying the cord at the back of the head. When properlytied, water infiltration into the Tuilik is kept to a minimum.
The cockpit coamings of most Inuit kayaks have round or elliptical shapes and, more often than not, are not much largerthan the kayak owner’s waist. From the reading I have done, the bottom hem of the Tuilik had to be stretched and worked toget it over the edge of the coaming. Once in place, it was tied tightly on with lace.

In the video, "Greenlanders at Kodiak", which features John Peterson, it takes him a minute and a half to stretch hisTuilik over his coaming. The importance of this fit cannot be overemphasized. During a capsize a failure of that preciousconnection between paddler and kayak meant certain death. With water temperatures at or below freezing, the Inuit hunterhad to stay in his kayak at all costs. It is interesting to note that the Inuit kayaker could not swim. The word, swim, was noteven in the Inuit language. The Tuilik was only effective when properly worn and sealed onto the coaming.
The Tuilik is windproof and waterproof, but has no more insulating properties than a well made waterproofwindbreaker. A wet exit meant water flooding into the once dry clothing underneath the Tuilik. Therefore, I must point outthat it is imperative that the kayaker wear thermal protection under the Tuilik when venturing out onto cold water. No onehas a 100% bombproof roll. I prefer wearing a wet suit and neoprene hood under my Tuilik. When the conditions warrant, Iwill even wear my drysuit under the Tuilik. Some will say this is redundant, however, I find it keeps the traditional look andprovides ultra violet protection for the latex gasket seal of my dry suit.
I have seen some homemade Tuiliks out on the water but the majority out there were made by Superior Kayaks ofWhitelaw, Wisconsin. The owners, Mark and Celeste Rogers, have been making them for years now. Originally sewn fromcanvas and then treated with a blend of linseed oil and bees wax, the canvas Tuilik had a very realistic feeling. Seal skin ishard to the touch when dry and sometimes must be soaked in sea water and worked in the hands to make it pliable again. Thecanvas retains this feeling. Although I like the canvas, when I heard Superior Kayaks came out with a Tuilik in gortex, I wason the phone instantly to order one for myself. Mark discussed the options with me: choice of color - black, navy, white andmore; canvas or gortex; rope or shock cord for the cockpit coaming; neck zipper; chest pocket; and most importantly,dimensions. I felt as though I was being fitted for a suit. If you are an avid roller, when considering dimensions, be sure tospecify having the Tuilik cut long enough so you can easily lay back, forward, and in all other directions with total freedom ofmovement. Another bonus of a long cut is that it allows you, in a capsize, to come halfway out of the cockpit. This will enableyou to reach the surface to breathe and await rescue without breaking the cockpit’s seal. This feature has saved many an Inuitpaddler’s life. Make sure you also allow for enough room inside the Tuilik and hood for adequate layers of thermal protection.
Don’t worry - Mark and Celeste will ask all the right questions. According to Mark, the Tuilik, which works best on smallcockpits, can fit up through 24" long cockpits. Some Inuit Tuiliks I have seen have what resembles a pair of suspenders tokeep the lap portion of the Tuilik pulled up to prevent puddling. I have not had this problem on my 22" cockpit, however, onlarger cockpits it may be a useful feature.
My gortex Tuilik performs beautifully and is very comfortable. The seams are flawless and waterproof. I have worn it forrolling in the summer with no insulation, as well as in the winter with insulation. In camp it becomes an anorak. Mated with alarge heavy duty garbage bag from my survival kit, it becomes an emergency shelter. And lastly, it doubles as an emergencyspray skirt.
The Tuilik allows a sense of freedom because it is worn loose - you feel as one with the kayak and kayaking roots. To seehow the Tuilik is put on, please look at the diagrams that are included here, courtesy of Mark Rogers.

In The Fog
by Captain Denis J. Blaise,
Instructor, Sea School Northeast
This article by Capt. Blaise originally appeared in Offshore Magazine .
Fog is so common along the Northeast coast that we all learn to handle it or else we are forced to spendmany days in harbor. This exercise covers all the Inland and International waters of the Atlanticseaboard.
There are several books on weather for the mariner with long treatises on the nature of fog. We areindebted to Bowditch’s American Practical Navigator, Vol II, for some of the explanations which wesimplified and paraphrased from its Glossary.
1. When is fog "fog" or can you differentiate between haze, mist and fog?
a) A dry haze gives the atmosphere a bluish or yellowish appearance. It is made of veryfine dust or salt particles which somewhat reduce visibility. A damp haze is made of tinywater droplets creating a veil thinner than fog.
b) Mist is also made up of very small water droplets which create a gray veil over thelandscape or the sea. Relative humidity for mist is often less than 95% and it is anintermediary step between haze and fog.
c) Fog is a visible accumulation of the tiny droplets created by condensation whichreduces visibility to less than 1/2 nautical mile (1km).
2. What is the name of the most common type of fog along the New England coast in summer?
Advection fog
3. How does this fog come about?
It is created by warm water moist air moving over cold water. As the air cools it can nolonger hold as much moisture, and condensation creates the tiny water droplets we callfog.
4. Where does all that warm moist air come from in the summertime?
The summer prevailing wind is SW in New England. That wind picks up its moistureover the Gulf Stream and brings it over the cold coastal waters.
5. Why are the New England coastal waters so cold?
The Labrador current brings cold Arctic water around Newfoundland and Nova Scotia,southwest along Cape Cod, Long Island and all the way to Cape Hatteras.
6. What kind of weather system clears the fog off the New England coast?
A good high pressure with strong westerly or northwesterly winds will give you a niceclear blue sky.

7. In the fall, what may happen when cold NW wind blows over the coastal waters which havebeen warmed up by the summer sun?
You have fog again! The ocean looks like a hot cup of coffee with steam fog or sea smokerising from its surface.
8. How would you define smog?
Pollution. Visible pollution in the air, with or without fog.
9. What sound producing devices must you have on board?
If your boat is over 40 feet you must have a whistle and a bell. Under 40 feet, boats arenot required to have a whistle and bell but they need to be able to make an efficientsound which sounds like a whistle or a bell. Many states, however, have their ownrequirement list and, while you may be able to convince a Coastie that the sound fromyour Key West conch and from beating a pan with a spoon meet the Rules requirements,your local Watery Bear may not be so inclined! Be safe: carry a whistle and a bellregardless of the size of your boat.
10. What’s a fog horn?
A fog horn is found on aids to navigation, like buoys and lighthouses.
11. How long is a short blast on a whistle? and how long is a prolonged blast?
A short blast is a one second; a prolonged blast is four to six seconds.
12. What is the fog signal for a powerboat underway, making way (moving forward through thewater, with or without propulsion)?
One prolonged blast every two minutes.
13. What is the fog signal of a powerboat underway, not making way (drifting, but not disabled)?
Two prolonged blasts every two minutes.
14. You hear another boat getting close to you. Can you blow your fog signals more often thanevery two minutes?
You bet you can... two minutes of silence is a long time when you can’t see who’s about torun you down.
15. Now you hear one prolonged and two short blasts on a whistle. What is it?
The only thing you know for sure is that you need to be very careful. It is a vessel withsome sort of handicap like a broken engine, or unable to maneuver because of her work -like a dredge, or fishing nets, or trawling (NOT trolling however), or sailing, or trolling.
16. When you anchor in the fog what signal must you sound?
An anchored boat must sound a rapid ringing of the bell for five seconds every minute.
17. What is the proper fog signal if you are aground?

If aground, you sound three distinct raps on the bell before and after the ringing of thebell, three strokes means "I AM AGROUND".
18. Do you hear all these fog signals on the ocean, in the bay, the river, the harbor? Do you feelself-conscious about blowing your whistle in restricted visibility or ringing your bell when youanchor or run aground in the fog?
NO and YES you say. Well, you’re not alone, but your self-consciousness is misplaced...naahh! that’s a feel-good euphemism... let me say it plainly: YOU ARE WRONG. Areyou self-conscious when you put your blinker on to tell other cars you are making aturn? Of course not, it’s required and it’s smart. Proper signals on the water are thesame way: it’s the law and it’s safer.
If someone runs into you and you weren't’t sounding the proper fogsigs ( ormaneuvering signals, of course), an admiralty lawyer will make minced meat out of you.In court, they’l call your 16- footer a vessel and they’l refer to you as the Master of thevessel... and they’l treat you as what you think of as "one of the big boys" a tug or tankercaptain. And if you ignored the Rules of the Road, or claim you did not know them,you've got problems. So avoid expensive headaches: ALWAYS SOUND THE PROPERSIGNALS REGARDLESS OF THE SIZE OF YOUR BOAT. (OK, Enough. Down frommy soapbox)
19. Fog is a common cause of restricted visibility. What else are you supposed to do in restrictedvisibility?
Yes, you must turn your running lights on.
20. Do you ever sound fog signals in an area of unrestricted visibility?
Indeed you do. If you are near an area of restricted visibility, such as a fog bank, theRules require the proper fogsigs to be sounded.
21. How fast may you travel in the fog?
The Rules state that you proceed at a SAFE SPEED. So it is your judgment, but if youever hit anybody, that was not a safe speed and those admiralty lawyers...
22. May you turn your engine off to listen for fog signals and buoys like gongs, bells and horns?
No you may not. Your engines must be ready for immediate maneuvering. Send someoneto the bow to listen and act as your lookout (another requirement)
23. When you hear the fog signals of another vessel on your port or starboard quarter, whatshould you do?
You should hold course and speed, because that vessel is behind you.
24. What should you do upon hearing the fog signal of another vessel somewhere ahead of thebeam of your boat?
You must slow down to bare steerage way: that is the speed at which you keep the boaton course; or you must take all way off if necessary, and you must navigate with extremecaution until the danger has passed.

25. You feel that you are going to be run down by a vessel you cannot see but whose fogsigs youhear. May you sound Danger/Doubt?
No, you may not sound Danger/Doubt in the fog - or restricted visibility.
26. What is the Danger/Doubt signal?
The Danger/Doubt signal consists of five or more short blasts on the whistle.
27. You finally see the boat coming towards you and about to run you down. Now may you soundDanger/Doubt?
Yes, when in sight (with your eyes, NOT on radar), you may sound Danger/Doubt.
Who We Are Kayaking Skills Kayaking Safety Say Hello Join MASK Where We Go The Drift Web Kayaking LinksPaddle
Home
Comments & QuestionsE-Mail Webmaster

Deceptive but 'Orrible Off-shore Windsby Paul Caffyn
Introduction
Wind is the curse of sea kayakers. It generates the bulk of problems that arise, choppy seas, capsizes, wind chill,weather tide effects, surf and so on.
There is however an exception; a following breeze, or one quartering from astern, can be a real boon in aidingprogress through surfing rides.
A breeze on the beam requires continuous corrections for drift and more concentration on balancing the boat.A breeze on the nose, or quartering from the bow, generates soul- destroying, tiring, very wet, slogs.
The most deceptive and horrible wind blows offshore. Deceptive in that conditions may appear flat calmagainst shore with a light breeze wafting offshore, but with increasing distance offshore wind strength increases dramatically.Cliffed coastlines or those with marked topographic relief such as dune ridges, or swathes of forest, are particularly deceptive.Lurking sea kayaker traps are wherever those continuous cliffs or dune ridges are broken by gorges, fjords, steep sided valleysand narrow entrance bays.
Recently I received a swag of E mail messages from Sandy Ferguson relating to a party of New South Wales sea kayakers whowere subjected to the deceptive but 'orrible offshore winds at Jervis Bay, south of Sydney. I can sympathize with the N.S.W.paddlers' predicament, for yours truly was caught during the Australian trip a long way offshore immediately south of JervisBay by a sudden, dramatic wind shift, that left me with such a struggle against an offshore wind that I felt like throwing in thetowel and abandoning the trip. Limping into the lee of St. Georges Head I coined the phrase, 'Wind was definitely thecurse of the canoeing class.'
Wind Strength
Above an altitude of 500 to 600m, wind has an unobstructed flow over the sea while below that height,there is increasing frictional or drag effect between the air and the surface over which the wind is blowing, resulting in adiminishing of wind speed as the ground or sea is approached.
The amount of wind strength reduction depends on the nature of the surface; over forested hilly terrainthe air flow will be less than that over sea because of greater frictional drag.
Approximate values have been determined for fractional drag: over open sea a wind 500m above the seareduces by about 33% at sea level, while over land the reduction is 66%. Thus a 30 knot wind at 500m will produce a 20 knotwind over the sea and 10 knots over land.
There is where the 'deceptive' description for offshore wind applies, for a factor of 50% can be applied towind when it blows from land out to sea. A gentle breeze of 6 knots inland becomes a moderate wind of 12 knots offshore and a15 knot wind inland becomes a near gale of 30 knots at sea.
The height and nature of a coastline govern the zone width of calm, sheltered water in offshore wind conditions:
a. a long beach with a low sand dune ridge providing minimum relief, dictates aminimum width with the offshore wind felt at the water's edge.
b. a continuous line of vertical cliffs will provide a maximum width of calm, shelteredwater, naturally depending on the height of the cliffs which govern where the offshorewind hits the sea.
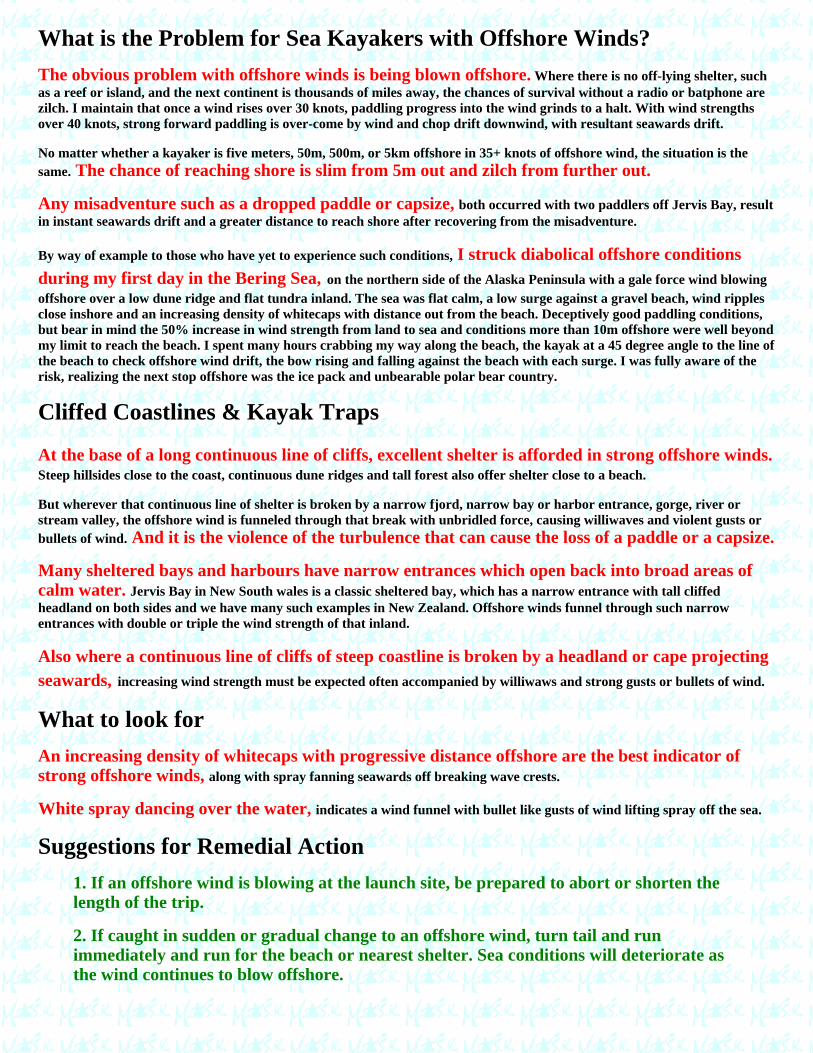
What is the Problem for Sea Kayakers with Offshore Winds?
The obvious problem with offshore winds is being blown offshore. Where there is no off-lying shelter, suchas a reef or island, and the next continent is thousands of miles away, the chances of survival without a radio or batphone arezilch. I maintain that once a wind rises over 30 knots, paddling progress into the wind grinds to a halt. With wind strengthsover 40 knots, strong forward paddling is over-come by wind and chop drift downwind, with resultant seawards drift.
No matter whether a kayaker is five meters, 50m, 500m, or 5km offshore in 35+ knots of offshore wind, the situation is thesame. The chance of reaching shore is slim from 5m out and zilch from further out.
Any misadventure such as a dropped paddle or capsize, both occurred with two paddlers off Jervis Bay, resultin instant seawards drift and a greater distance to reach shore after recovering from the misadventure.
By way of example to those who have yet to experience such conditions, I struck diabolical offshore conditionsduring my first day in the Bering Sea, on the northern side of the Alaska Peninsula with a gale force wind blowingoffshore over a low dune ridge and flat tundra inland. The sea was flat calm, a low surge against a gravel beach, wind ripplesclose inshore and an increasing density of whitecaps with distance out from the beach. Deceptively good paddling conditions,but bear in mind the 50% increase in wind strength from land to sea and conditions more than 10m offshore were well beyondmy limit to reach the beach. I spent many hours crabbing my way along the beach, the kayak at a 45 degree angle to the line ofthe beach to check offshore wind drift, the bow rising and falling against the beach with each surge. I was fully aware of therisk, realizing the next stop offshore was the ice pack and unbearable polar bear country.
Cliffed Coastlines & Kayak Traps
At the base of a long continuous line of cliffs, excellent shelter is afforded in strong offshore winds.Steep hillsides close to the coast, continuous dune ridges and tall forest also offer shelter close to a beach.
But wherever that continuous line of shelter is broken by a narrow fjord, narrow bay or harbor entrance, gorge, river orstream valley, the offshore wind is funneled through that break with unbridled force, causing williwaves and violent gusts orbullets of wind. And it is the violence of the turbulence that can cause the loss of a paddle or a capsize.
Many sheltered bays and harbours have narrow entrances which open back into broad areas ofcalm water. Jervis Bay in New South wales is a classic sheltered bay, which has a narrow entrance with tall cliffedheadland on both sides and we have many such examples in New Zealand. Offshore winds funnel through such narrowentrances with double or triple the wind strength of that inland.
Also where a continuous line of cliffs of steep coastline is broken by a headland or cape projectingseawards, increasing wind strength must be expected often accompanied by williwaws and strong gusts or bullets of wind.
What to look for
An increasing density of whitecaps with progressive distance offshore are the best indicator ofstrong offshore winds, along with spray fanning seawards off breaking wave crests.
White spray dancing over the water, indicates a wind funnel with bullet like gusts of wind lifting spray off the sea.
Suggestions for Remedial Action
1. If an offshore wind is blowing at the launch site, be prepared to abort or shorten thelength of the trip.
2. If caught in sudden or gradual change to an offshore wind, turn tail and runimmediately and run for the beach or nearest shelter. Sea conditions will deteriorate asthe wind continues to blow offshore.

3. When faced by a wind violently funneling out of a harbour or fjord etc., either returnto the launch site or attempt to land and wait until the wind strength abates.
Patience is the order of the day. If there is any doubt, it is better to wait.
4. When caught on an exposed coast by a change to offshore wind conditions, hug thecoast intimately, even if it adds considerably to the distance paddled for example bypaddling around the curve of a bay.
5. Do not make straight line crossings of the narrow entrances to bays, fjords orharbours. Paddle upwind into the feature far enough before kicking out on the crossing.This is to combat ensuing wind and chop drift during the crossing and ensure reachingthe far side safely.
Weather Forecasts
Marine forecasts relate to powered vessels and not paddler powered kayaks. Offshore winds commonlyknock down the sea state, diminishing swell size and generating reasonable fishing conditions for powered vessels.
Listen to the marine forecast and if the stated wind direction is offshore in your area, be extrawary before commencing a paddle.
We know forecasts are not always accurate, hence a final decision to paddle or not must be made at the launchsite.
Points to Remember
1. Offshore wind conditions are deceptive, with calm water and light breezes against thebeach. Always look for whitecaps offshore.
2. Wind strength increases 50% when passing from land to open sea.
3. Narrow topographic features funnel offshore winds, with dramatic turbulence.
Who We Are Kayaking Skills Kayaking Safety Say Hello Join MASK Where We Go The Drift Web Kayaking LinksPaddle
Home
Comments & QuestionsE-Mail Webmaster

PLANNING FOR A STRAIT CROSSINGnotes by Paul Caffyn
Firstly congratulations to Dave for a well planned and executed double crossing.
Strait crossings are much more committing than coastal cruising for three main reasons:
1. straits are generally subject to strong tidal stream flow and some are subject to bothstrong current and tidal stream flow.
2. crossings take the paddler a long way out from the security of shore
3. straits between high land masses, are subject to strong winds where the air stream isfunneled between the two land masses.
The two essential elements of a successful strait crossing are:
firstly Planning and secondly Execution.
The notes below apply not only to straits but also to channels subject to tidal stream flow.
PlanningThe three important sources of information regarding straits are:
The relevant volume of the 'Pilot'The relevant marine chartA set of tide tables or Nautical Almanac.
In the case of Cook Strait, which is a good example to discuss as it is subject to strong tidal stream andcurrent flow, plus funneling of the wind between the North and South islands, page 86 of the 'NewZealand Pilot' (1971 edition) has a lengthy section on the strait with information on the tidal streams andcurrent. It describes the worst areas for tidal violence, for example: 'As the tidal streams in the strait arerapid, especially off Cape Terawhiti where they attain a rate of 5 knots and upwards at springs, when thewind opposes the tidal streams a turbulent sea is raised, which with very heavy gales may be dangerouseven to large vessels...... High water on the western side of Cook Strait occurs about 5 hours later thanon the eastern side, so that when it is high water on one side it is nearly low water on the other.'
Further reading of the descriptions of the eastern and western sides of the strait allow a full picture to bebuilt up of the tidal stream activity. The important slack water tidal stream times are detailed referenceWellington, and it is important to note that more often than not, they do not correspond to high or lowwater tide times on shore.
Since tidal stream strength is strongest during spring tides and weakest during neap tides, it is importantto consult the Nautical Almanac or set of tide tables to pick a period of neap tides (minimal tidal range).
The marine chart often has more detailed information than is contained in the 'Pilot'. A diamond symbol,with a alphabet letter, in the strait will be referenced in a tidal stream table on the edge of the chart.Tidal stream direction (in degrees) and strength (in knots) are given at hourly intervals plus the slackwater times reference a main port or secondary port.

Start and finish points for a crossing need to be researched. Where a strait is long with relatively straightcoastlines, for instance Foveaux Strait or Shelikof Strait between Kodiak Island and the AlaskaPeninsula, the choice is the strongest 'land to land' straight line crossing. Where a strait has capes orreefed headlands jutting out seawards into the narrowest part, it is best to look for a longer crossing asthese headlands/capes invariably have violent tidal stream activity in the way of overfalls, races and rips.On a calm day, the paddler may be able to fight through such areas, however with any weather tideeffect, wind blowing against tidal stream, these areas need treating with great caution and respect.
Two Approaches to a crossingThere are two different means of executing a crossing.
The big ferry glideThe tidal stream strength is calculated and an angle of drift is allowed during the course steered for thecrossing. Dave Herrington worked out a course correction of 20 degrees for tidal stream drift during hisnorth to south crossing. This enables the paddler to leave shore at slack water and cross while the tidalstream is flowing in one direction.
Caffyn's cunning slack water mid-strait method.Ever since my first strait crossing, Cook Strait in 1979, I have used this method with great success. Itinvolves calculating the time it will take me to make the crossing, saythree hours for a 12 mile crossing.I subtract 1.5 hours from a daytime tidal stream slack water time, and set this as my start time. Thus Ishould be mid-strait when the tidal streams turn. Having calculated the course to be steered, I steer thatcourse for the three hours, with no allowance for drift until I have virtually completed the crossing.Maintaining the same course means a dog-leg course is paddled. For instance in Cook Strait, I start withthe last 1.5 hours of the north- going tidal stream which by mid-strait drifts me well north of mycompass line on the chart. Drift is then minimal for the short period of slack water, after which thesouth-going tidal stream drifts me back south so that I should arrive at my aiming point. This advantageof this technique are:
a. Only one compass course is necessary with no need for drift allowance; very handy ifvisibility deteriorates with fog or mist
b. The paddler misses the full mid-tidal stream strength both mid-strait and on bothsides of the strait.
c. If wind lifts during the crossing, then the weather tide effect is minimized.
Optimizing Favorable ConditionsTo ensure success, it is important to optimize both favorable weather and tidal conditions.
As noted above, the optimum tidal stream conditions are during neap tides, when tidalstream activity is at its weakest.
Favorable weather conditions are not as easy to predict and will not always coincide withneap tides.

It is necessary to observe the weather maps and wait until there is a very weak pressuregradient across the Cook Strait area.
Cold front situations should be avoided like the plague for Cook Strait, as the NWlywinds preceding the front funnel through the straight while a abrupt change to southerlywinds accompanies the passage of the front across the strait. In 1979, even though I wassuperbly fit after the 1700 mile North Island trip, I waited seven days for favorableconditions to cross Cook Strait.
Who We Are Kayaking Skills Kayaking Safety Say Hello Join MASK Where We Go The Drift Web Kayaking Links
Paddle
Home
Comments & QuestionsE-Mail Webmaster