the internet and its uses - college of dupage · switch s2 tags the unicast traffic as originating...
TRANSCRIPT

© 2006 Cisco Systems, Inc. All rights reserved. Cisco PublicITE I Chapter 6 1
Implement Inter-VLAN Routing
LAN Switching and Wireless – Chapter 6
Modified by Tony Chen
11/01/2008

© 2006 Cisco Systems, Inc. All rights reserved. Cisco PublicITE 1 Chapter 6 2
Notes:
If you see any mistake on my PowerPoint slides or if you have any questions about the materials, please feel free to email me at [email protected].
Thanks!
Tony Chen
College of DuPage
Cisco Networking Academy
© 2006 Cisco Systems, Inc. All rights reserved. Cisco PublicITE 1 Chapter 6 3
Objectives
Explain to the satisfaction of a qualified instructor
how network traffic is routed between VLANs in a
converged network.
Configure inter-VLAN routing on a router to enable
communications between end-user devices on
separate VLANs
Troubleshoot common inter-VLAN connectivity
issues.
© 2006 Cisco Systems, Inc. All rights reserved. Cisco PublicITE 1 Chapter 6 4
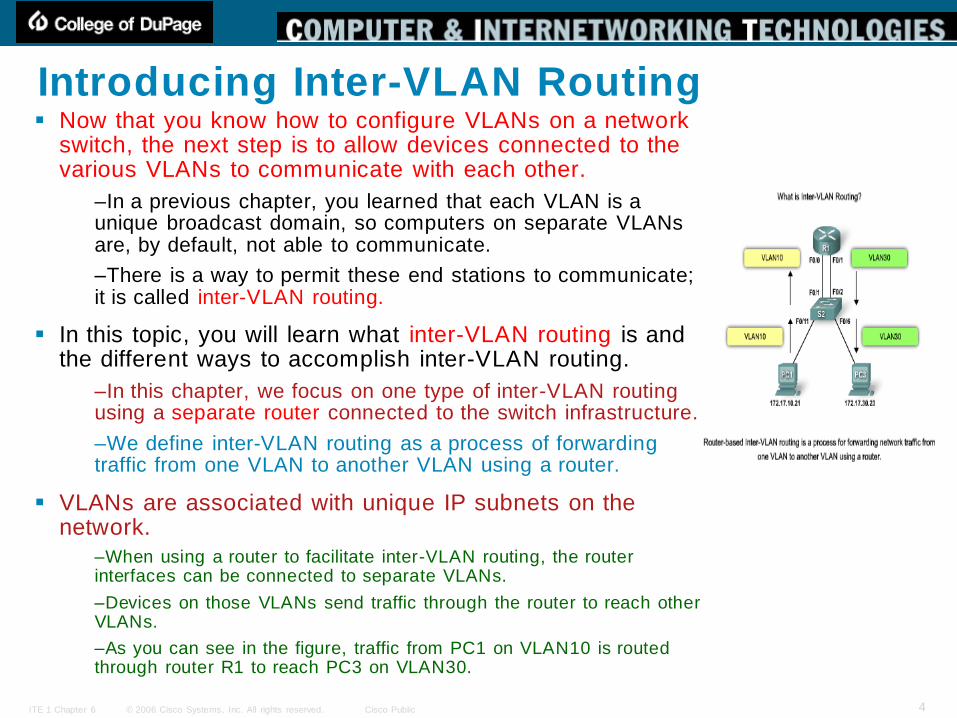
Introducing Inter-VLAN Routing Now that you know how to configure VLANs on a network
switch, the next step is to allow devices connected to the various VLANs to communicate with each other.
–In a previous chapter, you learned that each VLAN is a unique broadcast domain, so computers on separate VLANs are, by default, not able to communicate.
–There is a way to permit these end stations to communicate; it is called inter-VLAN routing.
In this topic, you will learn what inter-VLAN routing is and the different ways to accomplish inter-VLAN routing.
–In this chapter, we focus on one type of inter-VLAN routing using a separate router connected to the switch infrastructure.
–We define inter-VLAN routing as a process of forwarding traffic from one VLAN to another VLAN using a router.
VLANs are associated with unique IP subnets on the network.
–When using a router to facilitate inter-VLAN routing, the router interfaces can be connected to separate VLANs.
–Devices on those VLANs send traffic through the router to reach other VLANs.
–As you can see in the figure, traffic from PC1 on VLAN10 is routed through router R1 to reach PC3 on VLAN30.

© 2006 Cisco Systems, Inc. All rights reserved. Cisco PublicITE 1 Chapter 6 5
Introducing Inter-VLAN Routing In this example, the router was configured with 2 separate
interfaces to interact with the different VLANs and routing.
–Routing is performed by connecting different physical router
interfaces to different physical switch ports.
–The switch ports connect to the router in access mode
–Each switch interface assigned to a different static VLAN.
In this example.
–1. PC1 on VLAN10 is communicating with PC3 on VLAN30
through R1.
–2. PC1 and PC3 are on different VLANs and have IP addresses
on different subnets.
–3. R1 has a separate interface configured for each of the
VLANs.
–4. PC1 sends unicast traffic destined for PC3 to S2 on
VLAN10, where it is then forwarded out the trunk interface to S1.
–5. Switch S1 then forwards the unicast traffic to R1 on interface
F0/0.
–6. The router routes the unicast traffic through to its interface
F0/1, which is connected to VLAN30.
–7. The router forwards the unicast traffic to S1 on VLAN 30.
–8. S1 then forwards the unicast traffic to S2 through the trunk
link, after which S2 can then forward the unicast traffic to PC3 on
VLAN30.

© 2006 Cisco Systems, Inc. All rights reserved. Cisco PublicITE 1 Chapter 6 6
Introducing Inter-VLAN Routing "Router-on-a-stick"
–However, not all inter-VLAN routing configurations require multiple physical interfaces.
–"Router-on-a-stick" is a type of router configuration in which a single physical interface routes traffic between multiple VLANs on a network.
The router interface is configured to operate as a trunk link and is connected to a switch port configured in trunk mode.
–The router performs the inter-VLAN routing by accepting VLAN tagged traffic on the trunk interface coming from the adjacent switch and internally routing between the VLANs using subinterfaces.
–The router then forwards the routed traffic-VLAN tagged for the destination VLAN-out the same physical interface.
Subinterfaces are multiple virtual interfaces, associated with one physical interface.
–Subinterfaces are configured for different subnets corresponding to their VLAN assignment to facilitate logical routing before the data frames are VLAN tagged and sent back out the physical interface.

© 2006 Cisco Systems, Inc. All rights reserved. Cisco PublicITE 1 Chapter 6 7
router-on-a-stick The figure shows how a router-on-a-stick
performs its routing function.
–1. PC1 on VLAN10 is communicating with PC3 on VLAN30 through router R1 using a single, physical router interface.
–2. PC1 sends its unicast traffic to switch S2.
–3. Switch S2 then tags the unicast traffic as originating on VLAN10 and forwards the unicast traffic out its trunk link to switch S1.
–4. Switch S1 forwards the tagged traffic out the other trunk interface on port F0/5 to the interface on router R1.
–5. Router R1 accepts the tagged unicast traffic on VLAN10 and routes it to VLAN30 using its configured subinterfaces.
–6. The unicast traffic is tagged with VLAN30 as it is sent out the router interface to switch S1.
–7. Switch S1 forwards the tagged unicast traffic out the other trunk link to switch S2.
–8. Switch S2 removes the VLAN tag of the unicast frame and forwards the frame out to PC3 on port F0/6.

© 2006 Cisco Systems, Inc. All rights reserved. Cisco PublicITE 1 Chapter 6 8
Inter-VLAN Routing – Layer 3 switch Some switches can perform Layer 3 functions,
replacing the need for dedicated routers to perform basic routing on a network.
–1. PC1 on VLAN10 is communicating with PC3 on VLAN30 through switch S1 using VLAN interfaces
configured for each VLAN.
–2. PC1 sends its unicast traffic to switch S2.
–3. Switch S2 tags the unicast traffic as originating on VLAN10 as it forwards the unicast traffic out its trunk link
to switch S1.
–4. Switch S1 removes the VLAN tag and forwards the
unicast traffic to the VLAN10 interface.
–5. Switch S1 routes the unicast traffic to its VLAN30 interface.
–6. Switch S1 then retags the unicast traffic with
VLAN30 and forwards it out the trunk link back to switch
S2.
–7. Switch S2 removes the VLAN tag of the unicast frame and forwards the frame out to PC3 on port F0/6.
Configuring inter-VLAN routing on a multilayer switch
(CCNP)

© 2006 Cisco Systems, Inc. All rights reserved. Cisco PublicITE 1 Chapter 6 9
Using the Router as a Gateway The traditional model: Using the Router as a Gateway
–Traditional routing requires routers to have multiple physical
interfaces to facilitate inter-VLAN routing.
–Each interface is also configured with an IP address for the
subnet associated with the particular VLAN that it is connected to.
–In this configuration, network devices can use the router as a
gateway to access the devices connected to the other VLANs.
The routing process requires the source device to determine
if the destination device is local or remote to the local subnet.
–The source device accomplishes this by comparing the source
and destination addresses against the subnet mask.
–Once the destination address has been determined to be on a
remote network, the source device has to identify where it needs
to forward the packet to reach the destination device.
–The source device examines the local routing table to determine
where it needs to send the data.
–Typically, devices use their default gateway as the destination
for all traffic that needs to leave the local subnet.
–The default gateway is the route that the device uses when it
has no other explicitly defined route to the destination network.
The router interface on the local subnet acts as the default
gateway for the sending device.

© 2006 Cisco Systems, Inc. All rights reserved. Cisco PublicITE 1 Chapter 6 10
Using the Router as a Gateway Once the source device has determined that the packet must travel through the local
router interface on the connected VLAN,
1 2
3 4

© 2006 Cisco Systems, Inc. All rights reserved. Cisco PublicITE 1 Chapter 6 11
Using the Router as a Gateway
56
7 8
© 2006 Cisco Systems, Inc. All rights reserved. Cisco PublicITE 1 Chapter 6 12
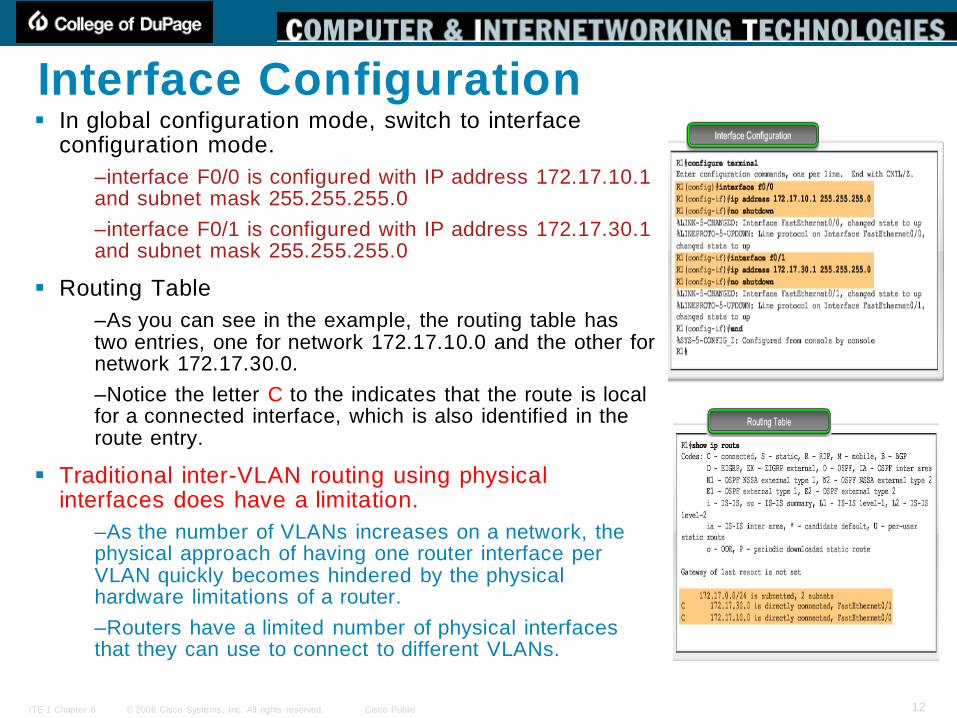
Interface Configuration In global configuration mode, switch to interface
configuration mode.
–interface F0/0 is configured with IP address 172.17.10.1 and subnet mask 255.255.255.0
–interface F0/1 is configured with IP address 172.17.30.1 and subnet mask 255.255.255.0
Routing Table
–As you can see in the example, the routing table has two entries, one for network 172.17.10.0 and the other for network 172.17.30.0.
–Notice the letter C to the indicates that the route is local for a connected interface, which is also identified in the route entry.
Traditional inter-VLAN routing using physical interfaces does have a limitation.
–As the number of VLANs increases on a network, the physical approach of having one router interface per VLAN quickly becomes hindered by the physical hardware limitations of a router.
–Routers have a limited number of physical interfaces that they can use to connect to different VLANs.

© 2006 Cisco Systems, Inc. All rights reserved. Cisco PublicITE 1 Chapter 6 13
Interface Configuration: subinterface To overcome the hardware limitations of inter-VLAN
routing based on router physical interfaces, virtual subinterfaces and trunk links are used, as in the
router-on-a-stick example described earlier.
–Subinterfaces are software-based virtual interfaces that
are assigned to physical interfaces.
–Each subinterface is configured with its own IP
address, subnet mask, and unique VLAN assignment, allowing a single physical interface to simultaneously be
part of multiple logical networks.
–This is useful when performing inter-VLAN routing on
networks with multiple VLANs and few router physical interfaces.
Functionally, the router-on-a-stick model for inter-
VLAN routing is the same as using the traditional
routing model, but instead of using the physical
interfaces to perform the routing, subinterfaces of a
single interface are used.

© 2006 Cisco Systems, Inc. All rights reserved. Cisco PublicITE 1 Chapter 6 14
Interface Configuration: subinterface
1 2
3
4
In the figure, PC1 wants to communicate with PC3. PC1 is on VLAN10, and PC3 is on VLAN30. For
PC1 to communicate with PC3, PC1 needs to have its data routed through router R1 using configured
subinterfaces.

© 2006 Cisco Systems, Inc. All rights reserved. Cisco PublicITE 1 Chapter 6 15
Interface Configuration: subinterface5 6
78
© 2006 Cisco Systems, Inc. All rights reserved. Cisco PublicITE 1 Chapter 6 16
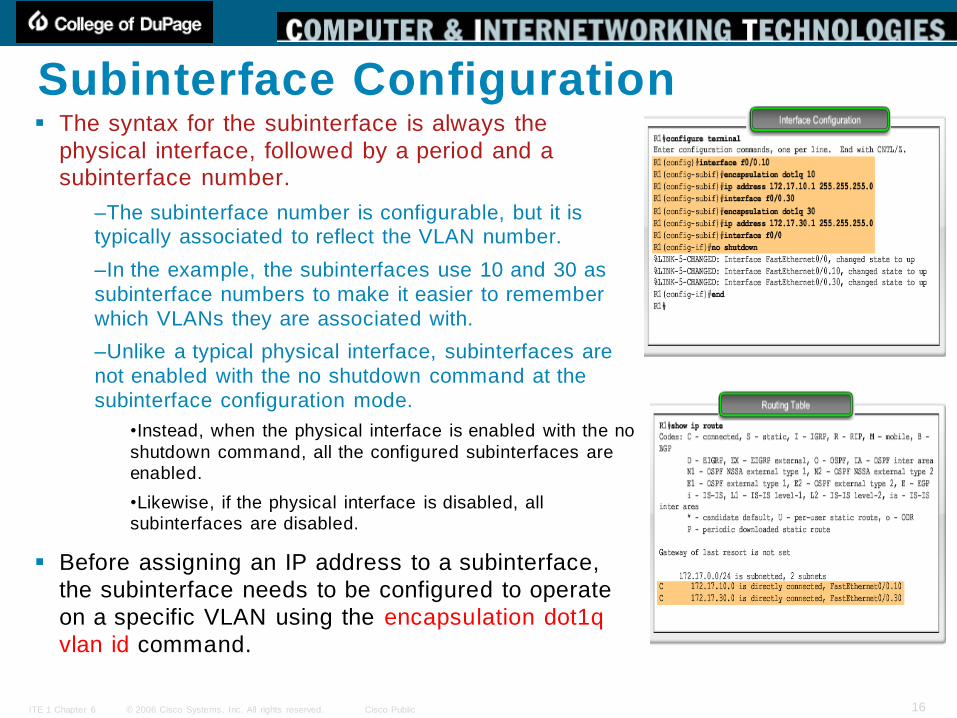
Subinterface Configuration The syntax for the subinterface is always the
physical interface, followed by a period and a subinterface number.
–The subinterface number is configurable, but it is typically associated to reflect the VLAN number.
–In the example, the subinterfaces use 10 and 30 as
subinterface numbers to make it easier to remember
which VLANs they are associated with.
–Unlike a typical physical interface, subinterfaces are
not enabled with the no shutdown command at the
subinterface configuration mode.
•Instead, when the physical interface is enabled with the no
shutdown command, all the configured subinterfaces are
enabled.
•Likewise, if the physical interface is disabled, all
subinterfaces are disabled.
Before assigning an IP address to a subinterface,
the subinterface needs to be configured to operate
on a specific VLAN using the encapsulation dot1q
vlan id command.

© 2006 Cisco Systems, Inc. All rights reserved. Cisco PublicITE 1 Chapter 6 17
Interface and Subinterface Using either physical interfaces or subinterfaces have advantages
and disadvantage.
Port Limits
–Physical interfaces are configured to have one interface per VLAN.
On networks with many VLANs, using a single router to perform inter-VLAN routing is not possible.
–Subinterfaces allow a router to scale to accommodate more VLANs
than the physical interfaces permit.
Performance
–Because there is no contention for bandwidth on physical interfaces,
physical interfaces have better performance for inter-VLAN routing.
–When subinterfaces are used for inter-VLAN routing, the traffic being routed competes for bandwidth on the single physical interface. On a
busy network, this could cause a bottleneck for communication.
Access Ports and Trunk Ports
–Connecting physical interfaces for inter-VLAN routing requires that the
switch ports be configured as access ports.
–Subinterfaces require the switch port to be configured as a trunk port so that it can accept VLAN tagged traffic on the trunk link.

© 2006 Cisco Systems, Inc. All rights reserved. Cisco PublicITE 1 Chapter 6 18
Interface and Subinterface Using either physical interfaces or subinterfaces have
advantages and disadvantage.
Cost
–Routers that have many physical interfaces cost more than routers with a single interface. Additionally, if you have a router with many physical interfaces, each interface is connected to a separate switch port, consuming extra switch ports on the network.
–Financially, it is more cost-effective to use subinterfaces over separate physical interfaces.
Complexity
–Using subinterfaces for inter-VLAN routing results in a less complex physical configuration than using separate physical interfaces.
–On the other hand, using subinterfaces with a trunk port results in a more complex software configuration, which can be difficult to troubleshoot.
•If one VLAN is having trouble routing to other VLANs, you cannot simply trace the cable to see if the cable is plugged into the correct port.
•You need to check to see if the switch port is configured to be a trunk and verify that the VLAN is not being filtered on any of the trunk links before it reaches the router interface.
•You also need to check that the router subinterface is configured to use the correct VLAN ID and IP address for the subnet associated with that VLAN.
© 2006 Cisco Systems, Inc. All rights reserved. Cisco PublicITE 1 Chapter 6 19
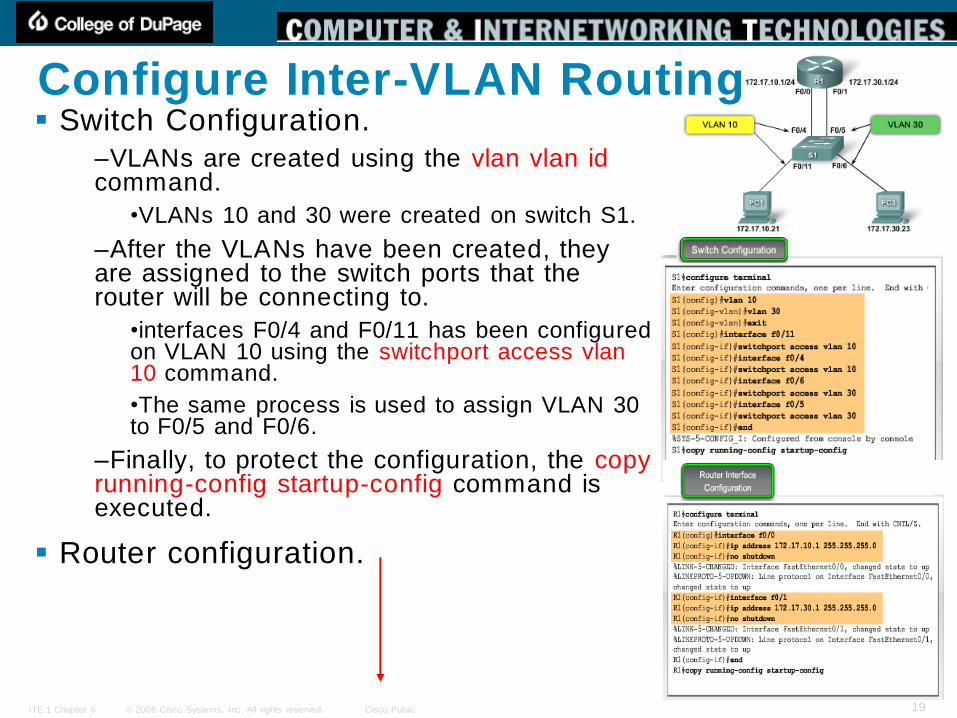
Configure Inter-VLAN Routing Switch Configuration.
–VLANs are created using the vlan vlan idcommand.
•VLANs 10 and 30 were created on switch S1.
–After the VLANs have been created, they are assigned to the switch ports that the router will be connecting to.
•interfaces F0/4 and F0/11 has been configured on VLAN 10 using the switchport access vlan 10 command.
•The same process is used to assign VLAN 30 to F0/5 and F0/6.
–Finally, to protect the configuration, the copy running-config startup-config command is executed.
Router configuration.

© 2006 Cisco Systems, Inc. All rights reserved. Cisco PublicITE 1 Chapter 6 20
Configure Inter-VLAN Routing Router configuration.
–Each interface is configured with an IP address using the ip address ip_address subnet_mask command.
•interface F0/0 has been assigned the 172.17.10.1 using ip address 172.17.10.1 255.255.255.0 command.
–Router interfaces are disabled by default and need to be enabled using the no shutdown command.
–The process is repeated for all router interfaces.
•F0/1, has been configured to use IP address 172.17.30.1, which is on a different subnet than interface F0/0.
By default, Cisco routers are configured to route traffic between the local interfaces. As a result, routing does not specifically need to be enabled.

© 2006 Cisco Systems, Inc. All rights reserved. Cisco PublicITE 1 Chapter 6 21
Inter-VLAN Routing: Routing Table Examine routing table using show ip route.
–There are two routes in the routing table.
•One route is to the 172.17.10.0 subnet, which is attached to the local interface F0/0.
•The other route is to the 172.17.30.0 subnet, which
is attached to the local interface F0/1.
Verify Configuration using show running-config.
–interface F0/0 is configured correctly with the
172.17.10.1 IP address.
–Also, the absence of the shutdown command below
F0/0.
•The absence of the shutdown command confirms that the no
shutdown command has been issued.
You can get more detailed information about the
router interfaces, such as diagnostic information,
status, MAC address, and transmit or receive
errors, using the show interface command in
privileged EXEC mode.

© 2006 Cisco Systems, Inc. All rights reserved. Cisco PublicITE 1 Chapter 6 22
Router on a Stick Inter-VLAN Routing Switch Configuration:
–R1 is connected to S1 on trunk port F0/5.
–VLANs 10 and 30 have also been added to S1.
To review switch configuration,
–VLANs 10 and 30 were created using the vlan 10 and vlan 30 commands.
–To configure switch port F0/5 as a trunk port, execute the
switchport mode trunk command in interface configuration
mode on the F0/5 interface.
•You cannot use the switchport mode dynamic auto or switchport mode dynamic desirable commands
because the router does not support dynamic trunking
protocol.
–Finally, to protect the configuration, copy running-
config startup-config command is executed.
Router Configuration

© 2006 Cisco Systems, Inc. All rights reserved. Cisco PublicITE 1 Chapter 6 23
Router on a Stick Inter-VLAN Routing Router Configuration
–The subinterface Fa0/0.10 is created using the
interface fa0/0.10 global configuration mode
command.
–After the subinterface has been created, the VLAN ID is assigned using the encapsulation dot1q vlan_id
subinterface command.
–Subinterface F0/0.10 is assigned the IP address
172.17.10.1 using the ip address 172.17.10.1 255.255.255.0 command.
–This process is repeated for all the router
subinterfaces that are needed to route between the
VLANs configured on the network.
By default, Cisco routers are configured to route
traffic between the local subinterfaces. As a result,
routing does not specifically need to be enabled.

© 2006 Cisco Systems, Inc. All rights reserved. Cisco PublicITE 1 Chapter 6 24
Router on a Stick: Routing Table Examine routing table using show ip route command.
–There are two routes in the routing table.
•One route is to the 172.17.10.0 subnet, which is attached to
the local subinterface F0/0.10.
•The other route is to the 172.17.30.0 subnet, which is
attached to the local subinterface F0/0.30.
Verify Router Configuration using the show running-
config command in privileged EXEC mode.
–Interface F0/0.10 has been configured correctly with the 172.17.10.1 IP address.
–The absence of the shutdown command below the F0/0
interface.
•The absence of the shutdown command confirms that the no
shutdown command has been issued and the interface is
enabled.
You can get more detailed information about the
router interfaces, such as diagnostic information,
status, MAC address, and transmit or receive errors,
using the show interface command in privileged EXEC
mode.

© 2006 Cisco Systems, Inc. All rights reserved. Cisco PublicITE 1 Chapter 6 25
Verify Router on a Stick Inter-VLAN Routing For the example shown in the figure, you would initiate
a ping and a tracert from PC1 to the PC3.
The Ping Test
–The ping command sends an ICMP echo request to the
destination address. When a host receives an ICMP echo request, it responds with an ICMP echo reply to confirm
that it received the ICMP echo request.
The Tracert Test
–Tracert is a utility for confirming the routed path taken
between two devices. Tracert also uses ICMP to determine the path taken, but it uses ICMP echo requests
with specific time-to-live values defined on the frame.
•The first ICMP echo request is sent with a time-to-live value
set to expire at the first router on route to the destination
device.
•When the ICMP echo request times out on the first route, a
confirmation is sent back from the router to the originating
device.
•The device send out another ICMP echo request, but this time
with a greater time-to-live value.
•The process repeats until finally the ICMP echo request is
sent all the way to the final destination device.

© 2006 Cisco Systems, Inc. All rights reserved. Cisco PublicITE 1 Chapter 6 26
Switch Configuration Issues: Topology 1 When using the traditional routing model for inter-
VLAN routing, ensure that the switch ports that connect to the router interfaces are configured on the
correct VLANs.
–If the switch ports are not configured on the correct
VLAN, devices configured on that VLAN cannot connect
to the router interface, and therefore, are unable to route to the other VLANs.
As you can see in Topology 1, PC1 and router R1
interface F0/0 are configured to be on the same
logical subnet, as indicated by their IP address
assignment.
–However, the switch port F0/4 that connects to router
R1 interface F0/0 has not been configured and remains
in the default VLAN.
–Because router R1 is on a different VLAN than PC1,
they are unable to communicate.
To correct this problem, execute the switchport
access vlan 10 interface configuration command on
switch port F0/4 on switch S1.

© 2006 Cisco Systems, Inc. All rights reserved. Cisco PublicITE 1 Chapter 6 27
Switch Configuration Issues: Topology 2 In Topology 2, the router-on-a-stick routing model has
been chosen. However, the F0/5 interface on switch S1 is not configured as a trunk and subsequently left
in the default VLAN for the port.
–As a result, the router is not able to function correctly
because each of its configured subinterfaces is unable to
send or receive VLAN tagged traffic.
–This prevents all configured VLANs from routing through router R1 to reach the other VLANs.
To correct this problem, execute the switchport mode
trunk interface configuration command on switch port
F0/5 on switch S1.
–This converts the interface to a trunk, allowing the trunk
to successfully establish a connection with router R1.
© 2006 Cisco Systems, Inc. All rights reserved. Cisco PublicITE 1 Chapter 6 28
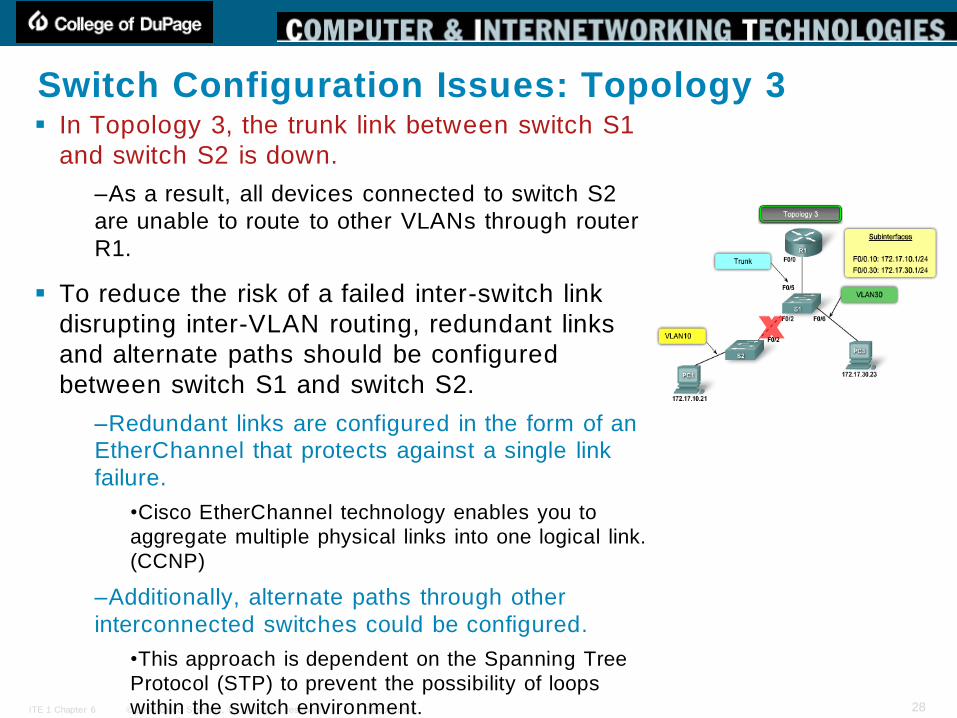
Switch Configuration Issues: Topology 3 In Topology 3, the trunk link between switch S1
and switch S2 is down.
–As a result, all devices connected to switch S2
are unable to route to other VLANs through router
R1.
To reduce the risk of a failed inter-switch link
disrupting inter-VLAN routing, redundant links
and alternate paths should be configured
between switch S1 and switch S2.
–Redundant links are configured in the form of an EtherChannel that protects against a single link
failure.
•Cisco EtherChannel technology enables you to
aggregate multiple physical links into one logical link.
(CCNP)
–Additionally, alternate paths through other
interconnected switches could be configured.
•This approach is dependent on the Spanning Tree
Protocol (STP) to prevent the possibility of loops within the switch environment.

© 2006 Cisco Systems, Inc. All rights reserved. Cisco PublicITE 1 Chapter 6 29
Switch Configuration Issues
Incorrect VLAN assignment
–The screen output shows the results
of the show interface interface-id
switchport command.
•Assume that you have issued these
commands because you suspect that
VLAN 10 has not been assigned to port
F0/4 on switch S1.
•The top highlighted area shows that port
F0/4 on switch S1 is in access mode, but it
does not show that it has been directly
assigned to VLAN 10.
•The bottom highlighted area confirms that
port F0/4 is still set to the default VLAN.
© 2006 Cisco Systems, Inc. All rights reserved. Cisco PublicITE 1 Chapter 6 30
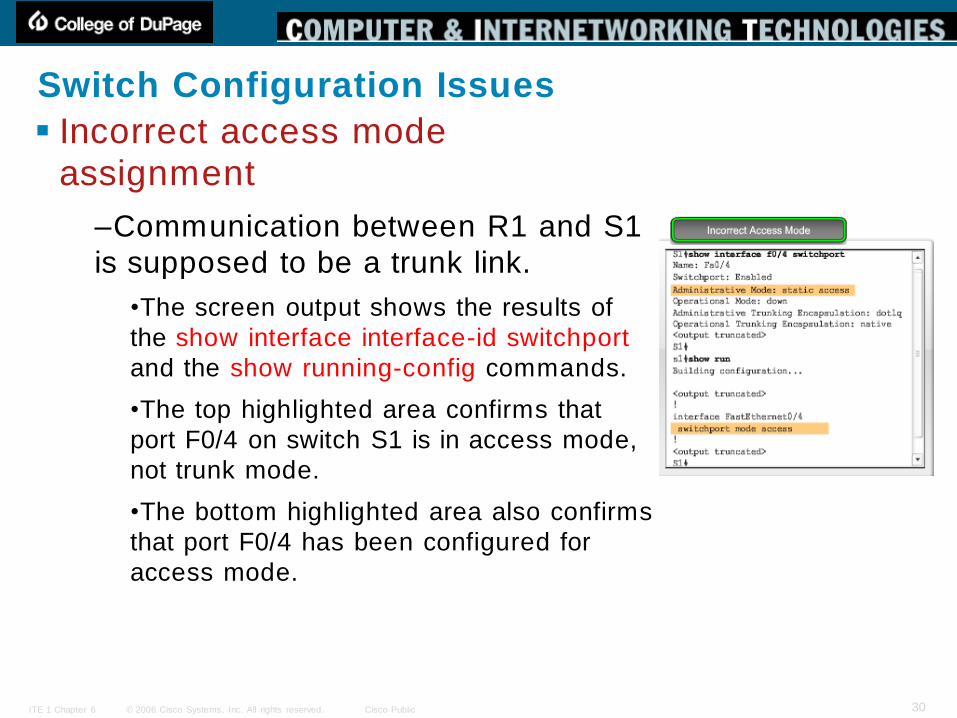
Switch Configuration Issues
Incorrect access mode
assignment
–Communication between R1 and S1
is supposed to be a trunk link.
•The screen output shows the results of
the show interface interface-id switchport
and the show running-config commands.
•The top highlighted area confirms that
port F0/4 on switch S1 is in access mode,
not trunk mode.
•The bottom highlighted area also confirms
that port F0/4 has been configured for
access mode.

© 2006 Cisco Systems, Inc. All rights reserved. Cisco PublicITE 1 Chapter 6 31
Router Configuration Issues: Topology 1 One of the most common inter-VLAN router
configuration errors is to connect the physical router interface to the wrong switch port,
–placing it on the incorrect VLAN and preventing it from reaching the other VLANs.
As you can see in Topology 1, router R1 interface F0/0 is connected to switch S1 port F0/9. Switch port F0/9 is configured for Default VLAN, not VLAN10.
–This prevents PC1 from being able to communicate with the router interface, and it is therefore unable to route to VLAN30.
To correct this problem, physically connect router R1 interface F0/0 to switch S1 port F0/4.
–This puts the router interface on the correct VLAN and allows inter-VLAN routing to function.
–Alternatively, you could change the VLAN assignment of switch port F0/9 to be on VLAN10. This also allows PC1 to communicate with router R1 interface F0/0.

© 2006 Cisco Systems, Inc. All rights reserved. Cisco PublicITE 1 Chapter 6 32
Router Configuration Issues: Topology 2 In Topology 2, router R1 has been
configured to use the wrong VLAN on
subinterface F0/0.10,
–preventing devices configured on VLAN10
from communicating with subinterface
F0/0.10.
To correct this problem, configure
subinterface F0/0.10 to be on the correct
VLAN using the encapsulation dot1q 10
subinterface configuration mode
command.
–When the subinterface has been assigned to
the correct VLAN, it is accessible by devices
on that VLAN and can perform inter-VLAN
routing.

© 2006 Cisco Systems, Inc. All rights reserved. Cisco PublicITE 1 Chapter 6 33
Verify Router Configuration Issues In this troubleshooting scenario, you suspect a
problem with the router R1. The subinterface
F0/0.10 should allow access to VLAN 10 traffic,
and the subinterface F0/0.30 should allow VLAN
30 traffic.
The screen capture shows the results of running
the show interface and the show running-config
commands.
–The top highlighted section shows that the
subinterface F0/0.10 on router R1 uses VLAN 100.
With proper verification, router configuration
problems are quickly addressed, allowing for
inter-VLAN routing to function again properly.
Recall that the VLANs are directly connected,
which is how they enter the routing table.

© 2006 Cisco Systems, Inc. All rights reserved. Cisco PublicITE 1 Chapter 6 34
IP Addressing Issues: Topology 1 For inter-VLAN routing to operate,each interface,
or subinterface, needs to be assigned an IP
address that corresponds to the subnet for which
it is connected.
As you can see in Topology 1, router R1 has
been configured with an incorrect IP address on
interface F0/0.
To correct this problem, assign the correct IP
address to router R1 interface F0/0 using the ip
address 172.17.10.1 255.255.255.0 interface
command in configuration mode.
–After the router interface has been assigned the
correct IP address, PC1 can use the interface as a
default gateway for accessing other VLANs.

© 2006 Cisco Systems, Inc. All rights reserved. Cisco PublicITE 1 Chapter 6 35
IP Addressing Issues: Topology 2 In Topology 2, PC1 has been configured
with an incorrect IP address for the
subnet associated with VLAN10.
To correct this problem, assign the
correct IP address to PC1.
–Depending on the type of PC being used,
the configuration details may be different.
© 2006 Cisco Systems, Inc. All rights reserved. Cisco PublicITE 1 Chapter 6 36
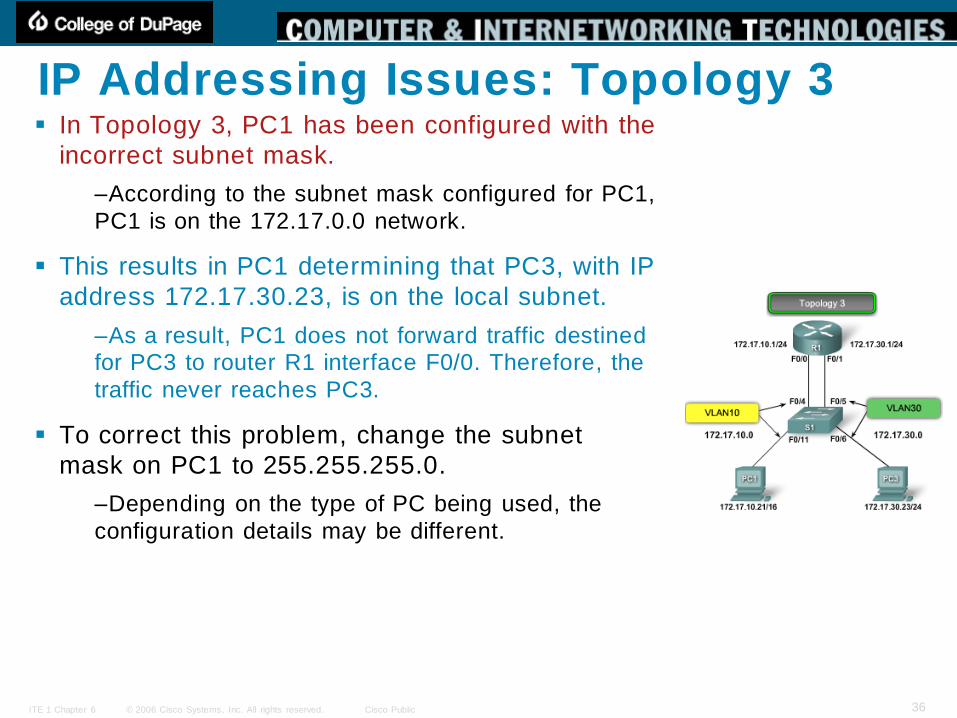
IP Addressing Issues: Topology 3 In Topology 3, PC1 has been configured with the
incorrect subnet mask.
–According to the subnet mask configured for PC1,
PC1 is on the 172.17.0.0 network.
This results in PC1 determining that PC3, with IP
address 172.17.30.23, is on the local subnet.
–As a result, PC1 does not forward traffic destined for PC3 to router R1 interface F0/0. Therefore, the
traffic never reaches PC3.
To correct this problem, change the subnet
mask on PC1 to 255.255.255.0.
–Depending on the type of PC being used, the
configuration details may be different.

© 2006 Cisco Systems, Inc. All rights reserved. Cisco PublicITE 1 Chapter 6 37
Verify IP Addressing Issues A common error is to incorrectly configure an IP
address for a subinterface.
The screen capture shows the results of the show
running-config command.
–The highlighted area shows that the subinterface F
0/0.10 on router R1 has an IP address of 172.17.20.1.
–The VLAN for this subinterface should allow VLAN
10 traffic.
The show ip interface is another useful command.
The second highlight shows the incorrect IP
address.
Sometimes it is the end-user device, such as a
personal computer, that is the culprit.
–In the screen output configuration of the computer
PC1, the IP address is 172.17.20.21, with a subnet mask of 255.255.255.0. But in this scenario, PC1
should be in VLAN10, with an address of
172.17.10.21 and a subnet mask of 255.255.255.0.

© 2006 Cisco Systems, Inc. All rights reserved. Cisco PublicITE 1 Chapter 6 38
Summary
Tony Chen COD
Cisco Networking Academy
Inter-VLAN routing is the process of routing
information between VLANs
Inter-VLAN routing requires the use of a router or a
layer 3 switch
Traditional inter-VLAN routing
–Requires multiple router interfaces that are each connected
to separate VLANs

© 2006 Cisco Systems, Inc. All rights reserved. Cisco PublicITE 1 Chapter 6 39
Tony Chen COD
Cisco Networking Academy
Summary
Router on a stick
–this is an inter-VLAN routing topology that uses router sub
interfaces connected to a layer 2 switch.
– Each Subinterface must be configured with:
– An IP address
– Associated VLAN number
Configuration of inter VLAN routing
–Configure switch ports connected to router with correct
VLAN
–Configure each router subinterface with the correct IP
address & VLAN ID
Verify configuration on switch and router