the kikuchi music institute library `âá|v|tÇá{|Ñ ... primer.pdf · the kikuchi music institute...
TRANSCRIPT

`âá|v|tÇá{|Ñ`âá|v|tÇá{|Ñ`âá|v|tÇá{|Ñ`âá|v|tÇá{|ÑYÉÜYÉÜYÉÜYÉÜfàÜ|ÇzáfàÜ|ÇzáfàÜ|ÇzáfàÜ|ÇzáVIOLINPRIMERA comprehensive and systematic course in theoryand technique specifically for string students,with different books for each instrument.
By Lee W. Kikuchi
The Kikuchi Music Institute Library

ii
Musicianship For Strings, VIOLIN PRIMER, is a systematic approach to theory and technique that isspecifically catered to the string student, in graded levels primer to 10. Beginners who have never studied musicshould start with this primer book. Beginners who have studied another non-string instrument for at least one yearshould start with Level 1. Each instrument (violin, viola, cello, bass) has its own series, but the musical examples arethe same and can be used for class instruction. Theory concepts are introduced systematically with reading andwriting examples to ensure the student’s comprehension and retention. The introduction of technical skills areintroduced in coordination with the theory to provide the student adequate repetition and “to-do” examples.
To order copies or to provide feedback, contact the author at:Kikuchi Music Institute1515 Warren StreetPittsburgh, PA 15212
(412) 322-0520
LWKikuchi @ KikuchiMusic.com
OR visit www.KikuchiMusic.com/publications
First Printing
© 2007 Lee W. Kikuchi, 1515 Warren St. , Pittsburgh, PA 15212 (412) 322-0520
iii
TABLE OF CONTENTSPreface...........................................................................................................ivIntroduction...................................................................................................vParts of the Violin and Bow ...........................................................................1Holding the Violin ........................................................................................ 2Holding the Bow ............................................................................................3Rosining the Bow...........................................................................................3String Names ................................................................................................ 4Pizzicato .........................................................................................................5Rhythm in Music .......................................................................................... 6Arco / The D String........................................................................................7Stems on Notes ............................................................................................. 8Playing D and A ............................................................................................ 9Bar Lines ......................................................................................................10Playing G and E............................................................................................ 11The Musical Alphabet ..................................................................................12Moving Between D and A ............................................................................ 13Time Signature: 2/4 Time ...........................................................................14Moving Between G, D and A........................................................................ 15Time Signature: 3/4 Time ...........................................................................16Moving Between D, A and E ........................................................................ 17Time Signature: 4/4 Time ...........................................................................18Skipping Strings...........................................................................................19Review Quiz ................................................................................................ 20Play All Four Strings....................................................................................21The Staff and Treble Clef ............................................................................ 22Letters on the Treble Staff .......................................................................... 23Open String Notes....................................................................................... 24Reading Open Strings D, A and E ...............................................................25Drawing Note Heads................................................................................... 26Drawing Note Stems................................................................................... 26Ledger Lines.................................................................................................27Ledger Line Letter Names .......................................................................... 28Reading Open Strings G, D, A and E.......................................................... 29Musical Terms............................................................................................. 30Theory Review 1 ...........................................................................................31Theory Review 2 ......................................................................................... 32
iv
PrefacePrefacePrefacePrefaceWhen I began teaching violin and cello several years ago, I was quite surprised that the teaching materials availablehave not changed substantially since I was a child. There were new method books, with CDs and DVDs, but despitethe advances in technology, the actual material and teaching approach did not seem substantially different. Themethods that exist today divide the technical skills into two different approaches: finger first with pizzacato or learn tobow the different open strings before fingering. Then, when it comes to teaching fingering, some systems start withfinger 1, and others start with finger 3 . [The latter is meant to help develop a better hand shape and position.]However, despite these variances, the method systems still seem to lack in their approach to theory and techniqueespecially in regard to adequate explanation of the various muscle motions required to play the instrument.
Toward meeting these latter deficiencies, I have developed this Musicianship for Strings series which is both aworkbook for music theory (from a string approach), and a rigorous approach to technique development throughcareful step-by-step instruction regarding all the necessary motions of the bow arm and left hand. I have attempted toavoid the issues of which is taught first whether pizzicato vs. arco, or finger 1 vs. finger 3, by giving exercises that useboth on the same page. This way the teacher can use this series with any existing method system, choosing the
exercises which match the system (or choose all of them for more in-depth instruction). If exercises are skipped, theteacher should return to them when appropriate to “back-fill” the skills not covered on the first pass.
The series is written in 11 different levels, with books for each instrument, so that the teacher may give the studentsubstantive instruction from the beginning to the point of entering college (pre-professional study). Such systemsexist for piano, but apparently not for any of the orchestral instruments. Now, finally Musicianship for Stringsprovides a comprehensive course in Theory and Technique for all pre-professional string students. A brief explanationof each level is provided below, to help teachers place students into the appropriate level:
Primer: All beginning students without any prior musical knowledge should begin with the Primer level. A pre-staff-reading approach (similar to what is used for piano methods) eases the student into reading by developing a solidunderstanding of rhythm, musical symbols and the instrument before placing the notes on the staff for reading. Thisapproach is good for students of all ages, and is essential for the very young students (under age 7) whose reading andeye-focus development is not as advanced as students age 7 and up. Clear explanations and carefully constructedexercises teach the student how to read music, and how to approach the skills needed for playing the violin. Wherewriting is required by the student, extra large staves are provided so that very young students can perform theseimportant written tasks. The Primer level covers rhythms using whole notes, half notes, dotted half notes, and quarternotes, reading notes on the staff and ledger lines, pizzicato and bowing all the open strings.
Level 1: This book follows the Primer book, but can be a first book for string students who have prior musicaleducation (usually 1 to 2 years or more). The student must demonstrate the ability to read notes on the staff, andmust have solid grounding in rhythms using whole notes, half notes, dotted half notes and quarter notes. Level 1technique covers rhythms using whole notes, half notes, dotted half notes, quarter notes and two-eighths and theirrest equivalents. Theory includes rhythms using the aforementioned note and rest values, ties, slurs, sharps, flats,keys of C major, G Major D Major & A major, reading notes on the staff & ledger lines and scales. Technical skillsinclude: pizzicato & bowing all the strings, moving between strings, holding fingers while playing other strings andfingering with fingers 1 –2 – 3 in the first position with 2nd finger in the forward (sharp) position (or all 4 fingers forcell0). Half position for 1st finger only is introduced for flats. Scales include C major, G major, D major and A major.
Level 2: Level 2 technique covers rhythms using whole notes, half notes, dotted half notes, quarter notes, dottedquarters with a single eighth note and their rest equivalents. Theory includes rhythms using the aforementioned noteand rest values, ties, slurs, sharps, flats, keys of C major, G Major D Major, A major, F Major, a minor & d minor,reading notes on the staff & ledger lines and scales. Technical skills include: pizzicato & bowing all the strings, movingbetween strings, holding fingers while playing other strings, slurs between two strings and block fingering (fingers 2 &3) across two strings. Fingering technique includes fingers 1 –2 – 3 in the first position with 1st finger both back andforward (flat & natural) and 2nd finger both back and forward (natural & sharp), (or all 4 fingers plus open handposition for cell0). Scales include keys: G, D, A, F, a, d.
[Levels beyond Level 2 will be described in later publications.]
Lee W. KikuchiMarch, 2007

v
IntroductionIntroductionIntroductionIntroduction
This new series is not designed to replace any existing method system, but instead is to be usedconcurrently with your method of choice. The only exception is the PRIMER book, which isspecifically designed to teach beginning strings students the skills of the instrument and musicaltheory using a pre-staff-reading system. The Primer is an alternative to Suzuki and an excellentfirst book for students who will be using a traditional system such as Stringbuilder, SamuelAppelbaum, Merle Isaac or Essential Elements for Strings.
Once your student completes this Primer, continue assigning these books to your student insequence, to ensure that she/he is learning the appropriate musical theory as well as theaccompanying string technique. The written exercises teach the theory and the playing exercisesreinforce the theory and parallel technique. All technical skills are clearly explained with pictures,and the exercises are very specifically graded in a step-by-step approach to ensure that the studenthas mastered each skill before proceeding to the next skill. Use the traditional method andrepertoire series to provide lesson and performance materials.
The books in this series are workbooks, and are meant for the student to write in. Each studentshould be given/sold a copy to keep and use until completed. You do not need to try to coordinatethese books with the method systems directly, especially since not all the material is taught in thesame sequence. If a student masters the theory and technique of one level, it is appropriate toadvance the student to the next level directly. Often students will understand theory and mastersimple technical skills more quickly than they master the songs or appropriate repertoire. As thestudent progresses through the theory and technique, he/she will catch up in the other materialeventually.

1
Parts of the Violin and BowParts of the Violin and BowParts of the Violin and BowParts of the Violin and Bow

2
Holding the ViolinHolding the ViolinHolding the ViolinHolding the Violin
When holding the violin to playjust open strings, the LEFT HANDmay grip the upper bout.
When holding the violin to playfingered strings, the LEFT HANDmust support the violin at theneck, with the fingers over thestrings.
When at rest (not playing) withinan ensemble or when waiting toplay, hold the violin by the neckon the left knee and the bowupright on the right knee.
When carrying the violin, alwayshold with the hand firmly grippedaround the neck.
3
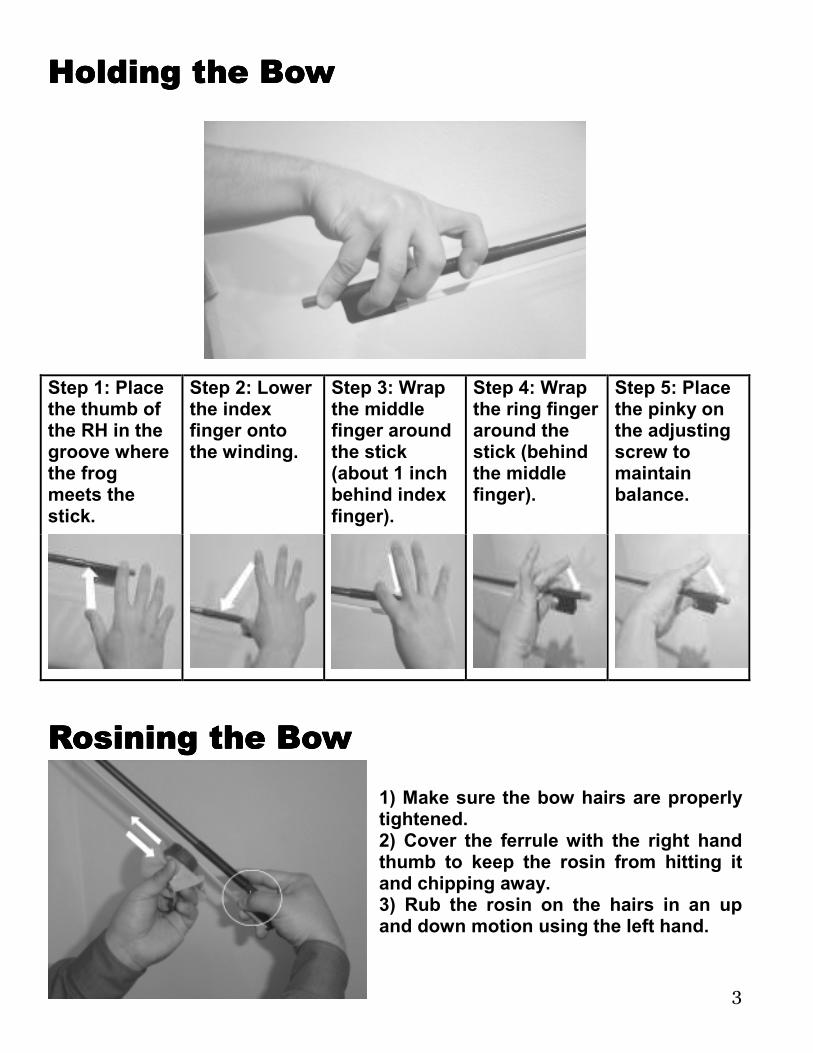
Holding the BowHolding the BowHolding the BowHolding the Bow
Step 1: Placethe thumb ofthe RH in thegroove wherethe frogmeets thestick.
Step 2: Lowerthe indexfinger ontothe winding.
Step 3: Wrapthe middlefinger aroundthe stick(about 1 inchbehind indexfinger).
Step 4: Wrapthe ring fingeraround thestick (behindthe middlefinger).
Step 5: Placethe pinky onthe adjustingscrew tomaintainbalance.
Rosining the BowRosining the BowRosining the BowRosining the Bow
1) Make sure the bow hairs are properlytightened.2) Cover the ferrule with the right handthumb to keep the rosin from hitting itand chipping away.3) Rub the rosin on the hairs in an upand down motion using the left hand.

4
String NamesString NamesString NamesString Names
1. Write the letter names of the stringsin the boxes:
EAR TRAINING
3. Play either the E string or G stringand ask the student to say “highstring” or “low string”. Repeat ateach lesson until the studentanswers correctly every time.
2. Color the strings as follows:G String: REDD String: BLUE
A String: YELLOWE String: GREEN
The Violin has FOUR strings.Each string has a different letter name: G, D, A, E
»»»»Bridge
Tail Piece ºººº
Strings ºººº»»»»Nut
»»»»Fingerboard
Peg ºººº
5
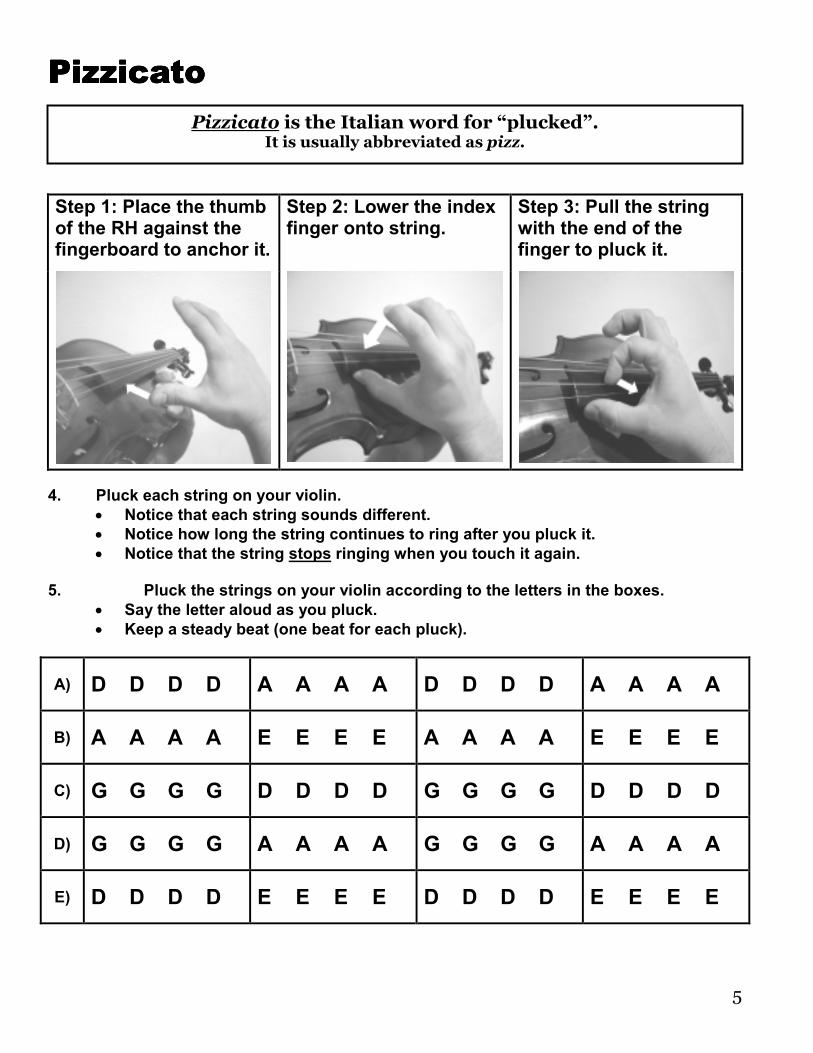
PizzicatoPizzicatoPizzicatoPizzicato
Step 1: Place the thumbof the RH against thefingerboard to anchor it.
Step 2: Lower the indexfinger onto string.
Step 3: Pull the stringwith the end of thefinger to pluck it.
4. Pluck each string on your violin.
• Notice that each string sounds different.
• Notice how long the string continues to ring after you pluck it.
• Notice that the string stops ringing when you touch it again.
5. Pluck the strings on your violin according to the letters in the boxes.
• Say the letter aloud as you pluck.
• Keep a steady beat (one beat for each pluck).
A) D D D D A A A A D D D D A A A A
B) A A A A E E E E A A A A E E E E
C) G G G G D D D D G G G G D D D D
D) G G G G A A A A G G G G A A A A
E) D D D D E E E E D D D D E E E E
Pizzicato is the Italian word for “plucked”.It is usually abbreviated as pizz.

6
Rhythm in MusicRhythm in MusicRhythm in MusicRhythm in Music
6. A) Clap each rhythm below, saying “quarter” or “half note” for each note symbol.B) Pluck each rhythm on one string, saying “quarter” or “half note”.
A)
B)
C)
7. Draw TEN quarter notes on the line below: [Always use pencil!]
8. Draw TEN half notes on the line below:
Rhythm is the fact that all sounds have different lengths.Some sounds are long, some are short and some are in between.
A Quarter Note represents ONE BEAT.
A Half Note represents TWO BEATS.
Notes are musical symbols that tell us how long to make a sound.• Each note looks different according to its length of time (also called value).
• The value of a quarter note is ONE BEAT (short note).• The value of a half note is TWO BEATS (long note).

7
Arco / The D StringArco / The D StringArco / The D StringArco / The D String
9. BOW the D String in even quarter notes.
• Count 1 – 2 – 3 – 4 as you play.
• Make sure the bow does not touch the other strings.
• Make sure the bow is straight and between the bridge and fingerboard.
1 2 3 4 1 2 3 4 1 2 3 4 1 2 3 4
10. PIZZICATO the following rhythms (twice each). Be careful which string you pluck!
• First time: Play and say the letters.
• Second time: Play and say “quarter” or “half note”.
A)
B)
C)
D)
Arco is the Italian word for “bow”.All violin music is played using the bow, unless marked with pizz.
The word arco indicates when to stop playing pizzicato, and use the bow.
8
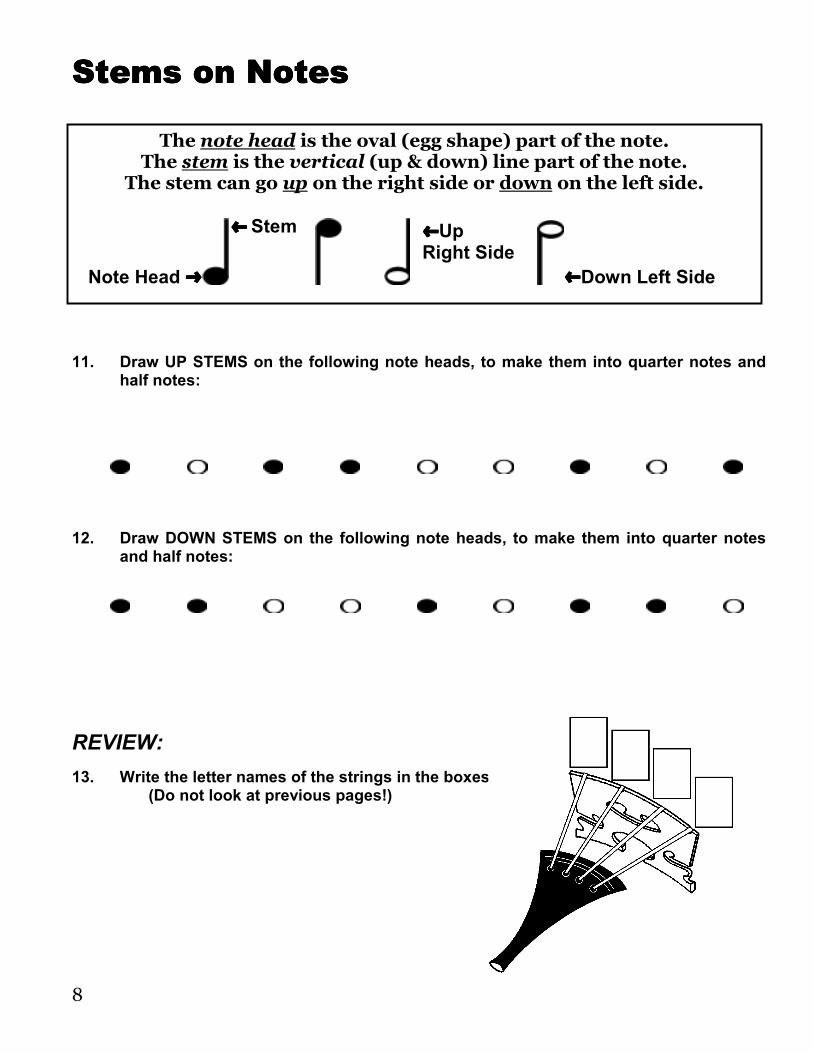
Stems on NotesStems on NotesStems on NotesStems on Notes
11. Draw UP STEMS on the following note heads, to make them into quarter notes andhalf notes:
12. Draw DOWN STEMS on the following note heads, to make them into quarter notesand half notes:
REVIEW:
13. Write the letter names of the strings in the boxes:(Do not look at previous pages!)
The note head is the oval (egg shape) part of the note.The stem is the vertical (up & down) line part of the note.
The stem can go up on the right side or down on the left side.
Note Head ºººº
»»»» Stem »»»»UpRight Side
»»»»Down Left Side