the swickster lessons complete.pdf · the swickster fingerboard system ... cuban tablature most...
TRANSCRIPT
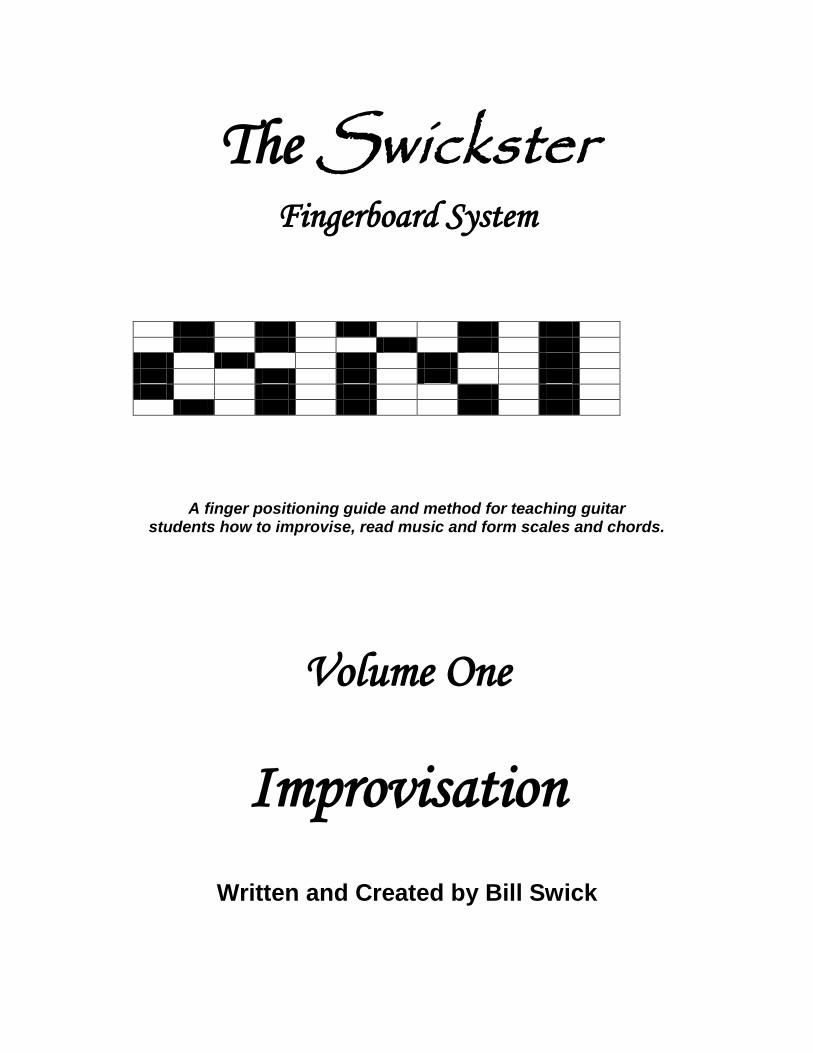
The Swickster Fingerboard System
A finger positioning guide and method for teaching guitar students how to improvise, read music and form scales and chords.
Volume One
Improvisation
Written and Created by Bill Swick

The Swickster Fingerboard System The Swickster Fingerboard System is a finger positioning guide and method for teaching guitar students how to improvise, read music and form chords. This system is intended for teaching students of stringed instruments note locations and proper finger placement on the fingerboard of the instrument. This system involves carefully placed white inlays in the fingerboard. The white inlays represent the white keys on the piano keyboard while the natural fingerboard represents the black keys of a piano keyboard.
When played open, all of the strings of the guitar are notes which correspond to the white keys on the piano. The piano consists of eight octaves. Each octave has the same repetitive pattern of white and black notes. Starting with middle C, the pattern is: white black white black white white black white black white black white white
C D E F G A B C
This pattern continues to repeat itself on the piano keyboard for each octave. The black keys represent the sharps and/or flats. The two pairs of consecutive white keys on the piano keyboard are the half steps, E & F and B & C.
Page 2

All open strings on the guitar are notes represented by the white keys on the piano. Starting with the “E” string, that is the thinnest string closest to the floor, also known as the first string, the keyboard pattern looks like this.
E F G A B C D E
0 1 2 3 4 5 6 7 8 9 10 11 12 The second string or “B” string looks like this:
B C D E F G A B
0 1 2 3 4 5 6 7 8 9 10 11 12 The third string or “G” string looks like this:
G A B C D E F G
0 1 2 3 4 5 6 7 8 9 10 11 12 The fourth string or “D” string looks like this:
D E F G A B C D
0 1 2 3 4 5 6 7 8 9 10 11 12 The fifth string or “A” string looks like this:
A B C D E F G A
0 1 2 3 4 5 6 7 8 9 10 11 12 The sixth string or “E” string looks like this:
E F G A B C D E
0 1 2 3 4 5 6 7 8 9 10 11 12 Together, the six strings look like this:
E F G A B C D E
B C D E F G A B
G A B C D E F G
D E F G A B C D
A B C D E F G A
E F G A B C D E
0 1 2 3 4 5 6 7 8 9 10 11 12 Notice the four columns in which all six strings are white. The first column represents the open strings. The next columns are in frets 5, 10 and 12. These columns will become significant in defining fingering positions. As a general rule, the first finger or the fourth finger will be positioned in one of these white columns. The exception is the first column of open strings. We will begin with column one.
Page 3

Part 1 Lesson 1
OPEN OR FIRST POSITION
The first three frets of the guitar are referred to as “open position.” This position uses the open strings, therefore the name, “open position.” This same area on the guitar is also known as “First Position.”
E F G
B C D
G A
D E F
A B C
E F G
Open Fret 1 2 3 Many method books show the fret board like the following. The lowest pitched string, the sixth string is on the left side of this diagram and the first string, which is the smallest string, is on the right. Strings 6 5 4 3 2 1 Frets
E A D G B E
F C F
B E A
G C F D G
In just this small are of the guitar fingerboard, there is a range of two octaves and two notes. An octave is the distance from one note name to the next note name. For example, starting with the open “E” on the 6th string to the next “E” on the 4th string, second fret is one octave. The distance between the “E” on the 4th string, second fret and the open “E” on the first string is one octave. The distance from the open “E” on the 6th string to the open “E” on the first string is two octaves. Countless songs may be played with the notes in just this area of the guitar. This is the logical area in which most guitarists begin playing. Most method books begin here as well and encourage students to learn the note names and positions of the notes associated with the white keys of the piano. The following diagram provides the correct fingerings to use when playing in first or open position. The index finger on the left hand is considered finger 1. The middle finger is finger 2, and the ring finger is finger 3.
Page 4

Strings 6 5 4 3 2 1
Using the above diagram and the fingerings provided, practice playing these 17 notes. Once the skill of playing all 17 notes in open or first position is achieved, the fun begins.
Lesson 1 Video Link
http://youtu.be/g6rkxUP3E8w
3
2
2
1
1
1
1
1
1
2 2
3 3 3 3
0
1
0
1
0
1
0
1
0
1
0
1
Fret 1
Fret 2
Fret 3
Page 5

Lesson 2 IMPROVISATION
Improvisation is the art of composing music spontaneously. The guitarist with the skill of improvisation is often known as the “lead guitarist.” This is the guitarist who plays the melodic solos. It has been the belief of most beginning guitarists that it takes time, perhaps years, to learn how to improvise and solo on the guitar. The Swickster Fingerboard System is designed to help beginning guitarists learn to improvise quickly and effortlessly. The Swickster Fingerboard System has a website (www.swickster.com) with play-along tracks and instructional videos. Both are intended to help teach improvisation. Once the skill of playing all 17 notes in open position is accomplished, the next step is to get started with improvisation. Track 1 of the Improvisational Play-Alongs is entitled “Easy 2-5 Version 1.” It is a four-bar chord progression with a funky beat. Start by studying the chords found in the chord progression. It is not necessary to know how to play each of these chords to improvise over them. Notice both chords have the root or tonic on an open string.
Dm7 G7 Dm7 G7 / / / / l / / / / l / / / / l / / / / l
4/0 3/0 4/0 3/0
CUBAN TABLATURE
Most guitar players are familiar with the term tablature, and are most familiar with the type of tablature which has six lines, with each line representing a string on the guitar. Cuban tablature is very different from standard tablature and offers some advantages. Cuban tab uses two numbers to indicate the fingering. The first number is the string number and the second number is the fret number. For example, 4/0 means fourth string, open. 3/0 means third string, open. 5/0 means fifth string, open, etc. Any numeric combination ending in 0 means the note is played on an open string.
Lesson 2 Video Link
http://youtu.be/rnZoSitMecc
Page 6

Lesson 3
Dm7 G7 Dm7 G7 / / / / l / / / / l / / / / l / / / / l
4/0 3/0 4/0 3/0
Play along with Track 1 and play only the root of each chord. Watch the video and follow along.
Lesson 3 Video Link
http://youtu.be/pSdkB4Qdfxs
Lesson 4 TWO OCTAVES
The guitar has a two-octave range in open position. This means there are at least two places to play each of the first notes of each chord. The following is the Cuban tablature for each of the notes. Practice this first and then play along with the track 1 and the video for this lesson.
Dm7 G7 Dm7 G7
/ / / / l / / / / l / / / / l / / / / l 4/0 2/3 3/0 1/3 4/0 2/3 3/0 1/3
1 2 3 4
Lesson 4 Video Link
http://youtu.be/4EzlCTvJ7Tg
Page 7
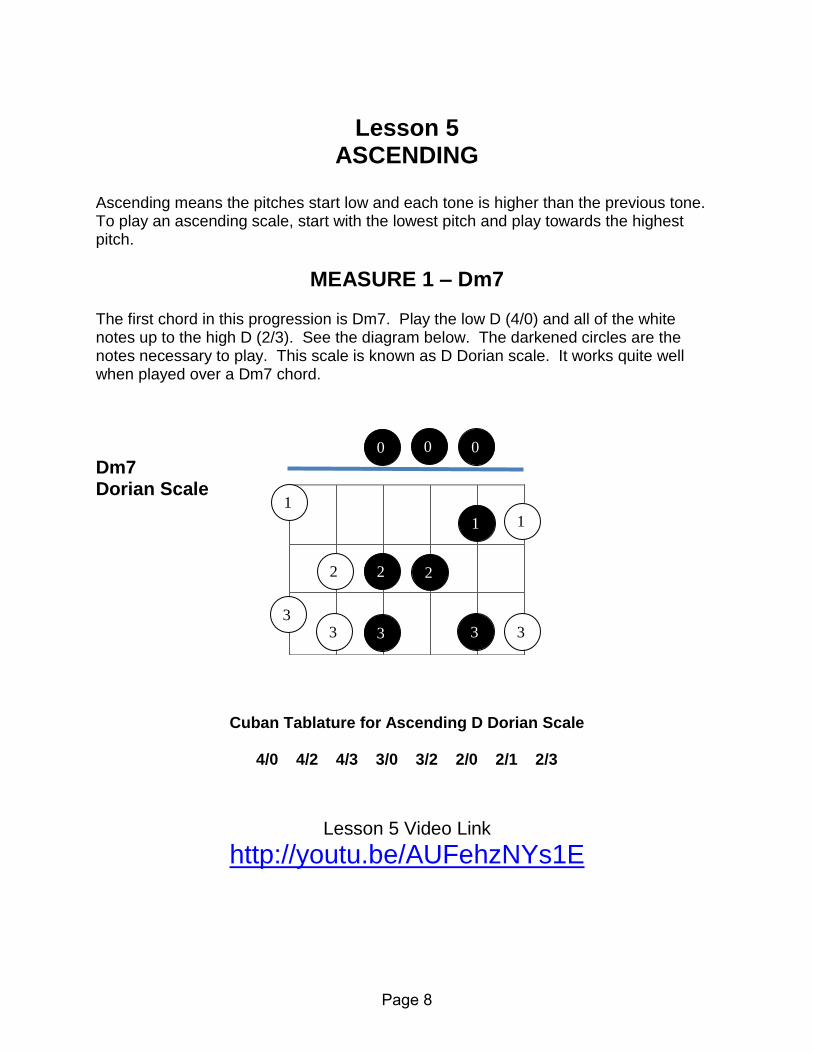
Lesson 5 ASCENDING
Ascending means the pitches start low and each tone is higher than the previous tone. To play an ascending scale, start with the lowest pitch and play towards the highest pitch.
MEASURE 1 – Dm7 The first chord in this progression is Dm7. Play the low D (4/0) and all of the white notes up to the high D (2/3). See the diagram below. The darkened circles are the notes necessary to play. This scale is known as D Dorian scale. It works quite well when played over a Dm7 chord.
Dm7 Dorian Scale
Cuban Tablature for Ascending D Dorian Scale
4/0 4/2 4/3 3/0 3/2 2/0 2/1 2/3
Lesson 5 Video Link
http://youtu.be/AUFehzNYs1E
3
0
0
1
1
1
1
0
2
3
0
1
1
3
2
3
1
2
3
Page 8
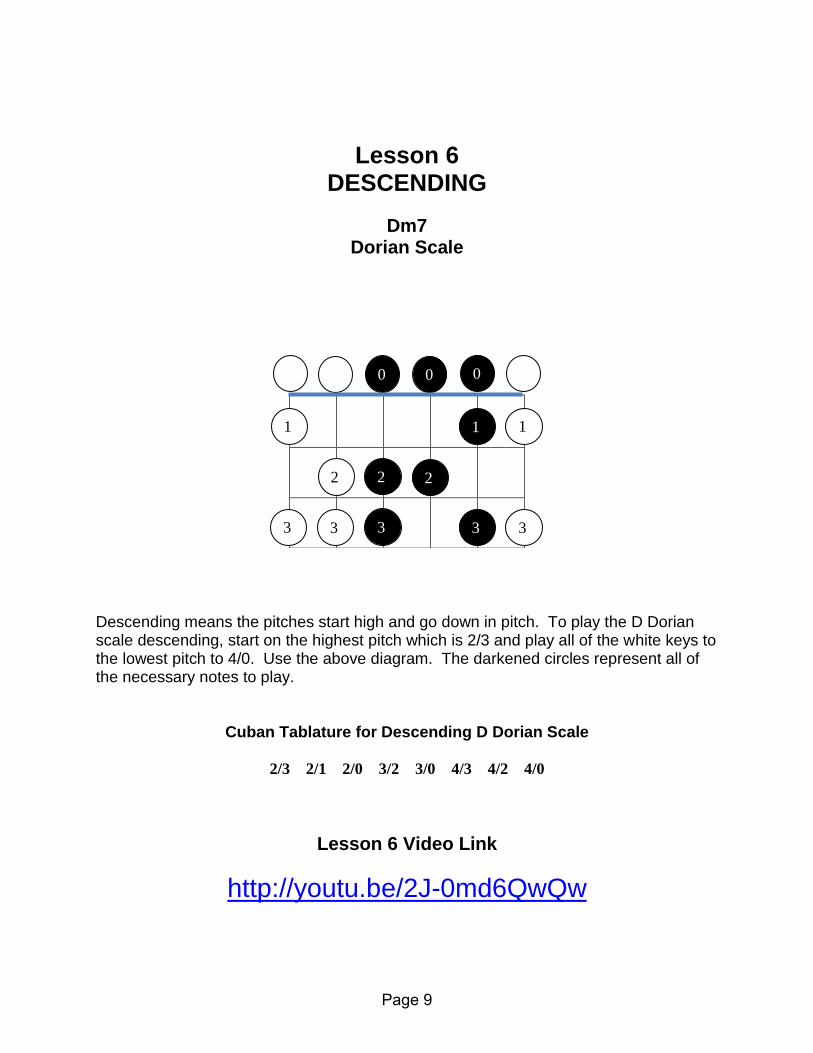
Lesson 6
DESCENDING
Dm7
Dorian Scale
Descending means the pitches start high and go down in pitch. To play the D Dorian scale descending, start on the highest pitch which is 2/3 and play all of the white keys to the lowest pitch to 4/0. Use the above diagram. The darkened circles represent all of the necessary notes to play.
Cuban Tablature for Descending D Dorian Scale
2/3 2/1 2/0 3/2 3/0 4/3 4/2 4/0
Lesson 6 Video Link
http://youtu.be/2J-0md6QwQw
3
1
1
1
1
2
3 3
2
3
1
2
3
0 0 0
Page 9
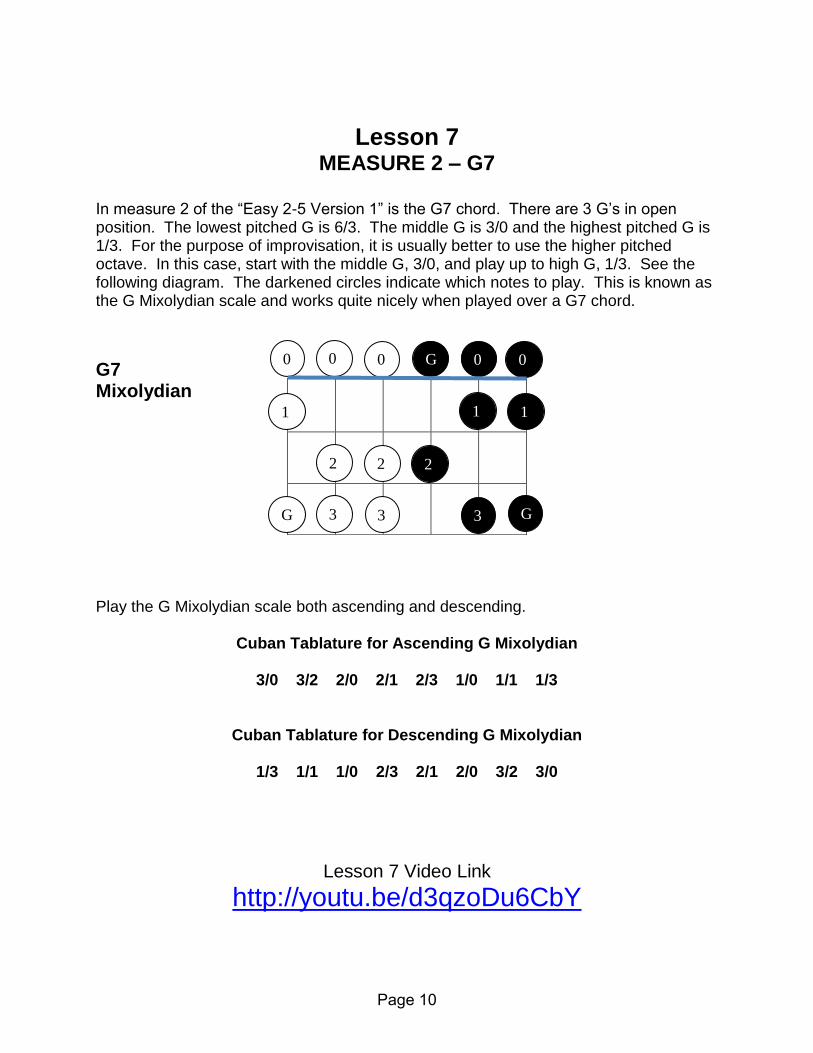
Lesson 7
MEASURE 2 – G7
In measure 2 of the “Easy 2-5 Version 1” is the G7 chord. There are 3 G’s in open position. The lowest pitched G is 6/3. The middle G is 3/0 and the highest pitched G is 1/3. For the purpose of improvisation, it is usually better to use the higher pitched octave. In this case, start with the middle G, 3/0, and play up to high G, 1/3. See the following diagram. The darkened circles indicate which notes to play. This is known as the G Mixolydian scale and works quite nicely when played over a G7 chord.
G7 Mixolydian
Play the G Mixolydian scale both ascending and descending.
Cuban Tablature for Ascending G Mixolydian
3/0 3/2 2/0 2/1 2/3 1/0 1/1 1/3
Cuban Tablature for Descending G Mixolydian
1/3 1/1 1/0 2/3 2/1 2/0 3/2 3/0
Lesson 7 Video Link
http://youtu.be/d3qzoDu6CbY
1
1
2
1 1
G
2
3
2
0 0 0 0
G 3 3
0 G
Page 10
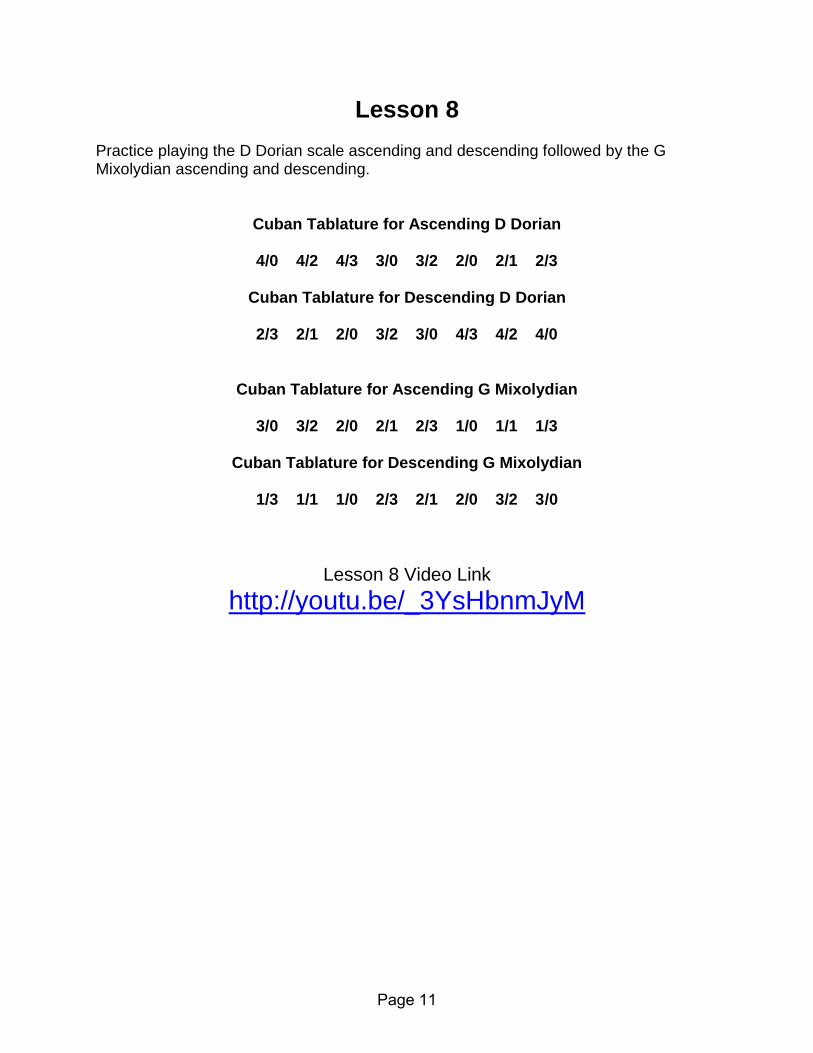
Lesson 8 Practice playing the D Dorian scale ascending and descending followed by the G Mixolydian ascending and descending.
Cuban Tablature for Ascending D Dorian
4/0 4/2 4/3 3/0 3/2 2/0 2/1 2/3
Cuban Tablature for Descending D Dorian
2/3 2/1 2/0 3/2 3/0 4/3 4/2 4/0
Cuban Tablature for Ascending G Mixolydian
3/0 3/2 2/0 2/1 2/3 1/0 1/1 1/3
Cuban Tablature for Descending G Mixolydian
1/3 1/1 1/0 2/3 2/1 2/0 3/2 3/0
Lesson 8 Video Link
http://youtu.be/_3YsHbnmJyM
Page 11
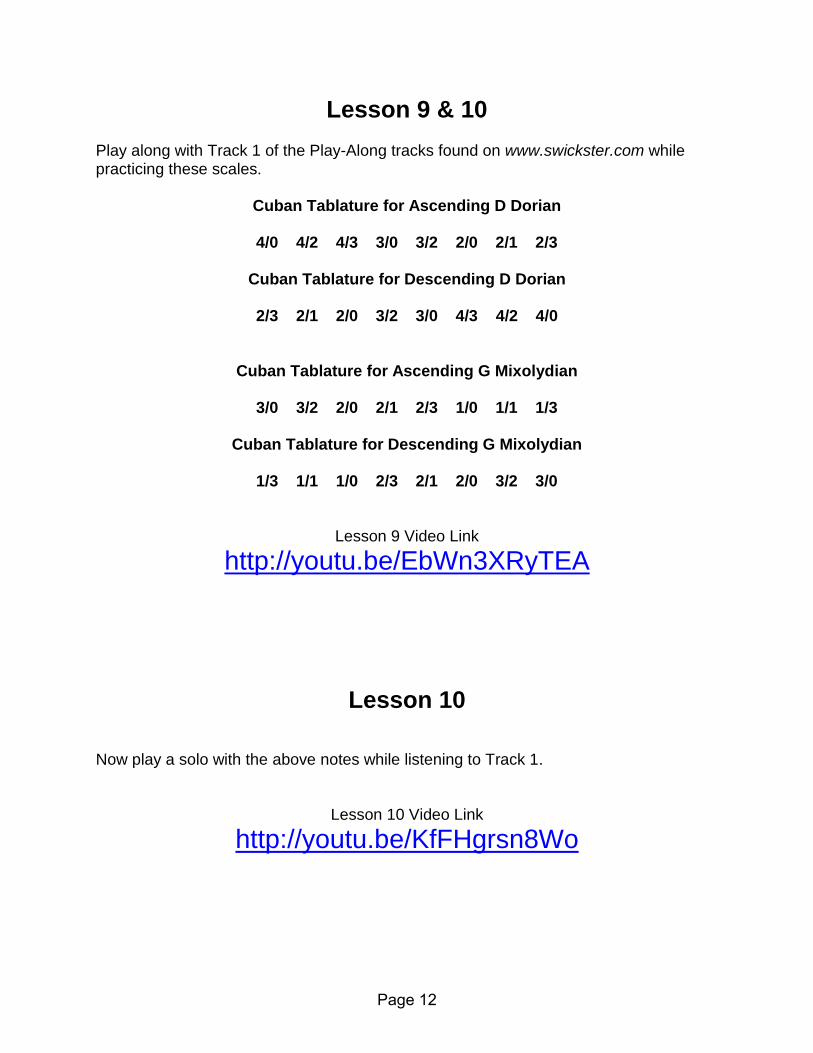
Lesson 9 & 10 Play along with Track 1 of the Play-Along tracks found on www.swickster.com while practicing these scales.
Cuban Tablature for Ascending D Dorian
4/0 4/2 4/3 3/0 3/2 2/0 2/1 2/3
Cuban Tablature for Descending D Dorian
2/3 2/1 2/0 3/2 3/0 4/3 4/2 4/0
Cuban Tablature for Ascending G Mixolydian
3/0 3/2 2/0 2/1 2/3 1/0 1/1 1/3
Cuban Tablature for Descending G Mixolydian
1/3 1/1 1/0 2/3 2/1 2/0 3/2 3/0
Lesson 9 Video Link
http://youtu.be/EbWn3XRyTEA
Lesson 10 Now play a solo with the above notes while listening to Track 1.
Lesson 10 Video Link
http://youtu.be/KfFHgrsn8Wo
Page 12

Lesson 11 & 12 TRACK 2 – Easy 2-5 Version 2
Track 2 of the Play-Alongs is “Easy 2-5 Version 2.” The chords are the same as Track 1. The difference is the style in which the accompaniment is played. While all of the notes are the same, just by changing the style, the type of improvisation can sound quite different. Practice playing the scales while playing along with Track 2 found at www.swickster.com.
Cuban Tablature for Ascending D Dorian
4/0 4/2 4/3 3/0 3/2 2/0 2/1 2/3
Cuban Tablature for Descending D Dorian
2/3 2/1 2/0 3/2 3/0 4/3 4/2 4/0
Cuban Tablature for Ascending G Mixolydian
3/0 3/2 2/0 2/1 2/3 1/0 1/1 1/3
Cuban Tablature for Descending G Mixolydian
1/3 1/1 1/0 2/3 2/1 2/0 3/2 3/0
Lesson 11 Video Link
http://youtu.be/koaWe6oUJhU
Lesson 12 Now play a solo while listening to Track 2.
Lesson 12 Video Link
http://youtu.be/9prKEYBzsbU
Page 13
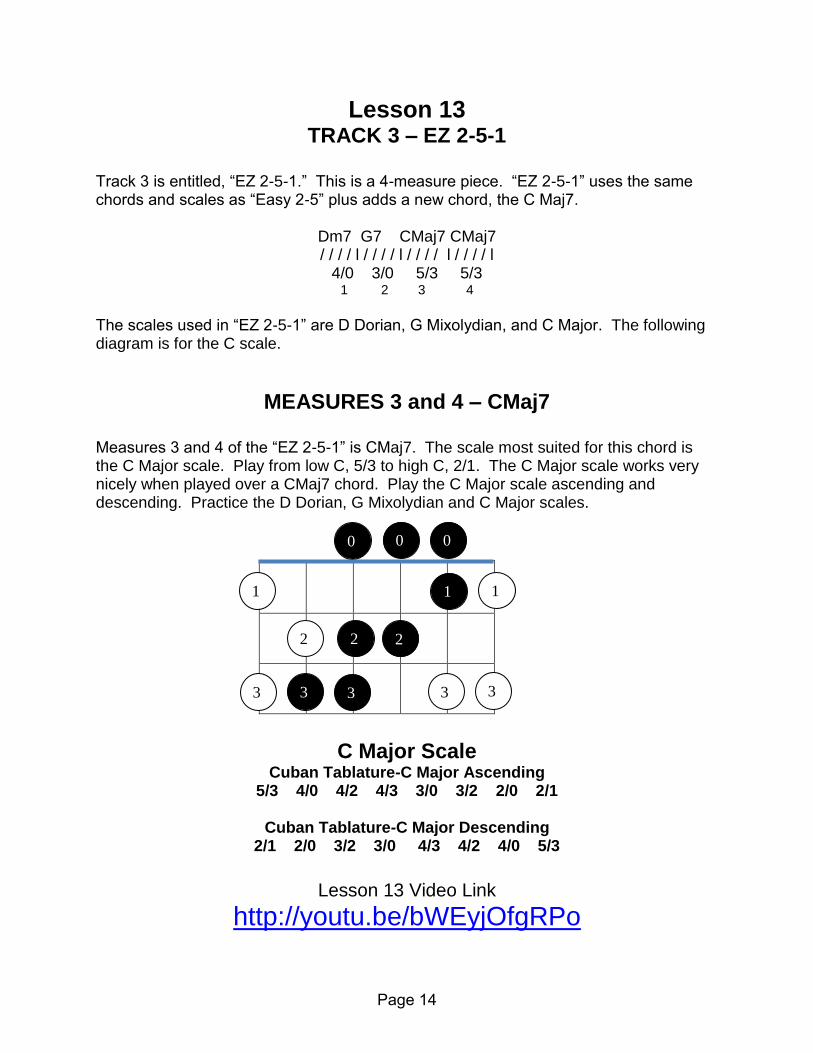
Lesson 13 TRACK 3 – EZ 2-5-1
Track 3 is entitled, “EZ 2-5-1.” This is a 4-measure piece. “EZ 2-5-1” uses the same chords and scales as “Easy 2-5” plus adds a new chord, the C Maj7.
Dm7 G7 CMaj7 CMaj7 / / / / l / / / / l / / / / l / / / / l
4/0 3/0 5/3 5/3 1 2 3 4
The scales used in “EZ 2-5-1” are D Dorian, G Mixolydian, and C Major. The following diagram is for the C scale.
MEASURES 3 and 4 – CMaj7
Measures 3 and 4 of the “EZ 2-5-1” is CMaj7. The scale most suited for this chord is the C Major scale. Play from low C, 5/3 to high C, 2/1. The C Major scale works very nicely when played over a CMaj7 chord. Play the C Major scale ascending and descending. Practice the D Dorian, G Mixolydian and C Major scales.
C Major Scale
Cuban Tablature-C Major Ascending 5/3 4/0 4/2 4/3 3/0 3/2 2/0 2/1
Cuban Tablature-C Major Descending
2/1 2/0 3/2 3/0 4/3 4/2 4/0 5/3
Lesson 13 Video Link
http://youtu.be/bWEyjOfgRPo
3
2
1
2
3 3
2
3 3
1 1
0 0 0
Page 14
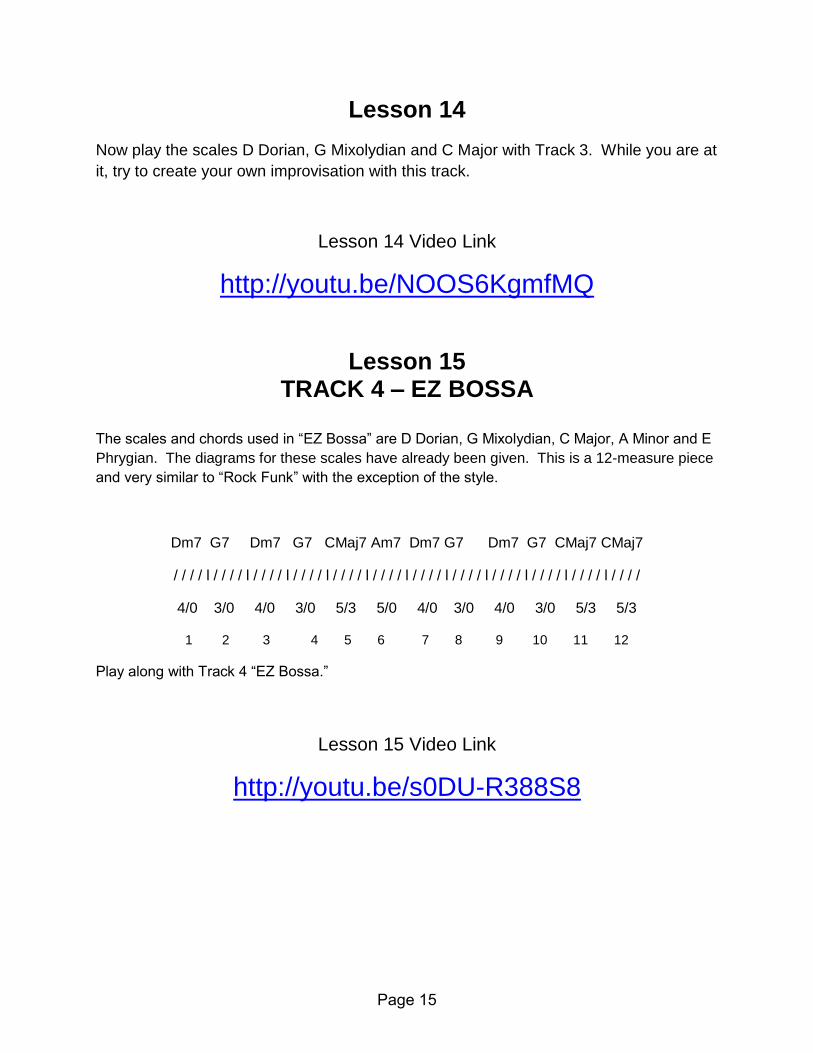
Lesson 14
Now play the scales D Dorian, G Mixolydian and C Major with Track 3. While you are at
it, try to create your own improvisation with this track.
Lesson 14 Video Link
http://youtu.be/NOOS6KgmfMQ
Lesson 15
TRACK 4 – EZ BOSSA
The scales and chords used in “EZ Bossa” are D Dorian, G Mixolydian, C Major, A Minor and E
Phrygian. The diagrams for these scales have already been given. This is a 12-measure piece
and very similar to “Rock Funk” with the exception of the style.
Dm7 G7 Dm7 G7 CMaj7 Am7 Dm7 G7 Dm7 G7 CMaj7 CMaj7
/ / / / l / / / / l / / / / l / / / / l / / / / l / / / / l / / / / l / / / / l / / / / l / / / / l / / / / l / / / /
4/0 3/0 4/0 3/0 5/3 5/0 4/0 3/0 4/0 3/0 5/3 5/3
1 2 3 4 5 6 7 8 9 10 11 12
Play along with Track 4 “EZ Bossa.”
Lesson 15 Video Link
http://youtu.be/s0DU-R388S8
Page 15
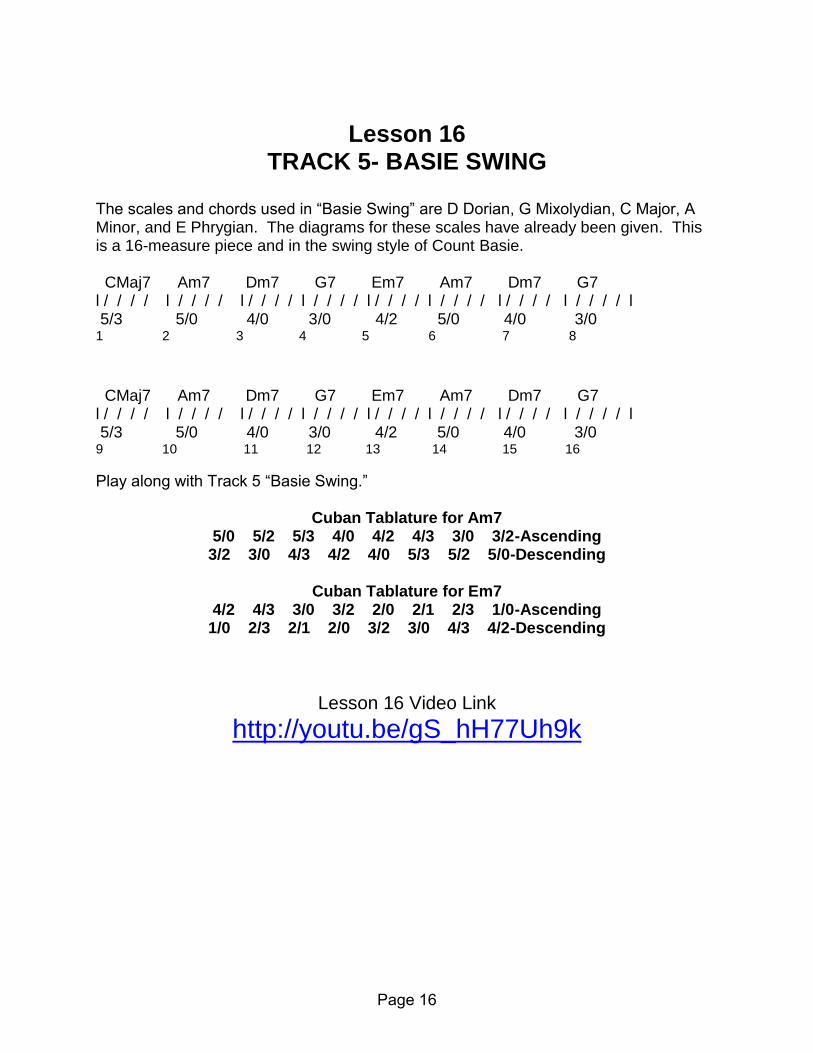
Lesson 16 TRACK 5- BASIE SWING
The scales and chords used in “Basie Swing” are D Dorian, G Mixolydian, C Major, A Minor, and E Phrygian. The diagrams for these scales have already been given. This is a 16-measure piece and in the swing style of Count Basie. CMaj7 Am7 Dm7 G7 Em7 Am7 Dm7 G7 l / / / / l / / / / l / / / / l / / / / l / / / / l / / / / l / / / / l / / / / l 5/3 5/0 4/0 3/0 4/2 5/0 4/0 3/0 1 2 3 4 5 6 7 8
CMaj7 Am7 Dm7 G7 Em7 Am7 Dm7 G7 l / / / / l / / / / l / / / / l / / / / l / / / / l / / / / l / / / / l / / / / l 5/3 5/0 4/0 3/0 4/2 5/0 4/0 3/0 9 10 11 12 13 14 15 16
Play along with Track 5 “Basie Swing.”
Cuban Tablature for Am7 5/0 5/2 5/3 4/0 4/2 4/3 3/0 3/2-Ascending
3/2 3/0 4/3 4/2 4/0 5/3 5/2 5/0-Descending
Cuban Tablature for Em7 4/2 4/3 3/0 3/2 2/0 2/1 2/3 1/0-Ascending
1/0 2/3 2/1 2/0 3/2 3/0 4/3 4/2-Descending
Lesson 16 Video Link
http://youtu.be/gS_hH77Uh9k
Page 16
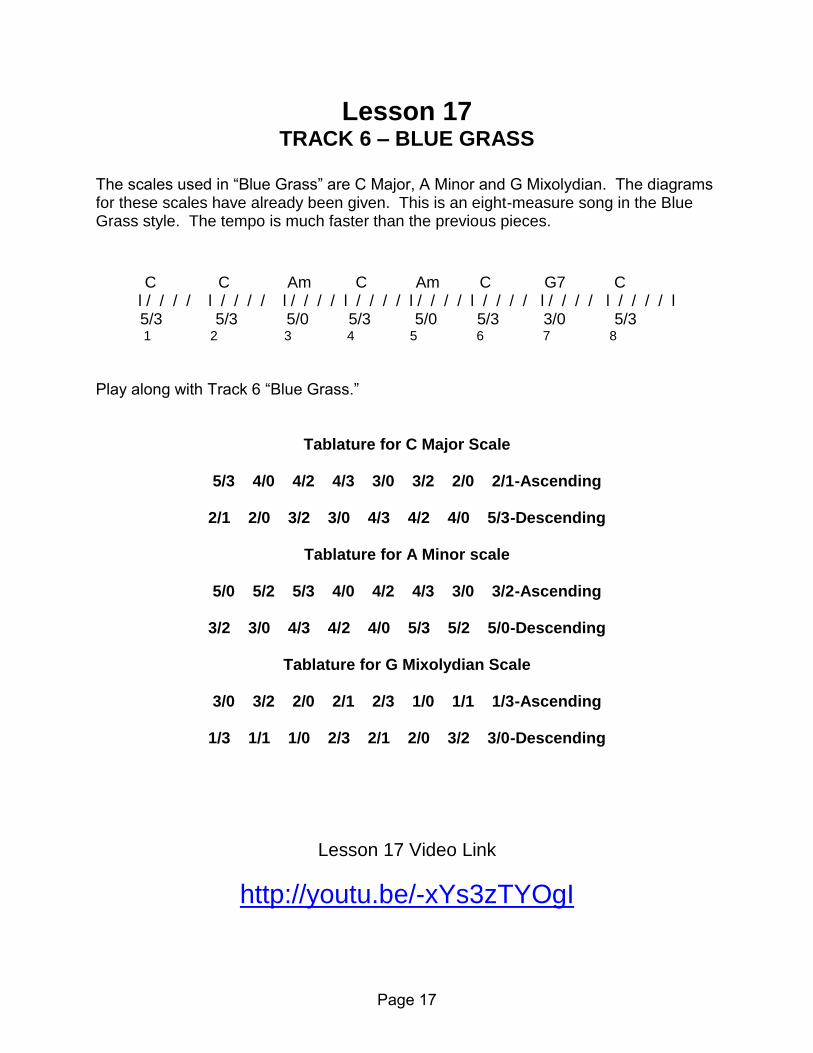
Lesson 17 TRACK 6 – BLUE GRASS
The scales used in “Blue Grass” are C Major, A Minor and G Mixolydian. The diagrams for these scales have already been given. This is an eight-measure song in the Blue Grass style. The tempo is much faster than the previous pieces.
C C Am C Am C G7 C
l / / / / l / / / / l / / / / l / / / / l / / / / l / / / / l / / / / l / / / / l 5/3 5/3 5/0 5/3 5/0 5/3 3/0 5/3 1 2 3 4 5 6 7 8
Play along with Track 6 “Blue Grass.”
Tablature for C Major Scale
5/3 4/0 4/2 4/3 3/0 3/2 2/0 2/1-Ascending
2/1 2/0 3/2 3/0 4/3 4/2 4/0 5/3-Descending
Tablature for A Minor scale
5/0 5/2 5/3 4/0 4/2 4/3 3/0 3/2-Ascending
3/2 3/0 4/3 4/2 4/0 5/3 5/2 5/0-Descending
Tablature for G Mixolydian Scale
3/0 3/2 2/0 2/1 2/3 1/0 1/1 1/3-Ascending
1/3 1/1 1/0 2/3 2/1 2/0 3/2 3/0-Descending
Lesson 17 Video Link
http://youtu.be/-xYs3zTYOgI
Page 17
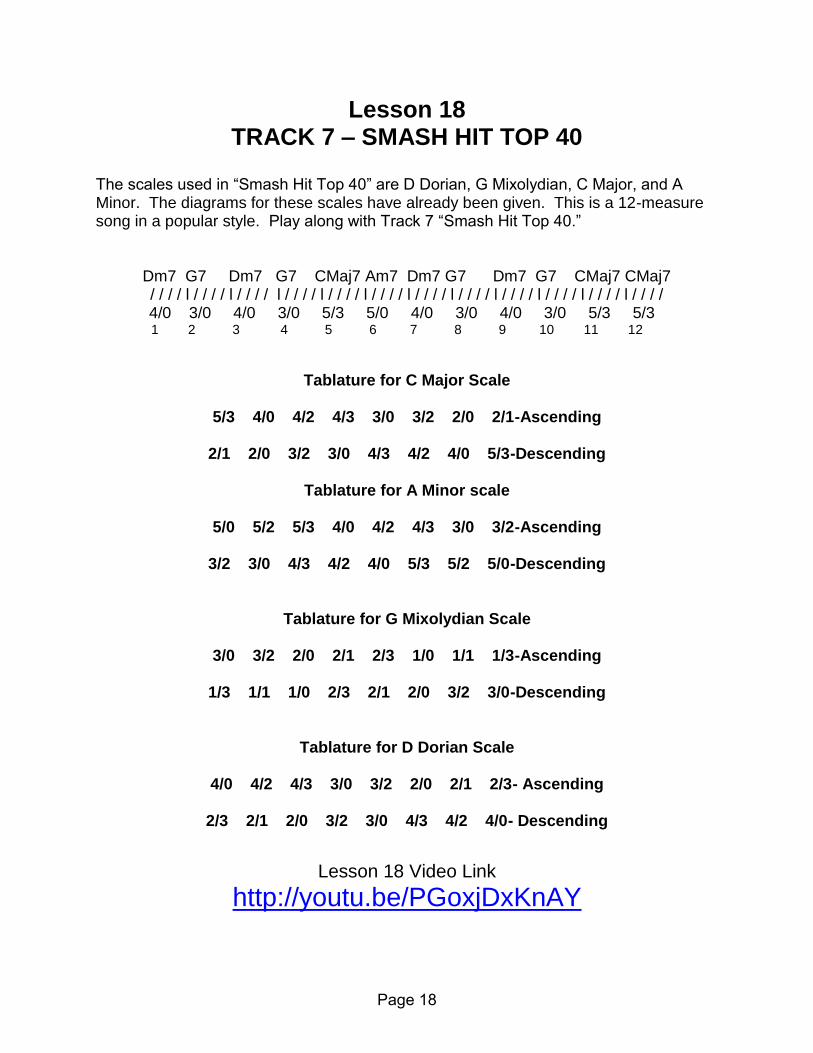
Lesson 18 TRACK 7 – SMASH HIT TOP 40
The scales used in “Smash Hit Top 40” are D Dorian, G Mixolydian, C Major, and A Minor. The diagrams for these scales have already been given. This is a 12-measure song in a popular style. Play along with Track 7 “Smash Hit Top 40.”
Dm7 G7 Dm7 G7 CMaj7 Am7 Dm7 G7 Dm7 G7 CMaj7 CMaj7 / / / / l / / / / l / / / / l / / / / l / / / / l / / / / l / / / / l / / / / l / / / / l / / / / l / / / / l / / / /
4/0 3/0 4/0 3/0 5/3 5/0 4/0 3/0 4/0 3/0 5/3 5/3 1 2 3 4 5 6 7 8 9 10 11 12
Tablature for C Major Scale
5/3 4/0 4/2 4/3 3/0 3/2 2/0 2/1-Ascending
2/1 2/0 3/2 3/0 4/3 4/2 4/0 5/3-Descending
Tablature for A Minor scale
5/0 5/2 5/3 4/0 4/2 4/3 3/0 3/2-Ascending
3/2 3/0 4/3 4/2 4/0 5/3 5/2 5/0-Descending
Tablature for G Mixolydian Scale
3/0 3/2 2/0 2/1 2/3 1/0 1/1 1/3-Ascending
1/3 1/1 1/0 2/3 2/1 2/0 3/2 3/0-Descending
Tablature for D Dorian Scale
4/0 4/2 4/3 3/0 3/2 2/0 2/1 2/3- Ascending
2/3 2/1 2/0 3/2 3/0 4/3 4/2 4/0- Descending
Lesson 18 Video Link
http://youtu.be/PGoxjDxKnAY
Page 18

Part 2 Lesson 19
FIFTH POSITION
As mentioned earlier, when looking at the patterns on the fingerboard to the twelfth fret, there are four columns in which all of the notes on all six strings are white. The first column is behind the nut indicating all of the open strings are white notes. The second column occurs at the fifth fret. The all-white columns or frets are very significant. Basically, all positions for improvisation will be connected to an all-white frets either with the first finger or the fourth finger of the left hand. The next chronological position is the second position. This means the first finger will cover all of the notes played in the second fret while the fourth finger will cover the notes in the fifth fret, the all-white fret. This position is an advanced position for improvisation and will be covered later in this volume.
This lesson and the remainder of Part 2 covers fifth position. The first finger will play all of the notes in the fifth fret, an all-white fret, while the notes in the eighth fret will be played by the little finger.
A B C
E F G
B C D
G A
D E F
A B C Fret 4 Fret 5 Fret 6 Fret 7 Fret 8
By starting on the sixth string and playing all of the white notes in these four frets from the sixth string to the first string, this position creates an A Natural Minor scale. This position is perfect for playing in A minor. The next two tracks are in A minor. The fifth position is the natural position for improvising in A minor.
Page 19

The following is a diagram for the fingering in fifth position including the proper fingering numbers.
Notice the first finger will also cover the fourth fret on the third string. The first finger will slide from the fourth fret to the fifth fret on the third string. Practice playing this two octave scale both ascending and descending.
Lesson 19 Video Link
http://youtu.be/eh4fcOUK6fw
1
2
1 1 1 1 1 1
2
3 3 3 3 3
4 4 4 4
Fret 4 Fret 5 Fret 6 Fret 7 Fret 8
Page 20
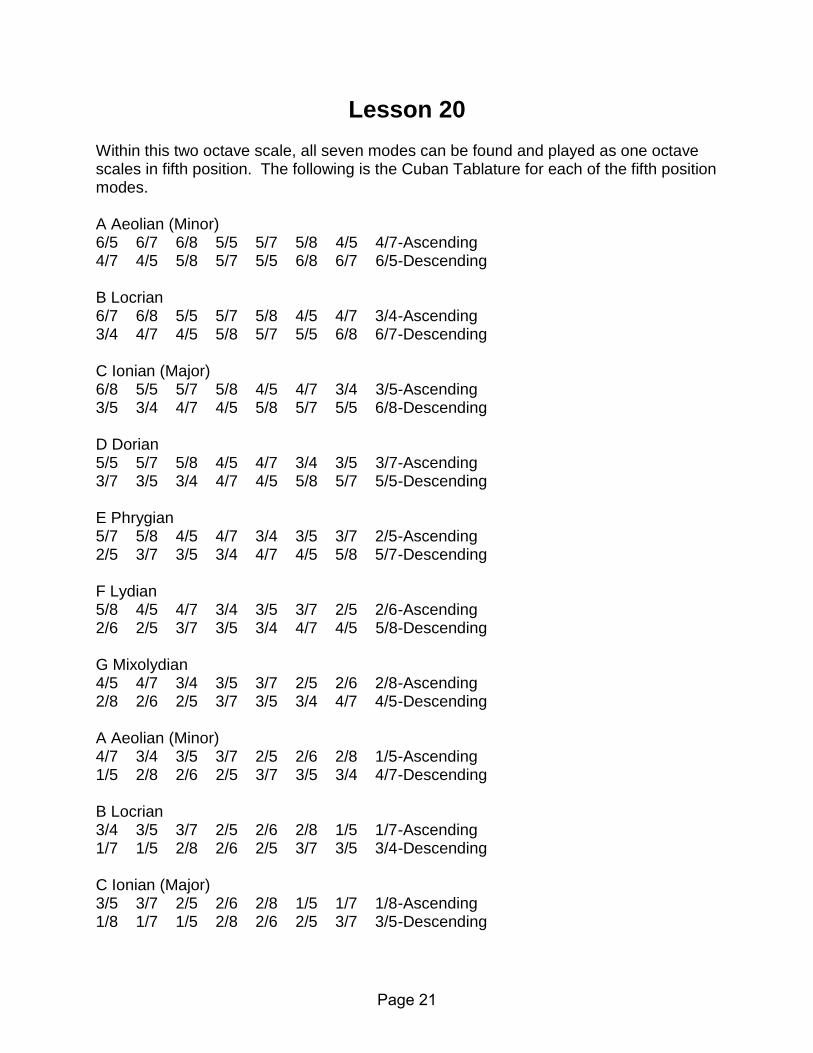
Lesson 20 Within this two octave scale, all seven modes can be found and played as one octave scales in fifth position. The following is the Cuban Tablature for each of the fifth position modes. A Aeolian (Minor) 6/5 6/7 6/8 5/5 5/7 5/8 4/5 4/7-Ascending 4/7 4/5 5/8 5/7 5/5 6/8 6/7 6/5-Descending B Locrian 6/7 6/8 5/5 5/7 5/8 4/5 4/7 3/4-Ascending 3/4 4/7 4/5 5/8 5/7 5/5 6/8 6/7-Descending C Ionian (Major) 6/8 5/5 5/7 5/8 4/5 4/7 3/4 3/5-Ascending 3/5 3/4 4/7 4/5 5/8 5/7 5/5 6/8-Descending D Dorian 5/5 5/7 5/8 4/5 4/7 3/4 3/5 3/7-Ascending 3/7 3/5 3/4 4/7 4/5 5/8 5/7 5/5-Descending E Phrygian 5/7 5/8 4/5 4/7 3/4 3/5 3/7 2/5-Ascending 2/5 3/7 3/5 3/4 4/7 4/5 5/8 5/7-Descending F Lydian 5/8 4/5 4/7 3/4 3/5 3/7 2/5 2/6-Ascending 2/6 2/5 3/7 3/5 3/4 4/7 4/5 5/8-Descending G Mixolydian 4/5 4/7 3/4 3/5 3/7 2/5 2/6 2/8-Ascending 2/8 2/6 2/5 3/7 3/5 3/4 4/7 4/5-Descending A Aeolian (Minor) 4/7 3/4 3/5 3/7 2/5 2/6 2/8 1/5-Ascending 1/5 2/8 2/6 2/5 3/7 3/5 3/4 4/7-Descending B Locrian 3/4 3/5 3/7 2/5 2/6 2/8 1/5 1/7-Ascending 1/7 1/5 2/8 2/6 2/5 3/7 3/5 3/4-Descending C Ionian (Major) 3/5 3/7 2/5 2/6 2/8 1/5 1/7 1/8-Ascending 1/8 1/7 1/5 2/8 2/6 2/5 3/7 3/5-Descending
Page 21

Play all of the notes and scales in fifth position ascending and descending to get use to the new fingering pattern.
Lesson 20 Video Link
http://youtu.be/yanlbZDHr-g
Page 22

Part 2-Fifth Position Lesson 21 & 22
Track 8 SLOW FUNKY MINOR BLUES
“Slow Funky Minor Blues” is a 12-bar blues in the key of A minor. The chords for this 12-bar blues look like the following.
Am7 Dm7 Am7 Am7 Dm7 Dm7
l / / / / l / / / / l / / / / l / / / / l / / / / l / / / / l 6/5 5/5 6/5 6/5 5/5 5/5 1 2 3 4 5 6
Am7 Am7 Bm7(b5) E7(b9) Am7 E7(b9) l / / / / l / / / / l / / / / l / / / / l / / / / l / / / / l 6/5 6/5 6/7 5/7 6/5 5/7 7 8 9 10 11 12
The A natural minor can be played in two octaves in the fifth position. The darkened notes in the following diagram indicate the note positions for the two octave A minor scale. Keep in mind, all of the notes in this diagram will work when played over an Am7 chord.
1
2
1 1 1 1 1 1
2
3 3 3 3 3
4 4 4 4
Fret 4 Fret 5 Fret 6 Fret 7 Fret 8
Page 23
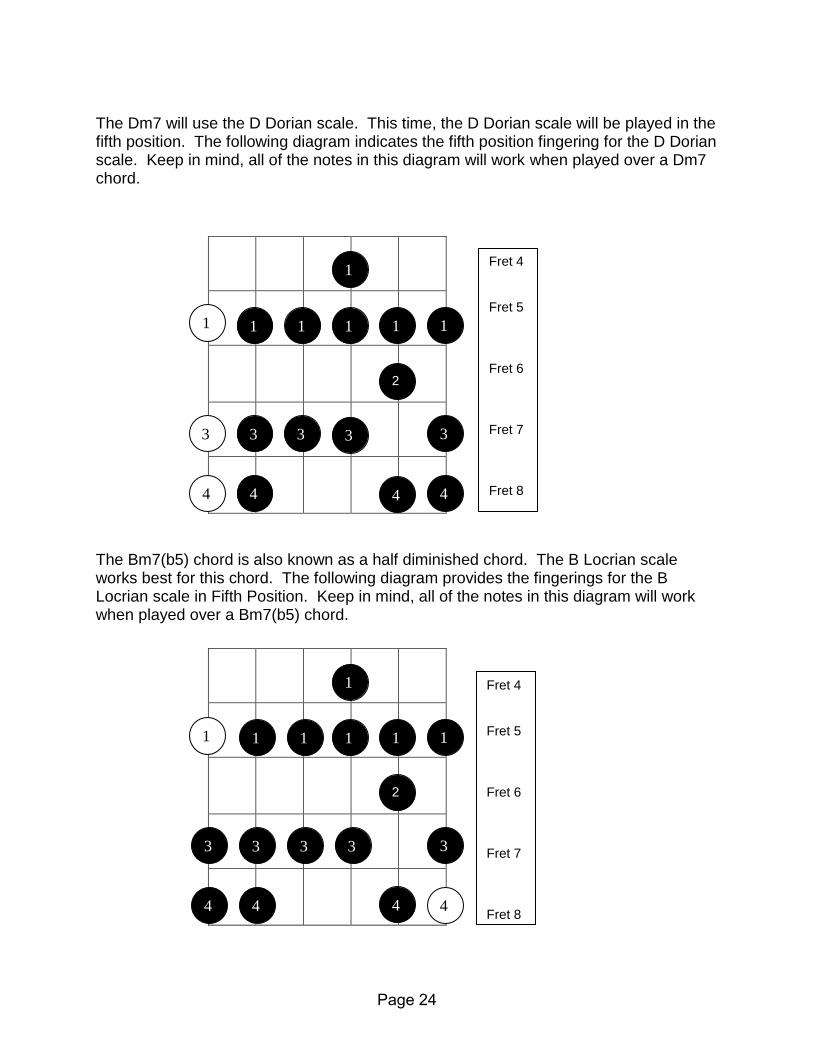
The Dm7 will use the D Dorian scale. This time, the D Dorian scale will be played in the fifth position. The following diagram indicates the fifth position fingering for the D Dorian scale. Keep in mind, all of the notes in this diagram will work when played over a Dm7 chord.
The Bm7(b5) chord is also known as a half diminished chord. The B Locrian scale works best for this chord. The following diagram provides the fingerings for the B Locrian scale in Fifth Position. Keep in mind, all of the notes in this diagram will work when played over a Bm7(b5) chord.
1
2
1 1 1 1 1 1
2
3 3 3 3 3
4 4 4 4
Fret 4 Fret 5 Fret 6 Fret 7 Fret 8
1
2
1 1 1 1 1 1
2
3 3 3 3 3
4 4 4 4
Fret 4 Fret 5 Fret 6 Fret 7 Fret 8
Page 24

The E7(b9) chord uses the E Phrygian scale. The following diagram provides the fifth position fingering for the E Phrygian scale. Keep in mind, all of the notes in this diagram will work when played over a E7(b9) chord.
Follow the above chord progression and play the corresponding scale with the track.
Lesson 21 Video Link
http://youtu.be/99hojA7C9R0
Play a solo with the track using the notes in fifth position.
Lesson 22 Video Link
http://youtu.be/NSkFCOm6_g8
1
2
1 1 1 1 1
2
3 3 3 3 3
4 4 4 4
Fret 4 Fret 5 Fret 6 Fret 7 Fret 8
1
Page 25

Lesson 23 Track 9
FAST DJANGO MINOR SWING
The 12-bar A minor chord progression is identical to that of “Slow Funky Minor Blues.” The basic difference is the style and the faster tempo. Play along with Track 9 “Fast Django Minor Swing.”
Lesson 23 Video Link
http://youtu.be/vwTh2npCYsI
Page 26

Lesson 24 TRACK 10
BLINK METAL
“Blink Metal” is a 32-bar chord progression in the metal style in the key of C. The example is intended to be played in the fifth position. It uses different chords than those already mentioned in this section. The chord progression looks like this.
Play 2 times C G A F C G A F C G A F C G A F
l / / / / l / / / / l / / / / l / / / / l / / / / l / / / / l / / / / l / / / / l 1 2 3 4 5 6 7 8
Play 2 times
C G A F C G A F l / / / / l / / / / l / / / / l / / / / l / / / / l / / / / l / / / / l / / / / l
1 2 3 4 5 6 7 8
To get the “metal” sound, the guitar plays what is known as “power chords.” These chords have only the root and the fifth of the chord. This is why there are no minor chords or seventh chords.
Like previous examples, all of the notes in fifth position will work for this example.
Lesson 24 Video Link
http://youtu.be/ypA-NojR4qA
1
2
1 1 1 1 1 1
2
3 3 3 3 3
4 4 4 4
Fret 4 Fret 5 Fret 6 Fret 7 Fret 8
Page 27
PART 3 Lesson 25
TENTH POSITION
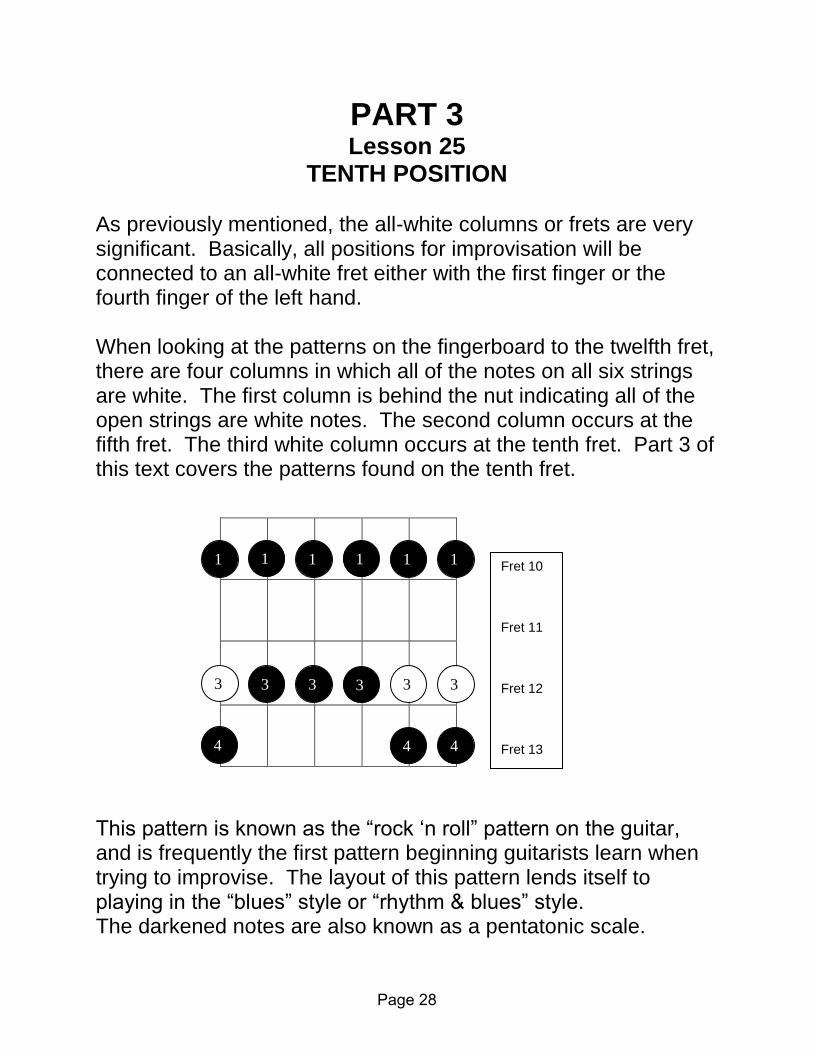
As previously mentioned, the all-white columns or frets are very significant. Basically, all positions for improvisation will be connected to an all-white fret either with the first finger or the fourth finger of the left hand. When looking at the patterns on the fingerboard to the twelfth fret, there are four columns in which all of the notes on all six strings are white. The first column is behind the nut indicating all of the open strings are white notes. The second column occurs at the fifth fret. The third white column occurs at the tenth fret. Part 3 of this text covers the patterns found on the tenth fret.
This pattern is known as the “rock „n roll” pattern on the guitar, and is frequently the first pattern beginning guitarists learn when trying to improvise. The layout of this pattern lends itself to playing in the “blues” style or “rhythm & blues” style. The darkened notes are also known as a pentatonic scale.
1 1 1 1 1 1
3 3 3 3 3 3
4
$
$
4 4
Fret 10 Fret 11 Fret 12 Fret 13
Page 28
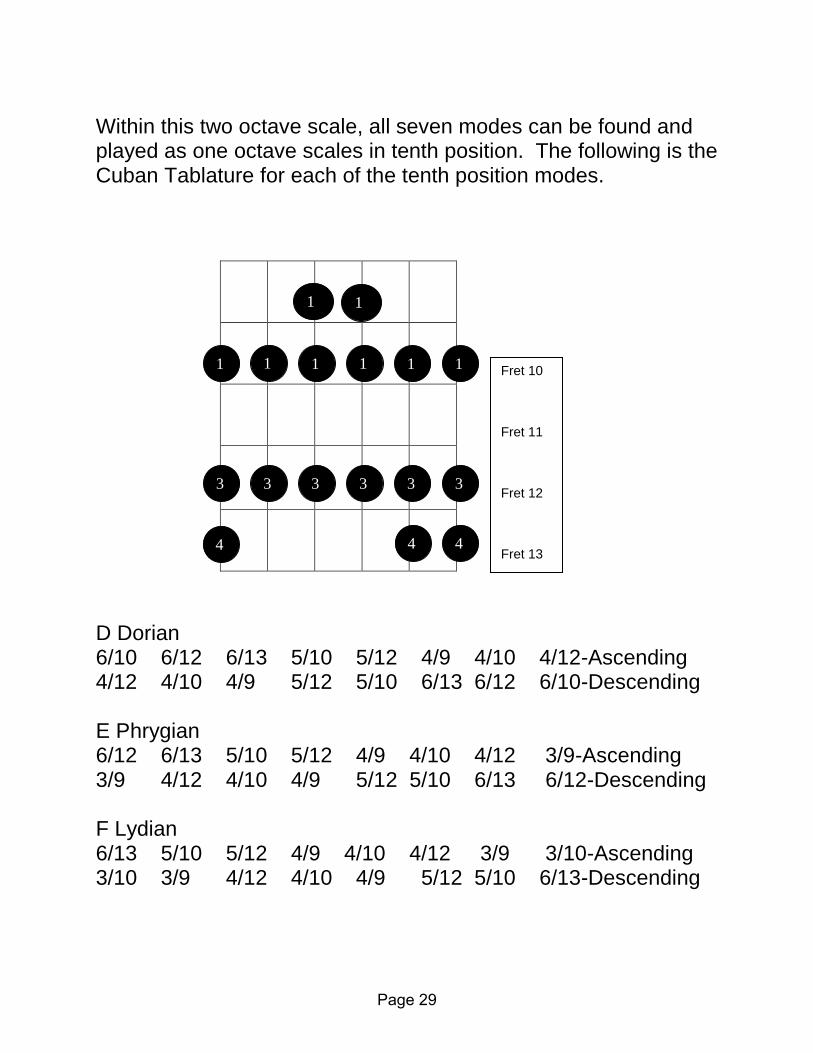
Within this two octave scale, all seven modes can be found and played as one octave scales in tenth position. The following is the Cuban Tablature for each of the tenth position modes.
D Dorian 6/10 6/12 6/13 5/10 5/12 4/9 4/10 4/12-Ascending 4/12 4/10 4/9 5/12 5/10 6/13 6/12 6/10-Descending E Phrygian 6/12 6/13 5/10 5/12 4/9 4/10 4/12 3/9-Ascending 3/9 4/12 4/10 4/9 5/12 5/10 6/13 6/12-Descending F Lydian 6/13 5/10 5/12 4/9 4/10 4/12 3/9 3/10-Ascending 3/10 3/9 4/12 4/10 4/9 5/12 5/10 6/13-Descending
1 1 1 1 1 1
3 3 3 3 3 3
4
$
$
4 4
Fret 10 Fret 11 Fret 12 Fret 13
1 1
Page 29

G Mixolydian 5/10 5/12 4/9 4/10 4/12 3/9 3/10 3/12-Ascending 3/12 3/10 3/9 4/12 4/10 4/9 5/12 5/10-Descending A Aeolian (Minor) 5/12 4/9 4/10 4/12 3/9 3/10 3/12 2/10-Ascending 2/10 3/12 3/10 3/9 4/12 4/10 4/9 5/12-Descending B Locrian 4/9 4/10 4/12 3/9 3/10 3/12 2/10 2/12-Ascending 2/12 2/10 3/12 3/10 3/9 4/12 4/10 4/9-Descending C Ionian (Major) 4/10 4/12 3/9 3/10 3/12 2/10 2/12 2/13-Ascending 2/13 2/12 2/10 3/12 3/10 3/9 4/12 4/10-Descending D Dorian 4/12 3/9 3/10 3/12 2/10 2/12 2/13 1/10-Ascending 1/10 2/13 2/12 2/10 3/12 3/10 3/9 4/12-Descending E Phrygian 3/9 3/10 3/12 2/10 2/12 2/13 1/10 1/12-Ascending 1/12 1/10 2/13 2/12 2/10 3/12 3/10 3/9-Descending F Lydian 3/10 3/12 2/10 2/12 2/13 1/10 1/12 1/13-Ascending 1/13 1/12 1/10 2/13 2/12 2/10 3/12 3/10-Descending
Lesson 25 Video Link
http://youtu.be/v6zUxlBiBcg
Page 30
Lesson 26 RHYTHM & BLUES
“Rhythm & Blues” is a 12-bar blues chord progression in the key of D. The chord progression looks like this. D G7 D D G7 G7
l / / / / l / / / / l / / / / l / / / / l / / / / l / / / / l 6/10 5/10 6/10 6/10 5/10 5/10 1 2 3 4 5 6
D D A7 G7 D A7 l / / / / l / / / / l / / / / l / / / / l / / / / l / / / / l 6/10 6/10 5/12 5/10 6/10 5/12 7 8 9 10 11 12
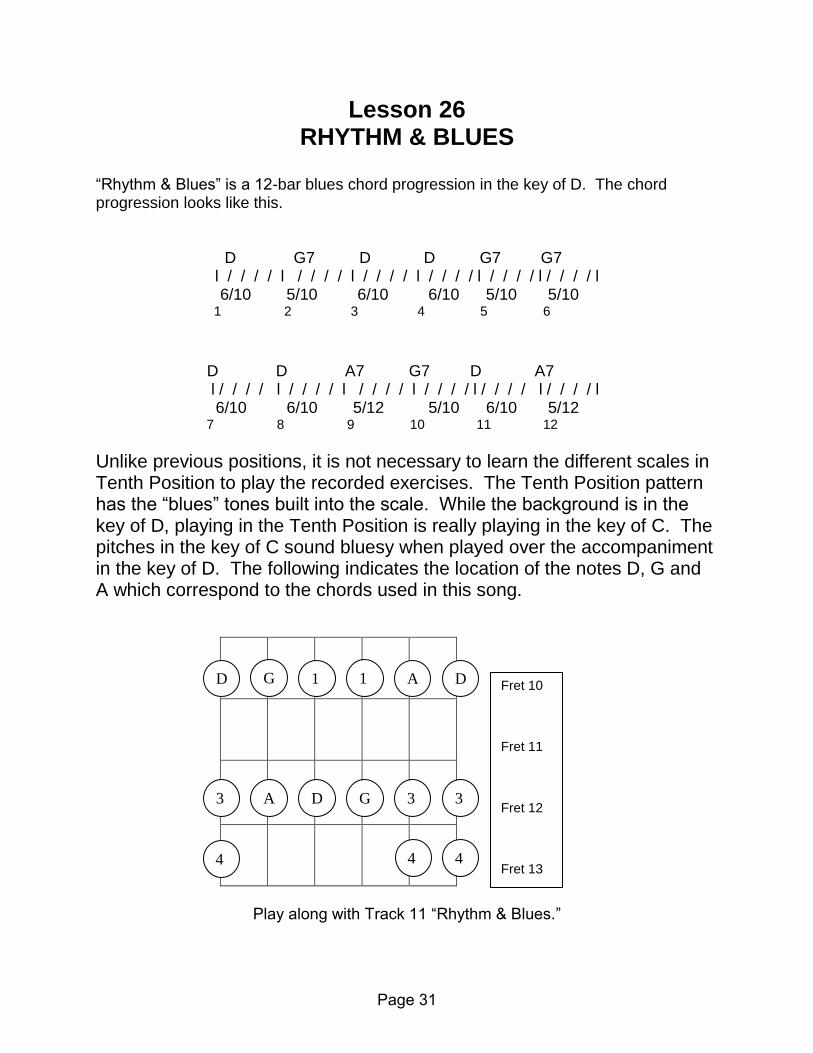
Unlike previous positions, it is not necessary to learn the different scales in Tenth Position to play the recorded exercises. The Tenth Position pattern has the “blues” tones built into the scale. While the background is in the key of D, playing in the Tenth Position is really playing in the key of C. The pitches in the key of C sound bluesy when played over the accompaniment in the key of D. The following indicates the location of the notes D, G and A which correspond to the chords used in this song.
Play along with Track 11 “Rhythm & Blues.”
D G 1 1 A D
3 A D G 3 3
4
$
$
4 4
Fret 10 Fret 11 Fret 12 Fret 13
Page 31


PART 3 Lesson 27
METAL BLUES
“Metal Blues” is 12-bar blues chord progression in the key of D. The chord progression looks like this. D G7 D D G7 G7
l / / / / l / / / / l / / / / l / / / / l / / / / l / / / / l 6/10 5/10 6/10 6/10 5/10 5/10 1 2 3 4 5 6
D D A7 G7 D A7 l / / / / l / / / / l / / / / l / / / / l / / / / l / / / / l 6/10 6/10 5/12 5/10 6/10 5/12 7 8 9 10 11 12
“Metal Blues” and “Rhythm & Blues” are quite similar structurally, however they differ stylistically. The approach for improvisation for both songs will be the same. Play along with Track 12 “Metal Blues.”
Lesson 27 Video Link
http://youtu.be/Lcb9mTXCXMw
Page 33
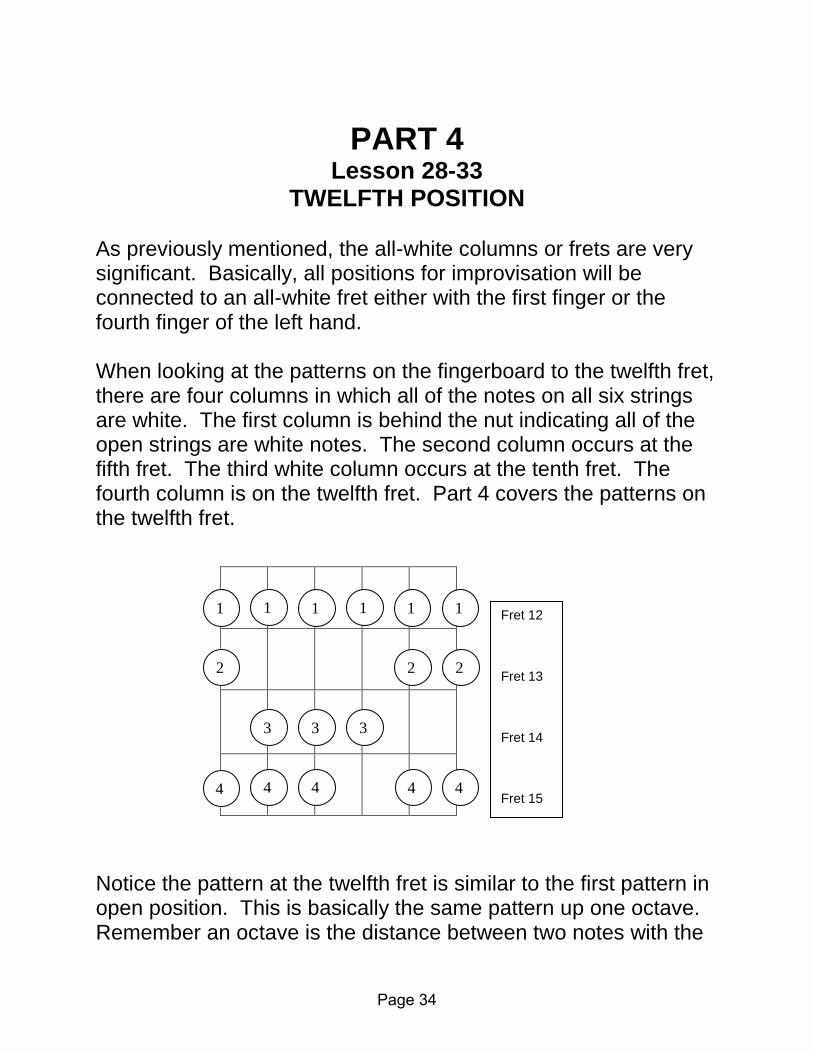
PART 4 Lesson 28-33
TWELFTH POSITION
As previously mentioned, the all-white columns or frets are very significant. Basically, all positions for improvisation will be connected to an all-white fret either with the first finger or the fourth finger of the left hand. When looking at the patterns on the fingerboard to the twelfth fret, there are four columns in which all of the notes on all six strings are white. The first column is behind the nut indicating all of the open strings are white notes. The second column occurs at the fifth fret. The third white column occurs at the tenth fret. The fourth column is on the twelfth fret. Part 4 covers the patterns on the twelfth fret.
Notice the pattern at the twelfth fret is similar to the first pattern in open position. This is basically the same pattern up one octave. Remember an octave is the distance between two notes with the
1 1 1 1 1 1
2
3 3 3
2 2
4
$
$
4 4
Fret 12 Fret 13 Fret 14 Fret 15
4 4
Page 34
same pitch name. The difference between the open position pattern and the twelfth fret pattern is the first finger will play all of the “open” strings. While the pattern is the same, all of the notes in the twelfth fret pattern are an octave higher making the sound of the notes quite different. Play Track 2 “Funk Fusion” in the twelfth position.
Lesson 28 Video Link
http://youtu.be/_Fq7S-I_Vjo Play Track 3 “Rock Funk” in the twelfth position.
Lesson 29 Video Link
http://youtu.be/K3PflMyS0UI Play Track 4 “EZ Bossa” in the twelfth position.
Lesson 30 Video Link
http://youtu.be/SAH9YFYqoEM
Page 35
Play Track 5 “Basie Swing” in the twelfth position.
Lesson 31 Video Link
http://youtu.be/lvFMi3Y7lWs Play Track 6 “Blue Grass” in the twelfth position.
Lesson 32 Video Link
http://youtu.be/YDEA4yPLOnk Play Track 7 “Smash Hit Top 40” in the twelfth position.
Lesson 33 Video Link
http://youtu.be/j6ajDUI2xsM
Page 36
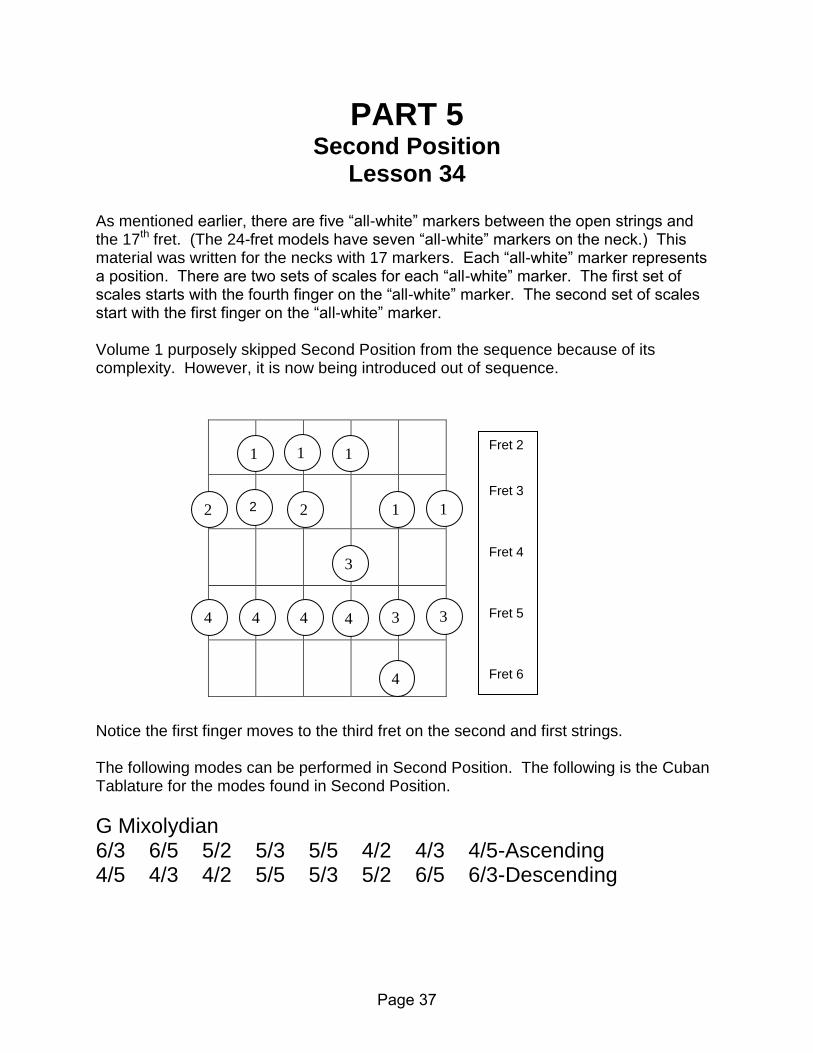
PART 5 Second Position
Lesson 34
As mentioned earlier, there are five “all-white” markers between the open strings and the 17th fret. (The 24-fret models have seven “all-white” markers on the neck.) This material was written for the necks with 17 markers. Each “all-white” marker represents a position. There are two sets of scales for each “all-white” marker. The first set of scales starts with the fourth finger on the “all-white” marker. The second set of scales start with the first finger on the “all-white” marker. Volume 1 purposely skipped Second Position from the sequence because of its complexity. However, it is now being introduced out of sequence.
Notice the first finger moves to the third fret on the second and first strings. The following modes can be performed in Second Position. The following is the Cuban Tablature for the modes found in Second Position.
G Mixolydian 6/3 6/5 5/2 5/3 5/5 4/2 4/3 4/5-Ascending 4/5 4/3 4/2 5/5 5/3 5/2 6/5 6/3-Descending
1
2
2
1
2
1
1 1 2
3
3
4 4 4 3 4
4
Fret 2 Fret 3 Fret 4 Fret 5 Fret 6
Page 37

A Aeolian (Minor) 6/5 5/2 5/3 5/5 4/2 4/3 4/5 3/2-Ascending 3/2 4/5 4/3 4/2 5/5 5/3 5/2 6/5-Descending B Locrian 5/2 5/3 5/5 4/2 4/3 4/5 3/2 3/4-Ascending 3/4 3/2 4/5 4/3 4/2 5/5 5/3 5/2-Descending C Ionian (Major) 5/3 5/5 4/2 4/3 4/5 3/2 3/4 3/5-Ascending 3/5 3/4 3/2 4/5 4/3 4/2 5/5 5/3-Descending D Dorian 5/5 4/2 4/3 4/5 3/2 3/4 3/5 2/3-Ascending 2/3 3/5 3/4 3/2 4/5 4/3 4/2 5/5-Descending E Phrygian 4/2 4/3 4/5 3/2 3/4 3/5 2/3 2/5-Ascending 2/5 2/3 3/5 3/4 3/2 4/5 4/3 4/2-Descending F Lydian 4/3 4/5 3/2 3/4 3/5 2/3 2/5 2/6-Ascending 2/6 2/5 2/3 3/5 3/4 3/2 4/5 4/3-Descending G Mixolydian 4/5 3/2 3/4 3/5 2/3 2/5 2/6 1/3-Ascending 1/3 2/6 2/5 2/3 3/5 3/4 3/2 4/5-Descending A Aeolian (Minor) 3/2 3/4 3/5 2/3 2/5 2/6 1/3 1/5-Ascending 1/5 1/3 2/6 2/5 2/3 3/5 3/4 3/2-Descending
Page 38

Play Track 2 “Easy 2-5” in the second position.
Lesson 35 Video Link
http://youtu.be/7XSoTfg0dWQ
Play Track 3 “Rock Funk” in the second position.
Lesson 36 Video Link
http://youtu.be/XFo7iqTbEn8 Play Track 4 “EZ Bossa” in the second position.
Lesson 37 Video Link
http://youtu.be/Epl-TmwhAZs Play Track 5 “Basie Swing” in the second position.
Lesson 38 Video Link
http://youtu.be/FE5n2Q0MImI
Page 39

COMBINING POSITIONS
Practice playing all of the notes in each of the five positions.
Lesson 39 Video Link
http://youtu.be/R4xyT9sIIN0
Play each track again and practice improvising in all five positions during the same song.
Lesson 40 Video Link
http://youtu.be/fO4FZUO8ecI Experiment with ways of connecting the notes in the five positions.
Lesson 41 Video Link
http://youtu.be/JZ2Tp7n4bBk
Page 40

PART 6 Seventh Position
Lesson 42
As mentioned earlier, there are five “all-white” markers between the open strings and the 17th fret. (The 24-fret models have seven “all-white” markers on the neck.) This material was written for the necks with 17 markers. Each “all-white” marker represents a position. There are two sets of scales for each “all-white” marker. The first set of scales starts with the fourth finger on the “all-white” marker. The second set of scales start with the first finger on the “all-white” marker. Volume 1 purposely skipped Seventh Position from the sequence because of its complexity. However, it is now being introduced out of sequence.
The following modes can be performed in Seventh Position. The following is the Cuban Tablature for the modes found in Second Position.
B Locrian 6/7 6/8 6/10 5/7 5/8 5/10 4/7 4/9-Ascending 4/9 4/7 5/10 5/8 5/7 6/10 6/8 6/7-Descending
1
1 2
2
1
3
1 1 1
2
4
3
4 4 4
2
4 4
Fret 7 Fret 8 Fret 9 Fret 10 Fret 11
2
Page 41
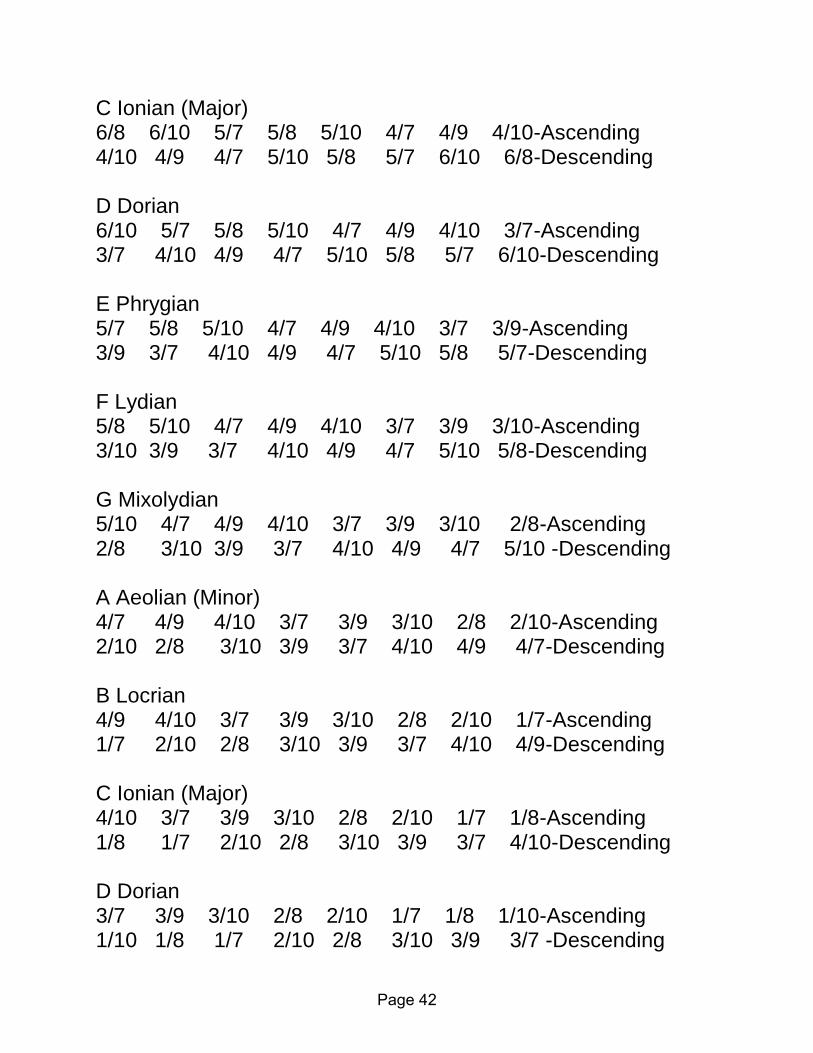
C Ionian (Major) 6/8 6/10 5/7 5/8 5/10 4/7 4/9 4/10-Ascending 4/10 4/9 4/7 5/10 5/8 5/7 6/10 6/8-Descending D Dorian 6/10 5/7 5/8 5/10 4/7 4/9 4/10 3/7-Ascending 3/7 4/10 4/9 4/7 5/10 5/8 5/7 6/10-Descending E Phrygian 5/7 5/8 5/10 4/7 4/9 4/10 3/7 3/9-Ascending 3/9 3/7 4/10 4/9 4/7 5/10 5/8 5/7-Descending F Lydian 5/8 5/10 4/7 4/9 4/10 3/7 3/9 3/10-Ascending 3/10 3/9 3/7 4/10 4/9 4/7 5/10 5/8-Descending G Mixolydian 5/10 4/7 4/9 4/10 3/7 3/9 3/10 2/8-Ascending 2/8 3/10 3/9 3/7 4/10 4/9 4/7 5/10 -Descending A Aeolian (Minor) 4/7 4/9 4/10 3/7 3/9 3/10 2/8 2/10-Ascending 2/10 2/8 3/10 3/9 3/7 4/10 4/9 4/7-Descending B Locrian 4/9 4/10 3/7 3/9 3/10 2/8 2/10 1/7-Ascending 1/7 2/10 2/8 3/10 3/9 3/7 4/10 4/9-Descending C Ionian (Major) 4/10 3/7 3/9 3/10 2/8 2/10 1/7 1/8-Ascending 1/8 1/7 2/10 2/8 3/10 3/9 3/7 4/10-Descending D Dorian 3/7 3/9 3/10 2/8 2/10 1/7 1/8 1/10-Ascending 1/10 1/8 1/7 2/10 2/8 3/10 3/9 3/7 -Descending
Page 42

Play Track 2 “Easy 2-5” in the seventh position.
Lesson 43 Video Link
http://youtu.be/koHOGwwcc6U Play Track 3 “Rock Funk” in the seventh position.
Lesson 44 Video Link
http://youtu.be/MyfZoZ273Lg Play Track 4 “EZ Bossa” in the seventh position.
Lesson 45 Video Link
http://youtu.be/Z4D0f-JDL00 Play Track 5 “Basie Swing” in the seventh position.
Lesson 46 Video Link
http://youtu.be/yXqCLxrBWIg
Page 43

COMBINING POSITIONS Practice playing all of the notes in each of the six positions.
Lesson 47 Video Link
http://youtu.be/Z6ATjxUtGfM Play each track again and practice improvising in all six positions during the same song.
Lesson 48 Video Link
http://youtu.be/DmUQ-PtgBzU
Page 44
Part 7 Lesson 49
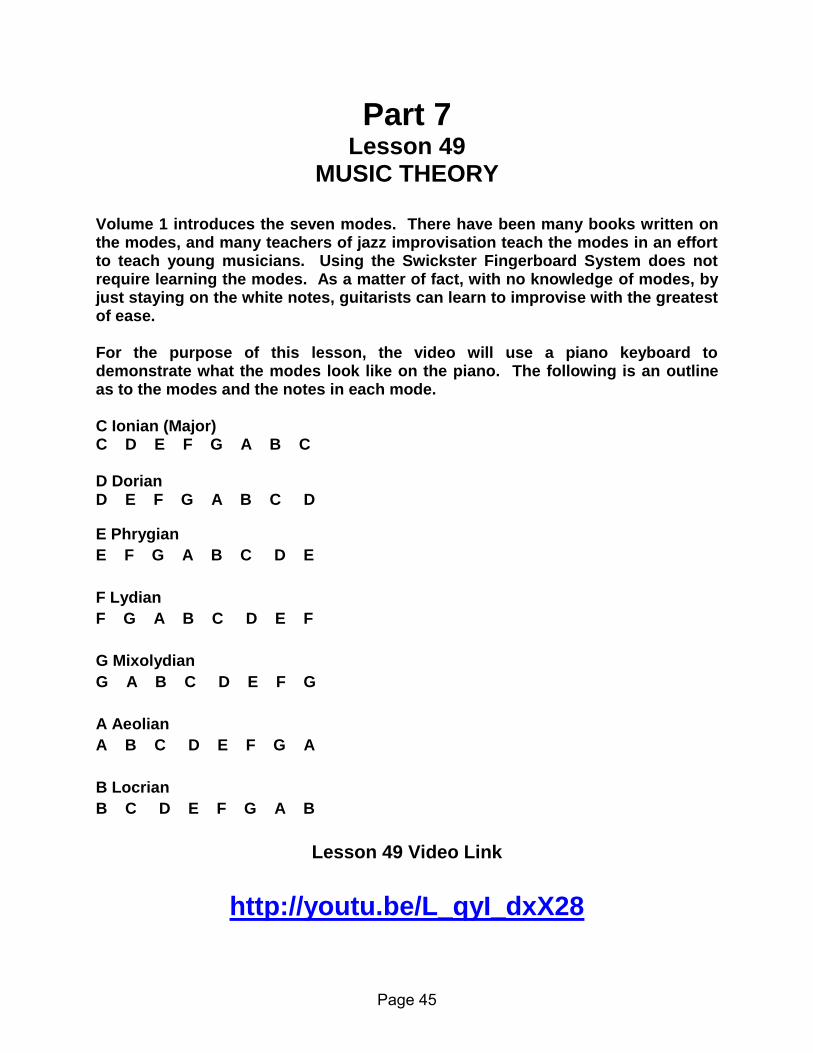
MUSIC THEORY
Volume 1 introduces the seven modes. There have been many books written on the modes, and many teachers of jazz improvisation teach the modes in an effort to teach young musicians. Using the Swickster Fingerboard System does not require learning the modes. As a matter of fact, with no knowledge of modes, by just staying on the white notes, guitarists can learn to improvise with the greatest of ease. For the purpose of this lesson, the video will use a piano keyboard to demonstrate what the modes look like on the piano. The following is an outline as to the modes and the notes in each mode. C Ionian (Major) C D E F G A B C D Dorian D E F G A B C D
E Phrygian
E F G A B C D E
F Lydian
F G A B C D E F
G Mixolydian
G A B C D E F G
A Aeolian
A B C D E F G A
B Locrian
B C D E F G A B
Lesson 49 Video Link
http://youtu.be/L_qyI_dxX28
Page 45

Page 46
Part 7 Lesson 50
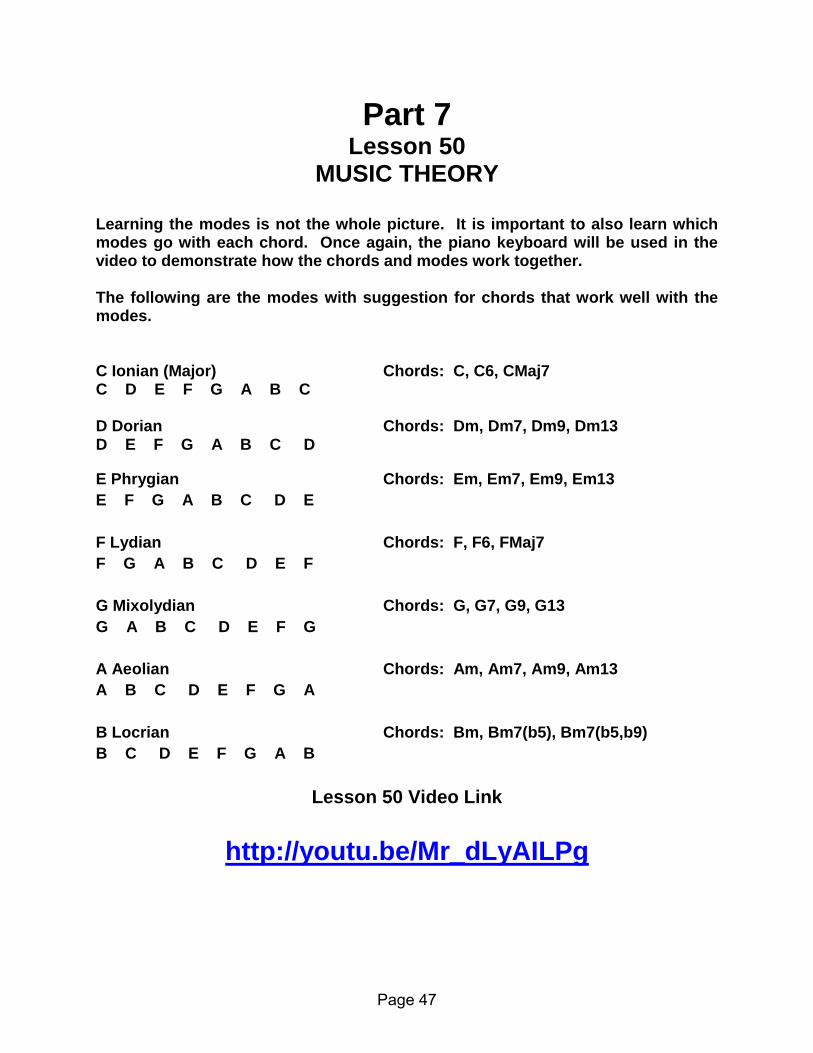
MUSIC THEORY
Learning the modes is not the whole picture. It is important to also learn which modes go with each chord. Once again, the piano keyboard will be used in the video to demonstrate how the chords and modes work together. The following are the modes with suggestion for chords that work well with the modes. C Ionian (Major) Chords: C, C6, CMaj7 C D E F G A B C D Dorian Chords: Dm, Dm7, Dm9, Dm13 D E F G A B C D
E Phrygian Chords: Em, Em7, Em9, Em13
E F G A B C D E
F Lydian Chords: F, F6, FMaj7
F G A B C D E F
G Mixolydian Chords: G, G7, G9, G13
G A B C D E F G
A Aeolian Chords: Am, Am7, Am9, Am13
A B C D E F G A
B Locrian Chords: Bm, Bm7(b5), Bm7(b5,b9)
B C D E F G A B
Lesson 50 Video Link
http://youtu.be/Mr_dLyAILPg
Page 47