the master guide to rigging a blackmagic design cinema camera
DESCRIPTION
ÂTRANSCRIPT


Read the online version of this guide here:
http://wolfcrow.com/blog/the-blackmagic-pocket-camera-guide-part-one-ergonomics-and-specifications/
Copyright © 2013, Sareesh Sudhakaran. All trademarks areproperty of their respective owners.
This document is licensed under Creative Commons, so the following freedoms apply.
You are free:
• to Share — to copy, distribute and transmit the work
• to Remix — to adapt the work
Under the following conditions:
• Attribution — You must attribute the work in the manner specified by the author or licensor (but not in any way that suggests that they endorse you or your use of the work).
• Non-commercial — You may not use this work forcommercial purposes.
• Share Alike — If you alter, transform, or build upon thiswork, you may distribute the resulting work only under the same or similar license to this one.
You can find out more about this license at:
http://creativecommons.org/licenses/by-nc-sa/3.0/us/
wolfcrow.com Page 1

Disclosure: Links in this ebook may be to our affiliates; sales through affiliate links may benefit this site. Please help support this website by patronizing Amazon. It won’t cost you anything extra.
You know this guide is free, right? May I ask you to help wolfcrow.com in return? Please share this guide with your friends or readers. Write a post telling everyone about this guide, and all the other great and absolutely free stuff availableon wolfcrow!
You should also share this via Facebook, Google+, Twitter, Pinterest or any other social networking site. For the latest updates, friend us on:
FacebookGoogle+Twitter
This ebook includes a number of affiliate links, from which I geta small percentage of anything you buy. This percentage comes out of the store’s pocket, not yours. In fact, if you want to support wolfcrow at no cost, one of the easiest ways to do so is to buy anything from Amazon (just click the link and continue shopping).
There’s one more great way to help wolfcrow: visit http://wolfcrow.com/blog/pleasesupport-wolfcrow/ and buy me a cup of coffee, a case of beer or a fancy dinner.
At the very least, give me feedback. Tell me how you feel aboutthis primer and wolfcrow. Help me improve!
If you have done any of the above and supported wolfcrow, a big THANK YOU!
wolfcrow.com Page 2

TABLE OF CONTENTS
Chapter
TitlePage
Number
1 Introduction and Specifications 4
2 Lenses and Adapters 11
3Matte boxes, Filters and Follow Focus Systems
23
4 Viewfinders and External Monitoring 26
5 Cages and Shoulder Rigs 31
6 Audio and Power Supplies 35
7The Costs of Putting Together a Blackmagic Pocket Cinema Camera Kit
38
8Recording Modes and Data Management
44
9 How to Expose your Camera Correctly 48
10 Post Production Workflows 54
wolfcrow.com Page 3

Chapter 1Introduction and Specifications
This guide covers everything you need to know to:
• Put together a Blackmagic Design Pocket Cinema Camera system,
• Select the right lenses and accessories,
• Handle exposure, data, power and monitoring,
• Process the CinemaDNG RAW footage from the camera, and
• Find the quickest post production workflow.
I have one bit of important advice: Buy only what you need. If you can’t judge rationally, get somebody with experience to assist you. A complete camera system is a constantly evolving thing, and you’re better off starting with the bare minimum and adding stuff later, than spending all your money on a setup thatwill evolve anyway.
Who is the Blackmagic Pocket Camera for?
In Blackmagic Design’s own words:
The Blackmagic Pocket Cinema Camera lets you shoot digital film quality images in virtually any location and for any kind of production.
If you want to make a documentary in a remote location then one of the major challenges is taking heavy equipmentwith you. Blackmagic Pocket Cinema Camera’s compact size means you’re agile enough to follow the story wherever it may take you!
wolfcrow.com Page 4

Passionate independent film makers can now shoot digital film quality and get the beauty that comes from wide dynamic range and color correction…
Bigger cameras can create barriers for journalists, whereasthe Blackmagic Pocket Cinema Camera is perfect when you’re fighting your way through a crowd to find the perfect angle to shoot from, sometimes without being noticed!
Blackmagic Pocket Cinema Camera’s affordable price, sizeand image quality make it perfect for use as a crash cam.
The Blackmagic Pocket Cinema Camera has a 12.5 ounce design with a smaller surface area than many new smartphones, as well as a 2.5mm jack connection for LANC remote control. This is great in situations where you are able to position a camera but not someone to operate it!
The Blackmagic Pocket Cinema Camera is a fantastic camera for personal use, especially when you want to achieve quality beyond the level of traditional video camcorders.
Students learning the craft of filmmaking can now get to use a digital film camera rather than only learning the theory behind the art.
In short, Blackmagic Design has created a product so revolutionary that they themselves don’t really know which market it will ultimately end up serving the most.
Ergonomics, Dimensions and Weight
It’s funny how, when the original Blackmagic Cinema Camera (BMCC) came out, the technical specifications page was severely lacking in information about dimensions of the
wolfcrow.com Page 5

camera. At the time, I used what information was available, and reverse-engineered my own specs. I’m glad to see they have followed my system of marking the dimensions of the camera in a clear manner:
Here is the Blackmagic Pocket Camera in comparison to an iPhone 5, so you know what size we are talking about here:
Size-wise, they are very similar, though the Pocket Camera is exactly 5 times thicker.
An iPhone 5 weighs about 112 grams, so the Blackmagic Pocket Camera is about 3 times heavier at 355 grams, without the battery, lens and the memory card. The weight of a typical SDXC card is about 20g, and the weight of a typical EN-EL20
wolfcrow.com Page 6

battery is around 40g. Therefore, the total weight of the camerawith one card and battery is about 415 grams.
For my philosophy on camera ergonomics and rig design, please read the Chapter on Ergonomics in the ComprehensiveGuide to Rigging Any Camera.
The Blackmagic Pocket Camera is a seriously front-heavy camera. All you have to do to tip the balance is add a lens in front, which you must. The greatest problem is going to be steadying it during handheld use.
The camera offers two mounting screws - one at the top and one at the bottom - in line with the vertical center of the lens. These are 1/4" -20 UNC screw threads. The bottom is obviously for the tripod, while the top is for who-knows-what? I don’t see how the Blackmagic Pocket Camera is strong enough to support an external monitor or an audio recorder, or is in the need of a handle or top cheese plate. In any case, it’s there, if you find the need to attach something. This mount will also accept BSW screws of a similar gauge without causing much pain.
Adding a cage will make the camera ‘bulkier’, but it will take all the accessories that are important for a consistent professionalvideo career.
The camera chassis is magnesium alloy, which is both light and strong. The grip makes it slightly easy to hold, but will never be as comfortable as a DSLR for long periods, simply because it’s too small.
Here are the connections available on the Blackmagic Pocket Camera:
wolfcrow.com Page 7

We’ll get into details in subsequent chapters. The specification also mentions a USB 2.0 Mini-B port, which is at the bottom:
At the back are the 3.5” LCD screen with a resolution of 800 x 480 (about 250 ppi), and the IRIS, Focus and Menu controls.
wolfcrow.com Page 8
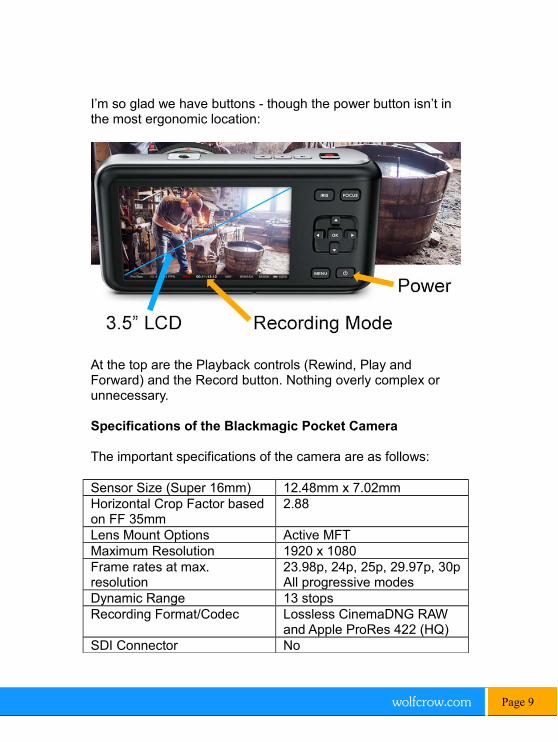
I’m so glad we have buttons - though the power button isn’t in the most ergonomic location:
At the top are the Playback controls (Rewind, Play and Forward) and the Record button. Nothing overly complex or unnecessary.
Specifications of the Blackmagic Pocket Camera
The important specifications of the camera are as follows:
Sensor Size (Super 16mm) 12.48mm x 7.02mmHorizontal Crop Factor based on FF 35mm
2.88
Lens Mount Options Active MFTMaximum Resolution 1920 x 1080Frame rates at max. resolution
23.98p, 24p, 25p, 29.97p, 30pAll progressive modes
Dynamic Range 13 stopsRecording Format/Codec Lossless CinemaDNG RAW
and Apple ProRes 422 (HQ) SDI Connector No
wolfcrow.com Page 9

HDMI Connectors One, Type DThunderbolt Connector No3.5mm TRS headphone jack OneMicrophone input 3.5mm TRS analog stereoLANC input 2.5mm LANC for Rec
Start/Stop, Iris Control and Focus
LCD Monitor 3.5” and 800 x 480Audio Specs 2 channels 48 kHz and 24 bitUSB Connector One, 2.0 Mini-BIncluded Accessories Wrist strap, Turret Dust Cap,
12V AC Adapter, EN-EL20 Lithium Ion Removable /Rechargeable Battery
Included Software DaVinci Resolve LiteWarranty 12 months
The greatest negative is the lack of professional audio ports. The camera seriously misses a ¼” or XLR connector, as well as SDI for timecode. The decision not to have these ports is keeping with the size of the camera, of course. It would have had to be bigger to accommodate any of the professional connectors.
The second big negative is the lack of a Thunderbolt port, which tells us this camera has limited monitoring options, and must be used within its means.
If you need these additional features, you’re better off with the original Blackmagic Cinema Camera. To see how the Blackmagic Pocket Camera compares to the other two cameras in their lineup, read my Comparison of Blackmagic Design Cinema Cameras.
wolfcrow.com Page 10

Chapter 2Lenses and Adapters
I won’t be going into details about how I choose lenses, because I’ve already covered a lot of ground here:
• What Lens to Get?
• How I select lenses for long-form projects
• Sensors, Image Circle, Crop Factor, Angle of View andthe 35mm Equivalent
• Lens Mount, Focal Flange Distance, and LensAdapters
The Blackmagic Pocket Camera has a Super 16mm-sized sensor. What does that mean? Here’s the actual size of Super 16mm film:
wolfcrow.com Page 11
The Blackmagic Pocket Camera sensor is slightly smaller at 12.48mm x 7.02mm, but it’s nothing to bicker about. The good news is that the sensor is a true 1920 x 1080 (or 2 MP) sensor.This will reduce artifacts caused by line-skipping and incorrect interpolation (down-sampling).
On the other hand, because the Blackmagic Pocket Camera doesn’t have an optical low-pass filter (OLPF) and because thepixels aren’t small enough (Pixel pitch is about 6.5 microns) to resolve fine detail, you’re going to get aliasing and color moiré. This is probably the camera’s weakest link when it comes to image quality.
The sensor demands a lens that can deliver a resolution of 154lines per mm, or 77 line pairs per mm. This is very similar to the original BMCC 2.5K camera. In plain speak you need a really good lens to get the best out of it. The flip side is, if you use a poorer lens, your images won’t be as sharp, but you’ll also get reduced moiré. How’s that for a choice?
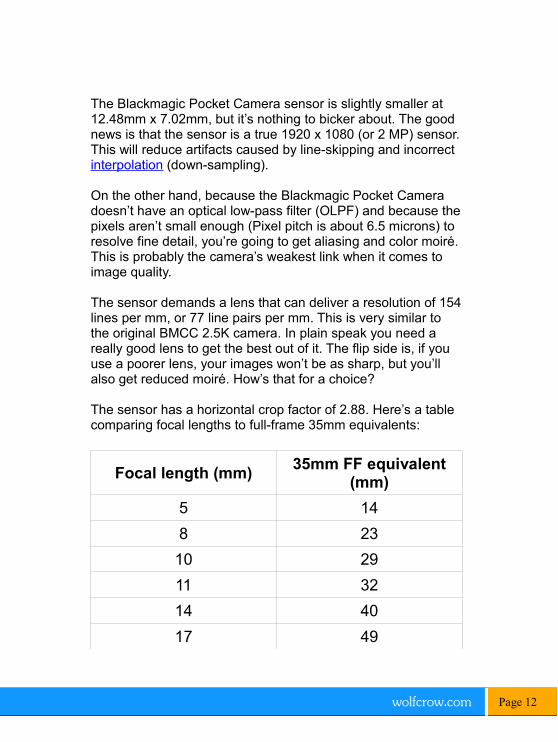
The sensor has a horizontal crop factor of 2.88. Here’s a table comparing focal lengths to full-frame 35mm equivalents:
Focal length (mm)35mm FF equivalent
(mm)
5 14
8 23
10 29
11 32
14 40
17 49
wolfcrow.com Page 12

21 60
24 69
28 81
30 86
32 92
35 101
40 115
50 144
75 216
100 288
200 576
300 864
The Blackmagic Pocket Camera comes in an active MFT mount (Micro Four Thirds, also sometimes written as m43). The advantages of the MFT mount are:
• The lenses don’t have to cover a large sensor, so theytend to be smaller and hence lighter than full frame orAPS-C lenses.
• They are primarily designed for highly demanding still-camera sensors, so they should be able to resolve 77lp/mm.
• They are cheaper.
• They have a smaller flange focal distance, because ofwhich various lenses can be adapted to its mount viaan adapter.
wolfcrow.com Page 13

Here’s information on each mount, in increasing order of the focal flange distance:
MountFocal Flange
Distance in mm
C-Mount 17.526
Sony E-mount 18
Sony PMW-F3 mount 18
Micro Four Thirds mount 19.25
Leica M mount 27.8
Four Thirds mount 38.67
Canon Manual FD mount 42
Canon EOS EF mount 44
Canon EOS EF-S mount 44
Minolta/Sony A-mount 44.5
Pentax K-mount 45.46
Nikon F-mount 46.5
Leica R-mount 47
Arri PL mount 52
As you can see, adapting most lenses on an MFT/m43 mount is easy. But let’s clear up some confusion regarding C-mount (Super 16mm, CCTV) and E-mount (Sony NEX, etc.) lenses.
wolfcrow.com Page 14

The problem with C-mount Super 16mm lenses on the Blackmagic Pocket Camera
As you can see from the table above, the flange focal distance of the C-mount is lower than Micro Four Thirds. It doesn’t matter if the Blackmagic Pocket Camera is Super 16mm size, ifthe lenses made for that format (which are in the C-mount), cannot be adapted without major compromises.
I do not recommend old Super 16mm C-mount lenses for the following reasons:
• They are old, and not all of them were good quality even when new.
• Those that were of good quality might not be good today.
• The new C-mount lenses, made for CCTV cameras or for 1″ sensors, are expensive ($1,000+). Even if you were willing to pay the price, there aren’t any good wide angle options that cover the 1″ sensor.
• Very few wide angle options, and they might have serious distortion and aberration problems. Most of them will vignette.
• Because they are made for a smaller flange focal distance, focusing will not ‘work as advertised’. The worst problem is that you most likely will lose infinity focus. Please read this excellent article for more information.
• The really good ones are still expensive today, because they are hard to find. What’s the point of recommending a lens that’s hard to find?
• Some of the C-mount lenses will need to be physically modified to fit on a C-mount to MFT adapter.
• Some will need multiple adapters to get them to work!
wolfcrow.com Page 15
• These lenses will not work with IRIS and Focus control.
• These lenses will not offer Image Stabilization, which you’ll need if you’re going to handhold the camera.
• These lenses are heavy (especially the zooms), and are usually made of metal. Imagine the stress they’ll put on your Pocket Camera mount.
• Finally, the most important thing – even if you manage to form a collection of these lenses, they most likely will not match when cut together. What happens if you drop or break one of them, or if they are stolen?
Seriously, unless you have quick access to a Super 16mm lensthat fits perfectly, and can afford it, and love the optical quality and ‘look’ of that lens, go for it. Otherwise, stay away and don’twaste your time.
The same applies to lenses made for 2/3″ CCD sensors, E-mount lenses, Nikon CX lenses, etc.; which have an even smaller flange distance than Super 16mm. Lenses made specifically for such sensors, like ENG lenses, will not cover the entire image circle necessary for the Blackmagic Pocket Camera. The ones that cover the 1″ area are super-expensive.
All this aggravation for your $995 Blackmagic pocket camera? Why bother?
Lenses for the Blackmagic Pocket Camera
Here are my lens suggestions for the Blackmagic Pocket Camera (the numbers in brackets signify the 35mm full-frame equivalent):
wolfcrow.com Page 16
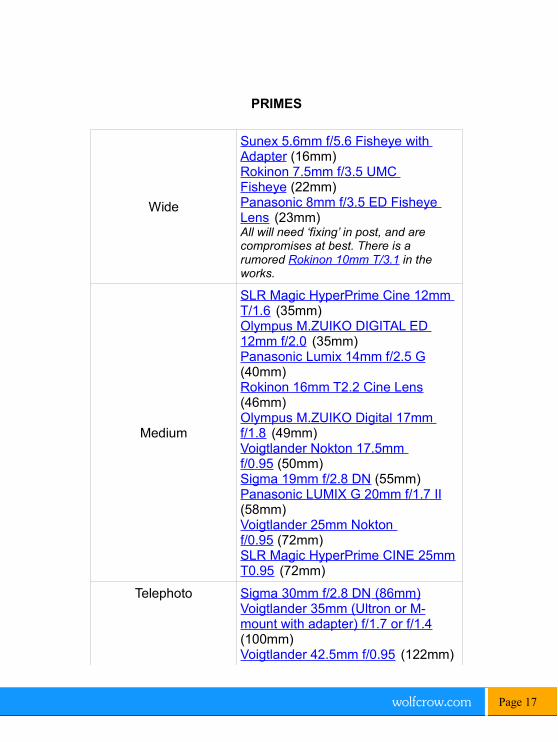
PRIMES
Wide
Sunex 5.6mm f/5.6 Fisheye with Adapter (16mm)Rokinon 7.5mm f/3.5 UMC Fisheye (22mm)Panasonic 8mm f/3.5 ED Fisheye Lens (23mm)All will need ‘fixing’ in post, and are compromises at best. There is a rumored Rokinon 10mm T/3.1 in the works.
Medium
SLR Magic HyperPrime Cine 12mm T/1.6 (35mm)Olympus M.ZUIKO DIGITAL ED 12mm f/2.0 (35mm)Panasonic Lumix 14mm f/2.5 G (40mm)Rokinon 16mm T2.2 Cine Lens (46mm)Olympus M.ZUIKO Digital 17mm f/1.8 (49mm)Voigtlander Nokton 17.5mm f/0.95 (50mm)Sigma 19mm f/2.8 DN (55mm)Panasonic LUMIX G 20mm f/1.7 II (58mm)Voigtlander 25mm Nokton f/0.95 (72mm)SLR Magic HyperPrime CINE 25mmT0.95 (72mm)
Telephoto Sigma 30mm f/2.8 DN (86mm)Voigtlander 35mm (Ultron or M-mount with adapter) f/1.7 or f/1.4 (100mm)Voigtlander 42.5mm f/0.95 (122mm)
wolfcrow.com Page 17
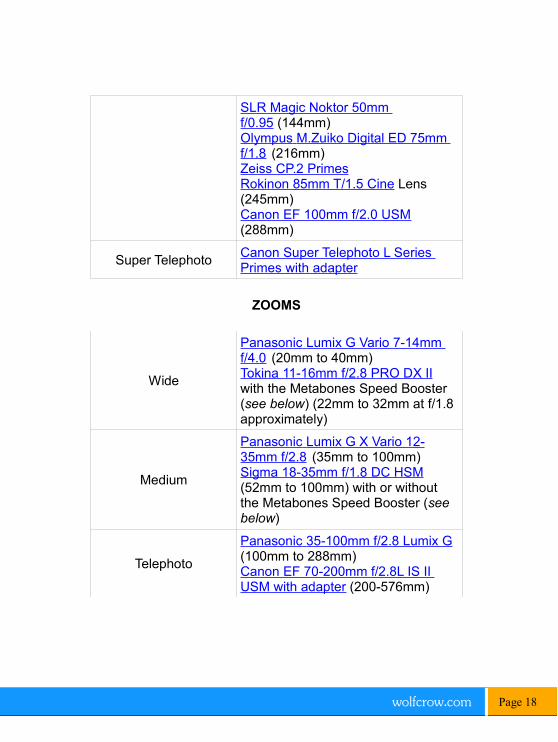
SLR Magic Noktor 50mm f/0.95 (144mm)Olympus M.Zuiko Digital ED 75mm f/1.8 (216mm)Zeiss CP.2 PrimesRokinon 85mm T/1.5 Cine Lens (245mm)Canon EF 100mm f/2.0 USM (288mm)
Super TelephotoCanon Super Telephoto L Series Primes with adapter
ZOOMS
Wide
Panasonic Lumix G Vario 7-14mm f/4.0 (20mm to 40mm)Tokina 11-16mm f/2.8 PRO DX II with the Metabones Speed Booster (see below) (22mm to 32mm at f/1.8 approximately)
Medium
Panasonic Lumix G X Vario 12-35mm f/2.8 (35mm to 100mm)Sigma 18-35mm f/1.8 DC HSM (52mm to 100mm) with or without the Metabones Speed Booster (see below)
Telephoto
Panasonic 35-100mm f/2.8 Lumix G (100mm to 288mm)Canon EF 70-200mm f/2.8L IS II USM with adapter (200-576mm)
wolfcrow.com Page 18
Lens Adapters
Because some of the lenses are not direct MFT mounts, you’ll need adapters. Here are some options:
• EF to Micro Four Thirds: Fotodiox
• C-mount to Micro Four Thirds: Fotodiox
• Leica M-mount to Micro Four Thirds: Fotodiox
Unfortunately, all the options available (including Metabones) at the moment are 'passive', which means they don't allow aperture control or autofocus.
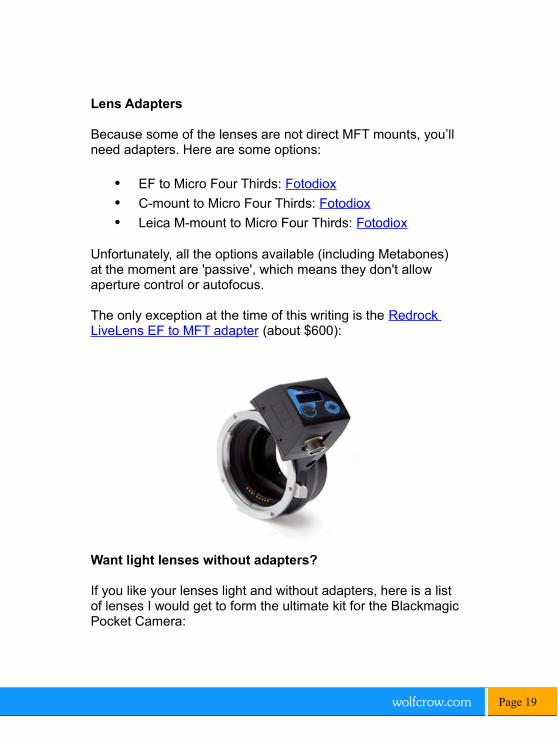
The only exception at the time of this writing is the Redrock LiveLens EF to MFT adapter (about $600):
Want light lenses without adapters?
If you like your lenses light and without adapters, here is a list of lenses I would get to form the ultimate kit for the BlackmagicPocket Camera:
wolfcrow.com Page 19

• Panasonic Lumix G Vario 7-14mm f/4.0 (This would cover the wide angle from 20mm to 40mm)
• Panasonic Lumix G X Vario 12-35mm f/2.8 (This wouldcover the mid range perfectly, from 35mm to 100mm)
• Panasonic 35-100mm f/2.8 Lumix G (100mm to 288mm)
• SLR Magic HyperPrime Cine 12mm T/1.6 (35mm) (Alternative: Olympus M.ZUIKO DIGITAL ED 12mm f/2.0)
• Voigtlander Nokton 17.5mm f/0.95 (50mm) (Alternative: Olympus M.ZUIKO Digital 17mm f/1.8 )
• Any 35mm f/1.4 for micro four thirds I can find, or a Sigma 30mm f/2.8 DN (86mm), if I wanted a 100mm prime. The new Voigtlander 42.5mm f/0.95 (122mm) will also work.
What’s the common factor? None of these need adapters, and all of them are the lightest in their class.
What would I get?
Of all the options listed in this chapter, if I had to pick one lens, it would be one of these:
• Sigma 18-35mm f/1.8 DC HSM with the Metabones Speed Booster (36mm to 70mm at f/0.9)
• Voigtlander Nokton 17.5mm f/0.95 (If you prefer 50mm), or the
• SLR Magic HyperPrime Cine 12mm T/1.6 (If you prefer 35mm)
The winner, for its phenomenal value, is the Sigma 18-35mm f/1.8 DC HSM with the Metabones Speed Booster (36mm to
wolfcrow.com Page 20

70mm at f/0.9). If all you wanted was one lens, this combination is it. More on the Speed Booster later.
MFT lens or Manual lens?
The Blackmagic Pocket Camera has an active MFT mount, and you might find it convenient to use autofocus and IRIS control. These options will only be available with the Panasonicor Olympus lenses in my list. Also, they will be far lighter than their semi-metallic manual lenses. Don’t forget that electronic lenses might also offer image stabilization. That’s three very important features, if you need them.
SLR Magic vs Voigtlander – what’s the difference?
The biggest problem with the Voigtlander lenses is that their focus rings aren’t compatible with most follow focus systems. At f/0.95, you might find focusing an impossible task. On the other hand, SLR Magic is based in Hong Kong, and if you havedefective product, shipping it back and forth might be more than you bargained for (depends on whether there are any direct dealers in your area). Get the ‘Cine’ version of the SLR Magic lens, and pay extra for the ‘Lens gear’ (about $100 difference) if you are planning to use it with a follow focus kit.
What about the Metabones Speed Booster?
At the time of this writing, there are three options available for the Micro Four Thirds mount:
• Nikon F – $429
• Leica R – $399
• Contax Yashica (T-mount)- $399
wolfcrow.com Page 21

Now, there is no doubt that the Metabones Speed Booster delivers on its promises, but is it financially and practically viable, in spite of it?
E.g., if you want to use cheap Nikon F lenses to go wider (0.71x) and faster (about 1 stop), then what are the options? You can find a used 18mm f/3.5 manual lens for $500, or a 20mm f/3.5 for $200. This would translate to a 13mm lens (40mm FF equivalent) at f/2.8 or slightly better. Total cost? At least $629 or more. The Olympus 12mm f/2 costs $799.
Or, let’s say you strike a bargain on a 24mm f/2.8 lens for $100. This will become a FF equivalent of 50mm at f/2. Price? $529. An Olympus 17mm f/1.8 (same 50mm FF equivalent) is only $499.
The only two combinations I recommend at this time are:
1. The Tokina 11-16mm f/2.8 PRO DX II Nikon mount with the Metabones Speed Booster. This will cost you roughly $980 total and give you a 22mm to 32mm FF equivalent at f/1.8 approximately.
2. The same can be done to the Sigma 18-35mm f/1.8 DC HSM. This will give you about 36mm to 70mm at f/0.9 for $1,229.
Forget the other combinations for now.
wolfcrow.com Page 22

Chapter 3Matte boxes, Filters and Follow Focus Systems
I’ve covered filters in great detail in the Chapter on Filters and Matteboxes in the Comprehensive Guide so I won’t be going into the basics here. However, one kind of filter that will definitely come handy is the ND or variable ND filter.
Why do you need an ND filter?
The native ISO of your camera is 800 ASA. This means, the camera delivers its best signal-to-noise performance (in other words, best quality) at this rating.
Since you’re shooting video, your shutter speed will be limited to a small range. E.g., if you’re shooting 25p, your shutter speed is about 1/50s. If your shutter is fixed, and the ISO must remain at 800 for best results, the only factor you can control tonail your exposure is the f-stop.
Let’s say you’re shooting in bright daylight. According to the Sunny 16 rule (or just use your camera meter) you will need anf-number of f/256 (no typo)! What if you want to shoot at f/2.8 for that shallow depth of field look?
To open up your aperture, you’ll need an ND filter that will cut light by almost 8 stops (ND256, 2.4).
But we all know that light levels vary greatly, and you’re not always shooting in direct sunlight. You must estimate your requirements correctly and find the right kind of ND filter. Also, don’t forget your filter must fit the filter thread of your lens(es).
For high-quality filters, I recommend Singh-Ray.
wolfcrow.com Page 23

Matte boxes
Even though Blackmagic Design can post a photo like this it doesn’t mean it’s worth the effort
:
Matte boxes will make your rig seriously front-heavy (not to mention ridiculous-looking, with the lenses I’ve recommended),and might not be a very wise decision. Follow the suggestions I’ve listed in the link above, if you must have a matte box. Don’tforget to match them against the front diameter of your lens.
Follow Focus Systems
The Blackmagic Pocket Camera has autofocus, but that won’t work with manual lenses. This means you’ll appreciate a followfocus system for those expensive f/0.95 primes. On the other hand, rigging a follow focus system is going to be tricky if the
wolfcrow.com Page 24

lens is small. As you can see in the above image, this will necessitate a riser plate under the camera.
For cheap but reliable follow focus systems, try this:
Opteka FF180 Reversible Follow Focus
If you want something smaller but sturdier, try the Edelkrone Focusone Pro.
wolfcrow.com Page 25
Chapter 4Viewfinders and External Monitoring
The Blackmagic Pocket Camera has no viewfinder, so you are left with two options:
1. LCD Loupe2. Electronic Viewfinder (EVF)
Loupes
There is a slight problem here. The Blackmagic Pocket camerahas a 3.5” LCD screen. Very few loupes fit that size (most are made for 3” DSLR screens). Some manufacturers make loupes that can cover a 3.5″ LCD, but the aspect ratio is likely to be 1.5, whereas the Blackmagic Pocket Camera LCD has an aspect ratio of roughly 1.66 (top and bottom used for overlay).
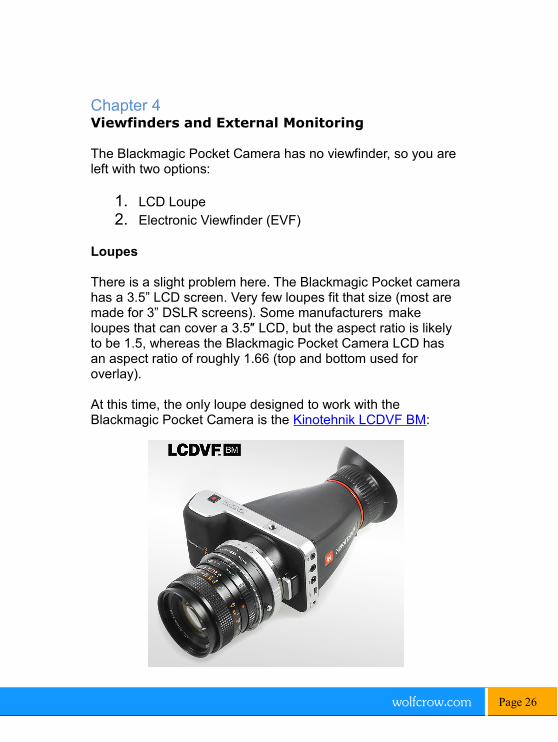
At this time, the only loupe designed to work with the Blackmagic Pocket Camera is the Kinotehnik LCDVF BM:
wolfcrow.com Page 26

Electronic Viewfinders (EVF)
The Blackmagic Pocket camera has an HDMI port (type D) via which you will be able to connect an external electronic viewfinder (EVF). I recommend the Cineroid Pro EVF4RVW:
The Cineroid has the following advantages:
• SDI loop-through, so you can connect it via an externalmonitor.
• Waveform and Vectorscope display.
• 3.5″ LCD and a detachable loupe that can be used optically (whether or not it’ll fit the Blackmagic Pocket Camera is a different story).
• 350 ppi resolution.
You could also use a ‘pure’ HDMI viewfinder, like the Zacuto Z-Finder EVF Pro .
wolfcrow.com Page 27
External Monitors
The HDMI port delivers a clean 1080p 10-bit 4:2:2 signal. If you like, you can overlay frame guides, aperture information, frame rates, etc.
The HDMI feed displays whatever mode you’re recording in, not what the display at the back of the camera shows. In this respect, it follows its bigger brother, the BMCC. This means, for example, if you change the Display Settings - Dynamic Range to Video mode (Rec. 709) while recording in Film mode, the display on the back of the camera will show you howit would look in Rec. 709, while the HDMI feed will still be Film mode. In other words, what you do in the Display Settings has no impact on the HDMI feed.
I have written extensively about monitor sizes andhow to choose the right size in the Chapter onExternal Monitors in the Comprehensive Guide.There is nothing more to add, really. Choose amonitor that can display 10-bit video in Rec. 709, and can accept a custom LUT. Unfortunately, such monitors don’t comecheap, or small.
One important accessory you might want is the HDMI Male Type-D to Type-A Adapter . It’s not very common so make sure you get it along with your camera.
How to Monitor Correctly
Okay, you connect the HDMI cable. Now what? The Blackmagic Design displays two color spaces + gamma modes(what it also confusingly calls Dynamic Ranges):
• Film mode
• Video mode (Rec. 709)
wolfcrow.com Page 28

Most monitors won’t be able to accurately display the Film mode space, simply because it’s a proprietary space unique only to Blackmagic Cameras. These monitors must either be fed the Video mode from the camera or must have the ability toload a custom Look-up Table (LUT).
This means, you have no choice but to use an external monitorthat can accept a custom LUT created in Resolve for Rec. 709.
One crazy workaround is to interchange between Video and Film modes while shooting. Just before you record, go over to Video mode, check the signal, and then come back to Film mode. This is painful, not only because you have to keep switching back and forth, but also because you have to record every time you do it. You see, the HDMI feed only works when the camera is recording!
At this time, I can only recommend EVFs and External monitors for framing and focusing.
Focus Peaking
The Blackmagic Pocket Camera can show you when a part of your scene is in focus. Unfortunately, this is only limited to the display on the back of the camera, and is not fed via HDMI.
Zebras
Under Display Settings you can also set a Zebra level (as a percentage) from 75% to 100% in 5% increments.
This is calculated on a linear scale directly from the sensor data. This means, if one part of your scene starts to clip, 50% below this level will be one stop under. Since the camera Zebra levels only start at 75%, you only have about half a stop between 75% and 100% Zebra. That’s not a lot of room to playwith.
wolfcrow.com Page 29

I’ll get into more detail about Zebras in chapter 9, but for now, just know that Zebras don’t get fed via HDMI. This means you must rely on the waveform, vectorscope, Zebras, etc. that your external monitor provides.
wolfcrow.com Page 30

Chapter 5Cages and Shoulder Rigs
This draws on the principles and ideas outlined in the followingarticles:
• How to design and lay out a Camera Rig
• Chapters 16 to 29 in the Comprehensive Guide, which covers all types of rigs and accessories
By rigging the Blackmagic Pocket Camera you will lose its size advantage. I will not recommend you use the top UNC thread to mount any device that is heavier than the camera itself. If you really want to surround the pocket camera with accessories, the ideal tool might be a cage. Here’s an exampleof a cage from Wooden Camera that I don’t completely recommend (cages should be rigid on all sides), but you get the idea:
wolfcrow.com Page 31

Another more solid option is the Viewfactor Contineo with Grip:
I suggest you read the chapters in the links provided for information on how to plan, design and execute the perfect rig for your camera. Look at the following image:
It looks cool, until you start asking some questions:
wolfcrow.com Page 32

• Where will the viewfinder and external monitor fit?
• Is there room for an external recorder?
• With the camera no longer providing any counter weight, isn’t the rig too front-heavy?
Don’t get me wrong, there’s nothing intrinsically wrong with mounting the Blackmagic Pocket Camera on a shoulder rig, but it would take some serious tinkering – unless someone comes up with a handy cage solution.
The Blackmagic Pocket Camera will almost vanish from sight when paired with a tripod and a fluid head. I won’t be going into detail about tripods in this book because I’ve already covered this extensively here.
Accessories
There are two additional ports on the Blackmagic Pocket Camera:
1. LANC 2.5mm2. USB 2.0 mini-B
The USB port is hidden from view, and it’s for firmware updatesand camera configuration.
The LANC port can be used to control these functions:
• Start and stop recording
• Focus
• Autofocus
• Iris (aperture) control
• Auto iris.
wolfcrow.com Page 33

This makes it an excellent B-cam or crash camera. For a strong LANC controller, look at the ManfrottoMVR901EPLA Pan Bar Remote for LANC
For other accessories, read the links providedearlier.
Just to wrap things up, here’s my favorite bag for the Blackmagic Pocket Camera:
Thinktank Retrospective 10
wolfcrow.com Page 34

Chapter 6Audio and Power Supplies
The Blackmagic Pocket Camera has one 3.5mm audio input jack, which I will not recommend for anything but home movies. You will need a full external audio solution.
Bottom line: if you value audio record it separately, period.
However, to make your editing life easier, you could send a synced line-level signal from your audio recorder, pre-amp or mixer to the camera to Channels 1 and 2. The camera automatically records audio if it comes from an external source.
Select Chl 2 uses Ch 2 input if you want to create a backup ata lower volume. There are no levels to verify what you’re doing, so I only recommend recording audio for faster editing, and nothing else. Audio is routed through the HDMI feed though, and you could refer to audio levels on an external monitor. Why go through all this trouble?
Power supplies
The Blackmagic Camera has a 0.7mm 12-20V DC port for external power. It ships with an AC adapter, and is probably your best solution as long as you’re near a power source.
The other, more common, way to power the Blackmagic Pocket Camera is via easily available Nikon EN-EL20 rechargeable lithium ion batteries. One battery is included in your purchase. This battery can be charged while being used in camera. Unfortunately, there is no charger supplied, so you’llhave to purchase one for field use.
wolfcrow.com Page 35

The specifics are as follows:
• Recording time: 50-60 minutes. Standby time might bearound 2 hours (live view drains battery).
• Charging time: one hour and 15 minutes when camerais off. 2 hours when camera is switched on.
• The camera consumes a maximum of 7W (with HDMI on) and about 6.8W otherwise.
• The camera can take a maximum voltage level of 18V before frying.
Based on these numbers, and the system I’ve outlined in the Chapter on Batteries in the Comprehensive Guide, I’d say on aprofessional shoot you might need at least 4-5 of these batteries, unless you have access to a charging point and can remember to charge them at the right moment.
If you’re looking for a single charger, I suggest you get the Blackmagic Design Charger. However, I strongly recommend you get a dual charger like this one:
Kapaxen Dual Channel Charger for Nikon EN-EL20
You could also get cheap clones of the EN-EL20, because an original Nikon battery costs about $45. Blackmagic Design alsosells the same as a rebranded solution for about $14.95.
wolfcrow.com Page 36

If your camera is going on a balanced rig, then I highly recommend you get an Anton Bauer or Switronix solution:
This way, you’ll only need two batteries and one charger, and don’t have to worry much about power at all. These batteries can also power an external monitor, and so on. The larger batteries also have the advantage of being heavier, and will help you balance your shoulder rig.
On the other hand, if you intend to use the camera only in ‘pocket’ mode, then go with the recommended batteries.
wolfcrow.com Page 37

Chapter 7The Cost of Putting Together a Blackmagic Pocket Cinema Camera Kit
Base Kit
This is what you get with the camera:
Items Unit Price* Qty Price *(USD)
Blackmagic Pocket Camera
$ 995 1 $ 995
Battery EN-EL20 $ 0.00 1 $ 0.00
Turret Cap $ 0.00 1 $ 0.00
DaVinci Resolve Lite $ 0.00 1 $ 0.00
Wrist Strap $ 0.00 1 $ 0.00
AC Adapter $ 0.00 1 $ 0.00
wolfcrow.com Page 38

*Important: The prices might be totally inaccurate or wrong, so don’t assume any of the prices in this page is correct. Please refer to manufacturer’s website for details. Also, the prices might be different depending on which country or regionyou’re in.
Adding Lenses
I’m going with three of my favorite lenses for this camera:
• Panasonic Lumix G X Vario 12-35mm f/2.8
• Voigtlander Nokton 17.5mm f/0.95
• SLR Magic HyperPrime Cine 12mm T/1.6
You could substitute this for cheaper or more expensive lenses, if that suits you. Most people will be buying the Blackmagic Pocket Camera for the following reasons:
• It’s $995
• 1080p up to 30p
• 12-bit Lossless CinemaDNG
• 13 stops of dynamic range
• Small and light-weight, with a ‘suitable’ mount I believe, to take complete advantage of 12-bit 1080p, one needs the best lenses one can find. You could use Leica M lenses or Zeiss CP.2 lenses, or you could adapt PL lenses if you must. My idea is to get a lens with reasonably good qualityand sharpness, with a small f-number. An f/0.95 or T/1.6 lens will not only let you shoot in low light (the ISO of the Blackmagic Pocket Camera goes up to 1600), but will also giveyou that shallow depth of field look (well, somewhat).
Here’s the price-list of my selected lenses (lens caps and hoods are included with the purchase):
wolfcrow.com Page 39

Items Unit Price QtyPrice(USD)
Panasonic Lumix G X Vario 12-35mm f/2.8
$ 1,030 1 $ 1,030
Voigtlander Nokton 17.5mm f/0.95
$ 1,150 1 $ 1,150
SLR Magic HyperPrime Cine 12mm T/1.6 with gear & 58/77 ring
$ 650 1 $ 650
Tiffen 58mm Variable ND filter
$ 110 1 $ 110
Edelkrone Follow Focus Kit
$ 290 1 $ 290
Cheap Baseplate and Rods
$ 150 1 $ 150
The Olympus alternative for the 12mm is more expensive, while the 17.5mm is less than half the price of the Voigtlander. The zoom, I would say, is almost a necessity, and it has image stabilization.
The Tiffen variable ND filter is one of the cheaper ones. In reality, if you’re planning to shoot f/2.8 or f/2 (to get that shallow DOF) in daylight, you’ll need a whole spectrum of ND filters that’ll work for all scenarios. All the lenses listed above have a 58mm filter thread size.
See how the small things make a difference?
wolfcrow.com Page 40

Similarly, without a good follow focus system, focusing at theselarge apertures will be a nightmare. You’ll need a plate and rods just to hold the system in place, so the camera mount isn’tstressed beyond its means.
Let’s kit up the rest.
Accessories
Here are some accessories that you might start off with:
Items Unit Price Qty Price (USD)
Cineroid EVF $ 995 1 $ 995
HDMI Cable $ 4 1 $ 4
EN-EL20 Battery $ 40 3 $ 120
Dual Charger $ 20 1 $ 20
Manfrotto MVR901EPLA
$ 280 1 $ 280
Thinktank Retrospective 10
$ 157 1 $ 157
Manfrotto Tripod with Fluid Head
$ 390 1 $ 390
The viewfinder costs as much as the camera! You could avoid the Cineroid EVF and go for something cheaper, or nothing at all.
Regarding batteries, four batteries should get you through an 8-12 hour day, but barely. The tripod and fluid head is cheap (for professional work at least) but workable. You could go for cheaper models, but test them before you buy. Remember, there’s no weight on the camera, so you’re almost forced to use a heavier tripod to compensate!
wolfcrow.com Page 41

The bag and LANC controller are optional tools, but very handy. If you want to position the camera in the corner ceiling of a room or hall, the LANC controller will be a great addition toyour kit. All this, except the tripod and head, should fit into a Thinktank 10 bag, or similar.
Media
Media is expensive. SDHC cards are cheap, but not if you want to shoot CinemaDNG:
Items Unit Price QtyPrice(USD)
SDXC Extreme Pro Card (64 GB)
$133.00 4 $ 532.00
Transcend SDXC Reader $ 16.00 1 $ 16.00
You’ll need at least four cards, which will give you 48 minutes of RAW footage. You could cut down on a few, but I will never recommend that. We’ll cover media cards in more detail in the next chapter.
Bottom Line
What’s the grand total? It’s $6,889. Assuming you didn’t want the Cineroid, and exchanged the two expensive primes for the Olympus alternative for 17mm, you’re still at about $5,200.
Say you don’t want the LANC controller, and are happy with a cheaper bag, only two SDXC cards (you’ll need at least one backup, right?), your price comes down to just over $4,000.
Also don’t forget to add things like lens cleaners, filters, matte boxes, articulating arms (for the viewfinder), and so on.
wolfcrow.com Page 42

If you have stuff lying about you could reduce the initial capital required, but not everyone has that luxury. The Blackmagic Pocket camera really isn’t $995 if you’re starting from scratch. It’s more like $4,000 (for just starters) to $7,000 (minimum professional kit). I hope this small analysis will help you calculate your own expenses with regards to your Blackmagic Pocket Camera kit.
In Comparison of the three Blackmagic Cinema Cameras, I’d written that the original ‘have-all-the-orders-been-shipped-out-yet’ 2.5K Blackmagic Cinema Camera is better value for money. If you subtract the cost of Resolve you’re paying the same price! What do you get for that?
• A bigger sensor and 2.5K
• Uncompressed CinemaDNG
• HD-SDI link for monitoring
• Thunderbolt and Ultrascope
• Better audio connectors and specification
• Bigger LCD
• Better construction and support for rigs
Isn’t this worth $1,000? I say it is, but you might think differently. If you’re targeting professional paying gigs, I strongly recommend you opt for the 2.5K BMCC.
wolfcrow.com Page 43

Chapter 8Recording Modes and Data Management
The recording modes on the Blackmagic Pocket Cinema Camera are as follows (as per Firmware update 1.5):
Format CinemaDNG Prores HQ
CompressionCompressed,
losslessCompressed, lossy
Color Specs12-bit, Filmmode only
10-bit 4:2:2, Video mode(Rec. 709) and Film
mode
Data rate at (in MB/s)
24p & 23.976p 52.8
27.525p 55
30p & 29.97p 66
Footage on64GB Card(minutes)
18 37
The file naming convention is as follows:
Camera IDReel
NumberDate Time
ClipNumber
Extension
MyPocket 2 2014-02-03 1534 C000343 .mov/.dng
The parts of the filename are combined with an underscore, like this:
MyPocket_2_2014-02-03_1534_C000343.mov (or .dng)
wolfcrow.com Page 44

In the case of CinemaDNG files, the image sequences are stored in folders (one per shot). Blackmagic Design warns not to trust the time and date on the camera. It is also a good idea to manually insert the Camera ID (Create a different one per project) for easier organization later.
The camera can also take in metadata from your production, but try typing out words using the joystick!
The Blackmagic Pocket Camera records to SDXC and SDHC cards. Here’s how they are different:
Max size Max speed* Range*
SDXC 2 TB 95 MB/s 8-32 GB
SDHC 32 GB 80 MB/s 64-128 GB
*Sandisk data only.
Blackmagic Design recommends the following cards:
Apple ProRes 422 (HQ)
• Delkin Devices 16GB Elite SDHC UHS-I
• Delkin Devices 32GB Elite SDHC UHS-I
• PNY Elite Performance 32 GB 90MB/s SD card
• Sandisk 64GB Extreme SDXC UHS-I
• Sandisk 128GB Extreme SDXC UHS-I
• Sandisk 16GB Extreme Pro SDHC UHS-I
• Sandisk 64GB Extreme Pro SDXC UHS-I
wolfcrow.com Page 45

CinemaDNG RAW
• Sandisk 64GB Extreme Pro SDXC UHS-I
Even in the case of Prores HQ, it might be a good idea to stick to Sandisk SDXC Extreme Pro cards. At the time of this writing,a 32GB Sandisk Extreme Class 10 80 MB/s card is about $45 and a 32GB Extreme Pro 95 MB/s card is about $68. Avoid slower cards, even with Prores.
Formatting
The good news is there is no recording limit on the Pocket camera. There are some major disadvantages though:
• You can’t format your SD card within the camera.
• You can’t delete recorded clips within the camera.
• You need to remove the card and use a reader to transfer files.
I can only assume these are cost-cutting ‘features’, but they really slow you down if you’re in a rush.
The cards can be formatted for exFAT (Mac, Windows and Linux) or HFS+ (Mac only, read-only on PCs).
In CinemaDNG, the data rate for the Blackmagic Pocket Camera is less than half of what the BMCC records. But then again, the BMCC records uncompressed 2.5K, so that counts. Lossless RAW is fine, and it won’t destroy the 12-bit dynamic range advantage of the camera.
How many cards should you get? Follow the principles I’ve outlined in Chapter on Data Management in the Comprehensive Guide to Rigging Any Camera. Whatever you do, don’t just buy one!
wolfcrow.com Page 46

Do you really need to shoot in CinemaDNG?
I don’t think so, unless you’re shooting in a highly demanding situation. If you have bad lighting, poor production design and sloppy camera work, no amount of dynamic range can save you. The difference between Prores HQ and CinemaDNG modes on the Pocket Camera are negligible.
Don’t forget, Prores 10-bit 4:2:2 is a strong codec sufficient for demanding grading and chroma keying work. It also has many other advantages, which we will see in the coming chapters.
RAW, even compressed RAW, is extremely cumbersome to work with, and the Prores files look like film anyway.
Bottom line, I recommend shooting in Prores HQ Film mode forbest results.
wolfcrow.com Page 47

Chapter 9How to Expose your Camera Correctly
You have the following factors to work with, other than the aperture:
• ISO
• White Balance
• Shutter Angle
• Zebra
• Dynamic Range
• ETTR
• Removing Moiré
ISO
Ideally, you should keep the ISO (written as ASA) at 800. This will give you the maximum dynamic range from the sensor. However, when you’re shooting in bright conditions without an ND filter, it might become impossible to shoot at ISO 800.
After studying frames at 1600 ASA, I must say the noise levels are a bit too high in the shadows, and will need some post production work. The grain looks organic, almost like film (if grain is your thing, I don’t prefer it.) You must test noise levels at 1600 ASA before committing to it, especially if your work is going to the big screen (how cool would that be?).
White Balance
The camera offers the following white balance presets:
• 3200K
• 4500K
wolfcrow.com Page 48

• 5000K
• 5600K
• 6500K
• 7500K
You can’t choose more precise values, which is a real shame. The simplest way is to approximate your look and then tweak itin post.
Shutter Angles
Shutter angles available are (in degrees):
• 360o
• 270 o
• 180 o (normal, for 24p in countries where power frequency is 60 Hz)
• 172.8 o (normal, for 24p in countries where power frequency is 50 Hz)
• 144 o
• 90 o
• 72 o
• 45 o
To understand shutter angles and how it translates into the shutter speeds you see on DSLRs, click here. Ideally, you’d want to start with either 172.8 o or 180 o as written above.
Zebra
One of the biggest frustrations of the Pocket Camera is exposing it properly. Actually, the camera does not cause this
wolfcrow.com Page 49

frustration. Those who think it’s an iPhone, and want to use it as such, bring it on themselves.
One crutch everyone loves to fall back on is the Zebra function.The crappy ‘conventional wisdom’ goes something like this: If Iset my Zebra at xx% and I don’t see stripes I should be okay, right?
The sad part is, there’s no answer to that question. If someone really wants to understand how Zebras work, they need to understand how a Rec. 709 signal is generated and defined. The right questions to ask are:
• Why does it have 75% and 90% and 100% and so on?What do these numbers really stand for?
• When should I use a Zebra?
• When I see stripes (which means you’ve clipped the limit you’ve set), how many channels are clipped - all channels, only one channel, or two channels?
• Is the Zebra on a log scale or linear scale? (Answer: Linear, as explained earlier)
Don’t want to know the answer to these questions? Then you’ll never know how to use a Zebra, and my suggestion to you is: Stop worrying about it.
Okay, let’s back up a bit and look at the available options for exposing the Blackmagic Pocket Camera:
• 100% Zebra in Film mode- this will Expose To The Right (ETTR) and will give you the best signal-to-noiseperformance you can get (at 800 ASA).
• 75% Zebra in Prores HQ Video mode – this is a tradition that places Caucasian skin at 70-75% for television. What exactly is caucasian skin? There is no
wolfcrow.com Page 50

standard definition. What about other skin colors? There is no sane answer. Unfortunately, 75% on the Pocket Camera does not correspond to 75% on a Rec.709 camera.
• 90-95% Zebra in Prores HQ Vide mode – which is the ‘traditional’ limit for clipping in Rec. 709. However, there is no exact value, which is why Blackmagic Design doesn’t tell you what to choose. Take the hint.
What’s the answer? Stick to Zebra 100%.
Dynamic Range
The Blackmagic Pocket Cinema camera bases exposure (using the IRIS button) on the Dynamic Range setting.
The two types of exposures are:
1. Video Mode – Middle grey, at about 8%-10% at 12-13 stops. Since this is calibrated internally, it will match middle grey exposure ratings from light meters (not precisely, of course).
2. Film Mode – ETTR only.
Because the middle grey value isn’t 18%, I do not recommend using an 18% grey card (or any grey card for that matter). It just adds to the confusion.
Now, let’s see how to best expose your Pocket Camera:
Metering Zebra
Prores Video IRIS 100%
Prores Film Light Meter 100%
CinemaDNG Film Light Meter 100%
wolfcrow.com Page 51
As you can see, I suggest you leave the Zebra at 100%, or better yet, not use it at all. You’re better off using a light meter to place your mid-tones where you want it to be, and let the shadows and highlights fall accordingly, as per the Zone system.
You do know there is no single correct exposure for a scene, right? Show the same scene to different DPs, and they’ll choose different exposures. Exposure, like everything else, is asubjective thing.
And the time-tested way to nail the exposure as you see fit, is by using a light meter. If you can’t afford one, or don’t want to carry one, use the camera IRIS feature instead. I don’t recommend the last option, but at least you’ll be exposing around a common standard which will help you match your shots in post. Even if you’re shooting in Film mode, you can quickly swap over to Video mode, meter, set your exposure and come back to film mode. Does it work correctly? Why bother, since you don’t want to use a light meter!
Learn to use a meter, and treat Film mode like Film (Now you know why it’s called ‘Film mode’, and not ‘Log mode’).
ETTR
It’s easy to assume that ETTR is the right way to go for video. In the stills world, photographers only have to play with one image at a time. However, video is composed of shots, sometimes taken days apart, that need to match. The problems with ETTR are:
• It works great on large sensor cameras with greater pixel pitch. On smaller sensors, like the 2 MP Blackmagic Pocket Camera, the results are not alwaysworth the effort.
wolfcrow.com Page 52

• The noise levels will not match from shot to shot. If youtry ETTR on two scenes with wildly varying dynamic ranges, the noise levels in the shadow areas can be aschalk and cheese. The Blackmagic Pocket Camera does tend to get noisy in the shadows.
• Finally, it’s hard to see an ‘over-exposed’ shot on set on the monitor!
All in all, if you’re working on a project that is shot across varying light and color levels, avoid ETTR.
Removing Moiré
There’s a ton of moiré on the Blackmagic Pocket Camera, because it doesn’t have an optical low-pass filter (OLPF). In one way, it’s a good thing, because you get greater resolution. On the other hand, you also get moiré.
Here’s another reason how shooting Prores really helps. If you shoot Prores, the color information is sub-sampled to 4:2:2, and this blurs the color information – which reduces moiré!
The other alternative is using DaVinci Resolve to separate Luma and Chroma and slightly blur just the Chroma channels. It won’t help though, if your aliasing is all across the board.
To recap, use these settings to start off:
• Codec: Prores HQ
• Dynamic Range: Film mode
• Learn to use a Light Meter
• ISO: 800 ASA
• Use ND filters
• Zebra: 100%
wolfcrow.com Page 53
Chapter 10Post Production Workflows
Post production can go two ways:
• CinemaDNG workflow
• Prores workflow
Let’s study the more complicated CinemaDNG workflow.
RAW files must be debayered before they can look like an image. With compressed RAW files, one must first decompressthe file and then debayer it. The application that does this is called a raw processor. The first step to working with CinemaDNG is finding the best raw processor.
Which is the best RAW Processor for compressedCinemaDNG?
DaVinci Resolve is one example of an application with a built-in raw processor. It stands to reason that Blackmagic Design would have taken great pains to ensure Resolve worked well with their cameras. So, is Resolve the best raw processor for the Blackmagic Pocket Cinema Camera?
I’ve written an extensive comparison between three RAW processors in Comparison of RAW processors for the Blackmagic Pocket Camera. I’m only going to summarize my findings here.
The three applications are:
• DaVinci Resolve Lite 10
• Adobe Camera RAW, via Adobe After Effects CC
• RAW Therapee 4.0.10.72
wolfcrow.com Page 54

What makes a good raw processor?
A camera sensor has pixels. If it’s a bayer sensor (as most cameras are, including the Blackmagic Pocket Cinema Camera), then it also has a Color Filter Array (CFA) that tells it which pixel is red, blue or green. In addition to the CFA, a sensor might also have an optical low-pass (OLP) filter, and other filters. The Blackmagic Cinema Cameras don’t have OLPfilters, so they tend to display greater moire and aliasing.Now, the distance between each pixel (not as simple as it sounds) is different for different sensors. E.g., the sensor in theBlackmagic Cinema Camera is totally different from the PocketCamera. This is why most camera manufacturers also make raw processors:
• Canon Utilities RAW image converter
• Nikon Capture NX 2
• Blackmagic Design DaVinci Resolve
• Sony RAW Viewer
• Arri Arriraw Converter
• Red Redcine-X Pro
Nobody knows their sensors better than they do. Most third-party raw processor developers must first have access to the camera sensor (so they must typically wait till the camera is in the market) and then study and test it thoroughly. From this, they derive the appropriate algorithms for each camera. The point is, debayering isn’t a simple process, and is as much art as it is science. For this reason, you’ll never find two raw processors agreeing on any image.
So, a good raw processor must:
• Have an algorithm custom-made for the exact camera sensor.
wolfcrow.com Page 55
• Have good workflow options (otherwise you’ll have headaches like the Magic Lantern RAW to DNG problem).
• Must offer important image processing tools for raw, like sharpening, LUTs, custom settings, camera metadata support, etc.
• Account for many scenarios – flare, aberrations, distortions, filters, noise, varying light, and even motion(for video). This means, a raw processor must also ‘know’ about the likely lenses the sensor is going to be paired with.
The more information the programmers have, the more accurate it can be.
Who should test raw processors?
How involved should you get with raw processors? It depends. How fanatical are you about image quality? Ignorance is bliss, so you could opt for ‘whatever’, and if that makes you happy then that’s all that matters.
On the other hand, these individuals will find it beneficial to testthe available options:
• DITs
• Colorists
• Compositors
• Archivists
• DPs or Camera Assistants (how many productions canafford to tag along a DIT?)
Ultimately, ignoring raw processing is ignoring a large part of what makes raw, raw.
wolfcrow.com Page 56

How should you test a raw processor?
I can tell you straight away that none of the processors I testedare bad in any absolute sense. That’s the problem with raw processing, the variations are either so minute or so off-on-a-tangent it becomes a matter of taste. Subjective opinion is a large part of the process.
From a workflow perspective, these are the factors I’m going toconsider:
• Cost
• Default state: How does the processor manage camera settings?
• Film mode: How does the processor manage the ‘film’ mode?
• Debayering algorithms: How many options do you have?
• Noise performance (Very important)
• Sharpening (Very important but also frustratingly subjective)
• Overall impression of color (highly subjective)
• Workflow and output codecs Cost
Resolve 10 Lite and RAW Therapee are free. Adobe CC is not. All three are available for both Windows and Macs.
Default look
How fast can we get from A to B? When a DP shoots on set with a look based on Rec. 709, you’ll want to start from that. Just to let you know what I tested, here are some sample frames (courtesy John Brawley):
wolfcrow.com Page 57

wolfcrow.com Page 58

RAW Therapee does three things differently:
• It increases the size of the frame from 1920 x 1080 to 1944 x 1104, and this changes the aspect ratio.
• It applies Auto levels by default. This causes the exposure to be set so the histogram sits perfectly between 0 and 255. Why? Because -
• It cannot read camera metadata at all, and you can see clearly that it cannot reproduce exposure automatically. Image 19 is somewhat exposed to the right and RAW Therapee knows it – but it doesn’t knowthe color space or the exposure.
After Effects has the following idiosyncrasies:
• It adds sharpness and noise reduction by default, and Ihad to turn it off. However, the Blackmagic Pocket Cinema Camera does add sharpening by default, so the images appear slightly sharper in Resolve.
• It also manages to add a tint of 14, and can read the white balance and exposure settings off camera metadata.
• It misses exposure but not by much, however the noise in the shadows become more visible. Here’s a comparison of the two histograms:
wolfcrow.com Page 59

The red circle is a really big difference. ACR does not contain as much information in the shadows. To test this, I used the levels curve to stress test the images (just a fancy way of saying I took the values to the extremes), and the images from Resolve held out better in the shadows.
Resolve manages to get more information in the shadows (black regions). ACR holds more green information in the highlights, though. So, when you want to get more information in the highlights, ACR is better. From this, I can only surmise that they are both equal, really. If ACR had a calibrated exposure tool designed for the Blackmagic Pocket Cinema Camera, the differences would be negligible.
The test, though not very practical, is exactly the kind of mistake most raw shooters get into. It’s like getting a Labrador and then restricting it to your apartment. Everyone knows that raw gives more latitude. But it’s what you have to do to extract that latitude that really makes the difference. What’s the point in shooting RAW and then immediately transcoding that into Prores HQ for an online edit?
There’s a good reason by Blackmagic cinema cameras have a Prores mode (which thankfully, the Alexa has too). It’s good enough for 99% of video work, just as JPEGs are good enoughfor 99% of photography work. There’s a good enough reason why most monitors are 8-bit and Rec. 709. If you’re really interested in knowing this stuff, start by reading Driving Miss Digital, but I’m going to stop here and get on with our comparison.
Film mode
The film mode gets you the best dynamic range. The greater dynamic range can be carried forward into post processing by controlling the bit depth and color space.
wolfcrow.com Page 60

The Blackmagic Pocket Cinema Camera has a custom curve that gives the film mode its unique look. The problem with Adobe Camera Raw and RAW Therapee is that they don’t have access to this exact curve, and its relation to the camera’s exposure values. So, the information is in the file, butyou always have to start with either Rec. 709 or auto levels.
You’re not going to stick to the desaturated flat image that many mistakenly think is the ‘raw look’. You’re going to apply a color space and gamma to it anyway. You have to. In Resolve, this process might involve using a LUT (which, ideally, you should have done prior to shooting). If you’re not using Resolve at all, you can create your own profiles in either ACR or RAW Therapee and apply them when you’ve got your footage in the can.
Noise performance and sharpening
It’s when you get closer and study the footage 1:1 (or at 100%)that you begin to see the differences between the raw processors. How do our candidates fare?
It is quite clear that Resolve has the better noise reduction, but which also translates into color noise. Both ACR and RAW Therapee have powerful noise-reduction tools that could give you the same look. However, we must remember that we’re notdealing with still images. Video image processing never has that kind of luxury with time.
Noise reduction also has the disadvantage of reducing sharpness, which you must then compensate with sharpening. Avoid.
After having analyzed all of the images and compared the three, I must say Resolve stands out as offering the sharpest image with the least noise, every time. I would have to spend
wolfcrow.com Page 61

countless hours trying to match the other two, and that is time better spent. Here’s how they stack up:
• Resolve – clearly the winner.
• RAW Therapee – better than After Effects by default.
• Adobe Camera RAW – it is definitely the slowest workflow. However, I feel it has a better noise-reduction algorithm. But who’s got the time?
As a side note, the noise levels in the shadow regions on the Blackmagic Pocket Cinema Camera are a bit too high. If you’reshooting raw, it is probably a good idea to expose to the right if only to avoid noise. Of course, this advice contradicts what I said about ETTR earlier. But this is a special case. Between the devil and the deep blue sea, choose yellow.
Debayering algorithms
Resolve and ACR offer only one debayering algorithm. RAW Therapee offers nine algorithms, and a host of other features that, if you master, will make you old real fast. Kidding aside, if you ever have RAW footage that no other application can fix, try RAW Therapee.
Output workflows
Finally, we come to the workflow. I’m not going to go into detail,as I’ve already covered workflows in these articles:
• DaVinci Resolve crash course
• Adobe After Effects import guide
• How to control bit depth and color space in Adobe AfterEffects
wolfcrow.com Page 62

Resolve 10 simply has the easiest CinemaDNG workflow. Import, edit on a timeline, and export to proxies or whatever. When you’re done editing, reimport back with XML and you have a solid workflow. RAW Therapee is easily the worst for video, though it has a powerful batch processing tool that can work for small projects. For really large projects, avoid it. Sometimes, with large number of images, RAW Therapee crashes. Because it doesn’t have the development budget the other big boys have, the software is not entirely optimized for the latest computers. Effects are the slowest to process.
I’m going to give this one to Resolve.
My impressions on color
I’m not a colorist, and my impressions on color are inaccurate at best. RAW really gives you the power to change color information at will, and video isn’t that demanding anyway. Ultimately, most videos shot on the Blackmagic Pocket CinemaCamera are bound to be viewed in Rec. 709 or sRGB.I wouldn’t worry about it if I were you. Only RAW Therapee sticks out as not having color grading options tuned for motion,like power windows, for example.
So, which is the best raw processor for the Blackmagic Pocket Cinema Camera?
No prizes for guessing this one. It’s DaVinci Resolve, by many orders of magnitude. It is fine-tuned to offer the best experience with Blackmagic Design’s cinema cameras, and that’s all that matters. With Resolve 10, the workflow is even more streamlined.
All said and done, Raw is not a pleasant workflow. It’s the nature of the beast. Adobe’s native support of CinemaDNG isn’t going to change this reality, any more than it did change
wolfcrow.com Page 63

how Red footage was processed. People still use Redcine-X Pro, and people will continue to use Resolve.
For those who don’t like raw, stick to Prores. The footage from Prores is film-like as it is. I really can’t see how Blackmagic Design could have made our lives any more exciting. A few years ago, everyone wanted the film look. Now we have it, in the blink of an eye, at insanely low price points.
The only two major tests I’ve haven’t made are for motion artifacts and skin tones. When you get your hands on more raw footage from the Blackmagic Pocket Cinema Camera, be sure to conduct your own tests. Noise characteristics are more prominent in motion.
That’s all for RAW processors. Now let’s get to the workflow.
Processing RAW with DaVinci Resolve
Other than FCP-X, there isn’t any NLE that can import and editin compressed CinemaDNG natively (Unfortunately, Adobe’s CinemaDNG support does not include compressed CinemaDNG at the time of this writing, though I’m sure it will change). Even in the case of FCP-X, the choices are so limitedyou wouldn’t really benefit from editing native. The true power of shooting in a RAW format is the flexibility you get in manipulating the image. Take that away, and you lose the only advantage of RAW.
It basically boils down to how much flexibility you want. E.g. –
• Reasonable flexibility – keep the images RAW until theedit is complete, and grade RAW images. Edit using proxies. Your ‘LUT’ is Rec. 709, because you don’t have time or the budget to tag a laptop or dailies specialist/DIT along.
wolfcrow.com Page 64
• Maximum flexibility – you will still grade in RAW, but will have also created a 3D LUT on set because you want the look ‘locked in’. It still gives you the choice of changing in post, and is the best of all worlds.
• Least flexibility – you will record in RAW, and use a LUT on set, but will transcode to a high-quality intermediary codec like Prores or DNxHD for online editing.
It is important to know your workflow before you start recordingon set.
If you are going to edit on a basic system which has an sRGB (all computers) or Rec. 709 monitor (broadcast monitor, consumer HDTV), you will be okay with the first option. If you are on a cinema workflow, intended for a DCI P3 projector, youwill appreciate the second option. If you can’t afford or don’t have the time for color correction in post production, you’ll prefer option three.
As far as option one is concerned, when you record CinemaDNG in camera, you can also output a video feed via SDI and set the ‘Dynamic Range’ to ‘Video’ (which is Rec. 709). This information will be stored as metadata along with your files, and DaVinci Resolve can use it to generate quick dailies, proxies or intermediaries. You will be able to see how the end video might look like (somewhat, depending on the quality of the external monitor).
The two ways of dealing with CinemaDNG
It must be quite obvious that there are only two ways of dealingwith CinemaDNG:
• Proxy workflow – Convert to proxies, with the intention of finishing with the original RAW files.
wolfcrow.com Page 65

• Intermediary workflow – Convert to high-quality intermediaries, which will be used to finish your project.
The third possibility might be the ability to edit natively in CinemaDNG, but we don’t have that option yet. The major difference between the above two workflows is that:
• The first option will force you to spend more time in post production, especially in color correction.
• The second option will force you to spend more time either in production, creating the right look (3D LUT) in camera; or at the time of ingest (same task).
All things considered, I prefer the first option. I also prefer the maximum flexibility option outlined earlier. The question is, then, how can we streamline these tasks into an efficient and simple workflow?
Using DaVinci Resolve as an ingest and transcoding tool
If you are new to DaVinci Resolve and round-tripping, I recommend you read the following before proceeding:
• What is round-tripping?
• The DaVinci Resolve Crash Course for Beginners
• FCP-X to Resolve Round-tripping Workflow
• Sony Vegas Pro to Resolve Round-tripping Workflow
• The Avid to Resolve Workflow
As mentioned earlier, there are two ways to go about this:
• Rec. 709 (Reasonable or Least flexibility)
• 3D LUT (Reasonable or Maximum flexibility)
wolfcrow.com Page 66

Let’s look at them both.
Rec. 709 workflow
If you have set the display or video output feed to ‘Video’ (Rec. 709), and have used that to ‘bake’ your look on set, you can use that to work quickly in Resolve. Go to the MediaHub view in Resolve.
Import the CinemaDNG sequence. Right click a clip and choose Edit CinemaDNG Codec Settings…. You’ll get something like this:
You have four options under ‘Decode Using’:
1. CinemaDNG Default – leave this2. Camera Metadata – Choosing this will preserve the
settings you’ve used in camera to ‘bake’ your look.3. Project – leave this4. Clip – Choosing this will allow you to change your
RAW settings and give you total control. For Rec. 709, you’ll choose ‘Camera Metadata’, as shown above. If you have calibrated your monitor correctly (assuming
wolfcrow.com Page 67

it is Rec. 709 and not sRGB), you should be able to see what you’ve seen in camera. From here you can move to the Deliver view to transcode. We’ll deal with this in a bit.3D LUT workflow
With a 3D LUT, you will have a computer/laptop running DaVinci Resolve, and a professional broadcast monitor set up correctly, on set. Before you record your take, you will spend some time creating a custom look for each scene or sequence,and then save that preset for later.
To do this, you must have imported your clips into Resolve. Then you go to the Color view. Choose Camera Raw (camera icon) to get the same settings as you got earlier:
Instead of choosing ‘Camera Metadata’ you’ll choose ‘Clip’. Under Color Space, choose ‘BMD Film’. Your footage will now take on the ‘RAW washed out look’, which is what you want.You can change the ‘White Balance’, ‘Tint’ and ‘Exposure’ settings (under Clip Decoder Settings) to come close to what you want. If you aren’t satisfied, you can use the extensive color toolset in Resolve to color correct your footage. When
wolfcrow.com Page 68

you’re satisfied, you can right click the footage and choose Generate 3D LUT.Save the LUT with a name that you will remember next year. To apply this LUT to subsequent shots or sequences, right click the footage and choose your LUT under 3D LUT:
The more control you want, the greater the number of LUTs you’ll create. You must only go into this in great detail if you areusing the Intermediary workflow. You must get it right so your high-quality intermediary codecs will look their best.If you’re into a Proxy workflow, don’t waste too much time here.In fact, it might be better to just stick to the Rec. 709 workflow. This will eliminate the need for an expensive broadcast monitorand a laptop/computer on set.
Transcoding
Once your footage is primed, it is time to transcode it. This is the inevitable ugly step in the entire CinemaDNG workflow. Luckily, Blackmagic Design has kept it relatively simple for us.Go to the Deliver view and choose ‘Export to Final Cut Pro’ under Presets. This will take you directly to a Prores workflow. If you prefer another codec, then you can choose ‘None’.
wolfcrow.com Page 69

• For proxies, I recommend Prores 422 (LT).
• For high-quality intermediaries, I recommend Prores 422 (HQ).
• For heavy VFX work, I recommend exporting those clips as TIFF or DPX sequences.
You’re done! All you need to do is ensure the filenames are intact (for proxies).
Editing CinemaDNG
As of Creative Cloud, ACR 8.2 recognizes the Blackmagic Cinema Camera and uncompressed CinemaDNG only. You have no option but to convert your footage to a proxy format (Prores LT is great) or an intermediary format (no point shooting CinemaDNG then).
For proxy work, my codec of choice is Prores, because, again, that’s what Blackmagic Design has tested. Most NLEs can work with Prores. Why reinvent the wheel?
Use Resolve to create your proxies, while keeping tabs on the file names. Every professional NLE can edit Prores footage, soI won’t be going into that aspect here.
Once you’re through, you need to export an XML or EDL file to round-trip back into Resolve for grading. Use the links I’ve given earlier to learn how to round-trip and work with footage.
To recap here’s the simplest Blackmagic Pocket Cinema Camera workflow:
wolfcrow.com Page 70

For CinemaDNG
1. Record CinemaDNG, and be careful with your file names and metadata. Also get an assistant to log your shots on paper.
2. Use Resolve to transcode your files to Prores LT.3. Import the proxies to your desired NLE, while
maintaining the settings and file name conventions.4. Edit and lock. Export an XML or EDL.5. Import the XML or EDL back into Resolve and relink to
the original CinemaDNG files.6. Grade and export to your desired codec.
If at a future date any NLE brings native compressed CinemaDNG editing, then you can avoid the second step.
For Prores
Nothing can be easier.
1. Import Prores HQ into your NLE and edit. Lock.2. If no complex grading or VFX work is required, master
directly from your NLE.3. If you want to round-trip, export an XML or EDL.4. Import XML or EDL to your choice of program and
continue.
We’re done! We started with the basics, learned how to put together the ideal Blackmagic Pocket Camera system, and then figured out how to work with its files for best results.
This ends the guide to the Blackmagic Pocket Cinema Camera. You now know everything you need to get started.
Now, go forth and produce something brilliant.
wolfcrow.com Page 71

Thanks for Reading!
I hope this guide has given you the confidence to work your magic with the Blackmagic Pocket Camera.
How can you help wolfcrow?
As you can guess, this guide took a long time to write. Hey, I believe knowledge should be free, and information unambiguous. I hope you have felt its power.
If this guide has helped you please visit: http://wolfcrow.com/blog/please-support-wolfcrow/ and buy me a cup of coffee, a case of beer or a fancy dinner.
At the very least, give me feedback. Tell me how you feel. Helpme improve! Share this guide and the site with your friends or readers. Tell everyone! You shouldalso share this via Facebook, Google+,Twitter, Pinterest or any other social networking site.
For the latest updates, friend us on:
FacebookGoogle+Twitter
This ebook includes a number of affiliate links, from which I geta small percentage of anything you buy. This percentage comes out of the store’s pocket, not yours. In fact, if you want to support wolfcrow at no cost, one of the easiest ways to do so is to buy anything from Amazon (just click on the link).
If you have done any of the above and supported wolfcrow, a big THANK YOU!
For all things workflow, visit http://wolfcrow.com
wolfcrow.com Page 72
