the mvs 3.8j tur(n)key system - eth zwotho.ethz.ch/tk4-/mvs_tk4-_v1.00_users_manual.pdf · the mvs...
TRANSCRIPT

Terminal CUU0C0 Date 10.11.13 Time 20:00:00 ************ **** ***** || ** ** ** ** ** ||| ** ** ** ** ** |||| ** ** ** || || |l _,,,---,,_ ** ** ** || || ZZZzz /,'.-'`' -. ;-;;, ** **** || || |,4- ) )-,_. ,( ( ''-' ** ***** || || '---''(_/--' `-')_) ** ** ** || || |||||||||| ** ** ** ||||||||||| The MVS 3.8j ** ** ** || Tur(n)key System ** ** ** || ****** **** *** |||||| TK3 created by Volker Bandke [email protected] TK4- update by Juergen Winkelmann [email protected] see TK4-.CREDITS for complete credits MVS 3.8j Level 8505 Logon ===> RUNNING TK4-
The MVS 3.8j Tur(n)key 4- System
OS/VS2 MVS 3.8j Service Level 8505
Tur(n)key Level 4- Version 1.00
User’s Manual
November 2013

2
********************************************************************** * * * This User’s Manual applies to the MVS 3.8j Tur(n)key 4- System. * * * ********************************************************************** * * * MVS 3.8j Tur(n)key 4- ("TK4-") is a ready to use OS/VS2 MVS 3.8j * * system built specifically to run under the Hercules System/370, * * ESA/390, and z/Architecture Emulator. It is an extension of the * * original MVS Tur(n)key Version 3 System ("TK3") created by Volker * * Bandke in 2002. See Appendix A for credits and copyrights. * * * * Note: TK4- does not claim to be a new release of the original TK3 * * system, hence its name is TK4-, not TK4. * * * ********************************************************************** * * * Jürgen Winkelmann, [email protected], November 2013 * * * **********************************************************************

3
Table of Contents
Introduction .................................................................................................................. 5
Installation .................................................................................................................... 6
Getting Started ............................................................................................................. 7
Start the System ....................................................................................................... 7
Logon to TSO ........................................................................................................... 8
Change TSO Logon Password ........................................................................... 10
Logoff a TSO Session ............................................................................................ 10
Stop the System ..................................................................................................... 10
Reference Information ................................................................................................ 11
Hercules Configuration Files .................................................................................. 11
Hercules Scripts ..................................................................................................... 11
System Consoles .................................................................................................... 12
Using the Hercules HTTP Server for Console Command Input ......................... 13
IPL and Shutdown .................................................................................................. 14
Unattended Operations ....................................................................................... 14
Manual Operations .............................................................................................. 14
Operating the System ............................................................................................. 16
JRP (JES2 Remote Print) ................................................................................... 16
Maintenance Concepts ........................................................................................... 18
Optional Source and CBT Volumes .................................................................... 18
User Management .............................................................................................. 18
RAKF Administration ........................................................................................... 19
Installed Programs .............................................................................................. 19
Usermods ............................................................................................................ 20
Performing an IOGEN ......................................................................................... 20
TCAM Generation ............................................................................................... 21
Alternative Methods to Access TSO ....................................................................... 21
TCAM Specific Aspects for 3270 Terminals ....................................................... 22
Session Types .................................................................................................... 24
Generalized TSO Logon ..................................................................................... 25
Generalized TSO Logoff ..................................................................................... 26

4
RJE (Remote Job Entry) ......................................................................................... 26
Known Issues ......................................................................................................... 27
Appendix A: About the MVS 3.8j Tur(n)key 4- System ........................................... 28
About the Hardware ............................................................................................ 28
About the Operating System ............................................................................... 28
About the MVS 3.8j Tur(n)key 4- Distribution ..................................................... 28

5
Introduction MVS 3.8j Tur(n)key 4- ("TK4-") is a ready to use OS/VS2 MVS 3.8j system built specifically to
run under the Hercules System/370, ESA/390, and z/Architecture Emulator. It is an extension
of the original MVS Tur(n)key Version 3 System ("TK3") created by Volker Bandke in 2002
(see Appendix A: About the MVS 3.8j Tur(n)key 4- System on page 28 for credits and
copyrights).
Although TK4- incorporates many updates listed on Volker’s Tur(n)key # 4 Wishlist or found
on other Tur(n)key update or “needed extras” systems, it is not related to any of them and is
in no way meant to be a new release of the original TK3 system; hence its name is TK4-, not
TK4.
TK4- is a personal preference of the author on how to operate and maintain a vintage MVS
system:
Automated system startup and shutdown procedures
Unattended operations
Just enough security to be sure that regular users cannot damage the system
unintentionally
All modifications to SMP controlled elements implemented as SMP user modifications
Reliable procedures for removal and reapplication of all user modifications to provide
a clean environment for IOGENs
The original intention was to replace a publicly accessible TK3 system implemented by the
author in 2009 with an easier to maintain and more robust one, while bringing functionality up
to a level comparable with other TK3 updates. So, in the beginning a publication as a
Tur(n)key style system was not envisioned at all. Nonetheless tools updated by the author
while creating the new system were published standalone in the Yahoo H390-MVS and
turnkey-mvs groups and are intended to be published on CBT too, once the system is
complete.
Along the way, however, many diversions occurred, leading to the development of tools and
concepts, not all of which being independent enough from the system to allow for a
meaningful standalone distribution. This finally lead to the decision to publish the system as a
whole in Tur(n)key style.
A major diversion was the exploitation of the connectivity options MVS 3.8j provides when
running under Hercules:
3x74 attached local non-SNA 3270 terminals controlled by VTAM or TCAM.
3791L attached local SNA 3270 and 3767 terminals controlled by VTAM or TCAM.
3705 NCP attached remote SNA 3270 and 3767 terminals controlled by VTAM or
TCAM.
2703 TCU controlled asynchronous lines connecting 3335 (TWX) or 2741 terminals to
TCAM.
2703 TCU controlled bisynchronous lines connecting RJE stations to JES2.
Kermit file transfer through 3767 SNA terminals controlled by VTAM.
The above connectivity options require specific I/O devices to be generated, which is out of
scope for most users of the Tur(n)key systems currently available. Besides having these

6
devices readily generated, TK4- has configurations (TCAM, VTAM, JES2) and user
modifications in place to support them.
The integration of these connectivity options into a Tur(n)key system makes them available
to a broad audience: There is no MVS systems programming knowledge required to use
them, as opposed to the in depth knowledge that would be needed to get them working if the
configurations and the user modifications were just published standalone.
While the 3705 NCP and the 3791L emulations are still in a proof of concept state on the
Hercules side, TK4- is a system enabling their full exploitation. Consequently it may well
serve as a test bed for any further development of these emulations.
The skills needed to enhance these emulations (C-Programming, Hercules development,
SNA concepts) differ greatly from those needed to create an MVS system exploiting them
(MVS systems programming, S/370 basic assembler language, TCAM and VTAM
programming). So, TK4- could in fact be the enabler when it comes to bringing these
emulations to a new level.
The following chapters provide basic information on how to use the MVS 3.8j TK4- system.
They focus on the specific setup of the system and will generally not duplicate information
available through other sources. It is strongly recommended to refer to the original IBM
documentation for more details concerning OS/VS2-MVS 3.8j and its components. Today,
quite a few websites (bitsavers, softlib, etc.) are providing access to vintage manuals in
various formats. A comprehensive collection of links to those manuals can be found on
http://tk3.limewebs.com/Vintage_Manuals.html. In addition the “New User’s Cookbook”
(http://www.bsp-gmbh.com/turnkey/cookbook) written by Volker Bandke for his original “MVS
Tur(n)key System, Version 3” is a comprehensive resource covering those aspects of the
TK4- system that have been taken over from TK3 unchanged.
As of the publishing date of TK4- the applicable Hercules documentation can be found on
http://hercdoc.glanzmann.org, section "V4.00 (Upcoming version)". Most probably that link
will change once Hercules Version 4.00 has been released officially.
Installation MVS 3.8j TK4- is comprised of three ZIP archives:
tk4-.zip: The ready to run MVS 3.8j TK4- system.
tk4-source.zip: The source volumes (SRCCAT, SRC000, SRC001, SRC002) that
come with Volker’s Tur(n)key 3 system. Because the TK4- system has RAKF installed
and activated, the RAC indicator of all datasets on these volumes has been turned
on. Otherwise they are fully identical to the ones distributed with TK3. These volumes
are not needed to run the system; consequently it is optional to download tk4-
source.zip. However, they are useful when it comes to developing user
modifications (although the source doesn’t exactly reflect the running system).
tk4-cbt.zip: The CBT volumes (CBTCAT, CBT000, CBT001, CBT002) that come
with Volker’s Tur(n)key 3 system. Because the TK4- system has RAKF installed and
activated, the RAC indicator of all datasets on these volumes has been turned on.
Otherwise they are fully identical to the ones distributed with TK3. These volumes are
not needed to run the system; consequently it is optional to download tk4-cbt.zip.

7
However, they come in handy to have a quick look at old CBT contents without
needing to download and receive the files from http://www.cbttape.org.
To install proceed as follows:
Unzip the tk4-.zip archive to an arbitrary folder. This folder will be referred to as the
tk4- folder from now on.
If the optional source volumes are to be installed unzip the tk4-source.zip archive
to the tk4- folder. Allow your unzip utility to overwrite existing files and to merge into
existing folders while unzipping the archive.
If the optional cbt volumes are to be installed unzip the tk4-cbt.zip archive to the
tk4- folder. Allow your unzip utility to overwrite existing files and to merge into
existing folders while unzipping the archive.
This concludes the installation.
Note: The datasets on the optional source and CBT volumes are cataloged in their own
user catalogs pointed to by aliases from the system’s master catalog. TK4- comes
with these user catalogs being disconnected, to prevent inadvertent mount requests
being issued against the optional volumes on systems having them not installed.
Installing the optional volumes as described above makes them physically available
only. It does not connect the respective user catalogs, which needs to be done when
the system is running. “Optional Source and CBT Volumes” on page 18 has
instructions on how to connect the user catalogs.
Getting Started This chapter presents automated procedures to operate an MVS 3.8j TK4- system on a
Windows or Linux host and provides basic information on how to logon and logoff a TSO
user session using tn3270 terminal emulation.
No Hercules or OS/VS2-MVS 3.8j skills are required to follow the instructions given in this
chapter. To be as straightforward as possible technical information is kept to a minimum. For
technical details refer to the “Reference Information” chapters starting at page 11.
Start the System
On a Windows system open the tk4- folder and click (or double click, depending on your
settings) the mvs.bat file.
Note: A message stating that MSVCR100.dll is missing might pop up after clicking the mvs.bat file.
This means that a Microsoft runtime library is missing. In this case download and install
http://www.microsoft.com/download/en/details.aspx?id=5555 for 32-bit systems
http://www.microsoft.com/download/en/details.aspx?id=14632 for 64-bit systems
On a Linux system open a shell window, change directory to the tk4- folder and enter the
command
./mvs
at the shell prompt.

8
System startup is fully unattended. After powering on an emulated IBM 3033 mainframe, an
automated IPL is performed bringing the system up to full usability.
Note that for technical reasons the startup procedure needs to pause a few times for up to 30
seconds. This is normal behavior which doesn’t indicate an error condition. Simply wait until
the following logo is displayed, signaling the end of the startup procedure:
HHC01603I * ************ **** ***** ||
HHC01603I * ** ** ** ** ** |||
HHC01603I * ** ** ** ** ** ||||
HHC01603I * ** ** ** || ||
HHC01603I * |l _,,,---,,_ ** ** ** || ||
HHC01603I * ZZZzz /,'.-'`' -. ;-;;, ** **** || ||
HHC01603I * |,4- ) )-,_. ,( ( ''-' ** ***** || ||
HHC01603I * '---''(_/--' `-')_) ** ** ** || || ||||||||||
HHC01603I * ** ** ** |||||||||||
HHC01603I * The MVS 3.8j ** ** ** ||
HHC01603I * Tur(n)key System ** ** ** ||
HHC01603I * ****** **** *** ||||||
HHC01603I *
HHC01603I * TK3 created by Volker Bandke [email protected]
HHC01603I * TK4- update by Juergen Winkelmann [email protected]
HHC01603I * see TK4-.CREDITS for complete credits
Do not try to enter anything in the window displaying the console log. The system is
operating fully unattended, the log is output only. In general it is not expected that any
console commands need to be entered when the system is operating in unattended mode.
If more control is desired see the “Reference Information” chapters starting at page 11 for
information on how to activate full function consoles or to operate the system manually.
Logon to TSO
Like the original Tur(n)key 3 system TK4- comes with four TSO users predefined, in addition
to IBMUSER, which is the system’s initial user. TK4-, however, has resource access control
(RAC) activated by means of RAKF, the RAcK ofF security system, being a replacement for
IBM’s well known RACF product. Due to this fact the TSO users have slightly different
definitions than their TK3 counterparts:
HERC01 is a fully authorized user with full access to the RAKF users and profiles
tables. The logon password is CUL8TR.
HERC02 is a fully authorized user without access to the RAKF users and profiles
tables. The logon password is CUL8TR.
HERC03 is a regular user. The logon password is PASS4U.
HERC04 is a regular user. The logon password is PASS4U.
IBMUSER is a fully authorized user without access to the RAKF users and profiles
tables. The logon password is IBMPASS. This account is meant to be used for
recovery purposes only.
To logon perform the following steps:
1. Connect a tn3270 emulator of your choice to port 3270 of the system running TK4-
(which typically will be localhost).

9
If, for the current IPL, this is the first connection to the terminal address
selected by Hercules, a panel showing the TK4- logo and information about
Hercules and the host operating system will be displayed. In this case press
the 3270 RESET key followed by the CLEAR key to display the logon panel
(RESET is needed if the keyboard is locked only).
Otherwise the logon panel is displayed immediately.
Continue to step 2 once the logon panel is displayed:
2. Enter the name of the user to logon at the cursor position and press ENTER. If
prompted enter the password and press ENTER.
3. After the “Welcome to TSO” banner has been displayed press ENTER. The system will
entertain you with a fortune cookie. Press ENTER again.

10
4. The system will now display the following TSO Applications menu:
From this menu the main TSO applications can be accessed by entering the
appropriate item number in the Option field. Pressing PF3 will exit to the TSO READY
prompt, allowing the full TSO functionality to be accessed.
Change TSO Logon Password
A TSO user’s logon password can be changed at logon time by entering oldpw/newpw (i.e.
the current password, followed by a slash, followed by the new password) when replying to
the “ENTER CURRENT PASSWORD FOR user-“ prompt. The new password gets activated
immediately.
Logoff a TSO Session
To logoff perform the following steps:
1. Exit any active application and press PF3 from the TSO Applications menu to exit
to the READY prompt.
2. Enter logoff and press ENTER. The tn3270 session will not drop and the logon panel
will be redisplayed. Disconnect the tn3270 session manually if you don’t want to
logon again or enter a userid to relogon.
Stop the System
To bring the system to an orderly halt perform the following steps:
1. Logon TSO user HERC01 or HERC02.
2. Press PF3 from the TSO Applications menu to exit to the READY prompt.
3. Type shutdown and press ENTER.
4. Enter logoff and press ENTER.
After pausing 30 seconds the automated shutdown procedure will bring the system down and
quit Hercules (which is equivalent to powering off the IBM 3033 mainframe).
Note: Any user having read access to the DIAG8CMD profile in the RAKF FACILITY class can
initiate the shutdown sequence. Only HERC01 and HERC02 have this authority initially. If a

11
user without DIAG8CMD authority issues the shutdown command RAKF issues an error
message to the MVS console and the shutdown procedure will not be initiated.
Reference Information This chapter provides information specific to the TK4- implementation of OS/VS2-MVS 3.8j
under the Hercules System/370, ESA/390, and z/Architecture Emulator. None of this
information is needed to use and operate the TK4- system in unattended mode. Tasks like
adding users, modifying authorizations, handling data on tape, modifying the system
configuration, etc. may, however, require interaction with Hercules or the operating system.
Basic MVS and Hercules knowledge will be needed to use the information provided in this
chapter, which is by no means intended to be an MVS or Hercules tutorial. IBM’s original
OS/VS2-MVS 3.8j documentation and the Hercules Version 4.00 documentation should be
consulted for in depth information.
Today, quite a few websites (bitsavers, softlib, etc.) provide access to vintage manuals in
various formats. A comprehensive collection of links to those manuals can be found on
http://tk3.limewebs.com/Vintage_Manuals.html.
As of the publishing date of TK4- the applicable Hercules documentation can be found on
http://hercdoc.glanzmann.org, section "V4.00 (Upcoming version)". Most probably that link
will change once Hercules Version 4.00 has been released officially.
Hercules Configuration Files
TK4- uses a single master configuration file to define the Hercules configuration variants for
all combinations of operational use (unattended or manual), optional source or CBT DASD
being present or not, and host operating system (use CRLF print mode on Windows). The
numerous configuration variants are created using variable substitution and include files in
the master configuration file.
The master configuration file is named tk4-.cnf and can be found, together with all include
files defined by TK4-, in folder tk4-/conf. It is not expected that the TK4- user will need to
change any of these files. Instead, there are 10 empty configuration files defined in folder
tk4-/local_conf. These are included at the end of the master configuration file and should
be used to apply user modifications.
Hercules Scripts
TK4- uses Hercules scripts for system initialization and unattended operations. These scripts
can be found in folder tk4-/conf. It is not expected that the TK4- user will need to change
any of these scripts. Instead, there are 10 empty scripts defined in folder
tk4-/local_scripts, which are executed
after Hercules initialization, when operating in manual mode
after MVS 3.8j initialization, when operating in unattended mode
These scripts should be used to perform any user specific processing.

12
System Consoles
The TK4- system comes with two MVS console configurations:
tk4-/conf/intcons.cnf has an integrated IBM 3215 console defined at 009. When this
configuration is in use all MVS console output will be displayed at the Hercules console.
MVS console commands, however, can be issued if Hercules hasn’t been started in
daemon mode only. Because this configuration can be IPLed without needing to connect
any external console, it is used for unattended operations.
Note that the scripts provided for unattended operations (mvs on Linux systems and
mvs.bat on Windows systems) start Hercules in daemon mode. This means that the
Hercules console is output only and consequently neither Hercules nor MVS console
commands can be entered. In daemon mode the only way to enter commands is through
the Hercules HTTP server as described in “Using the Hercules HTTP Server for Console
Command Input” on page 13.
This behavior can be changed as follows:
Prevent Hercules from starting in daemon mode:
o On a Windows system: Open the tk4-/unattended folder and click (or
double click, depending on your settings) the set_console_mode.bat file.
o On a Linux system: Open a shell window, change directory to the
tk4-/unattended folder and enter the command ./set_console_mode at
the shell prompt.
The system will confirm that console mode has been activated. Running the mvs
(Linux) and mvs.bat (Windows) scripts will start Hercules with a full console from now
on. A currently running Hercules instance, however, will not change its console mode.
Revert to starting Hercules in daemon mode:
o On a Windows system: Open the tk4-/unattended folder and click (or
double click, depending on your settings) the set_daemon_mode.bat file.
o On a Linux system: Open a shell window, change directory to the
tk4-/unattended folder and enter the command ./set_daemon_mode at the
shell prompt.
The system will confirm that daemon mode has been activated. Running the mvs
(Linux) and mvs.bat (Windows) scripts will start Hercules in daemon mode from now
on. A currently running Hercules instance, however, will not change its console mode.
tk4-/conf/extcons.cnf has two external consoles defined: An IBM 3270 at 010 and
an IBM 3215 at 01F. It is used by the start_herc (Linux) and start_herc.bat
(Windows) scripts for manual operations.
Note that many other combinations of consoles (external, internal, 3215, 3270) can be
defined. The tk4-/conf/extcons.cnf configuration file contains additional console
definitions as comments. Each combination of these consoles is valid as long as there is
at least one console defined, amongst which there is no more than one 3215-C (internal)
console.

13
Instead of editing tk4-/conf/extcons.cnf to define a different console configuration it
is recommended to use one of the user definable configuration files in folder tk4-
/local_conf as follows:
To add a console copy the corresponding statement from tk4-/conf/extcons.cnf
to the local configuration file and remove the # from column one.
To remove a console add the line
detach cuu
into the local configuration file, where cuu is the device address (i.e. 010 or 01F) of
the console to be removed.
To IPL MVS all external consoles defined in the configuration need to be connected to
console group CONS at port 3270, using a tn3270 client for IBM 3270 and a regular
telnet client for IBM 3215 consoles. Unused consoles must be detached before IPL to
avoid MVS running out of WTO buffers. Upon IPL MVS will select the first usable console
in the sequence 010, 011, 01F, 009 as its master console.
Using the Hercules HTTP Server for Console Command Input
Regardless of the MVS console configuration in use, there is an HTTP server listening at port
8038 of the system on which the TK4- Hercules instance is running (usually 127.0.0.1, aka
localhost) allowing console communications even when running in daemon mode. This can
be used to activate a full function console whenever one is needed.
Example: Add Full Function Console when Running in Unattended Mode
A typical use case when running unattended (i.e. MVS was started using the mvs or mvs.bat
script) is to add a full function console if this becomes necessary later. Use the following
steps to achieve this:
Point a web browser to port 8038 of the host system running TK4-. This will typically
be 127.0.0.1, aka localhost.
Enter
attach 010 3270 CONS
in the command field of the web browser session.
Connect a tn3270 emulator of your choice to port 3270 of the host system running
TK4- (which typically will be localhost). Use CONS for the LUNAME (or equivalent)
connection parameter of the tn3270 client. A panel showing the TK4- logo and
information about Hercules and the host operating system will be displayed.
Enter
/v 010,console,auth=all
in the command field of the web browser session. An MVS console will now be
activated in the tn3270 session.

14
It is recommended to press PF11 at the newly activated console at this point. This will
remove the annoying default display area which occupies most of the console’s
output area. Alternatively PF23 can be used if in addition the popular mn jobnames,t
and mn sess,t commands are to be issued.
IPL and Shutdown
Any IPL or shutdown method valid for an OS/VS2-MVS system running on real iron will, of
course, work with the TK4- system. Thus the methods mentioned here are recommendations
only, modify them as needed:
Unattended Operations
This is the method described in “Getting Started” on page 7. It is meant to enable a user to
work interactively using TSO sessions or to submit batch jobs through card readers, without
needing to know what is “under the hood”. There is no console input required neither at the
Hercules nor at the MVS level. Console interaction is nonetheless possible using the HTTP
server listening at port 8038.
Manual Operations
This method provides full control over IPL, operations, and shut down. However, IPL and
shutdown can optionally still be performed using the autopilot the same way as unattended
operations do. For a manual startup perform the following steps:
If necessary, adapt the configuration file tk4-/conf/extcons.cnf to your specific
requirements as described in “System Consoles” on page 12 for the tk4-
/conf/extcons.cnf MVS console configuration.
Run the tk4-\start_herc.bat (Windows) or the tk4-/start_herc (Linux) script to
start Hercules, which will open the Hercules console window displaying the TK4- logo.
Connect all consoles defined in tk4-/conf/extcons.cnf.
Enter ipl 148 at the Hercules command prompt and press RETURN.
When message
IEA101A SPECIFY SYSTEM PARAMETERS FOR RELEASE 03.8 .VS2
is displayed on the master console (which is the first usable console found in the
sequence 010, 011, 01F, 009), simply press ENTER to continue using automatic
startup with autopilot assistance.
If, however, automatic startup is not desired, enter
r 00,cmd=03
before pressing ENTER. This selects the nonexistent parmlib member COMMND03
(consequently yielding NIP messages IEA301I and IEA208I) and thus prevents any
further initialization. MVS will now wait for start commands to be entered manually.
If automatic startup was allowed in the previous step the system will now bring up
JES2, the CMD subsystem, and the automated operator (BSPPILOT). Then it does
some useful PFkey assignments on the active 3270 consoles and displays message
+BSPSP99I - End of processing, MAXRC=0000

15
It is recommended to press PF11 at the active 3270 consoles at this point. This will
remove the annoying default display area which occupies most of the console’s
output area. Alternatively PF23 can be used if in addition the popular mn jobnames,t
and mn sess,t commands are to be issued.
The system waits for 30 seconds now. Then startup will then be continued to the
same functional level as when running in unattended mode.
If, however, automatic startup is not desired, enter
$ca,all
within the 30 seconds wait interval to cancel.
To stop the system, perform the following steps:
Terminate all system activity:
o If the system had been started with autopilot assistance enter
f bsppilot,shutnow
at any console and wait for message
$HASP099 ALL AVAILABLE FUNCTIONS COMPLETE
(note that on 3270 consoles PFKey 16 is assigned to display the text
F BSPPILOT,SHUT in the command line, which can easily be completed by
typing now and pressing ENTER to initiate the shutdown)
o If the system had been started without autopilot assistance manually stop all
started tasks and quiesce JES2 activity until message $HASP099 gets
displayed.
Enter $PJES2 at the master console and wait for JES2 termination.
Enter Z EOD at the master console.
Enter QUIESCE at the master console. The Hercules console now confirms with
message
HHC00809I Processor CP00: disabled wait state 000A0000 00000CCC
that the system is down.
Regardless how the system was brought up and shut down, there will be no
automatic Hercules “power off” in manual mode. After having shut down the MVS
system it is recommended to enter stopall, then sysclear, and finally quit at the
Hercules console to terminate Hercules.

16
Operating the System
The TK4- system is designed such that no console interactions are required during normal
use. Of course there are exceptions, for example when dealing with tapes.
Volker’s very comprehensive “New User’s Cookbook” is highly recommended to learn about
MVS and JES2 commands and other operational aspects. It can be found at http://www.bsp-
gmbh.com/turnkey/cookbook/index.html.
JRP (JES2 Remote Print)
JRP (JES2 Remote Print) is a VTAM application that enables printing of JES2 output to 3270
printers. Because the original TK3 system doesn’t have JRP installed, the rationale for
providing JRP on TK4- and some of its operational aspects are described here.
JRP on TK4-
Today’s MVS 3.8j systems, running on emulated hardware, have no real need for a tool like
JRP: It can be seen as yet another method to obtain line printer output, where the more
common methods are
Viewing the line printer output files directly: prt002.txt (SYSOUT=X, when released),
prt00e.txt (SYSOUT=A) or prt00f.txt (SYSOUT=Z) in folder tk4-/prt. This is
particularly convenient when Hercules is running on the user’s local system, probably
the most common configuration.
Defining a line printer as a socket device and connect a printing or formatting utility
like HercPrt (http://www.softdevlabs.com/Hercules/hercprt.html). Besides
conveniently connecting to Hercules instances running on remote systems this gives
the flexibility to beautify the output inline, for example by creating a PDF file using the
famous blue/green bar “paper” from the old days.
JRP converts spooled output from JES2 to a 3270 printer data stream and sends it via VTAM
to a 3270 printer. A 3270 printer emulation (pr3287, PCOMM, etc.) connected through the
Hercules console port to the 3270 printer logical unit can then format and print the data
stream. Conceptually that’s the same as connecting to a Hercules socket printer, except that
the console port is used instead of a dedicated printer port and the client has to decode a
3270 data stream instead of receiving plain text. So, basically JRP adds complexity to the
printing process without providing additional capabilities.
Why have it on TK4- then? There still are a few reasons:
Nostalgia: In the old days, on real hardware, printing via JRP to a 3270 printer often
was the only way to obtain output quickly, without having to go to the data center, or
find a nearby RJE station. So, JRP was a very commonly used tool and amongst
today’s MVS 3.8j users there might well be a few who simply like it.
JRP is a VTAM application. As implemented on TK4- it supports non SNA (LU0)
printers and non SNA (LU0) or SNA (LU2) consoles. As such it is the only production
style application on TK4- that can communicate with SNA (LU2) terminals and for
which full source is available. Given that one of the major TK4- use cases is to
provide a test bed for the exploitation of MVS 3.8j’s SNA communication capabilities,
JRP is a very relevant part of the system.

17
Operating JRP
JRP can print to any 3270 device that is defined to VTAM as an LU0 3286 and to Hercules
as a 3287 printer (i.e. it doesn’t matter whether the device is sysgen’ed in MVS as a 3277
terminal or a 3286 printer). As an example, JRP is configured on TK4- to drive one printer,
named PRT4, printing output from JES2 class G (SYSOUT=G in JCL) to the Hercules 3287
device connected to address 0C7. Although JRP and JES2 printer names are completely
independent PRT4 was chosen, in line with the fact that PRT1, PRT2 and PRT3 are the printers
defined to JES2.
To operate JRP, a 3270 terminal (the “JRP console”) must be connected to the JRP console
application and an authorized user must be logged on to it. The MVS console can be used to
start and stop JRP only, not to operate JRP.
On the TK4- system JRP is started and stopped automatically when running in unattended
mode, or when running in manual mode with autopilot assistance. The sample JRP printer
PRT4, however, will come up drained after JRP has started. This is a precaution to avoid
message flooding on the MVS console when class G output is available without a 3270
printer emulation being connected to 0C7.
So the minimum operational task that needs to be performed before being able to print
through JRP is to start PRT4. The following procedure is recommended:
Connect a 3270 printer emulation to the Hercules console port (this will usually be
port 3270 on localhost) using an LUNAME of 0C7.
Connect a VTAM controlled 3270 terminal to the JRP console application:
o On a local non SNA (LU0) terminal showing the TK4- logon panel as
described in item 1 on page 8 enter
logon applid=cjrp
in the Logon ===> field and press ENTER.
o On an SNA (LU2) terminal bring up Volker’s cat as described in item b) on
page 25, enter
#applid cjrp
above the Enter logon command prompt and press ENTER twice.
The CONTROL TERMINAL FACILITY logon panel will now be displayed.
Enter the userid and the password of a user having read access to the JRPAUTH
profile in the FACILITY class in the respective fields and press ENTER (as shipped
with TK4- users HERC01 and HERC02 have this permission). The JRP console will now
be displayed.
Press PF12, PF1 and PF8 to activate the console’s alternate screen size, have it
receive unsolicited messages and start PRT4. The console can be logged off at any
time by pressing PF3, i.e. it is not necessary to have it connected for printing. The
printer will remain started until it is explicitly stopped by pressing PF9 on a JRP
console.

18
Once printer PRT4 has been started, all JES2 output spooled to class G will get printed
through the 3287 printer session connected to 0C7.
Further information about JRP operations and use can be obtained from the documentation
in the JRP distribution library, which is a modified version of CBT file 755. Run job JRPUPDT$
from SYS2.CNTL to create this library as HERC01.JRP.
Maintenance Concepts
No reinvention of the wheel: All the good ideas from TK3 are taken over unchanged unless
stated otherwise here.
Optional Source and CBT Volumes
The datasets on the optional source and CBT volumes are cataloged in their own user
catalogs pointed to by aliases from the system’s master catalog. TK4- comes with these user
catalogs being disconnected, to prevent inadvertent mount requests being issued against the
optional volumes on systems having them not installed.
To make the optional volumes accessible through catalog search the respective user
catalogs need to be connected and the high level qualifier aliases pointing to them need to
be defined. Because the catalog structure is identical to the one used in the original TK3
system the original setup jobs can be used unmodified to do this:
To make the CBT volumes accessible submit job SYS1.SETUP.CNTL(MVS0170). It
connects the SYS1.UCAT.CBT user catalog and defines the CBT, CBTCOV, CBT072,
CBT129, CBT249 and CBT429 HLQ aliases.
To make the source volumes accessible submit job SYS1.SETUP.CNTL(MVS0200). It
connects the SYS1.UCAT.SRC user catalog and defines the MVSSRC HLQ alias.
User Management
User Management differs slightly from the original TK3 system because TK4- enforces an
enhanced security scheme using the RAKF resource access control system:
All user definitions are kept in the RAKF users table SYS1.SECURE.CNTL(USERS).
User authentication is always required to access the system. That holds particularly
true for batch jobs:
o All batch jobs have to specify the USER and PASSWORD parameters on their JOB
card.
o However, batch jobs submitted from a TSO session by means of the TSO
SUBMIT command (i.e. from a REVEDIT or a RPF EDIT session) get their
USER and PASSWORD parameters added automatically through the IKJEFF10
user exit. Thus there is no need to code them manually or store any user and
password information in job control libraries. In fact doing so is strongly
discouraged!
Once a user has been defined in the RAKF users table and the table has been
activated this user is known to the system. But that doesn’t mean that it is allowed to
use TSO. In addition to being defined in the RAKF users table a TSO user must also
be defined in UADS as is done on non-RAC protected systems, because all user
attributes except the password are still taken from UADS. To define a user in UADS it is
recommended to submit job SYS2.JCLLIB(ADDUSER) after having defined the user to

19
RAKF. The specifications for ADDUSER are exactly the same as in the original TK3
system.
It is not recommended to use TK3’s SYS2.JCLLIB(ADDUSERP) job as any passwords
defined in UADS are ignored by RAKF.
RAKF Administration
Security for the TK4- system has been set up to be “just enough” to prevent regular users
from performing destructive activities against the system or against other users’ data,
maliciously or inadvertently. In particular it is allowed for everyone to read anything on the
system (except the RAKF users and profiles tables of course).
This easy to manage scheme is defined by the RAKF profiles found in
SYS1.SECURE.CNTL(PROFILES). Each set of profiles has, as a comment, added the
equivalent commands that would have been issued on a RACF protected system to achieve
the same level of protection. With the help of these comments it should be possible to do
basic adjustments intuitively. Note that initially HERC01 is the only user having access to the
RAKF users and profiles tables.
Tightening security further, however, can be quite a task, as many probably know from
RACF, the infamous big brother of RAKF.
For more information see the RAKF User’s Guide, which can be unzipped in PDF or MS-
Word format from RAKF.SAMPLIB($DOC$ZIP).
Activating RAKF Table Changes
Any changes made to the RAKF users and profiles tables stored in SYS1.SECURE.CNTL will
not become active until the in core copies of these tables have been replaced with the
changed versions.
To activate changes to the users table enter S RAKFUSER at an MVS console.
To activate changes to the profiles table enter S RAKFPROF at an MVS console.
A re-IPL of the system will activate any changes also, but is of course not necessary.
Installed Programs
For many programs installed on TK3 there are later versions available. These have been
installed if applicable. Also, some additional programs have been installed. To keep track of
the installed programs and their versions the install files used are stored in ZIP format under
HLQ TK4-, conveniently viewable using REVIEW. Also, member UTILS in SYS2.HELP has
been updated whenever feasible to allow end users to find out what is on the system. UTILS
can be accessed easily from option 6 of the TSO Applications menu.
In most cases the programs have been installed using the relevant materials with no or only
minimal and obvious changes from the installers found under the TK4- HLQ. As a target for
the installations, if not required otherwise, SYS2.CMDLIB, SYS2.LINKLIB, SYS2.CMDPROC,
SYS2.PROCLIB and SYS2.HELP are used, depending on the respective object types.
If the installer’s logic requires or suggests job control or source members to be stored on the
system these are stored in SYS2.CNTL or SYS2.ASM, respectively. Also, any changes applied
to the programs are kept in SYS2.ASM.

20
There may be overlaps between SYS2.CNTL or SYS2.ASM and the original TK3’s
SYS1.SETUP.CNTL or SYS1.SETUP.ASM. In these cases the versions from the SYS2 libraries
are the ones in effect.
Usermods
All usermods installed on the TK4- system are placed in SYS1.UMODCNTL. Those that are in
TK3 already are reused with the same sysmod names. New usermods are always installed
using the names of the original publisher, i.e. they are not renamed to the TK3 ZUMnnnn
numbering scheme.
All REJECT, RESTORE and SETRC fiddling is removed from the usermod installation jobs in
SYS1.UMODCNTL. Instead, jobs REST-ALL and APPL-ALL have been introduced to restore or
apply all usermods (or selected ones by editing these jobs). There are rare situations in
which the SMP RESTORE doesn’t fully remove a usermod. To get a clean system all jobs in
SYS1.UMOD.RESTORE.CNTL (currently only one) should be run after REST-ALL.
A note on usermod ZJW0006: This usermod has been created in the beginning of the work
targeting the exploitation of the SNA LU1/2 connectivity given through the 3705 NCP
emulation provided by comm3705.c. Its main purpose is to “recycle” certain VTAM controlled
logical units (following a naming scheme) after each session, i.e. to issue V NET,ACT and V
NET,INACT commands. Since then the LU1/2 support has been stabilized to a point, where
recycling isn’t needed any more. The VTAM setup has consequently been changed such that
the ZJW0006 automation no longer gets triggered and it thus could be removed from the
system. However, it remained installed as an example on how to implement that kind of logic.
Performing an IOGEN
The following procedure isn’t meant to be a cookbook style recipe; in depth MVS systems
programming knowhow is required to follow it. Although the TK4- system is set up such that
this procedure should work reliably, the author cannot guarantee this. For good reasons
IOGENs and SYSGENs always were amongst the most hated tasks on IBM’s vintage
operating systems.
Create a backup copy of the system (one never knows…).
Deactivate RAKF:
o Submit jobs RAKF.SAMPLIB(VSAMSRAC) and RAKF.SAMPLIB(VTOCSRAC) to
clear the RACF indicators. Note: It is advisable to submit VTOCSRAC using
TYPRUN=HOLD and logoff the TSO session before releasing the job. VTOCSRAC
will have some issues with long dataset names under the TK4- HLQ. These
can safely be ignored.
o Change SYS1.PARMLIB(RAKFINIT) from YES to NO.
o Re-IPL the system.
The system is now “disarmed”, i.e. while RAKF is still installed, it is no longer active
and will grant each and every request. For more information see the RAKF User’s
Guide, which can be unzipped in PDF or MS-Word format from
RAKF.SAMPLIB($DOC$ZIP).
Edit job SYS1.SYSGEN.CNTL(IOGEN) to reflect the desired changes and submit it.
Check for errors and rerun as needed!
Run job SYS1.UMODCNTL(REST-ALL) and then all jobs from
SYS1.UMOD.RESTORE.CNTL.

21
Shut down the system.
IPL the starter system (if you don’t have it, get it from the original TK3 CD).
Submit job SYS1.STAGE1.IOGEN.OUTPUT from MVSRES. Check output for errors, there
generally shouldn’t be any condition codes higher than 4.
Shutdown the starter system and perform an IPL CLPA of the TK4- system. Of course
you now experience a vanilla system, particularly in terms of TSO session
capabilities… so, be warned and don’t worry!
Run job SYS1.SYSGEN.CNTL(IO-JCLIN) to bring SMP back into synch.
Run job SYS1.UMODCNTL(APPL-ALL) to get all usermods back into the system.
Carefully read and follow the warning message issued to the console upon
submission of the job: You must ensure, that all apply jobs are run sequentially. If
they don’t, you’re guaranteed to completely mess up your system.
Shut down the system and perform an IPL CLPA.
Reactivate RAKF:
o Set the setracf parameter in jobs RAKF.SAMPLIB(VSAMSRAC) and
RAKF.SAMPLIB(VTOCSRAC) to ON and submit them to switch the RACF
indicators back on. Note: It is advisable to submit VTOCSRAC using
TYPRUN=HOLD and logoff the TSO session before releasing the job. VTOCSRAC
will have some issues with long dataset names under the TK4- HLQ. These
can safely be ignored.
o Change SYS1.PARMLIB(RAKFINIT) from NO to YES.
o Re-IPL the system.
The system is now “armed”, i.e. RAKF will enforce all profiles defined in
SYS1.SECURE.CNTL. For more information see the RAKF User’s Guide, which can be
unzipped in PDF or MS-Word format from RAKF.SAMPLIB($DOC$ZIP).
Enjoy your new I/O configuration.
TCAM Generation
Job SYS1.SYSGEN.CNTL(TCAMGEN) is used to generate TCAM as it is provided with the TK4-
system. See the comment header of this job for details.
To enable full screen applications, alternate screen sizes and SNA LU2 3270 terminals to
work with TCAM a set of usermods has been installed. Look at SYS1.UMODCNTL members
with names starting with TC01 and at members ZJW0005 and ZJW0008 for details. They are in
parts based on an original idea of Margaret Gardner (probably from the late ‘70s). Her
original versions of these usermods together with a comprehensive documentation can be
found in PDS CBT249.FILE069 which is cataloged on the optional CBT volumes.
Alternative Methods to Access TSO
There are many different methods to access the MVS 3.8j TK4- system, interactively through
TSO terminal sessions controlled by either VTAM or TCAM, or by submitting batch jobs
using local card readers or RJE (Remote Job Entry) terminals. This chapter discusses
interactive TSO terminal sessions only.
All TSO sessions involve either a tn3270 or a standard telnet session to be connected to a
certain port of the system on which the Hercules instance is running. Some telnet or tn3270
session types are dropped automatically at the end of a TSO session, some not. For stability
reasons it is suggested to disable the “auto reconnect” feature of your telnet or telnet 3270

22
application if it has that feature. Also, any tn3270 sessions should be configured with
extended data stream enabled.
TCAM Specific Aspects for 3270 Terminals
The behavior of TCAM controlled 3270 terminals is very close to that of the more commonly
used VTAM controlled terminals. Thus TCAM terminals provide a very viable independent
second way to access the system if VTAM and/or TSO/VTAM do not work.
The following paragraphs describe the main differences between TCAM and VTAM sessions
on 3270 terminals.
Terminal Experience
The terminal experience under TCAM depends on the way applications make use of the
various TPUT options (NOEDIT, FULLSCR, ASIS): There is no equivalent on TCAM’s “side”
of SVC 93 to Greg Price’s famous ZP60009 usermod for TSO/VTAM and consequently each
TPUT NOEDIT is processed basically as if TPUT FULLSCR had been issued. Consequently,
the use of TPUT NOEDIT under TCAM can result in distorted 3270 datastreams.
On the other hand many of today’s tn3270 clients do quite well in making sense of this type
of datastream distortion, which yields a very usable terminal experience with most
applications currently available for MVS 3.8j (namely RFE/REVIEW, RPF, IMON/370,
Queue).
Testing has been done using Tom Brennan’s Vista TN3270 and IBM’s PCOMM 3270 client
on Windows systems and x3270 on Linux systems, all of them providing a very smooth
terminal experience.
Screen Size
TCAM doesn’t query a terminal’s capabilities but rather relies on the values specified during
TCAM generation (applications may of course query the terminal nonetheless and most do
so in fact). So, while TCAM is perfectly able to support any 3270 screen sizes, it in fact
supports the size that has been generated for a given terminal only.
In TK4- all TCAM controlled non SNA 3270 terminals are generated as model 4, while all
TCAM controlled SNA 3270 terminals are generated as model 3. So, remember to always
set your tn3270 application to a mod. 3 (for SNA terminals) or 4 (for non SNA terminals)
screen before connecting to a TCAM controlled terminal.
Besides generating TCAM using different screen sizes, there is a way to change the screen
sizes on the fly on a per terminal base using the LETTERS (LTR) TSO command. This requires
that you’ve logged on using the desired 3270 model and are willing to accept quite a few
“invalid buffer address” errors from your tn3270 application until you’ve entered the LTR
command. See HELP LETTERS for details on that command.
Note that due to currently not fully analyzed implementation limits TCAM controlled SNA
3270 terminals larger than a model 3 might exhibit erratic behavior (in rare cases screen
distortion, in extremely rare cases TCAM abends). For that reason it is not recommended to
use larger screens than model 3 on those terminals.
Toggling Full Screen and Line Mode
All 3270 sessions controlled by TCAM must be toggled manually between line mode and full
screen mode using the PF24 key (shift F12 on most tn3270 applications). Line mode

23
commands (like listcat, vtoc, listalc, …) don’t work well in full screen mode and full screen
applications (like RFE, RPF, IM, Q, …) don’t work well in line mode. It is advisable to keep
track of the mode the session currently is in and press PF24 instead of ENTER if the next
command requires the opposite mode.
TCAM terminals retain their full screen or line mode state across TSO sessions. That means
if someone logs off from a TSO session while being in full screen mode the next user logging
on to that same terminal will start in full screen mode instead of line mode. If you’re not sure
in which mode you are, simply press ENTER a few times from the TSO READY prompt: In line
mode the READY prompt and the cursor will move down with every ENTER, while in full screen
mode READY will always be displayed in line 1 and the cursor will always be positioned in line
2 of the screen.
24
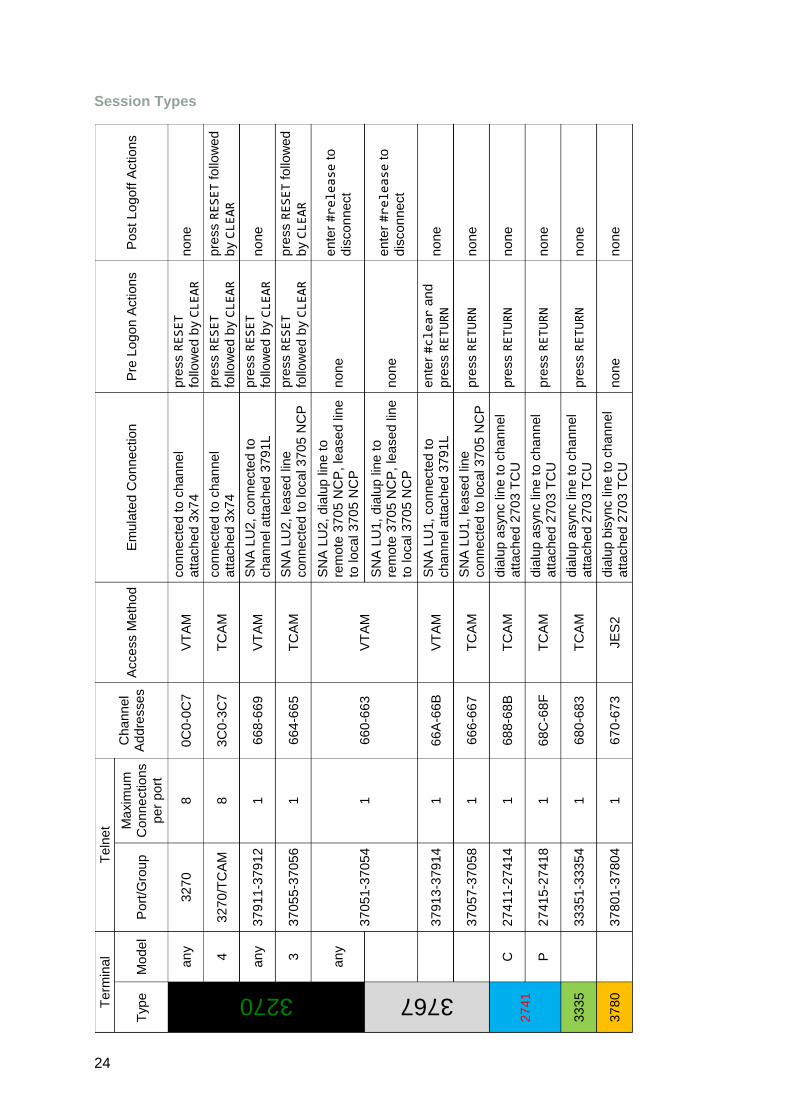
Session Types T
erm
inal
Teln
et
Ch
an
ne
l A
dd
resse
s
Acce
ss M
eth
od
E
mu
late
d C
on
nection
P
re L
og
on
Action
s
Po
st
Lo
go
ff A
ctio
ns
Typ
e
Mo
de
l P
ort
/Gro
up
Ma
xim
um
C
on
ne
ctio
ns
pe
r p
ort
3270
an
y
32
70
8
0C
0-0
C7
V
TA
M
co
nn
ecte
d to
cha
nne
l a
tta
che
d 3
x7
4
pre
ss RESET
follo
we
d b
y CLEAR
n
on
e
4
32
70
/TC
AM
8
3
C0
-3C
7
TC
AM
co
nn
ecte
d to
cha
nne
l a
tta
che
d 3
x7
4
pre
ss RESET
follo
we
d b
y CLEAR
pre
ss RESET f
ollo
we
d
by CLEAR
an
y
37
91
1-3
79
12
1
66
8-6
69
VT
AM
S
NA
LU
2,
co
nn
ecte
d t
o
ch
an
nel a
tta
ch
ed
379
1L
pre
ss RESET
follo
we
d b
y CLEAR
n
on
e
3
37
05
5-3
70
56
1
66
4-6
65
TC
AM
S
NA
LU
2,
lea
sed
lin
e
co
nn
ecte
d to
loca
l 37
05
NC
P
pre
ss RESET
follo
we
d b
y CLEAR
pre
ss RESET f
ollo
we
d
by CLEAR
an
y
37
05
1-3
70
54
1
66
0-6
63
VT
AM
SN
A L
U2, dia
lup lin
e to
re
mo
te 3
70
5 N
CP
, le
ase
d lin
e
to lo
ca
l 3
70
5 N
CP
n
on
e
en
ter #release t
o
dis
co
nn
ect
3767
S
NA
LU
1,
dia
lup
lin
e t
o
rem
ote
37
05
NC
P,
lea
se
d lin
e
to lo
ca
l 3
70
5 N
CP
n
on
e
en
ter #release t
o
dis
co
nn
ect
3
79
13
-379
14
1
66
A-6
6B
V
TA
M
SN
A L
U1
, co
nn
ecte
d t
o
ch
an
nel a
tta
ch
ed
379
1L
en
ter #clear a
nd
pre
ss RETURN
no
ne
3
70
57
-370
58
1
66
6-6
67
TC
AM
S
NA
LU
1,
lea
sed
lin
e
co
nn
ecte
d to
loca
l 37
05
NC
P
pre
ss RETURN
no
ne
27
41
C
27
41
1-2
74
14
1
68
8-6
8B
T
CA
M
dia
lup a
syn
c lin
e t
o c
ha
nn
el
att
ache
d 2
703
TC
U
pre
ss RETURN
no
ne
P
27
41
5-2
74
18
1
68
C-6
8F
T
CA
M
dia
lup a
syn
c lin
e t
o c
ha
nn
el
att
ache
d 2
703
TC
U
pre
ss RETURN
no
ne
33
35
3
33
51
-333
54
1
68
0-6
83
TC
AM
d
ialu
p a
syn
c lin
e t
o c
ha
nn
el
att
ache
d 2
703
TC
U
pre
ss RETURN
no
ne
37
80
3
78
01
-378
04
1
67
0-6
73
JE
S2
d
ialu
p b
isyn
c lin
e t
o c
ha
nn
el
att
ache
d 2
703
TC
U
no
ne
no
ne

25
Generalized TSO Logon
A TSO logon always comprises the following steps:
1. Connect a tn3270 or telnet session to a port of Host system providing the session
type desired.
2. If the terminal is not already in the state described below, perform session type and
access method specific actions according column “Pre Logon Actions” in table
“Session Types” on page 24. This brings the terminal into a state which allows a TSO
LOGON command to be entered. Upon completion of these actions
all TCAM controlled terminals except 2741s will display message
IKJ54012A ENTER LOGON –
all TCAM controlled 2741 terminals will display message
IKJ53020A ENTER LOGON
followed by the string
OW+43929P USVUN YQAQS
when the terminal uses papertape code or preceded by
Y.M73z2zG :RU:S VI,IR
when it uses correspondence code.
VTAM controlled terminals will display either the logon panel depicted in step
1 on page 8 or the message
Enter logon command for application TSO
This message is either
a) followed by the prompt
Enter command>
if the terminal is a line mode terminal (3767),
--- or ---
b) preceded by an empty input field and followed by Volker’s cat if it is a
3270 terminal.
3. Once the terminal is in the state described under step 2 a TSO logon command can
be entered. Usually the following suffices:
logon <user>
where <user> is the TSO user to be logged on. After entering the command press
ENTER on a 3270 terminal or RETURN on a line mode (3767, 3335, 2741) terminal.
The following special cases should be noted:
On a TCAM controlled 3270 terminal, message IKJ54012A must be
overwritten by the logon command. Any remaining data must be removed,

26
such that the 3270 screen contains the logon command only, then press
ENTER. Upon pressing ENTER these terminals will receive an “invalid buffer
address” error from the tn3270 emulation if the alternate screen isn’t already
active. Ignore this error and perform whatever action your tn3270 program
requires to continue (usually just accepting the error message); the correct
screen setting will be established just before the ENTER CURRENT PASSWORD
prompt gets displayed.
On VTAM controlled terminals the command verb logon can generally be
omitted, i.e. it usually suffices to just enter the TSO user name.
See help logon once you are logged on for the full syntax of the TSO logon
command.
4. The system will now display message
ENTER CURRENT PASSWORD FOR <user>-
5. Once the correct password has been entered the logon process will
on line mode terminals: Display some useful informational messages followed
by the TSO READY prompt.
on 3270 terminals: Continue as described in step 3 on page 9.
Note: On TCAM 3270 terminals it is recommended to press PF24 instead of
ENTER after the “Welcome to the TSO” banner, if the terminal is not in full
screen mode already. This will switch the terminal to TCAM full screen mode.
Generalized TSO Logoff
To logoff a TSO session perform the following steps:
1. Exit any active application, until the TSO READY prompt is displayed.
2. Enter logoff and press ENTER (3270) or RETURN (line mode).
3. Perform the session type and access method specific steps according column “Post
Logoff Actions” in table “Session Types” on page 24.
RJE (Remote Job Entry)
The TK4- system has 4 bisynchronous lines defined for the connection of 3780 RJE (Remote
Job Entry) stations. Connect an IBM 3780 emulation to one of the ports 37801 to 37804.
These ports correspond to JES2 lines LINE1 to LINE4, each of which is defined as an RJE
station with a reader, a printer and a card punch as follows:
0000 21.56.51 $DU,LINE1
0004 21.56.51 $HASP000 LINE1 670 ACTIVE (RMT1) E=N
0004 21.56.51 $HASP000 R1.RD1 670 INACTIVE C=A Q=A P=R1 U=R1 S=ANY H=N
0004 21.56.51 $HASP000 R1.PR1 670 INACTIVE F=0001,AUTOM P=N R=R1 C=6 ,STD
0004 21.56.51 $HASP000 T=QN ,STD S=Y LIM=0-* Q=XA
0004 21.56.51 $HASP000 R1.PU1 670 INACTIVE F=0001,OPER P=N R=R1 S=Y LIM=0-* Q=B

27
Known Issues
There currently exist a few known issues which are summarized in the following table:
Issue Circumvention Environment Probable Cause/Remarks
5 seconds timer in IMON/370 monitor G mode R doesn't work. Display doesn't get refreshed in R mode until ENTER is pressed. After pressing
ENTER all missing displays are
presented in quick succession, then the display stalls again.
Use monitor G in F (manual refresh) mode only.
Local non SNA 3270 under TCAM
Unknown
SNA LU2 under TCAM
Terminal name (luname) not displayed in IMON/370 and Q
None, cosmetic issue only
Local non SNA 3270 under TCAM The terminal name is available
in TSB field TSBTRMID, as the PROCSTEP of the TSO session and in the JCTJTPTN field of the initiator task’s JCT. Probably IMON and Q don’t look up any of these fields.
SNA LU2 under TCAM
RETURN needs to be pressed twice to
execute commands in TSO line mode. After command execution the TSO READY prompt gets displayed twice.
None, cosmetic issue only
2741 terminals attached through the 2703 ibm1 attachment as emulated by commadpt.c
Probably Circle C/D protocol violation.
RFE doesn’t startup in color mode.
Issuing REVIEW’s “color” subcommand while browsing a dataset switches color mode on
Local non SNA 3270 under TCAM
No initial QUERY REPLY issued against these terminals. SNA LU2 under TCAM
JRP console task abend 0C4 when CLOSE command is issued from JRP console.
Use "P JRP" command from MVS console to stop JRP.
JRP Console
Logic errors in JRP command processing. These issues already exist in the current JRP distribution for MVS 3.8j in CBT file 755. They are most probably "work in progress" artefacts.
JRP ignores ICLOSE and SHUTDOWN commands when issued from the JRP console.
Modify interface (F JRP,cmd) doesn't recognize any JRP commands except ICLOSE and SHUT.
MVS Console
"K D,PFK" command distorts MVS console display, rendering console unusable.
Don't issue "K D,PFK" command. Vary the console offline and back online (using a different console) if a "K D,PFK" was issued nonetheless.
3277-2 display consoles with more than 12 PFKeys assigned.
Screen layout for 3277-2 display consoles isn't designed to support more than 12 PFKeys because a real 3277-2 had 12 PFKeys only.

28
Appendix A: About the MVS 3.8j Tur(n)key 4- System
About the Hardware
The MVS 3.8j Tur(n)key 4- System runs on an IBM 3033 mainframe emulated by the
Hercules System/370, ESA/390, and z/Architecture emulator which is
Copyrighted (c) by Roger Bowler and others.
Hercules is licensed and distributed under the terms of the Q Public License Version 1.0.
See http://www.hercules-390.eu/herclic.html for license details. According to the terms of the
license an unmodified copy of the license is available as file tk4-
/hercules/httproot/herclic.html and all patches applied to Hercules to adapt it to the
needs of TK4- have been placed in folder tk4-/hercules/patches of the MVS 3.8j
Tur(n)key 4- distribution.
About the Operating System
For the present implementation IBM's OS/VS2 (MVS) operating system (Program-Number
5752-VS2, Release 3.8j, Service Level approx. 8505) was chosen, which is in the public
domain.
About the MVS 3.8j Tur(n)key 4- Distribution
The MVS 3.8j Tur(n)key 4- distribution itself is put into the public domain without claiming any
copyright by the author as far as no third party copyrights are affected.
Dataset TK4-.CREDITS holds a list, prepared to the best knowledge of the author, crediting
the owners and current maintainers of the software products installed on the TK4- system.
The original installation materials of these software products are provided unmodified under
the TK4- HLQ, if they were available to the author. They should be consulted carefully for
additional copyright notices before creating redistributions of TK4- or parts thereof.