the next step - copian | cdÉacfen.copian.ca/library/learning/nextstep/book9/geometry.pdfthe next...
TRANSCRIPT
The Next Step
Mathematics Applications for Adults
Book 14019 – Geometry

OUTLINE Mathematics - Book 14019
Geometry Lines and Angles
identify parallel lines and perpendicular lines in a given selection of figures. construct parallel lines. determine angles when a transversal cuts parallel lines. construct angles using a protractor, given a list of angle measurements. identify types of angles: acute, right, obtuse, straight, complete, reflex. illustrate with diagrams the following angle relations: complementary, adjacent, supplementary, exterior, and vertical or opposite.
Introduction to Geometric Figures identify parts of a circle. construct a circle and label its parts. identify a variety of polygons. identify a variety of polyhedrons. use the Pythagorean Theorem to find length of one side of a triangle.
Characteristics of Geometric Figures identify the line or lines of symmetry in given figures. identify congruent lines, angles, and shapes. determine whether two figures are similar and apply similarity in calculation exercises.
Construction of Geometric Figures construct a variety of geometric figures, given the

appropriate measurements. bisect angles using ruler and compass. construct altitudes and perpendiculars from a given point.
Problem Solving with Geometric Figures solve multi-step problems requiring the performance of any combination of mathematical operations involving whole geometric figures, with or without a calculator.

THE NEXT STEP
Book 14019
Geometry Geometry is the branch of mathematics that explains how points, lines, planes, and shapes are related. Lines and Angles
Points Points have no size or dimensions, that is, no width, length, or height. They are an idea and cannot be seen. But, points are used to tell the position of lines and objects. Points are usually named with capital letters: A, B, C, D and so on.

Points can describe where things begin or end.
Points can be used to measure distance.
Points define the perimeter of shapes and objects.
Lines Lines extend in opposite directions and go on without ending. Like points, lines have no volume, but they have infinite length. Lines are named by points with a line

symbol written above.
Lines intersect at a point. Lines AB and CD intersect at point Z.
⇒ Line AB can also be named BA.
Line Segments Line segments are parts of lines defined by two endpoints along the line. They have length.
Line segments are named by their two points with the line segment symbol written above: AB (or BA)

An infinite number of line segments can be located along a line: AB AE AC AD AF EC ED EF …
⇒⇒ Line segments of equal length are called
congruent line segments. Rays Rays are parts of lines that extend in one direction from one endpoint into infinity.
Rays are named by the endpoints and one other point with a ray symbol written above. The endpoint must always be named first.
AB

The Compass
The compass at left is a typical golf-pencil compass that seems to be preferred by many students. It is not recommended. The whole point of a compass is to draw an arc with constant radius. This model tends to slip easily. Friction is the only thing holding the radius. As it wears out, it becomes even looser. Also, the
point is not very sharp, so it will not hold its position well when drawing. Two advantages are that it is easy to find and it is inexpensive. The compass on the right is a much better design. The wheel in the center allows for fine adjustment of the radius, and it keeps the radius from slipping. It has a much heavier construction, and will not easily bend or break. Keep the compass lead sharpened for a nice, fine curve. There are special sharpeners made just for the leads that fit the compass, but it is a simpler matter to carry a small piece of sandpaper. Stroke the lead across it a few of times to give the tip a bevel.
Hold the compass properly. Use one hand, and hold it by the handle at the top. Do not hold it by the limbs. If you do that, there will be a tendency to change the radius as you draw.
This is especially a problem with the cheaper compasses that have no way of locking the radius. Tilt the compass back slightly, so that the lead is dragged across the page. If the compass is pushed toward the lead, it will cause the anchor point to lift up and slip out of position.
Do not be impatient with your work. When using a compass, there must be some well-defined point for the center point, such as the intersection of two lines. Center the compass precisely on that intersection. Depending on the complexity of the construction, small errors may be greatly magnified.
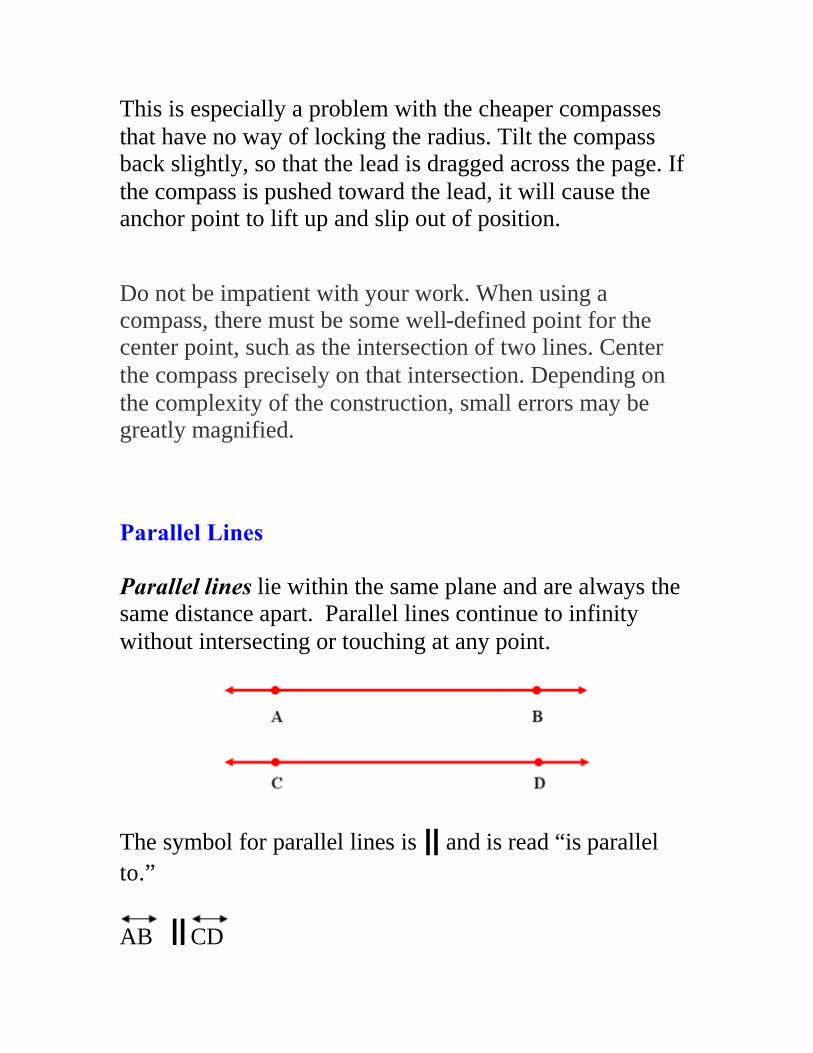
Parallel Lines Parallel lines lie within the same plane and are always the same distance apart. Parallel lines continue to infinity without intersecting or touching at any point.
The symbol for parallel lines is || and is read “is parallel to.”
AB || CD

Constructing Parallel Lines
Given a line and a point, construct a line through the point, parallel to the given line.
1. Begin with point P and line k.
2. Draw an arbitrary line through point P, intersecting line k. Call the intersection point Q. Now the task is to construct an angle with vertex P, congruent to the angle of intersection.
3. Center the compass at point Q and draw an arc intersecting both lines. Without changing the radius of the compass, center it at point P and draw another arc.
4. Set the compass radius to the distance between the two intersection points of the first arc. Now center the compass at the point where the second arc intersects line PQ. Mark the arc intersection point R.

5. Line PR is parallel to line k.
A second method follows these steps: Step 1 On a given line z, create two points and label them.
Step 2 Point P will be the point through which you will construct a line parallel to the given line z.
Step 3 Open compass to the length of LM. Put compass
point at P and draw an arc.

Step 4 Open compass to the length of LP. Put compass point at M. Draw an arc to cut the previous arc. Label Q.
Step 5 Draw PQ. PQ || LM.
B.C. by Johnny Hart 1/16 Copyright 1992 by Creatures Syndicate Inc.

Perpendicular Lines
Lines that intersect to form 90° angles, or right angles
Example:
Read: Line RS is perpendicular to line MN
Construct the Perpendicular Bisector of a Line Segment
Definition: The perpendicular bisector of a segment is the line that is perpendicular (at a right angle) to the segment and goes through the midpoint of the segment.
Construction Steps
Use a compass to draw a circle whose center is one of the endpoints of the segment, and whose radius is more than half the length of the segment.
Draw another circle with the same radius, and center the other endpoint of the segment.

Draw the line through the two points where the circles intersect.
Note: You don't have to draw the entire circle, but just the arcs where the two circles intersect.
Construct the Perpendicular to a Line Through a Given Point
Given a line and a point, there is one and only one perpendicular to the line through the point.
The main idea is to construct a line segment on the line, then construct the perpendicular bisector of this segment.
Construction Steps
A. If the point is not on the line, use a compass to draw a circle whose center is the given point, and whose radius is large enough so that the circle and line intersect in two points, P and Q.
B. If the point is on the line, draw a circle whose center is the given point; the circle and line intersect in two points, P and Q. Construct the perpendicular bisector of segment PQ.

Lines that intersect but do not form 90° angles, or right angles, are simply called intersecting lines.
Transversal
A line that intersects two or more lines
Example: Line AB is a transversal.
Name each figure.
1.
line QF line segment FQ Ray QF Ray FQ
2.
line VX line segment VX Ray VX Ray XV
3.
line AB
4.
line VX

line segment BA Ray AB Ray BA
line segment VX Ray VX Ray XV
5.
line SK line segment KS Ray SK Ray KS
6.
line NK line segment NK Ray NK Ray KN
7.
line BV line segment VB Ray BV Ray VB
8.
line BC line segment CB Ray BC Ray CB
Classify each group of lines.
1.
Parallel Intersecting Perpendicular
2.
Parallel Intersecting Perpendicular
3.
Parallel Intersecting Perpendicular
4.
Parallel Intersecting Perpendicular
5.
Parallel Intersecting
6.
Parallel Intersecting

Perpendicular
Perpendicular
7.
Parallel Intersecting Perpendicular
8.
Parallel Intersecting Perpendicular
9.
Parallel Intersecting Perpendicular
10.
Parallel Intersecting Perpendicular
Complete the following constructions. 1. Draw line segment DE and point F not in the line
segment. Use a compass and a ruler to construct a line segment through F parallel to line segment DE.
2. Draw line segment AB and point C not in the line
segment. Use a compass and a ruler to construct a line segment through C parallel to line segment AB.
3. Draw line XY and point A not in line XY. Use a
compass and a ruler to construct the perpendicular from A to line XY.
4. Use a compass and a ruler to construct the perpendicular
from D to line segment CB and from D to line segment AB.

Angles Angles are formed by two rays with a common endpoint called a vertex.
Angles are named by writing the names of three points on the set of lines after the symbol for angle, or by naming only the middle point after the angle symbol. The middle point always names the vertex. ∠∠ XAZ or ∠∠ ZAX or ∠∠ A Angles come in different shapes and sizes. Some are narrow, some are wide. But all angles can be measured as part of a circle. To make calculations easy, scientists have developed the protractor, a kind of ruler for angles.
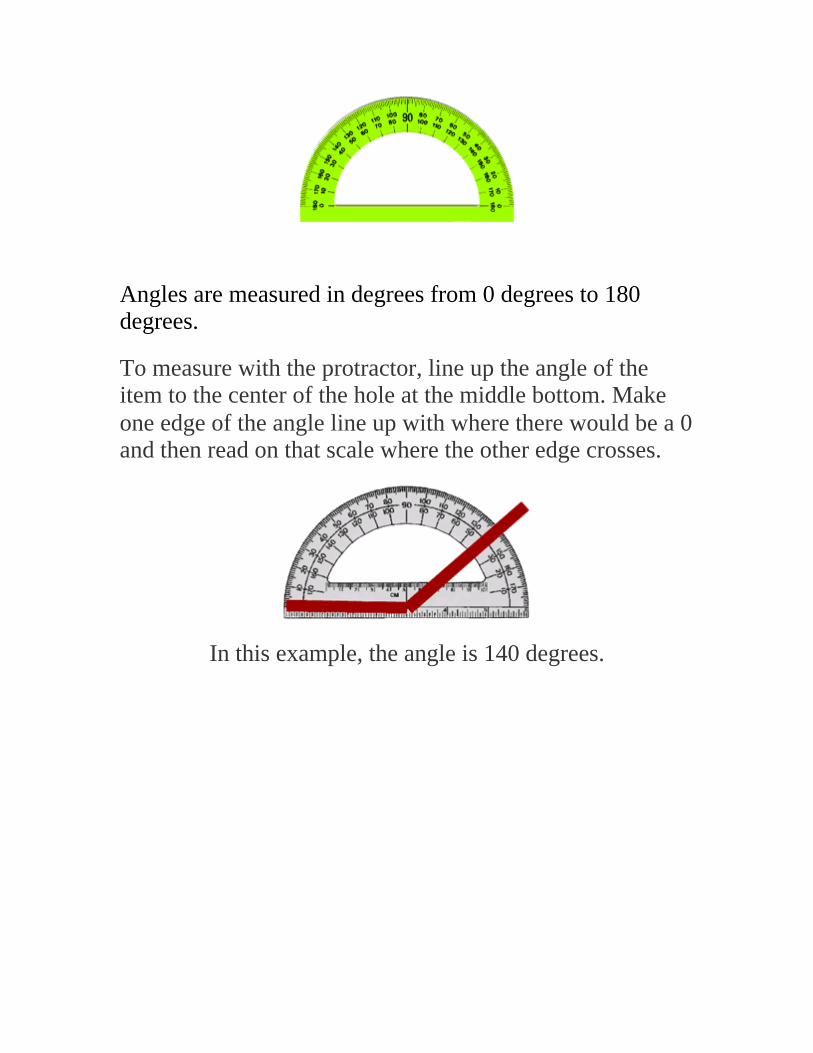
Angles are measured in degrees from 0 degrees to 180 degrees.
To measure with the protractor, line up the angle of the item to the center of the hole at the middle bottom. Make one edge of the angle line up with where there would be a 0 and then read on that scale where the other edge crosses.
In this example, the angle is 140 degrees.

1.) On a separate piece of paper, use a protractor and a ruler to construct an angle, MAP, with a 45° angle.
2.) On a separate piece of paper, use a protractor and a ruler to construct an angle, BOG, with a 90° angle.
3.) On a separate piece of paper, use a protractor and a ruler to construct an angle, DIN, with a 60° angle.
4.) On a separate piece of paper, use a protractor and a ruler to construct the angle, SET, with SE = 5.5 cm, ET = 6 cm, and ∠ SET measuring 120°.

Acute Angle An angle whose measure is greater than 0° and less than
90° Example:
Obtuse Angle An angle whose measure is greater than 90° and less than
180° Example:
Right Angle An angle whose measure is 90°
Example:

Reflex Angle
An angle whose measure is more than 180 degrees, but less than 360 degrees.
Example:
Straight Angle
An angle whose measure is 180° Example:
∠ ABC is a straight angle.
Complete Angle An angle whose measure is 360 degrees (a circle)
Example:

Acute, Obtuse, Right, Straight, Reflex, and Complete Angles
1 A 28 degree angle would be classified as: An acute angle. An obtuse angle. A right angle. A straight angle.
2 A 90 degree angle would be classified as: A reflex angle. An obtuse angle. A right angle. A straight angle.
3 A 150 degree angle would be considered: A reflex angle. An obtuse angle A complete angle. A straight angle.

4 A 180 degree angle would be considered: An acute angle. An obtuse angle. A complete angle. A straight angle.
5 An 88 degree angle would be considered: An acute angle. An obtuse angle. A right angle. A straight angle.
6 Larry opens up his lounge chair at a 131 degree angle and creates one of these angles.
Acute Angle Obtuse Angle Reflex Angle Straight Angle
7 Which angle is impossible to have in a rhombus (diamond-shape) but could be found in a square?
Acute Angle Obtuse Angle

Right Angle Straight Angle
8 If you took the sum of all the angles that are
used to make up a rectangle, what kind of angle could you make?
Complete Angle Obtuse Angle Reflex Angle Straight Angle
9 Which angle is the largest? Reflex Angle Obtuse Angle Right Angle Straight Angle
10 How many obtuse angles is it possible to use to
make a rhombus? 0 1 2 3
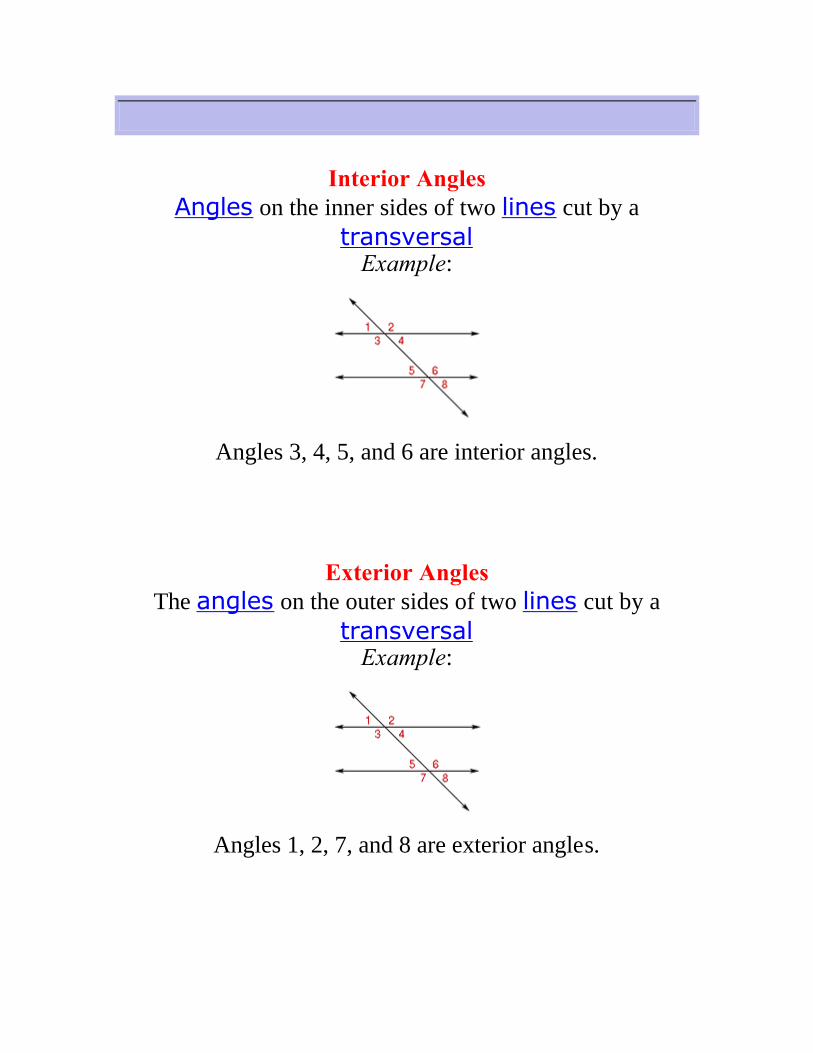
Interior Angles
Angles on the inner sides of two lines cut by a transversal
Example:
Angles 3, 4, 5, and 6 are interior angles.
Exterior Angles The angles on the outer sides of two lines cut by a
transversal Example:
Angles 1, 2, 7, and 8 are exterior angles.

Alternate Exterior Angles A pair of angles on the outer sides of two lines cut by a
transversal, but on opposite sides of the transversal Example:
∠ 1 and ∠ 8 and ∠ 2 and ∠ 7 are alternate exterior angles.
Alternate Interior Angles A pair of angles on the inner sides of two lines cut by a
transversal, but on opposite sides of the transversal Example:
∠ 3 and ∠ 6 and ∠ 4 and ∠ 5 are alternate interior angles.

Corresponding Angles Angles that are in the same position and are formed by a
transversal cutting two or more lines Example:
∠ 2 and ∠ 6 are corresponding angles.
Vertical or Opposite Angles A pair of opposite congruent angles formed by
intersecting lines Example:

Adjacent Angles Angles that share a common side, have the same vertex ,
and do not overlap Example:
∠ ABD is adjacent to ∠ DBC.
Complementary Angles Two angles whose measures have a sum of 90°
Example:
∠ DBE and ∠ EBC are complementary.
Supplementary Angles Two angles whose measures have a sum of 180°
Example:
m∠ABD + m∠DBC = 124° + 56° = 180°

Adjacent Angles
Use the picture above to answer the following questions?
1. Which angle is adjacent to <BAC?
2. Which angle is adjacent to <CAD?
Complementary and Supplementary Angles
1. What angle would be supplementary to a 75 degree
angle? 2. What angle would be complementary to a 50 degree
angle?
3. What angle would be complementary to 25 degree angle?

4. What angle would be supplementary to a 120 degree angle?
5. Using the diagram below: a) identify all of the
interior angles. b) identify all of the
exterior angles. c) identify all of the
vertical or opposite angles.

Introduction to Geometric Figures
Circle
A closed curve with all points on the curve an equal distance from a given point called the center of the circle
Example:
Radius
A line segment with one endpoint at the center of a circle and the other endpoint on the circle
Example:

Diameter
A chord or line segment with endpoints on a circle that passes through the center of a circle
Example:
The diameter of a circle is a line that crosses the circle through its center from one side to the other. It also
measures the distance across the circle. The radius of a circle is a line from the center of the circle to any point on the curve of the circle. A radius is half the distance across
a circle. In other words, a radius is half of the diameter of a circle.
Circumference
The distance around a circle. The perimeter of a circle is called circumference.

The formula for the circumference of a circle is C = d, where C = circumference, , and d =
diameter
Pi ( )
The ratio of the circumference of a circle to the length of its diameter;
≈ is the symbol that means “approximately equal to”.
⇒ It is useful to be familiar with both values of , because in some problems a fraction is easier to use, while in others a decimal will make the computation easier.
Example Find the circumference of the circle shown
below.
C = d C = 3.14 x 5 ft C = 15.70 = 15.7 ft

Solution: Replace with 3.14 and d with 5 ft in the formula C = d. The circumference of the circle is 15.7 feet.
When finding the circumference of a circle, if only the radius is given, you must multiply the radius by 2 to find the diameter, and then use the formula. Example Find the circumference of the circle shown
below. Use 22/7 for .
Step 1 Notice that the picture shows the radius of the circle. To find the diameter, multiply the radius by 2.
d = 2 x 35 = 70 m
Step 2 Replace with 22/7 and d with 70 m in the
formula C = d. C = d
C = 22/7 x 70 C = 220 m Answer: The circumference of the circle is 220 m.

To find the diameter of a circle, if only the circumference is given, divide the circumference by . To find the radius of a circle, if only the circumference is given, divide the circumference by to find the diameter. Then divide the diameter by 2 to find the radius. If you already know the diameter of the circle, you can find the radius by dividing the diameter by 2. If you already know the radius of the circle, you can find the diameter by multiplying the radius by 2.
1. Name the center
2. Name each radius
3. Name each diameter

4. Explain how the length of one radius compares to a diameter
5. Draw a diameter and label the new points
Find the Circumference for each. Round to the nearest hundredth. Assume = 3.14
1.
g = 26 m 81.64 m
2.
s = 5 m ___________
3.
m = 21 mi ___________
4.
e = 18 ft ___________
5.
g = 15.76 in ___________
6.
m = 40.368 cm ___________
7.
e = 12.6 m ___________
8.
s = 3 in ___________

Complete the table for each circle. Round to the nearest hundredth. Use 3.14 for
For problems 11-14, use 3 1
7 for .
radius diameter circumference 1. 5 mm 10 mm ________ mm 2. 10 mi ________ mi ________ mi 3. ________ yd 4 yd ________ yd 4. 12 ft 24 ft ________ ft 5. 3 in 6 in ________ in 6. 3.4 m 6.8 m ________ m 7. ________ cm 13.6 cm ________ cm 8. ________ km ________ km ________ km 9. 4.5 in ________ in ________ in 10. 9.4 mi 18.81 mi ________ mi 11.
9 3
5 cm ________ cm ________ cm
12. 5
4
5 km 11
3
5 km
________ km
13. 5
3
5 ft 11
1
5 ft
________ ft
14. ________ mm 10
3
5 mm ________ mm
15. 13. 41 yd 26.82 yd ________ yd

Parts of a Circle
Chord
A line segment with endpoints on a circle Example:
Segment
A straight set of points that has two endpoints. Example:
AB is a segment. In this picture, it is a straight set of points with two endpoints. Since both of the endpoints are on the circle this segment is also a chord.

Tangent
Tangent lines are perpendicular to the radius that has an endpoint on the point of tangency.
Example:
Line J is a tangent line that meets the radius line CW at an endpoint W on the circle that forms a 90 degree angle.
Therefore, Line J is perpendicular to line CW.
Arc
A section of a circle. Think about a circular pizza that has been cut like a pie is cut. The crust acts like the circumference of the pizza. That would make the crust on one piece of pizza an arc
because it is just a section of the whole circle. Example:

There are many arcs shown here. Can you see them all? 1) Small arc fb and big arc fb. 2) Small arc fc and big arc fc.
3) Small arc bc and big arc bc. 4) Arc cfb
Semicircle
The arc that goes halfway around a circle is called a
semicircle. Example:
Sector
A region in a circle that is created by a central angle and its intercepted arc. A piece of pie.
Example:
The piece of pie that the number 1 is in is called a sector.

CIRCLE CONSTRUCTIONS
Center/point construction:
Procedure: Center point A and linear point B are the endpoints of a given radius. Set the point of the compass on A and the lead on B and draw the circle.
Diameter construction:
Procedure: Bisect given diameter AB by placing the compass point first on Point A and opening your compass so that the lead touches a point on the line that is more than midway towards Point B.
Using this setting, make an arc above and below the line.

Now, put your compass point on Point B, and using the same compass setting, make an arc above and below the line that intercepts the arc made from point A.
Where the arcs intercept, join the two points to form a line that will bisect line AB. Since C denotes the midpoint of AB, then AC and BC are radii of the circle and either can be used to set the compass.

1. On a separate piece of paper, use a compass to construct a circle with center M and radius 6 cm. Draw a sector in your circle labeled AMR.
2. On a separate piece of paper, use a compass to construct a circle with a diameter 9 cm and center O. Label the diameter as RS. In the same circle draw a radius and label it as FO.
Using the diagram above, identify the following circle parts listed on page 159. 1. Name two radiuses. 2. Name a diameter. 3. Name a chord. 4. Name two arcs. 5. Name a segment.

6. Name a sector. 7. Name a tangent. 8. Name a semicircle.
Polygon
A closed plane figure formed by three or more line segments Examples:
The figure below is not a polygon, since it is not a closed figure:
The figure below is not a polygon, since it is not made of line segments:

The figure below is not a polygon, since its sides do not intersect in exactly two places each:
Regular Polygon
A regular polygon is a polygon whose sides are all the same length, and whose angles are all the same.
Examples:
The following are examples of regular polygons:
Examples:
The following are not examples of regular polygons:

Convex Polygon
A figure is convex if every line segment drawn between any two points inside the figure lies entirely inside the figure.
Example:
The following figures are convex.
Concave Polygon
A figure that is not convex is called a concave figure. A concave polygon has at least one side that is curved inward.
The following figures are concave. Note the red line segment drawn between two points inside the figure that also passes outside of the figure.

Triangle
A three-sided polygon Examples:
Quadrilateral
A four-sided polygon Examples:
Parallelogram
A quadrilateral whose opposite sides are parallel and congruent
Example:

Trapezoid
A quadrilateral with only one pair of parallel sides Example:
Square
A rectangle with 4 congruent sides Example:
Rectangle
A parallelogram with 4 right angles Example:

Rhombus
A parallelogram whose four sides are congruent and whose opposite angles are congruent
Example:
Pentagon
A five-sided polygon Examples:
Hexagon
A six-sided polygon Examples:

Octagon
An eight-sided polygon Examples:
Write down the name for each polygon.
1. Triangle
2. ________
3.
________
4.
________
5.
________
6.
________
7. ________

Right Triangle
A triangle with exactly one right angle Examples:
Isosceles Triangle
A triangle with two congruent sides Example:
Scalene Triangle
A triangle with no congruent sides Example:

Equilateral Triangle
A triangle with three congruent sides and three congruent angles
Example:
Acute Triangle
A triangle in which all three angles are acute Example:
Obtuse Triangle
A triangle containing exactly one obtuse angle Example:
∠ A is obtuse so ∠ ABC is an obtuse triangle

1. Measure the sides and classify the triangle as equilateral,
isosceles, or scalene. a.
b.
c.
d.
2. Measure the largest angle, then classify the triangle as acute, obtuse, or right.
a.
b.
c.
d.

Pythagorean Theorem (Pythagorean Property)
Pythagoras was a Greek philosopher and mathematician. His ideas influenced great thinkers throughout the ages, and
he is well known to math students. His Pythagorean Theorem is a simple rule about the proportion of the sides
of right triangles: The square of the hypotenuse (the longest side)of a right triangle is equal to the sum of the
square of the other two sides (legs).
In any right triangle, if a and b are the lengths of the legs and c is the length of the hypotenuse, then a2 + b2
= c2 Example:
a2 + b2 = c2 32 + 42 = 52
9 + 16 = 25
Example Find the length of the hypotenuse in the triangle below.
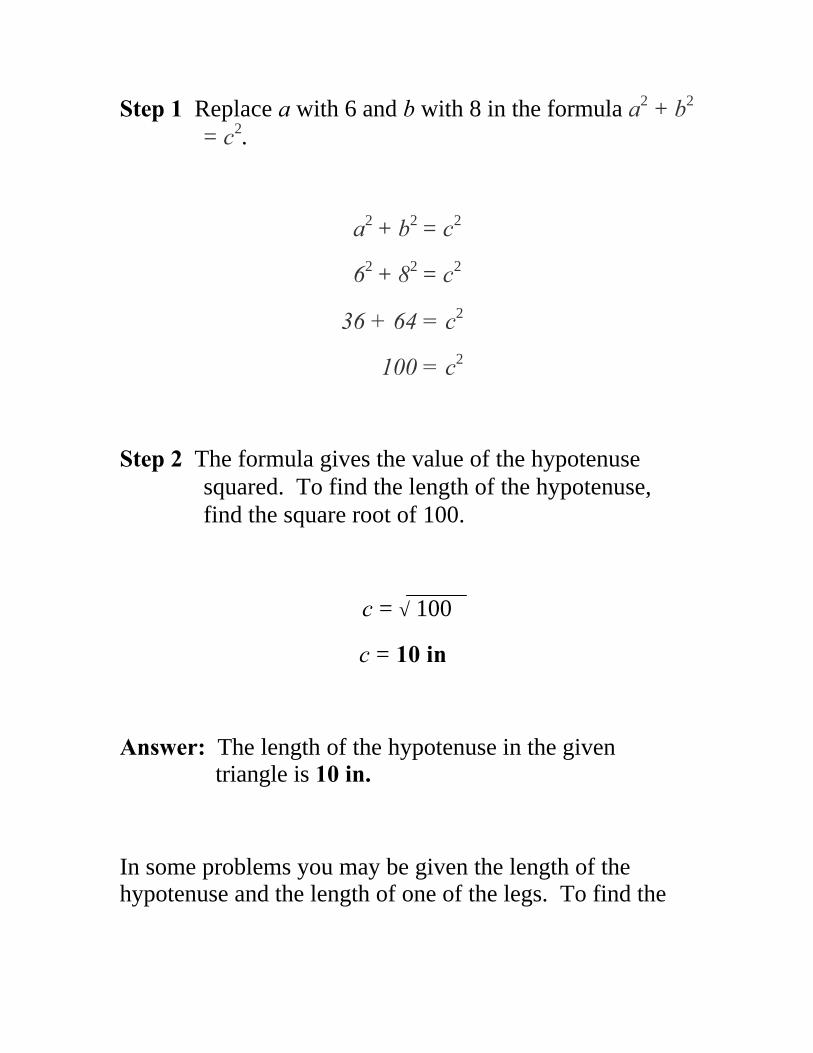
Step 1 Replace a with 6 and b with 8 in the formula a2 + b2 = c2.
a2 + b2 = c2
62 + 82 = c2
36 + 64 = c2
100 = c2
Step 2 The formula gives the value of the hypotenuse squared. To find the length of the hypotenuse, find the square root of 100.
c = √ 100
c = 10 in
Answer: The length of the hypotenuse in the given triangle is 10 in.
In some problems you may be given the length of the hypotenuse and the length of one of the legs. To find the

length of the other leg, you can still use the Pythagorean theorem.
Example Find the length of the missing leg in the triangle below.
Step 1 Write down the Pythagorean theorem and substitute in the values you know.
a2 + b2 = c2
a2 + 92 = 152
Step 2 Find the values of the squares.
a2 + 81 = 225
Step 3 To get the unknown, a, alone on one side, subtract 81 from both sides.

a2 + 81 - 81 = 225 – 81
a2 = 144
Step 4 To find a, find the square root of both sides of the equation.
a = √ 144
a = 12
Answer: The length of the missing leg in the given triangle is 12 ft.
In some problems you will have to recognize that a figure is a right triangle. The picture or problem may say nothing about a right triangle, the hypotenuse, or legs. Drawing a picture may help you see that the problem involves a right-triangle relationship.
Example A boat sails 20 miles east of port and then 15 miles south to an island. How far is the boat from the port if you measure in a straight line?

Step 1 Make a drawing to see how to solve the problem. East is normally to the right on a map, and south is toward the bottom. Notice that the actual distance from the port is the hypotenuse of a right triangle.
Step 2 Replace a with 20 and b with 15 in the formula a2 + b2 = c2.
a2 + b2 = c2
202 + 152 = c2
400 + 225 = c2
625 = c2
Step 3 Find the square root of 625.
√ 625 = c
25 = c
Answer: The boat is 25 miles from the port.
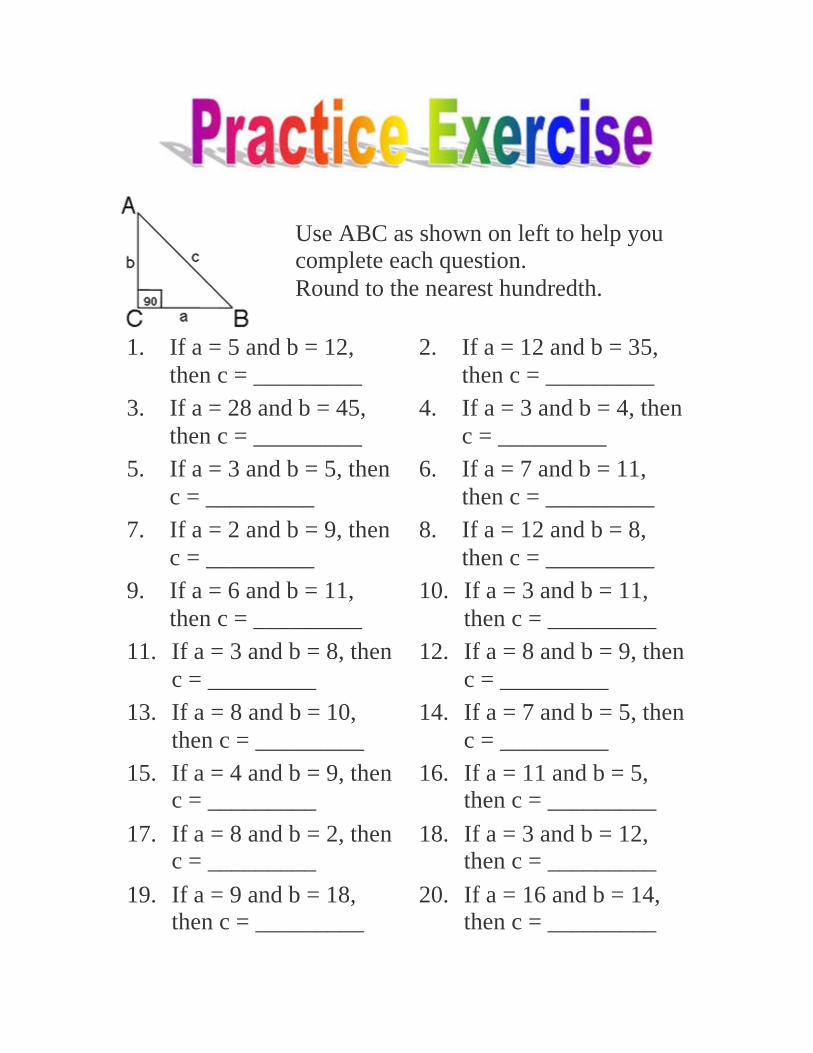
Use ABC as shown on left to help you complete each question. Round to the nearest hundredth.
1. If a = 5 and b = 12, then c = _________
2. If a = 12 and b = 35, then c = _________
3. If a = 28 and b = 45, then c = _________
4. If a = 3 and b = 4, then c = _________
5. If a = 3 and b = 5, then c = _________
6. If a = 7 and b = 11, then c = _________
7. If a = 2 and b = 9, then c = _________
8. If a = 12 and b = 8, then c = _________
9. If a = 6 and b = 11, then c = _________
10. If a = 3 and b = 11, then c = _________
11. If a = 3 and b = 8, then c = _________
12. If a = 8 and b = 9, then c = _________
13. If a = 8 and b = 10, then c = _________
14. If a = 7 and b = 5, then c = _________
15. If a = 4 and b = 9, then c = _________
16. If a = 11 and b = 5, then c = _________
17. If a = 8 and b = 2, then c = _________
18. If a = 3 and b = 12, then c = _________
19. If a = 9 and b = 18, then c = _________
20. If a = 16 and b = 14, then c = _________

21. If a = 15 and b = 15, then c = _________
22. If a = 19 and b = 10, then c = _________
23. If a = 14 and b = 17, then c = _________
24. If a = 17 and b = 21, then c = _________
25. If a = 10.9 and b = 3.9, then c = _________
26. If a = 6.7 and b = 4.2, then c = _________
27. If a = 9.9 and b = 6.1, then c = _________
28. If a = 9.8 and b = 11.3, then c = _________
Use ABC as shown on left to help you complete each question. Round to the nearest hundredth.
1. If c = 5 and b = 4 then a = _________
2. If c = 17 and a = 15 then b = _________
3. If c = 37 and a = 35 then b = _________
4. If c = 53 and b = 45 then a = _________
5. If c = 25 and b = 24 then a = _________
6. If c = 41 and b = 40 then a = _________
7. If c = 13 and a = 12 then b = _________
8. If c = 46 and a = 30 then b = _________
9. If c = 33 and b = 19 then a = _________
10. If c = 32 and a = 14 then b = _________
11. If c = 42 and b = 24 then a = _________
12. If c = 20 and a = 9 then b = _________

13. If c = 22 and a = 10 then b = _________
14. If c = 35 and a = 12 then b = _________
15. If c = 47 and b = 20 then a = _________
16. If c = 23 and b = 13 then a = _________
17. If c = 35 and b = 9 then a = _________
18. If c = 38 and a = 16 then b = _________
19. If c = 24 and b = 12 then a = _________
20. If c = 45 and a = 34 then b = _________
21. If c = 76 and b = 46 then a = _________
22. If c = 74 and b = 49 then a = _________
23. If c = 86 and a = 63 then b = _________
24. If c = 73 and a = 51 then b = _________
25. If c = 15.78 and a = 10.8 then b = _______
26. If c = 15.6 and a = 12.6 then b = _______
27. If c = 12.16 and b = 4.5 then a = ________
28. If c = 15.77 and b = 11.1 then a = _______

Polygons and circles are flat, or two-dimensional. They have only length and width. But cubes, prisms, pyramids, and spheres are solid. They have a third dimension known as height or, sometimes, depth. These solids are also called space figures or polyhedrons.
Cubes, prisms, pyramids, and other solids have sides called faces. These faces are flat surfaces that are in the shapes of polygons. Faces meet at edges. The edges are line segments, which meet in vertexes. The vertexes are points.
Prism
A polyhedron whose two bases are congruent, parallel polygons in parallel planes and whose lateral
faces are parallelograms Example:
rectangular prism
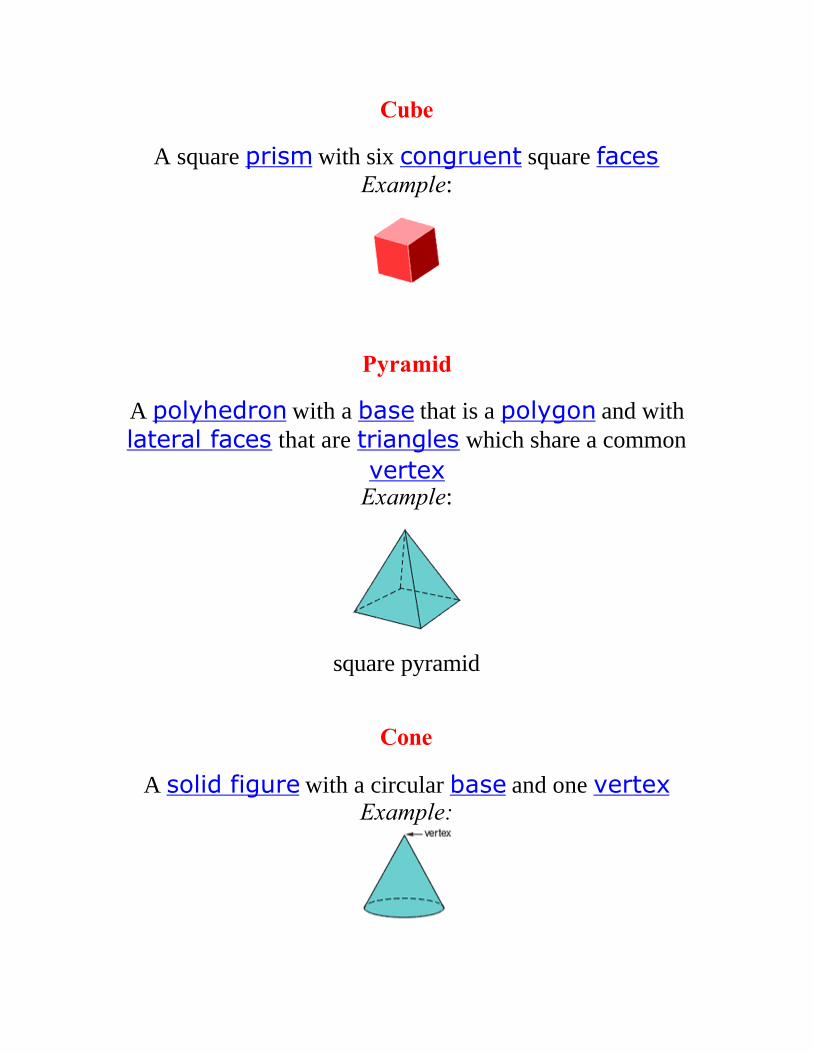
Cube
A square prism with six congruent square faces Example:
Pyramid
A polyhedron with a base that is a polygon and with lateral faces that are triangles which share a common
vertex Example:
square pyramid
Cone
A solid figure with a circular base and one vertex Example:

Sphere
A solid figure with all points the same distance from the center
Example:
Cylinder
A solid figure with two parallel, congruent circular bases connected by a curved surface
Example:

Name the following three-dimensional solid figures.
1.
________
2.
________ 3.
________
4.
________ 5.
________

Characteristics of Geometric Figures
Symmetry
Tyger! Tyger! burning bright In the forests of the night,
What immortal hand or eye Could frame thy fearful symmetry?
-William Blake The Tyger
Symmetry surrounds us. It is found in art and architecture, music, plants, insects, animals---and humans. Symmetry is the exact matching of shapes or figures on opposite sides of dividing lines or around a central point. Line symmetry means that a figure can be folded along the line so that its parts match exactly. The dividing line is called the axis of symmetry or line of symmetry. Certain shapes, particularly polygons and circles, have many lines of symmetry. Vertical line of symmetry

Horizontal line of symmetry
Examples:
The triangle below is a symmetric figure. The dotted line is the line of symmetry.
The square below is a symmetric figure. It has four different lines of symmetry.
The rectangle below is a symmetric figure. It has two different lines of symmetry.

The regular pentagon below is a symmetric figure. It has five different lines of symmetry.
The circle below is a symmetric figure. Any line that passes through its center is a line of symmetry!
The figures shown below are not symmetric. They are called asymmetric.

To create lines of symmetry, you need to know a few basic constructions.
The perpendicular bisector of a line segment is a line that goes through the midpoint of the segment, forming right angles. Constructing the perpendicular bisector of a segment will give you a right angle.
The second construction is the bisector of an angle, a line that divides the angle into two equal parts. Using both compass and straight-edge, the bisector of an angle can be constructed as shown below:

Example
Construct the center point of a given circle. 1. Begin with a circle, but no center point.
2. Draw chord AB.
3. Construct the perpendicular bisector of chord AB. Let C and D be the points where it intersects the circle.
4. Chord CD is a diameter of the circle. Construct point P, the midpoint of diameter CD. Point P is the center point of the circle.

Use a compass and a ruler to construct a line of symmetry through each of the following figures.
Folding paper is a good way to demonstrate lines of symmetry in geometric figures.

Example
Take a square piece of paper and fold it like this.
When you unfold the paper, the square’s lines of symmetry, represented by the point segments or broken lines, will be revealed.
Part of a geometrical figure is given in each of the diagrams on the next page. The figures are to be completed so that the line 'm' , in each case , is the line of symmetry of the completed figure.

Answers: Complete symmetrical figures about line m are:
In order for line m to be the line of symmetry in each figure, the parts on each side of line m must be equal in area or half of the total area of the newly created figure.

Example
The original figure is a rectangle. The area of a rectangle equals length multiplied by width.
A = l x w
A = 4 x 1.5
A = 6
The area of the original figure is 6 cm.

The new section that has been added to the figure is also a rectangle. Its area (l x w) is also equal to 6 cm. Line m is separating two figures that are equal in area; therefore, line m is the line of symmetry in this figure.
The total area of the complete symmetrical figure should also be double the area of the original figure.
A = l x w
A = 4 x (1.5 + 1.5)
A = 4 x 3
A = 12
The total area of the complete symmetrical figure is 12 cm. That is double the area of the original figure that was 6 cm.

Planes
A plane can be modeled by a floor, a tabletop or a wall. Planes extend indefinitely in all directions and have no edges or thickness. Planes are often denoted by a single capital letter and represented as four-sided figures.
Plane symmetry involves moving all points around the plane so that their positions relative to each other remain the same, although their absolute positions may change. Symmetries preserve distances, angles, sizes, and shapes.
1. For example, rotation by 90 degrees about a fixed point is an example of a plane symmetry.
Example
To rotate an object means to turn it around. Every rotation has a center and an angle.
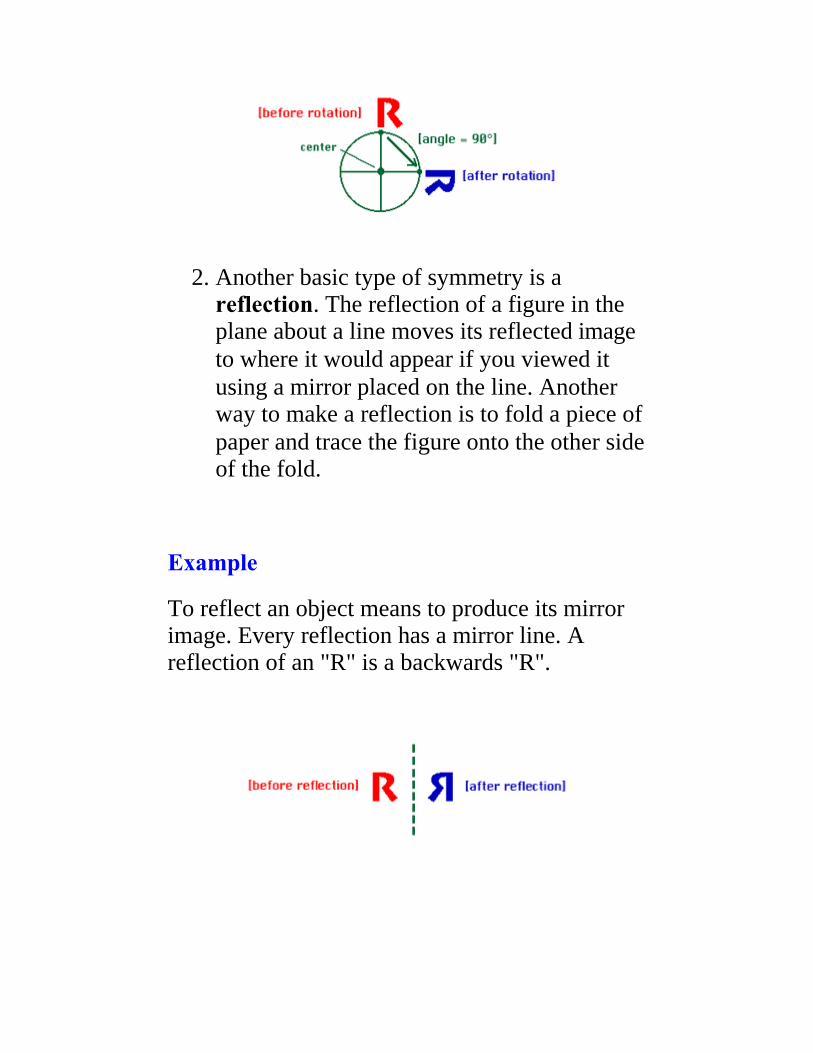
2. Another basic type of symmetry is a reflection. The reflection of a figure in the plane about a line moves its reflected image to where it would appear if you viewed it using a mirror placed on the line. Another way to make a reflection is to fold a piece of paper and trace the figure onto the other side of the fold.
Example
To reflect an object means to produce its mirror image. Every reflection has a mirror line. A reflection of an "R" is a backwards "R".

3. A third type of symmetry is translation. Translating an object means moving it without rotating or reflecting it. You can describe a translation by stating how far it moves an object, and in what direction.
Example
To translate an object means to move it without rotating or reflecting it. Every translation has a direction and a distance.
4. The fourth (and last) type of symmetry is a glide reflection. A glide reflection combines a reflection with a translation along the direction of the mirror line.

Example
A glide reflection combines a reflection with a translation along the direction of the mirror line. Glide reflections are the only type of symmetry that involve more than one step.
Some 3-D shapes can be divided by a plane (rather than a line) to produce two identical 3-D shapes. This plane is called a plane of symmetry.
The plane of symmetry (like a sheet of glass, or a mirror) cuts through the three-dimensional shape: the shape is cut exactly in half, with both halves identical, i.e. mirror images.)

The cone in the diagram is divided into identical shapes by a plane of symmetry. Note that the plane passes through the centre of the base of the cone.

Most shapes have many planes of symmetry.
A rectangular prism has three planes of symmetry.
The planes of symmetry can be infinite.

For example, a sphere has an infinite number of planes of symmetry.
Imagine the base of a cylinder or cone. Draw a diameter (and there are an infinite number of them). Fix a plane vertically along that diameter. That will be a plane of symmetry.

With a cylinder you must also consider that even though it has infinite planes of vertical symmetry, it only has one plane of horizontal symmetry.
Congruence – Congruent
You walk into your favorite mall and see dozens of copies of your favorite CD on sale. All of
the CDs are exactly the same size and shape.

In fact, you can probably think of many objects that are mass-produced to be exactly
the same size and shape.
Objects that are exactly the same size and shape are said to be congruent.
In plain English, these objects are exactly the same
- they are duplicates of one another. In Mathematics, if two figures are congruent
and you cut one figure out with a pair of scissors, it would fit perfectly on top of the
other figure.

The two right triangles on page 203 are congruent because the vertices (corners) and sides all match up exactly.
Mathematicians use the word congruent to describe geometrical figures.
If two quadrilaterals (4 sided) are the same size and shape, they are congruent.
If two pentagons (5 sided) are the same size and shape, they are congruent.
If two polygons (any number of sides) are the same size and shape, they are congruent.
If two line segments are the same size (they already are the same shape), they are
congruent.

The following pairs of figures below are congruent. Note that if two figures are congruent, they must be similar.
The symmetrical shapes formed by drawing a line of symmetry are congruent.
Divide a line segment into congruent line segments.
1. Begin with line segment AB. In this example, it will be divided into five congruent line segments.

2. Draw a ray from point A. Use the compass to step off five uniformly spaced points along the ray. Label the last point C. 3. Draw an arc with the compass centered at point A, with radius BC. Draw a second arc with the compass centered at point B, with radius AC. Label the intersection point D. Note that ACBD is a parallelogram.
4. Use the compass to step off points along line segment DB, using the same radius that was used for the points along line segment AC.
5. Use the straightedge to connect the corresponding points. These line segments will be parallel. They cut line segments AC and DB into congruent segments. Therefore, they must also cut line segment AB into congruent segments.

The mathematical symbol used to denote congruent is .
The symbol is made up of two parts: which means the same shape (similar) and
which means the same size (equal).
Congruent Symbol
When you are looking at congruent figures, be sure to find the sides and the angles that "match up" (are in the same place) in each figure. Sides and angles that "match up" are called corresponding
sides and corresponding angles.
In congruent figures, these corresponding parts are also congruent. This means that the corresponding sides will be equal in measure
(length) and that the corresponding angles will be equal in degrees.

Congruent Angles: Angles that have exactly the same measures.
Vertical or opposite angles are congruent.
If two angles are congruent, then their complements are congruent. Remember that two angles are complementary if the sum of their measures is 90 degrees.
If two angles are congruent, then their supplements are congruent. Remember that two angles are supplementary if the sum of their measures is 180 degrees.
If two angles are complementary to the same angle, then they are congruent.
If two angles are supplementary to the same angle, then they are congruent.
If two angles are congruent and supplementary, then each is a right angle.
All right angles are congruent.

The two triangles below have three congruent angles.
The most popular congruent figures are triangles!
Be sure to remember that in congruent figures, the corresponding parts are also
congruent.

NOTE: The corresponding congruent sides are marked with small straight line segments
called hash marks. The corresponding congruent angles are
marked with arcs.
When two triangles are congruent, there are 6 facts that are true:
• there are 3 sets of congruent (equal) sides and
there are 3 sets of congruent (equal) angles.
The 6 facts of congruent triangles:

Wow! Six facts for every set of congruent triangles!
Fortunately, when we need to PROVE (or show) that triangles are congruent, we do NOT need to
show all six facts are true. There are certain combinations of the facts that are sufficient to
prove that triangles are congruent.
Methods of Proving (Showing) Triangles to be Congruent
SSS If three sides of one triangle are congruent to three sides of another triangle, the triangles are congruent.
Example:
SAS If two sides and the included angle of one triangle are congruent to the corresponding parts of another triangle, the triangles are congruent.

Example:
ASA If two angles and the included side of one triangle are congruent to the corresponding parts of another triangle, the triangles are congruent.
Example:
AAS If two angles and the non-included side of one triangle are congruent to the corresponding parts of another triangle, the triangles are congruent.

Example: Triangle ABC and triangle JKL are congruent triangles by AAS if any of the following 6 cases are true:
ANGLE (A)
ANGLE (A)
SIDE (S)
1) < A=< J < B=< K CB=LK
2) < A=< J < B=< K AC=JL
3) < B=< K < C=< L AC=JL
4) < B=< K < C=< L AB=JK
5) < A=< J < C=< L CB=LK
6) < A=< J < C=< L AB=JK
HL If the hypotenuse and leg of one right triangle are congruent to the corresponding parts of another right triangle, the right triangles are congruent.
Example:

Complete each statement using the diagram above. 1) side BC = 2) ABC
3) side AB
4) hypotenuse of ABC is ___
5) right angle of ABC is ___
6) side of DEF measuring 5 cm is ___
7) ACB 8) CAB

If the two triangles can be proved congruent, state the postulate (SSS, SAS, ASA, AAS, or HL) to prove they are congruent. If you can use more than one way to prove, state all methods. Triangles may not be drawn to scale.
1.
Given: DBA and ∠FCE are 90 AD EF AB EC ∠DBA ∠FCE Prove: ABD ECF
2.
Given: ∠BAD ∠BCE ∠DBA ∠EBC BD BE Prove: ABD CBE
3.
Given: ∠BCA and ∠DEF are 90 ∠ABC ∠FDE ∠CAB ∠EFD BC DE Prove: ACB FED
4.
Given: ∠CBA ∠ADC ∠ACB ∠CAD BC DA Prove: ABC CDA

5.
Given: AB CD BC DA Prove: ABC CDA
6.
Given: ∠BAC and ∠DEC are 90 AC EC AB ED BC DC Prove: ABC EDC
7.
Given: ∠BDA and ∠BDC are 90 ∠DAB ∠DCB ∠ABD ∠CBD AD CD Prove: ADB CDB
8.
Given: AC DF Prove: ABC DEF

9.
Given: ∠CBA and ∠EDF are 90 AB FD AC EF Prove: ABC FDE
10.
Given: ∠BDA and ∠BDC are 90 ∠DAB ∠DCB ∠ABD ∠CBD DB DB Prove: ADB CDB

Rotation
When a figure is turned, we call it a rotation of the figure. We can measure this rotation in terms of degrees; a 360 degree turn rotates a figure around once back to its original position.
Example:
For the following pairs of figures, the figure on the right is a rotation of the figure on the left.
Reflection
If we flip (or mirror) along some line, we say the figure is a reflection along that line.

Examples:
Reflections along a vertical line:
Reflections along a horizontal line:
Reflections along a diagonal line:
The Platonic Solids
A polyhedron is a closed solid bounded by plane faces; each face of a polyhedron is a polygon. A cube is a polyhedron bounded by six polygons (in this case squares) meeting at right angles. Although regular polygons are

possible for any number of sides, there are only five possible regular polyhedrons, having congruent faces, each a regular polygon and meeting at equal angles. The five regular polyhedrons are also known as the Platonic solids, although they were known to the Greeks before the time of Plato. They are the tetrahedron, bounded by four equilateral triangles; the hexahedron, or cube, bounded by six squares; the octahedron, bounded by eight equilateral triangles; the dodecahedron, bounded by twelve regular pentagons; and the icosahedron, bounded by twenty equilateral triangles.
But why only five? The key observation is that the interior angles of the polygons meeting at a vertex of a polyhedron add to less than 360 degrees.
Let’s consider all possibilities for the number of faces meeting at a vertex of a regular polyhedron. For each possibility we actually construct such a polyhedron, a picture of which you can see close by on the following pages. Here are the possibilities:
• Triangles. The interior angle of an equilateral triangle is 60 degrees. Thus on a regular polyhedron, only 3, 4, or 5 triangles can meet a vertex. If there were more than 6 their angles would add up to at least 360 degrees which they can't. Consider the possibilities:
o 3 triangles meet at each vertex. This gives rise to a Tetrahedron.

o 4 triangles meet at each vertex. This gives rise to an Octahedron.

o 5 triangles meet at each vertex. This gives rise to an Icosahedron.
• Squares. Since the interior angle of a square is 90 degrees, at most three squares can meet at a vertex. This is indeed possible and it gives rise to a hexahedron or cube.

• Pentagons. As in the case of cubes, the only possibility is that three pentagons meet at a vertex. This gives rise to a Dodecahedron.
• Hexagons or regular polygons with more than six sides cannot form the faces of a regular polyhedron since their interior angles are at least 120 degrees.
Similar Figures

Let's look at the corresponding parts of these two triangles, triangle MHS and triangle ONE. Are the corresponding sides equal? How about the corresponding angles?
These triangles are not congruent, because the corresponding sides are obviously not equal. But they are somehow alike, aren't they? They have the same shape.
What about their angles? Are they equal? If we put triangle ONE on top of triangle MHS, we could compare each angle, and we would find that the corresponding angles are all congruent. This gives us the definition of similar triangles: if the corresponding angles of two triangles are congruent, then the triangles are similar.
Not only are the corresponding angles the same size in similar polygons, but also the sides are proportional. We can use the ratios called proportions to help us find missing values.

Here are two quadrilaterals: RUSH and GOLD. Are they similar? If we measured the angles, we would find that the corresponding angles are congruent. Therefore, these quadrilaterals are similar.
Since we know that they are similar, we also know that their sides are proportional. We can set up proportions between the sides, like this:
Let's use a proportion to find the length of segment OL, given the other lengths shown here.

We can set up the problem like this. We read this proportion as "OL is to US as GO is to RU."
If we substitute the values of the segment lengths, we get this proportion.
Now we can use cross products to solve for the length of OL. We multiply the extremes and the means together, and solve for n.
Similarity means objects have the same shape but they are not necessarily identical in size.
The pairs below are not similar or congruent.

Complete. Note: The perimeters of two similar figures are proportional.
1.
The perimeter of smaller triangle ABC is 53. The lengths of two corresponding sides on the triangles are 20 and 40. One side of ADE is 32. What is the length of the corresponding side on ABC?
2.
The length of the sides of ABC are 120, 160, and 112. The length of the smallest side of DEF is 224, what is the length of

3.
The length of the sides of ABC are 92, 114, and 98. The perimeter of DEC is 2080, what is the length of the longest side of DEC?
4.
The length of the sides of ABC are 315, 207, and 178. The perimeter of ADE is 1400, what is the length of the longest
5.
AB:AD = 3:9, and AD = 306, what is the length of AB?
6.
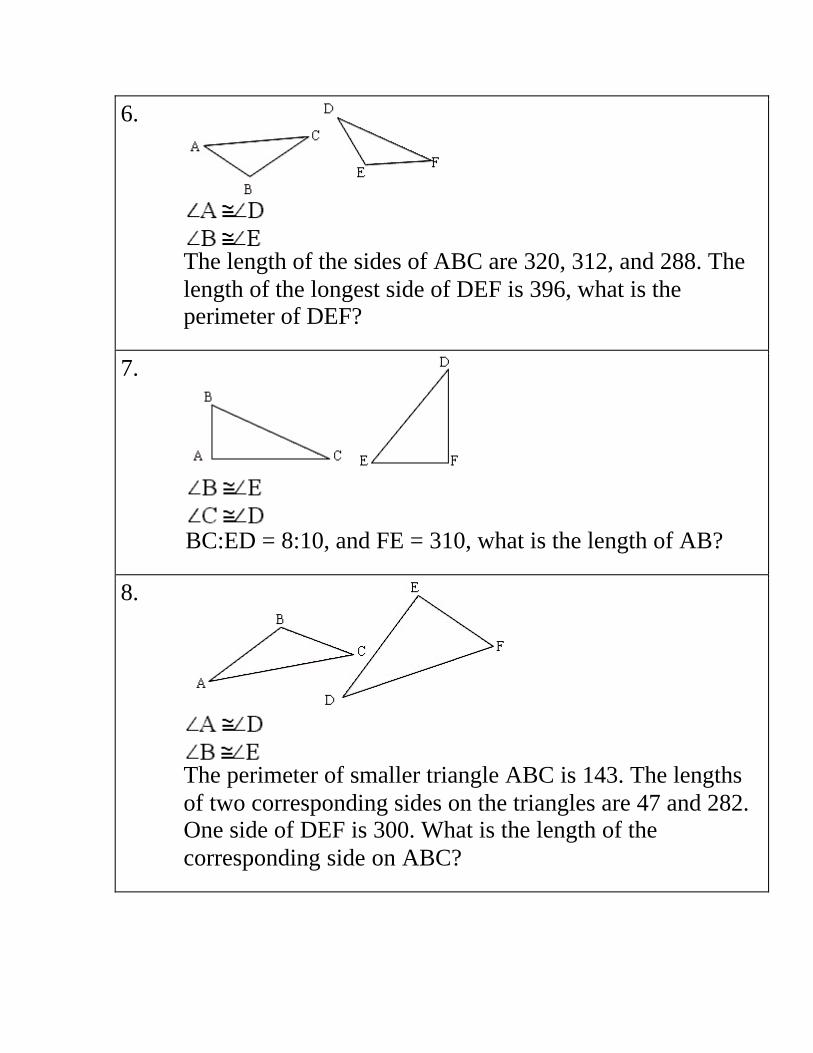
The length of the sides of ABC are 320, 312, and 288. The length of the longest side of DEF is 396, what is the perimeter of DEF?
7.
BC:ED = 8:10, and FE = 310, what is the length of AB?
8.
The perimeter of smaller triangle ABC is 143. The lengths of two corresponding sides on the triangles are 47 and 282. One side of DEF is 300. What is the length of the corresponding side on ABC?

Construction of Geometric Figures
What is a construction?
Geometric constructions go back to ancient Greece. They are often called Euclidean constructions, but they certainly predate Euclid, the Greek mathematician who taught in Alexandria c.300 BC, and who was probably the founder of its mathematical school. His most important work is the 13-volume Elements, which became the most widely known mathematical book of its time, and is still much used in geometry.
The phrase compass and straightedge construction may be more descriptive. Those are the only instruments allowed. The compass establishes equidistance (an equal distance between points), and the straightedge establishes collinearity (points lying on or passing through the same straight line). All geometric constructions are based on those two concepts.
The compass does not simply draw curves. It cannot be replaced by a circle pattern or a coffee can. The compass is anchored at a center point, and keeps the pencil at a fixed distance from that point. All points on the curve drawn by a compass are equidistant from the center point.
Although rulers are often used as straightedges, the graduation marks may not be used. No measurements are allowed. The straightedge is used only for drawing lines, line segments, and rays. Given any two distinct points, this

instrument can draw the set of all points that are collinear with them.
Rulers and protractors have their place in geometry, but these are not construction instruments. All measurements are approximations. In reality, the compass and straightedge also are subject to error. If we were not limited by the physical flaws of the instruments, the drawing surface, and the person using them, then construction instruments would render exact results. This is not true of measurement instruments.

The Drawing Instruments
The compass is used to create equal distances between points. The wheel in the center allows for fine adjustment of the radius, and it keeps the radius from slipping.
Keep the compass lead sharpened for a nice, fine curve. There are special sharpeners made just for the leads that fit the compass, but it is a simpler matter to carry a small piece of sandpaper. Stroke the lead across it a few times to give the tip a bevel.
Hold the compass properly. Use one hand, and hold it by the handle at the top. Do not hold it by the limbs. If you do that, there will be a tendency to change the radius as you draw. This is especially a problem with the cheaper compasses that have no way of locking the radius. Tilt the compass back slightly, so that the lead is dragged across the page. If the compass is pushed toward the lead, it will cause the anchor point to lift up and slip out of position.
Some compasses come with extra leads and a needle for use as a divider.

A divider is an instrument used for dividing lines, describing circles, and transferring measurements.
Finding a good straightedge is not so difficult. Most experienced drafters would never use a ruler or a scale as a straightedge, because it damages the graduation marks. You decide how to treat your own instruments though. Many rulers have a metal strip along one edge, just for this purpose.
Using a transparent plastic triangle will allow you to see your work as you draw.

The triangle can also be used to measure a 90° angle, just as a protractor would be used.
In a pinch, you can use the edge of a book or a calculator as a straightedge, but that can be awkward. Bring the right tools for the job.
You should have at least one good, sharp pencil with an eraser.
A protractor is included in construction sets as a tool for measuring angles.
An arm of an angle is either of the two rays making up an angle.

A degree is a unit of angle measure equal to of a complete revolution. There are 360 degrees in a circle. Degrees are indicated by the ° symbol, so 35° means 35 degrees.

Construct an angle congruent to a given angle.
1. To draw an angle congruent to ∠A, begin by drawing a ray with endpoint D.
2. Place the compass on point A and draw an arc across both sides of the angle. Without changing the compass radius, place the compass on point D and draw a long arc crossing the ray. Label the three intersection points as shown.

3. Set the compass so that its radius is BC. Place the compass on point E and draw an arc intersecting the one drawn in the previous step. Label the intersection point F.
4. Use the straightedge to draw ray DF.
∠EDF ≅ ∠BAC
Construct the bisector of an angle.
1. Let point P be the vertex of the angle. Place the compass on point P and draw an arc across both sides of the angle. Label the intersection points Q and R.

2. Place the compass on point Q and draw an arc across the interior of the angle.
3. Without changing the radius of the compass, place it on point R and draw an arc intersecting the one drawn in the previous step. Label the intersection point W.
4. Using the straightedge, draw ray PW. This is the bisector of ∠QPR.
You can construct any of the following angles from a straight line using a compass and starting with a 60° angle.
First: Draw a straight line of any length and mark a point on the line close to the center. Set your compass point on the marked point and draw a semi-circle or half of a circle.

Second: Leave the setting of the compass the same as above and place the compass point where the semi-circle and the straight line meet. Mark a small arc across the semi-circle.
Third: Draw a line from the center point of your straight line to the mark on the semicircle. The line is 60° from the bottom line.
To mark a 30° angle, divide the sixty degree angle in half (bisect the angle). Since all points on the semi-circle are equal distance from the center, all you have to do to bisect the angle is:
First: Keep your compass setting the same and place the compass on the point where the semi-circle and one of the straight lines of the 60° angle meet. Mark an arc above, but within the boundaries of the 60° angle. Repeat the same action for the other 60° angle line.

Second: Draw a straight line from the center point of the straight line (vertex of the 60° angle) to where the arcs cross. This causes the 60° angle to be bisected and results in two 30° angles.
To mark a 15° angle, keep the compass setting the same and bisect one of the 30° angles.
To copy a line segment means to draw a line segment equal in length to the given line segment. Examples: Using a ruler: Step 1 Measure the given line segment.
Step 2 Draw another line segment the same length.

Using a compass and a straightedge: Step 1 Draw a line segment longer than the given line
segment.
Step 2 Open the compass to the length of the given line
segment. Step 3 Transfer the compass to the new line segment,
placing the metal point on one endpoint. Step 4 Draw an arc cutting the new line segment. The
intersection is the second endpoint.

Construct the perpendicular bisector of a line segment.
Or, construct the midpoint of a line segment.
1. Begin with line segment XY.
2. Place the compass at point X. Adjust the compass radius so that it is more than (1/2)XY. Draw two arcs as shown here.
3. Without changing the compass radius, place the compass on point Y. Draw two arcs intersecting the previously drawn arcs. Label the intersection points A and B.
4. Using the straightedge, draw line AB. Label the intersection point M. Point M is the midpoint of line segment XY, and line AB is perpendicular to line segment XY.
Given point P on line k, construct a line through P, perpendicular to k.
1. Begin with line k, containing point P.
2. Place the compass on point P. Using an arbitrary radius, draw arcs

intersecting line k at two points. Label the intersection points X and Y.
3. Place the compass at point X. Adjust the compass radius so that it is more than (1/2)XY. Draw an arc as shown here.
4. Without changing the compass radius, place the compass on point Y. Draw an arc intersecting the previously drawn arc. Label the intersection point A.
5. Use the straightedge to draw line AP. Line AP is perpendicular to line k.
Given point R, not on line k, construct a line through R, perpendicular to k.
1. Begin with point line k and point R, not on the line.
2. Place the compass on point R. Using an arbitrary radius, draw arcs intersecting line k at two points. Label the intersection points X and Y.

3. Place the compass at point X. Adjust the compass radius so that it is more than (1/2)XY. Draw an arc as shown here.
4. Without changing the compass radius, place the compass on point Y. Draw an arc intersecting the previously drawn arc. Label the intersection point B.
5. Use the straightedge to draw line RB. Line RB is perpendicular to line k.
Given a line and a point, construct a line through the point, parallel to the given line.
1. Begin with point P and line k.
2. Draw an arbitrary line through point P, intersecting line k. Call the intersection point Q. Now the task is to construct an angle with vertex P, congruent to the angle of intersection.

3. Center the compass at point Q and draw an arc intersecting both lines. Without changing the radius of the compass, center it at point P and draw another arc.
4. Set the compass radius to the distance between the two intersection points of the first arc. Now center the compass at the point where the second arc intersects line PQ. Mark the arc intersection point R.
5. Line PR is parallel to line k.
When working with triangles, an altitude is a perpendicular segment from any vertex to the opposite side or extension of that side.
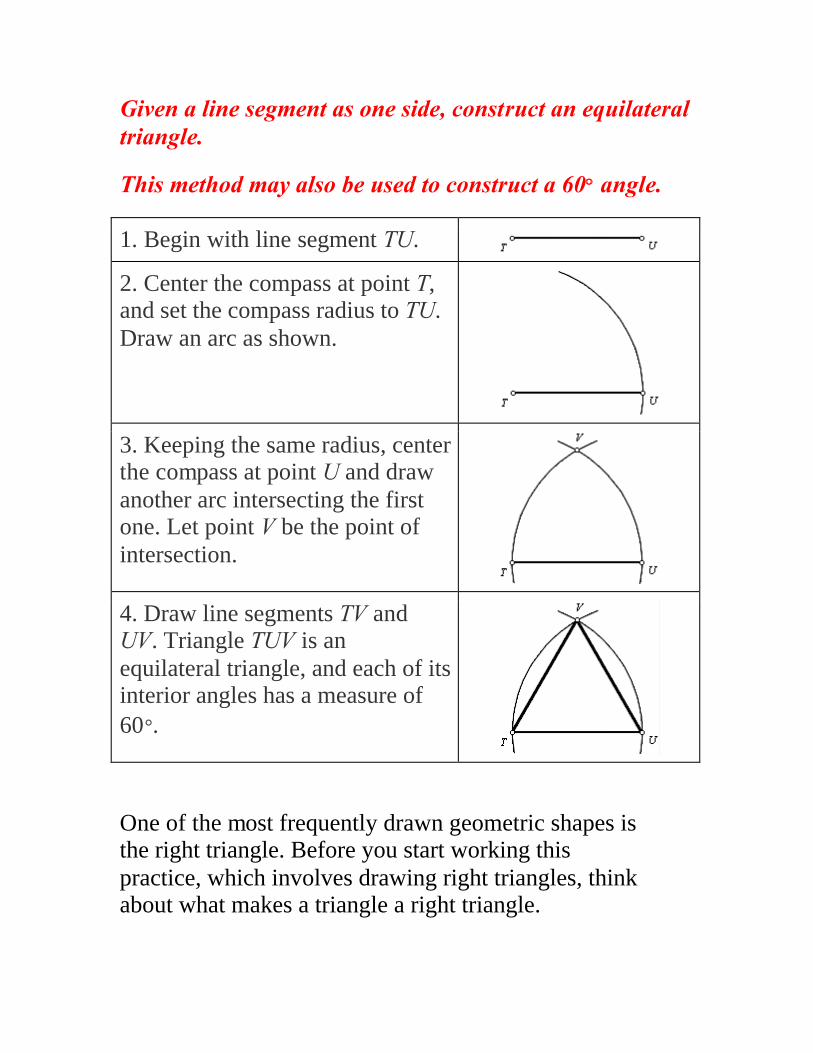
Given a line segment as one side, construct an equilateral triangle.
This method may also be used to construct a 60°° angle.
1. Begin with line segment TU.
2. Center the compass at point T, and set the compass radius to TU. Draw an arc as shown.
3. Keeping the same radius, center the compass at point U and draw another arc intersecting the first one. Let point V be the point of intersection.
4. Draw line segments TV and UV. Triangle TUV is an equilateral triangle, and each of its interior angles has a measure of 60°.
One of the most frequently drawn geometric shapes is the right triangle. Before you start working this practice, which involves drawing right triangles, think about what makes a triangle a right triangle.

One of the three angles of a right triangle must be a right angle (90°).
Remember:
Two straight lines that cross each other at right angles are perpendicular lines.
First:
Near the center of a piece of paper, draw a six inch straight line. Divide the line in half and create a perpendicular line through the center point. Make the perpendicular above the horizontal line 4" in length.
Since you divided the horizontal line in half, each horizontal line segment should measure three inches in length.

Second:
Draw a straight line from the end point of the horizontal line to the endpoint of the vertical line.
Measure the last line you drew. It should measure five inches.
If it does , the triangle created is a 3-4-5 right triangle.
If it does not , then either the length of one or both of the sides is not exactly three and four inches or the horizontal and vertical lines are not perpendicular.

Constructing Triangles Given Two Angles and a Side
Use protractor and ruler to construct ABC with AB = 7 cm, ∠ABC = 25º and ∠BAC = 60º.
Solution: Step 1 Using a ruler, draw a line interval, AB, 7 cm long. Step 2 Use a protractor to draw an angle, ∠ABL, of 25º. Step 3 Use a protractor to draw ∠BAM of 60º so that the
arm AM intersects BL at C. ABC is the required triangle.

Given Three Sides
Use a compass and a ruler to construct ABC with AB = 3 cm, BC = 4 cm and AC = 5 cm.
Solution: Step 1 Draw a line interval, AB, 3 cm long. Step 2 Using a compass, draw an arc with radius 4 cm and
with B as the centre. Step 3 With A as the centre and with radius 5 cm, draw an
arc to cut the arc drawn in Step 2 at C. Step 4 Join AC and BC. ABC is the required triangle.

Given Two Sides and an Angle
Use a compass, protractor and ruler to construct ABC with AB = 7 cm, BC = 8 cm and ∠BAC = 80º.
Solution: Step 1 Draw a line interval, AB, 7 cm long. Step 2 Use a protractor to draw ∠BAL, of 80º. Step 3 Draw an arc of radius 8 cm with B as the center to cut
AL (extend the arm AL, if needed) at C. Step 4 Join BC. ABC is the required triangle.

A square may be constructed by: Drawing two diameters of a circle perpendicular to each other. This will divide the circle into four equal arcs.
Then to form a square, connect these points.
Rectangles and parallelograms of specific measurements may be drawn provided enough of these measurements are given.

Examples: Draw a rectangle 1 ½ in. long and ¾ in. wide. Draw line AB 1 ½ inches long. Extend line AB in both directions. Construct perpendiculars at points A and B.
Draw line BC and line AD ¾ inches each.
Then draw line DC to form rectangle ABCD.
Draw a parallelogram with a base 30 mm long, side 22 mm long, and an included angle of 30 degrees.

Draw line AB 30 mm long. Extend AB in both directions. Use a protractor to draw a 30 degree angle at points A and B. Draw line BC and line AD 22 mm each.
Draw line DC to form parallelogram ABCD.
1. Use a compass and a straightedge to copy this line
segment:
2. Draw with a protractor an angle of 75 degrees. Then
construct with a compass an angle equal to it. Check your copy of the angle with a protractor.

3. Draw a line segment that measures 6.2 cm. Bisect it
using a compass. Check with a ruler. 4. Draw an angle measuring 68 degrees. Bisect it using a
compass. Check with a protractor. 5. Construct a triangle with two sides measuring 6.4 cm
and 5.8 cm and an included angle measuring 70 degrees.
6. Construct a triangle with two angles measuring 95
degrees and 40 degrees and an included side 2.3 cm long.
7. Draw any line. Using a compass, construct a
perpendicular to it at a point on the line. 8. Draw any line. Using a compass, construct a
perpendicular to it from a point not on the line. 9. Draw any line. Select a point outside this line.
Through this point construct a line parallel to the line you have drawn.
10. Draw any equilateral triangle. Select an angle and
bisect it. Construct from the vertex of this selected angle the altitude (line segment that is perpendicular to the opposite side). Does this perpendicular line bisect this opposite side?

Problem Solving With Geometric Figures Use Logical Reasoning Some problems must be solved using logic. Based on a few basic statements called assumptions, you will be asked to decide which conclusion is true. Example:
The sum of the measures of angles 1 and 2 is 180 degrees. The sum of the measures of angles 2 and 3 is 180 degrees. Based on this information, which of the following statements is true?
(1) m∠1 = 120 degrees (2) m∠2 = 60 degrees (3) m∠3 = 100 degrees (4) m∠1 > m∠2 (5) m∠1 = m∠3
Options (1), (2), (3), and (4) are incorrect because the assumptions given do not provide any information about the measures of each angle. Although angle 1 looks greater than angle 2 in the figure, we cannot conclude that it is

actually greater. Use only the information in the problem and any labels on the figure. Do not “jump to any conclusions.” Option 5 is correct. Angles 1 and 3 are congruent (equal). Consider the facts: m∠1 + m∠2 = 180 degrees m∠2 + m∠3 = 180 degrees m∠1 + m∠2 = m∠2 + m∠3 Then: Subtract m∠2 from both sides: m∠1 = m∠3 Using Similar Triangles A variety of practical problems can be solved using similar triangles. Similar triangles are often used when there is no way to actually perform the measurement of the missing length. Example: What is the height of the flagpole?
We can find the height of the flagpole in the diagram. The diagram shows that the flagpole casts a shadow of 5 m while a 1.8-m person casts a shadow of 1 m. We use the fact that the triangles formed by the objects and their shadows are similar. We set up a proportion and solve.

height of the person = height of the flagpole
shadow of the person shadow of the flagpole 1.8 = x
1 5 x = (1.8)(5) x = 9
The height of the flagpole is 9 m.
Solve each problem.
1. What is the diameter of a tire, if the radius is 25 in.?
2. Write the name of a polygon that has three sides.
3. When it is 9 o'clock, what type of angle is the smallest angle formed by the minute and hour hand?
4. What is the circumference to the nearest centimeter of a circle with a radius of 7 centimeters?
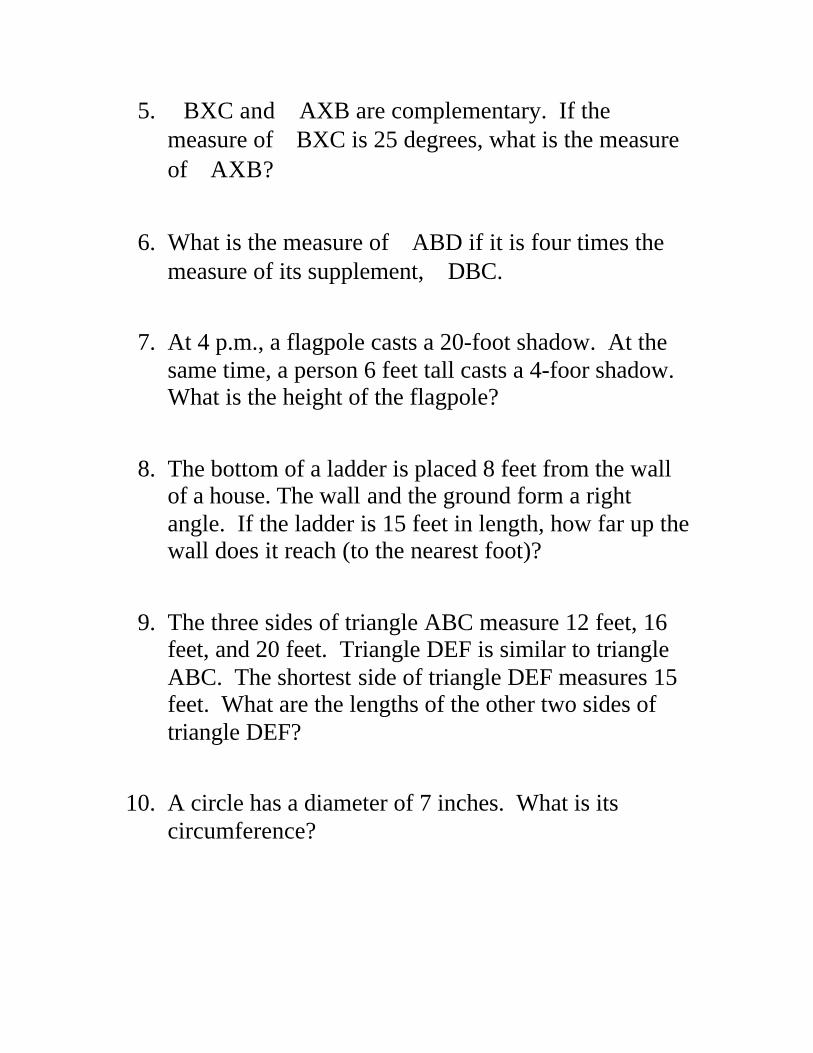
5. ∠BXC and ∠AXB are complementary. If the measure of ∠BXC is 25 degrees, what is the measure of ∠AXB?
6. What is the measure of ∠ABD if it is four times the measure of its supplement, ∠DBC.
7. At 4 p.m., a flagpole casts a 20-foot shadow. At the same time, a person 6 feet tall casts a 4-foor shadow. What is the height of the flagpole?
8. The bottom of a ladder is placed 8 feet from the wall of a house. The wall and the ground form a right angle. If the ladder is 15 feet in length, how far up the wall does it reach (to the nearest foot)?
9. The three sides of triangle ABC measure 12 feet, 16 feet, and 20 feet. Triangle DEF is similar to triangle ABC. The shortest side of triangle DEF measures 15 feet. What are the lengths of the other two sides of triangle DEF?
10. A circle has a diameter of 7 inches. What is its circumference?

Answer Key
Book 14019 – Geometry
Page 15 2. line segment VX 3. Ray BA 4. line VX 5. Ray SK 6. line segment NK 7. line BV 8. line segment CB Page 16 2. Parallel 3. Parallel 4. Intersecting 5. Intersecting 6. Intersecting 7. Perpendicular 8. Parallel 9. Intersecting 10. Perpendicular Page 17 Make sure that all of the instructions are
followed to complete the constructions in questions 1 – 4.
Page 20 Make sure that all of the instructions are
followed to complete the constructions in questions 1 – 4.
Page 23 1. An acute angle 2. A right angle 3. An obtuse angle 4. A straight angle 5. An acute angle 6. Obtuse Angle 7. Right Angle 8. Complete Angle 9. Reflex Angle 10. 2 Page 30 1. ∠∠CAD or ∠∠DAC 2. ∠∠BAC or ∠∠CAB

Page 30 (complementary and supplementary angles) 1. 105 degrees 2. 40 degrees
3. 65 degrees 4. 60 degrees 5. a. ∠∠o, ∠∠p, ∠∠q, ∠∠r b. ∠∠m, ∠∠n, ∠∠s, ∠∠t c. ∠∠m and ∠∠p; ∠∠n and ∠∠o; ∠∠q and ∠∠ t; ∠∠r and ∠∠s Page 36 1. I 2. IN or Ni; DI or ID; IS or SI 3. DS or SD 4. A radius is half the length of a diameter 5. Accept any reasonable answer Page 37 2. 31.4 m 3. 131.88 mi 4. 113.04 ft. 5. 49.49 in 6. 253.51 cm 7. 79.13 m 8. 18.84 in Page 38 1. 31.4 mm 2. 20 mi; 62.8 mi 3. 2 yd; 12.56 yd 4. 75.36 ft 5. 18.84 in 6. 21.35 m 7. 6.8 cm; 42.7 cm 8. 9.5 km; 19 km 9. 9 in; 28.26 in 10. 59.03 mi 11. 19 1/5 cm; 60 12/35 cm 12. 36 16/35 km 13. 35 1/5 ft 14. 5 3/10 mm; 33 11/35 mm 15. 84.21 yd Page 44 Make sure that all of the instructions are
followed to complete the constructions in questions 1 and 2.
Page 44 1. FC or CF; DC or CD; AC or CA; BC or
CB 2. AF or FA; BD or DB 3. AF or FA; BD or DB 4. AB or BA; AF or FA;

AD or DA; BF or FB; BD or DB; FD or DF 5. AF or FA; BD or DB 6. ACB or BCA; DCF or FCD; ACD or DCA; FCB or BCF 7. EG or GE 8. BD or DB; AF or FA
Page 51 2. Rhombus 3. Square 4. Triangle 5. Pentagon 6. Octagon 7. Hexagon Page 54 1. a. scalene b. scalene c. equilateral d. isosceles 2. a. right b. right c. obtuse d. acute Page 60 1. 13 2. 37 3. 53 4. 5 5. 5.83 6. 13.04 7. 9.22 8. 14.42 9. 12.53 10. 11.40 11. 8.54 12. 12.04 13. 12.81 14. 8.60 15. 9.85 16. 12.08 17. 8.25 18. 12.37 19. 20.12 20. 21.26 21. 21.21 22. 21.47 23. 22.02 24. 27.02 25. 11.58 26. 7.91 27. 11.63
28. 14.96 Page 61 1. 3 2. 8 3. 12 4. 28 5. 7 6. 9 7. 5 8. 34.87 9. 26.98 10. 28.77 11. 34.47 12. 17.86 13. 19.60 14. 32.88 15. 42.53 16. 18.97 17. 33.82 18. 34.47 19. 20.78 20. 31.13 21. 60.50 22. 55.45 23. 58.54 24. 52.23 25. 11.51 26. 9.20 27. 11.30 28. 11.20 Page 66 1. Pyramid 2. Prism 3. Cylinder

4. Cone 5. Cube Page 72 Make sure that all of the instructions are
followed to complete the constructions in this exercise.
Page 96 1. side DE 2. ∠DEF 3. side EF 4. side AC 5. ∠ABC 6. side DF 7. ∠EDF 8. ∠DFE Page 97 1. HL 2. AAS 3. AAS 4. ASA 5. SSS 6. SSS 7. AAS 8. Cannot be proven 9. HL 10. AAS Page 109 1. 16 2. 320 3. 780 4. 630 5. 102 6. 1138.5 7. 248 8. 50 Page 136 Make sure that all of the instructions are
followed to complete the constructions in questions 1 - 9. 10. Yes
Page 140 1. 50 in 2. Triangle 3. Right Angle 4. 44 cm 5. 65 degrees 6. 144 degrees 7. 30 ft 8. 13 ft 9. 20 ft; 25 ft 10. 21.98 in