the nta qualification system (nqs)
TRANSCRIPT

The NTA
Qualification System (NQS)
Assessment Module
User Guide

Prepared by: ISTS-ICT – NTA Qualifications System Version 4.0 Revised September 2018
Page | 2
Table of Contents
1.0 Introduction 3 2.0 Login and Authentication 3
3.0 Creating a New User 4
4.0 Editing and Resetting a User Password 5
5.0 Creating Registration Periods 6
6.0 Creating Submission 7
7.0 Deleting, Confirm or Updating Submissions 12
8.0 Verifying Submissions 16
9.0 Scheduling Submissions 18
9.1 Edit Schedule 19
10.0 Mark Attendance 21
11.0 Add Grades 23
12.0 Verify Assessment Results 25
13.0 Ratification 29
13.1 Ratification History 30

Prepared by: ISTS-ICT – NTA Qualifications System Version 4.0 Revised September 2018
Page | 3
The NQS Assessment Module User Guide
1.0 Introduction
The NQS Assessment Module allows for the management of Assessment records and subsequent Certification for Trainees processed through the Training Management System (TMS).
The Assessment Module is fully integrated with both the Training Management System (TMS) as well as the Certification System, (more popularly referred to as the NQS) thus allowing for a seamless transition from Application through Training and Assessment then unto Certification.
2.0 Login and Authentication
The NTA Qualifications System (NQS) requires Users to have a valid user id and password in order to log into the system
(Figure l). Before a User is granted access, the system first authenticates the account information to determine if the
account is valid and if so, had the User been granted permission to access the system. Two (2) methods of
authentication (Figure ll) employed to this end by the system are:
a. HEART Account Authentication: this method of authentication is for users who are employees of HEART
Trust/NTA and who has a valid HEART network or Active Directory account which is active.
b. Local Account Authentication: this method of authentication is for users who may or may not be employed to the Trust but require access to the system external of the HEART network.
Figure l:
Figure ll:

Prepared by: ISTS-ICT – NTA Qualifications System Version 4.0 Revised September 2018
Page | 4
3.0 Creating a New User
Before a user can access the NQS, a user account has to be created by the system’s Administrator. To create a user account, please follow the following steps:
a. Log into the NTA Qualifications System using an administrator account
b. From the menu bar, select “Administration”
c. From the list of menu items select “New User”
d. The system will display a form to capture the details of the new user.
Please note the following required fields when creating a new user account:
first name
last name
email address
ATO (the user is attached to in order control which ATO a user can submit a candidate for assessment)
Institutions
Role

Prepared by: ISTS-ICT – NTA Qualifications System Version 4.0 Revised September 2018
Page | 5
4.0 Editing and Resetting a User Password
a. From the menu bar, select “Administration”
b. From the list of menu items select “Update User Profile”
c. The system will then display the Edit User page with a Search form to find the User account to be edited.
d. Select a category (Last Name, HEART Login, NAS Login) to “Search By” then enter a search string and click the
“Search” button
e. The system will display a list of all Users matching the search string if found
f. From the search result, click the “Edit” button next to the User account to edit.
g. The system will display the details for the user account selected and their assigned Roles. Click the “Update
Institution Assignment” tab to view their assigned Institutions along with the full list of institutions from which
to make assignments.
h. Upon making the required changes, click the “Save Changes” button to complete editing.
i. If a User is logged-in, have them logout then log back in for the changes to take effect. If not the changes will
take effect on their next login.
Prepared by: ISTS-ICT – NTA Qualifications System Version 4.0 Revised September 2018
Page | 6
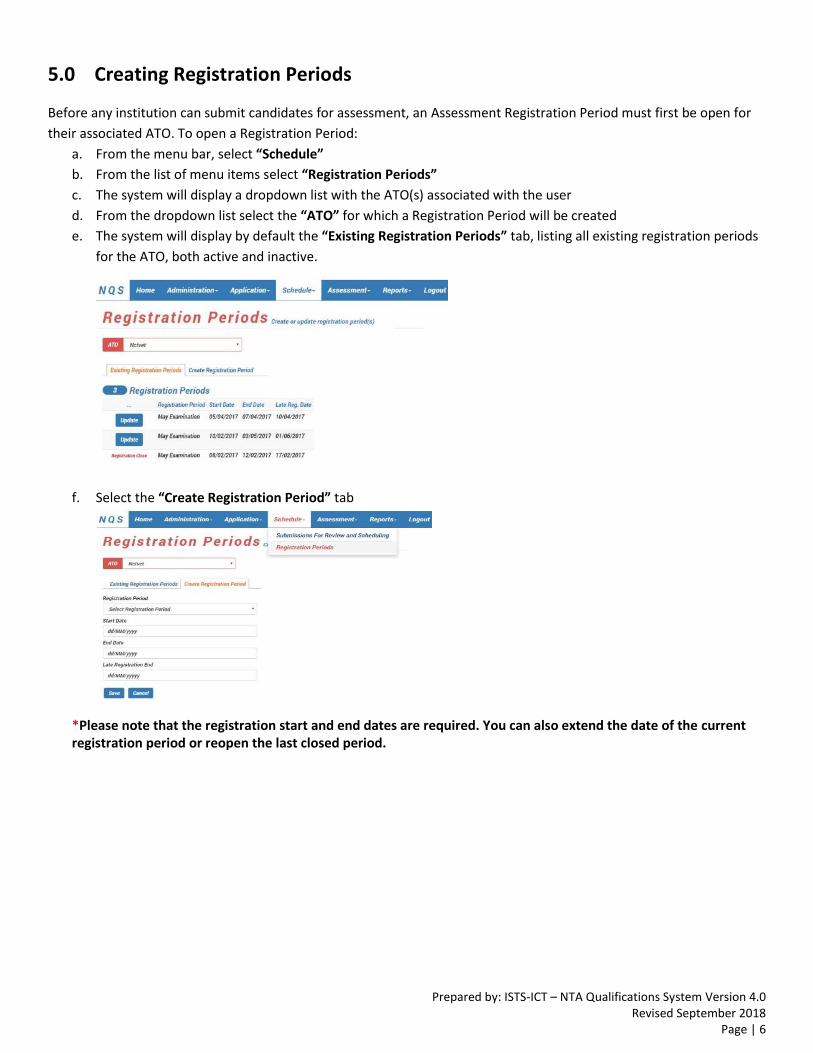
5.0 Creating Registration Periods
Before any institution can submit candidates for assessment, an Assessment Registration Period must first be open for
their associated ATO. To open a Registration Period:
a. From the menu bar, select “Schedule”
b. From the list of menu items select “Registration Periods”
c. The system will display a dropdown list with the ATO(s) associated with the user
d. From the dropdown list select the “ATO” for which a Registration Period will be created
e. The system will display by default the “Existing Registration Periods” tab, listing all existing registration periods
for the ATO, both active and inactive.
f. Select the “Create Registration Period” tab
*Please note that the registration start and end dates are required. You can also extend the date of the current registration period or reopen the last closed period.

Prepared by: ISTS-ICT – NTA Qualifications System Version 4.0 Revised September 2018
Page | 7
6.0 Creating Submission The registration process for assessment is done in two parts across two systems via integration. In the first instance, all
applications by Candidates are entered in the Trainee Management System (TMS) where their applications are
processed and approved by the respective institution to which they had applied. Successful applicants are accepted and
placed in training. At the end of each training period all Candidates must be accessed and in this the second instance all
assessments are done via the NQS Assessment module. Candidates are registered for assessments using the offering
data accessible from TMS. To register candidates for assessment:
a. From the menu bar, select “Application”
b. From the list of menu items select “Create, Update & Delete Submission”
c. The system will display the “Submissions - Create, update, confirm submission” page with a dropdown list of
the Institution(s) associated with the user
d. From the dropdown list select the “Institution” for which Candidates will be registered followed by the “ATO”.
I. The system will display a list of all associated Offerings for the selected institution from data in the TMS,
filtered by the “Current Year” by default along with the most recent Registration Period.
i. Offerings may be further filtered by the “Previous Year” or by “All Offerings”.

Prepared by: ISTS-ICT – NTA Qualifications System Version 4.0 Revised September 2018
Page | 8
e. From the list of Offerings, click the “Select” button for the Qualification/Skill Area with the Candidates to be registered for Assessment.
f. The system will display the details of the offering selected along with the “New Submission” form.
i. The “New Submission” form outlines the list of the Assessment strategies, Clusters (where applicable), Resit components, list of Candidates and Units assigned to the offering.
ii. The candidates eligible for registration in the offering are listed under the “Candidates” tab while the assigned units to the offering are listed under the “Units” tab

Prepared by: ISTS-ICT – NTA Qualifications System Version 4.0 Revised September 2018
Page | 9
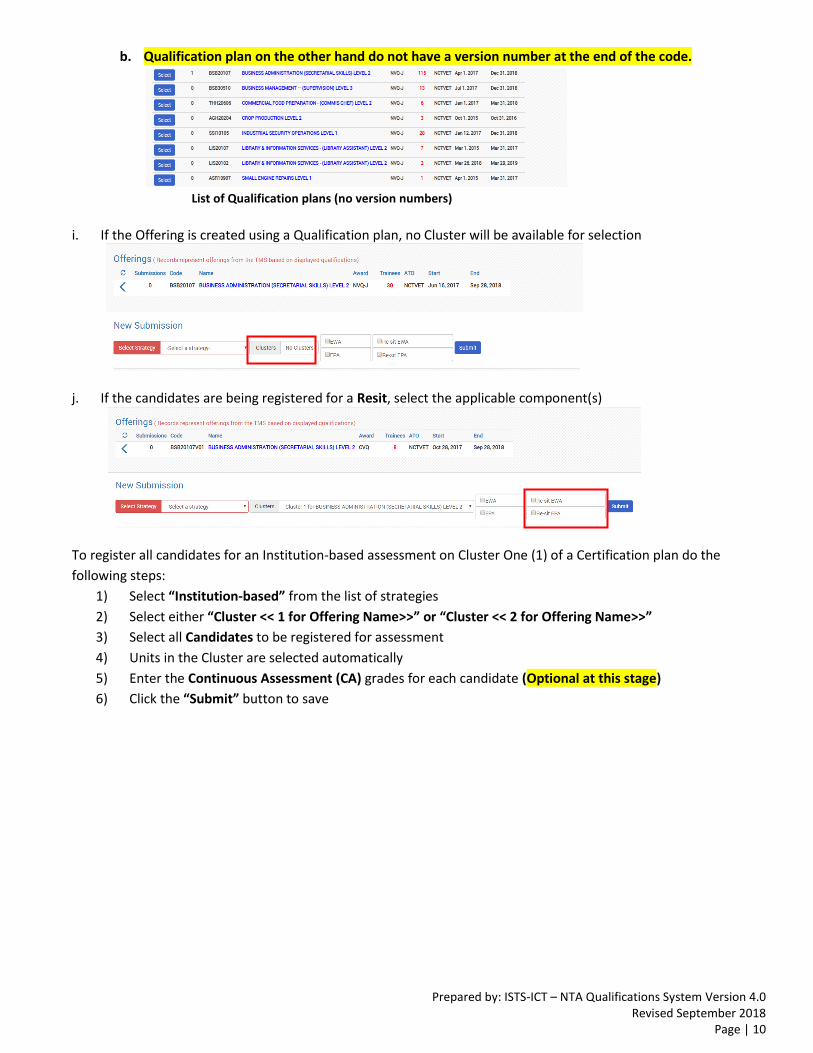
g. To select the applicable Assessment strategy for the assessment, click the dropdown.
h. To select the applicable Cluster for which the Candidates will be assessed, click the dropdown.
NB. a. Clusters are only applicable to Offering created from a Certification plan. Certification plans are those
plans whose code end with a version number starting at “V01” and incrementing to “V04” etc.
List of Certification plans with different versions
Offering details
Candidates tab
Prepared by: ISTS-ICT – NTA Qualifications System Version 4.0 Revised September 2018
Page | 10
b. Qualification plan on the other hand do not have a version number at the end of the code.
List of Qualification plans (no version numbers)
i. If the Offering is created using a Qualification plan, no Cluster will be available for selection
j. If the candidates are being registered for a Resit, select the applicable component(s)
To register all candidates for an Institution-based assessment on Cluster One (1) of a Certification plan do the
following steps:
1) Select “Institution-based” from the list of strategies
2) Select either “Cluster << 1 for Offering Name>>” or “Cluster << 2 for Offering Name>>”
3) Select all Candidates to be registered for assessment
4) Units in the Cluster are selected automatically
5) Enter the Continuous Assessment (CA) grades for each candidate (Optional at this stage)
6) Click the “Submit” button to save

Prepared by: ISTS-ICT – NTA Qualifications System Version 4.0 Revised September 2018
Page | 11
The newly created submission for the intended assessment is created and displayed as follows: In addition to the submission summary the system provides three (3) icons representing additional functionalities that
can be performed on the newly created submission as follows:
Delete submission
Confirm submission
Update submission
Step 1 Step 2
Step 3
Step 4 Step 5 Step 6

Prepared by: ISTS-ICT – NTA Qualifications System Version 4.0 Revised September 2018
Page | 12
7.0 Deleting, Confirm or Updating Submissions
A submission may be Deleted, Confirmed or Updated anytime after it is created within an active registration period. In addition to the above additional candidates can be also added to an existing submission thus eliminating the issue of multiple submissions for the same offering within the same registration period. The exception for this new feauture is when registering candidates using Qualification plans that are assessed in unique Clusters determined by an institution, these must still be done separately in order for the assessment results to be uploaded correctly. Follow the steps below to Delete, Confirm or Update submission.
a. From the menu bar, select “Application”
b. From the list of menu items select “Create, Update & Delete Submission”
c. The system will display the “Submissions - Create, update, confirm submission” page with a dropdown list of
the Institution(s) associated with the user
d. From the dropdown list select the “Institution” where the Candidates were registered followed by the “ATO”.
II. The system will display a list of all associated Offerings for the selected institution from data in the TMS,
filtered by the “Current Year” by default along with the most recent Registration Period.
i. Offerings may be further filtered by the “Previous Year” or by “All Offerings”.

Prepared by: ISTS-ICT – NTA Qualifications System Version 4.0 Revised September 2018
Page | 13
k. From the list of Offerings, click the “Select” button for the Qualification/Skill Area with the Candidates to be Deleted, Confirmed or Updated.
l. The Offering details will be displayed as follows with the updated submission count.

Prepared by: ISTS-ICT – NTA Qualifications System Version 4.0 Revised September 2018
Page | 14
Click the Delete icon to delete this submission. If there is only one (1) submission for the Offering, the system will return to the New submission form otherwise it list the remaining submissions as above:
m. Click the Confirm icon to confirm the registration of the candidates. The system will update the submission
summary as follows, replacing the Confirm icon with the View icon as a further indication is has been already been confirmed:
n. Click the Update icon to view the submission details for review and updating.

Prepared by: ISTS-ICT – NTA Qualifications System Version 4.0 Revised September 2018
Page | 15
i. To add or remove a Candidate, click the checkbox next their name then click the Update button ii. To upload Candidates CA grades, enter grades in textbox provided then click the Update button
Prepared by: ISTS-ICT – NTA Qualifications System Version 4.0 Revised September 2018
Page | 16
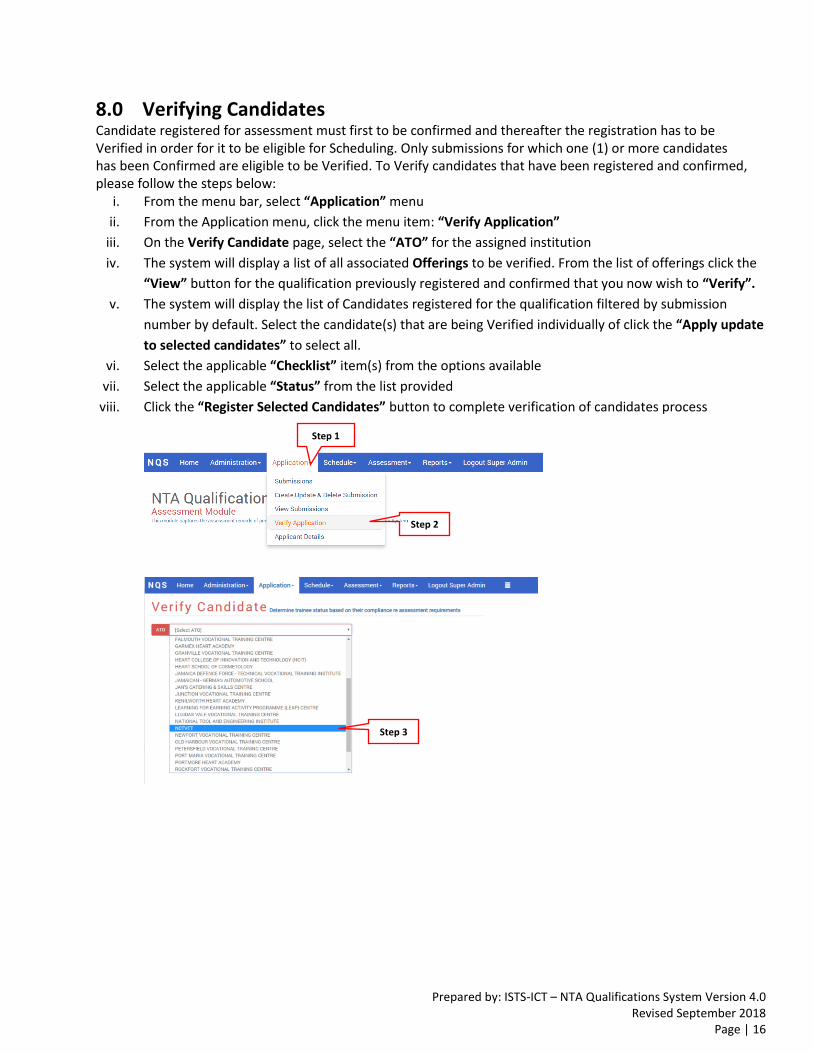
8.0 Verifying Candidates Candidate registered for assessment must first to be confirmed and thereafter the registration has to be Verified in order for it to be eligible for Scheduling. Only submissions for which one (1) or more candidates has been Confirmed are eligible to be Verified. To Verify candidates that have been registered and confirmed, please follow the steps below:
i. From the menu bar, select “Application” menu
ii. From the Application menu, click the menu item: “Verify Application”
iii. On the Verify Candidate page, select the “ATO” for the assigned institution
iv. The system will display a list of all associated Offerings to be verified. From the list of offerings click the
“View” button for the qualification previously registered and confirmed that you now wish to “Verify”.
v. The system will display the list of Candidates registered for the qualification filtered by submission
number by default. Select the candidate(s) that are being Verified individually of click the “Apply update
to selected candidates” to select all.
vi. Select the applicable “Checklist” item(s) from the options available
vii. Select the applicable “Status” from the list provided
viii. Click the “Register Selected Candidates” button to complete verification of candidates process
Step 1
Step 2
Step 3

Prepared by: ISTS-ICT – NTA Qualifications System Version 4.0 Revised September 2018
Page | 17
Upon clicking the “Registered Selected Candidates” button the system prompts the user that the candidates status are now updated and verified.
Step 4
Step 5
Step 6
Step 7
Step 8

Prepared by: ISTS-ICT – NTA Qualifications System Version 4.0 Revised September 2018
Page | 18
9.0 Scheduling Submissions
As part of the registration process a “Schedule” must be created for all Assessment registrations. Only submissions and by extension Candidates for which registrations have been “Verified” can be scheduled. The create a schedule for an assessment please follow the steps outlined below:
i. From the menu bar, select “Schedule” menu
ii. From the Schedule menu, click the menu item: “Submissions For Review and Scheduling”
iii. On the Submissions For Review and Scheduling page, select the “ATO” for the assigned institution
iv. The system will then display filtering options starting with all associated Registration Periods, followed
by Qualifications and then Institutions from which User will selected the applicable options.
v. The system will display a list of submissions based on the options selected in the previous step detailing:
o Submission Code
o Resit Type
o Qual ID
o Offering Name
o Institution
o Candidate Scheduled (Number of Candidates scheduled / Number of Candidates Registered)
o Number of Units
o Number of Groups
o Submission Date
vi. Select the “Schedule” button next to the submission to be scheduled
vii. The system will display the “New Assessment Group” tab with a form to capture the following:
o Assessment(s) date and time
o Location
o Assessor / Invigilator
o Candidates
o Units
viii. Complete the form then click the “Save Group” button
ix. Upon clicking the “Save Group” button, the system will display the newly created schedule under the
“Existing Assessment Group” tab.
Step 1-2
Step 3-5
Step 6

Prepared by: ISTS-ICT – NTA Qualifications System Version 4.0 Revised September 2018
Page | 19
Edit Schedule Repeat steps 1 - 6 above, the system will display the “Existing Assessment Group” tab
Click the “Edit” button next to the schedule to be editing.
Only schedules for which the assessment date(s) has not yet passed can be Edited. If an attempt is
made to Edit a schedule whose date has passed the system will display a prompt that the dates for
the component(s) has expired.
Make the relevant changes to the schedule then click the “Save Group” button to complete
Upon clicking the “Save Group” button, the system will display the newly created schedule under
the “Existing Assessment Group” tab.
Step 7a
Step 7b
Step 8
Step i
Step 7c
Step 9

Prepared by: ISTS-ICT – NTA Qualifications System Version 4.0 Revised September 2018
Page | 20
Step ii
Step iii
Step iv

Prepared by: ISTS-ICT – NTA Qualifications System Version 4.0 Revised September 2018
Page | 21
10.0 Marking Attendance The uploading of Assessments results for candidate whom have been assessed now requires that the marking of candidate attendance be completed first. To initiate the marking of candidate attendance please follow the steps outlined below:
i. From the menu bar, select “Assessment” menu
ii. From the Assessment menu, click the menu item: “Mark Attendance”
iii. On the Mark Attendance page, select the “ATO” for the assigned institution
iv. The system will then display filtering options starting with all associated Registration Periods, followed by
Qualifications and then Institutions from which User will selected the applicable options.
v. The system will display a list of submissions based on the options selected in the previous step detailing:
a. Submission Code
b. Qual ID
c. Offering Name
d. Candidate Scheduled (Number of Candidates scheduled / Number of Candidates Registered)
e. Number of Units
f. Number of Groups
g. Submission Date
h. Institution
i. Exam Period
vi. Select the “Select” button next to the submission for which attendance will be marked.
vii. If the scheduled assessment date has not yet passed the system will restrict further processing and will prompt
the user that the date(s) for the assessment component(s) has not yet expired.
viii. If the assessment dates has passed the system will display the details of the submission with a form to capture
the following:
a. EPA Attendance
b. EWA Attenadance
ix. Mark the attendance for each component by clicking the placeholder until it changes to the desired attendance
(P: Present, A: Absent, --: Not yet Marked)
x. The system will automatically update the candidates records immediately
Step 1 - 2
Step 3 - 4
Step 5
Step 6

Prepared by: ISTS-ICT – NTA Qualifications System Version 4.0 Revised September 2018
Page | 22
Step 7
Step 8
Step 9
Step 10

Prepared by: ISTS-ICT – NTA Qualifications System Version 4.0 Revised September 2018
Page | 23
11.0 Add Grades The uploading of Assessments results for candidate whom have been assessed now requires that the marking of candidate attendance be completed first. To initiate the marking of candidate attendance please follow the steps outlined below:
i. From the menu bar, select “Assessment” menu
ii. From the Assessment menu, click the menu item: “Add Grades”
iii. On the Add Grades page, select the “ATO” for the assigned institution
iv. The system will then display filtering options starting with all associated Registration Periods, followed by
Qualifications and then Institutions from which User will selected the applicable options.
v. The system will display a list of submissions based on the options selected in the previous step detailing:
a. Submission Code
b. Qual ID
c. Offering Name
d. Candidate Scheduled (Number of Candidates scheduled / Number of Candidates Registered)
e. Number of Units
f. Number of Groups
g. Submission Date
h. Institution
i. Exam Period
vi. Select the “Select” button next to the submission for which grades will be added.
vii. If the scheduled assessment date has not yet passed the system will restrict further processing and will prompt
the user that the date(s) for the assessment component(s) has not yet expired.
viii. In the marking of attendance is incomplete, the system will display prompt that all candidates attendance are not fully marked and will restrict further processing.
ix. If the assessment dates has passed and the attendance for all candidates in the submission has been marked,
the system will display the details of the submission with a form to capture the following:
a. CA EWA grade
b. CA EPA grade
c. EPA grade
d. OTJA + Project/Portfolio (Levels 3 and above), where applicable based on qualification
e. EWA grade
x. The system will automatically compute and display the CA Average grade, EPA Average (Levels 3 and above) and
the Rating/score for each component, CA, EPA and EWA.
xi. The system will automatically update the candidates records immediately
Step 1 - 2

Prepared by: ISTS-ICT – NTA Qualifications System Version 4.0 Revised September 2018
Page | 24
Step 3 - 4
Step 5
Step 6
Step 7
Step 8
Step 9
New EPA Grades form for Levels 3 and above
Step 10

Prepared by: ISTS-ICT – NTA Qualifications System Version 4.0 Revised September 2018
Page | 25
12.0 Verify Assessment Results Candidate Assessment results that have been uploaded to the system must be verified as part of the assessment process. To initiate the verification of assessment results please follow the steps outlined below:
i. From the menu bar, select “Assessment” menu
ii. From the Assessment menu, click the menu item: “Verify Assessment Results”
iii. On the Verify Assessment Results page, select the “ATO” for the assigned institution
iv. The system will then display filtering options starting with all associated Registration Periods, followed by
Qualifications and then Institutions from which User will selected the applicable options.
v. The system will display a list of submissions based on the options selected in the previous step detailing:
a. Submission Code
b. Qual ID
c. Offering Name
d. Candidate Scheduled (Number of Candidates scheduled / Number of Candidates Registered)
e. Number of Units
f. Number of Groups
g. Submission Date
h. Institution
i. Exam Period
vi. Select the “Select” button next to the submission for which grades will be verified.
vii. If the scheduled assessment date has not yet passed the system will restrict further processing and will prompt
the user that the date(s) for the assessment component(s) has not yet expired.
viii. In the marking of attendance is incomplete, the system will display prompt that all candidates attendance are
not fully marked and will restrict further processing.
ix. If the assessment dates has passed and the attendance for all candidates in the submission has been marked,
the system will display the details of the submission with a form to allow for the verification of assessment
components as follows:
a. CA component
b. EPA component
c. EWA component
x. Select the component(s) that are to be verified
xi. Select the candidate(s) whose respective grade components are to be verified
xii. Click the “Verify Grades for Selected Candidates” button
xiii. The system will automatically compute and display the candidate’s competency for the assessment and if all
requirements have been met and will also indicate whether or not the candidate is Certified.
xiv. The system will automatically update the candidates records immediately
Step 1 - 2

Prepared by: ISTS-ICT – NTA Qualifications System Version 4.0 Revised September 2018
Page | 26
Step 3 - 4
Step 5
Step 6
Step 7
Step 8
Step 9

Prepared by: ISTS-ICT – NTA Qualifications System Version 4.0 Revised September 2018
Page | 27
Step 10
Step 11
Step 12
Step 12a
Prepared by: ISTS-ICT – NTA Qualifications System Version 4.0 Revised September 2018
Page | 28
Step 12b
Step 13
Prepared by: ISTS-ICT – NTA Qualifications System Version 4.0 Revised September 2018
Page | 29
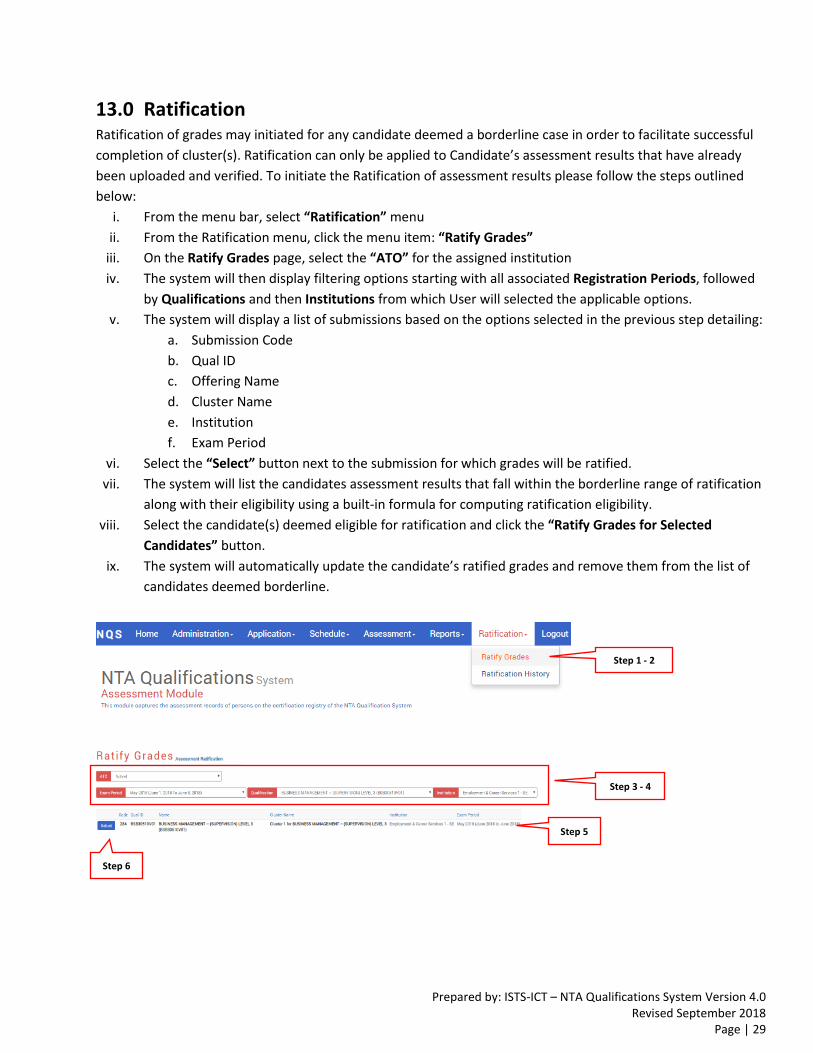
13.0 Ratification Ratification of grades may initiated for any candidate deemed a borderline case in order to facilitate successful
completion of cluster(s). Ratification can only be applied to Candidate’s assessment results that have already
been uploaded and verified. To initiate the Ratification of assessment results please follow the steps outlined
below:
i. From the menu bar, select “Ratification” menu
ii. From the Ratification menu, click the menu item: “Ratify Grades”
iii. On the Ratify Grades page, select the “ATO” for the assigned institution
iv. The system will then display filtering options starting with all associated Registration Periods, followed
by Qualifications and then Institutions from which User will selected the applicable options.
v. The system will display a list of submissions based on the options selected in the previous step detailing:
a. Submission Code
b. Qual ID
c. Offering Name
d. Cluster Name
e. Institution
f. Exam Period
vi. Select the “Select” button next to the submission for which grades will be ratified.
vii. The system will list the candidates assessment results that fall within the borderline range of ratification
along with their eligibility using a built-in formula for computing ratification eligibility.
viii. Select the candidate(s) deemed eligible for ratification and click the “Ratify Grades for Selected
Candidates” button.
ix. The system will automatically update the candidate’s ratified grades and remove them from the list of
candidates deemed borderline.
Step 1 - 2
Step 3 - 4
Step 5
Step 6

Prepared by: ISTS-ICT – NTA Qualifications System Version 4.0 Revised September 2018
Page | 30
13.1 Ratification History The Ratification History report produces a detailed listing of candidate assessment results that have been ratified. To initiate the ratification history please follows the steps outlined below:
i. From the menu bar, select “Ratification” menu
ii. From the Ratification menu, click the menu item: “Ratify History”
iii. On the Ratify History page, select the “ATO” followed by the Institution
iv. The system will display a list of submissions based on the options selected in the previous step detailing:
a. Submission Code
b. Qual ID
c. Offering Name
d. Cluster Name
e. Group Name
f. Institution
v. Select the “View” button next to the submission for which grades have been ratified to see the details.
vi. The system will list the candidate(s) assessment results that were ratified.
Step 7
Step 8
Step 9

Prepared by: ISTS-ICT – NTA Qualifications System Version 4.0 Revised September 2018
Page | 31
vii. Select the download icon to generate a PDF document for printing or downloading to local or external
storage device.
viii. The system will generate and open the PDF document in a new tab in the browser
Step 1 - 2
Step 3
Step 4
Step 5
Step 6
Step 7
Step 8

Prepared by: ISTS-ICT – NTA Qualifications System Version 4.0 Revised September 2018
Page | 32
NOTES
__________________________________________________________________________________________________
__________________________________________________________________________________________________
__________________________________________________________________________________________________
__________________________________________________________________________________________________
__________________________________________________________________________________________________
__________________________________________________________________________________________________
__________________________________________________________________________________________________
__________________________________________________________________________________________________
__________________________________________________________________________________________________
__________________________________________________________________________________________________
__________________________________________________________________________________________________
__________________________________________________________________________________________________
__________________________________________________________________________________________________
__________________________________________________________________________________________________
__________________________________________________________________________________________________
__________________________________________________________________________________________________
__________________________________________________________________________________________________
__________________________________________________________________________________________________
__________________________________________________________________________________________________
__________________________________________________________________________________________________
__________________________________________________________________________________________________
__________________________________________________________________________________________________
__________________________________________________________________________________________________
__________________________________________________________________________________________________