the pearl the pearl akoya · off power switch located on the rear panel of the device to work...
TRANSCRIPT

THE PEARLTHE PEARL AKOYA
User guide

2
You have just bought THE PEARL or THE PEARL AKOYA and we thank you for your trust. We recommend reading this leaflet carefully to take full advantage of all the possibilities of THE PEARL and THE PEARL AKOYA.
Explanation of symbolsLightning within an equilateral triangle warns of the existence of dangerous,
uninsulated high voltage inside the product enclosure, of sufficient value to present a risk of electric shock.
The exclamation point in an equilateral triangle warned of the existence of
instructions usage and maintenance in the documentation attached to this product.
Cleaning - Unplug the unit before cleaning. Do not use cleaning solutions in liquid or aerosol form. Use preferably a damp cloth.
Installation on furniture and stands - Do not place this unit on an unstable stand, such as stands, tripods, tables, shelves, etc. It could fall and cause serious injury to a child or adult who is nearby.
Ventilation - The appliance must be positioned so that it does not interfere with its own ventilation. For example, it should not be installed on a bed, sofa, blanket or similar surfaces that could block its vents. It should not be embedded in confined spaces such as narrow shelves or furniture that could limit the amount of air available to the air intakes.
Power supply - The appliance must only be connected to a power source of the type written in the user manual or in line with the product. If you are unsure of the type of power supplied to your location, contact your dealer or the local power company.
Electrical Overloads -Do not overload power outlets, extension cords, or power reminders. This could result in fire or electrocution.
Foreign bodies and liquids - Care should be taken never to let foreign objects or liquids enter the unit. They could cause fires or electrocutions. Never pour liquid of any kind into the device.
Maintenance - - In the following cases, you must unplug your appliance and have it checked by a qualified technician:
the power supply or plug has been damaged.
foreign bodies or liquid have entered the device.
the unit has been exposed to rain or has been sprayed with water.
the unit does not seem to be working properly while you are using it as part of its normal operating instructions.
Only handle the controls covered by the user manual. Any other procedure could damage it and require the intervention of a qualified technician.
the unit has fallen or its bodywork is damaged.
the device shows significantly changed performance.
In a disturbed area environment (thunderstorm etc ...), the product may sometimes require shutdown and restart by means of the ON / OFF power switch located on the rear panel of the device to work properly again.
Spare parts - If the repair required the use of spare parts, make sure that the technician has used the references recommended by the manufacturer or having the same characteristics as the original parts. Non-conforming parts may cause fire, electric
SAFETY INSTRUCTIONS
3
IMPORTANT SAFETY INSTRUCTIONS!
shock or other.
Checks - After any work on the unit, have the technician perform tests to ensure that the unit operates safely.
Plastic Bags -Do not leave plastic bags in the box within reach of children to avoid choking.
1. READ these instructions.
2. SAVE these instructions.
3. RESPECT all warnings.
4. FOLLOW all instructions.
5. DO NOT use this unit near water.
6. CLEAN ONLY with a dry cloth.
7. DO NOT obstruct the ventilation holes.
Install according to the manufacturer's instructions.
8. DO NOT install near any heat sources such as radiators, heat registers, stoves, or other apparatus (including amplifiers) that produce heat.
9. DO NOT disable the safety feature of the polarized or ground pin plug. A polarized plug has one blade wider than the other. A ground pin plug has two blades and a third pin for the ground. The wide blade or the third pin is provided for the safety of the user. If the provided plug does not fit into the outlet, have an electrician replace this outlet type that is too old.
10. PROTECT the power cord, making sure that it is not likely to be
stomped or crushed, particularly near the
plugs, power strips and its point of exit from the device.
11. USE ONLY the accessories recommended by the manufacturer.
12. Unplug this apparatus during lightning storms or when unused for
a long time.
13. CONFIRM any troubleshooting work to a competent professional repairer.
Have the device repaired in case of damage, for example: damaged plug or power cord, liquid spilled on the device or object inserted in the device, unit exposed to rain or moisture, malfunction or after a fall.
14. RUNOFF / HUMIDITY: To prevent fire or shock hazard, do not expose the unit to water or moisture. The appliance must not be exposed to any risk of liquid leaks, no object such as a vase will be placed on or above the appliance.
15. KEEP this product a safe distance away from any naked flame, such as a lit candle.
16. THE MAINS are nor disconnected in the off position, but the circuits are de-powe-red.
CAUTION: do not ingest the battery, fatal risk of chemical burn within 2 hours. Always keep button cells, new and used, out of reach of children. Seek immediate medical attention if you think that batteries may have been swal-lowed or inserted anywhere in the body. If the battery compartment no lon-ger closes securely, stop using the product and keep it away from children.

4
UNPACKINGOpen the cardboard box widely and take out the different elements one by one. If any of the items on the carton appear to be damaged, do not use it, put it back in the original carton and contact your dealer immediately.
Keep your packaging for possible future transport of your system.
INSTALLATION
THE COMPONENTS OF YOUR SYSTEM
1 THE PEARL, 1 power cord, 1 remote control, 1 simplified instruction and 1 warranty card.
THE PEARL AKOYA, 1 power cord, 1 remote control, 1 simplified instruction and 1 war-ranty card, , 1 USB adaptor, 1 RCA-Jack 3.5 mm adapter , 1 sac carry bag.

5
Volume +
Preset 1 access
Previous
Play / Pause
Next
Source Selection
Volume -
REMOTE CONTROL KEYS THE PEARL
FUNCTIONS
Bluetooth connection
WLAN/LAN via internet
routeur / box
Loss less audio broadcast YES
Access to all audio media from the WIFI network (computer ...) YES
Multi-room YES
Broadcast smartphone / tablet audio content YES YES
Broadcast audio application (youtube ...) from smartphone / tablet YES
Broadcasting from USB mediaYES
Internet radio and music services Qobuz, Deezer, Napster, Spotify,
Tidal, Vtuner

6
Status LED Pairing LED
Reset Pairing
Optical LAN USB ON/OFF Analog RCA IN
POWER
THE PEARL
THE PEARL AKOYA
Status LED Pairing LED
Reset Pairing
Optical LAN ON/OFF Analog
USB
POWER

7
FIRST USEConnect THE PEARL to the mains with the proper power cord.
THE PEARL / THE PEARL AKOYA is operational as soon as the LED on the left of the rear panel opposite is lit in solid blue.
A voice announcement, if the volume of THE PEARL / THE PEARL AKOYA is not at a minimum, indicates the status of the network connection: current, successful, failure.
STEREO USE WITH 2 THE PEARL / THE PEARL AKOYA
Use only one remote control to drive a stereo pair. Do not activate another remote in the same room.
REMOTE CONTROL ACTIVATIONBefore first use, unscrew the screw (PH00 screwdriver), remove the cover, remove the protective tab, replace the cover and retighten the screw.The blue LED on the remote control flashes, waiting for pairing.PAIRING THE REMOTE CONTROL1- Connect the speaker to the mains.2- Switch on the speaker using the on / off button on the back.3- Press the "pairing" button on the back of THE PEARL/ THE PEARL AKOYA briefly. The LED "pairing" flashes.4- The LEDs on the remote control and THE PEARL stop flashing when the pairing is finalized.Replacement of the CR-2450 type button-cell: turn the remote control over, unscrewthe screw, remove the cover, remove the old battery, insert the new battery, marked "+" to the outside, replace the cover, tighten the screw.
COLOR CODES OF THE STATUS LED
CYAN DLNA input: wifi, Ethernet, domestic streaming , internet streamingGREEN Spotify ConnectWHITE Aux In InputYELLOW Optical inputBLUE Bluetooth inputRED (flashing) Connexion to network failed PURPLE Automatic calibration running

8
ANALOG INPUTThis input can be connected to an audio source (CD player, MP3 player, smartphone, TV) equipped with an analog output RCA or mini-jack type. Use RCA / RCA cord or minijack / RCA cord (not included)
USB INPUTThis input is only useful for use in Wi-Fi / Ethernet mode (paragraphs 4,5,6 below). Connect a USB stick or hard drive containing audio files to this input to automatically network them. All files in formats recognized by the DLNA server included in THE PEARL are then listed in the Stream Audio Control application and can be read by all Cabasse Stream players connected to the same network. The PEARL USB socket has a 5V - 1A DC power supply for use with a portable hard drive without external power supply.
WIRED AND NON-WIRED INPUTSTHE PEARL
WIRED AND NON-WIRED INPUTSTHE PEARL AKOYA
ANALOG INPUT
This input can be connected to an audio source (CD player, MP3 player, smartphone, TV) equipped with an analog output RCA or mini-jack type. Use the included RCA / mini-jack adapter for RCA-RCA cord or minijack / RCA cord (not included), or a mini-jack/mini-jack cord if the source output is mini-jack type.
Micro-USB INPUTThis input is only useful for use in Wi-Fi / Ethernet mode (paragraphs 4,5,6 below). Connect a USB stick or hard drive containing audio files to this input to automatically network them. Use the supplied Micro-USB/USB adpater if needed. All files in formats recognized by the DLNA server included in THE PEARL are then listed in the Stream Audio Control application and can be read by all Cabasse Stream players connected to the same network. The PEARL micro-USB socket has a 5V - 1A DC power supply for use with a portable hard drive without external power supply.

9
BLUETOOTH CONNECTION
1. Once the speaker is on, press the "Pairing" button on the back
2. The "Pairing" LED on the back should flash
3. Activate Bluetooth on your mobile
4. Select "THE PEARL XXXX Cabasse" from the list of available devices
5. Once the connection is successful, the LED "Pairing" on the back stops flashing
WIRE CONNECTION (LAN) TO THE ETHERNET NETWORKThe wired Ethernet connection guarantees an optimum and constant transfer rate in any environment. Use this if Wi-Fi mode operation shows untimely cuts or stops of music, signs of a saturated Wi-Fi network, or too much router-to-stream distance.Connect an RJ45 cable between THE PEARL / THE PEARL AKOYA and your router (or Box Internet). The connection is established when the ETH diode changes to solid blue. The WIFI connection is then automatically disabled.
CAUTION: DHCP mode of the router must be enabled.

10
WARNING ! An update of THE PEARL software can start automatically as soon as an internet connection is made.
The beginning and the end of the update are announced by voice.
Do not turn off or disconnectTHE PEARL
or THE PEARL AKOYA during updates that may require several minutes.

11
WIRELESS DLNA CONNECTION (WLAN) TO WIFI NETWORK
on a smartphone or tablet connected to the Wi-Fi network.1. Install the Cabasse Stream CONTROL App on your tablet / smartphone from "Play Store" for an Android device, or "App Store" for an Apple product.
2. Press the PEARL "pairing" button for 3 seconds: the blinking pairing LED shows that the THE PEARL is ready for pairing
3. Open the "settings" or "parameters" App of your smart phone or tablet, select "Wi-Fi " then "THE PEARL XXX" among the list of available networks. You might have to wait a little for THE PEARL to be listed.
4. Open the application and choose "configure this new player"
5. Follow the instructions and upon request select the wi-fi network to be used and enter the network password.
6. Start listening to your favorite music from your smartphone, key or hard drive connected to THE PEARL's USB input, or using sources connected to its analog input or optical input.
The sources connected to the analog and optical inputs of THE PEARL can be played by all the other Stream devices belonging to the same zone.
1
2

12
USE / SYNCHRONIZE WITH A TV SETSTREAM CONTROL APPLICATION
FIRST USE
Open the Stream Control application and launch the tutorial to discover the main features of the application.
Swipe left-right to open the window giving access to sources and settings.Select "parameters" then "see the tutorial" at the bottom of the "settings" page. Here are the main actions detailed here:- Navigation in the application - Stereo mode- Selection / configuration of a zone - Voice control- Zone Management - Audio Customization- Player options - Favorites- Media Playback Menu - Services

13
USE / SYNCHRONIZE WITH A TV SET
CONFIGURATION1- Lay THE PEARL / THE PEARL AKOYA next to your TV, or a pair of THE PEARL or THE PEARL AKOYA on both sides of the TV on a solid stand.2- Leave a space of at least 3 centimeters between the rear wall and the appliance.3- Connect THE PEARL / THE PEARL AKOYA to the TV with one of the 2 available inputs. Favor the SPDIF coaxial solution:- SPDIF optical input: Connect the "OPTICAL IN" input to the TV audio output (TV Audio OUT) with the supplied optical cable or equivalent. Make sure that the protective caps at the ends of the optical cable are removed.
- THE PEARL analog RCA input: if the TV does not have an SPDIF optical output, connect the "AUX IN" input to the TV's analogue stereo output (RCA TV Audio out) with an RCA-RCA cable , or to the headphone output of the TV with a Jack-RCA cord (not supplied).
- THE PEARL AKOYA analog 3.5mm jack input: if the TV does not have an SPDIF optical output, connect the "AUX IN" input to the TV's analogue stereo output (RCA TV Audio out) with an RCA-RCA cable and the supplied RCA to mini-jack adapter, or to the headphone output of the TV with a Jack-mini-Jack cord (not supplied).
DEACTIVATION OF THE SPEAKERS OF THE TELEVISION
Turn on the TV, open the TV menu, and look for a tab such as Audio, Sound or Speakers. Use the menu function to switch off the TV speakers. This menu item may for example be labeled "Speaker On / Off" for speakers on / off. If this function does not exist, bring the TV sound volume with the TV remote control to the minimum level.
ACTIVATION OF THE OPTICAL OUTPUT OF THE TELEVISION
If there is no sound with an optical connection, set the chosen optical output in the TV menu if necessary.
OPTIMIZATION OF AV SYNCHRONIZATION
In order to provide a stable stereo reproduction with a WLAN connection, the standard delay in the firmware of THE PEARL / THE PEAL AKOYA can be up to 1000 milliseconds. This delay can be divided by 5 or more for AV purpose by selecting the TV mode instead of the Hi-Fi mode.

14
AUDIO CUSTOMIZATION AUTOMATIC CALIBRATION
4: stay away from the speaker during cali-bration. Avoid making noise
2 : enter into settings / players / The Pearl / au-tomatic calibration
3 : follow the instruc-tions and press "start"
1: place The Pearl speaker on a stable and not resonant stand or support, with a correct height and orientation according to your favorite listening positions.
4: press OK to exit or fol-low further instructions
15
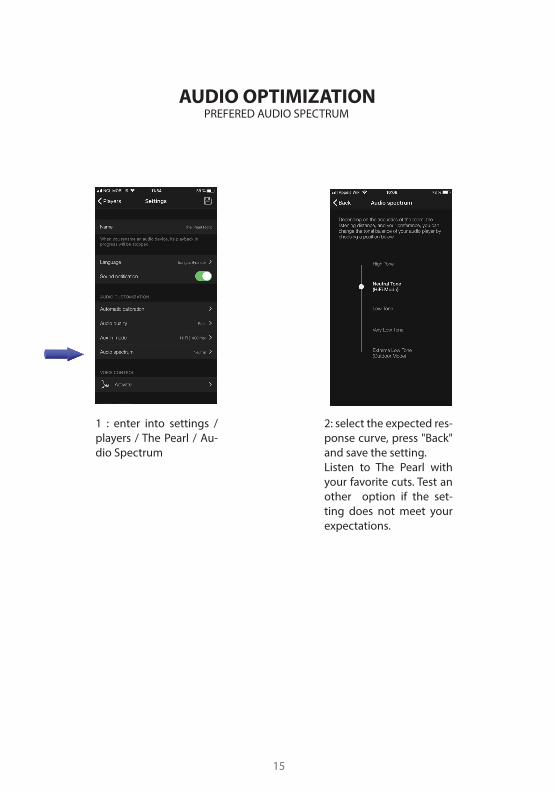
AUDIO OPTIMIZATION PREFERED AUDIO SPECTRUM
1 : enter into settings / players / The Pearl / Au-dio Spectrum
2: select the expected res-ponse curve, press "Back" and save the setting.Listen to The Pearl with your favorite cuts. Test an other option if the set-ting does not meet your expectations.

16
3 : select the second The Pearl and create a group (zone) of 2 speakers.Note that other Cabasse Stream products can be added to the zone, for instance for a synchronised diffusion in another room
CREATE A STEREO PAIR
1 : CREATE A ZONE WITH 2 THE PEARL
1 : press on the name of the first The Pearl to access to Zone
2 : press on the "..." icone to select the first The Pearl

17
2 : TURN THE DUAL MONO ZONE INTO A STEREO ZONE
1 : select the left speaker icone for the The Pearl on the left
2: select the right speaker icone for the The Pearl on the right . Exit Zone. The stereo pair is listed with a name composed by both speakers'names.
3: Stereo balance: press on the "settings" icone on the right of the volume control bar and access the volume setting of each speaker to adjust the left/right balance if necessary.

18
STREAMING QUALITY OPTIONS (QOBUZ)Qobuz (today, and soon other providers) offers several resolution qualities for most of its strea-ming catalogue. If your internet access does not allow to play high resolution files, please select another position in the audio quality menu
Open "Audio Quality" in settings / Players/ The Pearl.
Set the maximum audio quality allowed: Normal = up to MP3 320 kbsSuperior = up to FLAC 16 Bits / 44 kHzBest = up to FLAC 24 Bits / 192 kHz
DISPLAY THE AUDIO SPECIFICA-TIONS OF THE CUT BEING PLAYED
The audio specifications are available on most sources. When playing a music cut open the here-under page by clicking on the icone on the left of the volume control bar.
Then click on the "i" info icone to display the specifications
Click on "OK" to erase the specifications win-dow.

19

20
DEEE MARKINGTreatment of electrical and electro-nic devices at the end of their life (applicable in the countries of the European Union).
This crossed-out wheeled bin sym-bol affixed to the product indicates that this product should not be trea-ted with household waste. It must be handed over to a collection point for the treatment of electrical and
electronic equipment at the end of its life. By ensuring that this product is disposed of pro-perly, you will help prevent potential negative consequences for the environment and human health. Recycling materials will help conserve natural resources. For more information about recycling this product, you may contact your municipality, your dump or the store where you purchased the product.
REPLACING THE BATTERYFROM THE REMOTE CONTROLTurn the remote control over, facing towards the floor. Remove the old battery and replace it with another type CR-2450 coin cell. Dispose of the used battery according to the informa-tion below.
Information about batteries and accumulators in the equipment (Applicable in the countries of the European Union).
This crossed-out wheeled bin sym-bol affixed to a battery or accu-mulator indicates that the battery or accumulator should not be dis-posed of as unsorted household
waste but should be collected separately from the battery. to make it easier to process and recycle. It must be returned to a collection point for the treatment of used batteries and accumulators. By ensuring that this product is disposed of properly, you will help prevent potential negative consequences for the envi-ronment and human health. Recycling mate-rials will help conserve natural resources. For more information about recycling this product, you may contact your municipality, your dump or the store where you purchased the product.
WARNING for explosion hazard if battery is incorrectly replaced: use only the same or equivalent battery. Do not expose batteries to
excessive heat such as the sun, fire or the like.

21
AUTOMATIC UPDATETHE PEARL software updates are automatic.
The update time is variable and can last up to fifteen minutes during the first connection to the Internet.
The beginning and the end of the update are announced by voice.
THE PEARL is not functional during this phase.
Note: the reference of the current software ver-sion is available via the Cabasse Stream appli-cation: tab "Settings" + sub-tab "audio players" + THE PEARL
CLEANINGTHE PEARL can be cleaned with a soft cloth, do not use detergent or liquid that can run inside the appliance.
Do not use any solvents, chemicals, or cleaning solutions containing alcohol, ammonia, or abrasives.
FAQCheck out our answers to frequently asked questions on www.cabasse.com, on the STREAM FAQ page.
AFTER SALES SERVICECabasse has a network of authorized resellers who are at your disposal to ensure the after-sales service of your equipment.
For a list of Cabasse Authorized Dealers, contact us or visit our website www.cabasse.com.
WARNING ! Do not turn off or disconnect THE PEARL from the mains during the update phases! An
update may take several minutes.

22
Digital inputs
- 1 DLNA input: wired with RJ45 plugor Wi-Fi dual band 2x2 802.11a / b / g / n / ac
- 1 Bluetooth 4.2 input- 1 S / PDIF optical input
- 1 USB 2.0 input 5V 1A
Analog input RCA stereo
Power supply 100-240 V ~60/50 Hz, 6A
Consumption 1,400 W
Consumption in Eco mode 2.9 W @ 100-240VAC~50/60Hz
Remote control Bluetooth low energy
Operating temperature +5°C à +35°C
Storage temperature -5°C à +40°C
Moisture rate in use 40% to 70%
Network
10/100Mb Ethernet MAC & PHY
Wireless LAN 802.11b/g/nWPS 2.0 Security
Digital audio player(DMR with DLNA 1.5)
Audio formatsWifi/RJ45
MP3, AAC, WMA, WAV, AIFF, FLAC, ALACup to 24 bits/ 192 kHz
Voice control Google - Alexia ready
Music services Qobuz, Deezer, Napster, Spotify Tidal, Vtuner
THE PEARL

23
Speakers
Active 3-way amplification
Distortion rate plus noise(THD + N on the tape20-20 000 Hz for a power of 100 mW and more)
1 coaxial medium-high BCI1 x woofer 25 HELD
tweeter: 300 Wmedium 300 Wwoofer 1 000 W
Wifi : < 0.2% Bluetooth : < 0.2% Analogic : < 0.2%
Optical< 0.2%
Dimensions (h x l x p) 326 x 327 x 323 mm
Weight 18 kg
THE PEARL
FUNCTIONS
Bluetooth connection
WIFI/ETHERNET via routeur
internet / box internet
Loss less audio broadcast YES
Access to all audio media from the WIFI network (computer ...) YES
Multi-room YES
Broadcast smartphone / tablet audio content YES YES
Broadcast audio application (youtube ...) from smartphone / tablet YES
Broadcasting from USB mediaYES
Internet radio and music services Qobuz, Deezer, Napster, Spotify,
Tidal, Vtuner

CA
BA
SSE
- N
OT
TP
EN
19-
05-2
6
Cabasse SAS - 210, rue René Descartes - BP 10 - 29280 Plouzané - FRANCETel +33 298 05 88 88 - Fax +33 298 05 88 99
www.cabasse.com