the power to protect - i-gard ground fault protection ...ipc-resistors.com/downloads/techlib/product...
TRANSCRIPT
Instruction Manual C-408EM
hIgh RESISTANCE gROUNDINg SYSTEM
SLEU
THSLEUTh
the power to protect
HIGH RESISTANCE GROUNDING
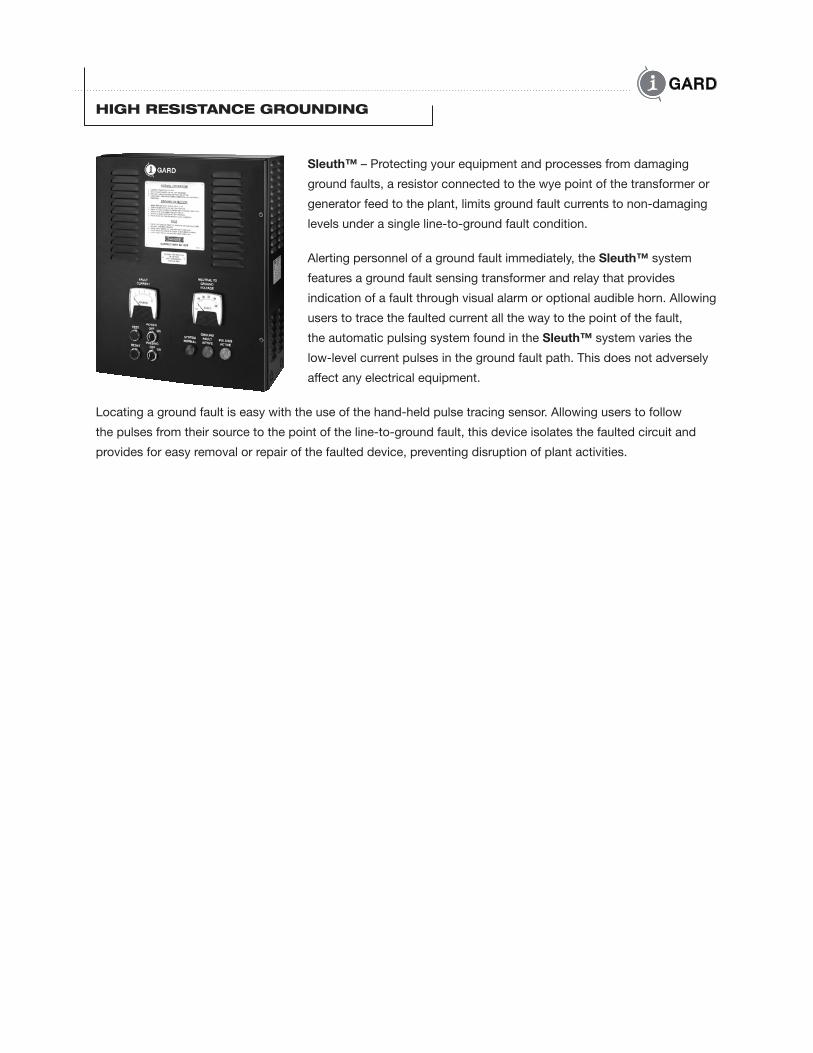
Sleuth™ – Protecting your equipment and processes from damaging
ground faults, a resistor connected to the wye point of the transformer or
generator feed to the plant, limits ground fault currents to non-damaging
levels under a single line-to-ground fault condition.
Alerting personnel of a ground fault immediately, the Sleuth™ system
features a ground fault sensing transformer and relay that provides
indication of a fault through visual alarm or optional audible horn. Allowing
users to trace the faulted current all the way to the point of the fault,
the automatic pulsing system found in the Sleuth™ system varies the
low-level current pulses in the ground fault path. This does not adversely
affect any electrical equipment.
Locating a ground fault is easy with the use of the hand-held pulse tracing sensor. Allowing users to follow
the pulses from their source to the point of the line-to-ground fault, this device isolates the faulted circuit and
provides for easy removal or repair of the faulted device, preventing disruption of plant activities.
TABLE OF CONTENTS
1. General Description 2
2. High-Resistance Grounding 2
3. Installation 4
4. Operation 7
5. Fault Location with the TS-Sensor 10
6. Maintenance 12
7. Definitions and Applicable Standards 13
8. Additional Information 16
9. Instruction Manuals ibc
TABLE OF FIGURES
Figure 1 Interior View 3
Figure 2 Sleuth Schematic 4
Figure 3 Knock-out Locations 5
Figure 4 Mounting Holes Dimensional Details 6
Figure 5 Sleuth Control Panel 7
Figure 6 Ground Fault Detector DGF-CT-A 8
Figure 7 TS-SENSOR with DMM 10
Figure 8 Location of LOGO Pulsing Relay 11
TABLES
Table 1 DGF-CT-A Settings 8

I-GARD Sleuth Instruction Manual2
1 GENERAL DESCRIPTION
I-Gard Sleuth is a neutral grounding device. The I-Gard Sleuth limits ground fault current to non-destructive
levels allowing normal operations to continue and preventing over voltage damage.
I-Gard Sleuth is the ideal tool for sensing and locating ground faults quickly and easily. Ground faults are the
most common form of electrical fault, accounting for a minimum of 85% of all electrical faults in a distribution
system. When a ground fault occurs: I-Gard Sleuth controls and limits the fault current. Sleuth provides alarms
that indicate an active fault, enabling plant electrical personnel to follow a simple sequence to locate and isolate
the fault without interrupting or opening circuit breakers. This allows process equipment to continue operations
uninterrupted.
I-Gard Sleuth announces the ground fault by means of lights on the panel front. In addition I-Gard Sleuth
provides relay contacts which may be wired to a wide variety of alarm or annunciation devices.
I-Gard Sleuth is available in a variety of voltages. I-Gard Sleuth systems rated for 480 V and 600 V line to line
systems are available for WYE or Delta systems. The latter make use of an artificial neutral. I-Gard Sleuth is also
available for 2,400 V and 4,160 V systems. This manual is intended specifically for 277 V and 347 V systems.
I-Gard Sleuth PS-277-2 through to PS-347-10 are wall mounted, high resistance, ground fault protection and
location devices. PS-2400-5 and upwards are floor mounted units.
The numbers 277 and 347 in PS-277-2 and other part numbers refer to the system line-to-neutral voltage and
correspond to the system voltages of 480 V and 600 V respectively. The last number in the part number refers
to the maximum let through ground fault current. For instance a unit with the final number 2 will limit the ground
fault current to less than 2 amps.
The I-Gard Sleuth pulsing system, when activated, will cyclically limit the ground fault current to 100%, 75%,
and 50% of the available ground fault current. The user can modify the duration of this pulse to suit the
requirements of his sensing device.
The cyclic pulsing combined with the hand held current sensor, and a single line diagram can be used to rapidly
locate a ground fault even in a very complex power distribution system .
2 HIGH-RESISTANCE GROUNDING
Both the Canadian Electrical Code, Part 1, C22.1-98 and the National Electrical Code, NFPA 70 1999, approve
the use of high-impedance grounding neutral systems up to 1000 V AC where the ground fault current is limited
to 5 amperes or less. These new changes to the electrical code allow users of the I-Gard Sleuth to maintain a
ground fault current of 5 amperes or less on their electrical distribution system without shutting down because
of a single ground fault, thereby avoiding unscheduled down times. I-Gard Sleuth users can locate, isolate and
repair faulty equipment at convenient time.

Sleuth Instruction Manual I-GARD3
The reason for limiting ground fault current by resistance grounding may be one or more of the following, as
indicated in IEEE Std. 142-1991, IEEE Recommended Practice for Grounding of Industrial and Commercial
Power Systems. pp. 25-26.
1) To reduce burning and melting effects in faulted electric equipment, such as switchgear, transformers,
cables, and rotating machines.
2) To reduce mechanical stresses in circuits and apparatus carrying fault currents.
3) To reduce electric-shock hazards to personnel caused by stray ground-fault currents in the ground
return path.
4) To reduce arc blast or flash hazard to personnel who may have accidentally caused or who happen to be
in close proximity to the ground fault.
5) To reduce the momentary line-voltage dip occasioned by the occurrence and clearing of a ground fault.
6) To secure control of transient over voltages while at the same time avoiding the shutdown of a faulty
circuit on the occurrence of the first ground fault.
Figure 1 Interior View
I-GARD Sleuth Instruction Manual4
SYSTEMHEALTHY
40
DGF-CT-AGROUND
FAULTRELAY
c/w C.T.
0-500V V201200
}11
1
Q1,1
Q2,1
IN1
IN2
1 2
SW2
TRIP
1 3
RB
TO SYSTEMGROUND.
No. 8 AWG MIN.(GREEN)
R1
PULSINGONA80
LT31 2
CONTACT OPENS AT 110 ° C. AND CLOSES AT 102 ° C.
PROGRAMMABLETIMER
70Q2,2 A1 A2
60Q1,2
Q2
2
Q1
AQ2A1 A2
AQ1
LT2
FAN 2
FAN 1
50
12
R1 2
GLT1
1 2
GROUNDFAULTACTIVE
10
HEAT SENSOR300
7301
8
1111
20213
8
912
R2
R3
GROUNDFAULTACTIVE
AQ1
AQ2
21
22
22
RA21
120 V.A.C. SUPPLIED BY OTHERS.RESET
R1
L+
13
TEST(DOUBLE CLICK)
2L
20
SW2
1 10
1
MANUAL ,NON-FAILSAFE
NOTES:1) ALL CONTACTS SHOWN IN THE DE-ENERGIZED STATE.2) ALL WIRING No. 14 AWG SIS GREY UNLESS OTHERWISE STATED.
CHECK DIPSWITCHES7 & 8
21
14
N-
A B
TRIP30
11R2
DIPSWITCHES 7 & 8 SET TO
R & R
2 3
}FOR CUSTOMER USEAUXILIARY CONTACTS
101100TRIP
4
1025
TRIP
6
765
DGF-CT-AGROUND
FAULT RELAYc/w C.T.
GROUNDFAULTACTIVE
R
N
9
0-5A
A
TO SYSTEMNEUTRAL.
No. 8 AWG MIN.(WHITE)
3 INSTALLATION
I-Gard Sleuth is housed in a NEMA 2 indoor solid top drip proof enclosure and is to be mounted in accordance
with local regulations.
The I-Gard Sleuth unit is housed within a NEMA 3 enclosure and is to be mounted in accordance with local
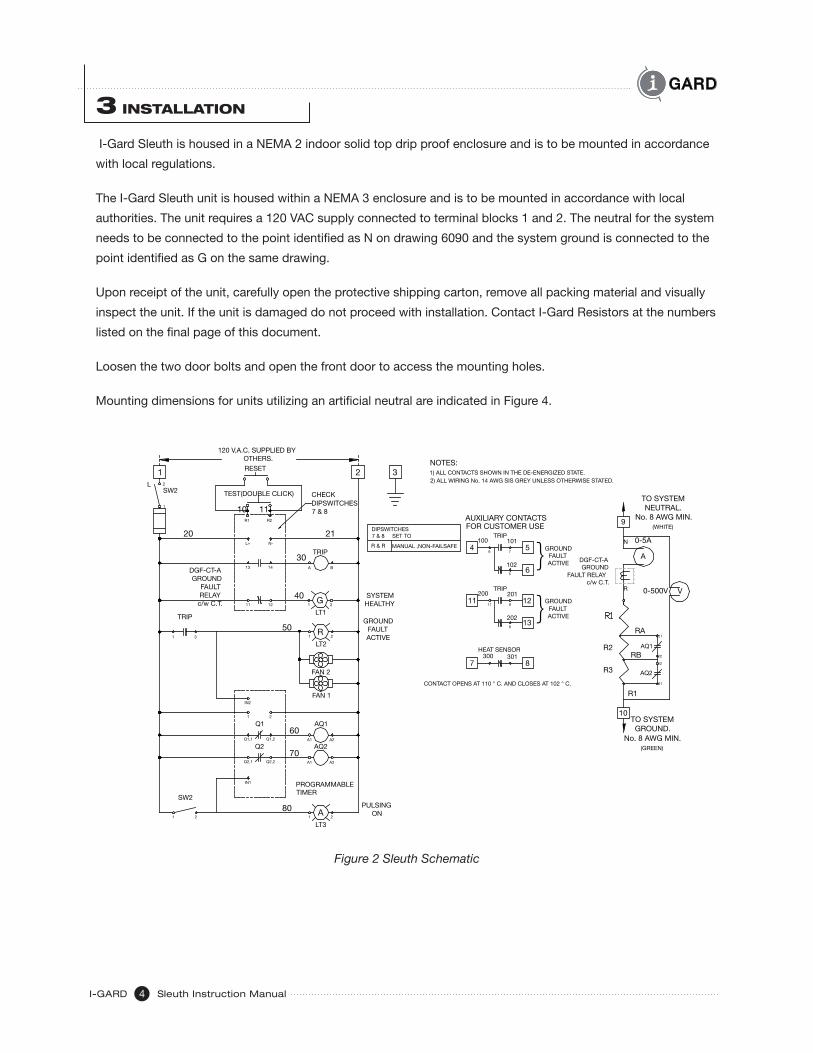
authorities. The unit requires a 120 VAC supply connected to terminal blocks 1 and 2. The neutral for the system
needs to be connected to the point identified as N on drawing 6090 and the system ground is connected to the
point identified as G on the same drawing.
Upon receipt of the unit, carefully open the protective shipping carton, remove all packing material and visually
inspect the unit. If the unit is damaged do not proceed with installation. Contact I-Gard Resistors at the numbers
listed on the final page of this document.
Loosen the two door bolts and open the front door to access the mounting holes.
Mounting dimensions for units utilizing an artificial neutral are indicated in Figure 4.
Figure 2 Sleuth Schematic
Sleuth Instruction Manual I-GARD5
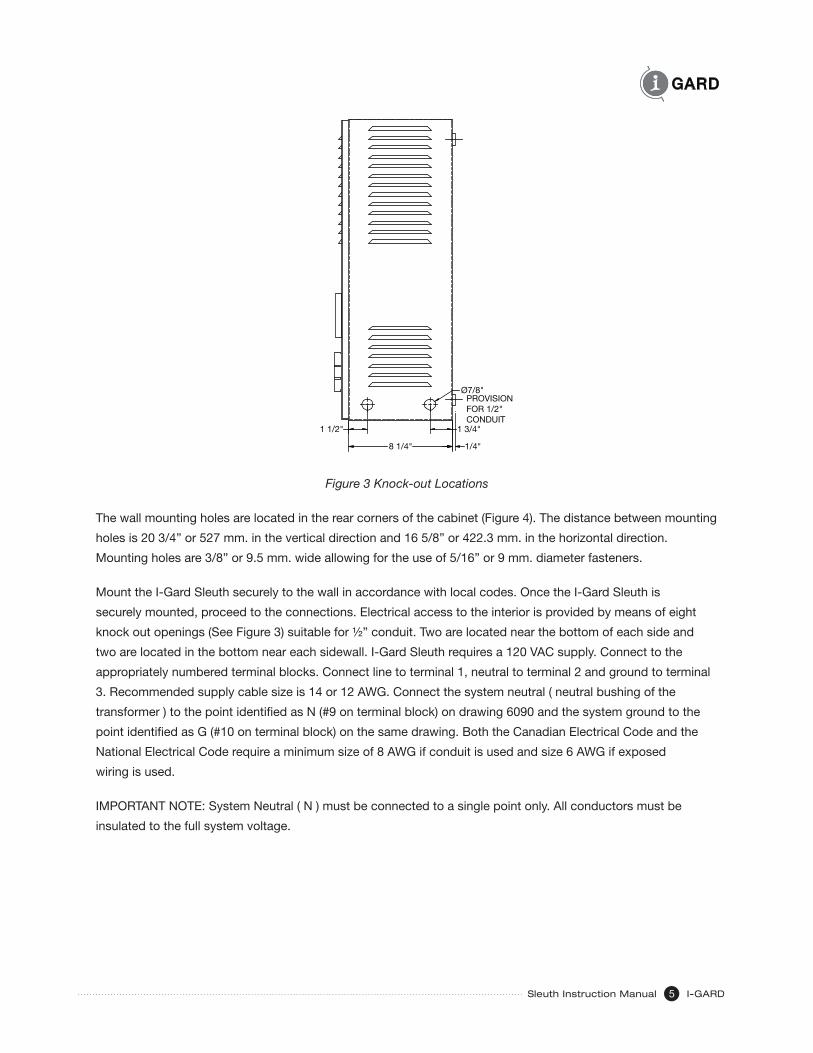
Figure 3 Knock-out Locations
The wall mounting holes are located in the rear corners of the cabinet (Figure 4). The distance between mounting
holes is 20 3/4” or 527 mm. in the vertical direction and 16 5/8” or 422.3 mm. in the horizontal direction.
Mounting holes are 3/8” or 9.5 mm. wide allowing for the use of 5/16” or 9 mm. diameter fasteners.
Mount the I-Gard Sleuth securely to the wall in accordance with local codes. Once the I-Gard Sleuth is
securely mounted, proceed to the connections. Electrical access to the interior is provided by means of eight
knock out openings (See Figure 3) suitable for ½” conduit. Two are located near the bottom of each side and
two are located in the bottom near each sidewall. I-Gard Sleuth requires a 120 VAC supply. Connect to the
appropriately numbered terminal blocks. Connect line to terminal 1, neutral to terminal 2 and ground to terminal
3. Recommended supply cable size is 14 or 12 AWG. Connect the system neutral ( neutral bushing of the
transformer ) to the point identified as N (#9 on terminal block) on drawing 6090 and the system ground to the
point identified as G (#10 on terminal block) on the same drawing. Both the Canadian Electrical Code and the
National Electrical Code require a minimum size of 8 AWG if conduit is used and size 6 AWG if exposed
wiring is used.
IMPORTANT NOTE: System Neutral ( N ) must be connected to a single point only. All conductors must be
insulated to the full system voltage.
Ø7/8"
1/4"
1 3/4"
8 1/4"
1 1/2"
PROVISION FOR 1/2" CONDUIT

I-GARD Sleuth Instruction Manual6
I-Gard Sleuth with an artificial neutral are connected differently. Four cables are required, three (3) phase
connections and one ground connection as specified in drawing 6822-4.
Connect phase A to terminal #9
Connect phase B to terminal #10
Connect phase C to terminal #11
Connect ground to terminal #12.
Always perform a final inspection. All foreign objects must be removed. All conductors must be secured in the
proper positions before closing the door and energizing the system. DO NOT ENERGIZE the I-Gard Sleuth
unless the door is closed and secured by the two bolts provided.
Figure 4 Mounting Holes Dimensional Details
FUSE HOLDER
16 5/8"
20 3/4"
Ø3/8"TIMING RELAYS
TEST/RESET
T2T1
R2R1
DGF-CT-AAC-DC
24-240V
14131211L+N-
FAN
TERMINAL BLOCKS
TRIP AQ1 AQ2 1 11 1213
FAN

Sleuth Instruction Manual I-GARD7
4 OPERATION
Figure 5 Sleuth Control Panel
I-Gard Sleuth is energized by turning the rotary “POWER” switch to the ON position. The “POWER” switch is
located on the panel door.
Upon energizing the control panel the “SYSTEM NORMAL” green light turns on signifying that no ground faults
are on the system and the I-Gard Sleuth is receiving control voltage.
Verify the I-Gard Sleuth condition by pushing the “TEST” button TWICE. This causes the DGF-CT-A to trip. The
green light turns off, the red “GROUND FAULT ACTIVE” light turns on and the fans activate. This confirms that
control voltage is available, the DGF-CT-A is functioning and the fans are operational.
Push the “RESET” button to reset the system to normal operational status. The red “GROUND FAULT ACTIVE”
light goes off, the green “SYSTEM NORMAL” light turns on and the fans stop. The I-Gard Sleuth is now ready to
monitor the distribution system.
When a ground fault occurs the potential between the system neutral and ground elevates to the line to
neutral voltage. This is reflected by the deflection of the NEUTRAL TO GROUND voltmeter needle on the front
door control panel. In addition to the voltage, the current is also being monitored. A deflection of the FAULT
CURRENT ammeter needle will indicate the magnitude of the fault current on the system. If the fault current
magnitude is greater than the pick up setting of the DGF-CT and the duration is greater than the time delay
setting on the DGF-CT, the DGF-CT will trip changing the state of the “TRIP” contacts. The green light turns off,
the red light turns on and the fans activate.
The “GROUND FAULT ACTIVE” red light indicates the presence of a ground fault. Deflection on the voltmeter
and ammeter on the I-Gard Sleuth indicate the magnitude of the neutral to ground voltage and the ground fault
current available.
The ground fault pickup level can be set from 5% to 100% of the I-Gard Sleuth let-through current. The time
delay can be adjusted from 0.5s to 10s; this allows the user to adjust the I-Gard Sleuth settings to the unique
requirements of his system in order to avoid nuisance tripping.

I-GARD Sleuth Instruction Manual8
Both ground fault pickup level and time delay are adjusted using the dipswitch located on the front plate of the
DGF-CT-A (Fig.6). The DGF-CT-A is located inside the I-Gard Sleuth enclosure. The settings are indicated by
Table 1. Refer to Manual C-323EM (Formerly IM-DGF-CT) for complete details of this relay.
Dipswitches 7&8 in Sleuth are set to R&R for Manual setting.
Figure 6 Ground Fault Detector DGF-CT-A
Table 1. DGF-CT-a SeTTinGS
Switch Function Set to Meaning
1 2 3 Ground fault trip current limit R L L 5 percent
R L R 10 percent
R R L 15 percent
R R R ◊ 20 percent
L L L 25 percent
L L R 50 percent
L R L 75 percent
L R R 100 percent
4 5 6 Trip time delay R R R ◊ 0.5seconds RRL 1.0seconds RLR 1.5seconds RLL 2.0seconds LRR 2.5seconds LRL 5.0seconds LLR 7.5seconds LLL 10.0seconds78 Triprelayoperationmode RR ◊ Non-failsafe,continuousoperation R L Failsafe, continuous operation
L R Pulsed Auto reset operation (pulse
turns off 3 seconds after G/F removed)
Dip Switches
Sleuth Instruction Manual I-GARD9
IMPORTANT NOTE: Although the ground fault pickup level can be adjusted up to 100% of the let through
current, this it is not recommended. Adjusting to a setting higher than 50% of the let through current may
prevent the DGF-CT-A from detecting a fault.
I-Gard Sleuth can only pulse when tripped by an active ground fault. If ground fault current is available, pulses
are visible on the ammeter.
To initiate pulsing, rotate the “PULSING” switch to the “ON” position. The “PULSING ACTIVE” light turns on and
the ground fault current changes from 100% to 75% and 50% of available ground fault current.
DANGERHazard of Electrical Shock, Burn or Explosion
All installation, servicing and testing referred to in this manual must be performed
by qualified personnel. All power should be disconnected prior to removing covers
or enclosures and where live conductors may otherwise be exposed.
Failure to observe these precautions will result in death or severe personal
injury.
!
I-Gard Sleuth creates a pattern of step pulses in the ground fault current. The pulses only appear in the faulted
circuit. Use the TS-SENSOR current sensor and voltmeter to follow the pulse trail directly to the fault site.
Check for the presence of pulses by viewing the ammeter needle deflection. The needle will cycle between
100%, 75% and 50% of the available ground fault current. After confirming that the pulses are active, trace the
source of the ground fault by:
a) Comparing readings of the front panel ammeter and the remote meter. Both meters will display the same
step time pattern.
b) Attach the TS-SENSOR current sensor to a standard voltmeter as described below.
c) Use a single line diagram for the electrical distribution protected by the I-Gard Sleuth. Locate the pulsing
ground fault current on the ground or neutral line as close to the I-Gard Sleuth as possible. Familiarize
yourself with the values of the pulses on the hand held meter.
d) Check for the presence of pulses at branch points. Place the current sensor around the 3 phase
conductors of each outgoing circuit. If you see no pulses, this is not the faulted circuit. Move on to the
next circuit.
e) If current pulses are found, move down the circuit to the next branch point and repeat the procedure.

I-GARD Sleuth Instruction Manual10
f) Follow the pulses. The pulsing ground fault signal will lead to the equipment or to the section of
conductor containing the ground fault.
g) Isolate the equipment or conductor from the circuit. Check the I-Gard Sleuth ammeter and voltmeter. If
the voltage and current reads zero on these meters, the ground fault has been removed.
h) At this point the I-Gard Sleuth may be reset by rotating the “PULSING” switch to the “OFF” position and
pushing the “RESET” button.
i) Repair or replace the equipment or conductor that was the source of the ground fault. The equipment or
conductor may now be reconnected to the circuit.
j) Confirm that the ground fault has not returned by viewing the I-Gard Sleuth front panel.
Figure 7 TS-SENSOR with DMM
5 FAULT LOCATION WITH THE TS-SENSOR
I-Gard Sleuth comes with a TS-SENSOR current sensor loop (OPTIONAL). The TS-SENSOR loop is supplied
with a dual banana to BNC adapter for easy connection to most standard meters. The TS-SENSOR will pick up
and facilitate the display of the ground fault current pulses.
SAFETY NOTE: Read all safety and use information packaged with the TS-SENSOR before use.
Set the selector switch on the TS-SENSOR transducer to 10mV/A. The “POWER ON” light will flash on and off.
A deflection of 0.25mV on the voltmeter with the transducer set to 10mV/A translates into a ground fault current
of 2.5 Amps.
Sleuth Instruction Manual I-GARD11
The TS-SENSOR requires a 9 Volt battery. Ensure that a fully charged battery is in place. The unit incorporates
a flashing “Battery Low” light to indicate the battery is too low for correct measurement results.
Wrap the TS-SENSOR loop around all phases of the conductor. Any imbalance will be evident in meter
deflection when the range is set to the appropriate setting. The ground fault current pulses will be visible in
the meter deflection. Analogue meters provide easier reading during rapid pulsing. The pulse rate may be
programmed to facilitate easier readings on digital meters.
When placing the sensor around the three phase conductors make sure that the arrow moulded into the sensor
loop points downstream (toward the load ) in order to provide proper readings.
Ensure that the junction point of the loop is held a minimum of 1” away from the conductors in order to minimize
interference.
Additional information on the TS-SENSOR is available on the TS-SENSOR data sheet and at the address located
at the end of this manual.
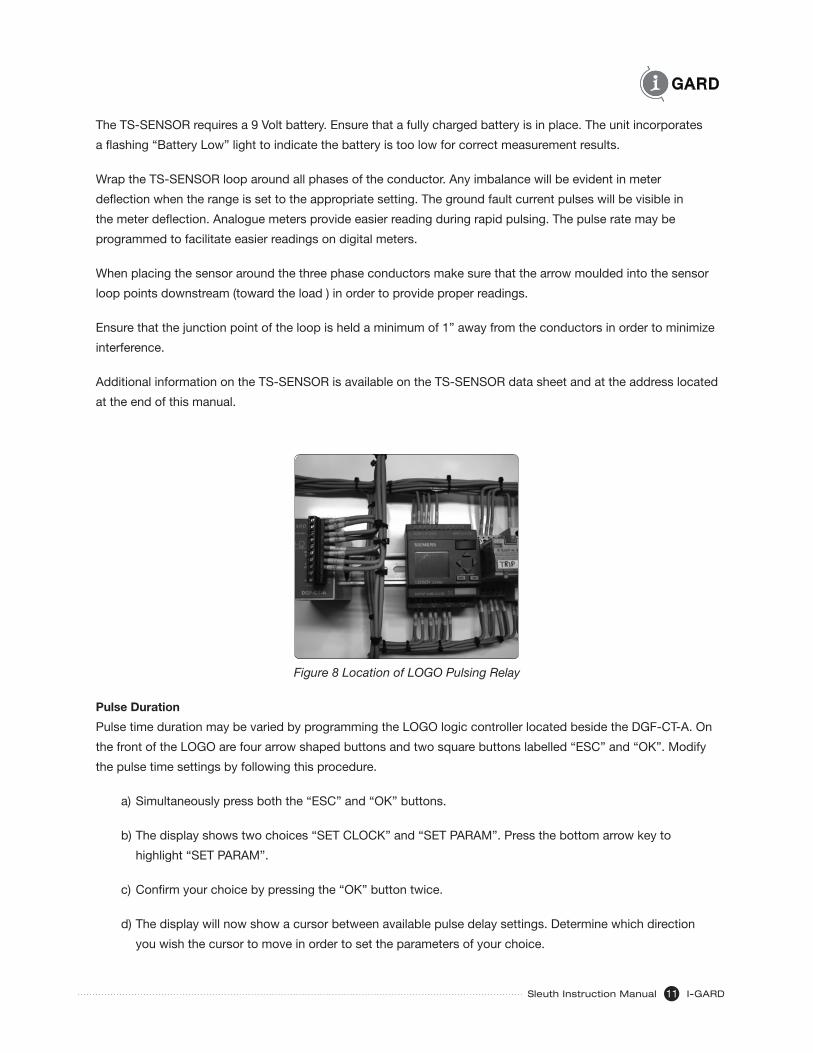
Figure 8 Location of LOGO Pulsing Relay
Pulse Duration
Pulse time duration may be varied by programming the LOGO logic controller located beside the DGF-CT-A. On
the front of the LOGO are four arrow shaped buttons and two square buttons labelled “ESC” and “OK”. Modify
the pulse time settings by following this procedure.
a) Simultaneously press both the “ESC” and “OK” buttons.
b) The display shows two choices “SET CLOCK” and “SET PARAM”. Press the bottom arrow key to
highlight “SET PARAM”.
c) Confirm your choice by pressing the “OK” button twice.
d) The display will now show a cursor between available pulse delay settings. Determine which direction
you wish the cursor to move in order to set the parameters of your choice.

I-GARD Sleuth Instruction Manual12
e) There are three steps in one pulsing cycle. The entire cycle will take six times the number you program
in seconds. If you program .5, the cycle will consist of three steps each 1 second long for a total of 3
seconds.
f) Push the UP and DOWN arrow buttons to move the cursor. Continue to press the arrow buttons until your
chosen parameter is reached.
g) Confirm your choice by pushing the “OK” key. The cursor disappears and I-Gard Sleuth will pulse using
the newly set time duration.
h) Leave the programming mode by pushing the “ESC” button twice. I-Gard Sleuth will now return to normal
operation.
I-Gard Sleuth will now remember and use the newly set pulsing times. In the event of a power failure to the
control circuit, the I-Gard Sleuth will reset to the original factory set pulse times.
6 MAINTENANCE
I-Gard Sleuth is designed and constructed to reduce maintenance needs to a minimum. Test your I-Gard Sleuth
every six months.
Test Procedure:
Push the “TEST” button twice located on the front of the panel. The following changes take place.
a) The red “GROUND FAULT ACTIVE” light turns on.
b) The green “SYSTEM NORMAL” light turns off.
c) The internal fans turn on.
d) Auxiliary contacts change state.
This change confirms that your I-Gard Sleuth is functioning normally. Return the I-Gard Sleuth to normal
operating mode by pushing the “RESET” button.
If a lamp fails to function, check the bulb. If a bulb is blown, change it.
If the fans fail to start, remove power and check the electrical connections.
If all power fails, check the internal fuse and replace it if necessary.
To clean the I-Gard Sleuth, first disconnect the electrical power. Using compressed air, blow away any
accumulated dust and foreign material. The exterior may be cleaned using a slightly damp cloth. Ensure that the
I-Gard Sleuth is completely dry before energizing. Close the front door and reconnect electrical power. Test the
unit again before returning to normal service.
Sleuth Instruction Manual I-GARD13
7 DEFINITIONS AND APPLICABLE STANDARDS
Grounding means a permanent and continuous conductive path to the earth with sufficient ampacity to carry any
fault current liable to be imposed on it, and of a sufficiently low impedance to limit the voltage rise above ground
and to facilitate the operation of protective devices in the circuit;
Bonding means a low impedance path obtained by permanently joining all non-current-carrying metal parts to
assure electrical continuity and having the capacity to conduct safely any current likely to be imposed on it;
neC 1999 pg. 70-87-88
250-36. High-Impedance Grounded Neutral Systems.
High-impedance grounded neutral systems in which a grounding impedance, usually a resistor, limits the
ground-fault current to a low value shall be permitted for 3-phase ac systems of 480 volts to 1000 volts
where all of the following conditions are met.
1) The conditions of maintenance and supervision ensure that only qualified persons will service
the installation.
2) Continuity of power is required.
3) Ground detectors are installed on the system.
4) Line-to neutral loads are not served.
High-impedance grounded neutral systems shall comply with provisions (a) through (f).
a) Grounding Impedance Location The grounding impedance shall be installed between the grounding
electrode conductor and the system neutral. Where a neutral is not available, the grounding impedance
shall be installed between the grounding electrode conductor and the neutral derived from a grounding
transformer.
b) Neutral Conductor The neutral conductor from the neutral point of the transformer or generator to its
connection point to the grounding impedance shall be fully insulated.
The neutral conductor shall have an ampacity of not less than the maximum current rating of the
grounding impedance. In no case shall the neutral conductor be smaller than No. 8 copper or No. 6
aluminum or copper-clad aluminum.
c) System Neutral Connection The system neutral connection shall not be connected to ground except
through the grounding impedance.
d) Neutral Conductor Routing The conductor connecting the neutral point of the transformer or generator
to the grounding impedance shall be permitted to be installed in a separate raceway. It shall not be
required to run this conductor with the phase conductors to the first system disconnecting means or
overcurrent device.
I-GARD Sleuth Instruction Manual14
e) Equipment Bonding Jumper The Equipment bonding jumper (the connection between the equipment
grounding conductors and the grounding impedance) shall be an unspliced conductor run from the first
system disconnecting means or overcurrent device to the grounded side of the grounding impedance.
f) Grounding Electrode Conductor Location The grounding electrode conductor shall be attached at any
point from the grounded side of the grounding impedance to the equipment grounding connection at the
service equipment or first system disconnecting means.
CSa Canadian electrical Code Part 1, C22.1-98
Pg. 105-106
10-1100 Scope Rules 10-1102 to 10-1108 apply to the use of neutral grounding devices used for the purpose of
controlling the ground fault current or the voltage to ground of an alternating-current system.
10-1102 Use
1) Neutral grounding devices shall be permitted to be used only on a system involving a true neutral or an
artificial neutral, where the line to neutral loads are not served.
2) Where a neutral grounding device is used on an electrical system operating above 5 kV, provision shall be
made to automatically de-energize the system on the detection of ground fault.
3) Where a neutral grounding device is used on an electrical system operating at 5 kV or less, provision shall
be made to automatically de-energize the system on the detection of ground fault, unless:
a) The ground fault current is controlled at 5 A or less; and
b) A visual or audible alarm, or both, clearly identified to indicate the presence of a ground fault
is provided.
10-1104 Neutral Grounding Devices
1) Neutral grounding devices shall be specifically approved for the application.
2) Only neutral grounding devices with a continuous rating shall be permitted where provision is not made
to de-energize the system on the detection of a ground fault.
3) Neutral grounding devices not having a continuous rating shall be permitted where:
a) Provision is made to automatically de-energize the system on the detection of a ground fault; and
b) The time rating of the device is coordinated with the time/current rating of the protective device
on the system.
4) Neutral grounding devices shall have insulation voltages at least equal to the line-to-neutral voltage.
10-1106 Location of Neutral Grounding Devices and Warning Signs
1) All live parts of neutral grounding devices shall be enclosed or guarded in compliance with Rule 2-202.
Sleuth Instruction Manual I-GARD15
2) Neutral grounding devices shall be placed in a location that is accessible only to qualified persons to
perform inspection, testing, and maintenance of the neutral grounding device.
3) Neutral grounding devices shall be placed in a location so that heat dissipation from the device
under ground fault conditions will not damage or adversely affect the operation of the device or other
equipment.
4) Where neutral grounding devices are used, warning signs indicating that the system is impedance
grounded and the maximum voltage at which the neutral may be operating relative to ground shall be
placed at the:
a) Transformer or generator, or both; and
b) Consumer’s service switchgear or equivalent; and
c) Supply authority’s metering equipment.
10-1108 Conductors Used with Neutral Grounding Devices
1) The conductor connecting the neutral grounding device to the neutral point of the transformer, generator,
or grounding transformer shall be:
a) Insulated for the nominal system voltage; and
b) Identified white or natural grey; and
c) Sized to conduct the rated current of the neutral grounding device, and in no case less than No.
8 AWG; and
d) Installed in accordance with other appropriate Rules of this Code.
2) The conductor connecting the neutral grounding device to the neutral point of the transformer, generator,
or grounding transformer shall not be grounded.
3) The conductor connecting the neutral grounding device to the system grounding electrode shall be:
a) A copper conductor which shall be permitted to be insulated or bare; and
b) Identified green if insulated; and
c) Sized to conduct the rated current of the neutral grounding device, and in no case less than No.
8 AWG in size; and
d) Installed in accordance with other appropriate Rules in this Code.

I-GARD Sleuth Instruction Manual16
Can/CSa M421-93 Use of electricity in Mines
Pg. 26
Neutral-grounding Devices
The neutral grounding device shall be continuously monitored by a device that will trip the supply if an open
circuit in the neutral grounding device occurs.
Pg. 29
4.7.3.4.1 Resistance Grounding
Where on-board three-phase, isolation power transformers larger than 20 kVA and operating at voltages in
excess of 300 V are used, the following requirements shall apply:
a) Except as permitted by item (g), either a direct or derived neutral shall be grounded through a resistor at
the power source to limit the prospective ground-fault current to 25 A or less.
b) A grounding circuit shall originate at the grounded side of the resistor and extend along with the power
conductors to ground the frames of all electrical apparatus supplied from the circuit, except where the
steel structure provides the ground-return path as permitted by clause 4.7.5 (b).
c) The size of the grounding conductors may be reduced provided the ampacity exceeds the prospective
ground-fault current.
d) Neutral-grounding resistors shall be isolated by elevation or guarded in accordance with Clause 4.7.4.1.
e) Neutral-grounding resistors shall be rated and protected in accordance with Clause 3.6.2.
f) Ground-fault protection with a minimum tripping ratio of 5 shall be provided, except as permitted by
items (g) and (h).
g) Acceptable ungrounded systems with ground-fault detection may be used for specialized drive circuits.
h) Ground-fault detection, which alerts the operator to the ground fault, may be used instead of ground-fault
protection where de-energizing a circuit can create a machine-operation hazard.
8 ADDITIONAL INFORMATION
If you require more information or experience problems with your equipment that persist after taking the steps
identified in this manual, contact I-Gard customer service.
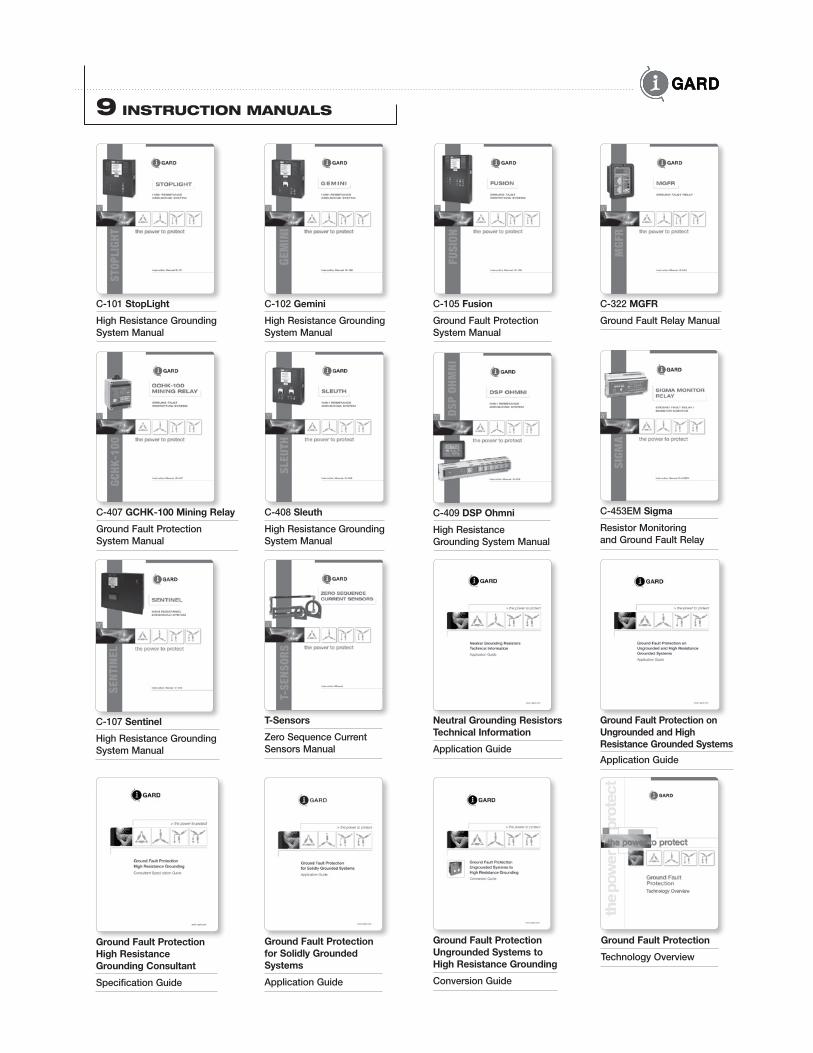
9 INSTRUCTION mANUAlS
C-322 MGFR
Ground Fault Relay Manual
C-101 StopLight
High Resistance Grounding System Manual
C-102 Gemini
High Resistance Grounding System Manual
C-105 Fusion
Ground Fault Protection System Manual
C-409 DSP Ohmni
High Resistance Grounding System Manual
C-407 GCHK-100 Mining Relay
Ground Fault Protection System Manual
C-408 Sleuth
High Resistance Grounding System Manual
C-453EM Sigma
Resistor Monitoring and Ground Fault Relay
T-Sensors
Zero Sequence Current Sensors Manual
C-107 Sentinel
High Resistance Grounding System Manual
Ground Fault Protection on Ungrounded and High Resistance Grounded Systems
Application Guide
Neutral Grounding Resistors Technical Information
Application Guide
Ground Fault Protection High Resistance Grounding Consultant
Specification Guide
Ground Fault Protection Ungrounded Systems to High Resistance Grounding
Conversion Guide
Ground Fault Protection for Solidly Grounded Systems
Application Guide
Ground Fault Protection
Technology Overview

7615 Kimbel St., Unit 1
Mississauga, Ontario
Canada L5S 1A8
Phone 905-673-1553
Toll Free 1-800-737-4787
Fax 905-673-8472
e-mail: [email protected]
www.i-gard.comthe
pow
er to
pro
tect