the principles of knitting, by june hemmons hiatt :: excerpt, chapter 30 - working a project
DESCRIPTION
Excerpt from The Principles of Knitting, by June Hemmons Hiatt. This excerpt is from Chapter 30 - Working a ProjectTRANSCRIPT

MEET THE AUTHORS, WATCH VIDEOS AND MORE AT
SimonandSchuster.comT H E S O U R C E F O R R E A D I N G G R O U P S
COVER DESIGN BY JODY HANSON AT WILSTED & TAYLOR PUBLISHING SERVICES COVER PHOTOGRAPHS BY COREY LESH, COREY LESH STUDIO
TOUCHSTONE
9 781416 535171
ISBN 978-1-4165-3517-154500
ISBN 978-1-4165-3517-1 $45.00 U.S./$49.99 Can.
54500
CRAFTS & HOBBIES 0212
PRIN
TED
IN T
HE U
.S.A
.
Principles of Knitting
The Comprehensive & Timeless Guide
june hemmons hiatt
completely revised & updated
Methods and Techniques of Hand Knitting
The
The P
rinciples of K
nittingju
ne h
emm
on
s hiatt
Aword-of-mouth
phenomenon
since its original
publication, with a
passionate and loyal
following, The Principles
of Knitting has served as
a treasured resource for
an entire generation of
knitters. Now completely
revised and updated,
this long-awaited new edition contains indispensable information for every
knitter, from the beginner to the most experienced, on all aspects of the craft.
Written in clear, direct language, The Principles of Knitting is like
having a knitting mentor by your side, ready to answer any question in
a comprehensive, reasoned, and informed manner. June Hemmons Hiatt
includes instructions for all facets of knitting, from the most basic skills
to the most advanced techniques, and offers suggestions for best practices
as well as alternatives and innovations.
The Principles of Knitting provides the inspiration and instruction to
help every knitter gain the knowledge and confidence needed to produce
unique, beautifully crafted garments, accessories, and household items.
It is the one reference guide no knitter should be without.
The definitive book of knitting techniques
The classic work on thistimeless and important craft
Finish: gloss film Effects: none PDF file name: principles_of_knitting_cvr.pdf Printer: coral # of colors: CMYK
585
chapter 30
Working a Project
T he material in this chapter provides useful information about how to decide on a new project and carry it out from beginning to end.
You will fi nd tips for selecting a pattern or yarn, along with suggestions for various tools you might want to have on hand, and information about caring for a work in progress.
Also included are techniques you can use to keep track of where you are in a pattern by counting stitches and rows and/or using markers to guide your work, and there are instructions for various ways to tie on new supplies of yarn, along with a selection of useful knots, for when needed.
Because we all make mistakes, you will fi nd detailed instructions for how to fi x them, whether it is simply a matter of picking up a stray stitch or repairing more serious problems. And if you have had to rip out a lot of yarn, you will also fi nd suggestions for how to recycle it.
Knowing how to handle these mundane tasks will make your work go more smoothly and contribute in innumerable subtle ways to a fi nished project that you will be proud of.
Choosing a Project
For many of us, the look and feel of a certain yarn, a charming pattern spotted in a magazine, or just the urge to have knitting in hand is what gets a project going. However, it is a good idea to hold all these impulses in check long enough to give some serious consideration to what it is we are about to embark upon, for most garments involve a considerable investment of time and money, especially the former.
Making your choice requires careful attention to several fac-tors: the details of the design and how suitable it is for the per-son who will wear it, the characteristics of the yarn, and how compatible both the yarn and any stitch or color pattern are with the style of the garment.
Selecting a Garment PatternWhether you are designing something yourself, or planning to use a published pattern, the fi rst step is to decide on a style that is appropriate for the person, for the season, and for the use it will be put to.
If the garment is for yourself, give some thought to what you need in your wardrobe. Perhaps you have a beautiful skirt or handsome pair of slacks that you do not wear very often for lack of a pullover that works with it. Maybe there is a blouse you would wear more often if you had a cardigan that matched. Or a jacket you might get more wear out of if you had just the right scarf or vest. If this is where you start, you will solve many problems at once, for these things may decide not just the style of the garment, but the kind of yarn and the color.
Another approach is to use the design of a favorite garment that has always worked well in your wardrobe as a model for something new. Or, if you try on something you like in a store, use it as a concept for what you want to make. Take a picture of it, or take notes on the details of fi t and style, and then see if you can fi nd a similar pattern, or design one of your own.
If you are knitting for someone else, of course, the safest

586 Part Eight: Working a Project
thing is to ask them what they would like, but when you are planning a surprise, a bit of detective work is in order. Be alert to what that person wears, the colors they like, and what fl at-ters them. Is their style casual or formal? Perhaps they are in-volved in a sport or other activity that suggests a theme. Some people enjoy dramatic, contrasting color combinations, others a quieter, monochromatic palette.
If you are looking for a published pattern, keep in mind that the pictures are always of attractive, carefully posed models. However, few of us look like models, nor will we always stand around in attractive poses. Fortunately, if a schematic drawing is included, it will reveal details of the garment that you might otherwise miss when looking at the photo.
First, check the measurements and compare them to your own; this will tell you how much ease there is and whether the garment is meant to fi t loose or hug the body more closely (see Measurements and Schematics). Then analyze key design elements for whether or not they will be fl attering.
Pay particular attention to the shape and size of the neck-line and the style of the armhole and sleeve, as these are criti-cal areas in terms of both fi t and appearance. Cap sleeves and sleeveless garments enhance only the prettiest arms. Open or round necklines and small collars enhance the appearance of a short neck, while cowls, turtlenecks, ruffl es, and large col-lars fl atter a longer one. Yokes make shoulders seem broader, especially if done in a contrast color.
Pay close attention to where the garment falls against waist or hips. A blouson style adds softness to a fi gure with straight lines, while anything that hits at the widest part of the hips can make them look even wider. (But keep in mind that it is rela-tively easy to adjust the length of almost any garment between the lower edge and the underarm.) Short jackets are fl attering to the petite fi gure and to anyone who is slender because they make the legs look longer. Vests are versatile because they look just as nice under a jacket as over a shirt, and they are good for almost any fi gure type.
Selecting a YarnIf you are deciding whether to make a particular pattern, give careful thought to the yarn that is used and what kind of care it will require. Most yarns can be washed, but if dry cleaning is recommended, this will be an additional, ongoing expense that you may want to take into consideration.
If the yarn represents a serious investment, you might want to buy just one ball to try it out; most stores will hold enough yarn in the same dye lot for a few days while you decide. Do some Test Swatches to get a feel for how the yarn behaves and what it feels like when you work with it; this is also an op-portunity to learn the stitch or color pattern to see what you think of it.
Wash the swatch to get a good idea of what the fi nished fabric will really be like (and check the wash water for col-orfastness). Finally, hold the swatch up against your cheek in front of a well-lit mirror to see whether the color is fl attering to your complexion; hold the swatch up against clothes in your wardrobe to see how compatible it will be with other items.
Doing this gives you time to think, away from all the se-ductions of the yarn shop. After all of this sober refl ection, you may decide your original idea was a mistake. Please do not think of your time and money as wasted; focus instead on how much time and effort you have saved. Go back and try again—you are likely to make a much better selection the second time.
Of course, there are many wonderful projects that start, not with a pattern, but with the yarn. If you fi nd a yarn you really like but have no idea what to make with it, someone at the store can usually direct you to a selection of published pat-terns that use that yarn or one that is similar. Many shops have swatches made up so you can get a better sense of what the yarn feels and looks like when knitted up. And if you want to try designing something yourself, see the material in the sec-tion on Pattern Design.
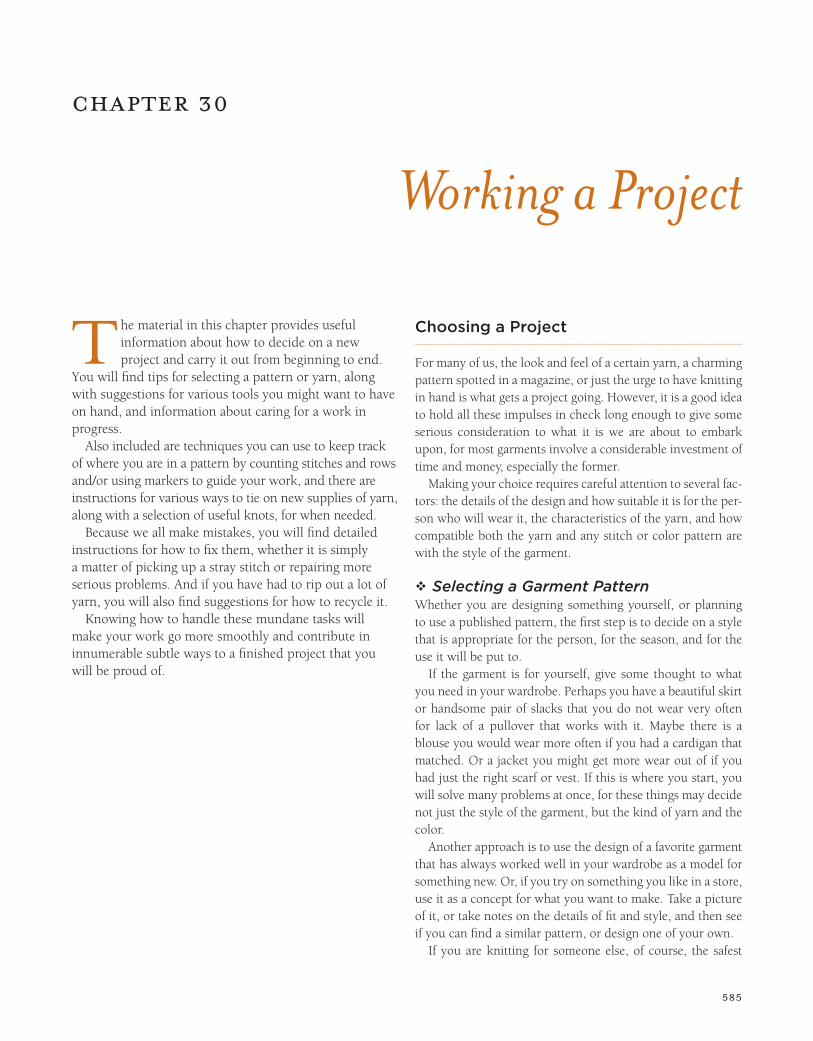
Consider the size of the yarn in relation to the type of gar-ment you want to make. Something made in a bulky yarn will be quick to do and have a bold charm, but may be too heavy for indoor wear. Stitch patterns done in thick yarns will take on a grand scale and give the fabric a pronounced
Stitch pattern in relatively thick yarn. Swatch is 5 inches wide.
Chapter 30: Working a Project 587
surface texture; color patterns that require stranding will in-crease the thickness of the fabric and make a warm garment even warmer.
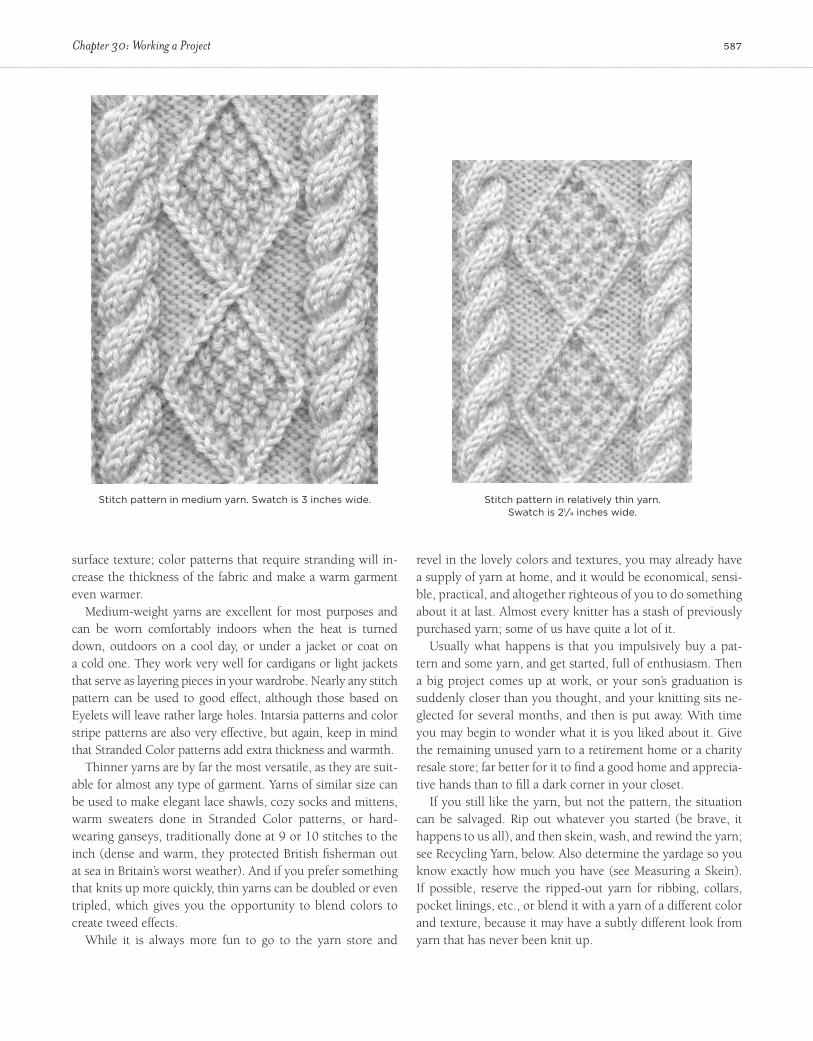
Medium-weight yarns are excellent for most purposes and can be worn comfortably indoors when the heat is turned down, outdoors on a cool day, or under a jacket or coat on a cold one. They work very well for cardigans or light jackets that serve as layering pieces in your wardrobe. Nearly any stitch pattern can be used to good effect, although those based on Eyelets will leave rather large holes. Intarsia patterns and color stripe patterns are also very effective, but again, keep in mind that Stranded Color patterns add extra thickness and warmth.
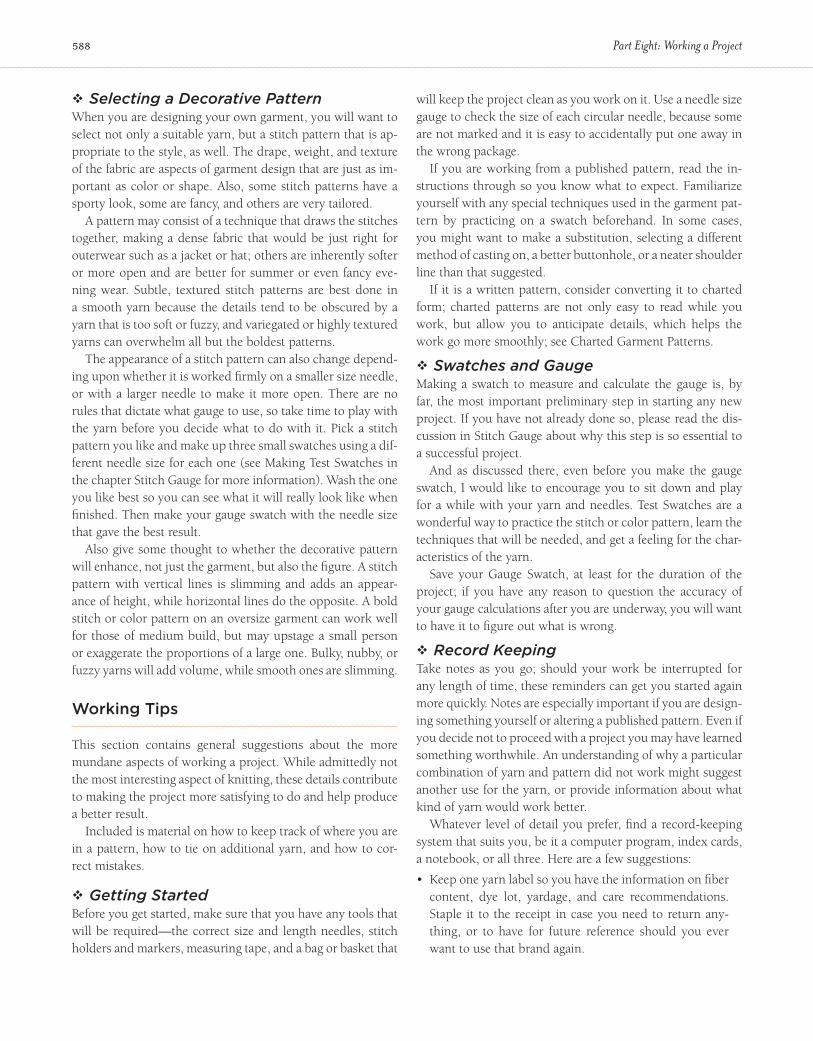
Thinner yarns are by far the most versatile, as they are suit-able for almost any type of garment. Yarns of similar size can be used to make elegant lace shawls, cozy socks and mittens, warm sweaters done in Stranded Color patterns, or hard-wearing ganseys, traditionally done at 9 or 10 stitches to the inch (dense and warm, they protected British fi sherman out at sea in Britain’s worst weather). And if you prefer something that knits up more quickly, thin yarns can be doubled or even tripled, which gives you the opportunity to blend colors to create tweed effects.
While it is always more fun to go to the yarn store and
revel in the lovely colors and textures, you may already have a supply of yarn at home, and it would be economical, sensi-ble, practical, and altogether righteous of you to do something about it at last. Almost every knitter has a stash of previously purchased yarn; some of us have quite a lot of it.
Usually what happens is that you impulsively buy a pat-tern and some yarn, and get started, full of enthusiasm. Then a big project comes up at work, or your son’s graduation is suddenly closer than you thought, and your knitting sits ne-glected for several months, and then is put away. With time you may begin to wonder what it is you liked about it. Give the remaining unused yarn to a retirement home or a charity resale store; far better for it to fi nd a good home and apprecia-tive hands than to fi ll a dark corner in your closet.
If you still like the yarn, but not the pattern, the situation can be salvaged. Rip out whatever you started (be brave, it happens to us all), and then skein, wash, and rewind the yarn; see Recycling Yarn, below. Also determine the yardage so you know exactly how much you have (see Measuring a Skein). If possible, reserve the ripped-out yarn for ribbing, collars, pocket linings, etc., or blend it with a yarn of a different color and texture, because it may have a subtly different look from yarn that has never been knit up.
Stitch pattern in medium yarn. Swatch is 3 inches wide. Stitch pattern in relatively thin yarn. Swatch is 21⁄4 inches wide.
588 Part Eight: Working a Project
Selecting a Decorative PatternWhen you are designing your own garment, you will want to select not only a suitable yarn, but a stitch pattern that is ap-propriate to the style, as well. The drape, weight, and texture of the fabric are aspects of garment design that are just as im-portant as color or shape. Also, some stitch patterns have a sporty look, some are fancy, and others are very tailored.
A pattern may consist of a technique that draws the stitches together, making a dense fabric that would be just right for outerwear such as a jacket or hat; others are inherently softer or more open and are better for summer or even fancy eve-ning wear. Subtle, textured stitch patterns are best done in a smooth yarn because the details tend to be obscured by a yarn that is too soft or fuzzy, and variegated or highly textured yarns can overwhelm all but the boldest patterns.
The appearance of a stitch pattern can also change depend-ing upon whether it is worked fi rmly on a smaller size needle, or with a larger needle to make it more open. There are no rules that dictate what gauge to use, so take time to play with the yarn before you decide what to do with it. Pick a stitch pattern you like and make up three small swatches using a dif-ferent needle size for each one (see Making Test Swatches in the chapter Stitch Gauge for more information). Wash the one you like best so you can see what it will really look like when fi nished. Then make your gauge swatch with the needle size that gave the best result.
Also give some thought to whether the decorative pattern will enhance, not just the garment, but also the fi gure. A stitch pattern with vertical lines is slimming and adds an appear-ance of height, while horizontal lines do the opposite. A bold stitch or color pattern on an oversize garment can work well for those of medium build, but may upstage a small person or exaggerate the proportions of a large one. Bulky, nubby, or fuzzy yarns will add volume, while smooth ones are slimming.
Working Tips
This section contains general suggestions about the more mundane aspects of working a project. While admittedly not the most interesting aspect of knitting, these details contribute to making the project more satisfying to do and help produce a better result.
Included is material on how to keep track of where you are in a pattern, how to tie on additional yarn, and how to cor-rect mistakes.
Getting StartedBefore you get started, make sure that you have any tools that will be required—the correct size and length needles, stitch holders and markers, measuring tape, and a bag or basket that
will keep the project clean as you work on it. Use a needle size gauge to check the size of each circular needle, because some are not marked and it is easy to accidentally put one away in the wrong package.
If you are working from a published pattern, read the in-structions through so you know what to expect. Familiarize yourself with any special techniques used in the garment pat-tern by practicing on a swatch beforehand. In some cases, you might want to make a substitution, selecting a different method of casting on, a better buttonhole, or a neater shoulder line than that suggested.
If it is a written pattern, consider converting it to charted form; charted patterns are not only easy to read while you work, but allow you to anticipate details, which helps the work go more smoothly; see Charted Garment Patterns.
Swatches and GaugeMaking a swatch to measure and calculate the gauge is, by far, the most important preliminary step in starting any new project. If you have not already done so, please read the dis-cussion in Stitch Gauge about why this step is so essential to a successful project.
And as discussed there, even before you make the gauge swatch, I would like to encourage you to sit down and play for a while with your yarn and needles. Test Swatches are a wonderful way to practice the stitch or color pattern, learn the techniques that will be needed, and get a feeling for the char-acteristics of the yarn.
Save your Gauge Swatch, at least for the duration of the project; if you have any reason to question the accuracy of your gauge calculations after you are underway, you will want to have it to fi gure out what is wrong.
Record KeepingTake notes as you go; should your work be interrupted for any length of time, these reminders can get you started again more quickly. Notes are especially important if you are design-ing something yourself or altering a published pattern. Even if you decide not to proceed with a project you may have learned something worthwhile. An understanding of why a particular combination of yarn and pattern did not work might suggest another use for the yarn, or provide information about what kind of yarn would work better.
Whatever level of detail you prefer, fi nd a record-keeping system that suits you, be it a computer program, index cards, a notebook, or all three. Here are a few suggestions:
• Keep one yarn label so you have the information on fi ber content, dye lot, yardage, and care recommendations. Staple it to the receipt in case you need to return any-thing, or to have for future reference should you ever want to use that brand again.
Chapter 30: Working a Project 589
• I like to staple the Gauge Swatch to a large index card con-taining all of the above information, along with the title and page number of a published stitch or color pattern, or that of a garment pattern. Having this not only provides a nice memento of the project, but the information may be useful when planning other projects in the future. Do the same with any Test Swatches you found interesting.
• In addition to making note of the Gauge itself, also re-cord the number of stitches and rows in the swatch, its dimensions, and the size needle used. Include any of the information you may have regarding stitches per yard for the decorative pattern, and yarn requirements for the garment pattern; see Calculating Yarn Requirements.
• You might want to make a copy of the pattern so you have one to work from; save the original in case you need a fresh copy. Also, consider enlarging the pattern to make it easier to read as you work.
• Mark off rows as you go, and take notes when you work a challenging area such as the armholes and sleeve cap; these may prove useful when you make the other gar-ment section with the same shaping. Also make a note if you substitute a different technique for the one indicated, or make any alterations in the dimensions of the pattern.
• Keep all materials related to a single project together; large plastic storage bags are helpful for this sort of thing.
Caring for Work in ProgressIt is nice to have some sort of a container to keep all your as-sembled materials together while you work on a project.
A zippered bag is useful for all the little things you carry along—measuring tape, markers, pen or pencil, stitch coun-ter, tapestry needle, crochet hook, cable stitch holders, and tip protectors.
If you have a favorite chair at home where you always knit, a large lined basket is ideal. If you are not always at home, knit-ting bags of various kinds are available at craft stores and yarn shops, but even a sturdy plastic shopping bag will do.
Keep your knitting clean. One of the more sensible sugges-tions I have seen is to put what you are working on in a pil-lowcase (and a zippered pillow cover is ideal). Spread out on your lap, this makes a clean surface for you to rest the fabric on as you knit, and it will protect your clothing from lint.
Do wash your hands before you pick up your knitting, es-pecially if the yarn is a light color or delicate, or keep packages of wipes in your knitting bag.
When you must put your knitting down, try not to stop mid-row, as this tends to stretch out the fabric at the gap be-tween the needles. When this is unavoidable, here are some tips to prevent stretching:
• If you are working on circular needles, slide the stitches onto the cable to loosen the tension on them, and tuck the tips into the fabric in opposite directions.
• If you are working on straight needles, fold the fabric so the needles are side by side, hold them as one and wrap some of the yarn around the needle tips to keep them in position and prevent the stitches from falling off.
Counting Stitches and RowsYarn shops sell counters of various sorts that work well for keeping track of the number of rows worked (see Tools). However, if you are working with a stitch or color pattern, it is far easier to count the repeats, with their fi xed number of stitches and rows. To keep track of where you are in a shap-ing pattern, tick off each row on a chart, or make a note in the margin of a written pattern.
Should you need to count stitches and rows to fi nd out where you are, the simplest thing to do is to count by stitch or color pattern repeats whenever possible. Multiply the number of repeats by the number of stitches or rows for that portion of the count.
To count individual stitches and rows, work as follows:
• Put fabric down on fi rm surface in good light and use tip of needle as pointer; stick it into center of each stitch as you count.
If possible, count across a plain row, or up a column of plain stitches, or work on Purl side and count nubs.
• For complex stitch patterns, see illustrations in The Stitches that show the structures of various techniques; these will help you identify the stitches in the fabric.
• If your count is interrupted, insert needle or cable needle into stitch to mark your place and make note of row or stitch number.
MarkersThere are several types of markers that can be used to help you keep track of where you are in a pattern; some are available at stores, but it is easy to make your own.
One type is carried on the needle to mark off a position within the stitches, the other is set within the fabric as an aid in counting stitches or rows; see Tools.
Ring MarkersYarn shops sell metal or plastic Ring Markers of two kinds. One type rides on the needle between two stitches to iden-tify the beginning of a round in circular knitting, the position where a certain technique needs to be worked, or the bound-aries between two different stitch patterns.
Just slip one on the needle wherever you think it would be

590 Part Eight: Working a Project
helpful, and use as many of them as you please. Every time you encounter a marker, simply slip it from one needle to the other, and carry it up row by row as you work.
If you do not have any on hand, you can make an equiva-lent with a bit of contrast-color yarn. Cut a 4- to 6-inch length of yarn, put a Slip Knot in the center, and slip it on the nee-dle in the required position; these are also softer under your hands as you work.
A split Ring Marker is another type that can be placed on the needle, or on a stitch; you might do the latter to mark a po-sition to count from, for instance. There are also coilless pins available that can be used in the same way; see Tools.
Yarn MarkersMarkers can also be set within the fabric either on a single stitch, across a row, or vertically, alongside a column of stitches.
This might be done to keep count of rows, or when neces-sary to mark the position of something like a pocket or where decorative trim will be added.
A marker of this kind can also be inserted later by threading a length of yarn into a tapestry needle and weaving it through the fabric, but it is much easier to do this while you are work-ing, as follows:
Running Thread Marker
1. Cut strand of contrast-color yarn about 12 inches long and fold in half. Insert right needle under running thread, place loop of marker yarn on needle and draw under running thread (as for a Running Thread Increase).
2. Insert left needle into nearside of marker “stitch,” wrap both ends of marker yarn around right needle, and Knit.
3. Pull two ends of marker yarn through discarded stitch and gently tighten it into a knot around running thread.
A smooth yarn makes these markers easier to remove later and leaves no lint behind.
If this is an afterthought, you can crochet the marker yarn onto the running thread, as follows:
• Hold folded end of marker yarn on outside with looped end facing crochet hook. Reach up under running thread and hook loop, then hook two ends and pull through loop; tighten into place.
Row Marker
If you need to mark a row for something like pocket place-ment, or just as a line to measure or count from, lay it in as you work.
Use smooth contrast-color yarn slightly longer than fabric width, and work as follows:
• To begin, allow tail on marker yarn and pinch end against fabric on nearside; hold other end in hand not carry-ing main yarn. Work across row and, every few stitches, move marker yarn between needles to other side of fabric.
Alternatively, use technique described in Purl Inlay to weave marker yarn in on inside of fabric.
Running Thread Markers.
Row Marker woven in with Purl Inlay.
Measuring from a Row Marker.