the sage precision brewer
TRANSCRIPT

SDC450SDC400
the Sage Precision Brewer®
EN QUICK GUIDE

2
SAGE® RECOMMENDS SAFETY FIRSTAt Sage® we are very safety conscious. We design and manufacture consumer products with the safety of you, our valued customer, foremost in mind. In addition we ask that you exercise a degree of care when using any electrical appliance and adhere to the following precautions.
IMPORTANT SAFEGUARDSREAD ALL INSTRUCTIONS BEFORE USE AND SAVE FOR FUTURE REFERENCE• A downloadable version of this
document is also available at sageappliances.com
• Before using for the first time please ensure that your electricity supply is the same as shown on the rating label
on the underside of the appliance. If you have any concerns please contact your local electricity company.
• Remove and safely discard any packaging materials before first use.
• To eliminate a choking hazard for young children, safely discard the protective cover fitted to the power plug.
• Always ensure the appliance is properly assembled before use. Follow the instructions provided in this book.
• Keep the appliance clean. Follow the cleaning instructions provided in this book.
• Ensure the supplied mesh basket filter or a paper filter (8 -12 cup, flat base basket style with ~ 3¼" / 8.25cm base) is placed in the coffee basket before using the appliance.
• Do not use the mesh basket filter in conjunction with a paper filter.
• Before starting a brew cycle: − Check that the carafe
drip stop moves up and down freely.
− Completely empty the carafe and securely lock the carafe lid in place.
− Insert and seat the carafe under the drip stop. − Ensure the filter basket is empty and properly fit in place.
2 Sage® Recommends Safety First6 Components8 Operation13 Care & Cleaning14 Troubleshooting17 Guarantee
Contents

3
EN
• During a brew cycle: − Do not remove the carafe or remove the filter basket while the unit is in a brew cycle. Failure to follow the above may lead to scalding or serious injury.• Some surfaces may be hot, use
caution when touching or lifting the unit or accessories.
• Use only carafe handle when lifting the carafe.
• The carafe is designed for use with this appliance only. It must never be used on a range top or in a microwave.
• Scalding may occur if the carafe lid or basket is removed during the brewing cycle.
CAUTION• Risk of injury. Proper installation/
removal of basket is required to reduce the risk of splashing of hot water.
• Always ensure the carafe lid is securely locked in place onto the carafe before pouring.
• Do not use the carafe with a cracked, loose, weakened or damaged handle.
• Do not use the filter basket with a cracked, loose, weakened or damaged handle.
• Do not touch hot surfaces. Use the handle for lifting and carrying the carafe.
• Always wait until the machine has cooled before removing the brew basket.
• Do not set a hot carafe on a wet, cold or heat sensitive surface.
• Always turn the appliance to the off position, switch off at the power outlet and unplug at the power outlet when the appliance is not in use.
• Do not use harsh or abrasive materials when cleaning any part of this appliance such as steel wool or scoring pads.
• The use of attachments not sold or recommended by Sage® may cause fire, electric shock or injuries.
• Always ensure the appliance is turned OFF, unplugged at the power outlet and has been allowed to cool before cleaning, attempting to move or storing.
• Proper installation of filter basket, showerhead seal, and showerhead locking ring is required to reduce the risk of splashing of hot water.
CAUTION• We recommend using
cold, filtered water. We do not recommend the use of de‑mineralised or distilled water as this may affect the taste of brewed coffee.

4
IMPORTANT SAFEGUARDS FOR ALL ELECTRICAL APPLIANCES• The appliance can be used by
children aged 8 or older and persons with reduced physical, sensory or mental capabilities or a lack of experience and knowledge, only if they have been given supervision or instruction concerning use of the appliance in a safe way and understand the hazards involved.
• Children should not play with the appliance.
• Cleaning of the appliance should not be carried out by children unless they are 8 years or older and supervised.
• Any maintenance other than cleaning should be performed by an authorised Sage® service centre.
• The appliance and its cord should be kept out of reach of children aged 8 years and younger.
• Do not use the appliance if the power cord, power plug, or appliance becomes damaged in any way. If damaged or maintenance other than cleaning is required, please contact Sage Customer Service or go to sageappliances.com
• Fully unwind the power cord before operating.
• Do not let the cord hang over the edge of a bench or table, touch hot surfaces, or become knotted.
• Do not leave the appliance unattended when in use.
• This appliance is for household use only. Do not use the appliance for anything other than its intended use. Do not use in moving vehicles or boats. Do not use outdoors. Misuse may cause injury.
• It is recommended to regularly inspect the appliance.
SHORT CORD INSTRUCTIONS• Your Sage® appliance is fitted
with a short power cord to reduce the risk of personal injury or property damage resulting from pulling, tripping or becoming entangled with a longer cord. Longer detachable power cords or extension cords are available and may be used if care is exercised.
• If an extension cord is used,(1) the marked electrical rating of the cord set or extension cord should be at least as great as the electrical rating of the appliance,(2) the cord should be arranged so that it will not drape over the counter‑top or table where it can be pulled on by children or tripped over unintentionally and

5
EN
(3) the extension cord must include a 3‑prong grounding plug.• The installation of a residual
current safety switch is recommended to provide additional safety when using all electrical appliances. Safety switches with a rated operating current not more than 30mA are recommended. Consult an electrician for professional advice.
NOTEThis appliance has a three wire grounded plug. To reduce the risk of electric shock, this plug will fit in a polarised outlet only one way. If the plug does not fit properly into the outlet, contact a qualified electrician.Do not use an adapter or modify the plug in any way. Do not connect the appliance to an external switch or device (such as a timer, monitor or remote circuit) that can be switched on and off.
FOR HOUSEHOLD USE ONLY SAVE THESE INSTRUCTIONS
The symbol shown indicates that this appliance should not be disposed of in normal household waste.
It should be taken to a local authority waste collection centre designated for this purpose or to a dealer providing this service. For more information, please contact your local council office.
To protect against electric shock, do not immerse the
power plug, cord or appliance in water or any liquid.
6
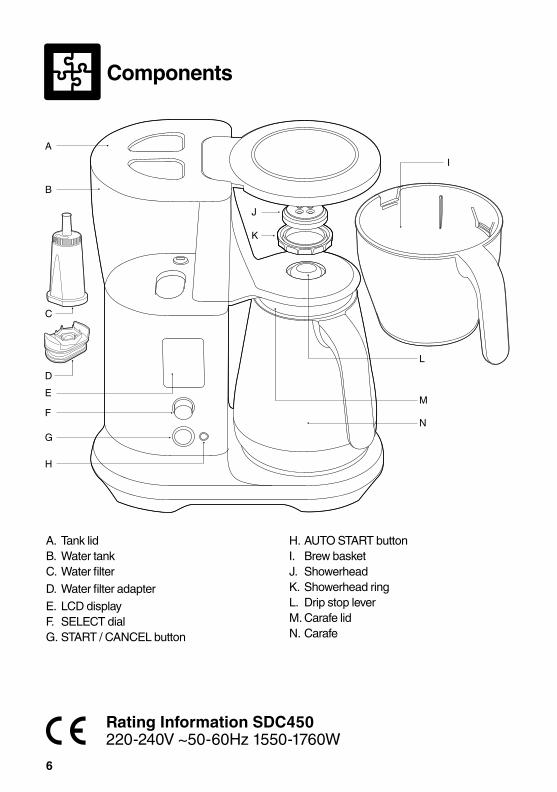
Components
B
J
K
E
C
F
D
G
H
AI
L
M
N
A. Tank lidB. Water tankC. Water filterD. Water filter adapterE. LCD displayF. SELECT dialG. START / CANCEL button
H. AUTO START buttonI. Brew basketJ. ShowerheadK. Showerhead ringL. Drip stop leverM. Carafe lidN. Carafe
Rating Information SDC450 220‑240V ~50‑60Hz 1550‑1760W
7
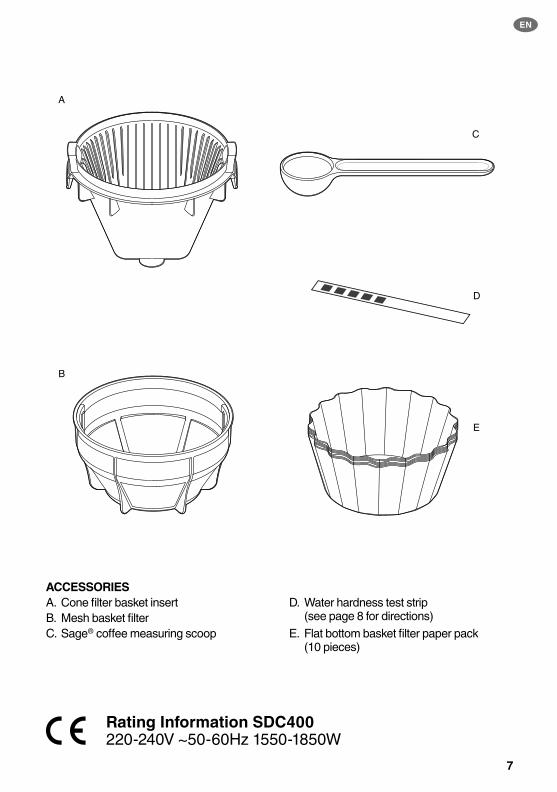
EN
A
D
E
B
C
ACCESSORIESA. Cone filter basket insertB. Mesh basket filterC. Sage® coffee measuring scoop
D. Water hardness test strip (see page 8 for directions)
E. Flat bottom basket filter paper pack (10 pieces)
Rating Information SDC400 220‑240V ~50‑60Hz 1550‑1850W

8
Operation
WATER HARDNESS SETTING& FLUSHING1. Ensure that the empty coff ee basket and empty
carafe (with lid attached) are inserted into the machine.
2. Fill the water tank with fresh cold water to the MAX mark on the water tank. Plug into power outlet.
3. When fi rst turned on, the machine will show ‘SEt HArdnESS’ on LCD, asking you water hardness level. Press SELECT dial once. Dip the water hardness test strip into the fi lled water tank for 1 second. Remove and wait 1 minute to reveal the result.
4. Rotate SELECT dial until the corresponding test result is shown on the screen. Press to set.
5. Install the water fi lter into the water tank before continuing to the fl ush cycle.
6. The machine will show ‘FLUSH Unit’ on LCD. Press SELECT dial to commence fl ush cycle. The machine will dispense all the water from the tank, through the system and into the empty carafe. After fl ushing, empty the basket and carafe.
INSTALLING THE WATER FILTERThis product is designed to be used with a water fi lter installed in the water tank. Not doing so will aff ect the internal components and performance of the appliance. The fi lter cartridges should be replaced regularly; when indicated on the LCD screen.
NOTEAll water tank levels will be incorrect if the machine is used without the water fi lter correctly installed.
1. Remove the water fi lter and water fi lter adapter from the packaging.
2. Soak the fi lter in cold water for 5 minutes.
3. Attach water fi lter to adapter.
4. Insert the assembled water fi lter and adapter into the water tank.
5. Fill the water tank with cold water to the indicated MAX marking.

9
EN
BREWING A CARAFE1. Select the correct basket and fi lter to suit the
amount of coff ee being brewed.
2 - 8 CUPS 8+ CUPS
8+ CUPS
OR
OR
CAUTIONFilling the basket without a mesh basket fi lter or fi lter paper may cause the basket to overfl ow during the brewing cycle.2. Fill the water tank with fresh cold water up to
the MAX marking on the water tank.
450
MLSCUPS
12
6004
150
300
12008
1800
10
9006
1500
MAX
SINGLE CUP COLD BREW
MAX
CARAFE
MAX
CONE
NOTEThis machine will brew all the water in the tank. Ensure the tank is not fi lled past the indicated MAX marking.
3. Grind enough coff ee beans for the volume of coff ee being brewed. For a full 12 cup carafe, we recommend (108g) of coff ee, approximately 13 level Sage® measuring scoops. Roughly 1 scoop for every 150ml.
4. Insert the correct fi lter paper, cone or fl at bottom, or mesh basket, into the brew basket. Add your ground coff ee then insert the brew basket into the machine.
NOTENever use both mesh basket fi lter and paper fi lter at the same time.
5. Lock the carafe lid onto the carafe and insert under the drip stop outlet.
ALIGN ARROWS TURN TO POUR
CAUTIONThe carafe MUST be in place before you brew with the water level higher than the SINGLE CUP marking. Otherwise the coff ee basket will overfl ow.
COFFEE/WATER RATIOWe recommend 1 level Sage scoop of coff ee grounds per 150ml cup of water. Adjust the amount according to your individual taste. The maximum capacity for pre-ground coff ee is 12 level Sage scoops. Exceeding this amount may cause the coff ee basket to overfl ow.
Cups of coff ee (150ml cup)
1 2 3 4 5 6 7 8 9 10 11 12
Scoops of coff ee grinds
1(8.25g)
2(16.5g)
3(24.75g)
4(33g)
5(41.25g)
6(49.5g)
7(57.75g)
8(66g)
9(74.25g)
10(82.5g)
11(90.75g)
12(99g)
Water amount 150ml 300ml 450ml 600ml 750ml 900ml 1.05L 1.2L 1.35L 1.5L 1.65L 1.8L

10
BREW MODES• FAST: This mode is to deliver the fastest
brewed coff ee. • GOLD (recommended): This mode meets the
criteria for an optimum brew and the gold cup standard* requirements of ECBC (European Coff ee Brewing Center) using the Cone Filter basket and water volumes of 1.0L & 1.2L together with a brew ratio of 60g of coff ee to 1.0L of water.
• STRONG: This brewing mode delivers a stronger tasting coff ee.
• MY BREW: Allows you to customise every brew setting.
− Bloom Time: Coff ee bloom occurs when hot water hits the ground coff ee. This setting allows you to adjust how long the bloom time lasts. We recommend 30‑60 seconds.
− Bloom Volume: You can adjust the amount of water used for blooming by changing this setting. Ideally, this will be around 10% of the brew volume.
− Brewing Temp: You can adjust the temperature of the brew water to suit your favourite coff ee.
− Flow Rate: You can adjust brewing time to control contact time by adjusting the water delivery speed.
• POUR OVER: If you are using the Pour Over Adapter, use this mode. Adapter sold separately.
• COLD BREW: Due to the long duration (typically 4‑14 hours) of the brewing process we recommend setting the machine up overnight. 1. Fill the tank with your desired volume of chilled
water, ensuring this is below the COLD BREW marking.
2. Remove the basket, and ensure both the cone insert and mesh basket fi lter are removed. Add a large paper fi lter and then coff ee at 2-3 times of regular ratio (approximately 12 scoops for 4 cups). Reinsert the basket into the machine.
3. Remove the lid from the carafe and re‑insert the carafe.
4. Navigate to the COLD BREW setting and press START / CANCEL.
NOTEAlways ensure your carafe is empty and clean before brewing.
NOTEFor the very best tasting coff ee we recommend using a brew ratio of 60g of coff ee per 1.0 litre of water.6. Rotate the SELECT dial to the desired
mode. Press the START / CANCEL button to commence brewing.
7. When your coff ee is ready, the machine will beep 3 times then commence counting up for the TIME SINCE BREW.
FASTGOLD
SET CLOCK STANDBYKEEP WARMEXIT
DESCALESOUND
SETTINGSCOLD BREW
MYBREWPOUROVER
STRONGBLOOM TIMEBLOOM VOL.BREW TEMP.FLOW RATE
CUSTOMIZE
CARAFE LIDREMOVE
FILLAUTO START
TANK!TIME SINCE BREWMINHEATING BLOOMINGBREWING
AMPMHR
MAXAT
NOTENever fi ll the water tank once the coff ee machine has started a brewing cycle.

11
EN
3. We recommend using cone fi lter basket insert for single cups.
4. Insert the Cone fi lter basket into the brew basket. Use the alignment marks as a guide.
5. Place a cone shaped paper fi lter into the cone fi lter basket.
6. Grind the correct amount of whole bean coff ee for the amount being brewed.
7. Select desired brewing mode. 8. Press START / CANCEL to begin brewing.
AUTO STARTAllows you to automatically start brewing at preset time.1. Set fi lter basket type for the amount
of coff ee being brewed.2. Select your brewing mode.3. Fill the water tank with enough fresh cold water
for the amount of coff ee being brewed.4. Insert the brew basket with your desired insert
or paper fi lter and add ground coff ee.5. Insert the appropriate cup or the carafe with
the lid locked in place into the machine.6. Press the AUTO START button.
FASTGOLD
SET CLOCK STANDBYKEEP WARMEXIT
DESCALESOUND
SETTINGSCOLD BREW
MYBREWPOUROVER
STRONGBLOOM TIMEBLOOM VOL.BREW TEMP.FLOW RATE
CUSTOMIZE
CARAFE LIDREMOVE
FILLAUTO START
TANK!TIME SINCE BREWMINHEATING BLOOMINGBREWING
AMPMHR
MAXAT
7. The machine will prompt you to set the time for Auto Start. Rotate the SELECT dial to adjust Auto Start time, press SELECT dial to set. Auto Start is now set and the machine will enter Auto Start mode, brewing automatically at the set Auto Start time.
NOTECOLD BREW mode will be disabled if there is more than 4 cups of water in the tank.
SINGLE CUP / SMALLER VOLUMES (LESS THAN 4 CUPS)1. Your Sage® Precision Brewer will recognise
when the brewer has less than 4 cups of water and will adjust the brew settings, automatically. Fill your cup with fresh cold water and then pour it into the water tank, ensuring the water level stays below the SINGLE CUP line.
450
MLSCUPS
12
6004
150
300
12008
1800
10
9006
1500
MAX
SINGLE CUP COLD BREW
MAX
CARAFE
MAX
CONE
NOTEDO NOT fi ll the water tank above the SINGLE CUP marking or the volume of the cup being used. Otherwise it will overfl ow, as the machine brews until the water tank is empty.2. Place your empty cup underneath the brew
basket outlet.

12
KEEP WARM* Applicable to the Sage® Precision Brewer™ Glass (SDC400) only.
FASTGOLD
SET CLOCK STANDBYKEEP WARMEXIT
DESCALESOUND
SETTINGSCOLD BREW
MYBREWPOUROVER
STRONGBLOOM TIMEBLOOM VOL.BREW TEMP.FLOW RATE
CUSTOMIZE
CARAFE LIDREMOVE
FILLAUTO START
TANK!TIME SINCE BREWMINHEATING BLOOMINGBREWING
AMPMHR
MAXATNEW FILTER
KEEP WARM will be activated automatically for brew volumes above 4 cups.• KEEP WARM can be switched off by navigating
the SETTINGS menu to KEEP WARM then rotate and press SELECT dial to set ON or OFF.
• Keep warm will not engage on cold brew mode or pour over mode.
CAUTIONThe bottom of the carafe is hot to touch for several minutes after brewing. Use caution and ensure not to set the carafe on a heat sensitive surface.
CAUTIONDo not place the thermal carafe on the heater plate when KEEP WARM is activated. It will damage the insulation.
WARNINGDo not place pour over kit / box on heater plate when hot.
NOTEIf the clock hasn’t been set, the machine will prompt you to set the clock. Ensure the clock is correct. The clock will reset every time the unit is unplugged.
FASTGOLD
SET CLOCK STANDBYKEEP WARMEXIT
DESCALESOUND
SETTINGSCOLD BREW
MYBREWPOUROVER
STRONGBLOOM TIMEBLOOM VOL.BREW TEMP.FLOW RATE
CUSTOMIZE
CARAFE LIDREMOVE
FILLAUTO START
TANK!TIME SINCE BREWMINHEATING BLOOMINGBREWING
AMPMHR
MAXAT
8. Pressing START / CANCEL will cancel the set AUTO START time.
SETTINGS• SET CLOCK: Set the time displayed on LCD.• DESCALE: Clear mineral build up on internal
components.• SOUND: Sound volume is adjustable and also
can be turned off .• STANDBY: Adjust time to automatically enter
STANDBY mode after a period of no use.• NEW FILTER: Update when a new fi lter is
installed in the machine.
CHILD-LOCKTo prevent children from possible danger, child‑lock feature is available. Press and hold AUTO START for 3 seconds. LCD will display “CL” when it is locked. Repeat this again or unplug the unit to unlock.
DEGREE INDICATION PREFERENCETo switch between C° / F°, press the SELECT dial and AUTO START button at the same time. Rotate the SELECT dial to set preference.

13
EN
REPLACING THE WATER FILTER1. Remove old water fi lter and separate the
adapter from the fi lter cartridge. Discard old cartridge.
2. Soak the new fi lter in cold water for 5 minutes.
3. Attach water fi lter to adapter. Insert the assembled water fi lter and adapter into the water tank.
4. Fill the water tank with cold water to the
indicated MAX marking.5. Navigate the SETTINGS menu and set YES to
the NEW FILTER.
NEW FILTER
Care & Cleaning
Always turn the coff ee machine off and remove the plug from the power outlet before cleaning.
CLEANING THE COFFEE BASKET AND MESH BASKET FILTERRemove the coff ee basket. Discard any ground coff ee and fi lter paper. The coff ee basket and mesh basket fi lter can be rinsed under running water. Ensure the fi ne holes of the mesh basket fi lter are clear. For a deeper clean, wash the coff ee basket and mesh basket fi lter in warm, soapy water with a soft bristled brush.
CAUTIONThe coff ee basket, mesh basket or paper fi lter may still be very hot after brewing. Use caution and allow to cool before removing.
CLEANING THE CARAFEAfter each use, empty the carafe. Do not let brewed coff ee stand overnight as this can cause the carafe to stain. Rinse the carafe and carafe lid under warm running water. For a deeper clean, we recommend regularly washing the carafe in warm, soapy water using a soft bristled brush. Do not use abrasive cleansers, pads or cloths which can scratch the surface. Rinse and dry thoroughly.
CLEANING THE SHOWERHEADSimply wipe down the showerhead area periodically. However, if a more thorough clean is required, the Showerhead can be removed by unlocking the Showerhead Ring. Rotate clockwise then remove the Showerhead for cleaning. Once complete, reinstall the Showerhead.
CLEANING THE OUTER HOUSINGThe outer housing and LCD screen can be cleaned with a soft, damp cloth. Apply cleaner to the cloth and not the LCD surface. Polish with a soft, dry cloth. Cleaning and drying with dry paper towels or abrasive cloths and cleaners may scratch the surface.
REPLACING THE WATER FILTER The provided water fi lter helps prevent scale build‑up in and on many of the inner functioning components. Replacing the water fi lter when indicated on the screen or after 3 months will reduce the need to descale.

14
DESCALINGAfter regular use, hard water can cause mineral build up in internal components, reducing the brewing flow, brewing temperature, power of the machine, and taste of the coffee. We recommend to descale regularly. When LCD shows “DESCALE” (flashing), descaling cycle is needed but the cycle can be performed at anytime. Descaler is available on the Sage website.
NOTEIt takes approximately 33 minutes to complete descaling cycle.1. Empty the water tank and remove the water
filter. 2. Prepare a descale solution in accordance with
manufacturer’s instructions. Pour this solution into the empty water tank , do not exceed MAX marking.
3. Place the basket and the carafe into position under the drip stop outlet, Ensure the carafe is empty and the lid is securely locked.
4. Navigate SETTINGS menu to DESCALE. Press SELECT dial to start the cycle. The time remaining will display on the LCD.
5. When the descaling process is finished, the LCD screen will go back to the main menu. To completely remove residual water in the tank, brew with fresh water twice. Discard the water from the carafe and rinse thoroughly.
NOTEWe recommend to brew through again after descaling to brew out the residue descale solution.
NOTEYou cannot stop the descaling process mid cycle. Force stop by unplugging the cord from the power outlet.
FACTORY RESETThis will reset the machine to the factory settings, including water hardness setting. Hold the START button, the SELECT button, and AUTO START button altogether for 3 seconds. When LCD shows “rES” (flashing), press SELECT button to start. Rotate between YES or NO and press to confirm.

15
EN
Troubleshooting
PROBLEM POSSIBLE CAUSE WHAT TO DOCoffee too strong or weak
• Amount of coffee and water is not correct (1 spoon : 150ml cup).
• Check correct amount of coffee or water is used.
Coffee leaking from basket when removed
• The basket drip‑stop seal doesn’t cover the gap properly due to foreign material.
• Check that there is no obstruction in the basket drip‑stop seal. Wash out the basket seal by turning the basket upside down, and pressing down and rinsing into the seal to clear any particles obstructing that area.
Coffee overflowing from the basket(CAUTION: If the basket has overflowed remove slowly and with caution)
• Carafe is not inserted.• Amount of coffee and water is not
correct (1 spoon : 150ml cup).• Grind size is too fine.• Too much grinds in the basket.• No paper in the basket.• Putting paper into mesh basket
filter.
• If you are brewing with carafe, check that the carafe is inserted.
• Check that the correct amount of coffee and water is used for the operation.
• Correct grind size / amount.• Use mesh basket filter without paper
and other baskets with paper.
‘FILL TANK’ on LCD screen
• Water tank is empty or not enough water to brew the selected volume.
• Sensors may be dirty.
• Open the lid and pour the desired amount of cold, preferably filtered water.
• While the tank is empty wipe the sensor prisms in the tank with a cloth.
Auto Start does not function
• Auto Start does not repeat after it has been activated.
• Re‑engage the Auto Start mode for each time that it needs to be used.
Shows ‘CLOCK’ when Auto Start is pressed
• Current time should be set before setting Auto Start.
• Set the current time before using Auto Start.
Clock does not remember time
• Clock is cleared every time the unit is unplugged.
• Keep the unit plugged in.
Auto Start starts at the wrong time
• Current time is not correct. • Set the correct current time in the SETTINGS menu.
Carafe overfilling • Carafe is not completely empty before brewing.
• Amount of water is too much.
• Check that the carafe is empty before brewing.
• Check that the MAX line on the water tank is not exceeded.
• Ensure water runs freely through carafe lid.

16
PROBLEM POSSIBLE CAUSE WHAT TO DOLCD shows ‘FILL TANK’ when there is water in the tank
• Check that the unit is not in direct sunlight or direct bright lighting.
• Move unit away from the light source.
Brew doesn’t start
• There is no water in the water tank.• Each brewing mode has different
water amount limits, and it does not brew when the amount is beyond the limit.
• Check that the water tank is filled.• Check the water amount limits for
each mode.
Showerhead falls out
• The showerhead may loosen and fall out from time to time if not inserted or tightened correctly.
• Please wash the showerhead ring and seal and re‑insert.
The mesh filter in the water tank loosens and floats
• Mesh filter is not inserted or tightened correctly.
• Call Sage® Consumer Support.
Carafe drip stop stays down
• The drip stop is stuck. • Pull the drip stop back up.• Clean the drip stop for any foreign objects
of coffee grinds or stains.• If the problem persists and drip stop does
not return to top position please call Sage® Consumer Support.
Unit produces excessive steam while brewing or runs for extended periods with only steam output
• Brewing performance is affected by scale accumulated by hard water.
• Brewing temperature profile is not properly set.
• Descale the unit.
• Call Sage® Consumer Support if problem persists.
‘DESCALE’ on LCD screen (flashing)
• Brewing performance is affected by scale accumulated by hard water.
• Descale the unit by following the instructions under Descaling in the Care & Cleaning section of this manual.
Unit shows “too hot”
• Unit has been run too many times back to back and the components are overheated.
• Let unit rest for at least 20mins before starting another cycle.
LCD flashes FILTER
• Water filter needs to be replaced. • Replace water filter following instructions in ‘Care and Cleaning’ section. Navigate to SETTINGS menu and set YES to NEW FILTER.

17
EN
2 YEAR LIMITED GUARANTEESage Appliances guarantees this product for domestic use in specified territories for 2 years from the date of purchase against defects caused by faulty workmanship and materials. During this guarantee period Sage Appliances will repair, replace, or refund any defective product (at the sole discretion of Sage Appliances).All legal warranty rights under applicable national legislation will be respected and will not be impaired by our guarantee. For full terms and conditions on the guarantee, as well as instructions on how to make a claim, please visit www.sageappliances.com.
Guarantee

18
Notes

19
EN
Notes

www.sageappliances.com
GBR IRE
BRG Appliances LimitedUnit 3.2, Power Road Studios, 114 Power Road, London, W4 5PY
Freephone (UK Landline): +44 (0)808 178 1650 Mobile Calls (National Rate): 0333 0142 970
Registered in England & Wales No. 8223512. • Due to continued product improvement, the products illustrated or photographed in this document may vary slightly from the actual product.
Copyright BRG Appliances 2019.
SDC450 UG1 D19