the simplest, most time effective way to schedule
TRANSCRIPT

The simplest, most time effective
way to schedule appointments,
meetings, facilities and more.
Administrator’s Guide

(c) Copyright 1992-2004 Milum Corporation. All rights reserved. Office Tracker and Milum are trademarks belonging to Milum Corporation. All other trademarks mentioned belong to their respective owners. This manual, as well as the software described in it, is furnished under license and may be used or copied only in accordance with the terms of such license. The content of this manual is furnished for informational use only, is subject to change without notice, and should not be construed as a commitment by Milum Corporation. Milum Corporation assumes no responsibility or liability for any errors or inaccuracies that may appear in this book. For defense agencies: Restricted Rights Legend. Use, reproduction, or disclosure is subject to restrictions set forth in subparagraphs (a) through (d) of the commercial Computer Software Restricted Rights clause at 52.227-19 and the limitations set forth in the license agreement for this software. Unpublished rights reserved under the copyright laws of the United States. First Printing October 1993 Last Printing October 2004 Version 6.5.x MILUM Corporation P.O. Box 5807 Austin, TX 78763 Business: 512-469-2966 Support: 512-469-2967 www.officetracker.com Trademark Notification Office Tracker and MILUM are trademarks belonging to Milum Corporation. All other trademarks or trade names mentioned belong to their respective owners. Printed in the U.S.A. Part number: 90002

Table of Contents i
Table of Contents
Introduction....................................................................................1 About This Guide................................................................................................. 1 Office Tracker Server Administration................................................................. 1 Support................................................................................................................ 2 Office Tracker Overview...................................................................................... 3
Office Tracker Server Installation.................................................7 Installation........................................................................................................... 7 Office Tracker System Requirements ................................................................ 7 Installing on Windows 98, Windows NT/2000/2003/XP ................................ 8 Registering Your Serial Number.......................................................................13
Getting Started with Office Tracker............................................15 Office Tracker Server Do’s and Don’ts ............................................................15 Starting and Setting Up the Office Tracker Server..........................................16 What To Do If You Can’t Access the Admin Pages..........................................17
Server Administration .................................................................23 Server Admin Pages..........................................................................................23 Starting and Stopping the Office Tracker Server ............................................25 Working with the Names List ...........................................................................26 Office Tracker Groups.......................................................................................26 Adding Names to the Names List ....................................................................27 Viewing, Editing, and Deleting Names.............................................................29 Security and Custom Sharing Privileges..........................................................30 Backing up Your Office Tracker Server Database Files ..................................34 Where Backups are Stored ..............................................................................35 Making a Backup to Another Drive ..................................................................37 Restoring a Backup of the Data File ................................................................38 View Log - Using the Office Tracker Server Log...............................................39 Exporting Events for Reports............................................................................41 Deleting Events (Clearing Historical Data) ......................................................42 Rebuilding the Office Tracker Server Data File ...............................................43 Increasing the Memory Allocation for the Server............................................44

ii Table of Contents
Setting Passwords for Admin, Labels and Keywords......................................45
E-Mail Integration for Client Users ............................................ 47 Notifications and E-Mail Integration ................................................................47 Built-in Notification Message System..............................................................47 E-mail Messaging Integration...........................................................................47 Setting up Windows Clients to use e-mail notifications .................................48 How to Setup a MAPI Profile in Outlook ..........................................................49
GMT Time Zone Support ............................................................ 51 Setting Time Zone on Windows Clients ...........................................................51
Using the Office Tracker WebViewer ........................................ 53 Installing the WebViewer..................................................................................54 WebViewer Settings..........................................................................................57 WebViewer Login Name and Password...........................................................58 Setting Up Your User, Room and Resource Schedules for the WebViewer...59 How Users Connect to the Web Viewer ...........................................................59 How to Customize the Web Viewer Interface ..................................................60 Setting a default calendar for WebViewer to Display .....................................61 Potential WebViewer Problem and Solution....................................................61
Office Tracker Contacts.............................................................. 63 How Contacts Are Updated From the Office Tracker Server ..........................64 Categories and Customized Fields ..................................................................65 Record Locking .................................................................................................66 Importing Contacts from Other Programs .......................................................67
Office Tracker Palm Sync Setup................................................ 69 General Guidelines and Requirements ...........................................................69 Setting up the Office Tracker Server to Work with OTPalm Sync...................69 Setting Up the Palm Sync Software .................................................................70
Sample Office Tracker Setups ................................................... 75 Office Tracker Medical Scheduling Set-Up......................................................75 General Office Scheduling................................................................................77
Advanced Installations and Options ......................................... 81

Table of Contents iii
Installation Notes..............................................................................................81 Installation Steps for Windows 98/NT/ 2000/2003/XP ...............................81 Locating your server IP address.......................................................................84 Modify, Repair or Remove the Program ..........................................................86
Basic TCP/IP Network Setup Information ..................................89 Adding and Configuring the TCP/IP Protocol...................................................89 Using NAT to Setup a Public Internet Address for Remote Access ................90
Using Office Tracker with Firewalls ...........................................93
Troubleshooting and Tips...........................................................95 Reseting the Local Client Database File........................................................101 Office Tracker Client Tips ...............................................................................101
Upgrading and Moving the Server............................................105 How to Upgrade Office Tracker From 3.7.3 to 6.5.x .....................................106 Upgrading Clients from 3.7.x to Version 6.5.x ..............................................109 Upgrading the Server from Version 4.0.x or 4.1.x to version 6.5.x..............105 Moving the Office Tracker Server Software to a New Machine....................111
Using the Office Tracker Server with an ODBC Data Source.113
Index ...........................................................................................115

Introduction 1
Introduction Welcome to Office Tracker. Office Tracker is a multi-user, client/server network group scheduling tool that lets users maintain personal and group calendars, schedule rooms, resources and facilities, and arrange group events with other Office Tracker users. With Office Tracker, everyone on the network can create and share schedules, keep track of tasks, meetings and projects, and schedule personal and group events - all from one easy-to-use interface. Office Tracker Contact Manager, Office Tracker Webviewer and OTPalm are additional add-ons to the Office Tracker scheduling system. You may or may not have purchased these add-ons but can add them at a later date. Office Tracker Contact Manager lets the entire office create and share contacts for customers, vendors and employees. Office Tracker Webviewer lets you share schedules via a standard web browser and OTPalm lets users get their Office Tracker schedules downloaded to their Palm so they can take their schedule on the road. For more information about Office Tracker add-on products, contact Milum Corporation at: 800-257-2120 or visit the Office Tracker web site at: www.officetracker.com
This guide will help set up both the Office Tracker Server and Office Tracker client users. Please read over the entire guide before you begin setting up your server. You should also read the Office Tracker Client Guide to familiarize yourself with the client software. Most features in the client software are not covered in this Server Guide to avoid repetition.
About This Guide
PDF Server and Client Guides (Online Guides) The Office Tracker Server and Client Guides have been included as a set of .pdf (requires the Adobe Reader, free from adobe.com) documents on your install disks and are accessible via the “Help” menu or “Help” button in the Office Tracker client and server software. Once you've installed the Office Tracker Server, you can access the Office Tracker Server Help Guide from your Start/Programs/Office Tracker Server menu, or by pressing the "Help" button in the Office Tracker Server Administration Pages.
Office Tracker Server Administration
Note: Running software requires specific expertise. It may be necessary to have a person experienced with network management and terms such as “TCP/IP” and “Routers” handling the Office Tracker Server.
The machine you choose for your Office Tracker Server is the central repository for all your client user data. The server is set up on one machine, preferably one that is not also used as a desktop machine. The client software is installed on each user machine you would like included in the Office Tracker scheduling system, depending on the total number of users in your license agreement. Each client user has the ability to schedule and share schedule information with the other Office Tracker users.

2 Introduction
The Office Tracker Server Administrator is the person who controls the Server, adds user names, creates sharing privileges and generally maintains the server machine. This guide covers the Server Administration features of the Office Tracker software.
Office Tracker comes with free* support for 30 days from the initial purchase date. Support includes telephone and/or e-mail communication. Visit the officetracker.com web site for more details. After the 30-day period you will need to purchase a Support Package in order to have access to a support representative via telephone. To order a support package, visit the Office Tracker web site at: www.officetracker.com or call the support line at 512-469-2967. When contacting support by phone or e-mail, be prepared to give your server hardware and software (OS) info. and the current version of the Office Tracker software you are using. Fill out the information below and have it on hand when you call:
Support
Serial #:_____________________ Server version: _________________ Hardware CPU: ________________ RAM:________________________ Name of person who installed Server software:_______________________ Note any modifications you made to install:_______________________________________________________ ____________________________________________________________ To get support under your support plan agreement, call the Support Line at: 512-469-2967 or send support questions via e-mail to: [email protected]. *Some limitations and restrictions apply such as long distance telephone fees. Please contact Milum Corporation for details.

Overview 3
Overview How the Office Tracker System Works Office Tracker is a client/server solution, meaning there are two software programs, one installed on the machine that is the "server" and one program installed on all other machines (the people who schedule and need to see schedules) called "client" users.
The Office Tracker Server maintains the "master" data files of all events scheduled by users on your network. Each Office Tracker client keeps a local data file containing events they've created or viewed. These two data files synchronize to each other when changes are made to a schedule to keep everyone up to date. The local client data file is available when the client goes off-line so client users can continue to work on their schedules. Once the client is back online, the client data file synchronizes to the server file automatically. Client users can work remotely (from other locations) provided the Office Tracker Server has an IP address that allows this type of dial in access (search the web for "Network Address Translation" to learn more about this type of IP address). The client user would also need an internet connection to connect remotely. For more information see the section “Basic TCP/IP Network Setup Information”.
The Office Tracker Server resides on one machine on your network. This may be a non-dedicated or dedicated server-based machine or a desktop machine. The machine you choose depends on the size of your workgroup and your particular needs. It is best if you can choose a server machine that runs Windows NT, 2000/2003 or XP for server use, however Windows 98 will also work as an Office Tracker Server.
Office Tracker Server Overview
The Office Tracker Server is a background application. There are no visible windows when the application is running until you administer the Office Tracker Server through a web browser such as Microsoft Internet Explorer via the “Admin” pages. The Admin web pages provide a graphical user interface to view and control all of the administration functions. Keep in mind this "local" access is to

4 Overview
your own machine, you are not connecting to anyone else via the web, but just using the web browser as a "front end" to view the Admin pages (which are html documents) installed on your own server machine. Your data is stored on your own machine - not at our location. You maintain control and privacy. Names List of People, Rooms and Resources The Office Tracker Server is where you create the "Names List," a list of all the names you will be scheduling such as the people in your office, rooms, facilities and other resources such as equipment or vehicles. Once you add your names to the Names List you will be ready to "connect" your Office Tracker client software (provided you've installed it) then you can create group schedules with any of the names on the Names List. Note: You will need to add your own name or at least some name you will use to connect to the Office Tracker Server when you use the Office Tracker client software.
Office Tracker “client” users are all the users who will be scheduling, viewing schedules and connecting to the Office Tracker Server to share schedule information. Client users must have the "Office Tracker" client software installed on their individual machines in order to begin scheduling and using calendars. Client users can create schedule views containing the names created on the Office Tracker Server. Users can schedule events with one another or schedule events for resources such as conference rooms and equipment. Each time a client user creates an event, the information is sent to the Server and stored in the Server’s database. Client users can work “offline” while disconnected from the Server and when they reconnect their changes are synchronized to the Office Tracker Server. How Office Tracker Updates Schedule Information Office Tracker client users are updated automatically every time users move to a new day, week or month, each time they add names to a view, or if they are “resting” on the same day, week or month, the view is updated every 10 minutes or less, depending on the setting in the Server Preferences (default is 10 mins., minimum is 3 mins.). In addition, users can press the F3 key, to update their schedule immediately with any new events.
Office Tracker Client Overview
When the schedule is being updated, the user will see a message in the bottom left “status” area of the Office Tracker window such as “Gathering events…” or “Gathering permissions…” When the update is complete the user will see “Ready” in this status area. Overview of Steps Involved in Setting up Office Tracker 1. Install Office Tracker Server software. 2. The server is set by default to start automatically unless you cancelled this option at the end of the install. If it is not running, start the Office Tracker Server (from the launcher in your Start menu “Programs>Office Tracker Server>Office Tracker Server” or from the Services Control Panel when installed as a Service under Windows NT, 2000/2003 or XP) 4. Open your web browser to access the Server “Admin” pages by entering: http://yourserverIPaddress:8001 5. Click the “Names List” button, then the “Add Name” button and add your users’ names and the

Overview 5
names of any resources (rooms, facilities etc.) 6. Install Office Tracker client software on each client machine. To do this, run the Office Tracker Installer and choose to install just the Office Tracker Client. 7. Locate the Office Tracker Server IP address or Machine Name (on the main “Admin” page) and give it to each of your client users. 8. Have client users connect to the server via the “Identity” window and instruct them on how to create group schedule views. See the User Guide for details. Where Schedule Information is Stored The Office Tracker Server maintains the "master" data files. The Office Tracker client software stores a local data file on each client machine ("otclient.mdb”). The files automatically synchronize to the Office Tracker Server's files when the client users are connected to the server. This allows clients to work offline and to update the server when they reconnect. For example, if your users travel with a notebook computer they can continue to schedule "offline" and their information will update automatically when they connect back to your network. Office Tracker and Shared Files (NOT SUPPORTED) Office Tracker does not use the “Shared file” concept. Office Tracker is a true client/server system. The client will send its information to the server and other clients will communicate with the server to get updated information from the other clients. This is the most efficient method and allows many users to access the information simultaneously. Important: Do not attempt to place the .ots files (“views”) created by the Office Tracker client in a shared directory and share them with other users. This can cause undesired results. How Clients Know They Are Offline The Office Tracker client software displays an offline icon (red X on a network cable) in the upper right corner of the main Office Tracker window any time the server machine is unavailable. This lets the users know that the schedule information they are viewing may not be completely up to date.

Installation 7
Office Tracker Server Installation
This section describes the minimum requirements, installation steps and other important topics regarding how to install the Office Tracker Server.
Installation
System requirements can change over time due to changes made in the operating system software purchased with your machine as well as updates you do to the machine.
Office Tracker System Requirements
Installing on Multiple Machines with One Machine Acting as the Server Processor: 800 MHz or better Operating System: Windows 98/NT/2000/XP/2003 workstation or server machine. Laptops are not recommended or supported for server use. Network: TCP/IP Network Support RAM: 256MB RAM (512MB RAM Recommended)* Hard Drive: Min. 60 MB free disk space.* Monitor: VGA or SVGA video monitor and 256 colors CD-ROM: CD-ROM Printer: Works with most printers supported by Windows 98, 2000/2003/NT/XP Other: Web Browser with Frames support for Administration tools. * More memory and disk space may be required, depending on maximum number of client connections and average number of events scheduled. Office Tracker Windows Client Requirements Processor: 400 MHz or greater Operating System: Windows 98/NT/2000/XP/2003 RAM: 64MB RAM (128MB RAM Recommended) Network: TCP/IP Network Support Hard Drive: 50 MB free disk space Monitor: 15" VGA or SVGA video monitor and 256 colors Resolution: 800x600 or larger screen area recommended CD-ROM: CD-ROM Printer: Works with most printers supported by Windows 98, 2000/2003/NT/XP Installing Office Tracker Windows Single or Multi-user on a Single Machine Processor: 800 MHz or better Operating System: Windows 98/NT/2000/XP RAM: 256MB RAM (512MB RAM Recommended) Hard Drive: 100 MB free disk space Monitor: 15" VGA or SVGA video monitor and 256 colors Resolution: 800x600 or larger screen area recommended CD-ROM: CD-ROM

8 Installation
Printer: Works with most printers supported by Windows 98, 2000/2003/NT/XP WebViewer Requirements • Windows NT, 2000/2003 or XP • Memory and disk space requirements may be considerably higher than the above defaults,
depending on the number of names and the number of events you schedule
Server Performance and Network Notes
The Office Tracker Server is designed to accommodate from one to thousands of users per server depending on usage patterns and your machine configuration. For example, if your office has 20 full-time schedulers viewing large groups of names (10 or more at a time) and scheduling appointments every few minutes you will be putting more of a demand on the server than an office with 100 users who only use Office Tracker to outline their personal schedule and to occasionally set up meetings with each other. In addition to usage patterns, there are other factors such as available bandwidth on your network, the speed of the server machine and the amount of memory on the server machine. The more memory you have, the better the performance.
Installing on Windows 98, Windows NT/2000/2003/XP
More advanced installation options including Custom install instructions can be found in this guide in the section “Advanced Installation and Options.”To install the Office Tracker Server using the recommended default settings, follow the steps below. 1. Important: If you are running Windows NT/XP or 2000 you should be logged on to your machine
with full Administrator privileges in order to do the installation for the Office Tracker Server. Please check this first and call if you have a question.
2. Insert the CD ROM into your computer. The CD should automatically start and display the startup screen.
3. Click on the “Install Office Tracker” link. Follow the on screen instructions, clicking the “Next>” button or other buttons as needed.

Installation 9
4. The Office Tracker Installer Extracting Files window displays.
a. If you have previously installed using this installer, you may get a window asking if you’d like to replace files already installed. Press “Yes to All” to continue.
5. The Office Tracker Installer Welcome screen displays. Press Next to continue.

10 Installation
6. License Agreement. Press the “Yes” button to agree to the License Agreement and continue.
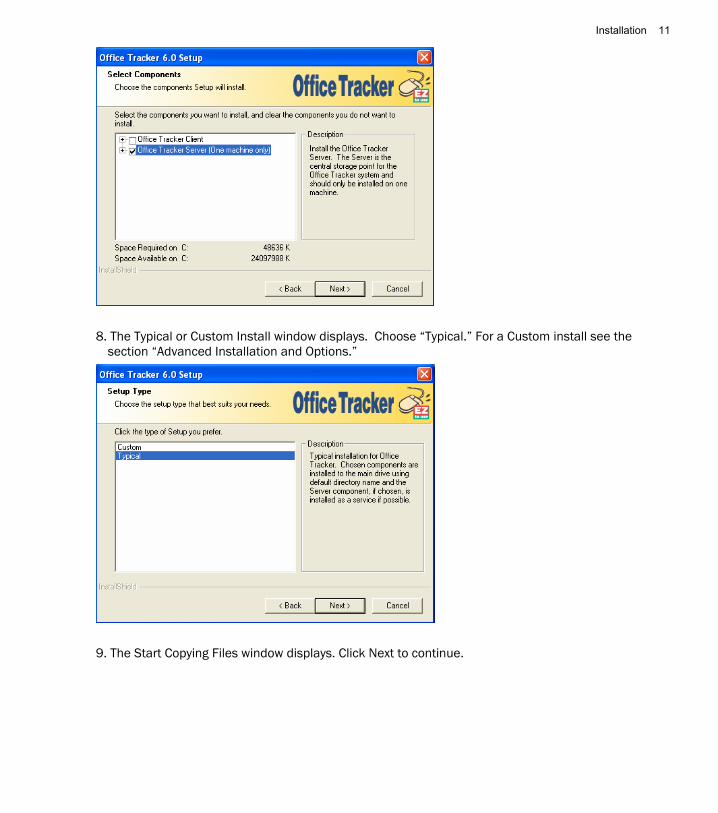
7. The Select Components window displays. Choose “Office Tracker Server” by clicking the checkbox
to turn the checkmark “on.”
Installation 11
8. The Typical or Custom Install window displays. Choose “Typical.” For a Custom install see the
section “Advanced Installation and Options.”
9. The Start Copying Files window displays. Click Next to continue.

12 Installation
10. Click the Finish button, leaving the checkbox “on” to Go to the Office Tracker Server Admin Page.
This completes the installation and opens the Admin page so you can begin setting up the server with the names of your users, rooms and resources.
Installation 13
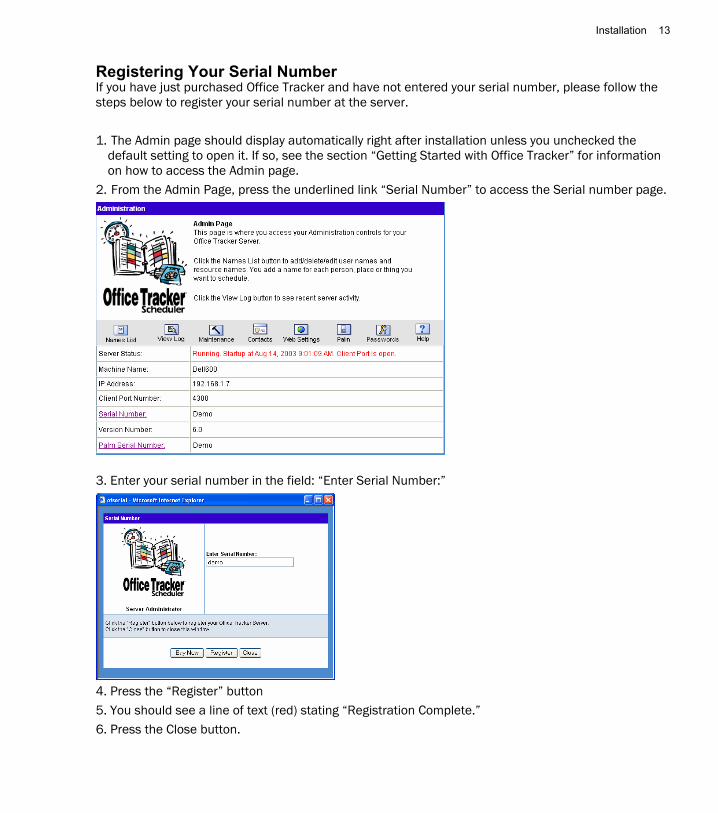
If you have just purchased Office Tracker and have not entered your serial number, please follow the steps below to register your serial number at the server.
Registering Your Serial Number
1. The Admin page should display automatically right after installation unless you unchecked the
default setting to open it. If so, see the section “Getting Started with Office Tracker” for information on how to access the Admin page.
2. From the Admin Page, press the underlined link “Serial Number” to access the Serial number page.
3. Enter your serial number in the field: “Enter Serial Number:”
4. Press the “Register” button 5. You should see a line of text (red) stating “Registration Complete.” 6. Press the Close button.

14 Installation
Now you are ready to begin using the Office Tracker Server. The next section will tell you how to get started, add names and how to instruct your client users to connect to the server.

Getting Started with Office Tracker 15
Getting Started with Office Tracker To begin using Office Tracker as a network group scheduling solution you must set up the Office Tracker Server and add your client user and resource names. This section covers how to do both. Before you go on, here is a list of Do’s and Don’ts you should read in order to run the Office Tracker Server effectively.
Office Tracker Server Do’s and Don’ts
DO read the documentation for both the server and the client. You should be familiar with all features (client and server) in order to act as the Server Administrator.
DON’T let an inexperienced user run the Office Tracker Server. Schedules are important information to your company, don’t allow this valuable asset to be in the wrong hands.
DO show your client users how to access the Help system in the client software from the Help menu by choosing “Contents.”
DON'T make copies of the OTServer directory while the server is running as this is not the proper method for backing up. See the section on Server Administration for backup instructions.
DO read the documentation on your operating system and network configuration. TCP/IP can be complicated if you’ve never read the instructions.
DON’T upgrade client software versions without upgrading the Server version, unless specifically instructed to do so by Office Tracker technical support.
DO keep a current backup of the OTP_Backups and the OTPSettings file on a backup device as often as practical. We recommend daily.
DON’T move the Office Tracker Server to a new machine before you thoroughly understand what’s involved and how to move it.
DO read periodic e-mail updates sent to you by Milum identified with "Office Tracker" in the subject area and keep up with recommended maintenance updates.
DON'T change your server IP address without understanding how to re-connect your clients.
DO instruct client users how to set-up their initial schedule views (.ots files). Each user will need to have their own schedule view(s) created on their local machine.
DON’T attempt to place the .ots files created by the Office Tracker client in a shared directory and share them with other users. This can cause undesired results and strange behavior.
DON'T forget to make backups of your data files as described in “Making Backups of Your Data File” later in this guide.

16 Getting Started with Office Tracker
Starting and Setting Up the Office Tracker Server
Step 1. Starting the Office Tracker Server 1. The Office Tracker Server is set up to auto-start after install. Each time the server machine is restarted, the Office Tracker Server should also start up. If the server is not running for some reason you can start it as described under the “Server Administration” section. Step 2. Opening the Office Tracker Server Administration Pages 1. The Office Tracker Server Admin page is set to automatically open after install unless you cancelled this option. If your web browser is not open to the Admin page, open your web browser now. Enter your Office Tracker Server machine IP address or machine name followed by a colon “:” and the Office Tracker Server port number which is “8001” If your server IP address is “122.22.22.22” you would enter: <http://122.22.22.22:8001> Or if your server machine name was “ServerXYZ” you would enter: <http://ServerXYZ:8001> The Office Tracker Server “splash” screen displays for a moment. If you do not have Javascript “active”, this window will continue to display and you will need to turn Javascript "on" and reload the page in your web browser. To turn Javascript “on” check your web browser “Preferences” or "Options" menu. Step 3. Enter Administrator’s Name and Password (Server Password) Note: This step is not required in “Demo” mode. The Office Tracker Administrator Pages uses a password to protect access from unauthorized users. Enter the following password into the password field. The name and password are case sensitive. Note: Don’t hold down the shift key when pressing the “=” key. Administrators Name: Admin Administrators Password: ot=timesavings You can change the Office Tracker Server password from the Admin pages, please read the section later in this guide under Server Administration.

Getting Started with Office Tracker 17
Tip: Create a “bookmark” in your browser for the Main Admin page or the Names List page. If you do not create a bookmark you will have to enter the full path each time you want to access the Office Tracker Server Administration Pages.
a.) If your web browser is set to use a Proxy Server, it could block the ability to connect to the local server. Turn the Proxy Server option “Off” prior to any administration tasks. From Internet Explorer choose "Internet Options" from the "View" menu, then click the Connections tab. From Netscape, choose "Preferences" and click on the Advanced settings to access the Proxy Server option.
WHAT TO DO IF YOU CAN’T ACCESS THE ADMIN PAGES
b.) If you are using MS Internet Explorer, be sure you've entered the full path for your server including the "http://" at the beginning and the ":8001" port number after your IP address. c.) If you are running Windows XP and have installed Service Pack 2 or Personal Firewalls, you will need to open the :8001 port for the server and the 4300 port for the client. These settings are normally found in the Control Panel under the Start menu. Step 4. Adding Names for People and Resources About Adding Names (People, Rooms and Resources) You must add each of your client users’ names before they can log into the Office Tracker Server and begin sharing schedules. You must also add any resources such as conference rooms in order for users to begin creating schedules displaying the rooms.

18 Getting Started with Office Tracker
Group Names If you would like to divide your users, rooms and resources into groups you can create Group Names at the Office Tracker Server, prior to adding the individual names. Setting up groups enables you to better organize the Names List and allows client users the added advantage of “filtering” their names list by group any time they want to create a new schedule view, add attendees to a meeting or print schedules. You can find more detailed information about Groups later in this guide. Whether you enter a person’s name or resource name you will follow the same procedure. In Office Tracker each name (people and resources) has an “Identity”. Each identity may have a corresponding e-mail address, sharing privileges and password. Sharing Privileges are accessed after you add the names and are described in detail in the section "Security and Custom Sharing Privileges" later in this guide. When a client user launches the Office Tracker application they enter their “Identity” Name. A client user can sign on with their own identity or the identity of any other user or resource if they have the correct password. The Identity of the user scheduling events will display on the user’s screen at the bottom of the Office Tracker schedule window and in the event block as “Scheduled by: Identity Name”. This is important because whenever an event is created no matter what schedule it is placed on, the person who scheduled the event "Scheduled by: Identity Name" is the owner of that event. To add a new name, follow these steps: Important Note: You should decide on your standard naming formats before you begin adding new names to the Office Tracker Server. Client users must use this “Identity” name exactly as you enter it. We recommend a straightforward “Firstname Lastname” approach. If you choose to enter each clients’ identity as “Lastname Firstname” they may have more difficulty using the system as most people are used to using first names. Names are case sensitive. 1. Click on the Names List button from the Admin page. The Names List window opens. If you are not at the Admin page, open your web browser and enter your Office Tracker Server machine IP address followed by a colon “:” and the Office Tracker Server port number which is “8001” If your server IP address is “122.22.22.22” you would enter: <http://122.22.22.22:8001> , then click on the Names List button.

Getting Started with Office Tracker 19
2. Click the “Add Name” button. The Add Name window displays. If the Add Name window does not show the Add Name button at the bottom, drag the bottom corner of the Add Name window to resize it.
3. Enter the name of the person or resource in the name field.

20 Getting Started with Office Tracker
4. Choose a “Type” from the drop down menu. Each name can have one corresponding “type” which identifies it by an icon client users see in their schedule displays. Types can also be useful when you export schedule data for reporting. For example, you may want to create a report of conference room usage and having the “conference room” type assigned to all rooms makes it easier to retrieve this information. 5. Choose a “Group” if you have created Group Names (Optional). You can add group names later and edit any name on the Names List to add it to a group. 6. Info (Optional)- Enter any desired information about the name in the Info. field (many users like to use this field for the phone extension of the client or conference room, or serial number of the equipment). For conference rooms you might also put the total number of occupants the room can handle. 7. Password (Optional)- Set a password for the name. If you set the password from the server, client users will need to enter this password when they launch Office Tracker. Client users can also set a password for themselves once they log onto the Office Tracker Server (preferred). 8. E-mail (Optional)- This is for use with MAPI e-mail notifications) Enter the e-mail address you want to associate with this name. (You may want to associate a user’s e-mail address to your resources.) 9. Click the “Add Name” button to create the new name record. A new blank Add Name window displays. You can add another name or close the Add Name window. When you are done adding names, close the Add Name window. 10. Click the Update button in the Names List window to view the names you added. Each time you add names, edit names or delete names, the Names List window will require an “update” to reflect the changes. Click the update button after making name changes to view the changes in the Names List. Once you have added all names (you can add additional names later as needed) you are ready to connect your client users. Client users will need to have the Office Tracker client software installed on their individual machines. Step 5. Install Office Tracker on Users Machines
Detailed instructions for installation on Windows 98/NT/2000/2003/XP are included in the User’s Guide.
Step 6. Give Users IP Address or Machine Name, Log-On Name (“Identity” Name) and Serial Number Distribute the IP Address or Machine Name and serial number to each user and give them their “Identity” name so they can connect to the Office Tracker Server. The “Identity” name needs to match exactly as it is entered at the Office Tracker Server on the Names List. Spaces and capitalization must match as well.
Getting Started with Office Tracker 21
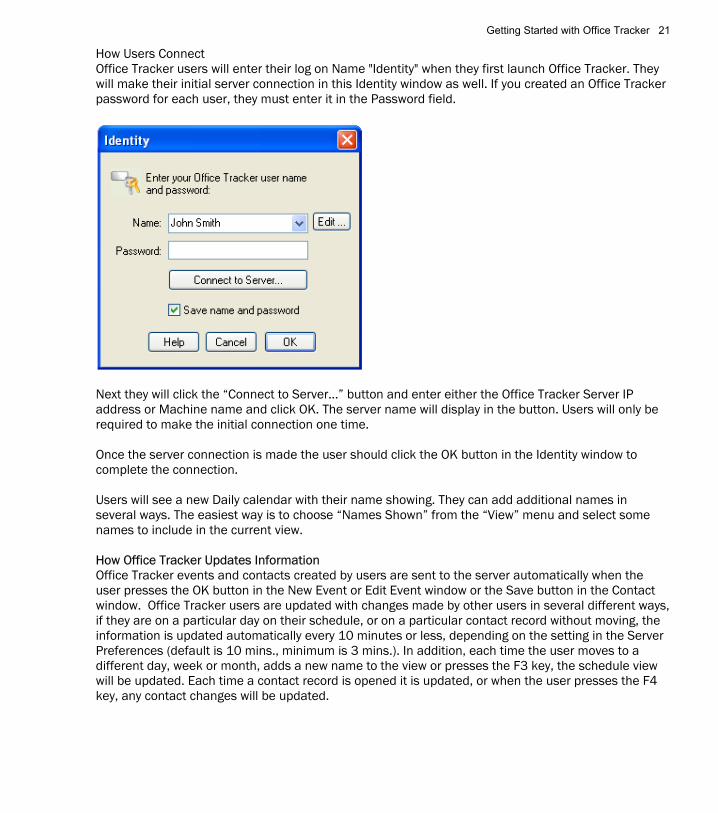
How Users Connect Office Tracker users will enter their log on Name "Identity" when they first launch Office Tracker. They will make their initial server connection in this Identity window as well. If you created an Office Tracker password for each user, they must enter it in the Password field.
Next they will click the “Connect to Server…” button and enter either the Office Tracker Server IP address or Machine name and click OK. The server name will display in the button. Users will only be required to make the initial connection one time. Once the server connection is made the user should click the OK button in the Identity window to complete the connection. Users will see a new Daily calendar with their name showing. They can add additional names in several ways. The easiest way is to choose “Names Shown” from the “View” menu and select some names to include in the current view. How Office Tracker Updates Information Office Tracker events and contacts created by users are sent to the server automatically when the user presses the OK button in the New Event or Edit Event window or the Save button in the Contact window. Office Tracker users are updated with changes made by other users in several different ways, if they are on a particular day on their schedule, or on a particular contact record without moving, the information is updated automatically every 10 minutes or less, depending on the setting in the Server Preferences (default is 10 mins., minimum is 3 mins.). In addition, each time the user moves to a different day, week or month, adds a new name to the view or presses the F3 key, the schedule view will be updated. Each time a contact record is opened it is updated, or when the user presses the F4 key, any contact changes will be updated.

22 Getting Started with Office Tracker
Instruct Clients About Working Offline Client users can work while connected to the server as well as when they are “offline” or disconnected from the server. They may disconnect physically to take their computer home with them or they may get disconnected temporarily if the Office Tracker Server is taken off line. If clients become disconnected the offline icon will display in the top right corner of their schedule window. When the server is available again they will automatically be reconnected and the icon no longer displays. When client users work offline, Office Tracker keeps track of the changes they make on their local machines and waits to reconnect to the server to synchronize the changes. The synchronization process happens automatically and takes place in the “background” however there are some “rules” to be aware of. In general, the server will always have the ruling events. In other words, changes to events on the server usually hold precedence over changes clients make while offline. - Events and contacts that are added by other users while clients are offline will show up on their schedules once they reconnect and synchronize to the server. - Events and contacts that were modified while clients were offline. An event modified by another connected user will override. In this case, Office Tracker will use the record on the server as the ruling record. This means a client’s schedule may reflect the changes made by the other connected user once they synchronize. - Events and contacts clients create and edit while offline should be reflected once they synchronize.

Server Administration 23
Office Tracker Server Administration There are several tasks the Office Tracker Server Administrator should take care of on a regular basis. Aside from installing the software and setting up the Names List, there are backups to manage, Sharing Privileges to assign and periodic maintenance such as checking for the latest upgrades and applying them when appropriate. Most tasks are handled via the Server “Admin” pages as described in this section. Overview of Common Server Administration Tasks • Adding new names to the Names List as new employees come on board, or new resources such as
meeting rooms are added. • Making frequent backups of the server data files to a separate disk. These are fundamental to the
operation of the Office Tracker system and if your server machine has a problem or your hard drive fails you do not want to be without backups!
• Setting your client’s sharing privileges to give or restrict access to schedules. • Stopping and Starting the Office Tracker Server properly. Detailed instructions are included in this
section under the heading "Starting and Stopping the Office Tracker Server." • Regularly checking the “View Log” for errors and Startup information and the “Names List” to be
sure it is displaying your names after a server restart. • Troubleshooting: For example, if a particular client user is having a problem with their data such as
events not displaying correctly or error messages, you may need to re-set the client’s local data file. Or, if users have trouble with their connection to the server they will see an "offline" icon in the right hand corner of their Office Tracker window. You should check the Server Admin pages “View Log” to see if there are any error listings.
Server Admin Pages
The Office Tracker Administration pages (“Admin” pages) act as the front end to the various controls and features of the Office Tracker Server application. The Admin pages are a series of html pages that were installed on your server during your server installation process. To open the main Server Admin page, follow the steps below. 1. Open your web browser and use the bookmark you created in the “Getting Started” section of
this guide, or enter the following: http://yourserveripaddress:8001 or http://yourservermachinename:8001 into the address area (url area) of your web browser, then press the “Enter” key
Note: If the Office Tracker Server application is not running you will see the “Page Not Found” message in your browser. If so, start the Office Tracker Server and try again. See “Starting and Stopping the Office Tracker Server.”

24 Server Administration
2. The Administration window displays. You will see the the status of your server (whether or not it’s running), your IP address, Machine Name, your serial number and version information.
From the main Admin page you can access the other administrative tools you will use in the Office Tracker Server. The Names List is where you will enter your user’s names as well as the names of any rooms or other resources you will be scheduling. The View Log is used for troubleshooting server activity. The Backup page lets you set your backup times. It is recommend you backup the files to another drive, see “Backing up Your Office Tracker Server Database Files” later in this guide. Server Status: This shows the last startup time of the server and indicates if the client port 4300 is opened correctly. If not, you may need to Stop the Office Tracker Server and restart it. Machine Name: This is the name of the machine where the Office Tracker Server is installed and running. You can allow your Windows client users to use this name instead of the IP address if they are connecting from a Local Area Network. IP Address: This is the IP address of the machine where the Office Tracker Server is installed and running. Client Port Number: This is the port used for all Office Tracker client connections. You may need to allow this port number access if you are using firewalls for your network. Serial Number: Your serial number will display in this area. If you have not registered your serial number yet, it will say “Demo”. To register, click the underlined Serial Number link. Version Number: This displays the version of the Office Tracker Server you are currently running. Please have this information available if you call for support. Palm Serial Number: This is only pertinent if you have purchased the optional OTPalm software.

Server Administration 25
Starting and Stopping the Office Tracker Server
Starting and Stopping the Office Tracker Server as a Standard Application (Windows 98) If you chose to install the Office Tracker Server as a standard application, once you run the installer you will have a mini-application or “launcher” accessible from your Task Tray at the bottom of your screen. The launcher icon looks like a small calendar with a network connection on the bottom. You can right click on the launcher icon and choose to “Start” or “Stop” the Office Tracker Server from the launcher menu. Starting and Stopping the Office Tracker Server as a “Service” If you chose to install the Office Tracker Server as a “Service” once you’ve run the installer you will have a new service called “Office Tracker Server” in your Services window. The service will start automatically upon completion of your install and should be ready to use. If you stop the service, you will start it as described below. Starting the Office Tracker Service on Windows 2000/2003/XP If you have the Office Tracker Service set to Startup “Automatically” (default setting) in your Services window when you restart the machine the Office Tracker Server will start automatically. If you have set the Office Tracker Service to startup “Manually” and you Stop the service, you will need to open the Services window from your Start/Settings/Control Panel/Administrative Tools double-click the Office Tracker Server and press the “Start” button to start the server again. Stopping the Office Tracker Service on Windows 2000/2003/XP To Stop the Office Tracker Server Service, open your Services window from your Start/Settings/Control Panel/Administrative Tools, double-click on “Office Tracker Server” to open it, then click the “Stop” button. Starting the Office Tracker Service on Windows NT If you have the Office Tracker Service set to Startup “Automatically” (default setting) in your Services window when you restart the machine the Office Tracker Server will start automatically. If you have set the Office Tracker Service to startup “Manually” and you Stop the service, you will need to open the Services window from your Start/Settings/Control Panel/, select the Office Tracker Server and press the “Start” button to start the server again. Stopping the Office Tracker Service on Windows NT To Stop the Office Tracker Server Service, open your Services window from your Start/Settings/Control Panel and click on “Office Tracker Server” to select it, then click the “Stop” button. Note: Some machines may require you to manually stop the javaw.exe process by choosing Ctrol-alt-Delete, pressing the Task Manager tab and selecting “javaw.exe” from the tasks and pressing the “End Task” button.

26 Server Administration
The Office Tracker Server's Names List window is accessible from the Admin page. This is the page you will likely use most often, especially when you first begin using Office Tracker. The Names List is where you enter all users’ names as well as the names for any rooms, facilities or other resources you want to schedule.
Working with the Names List
If you have a small office or you are scheduling for just a few names, you may choose not to use the “Groups” feature in Office Tracker. This is an optional feature that is most beneficial to users who will schedule a large number of names and would like to divide them into specific groups. If you choose not to use Groups, you can skip down to the section on Adding Names to the Names List.
Office Tracker Groups (Optional)
A “Group” in Office Tracker lets you organize your Names List so users can filter which names they view based on the group they are interested in seeing. In addition if you use group names you can assign Sharing Privileges to an entire group of users at one time, saving yourself administration time. For example, if you create a Group called “Meeting Rooms” then create each of the Room Names on your Names List and assign each room to the “Meeting Rooms” group, users can choose to only view “Meeting Rooms” when they are creating a new schedule view or editing Attendees/Resources. When you want to assign privileges to the schedules for “Meeting Rooms” you can give users the same access to all rooms if you like. Similarly if you create a group such as “Sales Group” you can easily assign Sharing Privileges to everyone in the Sales Group at one time. Setting Up Group Names You set up Group names under the Groups button on the Names List page in your Server Admin Pages.
1. Open your Admin pages by Starting your web browser such as Internet Explorer, and entering: http://yourserverIPaddress:8001 into the address area.
2. Press the Names List button, then the Groups button. 3. Press Add Group to add the first Group Name.
After adding Group Names, you can choose a Group when you add or edit a name on the Names List. How to Add a User or Resource to a Group 1. Open your Admin pages by Starting your web browser such as Internet Explorer, and entering: http://yourserverIPaddress:8001 into the address area. 2. Press the Names List button 3. Click on the name on the Names List or click the “Add Name” button if you are adding a new name and assign them to a Group by selecting the Group Name from the Group menu, then press the Update button. You can assign each new name into an existing group by selecting the group on the Add Name window

Server Administration 27
when you are creating the name. You can also assign Sharing Privileges to Groups making it much faster and more effective when trying to make a change to several names at once. How Client Users Access Groups Grouping of names gives you the ability to “filter” your Names lists within the “Names Shown,” “Attendees/Resources,” and “Select Contacts from Server” windows. When you open these windows, the “Group” menu will display above the names available list. Selecting a group will filter the list to only show the names in that specific group.
1. Open the Office Tracker Administration Page in your web browser window by using the bookmark you created or by entering <http://yourserveripaddress:8001> in the address area.
Adding Names to the Names List
2. Click the Names List button. The Names List window displays as shown– however if you have not added names, the lower portion will be empty.
3. Click the “Add Name” button. The Add Name window displays.

28 Server Administration
TIP: If the Add Name window does not display the Add Name and Close button at the bottom, drag the bottom corner of the window to resize it. Important Note: Be sure you have decided on your standard naming formats before you begin adding new names. Client users must use this “Identity” name exactly as you enter it. We recommend a straightforward “Firstname Lastname” approach. If you choose to enter each clients’ identity as “Lastname Firstname” they may have more difficulty using the system. 4. Enter the name of the person or resource in the Name field. 5. Choose a “Type” from the drop down menu. Each name can have one corresponding “type” which identifies it by an icon client users see in their schedule displays. Types can also be useful when you export schedule data for reporting. For example, you may want to create a report of conference room usage and having the “conference room” type assigned to all rooms makes it easier to retrieve this information. 6. Group (Optional)- Choose a group name from the Group menu if you have created groups. 7. Info.(Optional)- Enter any desired information about the name in the Info. field (many users like to use this field for the phone extension of the client or conference room, or serial number of the equipment). For conference rooms you might also put the total number of occupants the room can handle. 8. Password (Optional)- Set a password for the name. If you set the password from the server, client users will need to enter this password when they launch Office Tracker. Client users can also set a password for themselves once they log onto the Office Tracker Server (preferred). 9. E-mail (Optional)- for use with MAPI e-mail notifications) Enter the e-mail address you want to associate with this name. (You may want to associate a user’s e-mail address to your resources.) 10. Click the “Add Name” button to create the new name record. A new blank name record displays. You can add another name or close the Name Record window. When you are done adding all names you want for this session close the Name Record window. 11. Important: Click the Update button to view the names you added.

Server Administration 29
Viewing, Editing (Changing), and Deleting Names
Important Note: When you edit the spelling of a name on the Names List or delete a name, instruct client users to edit any saved views containing the original spelling of the name. When you want to make a change to a Name record or to remove a Name, follow the steps below. To View or Edit a Name Record, follow these steps. 1. Open the Office Tracker Administration Pages in your browser window by using the bookmark you created or by entering <http://yourserveripaddress:8001> 2. Click the Names List button. The Names List window displays. 3. Click on the underlined Name in the first column of the Names List to edit the record. 4. The Edit Name window for that user or resource displays. Tip: If the Edit Name window does not display the buttons at the bottom you may need to drag the bottom corner of the window to resize it. 5. Make your changes to the name record. 6. Click the “Update Name” button to accept your changes. To delete a name, click the Delete Name button. Instruct all client users to remove the old name from any saved views, press the F3 key to get an update of names from the server, then add the new name into their schedule view. 7. Click the Update button in the Names List window to update your list when you delete or modify names. Sending e-mail to a name on the Names List Provided you have your web browser configured properly, you can send e-mail to any name on the Office Tracker Names List by clicking on the underlined e-mail address in the Names List window. Viewing the Currently Connected Users in the Names List From the Names List window you can click the “Connected” button to view a list of currently connected users on your Office Tracker Server. This is helpful to diagnose network trouble and usage of the system. On occasion the “Connected Users” list may not be able to resolve the user’s name and will display an “Unknown User” in the space for the name of the connected user. You can make a note of the IP address and resolve the name from the IP address. 1. Click the “Connected” button. 2. The Connected Users window displays a list of connected users. Note: If the name shown is "unknown" this is because Office Tracker had a problem resolving the name associated to the IP address listed. Adding Client Users (Increasing User License) If you would like to add additional client users to Office Tracker you can upgrade your user license at

30 Server Administration
any time by contacting Milum at: 512-469-2966. Changing the Spelling of Name on the Server List Changing the spelling of a name on the server will require client users with saved views to remove the old name and add the new name. This is accomplished by choosing “Names Shown” from the “View” menu with the view open. The client should remove the old name and add the corrected name by choosing it from the Names Available field. Deleting a Name from the System You may want to delete a user or resource name from the server if the user is no longer working with your organization or the resource is no longer available for scheduling. Note: Removing a name means that some client users will have saved views with the removed name still included. Unless you want client users to be able to access the information for historical record keeping, they should be instructed to remove the name from their saved views as well. Once a name is removed from the server and the client has received a full update, the name will no longer display in the Names Available list. The client user will get a message each time they open a view with the old name included to let them know this name no longer exists on the server. When you delete a name from the Names List, events with the name (any events including this name as an “Attendee”) will remain. This is to preserve the history of that user or resource's schedules. Your current client users will no longer have access to the deleted user’s name from their Names Shown and Attendees lists. Tip: If you delete a name by accident you can reactivate the name by re-entering it at the Office tracker Server Names List exactly as you had it before.
Office Tracker users can share information in a number of ways. Sharing Privileges can be assigned at the Office Tracker Server for client users as well as for resources such as conference rooms and equipment. Sharing privileges allow users to view each other's schedules and to schedule meetings and group events.
Security and Custom Sharing Privileges
Important Note: Office Tracker has default sharing privileges that meet the needs of most offices. Before making changes to the privileges, please review this information and the needs of your office. A large number of non-default Sharing Privileges can slow down server performance when a new user connects for the first time and needs to retrieve all permission information concerning their name.
In addition to the default privileges, you can create custom Sharing Privileges. Custom Sharing Privileges can be assigned at the server. For example, if you use Office Tracker to set meeting times for conference rooms you may want to set privileges to restrict who is allowed to schedule (create events) on the conference room schedules.

Server Administration 31
Passwords Security is provided on the client user’s machine by allowing users to set a password for themselves. The password simply keeps other network users from signing on with an unauthorized identity and obtaining schedule information. The Office Tracker Server Administrator can remove the password for any user from the user’s name record in the Names List page. Event Ownership When an event is created, ownership is based on the current Identity selected at the Office Tracker client. The Identity may or may not be the user's name. When an Office Tracker client has Sharing Privileges to schedule events for a person or resource other than their own name, the event that is created is still owned by the client (identity) scheduling the event. If a user wants to modify an event that is scheduled on a conference room calendar they must have privileges to “Edit events” for the owner of the event not the conference room. To check the identity of any client, go to the client machine and choose "Identity" from the "File" menu or look in the bottom “status” area of the Office Tracker window. The Identity window shows the current Identity in the "Name" field. If you want to change the Identity, select the users name from the drop down menu if it is available. If it is not available, enter their name exactly as it is entered on the Server's Names List and click the “OK” button. When a user schedules an event the event will show the "Scheduled by" name in the edit event window (double-click on any event to view this information in the lower left corner of the event window). The "Scheduled by" name is the name of the Identity used when the event was created. Setting Sharing Privileges for Resource Names Sharing privileges can be set for resource names from the Office Tracker Server. For example, if you use Office Tracker to set meeting times for conference rooms you may want to set privileges to restrict who is allowed to schedule conference rooms. Resources have an “identity” just like client users. Think of the resource as a regular user name when you are creating privileges. Sharing Privileges for Client Users When client users connect for the first time they will gather all Sharing Privileges for their name from the Office Tracker Server. If you make a large number of changes to the Sharing Privileges before allowing clients to connect, then you instruct ALL of your clients to connect at the same time, you will notice a delay time and slow server performance as the server updates all the connecting clients. Client users can also get Sharing Privileges updates by pressing the F3 key on the top of their keyboard. “Everyone” Option in Sharing Privileges (Use with care) The “Everyone” option in the Sharing Privileges window actually creates individual “exceptions” to the default Office Tracker Sharing Privileges. What this means is that a large number of sharing “permission slips” must be sent to each client user when this option is used. The more often you use the “Everyone” privilege, the more hits your server performance will take on initial client connections. Use this option with care.

32 Server Administration
To create custom sharing privileges for any name (client user or resource), follow the steps below. Creating or Assigning Sharing Privileges for Users
1. Open the Office Tracker Administration Page in your browser window by using the bookmark you created or by entering <http://yourserveripaddress:8001> 2. Click on the Names List button. The Names List window displays. 3. Click on the Sharing button. The Sharing window displays.
4. Choose a name from the “Name” menu at the top “For schedules, events & contacts owned by:” 5. In the section “Give the access privileges below to:” choose a name from the "Group" menu if you are using Groups. This will give privileges to every name in that group or choose a name from the “Name” menu to give privileges to a specific name. 6. Click on the corresponding privileges to check the boxes or uncheck them to grant or remove privileges. See the definitions for Sharing Privileges below. 7. Click the “Save” button to send the changes to the Office Tracker Server.
Several Sharing Privileges are on by default. These are: “View Schedule,” “Add Events” and “View My Contacts.” These default settings allow your client users to get up and running quickly without
Sharing Privileges Defined

Server Administration 33
requiring you to make changes. Many users find these settings to be all they need. Each sharing privilege is described in detail along with a brief overview of when you would want to assign the privilege. The settings you select affect the user’s name you have selected in the drop down menu. View Schedule- allows the selected user to view the schedule for this name. If this setting is off, the name column displays in italics on that user’s machine. This is on by default. Add Events - allows the selected user to schedule events for this name. Assign this to anyone in your workgroup who may need to set up events or meetings that include this person or resource. This is on by default. Add Conflicting Events- allows the selected user to create conflicting events for this name/resource. Some organizations may need this ability in order to schedule shared rooms or to accommodate other specific scheduling needs where more than one event takes place at the same time. Edit/Delete Events- allows the selected user to edit or delete events created by this name. Users with this privilege can edit the contents of any event created by the user who is granted Edit/Delete. Assign this privilege to a user who does all of the scheduling for an office for each of the names they schedule. View Private Events- allows the selected user to view Private Events. This privilege requires View Schedule to be checked. It overrides the Private Event checkbox in the Event window. Assign this only when you want a user to have viewing access to all of another user's or resource's private events. When an event is displayed that is set to "private" and the user who is viewing does not have privileges to view the private events for this name, the event block displays with no readable text. View Contacts- allows the selected user to view the contacts for this name. If this setting is off, the name will not be available in the client user’s “Select Contacts from Server” window. This is on by default. Edit Contacts- allows the selected user to edit contacts created by this name. This is off by default. Delete Contacts- allows the selected user to delete contacts created by this name. This is off by default. View Private Contacts- allows the user to view private contacts created by this name. This is off by default. Add Contacts- this setting is only available when you choose the same name from both Name menus. It allows the selected user to create contacts. This is on by default. Office Tracker Contact Manager Sharing Privileges Contact records are “owned” by the creator just like events. The Office Tracker Server Administrator can give Sharing Privileges to each user to “View, Add, Edit, Delete, and View Private Contacts.” Adding/Sharing Contacts With Other Office Tracker Contact Manager Users Once you’ve set the Sharing Privileges for client users access to contacts they will need to choose which contacts to view locally using the “Select Contacts from Server” function. Each Office Tracker client user must choose “Select Contacts from Server” under the “Contacts” menu and select the names from the list as shown. Client users may view contacts from other users only if they have been granted Sharing Privileges to do so.

34 Server Administration
Backing up Your Office Tracker Server Database Files
Important: Please read this section thoroughly and make backups frequently. Do not make a backup copy of the OTServer folder while the Office Tracker Server is running. It is a “live” database and trying to copy it while it is running could damage the files. Check the backup software you plan to use to ensure it will not copy “live” files or be sure you exclude the “OTDatabase” folder. How and Why You Should Make Backups In general, data corruption is not common but on occasion it can happen. With a mission critical application like scheduling software there is never a good time for a corruption problem so backups are very important. If the server files become corrupt or get damaged you will have to recover a backup. You make backups on your local drive by opening your Admin page, pressing the Backup button to go to the Backup page, then pressing the Backup button. You will also want to make copies of your backups to a separate disk (not local) in case of a hard drive failure. All of this is covered in this section. Your backups only reflect the information you had at the time they were made. The 5.0 and later versions of the Office Tracker Server include a Backup setting that allow you to make backups as frequently as every 3 hours. This doesn’t mean you will have 8 copies each day, the backup scheme is handled on a rotating basis, keeping only 2 of the most recent copies of the file (“OTDATABackupA.xml” and “OTDATABackupB.xml”) and one for the start of the day such as “OTDATAWed.xml.” The backup files will be created every “x” number of hours apart depending on the setting you choose. The default setting is every 24 hours at midnight. What to do if you suspect corruption? If you suspect a database problem, don’t delay, immediately instruct users to Exit the Office Tracker application, then go to the server machine and Stop the Office Tracker Server. After the server has been stopped, try opening one of the client’s machines and see if you can print some reports reflecting data added since the last backup. This will give you something to use if necessary. You can at minimum pass around some printed reports to use while you are getting the backup copy in place. See “Restoring a Backup” for more information. AUTOMATIC SERVER BACKUPS The Office Tracker Server is configured by default (if you haven’t changed it) to automatically back up the data files once every night at midnight– provided you leave the machine and the server software running. This is only partial protection as you may have a hard drive failure or other hardware/software problem where you can’t access this backup. Important: You should make additional copies of the data files to another drive or backup system on a regular basis. This is covered later in this section under the heading “Making Manual Backups to Another Drive.”

Server Administration 35
The Office Tracker Server utilizes the XML (extendable markup language) format for backup files. This means with a web browser such as MS Explorer or any other XML parser you can open the backup and look at the data. You may even modify the file and use it for your data file – though this is for advanced users and we recommend consulting with a technical support person at Milum before you do this.
Where Backups are Stored
The automatic backup feature exports the Office Tracker master data file to an .xml file that is stored by default in a backup directory on your Office Tracker Server machine. This occurs by default each night at midnight, provided the Office Tracker Server software is running. You can view the backup location by clicking the Maintenance button in the Admin pages, then click the Backup button. The default backup directory is located in the path that follows: C:/Program Files/OT Server/Jigsaw/Jigsaw/WWW/Milum/OTP_Backups Note, C: could be a different letter drive if you installed the Office Tracker Server to a different drive during installation. The .xml backup files will be named OTDatamon.xml, OTDatatue.xml, etc. for each day of the week. Changing Your Backup Storage Location To change the path where your backup files will be located, open the Backup page from the Office Tracker Administrator and change the path from the default to the location of your choice. Be sure to enter the path explicitly with the correct backslashes indicating sub-directories. If the path you enter is invalid for any reason, the Office Tracker Server will default to the original path to save the backups. Backing Up Over Network When Running as a Service If you are running the Office Tracker Server as a “Service” you will need to set up your Office Tracker Server Service to allow network backups. 1) Open the Control Panel Services window on the Office Tracker Server machine and configure the Office Tracker Server service to log on to a user account that has access to network shares. This must be a user account other than “Admin.” To configure the account, right click on the Office Tracker Server service and choose “Properties” then click the “Log On” tab. 2. Click the “This account:” option then Browse to find the user account you want to set up. Choose it, click “OK” then click “OK” in the Log On window. Note: If the network share has a password to access the share, then the user account must have the same password as the share to successfully access the share from the Office Tracker Server service. 3. Restart the Office Tracker Server service and go to the backup page and enter the UNC pathname for the share. UNC pathnames are composed of the host name followed by the share name followed

36 Server Administration
by any directory names under the share name using the following format: \\hostname\sharename\directoryname\subdirectoryname...\subdirectoryname For example, to access the OTBackups directory under the ServerBackup share on the MainServer host machine the user would enter: \\MainServer\ServerBackup\OTBackups in the path input area on the Backup page of the Office Tracker Server. This only applies to users running the Office Tracker Server as a service, running the server as an application does not require the use of UNC names for shares, mapped drive letters may be used instead. Making a Manual Backup Ideally you should make backups during “down” time on your network when client users are not trying to access the Server. If client users are accessing the server they may be temporarily disconnected during the Backup process. When using this manual method of backup, the backup of your data file will have numbers appended to the end of the file name such as "OTDATA27100114629.xml." Each backup will have a different number appended. To locate the most recent backup, view the file by "Detail" to locate the most recently created file. Your manual backups will be stored in the same location as your automated server backups. See above under “Where Backups are Stored.” 1. Open the Office Tracker Administration Pages in your web browser window by using the bookmark you created or by entering <http://yourserveripaddress:8001>. 2. Click the Admin button. 3. Click the Maintenance button 4. Click the Backup button.

Server Administration 37
5. In the Backup Now section on the page, click the “Back-up” button. Note: Backups can take several minutes from 10-30 or more depending on the size of your data files (how many events you have) and the speed of your server machine. Important: Do not Shut Down the machine during the backup process as it can corrupt your backup. 6. When complete you will see a “Backup Complete” page. It should say that it was “successful.” If so, you can continue with other administration tasks at that time. If not, you may need to try a Rebuild and/or restore a previous backup copy.
Making a Backup to Another Drive
Important: In addition to Office Tracker's automatic backups, it is important to make backups to another drive. If your server machine has a hard drive failure for example, you would lose all the automatic backups unless you had copied them to another drive or changed the path for the automatic backup to another drive. Please do not make copies of the entire “OTServer” directory while the server is running as this may corrupt your database files. Since the Office Tracker Server keeps the database files open while the Office Tracker Server software is running you will not be able to backup the files by simply copying them. Instead, you should backup the xml files the Office Tracker Server automatically creates every night at midnight such as the OTDATAWed.xml for the backup of the data file from Tuesday. The name for the backup reflects the day after the actual backup since the backup starts at 12:01 am.

38 Server Administration
Following are the recommended file names to backup: OTDATASun.xml, OTDATAMon.xml, OTDATATue.xml, OTDATAWed.xml, OTDATAThu.xml, OTDATAFri.xml, OTDATASat.xml. These files are located in your OTServer directory in the following path by default: (Note, C: could be a different letter drive if you installed the Office Tracker Server to a different drive) C:/Program Files/OTServer/Jigsaw/Jigsaw/www/Milum/OTP_Backups If you have set the backups to be saved to another directory you can check the setting on your Backup page in the Admin pages. When the Office Tracker Server creates the automatic backups (provided the machine is on and the Office Tracker Server is running) it will replace the file from the last backup. At no time will there be more than seven (7) daily data backup files. If your server has not been running for an entire week you may not have all the files listed. If you're using an automated backup system you might want to create empty files with the missing names as place holders for your backup system or just back up the complete OTP_Backups directory.
Before trying to restore a backup copy you might want to try “Rebuilding” the data file. See “Rebuilding the Office Tracker Server Data File” later in this section.
Restoring a Backup of the Data File
If your data file becomes damaged due to a hard crash or other problem you may need to restore a backup copy. This is not a common procedure but one you will value if a minor catastrophe occurs. If you have trouble with the server and begin getting error messages or see errors in your log file it is an indication that something may be wrong with the data file. If rebuilding the data file does not fix the problem you will need to use a backup file. Note: You must restore the backup data file at the server machine unless you have remote access software. Office Tracker Server Backup Files The backups are stored by default in the “OTP_Backups” directory in the following path “C:/Program Files/OTServer/Jigsaw/Jigsaw/www/Milum/OTP_Backups” If you made a change to your backup storage location, you should check your Backup page to verify the correct location. Restoring the Office Tracker Server data file using a backup file. To restore the Office Tracker Server data file from a backup file, complete the following steps. 1. Exit all Office Tracker client users. 2. Stop the Office Tracker Server by either choosing “Stop Office Tracker Server” from your launcher icon (in your Task Bar) or if it’s running as a service open your Services Control Panel window and Stop the Office Tracker Server service. See the Chapter on Getting Started for more complete Starting and

Server Administration 39
Stopping instructions. 3. Locate the directory “OTP_Backups” in the following path (Note, C: could be a different letter drive if you’ve moved the Office Tracker Server to a different drive) “C:/Program Files/OTServer/Jigsaw/Jigsaw/WWW/Milum/OTP_Backups” 4. Make a copy of the most recent backup file you have such as “OTDATAMon.xml” The day of the backup is indicated prior to the .xml suffix. Mon, Tue, Wed, etc. Will indicate the day the backup was generated. Since the day of the backup is 12:00:01 AM the day Mon is really the backup form Sunday night at midnight. 5. Rename the directory “OTDataBase” in the C:\Program Files\OTServer directory to “OTDataBaseOld”. (Note, C: could be a different letter drive if you installed the Office Tracker Server to a different drive) 6. Move a copy of the backup file ex: “OTDATAMon.xml” to the “Import” directory at “C:/Program Files/OTServer/Jigsaw/Jigsaw/WWW/Milum/Import.” (Note, C: could be a different letter drive if you’ve moved the Office Tracker Server to a different drive) The Office Tracker Server looks for an Import file in the Import folder and scans the contents. If it finds any .xml files it imports their contents and then renames the file ".xml.done". 7. Start the Office Tracker Server application by choosing it from the launcher or by starting the service in your Services Control Panel window. The import process will begin immediately. Don’t turn off the machine or interrupt this process. 8. Log in to your Admin pages like you normally do. The import process page will display until the import is complete. Don’t turn off your machine or try to do other tasks until the Import is complete. The Import Complete page will display to notify you when the import is complete. 9. Once the Import Complete page displays, go to your Admin page, then check your Names List to verify your names are displaying properly. Check the View Log to make sure there are no errors. You may need to Refresh your web browser or Delete cached files to see the current View Log information. To delete cached files in Internet Explorer, choose the Tools menu, then Internet Options, select the General Tab, then click the “Delete Files” button under the Temporary Internet Files section. Click OK and then click the Refresh button.
The Office Tracker Server automatically logs server activity and creates a text file or “log” for each day of the week. The log is useful for spotting error messages that may indicate a need to rebuild your database files. You can view the “active” server log in your Admin pages by clicking the “View Log” button. You can also access stored text versions of your inactive logs.
View Log - Using the Office Tracker Server Log
Where Log Files are Stored The log files are stored in the Office Tracker Server folder on the hard drive in the following directory: "C: /Program Files/OTServer/Jigsaw/Jigsaw/logs." You can view the current log from the Server Administration Pages. Note: If you installed the Office Tracker Server on a drive other than the C: drive, the letter will be different.

40 Server Administration
Office Tracker will generate a file for each day of the week but only hold one week at a time. For example “Monday” will always reflect the most recently passed Monday. The Server Log can indicate problems on your server such as low memory, low disk space, or overuse of large group views. They can also be used to track changes made to events. You will likely read the server log only if you are experiencing some difficulty on your Office Tracker system, such as users being unable to connect to the server or slow access times. The Server Log must be backed up (copied) if you want to save the log information for more than the current week. Office Tracker automatically overwrites each weekday with the most current day’s information, storing just a week’s worth of log files at a time. To View the Office Tracker Current Log, follow these steps. 1. Open the Office Tracker Administration Page in your browser window by using the bookmark you created or by entering: <http://yourserveripaddress:8001>. 2. Click the Admin button. The Administration window opens. 3. Click the View Log button. The Server Log window displays. 4. Press the “Reload” button in your browser to get updates. Note: Only a portion of the current log file will be displayed in the View Log window. If you want to look at the entire log file you will need to open a word processor first, then open the log file by choosing "Open" from the "File" menu and locating the log file in the following directory: "C: /Program Files/OTServer/Jigsaw/Jigsaw/logs." You can view the current log from the Server Administration Pages. If you installed the Office Tracker Server on a drive other than the C: drive, the letter will be different.

Server Administration 41
Note: You must press the “Refresh” button in your browser window to see the most current log report. You will likely press this button several times during troubleshooting to watch the progress or activity.
With the Office Tracker Server you can export events to a xml or tab delimited file for use in a spreadsheet or database program. This is a useful reporting and archiving tool. You may for example, export all the events for a particular month with particular attendees for use in a time-billing scenario. Events are exported with all information fields in the following order: (Start Date and Time, End Date and Time, Actual Time, Description, Attendees, Scheduled by, Keyword, Label, and Recurring)
Exporting Events for Reports
Exporting to Tab Delimited Format Tab delimited format is simply a file format that uses tabs to separate the fields of information. When you export to this format you can open the exported file in a spreadsheet, database or even word processor to further manipulate the data.
42 Server Administration
Exporting in XML Format XML stands for eXtensible Markup Language, and is a data format for structured document interchange on the Web. Like HTML, it is a markup language derived from SGML. However, unlike HTML, which was created to allow cross-platform formatting of information for display, XML is best suited for organizing data. XML looks much like HTML, but the principle difference is that XML describes the type of content, whereas HTML describes how to display content. You can also think of each XML file or document as a mini-database. Tags (the text surrounded by angle brackets) in an XML document delineate the records and fields. The text between the tags is the data. Use the [CDATA[<data>]] block to include raw character data. XML tools are available for just about any platform and many are free. The SGML/XML Web Page (see below) maintains a very thorough list of publicly available software for XML. You can find it at http://www.oasis-open.org/cover/publicSW.html . To export events from the Office Tracker Server, follow these steps: 1. Open the Office Tracker Administration Page in your browser window by using the bookmark you created or by entering <http://yourserveripaddress:8001>. 2. Click the Admin button. The Administration window opens. 3. Click the Export Events button. The Export Events window displays. 4. Enter the desired date range in the format MM/DD/YY. 5. Choose the name or “Everyone” option in the Attendees menu. The “Everyone” option exports events for all attendees for the date range given. 6. Choose the format for the exported file. 7. Enter a name for the exported file. 8. Press the “Export” button. The exported file will be located in the following directory: "Program Files/OTServer/Jigsaw/Jigsaw/www/milum/Export."
Deleting Events (Clearing Historical Data)
¿ ! Important Note: Make a backup of the Server data file first. Once you clear old data client users will not have access to the information. You cannot reverse the deletion process. The Server data file is the “master” file and changes made to the Server override those made by clients.
To clear data from the Office Tracker Server follow the steps below. 1. Open the Office Tracker Administration Page in your browser window by using the bookmark you created or by entering <http://yourserveripaddress:8001>. 2. Click the Admin button. The Administration window opens.

Server Administration 43
3. Make a backup of the data file. (See Backing up the Office Tracker Server) 4. Click the Maintenance button. 5. Click the Delete Events button. The Delete Events window displays.
5. Enter the desired date range in the format MM/DD/YY. 6. Select the Attendee Name or “Everyone” to indicate events you want to delete that have a specific name or nonspecific name in them. 7. Press the “Delete” button. Note: Recurring events that have not completed all recurrences will not be deleted.
The Office Tracker Server has an automatic rebuild feature built in however there are times when you may need to do a manual rebuild. If your Server machine crashes or a network error causes some file corruption there may be a need to manually rebuild your data file. Also, if you want to upgrade, you should rebuild your data file prior to installing the upgrade. If you begin getting error messages in your Server Log file or client users report strange difficulties with events, this may be an indication you need to rebuild the file as well.
Rebuilding the Office Tracker Server Data File
To rebuild the Office Tracker Server Data file follow these steps. 1. Open the Office Tracker Administration Pages in your browser window by using the bookmark you created or by entering <http://yourserveripaddress:8001>. 2. Click the Admin button.

44 Server Administration
3. Click the Maintenance button. 4. Click the “Rebuild” button. 5. You are prompted to be sure you want to rebuild. 6. As long as you have a backup of your data file, and you have notified client users to disconnect from the server, click the “Rebuild” button to begin. Important Note: Do not shut down the machine during the rebuild process or you will corrupt your database file. This may take some time- 10- 60 minutes or more, depending on the size of your data file and the speed of your machine. The “Rebuild Successful” page will display when process is complete. 7. When you see the “Rebuild Successful” page click the Admin button to go back to your Admin page. Check your Names List page to be sure all your names are displaying properly, then check the View Log to be sure there are no errors being reported. If you see errors you may need to restore a backup copy of your database files. Note: The View Log may not update on it’s own due to the way some browsers handle caching of pages. To empty your cache in Internet Explorer select Internet Options, then Tools, click the Delete Files button then click OK. Close the Internet Options window then press your F5 key to refresh the page.
If the server data file becomes too large for the default memory setting, you may need to increase the memory size of the Office Tracker Server application. You may notice your Office Tracker Server responding slowly which would be a sign that the memory is set too low.
Increasing the Memory Allocation for the Server
To change the memory setting for the Office Tracker server follow these steps. 1. Go to the Office Tracker Server computer. 2. Stop the Office Tracker Server application or service. 3. Open regedit 4. Expand HKEY_LOCAL_MACHINE 5. Expand Software under HKEY_LOCAL_MACHINE 6. Expand Milum Corporation 7. Click on Office Tracker Server 8. You should see the Item LaunchCmd in the right pane 9. Double click the LaunchCmd to open the editor 10. Change the current string to the following line with no returns: javaw -Xrs -Xms32m –Xmx256m -cp "C:\Program Files\OTServer\Jigsaw\classes\OTPServ.zip" OTPServer -root "C:\Program Files\OTServer\Jigsaw\Jigsaw" 11. Press Ok to close and save the changes 12. Close Regedit

Server Administration 45
13. Start the Office Tracker Server. 14. Log into the server admin and check the view log to make sure the server is started and no errors are being logged. 15. Press the backup button to see if the server creates a backup file. If the server does not create the backup you will need to increase the memory in Regedit to a higher value. The –Xmx128m is the memory setting to change to increase the memory allocation.
The Office Tracker Server Admin pages can be accessed from any computer on your local area network provided you know the IP address and the Admin password. The default Admin password is “ot=timesavings” If you change the password you should write it down in a safe place and let at least one other person at your organization know what it is.
Setting Passwords for Admin, Labels and Keywords
The Office Tracker Server gives you password control over the Label edit and Keyword edit functions if you choose to password protect these items. If you password protect the labels and keywords, Office Tracker users cannot change or add to the labels or keywords menus unless they enter the correct password. Changing Passwords From the main Office Tracker Server Admin page (enter in your web browser - http://yourserveripaddress:8001), you can access the Passwords page by clicking on the passwords button. The Edit Passwords page displays.
Enter the new password in the appropriate field and click the “Update Passwords” button to save your changes.

46 Server Administration
Note: To change the WebViewer password, please see the section on “Using the Office Tracker WebViewer.”

E-Mail Integration 47
E-Mail Integration for Client Users This section covers e-mail integration with the Office Tracker client software. By using the client preferences and setting up e-mail addresses at the Office Tracker Server you can offer your clients the option of receiving their meeting and event notifications via e-mail.
Office Tracker provides several options for messaging. Event notifications are created by the Office Tracker system at the client side each time a group event is created (any event with multiple attendees or an attendee other than the person scheduling the event). Client users can turn the automatic notification feature “off” by choosing “Preferences” from the “Edit” menu and clicking on the “Event” icon, then click the "Auto Create Notifications" to uncheck it (off).
Notifications and E-Mail Integration
Note: This is “off” by default.
Meeting and event notifications are created automatically when client users schedule an event for multiple Office Tracker users. If they have chosen another mail program to use for their notifications, the message is created as a mail message of that type. See below for more information on using optional mail applications.
Built-in Notification Message System
Once clients create or edit a group meeting or event and accept the New Event information by clicking OK, Office Tracker opens the Notification window displaying a default message indicating who scheduled the event, the time, location, and current attendees list. The message is composed automatically based on the event or meeting information. They can add to the message or edit it before sending. Client users click the Send button to send the notification to all attendees. If a user cancels the notification the attendees will not be notified, however the event is still added to their schedule. Receiving Notifications When another Office Tracker user creates or edits an event which includes a client’s name as an attendee, they are notified. The Event Notification informs them of the event, location, duration, who scheduled it, and the attendees. The event notification window displays automatically as long as Office Tracker is open or running in the background. The event is added to their schedule automatically provided the user scheduling it has access privileges to create events for them. Replying to Notifications Client users can reply to a notification by clicking on the “Reply” button at the top of the notification window. Replies are sent to everyone on the “Attendees” list, which may or may not include their own name.
All names on the Office Tracker Server’s Names List must have e-mail addresses set on the Office Tracker Server if you want to give them the option to use an e-mail system in place of the built-in Office
E-mail Messaging Integration
48 E-Mail Integration
Tracker messaging system. Setting e-mail addresses for client users from the server 1. Click on the underlined name from the "Names List" window on the Office Tracker Server. The Name Record window opens. 2. Enter the e-mail address in the E-mail field. 3. Press the "Update Name" button. 5. Close the Name Record window. 6. Click the "Update" button in the "Names List" window. Note: You must have e-mail addresses set for each of the names on the Office Tracker Server if you want to give your client users this option. SETTING UP WINDOWS CLIENTS TO USE E-MAIL NOTIFICATIONS Office Tracker uses its internal (part of the Office Tracker application) notification structure by default. Each time a client user creates an event with names other than their own included as “attendees” the notification is created (unless they have the notification feature turned “off” in the “Preferences”). As an alternative, users can choose any MAPI-compliant e-mail application as the “carrier” of notifications instead of using the internal notification structure. This option will create e-mail messages which will be stored along with other e-mail in their “In” and “Out” box of the mail application of choice. Note: Client users must have a “Profile” set up in their e-mail application program and have the application set up to be the default MAPI application. See your mail application user guide for more detailed instruction. Choosing a MAPI-compliant e-mail application from the Office Tracker Windows client machine. 1. Choose “Preferences” from the “Edit” menu. 2. Click on the “Mail” tab. 3. Select the Preferred Notification Method from the drop-down menu. 4. Choose your Default Profile Name from the drop-down menu. 5. If you have a password set in your mail application for this profile, enter the password in the Default Profile Password field. 6. Click OK to accept the changes. Office Tracker will now use this mail application to create group event notifications.

E-Mail Integration 49
How to Setup a MAPI Profile for E-mail Integration
User Profiles A user profile is a group of settings that define how e-mail is set up for a particular user. For example, a profile may include access to a mailbox on Microsoft Exchange Server and specify that the Outlook Address Book appear in the Address Book dialog box. A profile can contain any number of information services. Generally, you only need one user profile. If you sometimes need to work with a different set of information services, it may be helpful to create an additional profile to use those services. If more than one person uses the same computer, each person should have a separate profile to keep personal items secure. You can copy an existing user profile, rename it, and then modify it as needed to create your profile. You can have your e-mail start with the same profile every time, or you can select a profile to use each time you start. To Add a User Profile To add a User Profile to your computer, follow these steps: Click Start, point to Settings, and click Control Panel. 1. Double-click the Mail (or Mail and Fax) icon. 2. Click Show Profiles. 3. In the Mail and Fax dialog box, click Add. 4. Follow the prompts of the Inbox Setup Wizard. Internet E-mail With the Internet E-mail service, Outlook functions as a full- featured e-mail client integrated with desktop information management and the Outlook document explorer. You store messages locally in a .pst file, and remotely connect to and download messages from an Internet e-mail service provider (ISP). You can store e-mail addresses in the Outlook Contacts folder or a Personal Address Book. Microsoft Mail Using the Microsoft Mail service, you store messages locally in a .pst file, but work connected primarily through the Local Area Network (LAN) to a post office. The postoffice provides the messaging transport and central address book or e-mail directory. In this configuration, Outlook functions as a full-featured e-mail client. Using MAPI with IMAP Servers Microsoft does not supply a Messaging Application Programming Interface (MAPI) service to allow Outlook in Corporate/Workgroup mode, to access e-mail on an Internet Message Access Protocol (IMAP4) Internet mail server.

50 E-Mail Integration
More Information IMAP MAPI Service Provider is a MAPI service for IMAP4 connectivity, available from Syntegra (USA) Inc. The following information is from the Syntegra Web site: IMAPSP enables IMAP server mail folder access with Microsoft(R) Windows clients. Also included is a MAPI SMTP Transport Provider to facilitate "sending" e-mail messages, and an Exchange Client Extension (ISTORX) to add commands and dialogs to the client interface. For more information visit to the Syntegra Web site at: http://www.us.syntegra.com/imapsp/

GMT Time Zone Support 51
GMT Time Zone Support Office Tracker supports GMT (Greenwich Mean Time) so clients can schedule more easily with colleagues in other time zones. Your time zone may be set to the correct area, however you should check it to be certain before you begin scheduling as the event will “hold” the start time of the person who scheduled it based on their machine setting at the time. Events are stored on the Office Tracker Server in GMT Time. When a client user accesses schedule information they see the events based on the time zone they are in. For example, a user in California may see an event three hours earlier if it was scheduled by someone in New York. Note: Be sure to set the System time zone on client machines before they begin scheduling.
You should be sure you have your computer set to the proper time zone before using Office Tracker. Setting the Time Zone on Windows Clients
1. Choose Settings: Control Panel: Date/Time from your Start menu. 2. When the Date/Time control panel displays click on the Time Zone tab. 3. Select your time zone from the drop down menu.


Using the Office Tracker WebViewer 53
Using the Office Tracker WebViewer™ The Office Tracker WebViewer is an option that you may have purchased with your Office Tracker Software License. If you do not have a license to use the WebViewer you can order it by contacting Office Tracker sales at: 512-469-2966 or by sending e-mail to: [email protected]. WebViewer™ Overview The Office Tracker Web Viewer allows client users to view daily, weekly, and monthly calendars right in their web browser from any location in the world. Users on the road can easily check their schedules. You can also give access to your customers, vendors, friends and the general public so they can view the schedules for any of the Office Tracker names you’ve assigned to be “published” to the web. The Office Tracker WebViewer consists of a cgi on the Office Tracker Server and a set of calendar web pages (.html files) on your Office Tracker Server machine. You control which schedules are published to the web from the Office Tracker Server Names List by clicking on a name and setting the “Publish to Web” setting “on” (checked). Schedules are updated based on a frequency setting you choose in the Web Settings area in the Office Tracker Admin pages. You can set the frequency of web updating from every 15 mins. to every 12 hrs. A User Name and Password requirement provides security. Both the Office Tracker Web Viewer and the Office Tracker Client software use TCP/IP as their communications protocol. Limitations The Office Tracker Web Viewer currently does not offer the ability to create or edit schedule items, automatically find open times, set alarms or the display of multiple names side-by-side, upcoming releases are planned to provide scheduling functions via the web. With the WebViewer, scheduling of events and appointments must be done from the Office Tracker client, however e-mail reservation requests can be easily made and you can customize the WebViewer to include an e-mail reservation button if you like. See below on “How to Customize the WebViewer Interface.” WebViewer Requirements The Office Tracker WebViewer requires you to have at minimum one multi-user Office Tracker Client and the Office Tracker Server running on your network. Windows NT/2000/2003/XP is the recommended operating system for use with the WebViewer. Windows 98 WebViewer Issue There is a known issue with Windows 98 that may cause the perl code to load into memory multiple times. If you cannot run the Office Tracker Server on a machine other than a Windows 98 machine, you will need to instruct your client users to allow the WebViewer calendar pages to fully load before clicking on another link or loading another calendar name. Otherwise you will find your server machine loading many copies of perl and running out of system resources.

54 Using the Office Tracker WebViewer
Installing the WebViewer
Step 1. Insert the Office Tracker CD ROM and it should auto open. If not, open it from your CD ROM drive (Open "My Computer" then double-click the Office Tracker Installer CD ROM icon). Step 2. You will be prompted to Choose a Location for the install. Click Next to continue the install process on your C drive (recommended). If you want to install the WebViewer on a drive other than your “C” Drive, click the Browse button to choose another drive. Step 3. If you’ve installed other components with the installer already, you will be prompted to replace existing files or not. Choose “Yes to All” to continue. The next screen will ask you if you want to Modify, Repair or Remove. Choose “Modify” then press the “Next” button.
Step 4. You will see the “Select Components” window. Click on the Office Tracker Client to uncheck it and all it’s options, then click on the Office Tracker Server and be sure the “WebViewer” component is checked. Click the Next button.

Using the Office Tracker WebViewer 55
Step 5. The “Typical” or “Custom” window displays, click the “Next” button to continue. The copying files window displays. Step 6. Click the “Next” button to begin the install.
Once you’ve completed the installation of the WebViewer you can adjust the settings and turn on the names you’d like to have accessible via the Web by following the instructions on “WebViewer Settings” and “Setting up Your User, Room and Resource Schedules for the WebViewer.”

56 Using the Office Tracker WebViewer
Using the Office Tracker WebViewer 57
WebViewer Settings
Important: On January of any new year, you will need to manually change the WebViewer's setting file "Calendar.setup" to reflect the current year. This is an easy change, but one you must do in order to see the correct information. 1. Open the file "calendar.setup" from "Program Files/OTServer/Jigsaw/Jigsaw/www/cgi-bin/Calendars/calendar.setup" using a word processor like Word Pad. 2. In this file, locate the line of text "$the_current_year= "2003" 3. Change the line of text to read "$the_current_year= "2004" 4. Save the file as a plain text file. 5. You will need to reload the WebViewer page in your web browser to see the new change. Note: You may also need to delete the browsers temporary Internet files.The WebViewer Settings page lets you change the logon name and password for the WebViewer, the range of dates to publish to the web and the frequency of the updating. To view the WebViewer Settings page, first open your Admin page in your web browser by entering <http://myserveripaddress:8001>, then click the “Web Settings” button.

58 Using the Office Tracker WebViewer
EXPORT SETTINGS The Export Settings effect how often the WebViewer Is updated and which range of dates are exported. You can adjust these settings as needed. Range of events to display - This setting controls the range of events to export to the web. It is recommended that you export a moderate range such as 1 month back and 6 months forward for best performance. This will be affected by the performance capability of your Office Tracker Server machine. A high end server machine with only one server application running can handle a much larger date range and more names than a less powerful machine or one running multiple server applications. Update Web Schedules Every: X minutes. This setting controls the frequency of the schedule exporting to the WebViewer. It is recommended that you set this at 1 hour or greater for best performance, unless your Office Tracker Server machine has a very fast processor. A high end server machine with few server applications running can handle more frequent web updates. If you set the update time to “Don’t Export” this will stop all web schedules from updating. This is handy when you want to work on the server and you want a minimum amount of server activity.
You have the option to leave the WebViewer Login Name and Password with the default settings, change them to a new login name and password, or allow users to access the WebViewer without a login name and password.
WebViewer Login Name and Password

Using the Office Tracker WebViewer 59
Default Name: View Default Password: Please To change the login settings open the Office Tracker Server Admin page in your web browser, press the Names List button, then the Web Settings button. Enter the password desired in the WebViewer password: field. You will only see •••••• bullet marks where the letters would display for security reasons. Keep the password listed in a separate place where you keep all of your passwords. Enter the login name in the name field. This is the name users will enter when they access the WebViewer (as described following in “How Users Connect to the WebViewer.” Logging In Without a Name and Password Click on the “Login required” checkbox to turn it off if you prefer to allow users to log in to the WebViewer with no log in name or password. Click the Update Settings button at the bottom of the page to save your changes. Note: If you have trouble with adding the Logon name or Password you may need to contact Milum’s customer support for instructions.
Once you have entered your users or resource names in the Office Tracker Names List on your server, you can access the web viewer settings.
Setting Up Your User, Room and Resource Schedules for the WebViewer
1. Click on a name in the Names List window. When the Edit Name Record window opens, set the WebViewer Access to be “on” by clicking on the checkbox “Publish Schedule to WebViewer,” then press the “Update Name” button and close the window. The next scheduled export time (see Export Settings below) will include the schedule for this name. Note: If you don’t wait for the next export time and try to access the schedule with your web browser you may not see events. In this case, wait at least 15 mins. and try again.
To connect to the web viewer, users will follow these steps: How Users Connect to the Web Viewer
1. Open a web browser and enter the IP path of the Office Tracker Server followed by the word “Calendar” such as: http://your.IP.Address.here:8001/Calendar

60 Using the Office Tracker WebViewer
2. The user is prompted for their name and password for access to the web schedules. The default name and password are as follows: Name: View Password: Please 3. The user can choose any name from the WebViewer drop down Calendar menu at the top of the window. The names that display in this menu are the names on the Office Tracker Server Names List that have the WebViewer Access turned on “Publish Schedule to WebViewer.” 4. Web Viewer users can access one schedule in the drop down menu at a time. They have the ability to view the schedule in Monthly, Daily or by Event List (7 ,14 ,20 or 30 days) views.
Important: This Information is only for advanced users and the use of this information is solely the responsibility of the end user. If you need help making changes to the system Milum Corporation can provide customization pricing. If you are going to do the work in-house and need technical support for the modification, you can purchase hourly support from Milum Corporation. Contact [email protected] for more info.
How to Customize the Web Viewer Interface:
HTML Authors: The Calendar CGI uses standard CGI calling conventions. You can make your own calls to the Calendar CGI to create your own custom interface to the schedule data. The following are the calls to the CGI. You will need to verify the users schedules you want to access are set to “Publish schedule to WebViewer.” 30 Day Calendar view: To display a 30 day calendar in a window or a frame you can use the following call. http://your.IP.Address.here:8001/cgi-bin/Calendars/calendar.cgi?calendar=”Put User Name Here” The user name should have no spaces if the name is “Bill Smith” on your server you would use “Bill_Smith” to access the schedule for Bill Smith. List upcoming events: To create a list of upcoming events you can make the following call to the CGI. http://your.IP.Address.here:8001/cgi-bin/Calendars/calendar.cgi?calendar=”Put User Name Here”&list=on&days=”any number of days” The previous call will generate a list of events for the next ten days from the current day. You can also go directly to a day view by making the following CGI call.

Using the Office Tracker WebViewer 61
http://205.241.20.251:8001/cgi-bin/Calendars/calendar.cgi?day=2&year=1998&month=7&session_file=&calendar=Bill_Smith&View_day=on The example above will display a day view for Bill Smith for the day of 7/2/98. If you intend on creating your own interface to the Office Tracker CGI and you have technical questions there will be a charge for the support call. This is not covered under the standard support program.
To set a default calendar for the WebViewer to open (so users don’t have to select a calendar) you need to make a change in JavaScript in the button bar html used to open the Web Viewer.
Setting a default calendar for WebViewer to Display
In the file "buttonbartmpl.html" in the following directory "C:/Program Files/OTServer/Jigsaw/Jigsaw/WWW/Calendar" modify the script as shown below. The "buttonbartmpl.html" is a template used to create the button bar. The template is used every time the Office Tracker Server is restarted and automatically generates the button bar in the WebViewer. After you make the modifications you will need to "Stop" the Office Tracker Server, then restart it from the Start menu to see the change. updateCalDisplay(CalNameObj) { nameInteger=CalNameObj.selectedIndex CalInteger=CalNameObj.selectedIndex CalString=CalNameObj.options[nameInteger].text if (CalString =="") { //alert ("This is not a valid calendar please select an item from the menu") pathHolder=("/cgi-bin/Calendars/"+ "calendar.cgi?calendar=NameOfCalendar") //in the line above replace "NameOfCalendar" with the name of the calendar you wish to display by default. Perl Programmers: If you are a Perl programmer you can edit the Perl script “calendar.cgi” to make it behave the way you want. Milum will not support customized versions of the Perl code. If you make changes to the Perl code all changes must be sent to Milum Corporation and become property of Milum. If you fail to send in your customized version of the Perl code you will be in breach of your license contract. Warning: Milum will be updating the Perl code for the WebViewer and changes you make can be lost if you don’t backup your modified version before installing any updates to the server. Milum also reserves the right to modify the calls to the CGI without notice.
Potential WebViewer Problem and Solution

62 Using the Office Tracker WebViewer
Note: This is a Windows NT Fix to a problem where the WebViewer’s use of Perl may cause your Office Tracker Server to crash. The WebViewer uses Perl, a special programming language. Perl stays resident in the computer's memory if a user does not wait for the perl process to finish sending the browser the html message. The following steps will fix this by removing any perl.exe at a scheduled time. Instructions on how to automate the clean up process of Perl.exe from memory 1. Create a patch file with only this line in it. e:\tools\kill.exe perl.exe Name the file “ killperl.cmd” Save it in the e:\tools folder. 2. Copy kill.exe file from the winnt resource kit into the e:\tools folder. 3. At the command prompt window, enter the following command exactly as shown. C:\>at 22:00 /every:M,T,W,TH,F,S,SU "e:\tools\killperl.cmd" 4. Repeat the above command changing the time from 22:00 to the desired time for each scheduled time you would like to ensure the perl has been cleared from memory. 5. To confirm the results type c:\at and you’ll see a list of your scheduled times. 6. To delete a scheduled time line, type c:\at 2 /delete (where 2 is the ID for the line that is shown when you type AT).

Office Tracker Contacts 63
Office Tracker Contact Manager The Office Tracker Contact Manager is an optional add-on that integrates into the Office Tracker scheduling program version 6.5.x and later, giving you a group address book system to track customers, vendors, employees and others. If you’d like to add Office Tracker Contact Manager to your system: Contact Milum Corporation sales at: 800-257-2120 or visit the Office Tracker web site at: www.officetracker.com. With Office Tracker Contact Manger users can track and schedule people and appointments more effectively. With Office Tracker Contact Manager users can enter detailed information about customers, patients, vendors, employees, or others they want to keep track of on an ongoing basis, then find, print and schedule them with a few simple clicks. Each contact record provides fields for information such as “Name, Address, Business Phone, etc.” and gives the ability to instantly create an appointment or scheduled event within Office Tracker by simply dragging and dropping the contact icon onto the schedule. Importing Contacts from Other Programs The Office Tracker Server can “import” contacts from other programs and gives the option to “assign” the contacts to a particular “owner.” See the heading in this section “Importing Contacts from Other Programs.”
Opening the Office Tracker Contact Manager
To open Office Tracker Contacts, first start the Office Tracker client by double-clicking the Office Tracker icon on the desktop or by choosing from the Start menu under Programs, Office Tracker. There are two ways to open the Office Tracker Contacts. 1. Go to the View Menu, and select Contact Manager, or 2. Click on the Contact Manager Button on the toolbar.
If users try to activate Office Tracker Contact Manager and have not yet supplied a serial number or chosen demo mode, a dialog displays notifying them that Office Tracker Contact Manager is not yet available. To activate a 30-day demo of Office Tracker Contacts, press the “Demo” button in this window. Once Office Tracker Contact Manager is purchases, the serial number will need to be entered from the Help menu in the Office Tracker Contact Manager window.

64 Office Tracker Contacts
The contacts window opens.
Complete instructions for using Office Tracker Contact Manager are included in the Client User Guide. If you will be supporting your users you should read the section “Office Tracker Contacts” in the Client User Guide.
Once users make the initial connection, contact information is included in the regular server updates, or when they press the F3 key for a forced update, as long as the Office Tracker Contact Manager window is active. The F4 key forces an immediate contact only update whenever necessary.
How Contacts are Updated from the Office Tracker Server
Select Contacts from Server Before users can view contacts created by other users, they need to select the names of the users whose contact records you want to share. To Add Contacts from other users, choose “Select Contacts from Server” under the Contacts menu. You will only be able to view contacts from other users if you have been granted Sharing Privileges to do so. Sharing Privileges are set up at the Office Tracker Server. Click on the checkbox for each name in order to view the contacts created by them.

Office Tracker Contacts 65
When Office Tracker Contact Manager is activated, the contact information local to the client users’ machine is reconciled with the same information on the Office Tracker Server using the Reconciled and Revision fields in the contact record. If the client cannot update the record, because it has been locked by another user, the record will not synchronize until it is either edited or found to be unlocked during a poll of the server. Contacts that no longer exist on the Server are automatically removed from the Client and any new records created on the Client while offline are added to the Server. New records are downloaded from the Server and added to the local Office Tracker client database.
Contact Categories and Customized Fields allow users to organize contact records more effectively. Categories and Customized Fields are created at the Office Tracker Server. Once created, client users will see them in the Category menu and on the “Details” screen in Office Tracker Contacts.
Categories and Customized Fields
Adding New Categories 1. To access the Category set up page, open your Office Tracker Server Admin pages: http://yourserverIPaddress:8001 and press the “Contacts” button, then the “Categories” button and “Add Category” button. You will see the Add Category page as shown below.

66 Office Tracker Contacts
2. Type the first new category into the Name field and press the “Add Category” button. You can add as many categories as you want, then press the “Close” button when you are done. 3. Press the Update button in the Categories page to view your new category names. Client users will get this update on their local machines the next time they launch Office Tracker, or by pressing the F3 key on their keyboards. Once Contact Categories are created at the Office Tracker Server, you can assign a category to any contact record you create or edit. You can also set a “default” category to use for any new contact records you create. Adding Custom Fields To access the Custom Fields set up page, open your Office Tracker Server Admin pages: http://yourserverIPaddress:8001 and press the “Contacts” button, then the “Custom Fields” button. You will see the Custom Fields page as shown below. Type the name of each field in the corresponding field text box. The Details screen of the contact record is set up to use the Custom Field names you create here. Note: Before you begin using these fields you should talk to your Office Tracker client users about what names to use so they will be most beneficial for your office.
When any user activates one of the edit fields in the Record View by clicking in it, Office Tracker Record Locking

Office Tracker Contacts 67
Contact Manager checks with the Server, if online, for that contact record’s availability. If the Server indicates that another client has already locked the record, a message box will appear stating: “Contact locked by User Name. You may view this contact but you may not make changes.” This will occur any time the user attempts to select the contact record as long as that record is locked by another user. If the contact record is available, and you click in a field, Office Tracker Contact Manager locks the record on the Server, which includes obtaining the current contact record version from the Server, if necessary, and no other client may edit it until you release it. The record remains locked until you save the record, revert the record, select a different record, or delete it.
Office Tracker Contact Manager lets you import contact records you exported from other programs so you can make the transition from a different contact management system to Office Tracker Contact Manager without re-keying all of your contact information.
Importing Contacts from Other Programs
There are a few guidelines you should be aware before you import a file. - You can only import contact records at the Office Tracker Server machine. - You should not attempt to import contacts while client users are connected to the Office Tracker Server - To import contacts from other programs, the file must be in the correct format (Tab-Delimited text file) and you must add a “Header” line that contains a field match of information from any of the listed supported fields shown below. When you create your “Header” you need only list fields that are contained in your exported contacts file. A sample Header is included below. How to Import Contact Records 1. Export your contacts in the correct format, using any of the supported field names as shown in list below. 2. Open the exported text file and enter the headers used, matching the Office Tracker Header Names shown below exactly. 3. Save the file to a location you can easily locate. 4. Open your Office Tracker Server Admin Page in your web browser, press the Contacts button, then press the Import button. 5. Select the "Creator Name" you would like to use for the contacts you are importing. All contacts from the file will be saved with this name. If you need to separate your contacts by other creator names you will need to create different import files and do each one individually. 6. Locate your contact file in the File Location area below by clicking the "Browse" button. 7. Click the "Import" button to begin. Sample Header for Your Exported Text File of Contacts Note: <tab> below is not meant to be typed literally but is used to demonstrate that you would use the Tab key to place a tab between each of the field names.

68 Office Tracker Contacts
First Name <tab>Middle Name<tab>Last Name<tab>Company<tab>Business Street<tab>Business City<tab>Business State<tab>Business Postal Code<tab>Business Fax<tab>Business Phone<tab>E-mail Address John<tab>Alan<tab>Smith<tab>ABC Company<tab>124 Walsh Street<tab>Austin<tab>TX<tab>78705<tab>512-555-1212<tab>512-555-1234<tab>[email protected] Supported Contact Field Names (These match the current Outlook field names) Title First Name Middle Name Last Name Suffix Company Department Job Title Business Street Business Street 2 Business City Business State Business Postal Code Business Country Home Street Home Street 2 Home City Home State Home Postal Code Home Country Business Fax Business Phone Company Main Phone Home Fax Home Phone Home Phone 2 Mobile Phone Other Fax Other Phone Categories E-mail Address User 1 User 2 User 3 User 4

Office Tracker Palm Setup 69
Office Tracker Palm Sync Setup
• You cannot run the Office Tracker Server on a machine with the Palm Synchronization software installed. If you are running the Office Tracker Server and Office Tracker client on one machine, you will not be able to synchronize that client with the Palm Pilot.
General Guidelines and Requirements:
• The OTPalm is a two-way sync – meaning events can be downloaded from Office Tracker to your Palm, and uploaded from your Palm to Office Tracker. You can edit –OT events on your Palm and re-sync them.
• The range of events each client will receive when they do a palm sync depends on the settings you have created in the Office Tracker Server Palm Settings area.
• The OTPalm Sync software requires that the Network Hotsync manager is installed on your palm device.
• The Office Tracker Server uses port 14238 to sync to the palm pilots on your network. If you plan to allow internal syncs only you should not open this port. This port will need to be opened to sync from an Internet connection. Refer to your Information Systems department or the person who handles your routers.
Setting up the Office Tracker Server to Work with OTPalm Sync
Entering your OTPalm Sync Serial Number 1. Click the Palm Settings icon from the Office Tracker Server Admin page.
2. Enter the Palm serial number from the front of your CD ROM cover. 3. Click the “Update Settings” button and then click “OK” to accept your number. Creating or Editing the Date Range for Palm Synchronization The recommended settings for your Palm Sync is already entered by default. If you find that you need to change this time range so users get events further into the future, you can edit the settings by

70 Office Tracker Palm Setup
following the steps below. 1. Click the Palm icon in the Office Tracker Server Admin page. 2. Change the number of days for “Sync Backward” and “Sync Forward” to the number of days you would like to use. 3. Click the “Update Settings” button. Click “OK” when asked if you are sure you want to save changes. 4. Press the “Close” button to close the Palm settings window.
The OTPalm software lets you synchronize events created on the Office Tracker scheduling system to you palm device. The OTPalm Sync software requires that the Network Hotsync manager is installed on your palm device. Once this software is installed, you may download your events from the Office Tracker Server to your palm device from your Office Tracker client computer. The following outlines what is required to set up your palm and client computer to sync with the Office Tracker system.
Setting Up the Palm Sync Software
1. Check your Palm Desktop name and make sure it matches exactly to your name as it is entered on the Office Tracker Server Names List. To check this, open your Palm Desktop software and look in the menu “Users” to see if your name is entered. If not, choose Edit and add your name to the User’s list exactly the way it is entered on the Office Tracker Server Names List. 2. Perform a local hot synch to your desktop. 3. Installing the Network Hot sync Manager on your Palm Device First determine whether or not your Palm device has the Network Hotsync manager software. 1. Tap the Hot sync icon in the main applications area.
2. Tap the Menu icon to show the Options menu.

Office Tracker Palm Setup 71
3. If the Network Hotsync manager is present, LANSync Prefs will appear in the menu list. If the Network Hotsync manager is present, perform a local hotsync first before attempting to connect to the Office Tracker Server. If the Network Hotsync manager is not present, you must complete the following steps to install the Network Hotsync manager on your palm device. 1. Download the manager from the palm website: www.palm.com/support/downloads/netsync.html. 2. Unzip the file into a local directory (such as C:\Temp). You should see the file Netsync.PRC in the local directory. 3. Run the Palm Desktop (must be version 3.0 or greater) and click on the Install icon. 4. In the Install dialog, click Add and locate the file Netsync.PRC. 5. Select the file Netsync.PRC for installation. 6. Connect your palm to your computer with the hotsync cable and do a local hot sync. This will install the Network Hotsync manager on to your palm device. 7. Verify the installation worked properly by following steps 1-3 above. 2. Setting up your Palm to connect to the Office Tracker Server 1. Tap the Hotsync icon in the main applications menu. 2. Tap the menus icon to bring up the Options menu.

72 Office Tracker Palm Setup
3. Select Primary PC Setup. 4. Enter “!!” for the Primary PC Name. To enter “!!” first tap the keyboard icon “abc”, tap the “Shift” key on the keyboard, then tap the exclamation point two times.
5. Enter the Office Tracker Server IP address for the Primary PC Address. 6. Enter 0.0.0.0 for the Subnet Mask, or leave it empty.

Office Tracker Palm Setup 73
7. Tap OK. 8. Tap the menus icon again to bring up the Options menu. 9. Tap LanSync Prefs. 10. Select LanSync and tap OK. 3. Setting up your local client machine for Palm Sync to the Office Tracker Server 1. Run the Palm Desktop software. Note: When you do the Palm Desktop install, the User Name for the Palm handheld needs to match the name on the Office Tracker Server. 2. Make sure the Hotsync Manager is running, it should show up in the taskbar. 3. In the Palm Desktop, select the Hotsync/Setup menu item. 4. Click on the Network tab. 5. If your username is checked, uncheck it. 6. Click OK. 7. Right-click the Hotsync Manager Icon in the taskbar. 8. If the Network item is not checked, click on it to activate it. 9. If the Local Serial or Local USB item is not checked, click on the appropriate item to activate it (depending on the type of hotsync cable you have). 4. Perform a Palm Sync to the Office Tracker Server You are now set up to perform a Palm sync to Office Tracker. Connect your palm device to the hotsync cable on your client computer and press the hotsync button. You should see the Datebook updating and once the hotsync is complete, you should see your events from Office Tracker in your Datebook. All Office Tracker events have “-OT” at the end of their name/description field. Every time you sync with the Office Tracker server, your old OT events will be erased and the latest OT events will be added to your palm device for the time range set by the server administrator. If the Office Tracker Server does not have the OTPalm Sync software configured it will time out after

74 Office Tracker Palm Setup
several seconds and your Palm unit will tell you that the connection could not be established. Contact your Office Tracker Server Administrator to let them know if you can’t connect. Note: This is a one-way sync. You cannot edit –OT events on your palm and re-sync them. You must edit them from Office Tracker itself.
5. Switching to and from Office Tracker Sync to Local Sync To perform a local hotsync once you have done the setup described above, you must complete the following steps: 1. Tap on the Hotsync icon on your palm device. 2. Tap on the Menus icon to see the Options menu. 3. Select the LANSync Prefs item 4. Select Local Hotsync and click OK. 5. Once you have done the local hotsync, to switch back to Office Tracker Hotsync, perform steps 1-3 and then select LANSync and click OK. 6. Switching to and from Office Tracker Sync to regular Network Sync To perform a network hotsync to your Palm Desktop once you have done the setup described above, you must complete the following steps: 1. Activate your Palm Desktop. 2. Select the Hotsync/Setup menu item. 3. Click on the Network tab. 4. Check your username. 5. Perform a local hotsync. 6. Once you wish to perform an Office Tracker palm sync in the future, you must complete the steps in paragraphs II and III, above.

Sample Office Tracker Setups 75
Sample Office Tracker Setups The Following samples assume you have installed the Office Tracker Server software on one machine on your network and have installed the Office Tracker (client) software on one or more machines. The scenarios below are just samples. The Office Tracker scheduling system is very flexible and can be configured in many ways.
Office Tracker Medical Scheduling Set-Up
Scenario: You have 2 or more front office scheduling personnel who share the task of scheduling the medical staff and rooms/resources in your office. You want all of the scheduling personal to be able to edit events that have been added to a schedule without setting up extensive Sharing Privileges. You also want the Doctors and other staff members to have access to the scheduled information but do not want them to be able to modify it. Office Tracker Server Setup 1. Access the Office Tracker Server Administration page by opening Internet Explorer and entering http://yourserverIPaddress:8001. Enter the user name “Admin” is default and password “ot=timesavings” is default. 2. Press the “Name List” button to display the Names List page and press the “Add Name” button. This will display the add name screen in a new window. 3. In the Add Name window type “Scheduler” in the name area and leave the other fields empty for now and press the Add Name button to add the name Scheduler. The window will refresh (clear) but remain open so you can additional names. 4. The next name to add is “Viewer”. Type the name “Viewer” into the “Name” field and press the “Add Name” button. The window will clear, ready for the next new name. 5. Make a list of all rooms and or staff you want to have the ability to schedule. 6. One by one add each name from your list. (Tip: if you are adding resources you can set the icon that will display with the name by selecting a “Type” of icon form the Types menu in the Add Name window) 7. Once you have all your names in the list close the “Add Name” window. 8. On the Name List window press the “Update” button and the names you added display in the list. 9. From the Names List screen click on “Sharing.” 10. Choose “Viewer” from the first Name menu at the top of the Sharing window, then choose

76 Sample Office Tracker Setups
“Everyone” from the second “Name” menu just below the “Group” menu. Uncheck “Add Events” then press the “Update Name” button to save the changes. Now select the name “Scheduler” from the “Assign Privileges to” drop down and check “Add Events” then press the “Update Name” button to save the changes. You can now close the “Edit Name” window. 11. Repeat steps 9 and 10 for all the names on the list created on step 5. 12. Now you can minimize Internet Explorer and move on to the Office Tracker client set up. Office Tracker “Scheduler” Client Setup 1. Install the Office Tracker client on one of schedulers’ machines if you haven’t already. 2. Launch the Office Tracker client software from the Icon on the desktop or from the Start Menu Start>Programs>Office Tracker>Office Tracker. 3. Enter your serial number or press the Demo button if you are using the software in demo mode. 4. The Identity window displays (if it doesn’t, choose “Identity” from the “File” menu.) 5. In the Identity window enter the Name “Scheduler” in the Name field at the top. Press the “Connect to Server” button and enter either the IP address or the Name of the machine where the Office Tracker Server is installed, then press OK. 6. Press OK in the Identity window. A monthly calendar for the current identity “Scheduler” displays. Click the “Day” button to switch the view to a Daily view. 7. Choose “Names Shown” from the “View” menu and the “Names Shown” window displays. 8. Select some names from the “Names Available” column and press the <<Add button to move the names selected to the “Names Shown” column. 9. Press the “OK” button when you are done adding names. A side-by-side group view with the names selected displays. You can choose “Names Shown” from the “View” menu at any time to change the names you are viewing. 10. Choose “Save As…” from the “File” menu to save this schedule for easy access later. 11. Follow steps 1 through 10 above for all clients you wish to log into the Office Tracker Server as a “Scheduler”. 12. Each user can now create appointments, reservations and other scheduled events. Updates are sent from the server every few minutes (Preference setting), or anytime the user presses the F3 key, moves to another day, week or month, or changes the names they are viewing.

Sample Office Tracker Setups 77
Office Tracker “Viewer” client setup: Use this set up for people in the office that you want to only have “viewing” privileges. 1. Install the Office Tracker client on one of the “View only” machines. 2. Launch the Office Tracker client software from the Icon on the desktop or from the Start Menu Start>Programs>Office Tracker>Office Tracker. 3. Enter your serial number or press the Demo button if you are use the software in demo mode. 4. The Identity window will display next, If it doesn’t choose Identity from the File menu. 5. In the Identity window enter the name “Viewer” in the “Name” field at the top. Press the “Connect to Server” button and enter either the IP address or the name of the Office Tracker Server machine, then press OK. 6. Press OK in the Identity window. A monthly calendar for the current log on account “Viewer” displays. Press the “Day” button to change the view to a Daily schedule. 7. Select “Names Shown” from the “View” menu. 8. Select some names from the “Names Available” column on the right and press the << Add button to move the names selected to the “Names Shown” column. 9. Press the “OK” button when you are done. The names will display in a side-by-side group view. 10. Choose “Save As…” from the “File” menu to save this schedule for easy access later. 11. Follow steps 1 through 10 above for all clients you wish to log into the Office Tracker Server as a “Scheduler”. 12. Each user can now create appointments, reservations and other scheduled events. Updates are sent from the server every few minutes (Preference setting), or anytime the user presses the F3 key, moves to another day, week or month, or changes the names they are viewing.
Scenario: You have an Office with multiple employees or staff that needs to schedule meetings with each other and need to maintain their own calendar.
General Office Scheduling
The following is a step by step to setup the Office Tracker system like the scenario above. Office Tracker Server Setup 1. Make a list of all staff and/or resources (conference rooms, grounds, vehicles and other equipment)

78 Sample Office Tracker Setups
you want to schedule in the Office Tracker system. 2. Access the Office Tracker Server Administration page by opening Internet Explorer and entering http://yourserverIPaddress:8001. Enter the user name “Admin” is default and password “ot=timesavings” is default. 3. Press the “Name List” button to display the Names List page and press the “Add Name” button. This will display the add name screen in a new window. 4. In the Add Name window type the name of the first person or resource to add from the list you created in step 1 in the name area and leave the other fields empty for now and press the Add Name button to add the name to Office Tracker. The window will remain open so you can add the next name. 5. One by one add the names from the list you created above as you did in steps 4 above. (tip: if you are adding resources you can set the icon that will display next to the name in the Office Tracker clients schedule view by selecting a type of icon form the types menu in the Add Name window) 6. Once you have all your names in the list you can close the Add Name window. 7 . On the Name List window press the “Update” button and the names you added should be displayed in the list. Office Tracker Client Setup: 1. Install the Office Tracker client on one of the computers you want on the Office Tracker system. 2. Launch the Office Tracker client software from the Icon on the desktop or from the Start Menu Start>Programs>Office Tracker>Office Tracker. 3. Enter your serial number or press the Demo button if you are use the software in demo mode. 4. The “Identity” window displays. (If the Identity window does not open, choose “Identity” from the “File” menu.) 5. Enter the Name for this user (must be on the Names List ) in the “Name” field at the top. Press the “Connect to Server” button and enter either the IP address or the name of the Office Tracker Server machine, then press OK. 6. Press OK in the Identity window. A monthly calendar for the current log on Name displays. Press the “Day” button to change the view to a Daily schedule. 7. Select “Names Shown” from the “View” menu. 8. Select some names from the “Names Available” column on the right and press the << Add button to move the names selected to the “Names Shown” column. The user (scheduler) may remove their own name if they do not want it to display in the schedule view.

Sample Office Tracker Setups 79
9. Press the “OK” button when you are done. The names will display in a side-by-side group view. 10. Choose “Save As…” from the “File” menu to save this schedule for easy access later. 11. Follow steps 1 through 10 above for all clients you wish to log into the Office Tracker Server as a “Scheduler”. 12. Each user can now create appointments, reservations and other scheduled events. Updates are sent from the server every few minutes (Preference setting), or anytime the user presses the F3 key, moves to another day, week or month, or changes the names they are viewing.

Advanced Installations and Options 81
Advanced Installations and Options
The Office Tracker Server may be installed on any local drive you choose. The server installer will default to installing on Windows NT/2000/2003/XP as a “Service.” This is the recommended install setting but if you do not want to install the application as a service be sure to make this change to “application” during the install process when you are prompted by the installer.
Installation Notes
Upgrade Installs Follow the specific upgrade installation instructions for your version of Office Tracker. If you are upgrading over an existing 6.5.x demo installation, Stop the Office Tracker Server and make a backup copy of your entire OTServer directory to another disk before installing a new version of the software. See “Upgrading and Moving the Office Tracker Server” for more information. WebViewer Installer If you have purchased a license to use the "WebViewer" option, you will need to install the WebViewer on the same machine as the Office Tracker Server. You can do this by following the instructions in the section “Office Tracker WebViewer” or by using the “Custom” install option described below.
Installation Steps for Windows NT/2000/2003/XP
Important: Windows NT/2000/2003/XP Install If you are installing the Office Tracker Server on a Windows XP machine you will need to be logged on to the machine as "Admin" not just as a "User". 1. Insert the Office Tracker CD-ROM and open it from your CD ROM drive (Open "My Computer" then
double-click the “Office Tracker” CD-ROM icon). Double-click the “Office Tracker for Windows” folder..
2. Double-click the “Office Tracker Installer” to view the installer options. 3. When the installer launches you will see the extracting files screen. Choose a location to extract the
installer files. Click the “Next” button to move to the next screen which is the License Agreement. After reading and agreeing to the license, click “next” to move to the next step of the installation process.
1. Select the components you want to install. If you are installing the Office Tracker Server only, click on the checkbox to turn it on “checked” and click on the Office Tracker Client checkbox to turn it off “unchecked.” You can expand the Office Tracker Server to see the other components available by clicking on the + mark. Additional components include the WebViewer. If you purchased the WebViewer license and want to install it, select it by clicking the checkbox to turn it on “checked.”

82 Advanced Installations and Options
5. You will be prompted to choose “Typical” or “Custom” install. Select “Custom” if you’d like to make
changes such as where the application is stored or rather it’s installed as a “Service” under Windows NT/2000/2003/XP or an application.
If you choose “Custom”
Note: You can use the “Back” button to go back and make changes prior to completing the installation process. a. Choose Destination Location for the Office Tracker Server - the folder and drive for the Office Tracker Server directory “OTServer.” It is recommended you leave this with the default setting unless you have a special need to install to a different drive location. The default location is: “C:/Program Files/OTServer” b. Choose the Destination Location for the Office Tracker Client (if you chose it earlier in the Select Components window). The folder and drive for the Office Tracker Client “Office Tracker” is set by default to “C:/Program Files/Office Tracker.” b. Select the Program Folder for the Program Icons. It is recommended you leave this as the default “Office Tracker.” This will display the “Office Tracker” folder and shortcuts in your “Start” menu under “Program Files” as shown.

Advanced Installations and Options 83
c. Next, the Options window displays if you are installing on Windows NT/2000/2003/XP. You can choose to install the Office Tracker Server as a “Service” or “Application.” It is recommended to install as a “Service.”
Service If you choose to install the Office Tracker Server as a “Service” once you complete the installation you will have a new service called “Office Tracker Server” in your Services window (Start/ControlPanel/Administrative Tools/Services). The service will start automatically upon completion of your install and should be ready to use. If you stop the service, you will start it as described below.
As defined by the Microsoft Windows Help System- A service is an application type that runs in the background and is similar to UNIX daemon applications. Service applications typically provide features such as client/server applications, Web servers, database servers, and other server-based applications to users, both locally and across the network.
Standard Application If you choose to install the Office Tracker Server as a “Standard Application,” once you complete the installation, you will have a mini-application or “launcher” accessible from your Task Tray at the bottom right of your screen. The launcher icon looks like a small calendar with a network connection on the bottom. The application will start automatically upon completion and you can choose to “Start” or “Stop” the Office Tracker Server from the launcher menu. 6. The Start Copying Files window displays. Click the “Next” button to complete the install. 7. The last screen in the installer will have the option “on” to Go to the Office Tracker Server Admin
Page. If you do not want to view the Office Tracker Server Admin page you can uncheck this option. 8. Click the “Finish” button to complete the install.

84 Advanced Installations and Options
Locating your server IP address
If you kept the default install settings the server will be running in the background already and you can look at the main “Admin” page to locate your IP Address and Machine Name. Client users will need the IP Address or Machine Name to make their initial connection to the server.
To locate your TCP/IP Address: 1. Choose “Settings>Control Panel” from your “Start” menu.
2. When the Control Panel window opens, double-click the "Network" icon.
Advanced Installations and Options 85
3. If you're running Windows 98, click on TCP/IP from the listing in the Network window to
select it, then click the "Properties" button. Click the IP Address tab at the top of the Properties window.
If you're running Windows NT, click the "Protocols" tab, and then double-click the TCP/IP protocol.
Optionally you can get your IP address this way: Windows 98:
1. Choose “Run” from the “Start” menu. 2. Type “winipcfg”. 3. Press “Enter”.
Windows NT: 1. Choose “Command Prompt” from the Start menu: Start>Programs>Command Prompt 2. Type “ipconfig” in the window that opens. 3. Press the Enter key on your keyboard.
The current IP address for the machine is displayed. If you do not have a server IP address you will need to specify one now. You must have the IP Address to make changes (add names, etc.) to the Office Tracker Server.

86 Advanced Installations and Options
4. Make a note of your server IP address. You will need it to access the Office Tracker Server administration pages. If your IP addresses are dynamically allocated, or you can’t find the address using the method indicated above, try the following steps.
To set an IP address on your server machine (if you do not have one), follow the 1-4 steps above to get to the IP Address area, then enter an IP Address and make a note of it. If you do not understand how to assign IP addresses please refer to your Windows NT, 98/2000 or XP System software documentation and read the section in this guide on Basic TCP/IP Setup.
Once you have run the Office Tracker Installer one time, if you open it again, you will be prompted to choose to “Modify, Repair or Remove” components.
Modify, Repair or Remove the Program

Advanced Installations and Options 87
Modify – Use this if you want to add new components or remove installed components from your current installation. CAUTION: When you get to the “Select Components” window, be sure to keep the items checked that you want to keep installed. The installer will remove items that are not checked in the Select Components window. Repair- Use this if you want to reinstall components you previously installed on this machine. This can be helpful is you believe a file has been damaged or corrupted in some way. This option will keep all data files in place and make sure all Office Tracker files are correct. Remove- Use this if you want to remove all installed Office Tracker components.

88 Advanced Installations and Options

Basic TCP/IP Network Setup 89
Basic TCP/IP Network Setup Information Note: This information is provided as a general overview only. As there are many different types of network software products, Milum cannot offer specific help with setting up your TCP/IP addresses and network. Please refer to the manual for the network software you use, such as 3Com, Microsoft, etc. Most of the pain of dealing with TCP/IP networks is setting up connections between your machines. Although most people connect on the Internet using names like ([email protected]), there are always numbers underlying those names someplace. Setting up your own LAN (Local Area Network) with TCP/IP means that you get to deal with setting up the numbers or IP addresses for your machines on your local network. IP addresses are 32-bit numbers, usually written out as four numbers separated by periods, example 192.168.123.10. There are three sizes of networks: A, B, and C. If the first number is below 128, the network is a class A network, a massive address space capable of holding millions of computers. Class B addresses start with numbers between 128 and 191, and can hold tens of thousands of machines. Class C addresses start with numbers from 192 to 223, and can hold about 250 machines. All that you really need to know for your network is how to pick numbers that will work. If you plan on connecting this network to a larger net later, you might want to ask your administrator or Internet service provider for a list of valid Internet address so you don’t have to re-configure your system later. The easiest numbers to use are the private address IP numbers. Even if you are connected to the Internet, all traffic from these numbers will simply get dropped and never retransmitted across the internet. Even if you don’t think you’ll ever connect to the Internet, it makes sense to use these numbers - it’s just one less thing to worry about. The class C private addresses are all addresses from 192.168.0.0 to 192.168.255.0. For a network, I recommend using class C. Pick your favorite number from 0 to 255 and make your network IP address 192.168.(your number).0. For your private network’s subnet mask, use 255.255.255.0, which will work fine on any class C network. Always pick your number consecutively it makes it a lot easier to keep track of the numbers you have in use.
Adding and Configuring the TCP/IP Protocol
Confirming the Default Network Settings: 1. Open up the Control Panel from the "Start>Settings>Control Panel" menu. 2. Double-click on the Network icon Adding TCP/IP Protocol If you're using Windows NT, click the "Protocols" tab fist. 1. Click on the Add button. 2. Click on Protocol.

90 Basic TCP/IP Network Setup
3. Click on Microsoft. 4. Click on TCP/IP. 5. Click on OK and re-boot if necessary. Configuring TCP/IP IP Address 1. Click on TCP/IP 2. Select IP Address: If you have a DHCP serviced subnet, Select Obtain an IP Address Automatically, Go to Configure WINS Server for DHCP. If not, enter your IP address and Subnet Mask. 3. Click on WINS Configuration. Configuring TCP/IP WINS 1. If you do not have a WINS Server, select Disable WINS Resolution. If you have a WINS Server but not a DHCP serviced subnet: 1. Select Enable WINS Resolution. 2. Type in the Primary and Secondary IP addresses for your WINS Servers. 3. If you have a DHCP serviced subnet, select Use DHCP for WINS Resolution. 4. Click on Gateway Configuration. Configuring TCP/IP Gateway 1. Type in the IP address of your Gateways or Routers. 2. Click on ADD after each one. 3. Click on DNS Configuration. Configuring TCP/IP DNS IP Addresses 1. Type in your Host Name. 2. Type in your Domain Name. 3. Type in the IP address for your network’s Domain Name Server(s). 4. Click on Add. 5. If you have more than one DNS server, add subsequent IP addresses. 6. Bindings and Advanced should not need to be modified. 7. Click on OK and re-boot. You should then have network access.
You will need to read the specific instructions in your router guide but this overview will give you a basic understanding of how to use NAT in your company to provide external access (remote access) to your Office Tracker system.
Using NAT to Setup a Public Internet Address for Your Office Tracker System for Remote Access

Basic TCP/IP Network Setup 91
NAT is an acronym for Network Address Translation. Developed by Cisco, NAT is used by a device such as a router, firewall or computer. NAT is an IP translation and mapping technology. It allows your entire network to share internet access over a single IP address. A single cable mode, DSL modem, or even 56k modem could connect all the computers in your small business to the internet simultaneously. Your ISP provider assigns a registered IP address to your company. This address must be registered by the IANA, an acronym for Internet Assigned Numbers Authority. You set up a NAT – enabled router with these IP addresses at your company. Using NAT, you can map this registered IP address to the internal machine IP address you want to use as the Office Tracker Server. In addition you will need to set up “port forwarding” for the Office Tracker Server port 8001. This provides a publically accessible IP address and port so users outside of your network can access the Office Tracker system using the client software “Office Tracker” or the web software “WebViewer.” How does NAT work? NAT acts as an interpreter between two networks. In the case of a small business or home network, it sits between the internet and your network. The internet is considered the‘public’ side and your home network is considered the ‘private’ side. When a computer in the private side requests data from the public side (the internet), the NAT device will open a conduit between your computer and the destination computer. When the public computer returns results from the request, it is passed back through the NAT device to the requesting computer.


Using Office Tracker with Firewalls 93
Using Office Tracker with Firewalls or Windows XP Service Pack 2 This section should help you allow access to the Office Tracker Server if you are running a firewall. If you do not have a firewall this section will most likely not be relevant to your operation of the Office Tracker Server. There are several ways a firewall can protect your network. Three key techniques are filtering, proxy servers, and encryption. In this section we are going to provide the necessary information to setup a filter to allow Office Tracker clients to have access to the Office Tracker Server. A firewall can screen TCP/IP packets and deny or grant access based on criteria such as IP address and TCP/IP protocol. When TCP/IP sends data packets to the firewall, the filtering function in the firewall looks at the header information in the packets and directs them accordingly. Firewalls make their decisions based on tables of data and rules. You can manipulate these rules so that, for example, only data from certain addresses is allowed to pass through the firewall. Filters are one way the Firewall controls traffic from one network to another. The filters operate on criteria such as IP source or destination address range, TCP ports, UDP responses, Internet Control Message Protocol (ICMP) responses, and TCP responses. Upgrading to Service Pack 2 in XP turns on the Windows Firewall by default. To open the firewall for Office Tracker: 1. Open the Control Panel from your Start menu. 2. Open the Windows Firewall (Also in Security Center). 3. Select the Exceptions Tab. 4. Click Add Port. The Add Port window opens.
Enter the following information where indicated: Name: Office Tracker Port: 4300 Leave TCP checked and click Add.
If you wish to have access to the Server Admin Pages or Web Viewer, you will also need to add this port. Name: Office Tracker Server Port: 8001

94 Basic TCP/IP Network Setup
Leave TCP checked and click Add The following contains the information needed to set a filter for the Office Tracker system. The Office Tracker Server maintains two port for communications one at 8001 for the HTTP web admin interface and 4300 for the client application to connect to. Office Tracker uses TCP not UDP. Office Tracker Server Port information HTTP Source Port: 8001 HTTP Destination Port: 8001 Client connection Source Port: 4300 Client connection Destination Port: 4300 Office Tracker Client Port information Client Source Port: 4300 Client Destination Port: 4300 OTPalm Source and Destination Port: 14238 If you need more detailed information, please contact Milum at [email protected].

Troubleshooting and Tips 95
Troubleshooting and Tips The following troubleshooting tips are useful in diagnosing and assisting with server and client trouble. #1- Client Connection Problem - I've installed the server but my clients aren't showing connected (there's a server offline icon in the upper right corner of their window). First Possibility: Have you made the initial client connection by choosing from the File menu “Identity” and clicking the “Connect to Server” button? If not, you will need to do this in order to establish the connection for the first time. After the first time, the client will “find” the server automatically. Second Possibility: The Office Tracker Server machine must have a "static" IP address so client users can connect. If you do not have a static IP address you should use the Machine Name of the Office Tracker Server machine to connect your client users. To check the IP address, go to the server machine, then follow the steps below. Windows 98 1. Choose "run" from the "Start" menu. 2. Type "winipcfg" 3. Press the Enter key. Windows NT/2000/2003/XP: 1. Choose “Command Prompt” from the Start/Accessories menu, Accessories menu, then type “ipconfig” 3. Press the Enter key. The current IP address for the machine should display. Make sure this is the same address you entered at the client machine. #2- I can't seem to access the features of the Administration Pages. Page Not Found displays. New Users: Most Likely Reasons Server Admin Pages Won’t Display: 1. The Office Tracker Server software isn’t running (check Task Manager Ctrl-Alt-Delete to see if the process “javaw.exe” is running. If you don’t see java.exe, choose “Office Tracker Server” from the “Start” menu and try again or if it’s installed as a service, choose Start/Control Panel/Administrative Tools/Services and Stop, then re-start the Office Tracker Server service. 2. IP address isn’t static.

96 Troubleshooting and Tips
On Windows 95/98 choose Run from the Start menu and type in “winipcfg” and click “OK” to see your IP address. On Windows NT/2000/2003/XP, choose “Command Prompt” from the “Start/Programs/Accessories” menu and when the DOS window displays, type “ipconfig” then press the Enter key. Your IP address should not be all zeros such as: 00.00.00.00, it should also not change from one startup to the next. If it does, it’s not “static” but is being assigned automatically by a DHCP Server and changes at random times. Check with your network administrator or the person who set up your network. 3. Proxy Server option is turned on in Internet Explorer. Choose “Internet Options” under the “Tools” menu (or other menu in older versions) in Internet Explorer, click “Connections” tab, then click “LAN Settings” button. If Proxy Server is on (checked) click on it to uncheck it. 4. You’re not entering the full path in your browser: http://yourIPaddresshere:8001 5. Go to the “View Log” by pressing the “View Log” button and see if you are getting an error such as javalangnullpointer error in the log (you may need to scroll to see it). If you see this error, follow these steps:
1. Stop the Office Tracker Server by choosing “Stop Office Tracker Server” from the launcher in your Task Bar, or if it’s running as a Service, Stop the Office Tracker Server Service in your “Services” Control Panel. 2. Wait 2 mins. then restart the Office Tracker Server as you normally do.
6. You’ve upgraded improperly from 3.7.3 to 5.0.x or 6.5.x. Repeat the upgrade but this time follow the instructions step by step. 7. Windows 2000/2003 install problem. The OT Server may have been installed incorrectly under a login other than “Admin” or on another drive. Please call our tech support line and they can help you fix this. Existing Users: If you have been using the Office Tracker Server for a while and are not getting an error message try these solutions: You may need to do a “rebuild” on your server database. See the section in this guide on “Rebuilding the Office Tracker Server Data File” Or If you try a rebuild and it is unsuccessful you may need to restore a backup of the Office Tracker Server database. See the section in this manual on “Restoring a Backup of the Data File.” #3 Reason Names List Won’t Display 1. Most Likely: If you created your own Office Tracker Server shortcut you may have this problem. To fix it, Stop the Office Tracker Server by choosing “Stop Office Tracker Server” from the launcher in your Task Bar, or if it’s running as a Service, Stop the Office Tracker Server Service in your “Services”

Troubleshooting and Tips 97
Control Panel. Now, start the Office Tracker Server from the Start/Programs/Office Tracker Server menu or from the Services Control Panel. Refer to the Server documentation for how to create a shortcut properly. The best way is to copy the current Short Cut that is installed in the Start menu on the Office Tracker Server machine. 2. Possible – If you can, go to the “View Log” by pressing the “View Log” button and see if you are getting an error such as javalangnullpointer error in the log (you may need to scroll to see it). If you see this error, follow these steps:
1. Stop the Office Tracker Server by choosing “Stop Office Tracker Server” from the launcher in your Task Bar, or if it’s running as a Service, Stop the Office Tracker Server Service in your “Services” Control Panel. 3. Wait 2 mins. then restart the Office Tracker Server as you normally do.
#4 Office Tracker Registration Page Keeps Displaying on Server If your demo period has expired you need to enter your serial number. You could also be experiencing a caching problem with your web browser. If so, try this: 1. To fix it, go to “Internet Options” under your “Tools” menu and press the “Delete Files” button. Click “OK” then click the “Refresh” button in your browser. 2. If the registration page doesn’t go away, enter your serial number or “Demo” if you’re a demo user. Press “Register” - if it doesn’t move on to the Admin page, repeat step 1. 3. If you still have a problem, restart the server machine, log on to the Admin page and then enter your serial number. #5 Symptom: Server misbehaving in unusual ways. Clients getting disconnected or very slow. Problem: The WebViewer Export Settings need to be set with the machine speed and memory in mind. With most 98 Systems this will be quite low, with NT systems, slightly higher and with 2000/2003 or XP much better. If you are exporting - every 15 mins. for every name for 4 full years --- this adds up to a lot of events. This means thousands events are being "requested" pretty much constantly from the database (especially on a slower machine) while it may still be trying to process the last request. So you are taxing your server machine to the point of running out of system resources. Solution: Change the WebViewer settings. If you're running on Windows NT, try a maximum of every 1 hour for a period of just 1 year at a time for a starting point unless you increase your machine speed. If you're running Windows 98, try every 2 hours for a period of 1 year.

98 Troubleshooting and Tips
It also depends on the number of events you typically create for each day and each name. These guidelines cover names lists that contain up to maybe 50 names. #6- Server isn’t responding to my client users Check to be certain the Office Tracker Server is running. Open your web browser and enter: http://serveripaddress:8001. If you get a message stating Page Not Found, it may have been shut down. If so, you need to restart the Server. If you can access the Admin page, click the View Log button and check for error messages or a message indicating the Server is rebuilding. #7- One of my client users can't see the events they created. Office Tracker uses a scheme where the identity is part of the event data record. If a user changes their identity, events may display differently. Check "File: Identity" to see what the current Identity is, then try choosing another Identity from the drop down menu in the Identity window. If the user created events under another identity you will either have to set up Sharing Privileges for that Identity and view the schedule with both names showing (group view) or re-create the events under the proper identity. #8- My client users connected and the events went away. This usually happens if someone moves the Office Tracker Server to another machine or directory and forgets to move the data files. NOTE: If you do not have the “OTDatabase” folder in the “OTServer” directory, a new empty data file folder is automatically created. Since it is the master file directory, the clients are updated when they connect (meaning they are updated to a new "clear" status). To fix this problem, you need to Stop the Office Tracker Server, locate your most recent backup of the “OTDatabase” folder and put it back into the “OTServer” folder where it belongs, then restart the server. #9- Client Users are Getting Error Messages On occasion, a client's local data file "otclient.mdb" can become corrupt. This can happen if the machine has a hard crash, etc. If one of your client users is getting error messages or can’t get updates from other users, you may need to reset the client database. See #11 for instructions. #10- Client Users Can’t Connect to Server or Can't "Hold" Their Connection There are several conditions that can cause this problem. If you have too many applications running on your server machine there may not be enough processing time for the Office Tracker Server. If you are able to access the Office Tracker Server Admin pages with your browser but can not connect to the server with a client there is a possibility the Office Tracker Server was unable to initialize the client port (4300) on the server. To correct the problem, follow the steps below. Stopping and Re-starting the Office Tracker Server 1. Stop the Office Tracker Server by choosing “Stop Office Tracker Server” from the launcher in your Task Bar, or if it’s running as a Service, Stop the Office Tracker Server Service in your “Services”

Troubleshooting and Tips 99
Control Panel. 2. Wait for 3 minutes. 3. Restart the Office Tracker Server as you normally do. 4. Open your web browser and enter http://yourserveripaddress:8001, then go do the Names List. If the Registration window displays, enter your serial number. Test your TCP/IP connection to the Office Tracker Server: A program called "Ping" allows your computer to send a small packet to another computer with a request for a reply. You will need to know the IP address of the machine you want to test the connection to before you can use ping. For a basic PING : From the “Start” menu go to "Programs" and select “MS-DOS Prompt” or “Command Prompt.” This will open a DOS window. Now type “ping 123.123.123.123” (Replace 123.123.123.123 with the IP address you want to check) and press enter. You will see some information displayed on the screen telling you how many packets were sent and how many were received and how long the transaction took in mili-seconds. If you see a message “Request timed out” this means you cannot make a connection to the IP address you entered. If you see that a lot of the packages are lost, this can imply there is some type of network trouble. Your IP Address May Not be Static The Office Tracker Server must have a "static" IP address so client users can connect. To check your IP address on the server machine, follow these steps: Choose "run" from the "Start" menu. Type "winipcfg" (for Windows 95/98) Press Enter. A window opens and displays the current IP address for the machine. Make sure this is the same address you entered at the client machine. For Windows NT users, either bring up the Command Prompt from the “Start/Programs” menu and enter ipconfig in the DOS window or select "Start>Settings>Control Panel" then double-click the "Network" icon. Click the "Protocols" tab and then double-click your TCP/IP protocol to check your IP address for the machine. #11 My clients aren’t behaving correctly, they can’t edit events or their schedule seems to “freeze.” Re-setting the Office Tracker Server and Clients There are some circumstances where you may need to do a re-set on your Office Tracker Server and clients. This usually occurs when files have been installed incorrectly, moved around during use, or when the server has been abruptly shut down and the data file corrupted. To re-set the Office Tracker Windows clients you should follow these steps:

100 Troubleshooting and Tips
1. Open your web browser and go to the Office Tracker Server Admin pages. Press the Admin button, then press the "Rebuild" button. First, you will be asked if you'd like to make a back-up which you should do, then you can continue with the Rebuild. The Rebuild Successful page will display on completion. If not, the data file may be corrupt. You may need to follow the instructions for restoring a backup of your database file before you can continue. If you do restore a backup you will need to repeat this step again and be sure you get a successful rebuild. 2. On each client machine, Exit the Office Tracker application. Exit the Alarmer on Windows machines by right-clicking the Alarmer icon in the Task Bar and choosing Exit. Rename the file "otclient.mdb" in the Office Tracker folder to "otclient.mdbOLD." 3. Open the directory folder “reserve db” in the Office Tracker client folder. Make a copy of the file “Otclient.mdb” and put the copy into the main Office Tracker directory at C: Program Files/Office Tracker. 4. Re-launch the client software, re-enter the serial number and choose "Connect" from the "Server" menu in the "Identity" window. Note: If the Identity window does not open automatically, choose "Identity" from the "File" menu. 5. Enter the Office Tracker Server IP address and click "OK". 6. Click "OK" in the Identity window. The client should connect and begin retrieving events from the server. The local database file "otclient.mdb" will build from the server's master database file as the user moves from day to day. #12 WebViewer Problem Where the Server Crashes Causing an Error Note: This is a Windows NT Fix The WebViewer uses Perl, a special programming language that will leave itself in memory if a user does not wait for the perl process to finish sending the browser the html message. The following steps will fix this by removing any perl.exe at a scheduled time. Instructions on how to Automate the clean up process of Perl.exe from memory 1. Create a patch file with only this line in it: e:\tools\kill.exe perl.exe Name the file “ killperl.cmd” Save it in the e:\tools folder. 2. Copy kill.exe file from the winnt resource kit into the e:\tools folder. 3. At the command prompt window, enter the following command exactly as shown. C:\>at 22:00 /every:M,T,W,TH,F,S,SU "e:\tools\killperl.cmd" 4. Repeat the above command changing the time from 22:00 to the desired time for each scheduled time you would like to ensure the perl has been cleared from memory.

Troubleshooting and Tips 101
5. To confirm the results type c:\at and you’ll see a list of your scheduled times. 6. To delete a scheduled time line, type c:\at 2 /delete (where 2 is the ID for the line that is shown when you type AT).
If a client user is experiencing trouble it is often best to follow these steps to reset the client data file. Reseting the Local Client Database File
1. Exit from the Office Tracker software by choosing Exit from the File menu.
Windows Client Users: a. Use the right mouse button to click on the Alarmer icon (small clock icon in the lower right corner of your Task bar) and choose “Exit”. b. Rename the client's local data file ("otclient.mdb") in the Office Tracker folder to “otclient.mdbOLD”. Note: You won’t be able to rename it if you haven’t Exited from the Alarmer application. c. Make a copy of the otclient.mdb file from the “reserve db” folder (right click on it and choose “copy”) then close the reserve db folder and right click and choose “paste” in the Office Tracker folder in the same location as the otclient.mdbOLD.
2. Go back to the client machine and restart the Office Tracker from the “Start” menu, re-entering the serial number and Server IP address in the Identity window (‘File” menu). This is like starting the client as a new connection and will create a new local schedule file on the client's machine using the server for data collection. It will take a few minutes at first for the client to get the updated events from the server but once the client has viewed the data, it will again be stored in the local file.
The following tips are useful in diagnosing and assisting with client trouble. Office Tracker Client Tips
Windows 95 Potential Problem: Running the 4.0 or higher client on Windows 95 machines. There can be a problem setting up the 4.0 or higher version of the Office Tracker client on Windows 95 machines if the wrong version of the MDAC file exists. If you get an error message about OLE you know you have this problem. Take the following steps to fix the client install on Windows 95. 1. Locate and download MDAC from the following web page: http://www.microsoft.com/msdownload/uda/mdac21/mdac_typ21.asp 2. Install MDAC.

102 Troubleshooting and Tips
3. Launch the Office Tracker client. 4. "Select Existing" button from the dialog that appears 5. Select the "Microsoft Jet OLE DB Provider" or the "Microsoft OLE DB Provider for ODBC Drivers" from the list 6. Press the next button. 7. Select the button "..." to the right of the data base name field. 8. Navigate to the Office Tracker folder - the default path is C:/Program Files/Office Tracker. 9. Select the file "otclient.mdb" 10. Press the "OK" button. 11. You should now see the registration screen for the client. #1- Event notifications aren’t being created Check the client’s notification preferences by choosing "Preferences" from the “Edit” menu on the Office Tracker client machine, then click the icon Events and be sure the “Auto-create Notifications” option is checked (on). #2- Client can’t see their colleague’s events Be sure the client has the necessary Sharing Privileges to view their colleague's schedule information. Also, be sure they have signed in under their correct Identity. #3- Server seems slow There may be more than one reason for this. Check the frequency of the WebViewer exports. If you are exporting “Every 15 mns.” You likely need to change this seeting to “Every hour” or “Every 3 hours.” A large number of non-default Sharing Privileges can slow down server performance, especially when a new user connects for the first time and needs to retrieve all permission information concerning their name. Once all users have retrieved the initial Sharing Privileges, server speed should increase. Clients may see a slowdown if you have a large number of client users accessing one Office Tracker Server. You might want to consider upgrading the server hardware to a faster machine. Check how often the client users are “requesting” large group views. For example, if several users have monthly group views saved with several names in them and they open and use the view regularly, the Office Tracker Server is receiving a very large data request each time they open and navigate with the view. In this instance, the best solution is to be sure the clients understand the purpose of creating group views and to recommend they limit access to large group views to an “as needed” basis only. #4- When printing the monthly calendar the day in the calendar only shows the first character. Choose Preferences from the "Edit" menu. Click on the Schedule tab, then click on the font button (probably says “Arial”). Select "Regular" for the style and set the font size to a smaller setting like 8. If

Troubleshooting and Tips 103
you need to reduce the font size smaller than 8 you can select the text field that displays the current font size and type in your new size. Press the OK button when you have finished then press the "Apply" button to have your changes saved. Press the OK button. Your monthly calendar view should be corrected. #5- The Office Tracker client crashes and the next time you launch it does not communicate to the Office Tracker Server Clients see a small red “x” icon in the upper right corner of the Office Tracker window and you know that the Office Tracker Server is running, you will need to do the following. From the File menu in the Office Tracker Application select “Identity...” when this window opens press “Connect to Server.” Enter the IP address of the Office Tracker Server and press OK #6- When I open a saved schedule view it comes up with nothing in the window, no columns or names. With the saved view open, set the View to "Daily," select “Set Column Widths...” from the View menu. In the "Set Column Width" window press the “Fill Client Area” button. This should fix the display. You should save the file now to save the new settings. If this does not work you will need to recreate the view and delete the damaged view from the Office Tracker folder. #7- When in the Daily view the screen flickers like an old movie. (Windows client problem) This can happen if you set the schedule view Preferences to display a time that Ends before the Start time. To fix it, choose “Preferences” from the “Edit” menu, press the “Schedule” tab and enter an Ending time that is later that the Starts time.


Upgrading and Moving the Server 105
Upgrading and Moving the Server
Version 6.5.x Important Notice
Version 6.5.x of Office Tracker requires both server and client upgrades. You should instruct client users to Exit out of Office Tracker and disconnect the server machine during the upgrade process. Install version 6.5.x on both the Office Tracker Server and all Office Tracker client machines before you begin to use it again. The Office Tracker Client versions earlier than 6.5 will not function with the version 6.5.x Server nor will Office Tracker Server versions earlier than 6.5 function with 6.5.x clients. If you have questions, contact Office Tracker Support at: 512-469-2967
Upgrading the Server from Version 4.0 or Later to version 6.5.x (If you have been using a demo this also applies to you)
1. Stop the Office Tracker Server by using the launcher in your Task Bar (version 4.0.x and later) or by stopping the Office Tracker Server Service if it’s running as a service under Windows NT, 2000/2003/XP. 2. Instruct all client users to Exit Office Tracker and do not Start it again until you have completed the Server upgrade. Make sure all clients have synchronized their schedules to the Office Tracker Server, they may want to print out necessary schedules so they can continue to work on paper, and enter any "penciled in" schedule information once the upgrade is complete. 3. Make a backup of your entire OTServer directory to another disk before upgrading 4. Press control-alt-delete and end the process javaw.exe if it is still running after you have stopped the Office Tracker Server. 5. Run the installer by inserting the CD ROM or if you downloaded, by double-clicking the “Office Tracker Installer” it and following the on-screen instructions. Be sure to choose only the Office Tracker Server when you are prompted to “Select Components” unless you want this machine to have both the client and server software installed. 6. Start the Office Tracker Server by selecting “Start Office Tracker Server” from the launcher in your Task Bar or by starting the Office Tracker Server service in your Services Control Panel. Note: If you are doing an upgrade and choose a different drive this time, you will need to move your data. You will need to stop the Office Tracker Server, copy and paste your OTDatabase folder and OTPSettings file from the current installed drive to the appropriate locations on the new drive, and restart the Office Tracker Server. The location of the OTDatabase folder is: C:/Program Files/OTServer

106 Upgrading and Moving the Server
and the location for the OTPSettings file is the following path: C:/Program Files/OTServer/Jigsaw/jigsaw/www/milum/. Upgrading the Clients 1. Exit the Office Tracker client application. 2. Run the Office Tracker installer. 3. Start the Office Tracker 6.5.x by selecting Office Tracker from the Start menu or by double-clicking the shortcut on the desktop.
If you have already upgraded to a version of 4.0.x, (4.0.1, 4.1.2, etc.) see instructions for upgrading from a 4.0 or 4.1 version to 6.5.x.
How to Upgrade Office Tracker From 3.7.3 to 6.5.x
Important: You must be running the Office Tracker 3.7.4 Server or later version before you can upgrade to version 6.5.x. Instructions for upgrading to 3.7.4 are included below. Please do not attempt to upgrade an earlier version. To check the version of the server open the "Admin" page and look at the bottom where it says "Version Number:" Please do not skip steps. Be sure you have backups of all your Office Tracker files, stored on disk before you begin. Read through these instructions and read the list of changes and the list of known bugs before beginning the upgrade process.
1. Make sure all clients have synchronized their schedules to the server and instruct them to Exit the Office Tracker client software. Client users will not be able to use the Office Tracker software during this upgrade process. You may want to instruct your Office Tracker users to make printouts of any pertinent schedule information so they can work from paper during this time.
If you are running version 3.7.3 or earlier begin here
2. From the Office Tracker Server "Admin" page press the "Backup" button to back up your current Office Tracker Server data file ("OTDATA"). 3. From the Admin page press the "Rebuild" button to rebuild the Office Tracker Server data file. Allow this process to complete and report back to you that the rebuild was successful. 4. Stop the Office Tracker Server then verify the jrew is not in memory in your Task Manager (press Control-Alt-Delete to view the Task Manager). 5. Download and install the 3.7.4 DLL update from the www.officetracker.com/html/upgrade40.html web site. You will need to unzip the archive "374DLL.ZIP". You will have two files.

Upgrading and Moving the Server 107
6. Copy the file "otplib.dll" to the following directory: "C:/Windows/System" or "C:/WinNT/System32." You will be asked if you want to replace the one that is already there, reply Yes. Copy the file "OTPServ.zip" to the following directory : "c:/Program Files/OTServer/Jigsaw/Classes". You will be asked if you want to replace this file, reply Yes. 7. Launch the 3.7.4 Office Tracker Server from the Start menu or Start the Office Tracker Server services if it’s installed as a service. 8. Go to the Admin page and verify the version number is now 3.7.4 Note: You may need to empty your web browser cache before the new version information will display. Choose Internet Options from the Tools menu in MS IE 5.0 and press the “Delete Files” button.
Please do not skip steps. Be sure you have backups of all you Office Tracker files, stored on disk before you begin. Read through these instructions and the pages covering changes and known bugs before beginning the upgrade process.
If you are running version 3.7.4 begin here:
Important: You must update your server to the Office Tracker 3.7.4 Server version before you can upgrade to version 6.5.x. Please, do not attempt to upgrade an earlier version. See above for information on how to do this. You will need to allow some time for the import of the 3.7.4 file to the new 6.5.x version because of the new SQL database structure. Please be sure to do this upgrade only when you can have your server tied-up for about an hour without client access. 1. Instruct all client users to Exit Office Tracker and do not Start it again until you have completed the Server upgrade. Make sure all clients have synchronized their schedules to the Office Tracker Server, they may want to print out necessary schedules so they can continue to work on paper, and enter any "penciled in" schedule information once the upgrade is complete. 2. Perform a "Rebuild" on the Office Tracker Server with the 3.7.4 version by going to the "Admin" page and pressing the "Rebuild" button one time only. This will create a file named "Otpdbbkp" in the current working directory, usually the OTServer directory. Let the rebuild complete until you see the “Rebuild Completed” page. 3. Make a backup copy of the "Otpdbbkp" file and move a copy of this backup to a safe place (another disk or at least another folder). 4. Stop the Office Tracker Server by pressing the Stop Server button on the Office Tracker Admin page. Then open the task manager by pressing (Control-Alt-Delete) and end the Task/Process "JREW"

108 Upgrading and Moving the Server
5. Very Important: Rename your current OTServer directory folder (in your Program Files) to "OTServer374" Note: To rename a directory you can right mouse click on the folder and choose "Rename" from the menu then type in the new name. 6. Install the Office Tracker 6.5.x Server by running the installer on the server machine. If you received the latest 6.5.x version on CD ROM, insert the disk and it should auto-run and open the installer. If you downloaded, look for the file “Office Tracker Installer” on your hard drive. If you do not have the latest version, download it from the Milum web site at: http://www.officetracker.com/html/upgrade60.html. This page will have the most recent version available. 7. After the install, Stop the Office Tracker Server by choosing "Stop Office Tracker Server" from the launcher icon in your Task Bar or by stopping the service if it's running as a service under Windows NT or 2000. 8. With the server stopped, move the file "Otpdbbkp" to the Import directory which is "Program Files/OTServer/Jigsaw/Jigsaw/Www/Milum/Import/." 9. Move the "OTPSettings" file from C:/Program Files/OTServer374/Jigsaw/Jigsaw/www/Milum/ to the new directory: C:/Program Files/OTServer/Jigsaw/Jigsaw/www/Milum. 10. Start the Office Tracker Server from the launcher icon in your Task Bar or by starting the Office Tracker Server service if it's running as a service under Windows NT/2000/2003/XP. 11. Launch your web browser and enter your log in information to access the Admin pages such as: http://yourIPaddress:8001. The import process may take up to an hour or more depending on the size of your database files. 12. Open the Office Tracker Admin page from your browser and check that the version now is 6.5.x. You should also check the Names List to verify the import worked. You should see all of your user's names and resource names as you did with version 3.7.4. If you have a long list of names it may take a few seconds for the whole list to display. If not, please contact Milum support at: [email protected] You can now upgrade the clients to 6.5.x as described below. If you have a problem please contact Milum's technical support either by e-mail at [email protected] or by telephone at 512-469-2967. Note: If you do not have a support package you may need to purchase support before you can talk with a representative.

Upgrading and Moving the Server 109
Upgrading Clients from 3.7.x to Version 6.5.x
Important!: You must upgrade the Office Tracker Server before upgrading the Clients. The Office Tracker 6.5.x client uses a different data file format than the 3.7.x client. This means you will need to reconnect to the Office Tracker Server as you would if it was a new install. It may take a while to update the client's sharing privileges and event information from the server to the new database file. This is especially true if they open a view with many names in it. This will not happen every time, as once they get the information from the server they don't have to get it again until a change is made. Client users will see the messages "Gathering Events" or "Getting Permissions" in the lower left corner of their Office Tracker window. 1. The client application "Office Tracker" should not be running if you followed the instructions for upgrading the Office Tracker Server. 2. Run the Office Tracker client installer on each of the client computers. If you received the latest 6.5.x version on CD ROM, insert the disk and it should auto-run and open the installer. If you downloaded, look for the file “Office Tracker Installer” on your hard drive. 3. When prompted to Select Components, select the Office Tracker Client installer and follow the on-screen instructions. Note: If you are installing on the same machine as your main Office Tracker Server, leave the Office Tracker Server checked “on” as well, otherwise, be sure it is not checked. 4. Start the Office Tracker client from the Start menu and enter the 6.5.x serial number. 5. If the Identity window does not display, select Identity from the File menu. 6. Press the "Connect to Server" button at the bottom of the Identity window and enter the IP address or Machine Name of the Office Tracker Server. 7. Press the OK button. 8. When the name of the Office Tracker Server appears in the "Server" area of the Identity window press the "OK" button to complete the connection. Note: It may take a while to update your sharing privileges and event information from the server to your new database file. This is especially true if you open a view with many names in it. This will not happen every time, once you receive the information from the server you don't have to get it again until a change is made. You will see the messages "Gathering Events" or "Getting Permissions" in the lower left corner of your Office Tracker window. 9. You may need to choose "Open" from the "File" menu and open your saved schedule views. Once you open them, it is also recommended that you “Save As” and re-save them with the new 6.5.x file format. You can leave your schedule views open when you Exit the Office Tracker client application so they will be "remembered" next time you launch the application. TECHNICAL SUPPORT: If you have a problem please contact Milum's technical support either by e-mail at

110 Upgrading and Moving the Server
[email protected] or by telephone at 512-469-2967. Note: If you do not have a support package you may need to purchase support before you can talk with a representative.

Upgrading and Moving the Server 111
Moving the Office Tracker Server Software to a New Machine.
1. Log into the current Office Tracker Admin page via your browser and press the Backup button to make a backup of the current data file. 2. Stop the current Office Tracker Server software by using the launcher in your Task Bar or by stopping the Office Tracker Server service. 3. Make a backup copy of the entire OTServer folder. Store this copy on another disk in case of a problem so you can get back to your data. 4. Install the Office Tracker Server software on the new machine. Note: If you are installing your new server on Windows NT/2000/XP after installing you will need to Stop the Office Tracker service on the new machine before continuing unless you cancelled the auto start option in the installer. 5. Make a new folder named OTServerData on the current Office Tracker server machine. 6. Locate and copy the latest backup file example "otdatafri.xml" or "otdata38437438.xml" in the OTP_Backups folder to the new folder OTServerData , locate and copy the "OTPSettings" files on your current server to the new folder OTServerData. The "OTP_Backups" folder will be in the following location. "Program Files/OTServer/Jigsaw/Jigsaw/www/Milum/OTP_Backups" The OTPSettings file will be located at "Program Files/OTServer/Jigsaw/Jigsaw/www/Milum." 7. Move a copy the folder OTServerData to the new server machine. 8. Copy the file OTPSetting from the folder OTServerData to OTServer/jigsaw/jigsaw/www/milum. Copy the file that ends with .xml from from the folder OTServerData to the following OTServer/jigsaw/jigsaw/www/milum/import. 9. You can log onto the Office Tracker Admin page after you start the Office Tracker Server to see when the server completes importing the data. If you move the Office Tracker Server to a new machine and keep the same IP address you do not need to read any further. The Office Tracker client will connect to the new server automatically since the IP address is the same. 10. If the IP address of the new Office Tracker Server machine is different, instruct all client users to do the following: a. Choose "Preferences" from the Office Tracker Edit menu. b. Select "Servers" from the tabs across the top of the Preferences window. c. Click on the Server Name in the Server List area, then press the Delete button. d. Click "Yes" when asked if you want to delete the Server from the list. e. Click "Apply" and click "OK" to close the Preferences window. f. Choose "Identity" from the "File" menu and press the “Connect to Server” button. g. Enter the new server's IP address when prompted and click "OK" then "OK" again to log on.

Using Office Tracker with ODBC Data Source 113
Using the Office Tracker Server with an ODBC Data Source The Office Tracker Server ships pre-configured to use the 100% pure Java database “InstantDB” by Lutris www.lutris.com. If you wish to use an ODBC data source for the database for the Office Tracker Server you will need to do the following. Follow the instructions below to switch the Office Tracker Server to an ODBC data source such as Microsoft Access. 1. You should be at the Office Tracker Server machine to begin. Stop the Office Tracker Server application or service. 2. Make a backup copy (to another disk) of your “OTDatabase” folder in the OTServer directory and your “OTPSettings” file located in: Program Files/OTServer/jigsaw/jigsaw/www/milum. 3. Open the ODBC Data Source control panel. You can access this control panel from the Start menu at Start>Control Panel>Administrative Tools>ODBC Data Source. If you do not have the ODBC Data Source control panel installed you will need to locate the Installer on the Microsoft web site at www.Microsoft.com. 4. With the “ODBC” Control Panel open, press the “Add” button to create a new ODBC data source. This will display the "Create New Data Source" window. 5. Select "Microsoft Access Driver" from the list of available drivers and press the "Finish" button. 6. Type the Name "OTServer" in the Data Source name field. You can add a description to the Description field if you wish. 7. Press the "Create..." button, This will open the "New Database" dialog. Select the directory (Folder) you wish to save the database in by navigating to it in the Directories area on the right side of the dialog (Milum recommends the “OTServer” directory). Once you have selected the directory where you want to save the data file, type a name for the data file, example "OTServerData.mdb". Press the "OK" button to save your settings. You should see a dialog confirming the database creation. 8. Close the Windows for the ODBC Data Source by pressing "OK" on each one until the control panel is closed. 9. Locate and open the file "OTPSettings." This file should be located in the following path b default: "C:\Program Files/OTServer/Jigsaw/Jigsaw/www/Milum".

114 Using Office Tracker with ODBC Data Source
10. You will need to change the following text in the settings file, We will be using the data source name "OTServer" we created earlier. Be careful the text must be exact! a. Locate the section in the OTPSetting file with the following text:
jdbcdriver=org.enhydra.instantdb.jdbc.idbDriver
Change the string to the following text: jdbcdriver=sun.jdbc.odbc.JdbcOdbcDriver
b. Locate the section in the OTPSettings file with the following text:
jdpcpropfile=InstantDB.prp
Change the string to the following text: jdpcpropfile=MSSQL.prp
c. Locate the section in the OTPSettings file with the following text:
jdbcurl=jdbc\:idb\=OT.prp
Change the string to the following text: jdbcurl=jdbc\:odbc\:OTServer
11. Locate the backup file created earlier, this file should be located in the following path “c:\Program Files/OTServer/Jigsaw/Jigsaw/Www/Milum/OTP_Backups” The file you are looking for will be the most recently created file. You can set your view to “Detail” to see when the files where created. 12. Make a copy (Do Not Use The Original file) of the most recent back up file from the OTP_Backups directory to the “Import” directory at the following path “c:\Program Files/OTServer/Jigsaw/Jigsaw/Www/Milum/Import” 13. Launch the Office Tracker Server as you normally do. The backup file will be imported to the new ODBC data file and the Office Tracker Server will use the specified data file from now on. The Import may take some time depending on the size of the file you are importing. You can tell when the Server is finished as the drive indicator will return to normal. Usually takes from 10 to 120 mins. 14. Once the Import has completed you will need to log onto the Servers Admin pages to verify the data has been imported. You should go to the “Names List” and verify all your names are present, If your users list has been imported and all looks well, you should check the View Log from the Admin page to check for any error messages.

Index 115
Index exporting, 41 adding names, 17, 20 exporting Events, 41 Admin, 23 extendable markup language, 35 administration pages, 1, 16, 17, 27, 29, 32,
36, 39, 40, 42, 43, 95 firewalls, 93 frequently asked questions, 23, 95 Alarmer, 101 group scheduling, 1, 15 Assigning Privileges for Clients, 32 group view, 5, 40, 98, 102 automatic rebuild, 43 Groups, 26 back up, 106, 114 help guide, 1 backup, 45 Help Guide, 1 Backup, 37 identity, 18, 20, 28, 31, 98, 100, 101, 102,
103, 109 building the Office Tracker Server Data File, 43 calendars, 4
increasing User License, 29 cgi, 59, 60, 61 installation, 20, 71 CGI, 60 Installing Server, 81 Client Connection Problem, 95 installing WebViewer, 54 client port, 94 internet browser, 59 Client Port, 94 ip address, 20, 84, 85, 86, 90, 99 conference rooms, 4, 17, 20, 28, 30, 31 IP Address, 84 configuring tcp/ip gateway, 90 ipconfig, 85, 99 Configuring TCP/IP Gateway, 90 javaw, 95, 105 connect to the web viewer, 59 Keyword edit, 45 connect to the Web Viewer, 59 Label edit, 45 connected users, 29 load, 41 Connection Problem, 95 Machine Name, 24 Contact locked, 67 crash, 38, 61, 98 Mail Integration, 47 creating an IP address, 86 Memory Allocation, 44 data file, 5, 15, 23, 34, 35, 36, 37, 38, 42,
43, 44, 98, 99, 100, 101, 106, 109, 113, 114
messaging, 47, 48, 49 ML, 1
database file, 4, 37, 39, 44, 100, 109 Modify, Repair or Remove the Program, 86 date button, 20, 28 moving a Name, 30 delete events, 33 Moving the Office Tracker Server Software,
111 Deleting a Name, 30 deleting events, 42 moving the server, 105 DHCP serviced subnet, 90 names list, 17, 20, 23, 26, 27, 29, 30, 31, 32,
39, 44, 48, 58, 96, 114 Don’t Export, 58 e-mail integration, 47 NAT, 90 E-Mail Integration, 47 Netscape, 17 e-mail, sending from server, 2, 15, 18, 20, 28,
29, 47, 48, 49, 50, 53, 109 Network Address Translation, 91 notification, ii, 47, 48
equipment, 4, 20, 28, 30 ODBC, 102, 113, 114 everyone option (sharing privilege), 31 offline, 4, 5, 22, 23

116 Index
OLE, 101 Palm, 69, 70, 71, 73, 74 Passwords, 45 passwords, client, 31 perl, 60, 61, 100 Perl, 60 port number, server, 16, 18 Printing, ii printing the monthly calendar, 102 privileges, 2, 18, 30, 31, 32, 33, 47 problem solving, 23, 95 proxy, 93 Public Internet Address, 90 questions and answers, 23, 95 rebuild, 44, 96, 100, 106 Remote Access, 90 Removing a name, 30 reset the client data file, 101 resources, 17, 31 Resources, 17 restoring a Backup, 38 rooms, 17 Rooms, 17 router, 90 scheduling, 4 security, 30, 53 serial number, 13, 20, 69 server port, 94 Server Port, 94 Server Requirements, 7 Shared Files, 5 sharing privileges, 2, 18, 30, 32, 109 source, 93, 113, 114 starting, 25, 39, 101 support, ii, 47, 51 synchronization, 22 system requirements, 7
TCP/IP Locate your server IP address, 84
TCP/IP Address, 84 tcp/ip dns ip addresses, 90 TCP/IP DNS IP Addresses, 90 tcp/ip gateway, 90 TCP/IP Gateway, 90 tcp/ip network setup information, 89 TCP/IP Network Setup Information, 89 tcp/ip packets, 93 TCP/IP packets, 93 tcp/ip protocol, 89 TCP/IP Protocol, 89 TCP/IP WINS Configuration, 90 time zone, 51 troubleshooting, 95 type, 20, 28, 85, 90, 95, 99, 113 Type, 20, 28 Updates, 4 Upgrade, 106 upgrading, 15, 102, 106, 109 Upgrading, 105 view Log, 39 web site, 2, 106, 108, 113 web viewer, 53, 59, 60 Web Viewer, 53 WebViewer Login Name, 58 WebViewer password, 58 WebViewer Requirements, 53 WebViewerExport Settings, 97 Where Backups are Stored, 35 Windows 95, 101 Windows XP Service Pack 2, 93 winipcfg, 95 wins server, 90 WINS Server, 90 XML, 35