the strength of digitalsound-better.net/support/manuals/autosound/dqxs_manual.pdf · the strength...
TRANSCRIPT

DigitalThe Strength of
DQXS
Owner’s Enjoyment Manual
Six Channel Digital Equalizer/Crossover
AudioControl®
22410 70th Avenue West • Mountlake Terrace, WA 98043 USAPhone 425-775-8461 • Fax 425-778-3166
www.audiocontrol.com
tm
Digital
Owner’s Enjoyment Manual
AudioControl®
This page was intentionally left blank
Owner’s Enjoyment Manual
The Strength of Digital ™
Table of ContentsIntroduction . . . . . . . . . . . . . . . . . . . . . . . . . . . . . . . . . . . . . . . . . . . . . . . . . . . . . . . . . . . 1
Key Features and Highlights . . . . . . . . . . . . . . . . . . . . . . . . . . . . . . . . . . . . . . . . . . 2
Quick Installation Information . . . . . . . . . . . . . . . . . . . . . . . . . . . . . . . . . . . . . . 4
Installation . . . . . . . . . . . . . . . . . . . . . . . . . . . . . . . . . . . . . . . . . . . . . . . . . . . . . . . . . . . . 9
Placement and Mounting . . . . . . . . . . . . . . . . . . . . . . . . . . . . . . . . . . . . . . . . . . 9
Power Wiring . . . . . . . . . . . . . . . . . . . . . . . . . . . . . . . . . . . . . . . . . . . . . . . . . . . . . . . . 9
Audio Wiring and System Diagrams . . . . . . . . . . . . . . . . . . . . . . . . . . . . 9-13
Level Matching. . . . . . . . . . . . . . . . . . . . . . . . . . . . . . . . . . . . . . . . . . . . . . . . . . . . . 14
Navigating the DQXS Menu Screens . . . . . . . . . . . . . . . . . . . . . . . . . . . . . . . . 15
Equalization Adjustment . . . . . . . . . . . . . . . . . . . . . . . . . . . . . . . . . . . . . . . . . . . . 21
Troubleshooting . . . . . . . . . . . . . . . . . . . . . . . . . . . . . . . . . . . . . . . . . . . . . . . . . . . . . 23
Warranty . . . . . . . . . . . . . . . . . . . . . . . . . . . . . . . . . . . . . . . . . . . . . . . . . . . . . . . . . . . . . 25
Specifications . . . . . . . . . . . . . . . . . . . . . . . . . . . . . . . . . . . . . . . . . . . . . . . . . . . . . . . . 28

Owner’s Enjoyment Manual
AudioControl®
This page was also intentionally left blank
Owner’s Enjoyment Manual
The Strength of Digital ™
1
IntroductionWelcome to the world of AudioControl digi-
tal signal processing . A unique combination of AudioControl’s lengthy experience in perfor-mance signal processing design combined with state-of-the-art Digital Signal Processing (DSP) technology. You now have in your possession the DQXS, an extremely powerful six-channel, dual-bandwidth graphic and parametric digital equalizer with a fully-programmable eight-channel 24 dB/octave Linkwitz-Riley alignment electronic crossover. If it sounds cool when you say it, that’s because it really is. The 142 equal-ization filters on your DQXS give you complete acoustical control over your system which makes it an ideal addition to any multi-channel system...even those using the factory-installed source unit! Whether you are a die-hard sound-off competitor or simply enjoy great music, you will definitely appreciate how the DQXS makes your performance autosound system sound even better.
Now before you start salivating too much just thinking about the benefits of the DQXS, take a few minutes to sit back, grab yourself a cold
one, and spend a few minutes reading through this manual. It contains lots of useful facts and information (and besides, we spent a lot of time writing it!)
KEY FEATURES OF THE DQXS Here are some of the cool features that are
enclosed in this magical box:
• Selectable inputs - Two, Four, Or Six channels
• Eight output channels
• One third octave and one half octave equaliza-tion controls
• Two, fully-adjustable parametric equalizers per pair of channels
• 24dB/octave Linkwitz-Riley alignment cross-over
• PFM Subsonic Filter
• Eight user-adjustable memories
• 24-bit digital signal processing
• Input for optional DDC Digital Dash Control (sold separately of course!)
Quite frankly your DQXS has a lot of features so quit wasting your time and read on!!

Owner’s Enjoyment Manual
AudioControl®
2
FEATURES AND HIGHLIGHTSSix Channels Of Input and Eight
Channels Of Output: The DQXS has more system-design flexibility than any other digital car audio equalizer that AudioControl has ever built making it ideal for a multitude of appli-cations. Whether you are designing a system around a source unit with two, four, or six out-puts and only a couple of amplifiers or you are maxing it out the DQXS is the processor for you.
Input and Output Level Controls: To help accurately level match your source units and amplifiers, the DQXS has individual input- and output-level controls. This will help you maximize the sound quality of your system and minimize any system noise. These controls will also help your DQXS work with factory-installed source units.
Dual Bandwidth Equalization Con-trols: Car interiors vary widely in size and acoustic make-up. Doors, kick-panels, and rear decks don’t make the best location for speaker placement causing your high-performance speaker system to sound somewhat lackluster. The DQXS offers one-third octave equalization controls for your front channels and subs plus
one-half octave filters for your rear channels.
Parametric Equalization Controls: In addition to offering 130 graphic equalization controls the DQXS also packs twelve fully-adjust-able parametric equalization controls, two for each pair of channels. With the DQXS’s paramet-ric controls you can select a center frequency, dial in the ideal bandwidth and apply the appro-priate amount of boost or cut. The precise filter-ing of the DQXS allows you to select bandwidths as narrow as 1/12 octave!
Eight Channel 24 dB/Octave Cross-over: Not to be content with just state-of-the art equalization, your DQXS is equipped with incredibly flexible and accurate 24 dB/octave Linkwitz-Riley alignment electronic crossovers. This allows your DQXS to provide you with precisely crossed over signals for your front, rear, and subwoofer speakers.
User Memories: The DQXS has the ability to set and store eight different system equalization settings in individual memory locations. In ad-dition, these memories are non-volatile, which means they won’t go away when you leave your dome light on at night and kill your battery!
Owner’s Enjoyment Manual
The Strength of Digital ™
24-bit Digital Signal Processing: Audio-Control’s digital signal processors use a special 24-bit DSP (digital signal processor) that was specifically designed for equalization and other dynamics processing. Matching 24-bit A/D - D/A converters are also incorporated for maximum sound quality.
Bulletproof Warranty: The most impor-tant feature of all. Every AudioControl product is selflessly designed and manufactured by the occupants of our rainforest factory. We take every effort to ensure that you will have many years of enjoyment out of your DQXS. To ensure the performance of this new Digital product, we highly recommend that you allow your authorized AudioControl dealer to perform the installation. Not only do they have all the right knowledge and tools, but also in the unlikely chance your DQXS should stop working, we back it with a limited five years parts and labor warranty. Should you choose to install it your-self we will still give you a one-year parts and l a b o r warranty. To activate your warranty,
you need to FILL OUT AND SEND IN YOUR WARRANTY CARD!
3
We also recommend that you save your in-voice or sales slip as proof of installation and ownership. Not only is it necessary for warranty purposes, but should your DQXS “disappear” one day while your car is parked at your local latte’ stand, you will find insurance companies very unforgiving without proof of purchase.
IF YOU LIKE THE DQXS, YOU’LL LOVE . . .
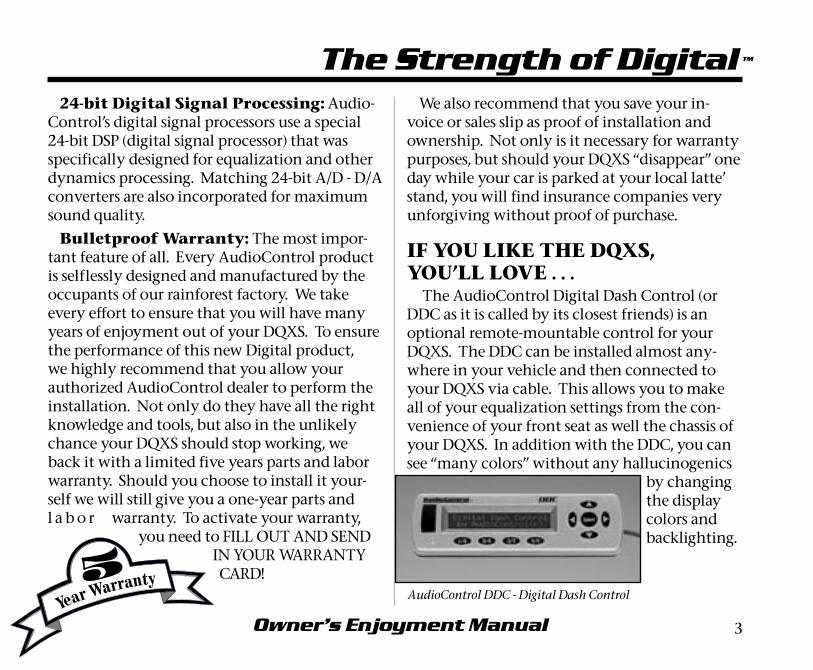
The AudioControl Digital Dash Control (or DDC as it is called by its closest friends) is an optional remote-mountable control for your DQXS. The DDC can be installed almost any-where in your vehicle and then connected to your DQXS via cable. This allows you to make all of your equalization settings from the con-venience of your front seat as well the chassis of your DQXS. In addition with the DDC, you can see “many colors” without any hallucinogenics
by changing the display colors and backlighting.
AudioControl DDC - Digital Dash Control
Owner’s Enjoyment Manual
AudioControl®
4
QUICK INSTALLATION INFORMATIONFor those of you short on time, but high on
ambition, we offer the following section to speed up your installation of the DQXS:
1. The DQXS needs to be installed in the signal path between your source unit and your exter-nal amplifier(s). If this is not obvious to you, quickly pack up your DQXS and run to your nearest authorized AudioControl dealer to have them perform the installation. You will thank us later.
2. Physically mount the DQXS in a location that keeps it away from soda spills, food crumbs, and curious fingers. However, you will want to select a location that allows you to see the dis-play and access the equalization controls during setup. If your are using our optional DDC (Digi-tal Dash Control) then you can probably install the DQXS wherever you want, just as long as the cable from the DDC will reach it.
3. Hook up +12 volt power, ground, and remote turn-on. If you need to know more, then read on. Heck, if you don’t think you need to know more, you should still read on, because you can never know too much.
4. Adjust the “Input Level” control on your DQXS to match the source unit’s output and then adjust the “Output Level” controls to match your amplifier inputs.
Note: You will want to turn the gains on your amplifiers DOWN to maximize your systems perfor-mance.
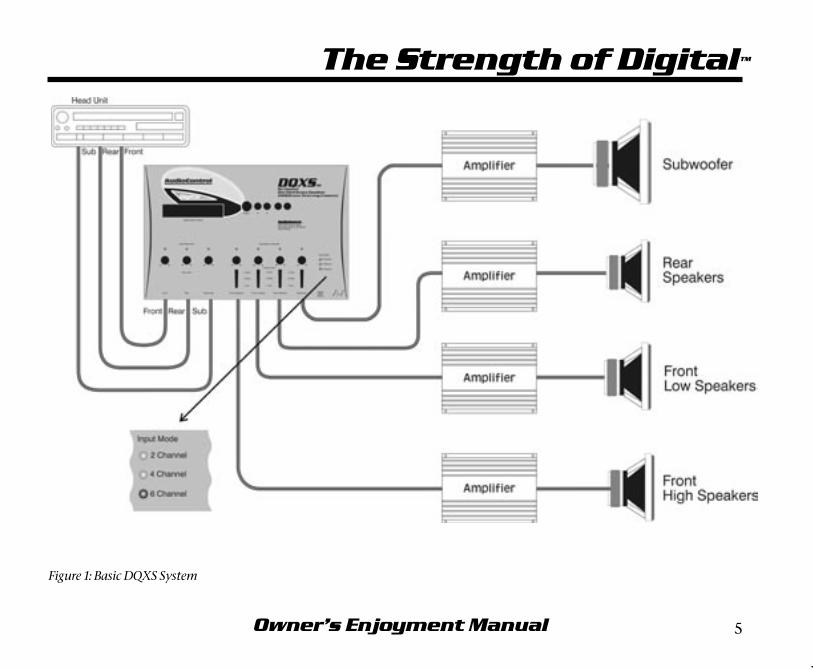
5. Scroll through menu screens on your DQXS and select the proper Input Mode. Your choices are two, four, or six channel so this should not be too complicated.
6. Scroll through the menu’s again and select the proper crossover settings for your system, ac-cording to system design, speaker manufacturer specs, etc.
7. Now comes the fun part. Set your equaliza-tion controls to where your system sounds the most balanced yet dynamic. More about this in the section titled “Adjusting Your Equalizer”... and you thought you would not have to read the rest of the manual. Hah!
8. Last but not least, scroll through those menus again (see a common theme) and you will want to save your system settings in one of the eight memory locations.
Owner’s Enjoyment Manual
The Strength of Digital™
5
Figure 1: Basic DQXS System
Owner’s Enjoyment Manual
AudioControl®
6
A GUIDED TOUR OF DQXS1) Inputs: The DQXS has six RCA inputs that
will need to get their audio signals from your main source unit. If your source unit only has two or four outputs, fear not, just use the front and/or rear inputs. See the system diagrams be-ginning on page 10 for some cool system ideas.
2) Input Level: These knobs allow you to maximize the signal level that goes from your source unit into your DQXS to achieve maxi-mum signal-to-noise ratio. Keep in mind that despite what the literature says, most aftermar-ket source units produce a relatively low volt-age signal, especially when it comes to playing music at normal levels.
3) Input Maximized Indicators: These nifty LEDs (Light Emitting Diode if you are curi-ous) indicate that you are supplying the DQXS its maximum amount of signal voltage. If the LED indicators never come on, don’t assume that it is not working (since LEDs rarely break) but you might consider adding a line driver to your system.
4) Output Level Controls: Although your DQXS has the ability to increase your signal volt-age, your amplifiers may not necessarily accept that high of a signal. These controls allow you to regulate the proper amount of pre-amp signal from the DQXS to the amplifiers.
5) Equalization Overload Indicator: This convenient LED indicates when the DSP (digital signal processor) of your DQXS is clip-ping or distorting. The usual cause of this is having the “Input Level” turned up too high or you have too much overall boost on the various frequencies of your equalizer.
6) Select: This button allows you to select one of the various equalization, crossover, display, or memory modes of your DQXS.
7) Navigation Arrows: These multi-func-tion buttons perform a number of duties, de-pending upon which mode your DQXS is in. You can do anything from applying boost or cut to your equalization filters to changing the display brightness. However, if you get the high score, you cannot enter your initials!

Owner’s Enjoyment Manual
The Strength of Digital ™
7
Figure 2: Top view of the DQXS
❷
¸
¹
º
Ñ
Ï
Ð
Ò Ó
Owner’s Enjoyment Manual
AudioControl®
8
8) Output Voltage Indicators: These brightly colored LEDs indicate the level of signal voltage that is coming out of the various outputs of your DQXS. Use these to assist in level match-ing your source unit with your amplifiers.
9) Outputs: These RCA connectors should be connected to the next component(s) after the DQXS, usually an amplifier. Do not connect any speakers directly to your DQXS or to any home appliances, like your toaster.
10) Digital Dash Control (DDC) Input: This input allows you to connect the optional AudioControl Digital Dash Control (DDC) which will allow you to control your DQXS from the convenience of the driver’s seat, passengers seat, back seat or anywhere else the cable will stretch. See your authorized AudioControl dealer for more information about this option or check out www.audiocontrol.com.
11) Power Connections: This incredibly handy connector is a godsend to those who have tried to wire up their gear with their body crammed in the trunk. You can wire up the power, ground, and remote turn-on from the convenience of outside your car and then casu-ally plug it into your DQXS.
12) Input Mode: These cool blue lights indi-cate the input mode that your DQXS is in, as this affects which outputs are active. For example, a two channel signal will only route the signal to 3 of the outputs whereas a four channel input will route signals to all of your outputs.
Owner’s Enjoyment Manual
The Strength of Digital ™
9
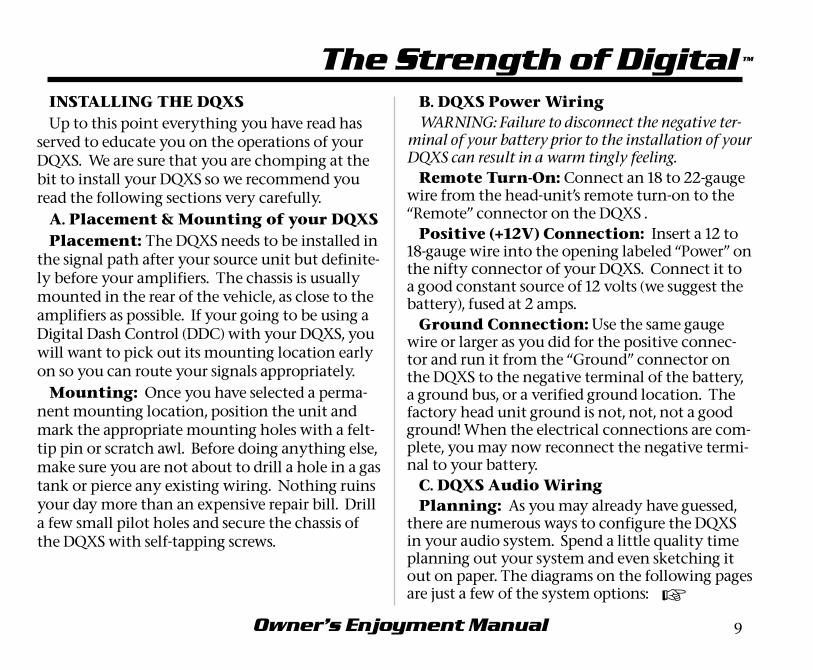
INSTALLING THE DQXS Up to this point everything you have read has
served to educate you on the operations of your DQXS. We are sure that you are chomping at the bit to install your DQXS so we recommend you read the following sections very carefully.
A. Placement & Mounting of your DQXSPlacement: The DQXS needs to be installed in
the signal path after your source unit but definite-ly before your amplifiers. The chassis is usually mounted in the rear of the vehicle, as close to the amplifiers as possible. If your going to be using a Digital Dash Control (DDC) with your DQXS, you will want to pick out its mounting location early on so you can route your signals appropriately.
Mounting: Once you have selected a perma-nent mounting location, position the unit and mark the appropriate mounting holes with a felt-tip pin or scratch awl. Before doing anything else, make sure you are not about to drill a hole in a gas tank or pierce any existing wiring. Nothing ruins your day more than an expensive repair bill. Drill a few small pilot holes and secure the chassis of the DQXS with self-tapping screws.
B. DQXS Power WiringWARNING: Failure to disconnect the negative ter-
minal of your battery prior to the installation of your DQXS can result in a warm tingly feeling.
Remote Turn-On: Connect an 18 to 22-gauge wire from the head-unit’s remote turn-on to the “Remote” connector on the DQXS .
Positive (+12V) Connection: Insert a 12 to 18-gauge wire into the opening labeled “Power” on the nifty connector of your DQXS. Connect it to a good constant source of 12 volts (we suggest the battery), fused at 2 amps.
Ground Connection: Use the same gauge wire or larger as you did for the positive connec-tor and run it from the “Ground” connector on the DQXS to the negative terminal of the battery, a ground bus, or a verified ground location. The factory head unit ground is not, not, not a good ground! When the electrical connections are com-plete, you may now reconnect the negative termi-nal to your battery.
C. DQXS Audio WiringPlanning: As you may already have guessed,
there are numerous ways to configure the DQXS in your audio system. Spend a little quality time planning out your system and even sketching it out on paper. The diagrams on the following pages are just a few of the system options: +
Owner’s Enjoyment Manual
AudioControl®
10
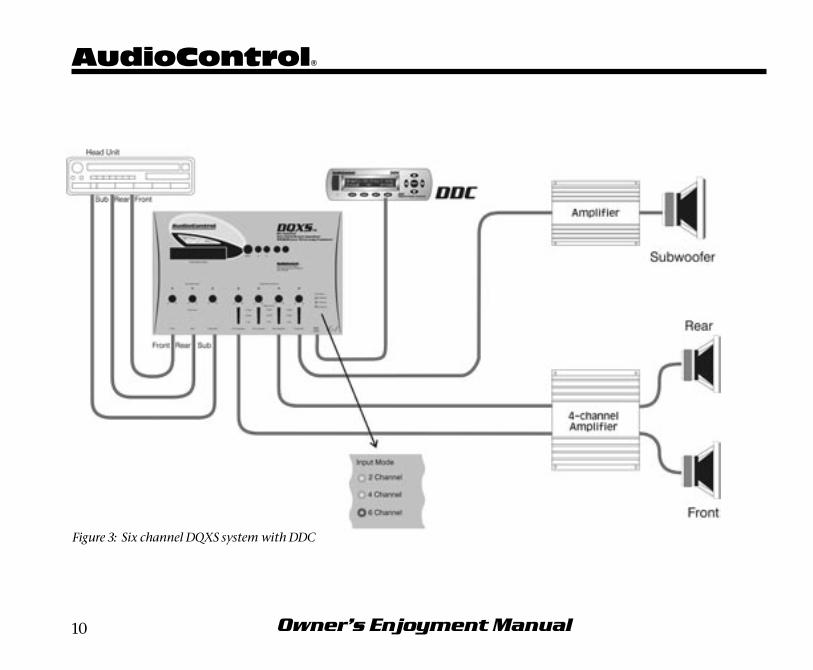
Figure 3: Six channel DQXS system with DDC
Owner’s Enjoyment Manual
The Strength of Digital™
11
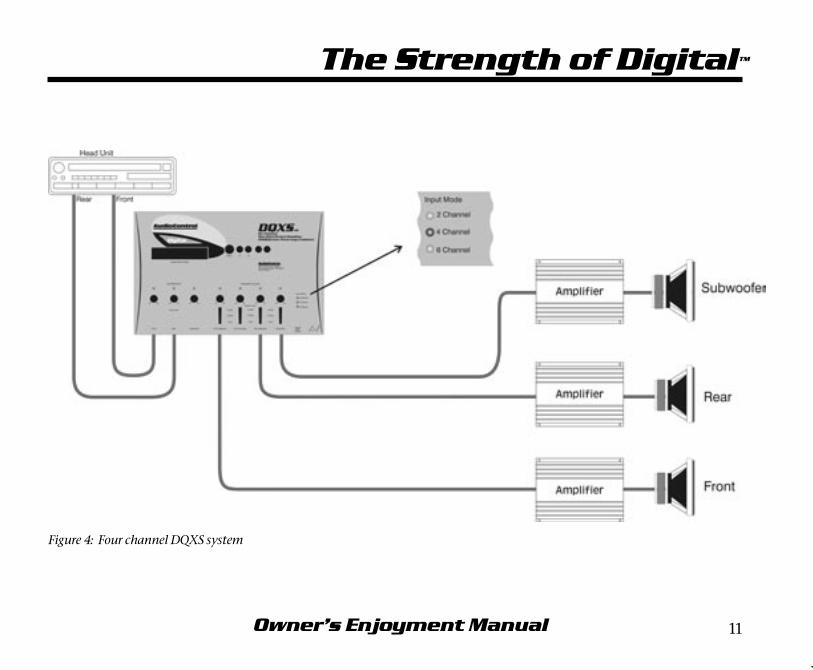
Figure 4: Four channel DQXS system

Owner’s Enjoyment Manual
AudioControl®
12
Figure 5: Two channel DQXS system
Owner’s Enjoyment Manual
The Strength of Digital ™
13
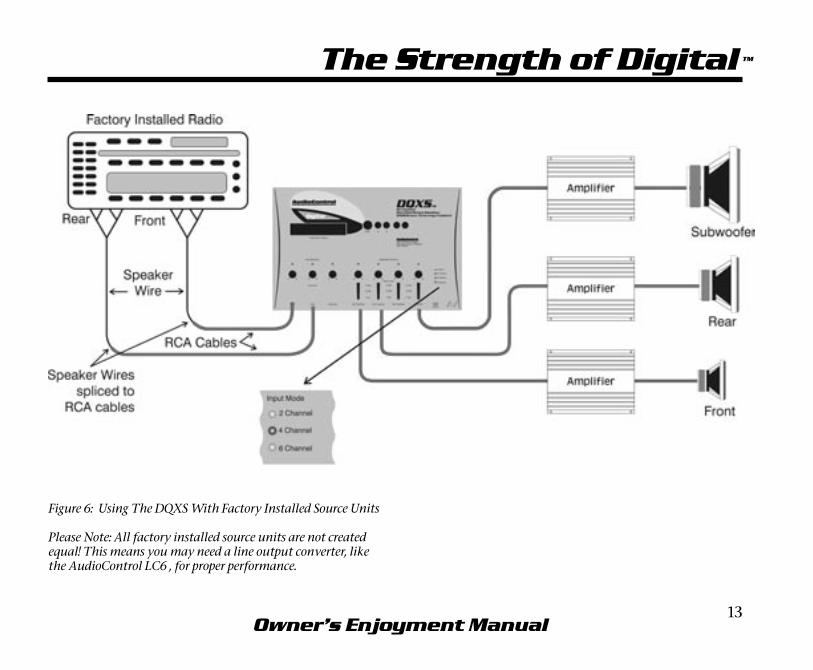
Figure 6: Using The DQXS With Factory Installed Source Units
Please Note: All factory installed source units are not created equal! This means you may need a line output converter, like the AudioControl LC6 , for proper performance.
Owner’s Enjoyment Manual
AudioControl®
14
D. Level MatchingIf you have ever listened to a friend’s “killer”
car audio system and heard lots of hiss, clicks or pops, then you have experienced an improperly level-matched system. When a performance autosound system is properly level matched, you should get the maximum output from your source unit and amplifiers without any clipping or that annoying hiss! The following steps will help guide you through the process, although at the end of the day, your ears will be your guide!
1) Set your source unit’s fader and balance con-trols to their center positions.
2) Disconnect the output RCA connections between your DQXS and the amplifier(s) . . . otherwise get some earplugs.
3) Start playing some relatively dynamic music and set the volume on your source unit to about 3/4 of maximum. You should not hear anything at this point. If you are hearing music, go back to step #2. If you are hearing voices, go see a doc-tor!
4) Starting with the DQXS “Input Level” con-trols, adjust the control knobs until the “Input Maximized” LEDs begin to flicker steadily with the music.
5) Now adjust the output level control until the “2 volt” or “5 volt” light starts to flicker. You will want the output voltage to match up to your amplifier’s input gain levels. If you don’t know how much this is, ASK the amplifier manufacturer or read the owner’s manual of the amplifier.
6) Very Important - Set the input gains on the amplifier(s) at minimum!
7) Double check that you performed Step #6
8) Decrease the volume control on your source unit and re-connect the RCAs between the DQXS and the amplifier(s).
9) Now increase the volume on your source unit to your normal listening level. For some of you, this may be louder than others!
10) At this point you may find yourself going back and adjusting the “Output Level” controls on your DQXS to accommodate for the speaker placement and efficiency.

Owner’s Enjoyment Manual
The Strength of Digital ™
15
DQXS Menu ScreensOne of the major benefits of using an Audio-
Control digital processor is that digital technol-ogy provides the ability to use less knobs and buttons yet you can get more control. In the past, a processor that has all of the equaliza-tion and crossover characteristics of the DQXS would normally require almost 200 individual controls and occupy an area as large as your trunk. AudioControl’s digital technology allows the DQXS to offer a plethora of features in one compact chassis. And since there are only a few knobs, navigating through the DQXS’s functions is quite simple.
When you first apply power to your DQXS, it will go through a few “wake-up” screens, includ-ing some subliminal advertising for AudioCon-trol. It will then display a friendly blue screen (not the scary blue screen found on many com-puters). Fear not, because the blue screen on the DQXS is actually a good thing.
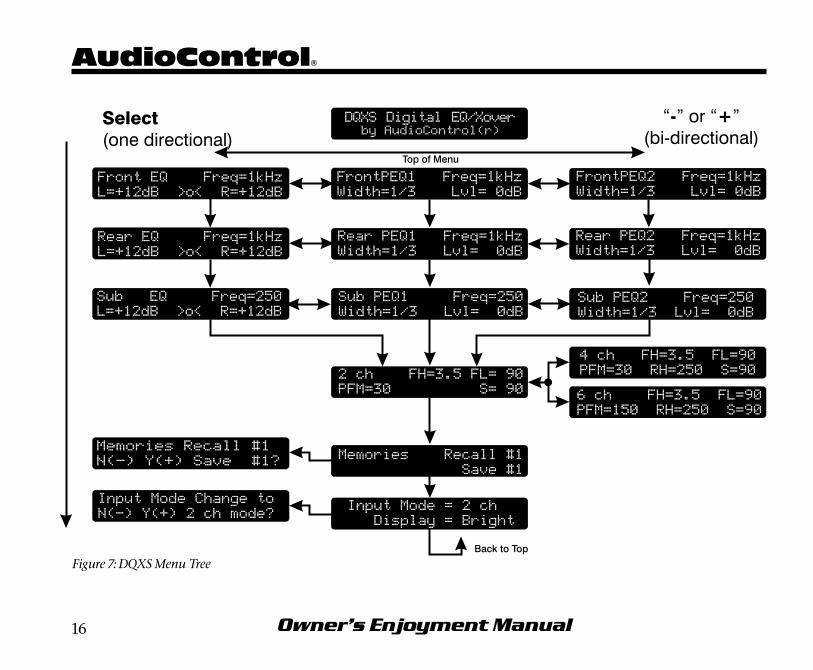
Menu Tree: Once your DQXS has settled on one of these menu screens, you will want to spend a few minutes familiarizing yourself with the various modes. Although the DQXS has one main screen, there are numerous sub menu screens that allow you to access and program all of the various functions of your DQXS. Figure 7 shows you how the Menu Tree of your DQXS flows.
Owner’s Enjoyment Manual
AudioControl®
16
Figure 7: DQXS Menu Tree
Owner’s Enjoyment Manual
The Strength of Digital ™
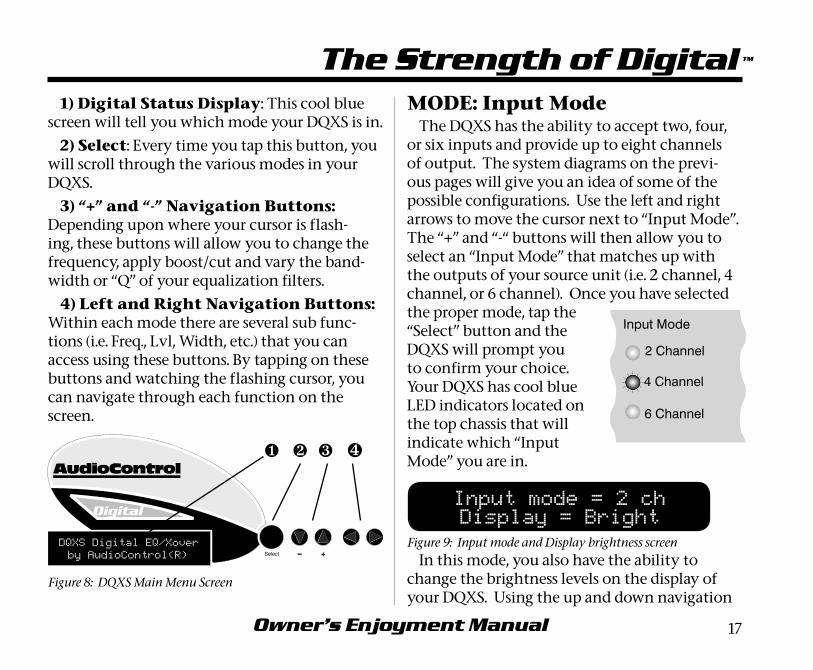
1) Digital Status Display: This cool blue screen will tell you which mode your DQXS is in.
2) Select: Every time you tap this button, you will scroll through the various modes in your DQXS.
3) “+” and “-” Navigation Buttons: Depending upon where your cursor is flash-ing, these buttons will allow you to change the frequency, apply boost/cut and vary the band-width or “Q” of your equalization filters.
4) Left and Right Navigation Buttons: Within each mode there are several sub func-tions (i.e. Freq., Lvl, Width, etc.) that you can access using these buttons. By tapping on these buttons and watching the flashing cursor, you can navigate through each function on the screen.
MODE: Input ModeThe DQXS has the ability to accept two, four,
or six inputs and provide up to eight channels of output. The system diagrams on the previ-ous pages will give you an idea of some of the possible configurations. Use the left and right arrows to move the cursor next to “Input Mode”. The “+” and “-“ buttons will then allow you to select an “Input Mode” that matches up with the outputs of your source unit (i.e. 2 channel, 4 channel, or 6 channel). Once you have selected the proper mode, tap the “Select” button and the DQXS will prompt you to confirm your choice. Your DQXS has cool blue LED indicators located on the top chassis that will indicate which “Input Mode” you are in.
Figure 9: Input mode and Display brightness screen
In this mode, you also have the ability to change the brightness levels on the display of your DQXS. Using the up and down navigation
Figure 8: DQXS Main Menu Screen
❶ ❷ ❸ ¹
17
Input mode = 2 ch Display = Bright

Owner’s Enjoyment Manual
AudioControl®
buttons you can toggle back and forth between “Bright” and “Dim”. Once you have selected a brightness level you are comfortable with, tap the “Select” button and your last brightness set-ting will be retained.
MODE: Crossover
Figure 10: Crossover screen
Depending upon your “Input Mode” you have three basic crossover configurations:
2 ch – Two input channels which output a highpass, bandpass, and subwoofer signal
4 ch – Front and Rear inputs which output Front Highpass, Front lowpass (bandpass), Rear highpass and a Subwoofer (fed from your front signals)
6 ch – Front and Rear inputs which output to Front Highpass, Front lowpass (bandpass), Rear highpass and an independent Subwoofer signal (fed by the Subwoofer inputs)
The top left hand corner of the Crossover screen will indicate which “Input” mode you are in. The display also shows the current crossover
and subsonic filter frequency settings. These are the points where the subwoofer output begins, where the subwoofer/midrange meet and where the midrange/highpass outputs crossover. Using the “Left” and “Right” arrows you can scroll between the following settings:
FH: Lowest frequency of your Front Highpass output and the highest frequency of your Front Lowpass output.
FL: Lowest frequency of your Front Lowpass output.
RH: Lowest frequency of your Rear Highpass output.
S: Subwoofer crossover frequency. PFM: The Programmable Frequency Match
(PFM) is a high pass filter that serves as a 24 dB/octave subsonic filter for your system. Typically you will want to set this at the absolute bottom end or tuning frequency of your system.
MODE: Front EQ, Rear EQ, Sub EQ
Figure 11: Graphic EQ Screen
18
Front EQ Freq = 1kHzL= +6dB >o< R =+4dB
6 ch FH=3.5 FL=90 PFM=30 RH=250 S=150

Owner’s Enjoyment Manual
The Strength of Digital ™
Your DQXS has numerous graphical equaliza-tion filters for each channel; thirty for the front channels and nineteen for the rear plus sixteen for the subwoofers. In the Graphic EQ mode, you can select any of the frequencies, one at a time, and apply boost or cut. The menu screens for your graphic equalizers are labeled Front EQ, Rear EQ, and Sub EQ respectfully. In addition you can select whether you want the equalization controls to affect the left and right channels individually or control both channels at the same time.
Freq(uency): This corner of the screen indi-cates which frequency you are boosting or cut-ting. If you wish to select another frequency, tap the left or right arrow buttons until the cursor is flashing on the number next to “Freq=”. Then use the “+” and “-” controls to select the fre-quency to which you wish to apply boost or cut.
Single or Dual Channel Equalization: After you have selected a frequency to equalize, you must decide whether you wish to equal-ize the left channel, the right channel, or both channels simultaneously. If you are a first time user, we suggest you equalize both channels together at first and then individually. Use the
arrow keys to move the cursor to one of the fol-lowing positions:
“L=” Equalizing on the left channel
“>o<” Equalizing both channels simultane-ously
“R=” Equalizing on the right channel
When the cursor highlights this screen, you can now apply boost or cut, using the “+” and “-” controls, to the frequency you selected in the previous step.
Once you have made your equalization set-tings, you will want to tap the Select button, go to the Memories screen, and save your settings in one of the eight memory locations. Keep in mind you have the ability to equalize your Front, Rear, and Subwoofer speakers individually.
MODE: Front PEQ1, Rear PEQ1 and Sub PEQ1
Besides having a highly flexible graphic equal-izer, your DQXS also has two fully-program-mable parametric bands for each pair of chan-nels. These allow you to select a frequency, apply boost or cut, and change the bandwidth or “Q” of the filter.
19
Owner’s Enjoyment Manual
AudioControl®
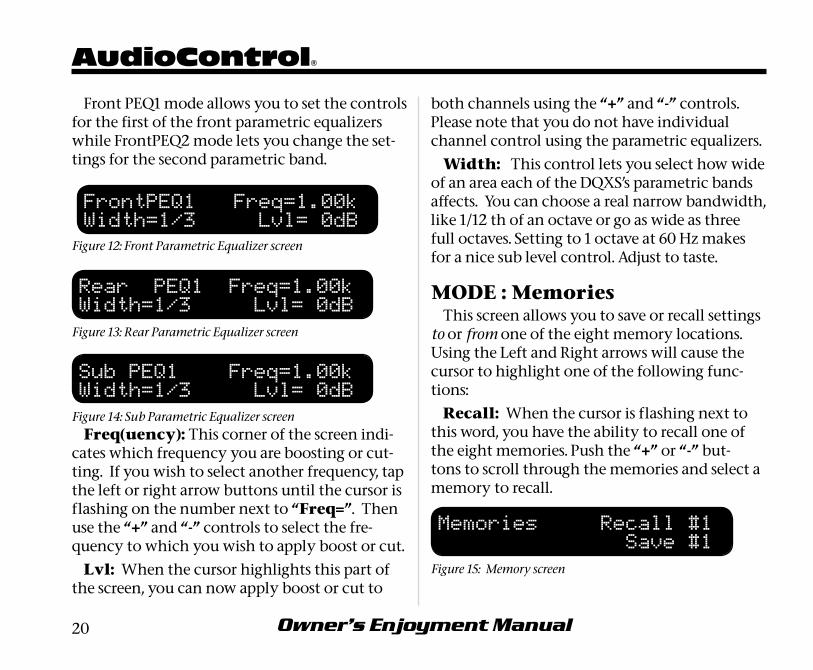
Front PEQ1 mode allows you to set the controls for the first of the front parametric equalizers while FrontPEQ2 mode lets you change the set-tings for the second parametric band.
Figure 12: Front Parametric Equalizer screen
Figure 13: Rear Parametric Equalizer screen
Figure 14: Sub Parametric Equalizer screenFreq(uency): This corner of the screen indi-
cates which frequency you are boosting or cut-ting. If you wish to select another frequency, tap the left or right arrow buttons until the cursor is flashing on the number next to “Freq=”. Then use the “+” and “-” controls to select the fre-quency to which you wish to apply boost or cut.
Lvl: When the cursor highlights this part of the screen, you can now apply boost or cut to
both channels using the “+” and “-” controls. Please note that you do not have individual channel control using the parametric equalizers.
Width: This control lets you select how wide of an area each of the DQXS’s parametric bands affects. You can choose a real narrow bandwidth, like 1/12 th of an octave or go as wide as three full octaves. Setting to 1 octave at 60 Hz makes for a nice sub level control. Adjust to taste.
MODE : MemoriesThis screen allows you to save or recall settings
to or from one of the eight memory locations. Using the Left and Right arrows will cause the cursor to highlight one of the following func-tions:
Recall: When the cursor is flashing next to this word, you have the ability to recall one of the eight memories. Push the “+” or “-” but-tons to scroll through the memories and select a memory to recall.
Figure 15: Memory screen
20
Memories Recall #1 Save #1
Rear PEQ1 Freq=1.00k Width=1/3 Lvl= 0dB
Sub PEQ1 Freq=1.00kWidth=1/3 Lvl= 0dB
FrontPEQ1 Freq=1.00k Width=1/3 Lvl= 0dB
Owner’s Enjoyment Manual
The Strength of Digital ™
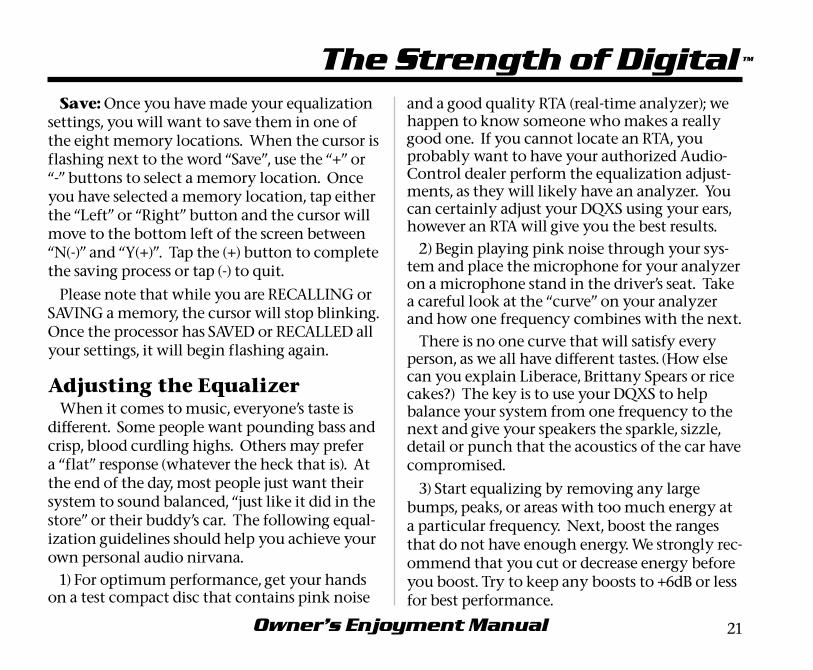
Save: Once you have made your equalization settings, you will want to save them in one of the eight memory locations. When the cursor is flashing next to the word “Save”, use the “+” or “-” buttons to select a memory location. Once you have selected a memory location, tap either the “Left” or “Right” button and the cursor will move to the bottom left of the screen between “N(-)” and “Y(+)”. Tap the (+) button to complete the saving process or tap (-) to quit.
Please note that while you are RECALLING or SAVING a memory, the cursor will stop blinking. Once the processor has SAVED or RECALLED all your settings, it will begin flashing again.
Adjusting the EqualizerWhen it comes to music, everyone’s taste is
different. Some people want pounding bass and crisp, blood curdling highs. Others may prefer a “flat” response (whatever the heck that is). At the end of the day, most people just want their system to sound balanced, “just like it did in the store” or their buddy’s car. The following equal-ization guidelines should help you achieve your own personal audio nirvana.
1) For optimum performance, get your hands on a test compact disc that contains pink noise
and a good quality RTA (real-time analyzer); we happen to know someone who makes a really good one. If you cannot locate an RTA, you probably want to have your authorized Audio-Control dealer perform the equalization adjust-ments, as they will likely have an analyzer. You can certainly adjust your DQXS using your ears, however an RTA will give you the best results.
2) Begin playing pink noise through your sys-tem and place the microphone for your analyzer on a microphone stand in the driver’s seat. Take a careful look at the “curve” on your analyzer and how one frequency combines with the next.
There is no one curve that will satisfy every person, as we all have different tastes. (How else can you explain Liberace, Brittany Spears or rice cakes?) The key is to use your DQXS to help balance your system from one frequency to the next and give your speakers the sparkle, sizzle, detail or punch that the acoustics of the car have compromised.
3) Start equalizing by removing any large bumps, peaks, or areas with too much energy at a particular frequency. Next, boost the ranges that do not have enough energy. We strongly rec-ommend that you cut or decrease energy before you boost. Try to keep any boosts to +6dB or less for best performance.
21
Owner’s Enjoyment Manual
AudioControl®
22
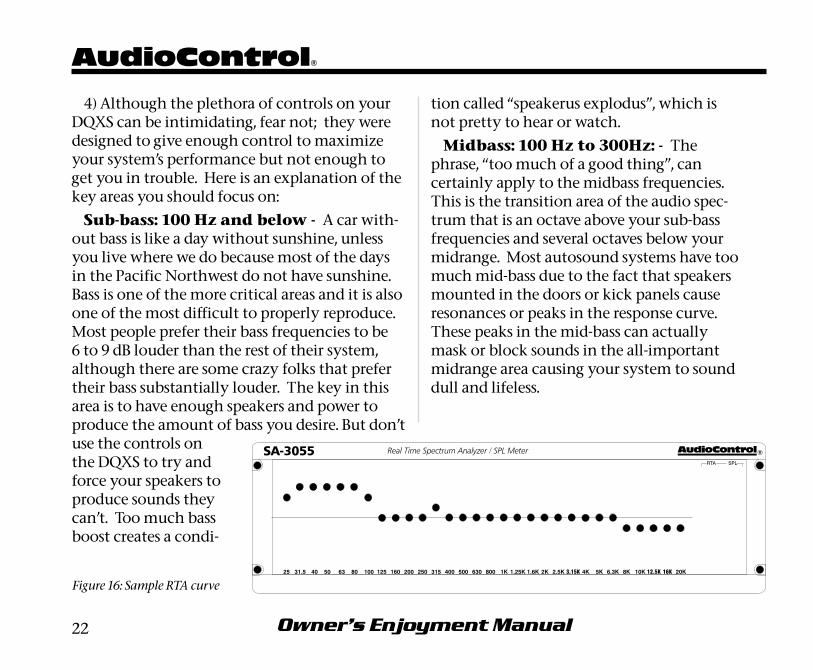
Figure 16: Sample RTA curve
4) Although the plethora of controls on your DQXS can be intimidating, fear not; they were designed to give enough control to maximize your system’s performance but not enough to get you in trouble. Here is an explanation of the key areas you should focus on:
Sub-bass: 100 Hz and below - A car with-out bass is like a day without sunshine, unless you live where we do because most of the days in the Pacific Northwest do not have sunshine. Bass is one of the more critical areas and it is also one of the most difficult to properly reproduce. Most people prefer their bass frequencies to be 6 to 9 dB louder than the rest of their system, although there are some crazy folks that prefer their bass substantially louder. The key in this area is to have enough speakers and power to produce the amount of bass you desire. But don’t use the controls on the DQXS to try and force your speakers to produce sounds they can’t. Too much bass boost creates a condi-
tion called “speakerus explodus”, which is not pretty to hear or watch.
Midbass: 100 Hz to 300Hz: - The phrase, “too much of a good thing”, can certainly apply to the midbass frequencies. This is the transition area of the audio spec-trum that is an octave above your sub-bass frequencies and several octaves below your midrange. Most autosound systems have too much mid-bass due to the fact that speakers mounted in the doors or kick panels cause resonances or peaks in the response curve. These peaks in the mid-bass can actually mask or block sounds in the all-important midrange area causing your system to sound dull and lifeless.

Owner’s Enjoyment Manual
The Strength of Digital ™
Midrange: 300Hz to 3kHz - Musical instruments, vocals, mid-range percussion and many things we associate with imaging and staging happen in this area of the bandwidth. For that reason you will want to keep this area as smooth and balanced as possible. Too much boosting can make you feel like you are listening to your system in a tile bathroom. Not enough energy in the midrange sounds empty and dry.
Treble: 3KHz and Up - If midrange is the cake, then these high or upper frequencies are the frosting. Many autosound systems start a gradual decline in this area which is why speaker placement is very important. The DQXS only gives you a few controls in this area because too much boosting can really make a speaker sound unnatural.
TroubleshootingNo Power: If the blue display on your DQXS
will not turn on, check to make sure that the power wire and remote turn-on wires are con-nected properly or a fuse has not blown.
System Sounds Unbalanced: Check your graphic and parametric equalization settings to make sure that one channel is not dramatically different than another.
No Output: If one or more of your outputs seem to have…no output, than you will want to confirm that the Inputs are connected properly, and that you have the Input Mode set properly. E.g. if you are in “2 Channel” mode, then you will not have sound from your rear outputs.
Sounds Distorted: Should your system sound distorted or your speakers are moving way too much, you should make sure you have your levels matched properly and that your ampli-fier gains are set at minimum. If this checks out okay, you will want to look at your EQ controls to insure that your boost levels are not overly boosted.
Still Sounds Distorted: Look at the fre-quencies that you have selected for FrontPEQ1 and FrontPEQ 2 and see how much boost or cut
23
Owner’s Enjoyment Manual
AudioControl®
you have applied. Then look at those same fre-quencies on your Graphic EQ. If you have boost applied to the same frequencies on both types of equalizers, there is a strong chance you are overdriving your speakers and amplifiers at that frequency.
Output Voltage LEDs Don’t Light Up: If your system is playing music but none of the output LED’s are on, there is a good chance that the output voltage of your source unit is not that strong. Now before you call us and say, “The guy at the store said my radio has high-volt-age output”, you might want to face the fact that there is “Engineering Voltage” and there is “Marketing Voltage”. Without picking on any particular source unit, remember that you do get what you pay for.
24
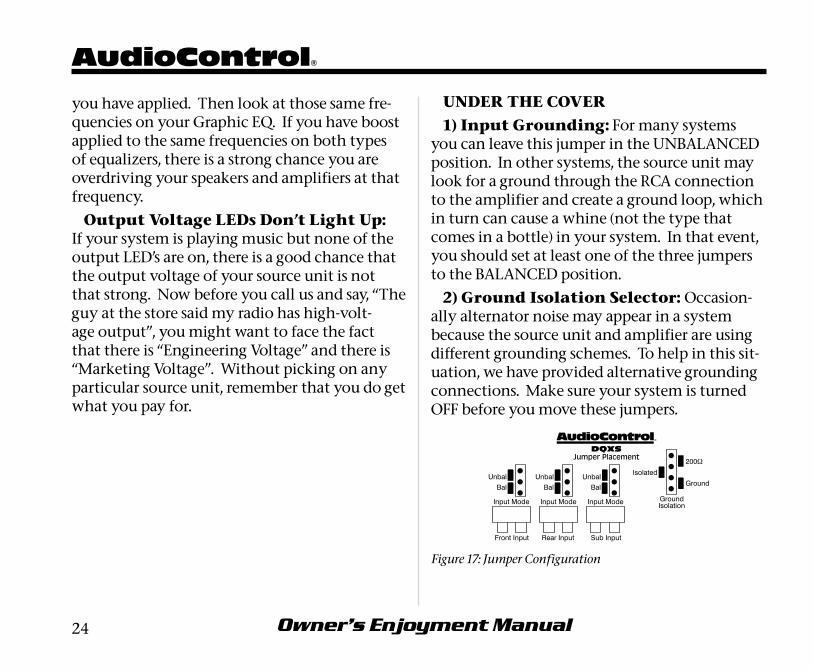
UNDER THE COVER1) Input Grounding: For many systems
you can leave this jumper in the UNBALANCED position. In other systems, the source unit may look for a ground through the RCA connection to the amplifier and create a ground loop, which in turn can cause a whine (not the type that comes in a bottle) in your system. In that event, you should set at least one of the three jumpers to the BALANCED position.
2) Ground Isolation Selector: Occasion-ally alternator noise may appear in a system because the source unit and amplifier are using different grounding schemes. To help in this sit-uation, we have provided alternative grounding connections. Make sure your system is turned OFF before you move these jumpers.
Figure 17: Jumper Configuration
Owner’s Enjoyment Manual
The Strength of Digital ™
And now a word from the legal department.
THE WARRANTYPeople are scared of warranties. Lots of fine
print. Months of waiting around. Well, fear no more, this warranty is designed to make you rave about us to your friends. It’s a warranty that looks out for you and helps you resist the temp-tation to have your friend, “...who’s good with electronics”, try to repair your AudioControl product. So go ahead, read this warranty, and then take a few days to enjoy your DQXS before sending in the warranty card and comments.
“Conditional” doesn’t mean anything omi-nous. The Federal Trade Commission tells all manufacturers to use the term to indicate that certain conditions have to be met before they’ll honor the warranty. If you meet all of these conditions, we will warrant all materials and workmanship on your DQXS for one year from the date you bought it (five years if it is installed by an authorized United States AudioControl dealer). We will fix or replace it, at our option, during that time.
Here are the conditional conditions:
1. You have to fill out the warranty card and send it to us within 15 days after purchasing your DQXS.
2. You must keep your sales receipt for proof of purchase showing when and from whom the unit was bought. We’re not the only ones who require this, so it’s a good habit to get into with any major purchase.
3. Your DQXS must have originally been pur-chased from an authorized AudioControl dealer. You do not have to be the original owner, but you do need a copy of the original sales slip.
4. You cannot let anybody who isn’t (A) the AudioControl factory; (B) somebody authorized in writing by AudioControl to service your DQXS. If anyone other than (A) or (B) messes with your DQXS, that voids your warranty.
5. The warranty is also void if the serial num-ber is altered or removed, or if your DQXS has been used improperly. Now that sounds like a big loophole, but here is all we mean by it.
25
Owner’s Enjoyment Manual
AudioControl®
26
Unwarranted abuse is (A) physical damage (don’t use the DQXS for a jack stand); (B) improp-er connections (120 volts into the power jack can fry the poor thing); (C) sadistic things. This is the best mobile product we know how to build, but if you mount it to the front bumper of your car, something will go wrong.
6. If an authorized United States AudioControl dealer installs your DQXS, the warranty is five years; otherwise the warranty is one year.
Assuming you conform to 1 through 6, and it really isn’t all that hard to do, we get the option of fixing your old unit or replacing it with a new one.
LEGALESE SECTIONThis is the only warranty given by AudioCon-
trol. This warranty gives you specific legal rights that vary from state to state. Promises of how well the DQXS will perform are not implied by this warranty. Other than what we have covered in this warranty, we have no obligation, express or implied. Also, we will not be obligated for direct or indirect consequential damage to your system caused by hooking up the DQXS.
Failure to send in a properly completed war-ranty card negates any service claims.
Owner’s Enjoyment Manual
The Strength of Digital™
27
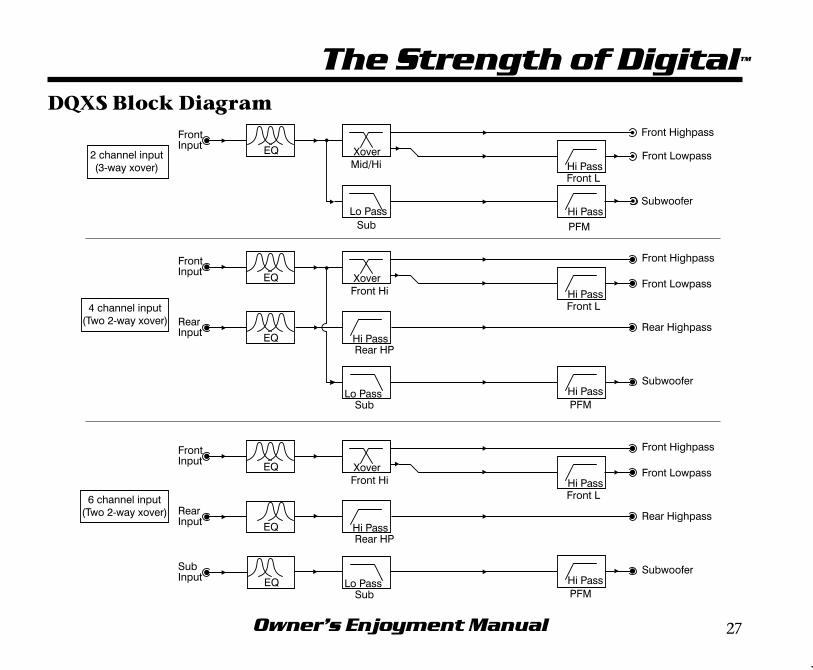
DQXS Block Diagram
Owner’s Enjoyment Manual
AudioControl®
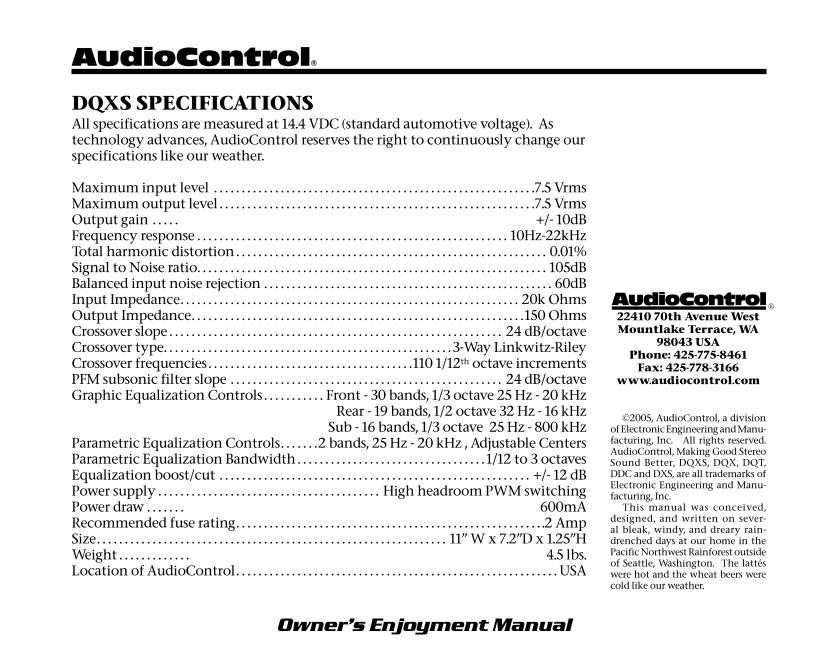
DQXS SPECIFICATIONSAll specifications are measured at 14.4 VDC (standard automotive voltage). As technology advances, AudioControl reserves the right to continuously change our specifications like our weather.
Maximum input level . . . . . . . . . . . . . . . . . . . . . . . . . . . . . . . . . . . . . . . . . . . . . . . . . . . . . . . . . .7.5 VrmsMaximum output level . . . . . . . . . . . . . . . . . . . . . . . . . . . . . . . . . . . . . . . . . . . . . . . . . . . . . . . . .7.5 VrmsOutput gain . . . . .� +/- 10dBFrequency response . . . . . . . . . . . . . . . . . . . . . . . . . . . . . . . . . . . . . . . . . . . . . . . . . . . . . . . . 10Hz-22kHzTotal harmonic distortion . . . . . . . . . . . . . . . . . . . . . . . . . . . . . . . . . . . . . . . . . . . . . . . . . . . . . . . . 0.01%Signal to Noise ratio. . . . . . . . . . . . . . . . . . . . . . . . . . . . . . . . . . . . . . . . . . . . . . . . . . . . . . . . . . . . . . . 105dBBalanced input noise rejection . . . . . . . . . . . . . . . . . . . . . . . . . . . . . . . . . . . . . . . . . . . . . . . . . . . . 60dBInput Impedance. . . . . . . . . . . . . . . . . . . . . . . . . . . . . . . . . . . . . . . . . . . . . . . . . . . . . . . . . . . . . 20k OhmsOutput Impedance. . . . . . . . . . . . . . . . . . . . . . . . . . . . . . . . . . . . . . . . . . . . . . . . . . . . . . . . . . . . 150 Ohms Crossover slope . . . . . . . . . . . . . . . . . . . . . . . . . . . . . . . . . . . . . . . . . . . . . . . . . . . . . . . . . . . . 24 dB/octave Crossover type. . . . . . . . . . . . . . . . . . . . . . . . . . . . . . . . . . . . . . . . . . . . . . . . . . . . 3-Way Linkwitz-Riley Crossover frequencies . . . . . . . . . . . . . . . . . . . . . . . . . . . . . . . . . . . . .110 1/12th octave increments PFM subsonic filter slope . . . . . . . . . . . . . . . . . . . . . . . . . . . . . . . . . . . . . . . . . . . . . . . . . 24 dB/octaveGraphic Equalization Controls . . . . . . . . . . . Front - 30 bands, 1/3 octave 25 Hz - 20 kHz . . . . . . . . . . . . . . . . . . . . . . . . . . . . . . . . . . . . . . . . . . . . . . . Rear - 19 bands, 1/2 octave 32 Hz - 16 kHz . . . . . . . . . . . . . . . . . . . . . . . . . . . . . . . . . . . . . . . . . . . . . Sub - 16 bands, 1/3 octave 25 Hz - 800 kHzParametric Equalization Controls. . . . . . .2 bands, 25 Hz - 20 kHz , Adjustable CentersParametric Equalization Bandwidth . . . . . . . . . . . . . . . . . . . . . . . . . . . . . . . . . . 1/12 to 3 octavesEqualization boost/cut . . . . . . . . . . . . . . . . . . . . . . . . . . . . . . . . . . . . . . . . . . . . . . . . . . . . . . . . +/- 12 dBPower supply . . . . . . . . . . . . . . . . . . . . . . . . . . . . . . . . . . . . . . . . High headroom PWM switchingPower draw . . . . . . .� 600mARecommended fuse rating. . . . . . . . . . . . . . . . . . . . . . . . . . . . . . . . . . . . . . . . . . . . . . . . . . . . . . . .2 AmpSize. . . . . . . . . . . . . . . . . . . . . . . . . . . . . . . . . . . . . . . . . . . . . . . . . . . . . . . . . . . . . . . 11” W x 7.2”D x 1.25”HWeight . . . . . . . . . . . . .� 4.5 lbs.Location of AudioControl . . . . . . . . . . . . . . . . . . . . . . . . . . . . . . . . . . . . . . . . . . . . . . . . . . . . . . . . . . USA
22410 70th Avenue WestMountlake Terrace, WA
98043 USAPhone: 425-775-8461
Fax: 425-778-3166www.audiocontrol.com
®
©2005, AudioControl, a division of Electronic Engineering and Manu-facturing, Inc. All rights reserved. AudioControl, Making Good Stereo Sound Better, DQXS, DQX, DQT, DDC and DXS, are all trademarks of Electronic Engineering and Manu-facturing, Inc.
This manual was conceived, designed, and written on sever-al bleak, windy, and dreary rain-drenched days at our home in the Pacific Northwest Rainforest outside of Seattle, Washington. The lattés were hot and the wheat beers were cold like our weather.
AudioControl