the swan - bluefiddles.com · my new heirloom cello, by playing saint-saens’ “the swan” –...
TRANSCRIPT

1
The Journeys
Of
The Swan
© Chet Bishop
2017

2
Foreword:
I first came in contact with the owner of the Jensen cello on the social medium called Facebook.
I had been following a particular thread, wherein several players were solemnly telling Maryanne
Jensen-Gowan that the cello she was looking to buy was no good, and that the open seam, or
lifted saddle (on a ten-year-old instrument) was evidence of bad workmanship, when, in fact, not
knowing where the cello had been for its ten-year lifetime, one could not possibly make such a
determination, because, in ten years, humidity changes alone could easily cause seams to open,
or much worse…and it had very little to do with workmanship.
I tried to point those things out to the group, but quickly decided it was not really worth the
effort, as the instrument in question was a factory-made import, and there was no “luthier, whose
name was being dragged in the dirt…” and I just dropped out of the conversation. In the brief
exchange, however, I had identified myself as a maker and repairer, and evidently that caught the
attention of the original poster, Maryanne Jensen-Gowan, the owner of the Jensen Cello.
She contacted me privately, and asked if I would look at some photos of her father’s pet project
(a cello, begun before his death, but not finished) and tell her whether it could be completed, and
made playable. I agreed, and she sent the photos. The cello was between 50% and 80% complete
(I was guessing closer to 80%), so I made my bid, she accepted it, and the journey had begun!
The owner has graciously sent me some photographs of her late father, her mother, her daughter,
etc. and a short biography of Kai Jensen, the original maker of this cello.
The History:
The following photographs, and the accompanying essay, are the owner’s contribution. I am
grateful for her permission and blessing upon my efforts to publish this work. This is her story:
My Father, Kai Jensen:
(by Maryanne Jensen-Gowan,)
My father, Kai Jensen, became interested in cellos, violins, and lutherie late in life; not until he
was ready to retire from almost three decades in engineering.

3
Born in Fredrickshavn, Denmark in 1927, …
(Kai is on the right in both photos, above, taken in Denmark during his childhood)
…Kai became a naturalized US citizen during the exciting era of the Space Race; he was proud
of his American citizenship, security clearance, and work on federal defense contracts. The
highlight of his career was when he developed a patent used by NASA on one of the Apollo
missions. (The photos below were pictures he drew, commemorating that work)

4
Kai had an interest in testing things like the tensile, compressive, and bending strengths of every
sort of material, from metals to woods. He approached cello-making like it was an engineering
problem; he called instruments “units” and he wondered about things like the relationship
between the frequency of wood vibration and the elasticity of wood fibers. But he also had a
reverence for the cello and a romantic belief that Cremona’s masters possessed some secret in
designing and building string instruments that transcended mere physics. He always said that
violins and cellos were “…much more than the sum of their parts.”
To further his plan (which was to become a student of lutherie), my dad and mom traveled to
Cremona and explored the district surrounding the famous violin fabbrica, where the bottegas of
Amati, Guarneri and Ruggieri had stood in the 1500s.
He started buying inexpensive violins at auctions and antique shops, and read every biography of
the great luthiers that he could find. When I had an interest in learning to play the violin, he
bought me an old-world style instrument with an intaglio back that depicted a European-looking
castle, and persuaded me to take violin lessons with him. Those were well-spent hours! But
lessons failed to hold his attention for long; my dad wanted to concentrate on the relationship
between wood and sound. The engineer in him was compelled to taking a knife to the old
instruments he had purchased; he would pry off their front and back plates to see what their

5
unvarnished sides looked like, and how they displayed their repair histories. He even borrowed
my “castle” and took his knife to it to find out what made it sound so good. His workshop started
to look like a surgical violin operating theatre – the table full of body parts of various vintages,
along with careful notes on technical attributes and measurements. My patient, good-natured
mother, amused by his childlike curiosity, would joke that she had no idea what on earth he was
looking for inside these dusty old instruments -- and hadn’t he found it yet?
Here are some pages of his notes from during that time:
In the Summer of 1990, Kai enrolled at the Violin
Craftsmanship Institute at the University of New
Hampshire, and one of his instructors was Karl Roy,
author of Violin Woods: A New Look, a book about tone-
woods from the perspective of wood structure and
resonating features. He embarked on a program of self-
study; often when I would bring my baby, Meghan, to
visit my parents’ home, I’d find him poring over his copy
of The Repairing and Restoration of Violins, by Horace
Petherick. (I suspect he read Petherick’s advice: “An
opening of the instrument for the purpose of one repair
may (Above: Dad with baby Meghan…she is holding a violin bow.)

6
lead to the necessity of half a dozen before closing up again...” only after he had dissected so
many of his poor victims!)
The Beginning of the Journey:
The UNH institute gave students a choice to build either a violin or a cello, and my dad decided
on a cello. He selected a beautifully patterned birdseye maple for the back and scroll.
Surprisingly, the wood he chose for the front plate was red cedar, likely sourced from the Pacific
Northwest according to luthier Chester Bishop. Chet noted how cedar was an unusual choice for
a front plate, given its softness; it posed quite a contrast with the extra-hard birdseye back plate. I
wonder whether this contrast in surface quality might have been one of my dad’s experiments –
but that will always remain a mystery!
Unfortunately, by the time the UNH institute ended, Kai had not been able to finish his project.
Time passed, and my dad’s health began to fail. The unfinished cello was hung from a special
hook he designed for it on the wall of his study – it stayed there for years. It could be that after
making some errors in measurements, my dad realized the cello would require repairs even
before it was finished.
My dad passed away in the early hours of October 3, 2008, after a quiet evening of reading his
Strad magazine. I sold his hundreds of disassembled violin “units” to Vermont Violins of
Burlington, VT, and his collection of books on violin and cello-making to Harding’s Books of
Wells, ME. His cello project went up to the attic for the next decade, where its lovely red cedar
front plate likely developed its patina while repelling moths. Years passed, and we sold the
family home. That is when I realized that getting my dad’s dream finished would be a very
meaningful way to honor him. In many ways, the cello project represented my dad’s enthusiasm
for life; his intellectual curiosity; his desire to make something beautiful.
Over the past ten years since my husband, Jeff, surprised me with a Christmas present of a rental
cello and beginner cello lessons at the Cambridge Center for Adult Education, I have been
learning to play some of the same music that my father loved to listen to. I was happy to discover
the Internet Cello Society and the Apprentice Cellists Club, two Facebook groups whose
collegial members have taught me so much about cello.

7
A few months back, I posted a request for advice on a factory-made, “Jonathan Li” cello that I
had out on trial. The instrument was opening at a seam, and that worried me. Chet Bishop
responded knowledgeably to my question and I was impressed by the sound advice he
generously shared. On a whim, I asked him whether he could take a look at some pictures of my
dad’s instrument and advise me on the possibilities for finishing it. I knew that the work would
have to be done by someone I could trust and who would understand my objective to honor my
dad’s memory.
From his courtesy and patient responses to all my questions, I could tell that Chet possessed tact
and empathy; he would respect my father’s rookie effort despite its defects. There are so many
snobs in the industry of lutherie, but Chet is not one of them! Seeing the outstanding instruments
he has built and that are featured on his website gave me great confidence in his workmanship;
his finished violin and cello projects are outstanding! One violin in particular has a wavy, quilted
pattern that looks like satin -- I had never seen anything like it! Mr. Chet agreed to take it on, and
I was grateful for his can-do attitude about what must have appeared to him (from the pictures I
sent) to be a project rife with potential issues – the age of the wood, the stress it had undergone
over 27 years, and my dad’s less-than-optimal gluing technique, to name just a few.
So many members of the Facebook groups I have mentioned – people from all over the world --
celebrated with me as my dad’s cello dream became a reality under Chet’s capable and caring
auspices. It was so much fun to view pictures Chet posted of each phase of the project – from his
careful repair of rib cracks – to his hand-carving of a new heel – to his precise grafting of my
dad’s hand-carved scroll onto a new neck that Chet had to install, to correct an “off” angle that
my dad had introduced. For that, he used lovely big leaf maple, sourced from a forest near his
workshop. One of my favorite pictures was when Chet had applied the first of many coats of
spirit varnish; that birdseye came alive! I love how the varnish accentuated the beauty of the
wood and made it look almost three-dimensional.
I’ll close by noting how fortunate I felt when I saw a video of Chet’s friend testing the sound of
my new heirloom cello, by playing Saint-Saens’ “The Swan” – it was the first time I heard the
instrument’s elegant voice. All I could think of was how proud my dad would be to have heard it,
too. The name I chose for it is “The Swan” so that I can always remember that moment.

8
I love my Swan! I have played it literally every day since the FedEx delivered it to my home in
New Hampshire last month. Kai Jensen’s beginning effort, now exquisitely completed, came
straight from the workshop of a top-notch luthier, in a place so aptly named Forest Grove --
where fragrant Western red cedar thrives “in silvis” along with Oregon’s glorious big leaf maple.
Thank you, Mr. Chester Bishop!
Maryanne Jensen-Gowan
December 5th, 2017

9
The Start of a New Life
When I first saw the photos of Mr. Jensen’s cello, there were things I could not see in the
pictures. I could tell that it was attractive wood, for instance, but I could not see that the belly,
rather than spruce was Western Red Cedar. My house is built of western red cedar, so, once I
began work on it, I had no doubt. My son (also a luthier) recognized it before I did. He is pretty
sharp-eyed.
I could see that it didn’t yet have purfling, and that the perimeters of the front and back plates
had not been finalized yet, but I could not tell how very flat the arching was (it turned out to be
workable.) I could see that the scroll seemed a little odd, but could not tell why. (I discovered all
of these things upon closer examination, in person…and they were things that I could work with.
My initial assessment from the photographs (as I sent it to the owner) was as follows:
~~~~~~~~~~~~~~~~~~~~~~~~~~~~~~~~~~
Miss Maryanne;
Thanks for honoring me with the query about your father’s cello project. As you probably
realize, there are many “marks of the amateur” there, but that is because it was a first attempt. I
have seen many first attempts turn into wonderful instruments, so that is not an indictment of any
kind.
Here’s what I see:
1. The heel-crack (if my eyes are not deceiving me) is the worst problem. Quite repairable,
but a lot of work, as it means removing the neck, repairing the crack, and re-setting the
neck.
2. The cracks in the lower-bout ribs are scary-looking, but repairable, and are almost
certainly caused by the wood shrinking during the “lost years” in the attic. They will
require steaming the ribs loose from the corner blocks, repairing the cracks, and then re-
gluing the ribs into the blocks.
3. The perimeter is unfinished on both plates. I would remove one plate at a time, thin it to
optimum thicknesses and contours all over, re-install the plate, and then trim the edges of
10
the plate to more closely match the shape of the rib garland (and then, obviously, repeat
on the second plate.) The f-holes will need some attention as well.
4. The purfling has not been installed. This may seem largely decorative, but it does serve
an important safeguard against bumps turning into cracks that extend across into the plate
(supposedly). At any rate, it is de rigeur for quality instruments, so…I will install the
purfling after the plates are both exactly the desired shape.
5. The lower ribs have come loose from the bottom (tail) block, and must be re-glued. If
they go together tightly, without trouble, it is a very easy fix. If it requires more work,
then so be it. (My eyes must not be good enough, or something…I was not able to see the
diamond-shaped patch you described.)
6. There is no saddle installed, though the mortise has been cut. If there is no problem there,
then fitting a saddle is pretty fast and easy. Same for fitting the missing endpin.
7. The scroll will need some attention: smoothing curves, perfecting details, but maintaining
the general character of the scroll as your Dad intended. (He definitely did not buy this
pre-carved…that is his work.)
8. Final prepping for finishing will include extensive scraping, wetting down, sanding,
wetting again, sanding again, etc. to get rid of any tendency for the grain to rise.
9. Mineral ground, sealer and numerous coats of varnish will complete the “looks”
department.
10. Set-up, including fingerboard, all fittings, bridge, soundpost, pegs, end-pin and strings
will make it playable, and adjustment of all those will make it sound great.
You are certainly correct that that wood is exceptionally beautiful. Your Dad had good taste in
wood. The thing to bear in mind through all of this, is that, had he completed it, it undoubtedly
would have sounded very good, though it may have looked a little wonky in some areas (normal
for first attempts.)
~~~~~~~~~~~~~~~~~~~~~~~~~~~~~~~~~~~~
The above assessment, along with my bid for the work, was approved by the owner, and she sent
me the cello so that I could begin the work.

11
The Journey to Forest Grove, Oregon
The cello was carefully packed, and shipped by FedEx; it arrived safely, packed in a hard cello-
case, well padded, and inside a large cardboard box, padded again. Looked “pretty much like a
cello!” The work was about to begin!
The owner had specifically requested Rosewood accessories, so
I had ordered them ahead of time, and, fortunately, they arrived
on time, the day before the cello arrived.
As all luthiers (and perhaps other readers, too) are aware,
Rosewood has been declared a species too threatened to harvest,
in most parts of the world. When I ordered these parts, the dealer
told me they were his last set…they would no longer be
available after this.
So…I felt simultaneously fortunate to have been able to obtain
them, and nervous, lest any mishap should happen, as I would
not be able to replace the broken parts. Fortunately that did not
become an issue.
Here is a picture of the cello with the assortment of things I
ordered to go with it: The pile includes four very nice rosewood
pegs; a rosewood tailpiece with four built-in fine tuners; a bridge
blank; a rosewood end-pin assembly; blanks for the fingerboard,
nut and saddle; and the strings. As it turned out, I was not able to
use the nut or the saddle. The original maker had cut the opening
for the saddle too wide for the blank I bought, and the nut had a
similar situation. He had carved some fairly uniquely-shaped
cheeks on his scroll, and the nut I had bought was made for a
more traditional shape. That was fine—in both cases, I simply
hand-carved a new piece from appropriate wood. Ebony was not
readily available, but I had blocks of African Blackwood that I
had purchased for another project, and it worked admirably. (Pictures later.)

12
The Journey to Completion: First Things First
I thought I would remove the neck first, and complete the scroll graft we had agreed upon. My
feeling was that this particular achievement would be encouraging and lend impetus to
completing the rest of the journey.
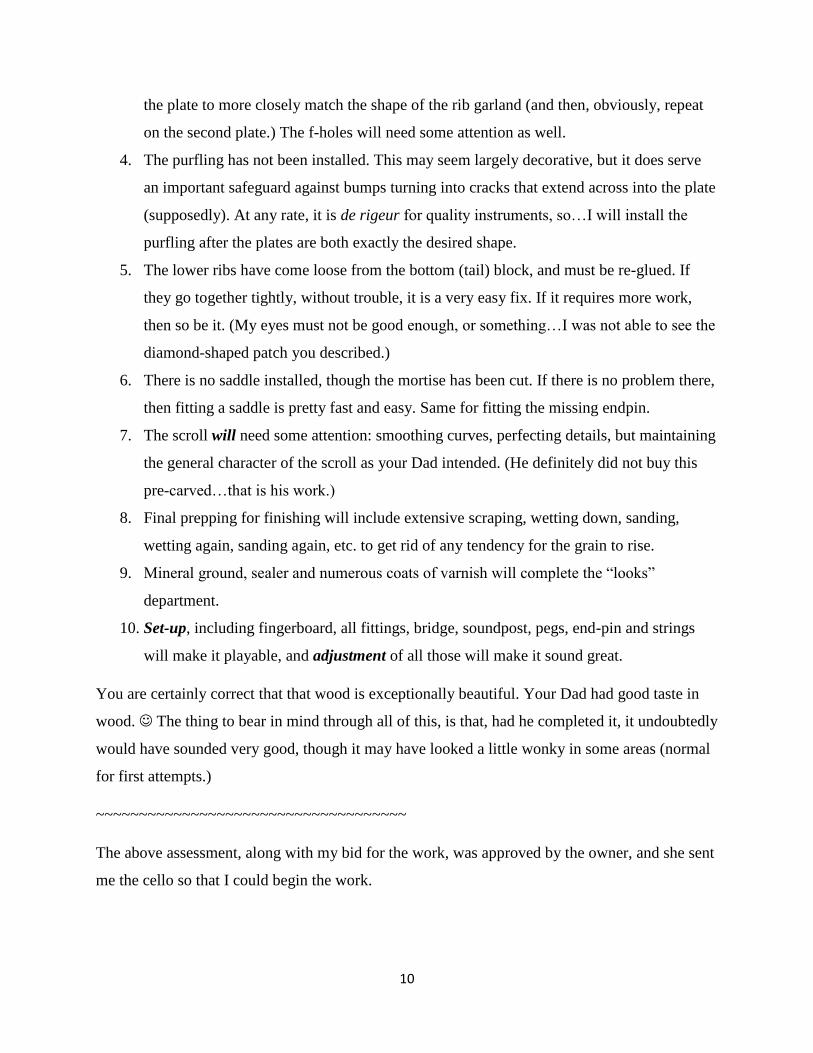
The crack in the heel had been perplexing, looking at the photographs, but it turned out to be
even more perplexing when I attempted to remove the neck. I couldn’t find the neck block inside
the cello! Why? Because it turned out that there wasn’t one! The original maker had pursued a
“through-neck” design, wherein the neck itself was actually one piece with the block inside the
cello body, so that it was impossible to simply “remove the neck” without dismantling the upper
section of the cello at the very least, and that required removing the front plate. I had hoped to
avoid that until later, but it
was unavoidable.
Fortunately, I have had
many instruments apart, and
they have all gone back
together, so I was not
particularly disturbed by the
change of plans. In the
adjacent photograph, you
can see how the neck block
was just a continuation of
the neck, and a platform had
been cut in the back plate,
upon which to affix the
block with glue. The ribs
had actually been let into the
sides of the neck.

13
Disassembly
Removal of the front plate of a violin-family instrument is usually not a very traumatic
undertaking: we usually can carefully work a “parting knife” between the front plate and the rib,
and then carefully advance that position all the way around the plate. If proper hide glue was
used to affix the plate to the rib structure, then one will hear a series of sharp cracking sounds as
the brittle glue breaks, allowing removal of the plate. But we have to watch carefully to see that
the plate itself (or the rib) is not splitting. (Such things can happen sometimes.)
The other thing about using appropriate glue is that, in a very stubborn joint, it is possible to
apply steam and the glue will “re-constitute” into syrupy collagen, and the joint will gently
release. Usually I only do that on an unfinished instrument, as I don’t want to endanger any
varnish. So, on this cello the steam seemed to be one of the available “tools.” But…it turned out
that hide glue had not been the chosen substance, and steam had no effect at all. But I am getting
ahead of myself…those joints came later. Getting the top off was not too difficult, and I managed
to remove it without doing any damage to either the instrument or myself. (I recall one of my
teachers relating how he had been removing the front plate of a (very expensive) cello, and the
knife had slipped and had run into his palm. The others in the shop had heard him exclaim, and
they turned to see the damage. He showed them the gash in his hand, and they all expressed their
relief that the cello was undamaged. Such is the life of a luthier!)
I had to work the ribs out of the slots into which they had been set, in the neck, then remove the
neck. By this time, I had discovered that the neck was in fact laminated of two pieces of bird’s-
eye maple, and the crack I had seen in the photos was only in one half of the neck…but there
were other reasons the neck needed to come out (extremely low overstand: barely appropriate for
a viola), and I had a section of good quality curly maple, waiting to become the new neck.
But, as the neck was also the neck block, the job required a new “real” neck block as well. So,
before I could remove the neck, I needed to establish the true shape of the ribs at that point, so
that the new block would ensure that the ribs would return to the correct shape.

14
The Neck-Block:
I cut out a piece of tag-board, and fitted it to the ribs, then went and secured a block of willow, or
similar wood (not sure), with which to make the actual block. After that, I could remove the
neck, and install the new block. The process went as follows:

15
The extra blocks are there to give the clamps a flat surface on which to apply pressure.

16
The Scroll Graft:
The next item I wanted to deal with, simply because I felt it would be a somewhat encouraging
step to complete, was the removal of the existing neck, so as to salvage the scroll that Kai Jensen
had carved, leaving it as his signature on the cello.
Scroll-grafts (or, “neck-grafts” as they are sometimes called) have sometimes been done to save
an instrument whose neck had been irreparably damaged, or, often (on baroque-period
instruments) it was done to accommodate the new styles of music and playing that became the
norm in the mid-19th century. Virtually all violins and violas made prior to around 1850 have
undergone this “surgery”, as it was cheaper than buying a new instrument, and the player really
needed the “upgrade.”
Sadly, it also means that there are relatively few baroque instruments in their original state, with
the baroque-style neck. Oddly, another side effect has been that people attempting to make
“antique” instruments and pass them off as old ones, have either actually performed a real scroll-
graft, or in some cases, have scratched a line in the location where the glue-joints would have
been, and rubbed dirt or pigmented varnish into the scratches, so that it seems to be a glue-joint.
Close examination reveals the forgery, though, as the wood grains are the same on both side of
the supposed “joint,” showing that they are really the same piece of wood. The old repairers
deliberately used very different wood, so as to avoid such accusations. Very plain scrolls are
grafted onto very curly necks, and vice-versa. In this case the woods are very different, too.
The Process:
The first thing is to lay out exactly where the cuts will be made. There are different ways to plan
the job, but I cut two long tapers coming in from the cheeks of the pegbox, to above the second
or third peg-holes, then a cut that intersects them, in plane with the back of the pegbox, and
emerging on the inside, about halfway up the box; I lay it out with a straight-edge and a pen, then
cut, using a very fine back-saw that cuts on the pull. I have several, but the one I use the most is
a modern copy of a traditional Japanese pull-saw. I don’t know the name-brand.
I cut both sides of the pegbox, until the side-cuts intersect the layout lines of the heel-cut, then
cut the heel exactly to that intersection. The remainder of the bottom cut will be done with
chisels and scrapers. All three planes have to be dead-flat and straight, when completed.
17

18
After all three planes are absolutely flat, the new neck has to be cut, planed and scraped to
perfectly fit the scroll. I cut it to nearly the right shape, with a saw, then I plane it until it is
getting close to a good fit, then I use chalk and scrapers to achieve a perfect fit.

19
Once the fit is perfect, I clean out all the remaining chalk, using a rag and hot water, then slather
in the hot hide glue, jam the neck home, and clamp it from every direction I can manage.

20
But then the carving begins!
The goal is to make all the new wood “fair into”
the original lines, as if that was the way the piece
was originally built.
It is not particularly desirable to make these joints
truly “invisible,” because the two species of maple
are not the same, so the change in grain structure
will always be visible…and intentionally so. We
are not trying to disguise the fact of the grafted
neck, but we do want the actual glue-lines to be as
nearly invisible as possible.
I was reasonably satisfied with the results, as it
looked in the raw wood, and was pretty sure that,
after varnishing is complete, it would be a nice-
looking graft-joint.

21
The next item on the agenda is to shape the other end of the neck—the heel—so that it will be
prepared to join the new neck-block in a shallow “dovetail” sort of joint. The idea is to shape the
neck-heel exactly the way it is supposed to be, and then, when it is time to cut the mortise in the
neck-block, painstakingly cut it to exactly fit the neck-heel. No further wood will be removed
from the portion of the neck-heel that joins the block.

22
The Plates:
Since I had the corpus (body) apart, I needed to reshape the plates before reassembling the
corpus. The main problem is that they had been shaped to fit the odd neck and tail-block
structures; but I could also see the marks of a toothed plane in various places, so the plates really
simply had not been finished. The thicknesses were not too bad, so I mostly left that alone, and
just tried to smooth things up a bit, after re-shaping the block areas.

23
That little “hump” at the top of the back plate is called the button, and it is an extremely
important part of the integrity of the neck-joint. In this particular case, it is really too small to do
much good, so I will graft in a larger button, taken from some of the same wood, which I
salvaged from the original neck. I simply sawed off
a slab of the neck wood, where it had been cracked,
and that piece was nearly exactly the right size.
First: I cut out the old button, carefully cutting it
off exactly where the purfling will eventually go,
so as to camouflage the lateral cross-grain joint.
Then I cut a spoon-shaped trough in the inside of
the back, almost as deep as the thickness of the
plate at the purfling, but tapering in a curve, to zero
at the edge.
Then I shaped the new button to fit the rounded
mortice, chalk-fitting it perfectly, and gluing it in
place with hide glue.

24
Chalk-fitting requires that I continue scraping just the chalk-transfers, until it all fits at once.

25
The results, inside and outside: The inside, after scraping, became very nearly invisible—the
outside, after purfling, will also be very nearly invisible. And the neck-joint will be much
stronger for having the larger button.
Years ago, I once had a cello come to me for repair, still up to playing-tension, in which it turned
out that ALL the glue in the neck-joint had failed, except that in the heel/button portion of the
joint. The button was all that prevented the neck completely pulling out of the corpus. I was
amazed to see it holding in those circumstances, and, of course, slacked the strings immediately,
and made the repair…but it was a good lesson as to the importance of the button integrity.
This button now has as much strength as if it had been made correctly in the first place. No harm
done, at all.

26
The Tail Block:
I decided that the tail-block also needed to be replaced…the original was a very heavy block of
Redwood, far too large, and shaped to some mysterious plan. I have no idea what the plan had
been…but the ribs had already come loose
from the original tail-block, and the whole
structure looked doubtful, so I removed it
and installed a traditional tail-block. Again,
it turned out that the glue holding it had
definitely not been hide-glue---steam
affected it not at all, and even soaking in
water only slowly took any effect.
I eventually set the structure upright, with a
terry-cloth pad on the joint, and kept it
saturated with water for several days, and it
eventually, grudgingly yielded. But the glue
itself was still quite solid, like a layer of
plastic, or something, and I had to scrape it
off. I don’t know what it was, but I suspect
it was “#3 (waterproof) Titebond.(TM)” It
was nasty stuff to remove. I guess the idea
had been that it was not supposed to be
removed.
Then I repeated the process of making the
neck block, and installed the new tail-block,
marrying the two lower-bout ribs at the
center line as closely as I could. The joint
was not absolutely perfect, but it was no
longer objectionable, and barely noticeable.

27
So here is the completed joint: not scraped, nor ready for varnish, but tight and dry:
After this, I planed flush all the blocks and eventually reattached the front plate to the rib
structure (usually called the “garland”,) so as to lend some rigidity to the ribs, while I attempted
to repair the numerous old, and gaping cracks in the ribs. There were ten cracks, in all.
The Sound Holes and Bass Bar:
While I had the plates off, though, I elected to clean up the sound holes, and try to adjust them so
that they looked a little closer to the standard f-holes of most cellos. A common error in
beginners is to get the f-holes at the wrong angle, so that they look like a stylized letter “S”,
instead of the old-style- “f”. In this case, the slope was not that bad, and I did not have to remove
very much. After a minor adjustment to the angles, I was able to simply clean up the margins of
the holes, and make them match one another as mirror-images, as much as possible.
There are other stylistic demands which I place upon my own instruments, but which are not any
sort of “requirement,” and certainly have little effect on sound, so I did not try to impose my
personal preferences on the original plan of Kai Jensen.

28
You will notice that there is no purfling, and the corners are quite wide. All this will be corrected
later. If you look closely, you can also see a small diamond-shaped patch in the lower bass-side
front. There is another one on the upper bass side, too, but not easily seen in this photo. They go
all the way through the plate, and are right at 16-1/2” apart, suggesting to me that the front plate
may have been re-purposed from an old building—perhaps a barn—as studs in buildings are
frequently 16” apart on center. Just a guess, but I think those are patched nail-holes, as there is
no grain anomaly (of any sort) around either of them, and no other signs of insect damage, or
anything of the kind.
Overall, the project is looking pretty encouraging, though the cracks have yet to be addressed. I
had hoped to be able to adjust the arching a little, as well as the graduations, but the arching is so
low that there isn’t much room for adjustments on either plate. I believe it will work out all right,
though. I am avoiding a very high projection-angle, to protect the soft cedar top and to make up
for the low top arching, so it should balance out OK.

29
I also cleaned up and smoothed the bass bar, as you can see in the next photographs.
There was probably nothing “wrong” with the way the bass bar had been completed, but it
simply looked “unfinished,” so I smoothed and re-shaped it, to leave it pretty close to how bass
bars have traditionally looked.
The transformation is now well under way, though some “hard times” are yet to come (cracks are
not fun.) I carefully aligned the completed garland on the front plate, attempting to make it
exactly centered, laterally, and then to “stretch” it this way or that, to get the corners lined up
with some degree of symmetry.
Beginning Reassembly:
Once I had the entire joint aligned as closely as I could manage, I securely clamped the garland
to the plate, using homemade spool-clamps, and then proceeded with the gluing. In my early
attempts at lutherie, I tried to apply the glue all the way around a joint, and then frantically
attempted to set all the clamps before the hot hide glue could gel. The result was that I frequently

30
failed to close a joint in time, and it was a most stressful experience. Nowadays, I simply clamp
the entire joint, dry, then loosen a few clamps at a time, and insert the hot hide glue into that one
small area, using a thin palette knife. Tighten the clamps, move over and repeat. No more stress.
So; here is the result:

31
The Corner Cracks:
I felt that the corner cracks (cracks in the upper-bout ribs, at the corners) would be easier and
safer to deal with, if the entire garland was secured to and stabilized by the front plate. I think it
was a good choice, as the cracks proved to be quite stubborn.
I had contacted a luthier friend in Virginia, Oded Kishony, who has extensive cello-repair
experience, and who has been very kind toward me and generous with teaching, in the past. He
recommended that I completely remove the corner blocks, as they undoubtedly had been the
“cause” of the cracks in the first place. Really, the cause was the seasonal sharp change in
humidity, as the ribs attempted to shrink and swell with the changes in moisture content, but the
blocks changed hardly at all, because the grain was 90 degrees off. (Wood expands radially with
moisture, far more than longitudinally, so the ribs changed far more than the blocks.)
He also recommended, after removing the blocks and repairing the cracks, that I reinforce the rib
ends with linen fabric, saturated with hot hide glue, then reinforce the corners themselves with
“false” corner blocks. (See the photos, below.)
The blocks were difficult to remove—all I could do was carve them away, as the glue was not
hide glue, but some sort of waterproof cement, just as at the heel block.
Once the corner was open and clean, I could begin to clean the old cracks and pull the edges
together. They had been open a long time, so they were fairly dirty, and very uncooperative
about rejoining one another. Part of this problem is residual stresses in wood: when wood is
sawn and shaped, it continues to dry and shrink, creating stresses in the wood fibers. Those

32
stresses were relieved by cracking. But I really don’t want the cracks, so I have to reintroduce
the stresses, by dampening and clamping the ribs, trying to exactly align the edges of the cracks.
It wasn’t easy, and sometimes, when I had it perfectly aligned, it also involved the rib being
curled like an autumn leaf. Then when I attempted to flatten the rib, back to its correct shape, the
crack opened up again. (Sigh…) So, here are some pictures, chronicling the “fun.”

33
Once the cracks were really closed, as tightly as possible, I reinforced the inside of the ribs ends
with strips of linen cloth, saturated with hide glue. This is actually a traditional maneuver, and
many old cello ribs and bass ribs are reinforced in just this manner.
Finally, I closed the corners and glued them securely, then added the false blocks as
recommended by my friend. Closing the corners was no easy task, in itself, because the ribs
absolutely did not want to return to that “unnatural” shape they had assumed thirty years ago,
and from which they had been set free. Adding to the difficulty, there are necessarily no flat
surfaces in cello corners…everything is a curve. So I had to improvise ways to get clamps to stay
in place and to apply pressure in the desired direction, so as to close the corners without
distorting them in any way.

34
Here is what the clamping scheme looked like:
There were narrow strips on the outside, curved on the inner face, to fit the rib, but flat on the
outer surface to allow the clamp to get a good footing. A regular c-clamp was gently positioned
to prevent the inside leg of the “F-clamps” from slipping. Once I could see that the joint was
properly closing, I inserted the hide glue, and re-tightened the clamps.

35
I cut false corner-blocks of straight-grained spruce, and shaped the edges to fit the curvature of
the ribs, then fitted and glued and clamped them in place. This was dead easy, compared to what
went before. I still will shape the new wood further before closing the corpus, but things are
definitely looking up! Here are inside and outside views:

36
I can still see the cracks in the rib-ends: Two have enough of an “open edge” that I will excise
the lips of the crack, in the open portion, forming a very narrow “V”-groove, then insert
matching wood, cut to fit that groove. The result will be nearly invisible, and quite permanent.
There are only about 2-3 cm of crack, total, on which I will resort to that method. I would rather
not do it, but these cracks were old and very stubborn. So—I will do what the job calls for.
Recreating the Front Plate Outline:
You may recall that the corners were pretty wide, and the overhang quite irregular, to begin with.
My hope is to bring all of the overhang into what is considered “normal” range, and to form the
corners accordingly. Once the outline is fully established, I will install the purfling, and it will
completely transform the look of the instrument.
I traced around the perimeter of the garland with a compass, laying down a mark on the inner
overhang surface of the front plate to establish an even width, then carved away the excess, using
small planes, a very sharp knife, and files. On the soft Western Red Cedar of the front plate, this
was very demanding, because Western Red
Cedar is famous for splitting and cracking. I
had to be very vigilant to make certain that I
was actually cutting away excess material,
and not starting a split.
Unfortunately, I forgot to take photographs
during this process, so all I can show is a shot
of doing the same thing on the Birds-eye
Maple of the back plate. You can see the
pencil line, and the procedure, but, believe
me; in spite of the extreme toughness of the
maple, it was an easier, far less stressful task
to carve the back plate than the front.
After trimming the perimeter to exactly the
right shape I still will have to shape the edges,
but that will happen after I complete the purfling.

37
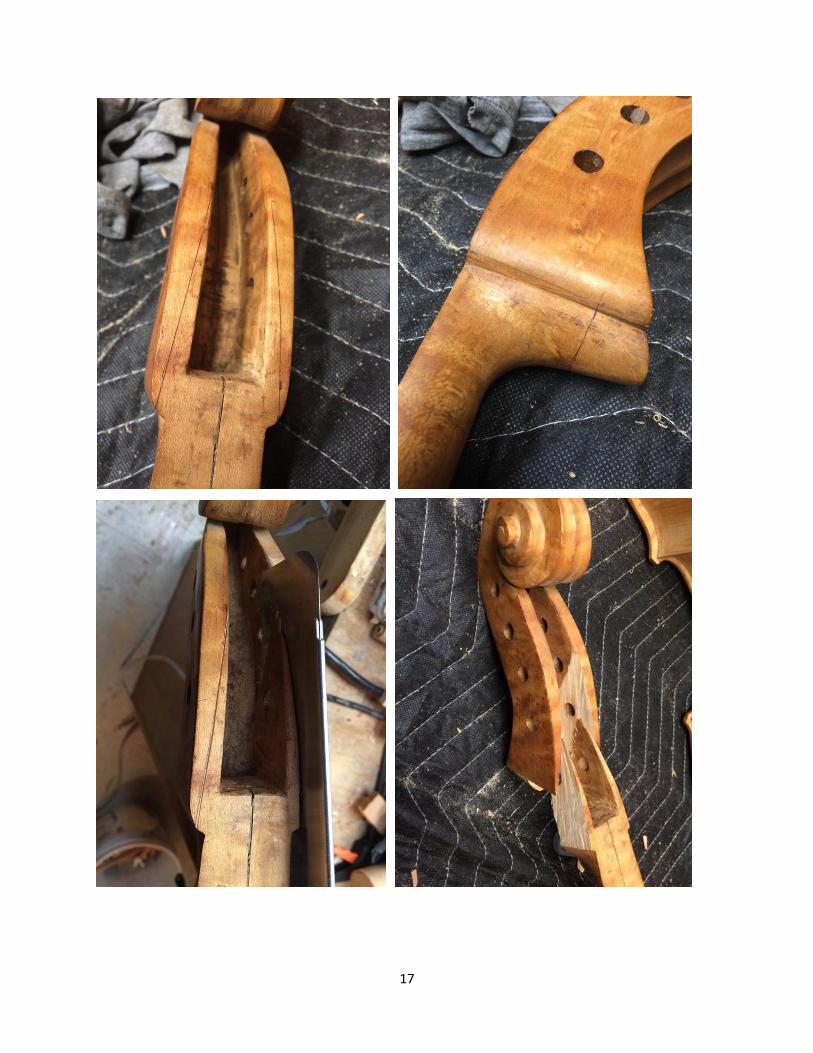
Installing the Purfling:
The English word “purfling” is derived from the Old Italian term “por filo”, meaning edge-trim.
It supposedly serves the double purpose of defining the shape of the instrument, to the eye, and
(supposedly) stopping cracks from running up into the instrument. I am not certain how effective
it is at this latter task. I have certainly seen instruments where the crack ran right through the
purfling, and the purfling held firm as if nothing had happened. So…perhaps “it looks pretty” is
just as good an answer. At any rate, there are very few violin-family instruments of any notable
worth that do NOT have purfling (some instruments by the Testore family only have drawn-in
purfling, but that really is a rarity among the old makers.) The only modern instruments lacking
this touch are usually very cheap imports. So…purfling is going to happen.
I begin with an instrument(this one!) with whose outline I am completely satisfied. I use a
purfling marker (sometimes called a “purfling cutter”) shown in the next photograph, to inscribe
the parallel lines marking the limits of the purfling slot. That tool will not reach all the way into
the corners, so I sketch the corners in by eye, and by hand.
Then I use a small, sharp knife to trace around each line, very lightly, just barely “deepening” the
lines. This is especially important on the soft wood of front plates, as the harder winter reeds can
turn the blade and send it off into places I really did not want to cut. So, if the first two cuts are
very light and fairly rapid, but completely accurate, then afterward, I can apply greater pressure,
and cut more deeply to get the slot the full depth. The maple is easier to deal with as it is much
less likely to misbehave…but it is much tougher, so it also requires more physical work.
The next step is to use a tool called a purfling pick, to remove the wood from the center of the
slot. I have several of these tools… some I made for myself, one I bought (it was useless), and a
couple were given to me. Effectively, you want a sharp chisel, about 1.5 mm wide, that is curved
to allow you to lay the flat portion of the blade nearly parallel to the bottom of the slot, and,
ideally, with a little pressure, you can slice away this center strip of waste wood. In reality, what
usually happens is that you “pick” away that waste wood…hence the name “purfling pick.”

38
The shiny brass tool below actually has two blades, set the proper distance apart, so as to incise
both lines simultaneously. I then used a small knife to gently incise the lines deeper until they
were well established, after which I could proceed to complete the slot.
In the photograph below, the purfling has been glued in place, but not finished. You can see the
tools I used: there are three knives, two purfling picks, and a roller I use to force the purfling into
the glue-filled slot. I use heat to bend the purfling, then fit it perfectly, using the knives, and glue
it in place.
The edgework is not even begun at this point, but the purfling is fully installed. The next step
will be to install the back plate, and then repeat the shaping and purfling process.

39
There is still a great deal of work to do on the front plate, but most will wait until later. I need to
ready the back plate for installation. In fact, in the above photo (see the spool clamps?) I had
already begun fitting it. But there were other things that happened first. Some important things
were already completed: I replaced the button and cleaned up the interior, I also checked the
graduations of both the plates. They really were not all that bad, so I cleaned them up a bit and
then left them alone. I did thin the edges of the various cleats, etc., too.
But what about the label? Mr. Jensen had installed a (dot-matrix-printer-produced) label, encased
in plastic, and held in place with double-sticky tape. His daughter (Maryanne Jensen-Gowan: my
customer) designed a new label that correctly identified him as the maker, and the date he had
originally stated on his label, but also added the completion date and the facts of its completion.
So, today, if you peer inside, through the bass-side f-hole, this is the label you will see:

40
It is difficult (to me, at least) to insert a label cleanly, after the corpus is closed, so I have always
installed the label just before closing. I can do a better job of it, and it is much easier. The only
problem is that the dates on my personal labels, then, actually reflect the closing dates, not the
completion dates. It is only a matter of a few weeks’ difference, as a rule. Hopefully that will not
bother anyone. (This label only gives the years, so I have lots of leeway.)
I carefully aligned the back plate on the garland, clamped it in place, and then glued it with hot
hide glue in exactly the same manner as I did the front plate. In the photograph on the next page,
I had temporarily attached the back plate, to check the fit (some finagling proved necessary), so I
left it that way while I installed the saddle and began the front plate edgework.

41
The Saddle:
The saddle is a small, but vital part of the instrument, as it bears all the stress of the strings where
the tailgut wraps around from the endpin assembly and turns toward the bridge. If the saddle
were not there, the tailgut would damage the instrument very quickly. So, the saddle is usually a
very hard wood, such as ebony. Kai Jensen had already cut the slot for his intended saddle, but
had not installed it. I bought an ebony blank from which to carve a saddle, but it turned out that
his mortise was oversized, so my blank was useless. So, I used a piece of African Blackwood
from a previous project, and carved one to fit. But…
One of the few things I do that is not
traditional, is that I end my saddles with a
radius, so as to avoid causing a stress-riser
in the front plate. Many older instruments
have cracked at the corner of the saddle,
and, though part of the problem is thought
to be the shrinking of the plate, and the
resistance of the saddle, I am convinced
that the sharp corner in the mortise is also
part of the problem…so I radius my
mortise corners.
So far, I have had good results. Most good makers
leave a small gap (the thickness of a business card) at each end of the saddle, so as to minimize
the danger of cracking. (I do that too.) But I have read enough about the effect of sharp corners

42
on structural stress to believe that
this is important, so; it’s what I do.
And, besides…I like the look of it.
After the glue on the saddle was dry,
I continued the fitting of the back
plate. There was a fair amount of
resistance, as the corpus shape had
changed during the months when it
was open. I knew this was going to
happen, and was prepared to deal
with it, but it still can be frustrating.
One of the things I have found to help, is to keep in mind which way things will move when they
are moistened: I remember talking to a carpenter who needed sheets of plywood to bend, to
follow a curve in a building of some sort. He simply laid the sheets of plywood on the lawn so
that the outside of the curve was down, and, in a few hours, the wood soaked up enough
moisture from the grass that it cupped
away from the ground, and he was able
to use that starting-point to complete
his task.
So…I used the same principle. The
front plate seemed to be “pinching” the
garland so that it was too narrow for
the back plate. So, I brushed water
onto the wood of the inside of the front
plate, and…waited. Sure enough, the
corpus seemed to relax, so that I was
able to pull the corners and ends into
appropriate places and glue the back
plate in place permanently.
The gloves are there to pad the clamp.

43
Completing the Corpus
The “box” is all one piece, now, but it will require a good deal more work to have it “complete.”
There will be a whole lot of work
involved in completing the edgework
front and back, and in scraping the rest
of each plate, so that all the curves flow
together appropriately.
Edgework (after purfling) includes
determining the “crest” of the edge all
the way around, then carving away just
the surface of the purfling channel, so
that it meets that crest from the inboard
side. Then the outer edge is planed and
filed to curve in and just touch that crest
from the outboard side. Then the inner
side of the overhang must be planed and
filed to match the curve of the outer
quadrant, and final smoothing can begin.
I am not under any constraint during this
phase, as to what has to happen first. It
all simply has to happen, and pretty
much in the order I just described.
First, of course, I still had to purfle the back plate. So, much as I did the front plate, I marked,
incised, and “picked out” the back purfling slot, making sure that, at the button, the slot
coincided with the glue-joint on the button graft. (Notice the fake center-seam in the button: it is
just there as “camouflage,” further adding to the illusion of an invisible repair.)
After that, it was a pretty straight-forward run to completion. I planed and scraped the outside of
the back plate to my satisfaction. (Believe it or not, the curvature of the plates is one of the most
important factors controlling sound, after wood selection.)

44
Back shaping is completed, and the outline has been completed, so purfling is next:
45
So, the purfling has been glued in place, the crest has been drawn, and the channel is in progress:

46
After the channel is complete, the curvature from the bottom of the channel must be extended up
into the curvature of the plate, so there will be a smooth transition from inside curve to outside
curve. The transition between the two is sometimes called the line of inflection. On violins that
line is far inboard. On violas it is very close to the purfling. On cellos, it is essentially at the
purfling, so that the curvature transitions from a hollow curve to a bulge, virtually from the
moment it emerges from the purfling slot. Obviously there is a great deal of variation between
makers, but that seems to be what I can see, in examining the photographs and technical
drawings of the Old Master instruments. I did not originate this observation, by the way: one of
my teachers pointed it out and I simply went on to see for myself that it was an accurate
observation.
It is a slow, patient slog, shaping the final curvature of the plates, but it is vital to the tone of the
instrument. The actual edgework is only vital to the aesthetics of the work. It pleases the eye, and
demonstrates good workmanship. (I’m still working on this one.)

47

48
Setting the Neck:
Once all the corpus work is done, it is time to set the neck. There are five critical measurements
which are to be planned in advance and then rigidly adhered to:
The centerline of the neck, itself, must coincide with the center of the corpus: not just
where they meet, but for the full length of both.
The edge of the lower end of the neck should be parallel with the plane between the front
plate and the garland. (No twist, unless that is what you are planning…)
The height of the lower end of the neck (not the fingerboard) must be as planned (it can
vary, cepending on a number of things…in this case I did make it a little high, to reduce
the projection angle thus reducing the string breakover angle and pressure at the bridge.
The distance from the front edge of the nut to the upper edge of the front plate.
The projection angle. There are “standards,” but if there is a reason you are changing
them, you need to know why and how you intend to accomplish such changes.
In the case of “The Swan”, there were certain decisions that had been taken out of my hands. The
wood choice was already made. The arching was complete, essentially, except for very minor
adjustments. The flat arching and extremely soft top plate wood dictated some adjustments in the
neckset. Once all the measurements and angles had been decided upon, I could begin cutting the
mortise in the neck-block to receive the heel of the neck.
As it turned out, the mortise
in the front plate was
already too wide, so I
grafted in some Western
Red Cedar left over from
the building of my home
(50 years ago.) The grain
matches closely enough,
and very little will remain
of it, anyway.
49
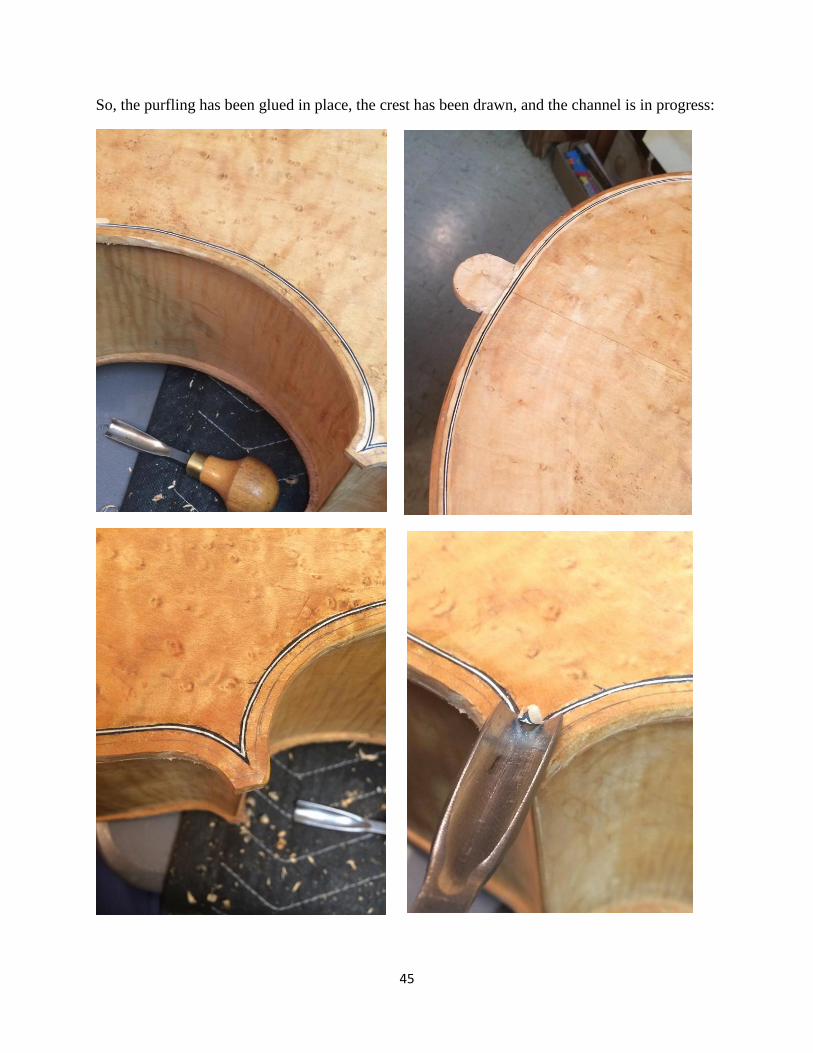
Then I began laying out and cutting out the mortise to match the heel of the neck:

50
Once the mortise is cut, and close to correct, I have to start trying the fit, checking and re-
checking, so as to not overshoot my target goals. “Close” is not good enough—it has to be an
airtight fit, with all the correct measurements and angles. (The extra block is to pad the clamp.)

51
So…at this point, it is beginning to “look like a cello” again. And, from this point forward, all
the work will be toward preparing for varnishing, fitting tuning pegs, endpin assembly, etc. For
some reason, even when I build from scratch, as opposed to completing another maker’s work,
there is a transformation at about this point, in my thinking: I no longer see it as a project that
“will be a cello;” I see it as a “cello I happen to be working on.” It is rather a mysterious feeling,
because at that point, though I personally performed nearly every step except creating the tree, I
no longer see it as “my project”—it has taken on a life of its own, in some way. It is a cello.
Carving the Heel of the Neck:
There are several measurements which do have “standards,” though, of course there are
exceptions. One of them is the heel of the neck. There is a particular shape to adhere to, and a
distance above the top edge of the front plate to the center of the upper curve of the heel. I began
with lots of extra wood, so it now has to be cut away.

52
At this point the heel looks pretty good, but it is still a little “puffy.” Ideally, the top surface of
the heel should be just slightly concave…just a hair…to avoid looking as though it has a hump in
it, as this one does.
But, it is definitely getting closer! I will have to scrape the entire corpus, ribs and all, as well as
the scroll, so that it all starts off approximately the same color before varnishing. It was all the
same before I began, but everywhere I removed wood, it looks much lighter, so I need to “even
things out” as best I can, before beginning the finishing process.

53
I kept scraping until all the curves seemed to blend smoothly: The goal is to be ready to begin the
finishing process. If I miss some little detail it will stick out as though it had a spotlight on it,
under the finish. So, I have to really pay close attention to details, here:
At this point, I was about ready to begin applying the fill-
coat: rubbing a slurry of gypsum and coffee into the
wood, all over, to fill the pores, so that the varnish will not
soak in excessively.
The only reason I use the coffee is in the vain hope that it
will simultaneously raise the grain and impart a little color
to the bare, light wood. In reality, it adds very little
color—a very faint tan, or light yellow, is about all I get
out of it, but at least it works as a vehicle for the gypsum
powder.
The gypsum will be nearly chalk-white when the filler
coat dries, and will seem pretty opaque, and tend to obscure the grain. But, when saturated with
the sealer coat, the gypsum goes completely transparent, and will never be visible again.

54
Here it is with the sealer coat:
Quite a change, isn’t it? I always find it a very satisfying thing to “see the lights come on” in a
new instrument. From here, forward, it will be a matter of adding color, clarity and depth, with
each coat of varnish. The owner has given me a fair idea of what she is looking for, having seen
some earlier work of mine, so I will “know when to stop,” so to speak. Some people prefer very
dark-colored instruments, and others much lighter, so it is important to know the end goal.
On smaller instruments, I remove the fingerboard during varnishing, to give better access to the
top plate. The cello has enough clearance under the fingerboard that I believe that move to be
unnecessary.
It will be interesting to try to balance the color of the dark Western Red Cedar top against the
lighter Birds-eye Maple of the back and sides. I will have to watch and make sure I am not
adding too much color to the front plate.

55
Varnish Coats:
I next applied about five coats of Spirit varnish. Each coat added more color, and so I used more
yellow varnish on the top plate, and more red-brown varnish on the back, sides and scroll, until
the colors seemed to match. Then I applied one last coat of yellow all over.
This was just the first coat: I forgot to take straight-on photos of the front, early on, I suppose,
just because the back and sides were so spectacular. But, all together, it was starting to be a very
pretty instrument, and I was pretty confident it would sound good, too.
56
Three Coats:
I am beginning to be concerned about the positions of the peg-holes. The original maker had no
way to know this, but it is very important to lay out the locations of the peg-holes in such a way
that none of the pegs will interfere with the other strings. As you can see in the photo below,
both the D-string and the G-string would drag heavily over the other two pegs.

57
So, I will have to plug those holes and lay out new locations, capping the other holes with
matching wood, and re-varnishing the pegbox, before installing the new pegs. Meanwhile, I went
ahead and completed the five coats I had planned.

58
New Peg-holes
I made a pencil-rubbing of the shape of the pegbox, and laid out the hole locations in such a way
as to optimize the shape and available space. The scroll and pegbox are a little different, anyway,
so I needed to work within the intent of the original maker, as the whole point of grafting the
scroll was to retain the original maker’s signature work.
You can see the lines, predicting the paths of the individual strings. I wanted to leave as much
wood as possible above the peg-holes, to avoid any weakness. But to get the G-string path to
clear the other pegs required that the other pegs be fairly far back toward the back of the pegbox.
Not a real problem, but not necessarily what I would like to do. Once the pegs and strings are in,
I doubt it will be objectionable. The procedure is as follows:
Ream and plug the old holes.
Lay out, drill and ream the new holes
Install the pegs.
I wanted to cap the plugs with bird’s-eye maple, though, which I had never done before.

59
So, here is how it went:
I reamed the holes, then cut and tapered a hardwood dowel to match the tapered holes, and
capped each dowel with Bird’s-eye Maple. Finally, I shaped the maple and glued the plugs in.

60
Then it was time to trim the plugs, inside and out.

61
I used a small gouge and plane to remove the excess outside wood without marring the pegbox,
then scraped and sanded the plugs absolutely flush with the surrounding wood, and sawed the
inside sections off, before carving them flush as well.

62
Then I varnished again, inside and out, to regain the smooth, finished look from before.

63
End-pin Assembly
The original maker had drilled a hole for the end-pin assembly, but it was not the right size, so I
reamed it to size, then tapered the new end-pin socket to fit the hole, and installed the end-pin.

64
New Peg-holes and New Pegs
I laid out the new peg-hole positions, using the paper template I had made earlier, then drilled the
holes and reamed them to the appropriate size, using a small-size violin reamer, then a standard
violin/viola reamer, and finally a cello reamer. Using the incremented sizes allowed me to adjust
the locations a little, as needed, to get them parallel.
The next step was to taper the new, rosewood tuning pegs to the correct diameter and the proper
taper, to match the reamed peg-holes. The peg-shaver is a specialized tool made specifically for
this task. There are different styles, and different sizes. This one is only for cello pegs.
I can’t get more rosewood pegs, so, I had “one shot at the target:” I was a little apprehensive, as
sometimes pegs have split when I tried to shape them. But these pegs were good-quality, and
there were no problems at all. I really like the deep purple color of the wood, too.

65

66
Where you can see the “shiny places” on the peg on the previous page, I had liberally applied
“peg-dope” to the peg-shank, then twisted it hard for a few dozen turns, to work the pegs into the
holes, coating both the insides of the holes and the outside of the pegs, so as to seat the pegs, and
lubricate them for easy turning.
Finally, I cut and fitted the bridge, fit and set the soundpost, adjusted the tailgut, and strung the
cello up for playing.
67
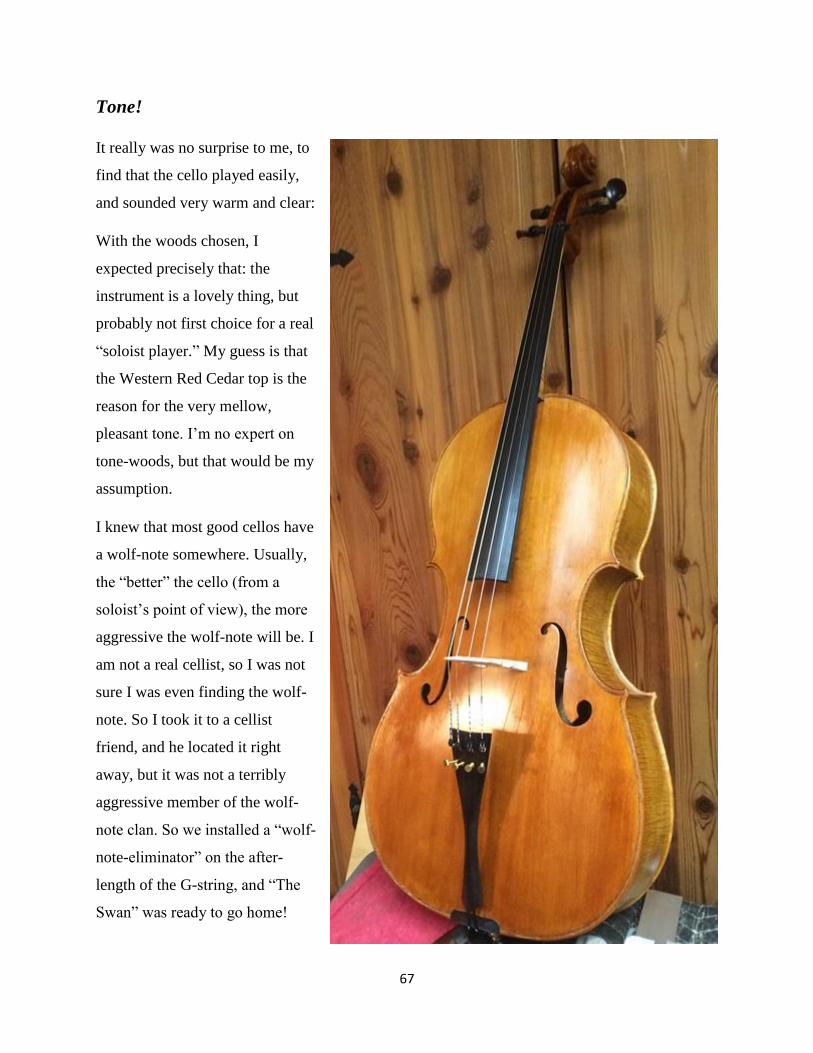
Tone!
It really was no surprise to me, to
find that the cello played easily,
and sounded very warm and clear:
With the woods chosen, I
expected precisely that: the
instrument is a lovely thing, but
probably not first choice for a real
“soloist player.” My guess is that
the Western Red Cedar top is the
reason for the very mellow,
pleasant tone. I’m no expert on
tone-woods, but that would be my
assumption.
I knew that most good cellos have
a wolf-note somewhere. Usually,
the “better” the cello (from a
soloist’s point of view), the more
aggressive the wolf-note will be. I
am not a real cellist, so I was not
sure I was even finding the wolf-
note. So I took it to a cellist
friend, and he located it right
away, but it was not a terribly
aggressive member of the wolf-
note clan. So we installed a “wolf-
note-eliminator” on the after-
length of the G-string, and “The
Swan” was ready to go home!
68
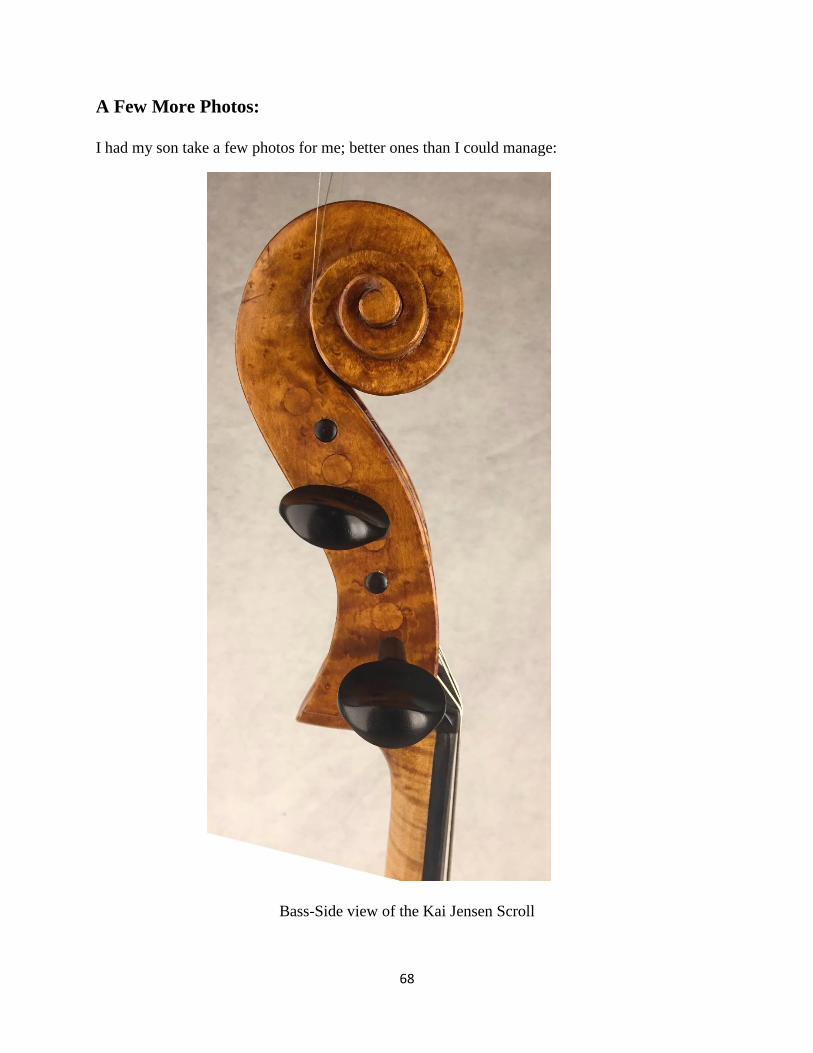
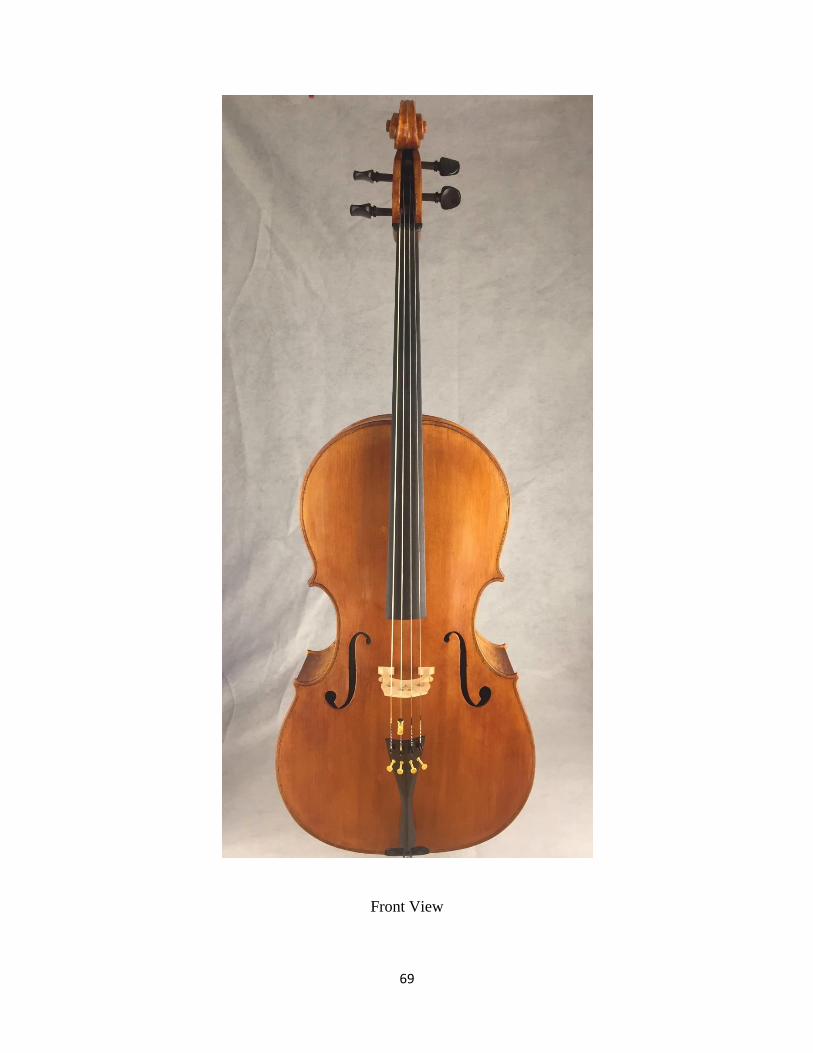
A Few More Photos:
I had my son take a few photos for me; better ones than I could manage:
Bass-Side view of the Kai Jensen Scroll
69
Front View

70
Bass Side View Treble Side View

71
Back View

72
The Swan Goes Home
I re-packed the “new” cello in
the case and lots of “bubble-
wrap” surrounded by all sorts
of packing stuff, closed it up
securely in the same box in
which it had arrived, and
entrusted it to FedEx.
A few days later, I had the
immense relief of knowing
that “the Swan” had safely
flown home to New
Hampshire, and had received
a very warm and emotional
welcome.
One has to bear in mind that
this was Kai Jensen’s last
project: a cherished hope, and
a dream that had been left
unfulfilled.
Now the dream has found
fulfillment, and is being
played by his daughter,
Maryanne Jensen-Gowan.
Blessing upon the whole clan!
I have certainly appreciated
her encouragement!

73
A Loving Home for the Swan!