the ultimate in sound and comfortfiler.fiolinmakern.com/pirastro_korfkerrest_manual.pdf · the...
TRANSCRIPT

The ultimate in sound and comfort

English
Quick start guide
instruction manual
Page 04 - 15
Handmade in Germany
DEutsch
Kurzanleitung
gebrauchsanweisung
seite 17 - 31
The ultimate in sound and comfort

thank you very much for purchasing the Pirastro Korfkerrest®.
For full benefit of its features and to ensure a long life for your purchase, please read this instruction manual care-fully before use.
Key ................................................................................. 04 - 05
Quick start guide ......................................... 06
instruction manual .......................... 07 - 15
BEnDing thE rEst ............................................................... 07
aDjusting thE lEgs .......................................................... 08
narrowing the rest ................................................................. 09
Widening the rest ................................................................... 10
adjusting the tilt of the rest ................................................ 11
harDEning thE WooD ............................................ 12 - 15
hardening in a conventional oven .......................... 12 - 13
hardening in a microwave oven ............................... 14 - 15
rEPlacing thE ruBBEr PaDs ........................................ 15
contEnts
Patent pending art. no. 700010

0
0
0
0
0
0
0
4
04
0
accessories12 torx key (size 8 for all screws)
13 rubber pad (x2)
14 locking rings (x4)
Protection bag
01 Wooden bridge
02 chest leg
03 shoulder leg
04 Base joint
05 hinge joint
06 rubber foot
07 adjustment screw
08 rubber pad
09 torx screw
10 torx fl ange screw
11 Eye
4
04 EN EN 05
The ultimate in sound and comfort
0

to get a fi rst impression of the Korfkerrest please follow these steps:
Bending the restthe Pirastro Korfkerrest has been pre-bent to a shape that has proven to be comfortable for many players. a unique feature of this rest is that its shape can be changed by manual bending to fi t the individual, as seen in picture 1, 2 and 3.
WhEn BEnDing thE WooD PlEasE KEEP thE FolloWing in MinD:
• Do not bend the rest if you have previously hardened it (see the section entitled »hardening the wood«). Bending a hardened rest will result in the wood breaking.
• the fi bres of the wood need time to adjust to a new shape, therefore always bend the rest slowly and carefully. Fast and forceful bending will damage the wood and may cause cracking.
• the rest has a bending limit. By bending it slowly and carefully you will feel when the rest cannot bend any further. Do not force the wood to bend beyond this point.
• Please keep in mind that small adjustments can have a signifi cant eff ect on comfort.
• clamping the rest onto the instrument will increase the shoulder curve slightly. Bear this in mind when deciding the fi nal curve.
• When the rest is bent and its shape altered, the legs might need to be readjusted. Please refer to the section entitled »adjusting the legs«.
QuicK start guiDE instruction Manual
step 1using the torx key provided, check that all the torx screws are tightened before use.
step 2if the rest is too tight or too loose for your instrument, adjust it by loosening the torx screw of the shoulder side leg and tilting the hinge joint inwards or outwards. tighten the torx screw again afterwards.
PlEasE oBsErVE thE FolloWing:
if the rubber feet slip during playing they can be tightened by adjusting the legs. to achieve maximum tightening the wood needs to be hardened. Please read how to do this in the section entitled »hardening the wood«.
06 EN EN 07
2
3
1

adjusting the legsEach leg has a torx screw connecting the hinge joint with the base joint and a torx flange screw connecting the base joint with the wooden bridge. locking rings prevent movement between the hinge joint and the base joint and between the base joint and the wood when the torx screws are tightened correctly. these four locking rings are essential to the functioning of the rest and should be replaced if lost or damaged (4 replacements included).
adjustments to the legs should be made in small increments. after changing their position, look at both legs sideways and make sure the adjustment screws of the rubber feet are parallel to each other (see picture 7). When placed feet downwards on a flat surface, all 4 tips of the rubber feet should touch the surface. if they are not, adjust the tilt of the hinge joint of the chest leg.
in order not to change the position of the wooden bridge in relation to the violin, whatever adjustment is made needs to be divided between the shoulder leg and the chest leg. this way the legs will both remain at a similar angle pointing inward (see picture 4).
after making adjustments always check all screws have been tightened.
narrowing the restincreasing the angle of the hinge joint of the shoulder leg inwards will narrow the rest and create a stronger clamping action (see picture 5). in order to adjust the hinge joint, loosen the torx screw enough to allow the joint to move. Move it to the desired position and tighten the torx screw.
a similar adjustment needs to be made to the chest leg (see picture 6). to make the rest narrower, slightly loosen the torx flange screw and rotate the base joint clockwise. after tightening the torx flange screw, loosen the hinge joint and swivel the hinge joint inwards. at this point both adjustment screws need to be parallel with each other and all screws need to be tightened.
instruction Manual
08 EN EN 09
5
4
6

instruction Manual
Widening the reststraightening the hinge joint of the shoulder leg by bringing it outwards will widen the rest and create a weaker clamping action (see picture 5). in order to adjust the hinge joint, loosen the torx screw enough to allow the joint to move. Move it to the desired position and tighten the torx screw.
a similar adjustment needs to be made to the chest leg (see picture 6). to make the rest wider, slightly loosen the torx flange screw and rotate the base joint anticlockwise. after tightening the torx flange screw, loosen the hinge joint and swivel the hinge joint outwards. at this point both adjustment screws need to be parallel with each other and all screws need to be tightened.
adjusting the tilt of the restthe tilt of the rest can be adjusted as seen in picture 7. in order to increase or decrease the tilt of the rest, start with the shoulder leg. slightly loosen only the torx flange screw and rotate the whole leg slightly clockwise to increase the tilt or anticlockwise to decrease it. a small rotation will have a noticeable result. after tightening the torx flange screw, adjust the tilt of the hinge joint of the chest leg by loosening its torx screw and swivelling the hinge joint so the two adjustment screws are parallel as in picture 7.
10 EN EN 11
7

instruction Manual
hardening the woodin its bendable state the Pirastro Korfkerrest rest attaches safely to your instrument with a minimum effect on its sound. nevertheless when the wooden bridge is still bendable the rest might slide during use, or in some cases the wood might bend during playing. this can be prevented by hardening the wood, thus maximising the clamping force and the stability of the rest. Please be aware that this process is irreversible. therefore harden the wood only after a period of testing. When choosing a final shape, bear in mind that even when the wood is hardened, putting the rest on the violin will slightly emphasise the bend.
hardening in a conventional ovenhardening the wooden bridge in a conventional oven will result in the greatest and most permanent stiffness. Do not heat at more than 200º C or for more than the stated times as this will cause burning of the wood. as the temperature control of conventional ovens can be inaccurate you are advised to use an oven thermometer to confirm the exact temperature in the oven. Follow these steps precisely:
step 1Before hardening the wooden bridge, take careful note of the positions of the legs so they can be repositioned easily after hardening the wood. take a picture if necessary. remove the legs, torx screws and locking disks and peel off the rubber pads. Place the wooden bridge sideways on a sheet of paper and copy its curve with a pencil. this drawing will be important during the hardening process. also look at the wooden bridge from the chest end and note its twist.
step 2Pre-heat an oven to 200º C and place the wooden bridge only on its side in the middle of the oven for 1 minute. Place the wood directly onto an ordinary wire oven shelf. Do not use a solid shelf or tray as this will cause damage to the wood.
step 3remove the wooden bridge with oven gloves and compare its curve with the line drawn on the paper. sometimes at this point the shoulder bend and twist will need slight rein-forcing. While the wood is still warm, carefully bend it to fit the line. remember that putting the rest on the violin will slightly emphasise the bend.
step 4When you are happy with its shape, place the wooden bridge back into the oven for another 3 minutes at 200º C to finalise the hardening process. remove the wood with oven gloves and let it cool down. From now on, do not try to bend the wood as it will break. the rest can then be reassembled. the rubber pads can be reattached after hardening the wood, although they may not stick as well as before. if they do not regain stickiness after a day, replace them with the new ones provided.it is normal for the colour of the rest to be slightly darker at the end of this hardening process.
12 EN EN 13

instruction Manual
hardening in a microwave ovenit is possible to harden the wooden bridge by microwave oven, but the hardening might be less permanent than when done by conventional oven. Do not use more than 450 Watts power and do not heat the wood for more than one minute at a time as this will cause burning of the wood. if the microwave oven does not have a turning plate, do not use it for hardening the wood as this may cause burning. Please find an alternative microwave oven with a turning plate or use a conventional oven. Follow these steps precisely:
step 4Place the wooden bridge in the microwave again, as in step 2 but with the Pirastro Korfkerrest engraving facing downwards. heat for 1 minute at 450 Watts. remove the wood with oven gloves and let it cool down. From now on, do not try to bend the wood as it will break. the rest can now be reassembled. the rubber pads can be reattached after hardening the wood, although they may not stick as well as before. if they do not regain stickiness after a day, replace them with the new ones provided.if after following this procedure maximum and more permanent stiffness of the wood is required, remove the legs, torx screws and locking disks and peel off the rubber pads. read the instructions under »hardening in a conventional oven« carefully and follow only step 4 for a maximum of 3 minutes at 200º C.
PlEasE notE:some microwave ovens express power in percentages or steps. in those cases please refer to the instruction manual of the microwave oven to come as close to 450 Watts as possible. if in doubt choose one step below 450 Watts. Microwave ovens can vary in accuracy of power output and Pirastro cannot accept responsibility for the results of using poorly calibrated ovens.
replacing the rubber padsWhen a rubber pad has worn out, it can be peeled off using the finger lift under the tip of the pad. Peel the backing off one of the replacement rubber pads included with your cradle. start by aligning the round hole exactly around the torx flange screw, then align the eyes in the rubber with the eyes in the wood. aligning the eyes might require slight stretching or compressing of the rubber, depending on how strongly the rest has been bent. Before using, press the whole rubber pad strongly onto the wood, starting at the edges.
step 1Before hardening the wooden bridge, take careful note of the positions of the legs so they can be repositioned easily after hardening the wood. take a picture if necessary. remove the legs, torx screws and locking disks and peel off the rubber pads. Place the wooden bridge sideways on a sheet of paper and copy its curve with a pencil. this drawing will be important during the hardening process. also look at the wooden bridge from the chest end and note its twist.
step 2Place the wooden bridge only in a microwave lying on its side. Position it on the turning plate 2-3 centimetres off centre with the Pirastro Korfkerrest engraving on the side of the rest facing upwards. heat for 1 minute at 450 Watts.
step 3remove the wooden bridge with oven gloves and compa-re its curve with the line drawn on the paper. sometimes at this point the shoulder bend and twist will need slight reinforcing. While the wood is still warm, carefully bend it to fit the line. remember that putting the rest on the violin will slightly emphasise the bend.
14 EN EN 15

DE 17
DEutsch
Kurzanleitung
gebrauchsanweisung
seite 17 - 31
The ultimate in sound and comfort
Handmade in Germany

18 DE
inhalt
DE 19
ansicht ..................................................................... 20 - 21
Kurzanleitung ..................................................... 22
gebrauchsanweisung .................. 23 - 31
BiEgEn DEr stützE ............................................................. 23
EinstEllEn DEr BEinE ........................................................ 24
Verringern des Beinabstandes ........................................... 25
Verbreitern des Beinabstandes ......................................... 26
anpassen der stützenneigung .......................................... 27
härtEn DEs holzEs ................................................... 28 - 31
härten im Backofen ....................................................... 28 - 29
härten in der Mikrowelle ............................................. 30 - 31
austausch DEr guMMiPaDs ........................................ 31
Patent pending art. no. 700010
herzlichen glückwunsch zum Kauf der Pirastro Korfkerrest®.
Damit alle Vorzüge dieses Produkts optimal zur geltung kommen können und eine lange haltbarkeit gewährleistet ist, lesen sie bitte vor der ersten Benutzung diese gebrauchsan-weisung sorgfältig durch.

20 DE DE 21
0
0
0
0
0
0
0
0
4
04
0
zubehör12 torx-schlüssel (größe 8 für alle schrauben)
13 gummipads (2 stk.)
14 sandpapierscheiben (4 stk.)
schutztasche
01 schulterstütze
02 gelenkbein (Brustseite)
03 gelenkbein (schulterseite)
04 gelenkbasis
05 gelenkkonus
06 gummifuß
07 stellschraube
08 gummipads
09 torx-schraube
10 torx-Flanschschraube
11 auge
4
The ultimate in sound and comfort

KurzanlEitung
um einen ersten Eindruck von den Vorzügen der Pirastro Korfkerrest zu erhalten, befolgen sie bitte die folgenden schritte:
Biegen der stützeDie Pirastro Korfkerrest hat eine vorgeformte Biegung, die erfahrungsgemäß für viele spieler komfortabel ist. Ein Vorzug dieser stütze ist es, dass die Form verändert wer-den kann, um individuellen Wünschen zu entsprechen, wie in abbildung 1-3 dargestellt.
BittE BEachtEn siE BEiM BiEgEn DEs holzEs FolgEnDEs:
• Biegen sie die stütze nicht nach dem härten, da sonst das holz brechen würde.
• Die holzfasern brauchen etwas zeit, um sich an die neue Form anzupassen. Biegen sie daher die stütze immer nur langsam und vorsichtig.
• Die stütze kann nur begrenzt gebogen werden. Wenn sie langsam und vorsichtig biegen, werden sie spüren, wenn sie nicht weiter gebogen werden kann. Versuchen sie nicht das holz über diesen Punkt hinaus zu biegen.
• Bitte beachten sie, dass kleine Veränderungen erhebliche Komfortunterschiede bewirken können.
• Die Biegung wird sich leicht verstärken, wenn die stütze am instrument befestigt wird. Bitte bedenken sie dies, wenn sie die endgültige Biegung festlegen.
• Wenn die stütze gebogen und die Form verändert ist, müssen eventuell die Beine neu eingestellt werden. hinweise hierzu fi nden sie im folgenden abschnitt »Einstellen der Beine« .
schritt 1Vor dem gebrauch kontrollieren sie mit dem mitgeliefer-ten torx-schlüssel, ob alle torx-schrauben festgezogen sind.
schritt 2Wenn die stütze zu fest oder zu locker an ihrem instrument sitzt, passen sie sie an, indem sie die torx-schraube des schulterseitigen gelenkbeins lockern und den gelenk-konus nach innen oder außen neigen. ziehen sie danach die torx-schraube wieder fest.
BittE BEachtEn siE FolgEnDEs:
sollten die gummifüße während des spiels verrutschen, müssen die Beinstellungen entsprechend geändert werden. Für eine maximale Fixierung muss das holz gehärtet werden. Bitte lesen sie dies im Kapitel »härten des holzes« nach.
22 EN EN 23
gEBrauchsanWEisung
1
2
3

24 DE
gEBrauchsanWEisung
DE 25
Einstellen der Beinejedes Bein hat eine torx-schraube, die den gelenkkonus mit der gelenkbasis verbindet sowie eine torx-Flansch-schraube, die die gelenkbasis mit der schulterstütze verbindet. Wenn die torx-schrauben richtig festgezogen sind, verhindern die sandpapierscheiben Bewegungen zwischen den anliegenden teilen. Diese vier scheiben sind äußerst wichtig für die Funktion der stütze und sollten bei Verlust oder Beschädigung ausgetauscht werden (vier Ersatzscheiben sind teil des mitgelieferten zubehörs).
Das anpassen der Beine sollte in kleinen schritten erfol-gen. nach jedem schritt betrachten sie beide Beine von der seite und stellen sicher, dass die stellschrauben der gummifüße parallel zueinander stehen (siehe abbildung 7). Wenn die Füße auf einer geraden Fläche stehen, sollten alle vier hakenenden diese berühren. Falls nicht, verän-dern sie die neigung des gelenkkonus auf der Brustseite entsprechend.
Damit sich die Position der stütze im Verhältnis zur geige nicht verändert, sollten beide gelenkbeine jeweils im Win-kel entsprechend angepasst werden (siehe abbildung 4).
stellen sie nach jeder Veränderung sicher, dass alle schrau-ben festgezogen sind.
Verringern des Beinabstandesum den Beinabstand zu verringern und damit die Klemm-kraft der schulterstütze zu erhöhen, lösen sie die torx-schrauben des schulterseitigen gelenks. Kippen sie den gelenkkonus nach innen und ziehen sie dann die gelöste schraube wieder fest (siehe abbildung 5).
um das brustseitige gelenkbein entsprechend zu ver-ändern, lösen sie die torx-Flanschschraube und drehen die gelenkbasis nach innen. ziehen sie die torx-Flansch-schraube wieder fest und verfahren sie wie beim ersten gelenkkonus, um den gelenkwinkel nach innen zu kippen (siehe abbildung 6).
5
4
6
26 DE DE 27
gEBrauchsanWEisung
Verbreitern des BeinabstandesWenn sie den gelenkkonus der schulterseite geradestel-len, indem sie es nach außen kippen, wird dies den Beinab-stand verbreitern und eine geringere Klemmkraft bewirken (siehe abbildung 5). um den gelenkkonus einzustellen, lösen sie die torx-schraube so weit, bis sich das gelenk bewegen lässt. Bringen sie ihn in die gewünschte Position und ziehen sie die torx-schraube wieder fest.
Die anpassung des brustseitigen gelenkbeins ist ähnlich (siehe abbildung 6). um den Beinabstand zu verbreitern, lösen sie die torx-schraube etwas und drehen sie die gelenkbasis nach außen. nachdem sie die torx-Flansch-schraube festgezogen haben, lösen sie die gelenkschrau-be und kippen den Konus nach außen. Die stellschrauben sollten nun parallel zueinander stehen. Kontrollieren sie abschließend, dass alle schrauben wieder festgezogen sind.
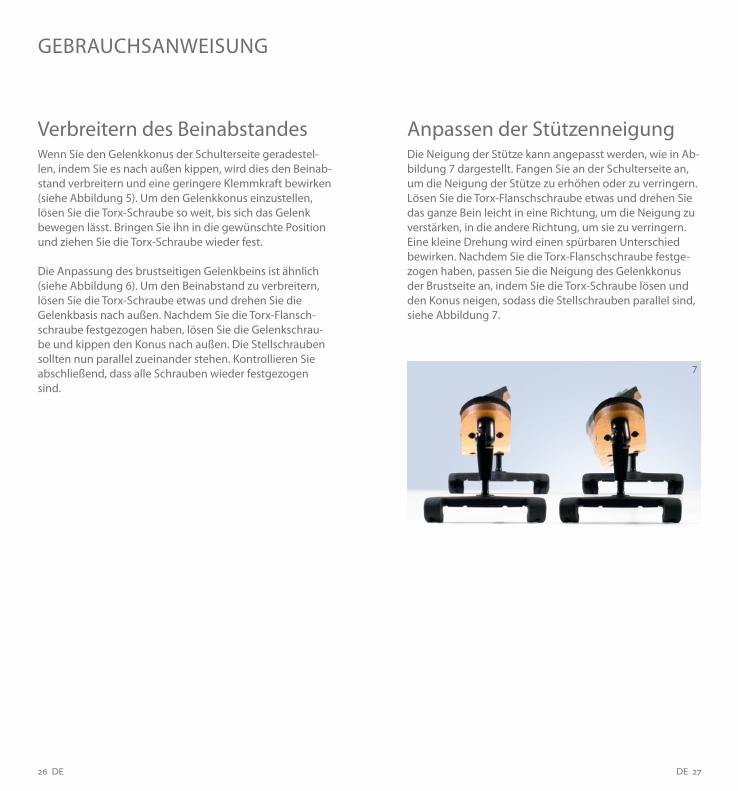
anpassen der stützenneigungDie neigung der stütze kann angepasst werden, wie in ab-bildung 7 dargestellt. Fangen sie an der schulterseite an, um die neigung der stütze zu erhöhen oder zu verringern. lösen sie die torx-Flanschschraube etwas und drehen sie das ganze Bein leicht in eine richtung, um die neigung zu verstärken, in die andere richtung, um sie zu verringern. Eine kleine Drehung wird einen spürbaren unterschied bewirken. nachdem sie die torx-Flanschschraube festge-zogen haben, passen sie die neigung des gelenkkonus der Brustseite an, indem sie die torx-schraube lösen und den Konus neigen, sodass die stellschrauben parallel sind, siehe abbildung 7.
7

gEBrauchsanWEisung
28 DE DE 29
härten des holzesim biegbaren zustand sitzt die Pirastro Korfkerrest sicher auf ihrem instrument mit minimaler auswirkung auf den Klang. solange das holz noch biegbar ist, kann jedoch die stütze eventuell bei der Benutzung verrutschen oder sich zum teil auch während des spiels verbiegen. Dies kann durch härtung der stütze verhindert werden, wo-durch die Klemmkraft und stabilität der stütze optimiert wird. Bitte beachten Sie, dass dieser Vorgang nicht rück-gängig gemacht werden kann. härten sie daher das holz erst, nachdem sie die stütze eine Weile getestet haben. Bei der Wahl der endgültigen Biegung beachten sie bitte, dass das anbringen am instrument die vorhandene Biegung leicht verstärken wird.
härten im BackofenDas härten der stütze im Backofen erzielt eine optimale und beständige Festigkeit. Erhitzen Sie die Stütze nicht über 200° C oder länger als angegeben, da sonst das Holz verbrennen kann. Die temperaturkontrolle ist bei herkömmlichen Öfen nicht immer zuverlässig, daher ist es ratsam ein ofenthermome-ter zu verwenden, um die genaue temperatur bestimmen und gegebenenfalls anzupassen zu können. halten sie sich genau an die folgenden schritte:
schritt 1Bevor sie die stütze härten, merken sie sich die genaue Position der Beine, so dass sie diese nach dem härten wieder leicht einstellen können. Machen sie bei Bedarf ein Foto. Entfernen sie die Beine, torx-schrauben und sand-papierscheiben und ziehen sie die gummipads ab. legen sie die stütze seitlich auf ein Blatt Papier und fahren sie die Krümmung mit einem Bleistift nach. Diese zeichnung benötigen sie während des härtungsvorgangs. Betrachten sie die stütze auch von der Brustseite und merken sie sich den grad der Verwindung.
schritt 2heizen sie den Backofen auf 200° C vor und legen sie den hölzernen teil der stütze für 1 Minute auf die seite in der Mitte des ofens. legen sie das holz direkt auf einen gitterrost. Benutzen sie kein Backblech, da dies das holz beschädigt.
schritt 3Entfernen sie die stütze mit einem Kochhandschuh und vergleichen sie die Biegung mit der linie, die sie aufge-zeichnet haben. Manchmal muss hier die schulterbiegung und Krümmung noch leicht nachgebessert werden. solange das holz warm ist, können sie das holz vorsichtig biegen, bis es der linie entspricht. Beachten sie bitte, dass das anbringen am instrument die vorhandene Biegung leicht verstärken wird.
schritt 4Wenn sie mit der Form zufrieden sind, legen sie die stütze für weitere 3 Minuten bei 200° C in den Backofen, um den härtungsprozess abzuschließen. Entfernen sie das holz mit einem Kochhandschuh und lassen es abkühlen. Versuchen sie nun nicht mehr das holz zu biegen, da es sonst bricht. Die stütze kann jetzt wieder zusammengebaut werden. nachdem das holz gehärtet wurde, können die gummi-pads wieder angebracht werden. allerdings kann es sein, dass diese nicht mehr so gut haften wie zuvor. Wenn nach einem tag ihre haftkraft nicht wieder zugenommen hat, ersetzen sie sie durch die mitgelieferten gummipads. Es ist normal, dass die stütze bei der härtung etwas nachdun-kelt.

gEBrauchsanWEisung
30 DE DE 31
und stellen sie diese für 1 Minute auf 450 Watt. Entfernen sie das holz mit einem Kochhandschuh und lassen sie es abkühlen. Versuchen sie nun nicht mehr das holz zu biegen, da es sonst bricht. Die stütze kann jetzt wieder zusammengebaut werden. nachdem das holz gehärtet wurde, können die gummi-pads wieder angebracht werden. allerdings kann es sein, dass diese nicht mehr so gut haften wie zuvor. Wenn nach einem tag ihre haftkraft nicht wieder zunimmt, ersetzen sie sie durch die mitgelieferten gummipads.
Falls nach abschluss dieses Vorgangs eine maximale und dauerhaftere Festigkeit des holzes erreicht werden soll, entfernen sie die Beine, torx-schrauben und sandpapier-scheiben und ziehen die gummipads ab. lesen sie genau die hinweise zum »härten im Backofen« und führen sie nur schritt 4 durch, für eine maximale Dauer von 3 Minuten bei 200° C.
BittE BEachtEn siE:Bei einigen Mikrowellen wird die leistung in Prozent oder stufen angegeben. in diesen Fällen richten sie sich nach der jeweiligen gebrauchsanweisung, um der benötigten leistung von 450 Watt möglichst nahe zu kommen. im zweifel wählen sie eine niedrigere Einstellung.Die genauigkeit der leistungsangaben von Mikrowellen können schwanken, daher übernimmt Pirastro keine haftung für etwaige, hiermit in Verbindung stehende schäden.
austausch der gummipadsWenn ein gummipad abgenutzt ist, kann dieses durch an-heben an der spitze des Pads abgezogen werden. ziehen sie die Folie von einem der mitgelieferten Ersatzpads ab und richten sie das runde loch genau um die torx-Flansch-schraube aus. Dann richten sie die augen des gummipads mit denen im holz aus. Dazu müssen sie eventuell das Pad leicht auseinanderziehen oder zusammendrücken, je nachdem wie stark die stütze gebogen ist. Vor Benutzung drücken sie das Pad fest auf das holz, beginnend an den außenrändern.
härten in der MikrowelleEs ist möglich, die stütze in der Mikrowelle zu härten, aber diese art der härtung ist möglicherweise weniger dauerhaft als mit einem herkömmlichen Backofen. Achten Sie darauf, dass die Energiezufuhr maximal 450 Watt beträgt, die Dauer von einer Minute nicht überschritten wird und Ihre Mikrowelle über einen Drehteller verfügt, da sonst das Holz verbrennt. halten sie sich genau an die folgenden schritte:
schritt 1Bevor sie die stütze härten, merken sie sich die genaue Position der Beine, sodass sie diese nach dem härten wieder leicht einstellen können. Machen sie bei Bedarf ein Foto. Entfernen sie die Beine, torx-schrauben und sand-papierscheiben und ziehen sie die gummipads ab. legen sie die stütze seitlich auf ein Blatt Papier und fahren sie die Krümmung mit einem Bleistift nach. Diese zeichnung benötigen sie während des härtungsvorgangs. Betrachten sie die stütze auch von der Brustseite und merken sie sich den grad der Verwindung.
schritt 2legen sie nur den hölzernen teil der stütze auf der seite mit der gravur nach oben liegend in die Mikrowelle 2-3 cm aus der Mitte der Drehplatte. lassen sie die stütze für 1 Minute bei 450 Watt in der Mikrowelle.
schritt 3Entfernen sie die stütze mit einem Kochhandschuh und vergleichen sie die Biegung mit der aufgezeichneten linie. Manchmal muss hier die schulterbiegung und Krümmung noch leicht nachgebessert werden. solange das holz warm ist, können sie das holz vorsichtig biegen, bis es der linie entspricht. Beachten sie bitte, dass das anbringen am inst-rument die vorhandene Biegung leicht verstärken wird.
schritt 4legen sie die stütze wieder in die Mikrowelle wie in schritt 2 beschrieben, aber mit der gravur nach unten zeigend,

notEs/notizEn

Pirastro gmbh
senefelderstrasse 8063069 offenbach am Main/germany
www.pirastro.com www.Korfkercradle.com