the zibby garnett travel fellowship report by kiri douglas
TRANSCRIPT

THE ZIBBY GARNETT TRAVEL FELLOWSHIP
Report by Kiri Douglas
Conservation of Historic Objects at
Auschwitz-Birkenau State Museum and Memorial
May to June 2016

2
Table of Contents
Introduction 3
Study Trip 4
Conservation Projects 7
Suitcases 7
Letters & Building Plans
13
Other Experiences 19
Leisure 20
Conclusion 26

3
Introduction
My name is Kiri Douglas, I am a 20-year-old Welsh student, currently studying BA
(Hons) Conservation and Restoration at the University of Lincoln, UK. As part of
my final year for the degree, I needed a work placement and decided to arrange a 3-
month placement at Auschwitz-Birkenau State Museum and Memorial at Oswiecim,
Poland. I felt this would provide me a unique perspective on conservation, where I
would be able to not only learn practical conservation techniques, but how to
overcome ethical challenges that can arise with objects we conserve, the difficulties
of exhibiting mass objects and the compromise between keeping the authenticity but
accessibility of a museum which is based at an historic setting. As I was unsure of
what material I would like to specialise and develop my career in, I felt this would
provide me with an opportunity to work on a variety of materials and also gain an
understanding in the operation of a museum, having only experience before in a
private sector.
It was my University that brought the Zibby Garnett Travel Fellowship to my
attention and I was extremely fortunate to be awarded £500 towards my trip, which
along with my student loan, savings and various odd-jobs, paid for my entire
placement. This money was put towards the cost of the accommodation which came
to £850, whilst my flights cost £155. Living expenses in Poland was very cheap,
especially compared to the UK.

4
Study Trip
Oswieҫim is a small town in southern Poland translated to Auschwitz in German
(figure 1) and it was specifically chosen for the concentration camp as the Nazi’s
expanded on the former polish military base to be more efficient, known as
Auschwitz I, it covers 40 square kilometres. In 1942, Auschwitz II (Auschwitz
Birkenau) the extermination camp was opened a few miles away.
The conservation laboratories were based in the former polish military base, which
was the largest building at Auschwitz I, outside the barbed fencing. This also housed
the Masterplan for Conservation and Construction departments, visitor’s entrance,
ticket office and café.
Figure 1. Map of Poland, showing Auschwitz which is approx. 1-
hour West of Krakow.
5
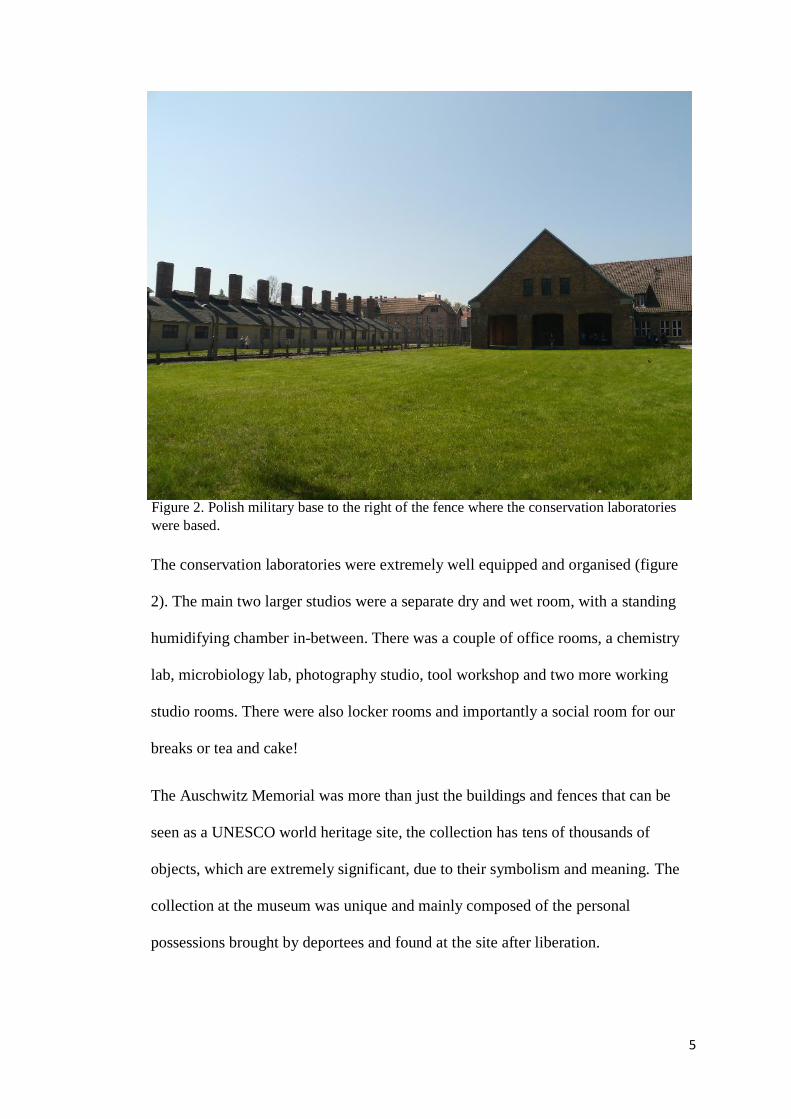
The conservation laboratories were extremely well equipped and organised (figure
2). The main two larger studios were a separate dry and wet room, with a standing
humidifying chamber in-between. There was a couple of office rooms, a chemistry
lab, microbiology lab, photography studio, tool workshop and two more working
studio rooms. There were also locker rooms and importantly a social room for our
breaks or tea and cake!
The Auschwitz Memorial was more than just the buildings and fences that can be
seen as a UNESCO world heritage site, the collection has tens of thousands of
objects, which are extremely significant, due to their symbolism and meaning. The
collection at the museum was unique and mainly composed of the personal
possessions brought by deportees and found at the site after liberation.
Figure 2. Polish military base to the right of the fence where the conservation laboratories
were based.

6
The collection consisted of many mass objects, from around 110 thousand shoes,
3,800 suitcases, over 12 thousand kitchen utensils, 470 prostheses and orthoses, 387
striped camp garments, 246 tallisim and about 4,500 works of art. These objects
were testimonies to the conditions and the life of the prisoners behind the barbed
wire of Auschwitz. The Museum collections also included objects associated with
the SS garrison, the perpetrators of the crime.
The staff members were extremely welcoming with the department having a friendly
and sociable atmosphere. As a volunteer I started work from 8am in the morning
although staff usually arrived at 7am, with some starting as early as 6am, especially
if they were working outside at Birkenau, where there is no shade from the sun
where the temperature can easily reach 30°C during the summer months. A 30-
minute break for breakfast and then lunch was given, before the work day ended at 3
in the afternoon. There were around 17 staff members, with many different
specialisms, therefore there was plenty to learn outside my own projects, with
everyone discussing their work to further my understanding and the thought process
and decision-making behind working with such unique museum objects.

7
Conservation Projects
Suitcases
My first and last projects were both suitcases. The first was a cardboard suitcase that
was lined in a decorative purple paper (figure 3), whilst the second was lined with
textile and trimmed with leather (figure 4).
The Jews transported to Auschwitz were allowed to take 10-50kg of luggage,
however after their arrival, their possessions were confiscated in accordance with
Figure 4. Base of suitcase lined with green textile.
Figure 3. Cardboard suitcase lined with geometric pattern
paper.

8
Nazi legislation, directed by the SS Economic and Administrative Central Office, to
become Nazi state property. The Jews’ possessions were left on the ramp of the train
carriages as they were quickly rushed through the selection process. Once complete a
work group of prisoners would collect the victim’s belongings to take them to the
‘Kanada’ warehouse. The suitcases were torn apart as they were searched for hidden
valuables, and then sorted according to their quality and subsequent destination. The
prisoners saw the country Canada as a symbol of wealth and therefore gave the
warehouse full of stolen property the ironic name ‘Kanada’ (German spelling). The
first six wooden warehouses - ‘Kanada I’ - were opened in 1942 on the German
Equipment Works (DAW) site, halfway between Auschwitz and Birkenau. A larger
camp – ‘Kanada II’ - of around thirty wooden barracks was opened in December
1943 between the Crematorium IV and sector BIIg (figure 5).
Figure 5. Map of Auschwitz II (Birkenau). Remember.org©

9
Treatment proposal
The methodology behind the treatment proposal was based on the museums mission
to preserve the history reflected by the objects associated with the Auschwitz-
Birkenau Concentration Camp and World War II. The conservation treatment aimed
to prevent as much further deterioration of the objects as possible, whilst still
preserving their authenticity. Many of the deteriorations were caused during the
functioning of the camp and were therefore important testaments that had to be kept,
limiting applicable conservation treatments. Any active deteriorations were
stabilized, as this damage could have expedited without intervention, and previous
conservation treatments removed, as they had aged, causing more harm than
protection.
To begin, appropriate documentation and analysis was conducted, including a
photographic and descriptive record. The suitcase was then dry cleaned using a brush
and vacuum to remove any loose debris and a wishab rubber for the more ingrained
surface dirt. The Poly(Vinyl) Alcohol was removed, using hot water to swell and
partially dissolve the solution, with a local blotter then applied to remove the coating
by capillary action (figure 6). This compress technique was the most sensitive
method possible, due to the fragility of the paper, especially once damp, however
repeated application was necessary. This removed the staining and discolouring
caused by the coatings (figure 7), leaving a much lighter surface, however kept the
dust and old debris, which conveyed its time kept outside in the warehouses (figure
8).

10
The acrylic resin was removed next from the metal components and the surrounding
area with the solvent Shellsol A and cottons swabs. The solvent was effective in the
removal of polymer coatings as it contains a fraction of petroleum and was therefore
a mixture of aliphatic and aromatic hydrocarbons. With a slow evaporation time it
caused the resin to react and swell enough for the remaining thicker coats to be
mechanically removed with a scalpel.
Figure 6. Removal of old PVAL coating with local blotter.
Figure 7. Close up of PVAL stains. Figure 8. Paper lining brighter on the proper right
after PVAL removed.
11
Cottons swabs of Shellsol A were also utilised for the removal of corrosion products
from the metal elements such as the hinges and locks. This helped to soften the
corrosion before hard grade erasers and a scalpel was used. Once these elements
were cleaned, a new protective coating of 1% Trisodium phosphate in the
microcrystalline wax solution AGS 3502 could be applied with a brush. This
corrosion inhibitor worked by creating an insoluble crystal layer as a barrier. This
insoluble tertiary iron phosphate was produced through iron dissolution, as the
Trisodium phosphate caused a decrease in the production of phosphoric acid. This
difference in pH caused a change in the position of equilibrium and therefore the
deposition of the desired compound iron phosphate. The microcrystalline wax
protected against airborne pollution and moisture.
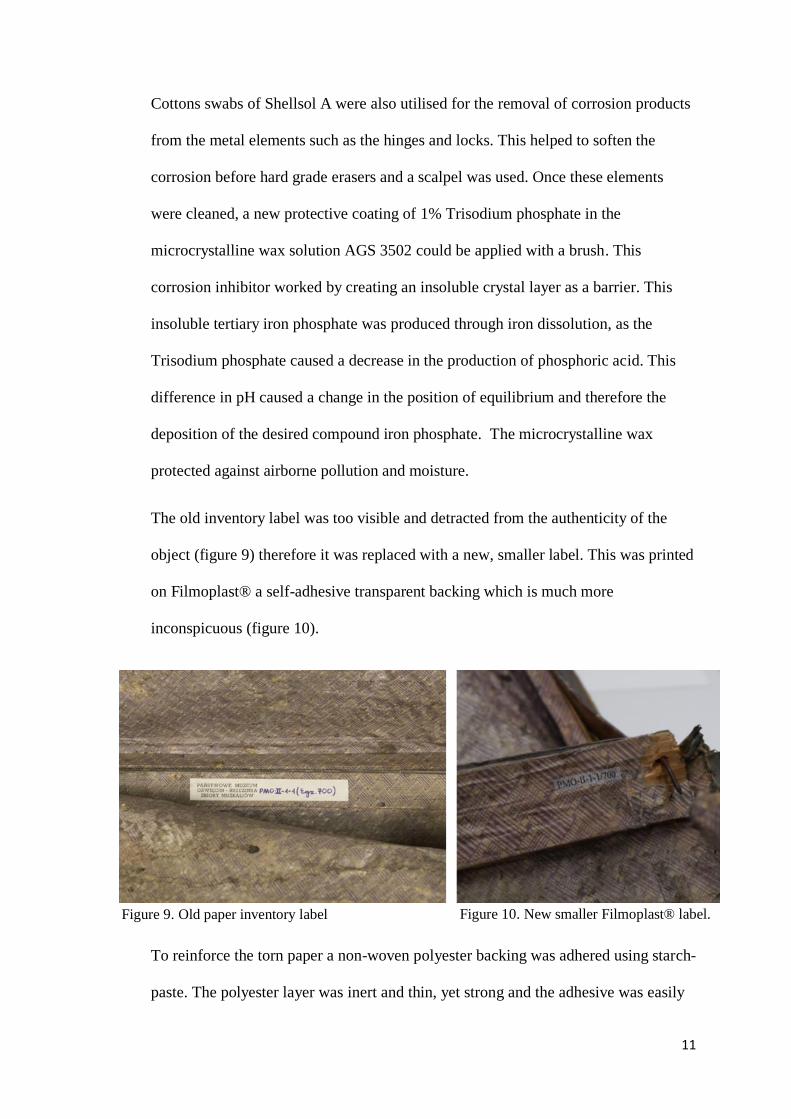
The old inventory label was too visible and detracted from the authenticity of the
object (figure 9) therefore it was replaced with a new, smaller label. This was printed
on Filmoplast® a self-adhesive transparent backing which is much more
inconspicuous (figure 10).
To reinforce the torn paper a non-woven polyester backing was adhered using starch-
paste. The polyester layer was inert and thin, yet strong and the adhesive was easily
Figure 9. Old paper inventory label Figure 10. New smaller Filmoplast® label.

12
reversible, being water-soluble. The label was mechanically removed with a scalpel
with the remaining adhesive removed with cotton swabs of ethyl acetate.
The pH of the paper was analysed and a high acidic content was identified. The
decision was therefore made to de-acidify the paper using Bookkeeper®
Deacidification Spray (magnesium oxide in a non-reactive carrier with a surfactant).
This method worked through the carrier evaporating to leave magnesium oxide
(MgO) particles, which reacted with water to form magnesium hydroxide (MgOH2)
a de-acidificant. This then reacted with acids in the paper to form magnesium salts,
increasing the pH to 6-7.
The exterior of the textile suitcase held a number of labels, some of which legible,
which gave us an insight to the history of the suitcase before the functioning of the
camp. The label on the proper left of the front handle read: ‘CSD… Ze Žatce’ (figure
11). It is likely that CSD stood for Czechoslovak State Railways (in Czech:
Československé státní dráhy, ČSD) which was established in 1918 until the
dissolution of Czechoslovakia at the end of 1992. There was a break in the company
between 1939 -1945 as the independent Czech-Moravian Railways (CMD) existed in
the Czech territory, and Slovakian Railways (SZ) in the Slovak territory, therefore
we can tell this label was from before 1939. ‘Ze Žatce’ can translate from Slovak and
Czech to English as ‘From Zatec’ which is a town in the Czech Republic.

13
On the proper right hand side of the suitcase there was a label that read: ‘Rýchlikom’
(figure 12) which translated from Slovak as ‘express train’. The suitcase also had
‘SV’ handwritten in blue ink on the inside base, which we could deduce with the
information from the labels was short for ‘Slovakia’.
There were fragments from three other labels, however these couldn’t be interpreted.
Nevertheless, all this information, however small was extremely significant as it
gave us an insight to the owner of the suitcase whose identity was taken away as a
prisoner of the camp.
Figure 11. Label from front of textile.
suitcase.
Figure 12. Label from the proper right side of textile suitcase.

14
Letters and Building Plans
My next project was helping to conserve a couple of volumes of correspondence
from the prisoners and their family and a couple of building plans of the camp. The
collection of camp correspondence were a mixture of special postcard and letter
forms (figure 13) that the prisoners purchased at the camp commissary. Since the
correspondence was censored by the camp administration, this possibility was
reserved for only German prisoners, with Soviet POWs and Jewish prisoners being
denied the chance. The Archives only hold a small part of these original documents
as the Nazis hurriedly tried to destroy as much records from the camp offices as
possible to remove evidence of the crimes committed in the camp. Many of the
letters were found onsite once the camp was liberated, whilst others have been
donated by the prisoner’s families.
Figure 13 Different formats of censorship in letters, and an example of a postcard and an envelope which
include instructions on how the families could reply.

15
There were a few different formats of the letters, with the earliest having a separate
envelope (figure 14) whilst the later letters would fold into one (figure 15).
There were thousands of letters in the collection held at the Archives therefore they
were worked on by volumes, which contained around 50-80 letters. During my stay I
helped conserve Volume 4 and 5.
The letters were first dry cleaned using Faber Castell eraser pencils, being careful to
go around the writing which in many of the letters were in pencil or copy pencil.
There was also a harder and softer eraser, therefore this was changed depending on
Figure 14. The earlier letter format with a separate envelope.
Figure 15. Later letter format which folded in the envelop, the
creases of which can be seen.

16
how open the surface of the letter was. If the letter was written in ink, to speed up the
process a wishab sponge was used.
Next the tears and losses were conserved using Japanese tissue and starch paste, as I
had not worked with paper before I was taught how to make the adhesive, shown
different papers they had at the department and how to cut the tissue to produce a
fibrous edge which helped to conceal it once applied. The adhesive was dried
quickly with a heated spatula at 100°C (figure 16 & 17), as this ensured the adhesive,
didn’t stain the paper. The department also had the equipment to produce their own
paper to the colour, thickness, and strength desired when this was needed.
Some of the letters which had major tears, or had been separated into pieces, had
been fixed by their owners with tape. The conservation department work to conserve
the objects to reflect the time of the camp, therefore if the tapes were of this time,
they were kept, which was usually found if there were many cuts due to the
censorship. However, if the tape was a later addition it was removed, which I found
extremely tricky to accomplish!
Figure 16 & 17. Mending the tears in the letters with starch paste and a heated
spatula.

17
Depending on the type of tape it could be mechanically removed with a small
spatula, however if it was of a textile variety a preservation pencil was used (figure
18) or a small paint brush with water, to dissolve the adhesive. This procedure was
undertaken very slowly and carefully to ensure there was no water stains produced, if
the adhesive was not water soluble, depending if there was ink on the letter, a water
bath was utilised, most commonly with ethyl acetate. This was also used at times to
remove stains produced from the tapes, however many of the letters were unable to
be bathed due to being stamped with ink. In this instance to help remove stains a
blotting technique was used with a suction table and a preservation pencil. This
worked as the steam lifted the stain out of the fibres and the suction table pulled it on
to the blotting paper. Again, this needed to be carried out carefully to avoid any
water stains. Layers of paper and plastic were placed over the letter to evenly
distribute the pressure, with a few layers of blotting paper used between the table and
letter to avoid any indents.
Figure 18. Tape stains being removed with a preservation pencil and suction table.

18
Removing the tapes gave me a valuable lesson on when to stop treatment. Although
not all the stains were removed (figure 19 & 20), it was a huge improvement, and
with the number of letters left to conserve, only so much time could be allocated to
the letters’ treatment. Also the longer we worked, the greater the risk of new stains
being caused with the preservation pencil.
The letters were then left in a large humidifying room (figure 21) for a full day
before being removed and layered between cardboards to be pressed for a few
weeks. The envelopes needed further layers of soft foam or felt to ensure the back of
the envelop didn’t cause an indent on the front.
Figure 19. Tape stain before conservation. Figure 20. Tape stain after conservation.
Figure 21. Humidifying chamber. Tissue is placed around the
racks to ensure the letters are not blown onto the floor.

19
To finish the treatment, the pH of the letters was analysed using a pH surface meter
and the letters had a high acidic content. The decision was therefore made to de-
acidify the papers using Bookkeeper® Deacidification Spray (figure 22)
I also worked on two building plans, which followed a similar treatment to the letters
(figure 23), however there were more creases which needed to be smoothed with a
boning tool before they were pressed. Some of the plans were also printed on much
thicker paper and were therefore humidified using a smaller humidifying chamber
above a sink, to give a more intense level of humidity.
Figure 23. Fixing tears in a building plan.
Figure 22. Applying bookkeeper® to a building plan.

20
Other Experiences
During my placement I was given a tour of the Collection Department which was
based in two of the barracks inside Auschwitz I next to the camp’s canteen. There
was a small store room inside the conservation department for the objects currently
being worked on, these were then swapped once finished with the help from the
collection team. During my visit I observed how the department had planned for an
emergency, with the closest shelves to the door, in the room closest to outside
labelled for removal in the event of a disaster, which held an example of all the
different objects they have. The collection department were also responsible for any
loans from the museum, such as to the Holocaust Memorial Museum, Washington,
DC and work with the conservation team to ensure the objects sent are suitable and
cared for correctly. I also managed to see how the running of a museum works, and
how the different departments work together for large events such as The World
Youth Days, where this year 155 thousand people, including the Pope visited the
museum. The collection department also worked with the conservation team during
the discovery of a lost archaeological collection and I saw how the museum prepared
and displayed the objects for the press release.
Leisure
As I had never before been to Poland, I tried to make the most out of my free time
and travel. I also tried Pierogi and Golabki (stuffed cabbage rolls) which are
common Polish dishes.
Krakow was the closest city to Oswiecim, being only an hour bus ride away I visited
a few times during my stay and it’s one of my favourite cities. The Wawel Royal

21
Castle was a great attraction that I visited with my family (figure 24), where I was
also fortunate to see Da Vinci’s Lady with an Ermine, which is surprisingly small!
I visited the Schindler’s Factory which was extremely interesting, the museum had
brilliant interactive and innovative exhibitions and displays. The Underground
Rynek museum was also clever in its design, being 4 meters under the famous
Market Square, the archaeological park shows the old medieval trade route through
Krakow. The city has wonderful architecture and the St Franciscan Church (figure
25) is beautiful with its Art Nouveau stained glass windows, it is a must see in the
city!
Figure 24. My Mum and I in Wawel Royal Castle.

22
Warsaw was a much more modern city, I left the train station to be met with the
Palace of Culture, which has become an iconic piece of architecture in the city. Here
I visited the Rising Museum, which was a brilliant tribute to the people who fought
and died for an independent Poland in 1944 during the Warsaw Uprising. I loved
visiting the rooftop gardens of the University of Warsaw’s Library and the Royal
Łazienki Gardens (figure 26) which spans nearly 80 hectares.
Figure 25. Inside the The Basilica of St. Francis of Assisi (St. Franciscan Church).
Figure 26. Royal Łazienki Palace and Gardens.

23
One week my sister came to visit me and we took a night bust from Krakow to
Budapest for the weekend which was an adventure in itself! We had brilliant weather
and visited many of the city sites (figure 27) including the Citadel, Parliament, Chain
Bridge, Shoes on the Danube memorial (commemorates the victims of the holocaust)
and Heroes’ Square. We also visited Margret Island for the day, which was fantastic,
with fountain shows to cool us down. We decided against the baths, with the weather
being the hottest we had felt at nearly 40°C. This way we had another reason to
return one day!
Figure 27. We had a wonderful morning visiting Fishermen’s Bastion
and Buda Castle.

24
Oswiecim every year holds the Life Festival which aimed to build peaceful relations
celebrating life, where there is no place for anti-Semitism, racism, and other forms of
xenophobia. I went to the festival with my sister (figure 28 & 29) where this year Sir
Elton John and Queen were the headliners, among other artists such as John
Newman and bands from the Baltic, Barcelona, Poland, Israel, and more. It was an
eclectic mix and one of my favourite experiences of the summer!
Figure 28. My sister and I at Life Festival. Figure 29. Waiting to watch Queen with Adam
Lambert play.

25
Conclusion
Overall I am very fortunate to have been given the opportunities and experiences I
have had this summer. Being able to immerse myself into a different culture and
seen the sights I have whilst traveling was wonderful and has improved my self-
confidence. I have learnt much more than I ever could have expected from my
placement at Auschwitz-Birkenau and I cannot thank the department enough for all
their help and warm welcome. The placement has also affected my personal outlook
and perspectives, where I now think twice before any judgements and making the
most of every opportunity.
At the beginning of my placement I had no idea if I wanted to specialise in
Conservation or where I would take my future career exactly however, I am now
excited to learn more about paper and archival material conservation. I am currently
researching into other possible internships and Master degrees to further my
understanding in that field of specialism. I am glad I have undertaken this placement
early on in my education as it has given me a such a variety of experiences and left
me eager to begin work in conservation. I would not have been able to gain all these
opportunities without the financial help from the Zibby Garnett Travel Fellowship.