theory and practice of pure tone audiometry - gateway · pdf filepure tone audiometry maggi...
TRANSCRIPT
OPEN ACCESS GUIDE TO AUDIOLOGY AND HEARING
AIDS FOR OTOLARYNGOLOGISTS
PURE TONE AUDIOMETRY Maggi Soer
Pure tone audiometry is generally the 1st
quantitative hearing test done to assess the
nature and degree of hearing loss in adults
and in children over about four years of
age to properly plan the most appropriate
interventions. Other tests include immit-
tance testing (testing middle ear function)
and speech audiometry.
Introduction to pure tone audiometry
Pure tone air conduction and bone conduc-
tion tests determine whether or not there is
any hearing loss; what type of hearing loss
it is; the frequencies that are affected
(configuration); and whether hearing loss
is unilateral or bilateral. Even though pure
tone audiometry is a useful measure of
basic hearing function, it does not indicate
how well speech is received or understood.
Pure tone audiometry indicates what hear-
ing thresholds (dB) are required to just be
able to perceive a tone at different
frequencies (Hz). A pure tone audiology
threshold at a specific frequency is the
decibel level at which a sound is perceived
50% of the time. The decibel scale used in
pure tone audiometry is dB Hearing Level
(dB HL). The dB HL intensity scale is
based on normal human hearing with 0 dB
HL representing the median threshold for
otologically normal young adults.
Pure tone testing is the measurement of an
individual’s hearing sensitivity to calibrate
pure tones at different frequencies. The
basic audiological assessment focuses on
pure tone air conduction thresholds in the
frequency range 0.25 - 8 KHz. The test is
conducted in a sound isolated environment.
Each ear is tested separately using various
transducers such as headphones, insert ear-
phones or bone conductors. As it is a
behavioural test, it is dependent on the
response from the individual being tested.
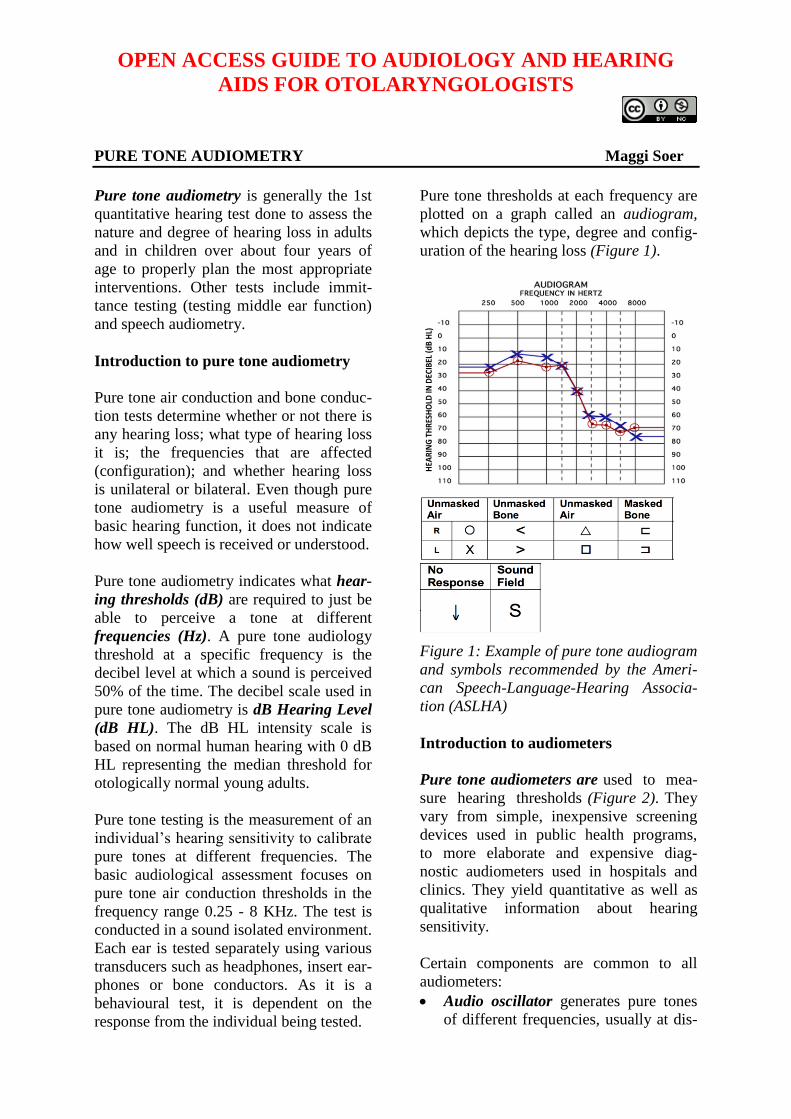
Pure tone thresholds at each frequency are
plotted on a graph called an audiogram,
which depicts the type, degree and config-
uration of the hearing loss (Figure 1).
Figure 1: Example of pure tone audiogram
and symbols recommended by the Ameri-
can Speech-Language-Hearing Associa-
tion (ASLHA)
Introduction to audiometers
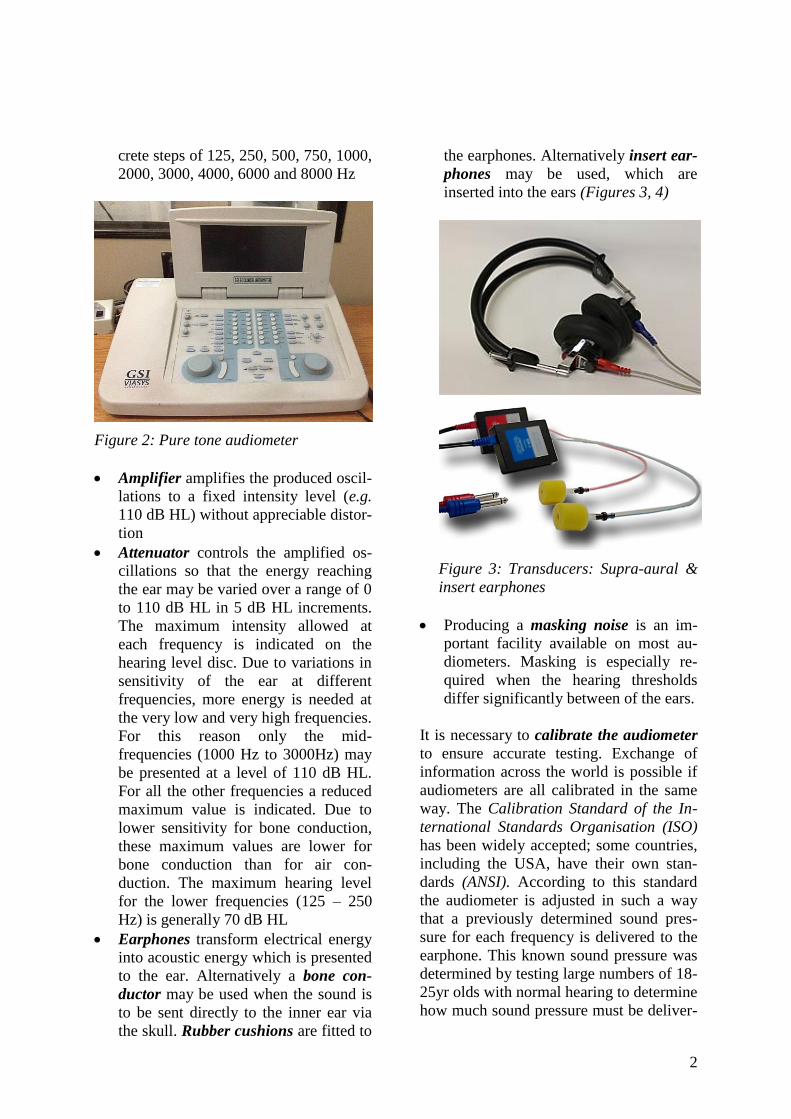
Pure tone audiometers are used to mea-
sure hearing thresholds (Figure 2). They
vary from simple, inexpensive screening
devices used in public health programs,
to more elaborate and expensive diag-
nostic audiometers used in hospitals and
clinics. They yield quantitative as well as
qualitative information about hearing
sensitivity.
Certain components are common to all
audiometers:
Audio oscillator generates pure tones
of different frequencies, usually at dis-
HEA
RINGTHRESHOLD
INDEC
IBEL(d
BHL)
2
crete steps of 125, 250, 500, 750, 1000,
2000, 3000, 4000, 6000 and 8000 Hz
Figure 2: Pure tone audiometer
Amplifier amplifies the produced oscil-
lations to a fixed intensity level (e.g.
110 dB HL) without appreciable distor-
tion
Attenuator controls the amplified os-
cillations so that the energy reaching
the ear may be varied over a range of 0
to 110 dB HL in 5 dB HL increments.
The maximum intensity allowed at
each frequency is indicated on the
hearing level disc. Due to variations in
sensitivity of the ear at different
frequencies, more energy is needed at
the very low and very high frequencies.
For this reason only the mid-
frequencies (1000 Hz to 3000Hz) may
be presented at a level of 110 dB HL.
For all the other frequencies a reduced
maximum value is indicated. Due to
lower sensitivity for bone conduction,
these maximum values are lower for
bone conduction than for air con-
duction. The maximum hearing level
for the lower frequencies (125 – 250
Hz) is generally 70 dB HL
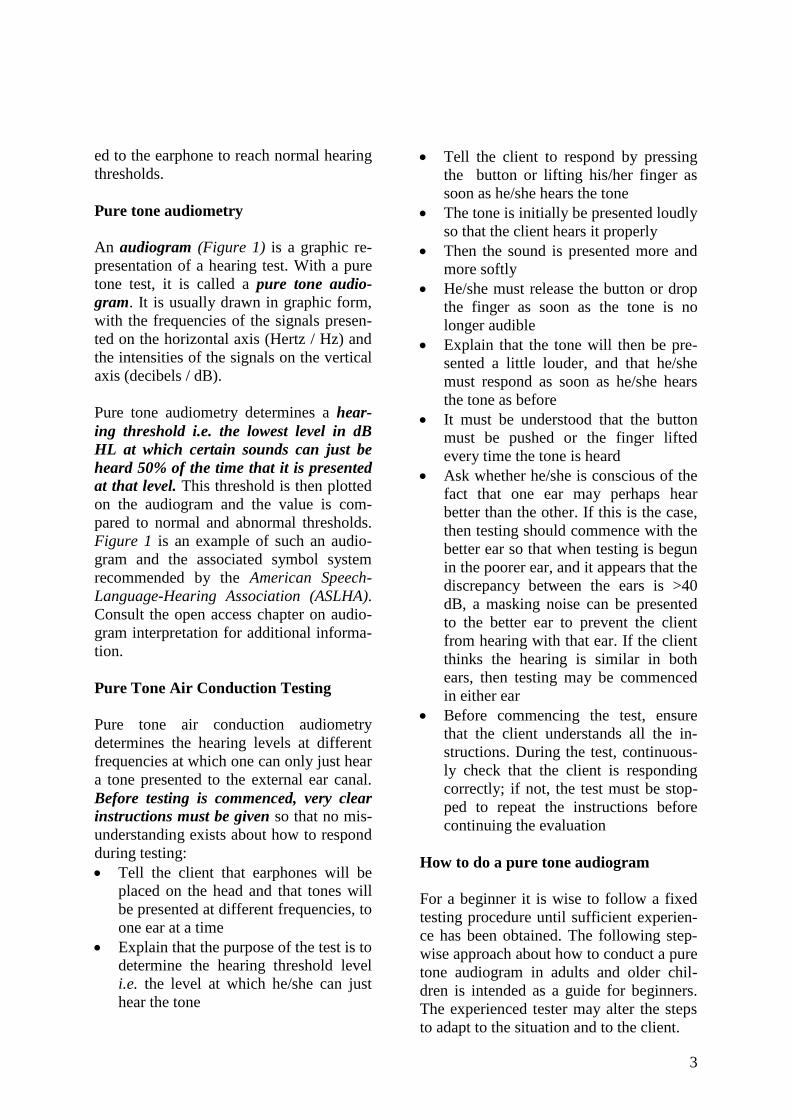
Earphones transform electrical energy
into acoustic energy which is presented
to the ear. Alternatively a bone con-
ductor may be used when the sound is
to be sent directly to the inner ear via
the skull. Rubber cushions are fitted to
the earphones. Alternatively insert ear-
phones may be used, which are
inserted into the ears (Figures 3, 4)
Figure 3: Transducers: Supra-aural &
insert earphones
Producing a masking noise is an im-
portant facility available on most au-
diometers. Masking is especially re-
quired when the hearing thresholds
differ significantly between of the ears.
It is necessary to calibrate the audiometer
to ensure accurate testing. Exchange of
information across the world is possible if
audiometers are all calibrated in the same
way. The Calibration Standard of the In-
ternational Standards Organisation (ISO)
has been widely accepted; some countries,
including the USA, have their own stan-
dards (ANSI). According to this standard
the audiometer is adjusted in such a way
that a previously determined sound pres-
sure for each frequency is delivered to the
earphone. This known sound pressure was
determined by testing large numbers of 18-
25yr olds with normal hearing to determine
how much sound pressure must be deliver-
3
ed to the earphone to reach normal hearing
thresholds.
Pure tone audiometry
An audiogram (Figure 1) is a graphic re-
presentation of a hearing test. With a pure
tone test, it is called a pure tone audio-
gram. It is usually drawn in graphic form,
with the frequencies of the signals presen-
ted on the horizontal axis (Hertz / Hz) and
the intensities of the signals on the vertical
axis (decibels / dB).
Pure tone audiometry determines a hear-
ing threshold i.e. the lowest level in dB
HL at which certain sounds can just be
heard 50% of the time that it is presented
at that level. This threshold is then plotted
on the audiogram and the value is com-
pared to normal and abnormal thresholds.
Figure 1 is an example of such an audio-
gram and the associated symbol system
recommended by the American Speech-
Language-Hearing Association (ASLHA).
Consult the open access chapter on audio-
gram interpretation for additional informa-
tion.
Pure Tone Air Conduction Testing
Pure tone air conduction audiometry
determines the hearing levels at different
frequencies at which one can only just hear
a tone presented to the external ear canal.
Before testing is commenced, very clear
instructions must be given so that no mis-
understanding exists about how to respond
during testing:
Tell the client that earphones will be
placed on the head and that tones will
be presented at different frequencies, to
one ear at a time
Explain that the purpose of the test is to
determine the hearing threshold level
i.e. the level at which he/she can just
hear the tone
Tell the client to respond by pressing
the button or lifting his/her finger as
soon as he/she hears the tone
The tone is initially be presented loudly
so that the client hears it properly
Then the sound is presented more and
more softly
He/she must release the button or drop
the finger as soon as the tone is no
longer audible
Explain that the tone will then be pre-
sented a little louder, and that he/she
must respond as soon as he/she hears
the tone as before
It must be understood that the button
must be pushed or the finger lifted
every time the tone is heard
Ask whether he/she is conscious of the
fact that one ear may perhaps hear
better than the other. If this is the case,
then testing should commence with the
better ear so that when testing is begun
in the poorer ear, and it appears that the
discrepancy between the ears is >40
dB, a masking noise can be presented
to the better ear to prevent the client
from hearing with that ear. If the client
thinks the hearing is similar in both
ears, then testing may be commenced
in either ear
Before commencing the test, ensure
that the client understands all the in-
structions. During the test, continuous-
ly check that the client is responding
correctly; if not, the test must be stop-
ped to repeat the instructions before
continuing the evaluation
How to do a pure tone audiogram
For a beginner it is wise to follow a fixed
testing procedure until sufficient experien-
ce has been obtained. The following step-
wise approach about how to conduct a pure
tone audiogram in adults and older chil-
dren is intended as a guide for beginners.
The experienced tester may alter the steps
to adapt to the situation and to the client.
4
Step 1: Connect the audiometer to the
power supply and switch it on. Ensure that
it is “live” by noting whether the power
light is on
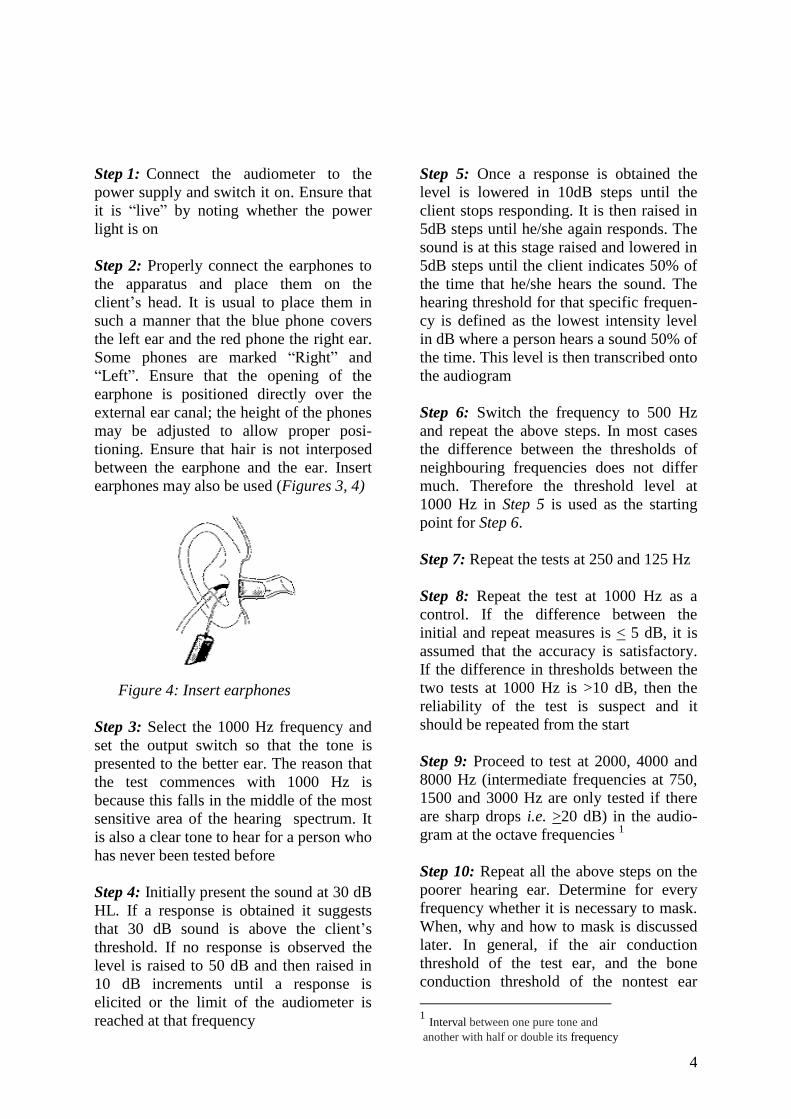
Step 2: Properly connect the earphones to
the apparatus and place them on the
client’s head. It is usual to place them in
such a manner that the blue phone covers
the left ear and the red phone the right ear.
Some phones are marked “Right” and
“Left”. Ensure that the opening of the
earphone is positioned directly over the
external ear canal; the height of the phones
may be adjusted to allow proper posi-
tioning. Ensure that hair is not interposed
between the earphone and the ear. Insert
earphones may also be used (Figures 3, 4)
Figure 4: Insert earphones
Step 3: Select the 1000 Hz frequency and
set the output switch so that the tone is
presented to the better ear. The reason that
the test commences with 1000 Hz is
because this falls in the middle of the most
sensitive area of the hearing spectrum. It
is also a clear tone to hear for a person who
has never been tested before
Step 4: Initially present the sound at 30 dB
HL. If a response is obtained it suggests
that 30 dB sound is above the client’s
threshold. If no response is observed the
level is raised to 50 dB and then raised in
10 dB increments until a response is
elicited or the limit of the audiometer is
reached at that frequency
Step 5: Once a response is obtained the
level is lowered in 10dB steps until the
client stops responding. It is then raised in
5dB steps until he/she again responds. The
sound is at this stage raised and lowered in
5dB steps until the client indicates 50% of
the time that he/she hears the sound. The
hearing threshold for that specific frequen-
cy is defined as the lowest intensity level
in dB where a person hears a sound 50% of
the time. This level is then transcribed onto
the audiogram
Step 6: Switch the frequency to 500 Hz
and repeat the above steps. In most cases
the difference between the thresholds of
neighbouring frequencies does not differ
much. Therefore the threshold level at
1000 Hz in Step 5 is used as the starting
point for Step 6.
Step 7: Repeat the tests at 250 and 125 Hz
Step 8: Repeat the test at 1000 Hz as a
control. If the difference between the
initial and repeat measures is < 5 dB, it is
assumed that the accuracy is satisfactory.
If the difference in thresholds between the
two tests at 1000 Hz is >10 dB, then the
reliability of the test is suspect and it
should be repeated from the start
Step 9: Proceed to test at 2000, 4000 and
8000 Hz (intermediate frequencies at 750,
1500 and 3000 Hz are only tested if there
are sharp drops i.e. >20 dB) in the audio-
gram at the octave frequencies 1
Step 10: Repeat all the above steps on the
poorer hearing ear. Determine for every
frequency whether it is necessary to mask.
When, why and how to mask is discussed
later. In general, if the air conduction
threshold of the test ear, and the bone
conduction threshold of the nontest ear
1 Interval between one pure tone and
another with half or double its frequency
5
differ by >40 dB, then the better ear must
be masked to ensure that only the
responses from the poorer ear are recorded.
The reason for this is that interaural
attenuation for air conduction is approxi-
mately 40 dB. In other words a sound
presented to the test ear must be 40 dB
louder than the bone conduction threshold
of the nontest ear before that ear hears the
sound
Step 11: Masking: A signal of significant
magnitude presented to one ear may be
perceived by the other ear. This is known
as crossover of the signal. Air conduction
and bone conduction audiometry are often
confounded by such crossover or contra-
lateralisation of the signal.
When crossover occurs one therefore
needs to isolate the ear you are trying to
test. Masking is the procedure whereby
noise is presented to the nontest ear (NTE)
to keep it occupied while the test ear is
being evaluated.
Masking concepts to remember:
Test ear (TE): Ear of which air or bone
conduction threshold is being measured
Nontest ear (NTE): Opposite or con-
tralateral ear
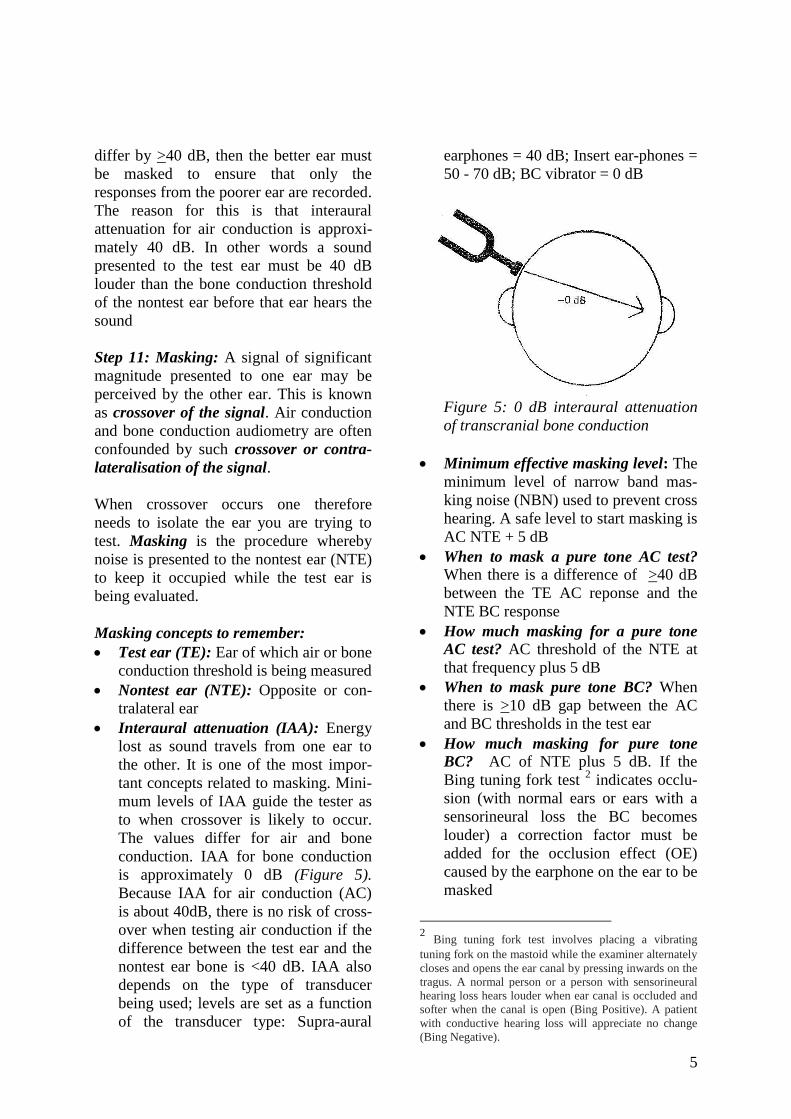
Interaural attenuation (IAA): Energy
lost as sound travels from one ear to
the other. It is one of the most impor-
tant concepts related to masking. Mini-
mum levels of IAA guide the tester as
to when crossover is likely to occur.
The values differ for air and bone
conduction. IAA for bone conduction
is approximately 0 dB (Figure 5).
Because IAA for air conduction (AC)
is about 40dB, there is no risk of cross-
over when testing air conduction if the
difference between the test ear and the
nontest ear bone is <40 dB. IAA also
depends on the type of transducer
being used; levels are set as a function
of the transducer type: Supra-aural
earphones = 40 dB; Insert ear-phones =
50 - 70 dB; BC vibrator = 0 dB
Figure 5: 0 dB interaural attenuation
of transcranial bone conduction
Minimum effective masking level: The
minimum level of narrow band mas-
king noise (NBN) used to prevent cross
hearing. A safe level to start masking is
AC NTE + 5 dB
When to mask a pure tone AC test?
When there is a difference of >40 dB
between the TE AC reponse and the
NTE BC response
How much masking for a pure tone
AC test? AC threshold of the NTE at
that frequency plus 5 dB
When to mask pure tone BC? When
there is >10 dB gap between the AC
and BC thresholds in the test ear
How much masking for pure tone
BC? AC of NTE plus 5 dB. If the
Bing tuning fork test 2 indicates occlu-
sion (with normal ears or ears with a
sensorineural loss the BC becomes
louder) a correction factor must be
added for the occlusion effect (OE)
caused by the earphone on the ear to be
masked
2 Bing tuning fork test involves placing a vibrating
tuning fork on the mastoid while the examiner alternately
closes and opens the ear canal by pressing inwards on the
tragus. A normal person or a person with sensorineural
hearing loss hears louder when ear canal is occluded and
softer when the canal is open (Bing Positive). A patient
with conductive hearing loss will appreciate no change
(Bing Negative).

6
o OE at 250 Hz + 20 dB
o OE at 500 Hz + 15 dB
o OE at 1000 Hz + 5 dB
The starting level in such cases is: AC
NTE + 5 dB + OE (only during BC
testing)
How to mask
Tell the client that he/she will hear a
"noise" in the NTE which he/she must
try to ignore
He/she must only react to the pure tone
("whistle" or "beep-beep")
Determine the initial masking level as
indicated above
Present the tone at the unmasked thres-
hold level
If there is a response, check the mas-
king level by raising the masking level
by 5 dB and again by 5 dB
If there is a response - stop! The thres-
hold is correct
If there is no response, raise the tone
by 5 dB steps until a response is elici-
ted
Check whether it is correct by raising
the masking level twice in 5 dB steps
Indicate the masked threshold on the
audiogram as well as the minimum and
maximum masking levels used
Step 12: The ideal masking noise for pure
tone testing is narrow band noise, concen-
trated on the test frequency. If this is not
available, wide band white noise may be
used for all frequencies.
Step 13: Remember to check, at every
frequency, whether it is necessary to
mask
Pure Tone Bone Conduction Test
The purpose of a bone conduction test is to
determine whether an abnormal air con-
duction test is due to conductive (middle
ear), or sensorineural (inner ear or audito-
ry nerve) pathology. Normal bone conduc-
tion with abnormal air conduction indica-
tes a middle ear pathology. When the
hearing threshold in both tests is more or
less equal, it is likely to be a sensorineural
problem.
Bone conduction audiometry is done with
an electromagnetic vibrator or bone con-
ductor which is placed on the mastoid bone
behind the ear and is held in place with a
headband (Figure 6).
Figure 6: Bone conductor vibrator
It must be pointed out to the patient that
he/she may hear the tone in the ear which
is not being tested, and that this should be
reported. Masking usually eliminates this
problem.
The following step-by-step procedure for
bone conduction testing is advised and is
similar to the procedure for testing air
conduction
Step 1: First test the ear with the better
bone conduction. This can be determined
by doing an audiometric Weber test (not
100% accurate....see chapter: Clinical
assessment of hearing with free field voice
testing and tuning forks). The Weber test
7
determines which ear's bone conduction is
the best by placing the bone conductor on
the forehead and determining in which ear
the client is able to hear the sound. Present
the sound at 250, 500, 1000, 2000 and
4000 Hz at 20 dB above the best air
conduction threshold for each frequency. If
the sound is heard centrally ("in the head
or middle") it means that the hearing in
both ears is equal and bone conduction can
be commenced in either ear.
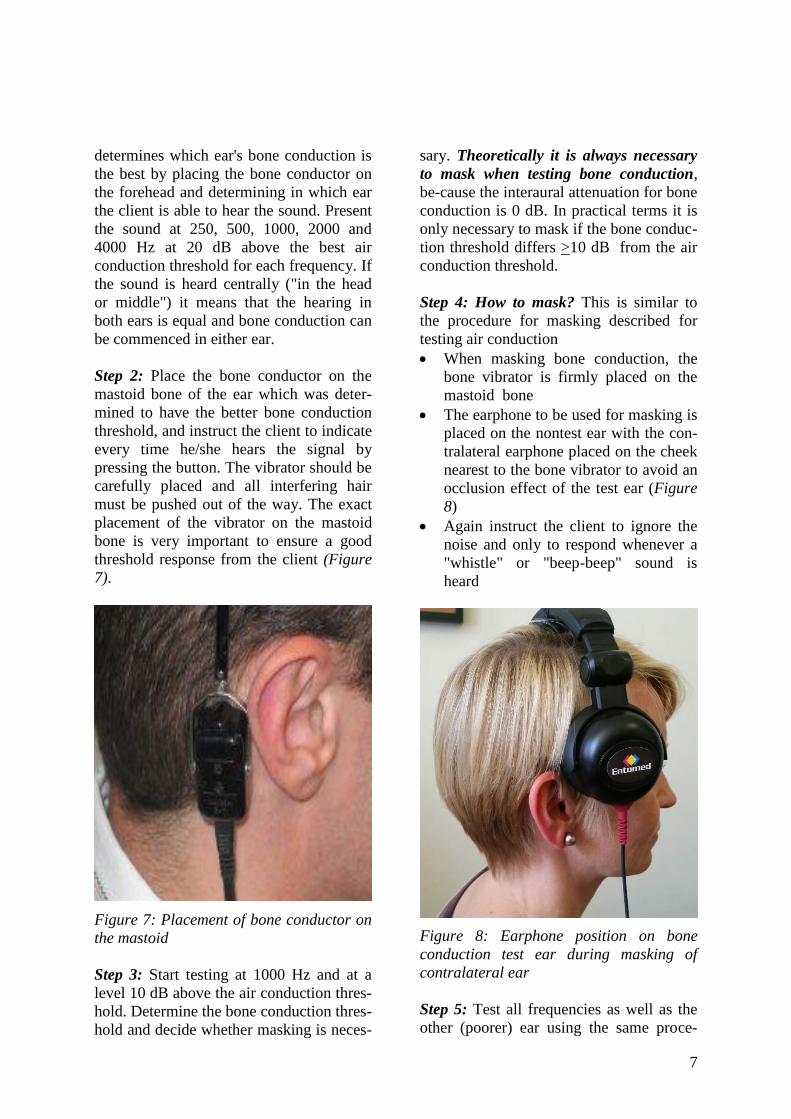
Step 2: Place the bone conductor on the
mastoid bone of the ear which was deter-
mined to have the better bone conduction
threshold, and instruct the client to indicate
every time he/she hears the signal by
pressing the button. The vibrator should be
carefully placed and all interfering hair
must be pushed out of the way. The exact
placement of the vibrator on the mastoid
bone is very important to ensure a good
threshold response from the client (Figure
7).
Figure 7: Placement of bone conductor on
the mastoid
Step 3: Start testing at 1000 Hz and at a
level 10 dB above the air conduction thres-
hold. Determine the bone conduction thres-
hold and decide whether masking is neces-
sary. Theoretically it is always necessary
to mask when testing bone conduction,
be-cause the interaural attenuation for bone
conduction is 0 dB. In practical terms it is
only necessary to mask if the bone conduc-
tion threshold differs >10 dB from the air
conduction threshold.
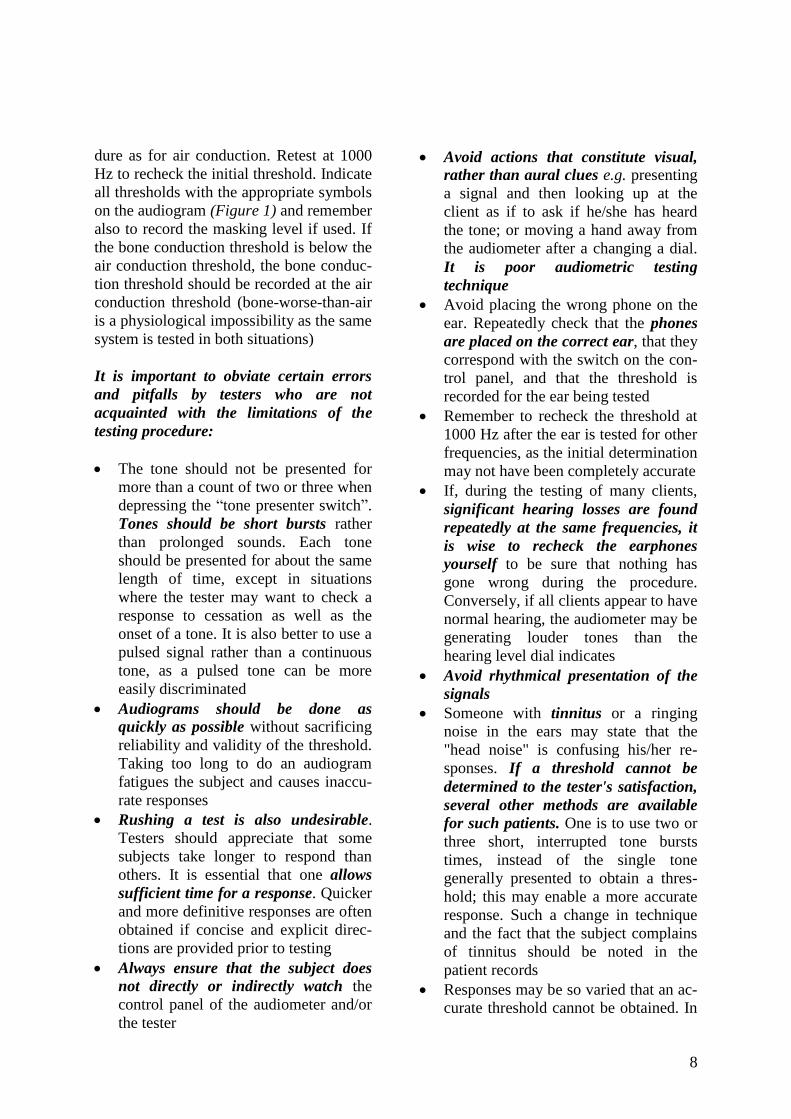
Step 4: How to mask? This is similar to
the procedure for masking described for
testing air conduction
When masking bone conduction, the
bone vibrator is firmly placed on the
mastoid bone
The earphone to be used for masking is
placed on the nontest ear with the con-
tralateral earphone placed on the cheek
nearest to the bone vibrator to avoid an
occlusion effect of the test ear (Figure
8)
Again instruct the client to ignore the
noise and only to respond whenever a
"whistle" or "beep-beep" sound is
heard
Figure 8: Earphone position on bone
conduction test ear during masking of
contralateral ear
Step 5: Test all frequencies as well as the
other (poorer) ear using the same proce-
8
dure as for air conduction. Retest at 1000
Hz to recheck the initial threshold. Indicate
all thresholds with the appropriate symbols
on the audiogram (Figure 1) and remember
also to record the masking level if used. If
the bone conduction threshold is below the
air conduction threshold, the bone conduc-
tion threshold should be recorded at the air
conduction threshold (bone-worse-than-air
is a physiological impossibility as the same
system is tested in both situations)
It is important to obviate certain errors
and pitfalls by testers who are not
acquainted with the limitations of the
testing procedure:
The tone should not be presented for
more than a count of two or three when
depressing the “tone presenter switch”.
Tones should be short bursts rather
than prolonged sounds. Each tone
should be presented for about the same
length of time, except in situations
where the tester may want to check a
response to cessation as well as the
onset of a tone. It is also better to use a
pulsed signal rather than a continuous
tone, as a pulsed tone can be more
easily discriminated
Audiograms should be done as
quickly as possible without sacrificing
reliability and validity of the threshold.
Taking too long to do an audiogram
fatigues the subject and causes inaccu-
rate responses
Rushing a test is also undesirable.
Testers should appreciate that some
subjects take longer to respond than
others. It is essential that one allows
sufficient time for a response. Quicker
and more definitive responses are often
obtained if concise and explicit direc-
tions are provided prior to testing
Always ensure that the subject does
not directly or indirectly watch the
control panel of the audiometer and/or
the tester
Avoid actions that constitute visual,
rather than aural clues e.g. presenting
a signal and then looking up at the
client as if to ask if he/she has heard
the tone; or moving a hand away from
the audiometer after a changing a dial.
It is poor audiometric testing
technique
Avoid placing the wrong phone on the
ear. Repeatedly check that the phones
are placed on the correct ear, that they
correspond with the switch on the con-
trol panel, and that the threshold is
recorded for the ear being tested
Remember to recheck the threshold at
1000 Hz after the ear is tested for other
frequencies, as the initial determination
may not have been completely accurate
If, during the testing of many clients,
significant hearing losses are found
repeatedly at the same frequencies, it
is wise to recheck the earphones
yourself to be sure that nothing has
gone wrong during the procedure.
Conversely, if all clients appear to have
normal hearing, the audiometer may be
generating louder tones than the
hearing level dial indicates
Avoid rhythmical presentation of the
signals
Someone with tinnitus or a ringing
noise in the ears may state that the
"head noise" is confusing his/her re-
sponses. If a threshold cannot be
determined to the tester's satisfaction,
several other methods are available
for such patients. One is to use two or
three short, interrupted tone bursts
times, instead of the single tone
generally presented to obtain a thres-
hold; this may enable a more accurate
response. Such a change in technique
and the fact that the subject complains
of tinnitus should be noted in the
patient records
Responses may be so varied that an ac-
curate threshold cannot be obtained. In
9
such cases the test should be termi-
nated and repeated on another day
Take particular care not to press the
tone presenter switch down too hard
or let it spring back too quickly as this
may cause a “click”, and a subjective
response to the “click” rather than to
the pure tones
Other Special Tests
Special tests are used to determine if path-
ology is located more centrally such as in
cochlea, auditory nerve, brainstem or cor-
tex. Detailed descriptions of these tests are
beyond the scope of this chapter. The most
important of these tests are:
Recruitment: This refers to a large in-
crease in perceived loudness of a signal
in response to relatively small in-
creases in intensity above threshold.
Such persons have a small dynamic
range and usually indicates cochlear
damage
Tone decay: This is a loss of audibility
of a sound when the ear is stimulated
by a continuous pure tone and is
usually associated with retrocochlear
pathology
Adaptation of Audiometric Techniques
to Special Populations
Nonorganic Hearing Loss population
Nonorganic hearing loss is also referred to
as pseudohypacusis. There are two main
types:
1. Psychogenic/hysterical deafness is a
nonorganic problem, and is a psycho-
logical rather than deliberately feigned
hearing loss
2. Malingering is deliberate falsification
of hearing loss
Signs might should alert one to pseudohy-
pacusis include the origin of the referral,
the history, behaviour during interviews,
and performance with routine hearing tests.
When someone is referred for financial
compensation, nonorganicity immediately
becomes a concern. Someone with non-
organic loss may describe all the expected
symptoms like vertigo, tinnitus etc. The
manner in which information is volun-
teered may also raise suspicion e.g. exag-
gerated postures, overreliance on lipread-
ing etc.
Geriatric population
Hearing function decreases with age and is
known as presbyacusis. It is typically bi-
lateral, symmetrical, high frequency senso-
rineural hearing loss of otherwise unex-
plained origin, occurring in an "older"
patient. When testing the elderly, certain
adaptations in technique should be con-
sidered:
Be patient, though firm and directive
during the interview
Phrase instructions simply and rephrase
if necessary
Elderly clients often tend to wait until
sounds are comfortably loud before re-
sponding. To get an accurate threshold
it is therefore necessary that they be
instructed to respond "even if the
sound is very faint and distant "
Make allowances for impaired motor
function e.g. difficulty pressing a small
button because of arthritis
A collapsed ear canal must be
identified and acted upon. A clue may
be inconsistent conductive hearing loss
as the earphones may collapse (flatten)
the ear canals
Establish direct visual contact if com-
munication via the earphones proves to
be difficult

10
The Audiometric Environment
Reliable test results require a noiseproof
environment and reliable equipment that is
in good working order.
Audiometric Booth
Audiometric testing is done in an audio-
metric booth that meets standards the ISO
standard ISO 8253-1:2010. Several good
booths are commercially available (Figure
9). Differences include positions of the
doors and viewports, and ventilation sys-
tems and sound reduction capabilities.
Figure 9: Typical audiometric booth
Booths should be noiseproof enough to
reduce ambient noise to acceptable
testing levels in accordance with ANSI
(1969) specifications
Windows and plugs for earphone jacks
must be located such that the audio-
meter can be placed and the tester can
be seated so as to see the client without
the client being able to see the
operation of the audiometer
The client should not be required to sit
in a closed booth for any longer than is
necessary because a risk of experien-
cing claustrophobia. Show the client
how to open the door from inside to
reduce apprehension
Give instructions to the seated subject
with the door wide open. Only when
the actually testing is the door to be
closed. If one needs to interrupt the test
to attend to an urgent matter, open the
door, remove the earphones, and invite
the client to leave the booth until the
test is recommenced
Practise the testing procedure until you
can do it accurately and confidently,
because the patient may become more
anxious in the closed booth if he/she
senses insecurity or hesitancy on the
part of the tester
Familiarise yourself with the attenua-
tion qualities of the booth as loud
sounds, talking, low flying aircraft or
street traffic outside the booth will
disturb the client. Rather stop the test
during such disturbances.
Daily Maintenance Checks
The following tests and inspection should
be conducted at the start of every day:
Check all control knobs on the
audiometer to ensure that they are
correctly fitted on their shafts
Check the calibration of the audiome-
ter by measuring the hearing threshold
at each test frequency of a person with
normal hearing and whose hearing
levels are known. Recalibrate the
audiometer if >10 dB variations occur
persistently from day-to-day in the
normal person’s hearing threshold at
any test frequency which cannot be
attributed to temporary threshold shifts
due to upper respiratory tract infection,
noise exposure, etc
Check the linearity of the hearing
level control by listening with the
earphones while slowly increasing the
hearing level from threshold with the
tone control set at 2000 Hz. Each 5 dB

11
step should produce a small, but
noticeable increase in level without
changes in tone quality or audible
extraneous noise
Test the operation of the presented
tone with dials set at 2000 Hz and 60
dB HL. Present the sound to a normal
hearing listener several times and listen
if audible noise, such as clicks or
scratches can be heard. No additional
noises nor changes in test tone quality
should be heard
Replace earphone cushions that are
not resilient or if there are cracks,
bubbles, or crevices
Straighten earphone cords to remove
kinks or knots and replace cords that
are worn or cracked
Test the earphone cords electrically by
listening with the earphones while
bending the cords along their lengths
with the dials set at 2000 Hz and 60 dB
HL. Any scratching noise, intermit-
tance, or change in test tone indicates a
need for new cords
Check for extraneous noises. No
noises should be heard while wearing
the earphones when the tone control is
switched to each test tone
Check the headband tension by obser-
ving the distance between the inner
sur-faces of the earphone cushions
when the headset is held in a free,
unmounted state. At the centre of its
adjustment range, the distance between
cushions should be 2 to 3 cm. The
headband may have to be bent to
achieve the correct setting
When it is noted that the audiograms
being obtained indicate a persistent,
unexplainable hearing loss at either
all or specific frequencies, stop testing
patients and test several ears known to
be normal, in order ensure that the
instrument is properly calibrated
Audiometers and earphones must be
calibrated every 12 months, or when-
ever equipment is moved. (ISO 8253-
1:2010 International Standards Orga-
nisation)
Audiometric inconsistencies
The above information is intended to mini-
mise problems that may arise during test-
ing that causes inconsistent audiometric
patterns. The most important of these
inconsistencies are:
Bone conduction thresholds lower than
AC thresholds
Poor test-retest consistency
Interview-test discrepancy
Such audiometric inconsistencies can be
attributed to various factors including
problems with the clinician, the client and
the equipment.
References
1. Gelfand SA Essentials of Audiology
(2009) 3rd
Ed. Thieme Medical
Publishers, Inc., New York
2. Kramer SJ. Audiology: science to
practice. (2008) Plural Publishing,
Inc., San Diego
3. Martin FN & Clark JG. Introduction
to Audiology. 9th
Ed. 2006. Pearson
Education Inc. Boston
4. Roeser RJ, Valente M. & Hosford-
Dunn H. Audiology Diagnosis. 2nd
Ed. 2007. Thieme: New York
5. Stach BA. Clinical Audiology: An
introduction. 2nd
Edition (2010)
Singular Publishing Group: USA
Author
Maggi Soer PhD
Department of Speech-Language Patholo-
gy and Audiology
University of Pretoria,
Pretoria, South Africa

12
Editors
De Wet Swanepoel PhD
Professor
Department of Speech-Language Patholo-
gy and Audiology
University of Pretoria
Pretoria, South Africa
Claude Laurent MD, PhD
Professor in ENT
ENT Unit
Department of Clinical Science
University of Umeå
Umeå, Sweden
Johan Fagan MBChB, FCORL, MMed
Professor and Chairman
Division of Otolaryngology
University of Cape Town
Cape Town, South Africa
OPEN ACCESS GUIDE TO
AUDIOLOGY & HEARING AIDS
FOR OTOLARYNGOLOGISTS www.entdev.uct.ac.za
The Open Access Atlas of Otolaryngology, Head & Neck Operative Surgery by Johan Fagan (Editor) [email protected] is licensed under a Creative Commons Attribution - Non-Commercial 3.0 Unported License