thermolite™ 110w-330w solar panel installation …...the solar panels. failure to properly prepare...
TRANSCRIPT
TK 56237-11-IS (Rev. 3, 11/18) © 20 T
ThermoLite™ 110W-330W Solar Panel Installation Instructions
INSTALL APPLICATIONS SUPPORTED BY THIS GUIDE:1. Trailer Roof Top Mounted
2. Bus Roof Top Mounted
3. Tractor Fairing Mounted 40W and 110W
Replacement Parts401417 - 110W Solar Expansion Kit Replacement Parts
422579 Controller (20A)
422456 Harness - Battery (fused)
452769 Solar Panel (110W)
401418 - 110W Solar Expansion Kit Replacement Parts
422453 Cable - Expansion Y
Charge Controller to Solar Panel Extension Harness (optional)
422405 Extension Harness - 8 Feet Long
401293 Extension Harness - 11.5 Feet Long
422406 Extension Harness - 25 Feet Long
422407 Extension Harness - 50 Feet Long

2
Installation Best Practices
IMPORTANT: For the solar panel to adhere properly, both the application surface and air temperature must be above 45 F (7 C).
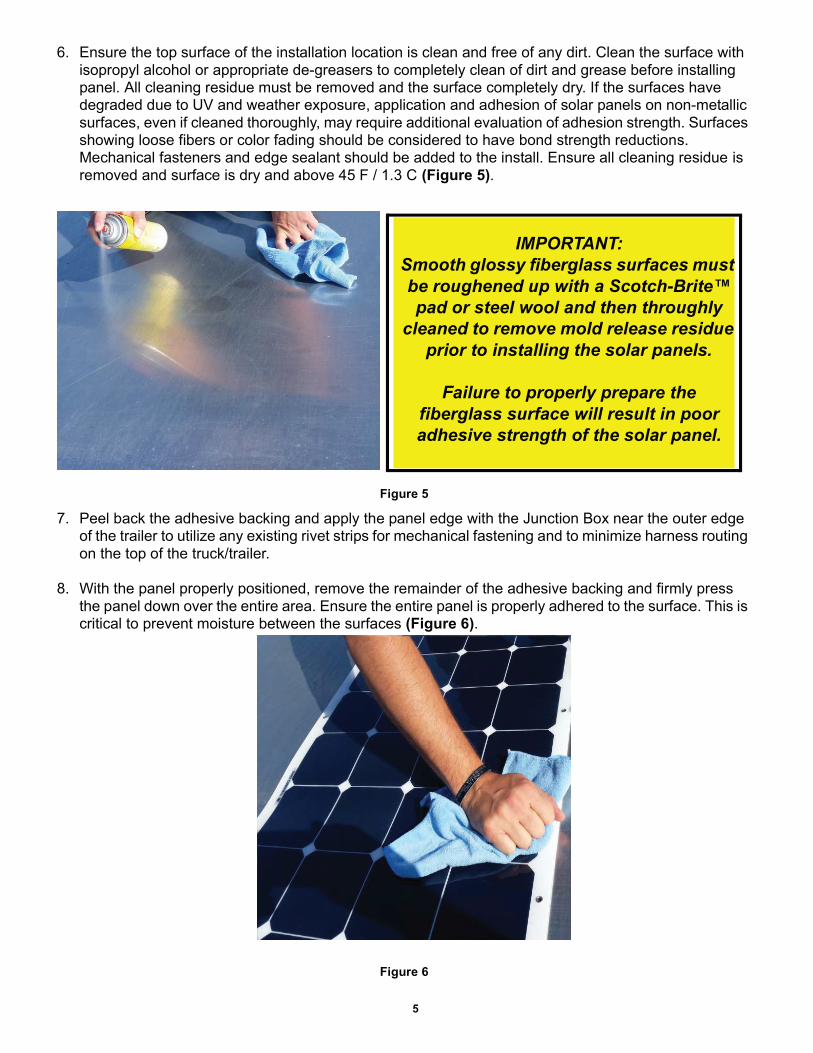
IMPORTANT: Smooth glossy fiberglass surfaces must be roughened up with a Scotch-Brite™ pad or steel wool and then throughly cleaned to remove mold release residue prior to installing the solar panels. Failure to properly prepare the fiberglass surface will result in poor adhesive strength of the solar panel.
NOTE: This equipment is designed and rated for 12V DC nominal systems.
• Switch unit controls to the off position and disconnect the positive battery cable.
• Always ensure solar panel fuse (located on the harness) is removed during installation and service.
• Clean the surface with isopropyl alcohol or appropriate de-greasers to completely clean of dirt andgrease before installing panel. All cleaning residue must be removed and the surface completely dry.If the surfaces have degraded due to UV and weather exposure, application and adhesion of solarpanels on non-metallic surfaces, even if cleaned thoroughly, may require additional evaluation ofadhesion strength. Surfaces showing loose fibers or color fading should be considered to have bondstrength reductions. Mechanical fasteners and edge sealant should be added to the install.
• Care should be taken when installing solar panel as the adhesive backing is very aggressive. Onceinstalled, the panel cannot be removed without causing permanent damage to the panel and possiblythe mounting surface. If the panel is intended to be removed in the future, use only the suppliedscrews not the adhesive backing to secure.
• Install the charge controller near the battery to be charged or the electrical connection to avoidvoltage loss in the cable.
WARNING: Always wear safety glasses and protective gloves when working with batteries.

3
110W Base Kit Installation (Trailer Roof Top Mounted)
Installing the PanelNOTE: Follow “Installation Best Practices” on page 2.
1. Turn off the refrigeration unit and any accessory equipment including standby power connection tothe truck or tractor.
2. Disconnect the negative battery cable of the refrigeration unit and any accessory battery packs usedfor lift gate or other auxiliary equipment.
3. Temporarily remove fuse from solar panel harness.
4. Panel installation location on the truck/trailer can be either the front or the back. Factors to beconsidered are:
a. If reefer unit is present with existing two-pole (two wire) connections with a wire gauge of 12 AWGor larger to the liftgate batteries, then the panels should be installed on the roof of the trailer nearthe front to utilize the existing connections (Figure 1).
b. Front of the trailer installations are generally preferred so vehicles parked against a building willnot shade the panels and reduce performance
c. Consider installing the panels away from tractor and unit exhaust. The panel may be positionedlength wise or perpendicular to the trailer roof edge. Exhaust soot build-up on the panel can resultin decreased performance of the panel if not cleaned.
d. The junction boxes should be positioned closest to the edge of the trailer end and lined up withthe planned wire route.
e. If snow scrapers are to be used for winter snow removal, position the panel with the long edgecontaining the junction box aligned to the front edge of the trailer so the sloped edge of thejunction box is facing forward (Figure 2).
Figure 1 Figure 2
Junction Box
2 Solar Panels ShownSingle Solar Panel Installation Shown

4
f. If the battery box is located at the very rear of the trailer, the panels could be located at the rear trailer with protected cable routing down the back (Figure 3).
5. Plan the panel layout and wire routing prior to permanently mounting any equipment. Familiarize yourself with the components to be installed (Figure 4). Make sure wire routes are free from abrasive materials and have adequate clearance from hot surfaces. Any holes through metal frames, skins or structures should be smooth and non-marring or be lined with a grommet prior to routing wires.
.
Figure 4
Figure 3
Rear of Trailer
Junction Boxes
Positive Battery Cable
w/Fuse
Negative Battery Cable
Charge Controller (Install near the battery)
Extension Harness
Y-Harness Solar Panels
5
6. Ensure the top surface of the installation location is clean and free of any dirt. Clean the surface withisopropyl alcohol or appropriate de-greasers to completely clean of dirt and grease before installingpanel. All cleaning residue must be removed and the surface completely dry. If the surfaces havedegraded due to UV and weather exposure, application and adhesion of solar panels on non-metallicsurfaces, even if cleaned thoroughly, may require additional evaluation of adhesion strength. Surfacesshowing loose fibers or color fading should be considered to have bond strength reductions.Mechanical fasteners and edge sealant should be added to the install. Ensure all cleaning residue isremoved and surface is dry and above 45 F / 1.3 C (Figure 5).
Figure 5
7. Peel back the adhesive backing and apply the panel edge with the Junction Box near the outer edgeof the trailer to utilize any existing rivet strips for mechanical fastening and to minimize harness routingon the top of the truck/trailer.
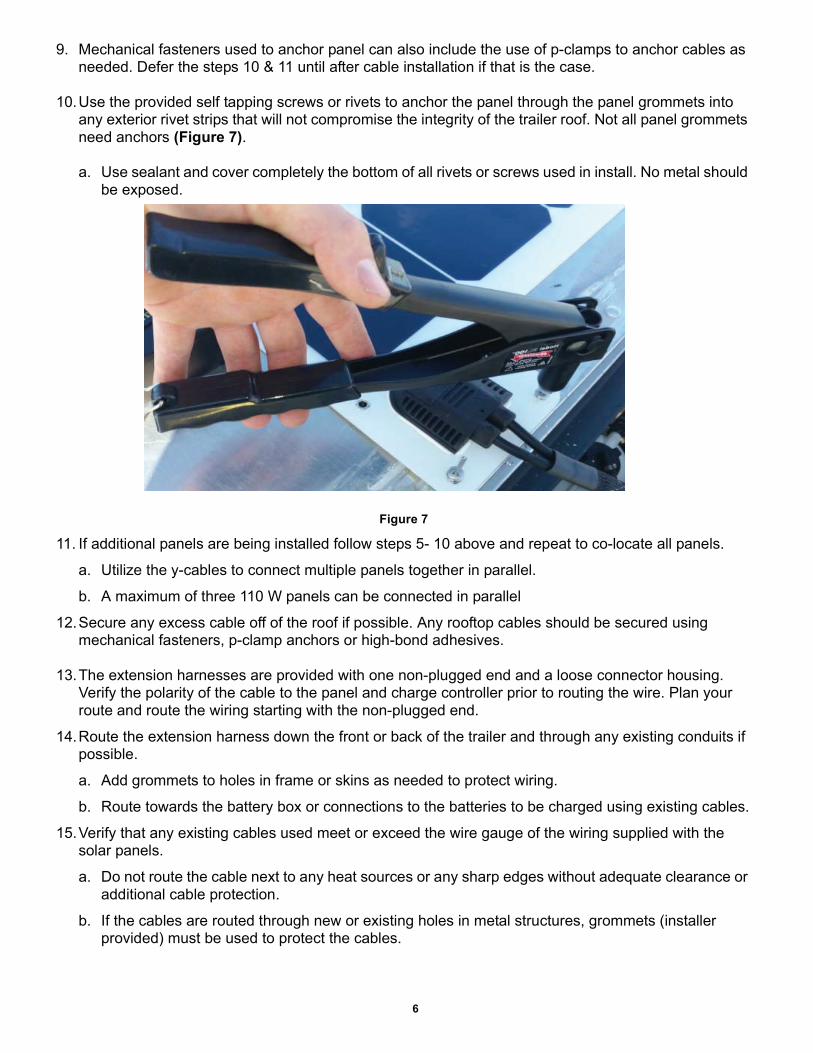
8. With the panel properly positioned, remove the remainder of the adhesive backing and firmly pressthe panel down over the entire area. Ensure the entire panel is properly adhered to the surface. This iscritical to prevent moisture between the surfaces (Figure 6).
Figure 6
IMPORTANT: Smooth glossy fiberglass surfaces must be roughened up with a Scotch-Brite™ pad or steel wool and then throughly
cleaned to remove mold release residue prior to installing the solar panels.
Failure to properly prepare the fiberglass surface will result in poor adhesive strength of the solar panel.
6
9. Mechanical fasteners used to anchor panel can also include the use of p-clamps to anchor cables asneeded. Defer the steps 10 & 11 until after cable installation if that is the case.
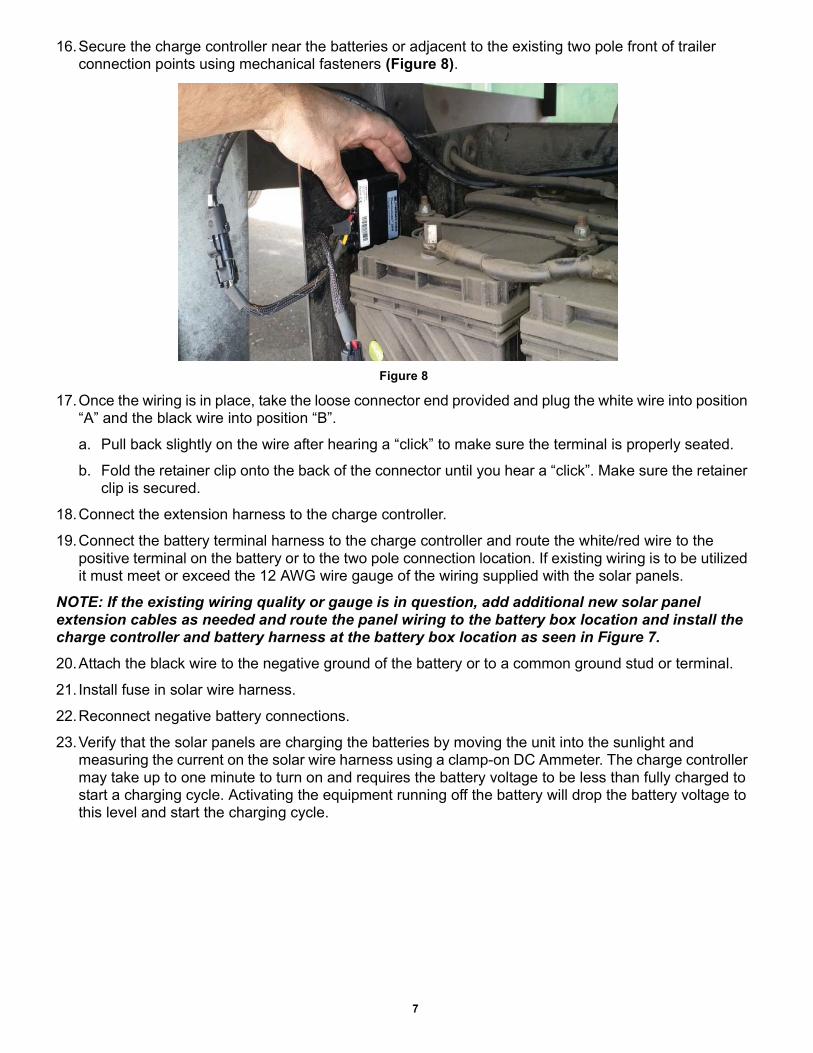
10.Use the provided self tapping screws or rivets to anchor the panel through the panel grommets intoany exterior rivet strips that will not compromise the integrity of the trailer roof. Not all panel grommetsneed anchors (Figure 7).
a. Use sealant and cover completely the bottom of all rivets or screws used in install. No metal shouldbe exposed.
Figure 7
11. If additional panels are being installed follow steps 5- 10 above and repeat to co-locate all panels.
a. Utilize the y-cables to connect multiple panels together in parallel.
b. A maximum of three 110 W panels can be connected in parallel
12.Secure any excess cable off of the roof if possible. Any rooftop cables should be secured usingmechanical fasteners, p-clamp anchors or high-bond adhesives.
13.The extension harnesses are provided with one non-plugged end and a loose connector housing.Verify the polarity of the cable to the panel and charge controller prior to routing the wire. Plan yourroute and route the wiring starting with the non-plugged end.
14.Route the extension harness down the front or back of the trailer and through any existing conduits ifpossible.
a. Add grommets to holes in frame or skins as needed to protect wiring.
b. Route towards the battery box or connections to the batteries to be charged using existing cables.
15.Verify that any existing cables used meet or exceed the wire gauge of the wiring supplied with thesolar panels.
a. Do not route the cable next to any heat sources or any sharp edges without adequate clearance oradditional cable protection.
b. If the cables are routed through new or existing holes in metal structures, grommets (installerprovided) must be used to protect the cables.
7
16.Secure the charge controller near the batteries or adjacent to the existing two pole front of trailer connection points using mechanical fasteners (Figure 8).
Figure 8
17.Once the wiring is in place, take the loose connector end provided and plug the white wire into position “A” and the black wire into position “B”.
a. Pull back slightly on the wire after hearing a “click” to make sure the terminal is properly seated.
b. Fold the retainer clip onto the back of the connector until you hear a “click”. Make sure the retainer clip is secured.
18.Connect the extension harness to the charge controller.
19.Connect the battery terminal harness to the charge controller and route the white/red wire to the positive terminal on the battery or to the two pole connection location. If existing wiring is to be utilized it must meet or exceed the 12 AWG wire gauge of the wiring supplied with the solar panels.
NOTE: If the existing wiring quality or gauge is in question, add additional new solar panel extension cables as needed and route the panel wiring to the battery box location and install the charge controller and battery harness at the battery box location as seen in Figure 7.
20.Attach the black wire to the negative ground of the battery or to a common ground stud or terminal.
21. Install fuse in solar wire harness.
22.Reconnect negative battery connections.
23.Verify that the solar panels are charging the batteries by moving the unit into the sunlight and measuring the current on the solar wire harness using a clamp-on DC Ammeter. The charge controller may take up to one minute to turn on and requires the battery voltage to be less than fully charged to start a charging cycle. Activating the equipment running off the battery will drop the battery voltage to this level and start the charging cycle.
8
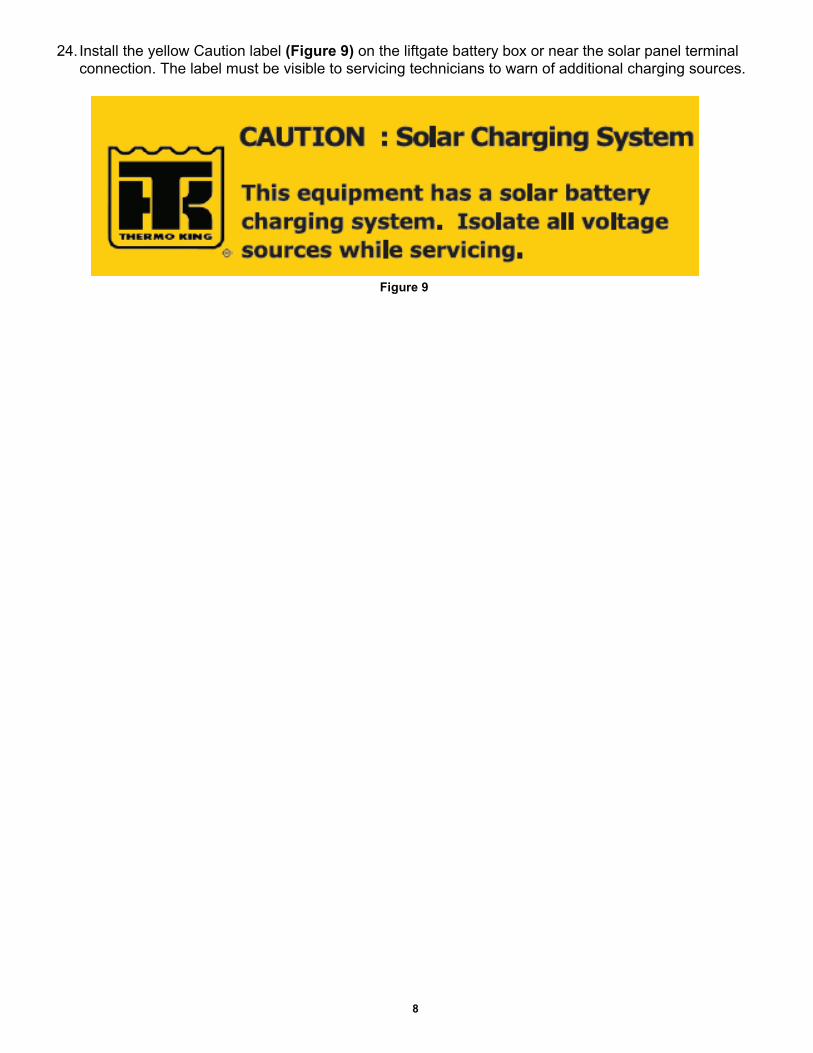
24. Install the yellow Caution label (Figure 9) on the liftgate battery box or near the solar panel terminalconnection. The label must be visible to servicing technicians to warn of additional charging sources.
Figure 9

9
110W Base Kit Installation (Bus Roof Top Mounted)
Installing the PanelsNOTE: Follow “Installation Best Practices” on page 2.
NOTE: It is recommended that one 110W solar panel be installed for each bus battery.
(2) 110W Solar Panels shown installed on the roof of a typical bus.
1. Plan the panel layout and wire routing prior to permanently mounting any equipment. Familiarize yourself with the components to be installed. Make sure wire routes are free from abrasive materials and have adequate clearance from hot surfaces. Any holes through metal frames, skins or structures should be smooth and non-marring or be lined with a grommet prior to routing wires.
.
Typical Solar Panel Components Shown
If (2) 110W panels (200W total) is not enough, additional panels can be
installed on the center door sections.Excess harness will need to be provided
to allow for door function.
Junction Boxes
Positive Battery Cable
w/Fuse
Negative Battery Cable
Charge Controller (Install near the battery)
Extension Harness
Y-Harness Solar Panels

10
2. Ensure the top surface of the installation location is clean and free of any dirt. Suggested cleaners:Isopropal alcohol, de-greaser. If needed, use a scouring pad to remove built-up oxides and residue.Ensure all cleaning residue is removed and surface is dry and above 45 F / 1.3 C.
3. Peel back the adhesive backing and apply the panel edge with the Junction Box near the outer edgeof the roof to utilize any existing rivet strips for mechanical fastening and to minimize harness routingon the top of the bus.
4. With the panel properly positioned, remove the remainder of the adhesive backing and firmly pressthe panel down over the entire area. Ensure the entire panel is properly adhered to the surface. This iscritical to prevent moisture between the surfaces
5. Mechanical fasteners used to anchor panel can also include the use of p-clamps to anchor cables asneeded.
IMPORTANT: Smooth glossy fiberglass surfaces must be roughened up with a Scotch-Brite™ pad or steel wool and then throughly
cleaned to remove mold release residue prior to installing the solar panels.
Failure to properly prepare the fiberglass surface will result in poor adhesive strength of the solar panel.

11
6. Use the provided self tapping screws or rivets to anchor the panel through the panel grommets into any exterior rivet strips that will not compromise the integrity of the trailer roof. Not all panel grommets need anchors.
a. Use sealant and cover completely the bottom of all rivets or screws used in install. No metal should be exposed. Additional sealant may be added around the perimeter of the panel to form a bead between the mounting surface and the panel edge. Take care to not get excess sealant on the panel surface.
.
Securing solar panel with rivets.
7. Secure any excess cable off of the roof if possible. Any rooftop cables should be secured using mechanical fasteners, p-clamp anchors or high-bond adhesives.

12
Extension Harness8. Attach 25 ft. extension harness to solar
panel connector.
9. Route the extension harness down the back of the bus and through any existing doors/panels and into the battery compartment.
a. Add grommets to holes in frame or skins as needed to protect wiring.
b. Route towards the battery box or connections to the batteries to be charged using existing cables.
10.Remove 2-pin connector (attached to harness) and route harness through a rubber grommet and into tractor’s battery box.
11. Attach 2-pin connector to harness by releasing the locking tab, inserting wires until they are fully seated, and closing locking tab securely.
• White wire (B+) into socket A
• Black wire (B-) into socket B

13
Charge Controller and Battery Harness12.Connect charge controller to extension
harness.
13.Remove fuse from battery harnessand connect to charge controller.
14.Connect terminal rings from batteryharness to battery:
• Black to Negative (-)
• White to Positive (+)
15.Secure controller inside batterycompartment.
16.Re-install fuse into harness.
17.Verify that the solar panels arecharging the batteries by moving theunit into the sunlight and measuringthe current on the solar wire harnessusing a clamp-on DC Ammeter. Thecharge controller may take up to oneminute to turn on and requires thebattery voltage to be less than fullycharged to start a charging cycle.Activating the equipment running off the battery will drop the battery voltage to this level and startthe charging cycle.
18. Install the yellow Caution label near the battery box or the solar panel terminal connection. Thelabel must be visible to servicing technicians to warn of additional charging sources.

14
CLASS 8 TRACTOR SOLAR PANEL INSTALLATION GUIDEInstalling the Panel(s)NOTE: Follow “Installation Best Practices” on page 2.
NOTE: If installing multiple panels, see page 16.
1. Peel back approximately 4 inches of the backing paper and position solar panel to desired location on fairing.
2. With panel properly positioned, remove remainder of backing paper and firmly press panel down over entire area.
• Press several times to ensure entire panel is properly adhered to fairing. This is critical to prevent moisture between the surfaces.
IMPORTANT:Smooth glossy fiberglass surfaces must be roughened up with a
Scotch-Brite™ pad or steel wool and then throughly cleaned to remove mold release residue prior to installing the solar panels.
Failure to properly prepare the fiberglass surface will result in poor adhesive strength of the solar panel.

15
Extension Harness3. Attach 25 ft. extension harness to solar
panel connector.
• Route and secure harness down rearof cab and over to tractor’s batteries.
IMPORTANT: Allow slack in the extension harness going from the cab to the tractor’s frame to allow for normal cab movement.
4. Remove 2-pin connector (attached toharness) and route harness through arubber grommet and into tractor’s batterybox.
5. Attach 2-pin connector to harness byreleasing the locking tab, inserting wiresuntil they are fully seated, and closinglocking tab securely.
• White wire (B+) into socket A
• Black wire (B-) into socket B
Charge Controller and Battery Harness6. Connect charge controller to extension
harness.
7. Remove fuse from battery harness andconnect to charge controller.
8. Connect terminal rings from batteryharness to Tractor Batteries Only:
• Black to Negative (-)
• White to Positive (+)
9. Secure controller inside battery.
10.Re-install fuse into harness.
IMPORTANTConnect Solar Panel(s) to Tractor Batteries Only.
DO NOT Connect to TriPac Envidia APU Batteries.

16
EXPANSION PANEL INSTALLATION AND WIRING INFOReference the wiring diagram below for detailed information.
1. Place additional panel(s) in their chosen locations and mount according to the instructions.
2. Connect provided parallel y-cable(s) together and secure using brand wraps and clamps.
• Up to 72W may be connected into a single 5amp charge controller.
• Up to 400W may be connected into a single 20amp charge controller.

17
STATUS LIGHT
STATUS LIGHT FUNCTION
Flashing Green = Battery charging / Controller connected correctly.Solid Green = Controller connected to battery / Solar input may or may not be connected correctly*No Light = Controller not connected / extremely low or dead battery.
*NOTE: Status light will illuminate solid green even if harness is connected in reverse. Ensurestatus light is flashing green to verify correct installation.

18
ThermoLite™ Solar Panel Kit Warranty Solar panel kits registered within the first 12 months of installation will receive 5 years warranty coverage from date of installation. Panels not registered in that time will automatically receive 5 years + 90 days coverage from date of manufacture.