this document should be treated as supplementary support ... layer to video in arcglobe.pdfthis...
TRANSCRIPT

Snow Leopard Conservancy – Exporting a Tracking Layer to a Video in ArcGlobe
December 22, 2008
Page 1
This report is generated for Joyce Robinson (SNC) by Richie Carmichael (ESRI). The report describes the
steps required to convert a tab delimitated text file into a tracking layer in ArcGlobe and generate a
video.
This document should be treated as supplementary support information. US customers are encouraged
to contact ESRI’s professional support staff through the support request form or by calling 1-888-377-
4575.
In ArcCatalog, review the tab delimited text file containing position, date and other attributes.

Snow Leopard Conservancy – Exporting a Tracking Layer to a Video in ArcGlobe
December 22, 2008
Page 2
Create a new File Geodatabase. Right click on a folder, select New > File Geodatabase.

Snow Leopard Conservancy – Exporting a Tracking Layer to a Video in ArcGlobe
December 22, 2008
Page 3
Right click on the tab delimited text file and select Create Feature Class > From XY Table.

Snow Leopard Conservancy – Exporting a Tracking Layer to a Video in ArcGlobe
December 22, 2008
Page 4
In the Create Feature Class dialog, select WGS 1984 as the spatial reference.

Snow Leopard Conservancy – Exporting a Tracking Layer to a Video in ArcGlobe
December 22, 2008
Page 5
Click the browse button highlighted below to save the output as a new feature class in the previously
created File Geodatabase.

Snow Leopard Conservancy – Exporting a Tracking Layer to a Video in ArcGlobe
December 22, 2008
Page 6
Click OK.

Snow Leopard Conservancy – Exporting a Tracking Layer to a Video in ArcGlobe
December 22, 2008
Page 7
Preview the data in ArcCatalog.

Snow Leopard Conservancy – Exporting a Tracking Layer to a Video in ArcGlobe
December 22, 2008
Page 8
View the Feature Class properties.

Snow Leopard Conservancy – Exporting a Tracking Layer to a Video in ArcGlobe
December 22, 2008
Page 9
The two critical fields in the feature class are ESN and MessageTime. ESN will be used as the track field.
This field MUST be defined as a Text file type. The track field typically contains a unique identifier for
moving objects, like a collar id or animal name.

Snow Leopard Conservancy – Exporting a Tracking Layer to a Video in ArcGlobe
December 22, 2008
Page 10
Before progressing, use ArcMap to locate and delete any erroneous data (if any). Start ArcMap and
display the Editor Toolbar.

Snow Leopard Conservancy – Exporting a Tracking Layer to a Video in ArcGlobe
December 22, 2008
Page 11
Add the newly created Leopard feature class using the standard Add Data command.

Snow Leopard Conservancy – Exporting a Tracking Layer to a Video in ArcGlobe
December 22, 2008
Page 12
The data is split. All but one point (or “event”) is located in the correct location. Select Start Editing
from the Editor menu.

Snow Leopard Conservancy – Exporting a Tracking Layer to a Video in ArcGlobe
December 22, 2008
Page 13
Select the Edit Tool from the Editor Toolbar.

Snow Leopard Conservancy – Exporting a Tracking Layer to a Video in ArcGlobe
December 22, 2008
Page 14
Drag a bounding box around the point located at 0°0’0”N latitude and 0°0’0”E longitude.

Snow Leopard Conservancy – Exporting a Tracking Layer to a Video in ArcGlobe
December 22, 2008
Page 15
Delete the selected point. Click the Delete button.

Snow Leopard Conservancy – Exporting a Tracking Layer to a Video in ArcGlobe
December 22, 2008
Page 16
Exit ArcMap. Click File > Exit.

Snow Leopard Conservancy – Exporting a Tracking Layer to a Video in ArcGlobe
December 22, 2008
Page 17
Click Yes to save edits.
Snow Leopard Conservancy – Exporting a Tracking Layer to a Video in ArcGlobe
December 22, 2008
Page 18
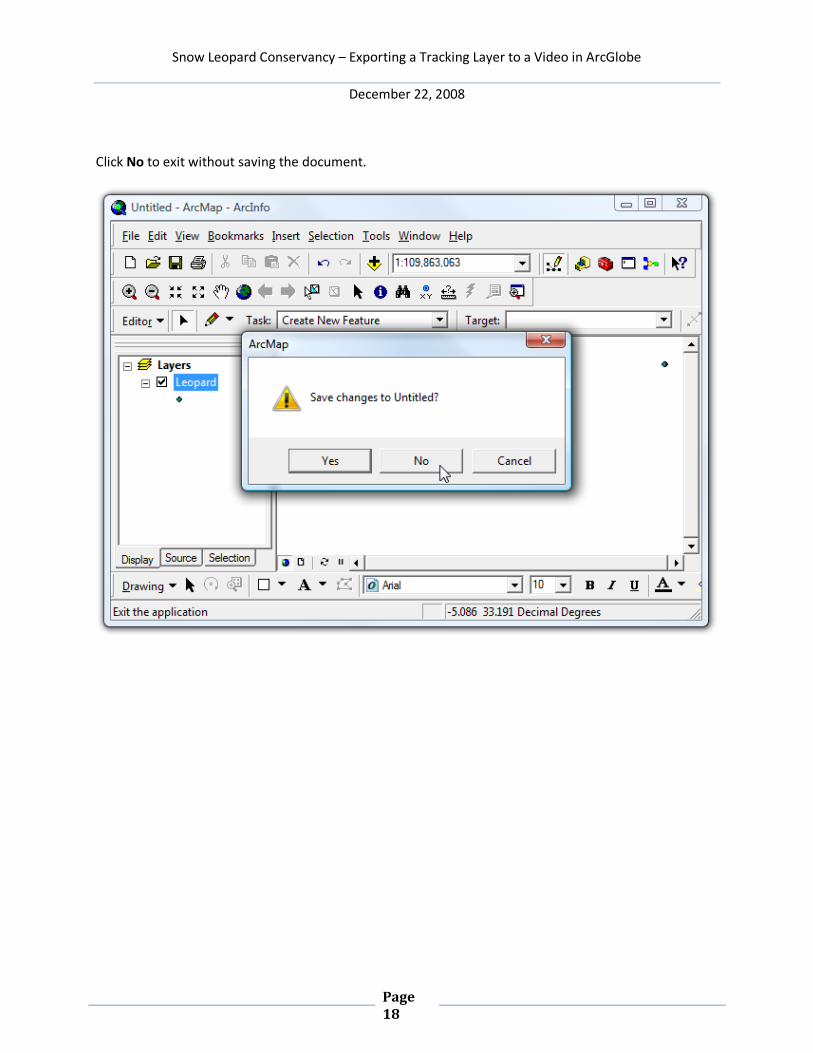
Click No to exit without saving the document.

Snow Leopard Conservancy – Exporting a Tracking Layer to a Video in ArcGlobe
December 22, 2008
Page 19
Start ArcGlobe.

Snow Leopard Conservancy – Exporting a Tracking Layer to a Video in ArcGlobe
December 22, 2008
Page 20
Check to see if the Tracking Analyst extension is enabled. Click Tools > Extensions.

Snow Leopard Conservancy – Exporting a Tracking Layer to a Video in ArcGlobe
December 22, 2008
Page 21
Check Tracking Analyst (if not already).

Snow Leopard Conservancy – Exporting a Tracking Layer to a Video in ArcGlobe
December 22, 2008
Page 22
The default globe layers are not suitable for your area of interest. Add better content from the ArcGIS
Resource Center. Select Add Data From Resource Center from the File menu.

Snow Leopard Conservancy – Exporting a Tracking Layer to a Video in ArcGlobe
December 22, 2008
Page 23
Click on the World Imagery thumbnail.

Snow Leopard Conservancy – Exporting a Tracking Layer to a Video in ArcGlobe
December 22, 2008
Page 24
When prompted click Open to load the World Imagery layer file into ArcGlobe.

Snow Leopard Conservancy – Exporting a Tracking Layer to a Video in ArcGlobe
December 22, 2008
Page 25
Turn off (or remove) the default globe layers Continents and World Image.

Snow Leopard Conservancy – Exporting a Tracking Layer to a Video in ArcGlobe
December 22, 2008
Page 26
Ensure that both the Tracking Analyst and Animation toolbars are displayed. If not click View > Toolbars
> Animation and View > Toolbars > Tracking Analyst.
Click the Add Temporal Data button on the Tracking Analyst toolbar.
Snow Leopard Conservancy – Exporting a Tracking Layer to a Video in ArcGlobe
December 22, 2008
Page 27
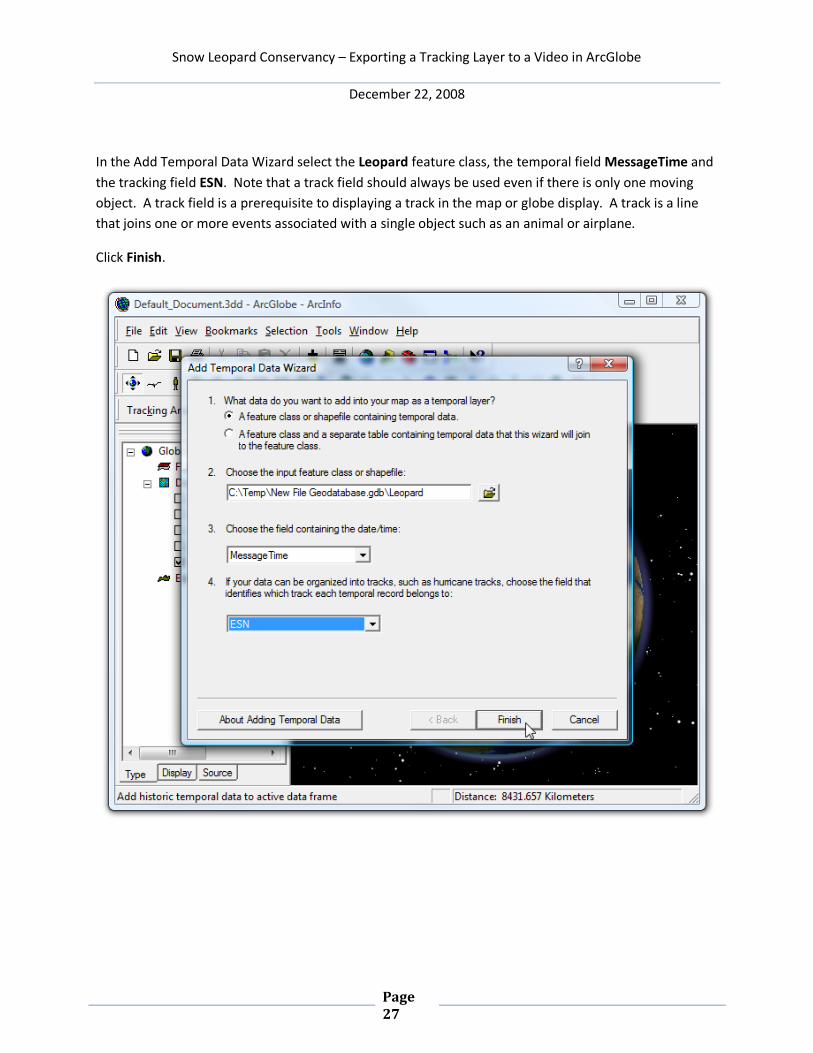
In the Add Temporal Data Wizard select the Leopard feature class, the temporal field MessageTime and
the tracking field ESN. Note that a track field should always be used even if there is only one moving
object. A track field is a prerequisite to displaying a track in the map or globe display. A track is a line
that joins one or more events associated with a single object such as an animal or airplane.
Click Finish.

Snow Leopard Conservancy – Exporting a Tracking Layer to a Video in ArcGlobe
December 22, 2008
Page 28
Double click on Leopard or right click on the layer and select Properties.

Snow Leopard Conservancy – Exporting a Tracking Layer to a Video in ArcGlobe
December 22, 2008
Page 29
The following instructions will change the way that events symbols are rendered. The most effective
method is probably a billboarded lollypop.
Uncheck Draw Leader Lines. This option, if checked, displays quite spectacular (and erroneous)
shooting white lines.
Select Draw Elevated Lines from the drop down menu and increase the Line Length to 50 pixels.
Click OK.

Snow Leopard Conservancy – Exporting a Tracking Layer to a Video in ArcGlobe
December 22, 2008
Page 30
In this walkthrough we don’t want to display a symbol for every event, just the most recent event based
on the current time. Click the Symbology tab in the Layer Properties dialog and uncheck Events.
To choose a symbol for the lead event, check Most Current Event and click the symbol button to display
the Symbol Selector window. Click the More Symbols button to display a list of installed styles.

Snow Leopard Conservancy – Exporting a Tracking Layer to a Video in ArcGlobe
December 22, 2008
Page 31
Click on the Conservation style.

Snow Leopard Conservancy – Exporting a Tracking Layer to a Video in ArcGlobe
December 22, 2008
Page 32
Scroll down the list of symbols, click on Bear 3, change the size to 2 and then click OK.

Snow Leopard Conservancy – Exporting a Tracking Layer to a Video in ArcGlobe
December 22, 2008
Page 33
To display tracks, check Tracks. Change the track symbol by clicking the symbol button and choosing
Highway Ramp.

Snow Leopard Conservancy – Exporting a Tracking Layer to a Video in ArcGlobe
December 22, 2008
Page 34
Right click on the Leopard layer and select Zoom To Layer.

Snow Leopard Conservancy – Exporting a Tracking Layer to a Video in ArcGlobe
December 22, 2008
Page 35
By default, newly added tracking layers are defined as floating. Floating layers use height sourced from
feature geometry, an attribute field or a constant value. This is typically used to model aircraft.
Because we are tracking ground animal, we can modify the layer to be draped. Right click on the
Leopard layer and select Redefine Layer > Redefine Layer as Draped.

Snow Leopard Conservancy – Exporting a Tracking Layer to a Video in ArcGlobe
December 22, 2008
Page 36
Display the Playback Manager by clicking the second to last button on the Tracking Analyst toolbar. Click
and drag the red pointer in the playback manager to adjust the “current time”.

Snow Leopard Conservancy – Exporting a Tracking Layer to a Video in ArcGlobe
December 22, 2008
Page 37
To emphasize the mountainous terrain we can modify the vertical exaggeration. Click View > Globe
Properties to display the Globe Properties window.

Snow Leopard Conservancy – Exporting a Tracking Layer to a Video in ArcGlobe
December 22, 2008
Page 38
In the General tab, change the exaggeration of the globe surface to 1.5. Click OK.

Snow Leopard Conservancy – Exporting a Tracking Layer to a Video in ArcGlobe
December 22, 2008
Page 39
To prepare the tracking layer for use in an animation, set the current time to the end time of the layer.
Drag the red current time marker to the end of the time line.

Snow Leopard Conservancy – Exporting a Tracking Layer to a Video in ArcGlobe
December 22, 2008
Page 40
Click the Animation drop menu on the Animation toolbar. Click Create Time Layer Animation.

Snow Leopard Conservancy – Exporting a Tracking Layer to a Video in ArcGlobe
December 22, 2008
Page 41
Select Leopard from the Layer drop down menu.
Select MessageTime as the Start Time Field.
Check Animation fields cumulatively.
Click OK.

Snow Leopard Conservancy – Exporting a Tracking Layer to a Video in ArcGlobe
December 22, 2008
Page 42
Open the Animation Control by clicking on the last button on the Animation toolbar.

Snow Leopard Conservancy – Exporting a Tracking Layer to a Video in ArcGlobe
December 22, 2008
Page 43
Click the Options >> button to reveal the animation properties. Change the duration to 30 seconds.
Click the Options << button again to hide the animation properties.

Snow Leopard Conservancy – Exporting a Tracking Layer to a Video in ArcGlobe
December 22, 2008
Page 44
Click the Play button (first button on Animation Controls window) to start the animation.
In ArcGIS Desktop 9.3, the tracking layer will not animate automatically. To trigger the tracking layer to
begin animating please click once inside the globe display. This is a bug.

Snow Leopard Conservancy – Exporting a Tracking Layer to a Video in ArcGlobe
December 22, 2008
Page 45
Click the Stop button on the Animation Controls window to cease the animation.
Before progressing, it is advisable to save the globe document. To save the document, click File > Save.

Snow Leopard Conservancy – Exporting a Tracking Layer to a Video in ArcGlobe
December 22, 2008
Page 46
To export the animation to a video file, click Animation > Export to Video on the Animation toolbar.

Snow Leopard Conservancy – Exporting a Tracking Layer to a Video in ArcGlobe
December 22, 2008
Page 47
Enter the name of the output video in the Export Animation dialog. Click Export.
If you have Apple Quicktime installed then the Save As Type drop down menu will include QuickTime
(*.mov). QuickTime movies are useful if you anticipate your movies will be played on both Windows and
Mac computers.

Snow Leopard Conservancy – Exporting a Tracking Layer to a Video in ArcGlobe
December 22, 2008
Page 48
Assuming that AVI was selected as the Save As Type, a dialog will appear presenting a list of all installed
CODECs. I would recommend either Microsoft Video 1 or Cinepak Codec by Radius. Both are almost
universally available on all Windows computers. Cinepak provides the best compression but requires
more processing power than Microsoft Video 1.
By default, the compression quality is set to 90%. Increasing this value will improve the quality but also
increase the size of the output video. Decreasing the quality will degrade the video but result in a much
smaller video. Click OK to start the video export.

Snow Leopard Conservancy – Exporting a Tracking Layer to a Video in ArcGlobe
December 22, 2008
Page 49
Remember to immediately click once inside the display to trigger the tracking layer to begin animating.

Snow Leopard Conservancy – Exporting a Tracking Layer to a Video in ArcGlobe
December 22, 2008
Page 50
The size of the output video will match the size of the globe display in ArcGlobe. Resize the ArcGlobe
application to desired size before exporting to video.
To bring the video to life, add a camera track. The easiest way to do this is to click the Camera button
(second from right on Animation toolbar) at least twice at different viewing positions. As the animation
progresses, ArcGlobe will automatically interpolate between camera positions (or “keyframes”).
Use the Animation Manager (Animation > Animation Manager) to view and/or change animation tracks
and key-frames.
End.