this presentation shows how to create a simple form from a single table, customer. also show is a...
TRANSCRIPT

This presentation shows how to create a simple form from a single table, CUSTOMER. Also show is a way to change the formatting displayed by the Layout Wizard.
SIMPLE FORMS

CUSTOMER {CustomerNumber, CustomerName, StreetAddress, Town, Province
Primary Key: CustomerNumber
INVENTORY {InventoryNumber, Description, Colour, QuantityOnHand, Cost}Primary Key: InventoryNumber
SUPPLIER {SupplierNumber, SupplierName, StreetAddress, Town, Province, FreightInArea}Primary Key: SupplierNuymber
SUPP_INV {SupplierNumber, InventoryNumber}Primary Key: SupplierNumber, InventoryNumberForeign Key: SupplierNumber references SUPPLIERForeign Key: InventoryNumber references INVENTORY
INVOICE {InvoiceNumber, SaleDate, CustomerNumber}
Primary Key: InvoiceNumber
Foreign Key: CustomerNumber references CUSTOMER
INVOICE_LINE_ITEM {InvoiceNumber, LineItemNumber, InventoryNumber, Quantity}
Primary Key: InvoiceNumber, LineItemNumber
Foreign Key: InventoryNumber references INVENTORY
Schema of the example database

P = primary keyF = foreign key
P
P
F
P
P
F
Tables used in this presentation

P
P & F
Tables used in this presentation, continued

CUSTOMER
CustomerNumber CustomerName Street Address Town Province Postal Code Company Sales Area
5155 George Black 379 Queen Street W Hamilton Ontario L8C 2B7 1
5204 Stephanie Green 491 Baker Street Toronto Ontario M3C 1J9 2
5255 Alice Van Dunn 296 Orton Avenue Winnipeg Manitoba R3A 8T6 5
5346 Bonnie Stewart 739 Sutton Lane Ottawa Ontario K2G 1V9 3
5389 Jake Solaris 2176 Alcott Crescent Vancouver British Columbia V6A 7G4 6
5443 Jane Quicker 12 Fred Street Montreal Quebec H4G 9E3 4
INVOICE
InvoiceNumber SaleDate CustomerNumber
24789 06/01 5443
24790 06/02 5204
24791 06/09 5155
24792 06/10 5443
24793 06/13 5204
24794 06/15 5204
24795 06/17 5255
24796 06/20 5389
24797 06/23 5255
24798 06/30 5389
INVOICE_LINE_ITEM
InvoiceNumber LineItemNumber InventoryNumber QuantitySold
24789 1 341798 15
24789 2 341785 5
24790 1 341766 10
24791 1 341782 9
24791 2 341784 3
24791 3 341785 10
24792 1 341798 12
24793 1 341785 6
24794 1 341524 5
24794 2 341525 2
24795 1 341524 4
24796 1 341785 8
24797 1 341766 10
24797 2 341798 4
24797 3 341783 2
24798 1 341784 7
Primary KeyForeign Key
Values in the tables
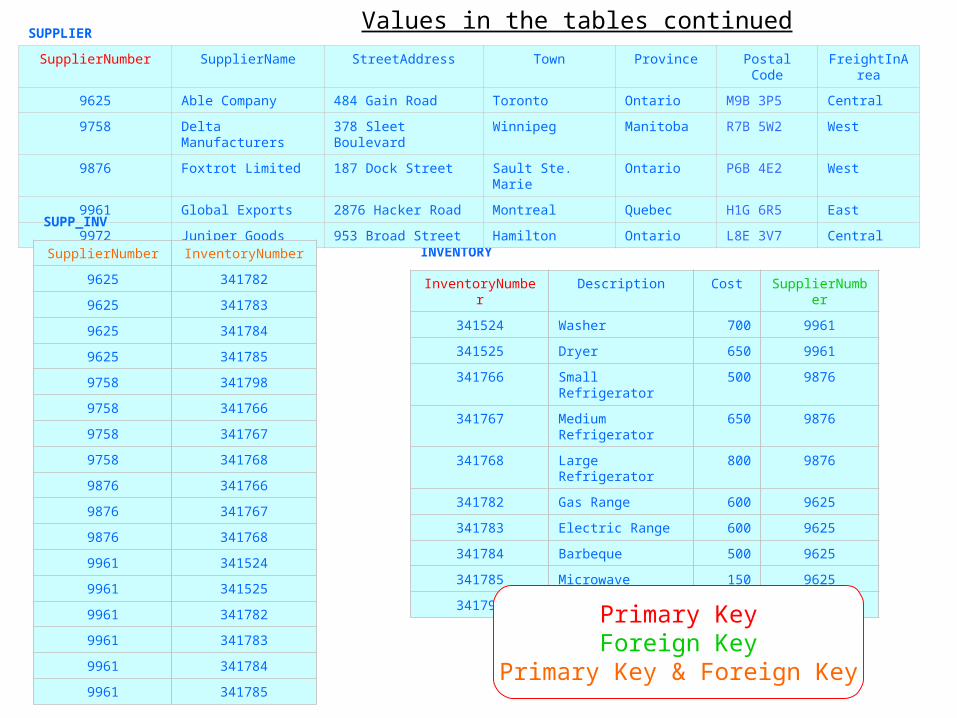
INVENTORY
InventoryNumber Description Cost SupplierNumber
341524 Washer 700 9961
341525 Dryer 650 9961
341766 Small Refrigerator 500 9876
341767 Medium Refrigerator 650 9876
341768 Large Refrigerator 800 9876
341782 Gas Range 600 9625
341783 Electric Range 600 9625
341784 Barbeque 500 9625
341785 Microwave 150 9625
341798 Freezer 500 9758
SUPPLIER
SupplierNumber SupplierName StreetAddress Town Province Postal Code FreightInArea
9625 Able Company 484 Gain Road Toronto Ontario M9B 3P5 Central
9758 Delta Manufacturers 378 Sleet Boulevard Winnipeg Manitoba R7B 5W2 West
9876 Foxtrot Limited 187 Dock Street Sault Ste. Marie Ontario P6B 4E2 West
9961 Global Exports 2876 Hacker Road Montreal Quebec H1G 6R5 East
9972 Juniper Goods 953 Broad Street Hamilton Ontario L8E 3V7 Central
SUPP_INV
SupplierNumber InventoryNumber
9625 341782
9625 341783
9625 341784
9625 341785
9758 341798
9758 341766
9758 341767
9758 341768
9876 341766
9876 341767
9876 341768
9961 341524
9961 341525
9961 341782
9961 341783
9961 341784
9961 341785
Primary KeyForeign Key
Primary Key & Foreign Key
Values in the tables continued

EMPLOYEE
EmployeeNumber
EmployeeLast Name
EmployeeFirst
Name
Street Address Town Province Postal Code
Employee
Type
Manager
Number
1000 Johnston Gerald 7145 Quarterly Road Toronto Ontario M6C 8R5 1
1001 Simpson Allison 595 Tatterly Avenue Toronto Ontario M6E 5V8 1 1000
1002 Spinner James 3815 Gottago Street Oakville Ontario L6M 6R3 1 1000
1003 Beef Angus 64 Stockyard Crescent Mississauga Ontario L5L 9G5 1 1000
2000 Brownstone Vincent 4234 Uppity Boulevard Oakville Ontario L6L 7T2 2 1000
2001 Windstorm Jane 6710 Nonesuch Avenue Brampton Ontario L6P 1Y5 2 2000
2002 Higgenbottom Paul 22 Dungeon Street Burlington Ontario L7M 8T5 2 2000
2003 Wormhole Ina 78 Oval Circle Toronto Ontario M3C 9H6 2 2000
3000 Bluecollar Arthur 4572 Higgins Street Brampton Ontario L6R 4K2 3 1000
3001 Blackpants Susan 10 Younger Road Mississauga Ontario L5P 9H3 3 3000
3002 Bottomtop Martha 71345 White Acres Road Markham Ontario L3R 9G2 3 3000
3003 Aboutface George 432 Gasoline Alley Toronto Ontario M4E 1K8 3 3000
EMPLOYEE TYPE
TypeNumber TypeName
1 Administration
2 Sales
3 Manufacturing
SALES AREA
AreaNumber AreaName
1 Central
2 Main
3 East
4 French East
5 West Central
6 West

Open the Oracle Forms Builder and Logon to the database
Enter File, Connect. The popup will appear as shown on the next
slide.


A new module is shown. This will be later saved under a
desired name.
Select Data Block Wizard in order to create
the Data Block

Create a Data Block for CUSTOMER
A Data Block contains the fields to be displayed from a selected table.

Select Table or View

Browse for the available
tables

Tables owned by the user.
Select CUSTOMER

Move all columns but for Postal Code and
Company Sales Area

The columns have been
moved

Name the Data Block CUSTOMER

Continue by using the Layout Wizard

The Layout Wizard

Select a New Canvas. This can be given a name at a later time
Select Content. See the next
page for details.

A canvas is the object on which the graphical user interface (GUI) is drawn, or the background of the form. At run-time, the user only sees those items that have been assigned to a specific canvas. Each canvas is displayed in a specific window. A a frame provides a way to interact with the window including the ability to scroll, move, update etc.
There are five main types of canvases. The three main ones are:
1. Content: Also called the “Base” canvas, is the main and default type of canvas. It occupies the entire window in which it is displayed. Each form should have at least one content canvas.
2. Tab: This allows for a number of tabbed pages to be shown on each canvas. One tab could show Customer, another could show Supplier. The tab is clicked-on to bring up the form. Adds, changes and deletes are allowed.
3. Stacked: One canvas can be stacked upon another so that the user can see several canvasses at the same time. A stacked canvas is stacked on, or displayed on top of, the content canvas. More than one stacked canvas can be displayed at the same time.

This shows that the Data Block CUSTOMER is being used.
Move all items over

All columns have been
moved

The Prompt, Width, and Height can be modified. Modify the Prompt names to a more readable format.

The Prompt has been modified. The Prompt is the word that appears on the Form.

Choose the Form layout. The Form layout shows the contents as a
form, not a table.
Tabular layout shows the contents of the table in
table format

Name the frame CUSTOMER
Allow 5 records to be displayed
Choose to display the Scrollbar

The form has been created.

This is what the CUSTOMER Form layout looks like. It can be
modified later.
The Frame Title

Compile the CUSTOMER Form
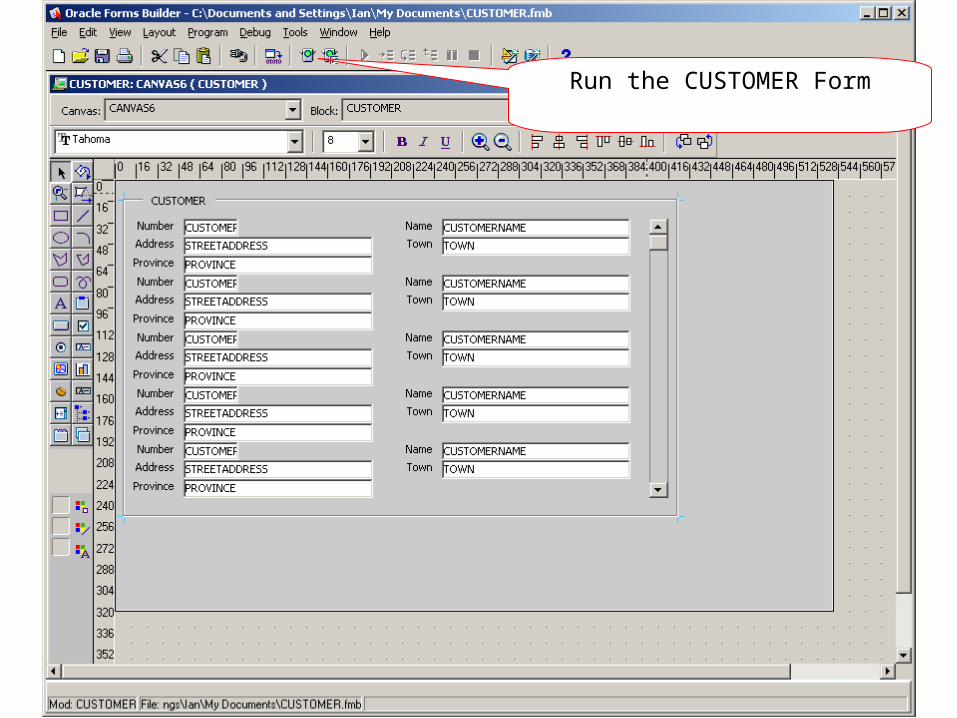
Run the CUSTOMER Form

The CUSTOMER Form is run in Windows Explorer as a Web application.
The format could be more user-friendly.
It can now be saved and modified.

File, Save As - CUSTOMER

MODULE1 will now be named CUSTOMER

The CUSTOMER module is the active module. CANVAS4 is the canvas,
using the (CUSTOMER) frame
The tool palette will aid in modifying the form

In the Object Navigator, under Tools, right click on
CUSTOMER. This will bring up the Property Palette

This is the Property Palette for CUSTOMER. In the palette the
form can be modified

Notice the black dots around the CUSTOMER frame. Right click to bring up
the Property Palette
The Layout Editor of the CUSTOMER frame

The Physical properties of the CUSTOMER frame.
Set the width at 530

The width has been highlighted and set to 530.
Close the screen after setting the width at 530.

The width has been increased.

Highlight the Scroll Bar. Right click to bring up the Property Palette

The Scroll Bar properties.Set the X Position at 520

The Scroll Bar position has changed. Now the CUSTOMER fields need to be rearranged

The name field has been highlighted. Right click to bring up the Property Palette.

Scroll down to the Physical
characteristics.

Change the X coordinate to 150 and the Y to 29

All Name fields have been moved

Highlight the Address field and
change the X coordinate to 350
and Y to 29

All the Address fields have moved.

Highlight the Town field and change
the X coordinate to 150 and Y to 43


Highlight the Province field and change the X
coordinate to 350 and Y to 43


The result when the form is run. Click Ctrl-F11 to
show the individual customers in the
CUSTOMER table.
Note: If the user is already logged into the database through SQLPlus, Ctrl_F11 will not work. Thus quit SQLPlus before trying Ctrl_F11.

The CUSTOMER fields are now filled. Scroll
down to look at the sixth customer.

File-Save As CUSTOMER


A line has been added with X = 7, Y = 64, and a width of 529
The Line tool.
The Line colour tool. This has been changed to a dark grey

Three more lines have been added with the following coordinates:1. X = 7, Y = 106, W = 5292. X = 7, Y = 148, W = 5293. X = 7, Y = 190, W = 529

The final formatted Customer form

The CUSTOMER Module
Fields in the CUSTOMER Data Block
The CUSTOMER Data Block
Within CANVAS6, FRAME7 can be renamed
CUSTOMER_FRAME
Notice the four lines that have been added as shown in slide 50

The renamed CUSTOMER_FRAME
using the Property Palette