thomson reuters world-check one€¦ · · 2017-02-20thomson reuters world-check one document...
TRANSCRIPT

THOMSON REUTERS WORLD-CHECK ONE
Document Version: 0.2 Issue Date: 31/05/16
CLIENT ADMINISTRATOR USER GUIDE

Legal Information
Client Administrator User Guide Document Version: 0.2
Copyright © Thomson Reuters 2016. All Rights Reserved.
Thomson Reuters, by publishing this document, does not guarantee that any information contained herein is and will remain accurate or that use of the information will ensure correct and faultless operation of the relevant service or equipment. Thomson Reuters, its agents and employees, shall not be held liable to or through any user for any loss or damage whatsoever resulting from reliance on the information contained herein.
This document contains information proprietary to Thomson Reuters and may not be reproduced, disclosed, or used in whole or part without the express written permission of Thomson Reuters.
Nothing in this document is intended, nor does it, alter the legal obligations, responsibilities or relationship between yourself and Thomson Reuters as set out in the contract existing between us.
Thomson Reuters recognizes that, in appropriate cases, some names used in this publication are the trademarks of their respective companies
This software may only be used in conjunction with Thomson Reuters services. It may not be resold, transferred, reproduced or copied by any means whatsoever (except for back-up purposes). Thomson Reuters does not warrant the performance of non Thomson Reuters equipment or agree to support or maintain non Thomson Reuters equipment. Thomson Reuters does not warrant that non Thomson Reuters equipment will be compatible with the service.

Contents
Client Administrator User Guide Document Version: 0.2
Contents
Introduction ......................................................................................................................... 6
World-Check One Administrators ............................................................................................................ 6
OnePass Profile ................................................................................................................... 7
Register New OnePass Profile ................................................................................................................ 7
Update Existing OnePass Profile .......................................................................................................... 13
Client Administrator Sign In ..............................................................................................16
Create Group ......................................................................................................................18
Created Group Details ........................................................................................................................... 20 Group Details......................................................................................................................................................... 20 Group Administrators ............................................................................................................................................. 21 Group Members ..................................................................................................................................................... 21 Features ................................................................................................................................................................ 22 Product Entitlements ............................................................................................................................................. 23 Product Settings .................................................................................................................................................... 23 World-Check Screening ......................................................................................................................................... 24 Screening and Resolution Settings ........................................................................................................................ 24
Create Roles .......................................................................................................................25
Create User .........................................................................................................................28
Client Admin Summary ......................................................................................................32
Edit ......................................................................................................................................34
Primary Group Details ........................................................................................................................... 35 Group Details......................................................................................................................................................... 35 Group Administrators ............................................................................................................................................. 36 Group Members ..................................................................................................................................................... 36 Features ................................................................................................................................................................ 37 Product Entitlements ............................................................................................................................................. 38 Product Settings .................................................................................................................................................... 39 Screening and Resolution Settings ........................................................................................................................ 40
Product Settings .................................................................................................................................... 40 Minimum Score Threshold ..................................................................................................................................... 41 Sources ................................................................................................................................................................. 42 Special Sources ..................................................................................................................................................... 42 Edit Group Settings ............................................................................................................................................... 43
Client Customization .............................................................................................................................. 45 Edit Custom Fields ................................................................................................................................................ 45 Edit Resolution Toolkit ........................................................................................................................................... 46 Edit Auto Resolution Toolkit................................................................................................................................... 47
Export ..................................................................................................................................48

Contents
Client Administrator User Guide Document Version: 0.2
Usage Report ........................................................................................................................................ 48
Audit ....................................................................................................................................51
Appendix A OnePass .....................................................................................................53
OnePass Username Requirements ....................................................................................................... 53
OnePass Password Requirements ....................................................................................................... 53

About this document
Client Administrator User Guide Page 5 of 54 Document Version: 0.2
About this document
Intended readership
Thomson Reuters Client Services and Professional Services personnel who are performing the Thomson Reuters Administrator role. Thomson Reuters Clients who are subscribed to World-Check One and are performing the Client Administrator role.
In this document
World-Check One is a single platform relationship risk management tool for customer on-boarding, identification and due diligence. It is currently offered as a SaaS (Software as a Service) solution.
This document contains the Client Administrator User Guide of World-Check One.
Feedback
If you have any comments on this document please contact the Thomson Reuters Risk Documentation team.
Glossary
Term Definition
IEI Iran Economic Interest Data
IMO International Maritime Organization
OGS On Going Screening
PEP Politically Exposed Person
SAAS Software as a Service
TR Thomson Reuters

Introduction
Client Administrator User Guide Page 6 of 54 Document Version: 0.2
Introduction
This user guide is for using Thomson Reuters World-Check One.
World-Check One simplifies and accelerates the customer due diligence process.
This highly scalable solution is built for single users or large teams to support a highly targeted approach for screening during KYC on-boarding, ongoing monitoring, and rescreening cycles.
It makes remediation quicker and more intelligent and is adaptable to meet changes in regulation.
It is part of Thomson Reuters, the unified platform built to meet the needs of the governance, risk and compliance community.
The software is built to maximize Thomson Reuters proprietary World-Check data, using:
Advanced name matching algorithms
Secondary matching
Filtering
Customizable workflow
Case management
Advanced administrative and reporting capability
Batch uploads, and
Ongoing monitoring for high volume client names.
World-Check One Administrators
There are three types of administrator roles in the system:
1. TR Admin: Users with this role are Thomson Reuters Professional Services personnel and they are the only Users allowed to create new Client records.
2. Client_Admin: Users with this role belong to the Client organization (i.e. no Thomson Reuters personnel). Client_Admin users can maintain the client and primary group as well as create child groups, users, roles etc. for the particular client.
3. Group_Admin: Users with this role belong to the Client organization (i.e. no Thomson Reuters personnel). Group_Admin users can maintain the group they administer as well as create child groups, users, etc. for the particular group.
This guide refers to Role 2 – Client Administrators.

OnePass Profile
Client Administrator User Guide Page 7 of 54 Document Version: 0.2
OnePass Profile
OnePass allows you to log on to multiple Thomson Reuters applications and websites with a single username and password. You choose your own username and password; if you forget your password, you can reset it yourself.
Register New OnePass Profile
As a Client Administrator you will receive an activation email by Thomson Reuters containing the URL to access World-Check One as well as a registration key to create your OnePass profile.
Once you click on the World-Check One URL provided in the Activation Email, you will be taken to the OnePass Sign In page. To set up your OnePass profile.
Click Create a new OnePass profile to display the register a new profile form:

OnePass Profile
Client Administrator User Guide Page 8 of 54 Document Version: 0.2
You must populate the Registration Key field with registration key that was sent to you through email.

OnePass Profile
Client Administrator User Guide Page 9 of 54 Document Version: 0.2
Copy the Registration Key from your Activation Email and Paste the registration key into the Registration Key field.
Note: If your registration key is not valid, you will be prompted with a message and the text field will be highlighted in red.
Give a Friendly Name to identify what type of user you are. Friendly name is the name given to the Product Registration Key to help a user identify its primary purpose (i.e. admin, research, trial) and product if you are subscribing to more than one Thomson Reuters products.
Enter your Email Address (must be the email address your activation email was sent to).
Click Continue. The Register a new OnePass Profile form is displayed.
Note: If by mistake you try to create a new profile and you already have an existing profile, after you click Continue, OnePass will prompt you directly to enter your username and password to access World-Check One.

OnePass Profile
Client Administrator User Guide Page 10 of 54 Document Version: 0.2
Enter First and Last Name.
Enter your Email Address (must be the email address your activation email was sent to).
Enter to Confirm Email Address (must be the email address your activation email was sent to).
Enter Alternate Email Address (optional).
Enter Username (make sure you make a note of this).
Enter Password (make sure you make a note of this).
Enter to Confirm Password.
Select a Security Question from the drop down which you will remember.
Enter your Answer.
Click Create Profile.

OnePass Profile
Client Administrator User Guide Page 11 of 54 Document Version: 0.2
Once complete, in order to access World-Check One, click Return to Accelus World-Check One on the left side of the page to display the OnePass Sign In.

OnePass Profile
Client Administrator User Guide Page 12 of 54 Document Version: 0.2
Note: If you already have an OnePass Profile and you have added an extra registration key with a different purpose. If successful with registration the following page will be displayed:
Once registration is complete you are notified the registration key is added to your OnePass Profile. Click Return To Accelus World-Check One to display the OnePass Sign In.
You can now successfully sign into World-Check through OnePass, based on the Username and Password entered when creating your OnePass profile.

OnePass Profile
Client Administrator User Guide Page 13 of 54 Document Version: 0.2
Update Existing OnePass Profile
To update an existing OnePass profile, do the following:
Access One Pass sign in screen and Click Update an existing OnePass profile.
Enter your OnePass Username and Password and click Sign In.

OnePass Profile
Client Administrator User Guide Page 14 of 54 Document Version: 0.2
Click Manage Products.
Click Add a new Registration key.

OnePass Profile
Client Administrator User Guide Page 15 of 54 Document Version: 0.2
Copy new Registration Key and paste it into the Registration Key field. Enter Friendly name e.g. ‘Screener 1’ then click Save.
Once done you can click Return to Accelus and you will be able to access World-Check One under the new Registration key.
Once you click Sign In you will be prompted to select what user/role you would like to use.
Click Continue to access World Check One.

Client Administrator Sign In
Client Administrator User Guide Page 16 of 54 Document Version: 0.2
Client Administrator Sign In
Login to World-Check One Client Admin through OnePass Sign In:
Note: For further details on OnePass Sign In, refer to Appendix A.
Enter your Username and Password.
Click Sign In to access World-Check One with Thomson Reuters Administrators rights.
Depending on the role you have been assigned, you could land on the Admin page (if you are a Client or Group Admin) or the Screening page (if you are a Screener). If you have been assigned both Admin and Screener roles, you will land on the Admin page.
Upon logging in, Client Administrator will land on the following page; the client record has already been created for you with a standardised set of defaults:

Client Administrator Sign In
Client Administrator User Guide Page 17 of 54 Document Version: 0.2
Options on the left hand panel:
Mystax (Client Name) This is the name of the client organisation, in this instance its Mystax.
Group Click Groups to display the groups page, where you can create/edit groups.
Users Click Users to display the users page, where you can create, edit or delete a user.
Audit Click Audit to display the audit page, where all audit trail of client administrator is recorded.
Roles Click Roles to display the roles page, where you can create and assign roles to users.
Theme Chooser Click Theme Chooser to display the theme settings page.

Create Group
Client Administrator User Guide Page 18 of 54 Document Version: 0.2
Create Group
A Client Administrator can configure settings that a TR Administrator has given them access to, as well as create group administrator(s), who can configure settings that a Client Administrator has given them access to.
The Primary Group (for example Mystax) is the highest parent group in the hierarchy and it is automatically created when a Client record is added by the TR Administrator(s). It contains the default settings that you would like to use across the different child groups, however each individual child group can be customized as needed/wanted regardless of the inherited defaults.
Client Administrators will be able to create, edit and remove child groups and specify the group features, such as default search type. The users can also add or remove users from a group as well as configure World-Check settings that will apply to all child groups created.
From the left hand panel in Admin, click Groups:
The Groups summary section is displayed.

Create Group
Client Administrator User Guide Page 19 of 54 Document Version: 0.2
Click New Group to display the Create New Group section.
Populate all mandatory fields:
Parent group Parent group is selected by default, cannot be changed
Group name Enter a group name for the new group
Compliance Leader Enter the compliance leader name
Email Enter the email address of the compliance leader.
Default search type for the group Select the default search type (Case Management & Audit or Zero Footprint Search).
Note: Case Management & Audit includes Initial and Ongoing Screening, having created a Case. Zero Footprint Search does screening with no Case creation and no audit trail.

Create Group
Client Administrator User Guide Page 20 of 54 Document Version: 0.2
Once all fields are populated and you have selected your default search type for the group, click Create Group. Once the group has been created, the following prompt message is displayed.
The newly created group will appear under the Parent Group name:
Created Group Details
Click on the new group name (Mystax – Commercial) to display the group summary page.
Group Details
The Group details tab details all the information about the group.
Note: Any Group under the Primary Group can be turned ON/OFF (activated/de-activated) by the Client Administrator and the Group Administrator can turn ON/OFF groups under its respective group.
You can turn the group to inactive status; click ON to turn the group off, the following prompt message is displayed when group has been set to inactive state.
To turn the group back to active status, click OFF to turn the group on, the following message is displayed when group has been set to active state.

Create Group
Client Administrator User Guide Page 21 of 54 Document Version: 0.2
Group active Displays active/inactive (ON/OFF) group
Group name Name of the group
Compliance Leader Name of the compliance leader
Email Email address of the compliance leader
To edit Group details refer to Edit section for further information.
Group Administrators
The Group Administrators tab displays the name and email address of the selected group administrator(s):
Group Members
The Group Members tab displays all the other Users associated with the selected group:
To edit Group Members details refer to Edit section for further information.

Create Group
Client Administrator User Guide Page 22 of 54 Document Version: 0.2
Features
The Features tab displays the Batch Screening:
You can toggle ON/OFF batch screening at Group level depending on your organisations requirements:
If you are using Batch Screening, you must Add Batch Names. Batch Names are used during the Batch screening process to upload batch files against and as filters on the Case Manager page.
Click Add Batch Names to display the Batch Names section:
Enter a Batch Name, for example Credit Cards (Credit Card Applications), Retail (Retail Clients), New Brokerage (New Brokerage Accounts), etc.
The Show check box is ticked by default, click to remove tick if you don’t want the batch name to be shown, but would like to create it for later use (will be displayed in Hidden tab).
Note: If you do not operate using different batch data extraction/feed, you can add one generic Batch Name e.g. Daily Upload.

Create Group
Client Administrator User Guide Page 23 of 54 Document Version: 0.2
Click Save to save the batch name. The following message will be displayed:
You can add more batch names depending on your requirements. Once finished adding batch names, the added batch names are displayed in the table:
All tab displays all the created batch names
Shown tab displays only shown batch names
Hidden tab displays only hidden batch names that are currently not shown.
Product Entitlements
The Product Entitlements list the entitlements the created group has:
To edit Product Entitlements refer to Edit section for further information.
Product Settings
The Product Settings display the subscription details and world-check screening details, which can be edited if required.

Create Group
Client Administrator User Guide Page 24 of 54 Document Version: 0.2
To edit subscription details, refer to Edit section for further information.
World-Check Screening
The World-Check Screening section displays the selected groups screening type and if it has inherited On Going screening settings from initial screening settings:
To edit World-Check settings, refer to Product Settings for further information.
Screening and Resolution Settings
The screening and resolution settings display the custom fields, resolution toolkit and auto-resolution settings, which are all editable:
To edit screening and resolution settings, refer to Client Customization for further information.

Create Roles
Client Administrator User Guide Page 25 of 54 Document Version: 0.2
Create Roles
The following Roles are pre-defined in the system:
CLIENT_ADMIN: this is the Client Administrator and permissions cannot be changed within this role
GROUP_ADMIN: this is the Group Administrator and permissions cannot be changed with in this role
Case Manager: this is a custom pre-defined role that includes all permissions related to screening/maintaining a case.
Note: You can either change the Case Manager Role by removing permissions or you could create your own custom roles
Resolve a Case Allows you to resolve a case and gives access to the Resolution tab of the resolution toolkit.
Create a Case/Screen Case Allows you to create a case, automatically done after clicking on Screen. You have the option to create a case but not screen it by clicking on the Save button. Screen a case = Allows you to screen a name. Both Create and Screen are required as enabling screen only without the other will not allow you to create a case.
Delete a Case Allows you to delete an archived case (case is removed from the system)
Archive a Case Allows you to archive a case through the Archive button in the Case and Case manager toolbar.
Case OGS Allows you to enable OGS for a case through the Ongoing Screening button in the Case and Case manager toolbar.

Create Roles
Client Administrator User Guide Page 26 of 54 Document Version: 0.2
Review a case Allows you to review a case and gives access to the review tab on the resolution toolkit.
Assign a Case Allows you to assign an existing case to self or other user, or unassign the case.
To create a new role, click New Role:
Enter Role Name in the text field and click on the Unassigned Permissions to move them to the Assigned Permissions section, for example:

Create Roles
Client Administrator User Guide Page 27 of 54 Document Version: 0.2
Click Create Role.
You will be prompted with the following message:
The new role will be displayed in the Roles section with its given Permissions on the left hand pane:
Create User
Client Administrator User Guide Page 28 of 54 Document Version: 0.2
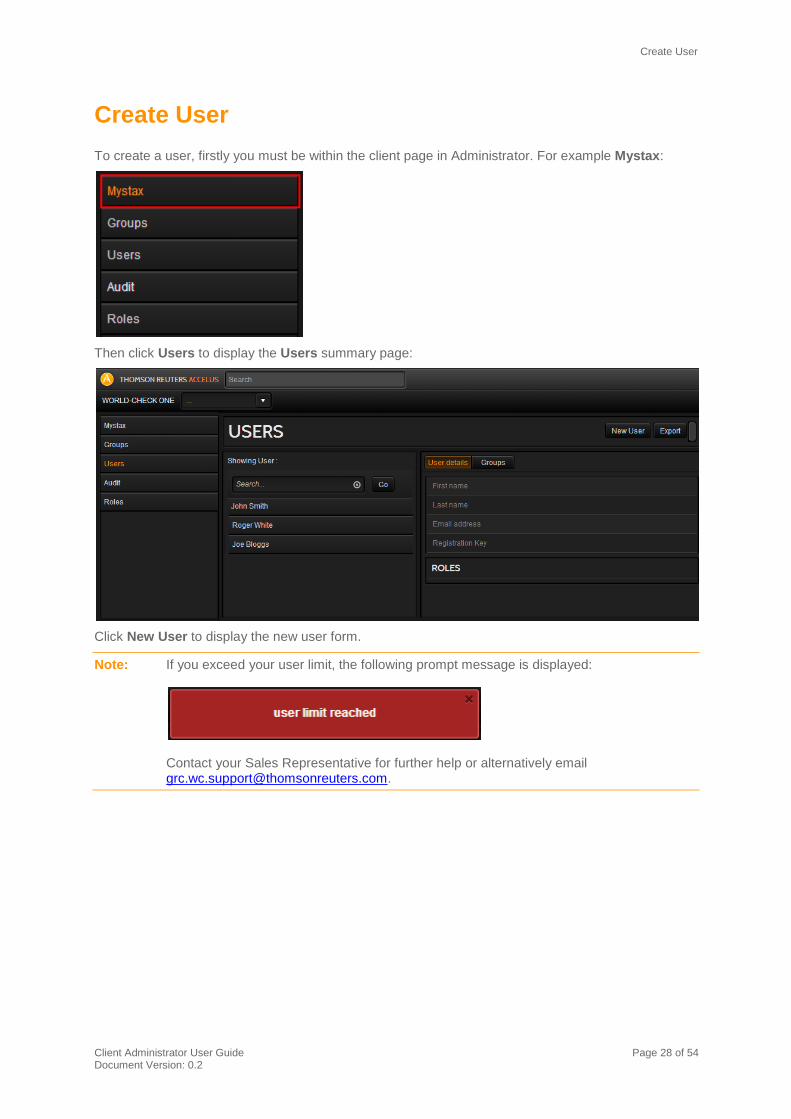
Create User
To create a user, firstly you must be within the client page in Administrator. For example Mystax:
Then click Users to display the Users summary page:
Click New User to display the new user form.
Note: If you exceed your user limit, the following prompt message is displayed:
Contact your Sales Representative for further help or alternatively email [email protected].

Create User
Client Administrator User Guide Page 29 of 54 Document Version: 0.2
Enter new user First name, Last name and Email address, for example:
Then assign roles to the user:
From the Unassigned Roles you have the options to assign certain roles to the user you are creating. You can assign the following roles:
Screener (client custom made).
All roles.
GROUP_ADMIN (system defined), only create users and create groups under the group you are assigned to.
CLIENT_ADMIN (system defined) you can edit the client, toolkit auto resolution and create any types of group.

Create User
Client Administrator User Guide Page 30 of 54 Document Version: 0.2
Click on the role to assign the role to Assigned Roles section, for example click Screener:
Then select which Group you want the user to be assigned to by clicking on it (multiple groups can be assigned). You can search for a group by using the Search text field or by selecting the group that is displayed in the list. For example Mystax - Commercial:
Then click Create User, the following prompt message is displayed once the user is created successfully.
The new created user (for example Roger White) will be displayed in the group Users section:
The User Details tab will display the user details, roles assigned and the registration key, which will be automatically emailed to the user for activation through OnePass.
The new user will need to create a new OnePass profile if not already registered (refer to Register New OnePass Profile for further information.

Create User
Client Administrator User Guide Page 31 of 54 Document Version: 0.2
The Groups tab displays the group the user is associated with; in this example the user is associated with Mystax – Commercial group.

Client Admin Summary
Client Administrator User Guide Page 32 of 54 Document Version: 0.2
Client Admin Summary
The client admin summary page displays a snapshot of information settings regarding the client.
Client Details:
Client Name Details of the client name, for example Thomson Reuters
Salesforce ID Salesforce ID if used (Thomson Reuters internal use only)
Number of Users Number of allocated users
Number of Searches Number of allocated searches
Number of OGS Searches Number of allocated OGS searches
Subscribed screening types Client subscription on screening types, for example Initial, OGS and Anonymous
Subscription Details:
Subscription Mode Subscription mode of client, for example Regular
Subscription Type Client subscription type, for example Premium Plus
From Subscription started date and time
To Subscription end date and time
Auto-include new sources by default Automatically includes new sources from World-Check data, the options are true or false.
Client Customisations:
Custom-Fields Click edit to display the customised custom fields for screening form
Resolution Toolkit Click edit to display the Client resolution settings form
Auto Resolution Settings Click edit to display the auto resolution settings form
Refer to Client Customization for further information.
Primary Group Details:

Client Admin Summary
Client Administrator User Guide Page 33 of 54 Document Version: 0.2
Compliance Leader Name of the compliance leader
Email Email address of the compliance leader
Client Admin Click more to display the Groups summary page for creating or editing a group.
Refer to Primary Group Details for further information
Product Settings:
World-Check Click edit to display the World-Check screening settings.
Refer to World-Check Screening for further information.

Edit
Client Administrator User Guide Page 34 of 54 Document Version: 0.2
Edit
From the Client Summary page you can edit your client settings:
You can edit the following areas:
Primary Group Details
Product Settings
Client Customization

Edit
Client Administrator User Guide Page 35 of 54 Document Version: 0.2
Primary Group Details
The Primary Group is the highest parent group in the hierarchy and it is automatically created when a Client record is added by Thomson Reuters Administrators. It contains the default settings that the Client would like to use across the different child groups, however each individual child group can be customized as needed/wanted regardless of the inherited defaults.
The standardised vanilla settings will enable you as a client to start using World-Check One with no further changes, however please review and make any changes, based on your client permissions that would be appropriate for your organisation.
Note: If you are the Group Administrator of a Primary Group you will have permission to edit the Primary Group details or if you are a Group Administrator for one of the child groups(s) then you will only have permission to edit the Group that you have been assigned to and create child group(s) for that group.
Group Details
The Group Details contain the name of the group, the compliance leader and its email address.

Edit
Client Administrator User Guide Page 36 of 54 Document Version: 0.2
Edit
Click Edit to edit the group details.
Compliance Leader You can edit the compliance leader name
Email You can edit the compliance leader email address
Group Administrators
The Group Administrators details display the name and email address of the group administrator(s).
Group Members
The Group Members tab displays the members of the Primary Group and what roles the member (user) is assigned to:

Edit
Client Administrator User Guide Page 37 of 54 Document Version: 0.2
Edit
Click Edit to display the following:
You can edit the group members assigned to the Primary Group. Use the Add All/Remove All functionality to add or remove members. Once done click Save.
Features
The Features tab displays Batch Screening settings, which can be toggled ON/OFF at Group level.
Refer to Features in the Create Group section for further information.

Edit
Client Administrator User Guide Page 38 of 54 Document Version: 0.2
Product Entitlements
The Product Entitlements section displays the products the client has subscribed to:
Edit
Click Edit to maintain the product entitlements:
Click World-Check and Passport check box to enable/disable the checks on the Screening page.
Once finished editing, click Save or click Cancel to discard changes.

Edit
Client Administrator User Guide Page 39 of 54 Document Version: 0.2
Product Settings
The product settings page displays the subscription details and World-Check screening details.
Subscription Details
The Subscription Details section details all information relating to client subscription.

Edit
Client Administrator User Guide Page 40 of 54 Document Version: 0.2
World-Check Screening
The World-Check Screening section details the client default screening type and if it has inherited On Going screening settings from Initial screening (the setting can be Yes or No).
To edit Group World-Check Screening settings, refer to Product Settings for further information.
Screening and Resolution Settings
The screening and resolution settings allow you to edit the custom fields, resolution toolkit and auto resolution settings. Refer to Client Customization section for further information.
Product Settings
From the Product Settings section, click Edit next to World-Check to display the Groups settings page. By default the parent Group level is the same as the Client:
Note: A client can have many groups under the parent group level. Groups under the parent group can have independent group’s settings; the following applies to all levels of group.
World-Check You can turn World-Check ON/OFF for the group.
Auto Include New Data Sources You can turn Auto Include New Data Sources ON/OFF. By turning this ON, the users will see matches from sources that

Edit
Client Administrator User Guide Page 41 of 54 Document Version: 0.2
have been newly introduced under the Opt-out source list (listed under Sources). Users can expect to see spikes in terms of number of matches as a result of this functionality.
Subscription Details Your subscription level (Standard, Premium, Premium Plus).
Exclude Low Quality Aliases You can turn Exclude Low Quality Aliases ON/OFF (applicable if the subscription is Premium or Premium Plus).
Include Native Aliases You can turn Include Native Aliases ON/OFF (applicable if the subscription is Premium Plus).
Initial Screening You can set the Minimum score threshold for initial screening.
Ongoing Screening You can set the Minimum score threshold for ongoing screening. Select Inherit Initial Search Settings check box if you want to use the same settings as Initial Screening for Ongoing Screening.
Sources You can edit the Sources that may not be relevant at Group level.
Revert Click Revert to inherit Parent Group level settings.
Minimum Score Threshold
The minimum score threshold applies to the matching results based on a technology assisted method of identifying names across two data sets. There may be differences in the names but similarities are still required to be returned in order to capture similar names within the data to account for the unknown differences (aka fuzzy matching).
Fuzzy matching may account for a lot of variations examples of which may be:
Missing name components e.g. John Smith to John Jacob Robert Smith
Translation of names e.g. Jack to Jaques
Colloquial variations e.g. Thomas to Tom
Phonetic variations e.g. Dixon to Dickson
Minor spelling variations e.g. John Simth to John Smith.
There are a number of different factors one needs to evaluate when choosing an optimum setting. One of those will be the quality of the data you are supplying for searching. If the quality of the data is good, then there is confidence that all name elements have been captured then a tighter match setting should be more appropriate.
The matching engine attributes a score to the World-Check results matching the Screening Name. The score is comprised between weak and exact.
You can set the Fuzzy matching to following settings:
Fuzzy - will return matches with scores from weak to exact
Medium - will return matches with scores from medium to exact
Strong - will return matches from strong to exact
Exact - will only return exact matches.
For further information on matching, refer to the Matching Overview Guide.

Edit
Client Administrator User Guide Page 42 of 54 Document Version: 0.2
Sources
The selection of sources follows the usual parent-child behaviour, for example select Sanctions parent, also selects the all the sub sources beneath:
However individual sources can be included/excluded regardless of the parent settings e.g. Australia DFAT-AS could be turned OFF.
Sources are list supplied by domestic and international bodies, where user inputted data is searched against for a match. The following sources and sub bodies are selected by default:
Law Enforcement – Contains lists by law enforcement bodies from domestic to international level.
Other Bodies – Contains lists by other bodies from World-Check (e.g. World-Check Data Research).
PEP (Politically Exposed Person) – Contains lists by PEP bodies from International, National, Local and so forth.
Regulatory Enforcement – Contains lists by regulatory enforcement bodies of various countries.
Sanctions – Contains lists by sanction bodies of various countries.
Special Sources
Special sources are extra lists that are only available if you have subscribed and opt-in:
INTERNATIONAL – IRAN – IEI – Iran Economic Interest Data – International sanctions against Iran. The IEI Database contains many 10,000s of records of entities believed to have significant and relevant relationships with Iran.
United States System for Award Management (USSAM) - A US government initiative to consolidate procurement databases, which include lists of excluded and restricted parties. All current and potential Federal contractors, grantees and assistance award recipients are required to register in this database. SAM contains organizations and entities that are either restricted or prohibited from doing business with the US government.

Edit
Client Administrator User Guide Page 43 of 54 Document Version: 0.2
Edit Group Settings
To edit the World-Check Settings, click Edit to enable edit mode:
You can edit the Group Settings, Minimum score threshold, Sources and Special Sources, use the selector to set the score threshold. It comprises of two controls:
Slider – which the user can move left to right to the desired position
Indicator – Which displays the score threshold value.
You can set the score threshold by operating the slider left to right.
If you want Strong to Exact matches returned when screening a name, the slider should be positioned between Strong and Exact:
You can remove the Sources that may not be you; click to remove tick from the check box, for example, PEP and Other Bodies:
Also if do not require particular sub lists, click on the arrow next to the source name to display all the sub bodies of the selected source. Then click to remove tick from the check box. For example:

Edit
Client Administrator User Guide Page 44 of 54 Document Version: 0.2
Then click Save to save the changes.
Note: The list of special sources is Opt-In by nature where you would have to opt out selectively, if needed.
You can remove any Special Sources list if not required; click to remove tick from the check box, for example:
Once you have completed editing the settings, click Save to save the settings or click Cancel to discard changes made to settings.

Edit
Client Administrator User Guide Page 45 of 54 Document Version: 0.2
Client Customization
The Client Customization settings allow you to edit the custom fields, resolution toolkit and auto resolution settings:
Edit Custom Fields
From the client customization settings page, next to Custom-Fields click Edit to display the following:
Click Add Row to add customs fields to the screening form, there is no limit to the amount of Custom Fields that can be added.
Custom fields are optional and each client can label them as deemed appropriate by typing the label in the entry field. Custom fields are information only fields that could be used to capture reference information when screening a name. The fields can be shown and optional on the Screening page or,

Edit
Client Administrator User Guide Page 46 of 54 Document Version: 0.2
if needed, they can be made mandatory; therefore the user will need to specify a value in the field when screening a name.
You can remove unwanted Custom Field(s) by clicking on X.
Edit Resolution Toolkit
The Resolution Toolkit Configuration allows you to specify Statuses, Risks and Reasons valid values as these will be displayed to a user resolving matches.
From the client customization settings page, next to Resolution Toolkit click Edit to display the following:
The following Reasons are pre-defined on the page:
1. Full match
2. Partial match
3. No Match
4. Unknown
The following Resolution States, Risk and Reasons are pre-defined:
Status Mandatory Notes Risk Reason
POSITIVE No HIGH, MEDIUM, LOW Full Match
POSSIBLE No HIGH, MEDIUM, LOW, UNKNOWN
Partial Match
FALSE No UNKNOWN No Match
UNSPECIFIED No UNKNOWN Unknown

Edit
Client Administrator User Guide Page 47 of 54 Document Version: 0.2
Click Edit to enable edit mode. You can edit existing resolutions states and Add New Reasons, once complete click Save or click Cancel to discard changes.
Edit Auto Resolution Toolkit
From the client customization settings page, next to Auto Resolution Toolkit click Edit to display the following:
You can decide what would be the outcome of the auto-resolution rules:
You have the option to select Remove from results or Auto-resolve as ‘False’.
Authorised users (TR Admin, Client_Admin and Group_Admin) can specify any secondary matching fields they want the system to use for each source type to help reduce potential false positives. You can edit existing settings.
The secondary matching fields available are as follows:
Individual - Gender, Date of Birth, Country of Residence, Place of Birth and Nationality
Organization - Registered Country
Vessel – IMO No
You can decide what secondary matching filed to use against each of the available lists (e.g. Sanctions) by ticking the appropriate box in the matrix.
Once you have completed editing the Auto Resolution Toolkit page, click Save or Cancel to discard changes.

Export
Client Administrator User Guide Page 48 of 54 Document Version: 0.2
Export
Usage Report
The Export feature allows you to export a Usage Report detailing the client usage information to a csv (comma separated value) file format. This feature is similar to the Summary and Detailed Reports and only available to the TR Admin and Client Admin users. The Client Admin can use this information to monitor their client activity.
The key features are:
Report generation managed in the background
System notify the user by e-mail that the report is completed
View and download reports generated by Client Administrators within the same client
Reports available to download for a minimum of 72 hours from completion date; users can download and save reports locally on their servers.
To export a Usage Report:
1. On the Client Summary page, click the Export icon.
The Export dialog-box appears.
2. Click Export.
The progress message is displayed when Export is selected.
3. Click OK.

Export
Client Administrator User Guide Page 49 of 54 Document Version: 0.2
Note: The selected report is generated in the background, so that the user session is not locked. The report completion time will vary depending on the concurrent reports processing in the background at the same time.
When the report generation is complete, you will receive an email notification. The email confirms that the report generation has been completed as well as the status of the report (In Progress / Completed / Failed).
If the report was successfully completed, it will be ready to be downloaded from the Report Status page.
4. On the World-Check One menu, click Report Status. The Report Status page appears and shows the list of reports.
5. In the Report Link column, click the download link.
The report will be minimized and displayed at the bottom of the screen. The following is the example of the Usage Report.
The Usage Report CSV lists the following usage information:
Client Name
Salesforce Id
Client code
Status
Finalised
Mode
Subscription Start Date
Subscription End Date
Name Transposition
Case Delete (Client)
User Subscribed (Client)
No of Actual users (Client)
Initial Subscribed (Client)
OGS Subscribed (Client)

Export
Client Administrator User Guide Page 50 of 54 Document Version: 0.2
Group Name
Group Status
Subscription Type
Alias
Case Management
ZFS
Batch
Products
Special Sources
No of Actual Internal Screening (Group)
Current Actual Cases on OGS (Group)
Cases Archived (Group)
Number of unique cases created (Group)
Batch Screening runs (Group)
Client Admins

Audit
Client Administrator User Guide Page 51 of 54 Document Version: 0.2
Audit
To access the audit trail of Client administrators, click Audit from the left hand panel to display the following:
Audit Filters:
Administrator Displays all the current Client Administrators; you can filter the audit trail based on a particular administrator.
Action Type Displays the all the different types of actions done by the Administrators; you can filter the audit trail based on a particular action type.

Audit
Client Administrator User Guide Page 52 of 54 Document Version: 0.2
Group You can select which Group audit trail you are interested in.
Audit Date You can specify From and To date audit trail to narrow your search.
Once you have selected either the administrator or group you are interested in, on the right hand side the audit trail of that particular interest will be displayed.
The audit trail will display the following information:
Administrator - name of administrator
Actioned On – What group or person the event was actioned on
Event – What type event it was for example new user, group update, etc.
Date – Date of the action

Audit
Client Administrator User Guide Page 53 of 54 Document Version: 0.2
Appendix A OnePass
OnePass allows you to log on to multiple Thomson Reuters applications and websites with a single username and password. You choose your own username and password; if you forget your password, you can reset it yourself.
OnePass Username Requirements
Must be between 8 and 70 characters in length, can be any letter, number or character combination, and is case sensitive.
Email addresses are valid usernames.
Must be unique from all other OnePass users.
Can be saved as a cookie.
Forgotten username can be emailed to user with validation of email address and answer to security question.
OnePass Password Requirements
Passwords must be at least 8 characters in length and include at least 3 of the following 4 characters:
uppercase letters
lowercase letters
numerals
special characters: period ( . ), at ( @ ), hyphen ( - ), underscore ( _ ), pound ( # ), dollar sign ( $ ), or percent ( % )
Do not use an email address as a password
Forgotten password can be reset with validation of username, email address, and answer to security question
Can be saved as a cookie. Please note that if you save both your username and password, and you access sensitive public records content, you will be asked to enter your password again. This re-authentication process will only be required once per session.

© 2016 Thomson Reuters. All rights reserved. Republication or redistribution of Thomson Reuters content, including by framing or similar means, is prohibited without the prior written consent of Thomson Reuters. 'Thomson Reuters' and the Thomson Reuters logo are registered trademarks and trademarks of Thomson Reuters and its affiliated companies.
For more information
Send us a sales enquiry at https://risk.thomsonreuters.com/about-us/contact-us
Read more about our products at http://risk.thomsonreuters.com
Find out how to contact your local office http://risk.thomsonreuters.com/about-us/where-we-are
Document Version: 0.2 Issue Date: 31/05/16