thread power system for customer service de alimentación thread para servicio al cliente (versión...
TRANSCRIPT

Thread™ Power Systemfor Customer Service
If you have a problem, question, or request, callyour local dealer, or Steelcase Line 1 at888.STEELCASE (888.783.3522)for immediate action by people who want to help you.
(Outside the U.S.A., Canada, Mexico, Puerto Rico, and the U.S. Virgin Islands, call: 1.616.247.2500)Or visit our website: www.steelcase.com© 2016 Steelcase Inc. Grand Rapids, MI 49501 U.S.A.
Printed in U.S.A.
®
1/4”
T20
OPTIONAL ACCESSORY WITH
PROPRIETARY PLUG
OPTIONALACCESSORY WITH
PROPRIETARYPLUG
OPTIONALTHREE PRONGPLUG ADAPTER
ELECTRICIANSUPPLIED
English - Page 1 to 3 of 9French - Page 4 to 6 of 9
Spanish - Page 7 to 9 of 924207102 Rev A
SOCKET WRENCH

Page 2 of 924207102 Rev A
®
To Replace Center Caps:
1. Remove center screw using T20 torx driver (refer to 1a or 1b depending on the cover).
2. Remove the existing center cap.
3. Replace with new center cap and reinstall screw using T20 torx driver.
ONE DOOR LOWPROFILE CONNECTOR
TWO DOORCENTER CAP
1a
ONE DOORCENTER CAP
2
3
TWO DOOR LOWPROFILE CONNECTOR
1b 2
3

Page 3 of 924207102 Rev A
®
BLANK LOWPROFILE CONNECTOR
TWO DOOR LOWPROFILE CONNECTOR
ONE DOOR LOWPROFILE CONNECTOR
To Replace Trim Ring:
1. Remove center screw using T20 torx driver (refer to 1a, 1b, 1c, or 1d depending on the cover).
2. Remove connector cover and center cap.
3. Remove existing trim ring from the carpet hole.
4. Place the new trim ring into the carpet hole and align the (4) tabs into the corresponding wells in the junction.
5. Reinstall the connector cover and center cap.
6. Reinstall the center screw using T20 torx driver.
1a
ONE DOORCENTER CAP
TWO DOORCENTER CAP
2
1b 1c
2 2
REMOVE TRIM RING
3
INSTALL TRIM RING IN PLACE
4
NEMA MONUMENTCONNECTOR
1d
NEMA MONUMENTCONNECTOR
2

Système d'alimentationThreadMC pour le service à la clientèle (Version Française)
IPour toute question ou demande de renseignements, communiquezavec le détaillant ou avec Steelcase au numéro 1 888 STEELCASE (1 888 783-3522)pour obtenir immédiatement de l'aide.(En dehors des É.-U., du Canada, du Mexique, de Porto Rico et des Îles Vierges américaines, faites le 1 616 247-2500.)Ou visitez notre site Web : www.steelcase.com.© 2016 Steelcase Inc.Grand Rapids, MI 49501U.S.A.Imprimé aux É.-U.
®
1/4 po
T20
Page 4 of 924207102 Rev A
ACCESSOIRE OPTIONNEL AVEC FICHE EXCLUSIVE
FOURNI PAR L'ÉLECTRICIEN
ADAPTATEUR DE FICHE OPTIONNEL À TROIS BROCHES
ACCESSOIRE OPTIONNEL AVEC FICHE EXCLUSIVE
CLÉ À DOUILLE
Page 5 of 924207102 Rev A
®
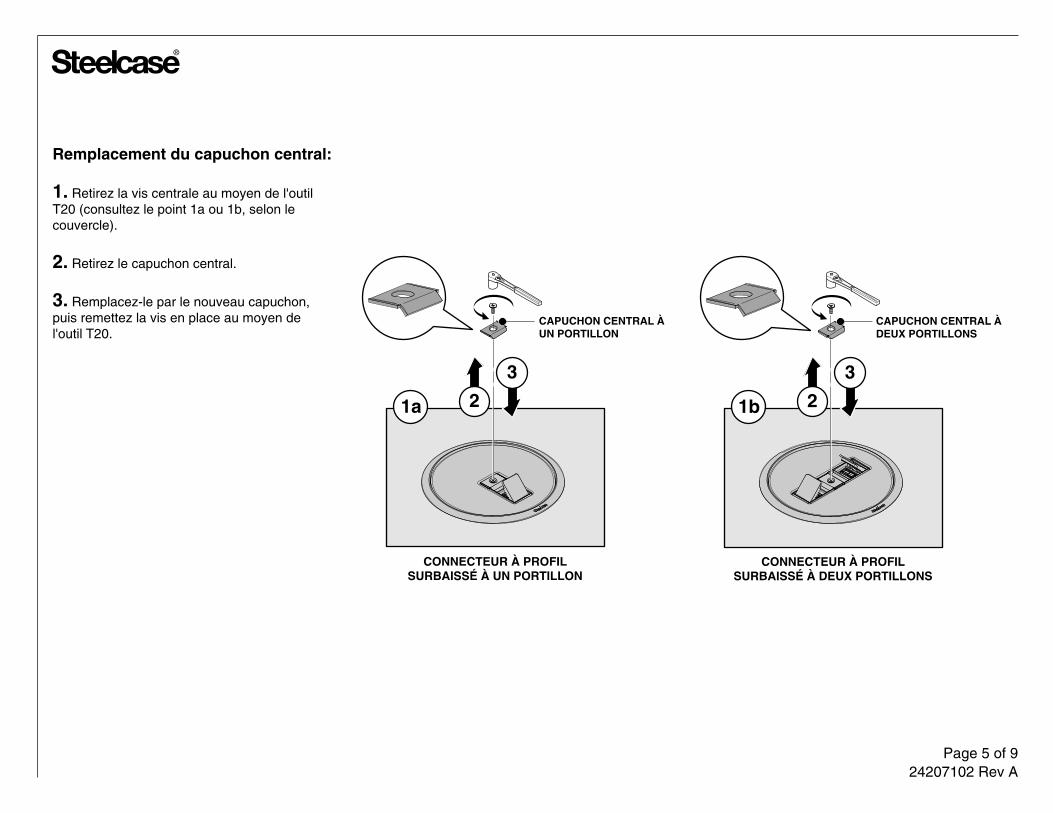
Remplacement du capuchon central:
1. Retirez la vis centrale au moyen de l'outil T20 (consultez le point 1a ou 1b, selon le couvercle).
2. Retirez le capuchon central.
3. Remplacez-le par le nouveau capuchon, puis remettez la vis en place au moyen de l'outil T20.
CONNECTEUR À PROFILSURBAISSÉ À UN PORTILLON
CAPUCHON CENTRAL ÀDEUX PORTILLONS
1a
CAPUCHON CENTRAL ÀUN PORTILLON
2
3
CONNECTEUR À PROFILSURBAISSÉ À DEUX PORTILLONS
1b 2
3

Page 6 of 924207102 Rev A
®
CONNECTEUR À PROFIL SURBAISSÉ VIDE
CONNECTEUR À PROFILSURBAISSÉ À 2 PORTILLONS
CONNECTEUR À PROFILSURBAISSÉ À 1 PORTILLON
Remplacement de l'anneau de garniture:
1. Retirez la vis centrale au moyen de l'outil T20 (consultez le point 1a, 1b, 1c ou 1d en fonction du couvercle).
2. Retirez le couvercle du connecteur et le capuchon central.
3. Retirez l'anneau de garniture existant du trou dans le tapis.
4. Placez le nouvel anneau de garniture dans le trou du tapis, puis alignez les 4 pattes dans les orifices correspondants de la boîte.
5. Remettez en place le couvercle du connecteur et le capuchon central.
6. Remettez la vis centrale au moyen de l'outil T20.
1a
CAPUCHON CENTRAL ÀDEUX PORTILLONS
CAPUCHON CENTRAL ÀDEUX PORTILLONS
2
1b 1c
2 2
RETIREZ L'ANNEAU
3
INSTALLEZ L'ANNEAU
4
PRISE DE SOL NEMA
1d
PRISE DE SOL NEMA
2

Sistema de alimentación Thread™ para servicio al cliente(Versión en Español)
®
¼ de pulgada
T20
ACCESORIO OPCIONAL CON ENCHUFE PROPIETARIO
ADAPTADOR OPCIONAL TRES PUNTAS
PROVISTO POR EL ELECTRICISTA
Page 7 of 924207102 Rev A
ACCESORIO OPCIONAL CON ENCHUFE PROPIETARIO
Si tiene algún problema, pregunta o pedido, llamea su distribuidor local , o a la línea 1 de Steelcase al888.STEELCASE (888.783.3522) para una respuesta inmediata de parte de quienes desean ayudarle.(Fuera de los EE.UU., Canadá, México, Puerto Rico y las Islas Vírgenes de los EE.UU., llame al 1.616.247.2500) o visite nuestro sitio web: www.steelcase.com© 2016 Steelcase Inc.Grand Rapids, MI 49501U.S.A.Impreso en los EE.UU.
LLAVE DE TUO

Page 8 of 924207102 Rev A
®
Para reemplazar las tapas centrales:
1. Retire el tornillo central utilizando la herramienta torx T20 (vea 1a o 1b dependiendo de la tapa).
2. Retire la tapa central existente.
3. Reemplace con la nueva tapa central y vuelva a instalar el tornillo utilizando la herramienta torx T20.
CONECTOR DE BAJO PERFIL CON UNA PUERTA
TAPA CENTRAL CON DOS PUERTAS
1a
TAPA CENTRAL CON UNA PUERTA
2
3
CONECTOR DE BAJO PERFIL CON DOS PUERTAS
1b 2
3

Page 9 of 924207102 Rev A
®
TWO DOOR LOWPROFILE CONNECTOR
Para reemplazar el anillo de la moldura:
1. Retire el tornillo central utilizando la herramienta torx T20 (vea 1a, 1b, 1c, o 1d dependiendo de la tapa).
2. Retire la tapa del conector y la tapa central.
3. Retire el anillo de la moldura existente del orificio de la alfombra.
4. Coloque el nuevo anillo de la moldura en el orificio de la alfombra y alinee las (4) lengüetas en los correspondientes agujeros en la unión.
5. Vuelva a instalar la tapa del conector y la tapa central.
6. Vuelva a instalar el tornillo central usando la herramienta T20.
1a
2
1b 1c
2 2
RETIRE EL ANILLO DE LA MOLDURA
3
INSTALE EL ANILLO DE LA MOLDURA
4
CONECTOR DE A TIERRA NEMA
1d
CONECTOR DE A TIERRA NEMA
2
CONECTOR DE BAJO PERFIL CON UNA PUERTA
TAPA CENTRAL CON DOS PUERTAS
TAPA CENTRAL CON UNA PUERTA
CONECTOR DE BAJO PERFIL CON DOS PUERTAS