throwing program - jeremy m. burnham, md … · 2 complete throwing program complete throwing...
TRANSCRIPT
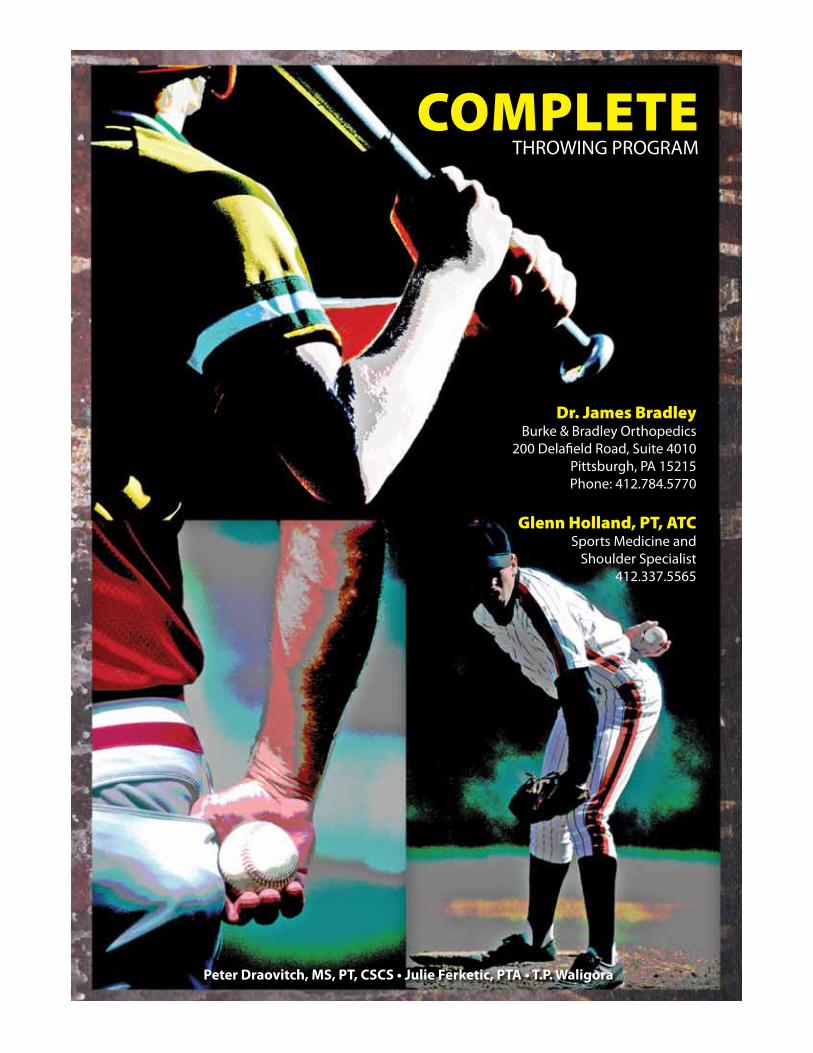
THROWING PROGRAM
Dr. James BradleyBurke & Bradley Orthopedics
200 Delafield Road, Suite 4010Pittsburgh, PA 15215Phone: 412.784.5770
Glenn Holland, PT, ATCSports Medicine and
Shoulder Specialist412.337.5565
Peter Draovitch, MS, PT, CSCS • Julie Ferketic, PTA • T.P. Waligora
2 Complete Throwing Program
Complete Throwing Program
The Complete Throwing Program is a comprehensive, preventative, and systematic program designed for the athlete who throws overhand. The program has been designed to identify and address common sequencing, mobility and stability shortcomings as they relate to kinetic linking in the overhead motion. The SLAP Program is based on:
• Shouldersequencing/stretching/stabilization • Lowerextremityrangeofmotion/flexibility/strength • Abdominalbracing&corestabilization • Progressionofengaged(Recruit)movements&patterns – Isometric movements & patterns – Repetitive movements & patterns – Rapid movements & patterns
The four areas of the progression part of the SLAP Program are:
• Recruitmentofappropriatesegmentalmovementpatterns within the kinetic link
• Staticheldpositionalexercisesfordevelopmentof muscular and postural stability
• Repetitiveexercisesfordevelopmentofconstantmuscular recruitment, strength and endurance
• Highspeedexercisesforthedevelopmentofsportspecific function, power and skill
The Throwing and Preventative Program was developed to fill a void in the sports medicine, rehabilitation, and sports performance communities. For years, the accepted informa-tion disseminated to the public by professionals was the Throwers Ten Program. Although the Throwers Ten Program has been beneficial to many, it lacks key components that prevent injuries in the throwing athlete. In recent years, sports medicine professionals have stressed the importance ofcoreandlegstrength,scapularrecruitmentandstabiliza-tion, and proper pitching mechanics.
Howdoesalackofthoracicmobilityaffectshoulderexternalrotation or how does a lack of frontal plane stability of the lowerextremitiesaffectarmpositionatrelease?Physicalimpairments such as lack of strength and motion, decreased postural stability, and poor neuromuscular control or se-quencingmayinfluencethrowingmechanicsandmaybethecause of shoulder or elbow pain. Although the Thrower’s Ten Programprovidestheathletewithcomprehensiveexercisesfortheupperextremity,itdoesnotaddresstheseimportantaspects of the kinetic chain. Just like the Throwers Ten Program, the Complete Throwing Program is not the solution for all problems associated with pain from the throwing motion. However, unlike the Throwers Ten, the Complete Throwing Program provides preventative and rehabilitation solutions for all links in the kinetic chain of the athlete who throws overhand.
The Throwing and Preventative Program has a base model so that it can be incorporated into a pre-practice warm up orintoapreventativeexerciseprogram.Inanever-changingstate of development, the program is frequently revised to incorporate recent research, clinical, functional, and perfor-mance findings. The program has been designed and initi-ated by James Bradley MD, Glenn Holland PT, Pete Draovitch PT, and Julie Ferketic PTA, all of Pittsburgh.
Title Page
Preventative Program ............................................................ 3
Throwing Guidelines ............................................................11
Throwing Program Pitchers Ulnar Collateral Ligament Reconstruction(1year) IntervalThrowingProgram•PhaseI ................13 IntervalThrowingProgram•PhaseII ...............14 IntervalThrowingProgram•PhaseIII ..............14
PitchersSLAPProgram(9months) IntervalThrowingProgram•PhaseI ................15 IntervalThrowingProgram•PhaseII ...............16 IntervalThrowingProgram•PhaseIII ..............16
Interval Throwing Program for ulnar collateral ligament reconstruction and SLAP repair for infielders, outfielders and catchers (nine-monthprogram) ..................................................17
AcceleratedThrowing(3months) Phase I .........................................................................19 Phase II ........................................................................19
SLAP Hitting Program ..........................................................20
Shoulder Weight Lifting Restrictions ...........................21
Pitching Mechanics ...............................................................22
Pitcher’s Daily Throwing Routine ...................................23
Table of Contents
Complete Throwing Program 3
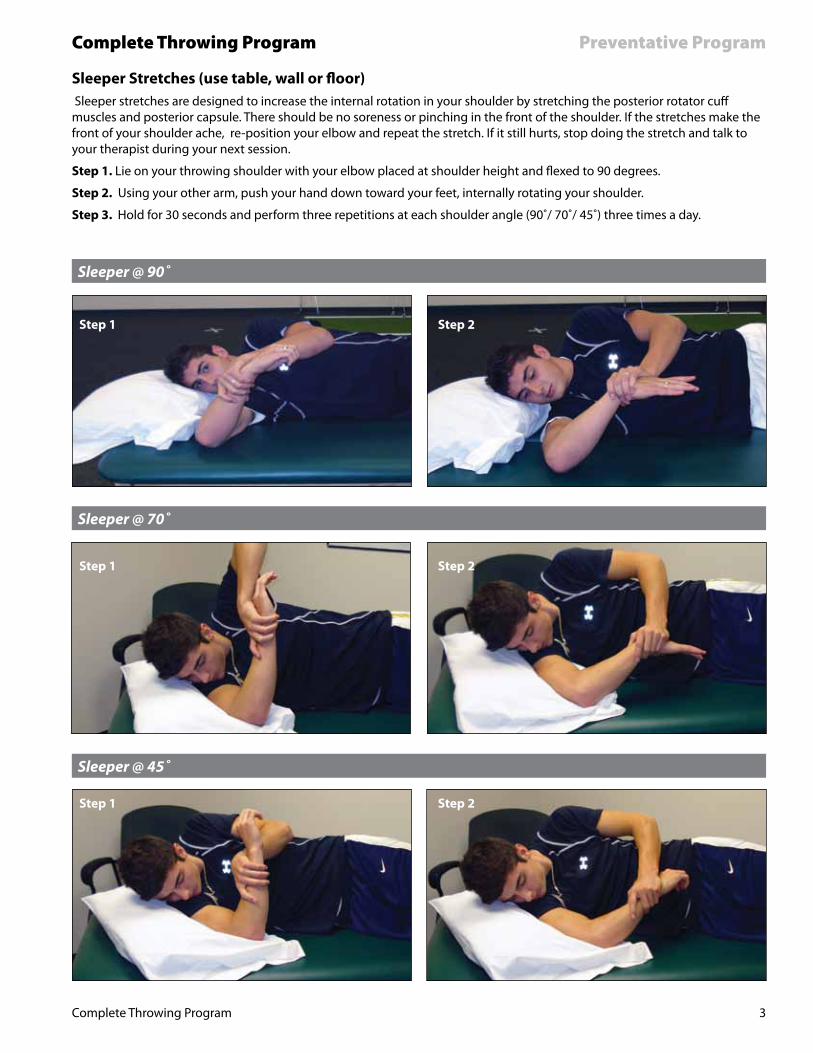
Sleeper Stretches (use table, wall or floor) Sleeper stretches are designed to increase the internal rotation in your shoulder by stretching the posterior rotator cuff muscles and posterior capsule. There should be no soreness or pinching in the front of the shoulder. If the stretches make the front of your shoulder ache, re-position your elbow and repeat the stretch. If it still hurts, stop doing the stretch and talk to yourtherapistduringyournextsession.
Step 1.Lieonyourthrowingshoulderwithyourelbowplacedatshoulderheightandflexedto90degrees.
Step 2. Using your other arm, push your hand down toward your feet, internally rotating your shoulder.
Step 3. Holdfor30secondsandperformthreerepetitionsateachshoulderangle(90˚/70˚/45˚)threetimesaday.
Sleeper @ 90˚
Step 1 Step 2
Sleeper @ 70˚
Step 1 Step 2
Sleeper @ 45˚
Step 1 Step 2
Preventative ProgramComplete Throwing Program
4 Complete Throwing Program
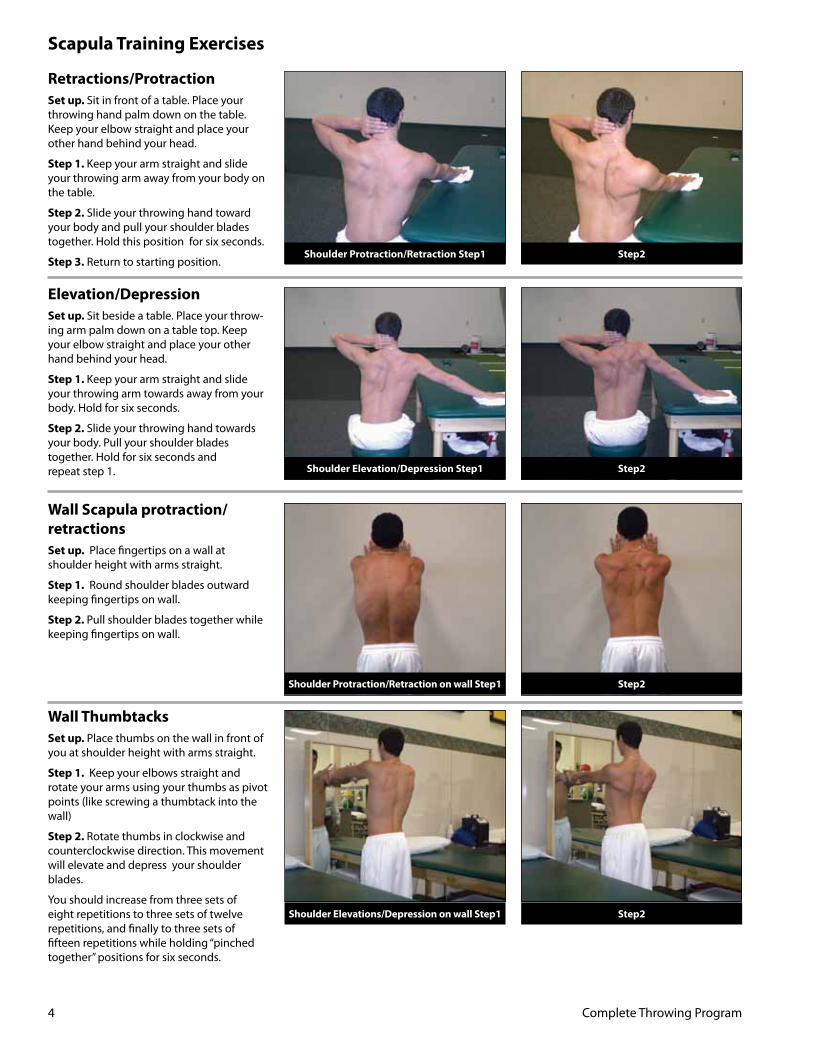
Retractions/ProtractionSet up. Sit in front of a table. Place your throwing hand palm down on the table. Keep your elbow straight and place your other hand behind your head.
Step 1. Keep your arm straight and slide your throwing arm away from your body on the table.
Step 2. Slide your throwing hand toward your body and pull your shoulder blades together.Holdthispositionforsixseconds.
Step 3. Return to starting position.
Elevation/DepressionSet up. Sit beside a table. Place your throw-ing arm palm down on a table top. Keep your elbow straight and place your other hand behind your head.
Step 1. Keep your arm straight and slide your throwing arm towards away from your body.Holdforsixseconds.
Step 2. Slide your throwing hand towards your body. Pull your shoulder blades together.Holdforsixsecondsand repeat step 1.
Wall Scapula protraction/ retractions Set up. Place fingertips on a wall at shoulder height with arms straight.
Step 1. Round shoulder blades outward keeping fingertips on wall.
Step 2. Pull shoulder blades together while keeping fingertips on wall.
Wall ThumbtacksSet up. Place thumbs on the wall in front of you at shoulder height with arms straight.
Step 1. Keep your elbows straight and rotate your arms using your thumbs as pivot points(likescrewingathumbtackintothewall)
Step 2. Rotate thumbs in clockwise and counterclockwise direction. This movement will elevate and depress your shoulder blades.
You should increase from three sets of eight repetitions to three sets of twelve repetitions, and finally to three sets of fifteen repetitions while holding “pinched together”positionsforsixseconds.
Shoulder Protraction/Retraction Step1 Step2
Shoulder Elevation/Depression Step1 Step2
Shoulder Protraction/Retraction on wall Step1 Step2
Shoulder Elevations/Depression on wall Step1 Step2
Scapula Training Exercises
Complete Throwing Program 5
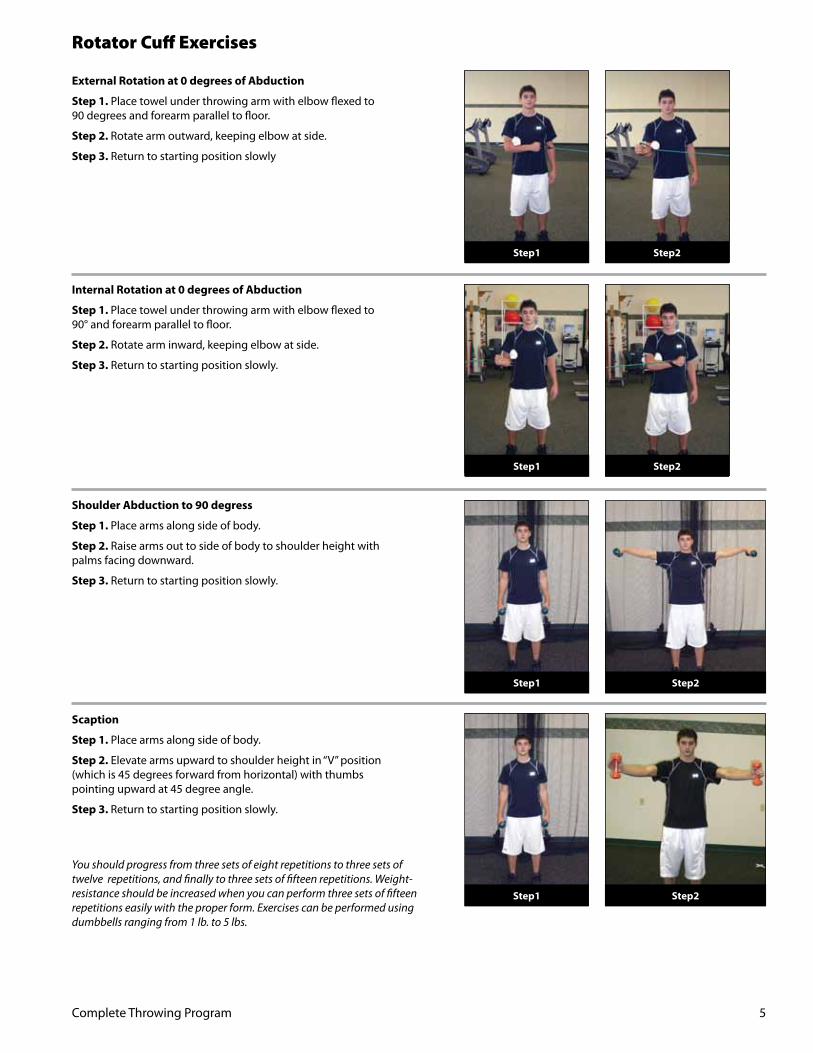
External Rotation at 0 degrees of Abduction
Step 1.Placetowelunderthrowingarmwithelbowflexedto 90degreesandforearmparalleltofloor.
Step 2. Rotate arm outward, keeping elbow at side.
Step 3. Return to starting position slowly
Step1 Step2
Step1 Step2
Step1 Step2
Step1 Step2
Internal Rotation at 0 degrees of Abduction
Step 1. Placetowelunderthrowingarmwithelbowflexedto 90°andforearmparalleltofloor.
Step 2. Rotate arm inward, keeping elbow at side.
Step 3. Return to starting position slowly.
Shoulder Abduction to 90 degress
Step 1. Place arms along side of body.
Step 2. Raise arms out to side of body to shoulder height with palms facing downward.
Step 3. Return to starting position slowly.
Scaption
Step 1. Place arms along side of body.
Step 2. Elevate arms upward to shoulder height in “V” position (whichis45degreesforwardfromhorizontal)withthumbspointing upward at 45 degree angle.
Step 3. Return to starting position slowly.
Rotator Cuff Exercises
You should progress from three sets of eight repetitions to three sets of twelve repetitions, and finally to three sets of fifteen repetitions. Weight- resistance should be increased when you can perform three sets of fifteen repetitions easily with the proper form. Exercises can be performed using dumbbells ranging from 1 lb. to 5 lbs.
6 Complete Throwing Program
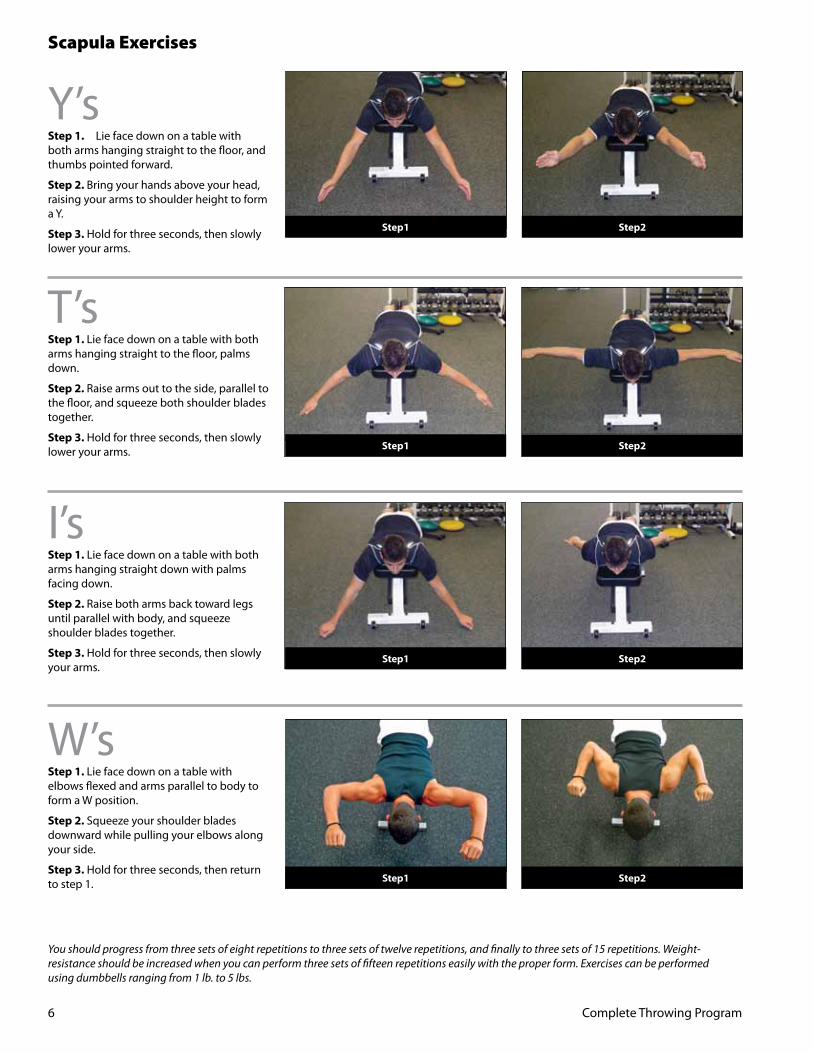
Y’s Step 1. Lie face down on a table with botharmshangingstraighttothefloor,andthumbs pointed forward.
Step 2. Bring your hands above your head, raising your arms to shoulder height to form a Y.
Step 3. Hold for three seconds, then slowly lower your arms.
Scapula Exercises
T’s Step 1. Lie face down on a table with both armshangingstraighttothefloor,palmsdown.
Step 2. Raise arms out to the side, parallel to thefloor,andsqueezebothshoulderbladestogether.
Step 3. Hold for three seconds, then slowly lower your arms.
I’s Step 1. Lie face down on a table with both arms hanging straight down with palms facing down.
Step 2. Raise both arms back toward legs untilparallelwithbody,andsqueezeshoulder blades together.
Step 3. Hold for three seconds, then slowly your arms.
W’s Step 1. Lie face down on a table with elbowsflexedandarmsparalleltobodytoform a W position.
Step 2. Squeezeyourshoulderbladesdownward while pulling your elbows along your side.
Step 3. Hold for three seconds, then return to step 1.
You should progress from three sets of eight repetitions to three sets of twelve repetitions, and finally to three sets of 15 repetitions. Weight- resistance should be increased when you can perform three sets of fifteen repetitions easily with the proper form. Exercises can be performed using dumbbells ranging from 1 lb. to 5 lbs.
Step1 Step2
Step1 Step2
Step1 Step2
Step1 Step2
Complete Throwing Program 7
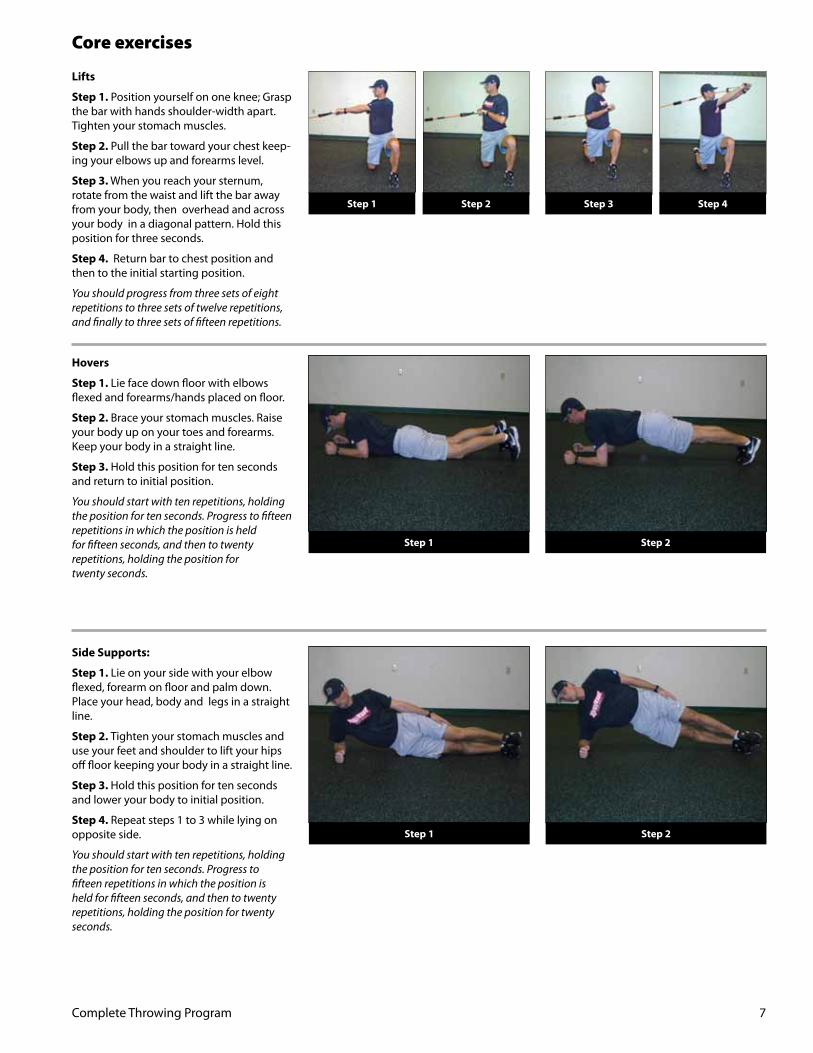
Lifts
Step 1. Position yourself on one knee; Grasp the bar with hands shoulder-width apart. Tighten your stomach muscles.
Step 2. Pull the bar toward your chest keep-ing your elbows up and forearms level.
Step 3. When you reach your sternum, rotate from the waist and lift the bar away from your body, then overhead and across your body in a diagonal pattern. Hold this position for three seconds.
Step 4. Return bar to chest position and then to the initial starting position.
You should progress from three sets of eight repetitions to three sets of twelve repetitions, and finally to three sets of fifteen repetitions.
Hovers
Step 1.Liefacedownfloorwithelbowsflexedandforearms/handsplacedonfloor.
Step 2. Brace your stomach muscles. Raise your body up on your toes and forearms. Keep your body in a straight line.
Step 3. Hold this position for ten seconds and return to initial position.
You should start with ten repetitions, holding the position for ten seconds. Progress to fifteen repetitions in which the position is held for fifteen seconds, and then to twenty repetitions, holding the position for twenty seconds.
Core exercises
Step 1 Step 2 Step 3 Step 4
Side Supports:
Step 1. Lie on your side with your elbow flexed,forearmonfloorandpalmdown.Place your head, body and legs in a straight line.
Step 2. Tighten your stomach muscles and use your feet and shoulder to lift your hips offfloorkeepingyourbodyinastraightline.
Step 3. Hold this position for ten seconds and lower your body to initial position.
Step 4. Repeat steps 1 to 3 while lying on opposite side.
You should start with ten repetitions, holding the position for ten seconds. Progress to fifteen repetitions in which the position is held for fifteen seconds, and then to twenty repetitions, holding the position for twenty seconds.
Step 1 Step 2
Step 1 Step 2
8 Complete Throwing Program
Lower Extremity Exercises
Step 1 Step 2 Step 3 Step 4
Step 1 Step 2
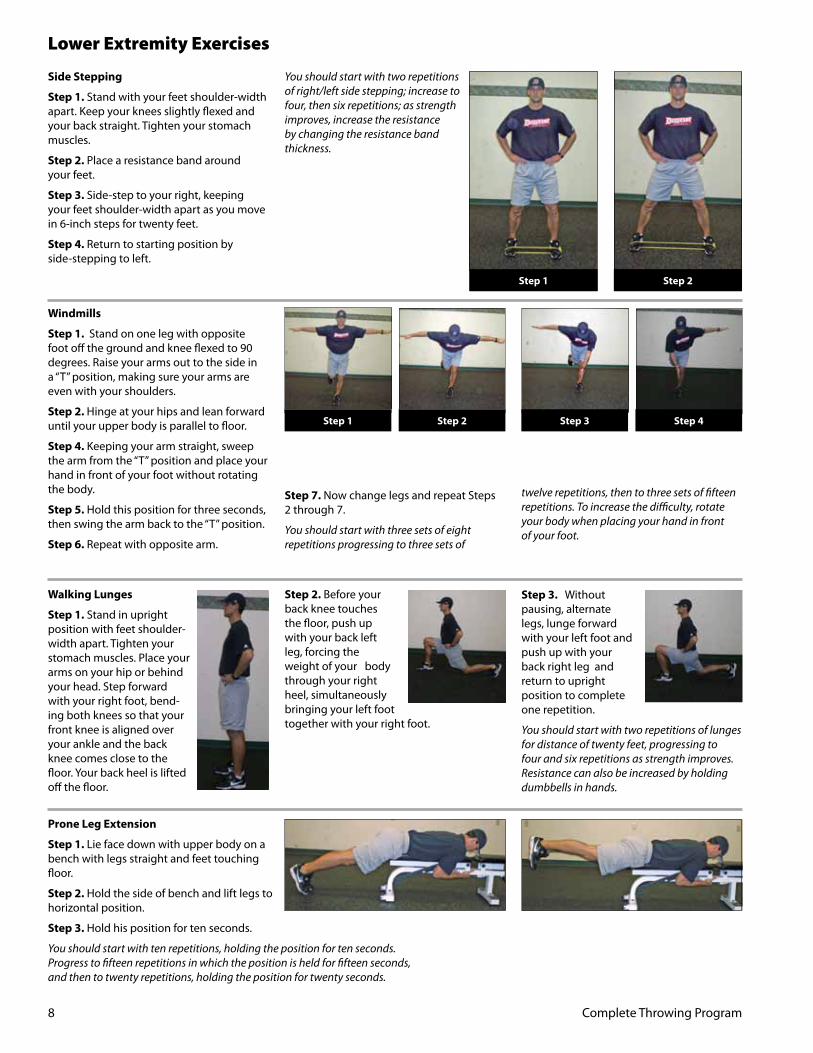
Prone Leg Extension
Step 1. Lie face down with upper body on a bench with legs straight and feet touching floor.
Step 2. Hold the side of bench and lift legs to horizontalposition.
Step 3. Hold his position for ten seconds.
You should start with ten repetitions, holding the position for ten seconds. Progress to fifteen repetitions in which the position is held for fifteen seconds, and then to twenty repetitions, holding the position for twenty seconds.
Side Stepping
Step 1. Stand with your feet shoulder-width apart.Keepyourkneesslightlyflexedandyour back straight. Tighten your stomach muscles.
Step 2. Place a resistance band around your feet.
Step 3. Side-step to your right, keeping your feet shoulder-width apart as you move in 6-inch steps for twenty feet.
Step 4. Return to starting position by side-stepping to left.
You should start with two repetitions of right/left side stepping; increase to four, then six repetitions; as strength improves, increase the resistance by changing the resistance band thickness.
Windmills
Step 1. Stand on one leg with opposite footoffthegroundandkneeflexedto90degrees. Raise your arms out to the side in a “T” position, making sure your arms are even with your shoulders.
Step 2. Hinge at your hips and lean forward untilyourupperbodyisparalleltofloor.
Step 4. Keeping your arm straight, sweep the arm from the “T” position and place your hand in front of your foot without rotating the body.
Step 5. Hold this position for three seconds, then swing the arm back to the “T” position.
Step 6. Repeat with opposite arm.
Walking Lunges
Step 1. Stand in upright position with feet shoulder-width apart. Tighten your stomach muscles. Place your arms on your hip or behind your head. Step forward with your right foot, bend-ing both knees so that your front knee is aligned over your ankle and the back knee comes close to the floor.Yourbackheelisliftedoffthefloor.
Step 2. Before your back knee touches thefloor,pushupwith your back left leg, forcing the weight of your body through your right heel, simultaneously bringing your left foot together with your right foot.
Step 7. Now change legs and repeat Steps 2 through 7.
You should start with three sets of eight repetitions progressing to three sets of
twelve repetitions, then to three sets of fifteen repetitions. To increase the difficulty, rotate your body when placing your hand in front of your foot.
Step 3. Without pausing, alternate legs, lunge forward with your left foot and push up with your back right leg and return to upright position to complete one repetition.
You should start with two repetitions of lunges for distance of twenty feet, progressing to four and six repetitions as strength improves. Resistance can also be increased by holding dumbbells in hands.
Complete Throwing Program 9
Medicine Ball Program
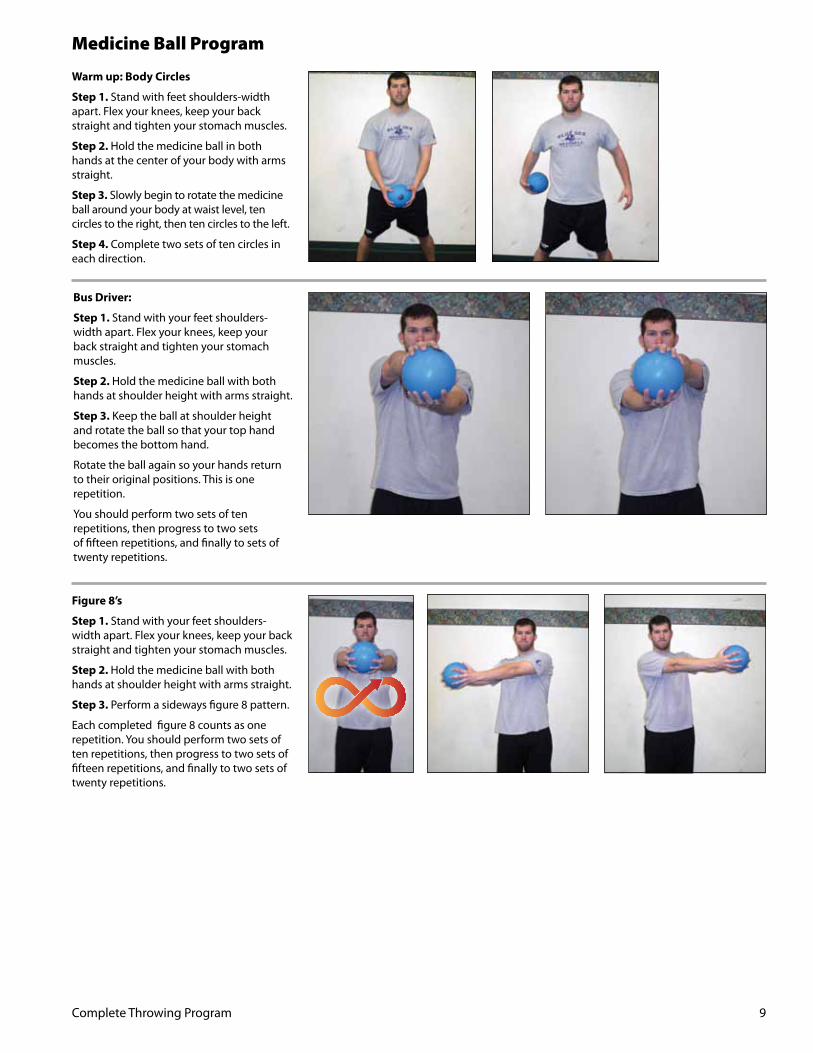
Figure 8’s
Step 1. Stand with your feet shoulders-widthapart.Flexyourknees,keepyourbackstraight and tighten your stomach muscles.
Step 2. Hold the medicine ball with both hands at shoulder height with arms straight.
Step 3. Perform a sideways figure 8 pattern.
Each completed figure 8 counts as one repetition. You should perform two sets of ten repetitions, then progress to two sets of fifteen repetitions, and finally to two sets of twenty repetitions.
Warm up: Body Circles
Step 1. Stand with feet shoulders-width apart.Flexyourknees,keepyourbackstraight and tighten your stomach muscles.
Step 2. Hold the medicine ball in both hands at the center of your body with arms straight.
Step 3. Slowly begin to rotate the medicine ball around your body at waist level, ten circles to the right, then ten circles to the left.
Step 4. Complete two sets of ten circles in each direction.
Bus Driver:
Step 1. Stand with your feet shoulders-widthapart.Flexyourknees,keepyourback straight and tighten your stomach muscles.
Step 2. Hold the medicine ball with both hands at shoulder height with arms straight.
Step 3. Keep the ball at shoulder height and rotate the ball so that your top hand becomes the bottom hand.
Rotate the ball again so your hands return to their original positions. This is one repetition.
You should perform two sets of ten repetitions, then progress to two sets of fifteen repetitions, and finally to sets of twenty repetitions.
10 Complete Throwing Program
Medicine Ball Program
Overhead Press
Step 1. Stand with your feet shoulders-widthapart.Flexyourknees,keepyourbackstraight and tighten your stomach muscles.
Step 2. Hold the medicine ball at chest heightwitharmsextended.
Step 3. Lift the ball directly over head, then return the ball to chest height
You should perform two sets of ten repetitions, then progress to two sets of fifteen repetitions, and finally to two sets of twenty repetitions.
To increase difficulty, progress from 4 lb. medball to 6, 8, 10 and 15 lbs. as tolerated.
Discus
Step 1. Stand with your feet shoulders-widthapart.Flexyourknees,keepyourbackstraight and tighten your stomach muscles.
Step 2. Hold the medicine ball on your left hip with your left hand under the ball and right hand on top of the ball.
Step 3. Lift the ball in a diagonal plane above your right shoulder while rotating your hand position.
Step 4. Repeat on the right side.
You should perform two sets of ten repetitions, then progress to two sets of fifteen repetitions, then two sets of twenty repetitions.
Chest Press
Step 1. Stand with your feet shoulders-widthapart.Flexyourknees,keepyourbackstraight and tighten your stomach muscles.
Step 2. Hold the medicine ball at chest heightwithelbowsflexed.
Step 3.Extendyourarmskeepingballatchest height.
Step 4. Return to starting position while squeezingyourshoulderbladestogether.
You should perform two sets of ten repetitions, then progress to two sets of fifteen repetitions, and finally to two sets of twenty repetitions.
Complete Throwing Program 11
Ulnar collateral ligament reconstruction (1 year)
SLAP repair (9 months)
Accelerated (3 months)
These Interval Throwing Programs are designed to gradually return the athlete to sport efficiently and safely. In these programs,stressesandloadsplacedontheupperextremities are slowly increased in steps that progress through the me-chanics of throwing. The number of throws, number of sets, and the intensity of the throws are used to gradually increase throwing volume. The program is initiated when the athlete is cleared by his or her physician to resume throwing and is performed under the supervision of the rehabilitation team (physician,physicaltherapist,andathletictrainer).
Tominimizethechanceofre-injury,theprogramemphasizesproper warm-up, stretching, strengthening, and throwing progression in a systematic order. Every athlete is different, so there is no set timetable for completion of the program. Dur-ingtherecoveryprocess,theathleteislikelytoexperiencesoreness and a dull, diffuse ache in the muscles and tendons. Iftheathleteexperiencessharppain,particularlyinthejoint,stop the throwing program and contact the physician. Fol-lowingtheprogramexactlyasitisoutlinedisthesafestrouteto back to competitive play. Progression through the pro-gram is dependent on the soreness rules listed below.
Soreness rules:• Ifasharppainoccurs,particularlyinthejoint,stopall throwing activities until pain decreases. If pain persists, contact your physician.
• Ifsoreforlongerthan1hourafterthrowingorifsorethe nextday,takeonedayoff.Afterthedayoff,repeatthe most recent throwing program workout.
• Ifsorenessoccursduringwarm-upbutdisappearswithin the first 15 throws, repeat the previous workout. If the shoulder becomes sore during this workout, stop and take two days off. On return to throwing, drop back one step in the workout program.
• Ifsorenessoccursduringwarm-upandcontinuesthrough the first 15 throws, stop throwing and take two days off. On return to throwing, drop back one step in the workout program.
• Ifthereisnosoreness,advanceaccordingtotheinjury guidelines listed below.
Throwing Guidelines:• Aftermedicalclearance,beginwithstep1.Throwevery other day and progress one step per week.
• Distancesshouldbeincreasedby15feetto30foot increments depending on specific throwing program.
Interval Throwing Program
Throwing Sequence:• Breakasweat
• Shoulderstretches
• Throwingprogram
• Rotatorcuffstrengthening
Warm-up: • Generalbodywarm-up:upperbicycleergometer, biking,andjoggingareexcellentforincreasingblood flowtomusclesandtendonsanddecreasingthechance of re-injury.
• Throwingwarm-up:Beginat20feetinfull-kneelposition for 15 throws to facilitate trunk rotation and proper technique; Advance 10 feet at a time in standing position, throwing 3 to 5 times at each distance at 50 percent effort until reaching the throwing distance for that workout.
Stretching: • Becausethrowinginvolvesallmusclesinthebody,upper extremity,trunk,andlowerextremitystretchingshould be performed prior to throwing. Dynamic stretching should be implemented prior to throwing, followed by capsular stretches. Static stretches should be performed systematically after throwing.
Throwing Mechanics:• AcriticalaspectofIntervalThrowingProgramsis maintaining proper throwing mechanics. Progressing from simulation throwing along a wall to full-kneel throwing to throwing using the walk- behind method enhances the use of proper body mechanics (seeillustrations).
• Componentsofthewalk-behindmethod:Step6inches with the lead leg, step behind with back leg, and step with lead leg followed by the throw. The velocity of the throw is determined by the distance, and the ball should have only enough momentum to travel each designated distance.
Weight Training:• Sport-specificweighttrainingforbaseballthat encompasses core strengthening, upper and lower body strengthening,andflexibilityexercisesshouldsupplement the Interval Throwing Programs. Weight-training should be performed on non-throwing days.
12 Complete Throwing Program
Step 1 Step 2 Step 3
Step 1
Step 3 Step 4
Step 2
Rotator Cuff Strengthening: • Strengtheningoftherotatorcuffmusclesshouldbeperformedthreetimesaweekafterthethrowingprogram.The athlete should progress through the stages while increasing repetitions from three sets of eight repetitions to three sets of twelve repetitions, and finally to three sets of fifteen repetitions. Weight-resistance should be increased when the athlete canperformthreesetsoffifteenrepetitionseasilywhiledemonstratingproperform.Exercisescanbeperformedusing resistancebandsordumbbells(1lb.to5lbs.).
Running/Hitting: • Athletesareabletoreturntorunningfourmonthsaftersurgery.Athletescanreturntohittingfivemonthsaftersurgery. (SeeHittingGuidelines)
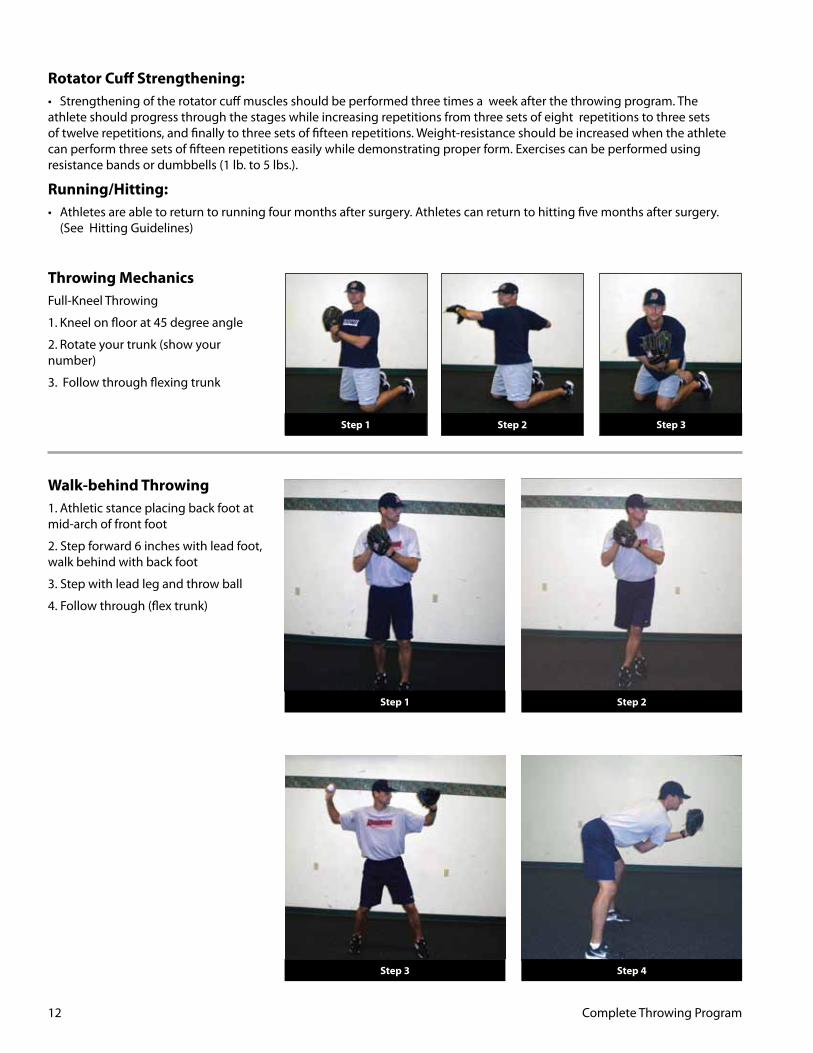
Throwing Mechanics Full-Kneel Throwing
1.Kneelonfloorat45degreeangle
2.Rotateyourtrunk(showyour number)
3.Followthroughflexingtrunk
Walk-behind Throwing1. Athletic stance placing back foot at mid-arch of front foot
2. Step forward 6 inches with lead foot, walk behind with back foot
3. Step with lead leg and throw ball
4.Followthrough(flextrunk)
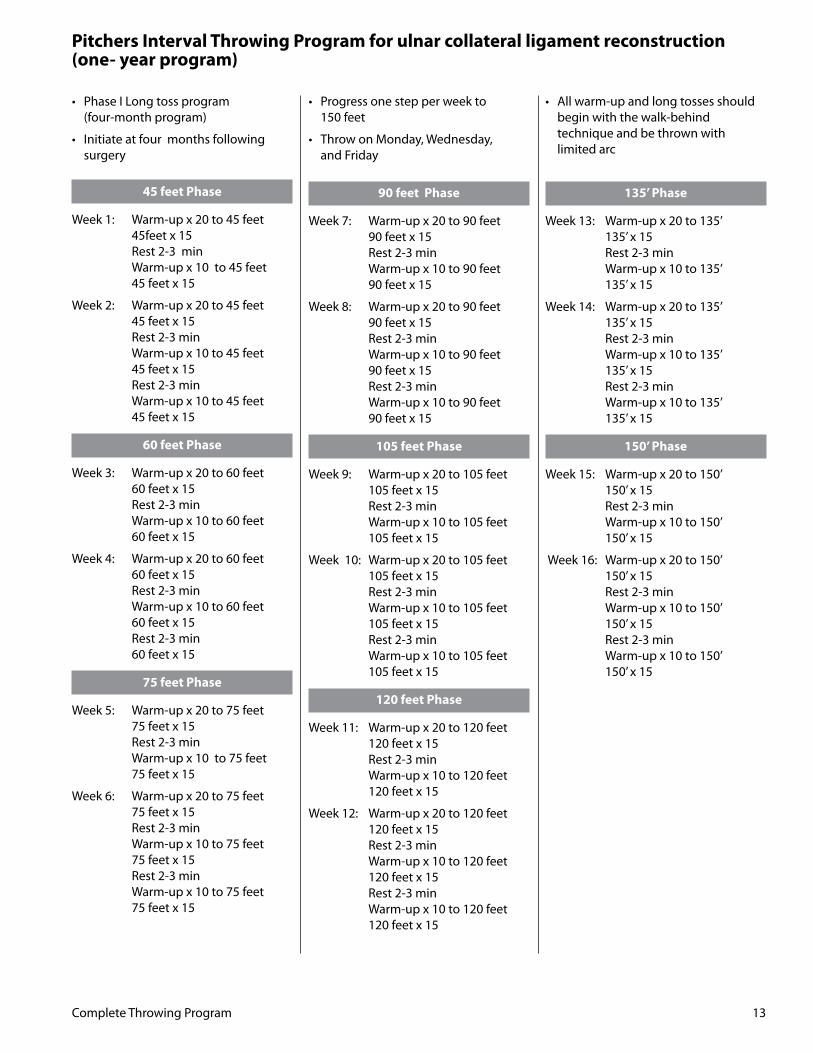
Complete Throwing Program 13
45 feet Phase
Week1: Warm-upx20to45feet 45feetx15 Rest 2-3 min Warm-upx10to45feet 45feetx15
Week2: Warm-upx20to45feet 45feetx15 Rest 2-3 min Warm-upx10to45feet 45feetx15 Rest 2-3 min Warm-upx10to45feet 45feetx15
60 feet Phase
Week3: Warm-upx20to60feet 60feetx15 Rest 2-3 min Warm-upx10to60feet 60feetx15
Week4: Warm-upx20to60feet 60feetx15 Rest 2-3 min Warm-upx10to60feet 60feetx15 Rest 2-3 min 60feetx15
75 feet Phase
Week5: Warm-upx20to75feet 75feetx15 Rest 2-3 min Warm-upx10to75feet 75feetx15
Week6: Warm-upx20to75feet 75feetx15 Rest 2-3 min Warm-upx10to75feet 75feetx15 Rest 2-3 min Warm-upx10to75feet 75feetx15
90 feet Phase
Week7: Warm-upx20to90feet 90feetx15 Rest 2-3 min Warm-upx10to90feet 90feetx15
Week8: Warm-upx20to90feet 90feetx15 Rest 2-3 min Warm-upx10to90feet 90feetx15 Rest 2-3 min Warm-upx10to90feet 90feetx15
105 feet Phase
Week9: Warm-upx20to105feet 105feetx15 Rest 2-3 min Warm-upx10to105feet 105feetx15
Week10: Warm-upx20to105feet 105feetx15 Rest 2-3 min Warm-upx10to105feet 105feetx15 Rest 2-3 min Warm-upx10to105feet 105feetx15
120 feet Phase
Week11: Warm-upx20to120feet 120feetx15 Rest 2-3 min Warm-upx10to120feet 120feetx15
Week12: Warm-upx20to120feet 120feetx15 Rest 2-3 min Warm-upx10to120feet 120feetx15 Rest 2-3 min Warm-upx10to120feet 120feetx15
135’ Phase
Week13: Warm-upx20to135’ 135’x15 Rest 2-3 min Warm-upx10to135’ 135’x15
Week14: Warm-upx20to135’ 135’x15 Rest 2-3 min Warm-upx10to135’ 135’x15 Rest 2-3 min Warm-upx10to135’ 135’x15
150’ Phase
Week15: Warm-upx20to150’ 150’x15 Rest 2-3 min Warm-upx10to150’ 150’x15
Week16: Warm-upx20to150’ 150’x15 Rest 2-3 min Warm-upx10to150’ 150’x15 Rest 2-3 min Warm-upx10to150’ 150’x15
• PhaseILongtossprogram (four-monthprogram)
• Initiateatfourmonthsfollowing surgery
• Progressonestepperweekto 150 feet
• ThrowonMonday,Wednesday, and Friday
• Allwarm-upandlongtossesshould begin with the walk-behind technique and be thrown with limited arc
Pitchers Interval Throwing Program for ulnar collateral ligament reconstruction (one- year program)
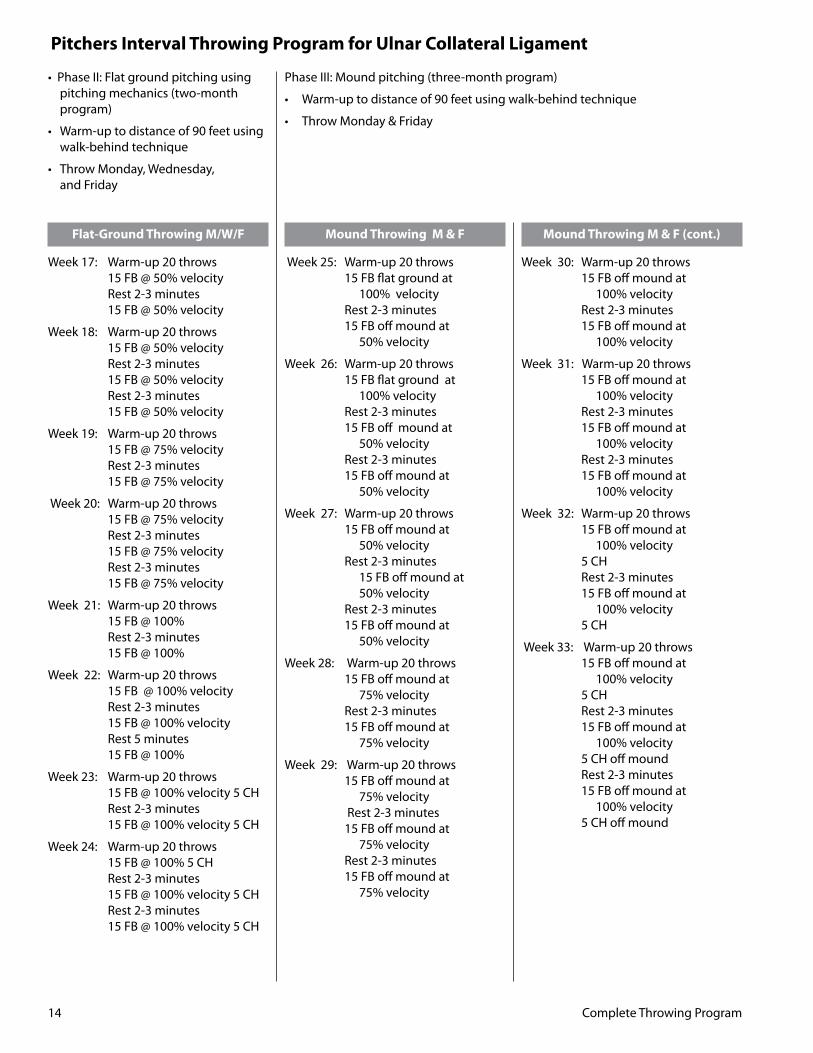
14 Complete Throwing Program
•PhaseII:Flatgroundpitchingusing pitchingmechanics(two-month program)
•Warm-uptodistanceof90feetusing walk-behind technique
• ThrowMonday,Wednesday, and Friday
Flat-Ground Throwing M/W/F
Week 17: Warm-up 20 throws 15 FB @ 50% velocity Rest 2-3 minutes 15 FB @ 50% velocity
Week 18: Warm-up 20 throws 15 FB @ 50% velocity Rest 2-3 minutes 15 FB @ 50% velocity Rest 2-3 minutes 15 FB @ 50% velocity
Week19: Warm-up20throws 15 FB @ 75% velocity Rest 2-3 minutes 15 FB @ 75% velocity
Week 20: Warm-up 20 throws 15 FB @ 75% velocity Rest 2-3 minutes 15 FB @ 75% velocity Rest 2-3 minutes 15 FB @ 75% velocity
Week 21: Warm-up 20 throws 15 FB @ 100% Rest 2-3 minutes 15 FB @ 100%
Week 22: Warm-up 20 throws 15 FB @ 100% velocity Rest 2-3 minutes 15 FB @ 100% velocity Rest 5 minutes 15 FB @ 100%
Week 23: Warm-up 20 throws 15 FB @ 100% velocity 5 CH Rest 2-3 minutes 15 FB @ 100% velocity 5 CH
Week 24: Warm-up 20 throws 15 FB @ 100% 5 CH Rest 2-3 minutes 15 FB @ 100% velocity 5 CH Rest 2-3 minutes 15 FB @ 100% velocity 5 CH
PhaseIII:Moundpitching(three-monthprogram)
• Warm-uptodistanceof90feetusingwalk-behindtechnique
• ThrowMonday&Friday
Mound Throwing M & F
Week 25: Warm-up 20 throws 15FBflatgroundat 100% velocity Rest 2-3 minutes 15 FB off mound at 50% velocity
Week 26: Warm-up 20 throws 15FBflatgroundat 100% velocity Rest 2-3 minutes 15 FB off mound at 50% velocity Rest 2-3 minutes 15 FB off mound at 50% velocity
Week 27: Warm-up 20 throws 15 FB off mound at 50% velocity Rest 2-3 minutes 15 FB off mound at 50% velocity Rest 2-3 minutes 15 FB off mound at 50% velocity
Week 28: Warm-up 20 throws 15 FB off mound at 75% velocity Rest 2-3 minutes 15 FB off mound at 75% velocity
Week29: Warm-up20throws 15 FB off mound at 75% velocity Rest 2-3 minutes 15 FB off mound at 75% velocity Rest 2-3 minutes 15 FB off mound at 75% velocity
Mound Throwing M & F (cont.)
Week 30: Warm-up 20 throws 15 FB off mound at 100% velocity Rest 2-3 minutes 15 FB off mound at 100% velocity
Week 31: Warm-up 20 throws 15 FB off mound at 100% velocity Rest 2-3 minutes 15 FB off mound at 100% velocity Rest 2-3 minutes 15 FB off mound at 100% velocity
Week 32: Warm-up 20 throws 15 FB off mound at 100% velocity 5 CH Rest 2-3 minutes 15 FB off mound at 100% velocity 5 CH
Week 33: Warm-up 20 throws 15 FB off mound at 100% velocity 5 CH Rest 2-3 minutes 15 FB off mound at 100% velocity 5 CH off mound Rest 2-3 minutes 15 FB off mound at 100% velocity 5 CH off mound
Pitchers Interval Throwing Program for Ulnar Collateral Ligament
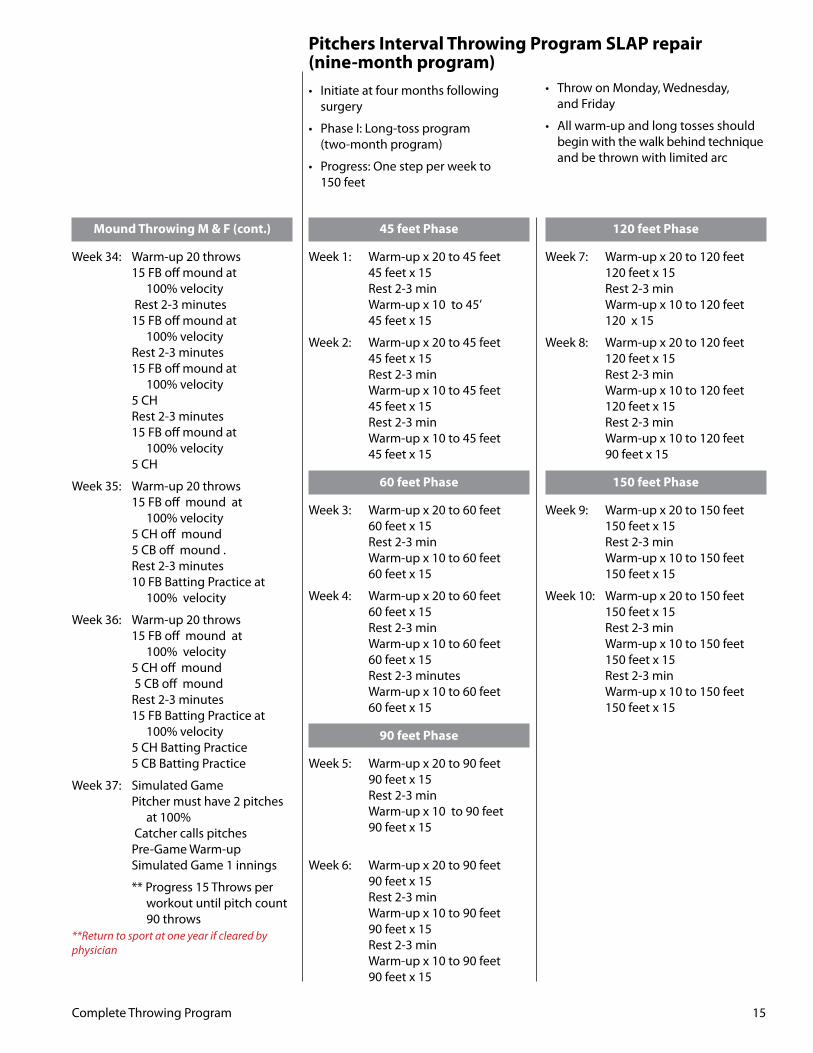
Complete Throwing Program 15
Mound Throwing M & F (cont.)
Week 34: Warm-up 20 throws 15 FB off mound at 100% velocity Rest 2-3 minutes 15 FB off mound at 100% velocity Rest 2-3 minutes 15 FB off mound at 100% velocity 5 CH Rest 2-3 minutes 15 FB off mound at 100% velocity 5 CH
Week 35: Warm-up 20 throws 15 FB off mound at 100% velocity 5 CH off mound 5 CB off mound . Rest 2-3 minutes 10 FB Batting Practice at 100% velocity
Week 36: Warm-up 20 throws 15 FB off mound at 100% velocity 5 CH off mound 5 CB off mound Rest 2-3 minutes 15 FB Batting Practice at 100% velocity 5 CH Batting Practice 5 CB Batting Practice
Week 37: Simulated Game Pitcher must have 2 pitches at 100% Catcher calls pitches Pre-Game Warm-up Simulated Game 1 innings
** Progress 15 Throws per workout until pitch count 90throws**Return to sport at one year if cleared by physician
45 feet Phase
Week1: Warm-upx20to45feet 45feetx15 Rest 2-3 min Warm-upx10to45’ 45feetx15
Week2: Warm-upx20to45feet 45feetx15 Rest 2-3 min Warm-upx10to45feet 45feetx15 Rest 2-3 min Warm-upx10to45feet 45feetx15
60 feet Phase
Week3: Warm-upx20to60feet 60feetx15 Rest 2-3 min Warm-upx10to60feet 60feetx15
Week4: Warm-upx20to60feet 60feetx15 Rest 2-3 min Warm-upx10to60feet 60feetx15 Rest 2-3 minutes Warm-upx10to60feet 60feetx15
90 feet Phase
Week5: Warm-upx20to90feet 90feetx15 Rest 2-3 min Warm-upx10to90feet 90feetx15
Week6: Warm-upx20to90feet 90feetx15 Rest 2-3 min Warm-upx10to90feet 90feetx15 Rest 2-3 min Warm-upx10to90feet 90feetx15
Pitchers Interval Throwing Program SLAP repair (nine-month program)
120 feet Phase
Week7: Warm-upx20to120feet 120feetx15 Rest 2-3 min Warm-upx10to120feet 120x15
Week8: Warm-upx20to120feet 120feetx15 Rest 2-3 min Warm-upx10to120feet 120feetx15 Rest 2-3 min Warm-upx10to120feet 90feetx15
150 feet Phase
Week9: Warm-upx20to150feet 150feetx15 Rest 2-3 min Warm-upx10to150feet 150feetx15
Week10: Warm-upx20to150feet 150feetx15 Rest 2-3 min Warm-upx10to150feet 150feetx15 Rest 2-3 min Warm-upx10to150feet 150feetx15
• Initiateatfourmonthsfollowing surgery
• PhaseI:Long-tossprogram (two-monthprogram)
• Progress:Onestepperweekto 150 feet
• ThrowonMonday,Wednesday, and Friday
• Allwarm-upandlongtossesshould begin with the walk behind technique and be thrown with limited arc
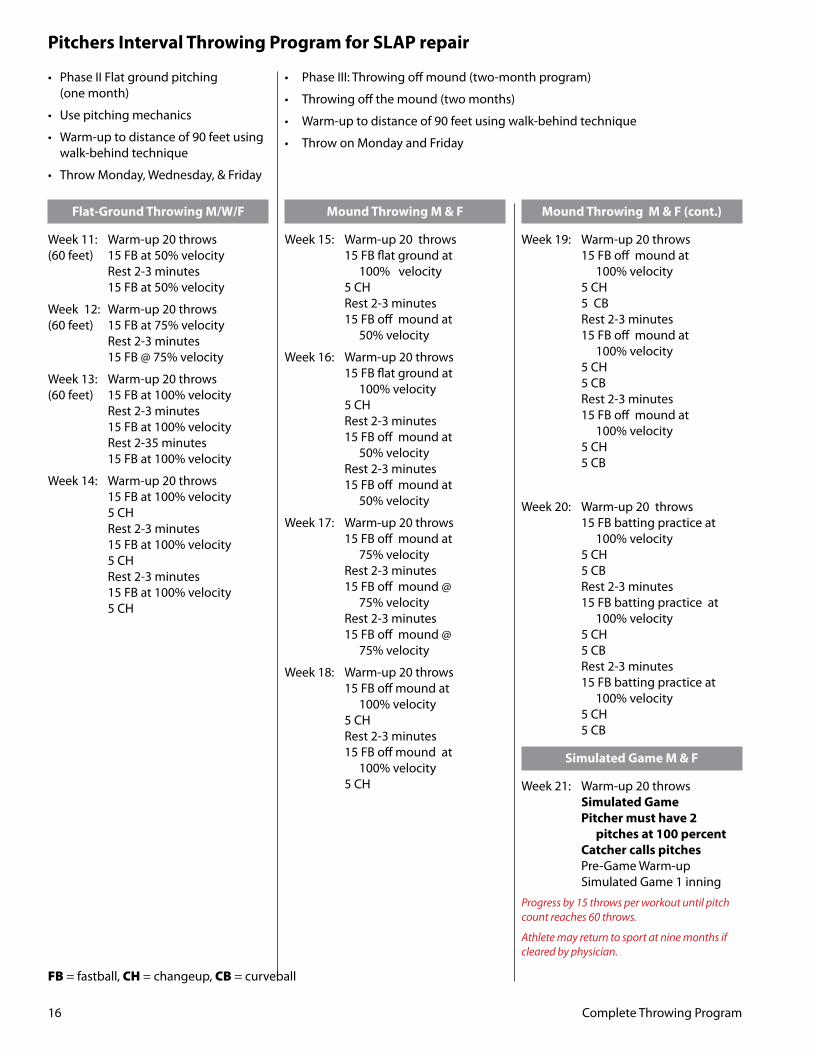
16 Complete Throwing Program
Flat-Ground Throwing M/W/F
Week 11: Warm-up 20 throws (60feet) 15FBat50%velocity Rest 2-3 minutes 15 FB at 50% velocity
Week 12: Warm-up 20 throws (60feet) 15FBat75%velocity Rest 2-3 minutes 15 FB @ 75% velocity
Week 13: Warm-up 20 throws (60feet) 15FBat100%velocity Rest 2-3 minutes 15 FB at 100% velocity Rest 2-35 minutes 15 FB at 100% velocity
Week 14: Warm-up 20 throws 15 FB at 100% velocity 5 CH Rest 2-3 minutes 15 FB at 100% velocity 5 CH Rest 2-3 minutes 15 FB at 100% velocity 5 CH
Mound Throwing M & F
Week 15: Warm-up 20 throws 15FBflatgroundat 100% velocity 5 CH Rest 2-3 minutes 15 FB off mound at 50% velocity
Week 16: Warm-up 20 throws 15FBflatgroundat 100% velocity 5 CH Rest 2-3 minutes 15 FB off mound at 50% velocity Rest 2-3 minutes 15 FB off mound at 50% velocity
Week 17: Warm-up 20 throws 15 FB off mound at 75% velocity Rest 2-3 minutes 15 FB off mound @ 75% velocity Rest 2-3 minutes 15 FB off mound @ 75% velocity
Week 18: Warm-up 20 throws 15 FB off mound at 100% velocity 5 CH Rest 2-3 minutes 15 FB off mound at 100% velocity 5 CH
Mound Throwing M & F (cont.)
Week19: Warm-up20throws 15 FB off mound at 100% velocity 5 CH 5 CB Rest 2-3 minutes 15 FB off mound at 100% velocity 5 CH 5 CB Rest 2-3 minutes 15 FB off mound at 100% velocity 5 CH 5 CB
Week 20: Warm-up 20 throws 15 FB batting practice at 100% velocity 5 CH 5 CB Rest 2-3 minutes 15 FB batting practice at 100% velocity 5 CH 5 CB Rest 2-3 minutes 15 FB batting practice at 100% velocity 5 CH 5 CB
Simulated Game M & F
Week 21: Warm-up 20 throws Simulated Game Pitcher must have 2 pitches at 100 percent Catcher calls pitches Pre-Game Warm-up Simulated Game 1 inning
Progress by 15 throws per workout until pitch count reaches 60 throws.
Athlete may return to sport at nine months if cleared by physician.
• PhaseIIFlatgroundpitching (onemonth)
• Usepitchingmechanics
• Warm-uptodistanceof90feetusing walk-behind technique
• ThrowMonday,Wednesday,&Friday
FB = fastball, CH = changeup, CB = curveball
• PhaseIII:Throwingoffmound(two-monthprogram)
• Throwingoffthemound(twomonths)
• Warm-uptodistanceof90feetusingwalk-behindtechnique
• ThrowonMondayandFriday
Pitchers Interval Throwing Program for SLAP repair
Complete Throwing Program 17
45’ Phase
Week1: Warm-upx20to45’ 45’x15 Rest 2-3 min Warm-upx10to45’ 45’x15
Week2: Warm-upx20to45’ 45’x15 Rest 2-3 min Warm-upx10to45’ 45’x15 Rest 2-3 min Warm-upx10to45’ 45’x15
60’ Phase
Week3: Warm-upx20to60’ 60’x15 Rest 2-3 min Warm-upx10to60’ 60’x15
Week4: Warm-upx20to60’ 60’x15 Rest 2-3 min Warm-upx10to60’ 60’x15
75’ Phase
Week5: Warm-upx20to75’ 75’x15 Rest 2-3 min Warm-upx10to75’ 75’x15
Week6: Warm-upx30to75’ 75’x15 Rest 2-3 min Warm-upx10to75’ 75’x15 Rest 2-3 min Warm-upx10to75’ 75’x15
90’ Phase
Week7: Warm-upx20to90’ 90’x15 Rest 2-35 min Warm-upx10to90’ 90’x15
Week8: Warm-upx20to90’ 90’x15 Rest 2-3 min Warm-upx10to90’ 90’x15 Rest 2-3 min Warm-upx10to90’ 90’x15
105’ Phase
Week9: Warm-upx20to105’ 105’x15 Rest 2-3 min Warm-upx10to105’ 105’x15
Week10: Warm-upx30to105’ 105’x15 Rest 2-3 min Warm-upx10to105’ 105’x15 Rest 2-3 min Warm-upx10to105’ 105’x15
120’ Phase
Week11: Warm-upx20to120’ 120’x15 Rest 2-3 min Warm-upx10to120’ 120’x15
Week12: Warm-upx20to120’ 120’x15 Rest 2-3 min Warm-upx10to120’ 120’x15 Rest 2-3 min Warm-upx10to120’ 120’x15
135’ Phase
Week13: Warm-upx20to135’ 135’x15 Rest 2-3 min Warm-upx10to135’ 135’x15
Week14: Warm-upx20to135’ 135’x15 Rest 2-3 min Warm-upx10to135’ 135’x15 Rest 2-3 min Warm-upx10to135’ 135’x15
150’ Phase
Week15: Warm-upx20to150’ 150’x15 Rest 2-3 min Warm-upx10to150’ 150’x15
Week16: Warm-upx20to150’ 150’x15 Rest 2-3 min Warm-upx10to150’ 150’x15 Rest 2-3 min Warm-upx10to150’ 150’x15
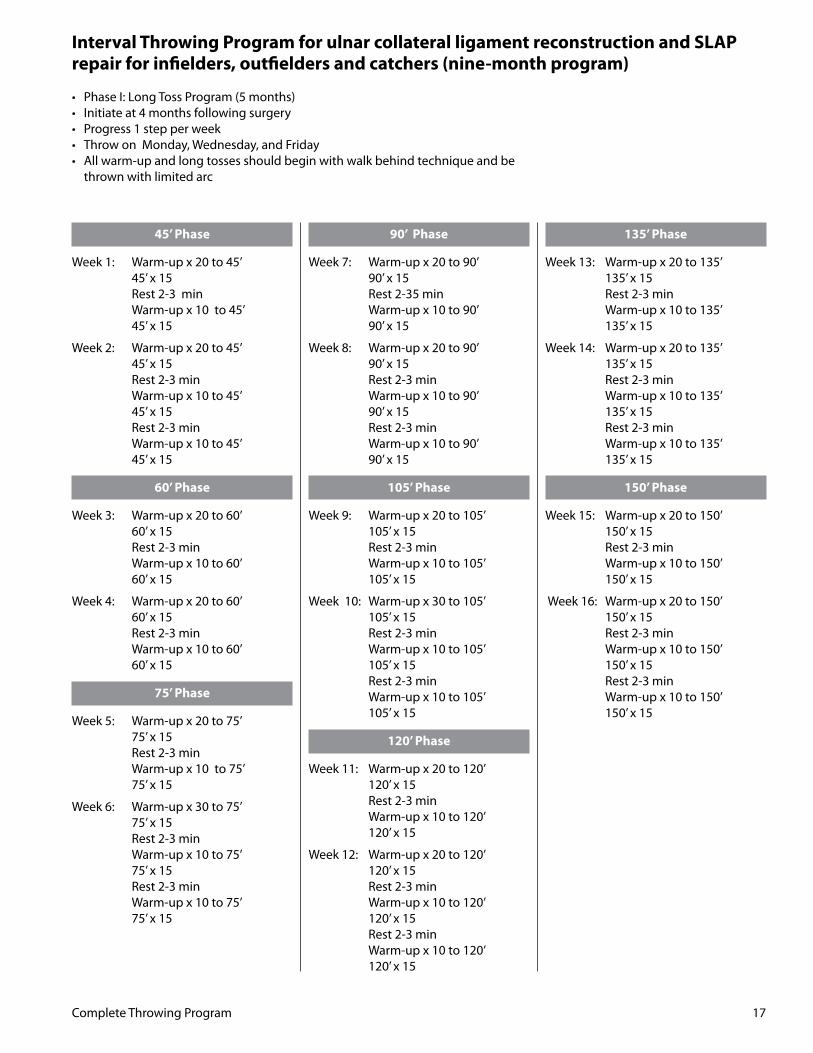
Interval Throwing Program for ulnar collateral ligament reconstruction and SLAP repair for infielders, outfielders and catchers (nine-month program)
• PhaseI:LongTossProgram(5months)• Initiateat4monthsfollowingsurgery• Progress1stepperweek• ThrowonMonday,Wednesday,andFriday• Allwarm-upandlongtossesshouldbeginwithwalkbehindtechniqueandbe thrown with limited arc
18 Complete Throwing Program
Infielders
Week17: Warm-upx20to75’ Field practice 75’x15@75% Rest 2-3 minutes 75’x15@75%
Week18: Warm-upx20to90’ Field practice 90’x15@75% Rest 2-3 minutes 90’x15@75%
Week19: Warm-upx20to105’ Field practice 105’x15@100% Rest 2-3 minutes 105’x15@100%
Week20: Warm-upx20to120’ Field practice 120’x15@100% Rest 2-3 minutes 120’x15@100%
Outfielders
Week17: Warm-upx20to120’ Flyballs/Groundballs 120’x15@75% Rest 2-3 minutes 120’x15@75%
Week18: Warm-upx20to120’ Flyballs/Groundballs 135’x15@75% Rest 2-3 minutes 135’x15@75%
Week19: Warm-upx20to150’ Flyballs/Groundballs 150’x15@100% Rest 2-3 minutes 150’x15@100%
Week20: Warm-upx20to180’ 180’x15@100% Rest 2-3 minutes 180’x15@100%90’ Phase
Catchers
Week17: Warm-upx20to90’ Catching position 90’x15@75% Rest 2-3 minutes 90’x15@75%
Week18: Warm-upx20to105’ Catching position 105’x15@75% Rest 2-3 minutes 105’x15@75%
Week19: Warm-upx20to120’ Catching position 120’x15@100% Rest 2-3 minutes 120’x15@100%
Week20: Warm-upx20to135’ 135’x15@100% Rest 2-3 minutes 135’x15@100%
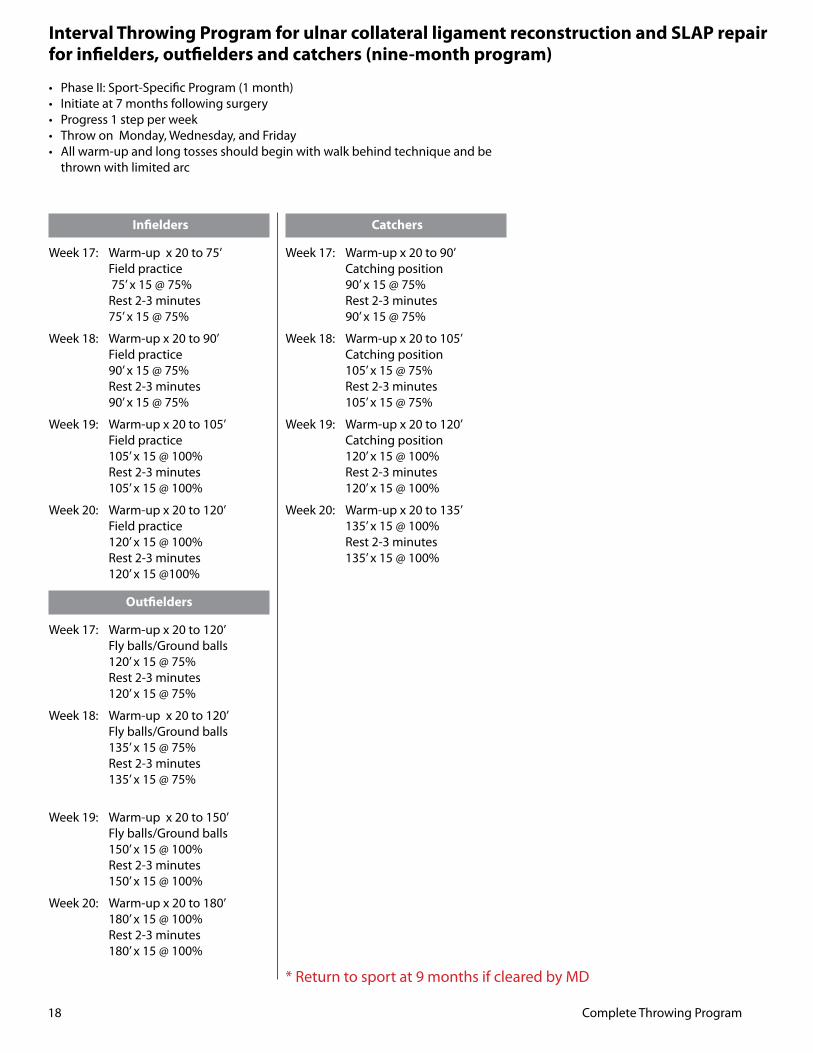
Interval Throwing Program for ulnar collateral ligament reconstruction and SLAP repairfor infielders, outfielders and catchers (nine-month program)
• PhaseII:Sport-SpecificProgram(1month)• Initiateat7monthsfollowingsurgery• Progress1stepperweek• ThrowonMonday,Wednesday,andFriday• Allwarm-upandlongtossesshouldbeginwithwalkbehindtechniqueandbe thrown with limited arc
*Returntosportat9monthsifclearedbyMD
Complete Throwing Program 19
45 feet Phase
Week1: Warm-upx20to45feet 45feetx15 Rest 2-3 min Warm-upx10to45feet 45feetx15
60 feet Phase
Week2: Warm-upx20to60feet 60feetx15 Rest 2-3 min Warm-upx10to60feet 60feetx15
90 feet Phase
Week3: Warm-upx20to90feet 90feetx15 Rest 2-3 min Warm-upx10to90feet 90feetx15
120 feet Phase
Week4: Warm-upx20to120feet 120feetx15 Rest 2-3 min Warm-upx10to120feet 120x15
150 feet Phase
Week5: Warm-upx20to150feet 150feetx15 Rest 2-3 min Warm-upx10to150feet 150feetx15
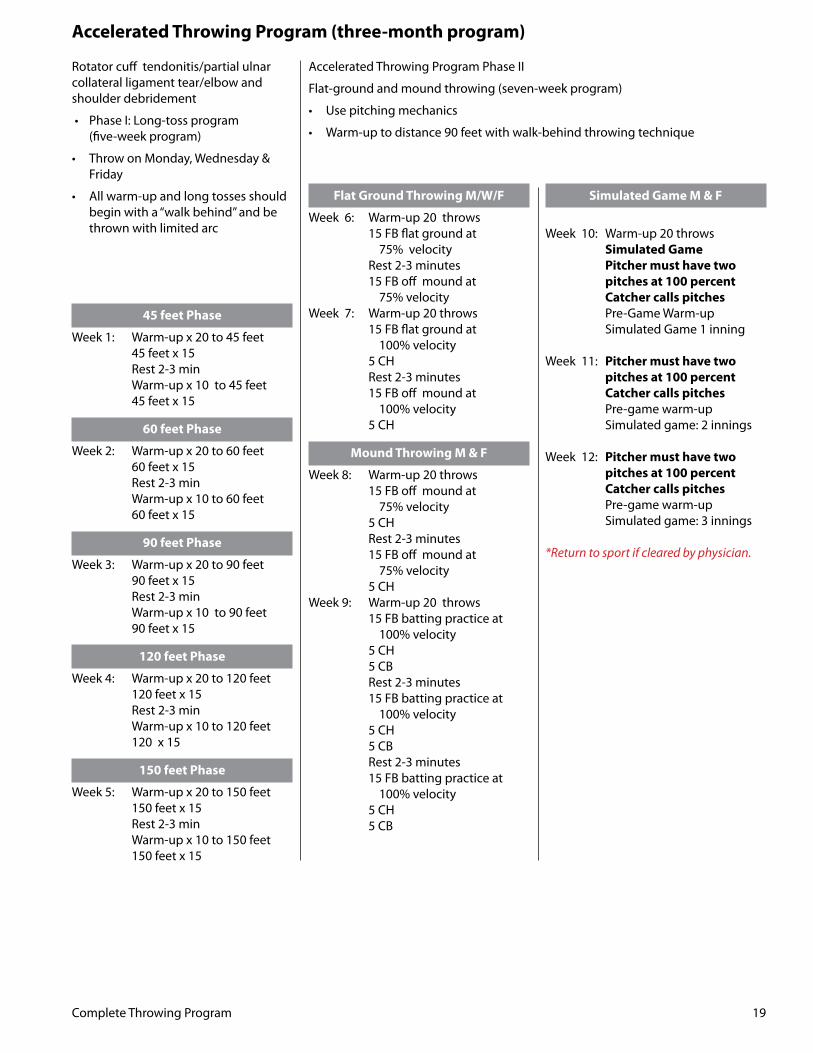
Rotatorcufftendonitis/partialulnarcollateralligamenttear/elbowandshoulder debridement
• PhaseI:Long-tossprogram (five-weekprogram)
• ThrowonMonday,Wednesday& Friday
• Allwarm-upandlongtossesshould begin with a “walk behind” and be thrown with limited arc
Accelerated Throwing Program Phase II
Flat-groundandmoundthrowing(seven-weekprogram)
• Usepitchingmechanics
• Warm-uptodistance90feetwithwalk-behindthrowingtechnique
Flat Ground Throwing M/W/F
Week 6: Warm-up 20 throws 15FBflatgroundat 75% velocity Rest 2-3 minutes 15 FB off mound at 75% velocityWeek 7: Warm-up 20 throws 15FBflatgroundat 100% velocity 5 CH Rest 2-3 minutes 15 FB off mound at 100% velocity 5 CH
Mound Throwing M & F
Week 8: Warm-up 20 throws 15 FB off mound at 75% velocity 5 CH Rest 2-3 minutes 15 FB off mound at 75% velocity 5 CH Week9: Warm-up20throws 15 FB batting practice at 100% velocity 5 CH 5 CB Rest 2-3 minutes 15 FB batting practice at 100% velocity 5 CH 5 CB Rest 2-3 minutes 15 FB batting practice at 100% velocity 5 CH 5 CB
Simulated Game M & F
Week 10: Warm-up 20 throws Simulated Game Pitcher must have two pitches at 100 percent Catcher calls pitches Pre-Game Warm-up Simulated Game 1 inning
Week 11: Pitcher must have two pitches at 100 percent Catcher calls pitches Pre-game warm-up Simulated game: 2 innings
Week 12: Pitcher must have two pitches at 100 percent Catcher calls pitches Pre-game warm-up Simulated game: 3 innings
*Return to sport if cleared by physician.
Accelerated Throwing Program (three-month program)
20 Complete Throwing Program
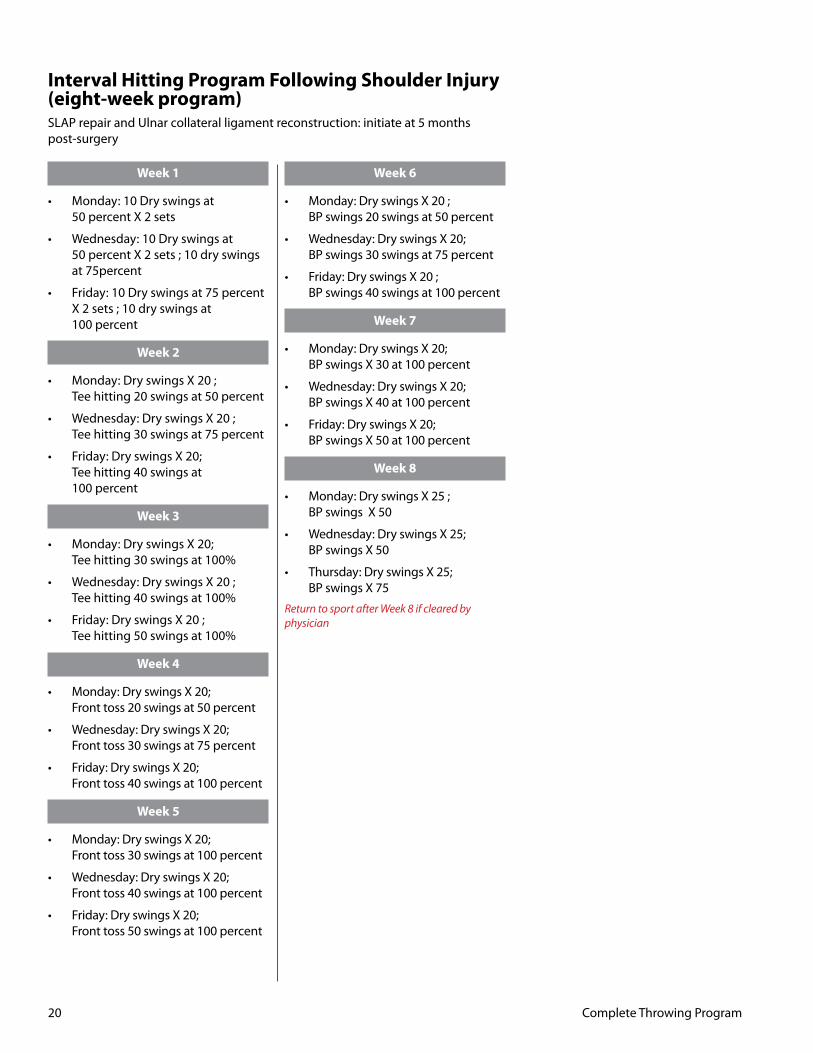
Week 1
• Monday:10Dryswingsat 50 percent X 2 sets
• Wednesday:10Dryswingsat 50 percent X 2 sets ; 10 dry swings at 75percent
• Friday:10Dryswingsat75percent X 2 sets ; 10 dry swings at 100 percent
Week 2
• Monday:DryswingsX20; Tee hitting 20 swings at 50 percent
• Wednesday:DryswingsX20; Tee hitting 30 swings at 75 percent
• Friday:DryswingsX20; Tee hitting 40 swings at 100 percent
Week 3
• Monday:DryswingsX20; Tee hitting 30 swings at 100%
• Wednesday:DryswingsX20; Tee hitting 40 swings at 100%
• Friday:DryswingsX20; Tee hitting 50 swings at 100%
Week 4
• Monday:DryswingsX20; Front toss 20 swings at 50 percent
• Wednesday:DryswingsX20; Front toss 30 swings at 75 percent
• Friday:DryswingsX20; Front toss 40 swings at 100 percent
Week 5
• Monday:DryswingsX20; Front toss 30 swings at 100 percent
• Wednesday:DryswingsX20; Front toss 40 swings at 100 percent
• Friday:DryswingsX20; Front toss 50 swings at 100 percent
Week 6
• Monday:DryswingsX20; BP swings 20 swings at 50 percent
• Wednesday:DryswingsX20; BP swings 30 swings at 75 percent
• Friday:DryswingsX20; BP swings 40 swings at 100 percent
Week 7
• Monday:DryswingsX20; BP swings X 30 at 100 percent
• Wednesday:DryswingsX20; BP swings X 40 at 100 percent
• Friday:DryswingsX20; BP swings X 50 at 100 percent
Week 8
• Monday:DryswingsX25; BP swings X 50
• Wednesday:DryswingsX25; BP swings X 50
• Thursday:DryswingsX25; BP swings X 75
Return to sport after Week 8 if cleared by physician
Interval Hitting Program Following Shoulder Injury (eight-week program)SLAP repair and Ulnar collateral ligament reconstruction: initiate at 5 months post-surgery
Complete Throwing Program 21
Complete Throwing Program
Guidelines for Returning to Weight TrainingAfter Shoulder Surgery
You should not return to training with weights until your surgeon determines that you may safely do so. In general, the following timetable illustrates when it is safe to return to weight training following your particular surgery:
• Rotatorcuffrepair 6months• BankartRepair 4months• SLAPRepair 4-6months• Arthroscopicsubacrominal decompression 4-6 months• CapsularRelease 3months
Before you return to or start a weight-training program, you should have no pain, full range of shoulder motion, and normalstrengthoftherotator/scapularmuscles.Yourmo-tion and strength will be tested by your surgeon or physical therapist; talk to your surgeon or therapist about your recov-ery and your rehabilitation program.
When you are cleared to start a weight-training program, you can begin with three sets of 15-20 repetitions. Training with high-repetition sets ensures that the weights that you are using are not too heavy.
Neverperformanyweight-trainingexercisetothepointofmuscle failure. “Muscle failure” occurs when, in performing a weighttrainingexercise,themuscleisnolongerabletopro-videtheenergynecessarytocontractandmovethejoint(s)involvedintheparticularexercise.Joint,muscle,andtendoninjuries are more likely to occur when muscle failure occurs.
The following weight training exercises should be avoided:
1. Pulldownsbehind-the-neck(widegrip)2. Behind-the-neck shoulder press3. Bench press4. Triceps press overhead5. Dips
The following exercises require special cautions:
1. Pull downs should only be done in front of the head, tothechest,withamedium(notwide)grip.2. Shoulderpressoverheadshouldbedonewithextreme caution. Avoid heavy weights. If doing shoulder presses, always start with the hand in front of the shoulders and end overhead where you can still see your hand. For persons using barbells, this is the “military press.”
3. Lateral deltoid raises should be performed to shoulder level because of the impinging and wearing effect on the rotator cuff. Forward raises in the “thumb up” position are usually safer and can be done with reasonable weights. Lateral raises from the prone or bent over position can be done as a substitute for standing lateral deltoid raises.4. Ifyouaredoinganytypeof“chest-fly”,keepinmindthe following precautions: – Donotdoanychest-flyexercisewithstraightelbows – Always bend the elbows – Alwayskeepweights/dumbbellsatorabove chest level. 5. The “Pec-Deck” machine is recommended, however, never let the weight stretch the arms so that your elbows pass behind your shoulders. You can set the arms on this machineafewclicksforwardtoadjustthemaximum motion allowed.7. Fortricepsextension,tricepspush-downsonapulley systemaresafeaswellasbent-overtricepsextensions. Whendoingupright-rowingexercise,keepyourhands at least 12 inches apart on the bar. When pulling the bar upward toward the chin, do not raise the bar higher than the point at which the elbow reaches shoulder level.
Exercises Usually Problem-Free• Bicepscurls(atthreemonths)• Cableandbent-overrowing• Shouldershrugs
If your goal is to return to a high-level weight training program,itwilltakethreetosixmonthofcautious,gradualprogression to return to top form. In general, avoid increas-ing the amount of weight lifted by more than 10-15 percent (atatime)ofyourpresentworkingweightevery10-14days.
Remember: Weight training improves muscle strength and helps to protect the joints from injury. However, if done im-properly—usingtoomuchweightand/orimproper technique — weight training can cause serious injury.
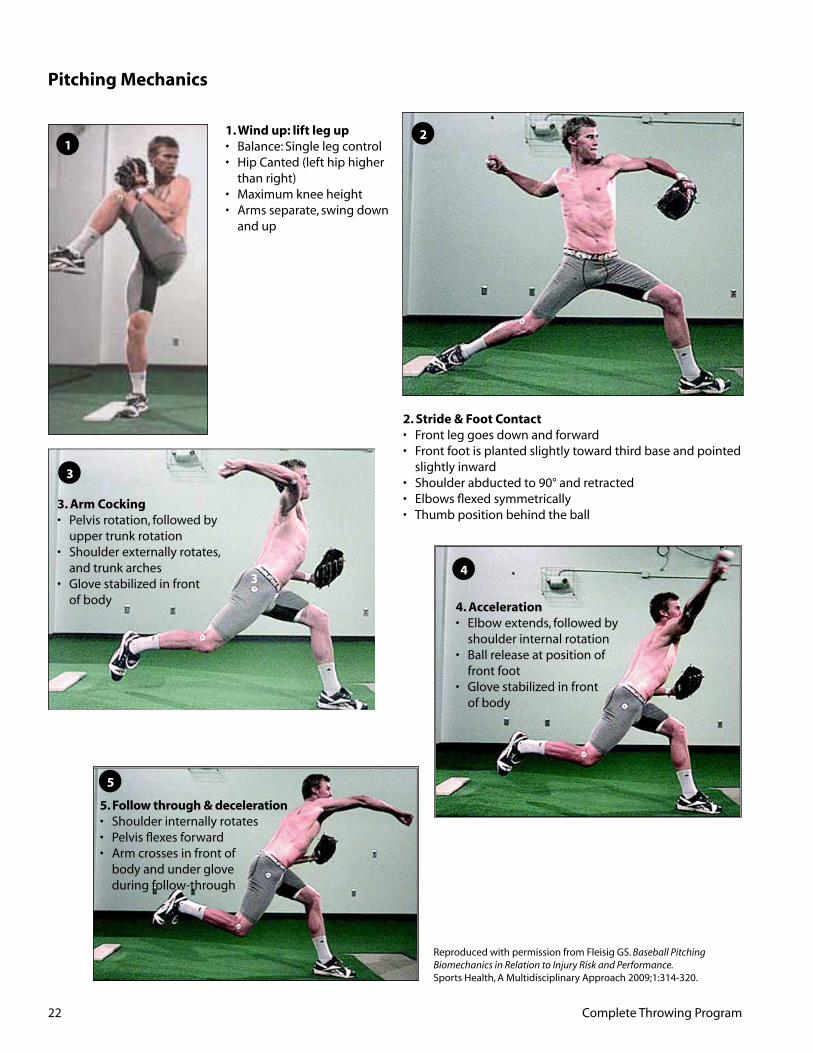
2. Stride & Foot Contact• Frontleggoesdownandforward• Frontfootisplantedslightlytowardthirdbaseandpointed slightlyinward• Shoulderabductedto90°andretracted• Elbowsflexedsymmetrically• Thumbpositionbehindtheball
1. Wind up: lift leg up• Balance:Singlelegcontrol• HipCanted(lefthiphigher thanright)• Maximumkneeheight• Armsseparate,swingdown andup
Pitching Mechanics
3. Arm Cocking• Pelvisrotation,followedby uppertrunkrotation• Shoulderexternallyrotates, andtrunkarches• Glovestabilizedinfront ofbody 4. Acceleration
• Elbowextends,followedby shoulderinternalrotation• Ballreleaseatpositionof frontfoot• Glovestabilizedinfront ofbody
5. Follow through & deceleration• Shoulderinternallyrotates• Pelvisflexesforward• Armcrossesinfrontof bodyandunderglove duringfollow-through
12
3
34
5
22 Complete Throwing Program
ReproducedwithpermissionfromFleisigGS.Baseball Pitching Biomechanics in Relation to Injury Risk and Performance.SportsHealth,AMultidisciplinaryApproach2009;1:314-320.
Pitchers Daily Throwing Routine
• Freetoss:gettingloose(3min-45ft.)• Feettogethersquaretotargetchestout-headon-lineturn upper½only(2min-55ft)• Feetspread,closedtotargetrockandfire-workquickarm action(3min-65ft)• Feetspreadarmsseparatedtolandingpointbackto balance-(2min-75ft)• Throwingfromstretch,sidestep,controlhead-(3min-85ft)• Workingbackin,freecatch,workinchangeups-(2min)
Game DayPost Game: Stretch/tubing• Ice(20minutes)• 20minutejog• Stretch
Rest Day 1: 25-30minuterun• Stretch• Tubing• Lighttoss(10minutesmax.60-80feetmax)• Shadowmechanics• Pitcher’sFieldingPracticefootwork(onlyifarmissore)• Abdominal(medball)&Lowerextremitycontrolexercises
Rest Day 2:Stretch/tubing• Long-toss(180-200ftmax)workoutward,thenback inward,lowlinedrives• Sprits(30-40,50-60,50-40,30)downandback=14total• Pick-offstoallbases• Shadowmechanics• Pitcher’sFieldingPractice• Drills(1kneecurveballs,toweldrill,CH-UPcatchetc.)
Rest Day 3: Stretch/tubing• 25-30pitchbullpen-workonspecificmechanicsor specificpitches• 10sprints-jogs(poletopole–sprint1/2jog1/2)downand back=2• Pick-offstoallbases• Pitcher’sFieldingPractice• Drills(1kneecurveballs,toweldrill,CH-UPcatchetc.)• Abdominal(medball)&Lowerextremitycontrolexercises
Rest Day 4: Lightjog(10minutes)• Stretch/tubing• Lighttoss(90ftmax10minutesmax)• Pitcher’sFieldingPractice(throwingoptional,orverylight)• Pick-off’s(lightthrowing,focusonfootwork)
Game Day:Ifyouarenoton5dayrotation,youmayhavetorepeatsomerestdays.Ifmorethen4daysrestbetweenstarts,doall4restday,andthenworkbackwardsfromgameday.
Forinstance,youhave6dayrestbetweenstarts.Doall4days,thenonday5dorestday3again,andrestday4workoutonday6,andyouarereadytogo.Alwaysendwithlightrestday4thedaybeforeyouthrowagain.
Complete Throwing Program 23
Glenn Holland, PT, MS, ATC, SCS, CSCS, FAAOMPTForthepast15years,Glennhasspecializedinevaluationandtreatmentoftheoverhead athlete with a primary emphasis on baseball players. As a consultant for baseball injuries in high school, collegiate, and professional athletes in Western Pennsylvania, he has implemented rehabilitative programs, throwing programs, and sport-specific training. Glenn works closely with Dr. Pat McMahon, the University of Pittsburgh Medical Center Orthopedic Specialist for shoulder, elbow, and wrist injuries; Dr. James Bradley, the physician for the Pittsburgh Steelers; andDrPatrickDeMeo,MedicalDirectorofthePittsburghPirates.A1995graduate of the University of Pittsburgh Physical Therapy School, Glenn is a Certified Athletic Trainer and has specialty certifications in manual therapy and strength and conditioning.Healsohas30yearsexperienceinbaseballasahighschooland collegiate player and as an AAU coach
Peter Draovitch, MS, PT, CSCSPete’sexpertisemeshesphysicaltherapy,sportsmedicine,fitnessandwellness.As a physical therapist, he has worked closely with young baseball and hockey athletes developing preventative programs and rehabilitative treatment and programs following injury or surgery. For 10 years, Pete was travelling physical therapist and fitness consultant to professional golfer Greg Norman. He is CEO of The BodyGuards, Inc., a health and fitness company that he founded to launch “BG Nation.” The program uses entertainment to encourage children ages seven to 11 to take responsibility for their own health and fitness. He is a Certified Strength and Conditioning Specialist. A graduate from the University of Miami’s Physical Therapy School, Pete has taught sports medicine, physical therapy and wellness courses at several universities.
Julie Ferketic, PTASince May 2007, Julie has been treating high school, collegiate, and professional athletes following injury or surgery. She works closely with lead physical therapists toensureathletesimplementtheirexerciseswithcorrectformandprogression.Julie complemented her Physical Therapist Assistant degree with additional train-ing in kinesio taping for sport injuries. While undertaking her PTA degree at Butler County Community College, Julie was class president and monitor of the physical therapy assistant program. She is a 2004 graduate of Slippery Rocky University withabachelor’sdegreeinexercisescienceandaminoringerontology.
T. P. WaligoraT. P. serves as the National Director for Champion Baseball Camps and the Pitching Coach for Duquesne University in Pittsburgh, Pennsylvania. His 14 years ofexperienceasacoachandtimeasaphysicaltherapythrowingspecialisthaveledtothedevelopmentoftheVelocity99ThrowingProgram,whichsafelyandsystematically increases throwing velocity 4-5 miles per hour. He has workedwith throwing athletes of all levels, ranging from Little League to Major LeagueBaseballplayers,includingmembersoftheChicagoWhiteSoxandTexasRangersorganizations.T.P.completedasuccessfulpitchingcareerspanningeight professional seasons with the Chicago Cubs, Pittsburgh Pirates, and Tampa Bay Raysorganizations.HewasalsohonoredasanAll-EastRegionandAll-StatePitcherat the College of William & Mary in Williamsburg, Virginia.
Copyright 2010 © by Glenn Holland, PT and Pete Draovitch, PT
Allrightreserved.Exceptforuseinareview,thereproductionorutilizationinanyformorbyanyelectronic,mechanical,orothermeans,nowknownorhereafterinvented,includingxerography,photocopying,andrecording,andinanyinformationstorageandretrievalsystem,isforbiddenwithoutthewrittenpermission of the publisher.
Layout and design by Andru Design • www.andrudesign.com