thuraya xt-hotspot user guide-v1.2 xt-hotspot user guide-v1.2.pdf · the first time, the xt-hotspot...
TRANSCRIPT

GREAT ARBOR COMMUNICATIONS
ThurayaTM XT-Hotspot User Guide
v1.2, Nov 2012
Great Arbor Communications Potomac, MD
www.greatarbor.com Email: [email protected]

1
Table of Contents
ThurayaTM XT-HotSpot User Guide 0 Description 5 Specifications 5 LED Information 5 Making the First Connection 6 Manage the Hotspot 6
Optional: On-Demand Mode ............................................................................................................................... 7 WiFi Security ........................................................................................................................................................ 8 Port Forwarding (Redirection) .............................................................................................................................. 9 Reset Router to Factory Defaults and Upgrade Firmware ................................................................................. 10
Troubleshooting 12 Warranty 13

2
COPYRIGHT & TRADEMARKS Specifications are subject to change without notice. Great Arbor TM is a registered trademark of Great Arbor Communications, Thuraya TM is a registered trademark of Thuraya Telecommunications. Other brands and product names are trademarks or registered trademarks of their respective holders.
FCC STATEMENT
This equipment has been tested and found to comply with the limits for a Class B digital device, pursuant to part 15 of the FCC Rules. These limits are designed to provide reasonable protection against harmful interference in a residential installation. This equipment generates, uses and can radiate radio frequency energy and, if not installed and used in accordance with the instructions, may cause harmful interference to radio communications. However, there is no guarantee that interference will not occur in a particular installation. If this equipment does cause harmful interference to radio or television reception, which can be determined by turning the equipment off and on, the user is encouraged to try to correct the interference by one or more of the following measures:
• Reorient or relocate the receiving antenna.
• Increase the separation between the equipment and receiver.
• Connect the equipment into an outlet on a circuit different from that to which the receiver is connected.
• Consult the dealer or an experienced radio/ TV technician for help.
This device complies with part 15 of the FCC Rules. Operation is subject to the following two conditions: 1) This device may not cause harmful interference. 2) This device must accept any interference received, including interference that may cause undesired operation.
Any changes or modifications not expressly approved by the party responsible for compliance could void the user’s authority to operate the equipment.
Note: The manufacturer is not responsible for any radio or TV interference caused by unauthorized modifications to this equipment. Such modifications could void the user’s authority to operate the equipment.
FCC RF Radiation Exposure Statement This equipment complies with FCC RF radiation exposure limits set forth for an uncontrolled environment. This device and its antenna must not be co-located or operating in conjunction with any other antenna or transmitter. “To comply with FCC RF exposure compliance requirements, this grant is applicable to only Mobile Configurations. The antennas used for this transmitter must be installed to provide a separation distance of at least 20 cm from all persons and must not be co-located or operating in conjunction with any other antenna or transmitter.”
CE Mark Warning
This is a class B product. In a domestic environment, this product may cause radio interference, in which case the
user may be required to take adequate measures.

3
National restrictions
This device is intended for home and office use in all EU countries (and other countries following the EU directive 1999/5/EC) without any limitation except for the countries mentioned below:
Country Restriction Reason/remark
Bulgaria None General authorization required for outdoor use and public service
France Outdoor use limited to 10 mW e.i.r.p. within the band 2454-2483.5 MHz
Military Radiolocation use. Refarming of the 2.4 GHz band has been ongoing in recent years to allow current relaxed regulation. Full implementation planned 2012
Italy None If used outside of own premises, general authorization is required
Luxembourg None General authorization required for network and service supply(not for spectrum)
Norway Implemented This subsection does not apply for the geographical area within a radius of 20 km from the centre of Ny-Ålesund
Russian Federation None Only for indoor applications
Note: Please don’t use the product outdoors in France.

4
Package Contents The following items should be found in your package:
• Thuraya XT-Hotspot Portable Battery Powered Wireless N Router
• Power Adapter
• USB Cable
• USB Hub (required to interface the XT-Hotspot correctly to lower speed devices like the Thuraya-XT phone)
• Ethernet cable
• Quick Start Guide
• Resource CD
Note:
Make sure that the package contains the above items. If any of the listed items are damaged or missing, please contact your distributor.
5
Description
he XT-Hotspot is a compact, portable, 802.11n WiFi Router with a USB port which can be interfaced to Thuraya XT phones with GmPRS packet data connections. The XT-Hotspot has an internal battery and internal WiFi antenna providing WiFi access to the Internet to mobile devices (smartphones, tablets, etc.) up to a distance of about 100 feet. The XT-Hotspot enables
users to access the Internet using their personal mobile devices with the Thuraya XT satellite phone providing the Wide Area Network Connection to the Internet
Specifications Standards IEEE 802.11n, IEEE 802.11g, IEEE 802.11b
Wireless Signal Rates 11n: Up to 150Mbps; 11g: Up to 54Mbps; 11b: Up to 11Mbps
Frequency Range 2.4-2.4835GHz
Security WEP, WPA-PSK,/WPA2-PSK
Interface 1 10/100Mbps LAN Port, USB 2.0 Port for Thuraya-XT, a micro USB Port for power supply.
Internal Battery 2000 mAh (up to 4 hours of WiFi access to GmPRS). Battery can be recharged by the included power adapter or from a PC using the included USB cable
Power Adapter Input: 110/220 volt, Output.; 5 Volts, 1A
Operating temperature 15oC-40oC
Storage temperature -20oC-50oC
Operating humidity 0% - 75%, Non-Condensing
Storage Humidity 0%~75% Non-Condensing
Software Features Always up data connections and on-demand connections
Certifications CE, FCC, RoHS
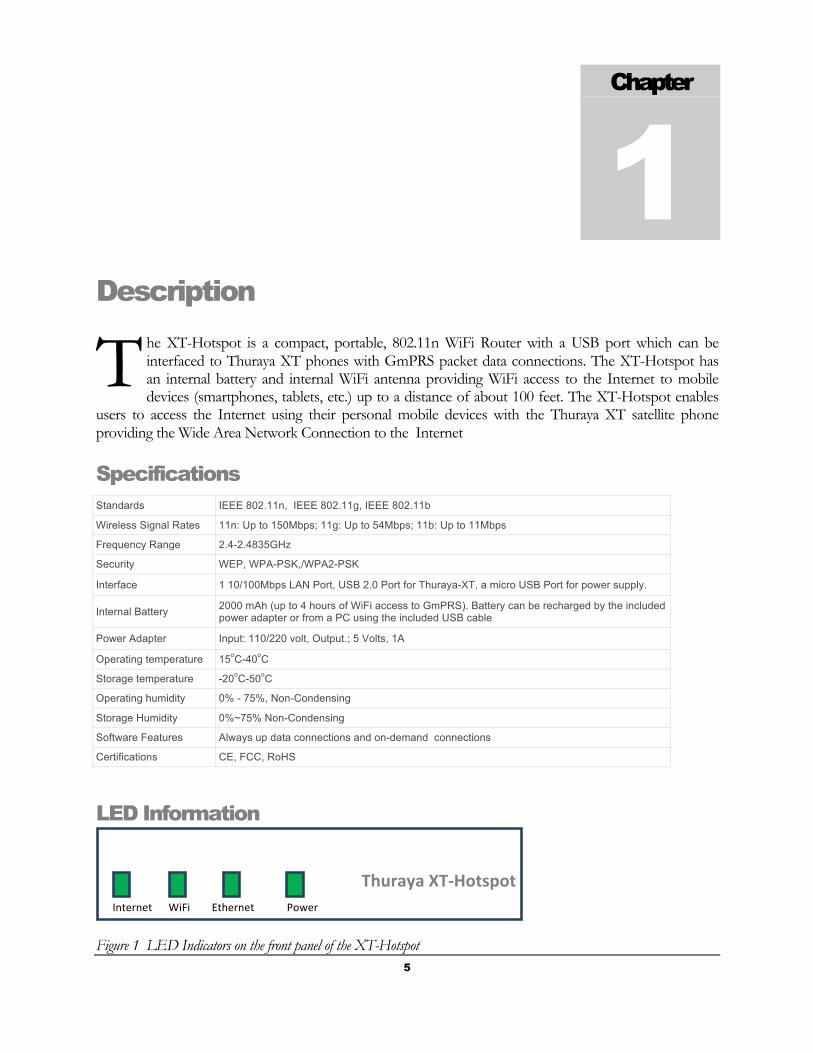
LED Information
Figure 1 LED Indicators on the front panel of the XT-Hotspot
Chapter
1 T
T
Internet WiFi Ethernet Power Thuraya XT-‐Hotspot

6
Making the First Connection
tart by connecting the Thuraya XT Phone to the bundled USB hub via the Thuraya XT data USB cable (not included in package). Connect the USB hub to the standard size USB port of the Thuraya-XT hotspot (the current version of the XT-Hotspot requires a USB hub in the middle to interface properly to lower speed USB devices like the Thuraya-XT phone). To charge the internal
battery, connect the power adapter cable to the micro-USB connector and plug the power-adapter to a 110/220 volt source. Turn the phone on and make sure it is registered and configured for GmPRS connectivity. Move the XT-Hotspot on/off switch to the ON position. Once the XT-Hotspot is up the WiFi LED will become a solid green. The XT-Hotspot will then attempt to establish a GmPRS connection if it is configured for an always-on connection (default). Once a connection is established the LED with the Internet symbol (LED closest to the edge) will start flashing once per second. Next turn on your PC and scan for wireless networks. This procedure can be different for different Operating Systems. For example on Windows XP, you can view the available WiFi networks by clicking the WiFi icon on the right end of the bottom panel and then selecting “View Wireless Networks”. The XT-Hotspot WiFi ID - Thuraya will appear. If it doesn’t, wait for 10 seconds, and re-scan (Refresh Network List in Windows XP). Once the Thuraya ID appears, select it and click Connect.
Start a web browser on the PC and see if you can access websites on the Internet. Once you are done with the Internet session, turn off the XT-Hotspot or pull the Thuraya XT USB cable out to disconnect the connection. If the Internet LED is blinking but you cannot connect to websites then your PC may not be connected properly to the XT-Hotspot. If the Internet LED does not blink then the XT-Hotspot has not been able to initiate a GmPRS connection. Review the troubleshooting section below to obtain the information needed to diagnose the problem.
The XT-Hotspot can handle failures in GmPRS connectivity. For example, the XT-Hotspot can be powered up without the Thuraya XT phone being connected to the XT-Hotspot. Plugging in the cable at a later time will cause the connection to be initiated. Additionally if the GmPRS connection attempt fails the first time, the XT-Hotspot will periodically attempt to establish a connection at a later time.
If you want to use the XT-Hotspot in wired mode, connect the PC’s LAN port to the LAN port on the XT-Hotspot. Make sure that the PC is configured to get an IP address automatically. Note that PCs are usually configured for automatic IP address assignment.
Manage the Hotspot Connect via WiFi to the Thuraya ID as described earlier. Open up your web browser and enter the address http://192.168.1.1 in the address bar. The login screen will appear. Login to the router with user name root and password admin. Click the Network tab to open up the Interfaces page as shown in
Chapter
2 S

7
Figure 2. In this page the GMPRS interface shows the status of the GMPRS connection. If you need to view or edit the GMPRS access configuration then click the Edit button in the GMPRS row.
Figure 2 Main Interfaces Page
This will open up the GMPRS configuration screen as shown in Figure 3. No changes are usually necessary to the configuration here. However if any changes are made then press Save & Apply to apply the changes.
Figure 3 GMPRS General Configuration Page
The XT-Hotspot will store the new entries and bring the interfaces up. Wait a minute and then turn the XT-Hotspot off and then on to power up with the new configuration.
Optional: On-Demand Mode Access the last field (titled “Inactivity timeout”) in the Advanced Settings Tab of GMPRS Configuration page to configure the XT-Hotspot to dial up a connection based on activity. In this mode, whenever the

8
PC or other user device connected to the XT-Hotspot (via WiFi or LAN) attempts to access the Internet, the XT-Hotspot will initiate a GmPRS connection. Enter the time after which the XT-Hotspot should automatically disconnect the connection in case of no activity (180 seconds is recommended). Setting the time to 0 changes the XT-Hotspot from Automatic Mode back to Always-On mode in which it will automatically open a connection and keep it up after being powered up. Press Save & Apply to save any changes made to the configuration.
Figure 4 GMPRS On-Demand Mode Configuration
In On-Demand mode various programs on your laptop (Virus update, Windows Update, etc.) or other WiFi device may attempt to access the Internet without your knowledge and will trigger a data connection. One way to disconnect the data connection is to disconnect the WiFi connection on your laptop/device. The data connection will be automatically dropped after the “Inactivity timeout” number of seconds. Another way is to turn the XT-Hotspot off or pull the USB cable out
WiFi Security Your WiFi connection can optionally be made secure if you want to be sure that no one else accesses the Internet using your GmPRS connection or accesses your PC over WiFi. Click the Wifi tab (located under the Interfaces option) in the Network section and the Wireless Status and Configuration page will open up as shown in Figure 5. Click the “Edit” button on the right to edit the WiFi configuration. Click the Wireless Security tab in the lower section to set encryption as shown in Figure 6. The most secure form of encryption is WPA2-PSK and the key can be a mixture of characters and letters. If your device does not support WPA2-PSK, you can set the encryption to WEP. However in the case of WEP, the key has to be exactly 10 characters. After making the entries, click Save & Apply.

9
Figure 5 Wireless Status Overview
Figure 6 Wireless Security Configuration
For increased security, you can also change the password for access to the XT-Hotspot. Select System and then Administration. Put in the new password, confirm it and click Save & Apply.
Port Forwarding (Redirection) Port Forwarding can be used to redirect incoming GmPRS connections to servers on the LAN side of the XT-Hotspot. Port Forwarding is useful if web servers, video cameras and other content servers on the LAN need to be accessed from the Internet. Typically a dynamic DNS client on the content server is used to associate a hostname with the current IP address of the XT-Hotspot. This allows users on the Internet

10
to access the hotspot with a hostname. The port forwarding configuration on the hotspot then ensures that those incoming connections are redirected to the content server. To configure port forwarding first click the Network/Firewall tab and select the Port Forwards option which pops up to the right. This will open up the page shown in Figure 7 below.
Figure 7 Port Forwarding Configuration
Specify your own name for the rule, elect the incoming protocols (TCP, UDP, TCP and UDP or custom IP protocol name), the port, and the IP address of the server on the LAN (Internal IP address) that the traffic is to be redirected to. For example for a web server on the LAN, the protocol would be TCP and the port would be 80. You can also map the external port to a different internal port if you wish. Press Add to add the rule and then Save & Apply to save the changes.
Reset Router to Factory Defaults and Upgrade Firmware If changes have been made to the configuration and the XT-Hotspot stops working, then the unit can be reset to factory defaults by holding down the reset button with a pin for 8 seconds. The unit will reset and come up in 2 minutes. Do not turn off power during this period.
Alternatively, the unit can also be reset to factory defaults from the web interface. Select System and then Backup / Flash Firmware from the drop-down menu. In the Backup / Restore section (see Figure 8 below) click the “Perform reset” button to reset the unit to the factory default configuration. A popup will appear asking to confirm the operation and after confirmation the unit will reset the configuration and reboot.
Occasionally a new version of firmware may be released by Great Arbor to add more capabilities or fix defects. To upgrade the firmware go to the “Flash new firmware image” section in the same web page (see Figure 8) and uncheck the Keep settings box. This is because new firmware may have new features which may be incompatible with your older settings. Then click “Choose File” to browse for the firmware file on your computer. After selecting the file, click the Flash image button. Make sure the Checksum listed on the page matches the Checksum provided to you along with the new firmware file. This step is essential to ensure that you are uploading the correct file to your XT-Hotspot and that the file has not been corrupted. If the checksums do no match, press Cancel. Otherwise press Proceed. The new firmware file will be uploaded to the unit and the flash will be reprogrammed with this file. Do not power off the unit while the reprogramming is occurring. Once the flash has been reprogrammed the unit will reset. The re-flashing and resetting process takes approximately 2-3 minutes.

11
Figure 8 Reset to Factory Defaults and Upgrade Firmware
To prevent unintended GmPRS connections which could cause high charges, it is recommended that you power off the XT-Hotspot when not in use.
Great Arbor disclaims all responsibility for inadvertent connections due to software/hardware malfunction, user configuration, or misuse of the XT-Hotspot.

12
Troubleshooting
se the issues and suggested resolution tips below to troubleshoot issues with the XT-Hotspot:
The USB/3G LED never flashes and there is no Internet access
Check if the GmPRS connection has been established on the Thuraya XT handset. If there is no connection then make sure the XT-Hotspot is turned ON and that the USB connection is secure on both ends. Verify that the GmPRS packet data subscription is valid and confirm that your device is connected over WiFi to the XT-Hotspot. Try repeating tests by connecting the Thuraya XT handset to a PC and establishing the connection using the Dial Up connection for the Thuraya XT handset. If you can make data calls through the PC but not through the XT-Hotspot then contact then access the System Log (Status Tab) and cut/paste that into an email to [email protected].
I made changes to the configuration and now the XT-Hotspot does not work
If changes have been made to the configuration and the XT-Hotspot stops working, then the unit can be reset to factory defaults by holding down the reset button with a pin for 8 seconds. The unit will reset and come up in 2 minutes. Do not turn off power during this period. If the XT-Hotspot cannot make a GmPRS connection then access the System Log (under the Status Tab) and cut/paste that into an email to [email protected]. Remote access to Great Arbor engineers can be provided by connecting a PC to the Internet via the PC LAN connection and using WiFi to connect the PC to the XT-Hotspot. A PC screen sharing program like TeamViewer can be used on the PC to provide remote access to the laptop.
How do I get help to troubleshoot issues with the XT-Hotspot
Contact Great Arbor by sending an email to [email protected]. if necessary Great Arbor engineers may request remote access to the XT-Hotspot. To provide remote access, bring the XT-Hotspot to an area where other Internet connectivity is available. Connect a PC to the Internet via the PC LAN connection and connect the PC to the XT-Hotspot using WiFi. A PC screen sharing program like TeamViewer can then be used on the PC to provide remote access to the laptop.
Chapter
3 U

13
Warranty
reat Arbor Communications warrants this product against defect in materials and workmanship for 1 year after purchase of the unit. Products requiring warranty service should be properly packed and returned to Great Arbor after receipt of a RMA Number. Proof of purchase is required to be submitted. Any product replaced by Great Arbor shall retain a warranty for the
remaining warranty period.
Warranty Exceptions
• Any defect caused by misuse, improper installation or maintenance that is not required as per the instructions; • Any unauthorized disassembly and repair; • Any defect caused by upgrading of the unit with unauthorized firmware; • Any defect caused by improper use in the working conditions beyond the stated ones by the instruction (for
example: use under abnormal temperatures that are too high, low, wet or dry; high sea-level; unstable electric current and voltage and so on);
• Any defect caused by personal disaster or improper maintenance, such as mechanical damage, serious oxidation and rusting, rat damage, permeating exertion and so on;
• Any defect caused by transportation or loading during return shipment; • Any damage caused by natural disasters such as earthquake, fire, flood, lightning strike, or any other natural
occurrence; • Any other defects that are not caused by workmanship, technique, product quality and the like.
Notices
• As for any direct or indirect loss caused by abnormal use of the product, Great Arbor shall only be liable for the duties that are stipulated by relevant state law.
• Great Arbor shall neither, on any account, respond to any loss or damages caused by intangible property such as applications or configurations, nor respond to any accusation put forward by a third party.
• Great Arbor reserves all rights including interpretation and modification to this warranty policy • Great Arbor shall not be liable for packet data charges or incur any liability for inadvertent GmPRS dial up due to
malfunctioning of the unit or user error
Chapter
4 G