tibco activematrix businessworks plug-in for activespaces for … · 2017-11-08 · tibco...
TRANSCRIPT

TIBCO ActiveMatrix BusinessWorks™ Plug-infor ActiveSpaces®
for TIBCO ActiveMatrix BusinessWorks™ 6.x
User's GuideSoftware Release 7.1.0November 2017
Two-Second Advantage®

Important Information
SOME TIBCO SOFTWARE EMBEDS OR BUNDLES OTHER TIBCO SOFTWARE. USE OF SUCHEMBEDDED OR BUNDLED TIBCO SOFTWARE IS SOLELY TO ENABLE THE FUNCTIONALITY (ORPROVIDE LIMITED ADD-ON FUNCTIONALITY) OF THE LICENSED TIBCO SOFTWARE. THEEMBEDDED OR BUNDLED SOFTWARE IS NOT LICENSED TO BE USED OR ACCESSED BY ANYOTHER TIBCO SOFTWARE OR FOR ANY OTHER PURPOSE.
USE OF TIBCO SOFTWARE AND THIS DOCUMENT IS SUBJECT TO THE TERMS ANDCONDITIONS OF A LICENSE AGREEMENT FOUND IN EITHER A SEPARATELY EXECUTEDSOFTWARE LICENSE AGREEMENT, OR, IF THERE IS NO SUCH SEPARATE AGREEMENT, THECLICKWRAP END USER LICENSE AGREEMENT WHICH IS DISPLAYED DURING DOWNLOADOR INSTALLATION OF THE SOFTWARE (AND WHICH IS DUPLICATED IN THE LICENSE FILE)OR IF THERE IS NO SUCH SOFTWARE LICENSE AGREEMENT OR CLICKWRAP END USERLICENSE AGREEMENT, THE LICENSE(S) LOCATED IN THE “LICENSE” FILE(S) OF THESOFTWARE. USE OF THIS DOCUMENT IS SUBJECT TO THOSE TERMS AND CONDITIONS, ANDYOUR USE HEREOF SHALL CONSTITUTE ACCEPTANCE OF AND AN AGREEMENT TO BEBOUND BY THE SAME.
ANY SOFTWARE ITEM IDENTIFIED AS THIRD PARTY LIBRARY IS AVAILABLE UNDERSEPARATE SOFTWARE LICENSE TERMS AND IS NOT PART OF A TIBCO PRODUCT. AS SUCH,THESE SOFTWARE ITEMS ARE NOT COVERED BY THE TERMS OF YOUR AGREEMENT WITHTIBCO, INCLUDING ANY TERMS CONCERNING SUPPORT, MAINTENANCE, WARRANTIES,AND INDEMNITIES. DOWNLOAD AND USE THESE ITEMS IS SOLELY AT YOUR OWNDISCRETION AND SUBJECT TO THE LICENSE TERMS APPLICABLE TO THEM. BY PROCEEDINGTO DOWNLOAD, INSTALL OR USE ANY OF THESE ITEMS, YOU ACKNOWLEDGE THEFOREGOING DISTINCTIONS BETWEEN THESE ITEMS AND TIBCO PRODUCTS.
This document contains confidential information that is subject to U.S. and international copyright lawsand treaties. No part of this document may be reproduced in any form without the writtenauthorization of TIBCO Software Inc.
TIBCO, Two-Second Advantage, TIBCO ActiveMatrix BusinessWorks, TIBCO Business Studio, TIBCOEnterprise Administrator, TIBCO ActiveMatrix BusinessWorks Plug-in for ActiveSpaces, and TIBCOActiveSpaces are either registered trademarks or trademarks of TIBCO Software Inc. in the UnitedStates and/or other countries.
Enterprise Java Beans (EJB), Java Platform Enterprise Edition (Java EE), Java 2 Platform EnterpriseEdition (J2EE), and all Java-based trademarks and logos are trademarks or registered trademarks ofOracle Corporation in the U.S. and other countries.
All other product and company names and marks mentioned in this document are the property of theirrespective owners and are mentioned for identification purposes only.
THIS SOFTWARE MAY BE AVAILABLE ON MULTIPLE OPERATING SYSTEMS. HOWEVER, NOTALL OPERATING SYSTEM PLATFORMS FOR A SPECIFIC SOFTWARE VERSION ARE RELEASEDAT THE SAME TIME. SEE THE README FILE FOR THE AVAILABILITY OF THIS SOFTWAREVERSION ON A SPECIFIC OPERATING SYSTEM PLATFORM.
THIS DOCUMENT IS PROVIDED “AS IS” WITHOUT WARRANTY OF ANY KIND, EITHER EXPRESSOR IMPLIED, INCLUDING, BUT NOT LIMITED TO, THE IMPLIED WARRANTIES OFMERCHANTABILITY, FITNESS FOR A PARTICULAR PURPOSE, OR NON-INFRINGEMENT.
THIS DOCUMENT COULD INCLUDE TECHNICAL INACCURACIES OR TYPOGRAPHICALERRORS. CHANGES ARE PERIODICALLY ADDED TO THE INFORMATION HEREIN; THESECHANGES WILL BE INCORPORATED IN NEW EDITIONS OF THIS DOCUMENT. TIBCOSOFTWARE INC. MAY MAKE IMPROVEMENTS AND/OR CHANGES IN THE PRODUCT(S)AND/OR THE PROGRAM(S) DESCRIBED IN THIS DOCUMENT AT ANY TIME.
2
TIBCO ActiveMatrix BusinessWorks™ Plug-in for ActiveSpaces® for TIBCO ActiveMatrix BusinessWorks™ 6.x

THE CONTENTS OF THIS DOCUMENT MAY BE MODIFIED AND/OR QUALIFIED, DIRECTLY ORINDIRECTLY, BY OTHER DOCUMENTATION WHICH ACCOMPANIES THIS SOFTWARE,INCLUDING BUT NOT LIMITED TO ANY RELEASE NOTES AND "READ ME" FILES.
Copyright © 2011-2017 TIBCO Software Inc. ALL RIGHTS RESERVED.
TIBCO Software Inc. Confidential Information
3
TIBCO ActiveMatrix BusinessWorks™ Plug-in for ActiveSpaces® for TIBCO ActiveMatrix BusinessWorks™ 6.x

Contents
TIBCO Documentation and Support Services . . . . . . . . . . . . . . . . . . . . . . . . . . . . . . . . . . . . . . . . . . . . . . . . . . . . . . . . 5
Product Overview . . . . . . . . . . . . . . . . . . . . . . . . . . . . . . . . . . . . . . . . . . . . . . . . . . . . . . . . . . . . . . . . . . . . . . . . . . . . . . . . . .6
Getting Started . . . . . . . . . . . . . . . . . . . . . . . . . . . . . . . . . . . . . . . . . . . . . . . . . . . . . . . . . . . . . . . . . . . . . . . . . . . . . . . . . . . . .7
TIBCO Business Studio Overview . . . . . . . . . . . . . . . . . . . . . . . . . . . . . . . . . . . . . . . . . . . . . . . . . . . . . . . . . . . . . . . . . . . . . . . . . . . . . . . . . . . . . 7
Creating a Project . . . . . . . . . . . . . . . . . . . . . . . . . . . . . . . . . . . . . . . . . . . . . . . . . . . . . . . . . . . . . . . . . . . . . . . . . . . . . . . . . . . . . . . . . . . . . . . . . . . . .8
Creating a DataGrid Connection . . . . . . . . . . . . . . . . . . . . . . . . . . . . . . . . . . . . . . . . . . . . . . . . . . . . . . . . . . . . . . . . . . . . . . . . . . . . . . . . . . . . . . .9
Adding a Table . . . . . . . . . . . . . . . . . . . . . . . . . . . . . . . . . . . . . . . . . . . . . . . . . . . . . . . . . . . . . . . . . . . . . . . . . . . . . . . . . . . . . . . . . . . . . . . . . . . . . . .11
Importing a Table . . . . . . . . . . . . . . . . . . . . . . . . . . . . . . . . . . . . . . . . . . . . . . . . . . . . . . . . . . . . . . . . . . . . . . . . . . . . . . . . . . . . . . . . . . . . . . . . . . . . . 12
Configuring a Process . . . . . . . . . . . . . . . . . . . . . . . . . . . . . . . . . . . . . . . . . . . . . . . . . . . . . . . . . . . . . . . . . . . . . . . . . . . . . . . . . . . . . . . . . . . . . . . 13
Testing the Process . . . . . . . . . . . . . . . . . . . . . . . . . . . . . . . . . . . . . . . . . . . . . . . . . . . . . . . . . . . . . . . . . . . . . . . . . . . . . . . . . . . . . . . . . . . . . . . . . . 14
Deploying an Application . . . . . . . . . . . . . . . . . . . . . . . . . . . . . . . . . . . . . . . . . . . . . . . . . . . . . . . . . . . . . . . . . . . . . . . . . . . . . . . . . . . . . . . . . . . . . 14
DataGrid and Table Shared Resources . . . . . . . . . . . . . . . . . . . . . . . . . . . . . . . . . . . . . . . . . . . . . . . . . . . . . . . . . . . . . 16
DataGrid Connection Parameters . . . . . . . . . . . . . . . . . . . . . . . . . . . . . . . . . . . . . . . . . . . . . . . . . . . . . . . . . . . . . . . . . . . . . . . . . . . . . . . . . . . . . 16
Table Connection Parameters . . . . . . . . . . . . . . . . . . . . . . . . . . . . . . . . . . . . . . . . . . . . . . . . . . . . . . . . . . . . . . . . . . . . . . . . . . . . . . . . . . . . . . . . .17
ActiveSpaces DataGrid Palette . . . . . . . . . . . . . . . . . . . . . . . . . . . . . . . . . . . . . . . . . . . . . . . . . . . . . . . . . . . . . . . . . . . . 20
Put . . . . . . . . . . . . . . . . . . . . . . . . . . . . . . . . . . . . . . . . . . . . . . . . . . . . . . . . . . . . . . . . . . . . . . . . . . . . . . . . . . . . . . . . . . . . . . . . . . . . . . . . . . . . . . . . . . 20
Get . . . . . . . . . . . . . . . . . . . . . . . . . . . . . . . . . . . . . . . . . . . . . . . . . . . . . . . . . . . . . . . . . . . . . . . . . . . . . . . . . . . . . . . . . . . . . . . . . . . . . . . . . . . . . . . . . . 21
Delete . . . . . . . . . . . . . . . . . . . . . . . . . . . . . . . . . . . . . . . . . . . . . . . . . . . . . . . . . . . . . . . . . . . . . . . . . . . . . . . . . . . . . . . . . . . . . . . . . . . . . . . . . . . . . . . 22
Query . . . . . . . . . . . . . . . . . . . . . . . . . . . . . . . . . . . . . . . . . . . . . . . . . . . . . . . . . . . . . . . . . . . . . . . . . . . . . . . . . . . . . . . . . . . . . . . . . . . . . . . . . . . . . . . 24
QueryBySQL . . . . . . . . . . . . . . . . . . . . . . . . . . . . . . . . . . . . . . . . . . . . . . . . . . . . . . . . . . . . . . . . . . . . . . . . . . . . . . . . . . . . . . . . . . . . . . . . . . . . . . . . .25
TableListener . . . . . . . . . . . . . . . . . . . . . . . . . . . . . . . . . . . . . . . . . . . . . . . . . . . . . . . . . . . . . . . . . . . . . . . . . . . . . . . . . . . . . . . . . . . . . . . . . . . . . . . . .26
Working with Sample Projects . . . . . . . . . . . . . . . . . . . . . . . . . . . . . . . . . . . . . . . . . . . . . . . . . . . . . . . . . . . . . . . . . . . . . 28
Importing Sample Projects . . . . . . . . . . . . . . . . . . . . . . . . . . . . . . . . . . . . . . . . . . . . . . . . . . . . . . . . . . . . . . . . . . . . . . . . . . . . . . . . . . . . . . . . . . . .28
Working with the IterateResultSet Project . . . . . . . . . . . . . . . . . . . . . . . . . . . . . . . . . . . . . . . . . . . . . . . . . . . . . . . . . . . . . . . . . . . . . . . . . . . . .29
Working with the DatabaseCache Project . . . . . . . . . . . . . . . . . . . . . . . . . . . . . . . . . . . . . . . . . . . . . . . . . . . . . . . . . . . . . . . . . . . . . . . . . . . . . 31
Working with QueryAndQueryBySQL . . . . . . . . . . . . . . . . . . . . . . . . . . . . . . . . . . . . . . . . . . . . . . . . . . . . . . . . . . . . . . . . . . . . . . . . . . . . . . . . . 32
Troubleshooting . . . . . . . . . . . . . . . . . . . . . . . . . . . . . . . . . . . . . . . . . . . . . . . . . . . . . . . . . . . . . . . . . . . . . . . . . . . . . . . . . . 34
Managing Logs . . . . . . . . . . . . . . . . . . . . . . . . . . . . . . . . . . . . . . . . . . . . . . . . . . . . . . . . . . . . . . . . . . . . . . . . . . . . . . . . . . . 35
Log Levels . . . . . . . . . . . . . . . . . . . . . . . . . . . . . . . . . . . . . . . . . . . . . . . . . . . . . . . . . . . . . . . . . . . . . . . . . . . . . . . . . . . . . . . . . . . . . . . . . . . . . . . . . . .35
Setting Up Log Levels . . . . . . . . . . . . . . . . . . . . . . . . . . . . . . . . . . . . . . . . . . . . . . . . . . . . . . . . . . . . . . . . . . . . . . . . . . . . . . . . . . . . . . . . . . . . . . . .35
Exporting Logs to a File . . . . . . . . . . . . . . . . . . . . . . . . . . . . . . . . . . . . . . . . . . . . . . . . . . . . . . . . . . . . . . . . . . . . . . . . . . . . . . . . . . . . . . . . . . . . . .36
Enabling TIBCO ActiveSpaces Logging . . . . . . . . . . . . . . . . . . . . . . . . . . . . . . . . . . . . . . . . . . . . . . . . . . . . . . . . . . . . . . . . . . . . . . . . . . . . . . 36
Log Properties . . . . . . . . . . . . . . . . . . . . . . . . . . . . . . . . . . . . . . . . . . . . . . . . . . . . . . . . . . . . . . . . . . . . . . . . . . . . . . . . . . . . . . . . . . . . . . . . . . 37
Error Codes . . . . . . . . . . . . . . . . . . . . . . . . . . . . . . . . . . . . . . . . . . . . . . . . . . . . . . . . . . . . . . . . . . . . . . . . . . . . . . . . . . . . . . 40
4
TIBCO ActiveMatrix BusinessWorks™ Plug-in for ActiveSpaces® for TIBCO ActiveMatrix BusinessWorks™ 6.x

TIBCO Documentation and Support Services
How to Access TIBCO Documentation
Documentation for TIBCO products is available on the TIBCO Product Documentation website, mainlyin HTML and PDF formats.
The TIBCO Product Documentation website is updated frequently and is more current than any otherdocumentation included with the product. To access the latest documentation, visit https://docs.tibco.com.
Product-Specific Documentation
Documentation for TIBCO products is not bundled with the software. Instead, it is available on theTIBCO Documentation site at https://docs.tibco.com/products/tibco-activematrix-businessworks-plug-in-for-activespaces. To directly access documentation for this product, double-click the following file:
TIBCO_HOME/release_notes/TIB_bwpluginactivespaces_version_number_docinfo.html
where TIBCO_HOME is the top-level directory in which TIBCO products are installed. On Windows,the default TIBCO_HOME is C:\Program Files\tibco. On UNIX systems, the default TIBCO_HOMEis /opt/tibco.
The following documents for this product can be found on the TIBCO Documentation site:
● TIBCO ActiveMatrix BusinessWorks Plug-in for ActiveSpaces Installation
●
● TIBCO ActiveMatrix BusinessWorks Plug-in for ActiveSpaces for TIBCO ActiveMatrix BusinessWorks 6.xUser's Guide
● TIBCO ActiveMatrix BusinessWorks Plug-in for ActiveSpaces Release Notes
How to Contact TIBCO Support
You can contact TIBCO Support in the following ways:
● For an overview of TIBCO Support, visit http://www.tibco.com/services/support.
● For accessing the Support Knowledge Base and getting personalized content about products you areinterested in, visit the TIBCO Support portal at https://support.tibco.com.
● For creating a Support case, you must have a valid maintenance or support contract with TIBCO.You also need a user name and password to log in to https://support.tibco.com. If you do not have auser name, you can request one by clicking Register on the website.
How to Join TIBCO Community
TIBCO Community is the official channel for TIBCO customers, partners, and employee subject matterexperts to share and access their collective experience. TIBCO Community offers access to Q&A forums,product wikis, and best practices. It also offers access to extensions, adapters, solution accelerators, andtools that extend and enable customers to gain full value from TIBCO products. In addition, users cansubmit and vote on feature requests from within the TIBCO Ideas Portal. For a free registration, go to https://community.tibco.com.
5
TIBCO ActiveMatrix BusinessWorks™ Plug-in for ActiveSpaces® for TIBCO ActiveMatrix BusinessWorks™ 6.x

Product Overview
TIBCO ActiveMatrix BusinessWorks™ Plug-in for ActiveSpaces® is a bridge between TIBCOActiveMatrix BusinessWorks™ and TIBCO ActiveSpaces®.
ActiveMatrix BusinessWorks™ is a leading integration platform that can integrate a wide variety oftechnologies and systems within enterprise and on cloud. ActiveMatrix BusinessWorks 6.x includes anEclipse-based graphical user interface (GUI) provided by TIBCO Business Studio™ for design, testing,and deployment. ActiveMatrix BusinessWorks 5.x uses the TIBCO Designer graphical user interface(GUI) to define business processes and the TIBCO ActiveMatrix BusinessWorks process engine toimplement these processes. If you are not familiar with ActiveMatrix BusinessWorks before using theplug-in, see the TIBCO ActiveMatrix BusinessWorks documentation for more details.
ActiveSpaces® software is a distributed in-memory DataGrid product. ActiveSpaces features familiardatabase concepts, high I/O capacity, and network scalability. The rise of big data and the internet ofthings places new and larger demands on databases. Traditional relational database implementationscan exhibit bandwidth bottleneck as more frequent queries with larger result sets overwhelm their I/Ocapacity. With ActiveSpaces DataGrids, you can scale I/O capacity by adding host computers to thegrid.
ActiveMatrix BusinessWorks™ Plug-in for ActiveSpaces® 7.1 can be plugged into either ActiveMatrixBusinessWorks 6.x or ActiveMatrix BusinessWorks 5.x to connect with ActiveSpaces 3.x. Depending onthe ActiveMatrix BusinessWorks version you are using, the plug-in adds an ActiveSpaces DataGridPalette and a DataGrid shared resource to either TIBCO Business Studio or TIBCO Designer.
The ActiveMatrix BusinessWorks Plug-in for ActiveSpaces 7.1 allows ActiveMatrix BusinessWorksusers to use ActiveSpaces without any coding. It provides the following features:
● Create and import tables
● Get data
● Put data
● Delete data
● Query data
● Query by SQL
● Table Listener
6
TIBCO ActiveMatrix BusinessWorks™ Plug-in for ActiveSpaces® for TIBCO ActiveMatrix BusinessWorks™ 6.x

Getting Started
This tutorial is designed for beginners who want to use the ActiveMatrix BusinessWorks Plug-in forActiveSpaces in TIBCO Business Studio.
All the operations are performed in TIBCO Business Studio. See TIBCO Business Studio Overview tofamiliarize yourself with TIBCO Business Studio.
Prerequisites
Make sure that ASDG_HOME/bin and FTL_HOME/bin are set in the PATH environment variable forWindows or ASDG_HOME/lib and FTL_HOME/lib are set in the LD_LIBRARY_PATH environment variableand ASDG_HOME/bin is set in the PATH environment variable for Linux.
Procedure
1. Creating a Project
2. Creating a DataGrid Connection
3. Adding a Table or Importing a Table
4. Configuring a Process
5. Testing a Process
6. Deploying an Application
TIBCO Business Studio OverviewTIBCO Business Studio is an Eclipse-based integration development environment that is used todesign, develop, and test ActiveMatrix BusinessWorks applications.
TIBCO Business Studio provides a workbench in which you can create, manage, and navigate resourcesin your workspace. See figure below.
A workspace is the central location on your machine where all data files are stored.
7
TIBCO ActiveMatrix BusinessWorks™ Plug-in for ActiveSpaces® for TIBCO ActiveMatrix BusinessWorks™ 6.x

The workbench consists of the following parts :
● Menu: contains menu items such as File, Edit, Diagram, Navigate, Search, Project, Run, Window,and Help.
● Toolbar: contains buttons for frequently used commands such as New , Save , Enable/
Disable Business Studio Capabilities , Create a new BusinessWorks Application Module ,
Create a new BusinessWorks Shared Module , Debug , Run , and so on.
● Perspective: contains an initial set and layout of views that are required to perform a certain task.TIBCO Business Studio launches the Modeling perspective by default. You can change theperspective from the menu Window > Open Perspective > Perspective_Name.
● View: displays resources. For example, the Project Explorer view displays the ActiveMatrixBusinessWorks applications, modules, and other resources in your workspace, and the Propertiesview displays the properties for the selected resource. You can open a view from the menu Window> Show View > View_Name.
● Editor: provides a canvas to configure, edit, or browse a resource. Double-click a resource in a viewto open the appropriate editor for the selected resource. For example, double-click an ActiveMatrixBusinessWorks process (Process.bwp) in the Project Explorer view to open the process in the editor.
● Palette: contains a set of widgets and a palette library. A palette groups activities that perform similartasks and provides quick access to activities when configuring a process.
Creating a ProjectIn the Getting Started tutorial, the first task you must do using the plug-in is to create a project.
An Eclipse project is an application module configured for ActiveMatrix BusinessWorks 6.x. Anapplication module is the smallest unit of resources that is named, versioned, and packaged as part ofan application.
Procedure
1. Start TIBCO Business Studio using one of the following ways:
● Microsoft Windows:
— Click Start > All Programs > TIBCO > TIBCO_HOME > TIBCO Business Studioversion_number > Studio for Designers.
— Double-click the TIBCO Business Studio executable file located in the TIBCO_HOME/studio/version_number/eclipse directory.
● Mac OS and Linux: run the TIBCO Business Studio executable file located in the TIBCO_HOME/studio/version_number/eclipse directory.
2. From the menu, click File > New > BusinessWorks Resources to open the BusinessWorks ResourceWizard.
3. In the Select a wizard dialog box, click BusinessWorks Application Module and click Next to openthe New BusinessWorks Application Module wizard.
4. In the Project dialog box, configure the project that you want to create:a) In the Project name field, enter a project name.b) By default, the created project is located in the workspace currently in use. If you do not want to
use the default location for the project, clear the Use default location check box and click Browseto select a new location.
8
TIBCO ActiveMatrix BusinessWorks™ Plug-in for ActiveSpaces® for TIBCO ActiveMatrix BusinessWorks™ 6.x

c) Use the default version of the application module, or enter a new version in the Version field.d) Keep the Create empty process and Create Application check boxes selected to automatically
create an empty process and an application when creating the project.e) Optional: Select the Use Java configuration check box if you want to create a Java module.
A Java module provides the Java tool capabilities.f) Click Finish to create the project.
Result
The project is created and displayed in the Project Explorer view and the canvas opens up showing theempty process in the Process Editor view.
What to do next
After you have created a project, the next task is to create a DataGrid connection. See the GettingStarted tutorial.
Creating a DataGrid ConnectionIn the Getting Started tutorial, the second task you must do using the plug-in is to create a DataGridconnection.
In the plug-in, a DataGrid shared resource represents a distributed database. The DataGrid sharedresource is available at the Resources level. To use ActiveSpaces DataGrid activities, you must create aDataGrid connection and then add a table to the DataGrid.
Prerequisites
You must create a project as described in Creating a Project.
Procedure
1. In the Project Explorer view, expand the created project.
2. Right-click the Resources folder and click New > DataGrid to open the ActiveSpaces window.
9
TIBCO ActiveMatrix BusinessWorks™ Plug-in for ActiveSpaces® for TIBCO ActiveMatrix BusinessWorks™ 6.x

3. The Resource Folder, Package, and Resource Name of the DataGrid resource are provided bydefault. If you do not want to use the default configurations, browse and change them accordingly.
4. Click Finish.The DataGrid Editor opens. See DataGrid Connection Parameters.
The details that you provided in step 3 are seen in the General panel.
5. Optional: Enter details in Description for the DataGrid.
6. Optional: In the DataGrid panel, enter the RealmServer URL. The default provided is: http://localhost:8080.
7. Select the Is Transacted check box if required.
8. Enter Wait Time. The default is 0.1 second.
9. Enter Timeout. The default is 5.0 seconds.
10. Enter the authenticated User Name for the server.
11. Enter the authenticated Password for the server.
12. Save the details. Restart TIBCO Business Studio.
If you are creating a new project in TIBCO Business Studio, you must restart before thenext step.
13. Click Test Connection to validate the connection.
What to do next
After you have created a DataGrid, the next task is to add a table. See the Getting Started tutorial.
10
TIBCO ActiveMatrix BusinessWorks™ Plug-in for ActiveSpaces® for TIBCO ActiveMatrix BusinessWorks™ 6.x

Adding a TableIn the Getting Started tutorial, the third task you must do using the plug-in is to add a table.
A Table shared resource represents a table. The Table shared resource is embedded in the DataGridshared resource. To use the ActiveSpaces DataGrid activities, you must create a DataGrid connectionand then add a table to the DataGrid.
Prerequisites
You must create a DataGrid connection as described in Creating a DataGrid Connection in the project.
Procedure
1. In the DataGrid Editor, click the Table tab.The Table Editor opens.
2. In the Table panel, click Add Table to add fields to a table in the DataGrid.
The table parameters that you can specify for configuration is displayed in the right panel. See TableConnection Parameters.
3. Enter the Table Name.
4. Click the "+" button beside the Table Fields definition.
5. In the Configuration panel, specify the table fields.a) Enter the Field Name.b) Enter the Field Type.
6. Repeat steps 4 and 5 to add more fields.
7. Click the Key Definition tab.
8. In the Key Definition panel, specify the key definition.
a) Click . In the Select dialog box, select the Key Field Names. Click Apply.
9. Optional: In the Index Definition panel, specify the index definition.a) Click the Index Definition tab.b) Enter the Index Name.c) Click , and enter the Index Field Names.You can manage the tables, by using Add Table to add a table, Remove to remove a table, or Exportto export a selected table.
11
TIBCO ActiveMatrix BusinessWorks™ Plug-in for ActiveSpaces® for TIBCO ActiveMatrix BusinessWorks™ 6.x

What to do next
After you have added a table, the next task is to configure a process. See the Getting Started tutorial.
Importing a TableAfter creating a DataGrid connection, you can import a table from an existing DataGrid if you havealready added a table.
A Table shared resource represents a table. To use the ActiveSpaces DataGrid activities, you mustcreate a DataGrid connection and then you can import a table from the DataGrid.
Prerequisites
You must create a DataGrid connection as described in Creating a DataGrid Connection and add a tableas described in Adding a Table. Also, ensure that the Activespaces RealmServer is started and theDataGrid shared resource connection is tested.
Procedure
1. Select the DataGrid you created.
2. In the DataGrid Editor, click Import Table.The Import Table dialog box opens.
3. Select the table that you want to import.
4. Click OK.The table is imported to the DataGrid in your project.
12
TIBCO ActiveMatrix BusinessWorks™ Plug-in for ActiveSpaces® for TIBCO ActiveMatrix BusinessWorks™ 6.x

Configuring a ProcessIn the Getting Started tutorial, the fourth task you must do using the plug-in is to configure a process.
Prerequisites
You must create a datagrid connection as described in Creating a DataGrid Connection and add a tableas described in Adding a Table or import a table as described in Importing a Table. You should have anempty process in the project you had created.
Procedure
1. In the Project Explorer view from the Processes folder, double-click the created project and open theempty process (.bwp) file.
2. Select an activity from the Palette view and drop it in the Process editor.For example, select and drop the Timer activity from the General Activities palette and the Putactivity from the ActiveSpaces DataGrid palette.
3. Drag to create a transition between the added activities.
4. Configure the added ActiveSpaces DataGrid activities, as described in ActiveSpaces DataGridPalette.
A datagrid connection is required when configuring the ActiveSpaces DataGrid activity.See Creating a DataGrid Connection for details on how to create a datagrid connection.
5. Click File > Save to save the project.
What to do next
After you have configured a process, the next task is to test the process. See the Getting Started tutorial.
13
TIBCO ActiveMatrix BusinessWorks™ Plug-in for ActiveSpaces® for TIBCO ActiveMatrix BusinessWorks™ 6.x

Testing the ProcessIn the Getting Started tutorial, the fifth task you must do using the plug-in is to test a process.
Prerequisites
You must configure a process as described in Configuring a Process.
Procedure
1. Click Run > Debug Configurations.
2. Click BusinessWorks Application > BWApplication in the left panel.By default, all the applications in the current workspace are selected in the Applications tab. Ensurethat only the application you want to debug is selected in the Applications tab in the right panel.
3. Click Debug to test the process in the selected application.TIBCO Business Studio changes to the Debug perspective. The debug information is displayed inthe Console view.
4. In the Debug tab, expand the running process and click an activity.
5. In the upper-right corner, click the Job Data tab, and then click the Output tab to check the activityoutput.
What to do next
After you have tested a process, the final task is to deploy an application. See the Getting Startedtutorial.
Deploying an ApplicationIn the Getting Started tutorial, the final task you must do using the plug-in is to deploy an application.After testing, if the configured process works as expected, you can deploy the application that contains
14
TIBCO ActiveMatrix BusinessWorks™ Plug-in for ActiveSpaces® for TIBCO ActiveMatrix BusinessWorks™ 6.x

the configured process into a runtime environment, and then use the bwadmin utility to manage thedeployed application.
Prerequisites
Before deploying an application, you must test the process as described in Testing the Process andgenerate an application archive, which is an enterprise archive (EAR) file that is created in ActiveMatrixBusinessWorks.
Procedure
Given below are the high-level tasks for deploying an application. See TIBCO ActiveMatrixBusinessWorks Administration for more details about how to deploy an application.
1. Upload an application archive.
2. Deploy the application archive.
3. Start the application.This last task completes the Getting Started tutorial. To check, see the Getting Started tutorial.
After getting started with using the plug-in, you can also work with the samples provided.
15
TIBCO ActiveMatrix BusinessWorks™ Plug-in for ActiveSpaces® for TIBCO ActiveMatrix BusinessWorks™ 6.x

DataGrid and Table Shared Resources
In the plug-in, the DataGrid and Table shared resources create a connection to a datagrid and table inActiveSpaces.
A DataGrid shared resource represents a datagrid. A datagrid is a distributed database, typicallydeployed on multiple hosts interconnected by a network. A datagrid could have one table or manytables. An ActiveSpaces datagrid organizes and presents data as rows in tables, like a traditionalrelational database.
A Table shared resource is embedded in the DataGrid shared resource. A Table shared resourcerepresents a table. A table is a shared entity that can be accessed by multiple applications concurrently,each one of which has the same coherent view of the data contained in the table.
See: Creating a DataGrid Connection and Adding a Table
DataGrid Connection ParametersGiven below are the parameters that you can specify for a datagrid in the DataGrid Editor to establisha connection with ActiveSpaces.
General
The General panel shows the package that stores the DataGrid shared resource and the sharedresource name. You can also provide a description for the shared resource in this panel.
The following table describes the fields in the General panel of the DataGrid shared resource:
FieldModuleProperty? Description
Package No Specifies the package that saves the DataGrid shared resource.
Name No Specifies the name to be displayed as the label for the DataGridshared resource in the process.
Description No Optional: Specifies a short description for the shared resource.
DataGrid
In the DataGrid panel , you can provide information for the ActiveSpaces datagrid that the plug-inconnects to.
Field Module Property? Description
Realm ServerURL
Yes Specifies The FTL realm server URL of a datagrid usedby a member to connect. The default value is http://localhost:8080
See TIBCO ActiveSpaces Developer’s Guide for detailedinformation.
Is Transacted Yes Optional: Specifies if the created session is transacted.Is Transacted has a boolean value.
See TIBCO ActiveSpaces Developer’s Guide for moreinformation.
16
TIBCO ActiveMatrix BusinessWorks™ Plug-in for ActiveSpaces® for TIBCO ActiveMatrix BusinessWorks™ 6.x

Field Module Property? Description
Wait Time(seconds)
Yes Optional: Specifies the amount of time that themember waits for a connection to the datagrid. Thevalue must be set to greater than the client-proxyroundtrip time or the connection will fail and must beretried.
The default value is 0.1 second.
See TIBCO ActiveSpaces Java API Reference for moreinformation.
Timeout(seconds)
Yes Optional: Specifies the amount of time that themember waits for a reconnection after the connectionto the datagrid terminates unexpectedly.
The default value is 5.0 seconds.
See TIBCO ActiveSpaces Java API Reference for moreinformation.
User Name Yes Specifies the user name for the realm server. The username has a string value.
Password Yes Specifies the password for the realm server. Thepassword has a string value.
Table Connection ParametersGiven below are the parameters that you can specify for a table in a datagrid after you click the AddTable button.
Configuration
In the Configuration tab, you can specify the table name and define the fields.
A row of a table is associated with a name and a type.
To create a row, click .
The following table describes the fields in the Configuration tab of the Table shared resource:
FieldModuleProperty? Description
Name No Specifies a name for the Table shared resource.
The name must start with a letter or a digit and caninclude alphanumeric characters, "-", or "_".
The Table Fields panel includes the following fields:
17
TIBCO ActiveMatrix BusinessWorks™ Plug-in for ActiveSpaces® for TIBCO ActiveMatrix BusinessWorks™ 6.x

FieldModuleProperty? Description
Field Name No Specifies a field name. Choose column names thatfollow these rules for SQL identifiers.
● Begin with a letter character.
ActiveSpaces® reserves column namesthat begin with an underscore characterfor internal use.
● Subsequent characters can be letters, digits, orunderscore characters.
● Do not use SQL keywords as column names.
● Column names are not case sensitive.
Field Type No Specifies a field type from the following options:
● LONG● DOUBLE● STRING● DATETIME● OPAQUE
Key Definition
In the Key Definition tab, you must set at least one of the defined fields as the key field to make thetable definition valid.
The following table describes the field in the Key Definition tab of the Table shared resource:
FieldModuleProperty? Description
Key Field Names No Click to select the key fields.
If the name of a field that is specified as a key ischanged, you have to update the correspondingfield name manually. Columns under key fieldsshould be Long or String type.
Index Definition
In the Index Definition tab, you can select the defined fields as indexes to accelerate the filtering of datawhen processing queries. An index uses memory to locate matching records, which is faster thaniterating through every record. This is optional.
To create an index, click .
The following table describes the fields in the Index Definition tab of the Table shared resource:
18
TIBCO ActiveMatrix BusinessWorks™ Plug-in for ActiveSpaces® for TIBCO ActiveMatrix BusinessWorks™ 6.x
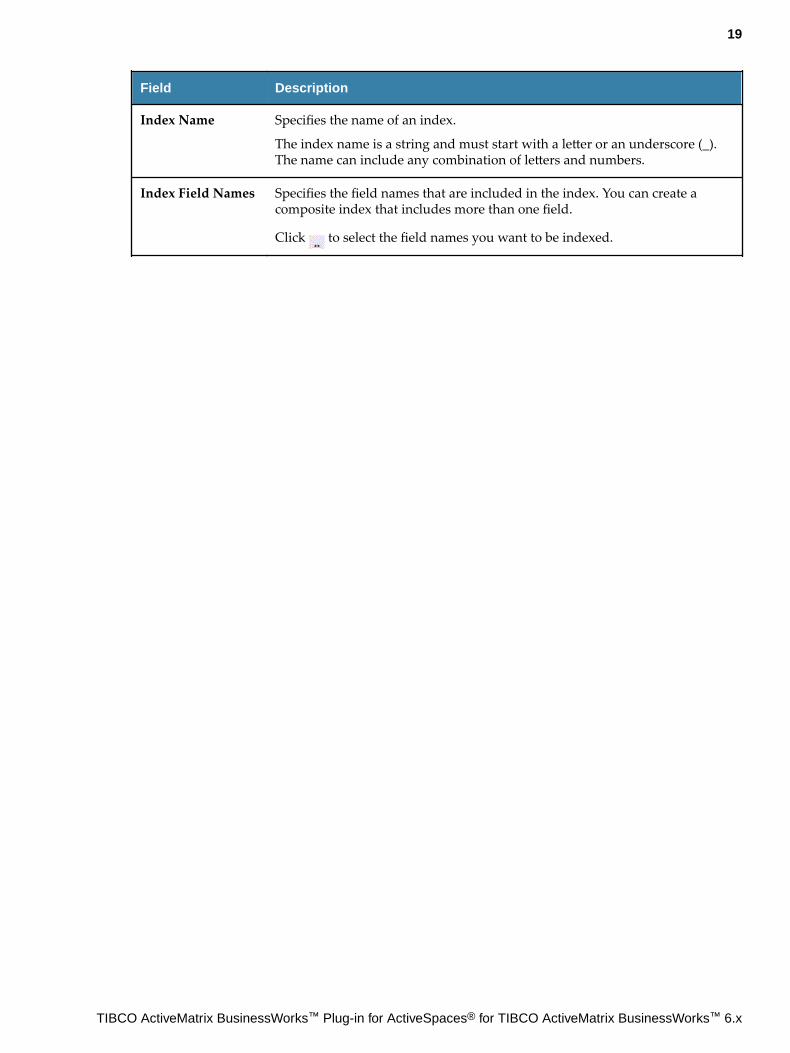
Field Description
Index Name Specifies the name of an index.
The index name is a string and must start with a letter or an underscore (_).The name can include any combination of letters and numbers.
Index Field Names Specifies the field names that are included in the index. You can create acomposite index that includes more than one field.
Click to select the field names you want to be indexed.
19
TIBCO ActiveMatrix BusinessWorks™ Plug-in for ActiveSpaces® for TIBCO ActiveMatrix BusinessWorks™ 6.x

ActiveSpaces DataGrid Palette
A palette groups the activities that connect the same external applications together. An ActiveSpacesDataGrid palette is added to the Palette Library in BusinessWorks after installing the plug-in.
The ActiveSpaces DataGrid palette contains the following activities:
● Put
● Get
● Delete
● Query
● QueryBySQL
● TableListener
PutThe Put activity adds a row to a datagrid table. Before using the Put activity, you must first create a rowobject and set its values in the fields. The row object must contain a value in all fields of the primarykey. The value of the key is unique. If the table already contains a row with that key value, then the Putactivity replaces the existing row within the table. All other fields may contain or omit values.
General
In the General tab, you can specify the activity Name and a Table Connection.
The following table describes the fields in the General tab of the Put activity:
Field Module Property? Description
Name No Specifies the name to be displayed as the label for theactivity in the process.
TableConnection
Yes Click to select a table connection. If the datagrid forthe required table connection is not found, in the SelectFireflyResource Resource Template dialog box that opens,click Create Shared Resource to create a datagridconnection first. See Creating a DataGrid and Adding aTable for details.
Description
In the Description tab, you can enter a short description for the Put activity.
Input
In the Input tab, you must provide the new rows that you want to put in the table.
You must provide input in all the fields specified in the table. Non-key fields are optional.
Output
In the Output tab, you can find the operation results when you test the process.
The following table describes the field in the Output tab of the Put activity:
20
TIBCO ActiveMatrix BusinessWorks™ Plug-in for ActiveSpaces® for TIBCO ActiveMatrix BusinessWorks™ 6.x

Output Item Data Type Description
ResultList String Specifies the HasError boolean value and the result. The resultcontains the HasError boolean value and the ROWs. IfHasError is true, the result contains the Error message as well.
The HasError value is true when one or moreresults have errors.
The HasError value is false when no error occurs.
Fault
In the Fault tab, you can find the error code and error message of the Put activity. See Error Codes formore detailed explanation of the errors.
The following table describes the errors in the Fault tab of the Put activity:
Error SchemaElement Data Type Description
msg String The plug-in error message.
msgCode String The plug-in error code.
GetThe Get activity retrieves a row of a datagrid table. Before using the Get activity, you must first create arow object and set a value in all fields of the primary key. The value of the key is unique. If the tablecontains a row with that key value, then the get operation returns the contents of that row in a new rowobject. If the table does not contain a row with that key value, then the activity returns null.
General
In the General tab, you can specify the activity name and a table connection.
The following table describes the fields in the General tab of the Get activity:
FieldModuleProperty? Description
Name No Specifies the name to be displayed as the label for the activity inthe process.
TableConnection
Yes Click to select a table connection.
If the datagrid for the required table connection is not found, inthe Select FireflyResource Resource Template dialog box thatopens, click Create Shared Resource to create a datagridconnection first. See Creating a DataGrid and Adding a Table fordetails.
Description
In the Description tab, you can enter a short description for the Get activity.
21
TIBCO ActiveMatrix BusinessWorks™ Plug-in for ActiveSpaces® for TIBCO ActiveMatrix BusinessWorks™ 6.x

Input
In the Input tab, you have to provide the key values of the rows to be queried.
You have to input all the keys specified in the table.
Output
In the Output tab, you can find the operation results when a process is tested.
The following table describes the field in the Output tab of the Get activity:
Output Item Data Type Description
ResultList String Specifies the HasError boolean value and the result. The resultcontains the HasError boolean value and the ROWs. IfHasError is true, the result contains the Error message as well.
The HasError value is true when one or moreresults have errors.
The HasError value is false when no error occurs.
Fault
In the Fault tab, you can find the error code and error message of the Get activity. See Error Codes formore detailed explanation of the errors.
The following table describes the errors in the Fault tab of the Get activity:
ErrorSchemaElement Data Type Description
msg String The plug-in error message.
msgCode String The plug-in error code.
DeleteThe Delete activity deletes a row from a datagrid table. Before using the Delete activity, you must firstcreate a row object and set a value in all fields of the primary key. The value of the key is unique. If thetable contains a row with that key value, then the Delete activity deletes that row from the table. If thetable does not contain a row with that key value, then the activity returns without changing the table.
General
In the Delete tab, you can specify the activity name and a table connection.
The following table describes the fields in the General tab of the Delete activity:
Field Module Property? Description
Name No Specifies the name to be displayed as the label forthe activity in the process.
22
TIBCO ActiveMatrix BusinessWorks™ Plug-in for ActiveSpaces® for TIBCO ActiveMatrix BusinessWorks™ 6.x

Field Module Property? Description
Table Connection Yes Click to select a table connection.
If the datagrid for the required table connection isnot found, in the Select FireflyResource ResourceTemplate dialog box that opens, click Create SharedResource to create a datagrid connection first. See Creating a DataGrid and Adding a Table for details.
Description
In the Description tab, you can enter a short description for the Delete activity.
Input
In the Input tab, you can specify the rows with the key values to be deleted.
Output
In the Output tab, you can view the rows that are deleted.
The following table describes the fields in the Output tab of the Delete activity:
Output Item Data Type Description
ResultList String Specifies the HasError boolean value and the result. The resultcontains the HasError boolean value and the ROWs. IfHasError is true, the result contains the Error message as well.
The HasError value is true when one or moreresults have errors.
The HasError value is false when no error occurs.
Fault
In the Fault tab, you can find the error code and error message. See Error Codes for more detailedexplanation of the errors.
The following table describes the errors in the Fault tab of the Delete activity:
Error SchemaElement Data Type Description
msg String The plug-in error message.
msgCode String The plug-in error code.
23
TIBCO ActiveMatrix BusinessWorks™ Plug-in for ActiveSpaces® for TIBCO ActiveMatrix BusinessWorks™ 6.x

QueryThe Query activity retrieves the entries that match the filter string or criteria specified in the datagridtable. Before using the Query activity, you must supply a filter string as an argument. This filterspecifies the content of the query, that is, criteria for selecting a subset of rows from the table.
General
In the General tab, you can specify the activity name and a table connection.
The following table describes the fields in the General tab of the Query activity:
FieldModuleProperty? Description
Name No Specifies the name to be displayed as the label for theactivity in the process.
Table Connection Yes Click to select a table connection.
If the datagrid for the required table connection is notfound, in the Select FireflyResource ResourceTemplate dialog box that opens, click Create SharedResource to create a datagrid connection first. See Creating a DataGrid and Adding a Table for details.
Description
In the Description tab, you can enter a short description for the Query activity.
Input
In the Input tab, you can specify the filter and the number of rows to be returned.
The following table describes the fields in the Input tab of the Query activity:
Input ItemDataType Description
Filter String Optional: Specifies a filter string.
A filtered query only returns the entries that match thespecified filter.
Ensure that the filter syntax is correct accordingto the TIBCO ActiveSpaces documentation. Ifan invalid filter is given, no results arereported.
See TIBCO ActiveSpaces Developer’s Guide for moreinformation on how to use filters.
Output
In the Output tab, you can find the operation results.
The following table describes the field in the Output tab of the Query activity:
24
TIBCO ActiveMatrix BusinessWorks™ Plug-in for ActiveSpaces® for TIBCO ActiveMatrix BusinessWorks™ 6.x
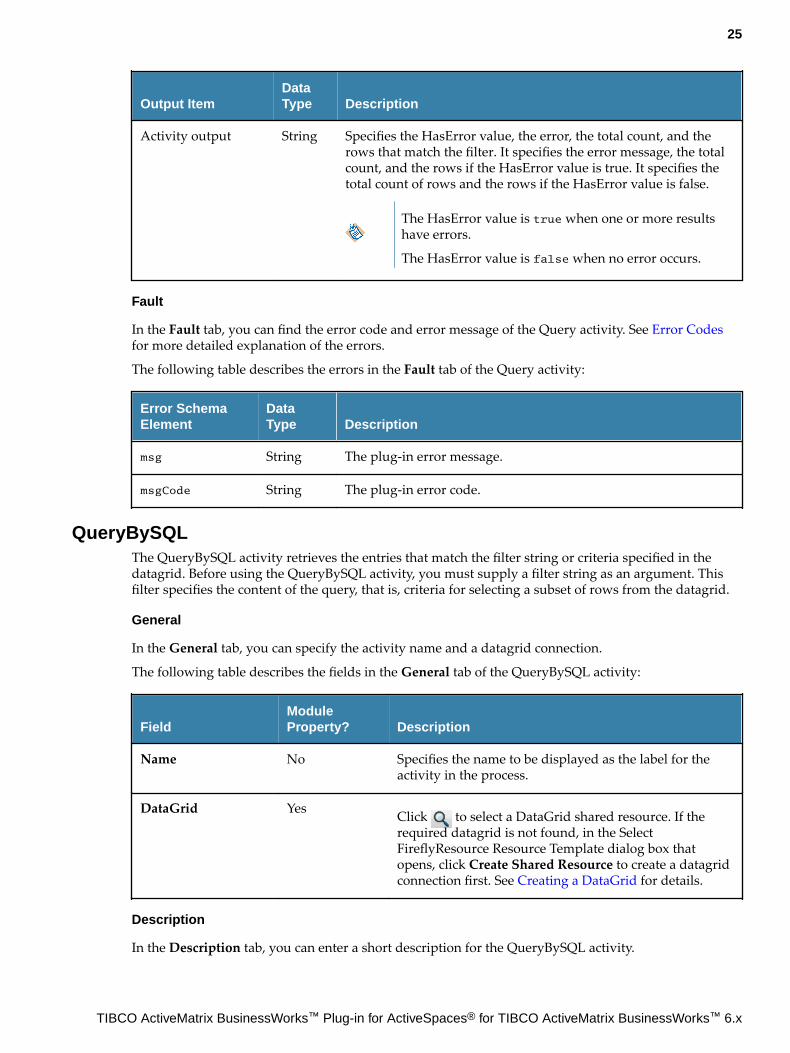
Output ItemDataType Description
Activity output String Specifies the HasError value, the error, the total count, and therows that match the filter. It specifies the error message, the totalcount, and the rows if the HasError value is true. It specifies thetotal count of rows and the rows if the HasError value is false.
The HasError value is true when one or more resultshave errors.
The HasError value is false when no error occurs.
Fault
In the Fault tab, you can find the error code and error message of the Query activity. See Error Codesfor more detailed explanation of the errors.
The following table describes the errors in the Fault tab of the Query activity:
Error SchemaElement
DataType Description
msg String The plug-in error message.
msgCode String The plug-in error code.
QueryBySQLThe QueryBySQL activity retrieves the entries that match the filter string or criteria specified in thedatagrid. Before using the QueryBySQL activity, you must supply a filter string as an argument. Thisfilter specifies the content of the query, that is, criteria for selecting a subset of rows from the datagrid.
General
In the General tab, you can specify the activity name and a datagrid connection.
The following table describes the fields in the General tab of the QueryBySQL activity:
FieldModuleProperty? Description
Name No Specifies the name to be displayed as the label for theactivity in the process.
DataGrid Yes Click to select a DataGrid shared resource. If therequired datagrid is not found, in the SelectFireflyResource Resource Template dialog box thatopens, click Create Shared Resource to create a datagridconnection first. See Creating a DataGrid for details.
Description
In the Description tab, you can enter a short description for the QueryBySQL activity.
25
TIBCO ActiveMatrix BusinessWorks™ Plug-in for ActiveSpaces® for TIBCO ActiveMatrix BusinessWorks™ 6.x

Input
In the Input tab, you can specify the SQL command.
The following table describes the field in the Input tab of the QueryBySQL activity:
Input ItemDataType Description
sql String Specifies a SQL query sentence.
Output
In the Output tab, you can find the operation results.
The following table describes the fields in the Output tab of the QueryBySQL activity:
Output ItemDataType Description
Activity output String Specifies the HasError value, the error, the total count, and therows that match the SQL query. It specifies the error message, thetotal count, and select fields of rows if the HasError value is true.It specifies the total count of rows and select fields of the rows ifthe HasError value is false. The ROW element can have multipleField elements which contains Name, Type, and Value elements.
The HasError value is true when one or more resultshave errors.
The HasError value is false when no error occurs.
Fault
In the Fault tab, you can find the error code and error message of the QueryBySQL activity. See ErrorCodes for more detailed explanation of the errors.
The following table describes the errors in the Fault tab of the QueryBySQL activity:
Error SchemaElement
DataType Description
msg String The plug-in error message.
msgCode String The plug-in error code.
TableListenerThe TableListener activity gets the entries that are put or deleted and match the filter string or criteriaspecified in the table. Before using the TableListener activity, you must create or import a table.
General
In the General tab, you can specify the activity name and a table connection.
The following table describes the fields in the General tab of the TableListener activity:
26
TIBCO ActiveMatrix BusinessWorks™ Plug-in for ActiveSpaces® for TIBCO ActiveMatrix BusinessWorks™ 6.x

FieldModuleProperty? Description
Name No Specifies the name to be displayed as the label for theactivity in the process.
Table Connection Yes Click to select a table connection. If the DataGrid forthe required table connection is not found, in the SelectFireflyResource Resource Template dialog box thatopens, click Create Shared Resource to create aDataGrid connection first. See Creating a DataGrid and Adding a Table for details.
Description
In the Description tab, you can enter a short description for the TableListener activity.
Advanced
The following table describes the fields in the Advanced tab of the TableListener activity:
Field Module Property? Description
Sequence Key No Specifies the XPath that determines the job sequenceorder. Matching string values produce sequential jobs forthose strings.
Custom Job Id No Specifies the XPath expression for a custom job id.
Filter Yes Optional: Specifies a string to filter events on the table.
Listen for PutEvents
Yes Specifies whether to listen for Put events in the table.
Listen forDelete Events
Yes Specifies whether to listen for Delete events in the table.
Output
In the Output tab, you can find the operation results.
The following table describes the fields in the Output tab of the TableListener activity:
Output ItemDataType Description
Activity output String Specifies the table events based on the filter provided. The tableevents provide the type of events and the rows listened for theevents.
27
TIBCO ActiveMatrix BusinessWorks™ Plug-in for ActiveSpaces® for TIBCO ActiveMatrix BusinessWorks™ 6.x

Working with Sample Projects
The ActiveMatrix BusinessWorks Plug-in for ActiveSpaces packages several sample projects with theinstaller. The sample projects show how the plug-in works.
The following sample projects are located in the TIBCO_HOME/bw/palettes/activespaces/version_number/samples directory:
● The DatabaseCache project shows how to use the plug-in to cache data from a file to a datagrid tableif the data is not on the table.
● The IterateResultSet project shows how to use the plug-in to handle the output of a batch operation.
● The QueryandQuerybySQL project shows how to use the plug-in to query the rows and comparethe result.
Importing Sample ProjectsBefore running the processes, you must import the sample project to TIBCO Business Studio.
Procedure
1. Start TIBCO Business Studio using one of the following ways:
● Microsoft Windows: click Start > All Programs > TIBCO > TIBCO_HOME > TIBCO BusinessStudio version_number > Studio for Designers.
● Mac OS and Linux: run the TIBCO Business Studio executable file located in the TIBCO_HOME/studio/version_number/eclipse directory.
2. From the menu, click File>Import.
3. In the Import dialog box, expand the General folder and select the Existing Studio Projects intoWorkspace item. Click Next.
4. Click Browse next to the Select root directory field to locate the sample. Click Finish.The sample project is located in the TIBCO_HOME/bw/palettes/activespaces/version_number/samples directory.
Result
The sample project is imported to TIBCO Business Studio.
28
TIBCO ActiveMatrix BusinessWorks™ Plug-in for ActiveSpaces® for TIBCO ActiveMatrix BusinessWorks™ 6.x

Working with the IterateResultSet ProjectThe IterateResultSet project contains a process that shows how to use ActiveMatrix BusinessWorksPlug-in for ActiveSpaces to handle the output of a batch operation.
The process is designed with the following activities:
29
TIBCO ActiveMatrix BusinessWorks™ Plug-in for ActiveSpaces® for TIBCO ActiveMatrix BusinessWorks™ 6.x

The following table describes the activities in this process:
Activity Description
Start Starts the process.
Put Stores a batch of rows into the table.
● If an error occurs during the Put operation, the group iterates over everyresult parameter in the Output tab of the Put activity.
● If no errors occur during the Put operation, the PutAgain operation isperformed.
SuccessLog Writes a message to the SucessTuple.txt file when the value of the HasErrorparameter in the Output tab of the Put activity is false.
The SucessTuple.txt file is located in the TIBCO_HOME/bw/palettes/activespaces/version_number/samples/IterateResultSet/output
directory.
FailedLog Writes a message to the FailedTuple.txt file when the value of the HasErrorparameter in the Output tab of the Put activity is true.
The FailedTuple.txt file is located in the TIBCO_HOME/bw/palettes/activespaces/version_number/samples/IterateResultSet/output
directory.
30
TIBCO ActiveMatrix BusinessWorks™ Plug-in for ActiveSpaces® for TIBCO ActiveMatrix BusinessWorks™ 6.x

Working with the DatabaseCache ProjectThe DatabaseCache project contains a process that shows how to use ActiveMatrix BusinessWorksPlug-in for ActiveSpaces to query and store rows in a table.
The process is designed with the following activities:
You must set Global Variables: DatabaseCache.BaseDir to TIBCO_HOME/bw/palettes/activespaces/version_number/samples/DatabaseCache/data and DatabaseCache.InputFileName toTIBCO_HOME/bw/palettes/activespaces/version_number/samples/DatabaseCache/data/
input.txt
The following table describes the activities in this process:
Activity Description
FilePoller Reads the input.txt file to monitor if an input ID or the key specified in the tableis created or changed. When the activity obtains an ID, it triggers the process.
Get FromSpace
Queries data in the table with the ID specified in the input.txt file.
Get SuccessLog
Writes the data in a row in the output.txt file if the row matches the input ID in theinput.txt file. The output.txt file is located in the TIBCO_HOME/bw/palettes/activespaces/version_number/samples/DatabaseCache/data directory.
ReadDatabase File
Reads the database.data file and sends the contents to the output of this activity.
Parse Data Retrieves the input from the output of the Read Database File activity and parsesthe data of the input based on the data format specified in the General tab.
Error Log Writes an error message in the output.txt file if no row matches the input ID inthe database.data file.
31
TIBCO ActiveMatrix BusinessWorks™ Plug-in for ActiveSpaces® for TIBCO ActiveMatrix BusinessWorks™ 6.x

Activity Description
Map Data Maps the data values in a row to the elements of the root variable if the rowmatches the input ID in the input.txt file.
The Root variable is a process variable added to the process definition by thisactivity and specified in the Input tab. The structure of the root is defined based onthe field names specified in the table.
Cache InfoSpace
Stores the output row of the Map Data activity in the table.
Success Log Writes a message that contains a row in the output.txt file when the rowmatching the input ID is stored successfully.
CacheError Writes an error message in the output.txt file if an error occurs during storing thematched row.
Working with QueryAndQueryBySQLThe QueryAndQueryBySQL project contains a process that shows how to use ActiveMatrixBusinessWorks Plug-in for ActiveSpaces to query the rows and compare the result.
The process is designed with the following activities:
The following table describes the activities in this process:
Activity Description
Put Stores a batch of rows into the table.
Query Queries rows in the table with filter id>0.
32
TIBCO ActiveMatrix BusinessWorks™ Plug-in for ActiveSpaces® for TIBCO ActiveMatrix BusinessWorks™ 6.x

Activity Description
Query by SQL Queries rows in the table with the SQL sentence select * from querytablewhere id>0.
33
TIBCO ActiveMatrix BusinessWorks™ Plug-in for ActiveSpaces® for TIBCO ActiveMatrix BusinessWorks™ 6.x
Troubleshooting
When you encounter problems with a project, check whether you have cleaned up the project.
If errors occur when you design a process in a project in TIBCO Business Studio, you can do a cleaningfirst. Cleaning deletes all the earlier files and reorganizes the project.
Procedure
1. Right-click the project in the Project Explorer view and click Refresh.
2. Select Project > Clean to start the cleaning.
34
TIBCO ActiveMatrix BusinessWorks™ Plug-in for ActiveSpaces® for TIBCO ActiveMatrix BusinessWorks™ 6.x

Managing Logs
When an error occurs, you can check logs to trace and troubleshoot the plug-in exceptions.
By default, error logs are displayed in the Console view when you run a process in the debug mode.You can change the log level of the plug-in to trace different messages and export logs to a file. Differentlog levels correspond to different messages, as described in Log Levels.
Additionally, you can also use the plug-in to enable TIBCO ActiveSpaces logging as described in Enabling TIBCO ActiveSpaces Logging.
Log LevelsDifferent log levels include different information.
The plug-in supports the following log levels:
Log Level Description
Debug Indicates a developer-defined tracing message.
Warn Indicates that an abnormal condition occurred. Processing continues, but it isgood practice for an administrator to pay special attention.
Error Indicates that an unrecoverable error occurred. Depending on the severity ofthe error, the plug-in might continue with the next operation or might stop.
Setting Up Log LevelsYou can configure different log levels for the plug-in and plug-in activities to trace different messages.
If you do not configure any log levels, the plug-in uses the default log level of TIBCO ActiveMatrixBusinessWorks. The default log level is Error.
Procedure
1. Navigate to the TIBCO_HOME/bw/version_number/config/design/logback directory and openthe logback.xml file.
When deploying the application in TIBCO Enterprise Administrator, you have to navigateto the TIBCO_HOME/bw/version_number/domains/defaultdomain/appnodes/defaultappspace/defaultappnode directory to find the logback.xml file.
2. Add the following node in the BusinessWorks Palette and Activity loggers area to specify a loglevel for the plug-in:<logger name="com.tibco.bw.palette.firefly.runtime"> <level value="DEBUG"/></logger>
The value of the level element can be Error, Info, or Debug.
If you set the log level to Debug, the input and output for the plug-in activities are alsodisplayed in the Console view. See Log Levels for more details regarding each log level.
3. Add the following node in the BusinessWorks Palette and Activity loggers area to specify a loglevel for an activity:<logger name="com.tibco.bw.palette.firefly.runtime.ActivityNameActivity"> <level value="DEBUG"/></logger>
35
TIBCO ActiveMatrix BusinessWorks™ Plug-in for ActiveSpaces® for TIBCO ActiveMatrix BusinessWorks™ 6.x

For example, add the following node to set the log level of the Put activity to Debug:<logger name="com.tibco.bw.palette.firefly.runtime.PutActivity"> <level value="DEBUG"/></logger>
The activities that are not configured with specific log levels use the log level configuredfor the plug-in.
4. Save the file.
Exporting Logs to a FileYou can update the logback.xml file to export plug-in logs to a file.
Procedure
1. Navigate to the TIBCO_HOME/bw/version_number/config/design/logback directory and openthe logback.xml file.
After deploying an application in TIBCO Enterprise Administrator, navigate to theTIBCO_HOME/bw/version_number/domains/domain_name/appnodes/space_name/
node_name directory to find the logback.xml file.
2. Add the following node to specify the file to which the log is exported:<appender name="FILE" class="ch.qos.logback.core.FileAppender"> <file>c:/bw6-asbw.log</file> <encoder> <pattern>%d{HH:mm:ss.SSS} [%thread] %-5level %logger{36}-%msg%n</pattern> </encoder></appender>
The value of the file element is the absolute path of the file that stores the exported log.
3. Add the following node to the root node at the bottom of the logback.xml file:<root level="DEBUG"> <appender-ref ref="STDOUT" /> <appender-ref ref="FILE" /></root>
4. Save the file.
Enabling TIBCO ActiveSpaces LoggingYou can use the plug-in to enable TIBCO ActiveSpaces logging to troubleshoot errors that occur inTIBCO ActiveSpaces.
Before deploying the application in TIBCO Enterprise Administrator, you have to add the logproperties listed in the Properties Added in the INI File column to the config.ini file to enable TIBCOActiveSpaces logging.
The config.ini file is located in the TIBCO_HOME/bw/version_number/domains/mydomain/appnodes/myappspace/myappnode directory.
Procedure
1. Start TIBCO Business Studio.
2. From the menu, click Run > Run Configurations.
3. In the Run Configurations dialog, click BusinessWorks Application > BWApplication.
4. Click the (x)=Arguments tab in the right panel.
36
TIBCO ActiveMatrix BusinessWorks™ Plug-in for ActiveSpaces® for TIBCO ActiveMatrix BusinessWorks™ 6.x
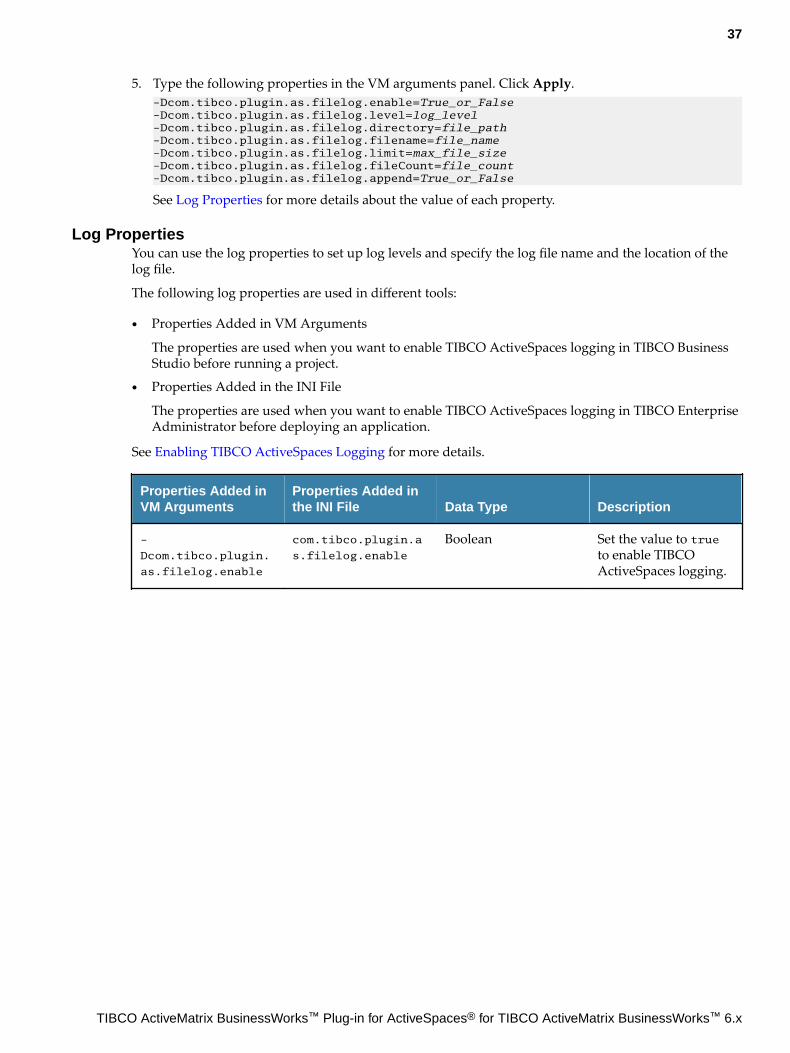
5. Type the following properties in the VM arguments panel. Click Apply.-Dcom.tibco.plugin.as.filelog.enable=True_or_False-Dcom.tibco.plugin.as.filelog.level=log_level-Dcom.tibco.plugin.as.filelog.directory=file_path-Dcom.tibco.plugin.as.filelog.filename=file_name-Dcom.tibco.plugin.as.filelog.limit=max_file_size-Dcom.tibco.plugin.as.filelog.fileCount=file_count-Dcom.tibco.plugin.as.filelog.append=True_or_False
See Log Properties for more details about the value of each property.
Log PropertiesYou can use the log properties to set up log levels and specify the log file name and the location of thelog file.
The following log properties are used in different tools:
● Properties Added in VM Arguments
The properties are used when you want to enable TIBCO ActiveSpaces logging in TIBCO BusinessStudio before running a project.
● Properties Added in the INI File
The properties are used when you want to enable TIBCO ActiveSpaces logging in TIBCO EnterpriseAdministrator before deploying an application.
See Enabling TIBCO ActiveSpaces Logging for more details.
Properties Added inVM Arguments
Properties Added inthe INI File Data Type Description
-
Dcom.tibco.plugin.
as.filelog.enable
com.tibco.plugin.a
s.filelog.enable
Boolean Set the value to trueto enable TIBCOActiveSpaces logging.
37
TIBCO ActiveMatrix BusinessWorks™ Plug-in for ActiveSpaces® for TIBCO ActiveMatrix BusinessWorks™ 6.x

Properties Added inVM Arguments
Properties Added inthe INI File Data Type Description
-
Dcom.tibco.plugin.
as.filelog.level
com.tibco.plugin.a
s.filelog.level
String Set the value to one ofthe following values toadjust and retrieve theamount of loggingproduced by TIBCOActiveSpaces corelibrary:
● None: Do not returnany information.
● FATAL: Return onlyfatal errors.
● ERROR: Returnerrors.
● WARN: Returnwarnings.
● INFO: Returndebug information.
● FINE: Return finedebug information.
● FINER: Returnmore detaileddebug information.
● FINEST: Return themost detaileddebug information.
The default value isERROR.
-
Dcom.tibco.plugin.
as.filelog.directo
ry
com.tibco.plugin.a
s.filelog.director
y
String Specify the outputdestination of the logfile.
-
Dcom.tibco.plugin.
as.filelog.filenam
e
com.tibco.plugin.a
s.filelog.filename
String Specify the file name.
-
Dcom.tibco.plugin.
as.filelog.limit
com.tibco.plugin.a
s.filelog.limit
Integer Specify the maximumsize (in bytes) of a logfile.
-
Dcom.tibco.plugin.
as.filelog.fileCou
nt
com.tibco.plugin.a
s.filelog.fileCoun
t
Integer Specify the number ofthe log file.
38
TIBCO ActiveMatrix BusinessWorks™ Plug-in for ActiveSpaces® for TIBCO ActiveMatrix BusinessWorks™ 6.x

Properties Added inVM Arguments
Properties Added inthe INI File Data Type Description
-
Dcom.tibco.plugin.
as.filelog.append
com.tibco.plugin.a
s.filelog.append
Boolean Set the value to 1 notto overwrite the logfile.
Set the value to 0 tooverwrite the log file.
The default value is 0.
39
TIBCO ActiveMatrix BusinessWorks™ Plug-in for ActiveSpaces® for TIBCO ActiveMatrix BusinessWorks™ 6.x

Error Codes
The following tables list error codes, detailed explanation of each error, where applicable, and ways tosolve different errors.
Error Codes for Shared Resources
Error Code and ErrorMessage Category Description Solution
500001
Cannot get Table FieldsDefinition [{0}].
BW-Plug-in Table fields are not defined. Specify tablefields in the tableConfigurationtab.
500002
Could not connect to theMetaspace [{0}].
BW-Plug-in Incorrect Realm Sever URLcauses an invalidconnection to the datagrid.
Specify correctRealm SeverURL.
500003
Cannot find Table Name intable resource [{0}].
BW-Plug-in The table name is not foundin the table resource.
Specify the tablename in the tableConfigurationtab.
500004
No [{0}] method in AS API.
BW-Plug-in The method does not existin TIBCO ActiveSpaces API.
No action.
500005
Failed to create sharedresource [{0}], due to [{1}].
BW-Plug-in Cannot create the sharedresource.
Check theconfigurations.
500006
Failed to Close sharedresource [{0}], due to [{1}].
BW-Plug-in Cannot create the sharedresource.
Check theconfigurations.
Error Codes for Activities
Error Code and ErrorMessage Category Description Solution
500000
ERROR_AS_ERROR={0}
BW-Plug-in An error occurs in TIBCOActiveSpaces.
No action.
500001
Other Error
BW-Plug-in An error occurs in the plug-in.
No action.
500002
The activity input is invalid.
BW-Plug-in No input parameters areentered or the inputparameters are invalid.
Enter valid inputparameters.
40
TIBCO ActiveMatrix BusinessWorks™ Plug-in for ActiveSpaces® for TIBCO ActiveMatrix BusinessWorks™ 6.x

Error Code and ErrorMessage Category Description Solution
500003
Cannot connect to Datagrid{0}.
BW-Plug-in The specified datagrid is notfound.
Check thedatagridconfigurations.
500004
Timeout is not specified.
BW-Plug-in The timeout is not specified. Set timeout fordatagrid.
500005
Connection Wait Timeout isnot specified.
BW-Plug-in The Connection WaitTimeout is not specified.
Set ConnectionWait Timeout fordatagrid.
500015
Operation timeout.
BW-Plug-in A timeout error occurswhen the Query orQueryIterator activityreturns query results.
No action.
41
TIBCO ActiveMatrix BusinessWorks™ Plug-in for ActiveSpaces® for TIBCO ActiveMatrix BusinessWorks™ 6.x