tibco activematrix businessworks plug-in for cics user's guide · pdf filetibco...
TRANSCRIPT
TIBCO ActiveMatrix BusinessWorks™ Plug-infor CICS User's GuideSoftware Release 2.2November 2014
Two-Second Advantage®

Important Information
SOME TIBCO SOFTWARE EMBEDS OR BUNDLES OTHER TIBCO SOFTWARE. USE OF SUCHEMBEDDED OR BUNDLED TIBCO SOFTWARE IS SOLELY TO ENABLE THE FUNCTIONALITY(OR PROVIDE LIMITED ADD-ON FUNCTIONALITY) OF THE LICENSED TIBCO SOFTWARE. THEEMBEDDED OR BUNDLED SOFTWARE IS NOT LICENSED TO BE USED OR ACCESSED BY ANYOTHER TIBCO SOFTWARE OR FOR ANY OTHER PURPOSE.
USE OF TIBCO SOFTWARE AND THIS DOCUMENT IS SUBJECT TO THE TERMS ANDCONDITIONS OF A LICENSE AGREEMENT FOUND IN EITHER A SEPARATELY EXECUTEDSOFTWARE LICENSE AGREEMENT, OR, IF THERE IS NO SUCH SEPARATE AGREEMENT, THECLICKWRAP END USER LICENSE AGREEMENT WHICH IS DISPLAYED DURING DOWNLOADOR INSTALLATION OF THE SOFTWARE (AND WHICH IS DUPLICATED IN THE LICENSE FILE)OR IF THERE IS NO SUCH SOFTWARE LICENSE AGREEMENT OR CLICKWRAP END USERLICENSE AGREEMENT, THE LICENSE(S) LOCATED IN THE “LICENSE” FILE(S) OF THESOFTWARE. USE OF THIS DOCUMENT IS SUBJECT TO THOSE TERMS AND CONDITIONS, ANDYOUR USE HEREOF SHALL CONSTITUTE ACCEPTANCE OF AND AN AGREEMENT TO BEBOUND BY THE SAME.
This document contains confidential information that is subject to U.S. and international copyright lawsand treaties. No part of this document may be reproduced in any form without the writtenauthorization of TIBCO Software Inc.
TIBCO, Two-Second Advantage, TIBCO ActiveMatrix BusinessWorks, TIBCO ActiveMatrixBusinessWorks Plug-in for Data Convention, TIBCO Enterprise Administrator and TIBCO BusinessStudio are either registered trademarks or trademarks of TIBCO Software Inc. in the United Statesand/or other countries.
Enterprise Java Beans (EJB), Java Platform Enterprise Edition (Java EE), Java 2 Platform EnterpriseEdition (J2EE), and all Java-based trademarks and logos are trademarks or registered trademarks ofOracle Corporation in the U.S. and other countries.
All other product and company names and marks mentioned in this document are the property of theirrespective owners and are mentioned for identification purposes only.
THIS SOFTWARE MAY BE AVAILABLE ON MULTIPLE OPERATING SYSTEMS. HOWEVER, NOTALL OPERATING SYSTEM PLATFORMS FOR A SPECIFIC SOFTWARE VERSION ARE RELEASEDAT THE SAME TIME. SEE THE README FILE FOR THE AVAILABILITY OF THIS SOFTWAREVERSION ON A SPECIFIC OPERATING SYSTEM PLATFORM.
THIS DOCUMENT IS PROVIDED “AS IS” WITHOUT WARRANTY OF ANY KIND, EITHEREXPRESS OR IMPLIED, INCLUDING, BUT NOT LIMITED TO, THE IMPLIED WARRANTIES OFMERCHANTABILITY, FITNESS FOR A PARTICULAR PURPOSE, OR NON-INFRINGEMENT.
THIS DOCUMENT COULD INCLUDE TECHNICAL INACCURACIES OR TYPOGRAPHICALERRORS. CHANGES ARE PERIODICALLY ADDED TO THE INFORMATION HEREIN; THESECHANGES WILL BE INCORPORATED IN NEW EDITIONS OF THIS DOCUMENT. TIBCOSOFTWARE INC. MAY MAKE IMPROVEMENTS AND/OR CHANGES IN THE PRODUCT(S)AND/OR THE PROGRAM(S) DESCRIBED IN THIS DOCUMENT AT ANY TIME.
THE CONTENTS OF THIS DOCUMENT MAY BE MODIFIED AND/OR QUALIFIED, DIRECTLY ORINDIRECTLY, BY OTHER DOCUMENTATION WHICH ACCOMPANIES THIS SOFTWARE,INCLUDING BUT NOT LIMITED TO ANY RELEASE NOTES AND "READ ME" FILES.
Copyright © 1999-2014 TIBCO Software Inc. ALL RIGHTS RESERVED.
TIBCO Software Inc. Confidential Information
2
TIBCO ActiveMatrix BusinessWorks™ Plug-in for CICS User's Guide
Contents
TIBCO Documentation and Support Service . . . . . . . . . . . . . . . . . . . . . . . . . . . . . . . . . . . . . . . . . . . . . . . . . . . . . . . . . .5
Plug-in Overview . . . . . . . . . . . . . . . . . . . . . . . . . . . . . . . . . . . . . . . . . . . . . . . . . . . . . . . . . . . . . . . . . . . . . . . . . . . . . . . . . . . 6
Getting Started . . . . . . . . . . . . . . . . . . . . . . . . . . . . . . . . . . . . . . . . . . . . . . . . . . . . . . . . . . . . . . . . . . . . . . . . . . . . . . . . . . . . .7
Creating a Project . . . . . . . . . . . . . . . . . . . . . . . . . . . . . . . . . . . . . . . . . . . . . . . . . . . . . . . . . . . . . . . . . . . . . . . . . . . . . . . . . . . . . . . . . . . . . . . . . . . . . 7
Creating a CICS Connection . . . . . . . . . . . . . . . . . . . . . . . . . . . . . . . . . . . . . . . . . . . . . . . . . . . . . . . . . . . . . . . . . . . . . . . . . . . . . . . . . . . . . . . . . . . 8
Configuring a Process . . . . . . . . . . . . . . . . . . . . . . . . . . . . . . . . . . . . . . . . . . . . . . . . . . . . . . . . . . . . . . . . . . . . . . . . . . . . . . . . . . . . . . . . . . . . . . . . . 8
Debugging and Running a Process . . . . . . . . . . . . . . . . . . . . . . . . . . . . . . . . . . . . . . . . . . . . . . . . . . . . . . . . . . . . . . . . . . . . . . . . . . . . . . . . . . . . 8
Checking Output of an Activity . . . . . . . . . . . . . . . . . . . . . . . . . . . . . . . . . . . . . . . . . . . . . . . . . . . . . . . . . . . . . . . . . . . . . . . . . . . . . . . . . . . . .9
Deploying an Application . . . . . . . . . . . . . . . . . . . . . . . . . . . . . . . . . . . . . . . . . . . . . . . . . . . . . . . . . . . . . . . . . . . . . . . . . . . . . . . . . . . . . . . . . . . . . . .9
Shared Resource . . . . . . . . . . . . . . . . . . . . . . . . . . . . . . . . . . . . . . . . . . . . . . . . . . . . . . . . . . . . . . . . . . . . . . . . . . . . . . . . . .10
CICS Connection Configuration . . . . . . . . . . . . . . . . . . . . . . . . . . . . . . . . . . . . . . . . . . . . . . . . . . . . . . . . . . . . . . . . . . . . . . . . . . . . . . . . . . . . . . .10
CICS Connection Configuration — General Panel . . . . . . . . . . . . . . . . . . . . . . . . . . . . . . . . . . . . . . . . . . . . . . . . . . . . . . . . . . . . . . . . 10
CICS Connection Configuration — Connection Configuration Panel . . . . . . . . . . . . . . . . . . . . . . . . . . . . . . . . . . . . . . . . . . . . . . . 10
CICS Connection Configuration — Pooling Configuration Panel . . . . . . . . . . . . . . . . . . . . . . . . . . . . . . . . . . . . . . . . . . . . . . . . . . . 12
CICS Connection Configuration — TLS Configuration Panel . . . . . . . . . . . . . . . . . . . . . . . . . . . . . . . . . . . . . . . . . . . . . . . . . . . . . . 13
CICS Palette . . . . . . . . . . . . . . . . . . . . . . . . . . . . . . . . . . . . . . . . . . . . . . . . . . . . . . . . . . . . . . . . . . . . . . . . . . . . . . . . . . . . . . 14
Interaction . . . . . . . . . . . . . . . . . . . . . . . . . . . . . . . . . . . . . . . . . . . . . . . . . . . . . . . . . . . . . . . . . . . . . . . . . . . . . . . . . . . . . . . . . . . . . . . . . . . . . . . . . . . .14
Interaction — General Tab . . . . . . . . . . . . . . . . . . . . . . . . . . . . . . . . . . . . . . . . . . . . . . . . . . . . . . . . . . . . . . . . . . . . . . . . . . . . . . . . . . . . . . . 14
Interaction — Description Tab . . . . . . . . . . . . . . . . . . . . . . . . . . . . . . . . . . . . . . . . . . . . . . . . . . . . . . . . . . . . . . . . . . . . . . . . . . . . . . . . . . . . 14
Interaction — Advanced Tab . . . . . . . . . . . . . . . . . . . . . . . . . . . . . . . . . . . . . . . . . . . . . . . . . . . . . . . . . . . . . . . . . . . . . . . . . . . . . . . . . . . . . 15
Interaction — Input Tab . . . . . . . . . . . . . . . . . . . . . . . . . . . . . . . . . . . . . . . . . . . . . . . . . . . . . . . . . . . . . . . . . . . . . . . . . . . . . . . . . . . . . . . . . . 17
Interaction — Output Tab . . . . . . . . . . . . . . . . . . . . . . . . . . . . . . . . . . . . . . . . . . . . . . . . . . . . . . . . . . . . . . . . . . . . . . . . . . . . . . . . . . . . . . . . 18
Interaction — Fault Tab . . . . . . . . . . . . . . . . . . . . . . . . . . . . . . . . . . . . . . . . . . . . . . . . . . . . . . . . . . . . . . . . . . . . . . . . . . . . . . . . . . . . . . . . . . 19
ContainerInteraction . . . . . . . . . . . . . . . . . . . . . . . . . . . . . . . . . . . . . . . . . . . . . . . . . . . . . . . . . . . . . . . . . . . . . . . . . . . . . . . . . . . . . . . . . . . . . . . . . . 19
ContainerInteraction — General Tab . . . . . . . . . . . . . . . . . . . . . . . . . . . . . . . . . . . . . . . . . . . . . . . . . . . . . . . . . . . . . . . . . . . . . . . . . . . . . 19
ContainerInteraction — Description Tab . . . . . . . . . . . . . . . . . . . . . . . . . . . . . . . . . . . . . . . . . . . . . . . . . . . . . . . . . . . . . . . . . . . . . . . . . . 20
ContainerInteraction — Advanced Tab . . . . . . . . . . . . . . . . . . . . . . . . . . . . . . . . . . . . . . . . . . . . . . . . . . . . . . . . . . . . . . . . . . . . . . . . . . . 20
ContainerInteraction — Input Tab . . . . . . . . . . . . . . . . . . . . . . . . . . . . . . . . . . . . . . . . . . . . . . . . . . . . . . . . . . . . . . . . . . . . . . . . . . . . . . . . 21
ContainerInteraction — Output Tab . . . . . . . . . . . . . . . . . . . . . . . . . . . . . . . . . . . . . . . . . . . . . . . . . . . . . . . . . . . . . . . . . . . . . . . . . . . . . . .22
ContainerInteraction — Fault Tab . . . . . . . . . . . . . . . . . . . . . . . . . . . . . . . . . . . . . . . . . . . . . . . . . . . . . . . . . . . . . . . . . . . . . . . . . . . . . . . . 23
Samples . . . . . . . . . . . . . . . . . . . . . . . . . . . . . . . . . . . . . . . . . . . . . . . . . . . . . . . . . . . . . . . . . . . . . . . . . . . . . . . . . . . . . . . . . .24
Importing the Sample Project . . . . . . . . . . . . . . . . . . . . . . . . . . . . . . . . . . . . . . . . . . . . . . . . . . . . . . . . . . . . . . . . . . . . . . . . . . . . . . . . . . . . . . . . . 24
Working with the IVP_Using_Commarea Project . . . . . . . . . . . . . . . . . . . . . . . . . . . . . . . . . . . . . . . . . . . . . . . . . . . . . . . . . . . . . . . . . . . . . . 24
Working with the IVP_Using_Containers Project . . . . . . . . . . . . . . . . . . . . . . . . . . . . . . . . . . . . . . . . . . . . . . . . . . . . . . . . . . . . . . . . . . . . . . 25
Working with the IVP_Using_Multiple_Containers Project . . . . . . . . . . . . . . . . . . . . . . . . . . . . . . . . . . . . . . . . . . . . . . . . . . . . . . . . . . . . . 26
Managing Logs . . . . . . . . . . . . . . . . . . . . . . . . . . . . . . . . . . . . . . . . . . . . . . . . . . . . . . . . . . . . . . . . . . . . . . . . . . . . . . . . . . . 27
Log Levels . . . . . . . . . . . . . . . . . . . . . . . . . . . . . . . . . . . . . . . . . . . . . . . . . . . . . . . . . . . . . . . . . . . . . . . . . . . . . . . . . . . . . . . . . . . . . . . . . . . . . . . . . . . 27
Setting Up Log Levels . . . . . . . . . . . . . . . . . . . . . . . . . . . . . . . . . . . . . . . . . . . . . . . . . . . . . . . . . . . . . . . . . . . . . . . . . . . . . . . . . . . . . . . . . . . . . . . . 27
3
TIBCO ActiveMatrix BusinessWorks™ Plug-in for CICS User's Guide
Exporting Logs to a File . . . . . . . . . . . . . . . . . . . . . . . . . . . . . . . . . . . . . . . . . . . . . . . . . . . . . . . . . . . . . . . . . . . . . . . . . . . . . . . . . . . . . . . . . . . . . . 28
Security for z/OS Components . . . . . . . . . . . . . . . . . . . . . . . . . . . . . . . . . . . . . . . . . . . . . . . . . . . . . . . . . . . . . . . . . . . . . 29
Security Modes . . . . . . . . . . . . . . . . . . . . . . . . . . . . . . . . . . . . . . . . . . . . . . . . . . . . . . . . . . . . . . . . . . . . . . . . . . . . . . . . . . . . . . . . . . . . . . . . . . . . . . .29
Unsecured Mode . . . . . . . . . . . . . . . . . . . . . . . . . . . . . . . . . . . . . . . . . . . . . . . . . . . . . . . . . . . . . . . . . . . . . . . . . . . . . . . . . . . . . . . . . . . . . . . . 29
Verify Mode . . . . . . . . . . . . . . . . . . . . . . . . . . . . . . . . . . . . . . . . . . . . . . . . . . . . . . . . . . . . . . . . . . . . . . . . . . . . . . . . . . . . . . . . . . . . . . . . . . . . . .29
Identify Mode . . . . . . . . . . . . . . . . . . . . . . . . . . . . . . . . . . . . . . . . . . . . . . . . . . . . . . . . . . . . . . . . . . . . . . . . . . . . . . . . . . . . . . . . . . . . . . . . . . . . 30
Plug-in Security . . . . . . . . . . . . . . . . . . . . . . . . . . . . . . . . . . . . . . . . . . . . . . . . . . . . . . . . . . . . . . . . . . . . . . . . . . . . . . . . . . . . . . . . . . . . . . . . . . . . . . 30
Transport Layer Security . . . . . . . . . . . . . . . . . . . . . . . . . . . . . . . . . . . . . . . . . . . . . . . . . . . . . . . . . . . . . . . . . . . . . . . . . . 32
RACF Configuration . . . . . . . . . . . . . . . . . . . . . . . . . . . . . . . . . . . . . . . . . . . . . . . . . . . . . . . . . . . . . . . . . . . . . . . . . . . . . . . . . . . . . . . . . . . . . . . . . . 32
Configuring BWCP Project . . . . . . . . . . . . . . . . . . . . . . . . . . . . . . . . . . . . . . . . . . . . . . . . . . . . . . . . . . . . . . . . . . . . . . . . . . . . . . . . . . . . . . . . . . . .37
4
TIBCO ActiveMatrix BusinessWorks™ Plug-in for CICS User's Guide
TIBCO Documentation and Support Service
All TIBCO documentation is available on the TIBCO Documentation site, which can be found here:
https://docs.tibco.com
Product-Specific Documentation
Documentation for TIBCO products is not bundled with the software. Instead, it is available on theTIBCO Documentation site. To directly access documentation for this product, double-click thefollowing file:
TIBCO_HOME/release_notes/TIB_bwcp_version_docinfo.html
The following documents for this product can be found on the TIBCO Documentation site:
● TIBCO ActiveMatrix BusinessWorks Plug-in for CICS Installation● TIBCO ActiveMatrix BusinessWorks Plug-in for CICS User’s Guide● TIBCO ActiveMatrix BusinessWorks Plug-in for CICS Release Notes
How to Contact TIBCO Support
For comments or problems with this manual or the software it addresses, contact TIBCO Support asfollows:
● For an overview of TIBCO Support, and information about getting started with TIBCO Support,visit this site:
http://www.tibco.com/services/support
● If you already have a valid maintenance or support contract, visit this site:
https://support.tibco.com
Entry to this site requires a user name and password. If you do not have a user name, you canrequest one.
How to Join TIBCOmmunity
TIBCOmmunity is an online destination for TIBCO customers, partners, and resident experts. It is aplace to share and access the collective experience of the TIBCO community. TIBCOmmunity offersforums, blogs, and access to a variety of resources. To register, go to:
http://www.tibcommunity.com
5
TIBCO ActiveMatrix BusinessWorks™ Plug-in for CICS User's Guide
Plug-in Overview
The plug-in allows the user to run CICS programs on the host (mainframe) computer and acquire theresults for processing in the ActiveMatrix BusinessWorks application. Both commarea and container-based programs are supported, as well as multi-region routing, connection pooling, and copybookrendering and parsing.
The most common use case scenario for this product is one in which the user needs to get or updatesome information on the host (mainframe) using an existing CICS program. To accomplish this, theuser only requires the following information:
● URL for the CICS Region.● Name of the program.● Input copybook for the program commarea (or container).● Output copybook for the program commarea (or container).● Security credentials, if required.
The plug-in along with TIBCO ActiveMatrix BusinessWorks Plug-in for Data Conversion allows you to:
● Take ActiveMatrix BusinessWorks XML data and transform it to CICS program input data.● Deliver input to Mainframe.● Check CICS security.● Run the program with the supplied input.● Receive the output back from CICS.● Deliver the program output back to BusinessWorks process in XML form.
6
TIBCO ActiveMatrix BusinessWorks™ Plug-in for CICS User's Guide
Getting Started
A typical workflow for using the plug-in to achieve different goals includes creating a process, testing itin the debugger, and deploying the application.
TIBCO ActiveMatrix BusinessWorks uses the Eclipse graphical user interface (GUI) provided by TIBCOBusiness Studio to define business processes and generate Enterprise Archives (EAR files). The EARfiles is deployed and run in the ActiveMatrix BusinessWorks runtime, and also is managed by usingTIBCO Enterprise Administrator (TEA).
The typical workflow for using the plug-in is:
1. Creating a Project
2. Configuring a Process
3. Debugging and Running a Process
4. Deploying an Application
Creating a ProjectProjects are BusinessWorks application modules that are created in TIBCO Business Studio. A projectcontains various resources.
Procedure
1. Start TIBCO Business Studio.
2. Click File > New > BusinessWorks Resources.
3. Click BusinessWorks Application Module in the BusinessWorks Resource dialog. Click Next.
There are several ways to open the New BusinessWorks Application Module dialog andcreate a new project in TIBCO Business Studio. See the TIBCO ActiveMatrixBusinessWorks documentation for more information.
4. Type a name for the project that you are creating in the Project name field.
5. Keep the Use default location, Create empty process, and Create Application check boxes selected.Click Finish.
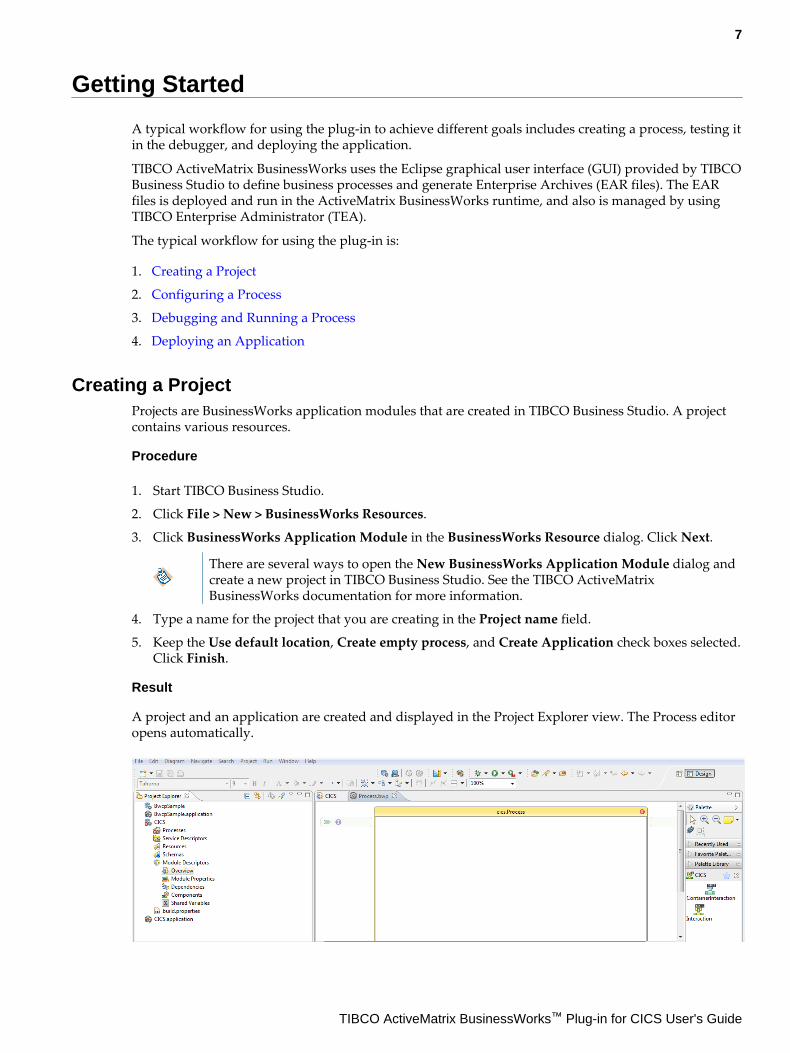
Result
A project and an application are created and displayed in the Project Explorer view. The Process editoropens automatically.
7
TIBCO ActiveMatrix BusinessWorks™ Plug-in for CICS User's Guide
Creating a CICS ConnectionThe CICS Shared Connection is required when using the plug-in activities. The CICS shared resource isused to create the CICS connection.
Procedure
1. Expand the created project in the Project Explorer view.
2. Right-click the Resources folder and select New > CICS Connection.
3. Type a name in the Resource Name field in the CicsConnection dialog. Click Finish.
4. Configure the CICS shared resource in the displayed editor, as described in CICS ConnectionConfiguration.
Configuring a ProcessProcesses define the business logic. Once a project is created, you need to configure the process byadding activities, conditions, and services.
Procedure
1. Select an activity from the Palette view and drop it in the Process editor.For example, select and drop the Timer activity from the General Activities palette and theCICSInteraction activity from the CICS palette.
2. Click to create links between the activities and configure the condition types.
3. Configure the added activities, as described in CICS Palette.
A CICS shared resource is required when configuring the activities. See Creating a CICSConnection for more details on how to create the CICS shared resource.
4. Click File > Save to save the project.
Debugging and Running a ProcessDebug the application you have configured to ensure that the application configuration is correct.
Procedure
1. Open the process you have configured in TIBCO Business Studio.
2. On the toolbar, click Run > Debug Configurations.
3. Click BusinessWorks Application > BWApplication in the left panel.
4. Ensure only the application you want to debug and run is selected in the Applications tab in theright panel.
5. Click the Advanced tab and click Browse to locate the logback file.By default, the log file resides in the TIBCO_HOME/bw/6.2/config/design/logback directory anderror logs are captured. See Managing Logs for more details.
6. Click Debug.TIBCO Business Studio changes to the Debug perspective. Logs are displayed in the Console view.
8
TIBCO ActiveMatrix BusinessWorks™ Plug-in for CICS User's Guide
Checking Output of an ActivityAfter debugging the application, you can check the output of activities.
Procedure
1. In the Debug perspective, expand BWApplication and click the activity in the upper left panel.
2. In the upper right panel, click the Job Data view and click Output.
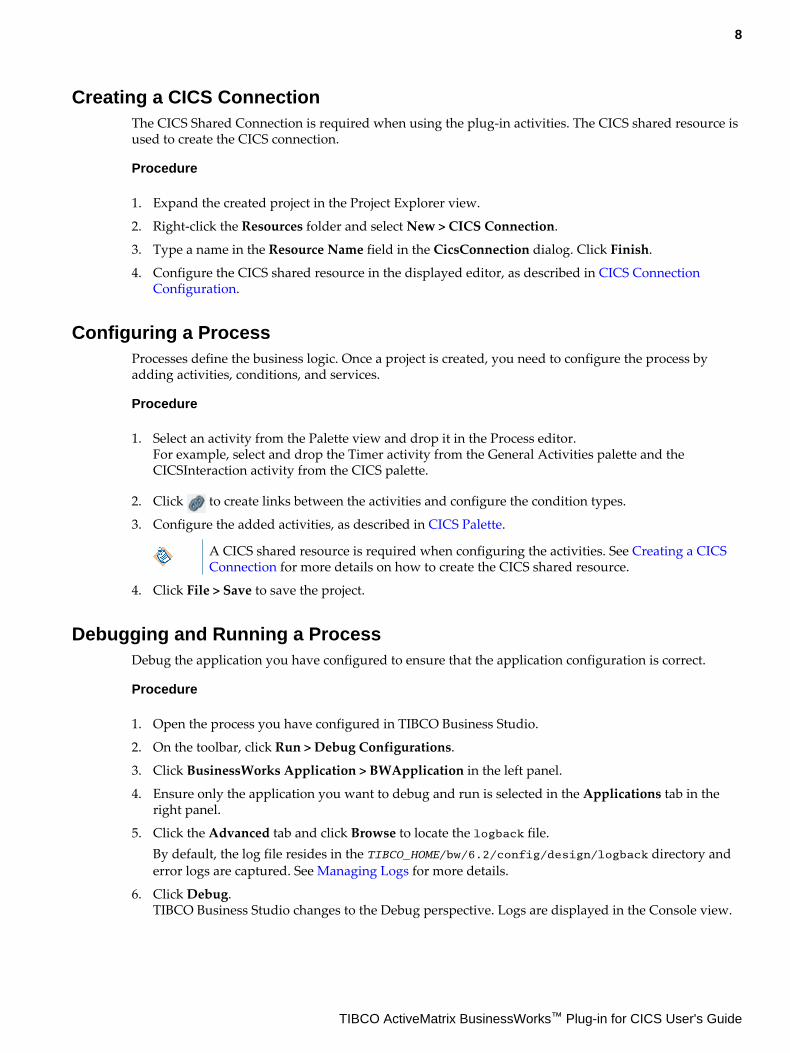
Result
The output of the activity is displayed.
You can also check the activity output in the plug-in logs. See Managing Logs for moreinformation.
Deploying an ApplicationGenerate an EAR file for an application, and deploy it in TIBCO Enterprise Administrator.
Procedure
1. Generate an EAR file in Business Studio.
a) Go to File Explorer and click the Open Directory to Browse icon.b) Select the folder where you want to generate the EAR file and click OK.
The folder appears in the File Explorer.c) Drag the application from the Project Explorer to the folder in the File Explorer.The generated EAR file is named as application_version.ear where version starts from 1.0.0 andincrements as more EAR files are created.
2. Deploy the EAR file in TIBCO Enterprise Administrator.a) In a terminal, navigate to TIBCO_HOME\bw\n.n\bin and type bwadmin.b) Upload the EAR file to MyDomain by using the following command:
bwadmin[admin@MyDomain]> upload -d MyDomain EARFileName
The use of forward slashes "/" is for the Windows path.
c) Deploy the EAR file to MyDomain which contains MyAppSpace by using the following command:bwadmin[admin]> Deploy -d MyDomain -a MyAppSpace EARFileName
See TIBCO ActiveMatrix BusinessWorks Administration.
9
TIBCO ActiveMatrix BusinessWorks™ Plug-in for CICS User's Guide

Shared Resource
Shared resources are specifications that are shared among activities. This plug-in contains one sharedresource: CICS Connection.
CICS Connection ConfigurationCICS Region represents all the information necessary to make a connection to a CICS region which isrunning the BusinessWorks Integration for CICS Plug-in socket listener.
CICS Connection Configuration — General PanelThe General panel has the following fields.
FieldModuleProperty? Description
Package No The name of the package where the shared resource is located.
Name No The name of the CICS connection.
Default: .CicsConnection
Description No Description of the resource.
CICS Connection Configuration — Connection Configuration PanelThe Connection Configuration panel has the following fields.
FieldModuleProperty? Description
Host Name Yes The TCP host name of the machine running the CICS region towhich this region connects.
Default: localhost
Port Yes The TCP port number on which CICS is listening.
Default: 9911
Range: 0-65535
10
TIBCO ActiveMatrix BusinessWorks™ Plug-in for CICS User's Guide
FieldModuleProperty? Description
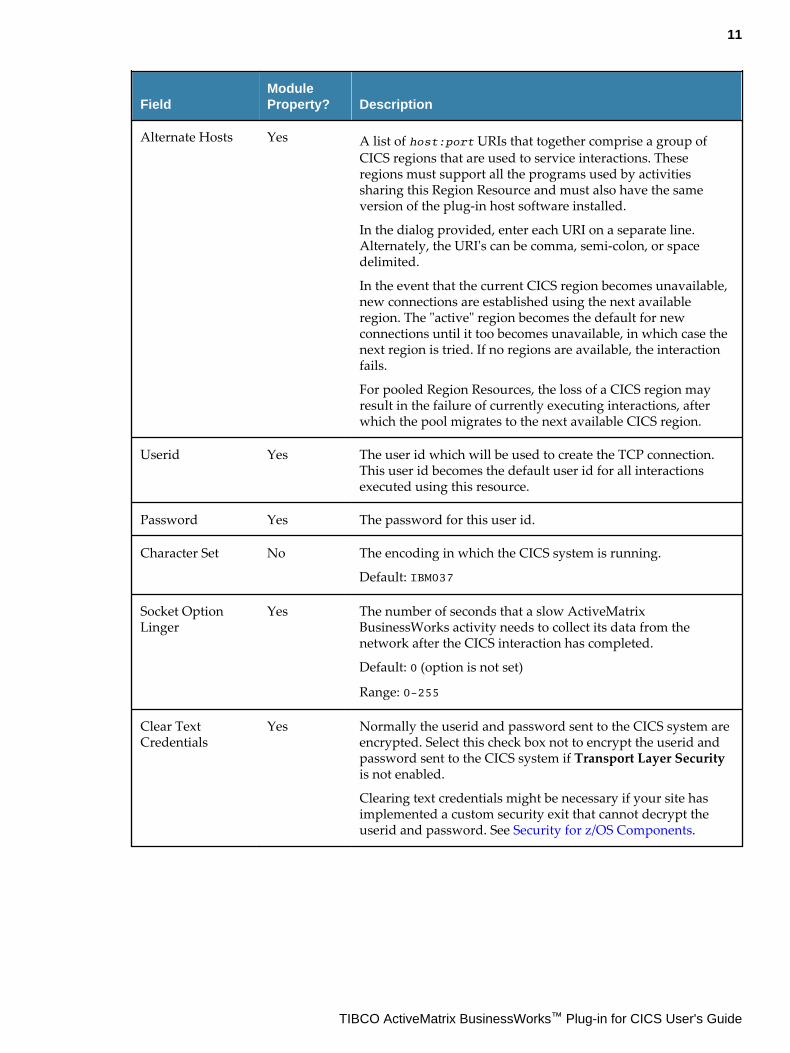
Alternate Hosts Yes A list of host:port URIs that together comprise a group ofCICS regions that are used to service interactions. Theseregions must support all the programs used by activitiessharing this Region Resource and must also have the sameversion of the plug-in host software installed.
In the dialog provided, enter each URI on a separate line.Alternately, the URI's can be comma, semi-colon, or spacedelimited.
In the event that the current CICS region becomes unavailable,new connections are established using the next availableregion. The "active" region becomes the default for newconnections until it too becomes unavailable, in which case thenext region is tried. If no regions are available, the interactionfails.
For pooled Region Resources, the loss of a CICS region mayresult in the failure of currently executing interactions, afterwhich the pool migrates to the next available CICS region.
Userid Yes The user id which will be used to create the TCP connection.This user id becomes the default user id for all interactionsexecuted using this resource.
Password Yes The password for this user id.
Character Set No The encoding in which the CICS system is running.
Default: IBM037
Socket OptionLinger
Yes The number of seconds that a slow ActiveMatrixBusinessWorks activity needs to collect its data from thenetwork after the CICS interaction has completed.
Default: 0 (option is not set)
Range: 0-255
Clear TextCredentials
Yes Normally the userid and password sent to the CICS system areencrypted. Select this check box not to encrypt the userid andpassword sent to the CICS system if Transport Layer Securityis not enabled.
Clearing text credentials might be necessary if your site hasimplemented a custom security exit that cannot decrypt theuserid and password. See Security for z/OS Components.
11
TIBCO ActiveMatrix BusinessWorks™ Plug-in for CICS User's Guide

FieldModuleProperty? Description
Transaction Name Yes The name of the CICS socket listener transaction. Options are:
● Production: It will be translated to SXNE. This is the defaultvalue.
● Debug: It will be translated to SXNT.
● The character name (in four uppercase letters) of thetransaction if you have copied or renamed the CICS socketlistener transaction during installation.
Test Connection No Click this button to test the host and port specifications todetermine if the socket listener is up. If the port is open, asimple program is run to ensure that the basic infrastructure isworking.
CICS Connection Configuration — Pooling Configuration PanelThe Pooling Configuration panel has the following fields.
FieldModuleProperty? Description
PoolConnections
No Select this check box to enable connection pooling for thisresource. After selecting this check box, the Connection PoolInitial Size, Connection Lifetime, and Maximum Wait Timefields are enabled.
If pooling is enabled for the connections to a region, activitiesusing that pool will be blocked until there is an availableconnection. The blocking interval corresponds to the pool's MaxWait Time.
Because this blocks threads in BusinessWorks, such activities aremade to run in their own threads. Therefore, the size of the poolnot only controls the maximum number of simultaneousconnections to a given region, but also the number ofBusinessWorks threads dedicated to that task.
12
TIBCO ActiveMatrix BusinessWorks™ Plug-in for CICS User's Guide
FieldModuleProperty? Description
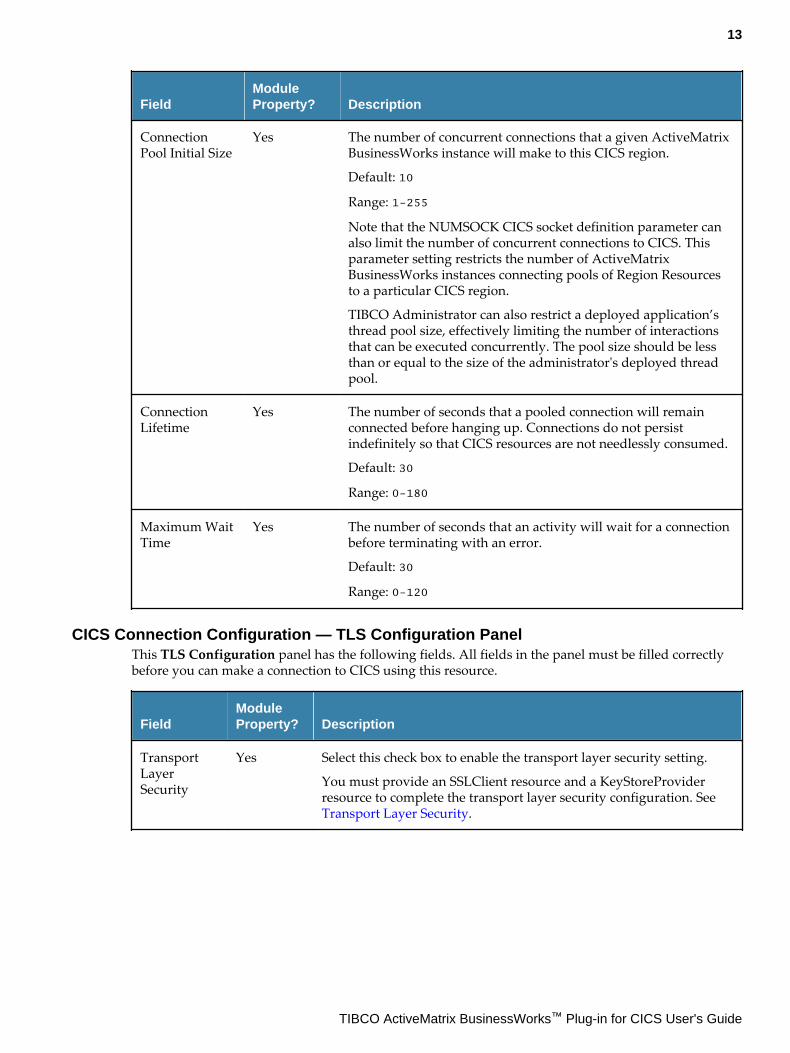
ConnectionPool Initial Size
Yes The number of concurrent connections that a given ActiveMatrixBusinessWorks instance will make to this CICS region.
Default: 10
Range: 1-255
Note that the NUMSOCK CICS socket definition parameter canalso limit the number of concurrent connections to CICS. Thisparameter setting restricts the number of ActiveMatrixBusinessWorks instances connecting pools of Region Resourcesto a particular CICS region.
TIBCO Administrator can also restrict a deployed application’sthread pool size, effectively limiting the number of interactionsthat can be executed concurrently. The pool size should be lessthan or equal to the size of the administrator's deployed threadpool.
ConnectionLifetime
Yes The number of seconds that a pooled connection will remainconnected before hanging up. Connections do not persistindefinitely so that CICS resources are not needlessly consumed.
Default: 30
Range: 0-180
Maximum WaitTime
Yes The number of seconds that an activity will wait for a connectionbefore terminating with an error.
Default: 30
Range: 0-120
CICS Connection Configuration — TLS Configuration PanelThis TLS Configuration panel has the following fields. All fields in the panel must be filled correctlybefore you can make a connection to CICS using this resource.
FieldModuleProperty? Description
TransportLayerSecurity
Yes Select this check box to enable the transport layer security setting.
You must provide an SSLClient resource and a KeyStoreProviderresource to complete the transport layer security configuration. See Transport Layer Security.
13
TIBCO ActiveMatrix BusinessWorks™ Plug-in for CICS User's Guide
CICS Palette
You can use the CICS palette to create the BusinessWorks processes to send requests and executeapplications in CICS for z/OS operating environments.
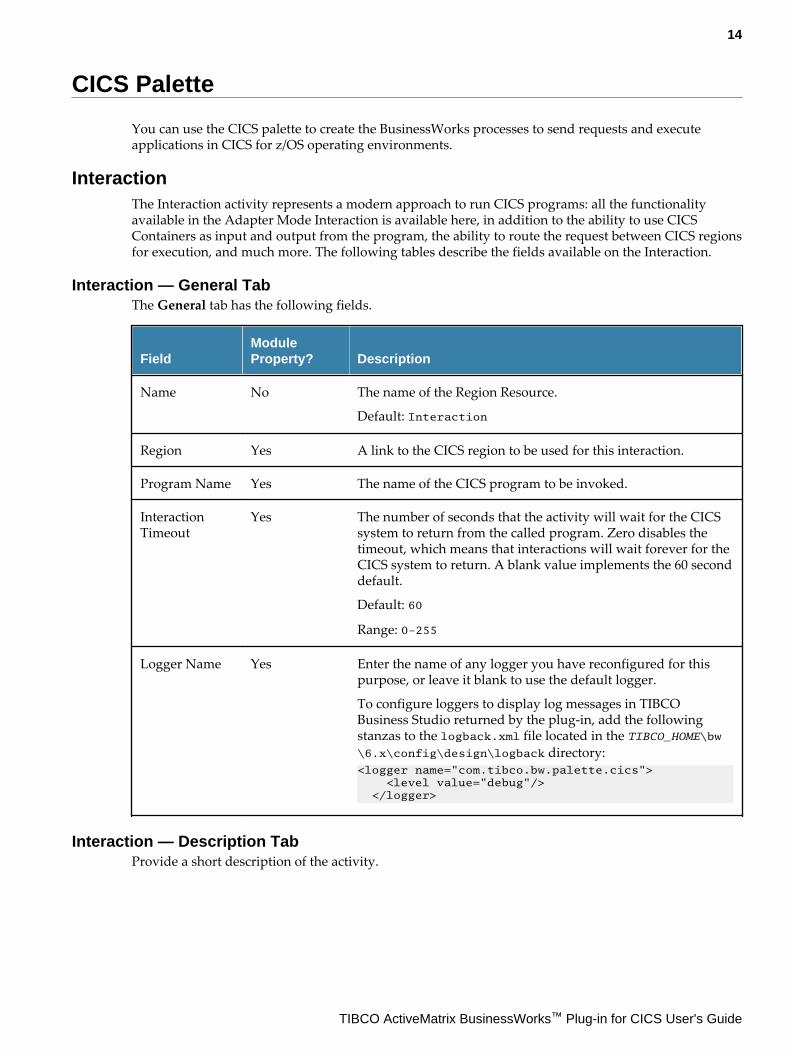
InteractionThe Interaction activity represents a modern approach to run CICS programs: all the functionalityavailable in the Adapter Mode Interaction is available here, in addition to the ability to use CICSContainers as input and output from the program, the ability to route the request between CICS regionsfor execution, and much more. The following tables describe the fields available on the Interaction.
Interaction — General TabThe General tab has the following fields.
FieldModuleProperty? Description
Name No The name of the Region Resource.
Default: Interaction
Region Yes A link to the CICS region to be used for this interaction.
Program Name Yes The name of the CICS program to be invoked.
InteractionTimeout
Yes The number of seconds that the activity will wait for the CICSsystem to return from the called program. Zero disables thetimeout, which means that interactions will wait forever for theCICS system to return. A blank value implements the 60 seconddefault.
Default: 60
Range: 0-255
Logger Name Yes Enter the name of any logger you have reconfigured for thispurpose, or leave it blank to use the default logger.
To configure loggers to display log messages in TIBCOBusiness Studio returned by the plug-in, add the followingstanzas to the logback.xml file located in the TIBCO_HOME\bw\6.x\config\design\logback directory:<logger name="com.tibco.bw.palette.cics"> <level value="debug"/> </logger>
Interaction — Description TabProvide a short description of the activity.
14
TIBCO ActiveMatrix BusinessWorks™ Plug-in for CICS User's Guide
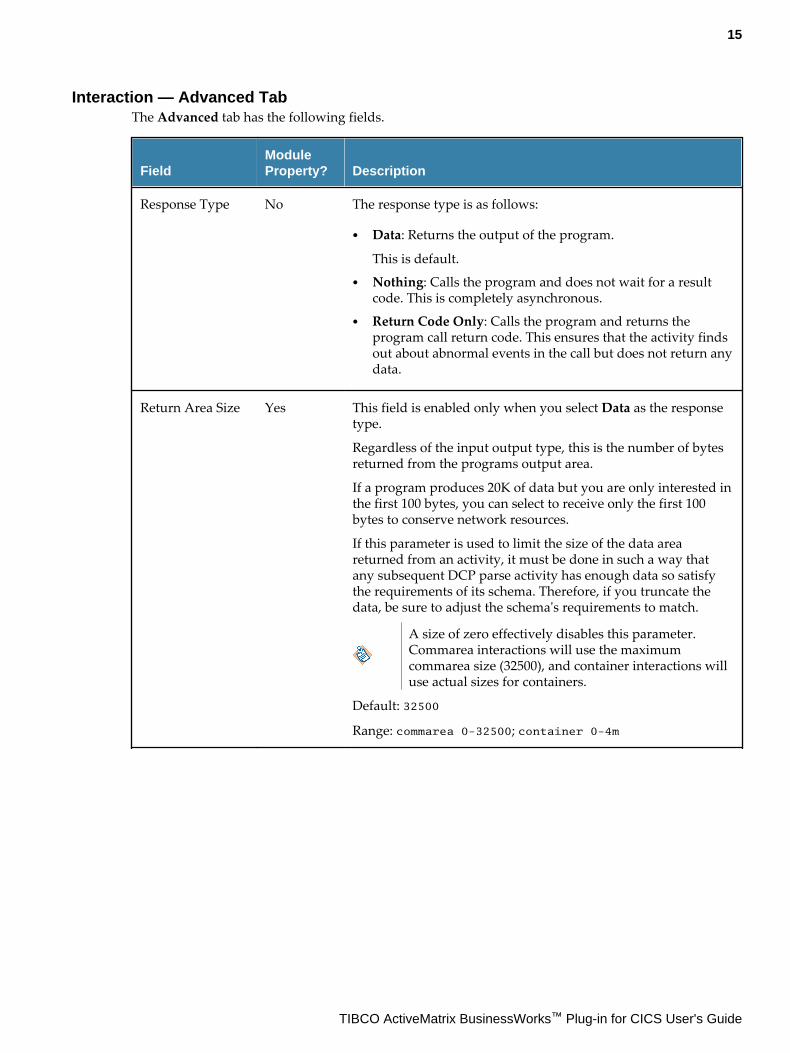
Interaction — Advanced TabThe Advanced tab has the following fields.
FieldModuleProperty? Description
Response Type No The response type is as follows:
● Data: Returns the output of the program.
This is default.● Nothing: Calls the program and does not wait for a result
code. This is completely asynchronous.● Return Code Only: Calls the program and returns the
program call return code. This ensures that the activity findsout about abnormal events in the call but does not return anydata.
Return Area Size Yes This field is enabled only when you select Data as the responsetype.
Regardless of the input output type, this is the number of bytesreturned from the programs output area.
If a program produces 20K of data but you are only interested inthe first 100 bytes, you can select to receive only the first 100bytes to conserve network resources.
If this parameter is used to limit the size of the data areareturned from an activity, it must be done in such a way thatany subsequent DCP parse activity has enough data so satisfythe requirements of its schema. Therefore, if you truncate thedata, be sure to adjust the schema's requirements to match.
A size of zero effectively disables this parameter.Commarea interactions will use the maximumcommarea size (32500), and container interactions willuse actual sizes for containers.
Default: 32500
Range: commarea 0-32500; container 0-4m
15
TIBCO ActiveMatrix BusinessWorks™ Plug-in for CICS User's Guide

FieldModuleProperty? Description
Data Comm Type No Data communication type can be as follows:
● Commarea: This is the default and means that the program isa commarea program and will use a commarea for input andoutput.
● Variable Length Commarea: This option provides the abilityto run a CICS program using a commarea of a specific size,as well as to transfer an arbitrary subsection of the resultantcommarea back to the activity. This option enables theCommarea Size and Commarea Offset fields.
● Container: This means that the input and output to theprogram is provided by named containers. You must knowwhat the program expects its containers to be named. Thisoption enables the Channel Name, Input Container, andOutput Container fields.
Commarea Size Yes This field is only enabled when you select Variable LengthCommarea as the data communication type.
Provide the size, in bytes, of the commarea to be used by theprogram. This size must be sufficient to hold the input data aswell as any data that the program will write.
Commarea Offset Yes This field is only enabled when you select Variable LengthCommarea as the data communication type.
Provide a zero-based offset into the commarea returned by theprogram. This value is used as the starting position whencopying the commarea data back to the activity. The number ofbytes specified in the Return Area Size field is copied from thisoffset. An error is returned to the activity if any overrun isdetected.
Channel Name Yes This field is only enabled when you select Container as the datacommunication type.
The optional name of the CICS Channel object which willcontain the input containers for this program execution. This isonly required to support programs which explicitly open anamed channel rather than use the default.
Input Container Yes This field is only enabled when you select Container as the datacommunication type.
The Input Container name to be used for this transaction. It canbe 1 to 16 chars long.
Output Container Yes This field is only enabled when you select Container as the datacommunication type.
The Output Container name to be used for this transaction. Itcan be 1 to 16 chars long.
16
TIBCO ActiveMatrix BusinessWorks™ Plug-in for CICS User's Guide
FieldModuleProperty? Description
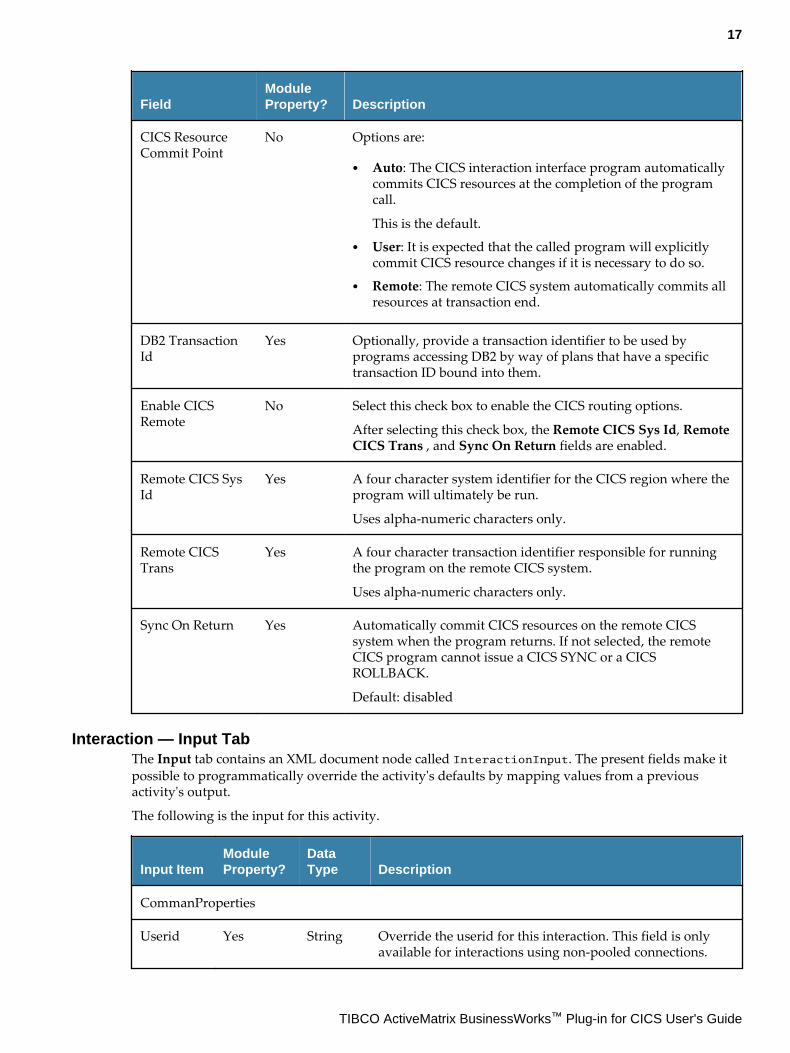
CICS ResourceCommit Point
No Options are:
● Auto: The CICS interaction interface program automaticallycommits CICS resources at the completion of the programcall.
This is the default.● User: It is expected that the called program will explicitly
commit CICS resource changes if it is necessary to do so.● Remote: The remote CICS system automatically commits all
resources at transaction end.
DB2 TransactionId
Yes Optionally, provide a transaction identifier to be used byprograms accessing DB2 by way of plans that have a specifictransaction ID bound into them.
Enable CICSRemote
No Select this check box to enable the CICS routing options.
After selecting this check box, the Remote CICS Sys Id, RemoteCICS Trans , and Sync On Return fields are enabled.
Remote CICS SysId
Yes A four character system identifier for the CICS region where theprogram will ultimately be run.
Uses alpha-numeric characters only.
Remote CICSTrans
Yes A four character transaction identifier responsible for runningthe program on the remote CICS system.
Uses alpha-numeric characters only.
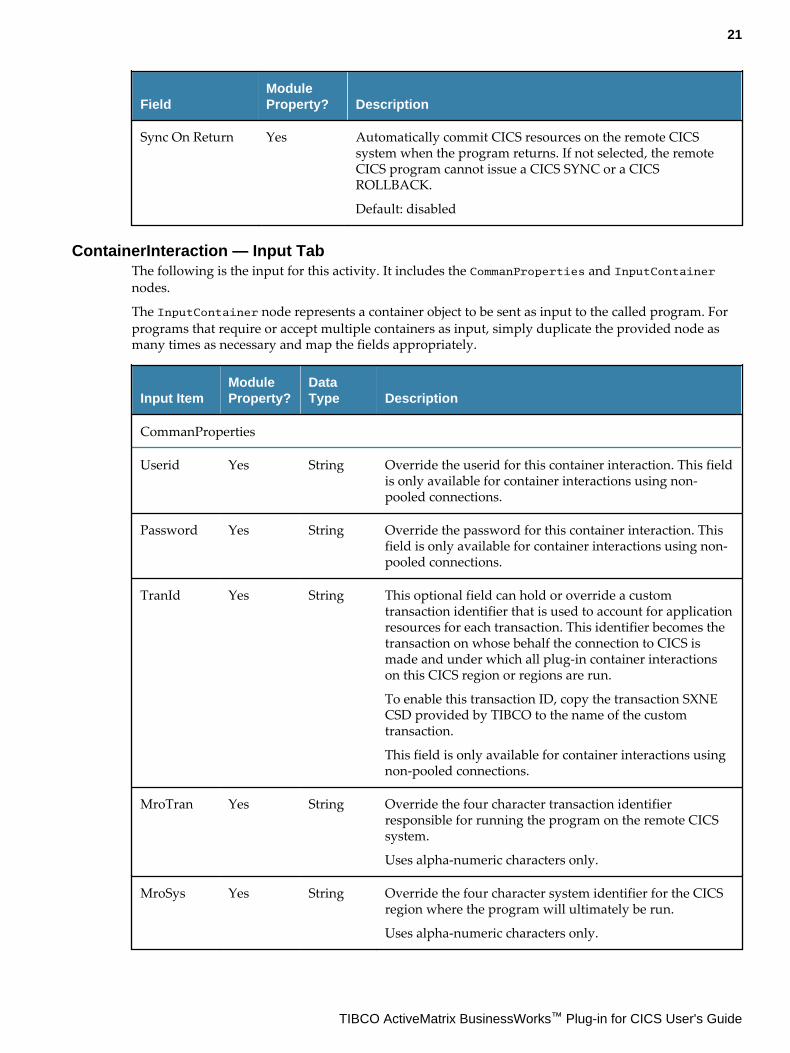
Sync On Return Yes Automatically commit CICS resources on the remote CICSsystem when the program returns. If not selected, the remoteCICS program cannot issue a CICS SYNC or a CICSROLLBACK.
Default: disabled
Interaction — Input TabThe Input tab contains an XML document node called InteractionInput. The present fields make itpossible to programmatically override the activity's defaults by mapping values from a previousactivity's output.
The following is the input for this activity.
Input ItemModuleProperty?
DataType Description
CommanProperties
Userid Yes String Override the userid for this interaction. This field is onlyavailable for interactions using non-pooled connections.
17
TIBCO ActiveMatrix BusinessWorks™ Plug-in for CICS User's Guide
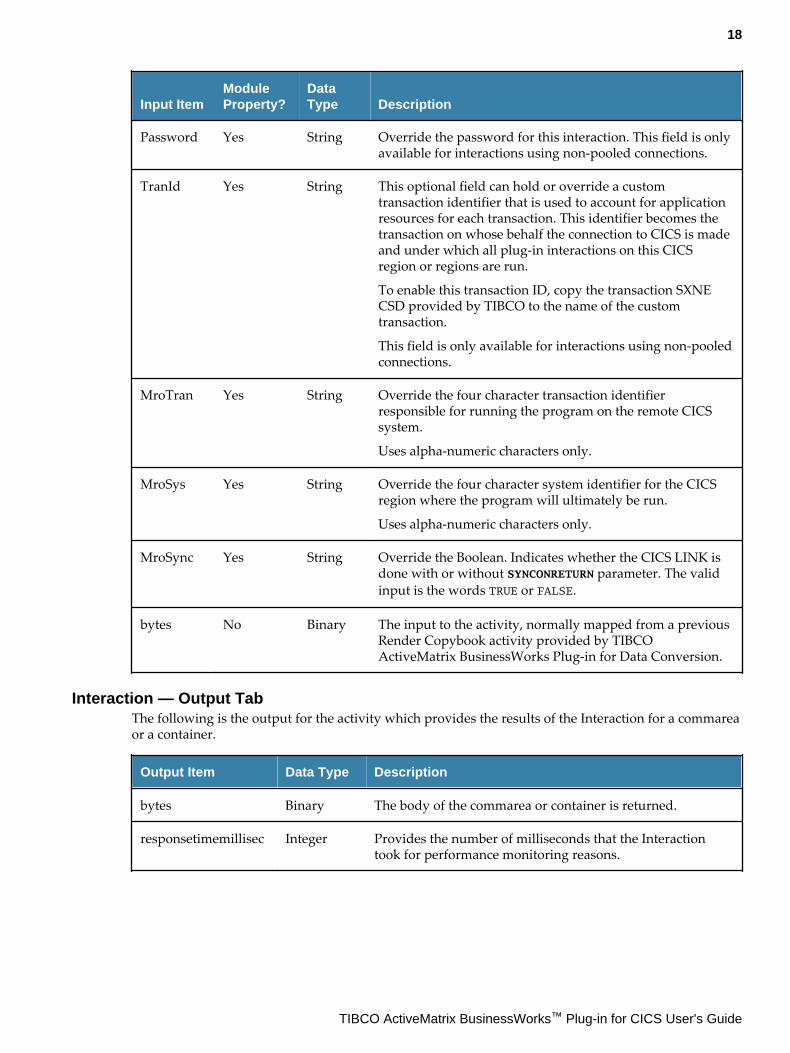
Input ItemModuleProperty?
DataType Description
Password Yes String Override the password for this interaction. This field is onlyavailable for interactions using non-pooled connections.
TranId Yes String This optional field can hold or override a customtransaction identifier that is used to account for applicationresources for each transaction. This identifier becomes thetransaction on whose behalf the connection to CICS is madeand under which all plug-in interactions on this CICSregion or regions are run.
To enable this transaction ID, copy the transaction SXNECSD provided by TIBCO to the name of the customtransaction.
This field is only available for interactions using non-pooledconnections.
MroTran Yes String Override the four character transaction identifierresponsible for running the program on the remote CICSsystem.
Uses alpha-numeric characters only.
MroSys Yes String Override the four character system identifier for the CICSregion where the program will ultimately be run.
Uses alpha-numeric characters only.
MroSync Yes String Override the Boolean. Indicates whether the CICS LINK isdone with or without SYNCONRETURN parameter. The validinput is the words TRUE or FALSE.
bytes No Binary The input to the activity, normally mapped from a previousRender Copybook activity provided by TIBCOActiveMatrix BusinessWorks Plug-in for Data Conversion.
Interaction — Output TabThe following is the output for the activity which provides the results of the Interaction for a commareaor a container.
Output Item Data Type Description
bytes Binary The body of the commarea or container is returned.
responsetimemillisec Integer Provides the number of milliseconds that the Interactiontook for performance monitoring reasons.
18
TIBCO ActiveMatrix BusinessWorks™ Plug-in for CICS User's Guide
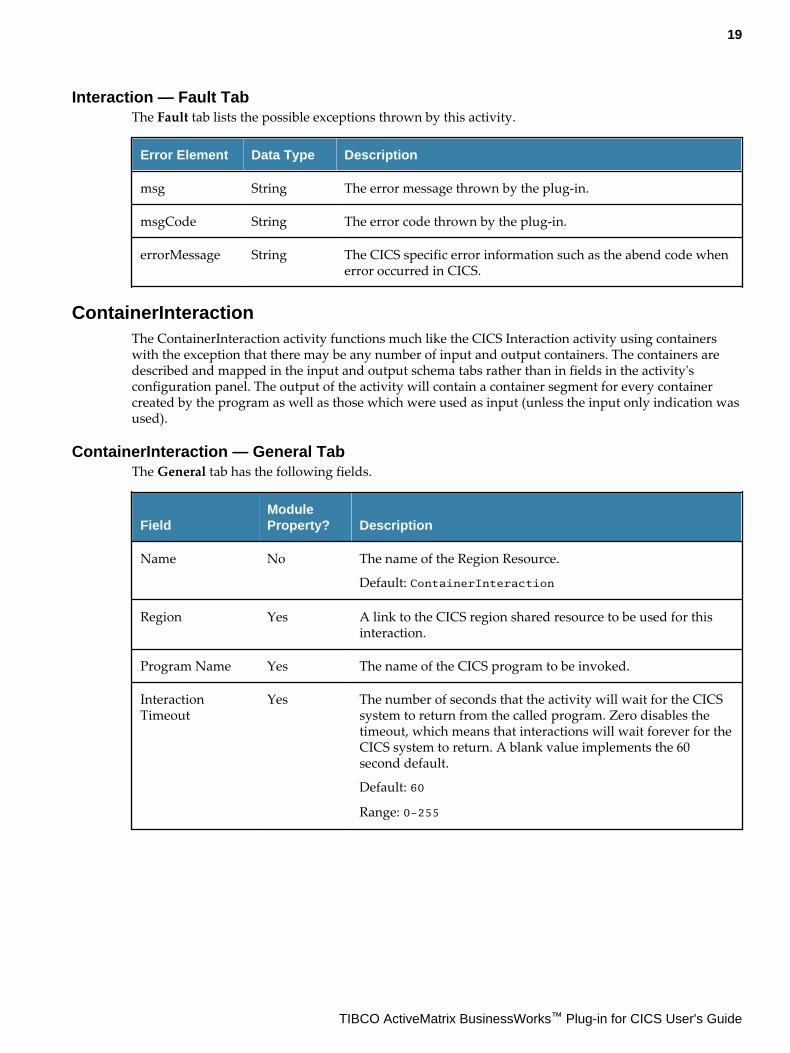
Interaction — Fault TabThe Fault tab lists the possible exceptions thrown by this activity.
Error Element Data Type Description
msg String The error message thrown by the plug-in.
msgCode String The error code thrown by the plug-in.
errorMessage String The CICS specific error information such as the abend code whenerror occurred in CICS.
ContainerInteractionThe ContainerInteraction activity functions much like the CICS Interaction activity using containerswith the exception that there may be any number of input and output containers. The containers aredescribed and mapped in the input and output schema tabs rather than in fields in the activity'sconfiguration panel. The output of the activity will contain a container segment for every containercreated by the program as well as those which were used as input (unless the input only indication wasused).
ContainerInteraction — General TabThe General tab has the following fields.
FieldModuleProperty? Description
Name No The name of the Region Resource.
Default: ContainerInteraction
Region Yes A link to the CICS region shared resource to be used for thisinteraction.
Program Name Yes The name of the CICS program to be invoked.
InteractionTimeout
Yes The number of seconds that the activity will wait for the CICSsystem to return from the called program. Zero disables thetimeout, which means that interactions will wait forever for theCICS system to return. A blank value implements the 60second default.
Default: 60
Range: 0-255
19
TIBCO ActiveMatrix BusinessWorks™ Plug-in for CICS User's Guide
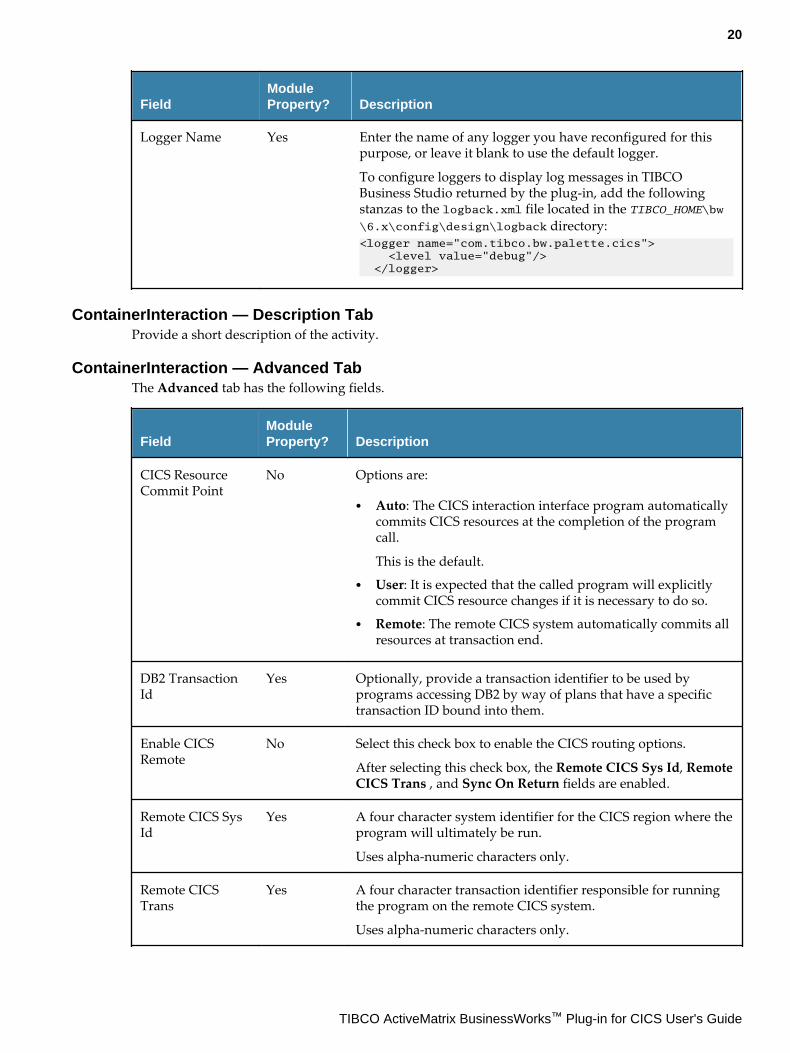
FieldModuleProperty? Description
Logger Name Yes Enter the name of any logger you have reconfigured for thispurpose, or leave it blank to use the default logger.
To configure loggers to display log messages in TIBCOBusiness Studio returned by the plug-in, add the followingstanzas to the logback.xml file located in the TIBCO_HOME\bw\6.x\config\design\logback directory:<logger name="com.tibco.bw.palette.cics"> <level value="debug"/> </logger>
ContainerInteraction — Description TabProvide a short description of the activity.
ContainerInteraction — Advanced TabThe Advanced tab has the following fields.
FieldModuleProperty? Description
CICS ResourceCommit Point
No Options are:
● Auto: The CICS interaction interface program automaticallycommits CICS resources at the completion of the programcall.
This is the default.● User: It is expected that the called program will explicitly
commit CICS resource changes if it is necessary to do so.● Remote: The remote CICS system automatically commits all
resources at transaction end.
DB2 TransactionId
Yes Optionally, provide a transaction identifier to be used byprograms accessing DB2 by way of plans that have a specifictransaction ID bound into them.
Enable CICSRemote
No Select this check box to enable the CICS routing options.
After selecting this check box, the Remote CICS Sys Id, RemoteCICS Trans , and Sync On Return fields are enabled.
Remote CICS SysId
Yes A four character system identifier for the CICS region where theprogram will ultimately be run.
Uses alpha-numeric characters only.
Remote CICSTrans
Yes A four character transaction identifier responsible for runningthe program on the remote CICS system.
Uses alpha-numeric characters only.
20
TIBCO ActiveMatrix BusinessWorks™ Plug-in for CICS User's Guide
FieldModuleProperty? Description
Sync On Return Yes Automatically commit CICS resources on the remote CICSsystem when the program returns. If not selected, the remoteCICS program cannot issue a CICS SYNC or a CICSROLLBACK.
Default: disabled
ContainerInteraction — Input TabThe following is the input for this activity. It includes the CommanProperties and InputContainernodes.
The InputContainer node represents a container object to be sent as input to the called program. Forprograms that require or accept multiple containers as input, simply duplicate the provided node asmany times as necessary and map the fields appropriately.
Input ItemModuleProperty?
DataType Description
CommanProperties
Userid Yes String Override the userid for this container interaction. This fieldis only available for container interactions using non-pooled connections.
Password Yes String Override the password for this container interaction. Thisfield is only available for container interactions using non-pooled connections.
TranId Yes String This optional field can hold or override a customtransaction identifier that is used to account for applicationresources for each transaction. This identifier becomes thetransaction on whose behalf the connection to CICS ismade and under which all plug-in container interactionson this CICS region or regions are run.
To enable this transaction ID, copy the transaction SXNECSD provided by TIBCO to the name of the customtransaction.
This field is only available for container interactions usingnon-pooled connections.
MroTran Yes String Override the four character transaction identifierresponsible for running the program on the remote CICSsystem.
Uses alpha-numeric characters only.
MroSys Yes String Override the four character system identifier for the CICSregion where the program will ultimately be run.
Uses alpha-numeric characters only.
21
TIBCO ActiveMatrix BusinessWorks™ Plug-in for CICS User's Guide
Input ItemModuleProperty?
DataType Description
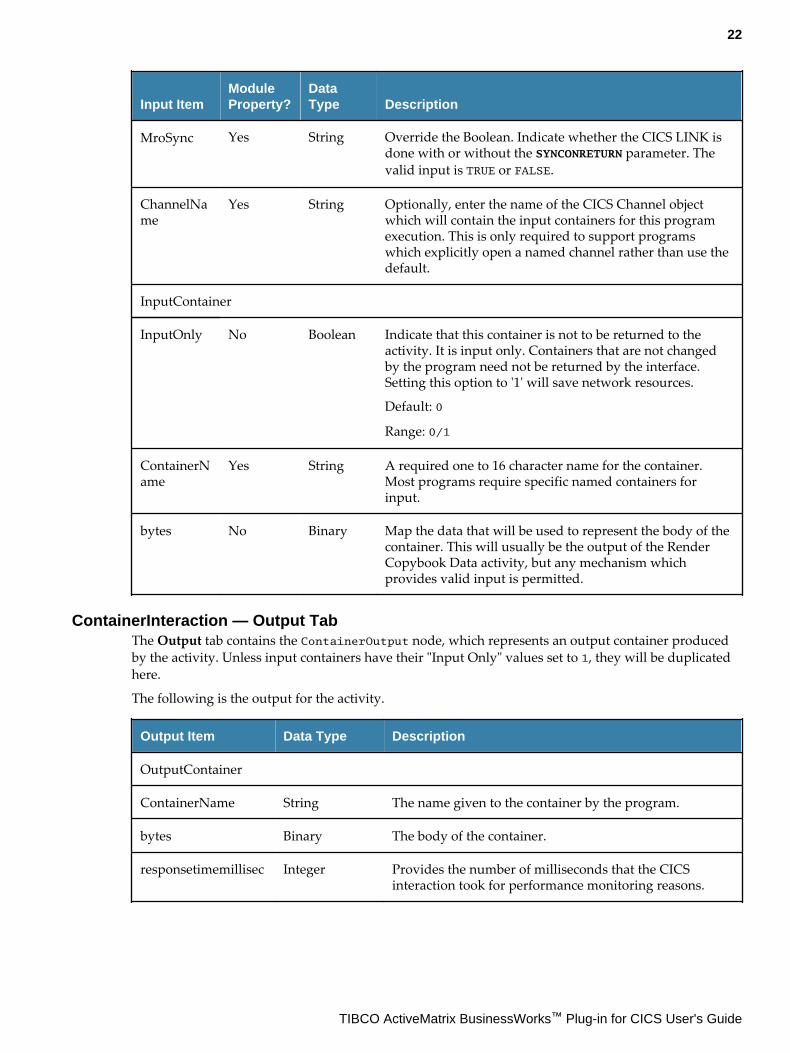
MroSync Yes String Override the Boolean. Indicate whether the CICS LINK isdone with or without the SYNCONRETURN parameter. Thevalid input is TRUE or FALSE.
ChannelName
Yes String Optionally, enter the name of the CICS Channel objectwhich will contain the input containers for this programexecution. This is only required to support programswhich explicitly open a named channel rather than use thedefault.
InputContainer
InputOnly No Boolean Indicate that this container is not to be returned to theactivity. It is input only. Containers that are not changedby the program need not be returned by the interface.Setting this option to '1' will save network resources.
Default: 0
Range: 0/1
ContainerName
Yes String A required one to 16 character name for the container.Most programs require specific named containers forinput.
bytes No Binary Map the data that will be used to represent the body of thecontainer. This will usually be the output of the RenderCopybook Data activity, but any mechanism whichprovides valid input is permitted.
ContainerInteraction — Output TabThe Output tab contains the ContainerOutput node, which represents an output container producedby the activity. Unless input containers have their "Input Only" values set to 1, they will be duplicatedhere.
The following is the output for the activity.
Output Item Data Type Description
OutputContainer
ContainerName String The name given to the container by the program.
bytes Binary The body of the container.
responsetimemillisec Integer Provides the number of milliseconds that the CICSinteraction took for performance monitoring reasons.
22
TIBCO ActiveMatrix BusinessWorks™ Plug-in for CICS User's Guide
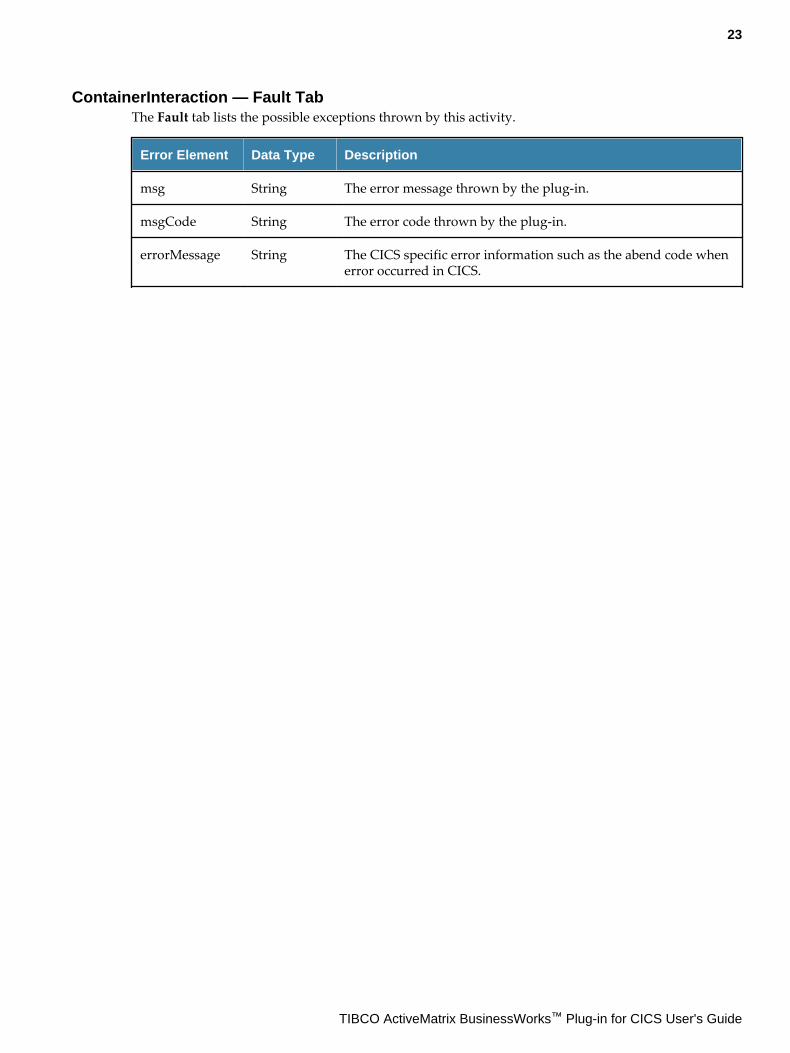
ContainerInteraction — Fault TabThe Fault tab lists the possible exceptions thrown by this activity.
Error Element Data Type Description
msg String The error message thrown by the plug-in.
msgCode String The error code thrown by the plug-in.
errorMessage String The CICS specific error information such as the abend code whenerror occurred in CICS.
23
TIBCO ActiveMatrix BusinessWorks™ Plug-in for CICS User's Guide
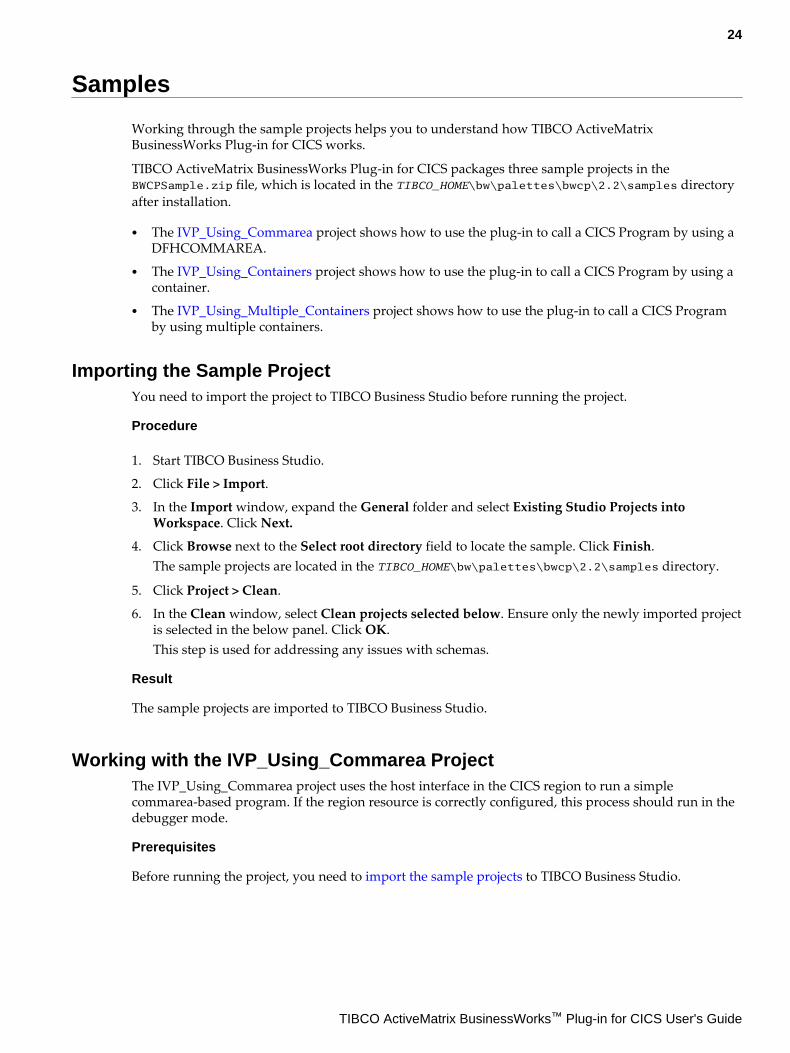
Samples
Working through the sample projects helps you to understand how TIBCO ActiveMatrixBusinessWorks Plug-in for CICS works.
TIBCO ActiveMatrix BusinessWorks Plug-in for CICS packages three sample projects in theBWCPSample.zip file, which is located in the TIBCO_HOME\bw\palettes\bwcp\2.2\samples directoryafter installation.
● The IVP_Using_Commarea project shows how to use the plug-in to call a CICS Program by using aDFHCOMMAREA.
● The IVP_Using_Containers project shows how to use the plug-in to call a CICS Program by using acontainer.
● The IVP_Using_Multiple_Containers project shows how to use the plug-in to call a CICS Programby using multiple containers.
Importing the Sample ProjectYou need to import the project to TIBCO Business Studio before running the project.
Procedure
1. Start TIBCO Business Studio.
2. Click File > Import.
3. In the Import window, expand the General folder and select Existing Studio Projects intoWorkspace. Click Next.
4. Click Browse next to the Select root directory field to locate the sample. Click Finish.The sample projects are located in the TIBCO_HOME\bw\palettes\bwcp\2.2\samples directory.
5. Click Project > Clean.
6. In the Clean window, select Clean projects selected below. Ensure only the newly imported projectis selected in the below panel. Click OK.This step is used for addressing any issues with schemas.
Result
The sample projects are imported to TIBCO Business Studio.
Working with the IVP_Using_Commarea ProjectThe IVP_Using_Commarea project uses the host interface in the CICS region to run a simplecommarea-based program. If the region resource is correctly configured, this process should run in thedebugger mode.
Prerequisites
Before running the project, you need to import the sample projects to TIBCO Business Studio.
24
TIBCO ActiveMatrix BusinessWorks™ Plug-in for CICS User's Guide
Procedure
1. Start TIBCO Business Studio.
2. Click Run > Run Configurations.
3. Click BusinessWorks Application > BWApplication in the left panel.
4. Click Deselect All in the Applications tab in the right panel, and select theIVP_Using_Commarea.application check box.
5. Click Apply and click Run.The log messages are displayed in the Console view.
6. Click the Terminate icon to stop the process.
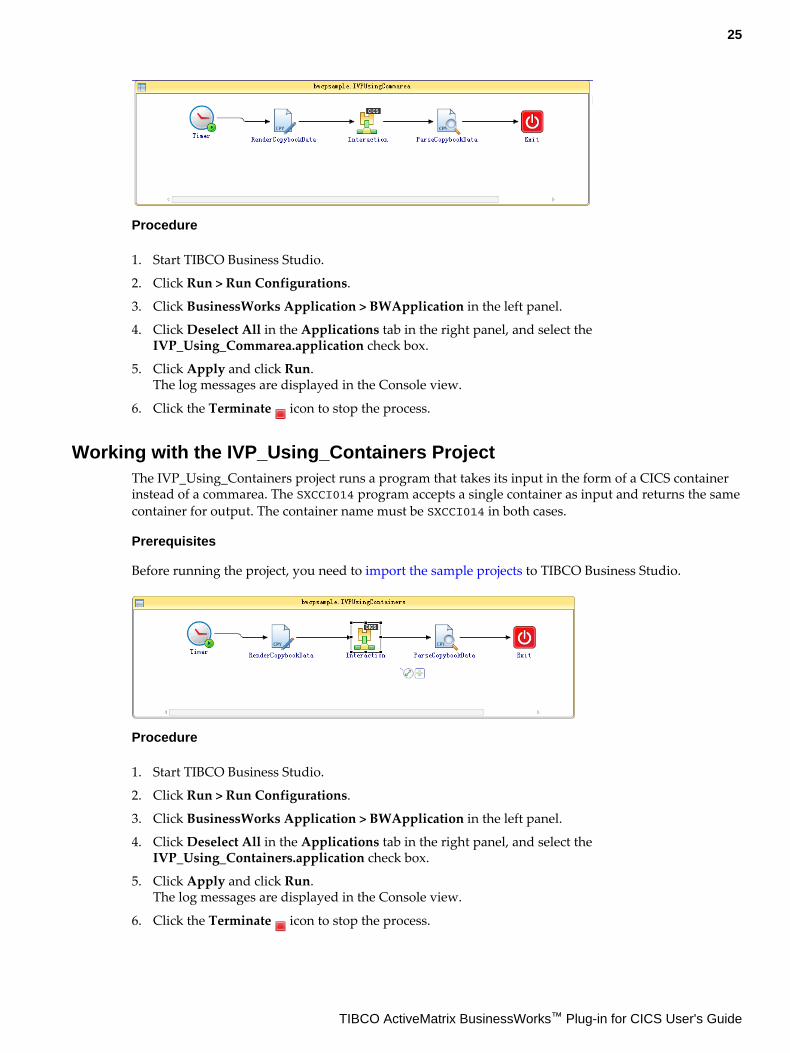
Working with the IVP_Using_Containers ProjectThe IVP_Using_Containers project runs a program that takes its input in the form of a CICS containerinstead of a commarea. The SXCCI014 program accepts a single container as input and returns the samecontainer for output. The container name must be SXCCI014 in both cases.
Prerequisites
Before running the project, you need to import the sample projects to TIBCO Business Studio.
Procedure
1. Start TIBCO Business Studio.
2. Click Run > Run Configurations.
3. Click BusinessWorks Application > BWApplication in the left panel.
4. Click Deselect All in the Applications tab in the right panel, and select theIVP_Using_Containers.application check box.
5. Click Apply and click Run.The log messages are displayed in the Console view.
6. Click the Terminate icon to stop the process.
25
TIBCO ActiveMatrix BusinessWorks™ Plug-in for CICS User's Guide
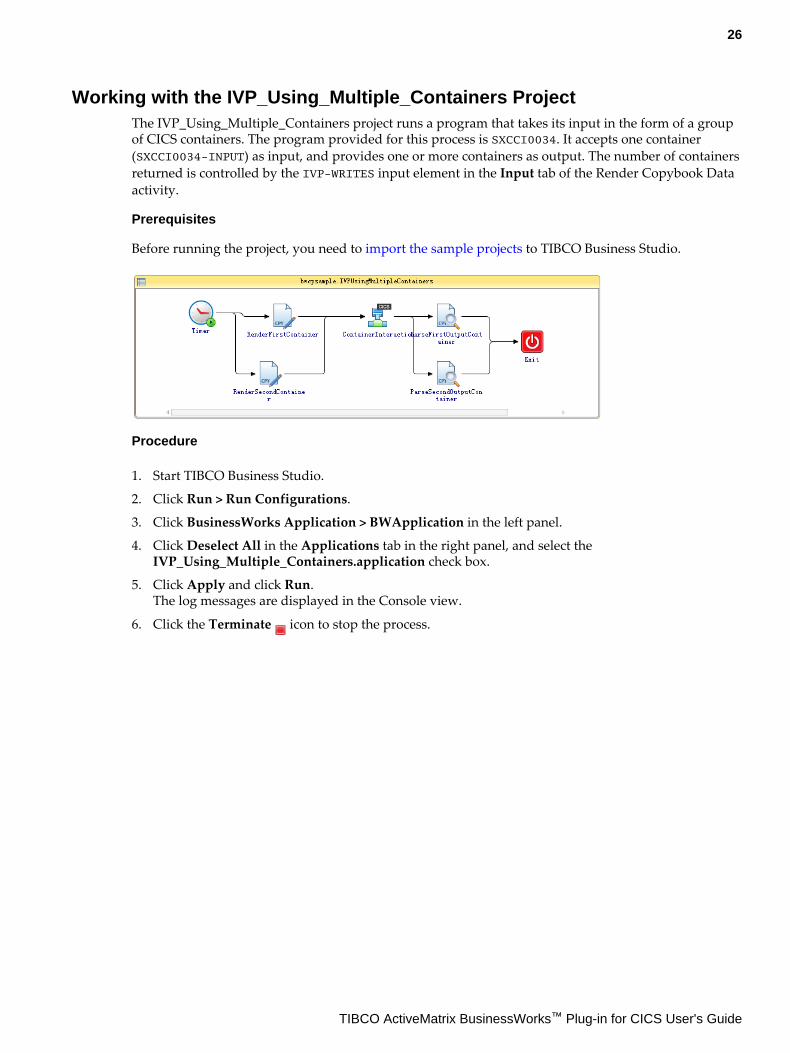
Working with the IVP_Using_Multiple_Containers ProjectThe IVP_Using_Multiple_Containers project runs a program that takes its input in the form of a groupof CICS containers. The program provided for this process is SXCCI0034. It accepts one container(SXCCI0034-INPUT) as input, and provides one or more containers as output. The number of containersreturned is controlled by the IVP-WRITES input element in the Input tab of the Render Copybook Dataactivity.
Prerequisites
Before running the project, you need to import the sample projects to TIBCO Business Studio.
Procedure
1. Start TIBCO Business Studio.
2. Click Run > Run Configurations.
3. Click BusinessWorks Application > BWApplication in the left panel.
4. Click Deselect All in the Applications tab in the right panel, and select theIVP_Using_Multiple_Containers.application check box.
5. Click Apply and click Run.The log messages are displayed in the Console view.
6. Click the Terminate icon to stop the process.
26
TIBCO ActiveMatrix BusinessWorks™ Plug-in for CICS User's Guide
Managing Logs
Logs are used to trace and troubleshoot the plug-in exceptions.
A logback.xml file is located in the TIBCO_HOME\bw\6.2\config\design\logback directory. Updatethis file to set up a log level and export logs to a file.
Log LevelsThe plug-in captures logs at different levels.
Log Level Description
Info Indicates normal plug-in operations. No action is needed. A tracing messagetagged with Info indicates that a significant processing step is reached andlogged for tracking or auditing purposes. Only info messages preceding atracking identifier are considered as significant steps.
Warn Indicates that an abnormal condition is found. Processing continues, but specialattention from an administrator is recommended.
Error Indicates that an unrecoverable error has occurred. Depending on the errorseverity, the plug-in may continue with the next operation or may stopaltogether.
Debug Indicates a developer-defined tracing message.
Trace Includes all the information regarding the running process.
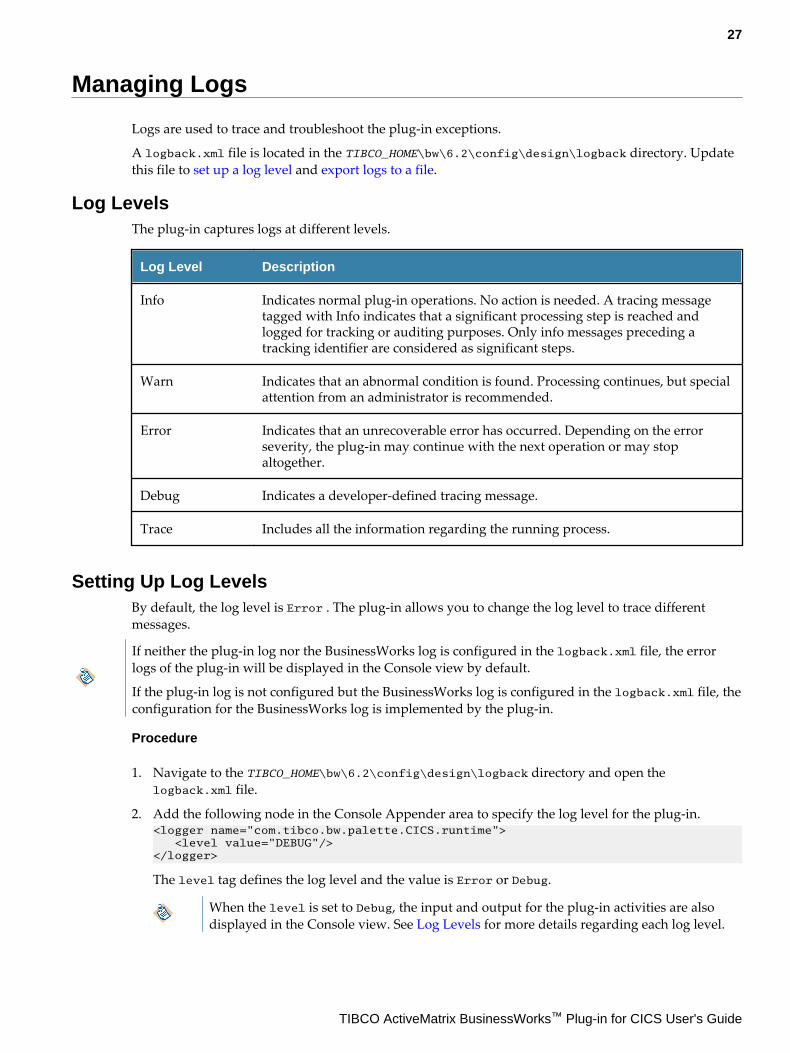
Setting Up Log LevelsBy default, the log level is Error . The plug-in allows you to change the log level to trace differentmessages.
If neither the plug-in log nor the BusinessWorks log is configured in the logback.xml file, the errorlogs of the plug-in will be displayed in the Console view by default.
If the plug-in log is not configured but the BusinessWorks log is configured in the logback.xml file, theconfiguration for the BusinessWorks log is implemented by the plug-in.
Procedure
1. Navigate to the TIBCO_HOME\bw\6.2\config\design\logback directory and open thelogback.xml file.
2. Add the following node in the Console Appender area to specify the log level for the plug-in.<logger name="com.tibco.bw.palette.CICS.runtime"> <level value="DEBUG"/></logger>
The level tag defines the log level and the value is Error or Debug.
When the level is set to Debug, the input and output for the plug-in activities are alsodisplayed in the Console view. See Log Levels for more details regarding each log level.
27
TIBCO ActiveMatrix BusinessWorks™ Plug-in for CICS User's Guide
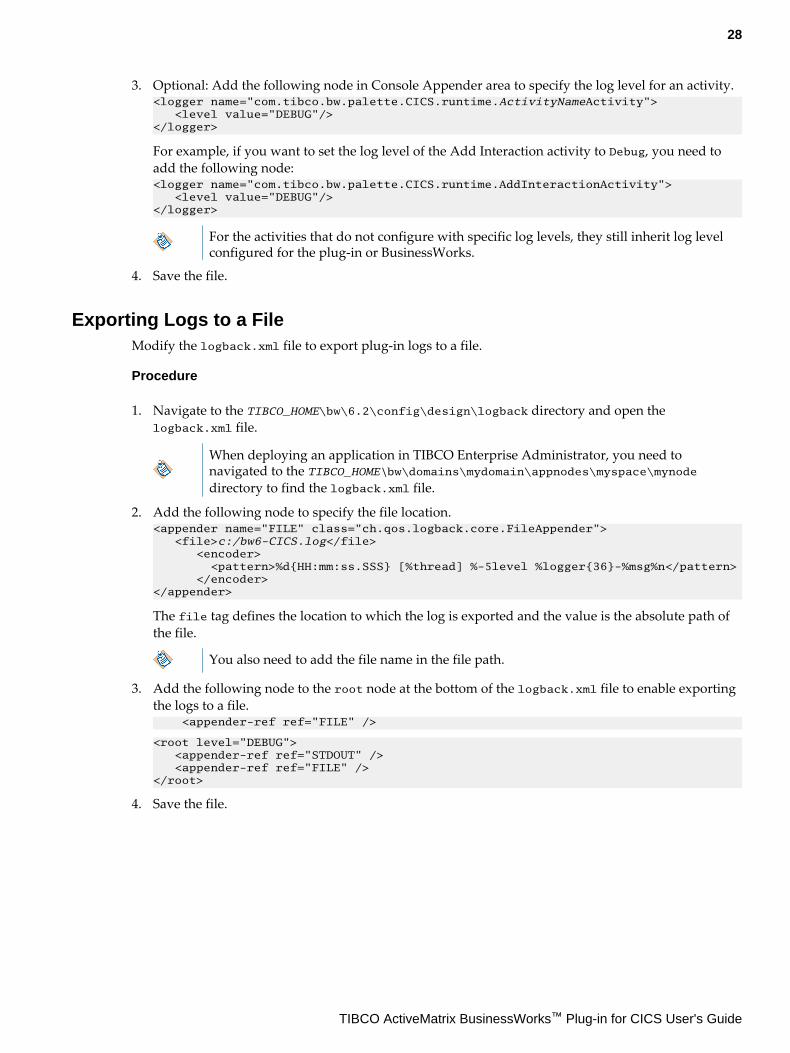
3. Optional: Add the following node in Console Appender area to specify the log level for an activity.<logger name="com.tibco.bw.palette.CICS.runtime.ActivityNameActivity"> <level value="DEBUG"/></logger>
For example, if you want to set the log level of the Add Interaction activity to Debug, you need toadd the following node:<logger name="com.tibco.bw.palette.CICS.runtime.AddInteractionActivity"> <level value="DEBUG"/></logger>
For the activities that do not configure with specific log levels, they still inherit log levelconfigured for the plug-in or BusinessWorks.
4. Save the file.
Exporting Logs to a FileModify the logback.xml file to export plug-in logs to a file.
Procedure
1. Navigate to the TIBCO_HOME\bw\6.2\config\design\logback directory and open thelogback.xml file.
When deploying an application in TIBCO Enterprise Administrator, you need tonavigated to the TIBCO_HOME\bw\domains\mydomain\appnodes\myspace\mynodedirectory to find the logback.xml file.
2. Add the following node to specify the file location.<appender name="FILE" class="ch.qos.logback.core.FileAppender"> <file>c:/bw6-CICS.log</file> <encoder> <pattern>%d{HH:mm:ss.SSS} [%thread] %-5level %logger{36}-%msg%n</pattern> </encoder></appender>
The file tag defines the location to which the log is exported and the value is the absolute path ofthe file.
You also need to add the file name in the file path.
3. Add the following node to the root node at the bottom of the logback.xml file to enable exportingthe logs to a file. <appender-ref ref="FILE" />
<root level="DEBUG"> <appender-ref ref="STDOUT" /> <appender-ref ref="FILE" /></root>
4. Save the file.
28
TIBCO ActiveMatrix BusinessWorks™ Plug-in for CICS User's Guide
Security for z/OS Components
The section explains the security modes for the plug-in components on z/OS.
The settings described in this section are actually taken on the CICS administration side.
Security ModesThe plug-in can be run in several security modes.
Unsecured ModeThe characteristics of the Unsecured mode are as follows:
● The CICS region has been started with SEC=NO in the SIT.
● Userid and password specified in the plug-in are not used in the CICS region. They can be presentin ActiveMatrix BusinessWorks activities and sent to the CICS region but are not used.
● The security exit in the Sockets Setup is blank.● It is strongly advised to use the new SXNSECUR or SXNSECID Security Exit, which is designed to
work with SEC=NO or SEC=YES and both plain and encrypted USERID/PASSWORD from the plug-in.
● All SXNE transactions run with the Userid that started Socket Listener through the EZAOtransaction, PLT start or Userid on Listener Configuration Setup (field USERID).
● The listener accepts on bind requests and starts the child listener SXNENTER for all initial messagesthat are sent in.
● In ActiveMatrix BusinessWorks activities, Userid and password are optional and not used in theCICS region.
● The password is encrypted.
Verify ModeThe characteristics of the Verify mode are as follows:
● The CICS region is started with SEC=YES, XTRAN=YES, and XPCT=YES in the SIT.
● In ActiveMatrix BusinessWorks activities, both the USERID and PASSWORD are required.● The USERID and PASSWORD are used in the CICS region.● Both the user ID and password are encrypted. TIBCO program SXNSECUR security routine can
handle both the encrypted and Clear Text User ID and password.● The security exit in Sockets Setup is SXNSECUR. The TIBCO COBOL Security routine SXNSECUR
provided by TIBCO runs in the Verify mode.● IBM Listener calls SXNSECUR with USERID and PASSWORD. SXNSECUR decrypts and verifies
both the USERID and PASSWORD, and allows the transaction to continue only if the ExternalSecurity System (usually RACF) indicates that the two parameters match.
● All SXNE transactions run with the USERID and security of the USERID for the plug-in.● The Userid value for TIBCO ActiveMatrix BusinessWorks Plug-in for CICS must be a SURROGATE
of the userid that CSKL is running under. The CSKL transaction must be allowed to start transactionSXNE or SXNT with the USERID for the plug-in.
29
TIBCO ActiveMatrix BusinessWorks™ Plug-in for CICS User's Guide
Identify ModeThe characteristics of the Identify mode are as follows:
● The CICS region is started with SEC=YES, XTRAN=YES, and XPCT=YES in the SIT.
● In the plug-in activities, the Userid is required while the password is optional.● The USERID and PASSWORD are encrypted.● The USERID is used in the CICS region while the password is not used.● The security exit in Sockets Setup is SXNSECID. TIBCO COBOL Security routine SXNSECID
provided by TIBCO runs in the Identify Mode.● IBM Listener calls SXNSECID with USERID and PASSWORD. SXNSECID sets the SXNE transaction
to run under the USERID for the plug-in.● All SXNE transactions run with the userid and security of the USERID for the plug-in.● The USERID value for the plug-in must be a SURROGATE of the Userid that CSKL is running
under. The CSKL transaction must be allowed to start the transaction SXNE or SXNT with theUserid for the plug-in.
Plug-in SecuritySecurity is currently used depending on the way the plug-in runs.
Security in POOL Mode
When the plug-in is communicating in Pool mode, only the USERID and PASSWORD from the RegionDefinition are used. The USERID and PASSWORD from CICS Interaction (if present) are ignored. Thismeans that all transactions using the pooled session will have the same security credentials.
SECEXIT in CICS can be set up as follows:
SEC=NO Both the USERID and PASSWORD are ignored.
The SXNx transaction runs under the USERID of CSKL.
SEC=YES No SECEXIT is set. The USERID and PASSWORD from the plug-in areignored.
The SXNx transaction runs under the USERID of CSKL.
SECEXIT=SXNSECUR withthe security mode Verify(default).
The USERID and PASSWORD are tested with RACF forvalidity.
The SXNx transaction runs under the USERID of theplug-in.
SECEXIT=SXNSECID withthe security mode Identify.
No RACF call.
The SXNx transaction runs under the USERID of theplug-in.
Userid of the plug-in must be a surrogate of Userid ofCSKL.
30
TIBCO ActiveMatrix BusinessWorks™ Plug-in for CICS User's Guide
Security in Non-POOL Mode
In the Non-Pool mode, the plug-in security depends on the following:
● Use of the USERID and PASSWORD.
— If the plug-in Interaction activity has a mapping to the Userid and password in the Input tab,then the mapping fields are used.
— If the plug-in Interaction activity has a static Userid and password in the General tab, then thefields in the General tab are used.
— Else, the fields in the CICS Region definition are used.● Setup of SECEXIT in CICS.
SEC=NO Both the USERID and PASSWORD are ignored.
The SXNx transaction runs under the USERID of CSKL.
SEC=YES No SECEXIT is set. The USERID and PASSWORD from the plug-inare ignored.
The SXNx transaction runs under the USERID ofCSKL.
SECEXIT=SXNSECUR
with the securitymode Verify (default).
The USERID and PASSWORD are tested withRACF for validity.
The SXNx transaction runs under the USERID ofthe plug-in.
USERID of the plug-in must be a surrogate ofUSERID of CSKL.
SECEXIT=SXNSECID
with the securitymode Identify.
No RACF call.
The SXNx transaction runs under the USERID ofthe plug-in.
Userid of the plug-in must be a surrogate ofUserid of CSKL.
31
TIBCO ActiveMatrix BusinessWorks™ Plug-in for CICS User's Guide
Transport Layer Security
Application Transparent Transport Layer Security (AT-TLS) provides a mechanism for securing theconnection between the plug-in’s application engine and the CICS regions to which it connects. Thisappendix provides a brief description of what it is and how to configure the mechanism.
This is not intended to replace any of the AT-TLS documentation, but only to provide the projectdeveloper with enough information to communicate properly with their mainframe administrators.
RACF ConfigurationThis procedure requires the assistance of your RACF and Networking administrators. The two maincomponents in this part of the configuration are a Personal Certificate and the AT-TLS rules that controlwhich ports are to be secured.
Personal Certificate
In order to configure RACF, you must have a personal certificate and the userid which starts the CICSregion must have read access to this certificate.
The personal certificate should be created by your RACF administrator using RACF commands similarto those shown in the example below. Note that the exact requirements will depend on your systemversion, configuration, and site standards.
Much of this will be completely familiar to your RACF administrator and he/she will have to customizethis approach to your local situation. For instance, it is very likely that you already have a CA withwhich to sign the personal certificate, making that part of the job unnecessary. Also, you will wantnames that make sense to your organization.
32
TIBCO ActiveMatrix BusinessWorks™ Plug-in for CICS User's Guide
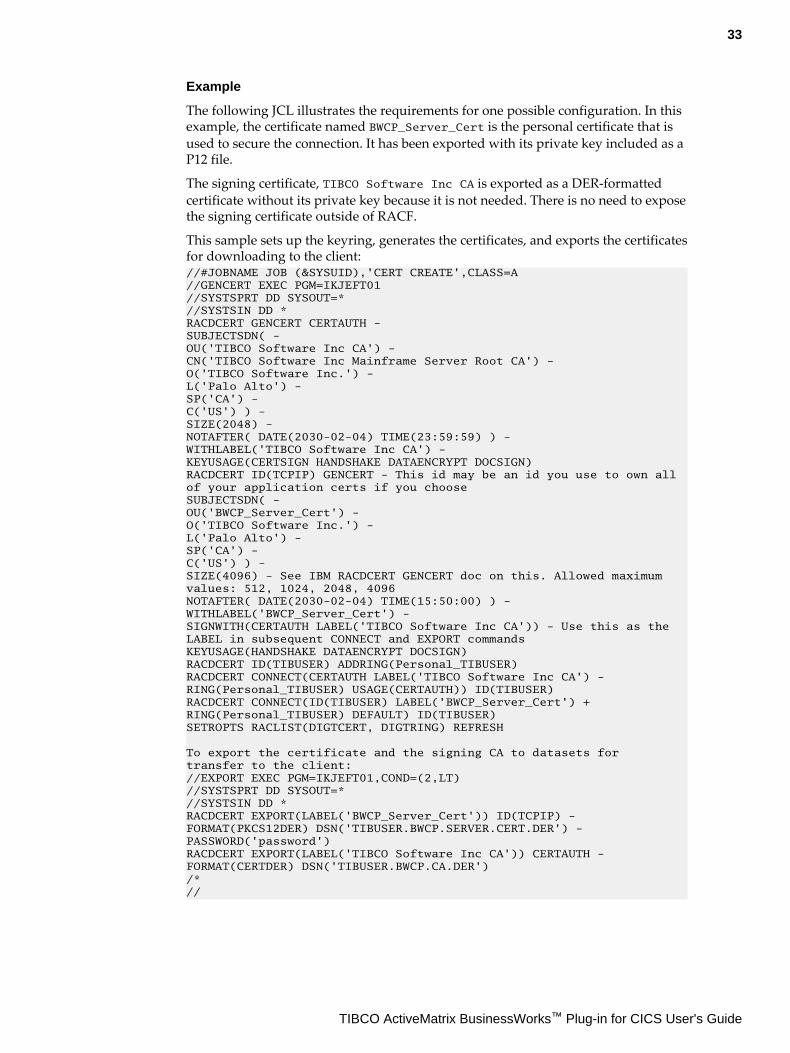
Example
The following JCL illustrates the requirements for one possible configuration. In thisexample, the certificate named BWCP_Server_Cert is the personal certificate that isused to secure the connection. It has been exported with its private key included as aP12 file.
The signing certificate, TIBCO Software Inc CA is exported as a DER-formattedcertificate without its private key because it is not needed. There is no need to exposethe signing certificate outside of RACF.
This sample sets up the keyring, generates the certificates, and exports the certificatesfor downloading to the client://#JOBNAME JOB (&SYSUID),'CERT CREATE',CLASS=A//GENCERT EXEC PGM=IKJEFT01 //SYSTSPRT DD SYSOUT=* //SYSTSIN DD *RACDCERT GENCERT CERTAUTH - SUBJECTSDN( - OU('TIBCO Software Inc CA') - CN('TIBCO Software Inc Mainframe Server Root CA') -O('TIBCO Software Inc.') - L('Palo Alto') - SP('CA') - C('US') ) - SIZE(2048) - NOTAFTER( DATE(2030-02-04) TIME(23:59:59) ) - WITHLABEL('TIBCO Software Inc CA') - KEYUSAGE(CERTSIGN HANDSHAKE DATAENCRYPT DOCSIGN) RACDCERT ID(TCPIP) GENCERT - This id may be an id you use to own all of your application certs if you choose SUBJECTSDN( - OU('BWCP_Server_Cert') - O('TIBCO Software Inc.') - L('Palo Alto') - SP('CA') - C('US') ) - SIZE(4096) - See IBM RACDCERT GENCERT doc on this. Allowed maximum values: 512, 1024, 2048, 4096 NOTAFTER( DATE(2030-02-04) TIME(15:50:00) ) - WITHLABEL('BWCP_Server_Cert') - SIGNWITH(CERTAUTH LABEL('TIBCO Software Inc CA')) - Use this as the LABEL in subsequent CONNECT and EXPORT commandsKEYUSAGE(HANDSHAKE DATAENCRYPT DOCSIGN) RACDCERT ID(TIBUSER) ADDRING(Personal_TIBUSER) RACDCERT CONNECT(CERTAUTH LABEL('TIBCO Software Inc CA') -RING(Personal_TIBUSER) USAGE(CERTAUTH)) ID(TIBUSER) RACDCERT CONNECT(ID(TIBUSER) LABEL('BWCP_Server_Cert') + RING(Personal_TIBUSER) DEFAULT) ID(TIBUSER) SETROPTS RACLIST(DIGTCERT, DIGTRING) REFRESH
To export the certificate and the signing CA to datasets for transfer to the client://EXPORT EXEC PGM=IKJEFT01,COND=(2,LT) //SYSTSPRT DD SYSOUT=* //SYSTSIN DD * RACDCERT EXPORT(LABEL('BWCP_Server_Cert')) ID(TCPIP) - FORMAT(PKCS12DER) DSN('TIBUSER.BWCP.SERVER.CERT.DER') - PASSWORD('password') RACDCERT EXPORT(LABEL('TIBCO Software Inc CA')) CERTAUTH - FORMAT(CERTDER) DSN('TIBUSER.BWCP.CA.DER') /* //
33
TIBCO ActiveMatrix BusinessWorks™ Plug-in for CICS User's Guide
AT-TLS Configuration with Rules
Once the personal certificate has been created, you must configure the z/OS TCP/IP stack's applicationtransparent TLS feature to secure the connection.
AT-TLS can secure a single port or a range of ports using a single set of rules. As long as the use of asingle certificate is acceptable for all connections to CICS regions on your z/OS system, you can allocatea range of ports and accomplish the whole task with one set of rules.
The plug-in allows you to define several CICS regions in one region resource definition. If such a regiondefinition uses AT-TLS to secure its connections, then all CICS regions must use the same certificate tosecure their ports.
AT-TLS configuration is covered in the z/OS Communications Server bookshelf which even includes aconfiguration assistant to simplify the process.
With the assistance of your z/OS network administrator, you may customize the set of rules shown inthe example below so that your port or ports are secured by the personal certificate created previously.
34
TIBCO ActiveMatrix BusinessWorks™ Plug-in for CICS User's Guide
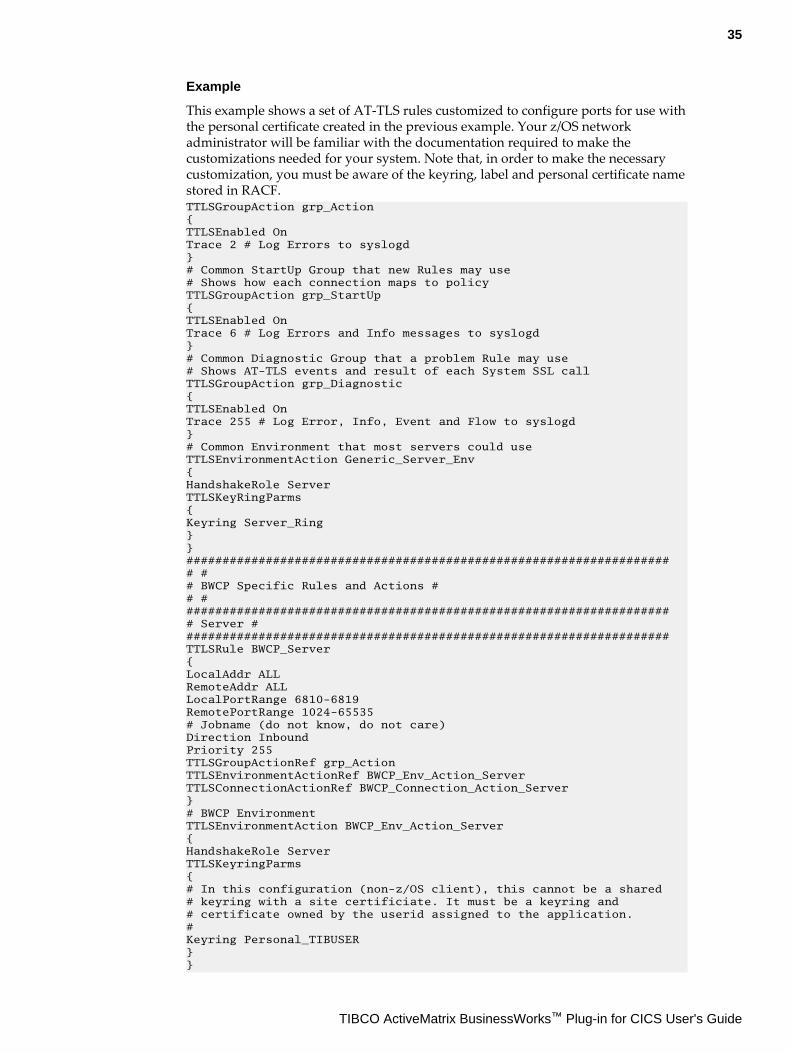
Example
This example shows a set of AT-TLS rules customized to configure ports for use withthe personal certificate created in the previous example. Your z/OS networkadministrator will be familiar with the documentation required to make thecustomizations needed for your system. Note that, in order to make the necessarycustomization, you must be aware of the keyring, label and personal certificate namestored in RACF.TTLSGroupAction grp_Action { TTLSEnabled On Trace 2 # Log Errors to syslogd } # Common StartUp Group that new Rules may use # Shows how each connection maps to policy TTLSGroupAction grp_StartUp { TTLSEnabled On Trace 6 # Log Errors and Info messages to syslogd } # Common Diagnostic Group that a problem Rule may use # Shows AT-TLS events and result of each System SSL call TTLSGroupAction grp_Diagnostic { TTLSEnabled On Trace 255 # Log Error, Info, Event and Flow to syslogd } # Common Environment that most servers could use TTLSEnvironmentAction Generic_Server_Env { HandshakeRole Server TTLSKeyRingParms { Keyring Server_Ring } } ################################################################### # # # BWCP Specific Rules and Actions # # # ################################################################### # Server # ################################################################### TTLSRule BWCP_Server { LocalAddr ALL RemoteAddr ALL LocalPortRange 6810-6819 RemotePortRange 1024-65535 # Jobname (do not know, do not care) Direction Inbound Priority 255 TTLSGroupActionRef grp_Action TTLSEnvironmentActionRef BWCP_Env_Action_Server TTLSConnectionActionRef BWCP_Connection_Action_Server } # BWCP Environment TTLSEnvironmentAction BWCP_Env_Action_Server { HandshakeRole Server TTLSKeyringParms { # In this configuration (non-z/OS client), this cannot be a shared # keyring with a site certificiate. It must be a keyring and # certificate owned by the userid assigned to the application. # Keyring Personal_TIBUSER } }
35
TIBCO ActiveMatrix BusinessWorks™ Plug-in for CICS User's Guide
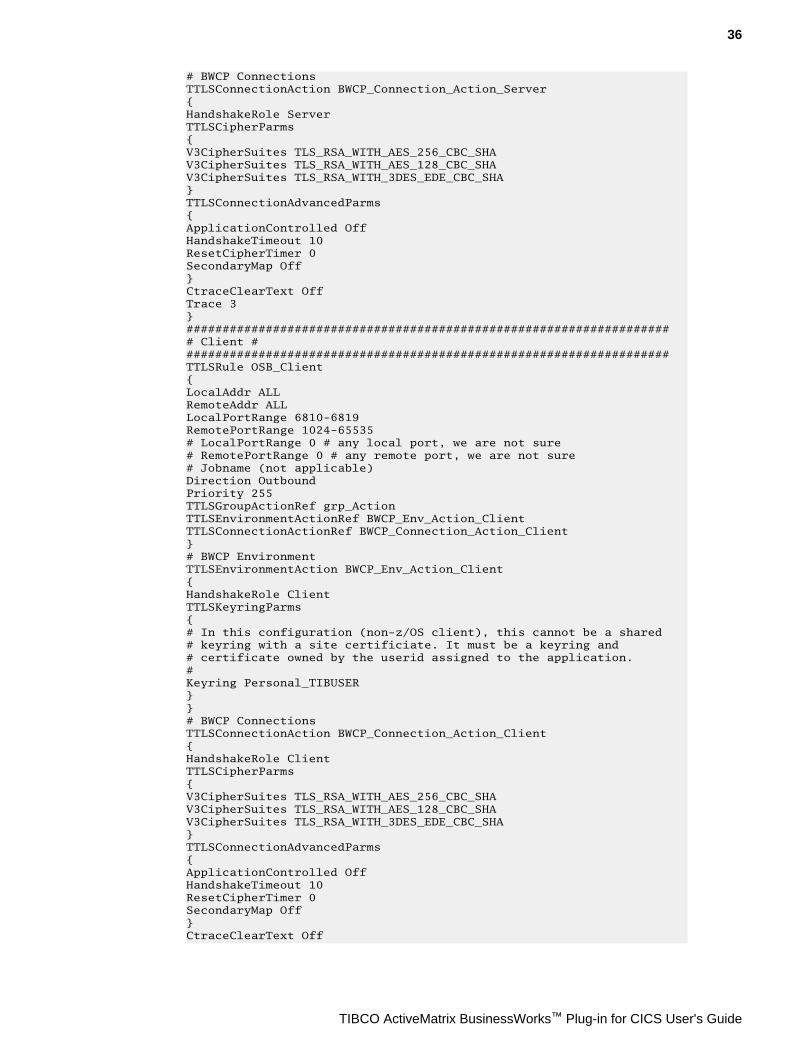
# BWCP Connections TTLSConnectionAction BWCP_Connection_Action_Server { HandshakeRole Server TTLSCipherParms { V3CipherSuites TLS_RSA_WITH_AES_256_CBC_SHA V3CipherSuites TLS_RSA_WITH_AES_128_CBC_SHA V3CipherSuites TLS_RSA_WITH_3DES_EDE_CBC_SHA } TTLSConnectionAdvancedParms { ApplicationControlled Off HandshakeTimeout 10 ResetCipherTimer 0 SecondaryMap Off } CtraceClearText Off Trace 3 } ################################################################### # Client # ################################################################### TTLSRule OSB_Client { LocalAddr ALL RemoteAddr ALL LocalPortRange 6810-6819 RemotePortRange 1024-65535 # LocalPortRange 0 # any local port, we are not sure# RemotePortRange 0 # any remote port, we are not sure# Jobname (not applicable) Direction Outbound Priority 255 TTLSGroupActionRef grp_Action TTLSEnvironmentActionRef BWCP_Env_Action_Client TTLSConnectionActionRef BWCP_Connection_Action_Client } # BWCP Environment TTLSEnvironmentAction BWCP_Env_Action_Client { HandshakeRole Client TTLSKeyringParms { # In this configuration (non-z/OS client), this cannot be a shared # keyring with a site certificiate. It must be a keyring and # certificate owned by the userid assigned to the application. # Keyring Personal_TIBUSER } } # BWCP Connections TTLSConnectionAction BWCP_Connection_Action_Client { HandshakeRole Client TTLSCipherParms { V3CipherSuites TLS_RSA_WITH_AES_256_CBC_SHA V3CipherSuites TLS_RSA_WITH_AES_128_CBC_SHA V3CipherSuites TLS_RSA_WITH_3DES_EDE_CBC_SHA } TTLSConnectionAdvancedParms { ApplicationControlled Off HandshakeTimeout 10 ResetCipherTimer 0 SecondaryMap Off } CtraceClearText Off
36
TIBCO ActiveMatrix BusinessWorks™ Plug-in for CICS User's Guide
Trace 3 }
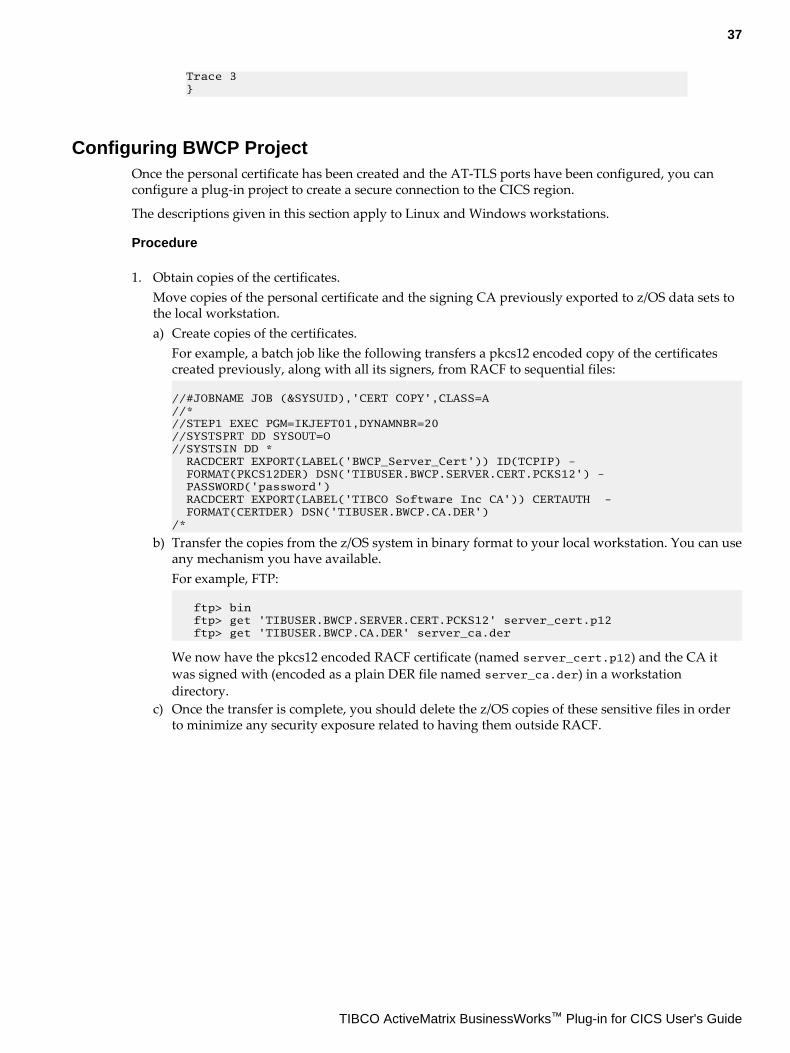
Configuring BWCP ProjectOnce the personal certificate has been created and the AT-TLS ports have been configured, you canconfigure a plug-in project to create a secure connection to the CICS region.
The descriptions given in this section apply to Linux and Windows workstations.
Procedure
1. Obtain copies of the certificates.Move copies of the personal certificate and the signing CA previously exported to z/OS data sets tothe local workstation.a) Create copies of the certificates.
For example, a batch job like the following transfers a pkcs12 encoded copy of the certificatescreated previously, along with all its signers, from RACF to sequential files:
//#JOBNAME JOB (&SYSUID),'CERT COPY',CLASS=A//* //STEP1 EXEC PGM=IKJEFT01,DYNAMNBR=20 //SYSTSPRT DD SYSOUT=O //SYSTSIN DD * RACDCERT EXPORT(LABEL('BWCP_Server_Cert')) ID(TCPIP) - FORMAT(PKCS12DER) DSN('TIBUSER.BWCP.SERVER.CERT.PCKS12') - PASSWORD('password') RACDCERT EXPORT(LABEL('TIBCO Software Inc CA')) CERTAUTH - FORMAT(CERTDER) DSN('TIBUSER.BWCP.CA.DER')/*
b) Transfer the copies from the z/OS system in binary format to your local workstation. You can useany mechanism you have available.For example, FTP: ftp> bin ftp> get 'TIBUSER.BWCP.SERVER.CERT.PCKS12' server_cert.p12 ftp> get 'TIBUSER.BWCP.CA.DER' server_ca.der
We now have the pkcs12 encoded RACF certificate (named server_cert.p12) and the CA itwas signed with (encoded as a plain DER file named server_ca.der) in a workstationdirectory.
c) Once the transfer is complete, you should delete the z/OS copies of these sensitive files in orderto minimize any security exposure related to having them outside RACF.
37
TIBCO ActiveMatrix BusinessWorks™ Plug-in for CICS User's Guide
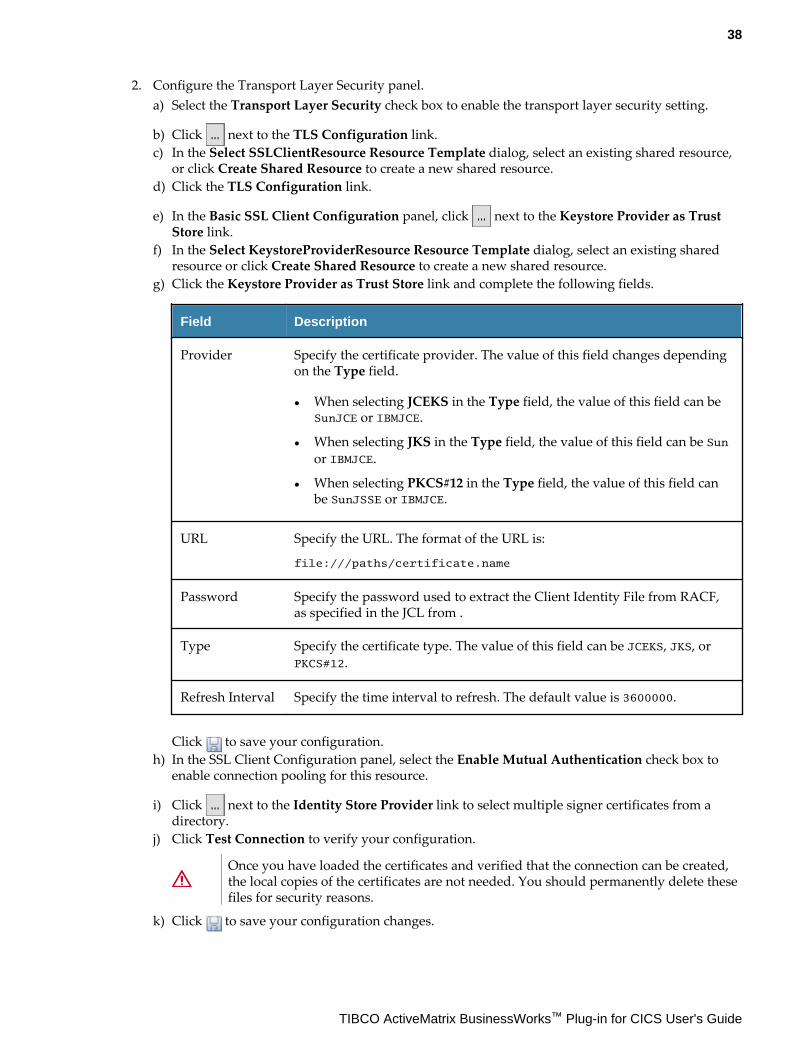
2. Configure the Transport Layer Security panel.a) Select the Transport Layer Security check box to enable the transport layer security setting.
b) Click next to the TLS Configuration link.c) In the Select SSLClientResource Resource Template dialog, select an existing shared resource,
or click Create Shared Resource to create a new shared resource.d) Click the TLS Configuration link.
e) In the Basic SSL Client Configuration panel, click next to the Keystore Provider as TrustStore link.
f) In the Select KeystoreProviderResource Resource Template dialog, select an existing sharedresource or click Create Shared Resource to create a new shared resource.
g) Click the Keystore Provider as Trust Store link and complete the following fields.
Field Description
Provider Specify the certificate provider. The value of this field changes dependingon the Type field.
● When selecting JCEKS in the Type field, the value of this field can beSunJCE or IBMJCE.
● When selecting JKS in the Type field, the value of this field can be Sunor IBMJCE.
● When selecting PKCS#12 in the Type field, the value of this field canbe SunJSSE or IBMJCE.
URL Specify the URL. The format of the URL is:
file:///paths/certificate.name
Password Specify the password used to extract the Client Identity File from RACF,as specified in the JCL from .
Type Specify the certificate type. The value of this field can be JCEKS, JKS, orPKCS#12.
Refresh Interval Specify the time interval to refresh. The default value is 3600000.
Click to save your configuration.h) In the SSL Client Configuration panel, select the Enable Mutual Authentication check box to
enable connection pooling for this resource.
i) Click next to the Identity Store Provider link to select multiple signer certificates from adirectory.
j) Click Test Connection to verify your configuration.
Once you have loaded the certificates and verified that the connection can be created,the local copies of the certificates are not needed. You should permanently delete thesefiles for security reasons.
k) Click to save your configuration changes.
38
TIBCO ActiveMatrix BusinessWorks™ Plug-in for CICS User's Guide